Showing 270 items matching "railway signals"
-
 Ballarat Tramway Museum
Slide - 35mm slide/s, Harry Jackson, Sept. 1971
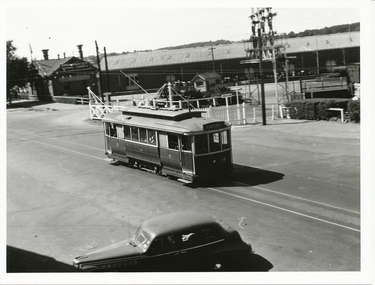
White cardboard mount, 35mm slide, from the Association of Railway Enthusiast's film strip titled "Provincial Tramway Film Strip" of No. 40 North bound for Lydiard St. North at the Railway Gates, with the gates closed. Tram carrying a heavy load of passengers. Railway station building and car park in background. Taken from the signal box. The film strip notes (Reg. Item 2560), provided the following caption details: "Principal feature of note on the "LYDIARD St. Nth." line was the level crossing at Ballarat Station. A well loaded No.40 waits patiently at the closed gates for a train.- Sept.'71 (Harry Jackson)" See image btm2566p.tif for high level scan of image. Stamped on base of slide "11776" and written in ink on top edge "No. 40 Lydiard St Ballarat"tramways, trams, are, film strip, lydiard st north, railway crossing, tram 40 -
 Ballarat Tramway Museum
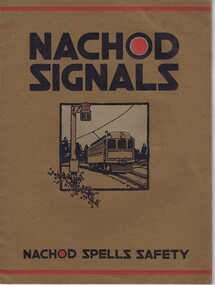
Book, Nachod and United States Signal Co, "Nachod Signals", c1918
... Parade Ballarat Ballarat goldfields Trams tramways Signals ...Sixteen page book with brown paper covers in addition. Pages printed on art paper with a red overprint on some pages. Titled "Nachod Signals", published by the Nachod and United States Signal Co. Inc, successors to Nachod Signal Co of Louisville Kentucky. Has a list of dates on page 2, of patents, the last being 5/2/1918. Has on the bottom of most pages "Nachod Spells Safety" Details the Nachod signals system, type CD with the details of the operation, elements of the system, signal layout, installation and wiring, trolley Contactors, signal aspects, relays, assembly on poles, ordering information, fuses, special designs and modifications, information in ordering, quantity and list of material, and specification details of the Type P on the last three pages. See also Reg Item 3318 for another US company system, received by ESCo at the same time. Indicates that the Nachod and US Signal Company had merged.On top of page 1 "Ballarat Tramway Preservation Society Catalogue No. 3" in black ink and overstamped ESCO's date stamp of 4 Nov. 1926. On page 2 at bottom :"Nachod and United States Signal Co. Inc successors to" has been overstamped. trams, tramways, signals, railways, tramways -
 Ballarat Tramway Museum
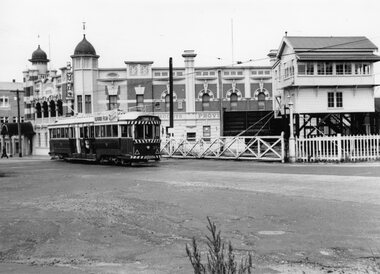
Photograph - Black & White Photograph/s, Wal Jack, 18/11/1961 12:00:00 AM
Yields information about Ballarat's trams in the late 1960'ss and the street scape in Victoria St?, Yields information about Ballarat's trams in the late 1960'ss and the street scape in Victoria St?Black and white print of Ballarat 35, northbound to Lydiard St North, crossing the Railway level crossing with Moodys Provincial Hotel and the Ballarat "B" signal box in the background. The tram has a roof advertisement for Ilford film. Note the entry canopy to the hotel. Two copies. Photo by Wal jack, 18/11/1961. Photo print courtesy of Port Dock Railway Museum, now the National Railway Museum. See worksheet 4311 for letter and details of prints sent to Bill Scott, 19/10/2001. Any photo credit to mention NRM Collection.On rear of copy 1 "SEC Ballarat / 35 / Lydiard St North / 18/11/61 2920 / Wal Jack " Copy 2 "DAC" in ink, bottom right hand corner.trams, tramways, lydiard st, ballarat railway station, level crossings, tram 35 -
 Ballarat Tramway Museum
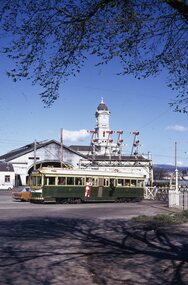
Slide - 35mm slide/s - set of 6, Campbell Duncan, 19/09/1971 12:00:00 AM
Yields information about the operations of the Ballarat Tramway system on the last day of SEC tramway operations in Ballarat.Set of 6 Kodak - Kodachrome slides - cardboard mounts - all taken on 19/9/1971, last day of operations prior to closure of the SEC operated tramway. .1 - Tram 40, waits at the level crossing gates - the gates are being opened. In the background is the station building and the signal gantry. Tram has the destination of Sebastopol. .2 - No. 42, with destination of Lydiard St north, northbound in Lydiard St, with railway station buildings and VRI in the background. .3 - No. 35 on inbound, Lydiard St North. .4 - No. 35, on inbound service, leaving Skipton St loop with another bogie in the background. .5 - No. 39 on inbound service, Albert St Sebastopol with the Sebastopol boundary sign and Binks Ford in the background. Tram has an everything under control in my all electric kitchen roof advert. .6 - No. 42, with destination of Sebastopol, Albert St Sebastopol.In ink on slide: .1 - Sun 19 Sept 71 - up Lydiard St Nth waits for gates to be opened after fast goods. .2 - Sun 19 Sept 1971, down Lydiard St Nth near VRI. .3 - Sun 19 Sept 1971, Up Lydiard St Nth .4 - Sun 19 Sept 1971, Up Sebastopol (supplementary service) has just crossed down in Skipton St near Drummond St. .5 - Sun 19 Sept 1971, Up Sebas at Ballarat / Sebastopol boundary. .6 - Sun 19 Sept 1971, c5.30pm down Sebas in Sebas shire.tramways, trams, lydiard st nth, railway station, level crossings, skipton st, albert st, sebastopol, closure, last day, tram 40, tram 42, tram 35, tram 39 -
 Ballarat Tramway Museum
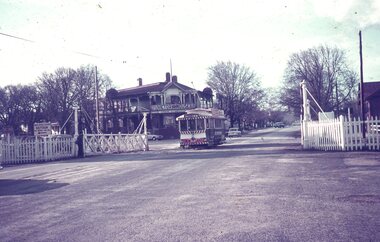
Slide - 35mm slide/s - set of 6, Dave Simpson, late 1960's early 1970's
Yields information about Railway Level crossing in Lydiard St North and some of the trains that used it.Set of six 35mm slides - Hanimex light grey white plastic mounts or AGFA dark blue / white plastic mounts of trams and trains crossing the level crossing at Lydiard St North Ballarat. .1 - tram 33 with destination of Lydiard St North, just after crossing the rail tracks - has a Twin Lakes sign with Victoria House in the background. .2 - tram 40 with destination of Lydiard St North, waiting at the level crossing with S303 entering the station. .3 - ditto, but with S304 in the photograph under the signal gantry. .4 - tram 17 crossing the crossing with the signal box and Victoria House in the background. .5 - ditto - tram has a Twin Lakes signs and a "Make Bliss No Love" roof advert for Bliss Bombs. .6 - ditto - with the S. F. Motors Pty Ltd Mercedes Benz dealership in the background.tramways, trams, railway station, lydiard st north, level crossings, victorian railways, tram 33, tram 40, tram 17 -
 Ballarat Tramway Museum
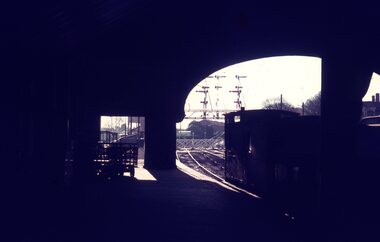
Slide - 35mm slide/s, Dave Simpson, late 1960's early 1970's
Yields information about the Ballarat Railway Station and the adjacent level crossing.Set of two 35mm slides - Hanimex light blue grey plastic mount of a the view from No. 1 platform at Ballarat Railway Station looking towards the Lydiard St level crossing. Shows the crossing gates, signals and tracks. A goods train with a Z van at the rear is in the platform.tramways, trams, railway station, victorian railways -
 Ballarat Tramway Museum
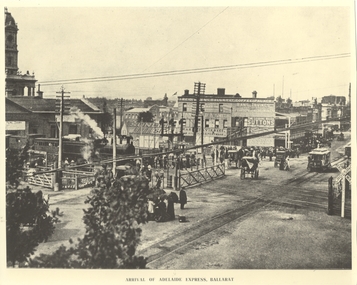
Photograph - Black & White Photograph/s, Lydidard St level crossing and a picnic train, c1905 to 1906
Yields information about the Lydiard St level crossing.Black and white photograph of No. ESCo No. 10 about to cross the Lydiard St level crossing. Photo has the title of "Arrival of Adelaide Express, Ballarat", which is not correct for the trains consist - more like a picnic special - this photo has been written up somewhere. D class loco, with two six wheel carriages behind the locomotive. Group of women with umbrellas (sun) waiting for the tram. Horse drawn carts, interlocked gates, signals prior to resignalling of the post and railway level crossing signs. In the background is Reids Coffee Palace, advertising Sunlight soap, Suttons Music, Pearson's Hard soap, Hans Irvines Champion Wines and Standard & Smith.trams, tramways, railway station, lydiard st north, reids coffee palace, esco, tram 10 -
 Ballarat Tramway Museum
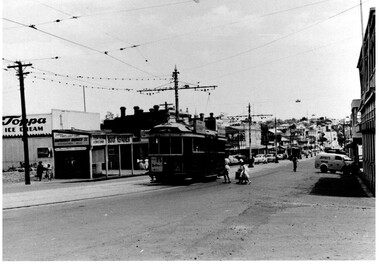
Photograph - Black & White, Bendigo 3 climbing Mitchell St, late 1950's
Black and White photograph, of Bendigo 3 climbing Mitchell St, near the Railway Station with the Destination of Quarry Hill. Has a Hutton's Ham ad on the front drivers panel and two rood ads. In the background are Sandhurst Dairies shop advertising Toppa Ice Cream, a boot repairer and a van marked Jeffreys Bread parked on the north side of Mitchell St. Nearing the point where the double track became single - see the signal wire insulators in the overhead. Printed on Fujichrome paper. Two copies held."TMSV Sales" stamp on rear. On rear of in ink 'HTT16 = MM N 102 = Geel 32 = BED 3"trams, tramways, bendigo, mitchell st, quarry hill, overhead, tram 3 -
 Ballarat Tramway Museum
Photograph - Black & White Photograph/s, late 1940's or 1950's
Yields information about the appearance of tram No. 26 crossing the railway level crossing in Lydiard St Nth and the railway features at this location.Black and white photograph of Ballarat tram No. 26 crossing the Railway level crossing in Lydiard St Nth. The tram has the destination of Grey St Sebastopol. In the background is the railway level crossing gates, the goods shed and the signal gantry. Two copies held.On rear in ink (Lloyd's hand writing) - "Ballarat, Lydiard St railway crossing, 27-2-1954, ARHS neg."trams, tramways, lydiard st nth, railway crossing, grey st, tram 26 -
 Ballarat Tramway Museum
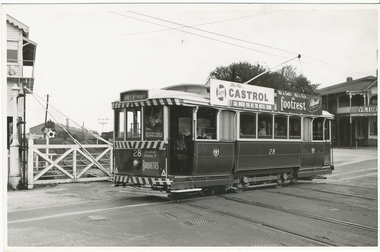
Photograph - Black & White Photograph/s, Lloyd Rogers, 21/03/1962 12:00:00 AM
Yields information about the appearance of SEC trams early 1960's at the Railway level crossing and the streetscape.Black and white photograph of Ballarat tram 28 crossing the level crossing. Dated 21/3/1962. Printed on Agfa Gevaert paper in a postcard format. Tram has the destination of Grey St Sebastopol, roof adverts for Castrol Oils and footrest shoes from Pittards of Ballarat and a front panel advert for SEC Briquettes. In the background are Ballarat "B" signal box and Victoria House accommodation facility. Photo by Lloyd Rogers.In ink "Car 28 on railway crossing - Lydiard St Ballarat 21/3/1962" and "7/42" and in pencil "ex M113".trams, tramways, level crossings, lydiard st, tram 28 -
 Ballarat Tramway Museum
Photograph - Black & White Photograph/s, 14/03/1954 12:00:00 AM
Yields information about the appearance of SEC trams in the mid 1950'ss at the Railway level crossing and the streetscape.Black and white photograph of Ballarat tram No. 14 crossing the railway level crossing in Lydiard St Nth - 14-3-1954. Tram has the destination of Sebastopol. In the background is Ballarat Goods Shed, the signal gantry and the Kennedy & Co. General Carriers building.On rear in ink "ARHS Photo, Ballarat, 14-3-1954"trams, tramways, level crossings, lydiard st north, railway station, tram 14 -
 Otway Districts Historical Society
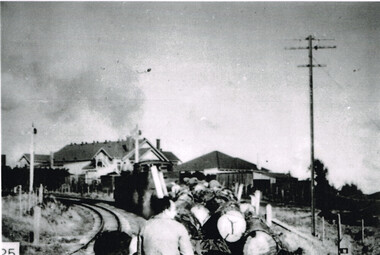
Photograph, Ray Jude, Colac: G42 about to depart with the last train, 30 June 1962
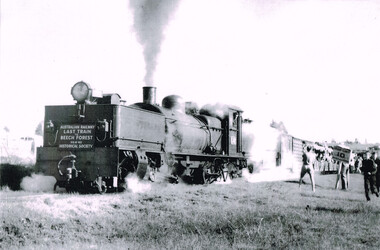
The last train to Beech Forest ran on 30 June, 1962. The train had a particularly motley look to it; 180 passengers were loaded into NU goods vans which had been hastily fitted out with temporary seats and tarpaulin roofing. The train was hauled by the dilapidated G42 locomotive, kept alive through patch-up repairs and cannibalised G41 parts, which intending travellers looked at with some trepidation. The train made it without mishap. When it returned to Colac on that cold, gloomy June day it signalled the end of narrow gauge operations in the Otway Ranges.B/W. Locomotive G42 with the sign " Australian Railway, Last Train to Beech Forest, 30-6-62, Historical Society" is departing Colac. NC guard's van and NU louvred van are attached. A woman and man watching. .colac; beech forest; railways; -
 Otway Districts Historical Society
Photograph, Ray Jude, Tulloh: last passenger train to Beech Forest, 30 June 1962
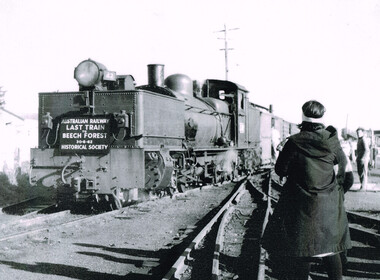
The last train ran to Beech Forest on 30 June 1962. It had a particularly motley look: 180 passengers were loaded into a series of NU goods wagons hastily fitted with temporary seats and, given the time of year, tarpaulin covers. The G42 locomotive had patched-up repairs and cannibalised G41 parts. Intending travellers faced up to the trip with some trepidation but the train made it with no problems. On this cold, gloomy day when it got back to Colac it signalled the end of narrow gauge operations in the Otway Ranges.B/W. Locomotive G42 with the sign "Australian Railway Historical Society, Last Train to Beech Forest, 30-6-62", an NC guard's van, a NU louvred van and many NQR open wagons, at a photostop near Tulloh. Several passengers taking photos while the driver is waiting to proceed.colac; beech forest; railway; tulloh; -
 Otway Districts Historical Society
Photograph, Beech Forest Railway Station: Laurie McCabe in charge, 1920s
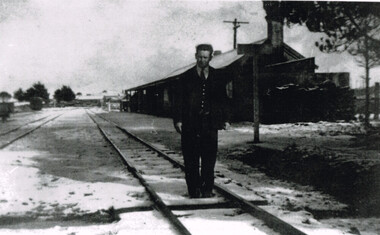
Laurie McCabe was in charge of Beech Forest Station until October 1929. When the timber industry went into decline because of poor markets and the crippling effects of the 1929 strike, and when road haulage signalled the beginning of a new transport era it was the beginning of the end. As a result staffing levels were severely cut over the period 1927/29 with the two station masters at Beech Forest and Gellibrand replaced by caretakers in October 1929. The line was then supervised by travelling station masters of whom Laurie McCabe was one of two.B/W. Laurie McCabe in charge of Beech Forest Railway Station in the 1920s, pictured on track one just down from the station buildings. Note the slight snow covering on the tracks.beech forest; railways; laurie mccabe; -
 Otway Districts Historical Society
Photograph, Beech Forest: train from Crowes arrives
B/W. A train from Crowes laden with timber passes the twin home signals on its way into Beech Forest. Two men are in the foreground. Otway Shire offices (now defunct) and the Shire Secretary's house are in the background.beech forest; railways; -
 Otway Districts Historical Society
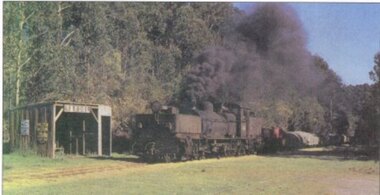
Photograph, R. Preston, Banool: Locomotive G42 and goods, c.1960, c.1960
This original station on the Colac-Beech Forest line was first known as "Moorbanool" after the local parish, and then shortened to "Banool" on 1 November 1904. At first facilities consisted of a passenger shelter, a loop siding for 11 trucks, plus a residence for the ganger of the track gang based there. By 1912 with the extension of the line to Crowes increased train services on the line required a crossing station in this section of the track, and therefore Banool became a staff and ticket station with a crossing loop and home signals. However, this only lasted for two years and was abolished as an economy measure in 1916. Loading figures show that in most years the outwards tonnage at Banool was less than 150 tonnes. The station was reduced to a passenger shelter and goods loop only by 1929, and by the time of closure in 1962 most trains were steaming through.Colour. Locomotive G42 and its NQR goods wagons, loaded and unloaded, steaming past Banool station passenger shelter. 143mm x 274mm print.banool; moorbanool; railways; locomotive g42; -
 Bendigo Historical Society Inc.
Slide - Images by Arthur Pulfer, 1957-1970
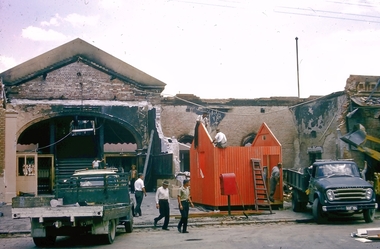
1965 fire at the Bendigo Railway Station A dull explosion in the refreshment room about 1:30 p.m. touched off the blaze, which quickly spread and burnt out the station in less than an hour. Just before the explosion a train carrying more than 200 Melbourne-bound holiday makers pulled out of the station. Scores of railways employees in other parts of the station did not realise the refreshment room was on fire until a signal box attendant gave the alarm. Early estimates place damage at more than £100,000. Quick work by station staff saved many thousands of pounds worth of equipment before flames engulfed the building from end to end. At the height of the blaze, a Bendigo fire brigade Station Officer, Vin Lapsley, fell 18 feet – and miraculously landed on his feet – after being overcome by smoke while directing a hose from a ladder on to the roof. Mr. Lapsley was later treated for a broken bone in his right leg.Many images from by Arthur Pulfer copied to slides. Nineteen Slides of Bendigo images: Bendigo Railway Station after fire 1965 New Bendigo Railway Station after the fire Bendigo Town Hall and Bull Street Bendigo Law Courts and Police Station from the conservatory gardens Gold Panners Monument with the Bendigo Technical school in the background Bendigo Cenotaph - set up for an event - Charing Cross - 1957 New Bendigo Chinese Dragon 'Loong' 1970 Easter Procession 1957 Golden Square High School September 1965 Hattam Street Bendigo Opening of Golden Oaks retirement village September 1965 - Hattam Street Bendigo High Street Golden Square, Bendigo - monument to the founding of gold in the area Bendigo Showgrounds with the Benevolent Home and the Base Hospital in the background Old Base Hospital Lucan Street Bendigo Arnold Street former shop Bendigo Alexandra Fountain Charing Cross Bendigo Banner - Bendigo Training Centre Bendigo House - address unknownhistory, bendigo, james lerk collection, bendigo conservatory, conservatory gardens bendigo, bendigo town hall, bull street bendigo, bendigo railway station fire, golden square high school, golden oaks village bendigo, dragon loong, bendigo cenotaph, alexandra fountain bendigo, bendigo base hospital, bendigo benevolent home, bendigo easter procession -
 Ballarat Tramway Museum
Negative, Wal Jack, 1951
Yields information about the Gold tram of 1951 and of the railway level crossing in Lydiard St North.Negative and Digital image of the Wal Jack Ballarat Negative file of No. 23 as the gold tram crossing the level crossing in Lydiard St North, during 1951 on its way to Lydiard St North. In the background is the signal gantry and the Kennedy Murray Pty Ltd General Carriers. trams, tramways, lydiard st nth, level crossings, ballarat railway station, gold tram, tram 23 -
 Ballarat Tramway Museum
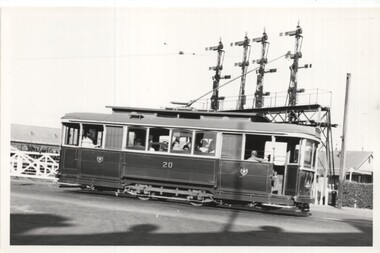
Photograph - Black & White - Tram 20 at Railway level crossing, Keith Kings, 22/1/1955
Shows trams at the Lydiard St level crossing gates and the signal gantry.Yields information about Ballarat tram No. 20 and the locationBlack and White photograph of SEC Ballarat tram No. 20 crossing the railway level crossing in Lydiard St North. Has the signal gantry in the background. Photo by Keith Kings 22/1/1955.On rear has the photographers file number (M)(d)(3)ballarat, lydiard st north, level crossing, railway station, tram 20 -
 Ballarat Tramway Museum
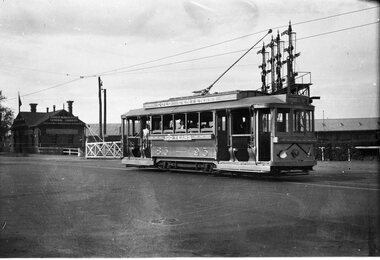
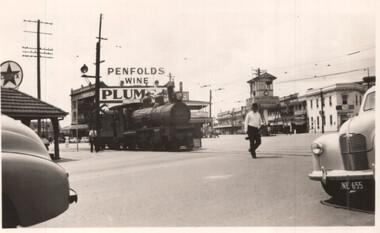
Photograph - QGR locomotive at Woolloongabba Brisbane, Keith Kings, 10/1/1951
Wal Jack swapped photographs with his correspondents. This photo by Keith Kings, a railway photograph of QGR locomotive 748 crossing the complex arrangements of tracks at Woolloongabba - three tram tracks, one trolley bus route. The photographer noted that trains could block all tram lines at times. Trains were always proceeded by a man carrying a red flag and ringing a bell. Has the tramway signal box in the background and a large Penfolds Wines advert on a building, a Caltex service station and an advert for Plume petrol.Demonstrates a photograph that would have been sent to Wal Jack by Keith Kings.Black and white photograph of QGR locomotive 748Has extensive details of the photograph on the rear. Keith Kings photo number E(k)(vii)letter, wal jack, keith kings, qgr, railways, woolloongabba -
 Ballarat Tramway Museum
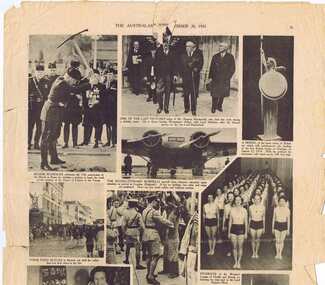
Newspaper, The Australasian, "Beautiful Ballarat, 1937", Nov. 1937
Yields information about Ballarat and its locations or environs late 1937.Pages iii,iv,v, and vi of the "The Australasian", 20/11/1937, featuring centre pages iv, and V, "Beautiful Ballarat" and 11 photos with captions of Ballarat, eg Town Hall (tram 33) in photo, Sturt St. from Town Hall, Arch of Victory, Ballarat East Signal box (internal view), on other pages, "To be a farmers boy" and general photos of current events on page III, photos black and white reproduction. Record reviewed and images of three pages added 7-9-2013.trams, tramways, ballarat town hall, sturt st, railway, lake wendouree -
 Ballarat Tramway Museum
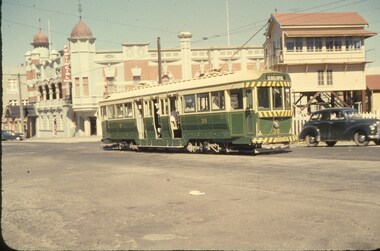
Slide - 35mm slide/s, Wal Jack, 24/03/1962 12:00:00 AM
... . Railway Crossing Level Crossings Signals tram 39 'SEC Ballarat ...Photo of No. 39 about to cross railway line, Lydiard St. Tram fitted with dash canopy lighting, small triangles, Provincial Hotel and Ballarat B signal box in background. Austin A40? car in photo heading north. Tram heading south. Has 'Sebastopol' destination. Taken on 24-3-1962.'SEC Ballarat, No. 39 at Railway Xing, Ballarat R.Stn, Lydiard St. Nth, 24-3-62.' in blue inktramways, trams, lydiard st., railway crossing, level crossings, signals, tram 39 -
 Stawell Historical Society Inc
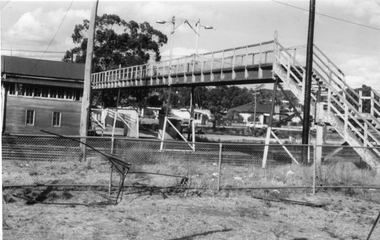
Photograph, Railway Step Bridge Stawell with signal box in the background
This Photograph is a copy printed from a negative owned by the Society - Paid from grant 1991. This is a Photograph of the footbridge over the rail yad at Stawell. A Signal Box in the Background. The Signal box was demolished some years ago. The Footbridge was demolished in 1991.Black and White Photograph of a bridge with wooden handrails. wooden building on far side of bridge. Housing in the backgroundstawell, railway -
 Stawell Historical Society Inc
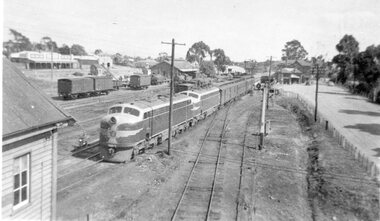
Photograph, Stawell Railway Yards with Two Diesel locomotives, the Station on right & the Signal Box in foreground c1950-1960's
Stawell Railway Yards 1950’s or 60’s. Two Diesel locomotives. Station on right. Goods shed on left. Signal Box in foreground.stawell transport -
 Stawell Historical Society Inc
Archive - CD/DVD, Stawell Rail Photos - Various photographs of trains at Stawell, Stawell Station, Stawell Cutting, Stawell Turntable, Sloane Street Crossing, Goods Shed, Signal Box, Stawell Gift Special, Silo's, Grampians Line
stawell, transport, railways -
 Surrey Hills Historical Society Collection
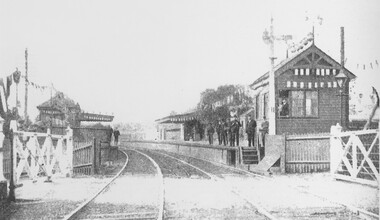
Photograph, Surrey Hills railway station on Empire Day in 1909
Man in the signal box is believed to be Mr J Rasmussan and the assistant stationmaster, Mr Tom Keating. Published in book 'Surrey Hills in Celebration of its Centenary: 1883-1983', compiled by the History Nook and edited by William Chandler.Black and white photo of Surrey Hills railway station on Empire Day in 1909. Signal box and station are decorated with bunting and lanterns. Gates are closed and there is a man in the signal box. There are approximately 9 men on the platforms including the stationmaster, assistant stationmaster, Mr Tom Keating and other railway officials.transport, empire day, railways, surrey hills station, mr tom keating, mr j rasmussan -
 Surrey Hills Historical Society Collection
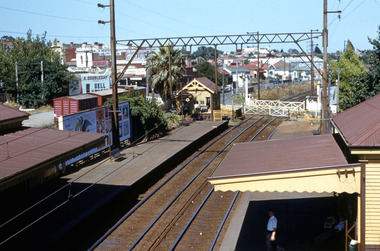
Work on paper - Digital photograph, George L Coop, Surrey Hills railway station c1958, c1958
The donor George Lister Coop was about 21 years of age when he took this photo. It is one of a small series of photos donated by him that relate to Mont Albert and Surrey Hills stations. He has always had an interest in railways and there are other examples of his documentation of railway history in other collections contributing to this database. R J Mercer was the butcher at 112 Union Road. This property has a long history of being a butcher's shop beginning from c1904. He took over from Edward Lloyd in 1951. Spotless Dry Cleaners were at 104 Union Road.This is an important photo as there are few known colour images of the station prior to the installation of the third line in the early 1970s, which resulted in the demolition of the station built in 1883. It is also significant as a record of the housing along the south side of Stirling Crescent which was later replaced by light industry.A digital colour photo of Surrey Hills railway station taken from the overhead pedestrian footbridge looking towards Canterbury. Both tracks and the verandas on either side of the line can be seen, as can the railway gates in the open position and the signal box, beside which is a large palm tree. A section of red goods vans are positioned in the adjacent goods yard. Some of the businesses and advertising hoardings in Union Road can be seen in the background. These include A Doubleday (real estate agents), R J Mer..., grocer, baker, Spotless Dry Cleaning, Robur tea and Lipton tea (part of only). A number of the Edwardian houses along the south side of Stirling Crescent are also seen.george l coop, surrey hills railway station, goods yard, real estate agent, a doubleday, grocer, baker, union road, stirling crescent, spotless dry cleaning, r j mercer, butcher -
Canterbury History Group
Document - Memo for Signal Box Inspector, 13 August 1890
... melbourne Canterbury Canterbury Station Victorian Railways Signal ...Victorian Railways memo certifying that Thos. Coughlin has been instructed in all the duties of Canterbury Signal Boxcanterbury, canterbury station, victorian railways, signal boxes, coughlin> thos. -
Canterbury History Group
Document - Canterbury Railway Station, Guiney, Michael, 2011
... Signal Boxes Railway Crossings Railway Gates Railway Bridges ...Four pages of historical information of the development of railway services in Canterbury. Includes contract and correspondence numbers and dates from 28 December 1880 to 19 December 1971canterbury, canterbury railway station, canterbury road, signal boxes, railway crossings, railway gates, railway bridges, railway lines, stationmasters houses, victorian railways -
Canterbury History Group
Map - Victorian Railways East Camberwell to Laburnum. Diagram No.3' 58, 1/05/1958 12:00:00 AM
Diagram showing proposed signal and interlocking arrangements for the East Camberwell to Laburnam line 1958canterbury, canterbury station, victorian railways, railway lines