Showing 827 items
matching royal parade
-
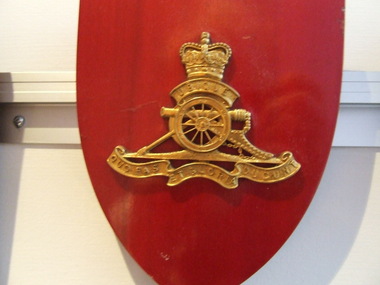 Waverley RSL Sub Branch
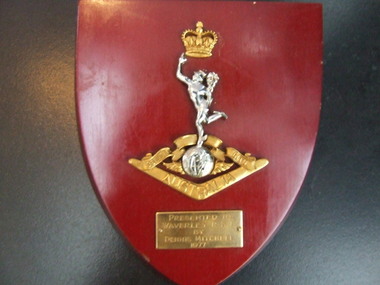
Plaque Royal Australian Artillery, Royal Australian Artillery
... Waverley RSL Sub Branch 161 Coleman Parade Glen Waverley ...Wooden Plaque 15cm x 13cm with insignia of Royal Australian Artillery Royal Australian Artillery -
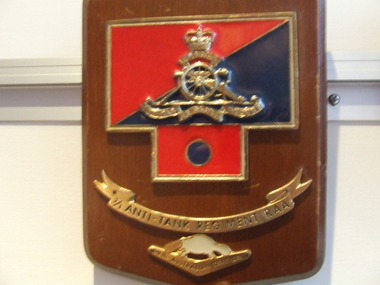 Waverley RSL Sub Branch
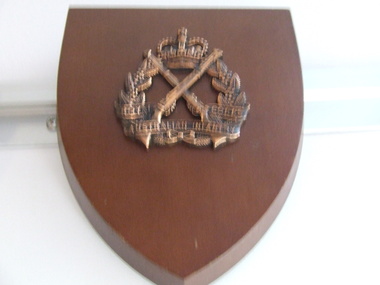
Plaque Royal Regiment of Australian Artillery 2/3 Anti Tank Regiment
This regiment 2/3 Anti-tank later was known as the 2/3 Tank Attack Regiment. The colors are sometimes shown as the reverse of the above.http://www.awm.gov.au/collection/records/awmohww2/army/vol1/awmohww2-army-vol1-app4.pdf The "T" shape of the colour patch denotes the Regiment served at Tobruk Wooden Plaque 15cm x 13cm with insignia of Plaque Royal Regiment of Australian Artillery 2/3 Anti Tank Regiment Plaque Royal Regiment of Australian Artillery 2/3 Anti Tank Regiment 2/3 anti-tank regiment, 2/3 tank attack regiment, tobruk -
 Waverley RSL Sub Branch
Plaque Royal Australian Electrical and Mechanical Engineers, Royal Australian Electrical and Mechanical Engineers
The Royal Corps of Australian Electrical and Mechanical Engineers (RAEME; pronounced Raymee) is a corps of the Australian Army that has responsibility for the maintenance and recovery of all land electrical and mechanical equipment. RAEME has members from both the Australian Regular Army and The Army Reserve. Prior to being given the title of 'Royal', the Australian Electrical and Mechanical Engineers (AEME) were raised on 1 December 1942. Some 64 years later, on 1 December 2006, the last independent RAEME Workshop was disbanded. RAEME soldiers continue in their role to provide support through attachment to other units in Tech Support Troops, Sections or Platoons.Wooden Plaque 15cm x 13cm with insignia of Royal Australian Electrical and Mechanical Engineers Royal Australian Electrical and Mechanical Engineers -
 Waverley RSL Sub Branch
Plaque H.M.A.S. Orian, H.M.A.S. Orian
HMAS Orion (S 71) was an Oberon class submarine of the Royal Australian Navy (RAN). One of six submarines ordered by the RAN during the 1960s, Orion, named after the constellation in a break from ship-naming tradition, was built in Scotland and commissioned in 1977. Orion was decommissioned in 1996, marked for disposal in 2003, and broken up for scrap in 2006. Several sections of the submarine remain intact as memorials and museum piecesWooden Plaque 15cm x 13cm with insignia of H.M.A.S. Orian H.M.A.S. Orian -
 Waverley RSL Sub Branch
Plaque Royal Australian Signals Corps, Royal Australian Signals Corps
... Waverley RSL Sub Branch 161 Coleman Parade Glen Waverley ...Wooden Plaque 15cm x 13cm with insignia of Royal Australian Signals Corps Royal Australian Signals Corps -
 Waverley RSL Sub Branch
Plaque Royal Australian Infantry Corps, Royal Australian Infantry Corps
... Waverley RSL Sub Branch 161 Coleman Parade Glen Waverley ...Wooden Plaque 15cm x 13cm with insignia of Royal Australian Infantry Corps Royal Australian Infantry Corps -
 Waverley RSL Sub Branch
Plaque 3 Royal Australian Regiment, 3 Royal Australian Regiment
Wooden Plaque 15cm x 13cm with insignia of 3 Royal Australian Regiment 3 Royal Australian Regiment -
 Waverley RSL Sub Branch
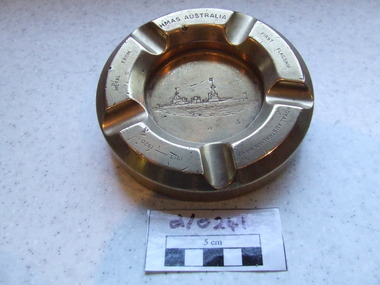
Ashtray H.M.A.S.. Australia
Brass Ashtray H.M.A.S.. Australia"Made from metal from the H.M.A.S. Australia First Falgship of the Royal Australian Navy 1913 - 1920 -
 Waverley RSL Sub Branch
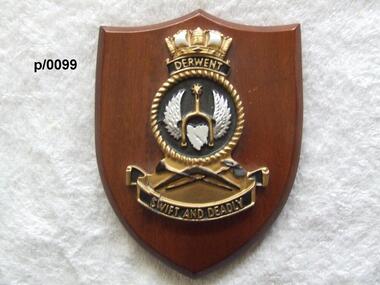
Plaque H.M.A.S. Derwent
HMAS Derwent (F22/DE 22/DE 49), named for the Derwent River, was a River class destroyer escort of the Royal Australian Navy (RAN). Commissioned in 1964, the ship operated during the Indonesia-Malaysia Confrontation, and was used for filming of the British drama series Warship. The ship was decommissioned in 1994, and was scutted as an artificial reef after use for ship survivability testsInsignia od H.M.A.S. Derwent on wooden shieldH.M.A.S. Derwenth.m.a.s. derwent -
 Waverley RSL Sub Branch
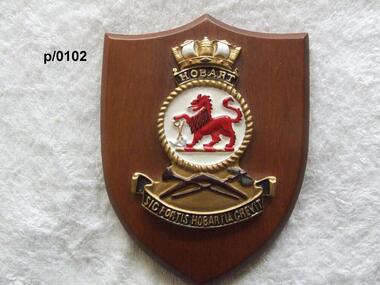
Plaque H.M.A.S. Hobart
HMAS Hobart (D63), a Leander class light cruiser acquired from the Royal Navy in 1938, and operating until 1962. HMAS Hobart (D 39), a Perth class guided missile destroyer commissioned in 1965 and decommissioned in 2000. HMAS Hobart (DDGH 39), lead ship of the Hobart class air warfare destroyers, scheduled to enter service in March 2016Wooden plaque with insignia of H.M.A.S. Hobarth.m.a.s. hobart -
 Waverley RSL Sub Branch
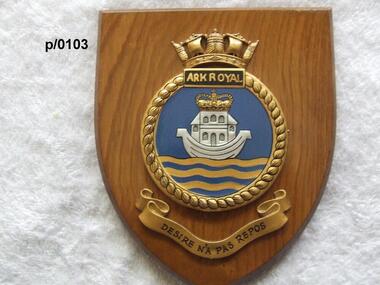
Plaque H.M.S. Ark Royal
Ark Royal (1587), the flagship of the English fleet during the Spanish Armada campaign of 1588. HMS Ark Royal (1914), merchant ship, converted to an aircraft carrier during World War I HMS Ark Royal (91), British aircraft carrier launched in 1937 that participated in World War II and was sunk by a U-boat in 1941. HMS Ark Royal (R09), an Audacious-class fleet aircraft carrier launched in 1950, decommissioned in 1979 HMS Ark Royal (R07), an Invincible-class aircraft carrier, launched in 1981, decommissioned in 2011Wooden plaque with insignia of H.M.S. Ark Royalh.m.s. ark royal -
 Waverley RSL Sub Branch
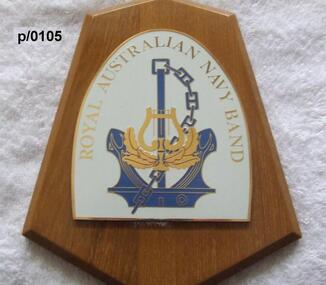
Plaque Royal Australian Navy Band, Royal Australian Navy Band
... Waverley RSL Sub Branch 161 Coleman Parade Glen Waverley ...Wooden Plaque with insignia of Royal Australian Navy BandRoyal Australian Navy Bandroyal australian navy band -
 Waverley RSL Sub Branch
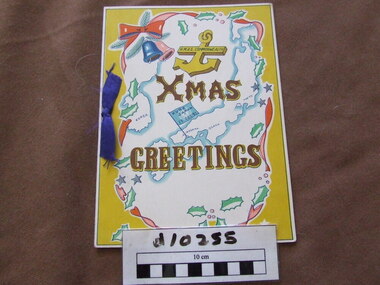
Christmas Card / Menu, Christmas Greetings, Dec 1951
Card was hand drawn to celebrate Christmas 1951 at H.M.A.S. Commonwealth .HMAS Commonwealth was a former Royal Australian Navy administered shore base located in Kure, Japan. The base was previously run by the British as HMS Commonwealth, the base was renamed HMAS Commonwealth on 1 October 1948 until it ceased operation , at which time the base was transferred to Japanese control HMAS Commonwealth(Establishment) was then transferred from 28 Apr 1952 19 Apr 1956 to KoreaChristmas card / Menu for the H.M.A.S. Commonwealth 1951 at Kure Japan. Map shows Japan and Korea where shore base was in service until 1956Xmas Greetings H.M.A.S. Commonwealthh.m.a.s. commonwealth, kure japan, korea, bcof -
 Waverley RSL Sub Branch
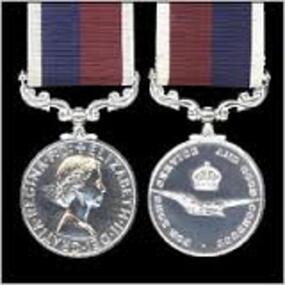
R.A.A.F. Long Service Medal
Awarded to Alan Bowers (A236814) who was a R.A.A.F. dental mechanic who serverd during WWII including service in Darwin, and then continued in the R.A.A.F. for some years after the end of WWII The Royal Australian Air Force (and all Commonwealth Air Forces) Long Service and Good Conduct Medal: Awarded to NCOs and ORs of the RAAF (RAF, RCAF etc) for 15 years service. A cupro-nickel plated medal, the obverse features the sovereign's head, the reverse features the crown and eagle emblem of the RAAF (and RAF). Officers are eligible for the award provided they have served a minimum 12 years in the ranks. The riband is dark blue and maroon with white edges. This medal ceased to be awarded in Australia in 1975 when it was replaced by the National Medal (and sbsequently the DFSM and DLSM) in the Australian system of honours and awards. http://www.heritagemedals.com.au/medals-1/service-long-service/air-force-long-service-and-good-conduct-medal.html History of the RAAF Dental Branch It took six years following the formation of the RAAF in 1921 for the first Dental Clinic to be established at Point Cook, Victoria. On 10th June 1927 Flying Officer James Carl Rosenbrock commenced work as an RAAF Dental Officer for the FlyingTraining School at Point Cook. As personnel numbers were still relatively small, Rosenbrock was also responsible for the dental care of all Victorian RAAF units, which involved treating members at 1AD Laverton, as well as Air Force Headquarters at Victoria Barracks in Melbourne. As Army Dental Officers were currently caring for RAAF personnel at Richmond, NSW, the Senior Dental Officer of the 3rd Military District in Victoria (SDO 3MD) requested through the military board that a similar arrangement be established, where that the newly appointed RAAF Dentist provide part time dental services to the Army units stationed at Queenscliff. This was seen as an effective reciprocal arrangement, with both units having a Dental Officer in attendance for, in total, around 3-4 weeks a year. Rosenbrock continued to serve as the sole RAAF Dental Officer until the middle of 1933, when the Air Board asked for his service to be terminated following ‘behaviour unbecoming of a RAAF officer'. He had borrowed several sums of money, of around 40 Pounds or so, from junior ranks on base (as well as from the Regimental Sergeant Major) and had failed to pay the money back. He was replaced by a fellow Victorian, FLGOFF Norman Henry Andrews, on the 18th Sep 1933, who went on to become our first Director of Dental Services, and was instrumental in establishing the organisations and conditions of the Branch that are still present today. Through a fair amount of persistence and hard work on the part of Norman Andrews, the RAAF Dental Branch began to expand from 1937, with the introduction of 2 additional positions, at RAAF station Richmond, and at the FlyingTraining School at Point Cook. This gave the RAAF 3 uniformed Dental Officers, which was expanded to 5 in the months leading up to WW2. 4 of these Dental Officers were based in Victoria and 1 at Richmond, with the other two RAAF units being cared for by the Army (as in the case of Pearce in WA) or by civilians (as in Darwin). With the sudden increase in RAAF personnel required at the outbreak of WW2, the number of RAAF Dental Officers increased dramatically, from 5 in 1939, 28 in 1940, 64 in 1941, 147 in 1942, 193 in 1943, 219 in 1944, and peaking at 227 in 1945. RAAF Dental Officers were required to work in a variety of locations, both in and out of Australia. Between 1940 and 1942 a massive construction programme occurred, with new dental clinics being established around Australia. Priority was given to aircrew training units in order to get these personnel dentally fit for operational deployment, but Dental Officers could equally find themselves posted to recruit depots, fixed stations, medical clearance stations, mobile dental sections, and RAAF and civilian hospitals. RAAF Dental Officers were posted to the large dental centres at Ascot Vale (Vic) and Bradfield Park (NSW) when first appointed, where they received military and clinical training, before being deployed to their needed location. Mobile Dental Units When Japan entered the war in 1941, the rapid deployment of troops to northern operational areas with less than ideal dental fitness was extremely high. As a result, the RAAF deployed a range of mobile dental units, either alone or with medical sections, to support the increasing number of isolated deployed personnel within Australia and overseas. There were three types of mobile unit used: a. Mobile Dental Unit – relied on using either a semi-trailer to get around or by building a surgery directly on to the truck chassis, and installing hydraulic chairs, units, x-rays, and laboratory equipment. They were able to move around between small units, such as RAAF radar stations, where they could plug into the local power supply and work immediately. b. Transportable Dental Units – used for stops of longer duration, where field equipment was carried in panniers from one unit to another by road or rail and housed in whatever accommodation was available at the destination. They were often carried within Australia on Tiger Moths and Dakota aircraft. c. Itinerant Dental Units – in some areas, the dental equipment was installed at the RAAF unit and the Dental Officer and their staff would travel from unit to unit, using the equipment available at each location. RAAF Dental BadgeAs the war developed in Europe, it soon became obvious that the RAF Dental support was not capable of supporting the increasing numbers of RAAF aircrew that were being sent for service with the RAF, with only enough Dental Officers available to provide one to every 2000 men ( instead of the preferred 1 to 600). As a result, the RAAF provided a mobile dental unit, fitted out in a caravan and pulled by a Ford V8 Coupe, to travel around England in support of RAAF personnel at various squadrons. Some degree of tact was needed to ensure that the RAF did not take this as a comment on the treatment they were providing, but it proved successful in maintaining a satisfactory state of dental fitness in RAAF personnel, and a second mobile unit was soon dispatched. They were also set up with a laboratory on board as well as the surgery, which was a major difference between the RAF and RAAF, as the RAF did not provide dentures for their troops (the RAAF would, providing they had served for 6 years). In 1943 the RAF was no longer able to provide Dental support to Australian troops in the Middle East, which resulted in the need for a transportable dental unit to be deployed from Australia. It functioned in a similar manner to the RAF, by moving from one squadron to another. It served in the Middle East and Africa, from Cairo across North Africa, to Italy, and eventually back to England to treat returned prisoners of war. GPCAPT Norman Andrews The growth and development of the RAAF Dental Branch owes a debt to one man in particular, GPCAPT Norman Andrews. As the second RAAF Dental Officer to enlist on 18 Sep 1933, Andrews became the principal architect of the structure and organisation of the RAAF Dental Branch leading up to and during WW2. Until early 1940, the RAAF Dental Branch was administered by the Director of Medical Services (Air), which placed it under the control of the Army Medical staff. The Army would provide their Inspector of Dental Services for advice whenever needed. In April 1940, the RAAF Medical service separated from the Army, resulting in the control of the RAAF Dental Branch shifting back to the RAAF. Andrews became the first Director of Dental Services, when the position was created in 1943 as recognition of the higher profile the Dental Branch was now playing in the RAAF Medical service. Until this time, Andrews's title had been as the Dental Staff Officer to the RAAF Medical Service. Andrews was responsible for the establishment of the war-time structure of the Dental service, establishing new dental centres at all major bases, creating mobile and transportable dental units, ensuring the continual growth of the Branch, maintaining professional development of staff through the establishment of a professional journal, and by organising renowned lecturers to speak at RAAF bases. He also believed in visiting as many dental units as possible to see for himself what conditions were like and to talk first-hand to staff in remote units. His itinerary during the war years, both in and out of Australia, shows a large number of trips in a variety of modes of transport in order to reach remote areas where units were serving. He was promoted to GPCAPT in July 1944, as the numbers of Dental Officers soon peaked at 227 towards the end of the war (1 GPCAPT, 9 WGCDRs, 60 SQNLDRs, and 157 FLTLTs). After the war, with the reduction in RAAF personnel required in uniform, the Dental Branch also reduced its numbers significantly. By 1947 there were only 18 Dental Officers serving (many part-time), with 1 GPCAPT, 1 WGCDR, 10 SQNLDRs, and 6 FLTLTs, and only 13 by 1950. With the decrease in Branch personnel numbers, the ‘powers to be' saw fit to reduce the Director of Dental Service rank to WGCDR, and as a result Norman Andrews found that in order to continue serving in the RAAF he would have to wear a reduced rank. This appears to have been a contributing factor in his decision to discharge at the relatively early age of 43 and accept an administrative job as Director of the Victorian Government's School Dental Service. Norman Andrews holds the proud honour of being the founder of the RAAF Dental Branch, which during the war was instrumental in educating servicemen of the importance of dental health and maintaining the dental fitness of troops in a variety of areas. Dental Orderlies (Assistants) The dental orderly mustering was first introduced in 1937. Until that time, medical orderlies were assigned to assist the Dental officer with their duties. As early as 1931 it had been noted by both RAAF and Army Dental Officers working in Victoria and Richmond that a lot of the troubles they were having would be solved by appointing a permanent Dental Orderly. Often they would find that the medical orderly they were assigned was a different one each day, and as a result the administration and work in general was very inefficient. By 1937, with the increase in Dental Officers to 3, it was realised that a Dental Orderly mustering needed to be created. Dental Mechanics/Technicians Before WW2, dental laboratory work was provided by civilian laboratories, as most RAAF units were stationed around metropolitan areas. At this time, service personnel were still required to pay for their own dentures, unless they had served for six years or had their dentures damaged during performance of their duties. In July 1940, mainly in response to the development of more remote RAAF dental units and the increasing demand for dental prostheses, the Dental Mechanic mustering was established. Unfortunately there was a very limited pool of civilian dental mechanics to recruit from, and as a result the RAAF set up a training school at Laverton (which was later moved to Ascot Vale) in June 1941 which conducted an intensive 6 month course in Dental mechanics. Dental mechanics were quickly in demand. In all fixed and mobile dental units at least 1 Mechanic was supplied for each Dental Officer, and indeed the RAAF supplied Dental Mechanics throughout all its deployments, something the RAF were unwilling, or unable, to do. Two grades of dental mechanic existed: the Senior Mechanic (with the rank of NCO), who was competent in all phases of laboratory work; and the Junior Mechanic, who could only handle routine work and not more advanced denture work. The progression to Senior required a further trade test in techniques including setting up, clasp-forming, casting and backing teeth. During the course of the War, two special courses were held for Mechanics. The first, directed at senior mechanics so that they could instruct others, was in 1942 when Acrylic Resin was first introduced as a denture base material, as an alternative to the current option of vulcanite. Later, towards the end of the War, a ‘refresher' course was provided for those that had served for the greatest period of time in order to allow them retraining in techniques that they had not practised during their service and which were common in civilian life. This included cast base dentures, crowns and bridges, partial dentures, and retainers. Towards the end of the War, a course was held with WAAAF trainees to train them as Mechanics. However, as the War was soon to end they never had the opportunity to progress within the mustering to become Senior Mechanics. The RAAF Dental Branch has survived 75 years of turbulence, with reviews of its viability occurring regularly every few years from as early as 1937. The Branch continues to provide excellent service to the ADF community and, despite reduced manpower, will continue to play an important role in Air Force Health operations. http://www.defence.gov.au/health/about/docs/RAAFDental.pdf40cm cupro-nickel plated medal, the obverse features the sovereign's head, the reverse features the crown and eagle emblem of the RAAF (and RAF). A23814 BOWERS.A. A. F.r.a.a.f long service medal, r.a.a.f good conduct, r.a.a.f. dental service medal -
 Waverley RSL Sub Branch
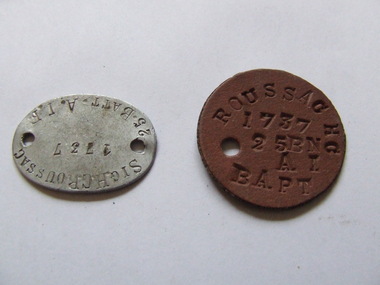
Identification Tags (Dog Tags)
Tags were used to identify wounded or deceased soldiers. All soldiers were issued two tags: one to stay with the body and the other to go to the person in charge of the burial for record-keeping purposesRossac Henry Claude 1737 25 Btn....Left Aus 20 08 15 Born India Patna 14 7 1892 Enlisted Queensland Sent to Alexandria Landed Gallipoli 12 10 1915 France Marseille 19 3 16 wia 9 10 17 (France) returned to Aus for discharge (medical) 21 04 18 Awards1914-15 star British War MedalVictory Medal WWII V18817 Enlisted Royal Park served 1939-45 His daughter Mena Roussac also enlisted 2 tID tags for Henry Claude Roussac 1737 Signaller 25 Bn Ist AIF one is round made of brownish fibre board and the other is oval made of aluminiumFibre tag Roussac H C 1737 25 BN AI Bapt The other aluminium Sig. Roussac1737 25 Batt A.I.F.roussac henry, id tags, dog tags wwi, gallipoli, 25 bn. 1st a i f -
 Waverley RSL Sub Branch
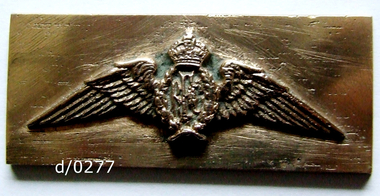
Royal Flying Corps. Insignia
This was collected by Henry Claude Roussac 1737 a Gallipoli Veteran 25 BnCast brass rectangle with the insignia of the Royal Flying Corps. cast in raised releifRCF -
 Waverley RSL Sub Branch
Desk Set H.M.A.S. Sydney
HMAS Sydney was a Chatham class light cruiser of the Royal Australian Navy (RAN). Laid down in 1911 and launched in 1912, the cruiser was commissioned into the RAN in 1913. During the early stages of World War I, Sydney was involved in supporting the Australian Naval and Military Expeditionary Force, and escorting the first ANZAC convoy. On 9 November 1914, the cruiser defeated the German cruiser SMS Emden at the Battle of Cocos. During 1915 and 1916, Sydney operated on the North America and West Indies Station, before joining the 2nd Light Cruiser Squadron at Greenock, Scotland in November 1916. On 4 May 1917, the cruiser was involved in an inconclusive action against the German zeppelin L43; neither was damaged. During late 1917, Sydney became the first Australian warship to launch an aircraft, and the first warship to do so from a rotatable platform. After the war's end, Sydney spent a year in reserve before being reactivated to serve as Flagship of the RAN. The cruiser was decommissioned in 1928 and broken up for scrap. Several sections of the ship, including her bow and foremast, have been preserved as monuments, and three of the ship's main guns saw later use in shore fortifications.A number of these desk sets were manufactured and given to the Headmasters of selected schools throughout Australia in recognition of the efforts of school children in assisting the War effort during World War IMade from timber extracted from a companionway or staircase in the battle cruiser H.M.A.S. Sydney 2 x 5 cm.square glass containers are fitted. Blue attachment advising,wood from H.M.A.S. Sydney h.m.a.s. sydney, desk set, r.a.n -
 Waverley RSL Sub Branch
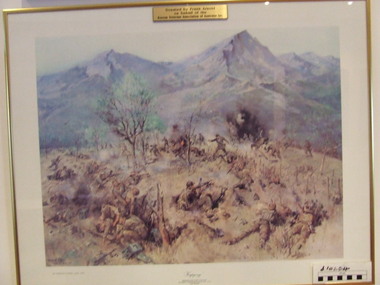
Print Kapyong, Kapyong
On 23 April, the 3rd Battalion, Royal Australian Regiment (3 RAR), under the command of Lieutenant Colonel Bruce Ferguson, and the 2nd Battalion, Princess Patricia's Canadian Light Infantry, occupied prominent hills on either side of the seven-kilometre-wide valley, where a small tributary joined the Kapyong River. Also forward were headquarters units, tanks and artillery. The 1st Battalion, Middlesex Regiment, were to the rear. Early in the evening, retreating South Koreans streamed past the Commonwealth position, with Chinese forces closely intermingled. Soon afterwards a platoon of American tanks supporting 3 RAR was overrun. The Kapyong valley was too large an area to defend with the forces available, and the brigade was spread very thinly. Throughout the night the Chinese repeatedly pressed the Australian positions, attacking in waves over their own dead and wounded. At dawn, A Company, under the command of Major Bernard "Ben" O'Dowd, found that the Chinese had infiltrated its position, but a counter-attack was able to eject them. Meanwhile B Company, which had spent the night on a hill near the riiver, discovered Chinese occupying some old bunkers on a small knoll. Hand-to-hand fighting ensued with grenades and bayonets. C Company, under the command of Captain Reg Saunders, was in position to reinforce both A and B Companies. "Major O'Dowd then directed the radio operator to contact anyone. The American 1st Marine Division answered but their operator refused to believe who our operator was speaking for. Major O'Dowd took the phone and demanded to speak to the commanding officer. The general in charge of the [Marine] division came on the phone and told O'Dowd we didn't exist as we had been wiped out the night before. Major O'Dowd said, 'I've got news for you, we are still here and we are staying here.'" Private Patrick Knowles, 3 RAR, on the morning of 24 April 1951 Fighting continued throughout the day with the Australians holding their positions, and the Chinese also engaging D Company. But late on 24 April, with their position now untenable, the Australians were forced into a fighting withdrawal down a ridge to the valley, where they rejoined the brigade. Their withdrawal was supported by New Zealand artillery from the 16th Field Regiment. Having found the Canadian position unassailable, the Chinese made no further attacks. By the afternoon of 25 April the road through to the Canadians had been cleared of Chinese and 2 PPCLI was relieved by US Army units. On Anzac Day 1951, the Australians rested after a long fight. Thirty-two Australians were killed and 53 were wounded for their part in stalling the Chinese advance and preventing Seoul from falling into enemy hands. Lieutenant Colonel Bruce Ferguson was awarded the Distinguished Service Order for his skilful leadership, and the Australian and Canadian battalions both received United States Presidential Distinguished Unit Citations for their part in the battle. http://www.awm.gov.au/exhibitions/korea/operations/kapyong/Print of painting of action in Kapyong Korea in wooden frame under glassDonated by Frank Arnold on behalf of Korean Veterans Association of Australia inc.korea, kapyong, 3rar -
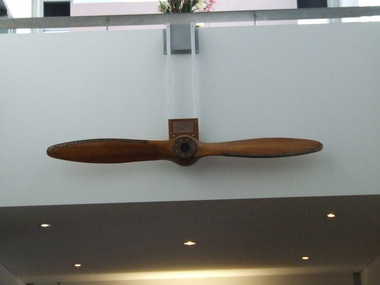 Waverley RSL Sub Branch
Wooden Propeller
De Havilland made DH 5220 original fitment. The de Havilland DH 82 Tiger Moth is a 1930s biplane designed by Geoffrey de Havilland and was operated by the Royal Air Force (RAF) and others as a primary trainer. The Tiger Moth remained in service with the RAF until replaced by the de Havilland Chipmunk in 1952 http://en.wikipedia.org/wiki/De_Havilland_Tiger_MothWooden propeller for Tiger Moth Aircraft with brass bound leading edgesTiger Moth No.43propeller, tiger moth, dh 5220, dh 82 -
 Waverley RSL Sub Branch
Badge Board, Regiments of Household Cavalry and Royal Armored Corps
Bage board with mounted badges glass fronted -
 Waverley RSL Sub Branch
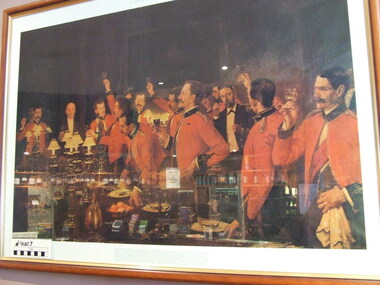
Print Gentlemen The Queen, Gentlemen The Queen
Original Painting in Bendigo Art Gallery PAINTING WON'T HANG IN MESS BENDIGO intends to keep its big oil painting, "Gentlemen - the Queen," hanging in the Shamrock Hotel in Pall Mall. i The painting is on loan to the hotel from the Bendigo Art Gallery. And It's badly wanted at the officers' mess of the Royal Australian Artillery, 3rd Div., in Batman av., Melbourne. A formal application for It was made, In writing, to the Art Gallery by Brigadier W. Hall, commanding offlfncer. But Art Gallery members at their meeting yesterday said "No." Lending it or giving it away would "create a dan- gerous precedent for the Gallery," they decided. . "Any anyway," said Mr. W. Little, the Gallery's curator, "Brig. Hall has erred in thinking the men depicted in the painting are artillerymen. "They're offlfflcers In the Duke of Connaught's Light Infantry." But in Melbourne last night Brigadier Hall, keenly disappointed, said: VI have been told the picture was painted in the Royal Artil- lery mess at Woolwich, In England. "I have never dauhted the men are artillerymen, be- cause they wear the gun- ners' blue mess Jacket, scar- let cuffs and scarlet waist- coat." The Argus Tuesday 8 September 1953 Digitalised http://trove.nla.gov.au/ndp/del/article/23307813/1762840?zoomLevel=3Colour print of a painting by Albert Chevallier Taylor in wooden frame Glass frontedCopy by Survey Regiment 1986gentlemen the queen, argus newspaper, bendigo art gallery. -
 Waverley RSL Sub Branch
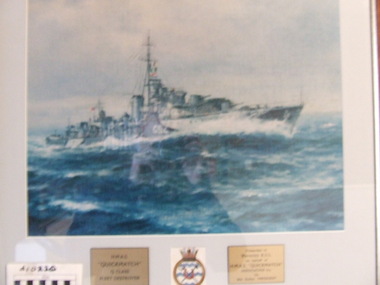
Print H.M.A.S. Quickmatch, H.M.A.S. Quickmatch
HMAS Quickmatch (G92/D21/D292/F04), named for the quick-match, a fast burning match used for lighting cannon, was a Q class destroyer operated by the Royal Australian Navy (RAN). Although commissioned into the RAN in 1942, the ship was initially the property of the Royal Navy. Quickmatch served with both the British Eastern Fleet and British Pacific Fleet during World War II. In the 1950s, the destroyer was converted into an anti-submarine frigate. In 1957, Quickmatch operated in support of Malaya during the Malayan Emergency. The ship remained in service until 1963, and after use as an accommodation ship, was sold for scrap in 1972Framed print of the H.M.A.S. Quickmatchhmas quickmatch, h.m.a.s. quickmatch, quickmatch -
 Waverley RSL Sub Branch
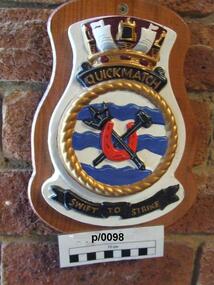
Plaque Insignia of H.M.A.S. Quickmatch
HMAS Quickmatch (G92/D21/D292/F04), named for the quick-match, a fast burning match used for lighting cannon, was a Q class destroyer operated by the Royal Australian Navy (RAN). Although commissioned into the RAN in 1942, the ship was initially the property of the Royal Navy. Quickmatch served with both the British Eastern Fleet and British Pacific Fleet during World War II. In the 1950s, the destroyer was converted into an anti-submarine frigate. In 1957, Quickmatch operated in support of Malaya during the Malayan Emergency. The ship remained in service until 1963, and after use as an accommodation ship, was sold for scrap in 1972Plaster insignia crest of H.M.A.S. Quickmatch on wooden plaqueH.M.A.S. Quickmatchhmas quickmatch -
 Bendigo Military Museum
Photograph - Army Survey Regiment – Commanding Officer Handover Parade, 1982
These photographs were taken at a Commanding Officer Handover Parade at the Army Survey Regiment, Bendigo in 1982. LTCOL Peter Eddy was the CO of the Army Svy Rgt from 1981 to 1982 and handed over to LTCOL Jorge Gruszka. LTCOL Gruszka’s appointment was from 1982 to 1985. W02 Gary Warnest in Photo .4P was congratulated by LTCOL Eddy on his recent promotion to WO2.This is a set of 6 photographs of a Commanding Officer Handover Parade at the Army Survey Regiment, Bendigo in 1982. The photographic negatives are on 35mm film. They are part of the Army Survey Regiment’s Collection. The photographic negatives were scanned at 96 dpi. .1) - Photo, black & white, 1982, L to R: WO1 Noel ‘Nesty’ Coulthard, SPR Graham Hales, SPR Peter Dillon, CPL Frank Lenane, SPR Roy Hicks, CPL Russ Mollenhauer, WO2 Gary Warnest, SSGT Stu Thaxter, SSGT Rowan Gillies. .2) - Photo, black & white, 1982, L to R: LT Karen (Adams) Byrne, LT Struan Robinson, CAPT John Bloor, MAJ Jim Mitchell, CAPT Mick Byrne, LTCOL Peter Eddy, SPR Tom Bloxhom, SPR Gerry Gates, SPR Peter McCurdy, SGT Bob Clisby, SSGT Bob Rogister, SGT Dave Critchlow, SGT Dennis Learmonth, SPR Dave Lawler. .3) - Photo, black & white, 1982, L to R: LT Karen (Adams) Byrne, LT Struan Robinson, MAJ Jim Mitchell, LTCOL Peter Eddy, SGT Bob Clisby, SSGT Bob Rogister, SGT Dave Critchlow, SGT Dennis Learmonth, SPR Dave Lawler, SPR Di (Thomas) Souter. .4) - Photo, black & white, 1982, L to R: CAPT John Bloor, CAPT Mick Byrne, LTCOL Peter Eddy, WO2 Gary Warnest. .5) - Photo, black & white, 1982, unidentified personnel. .6) - Photo, black & white, 1982, L to R: MAJ Jim Mitchell, LTCOL Peter Eddy, LTCOL Jorge Gruszka. .1P to .6P – There are no personnel identifiedroyal australian survey corps, rasvy, army survey regiment, army svy regt, fortuna, asr -
 Bendigo Military Museum
Photograph - Army Survey Regiment – Corps Day Parade, 1983
These photographs were taken at the Corps Day parade at the Army Survey Regiment, Bendigo in July 1983. This was the Director of the Survey Corps – COL John Hillier’s last parade at Fortuna before his retirement. COL Hillier, often referred to as ‘NRJ’ (his initials) was Director for five years. COL Alex W. Laing attended the parade as his successor, seen in the foreground of photos .5P and .6P. COL Hillier was appointed a couple of years later to the honorary position of Colonel Commandant of the Royal Australian Survey Corps from 1989 to 1993. COL Laing was Director of RASvy from July 1983 to November 1988. Corps Day Parades were held to commemorate the formation of the Royal Australian Survey Corps in July 1915.This is a set of 19 photographs of a Corps Day parade at the Army Survey Regiment, Bendigo in July 1983. The negatives of the photographs were scanned at 96 dpi. .1) - Photo, black & white, 1983, L to R: CPL Di Chalmers, CPL Dave Cook, unidentified, SGT Bob Bright, unidentified, SPR Dave Wright, SGT Josh Degroot, SPR Chad Hardwick. .2) - Photo, black & white, 1983, L to R: LT Karen (Adams) Byrne, CAPT Roger Rix, RSM WO1 Bob Mason, MAJ Bob Roche, CO LTCOL Jorge Gruszka, CAPT Mick Byrne, Director COL John Hillier, CPL Terry Danger, CPL Paul Richards, CPL Greg Sulman, CPL George Holland, CPL Roger Pearson, LT Terry Lord, CPL Warren ‘Wah’ Hall. .3) - Photo, black & white, 1983, L to R: unidentified personnel, Director COL John Hillier, SPR Ben Tarasenko, CAPT John Bloor, unidentified, RSM WO1 Bob Mason, CPL John Bettridge, SPR Tom Bloxham. .4) - Photo, black & white, 1983, L to R: unidentified, MAJ Bob Roche, CO LTCOL Jorge Gruszka, Director COL John Hillier, MAJ Stan Vote. .5) - Photo, black & white, 1983, L to R: Colonel Alex W. Laing – foreground, CO LTCOL Jorge Gruszka, MAJ Bob Roche. .6) - Photo, black & white, 1983, L to R: Director COL John Hillier, MAJ Jim Mitchell – background, Colonel Alex W. Laing - foreground, CO LTCOL Jorge Gruszka, unidentified, SGT Kevin Boehm, SGT Jim Beard, unidentified, CAPT Dave Sankey .7) - Photo, black & white, 1983, L to R: CAPT John Bloor, CAPT Andy McLeod, SGT Kevin Boehm, MAJ Bob Roche, SGT Jim Beard, CO LTCOL Jorge Gruszka, Director COL John Hillier, SSGT Bill Kemp, CPL Peter (Jack) Elvard, SGT Bob Croxton, CAPT Dave Sankey, CPL Mick Minchin, SGT Bruce Wetzig, CPL Ken Talbot-Smith. .8) - Photo, black & white, 1983, L to R: CAPT John Bloor, RSM WO1 Bob Mason, Director COL John Hillier, CO LTCOL Jorge Gruszka, MAJ Graham Baker. .9) - Photo, black & white, 1983, L to R: CAPT John Bloor, RSM WO1 Bob Mason, Director COL John Hillier, MAJ Bob Roche, CO LTCOL Jorge Gruszka, MAJ Graham Baker. .10) - Photo, black & white, 1983, L to R: CAPT Chris Mazur, CAPT John Bloor, CO LTCOL Jorge Gruszka, MAJ Graham Baker, SPR Steve Coulson, SGT Harald Mai, Director COL John Hillier, SPR Viv (Hawkins) Doherty, unidentified, SPR Tony Grivell, SPR Ross Collishaw, SGT Phil Meagher, SSGT Brett ‘Dutchy’ Van Leeuwen. .11) - Photo, black & white, 1983, L to R: CO LTCOL Jorge Gruszka, MAJ Graham Baker, SPR Tony Grivell, SPR Ross Collishaw, Director COL John Hillier, SGT Phil Meagher, SPR Peter Peterson, SSGT Brett ‘Dutchy’ Van Leeuwen, SGT Bruce Bowers, SGT Mick Davy, SPR Gerry Gates. .12) - Photo, black & white, 1983, L to R: SSGT Bruce ‘Stretch’ Gordon, SGT George Timmins, CO LTCOL Jorge Gruszka, Director COL John Hillier, MAJ Graham Baker, CAPT John Bloor, MAJ Bob Roche, WO2 Ted Burgess, RSM WO1 Bob Mason, WO2 Peter Biorac, WO1 Graeme Birrell. .13) - Photo, black & white, 1983, L to R: CO LTCOL Jorge Gruszka, CAPT John Bloor, Director COL John Hillier, inspecting rank R to L: SSGT Peter Barrett, CPL Gary Drummond, SPR Peter Breukel, CPL Ian Nichols, unidentified personnel. .14) - Photo, black & white, 1983, L to R: CO LTCOL Jorge Gruszka, Director COL John Hillier, MAJ Stan Vote, SSGT Peter Barrett, RSM WO1 Bob Mason, CPL Gary Drummond, SPR Peter Breukel, CPL Ian Nichols, unidentified. .15) - Photo, black & white, 1983, L to R: SGT John Cain, SSGT Jim Cook, CAPT John Bloor, CO LTCOL Jorge Gruszka, MAJ Stan Vote, Director COL John Hillier, CPL Keith Quinton, CPL Mick Gillham, CPL Kim Reynolds, SPR Paul Baker, WO1 Ken Slater, SPR Brian Fauth, SPR Jim Ash, WO2 George Graham, SGT Gavin Neilson. .16) - Photo, black & white, 1983, L to R: MAJ Bob Roche, MAJ Stan Vote, CPL Kim Reynolds, CO LTCOL Jorge Gruszka, Director COL John Hillier, WO2 George Graham, CPL John ‘Flash’ Anderson, SPR Gary Tremain, WO1 Ken Slater. .17) - Photo, black & white, 1983, L to R: MAJ Stan Vote, CO LTCOL Jorge Gruszka, Director COL John Hillier, WO1 Noel ‘Nesty’ Coulthard. .18) - Photo, black & white, 1983, L to R: LTCOL Jorge Gruszka, Director COL John Hillier, unidentified civilians. .19) - Photo, black & white, 1983, L to R: Director COL John Hillier, LTCOL Jorge Gruszka, RSM WO1 Bob Mason..1P to .19P – There are no personnel identifiedroyal australian survey corps, rasvy, army survey regiment, army svy regt, fortuna, asr -
 Bendigo Military Museum
photograph - Fortuna - 1st Year of Army Occupation in Bendigo, 1942
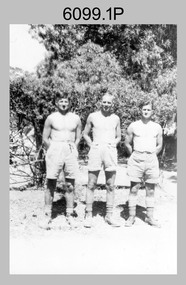
This is a set of 17 photographs taken during the first year of Army occupation at Fortuna, Bendigo in 1942. The photos provide an insight into the preparatory work performed on the Fortuna Villa and surrounding buildings, by the Working Party 5th Army Troop and Ordnance Training Depot, before its occupation by personnel from LHQ Cartographic Company, Royal Australian Survey Corps. The annotation on the back of Photos .9P and .10P is misspelt. The correct spelling is ‘Nell Gwynne’. The poppet head of the Central Nell Gwynne mine is still an iconic landmark in Bendigo, lying just down the road from the poppet head lookout at Victoria Hill. The Central Nell Gwynne was the premier mine of Bendigo's 1930s mining revival and is of high historical value, due to the extensive and relatively intact features which remain at the site. The annotation on the back of Photo .17P is incorrect. The location of HQ 5th Army Troop was ‘Reynard St, Coburg.’ By late 1941 as Japan extended its control throughout Indo-China, resolving the accommodation problem of AHQ Cartographic Company located in Melbourne became more urgent. The steady Japanese advance made the bombing of Melbourne no longer a remote possibility, and in accordance with a general policy of dispersion, the Deputy Chief of the General Staff, Major General Sidney Rowell instructed Major William Sarll, in the interests of security of plant and to provide against possible damage of air attack, to investigate suitable safer inland accommodation for AHQ Cartographic Company. Major Sarll inspected many properties before finding one that would meet the requirements of the Cartographic Company. In late 1941, he came to inspect Fortuna, a rambling old mansion with about fifteen acres of ground in central Bendigo. Initially there was no intention to occupy the site beyond the end of the war, although Major Sarll's report to the Director of Survey noted many advantages in moving the Company to Bendigo. Major General Rowell quickly approved the selection of Fortuna before other authorities, which were investigating the evacuation of school children, could get in ahead of the Cartographic Company. On 23 March 1942, the Commonwealth of Australia, under the provisions of the National Security Act of 1939, took possession of the house, the old battery buildings and the fifteen acres of grounds. Under Warrant Officer J. Trist’s direction, over fifty Parks and Works tradesmen completed building works necessary to accommodate the Survey Corps’ military, map making and printing requirements. The building program was still under way when the first officer, Lieutenant Ralph Westgarth, arrived in May 1942 with the advance party which received and positioned all equipment as it came up from Melbourne in semi-trailers. Once the equipment was installed the rest of the Cartographic Company completed its shift to Bendigo by 11th June 1942. The first year of the Survey Corps’ occupation of Fortuna is covered in more detail with additional historic photographs, in pages 17-22 of Valerie Lovejoy’s book 'Mapmakers of Fortuna – A history of the Army Survey Regiment’ ISBN: 0-646-42120-4.This is a set of 17 photographs taken during the first year of Army Occupation at Fortuna, Bendigo in 1942. The black and white photographs were printed on photographic paper and are part of the Army Survey Regiment’s Collection. The photographs were scanned at 300 dpi. .1) - Photo, black & white, 1942. Bendigo Parks and Works tradesmen at Fortuna. L to R: Cliff Day, Ernie Arnold, Norm? .2) - Photo, black & white, 1942. “Don” - possibly SGT Don Sutcliffe. Fortuna, Bendigo. .3) - Photo, black & white, 1942. Parks and Works tradesmen in garden at Fortuna, Bendigo. L to R: Fred & Ernie. .4) - Photo, black & white, 1942. Benny Jack Williams at Fortuna, Bendigo. Accommodation tents were erected above the lake, which later became the parade ground. .5) - Photo, black & white, 1942. Working dress - Giggle suits. Parks and Works tradesmen at Fortuna, Bendigo. L to R: Cliff and Harry on big roof. .6) - Photo, black & white, 1942. Parks and Works tradesmen at Fortuna, Bendigo. Ted on big roof. .7) - Photo, black & white, 1942. Gold crusher battery just behind Fortuna. .8) - Photo, black & white, 1942. Scene of Bendigo from Fortuna. .9) - Photo, black & white, 1942. Nell Gwynne Mine from mullock heap at Victoria Hill near Fortuna, Bendigo. .10) - Photo, black & white, 1942. Nell Gwynne Mine and crusher near Fortuna, Bendigo. .11) - Photo, black & white, 1942. Sluicing for gold at Eaglehawk. .12) - Photo, black & white, 1942. Fortuna, Bendigo taken from the far side of tennis courts. .13) - Photo, black & white, 1942. Fortuna, Bendigo & its reflection from across the lake. .14) - Photo, black & white, 1942. Fortuna, Bendigo from the fishpond. .15) - Photo, black & white, 1942. Fortuna, Bendigo. .16) - Photo, black & white, 1942. First Fortuna Football Team at unknown location. L to R: 5th Bob Wright, 11th SGT Don Sutcliffe. .17) - Photo, black & white, 1942. Working Party from 5th Army Troop and Ordnance Training Depot at Fortuna, Bendigo.Some personnel are identified. Annotated with date within photos. .1) – Annotated on back ‘Cliff, Ernie, Norm, Dec ‘42. Cliff Day - dairy farmer, plasterers’ labourer. Ernie Arnold – hard plasterer. Norm? - QM Store for tools etc. QM Store was the Stables.’ .2) - Annotated on back ‘Don. Fortuna 1942’ .3) - Annotated on back ‘Fred & Ernie. Dec 1942. Carpenters. Note the state of the gardens.’ .4) - Annotated on back ‘Benny Jack Williams Fortuna Bendigo. Tents were erected where present day parade ground is above the lake.’ .5) - Annotated on back ‘Working dress - Giggle suits. June 42. Cliff and Harry on big roof. This photo was taken as the ventilating ridge was being installed on the building housing the printing machines. The machines were installed later by civilian labour when building was complete.’ .6) - Annotated on back ‘Ted on big roof Fortuna Bendigo.’ .7) - Annotated on back ‘Gold crusher battery – Bendigo for slay heap – 1942. 12 stamp battery. Just behind Fortuna. Was working at night when the “Army” came to Bendigo. Later removed to “Coolgardie - WA. Present site of Southern Cross TV.’ .8) - Annotated on back ‘Scene of Bendigo from Fortuna. June 1942.’ .9) - Annotated on back ‘Nell Gwyne Mine from mullock heap (Victoria Hill) Sept 1942.’ .10) - Annotated on back ‘Nell Gwyne Mine and crusher September 1942.’ .11) - Annotated on back ‘Sluicing for gold at Eaglehawk. August 1942.’ .12) - Annotated on back ‘Fortuna Bendigo 1942. Taken from far side of tennis courts.’ .13) - Annotated on back ‘ “Fortuna” across the lake & reflection.’ .14) - Annotated on back ‘Fortuna from fishpond June 1942.’ .15) - Annotated on back ‘Fortuna Dec 1942.’ .16) - Annotated on front ‘X’ x2. Annotated on back First Fortuna Football Team 1942‘Bob Wright’, ‘SGT Don Sutcliffe’. .17) - Annotated ‘Working Party at Fortuna before one of the drafts’, Working Party 5th Army Troop and Ordnance Training Depot Showgrounds, now the Sportsground Bendigo’, ‘HQ of 5th Army Troop was Reynards Rd, Coburg.’royal australian survey corps, rasvy, army survey regiment, army svy regt, fortuna, asr -
 Bendigo Military Museum
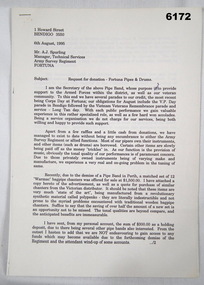
Memorabilia - Fortuna Pipes and Drums Request for Donation, PSJ Barker, Secretary Fortuna pipes and Drums, 06.08.1995
This is a document requesting a donation for the Fortuna Pipes and Drums for the update of some of their equipment. The members of the band are shown and named in the accompanying photo. Information about the Fortuna Pipes and Drums is also in Valerie Loyejoy's book " Mapmakers of Fortuna, A History of the Army Survey Regiment" ISBN 0-646-42120-4 and included in the Victorian Collection as item 6000. The Band was originally formed in 1993 from members of the local Masonic Lodge and first played for the Survey Corps Day Parade in 1994 after a request from the then RSM WO1 Phil Meagher. The Army was able to provide the original "Black Watch" tartan kilts. Using an original Survey Corps Badge c. 1915 provided by former WO1 Keith "Aki" Barber, a number of replica metal Survey Corps theodolite badges were struck and used along with the purple Survey Corps lanyard by the band. The Fortuna Pipes and Drums continued to actively support the Army Survey Regiment until its disbandment in 1996.A 4 x Page letter, A4 Pages, Typed document, PhotocopyAddressed to Mr Tony Spurling, Manager Technical Services, Army Svy Regt, Fortunaroyal australian survey corps, rasvy, fortuna, army survey regiment, army svy regt, asr -
 Bendigo Military Museum
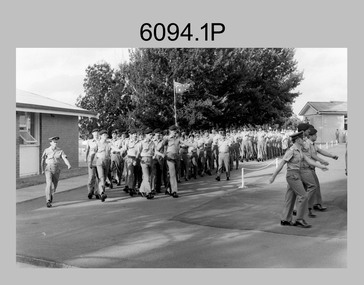
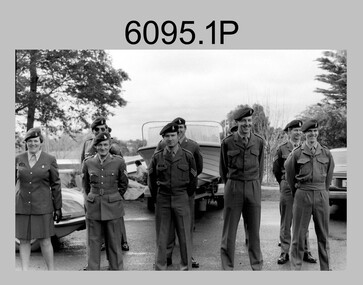
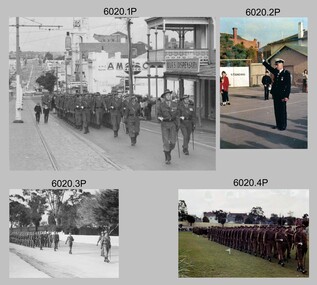
Photograph - AHQ Survey Regiment Freedom of Entry Parade, 1970
The Freedom of Entry to the City was an honour conferred by the Bendigo City Council to the AHQ Survey Regiment on the 20th of April 1970. The unit was granted for the first time the privilege of marching into the city with swords drawn, bayonets fixed and drums beating. The honour is usually bestowed upon local regiments, in recognition of their dedicated service, and it is common for military units to periodically exercise their freedom by arranging a parade through the city. The Freedom of Entry Parade occurred on the 14th of June 1970 led by the Regiment’s CO – LTCOL Bill Sprenger MID, MBE; the unit marched up View St in the CBD to the Queen Elizabeth II Oval. The ceremonial parade followed with a march past the guests of honour, Mayor of Bendigo Councillor Jeffrey and military dignitaries. The parade concluded after formal inspections of the troops. A ceremonial scroll was presented to the Bendigo City Council to the AHQ Survey Regiment citing the occasion and was proudly displayed in the entry foyer to Fortuna Villa up to October 2008. The Regiment continued to exercise its Freedom of Entry with anniversary parades in 1977, 1980, 1985, 1990 and 1995.These black and white and colour photographs of the AHQ Survey Regiment were taken on the occasion of the Freedom of Entry parade to the City of Bendigo on the 14th of June 1970. The photographs were printed on photographic paper and are part of the Army Survey Regiment’s Collection. The photographs were scanned at 300 dpi. .1) Photo, black & white, L to R: RSM WO1 John Hogan, CO LTCOL Bill Sprenger MID, MBE; and 2IC MAJ Frank Thorogood SB St J. .2) Photo, colour, unidentified Victorian police Superintendent .3) Photo, black & white, L to R: RSM WO1 John Hogan, 2IC MAJ Frank Thorogood SB St J. and CO LTCOL Bill Sprenger MID, MBE. .4) Photo, colour, unidentified personnel .5) Photo, colour, L to R: unidentified, COL COMDT BRIG Don Macdonald MID, unidentified, CO LTCOL Bill Sprenger MID, MBE; and Mayor - Councillor Jeffrey. .6) Photo, black & white, L to R: unidentified, COL COMDT BRIG Don Macdonald MID, unidentified, CO LTCOL Bill Sprenger MID, MBE; and Mayor - Councillor Jeffrey. .7) Photo, black & white, L to R: unidentified, Mayor Councillor Jeffrey, COL COMDT BRIG Don Macdonald MID, unidentified and CO LTCOL Bill Sprenger MID, MBE. .8) Photo, black & white, L to R: unidentified, COL COMDT BRIG Don Macdonald MID, unidentified, CO LTCOL Bill Sprenger MID, MBE; and Mayor - Councillor Jeffrey. royal australian survey corps, rasvy, fortuna, army survey regiment, army svy regt, asr -
 Bendigo Military Museum
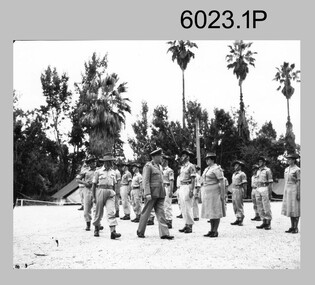
Photograph - Royal Australian Survey Corps Colonel Commandant and Director of the Survey Corps, c1960, 1962, c1969
COL Lawrence FitzGerald OBE was Director of the Survey Corps from 1942 to 1960 and was succeeded by COL Don Macdonald AM, MID. COL Frank Buckland OBE, MID succeeded BRIG Don Macdonald AM, MID as Director of the Survey Corps in 1967. He served as Director until 1972. BRIG Macdonald AM, MID was promoted before assuming the honorary position of Colonel Commandant of the Royal Australian Survey Corps. Royal Australian Survey Corps Colonel Commandant and Director of the Survey Corps c1969 at the Army Headquarters Survey Regiment, Fortuna Villa, Bendigo. .1 Black and white photograph: The Director of the Survey Corps COL Lawrence FitzGerald OBE inspecting the troops. Taken in c1960 on the parade ground at Fortuna Villa. .2 Black and white photograph: L to R: Director of the Survey Corps BRIG Don Macdonald AM, an unidentified British Officer and the CO Army Headquarters Survey Regiment LTCOL Tim Tyler. Taken in 1962 inside the Officers Mess at Fortuna Villa. .3 Black and white photograph: L to R: Colonel Commandant BRIG Don Macdonald AM and the Director of the Survey Corps COL Frank Buckland OBE. Taken in c1969 at the front steps to Fortuna Villa..1 no annotation 2.P named personnel annotated on paper sleeve, .3 named personnel annotated on back royal australian survey corps, rasvy, army survey regiment, army svy regt, fortuna, asr -
 Bendigo Military Museum
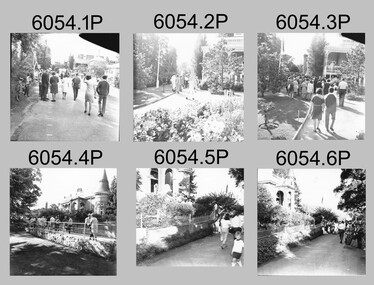
Photograph - AHQ Survey Regiment Open Day - c1970, c1970
This is a set of thirty photographs of an Open Day held at the AHQ Survey Regiment, Bendigo c1970. It’s evident in these photos there was also a technical tour for dignitaries through the production areas in Air Survey, Cartographic and Lithographic Squadrons. It is known an Open Day coincided with the Freedom of Entry to the City Parade, an honour that was conferred by the Bendigo City Council to the AHQ Survey Regiment and held on the 14th of June 1970. As the CO LTCOL Bill Sprenger is positively identified, it’s highly probable these photos were taken at that time.This is a set of photographs of an Open Day held at the AHQ Survey Regiment, Bendigo c1970. The photographs were printed on photographic paper and are part of the Army Survey Regiment’s Collection. The photographs were scanned at 600 dpi. .1) to .17) - Photos, black and white. Unidentified personnel and civilian visitors. .18) and .19) - Photos, black and white. CO LTCOL Bill Sprenger is wearing Sam Browne belt. .18) and .19) - Photos, black and white. CO LTCOL Bill Sprenger is wearing Sam Browne belt. .20) and .21) - Photos, black and white. Left rear: SPR John Bennett .22) - Photo, black and white, c1970. Unidentified personnel and civilian visitors. .22) - Photo, black and white, c1970. Unidentified personnel and civilian visitors. .23) - Photo, black and white. L to R: 1st CO LTCOL Bill Sprenger, 3rd WO1 Joe Farrington .24) - Photo, black and white. L to R: 2nd SGT Bob Williams .25) - Photo, black and white. Unidentified personnel .26) - Photo, black and white. L to R: 2nd CO LTCOL Bill Sprenger. .27) to .30) - Photos, black and white. Unidentified personnel and civilian visitors.royal australian survey corps, rasvy, army survey regiment, army svy regt, fortuna, asr