Showing 4149 items matching " however"
-
 Eltham District Historical Society Inc
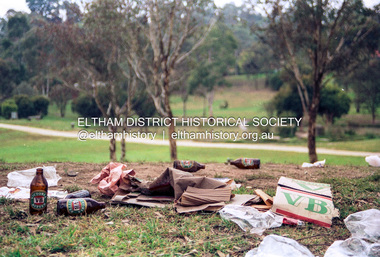
Photograph (Item) - Print, Nicholas West, The Morning After - Rubbish left scattered in Eltham Town Park after the weekend, 1988
Eltham Town Park was partially constructed on a tip site. The park and lake were landscaped in 1973-1974. As early as late 1980 a proposal to rename it Alistair Knox Park was met with significant community resistance with a petition of 1600 signatures against however Council ultimately pushed the name through in 1987. Many residents continued to call it Eltham Town Park for some years later. Nicholas West 1988 Entrant No. 66 Ref: Series 34, Items 82-86 SHIRE OF ELTHAM COMMUNITY PHOTOGRAPHIC SURVEY Photography is an artform which many of us practice, sometimes purely for artistic pursuit, sometimes to record the people and events in our lives. In 1988, as part of a local Bicentennial project, the Shire of Eltham conducted the Eltham Community Photographic Survey. Up to 100 entries were to be selected by a panel of photographers for entry into the Eltham Photographic Survey Exhibition. Entries had to be submitted by May 13, 1988. Entrants whose images were selected for the exhibition were contacted and requested to further submit an entry form providing entrant’s name, area of residence, age, and proposed captions. These details were then used to produce labels for the exhibition mounts. Where negatives had not been supplied, these were requested to support the display of printed enlargements mounted on 10” x 8” cardboard. The mounted prints were made available post exhibition for sale at $8.50 each for colour prints and $7.00 for B&W prints. Residents in the Shire were invited to collect a free roll of film and take a photograph of what they either liked or did not like about the area. A total of 160 entrants submitted multiple entries for the exhibition. Of those selected for exhibition, entrants ranged in age from 9 to 70 years. All custom colour and black and white printing for the exhibition was completed by Wattle Studios of Eltham. The Eltham Photographic Survey was jointly auspiced by the Shire of Eltham and Wattle Studios, of 953 Main Road, Eltham. The project was greatly assisted by: • David McRitchie, Media Studies Lecturer Victoria College, Rusden Campus. • Ian and Annette Toohill of Wattle Studios • Tracy Naughton, Eltham Community Arts Officer • Neville Emerson Pty. Ltd. • Superior Press, Eltham • Kodak Australasia Pty. Ltd. • Agfa Gevaert Ltd. • Townsend Colourtech Pty. Ltd. • The Australian Bicentennial Authority • Eleanor Bowers, Secretary, Eltham Arts Council The exhibition was placed on display in the Woolworths Arcade, Eltham between Monday June 6th and Saturday June 11, 1988. It was also intended to hold the exhibition at a venue in the Shire’s North Riding from Monday, June 20 to Friday June 24. It was then displayed at the Were Street Theatre, Montmorency from Friday, June 24 to Thursday, July 7. Series 34: Eltham Community Photographic Survey 1988 - Prints & Documentation Series consists of 117 photographs of Shire scenes taken by members of the community. Items I - 41 are larger photographs mounted on card, which were exhibited. Items 42 - 117 are unmounted copies, alternative takes and other entries. Corresponding negatives contained in Series 35: Eltham Community Photographic Survey 1988 – Negatives which consists of 267 colour and B&W negatives and one colour slide of Shire scenes taken by members of the community. The negatives are arranged by the entrant number of the photographer. The Eltham Community Photographic Survey collection is significant to the local community as it was curated by the local community - ordinary people of all ages - representing what they liked and did not like in the area where they lived. It represents an unfiltered representation of the Shire of Eltham as it was in 1988. It also represents one of many projects as part of the national programme of events and celebrations to commemorate the bicentenary. It is a time capsule of life in the 1980s of this urban and rural municipality in Melbourne's north. Rear: Entrant No., name and address in blue ink; also 'Series 34' and the 'Item No.' in orange inkshire of eltham archives, bicentennial project, eltham, eltham community photographic survey, series 34, series 35, alistair knox park, eltham town park, film - kodak gb 200 5096, nicholas west, scan - 35mm negative -
 Eltham District Historical Society Inc
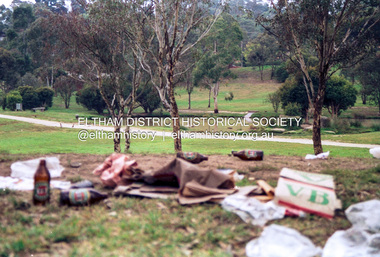
Photograph (Item) - Print, Nicholas West, The Morning After - Rubbish left scattered in Eltham Town Park after the weekend, 1988
Eltham Town Park was partially constructed on a tip site. The park and lake were landscaped in 1973-1974. As early as late 1980 a proposal to rename it Alistair Knox Park was met with significant community resistance with a petition of 1600 signatures against however Council ultimately pushed the name through in 1987. Many residents continued to call it Eltham Town Park for some years later. Nicholas West 1988 Entrant No. 66 Ref: Series 34, Items 82-86 SHIRE OF ELTHAM COMMUNITY PHOTOGRAPHIC SURVEY Photography is an artform which many of us practice, sometimes purely for artistic pursuit, sometimes to record the people and events in our lives. In 1988, as part of a local Bicentennial project, the Shire of Eltham conducted the Eltham Community Photographic Survey. Up to 100 entries were to be selected by a panel of photographers for entry into the Eltham Photographic Survey Exhibition. Entries had to be submitted by May 13, 1988. Entrants whose images were selected for the exhibition were contacted and requested to further submit an entry form providing entrant’s name, area of residence, age, and proposed captions. These details were then used to produce labels for the exhibition mounts. Where negatives had not been supplied, these were requested to support the display of printed enlargements mounted on 10” x 8” cardboard. The mounted prints were made available post exhibition for sale at $8.50 each for colour prints and $7.00 for B&W prints. Residents in the Shire were invited to collect a free roll of film and take a photograph of what they either liked or did not like about the area. A total of 160 entrants submitted multiple entries for the exhibition. Of those selected for exhibition, entrants ranged in age from 9 to 70 years. All custom colour and black and white printing for the exhibition was completed by Wattle Studios of Eltham. The Eltham Photographic Survey was jointly auspiced by the Shire of Eltham and Wattle Studios, of 953 Main Road, Eltham. The project was greatly assisted by: • David McRitchie, Media Studies Lecturer Victoria College, Rusden Campus. • Ian and Annette Toohill of Wattle Studios • Tracy Naughton, Eltham Community Arts Officer • Neville Emerson Pty. Ltd. • Superior Press, Eltham • Kodak Australasia Pty. Ltd. • Agfa Gevaert Ltd. • Townsend Colourtech Pty. Ltd. • The Australian Bicentennial Authority • Eleanor Bowers, Secretary, Eltham Arts Council The exhibition was placed on display in the Woolworths Arcade, Eltham between Monday June 6th and Saturday June 11, 1988. It was also intended to hold the exhibition at a venue in the Shire’s North Riding from Monday, June 20 to Friday June 24. It was then displayed at the Were Street Theatre, Montmorency from Friday, June 24 to Thursday, July 7. Series 34: Eltham Community Photographic Survey 1988 - Prints & Documentation Series consists of 117 photographs of Shire scenes taken by members of the community. Items I - 41 are larger photographs mounted on card, which were exhibited. Items 42 - 117 are unmounted copies, alternative takes and other entries. Corresponding negatives contained in Series 35: Eltham Community Photographic Survey 1988 – Negatives which consists of 267 colour and B&W negatives and one colour slide of Shire scenes taken by members of the community. The negatives are arranged by the entrant number of the photographer. The Eltham Community Photographic Survey collection is significant to the local community as it was curated by the local community - ordinary people of all ages - representing what they liked and did not like in the area where they lived. It represents an unfiltered representation of the Shire of Eltham as it was in 1988. It also represents one of many projects as part of the national programme of events and celebrations to commemorate the bicentenary. It is a time capsule of life in the 1980s of this urban and rural municipality in Melbourne's north. Rear: Entrant No., name and address in blue ink; also 'Series 34' and the 'Item No.' in orange inkshire of eltham archives, bicentennial project, eltham, eltham community photographic survey, series 34, series 35, alistair knox park, eltham town park, film - kodak gb 200 5096, nicholas west, scan - 35mm negative -
 Eltham District Historical Society Inc
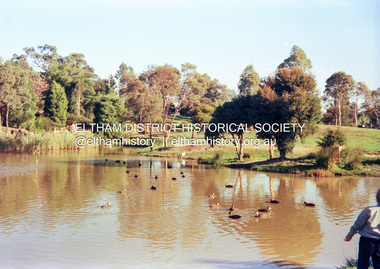
Photograph (Item) - Negative, Chris Gregory, Eltham Town Park, 1988
Eltham Town Park was partially constructed on a tip site. The park and lake were landscaped in 1973-1974. As early as late 1980 a proposal to rename it Alistair Knox Park was met with significant community resistance with a petition of 1600 signatures against however Council ultimately pushed the name through in 1987. Many residents continued to call it Eltham Town Park for some years later. Chris Gregory 1988 (9 yr old) Entrant No. 25 Ref: Series 34, Items 9, 56, 57 The images in this record were not selected for inclusion. SHIRE OF ELTHAM COMMUNITY PHOTOGRAPHIC SURVEY Photography is an artform which many of us practice, sometimes purely for artistic pursuit, sometimes to record the people and events in our lives. In 1988, as part of a local Bicentennial project, the Shire of Eltham conducted the Eltham Community Photographic Survey. Up to 100 entries were to be selected by a panel of photographers for entry into the Eltham Photographic Survey Exhibition. Entries had to be submitted by May 13, 1988. Entrants whose images were selected for the exhibition were contacted and requested to further submit an entry form providing entrant’s name, area of residence, age, and proposed captions. These details were then used to produce labels for the exhibition mounts. Where negatives had not been supplied, these were requested to support the display of printed enlargements mounted on 10” x 8” cardboard. The mounted prints were made available post exhibition for sale at $8.50 each for colour prints and $7.00 for B&W prints. Residents in the Shire were invited to collect a free roll of film and take a photograph of what they either liked or did not like about the area. A total of 160 entrants submitted multiple entries for the exhibition. Of those selected for exhibition, entrants ranged in age from 9 to 70 years. All custom colour and black and white printing for the exhibition was completed by Wattle Studios of Eltham. The Eltham Photographic Survey was jointly auspiced by the Shire of Eltham and Wattle Studios, of 953 Main Road, Eltham. The project was greatly assisted by: • David McRitchie, Media Studies Lecturer Victoria College, Rusden Campus. • Ian and Annette Toohill of Wattle Studios • Tracy Naughton, Eltham Community Arts Officer • Neville Emerson Pty. Ltd. • Superior Press, Eltham • Kodak Australasia Pty. Ltd. • Agfa Gevaert Ltd. • Townsend Colourtech Pty. Ltd. • The Australian Bicentennial Authority • Eleanor Bowers, Secretary, Eltham Arts Council The exhibition was placed on display in the Woolworths Arcade, Eltham between Monday June 6th and Saturday June 11, 1988. It was also intended to hold the exhibition at a venue in the Shire’s North Riding from Monday, June 20 to Friday June 24. It was then displayed at the Were Street Theatre, Montmorency from Friday, June 24 to Thursday, July 7. Series 34: Eltham Community Photographic Survey 1988 - Prints & Documentation Series consists of 117 photographs of Shire scenes taken by members of the community. Items I - 41 are larger photographs mounted on card, which were exhibited. Items 42 - 117 are unmounted copies, alternative takes and other entries. Corresponding negatives contained in Series 35: Eltham Community Photographic Survey 1988 – Negatives which consists of 267 colour and B&W negatives and one colour slide of Shire scenes taken by members of the community. The negatives are arranged by the entrant number of the photographer. The Eltham Community Photographic Survey collection is significant to the local community as it was curated by the local community - ordinary people of all ages - representing what they liked and did not like in the area where they lived. It represents an unfiltered representation of the Shire of Eltham as it was in 1988. It also represents one of many projects as part of the national programme of events and celebrations to commemorate the bicentenary. It is a time capsule of life in the 1980s of this urban and rural municipality in Melbourne's north. shire of eltham archives, bicentennial project, eltham, eltham community photographic survey, series 35, alistair knox park, chris gregory, eltham town park, film - kodak ga 100 5095, scan - 35mm negative -
 Eltham District Historical Society Inc
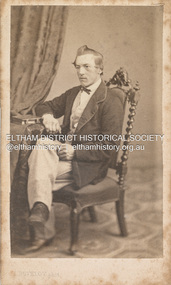
Photograph, Louis Buvelot, Possibly Phillip Shillinglaw, 1865
Famous Swiss landcape painter Louis Buvelot came to Melbourne in 1864 and set up a portrait photography studio which he operated for one year only in 1865. This photograph is believed to be the oldest photo in the Shillinglaw Family Album collection. It is believed that the subject is a young Phillip Shillinglaw, without beard, at age 22 or 23. Phillip Shillinglaw was born Melbourne, August 7, 1842. He married Sarah Ann Kidd in Heidelberg, Victoria, February 28, 1872. In 1881 Phillip and Sarah and their small family moved to Eltham and made home in what was later to become known as Shillinglaw Cottage but which Phillip named 'Wattle Brae'. Shillinglaw Cottage is significant to Eltham’s local history. It is one of the earliest known buildings still in existence. Records suggest that the cottage was built circa 1859 by a man named Cochrane, believed to be Thomas Cochrane, in conjunction with George Stebbings though it is not known what Stebbings’s contribution was. It is believed Stebbings owned the cottage between 1874 and 1888. According to Margaret Ball’s (2017) book Shillinglaw Family of Eltham 1660-2007, Thomas Cochrane and family lived there from 1867 to 1874 however this is contrary to the records of assessable rates levied by the Eltham District Road Board, established in 1858, which shows Cochrane was the owner occupier (in Little Eltham) of approximately 25 acres of cultivated land and 25 acres of pastureland upon which a hut was sited in 1860. It is suspected that George Stebbings may have acquired the property from Cochrane in 1874 as it is noted that he had a tenant for a period, James Rossiter, who was the editor for the Evelyn Observer in Kangaroo Ground in 1874 (LATE SHIRE OFFICE AT KANGAROO GROUND (1934, February 16). Advertiser (Hurstbridge, Vic. : 1922 - 1939), p. 5. Retrieved February 25, 2022, from http://nla.gov.au/nla.news-article56743657). In 1881 Phillip Shillinglaw became the ratepayer for the cottage though Stebbings retained ownership until 1888 at which time it was transferred to Shillinglaw. Photographer: Louis Buvelot Swiss landscape painter and portrait photographer, settled in Melbourne in 1864, admired by the artists from the Heidelberg area such as Tom Roberts and Arthur Streeton who bestowed him with the accolade of 'Father of Australian painting’. In the 1870s, his work increasingly drew elements from Australian landscape such as the bush land in works like Lilydale (1878) and Bush Track. "Louis Buvelot :: biography at :: at Design and Art Australia Online." Daao https://www.daao.org.au/bio/louis-buvelot/biography/. Accessed 9 Mar. 2023. On arriving in Melbourne in February 1865 Buvelot bought a photographer's studio at 92 Bourke Street East and took portraits for a year. In 1866 he moved to 88 La Trobe Street East and resumed his painting while Caroline-Julie gave French lessons to help Buvelot to establish himself as an artist in Melbourne. "Biography - Abram-Louis Buvelot." Australian Dictionary of Biography https://adb.anu.edu.au/biography/buvelot-abramlouis-3132. Accessed 2 Dec. 2022. CARTE-DE-VISITE (cdv) 1857-1890 Cartes-de-visite (cdv's) are the most common form of photograph from the nineteenth century, generally measuring two and a half inches by four and an eighth inches (6.3 x 10.5 cm) when mounted, sepia toned, mounted on a card which was generally printed with the photographer's name and address on the back or beneath the portrait. - Frost, Lenore; Dating Family Photos 1850-1920; Valiant Press Pty. Ltd., Berwick, Victoria 1991marg ball collection, shillinglaw family photo album 1, 1865, l. buvelot photographer, louis buvelot, phillip shillinglaw (1842-1914), unknown -
 Eltham District Historical Society Inc
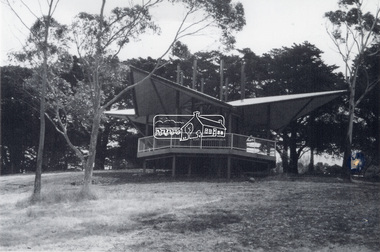
Photograph - Black and White Print, Moor-rul Viewing Platform, March 2007
Early stages - no display panels installed. OPENING OF THE VIEWING PLATFORM AT KANGAROO GROUND Nillumbik Council has advised that the viewing platform at Kangaroo Ground 27km NE of Melbourne is to be opened to the public on Wednesday, March 26th 2008 (Melway 271 , G10). The function of the platform is to provide shelter adjacent to the War Memorial Tower whilst allowing all people to enjoy the stunning panoramic views. From the platform you. can see the Dandenongs, the city of Melbourne, the You Yangs, Mount Macedon, the Kinglake Ranges and the Mt Baw-Baw Ranges where the Yarra River starts. This landscape covers all the ancestral lands of the Wurundjeri and some of the wider Kulin nation land. The platform has been given the name Moor-rut, a name which described the fertile soils of the Kangaroo Ground area in contrast to the poorer (Silurian) country of its surrounds, which the Wurundjeri knew as 'Nillumbik' or less rich country. The full 360 degree view can be seen from the adjacent Tower of Remembrance which has 53 stairs. The viewing platform however can be accessed by wheelchair. Inside the viewing platform there are eight double sided interpretive panels giving the history and information regarding this special area. The viewing platform's interpretive panels set out the Aboriginal and European history of the area and also the geology and the local flora and fauna, so that the casual visitor comes away understanding more about this significant part of Victoria. The concept of the viewing platform is part of the refurbishment project for the Kangaroo Ground War Memorial Park which has taken place since 1997 with the active approval and financial assistance of the Nillumbik Shire Council. This project has been guided by an Advisory Committee with volunteer community representatives from the local Historical Societies, the Country Fire Authority, the Returned Services League and the Wurundjeri people. Other allied groups such as the Nillumbik Reconciliation Group have been called upon for their expertise. The initial idea for the viewing platform came from Dean Stewart when he was the caretaker while living at the park. He discussed this idea with local author Mick Woiwod and Harry Gilham of Eltham District Historical Society when they were planning the refurbishment of the War Memorial Park in 1996. When the committee was formalised by the Nillumbik Council in 1997, Nicholas Pelling, representing the CFA and RSL, joined the group. Dennis Ward, local architect, then volunteered to develop the concept plan for the refurbishment of the park and later drew up the plans for the viewing platform. The Kangaroo Ground War Memorial Park and its Tower of Remembrance is located on one of the highest locations in the Yarra Valley. The Tower of Remembrance is a unique war memorial constructed from local stone standing 14 metres high. It was built in the style of a Scottish watchtower reflecting the strong Scottish influence of the first European settlers of the district from the 1840s onward. The park was opened in 1921 and the Tower of Remembrance was dedicated in 1926 recognising the local people who served in the First World War. Those who served in the Second World War were recognised by plaques dedicated in 1951 and more recently those who served in Korea, Borneo, Malaya and Vietnam by plaques unveiled in 2001. Harry Gilham, Advisory Committee Convenor - Eltham District Historical Society Newsletter N0 179 March 2008 Black and white inkjet print on paper 14 x 21 cmmoor-rul viewing platform, garden hill, kangaroo ground, memorial park -
 Eltham District Historical Society Inc
Photograph, Nicholes Photographers, Bird family, c.1905
Bird family, c.1905 Back row, L-R: Janet Bird (nee Kilpatrick), George Bird, Ellen May (Nell) Bird Front row L-R: George Hugh Bird, Ernest Reginald Bird, Arthur Andrew Bird, Edwin John Bird Nicholes Photographer, Alphington According to the Sands McDougall Melbourne Directory, George. Nicholes, Photographer was first listed on the north side of Heidelberg Road, Alphington in 1904 and again in 1905. By 1906 he was still listed but with no profession. From 1907 on he was listed as a bicycle agent. On July 23, 1878, George Bird married Janet Kilpatrick (born Ayrshire) at Northcote by Presbyterian minister, Duncan Fraser. The witnesses were daughters of the minister. George gave his profession as farmer. Around 1880 or possibly earlier he acquired the property known as View Hill at the top of Pitt Street, Eltham between Pitt Street and Mount Pleasant Road and what is now Eucalyptus Road. George and Janet developed an orchard and farm around the View Hill home and had 10 children, three of whom died young. George Bird is listed in the 1977 history of the Eltham Methodist Church as Steward and trustee in the early years. In the 1950 history he is mentioned as Sunday School Superintendent. In the early 1900s, Janet regularly went to the church by horse and jinker. Janet died September 2, 1915, age 60 of endocarditis and bronchial pneumonia. At about this time, three children had married (Sarah, George and Ada) and four were living at home. However, Edwin joined the AIF in August 1915 and Ellen married in 1916 leaving two sons, Arthur and Reg, to look after their father and the property although some of the married children may have lived at View Hill for some time. From Edwin's letters, Hilda Pepper, a cousin on their mother's side) stayed with the family for some time to help. In later years, George developed glaucoma and became blind. He died December 6, 1920, aged 75 years, of diabetes mellites. Both Janet and George are buried at Eltham Cemetery, but the gravestone incorrectly gives 1921 for the death of George. The estate was divided into equal portions and distributed to the surviving members with Arthur and Ted Pepper being Executors. Ada Janet Lowe received a portion above what is now Rockliffe Street and Sis Pepper (Sarah Ann nee Bird) the portion below Rockliffe Street. Ernest Pepper built in the 1930s on the Pepper block at the Pitt Street end. George's share was along Wattle Grove and Arthur received the portion at the eastern end. Presumably the other two received portions including the top of the hill and slopes down to Pitt Street, Mount Pleasant Road and Wattle Grove. Read's (at the corner of Pitt Street and View Hill Crescent) was the first additional house brought in on wheels by a Mr Walkenden. The View Hill house was occupied by the Johanssons in the 1930s and was later damaged by fire. Source: Info provided to Marg Ball by Neil and Lyn Pepper (both deceased) abt. 2018. PANEL 1875-1920 Panels began to be produced around 1875, and were particularly suited, because of their larger size, for capturing family, or even larger, groups. They measured 8.5 by 6.5 inches (22 cm x 16.5 cm). - Frost, Lenore; Dating Family Photos 1850-1920; Valiant Press Pty. Ltd., Berwick, Victoria 1991marg ball collection, 1905, arthur andrew bird, bird family, edwin john bird, ellen may (nell) bird, ernest reginald bird, george bird (1845-1921), george hugh bird, janet bird (nee kilpatrick), nicholes photographer alphington, straw boater -
 Eltham District Historical Society Inc
Photograph (Item) - Negative, Wendy Price, In Eltham, art is for everyone, 1988
Eltham Town Park was partially constructed on a tip site. The park and lake were landscaped in 1973-1974. As early as late 1980 a proposal to rename it Alistair Knox Park was met with significant community resistance with a petition of 1600 signatures against however Council ultimately pushed the name through in 1987. Many residents continued to call it Eltham Town Park for some years later. Wendy Price 1988 Entrant No. 147 Ref: Series 34, Items 35, 36, 107, 108 The images in this record were not selected for inclusion. SHIRE OF ELTHAM COMMUNITY PHOTOGRAPHIC SURVEY Photography is an artform which many of us practice, sometimes purely for artistic pursuit, sometimes to record the people and events in our lives. In 1988, as part of a local Bicentennial project, the Shire of Eltham conducted the Eltham Community Photographic Survey. Up to 100 entries were to be selected by a panel of photographers for entry into the Eltham Photographic Survey Exhibition. Entries had to be submitted by May 13, 1988. Entrants whose images were selected for the exhibition were contacted and requested to further submit an entry form providing entrant’s name, area of residence, age, and proposed captions. These details were then used to produce labels for the exhibition mounts. Where negatives had not been supplied, these were requested to support the display of printed enlargements mounted on 10” x 8” cardboard. The mounted prints were made available post exhibition for sale at $8.50 each for colour prints and $7.00 for B&W prints. Residents in the Shire were invited to collect a free roll of film and take a photograph of what they either liked or did not like about the area. A total of 160 entrants submitted multiple entries for the exhibition. Of those selected for exhibition, entrants ranged in age from 9 to 70 years. All custom colour and black and white printing for the exhibition was completed by Wattle Studios of Eltham. The Eltham Photographic Survey was jointly auspiced by the Shire of Eltham and Wattle Studios, of 953 Main Road, Eltham. The project was greatly assisted by: • David McRitchie, Media Studies Lecturer Victoria College, Rusden Campus. • Ian and Annette Toohill of Wattle Studios • Tracy Naughton, Eltham Community Arts Officer • Neville Emerson Pty. Ltd. • Superior Press, Eltham • Kodak Australasia Pty. Ltd. • Agfa Gevaert Ltd. • Townsend Colourtech Pty. Ltd. • The Australian Bicentennial Authority • Eleanor Bowers, Secretary, Eltham Arts Council The exhibition was placed on display in the Woolworths Arcade, Eltham between Monday June 6th and Saturday June 11, 1988. It was also intended to hold the exhibition at a venue in the Shire’s North Riding from Monday, June 20 to Friday June 24. It was then displayed at the Were Street Theatre, Montmorency from Friday, June 24 to Thursday, July 7. Series 34: Eltham Community Photographic Survey 1988 - Prints & Documentation Series consists of 117 photographs of Shire scenes taken by members of the community. Items I - 41 are larger photographs mounted on card, which were exhibited. Items 42 - 117 are unmounted copies, alternative takes and other entries. Corresponding negatives contained in Series 35: Eltham Community Photographic Survey 1988 – Negatives which consists of 267 colour and B&W negatives and one colour slide of Shire scenes taken by members of the community. The negatives are arranged by the entrant number of the photographer. The Eltham Community Photographic Survey collection is significant to the local community as it was curated by the local community - ordinary people of all ages - representing what they liked and did not like in the area where they lived. It represents an unfiltered representation of the Shire of Eltham as it was in 1988. It also represents one of many projects as part of the national programme of events and celebrations to commemorate the bicentenary. It is a time capsule of life in the 1980s of this urban and rural municipality in Melbourne's north. shire of eltham archives, bicentennial project, eltham community photographic survey, alistair knox park, artist, eltham town park, film - kodak ga 100 5095, scan - 35mm negative, series 35, wendy price -
 Waverley RSL Sub Branch
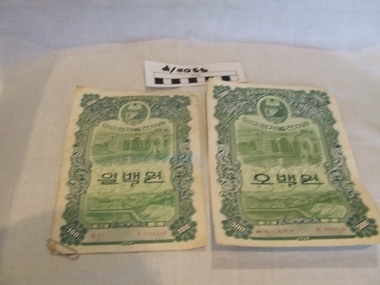
Korean Currency and N.A.T.O. Forces Notes
Used during Korean War Won (1947-) Main article: North Korean won After the division of Korea, North Korea continued using the Korean yen for 2 years until the Central Bank of the Democratic People's Republic of Korea was established on December 6, 1947 and a new currency was issued. It was at the time pegged at par to the Soviet ruble. It was revalued at a rate of one hundred to one in February 1959 and new won were issued. In the following years the won faced some devaluation, caused by the subsequent devaluation and redenomination of the Soviet ruble. From 1978 to 2001, the North Korean government maintained an iconic rate of 2.16 won to the US dollar; since then banks in the country exchange at rates closer to the black market rate. However, rampant inflation has been eroding the North Korean wŏn's value to such an extent that currently it is believed to be worth about the same as the South Korean wŏn. In any case, the U.S. dollar and other currencies are still worth more in North Korean wŏn on the black market than officially. South Korean currencies[edit] Won (1945-1953)[edit] Main article: South Korean won (1945) Following the end of the division of Korea, the won was introduced to replace the Korean yen. The won was subdivided in 100 jeon. The first banknotes were issued by the Bank of Joseon in denominations ranging from 5 jeon to 100 won. In 1950 the currency management switched to the Bank of Korea and new notes were then issued, mostly with higher denominations. The first note put in circulation by the Bank of Korea in 1950 was printed in Japan by the National Printing Bureau (国立印刷局). The next year the Korea Minting and Security Printing Corporation was created and took over as printer of South Korean currency. At the time of the introduction in 1945 the won was pegged to the Japanese yen at a rate of 1 won = 1 yen. In October of the same year the anchor currency got change to the US dollar at a rate of 15 won = 1 dollar. Toward the end of the Korean War the won was devaluated at 6000 won = 1 dollar. Following that the hwan was introduced as the new currency at a rate of 1 hwan = 100 won. Hwan (1953-1962)[edit] Main article: South Korean hwan Due to devaluation of the won the hwan was introduced on February 15, 1953 at the rate of 1 hwan = 100 won. It was subdivided in 100 jeon, but they were never used. New banknotes in denominations between 10 and 1000 hwan were issued. Starting in 1959, 10 and 50 hwan coins were also issued to replace the lower denomination notes. Those were the first circulating coins in South Korea. Due to the short notice of the change in currency, the first series of the new notes was commissioned from the United States Government Printing Office. The notes were released in five denominations, all with an identical design. Some replacement notes with a more suited Korean theme were later issued, starting with the 100 hwan just a month later. The hwan suffered from inflation as well. At its introduction, it was pegged to the United States dollar at 1 dollar = 60 hwan, but toward the end of its life it was devaluated at 1 dollar = 1250 hwan. In 1962, the won was reintroduced at the rate of 1 won = 10 hwan. The 10 and 50 hwan coins were kept in circulation until March 22, 1975.5 Currency notes issued by Korean Government and R.A.A.F. denominations of 100, 100 Won and 1 shilling国立印刷局, currency korea, money korea, money korean war -
 Eltham District Historical Society Inc
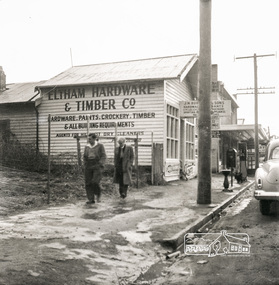
Photograph, Eltham Hardware and Timber Co, Main Road, Eltham, opposite Railway Station. c.1952, 1952c
The Eltham Hardware and Timber Company first opened on Main Road opposite the Railway Station around late 1922. An advertisement placed in the Hurstbridge Advertiser advised that the Hardware Store had just opened with a varied stock of Saws, Hammers, Nails, Shovels, Screw Drivers, and every article required in a house or on a farm. People were also encouraged to try their Jams, Pickles, Sauces, Cups and Saucers, etc. A few months later in May 1923, William Walker, a plumber, placed an advertisement wishing to to announce that he had taken over the ELTHAM HARDWARE STORE, and asked for the continued support of the district. He also noted that all kinds of Plumbing work was done. Walker remained the proprietor of the Hardware Store for many years regularly advertising its services and wares up until at least 1941. The trail goes a bit quiet then but he does appear in the 1944 Electoral Roll listed as a Plumber, of Main Street, Eltham. However he is not listed in the 1949 Electoral Roll but his son, Thomas Roy Walker, also a plumber of Main Road is listed. Thomas had been on active duty overseas during the Second World War and returned at the end of 1945. It is assumed that William died sometime between 1945 and 1949. On November 18th, 1950 the Hardware Store and residence was auctioned on site by Scarff Bros. Pty Ltd. It is presumed that this is when J.N. Burgoyne and Sons took over the business. It would have been around this time the picture of the store was taken for only three years later, in October 1953, the business and dwelling was again put up for sale, this time by Trebilcock Bros, in two separate lots. LOT 1. — ELTHAM HARDWARE AND TIMBER CO. Freehold and Property, Plant, Fittings and Business; Plus Stock at Valuation. To be Sold as a Going Concern. THE FREEHOLD PROPERTY Comprises Large Brick and Timber Shop. Well Fitted. Has Good Light. Comfortable 3-Room Dwelling and Detached Bungalow, H.W.S., Phone, Garage and Outbuildings. Situate on Large Allotment, 50 Ft. x 150 Ft. Aprox. THE BUSINESS: Flourishing Hardware and Builders’ Supplies, Crockery, Glassware and Gifts, Dry Cleaning Agency and Petrol Reseller Licence (1 Bowser Installed), Oil Storage. Annual Turnover Aprox. £12,000. Audited Figures Available, Old-established Business Comprehensive Stock is Good, Clean and Saleable (Value Approx. £4000). TERMS: £1000 Deposit, Balance 30 Days. VACANT POSSESSION. LOT 2. — Superb Shop Sites. Adjoining the Above Property. Land 58 Ft. x 150 Ft. (Approx.). Erected on Land Is Old Style 4-r Timber Dwelling, Set Well Back from Footpath. Leaving Ample Apace to erect Shops. Also Small Shop Let as Agent’s Office. To Be Sold Subject to Existing Tenancies, Gross Rentals £106 12/ Per Annum. Terms: £1000 Deposit, Balance 30 days. GENERAL: Eltham Is a Rapidly Developing Area only 12 Miles from G.P.O. Street Frontage of these Two Adjoining Properties Is 108 Feet By Depth of 150 Feet in the Heart of Expanding Shopping Centre, directly Opposite Station Entrance. Full Details and Inspection Available on Application from the Auctioneers: TREBILCOCK BROS. AUCTIONEERS and ESTATE AGENTS, Coincidentally, the Hardware Store was taken over by Richard Phillip Trebilcock, an electrical engineer from Mayona Road, MontmorencyNegative black and white film 120 6x6 formatSingle frameeltham, main road, 1951 chevrolet deluxe, ampol, eltham hardware and timber, j.n. burgoyne and sons, petrol bowser, william walker, richard phillip trebilcock -
 Flagstaff Hill Maritime Museum and Village
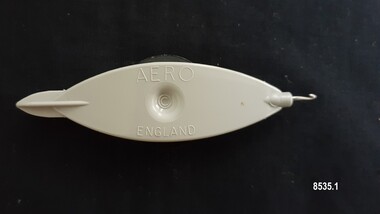
Domestic object - Tatting Shuttle, Aero Needles Group Ltd, Mid to late 20th century
Tatting is a form of knotted lace making using thread and a small shuttle. Twisted threads are tied around or through small, pointed shuttles that can be made of bone, mother of pearl, tortoise shell, steel or plastic. This produces a stable, strong lace using simple knots of two half hitches to make rings and chains embellished with picots.The origins of tatting are not clear but early versions of decorative knotting were used by the Egyptians on their ceremonial dress. Tatting also has elements of fishermen's net making techniques and the decorative knotting that was practiced by aristocratic women from the 15th century.Tatting, as we know it today, emerged in the first half of the 19th century. The new availability of mercerised thread from 1835 encouraged a burgeoning of lace crafts of all sorts. It was known in Italy as "occhi" and in France as "la frivolite". Tatting looks fragile but is both strong and durable. An article in a column named "Wives and Daughters" published in the Star newspaper in May 1910 describes the durability of tatting lace - "there is edging and insertion still in existence that have outworn two sets of pillow slips." In the 19th century and well into the 20th century, tatting was used like crochet and knitted lace for decorative edgings, collars, doylies, tray cloths etc. At first, different tatting patterns were passed along by word of mouth from person to person, however in time, patterns regularly appeared in newspapers and magazines well into the 1950's. A shuttle is a small tool that looks like a small boat "sailing" in and out of the thread. Tatting is called "schiffchenarbeit" in German, which means "the work of a little boat". There are two popular types of shuttles. The first has closed ends and a removable bobbin where the thread is wound around - often made from metal or plastic (as is item 8535.1). The second type has a post in the center where the thread is wound (e.g. item 8535.2). The ends of this bobbin are open but snug. Because it is constructed in two pieces, it can be made from materials like bone, ivory or mother of pearl. Shuttles hold a larger amount of thread (as compared with needles) which means fewer ends to weave in. Fishermen in the past are thought to have used large shuttles to weave cord into certain knots whilst making their fishing nets. Their methods were copied by weavers, who innovated by using threads and smaller shuttles to make lace. One type of tatting shuttle produced by "Aero" from the 1930's to the late 1960's was an anodized grey coated aluminium shuttle with a sharp pick at one end. In the 1970's it was superseded by the grey plastic "Aero" which has a removeable bobbin which you can put on the end of the shuttle to make thread winding easier and an embedded crochet hook for joining picots. The "Aero" company developed in Redditch, England - a town renowned as a centre for manufacturing needles. Firms run by Henry Milward and Abel Morrall were based in Redditch and by the 18th century Redditch was manufacturing one million sewing needles per year. Abel Morrall Ltd launched the "Aero" brand in 1936 and greatly expanded the firm's product line to include tatting shuttles and knitting needles. The classic plastic "Aero" tatting shuttle was manufactured in England from the early 1970's until the 1990's. These items are significant as examples of easily accessible handiwork tools that enabled women in the 1930s -1960s to be able to decorate and personalize their household linen and clothing.Shuttle no. 8535.1 is a beige, boat shaped plastic shuttle with enclosed ends, small round central indentations on both sides and an enclosed black removeable bobbin. The shuttle has a grooved point at one end to hold a bobbin and a small metal crochet hook at the other end. Shuttle no. 8535.2 is a beige, boat shaped metal shuttle with pointed ends that are open but snug, small round central indentations and two smaller circular markings (on both sides) and two internal posts with cream thread wound around.Shuttle no. 8535.1 - "AERO" / "ENGLAND" Shuttle no. 8535.2 - "AERO' / "ENGLAND" "39c" (written in ball point pen)flagstaff hill maritime museum and village, flagstaff hill, warrnambool, shipwreck coast, great ocean road, tatting shuttle, aero company, handwork, handwork tool, craft, handcraft, needlework, tatting -
 Flagstaff Hill Maritime Museum and Village
Craft - Ship Model, Arethusa, 1894
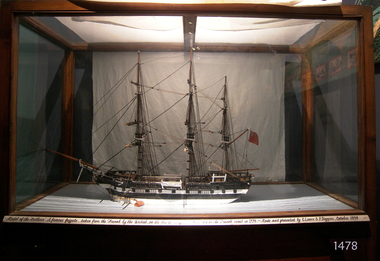
Original Ships History: Aréthuse was a French frigate, launched in 1757 during the Seven Years War between England and France. She was captured by the Royal Navy in 1759 and became the fifth-rate HMS Arethusa. She remained in Royal Navy service for twenty years until she was wrecked after being badly damaged in battle. The ship was constructed at Le Havre for privateer warfare as ”Pélerine” and soon after her launch, she was purchased by King Louis XV (1710-1774) and commissioned as Aréthuse on 21 January 1758. In June, under captain Vauquelin, she sailed through the British blockade of Louisbourg helping to defend the site before departing, again forcing the blockade. On 18 May 1759, she was in transit from Rochefort to Brest, under the command of Louis-Philippe de Rigaud, Marquis of Vaudreuil, when she was intercepted near Audierne Bay (Baie d'Audierne) by three Royal Navy ships the Thames, Venus and Chatham. She attempted to escape but after two hours, lost her topmasts and was overtaken by her pursuers. Thames and Venus engaged her with heavy fire, causing 60 casualties before the vessel surrendered. She entered service with the Royal Navy for the rest of the war, and was in service in British home waters and became responsible for the capture of several French privateer cutters. In 1777, a Scotsman James Aitken, widely known as John the Painter, was hanged from her mizzenmast for burning the Rope House at Portsmouth Royal Dockyard on 7 December 1776, to aid the struggle of American independence. The mast was struck from the ship and re-erected at the dockyard entrance so as many people as possible could watch the execution. On 17 June 1778, she fought a famous duel against the French 36-gun frigate, Belle Poule. Belle Poule was on a reconnaissance mission, along with the 26-gun Licorne, the corvette Hirondelle and the smaller Coureur when she encountered a large British squadron that included Arethusa at a point 37 km south of The Lizard. Admiral Keppel, commanding the British fleet ordered that the French ships be pursued. The captain of Belle Poule refused the order to sail back to the British fleet. The British fired a warning shot across his ship's bow, to which he responded with a full broadside. This action began a furious, two-hour battle between the two ships that resulted in the deaths of the French second captain and 30 of the crew. However, Arethusa was crippled by the loss of a mast and withdrew, allowing Belle Poule to escape. This battle was the first between British and French naval forces during the American Revolutionary War and took place around three weeks before France had made a formal declaration of war. The battle was widely celebrated in France as a victory, even inspiring a hair-style in court circles that included a model of Belle Poule. It was also viewed as a victory in Britain and became the subject of a traditional Sea shanty, The Saucy Arethusa. On 18 March 1779, under captain Charles Holmes Everitt, Arethusa engaged the French Aigrette, under Lieutenant Mortemart, sustaining considerable damage in the fight. Arethusa was wrecked the next day off Ushant, It was the fame of this Arethusa which induced the Royal Navy, during the following two centuries, to bestow the name on a further seven consecutive individual ships and two consecutive classes of cruisers. (See Provenance Sec this document for information on the makers of this model). Model ship of the 3 masted frigate the “Arethusa”, model is painted black and white with varnished deck and masts. A British flag is flown at the stern. The ship is displayed in a glass case with timber frame and 4 legged stand.Label at bottom of glass case, printed in black script on a gold strip “Model of the “Arethusa" "A famous frigate, taken from the French by the British, on the 18th of May 1759 and lost on the French coast in 1779. – Made and presented by G. Lance & P. Diggins, October 1894” flagstaff hill, warrnambool, shipwrecked-coast, flagstaff-hill, flagstaff-hill-maritime-museum, maritime-museum, shipwreck-coast, flagstaff-hill-maritime-village, arethusa ship model, george lance, peter diggins, len asling, warrnambool art gallery, warrnambool exhibition, message in a bottle -
 Flagstaff Hill Maritime Museum and Village
Plaque - Commemorative, circa 1928
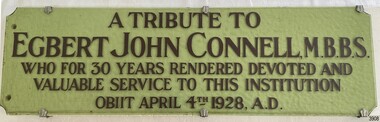
This commemorative plaque refers to the religiously themed window situated in the western (weather) wall of the St. Nicholas Mission to Seamen’s Church building in the Flagstaff Hill Maritime Village. It was crafted circa 1928. ABOUT THE WINDOW The window, to which this plaque belongs was once known as the Dr Connell Memorial Window, which was a feature of an external wall adjacent to the Women’s Children’s Wards of Warrnambool Hospital. Honorary Doctors had played a significant role in the operation of the hospital between the years 1900 to 1939. One of these doctors was Dr. Connell, who passed away in 1928. A paragraph in the book ‘A History of the Warrnambool Base Hospital’ by Forth and Yule describes the role of the Honorary Doctors - “At the start of the period the senior-part time medical officer was replaced by the junior resident medical officer and control of beds and the right to operate were given to the honorary medical officers...and these men dominated the Warrnambool medical world in the years before the Second World War.” Dr. Connell leased ‘Ambleside’, 192 Koroit Street, in the early 20th century, following Dr Teed who had previously run his medical practice there. In 1914 Dr Connell purchased the property and continued his private practice there until his death in 1928. He also took a prominent part in hospital work, both as physician and surgeon, and often acted as spokesmen for the Honorary Doctors. According to colleague Dr. Horace Holmes’ subsequent notes, it was after the close of the First World War, and the following years of the world-wide pneumonic influenza epidemic, that Dr. Connell himself contracted pneumonia and died. His family and friends then recognised his work by gifting the memorial window in his honour to the Hospital. By the mid-1970s the old wards at the hospital had been replaced and there was no obvious place for the window. Discussions between the previous and past Hospital managers, the Anglican Diocese, and Flagstaff Hill Planning Board, led to its installation in its present position in St Nicholas Seamen’s Church. It was installed without the bottom section of stained glass, which was inscribed as a memorial to Dr. Connell. St NICHOLAS SEAMEN’S CHURCH, Anglican Church Flagstaff Hill’s Mission to Seamen was opened in 1981. Its conception was partly motivated by the offer of Stained Glass Memorial Windows from the local Warrnambool and District Base Hospital, which was undergoing multi-storey development in the late 1960’s and early 1970’s. The Manager/Secretary at the time was keen to see the historical windows installed in an appropriate location. The chapel was designed by a local architectural draftsman in conjunction with members of the Planning Board of Flagstaff Hill, and built by Mr Leon Habel. The vision of the designers included the hope that the church be used for formal worship such as weddings and funeral, and for multi-denominational special services such as War commemorations. The design is based on the ‘Mission to Seamen’ buildings in both Portland and Port Melbourne. These types of buildings were often erected to house social and worshipful activities for seamen. The materials used in the building include sandstone recycled from nineteenth-century buildings demolished in Warrnambool and American slate tiles retrieved from the 1908 wreck of the FALLS OF HALLADALE. Most of the chapel furnishings came from the Williamstown Missions to Seamen, which was consecrated in 1946 but later decommissioned. These artefacts range from the altar cloth to the hymn board and include a visually stunning round stained glass widow called ‘Christ Guiding the Helmsman’. However the provenance of this particular artefact, large western window, is local.This plaque is significant because of its association with stained glass memorial window is of local, historical and social significance, linking local history and heritage with one of Warrnambool's doctors, Dr. Egbert John Connell (d. 1928), who gave 30 years of dedicated, medical service to the local citizens.Plaque, opaque, pale green glass rectangle mounted on white timber board and held in place with six decorative silver coloured clasps. Five rows of printed, capitalised text are fixed on the top surface. The plaque is companion to the commemorative, stained glass window installed in the St. Nicholas Mission to Seamen's Church at Flagstaff Hill. (The window was previously known locally as the Dr. Connell Memorial Window.)"A TRIBUTE TO / EGBERT JOHN CONNELL, M.B.B.S. / WHO FOR 30 YEARS RENDERED DEVOTED AND / VALUABLE SERVICE TO THIS INSTITUTION / OBIIT APRIL 4th 1928, A.D."flagstaff hill, warrnambool, shipwrecked coast, flagstaff hill maritime museum, maritime museum, shipwreck coast, flagstaff hill maritime village, great ocean road, chapel window, stained glass window, warrnambool and district base hospital, st nicholas mission to seamen’s church, williamstown mission to seamen, dr egbert connell, ambleside warrnambool, leon habel builder, falls of halladale slate, memorial window, commemorative window, dr connell, commemorative plaque, plaque, edgar mcconnell -
 Puffing Billy Railway
Equipment - Victorian Railways Carriage Foot Warmer
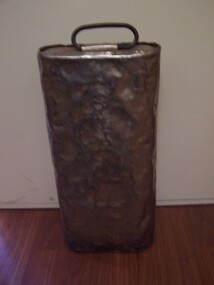
During prestige, long distance train journeys some carriages had air-conditioning, and the majority of passengers had to brave unheated carriages. To offer some comfort during the winter months, the non-air-conditioned carriages were provided with footwarmers. These were metal containers roughly 100 mm thick and 300 mm wide, and about 750 mm long, which were filled with salt crystals (concentrated crystalline hydrated sodium acetate). The footwarmers were covered by sleeves of thick canvas, and two footwarmers were usually placed in each compartment of non-air-conditioned carriages. To activate the chemicals, the footwarmers were heated almost to boiling point. This was done by removing the canvas sleeves and placing the footwarmers in a large bath of very hot water. After they had been heated, they were removed from the bath and the sleeves refitted. They were then ready to be placed in the carriages. The McLaren patent foot warmer was used on railways in New South Wales, Queensland, Victoria and South Australia as well as South Africa and New Zealand. It was during the 1901 royal visit by the Duke and Duchess of Cornwall that these foot warmers were first used in New Zealand in the royal carriage. Before railway carriage heating was introduced, McLaren patent foot warmers were placed on the floor of New South Wales government railway carriages from 1891 to provide a little passenger comfort. The rectangular steel container worked a bit like a hot water bottle but instead of water contained six and a half kilograms of loosely-packed salt crystals, (concentrated crystalline hydrated sodium acetate). This was permanently sealed inside the container with a soldered cap. After the foot warmer was heated in vat of boiling water for about one and a quarter hours the crystals became a hot liquid. (The melting point for sodium acetate is 58 degrees). There was a whole infrastructure of special furnaces set up at stations for the daily heating of foot warmers. By 1914 the Victorian railways had 4,000 foot warmers in service and by 1935 there were 33 furnaces at principal stations to heat them. After about 10 hours the container was picked up by the handle and given a good vertical shake which helped the cooled liquid reform into a solid mass of hot crystals. Staff or sometimes passengers shook them en route when the foot warmers began to get cold. However, as they were heavy this was only possible by fit and agile passengers. At the end of the journey the containers were boiled again for reuse on the next trip. Sodium acetate railway foot warmers were introduced in Victoria in 1889, Adelaide to Melbourne express in 1899. "Shaking up" on this service took place at Murray Bridge and Stawell on the tip to Melbourne and at Ballarat and Serviceton on the trip to Adelaide. The use of foot warmers began to decline in New South Wales from the 1930s with the first trial of carriage air-conditioning in 1936, steam heating from 1948 ad LP gas heating from 1961. By the early 1960s the main services using foot warmers were the overnight mail trains. info from : http://www.powerhousemuseum.com/collection/database/?irn=67564#ixzz4UBNzVf6t Under Creative Commons License: Attribution Non-Commercial There was a whole infrastructure set up at stations for the daily heating of foot warmers in special furnaces. In Victoria alone in 1935 there were 33 heating works.Historic - Victorian Railways - Carriage Heater - Foot warmerA rectangular-shaped stainless steel casing with a welded seam down the back and welded ends. There is a handle at one end for carrying and shaking. Inside the foot warmer are two baffle plates and three trays to contain the sodium acetate. There was a cast-iron ball in each internal compartment. puffing billy, victorian railways, carriage haeter, foot warmer, passenger comfort, station furnace, railway ephemera, early heating methods -
 Flagstaff Hill Maritime Museum and Village
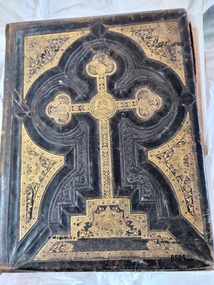
Book - Bible, Thomas Kelly & Sons, The Holy Bible - Douay Bible and Rheims Testament, 1880
The Douay (Douai) Rheims Bible is an English translation of the Latin Vulgate Bible (which had been the Latin Bible used by the Catholic Church since the 4th century). It was produced by Roman Catholic scholars in exile from Elizabethan Protestant England at the English College of Douai (then in the Spanish Netherlands but later part of France). The New Testament translation was published in 1582 at Rheims where the English College had temporarily located in 1578. The Old Testament was translated shortly afterwards but was not published until 1609-1610 in Douay (which makes it older than the King James version). The completed work was the only authorized Bible in English for Roman Catholics until the 20th Century. Its purpose was to uphold the Catholic tradition in the face of the Protestant Reformation and was produced as an alternative to the several Protestant translations then in existence. Prior to it being published, the Roman Catholic practice had restricted personal use of the Bible, in the Latin Vulgate, to the clergy. Bishop Richard Challoner issued a series of revisions (1749 - 1772) intended to make the translation more easily understandable and subsequent editions (including this one) were based upon this revision. In 1871, an edition of the Douay - Rheims Bible was published by Thomas Kelly & Sons of Philadelphia (and later, New York). Thomas Kelly described himself as a "Publisher, Printer, Binder, Lithographer and Steel Plate Engraver". In 1876, Thomas Kelly won an award (a Diploma of Honor and a Medal of Merit) for "the Best Catholic Bibles and Prayer Books" at the International Centennial Exhibition held in Philadelphia and his firm continued to print editions of the Bible throughout the 1870's but little is known of him after 1880 when this edition was published. This Bible has been in the Kermond family from 1888 until 1984 when Laurence Kermond (its last owner) died. The Kermonds were an old Warrnambool family with ties to the district going back to the mid 1840's. Joseph Kermond's mother, Catherine (1818 - 1895) and her husband John Kermond,, an ex-convict (1809 - 1877), had moved from Tasmania around 1843 and were living in the Warrnambool area in 1844 where their eldest son was born. They had six more children born at Port Fairy (or Belfast as it was then called). Catherine is buried at the Tower Hill cemetery. The last owner of the Bible was Laurence Kermond (1918 - 1984). He was the great grandson of John and Catherine Kermond and was a well known painter who lived in the Merimbula and Paynesville areas of N.S. W. and Victoria during the 1970's and early 1980's. The story of Joseph Kermond finding the Bible on a beach on the Shipwreck Coast near Peterborough on the southern coast of Victoria, Australia is plausible as it was not uncommon for items from shipwrecks to be washed ashore. However this Bible would not have come from the wreck of the Loch Ard as the dates don't align. The Loch Ard was wrecked in 1878 and this Bible was printed in 1880. It appears to have been printed for the Australian market as there is a page (with an engraved portrait) dedicated to the "Most Rev. Roger Bede Vaughan, O. S. B. Archbishop of Sydney, N. S. W.". It may also have been aimed at the Irish immigrants as the four "Family Register" pages are decorated with borders of shamrocks. The donor found the Bible in a box of secondhand books on a market stall in Gippsland and recognised its links to the Shipwreck Coast through the name of previous owners (a well-known Warrnambool name) and the story of it being found on a beach near Peterborough. This Bible is a rare example of Douay and Reims Catholic Bible of the late 19th century that was once a treasured item belonging to the Kermond family - one of Warrnambool's early settlers. It also has a most unusual story attached to it - being found (and rescued) washed up on a local beach and almost one hundred years later, being rescued again from a secondhand book stall.This Catholic Bible is an 1880 edition of a "Douay Bible and Rheims Testament", printed and published by Thomas Kelly of New York. Its full title is "The Holy Bible translated from the Latin Vulgate Diligently Compared with The Hebrew, Greek and Other Editions in Various Languages". It is revised with annotations by the Right Rev. R. Challoner D.D. The Bible has brown leather embossed front and back covers decorated with identical ornate gilt patterns and a central picture of a cross. It has two coloured illustrations and numerous black and white lithographs and engravings including portraits of past popes, events and places from Bible stories and decorative borders. The Bible includes the Old and New Testaments, approbations from Pope Pius the Sixth and Archbishops of the United States and other countries (including Archbishop Vaughan of Sydney), a Family Register with handwritten notes on births, deaths and marriages from the Kermond family (as well as a description of how they obtained the bible), a Catholic dictionary of the Bible, a history of the Holy Scriptures, a chronological list of heretics (Theological history) and a description of the "Centennial Award - Diploma of Honor and medal of Merit" won by Thomas Kelly (for the "Best Catholic Bible") at the Centennial Exhibition at Philadelphia in 1876. The Records section has a note on the Memoranda page written by William John Kennard in 1920.Spine: HOLY BIBLE Title Page: THE/ HOLY BIBLE /TRANSLATED FROM/ THE LATIN VULGATE/ DILIGENTLY COMPARED WITH/THE HEBREW, GREEK AND OTHER EDITIONS/ IN VARIOUS LANGUAGES/ THE OLD TESTAMENT WAS FIRST PUBLISHED BY THE ENGLISH COLLEGE AT DOUAY, A.D. 1600 / AND THE NEW TESTAMENT, BY THE ENGLISH COLLEGE AT RHEIMS, A.D. 1582./ REVISED WITH ANNOTATIONS/ BY THE RIGHT REV. R. CHALLONER D.D./ TOGETHER WITH REFERENCES, AND AN HISTORICAL AND CHRONOLOGICAL INDEX./ NOW CAREFULLY CORRECTED ACCORDING TO THE CLEMENTINE EDITION OF THE SCRIPTURES/ NEW YORK / THOMAS KELLY, PUBLISHER/ 17 BARCLAY STREET. / 1880 Dedication Page: DEDICATION OF THE ORIGINAL EDITION/ TO/ THAT LOYAL, RELIGIOUS AND ENLIGHTENED BODY OF MEN / THE/ CATHOLICS OF THE UNITED STATES OF AMERICA/ IN ADMIRATION OF THE STEADY ZEAL WITH WHICH THEY HAVE KEPTTHE/DEPOSIT OF FAITH/ BEQUEATHED THEM BY THEIR FOREFATHERS/ AND HANDED DOWN, WITHOUT INTERRUPTION OT ADULTERATION, TO THEIR GRATEFUL POSTERITY/ THIS EDITION/ OF THE/DOUAY BIBLE AND RHEIMS TESTAMENT/ IS / WITH GRATITUDE FOR PAST FAVORS AND HOPES OF FUTURE ENCOURAGEMENT/ MOST RESPECTFULLY ENSCRIBED. Handwritten note: ""This Holy Book was found . on the beach . near Peterborough Vic. having been washed ashore . from the wreck of the Loch Ard, (sailing ship) in the year 1888 . By .Joseph . Kermond; and presented to . his mother . Catherine Kermond , who in turn passed it - on . to her youngest . son ; one Jacob Kermond. He in turn presented . it to his son . William John Kermond , (the writer), 23/3/20)" [Original punctuation]flagstaff hill maritime museum and village, warrnambool, shipwreck coast, peterborough, kermond, kermond family, loch ard, bible, douay and rheims bible, catholic bible, thomas kelly and sons publiisher, douai, rheims, holy bible, religious bible, catherine kermond, john kermond, william john kermond' -
 Port Fairy Historical Society Museum and Archives
Photograph, Mason, John
Captain John Mason came from Stirling in Scotland, arriving at Port Fairy in 1844. One year after James Atkinson obtained his Special Survey of the area. Thus his life covers all the history of Port Fairy when it was known as Belfast. He married Jane Murray in Portland in 1846 and they had 5 children, Jane died in 1855 and ten years later he married Ann Brown widow of Abijah Brown. They had no children and she died in 1887. In due course he became known as Captain Mason, he was not a sea captain, but captain of the Belfast Volunteers, a Rifle Corps formed in 1859 as a consequence of the Crimean War, and later reconstituted as the Belfast Volunteer Corps. For 40 years he displayed a remarkable versatility in his various occupations. Starting as an Innkeeper - he took over the Stag Inn from Captain Saunders in 1852, for 3 years. He then became a carpenter, stonemason, architect, estate agent honorary technical advisor to the Borough and treasurer to the Shire, and Savings Bank Secretary. They thought so well of John mason in Belfast that they elected him to the first Roads Board in 1853 and to the first Municipal Council in 1856. He was Chairman four times and with Councillors David Talbot and Joseph Whitehead designed the Council's Common Seal and the Motto "Commune Bonum".He was the first Mayor of the Borough in 1863 for a period of 7 weeks. He was responsible for the design, supervision or construction of many of the buildings in the town; most still standing today. He built the Rosebrook Bridge in 1855 and the first official Post Office ( a timber structure in Bank Street) in 1857, replacing it with a stone office in 1865. he built the Court house in 1859 and completed the breakwater between Rabbit Island and Griffith Island started by James Atkinson and John Griffith in 1849, also the first bridge over the Moyne river which connected with Battery Lane and the Bay. Among the many buildings associated with John Mason are Gobles Mill, Tynemouth Villa, 10-12 Princes Street, the Mechanics Institute, the Commercial Hotel, Yambuk and Mickey Bourke's Pub in Koroit. However, he did not build "Riverdale" in Gipps Street as is thought. He had a store and workshop on this site but sold the property in 1872 before the house was built. After an almost uninterrupted term as Councillor starting with the Municipality in 1856, John resigned from the Council in 1873. He well deserved the illuminated address they gave to him and the toast that they drank in the Bank Hotel champagne. Within the year he was working for the Borough as its engineer., surveyor, general supervisor and advisor of public works, simply as the man to whom all difficult problems were referred and at very little expense. John Mason was a great worker for his town and devoted himself unsparingly to the community. That his work was appreciated was shown by the way in which people rallied to his aid when, in the end, he found himself in financial difficulties and his reputation was challenge; arrested for embezzling from the Savings Bank of which he was the actuary in 1882. The money was repaid and the charges found not proven at his trial. He was an early member of the Loyal Prince Albert Lodge, and a founding member of the smaller Loyal Belfast Lodge in 1863. He was also a member of the Horticultural Society. Captain John Mason Died on the 14th of October 1891 (see also 62-04-046 photo)Sepia photograph on heavy cardStevenson & McNicoll photo. 108 Elizabeth Street Melbourne copies can be obtained at anytimedefence, captain, mason, carpenter, councillor, mayor -
 Flagstaff Hill Maritime Museum and Village
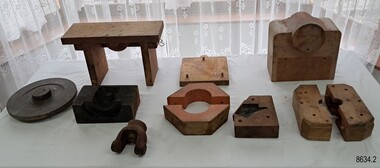
Equipment - Foundry Patterns set, Briggs Brass Foundry, Early 20th century
The wooden crate contains a set of patterns or moulds that were once used at Briggs’ Brass Foundry for making sand moulds. The traditional method of sand casting is over 2000 years old. It is part of a crafted process used to make brass and copper alloy goods suited to marine use; bells, boat hooks, cowls, propellers, handles, lids, rowlocks, hooks, letters, bolts, rail holders, brackets, deck plates, flanges, rudder guides, portholes and covers. Briggs’ Bronze is a copper-based alloy made from local ingots of copper, tin, zinc and lead in carefully measured quantities. The finished product is non-corrosive and can last indefinitely. The crate of patterns was donated by the Briggs family in the early years of Flagstaff Hill, along with other related items such as brassware, tools and machinery. The donated items were displayed in a simulated Brass Foundry in the Village. The items were on show from the completion of the building in 1986 until 1994 when the building was repurposed. The patterns represent the trades of foundering and metalwork, both supporting maritime industries such as shipwrights and boatbuilders. Farmers, manufacturers and other local industries also needed the castings made by foundries. The Brass Foundry display was one of the early ‘working craft’ shops at Flagstaff Hill. It included a historic Cornish chimney that was set up as a working model, telling the story of heat from furnaces to smelt metal, which would then be poured into the sand moulds. This chimney is made from specially curved bricks and is about two-thirds of its full height when originally located at the Grassmere Cheese factory. HISTORY of BRIGGS BRASS FOUNDRY: - The family business was founded in 1912 by Herbert Harrison Briggs (1963-1931) with his son George Edward Briggs, trading as Briggs & Son Foundry at 70 Wellington Street, Collingwood. Younger son Cyril Falkiner McKinnon Briggs joined the foundry in 1922, and it was renamed H H Briggs & Sons Foundry. Both sons ran the firm after Herbert’s death in 1931, making products mainly for marine purposes. They became Bell Founders in 1936 and were known for their specialty of high-quality ship bells. They produced miniature varieties of these and other decorative items such as small propellers. The firm became known as Briggs Marine Foundry. The great-granddaughter of Herbert Briggs inherited the Briggs Brass Bell, similar to the one at Flagstaff Hill. Cyril became the sole family member of the firm in 1965. The Briggs Marine was an exhibitor at the 1965 Boat Show, where he advertised as “non-ferrous founders” and “Bell Specialists”. The foundry relocated to Chesterville Rd, Moorabbin. Cyril passed away in 1967. It is thought that either Cyril or his business partner Frank Lee donated the objects from the Briggs’ Foundry around the time when the business moved to Moorabbin. However, Flagstaff Hill hadn’t been thought about until 1972. The donated items were registered in the Collection in 1986 but they could have been in storage from an earlier date. In October of that same year, Briggs Marine restored Schomberg Bell, a shipwreck artefact from the collection at Flagstaff Hill. Peter Oram, who had worked for the previous owners of Briggs Marine as a fitter and turner, took over the firm in 2014, reviving some of the old casts for current use. The business is now located at Seaford in Victoria and is part of Alliance Casting & Engineering Solutions (Alliance Casting Pty Ltd). In 2016 the original Collingwood Foundry building was repurposed as a thriving business hub named The Foundry. The crate and its patterns are significant for their association with brass foundries locally and generally in coastal areas of Victoria. Marine industries such as ship and boat building rely on good quality castings for their machinery, equipment and fittings. The patterns are associated with the long-running firm, Briggs Brass Foundry, that specialised in cast goods for the marine industry, ready to supply the needs for once-off or mass-produced items. Their products would have been fitted to sail and steam vessels along coastal Victoria including Warrnambool. Briggs Marine is also associated with the Schomberg Bell in Flagstaff Hill, restoring the bell to is former state to show an example of the bell from a luxury mid-19th century vessel. The craft of sand-casting from carved wooden patterns to create metal is an example of skills from the past that are still used today. Wooden rectangular crate with removable wooden lid. Inside is a set of wooden patterns of various shapes and sizes for making sand moulds in a metal foundry. The crate is made from thick wooden planks nailed together. The extended wooden struts on the long sides form a frame to hold the wooden lid. A pair of metal handles are at each short end of the crate, fixed with strong metal bolds. Between each pair of handles is an inscription stamped into the wood. The underside of the crate has red paint splashes. There are insect holes in the wood but no sign of current infestation. Stamped: "H.33 / II" (H may be N or a square B)flagstaff hill maritime museum and village, great ocean road, shipwreck coast, pattern, mould, foundry, brass foundry, metal foundry, crate, box, wooden container, briggs, traditional method, trade, sand cast, cast, brass alloy, copper alloy, marine equipment, marine tools, marine fittings, briggs' bronze, copper tin zinc lead, non-corrosive, briggs family, brassware, metalware, foundering, metalwork, maritime, casting, cornish chimney, curved bricks, grassmere cheese factory, 1912, herbert harrison briggs, h h briggs, george edward briggs, briggs & son foundry, collingwood, cyril falkiner mckinnon briggs, cyril briggs, h h briggs & sons foundry, bell founders, schomberg bell, alliance casting & engineering solutions, collingwood foundry, ship chandlers, marine products, flagstaff hill, warrnambool, maritime museum, maritime village, briggs & son brass foundry, briggs marine, moorabbin -
 Flagstaff Hill Maritime Museum and Village
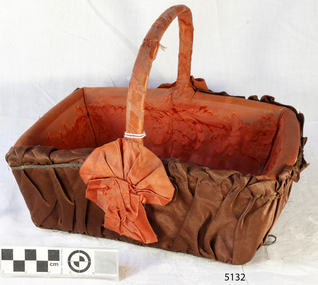
Accessory - Basket, c. 1855
This small cane basket belonged to David and Alice Ellis, a young couple married in Dublin in 1855. It has been handed down in the Ellis family until it was donated, together with other personal effects, in 2004 by David and Alice’s granddaughter, daughter of David Ellis Junior. On 6th October 1855 newlyweds David and Alice Ellis set sail for Australia in the brand new Schomberg, considered the most perfect clipper ship. She was built as an emigrant ship in Aberdeen and set sail from Liverpool on her maiden voyage, bound for Melbourne, Australia. She was loaded with 430 passengers plus cargo that included iron rails and equipment intended for building the Geelong Railway and a bridge over the Yarra from Melbourne to Hawthorn. On 27th December 1855, only one day from her Melbourne destination, the Schomberg was grounded on a sand-spit on the Victorian coast near Peterborough. The passengers and crew were all safely rescued by a passing small steamer, the SS Queen, which traded between Melbourne and Warrnambool, and taken to Melbourne. The passengers had been told, when leaving the sinking Schomberg, that all they could take with them was a small basket or handbag. A newspaper article later mentioned that one of the things Alice made space for in her basket was her Bible. (It is unclear whether Alice took any possessions with her onto the SS Queen, but a note accompanying the donation of the Bible and basket states that the items were “left on deck and salvaged as Schomberg went down”.) Another steamer was despatched from Melbourne to retrieve the passengers’ luggage from the Schomberg and Alice was reunited with all of her boxes of belongings. Other steamers helped unload the cargo until the change in weather made it too difficult. Although the Schomberg was wrecked there were no lives lost. At that time David was 23 years old (born in Wales, 1832) and his new bride Alice was 26 (born in Dublin, 1829). They had been given letters of introduction to people in Tasmania so they travelled there from Melbourne. However the couple only stayed on that island for about a year before they returned to the Western District of Victoria. David worked for Mr Neil Black as a gardener for a while then, when the land in the area was made available by the Victorian government, David and Alice claimed a selection of land on Noorat Road in the Terang district. They settled there for the remainder of their lives, expanding their property “Allambah” as opportunities arose. A document accompanying the donation lists the names of six children; William, Grace (c. 1859-1946), Thomas (c. 1866 – 1939), David (c. 1962 – 1953), James and Victor. David died on 13th April 1911, aged 79, at their property. Alice passed away the following year, November 1912, aged 83. Alice’s obituary described her as “a very homely, kindly-natured woman, who was highly esteemed by a large circle of friends; and she was also a firm adherent of the Presbyterian Church”. At the time of Alice’s death she left behind three sons and one daughter. Her daughter Grace Ellis was also a very active member of the Terang Presbyterian Church and a member of the PWMU (Presbyterian Women’s Missionary Union). She was also involved in the Red Cross and other charities. Grace passed away in 1946, aged 87. David and Alice Ellis were amongst the very earlies pioneers of the Terang district of Western Victoria. Their donated possessions are a sample of the personal effects of emigrants to Australia. The donated items are a sample of the personal goods carried aboard a significant migrant ship in 1855. They are also significant for their association with the Schomberg. The Schomberg, which is on the Victorian Heritage Register (VHR S612), has great historical significance as a rare example of a large, fast clipper ship on the England to Australia run, carrying emigrants at the time of the Victorian gold rush. She represents the technical advances made to break sailing records between Europe and Australia. Flagstaff Hill’s collection of artefacts from the Schomberg is significant for its association with the shipwreck, The collection is primarily significant because of the relationship between the objects, as together they have a high potential to interpret the story of the Schomberg. It is archaeologically significant as the remains of an international passenger Ship. It is historically significant for representing aspects of Victoria’s shipping history and for its association with the shipwreck and the ship, which was designed to be fastest and most luxurious of its day Small rectangular cane basket with timber base, firm carry handle across width. Basket is covered with brown fabric. The inside of the basked and the handle are covered with embossed orange fabric, and a rosette of the same orange fabric is at the base of each end of the handle. Basket was amongst the possessions of David and Alice Ellis, passengers on the Schomberg when wrecked in 1855.flagstaff hill, warrnambool, shipwrecked coast, flagstaff hill maritime museum, maritime museum, shipwreck coast, flagstaff hill maritime village, great ocean road, schomberg ship, 1855 shipwreck, peterborough shipwreck, ss queen, david ellis, alice ellis, allambah terang, dublin emigrants, terang presbyterian church, western district victoria, cane basket, schomberg basket -
 Flagstaff Hill Maritime Museum and Village
Functional object - Candlesticks, C. 1855
This pair of brass candlesticks feature a internal candle stubb pusher that is pressed from underneath the base of the candlestick to push up the used candle stubb from inside the hollow candlestick. It once belonged to David and Alice Ellis, a young couple married in Dublin in 1855, possibly a wedding present. It has been handed down in the Ellis family until it was donated, together with other personal effects, in 2004 by David and Alice’s granddaughter, daughter of David Ellis Junior. On 6th October 1855 newlyweds David and Alice Ellis set sail for Australia in the brand new Schomberg, considered the most perfect clipper ship. She was built as an emigrant ship in Aberdeen and set sail from Liverpool on her maiden voyage, bound for Melbourne, Australia. She was loaded with 430 passengers plus cargo that included iron rails and equipment intended for building the Geelong Railway and a bridge over the Yarra from Melbourne to Hawthorn. On 27th December 1855, only one day from her Melbourne destination, the Schomberg was grounded on a sand-spit on the Victorian coast near Peterborough. The passengers and crew were all safely rescued by a passing small steamer, the SS Queen, which traded between Melbourne and Warrnambool, and taken to Melbourne. The passengers had been told, when leaving the sinking Schomberg, that all they could take with them was a small basket or handbag. A newspaper article later mentioned that one of the things Alice made space for in her basket was her Bible. (It is unclear whether Alice took any possessions with her onto the SS Queen, but a note accompanying the donation of the Bible and basket states that the items were “left on deck and salvaged as Schomberg went down”.) Another steamer was despatched from Melbourne to retrieve the passengers’ luggage from the Schomberg and Alice was reunited with all of her boxes of belongings. Other steamers helped unload the cargo until the change in weather made it too difficult. Although the Schomberg was wrecked there were no lives lost. At that time David was 23 years old (born in Wales, 1832) and his new bride Alice was 26 (born in Dublin, 1829). They had been given letters of introduction to people in Tasmania so they travelled there from Melbourne. However the couple only stayed on that island for about a year before they returned to the Western District of Victoria. David worked for Mr Neil Black as a gardener for a while then, when the land in the area was made available by the Victorian government, David and Alice claimed a selection of land on Noorat Road in the Terang district. They settled there for the remainder of their lives, expanding their property “Allambah” as opportunities arose. A document accompanying the donation lists the names of six children; William, Grace (c. 1859-1946), Thomas (c. 1866 – 1939), David (c. 1962 – 1953), James and Victor. David died on 13th April 1911, aged 79, at their property. Alice passed away the following year, November 1912, aged 83. Alice’s obituary described her as “a very homely, kindly-natured woman, who was highly esteemed by a large circle of friends; and she was also a firm adherent of the Presbyterian Church”. At the time of Alice’s death she left behind three sons and one daughter. Her daughter Grace Ellis was also a very active member of the Terang Presbyterian Church and a member of the PWMU (Presbyterian Women’s Missionary Union). She was also involved in the Red Cross and other charities. Grace passed away in 1946, aged 87. David and Alice Ellis were amongst the very earlies pioneers of the Terang district of Western Victoria. Their donated possessions are a sample of the personal effects of emigrants to Australia. The donated items are a sample of the personal goods carried aboard a significant migrant ship in 1855. They are also significant for their association with the Schomberg. The Schomberg, which is on the Victorian Heritage Register (VHR S612), has great historical significance as a rare example of a large, fast clipper ship on the England to Australia run, carrying emigrants at the time of the Victorian gold rush. She represents the technical advances made to break sailing records between Europe and Australia. Flagstaff Hill’s collection of artefacts from the Schomberg is significant for its association with the shipwreck, The collection is primarily significant because of the relationship between the objects, as together they have a high potential to interpret the story of the Schomberg. It is archaeologically significant as the remains of an international passenger Ship. It is historically significant for representing aspects of Victoria’s shipping history and for its association with the shipwreck and the ship, which was designed to be fastest and most luxurious of its day Candlesticks, brass; pair of two candlesticks each incorporating a candle pusher inside the stem (used to push up and eject the candle stump). Candlesticks were amongst the possessions of David and Alice Ellis, passengers on the Schomberg when wrecked in 1855.schomberg, flagstaff hill, warrnambool, shipwrecked coast, flagstaff hill maritime museum, maritime museum, shipwreck coast, flagstaff hill maritime village, great ocean road, candlestick, candlestick with stubb pusher, 1855 shipwreck, peterborough shipwreck, ss queen, david ellis, alice ellis, allambah terang, dublin emigrants, terang presbyterian church, western district victoria, lighting, candlesticks, candle holders -
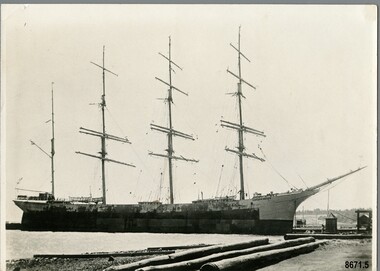 Flagstaff Hill Maritime Museum and Village
Photograph - Vessel "Strathgryfe", late 19th or early 20th century
This photograph was one of ten photographs donated to Flagstaff Hill Maritime Museum and Village by Fred Trewartha. Frederick John Fox Trewartha (Fred) was a well-known Warrnambool businessman. He was born in Beeac near Geelong in 1920 and came to Warrnambool with his family as a very young child. He was apprenticed to his father John, as a saddler and later opened his own shop on Raglan Parade. He then moved into working with tarpaulins and canvases for the trucking industry. Fred was keenly interested in photography (and was a member of the Warrnambool Cine Club), yachting and boat building. He kept his yacht moored at Port Fairy for many years and participated in sailing events locally and interstate. He also built boats with his sons. He had the opportunity to meet many older sailors and it's thought this photo (and others in the set) may have been given to him by one of these men. Fred Trewartha died in 2016 in Warrnambool. The "Strathgryfe" was a four masted steel barque built in 1890 by "Russell and Company", Port Glasgow and was owned by Duncan McGillivray (The Strathgryfe Ship Company Limited), Greenock. It arrived in Melbourne in December 1891 from New York. Between 1891 and 1910 it carried merchandise in and out of Australia to ports around the world - Melbourne to London (1892), Newcastle to San Francisco (1894), Capetown to Newcastle (1894), New York to Shanghai (1897), New York to Melbourne (1898), Frederickstadt to Melbourne (1899), Liverpool to Sydney (1900), San Francisco to Brisbane (1903), Newcastle to Pisagna, Chile (1905) and Rotterdam to Melbourne (1910). It carried breadstuffs from San Francisco, coal from Newcastle, wool from Sydney, saltpetre from Hamburg and wheat from Brisbane and Melbourne as well as a variety of general merchandise. In 1898, whilst on route between New York and Melbourne, it came across the Captain and crew of the missing barque "Glen Huntley" which had been reported as "lost" several months earlier. They had been marooned at Tristan D'Acunha (a remote group of volcanic islands in the South Atlantic ocean). Captain McIntyre, of the Strathgryfe, offered to bring Captain Shaw (of the Glen Huntly) on to Melbourne with them but the "old mariner" decided to stay on with his crew till arrangements could be made for rescuing the whole of them. In 1899, when in Melbourne, seven of its crew refused to go to sea in it due to its unsafe conditions. They said the vessel was unseaworthy and that the rigging was unsafe and the lifeboats, not watertight. The Captain (Donald McIntyre) denied the allegations and produced a marine surveyor's certificate as evidence of the condition of the vessel. The men were sentenced to three weeks imprisonment. In 1901 there was a fire on board the Strathgryfe just after it left Sydney for London which resulted in many bales of wool being destroyed. In 1902 it was beached at Shellback island (near Wilson's promontory) for several weeks and had to be considerably dismantled in order to lighten its load enough to allow tugs to pull it back into deep water. In 1910 it was sold to a German firm and renamed "Margretha". It continued to operate in Australian ports until 1914 when it left Sydney for the English Channel with 42,438 bags of wheat. However owing to W.W.1 breaking out, it made for the port of St Michael's where it remained for twenty-one months. Later it was seized by the Portuguese Government and renamed "Graciosa" and was leased back to the English Government. It was sunk by two German submarines in 1918.This photograph is significant as a record of the world wide mercantile trade Australia was engaged in at the end of the nineteenth century and beginning of the twentieth century.Black and white photograph of a four masted barque moored at a dock. The rigging and two lifeboats are clearly visible. Three large timber logs are in the foreground. On the back of the photograph, the donor's name and telephone number have been written in black ballpoint pen and the name of the ship has been handwritten (incorrectly) in pencil in cursive script.Back of Photo - donor's name and telephone number "Strarthgryfe" [Strathgryfe] / "late" / "Margurita" [Margretha]flagstaff hill maritime museum and village, warrnambool, great ocean road, shipwreck coast, strathgryfe, barque, steel barque, margretha, graciosa, frederick trewartha, mercantile trade, russell and company, merchandise, cargo ship, glen huntly, w. w. 1 -
Bendigo Historical Society Inc.
Photograph - AUSTIN COLLECTION: Ray Beer, Central Deborah Gold Mine
Ray Beer was an employee of the Central Deborah Gold Mine. February 15th 2009: Bendigo Advertiser: 'MINING stalwart Raymond Beer has died at the age of 74 after a battle with cancer. He leaves behind an extended family and a legacy in Bendigo’s mining history. Ray was mine manager at the Central Deborah Gold Mine - appointed in 1978 - and led the team that made possible the underground project at the second level. He had a vision to allow visitors to go underground and experience Bendigo’s mining heritage first hand. Ray was responsible for developing the new battery, shaft and poppet head to make this a reality. It took persistence and lots of hard work. Friend and work colleague Bill McNamara said Ray was as good as 10 men. His enthusiasm and work ethic were unprecedented. Ray will be sadly missed by his wife, Thelma, six children, 15 grandchildren, seven brothers, three sisters, his extended family, and friends. He will be remembered for his kindness, tenacity and strength of character. In recognition of his contribution to Bendigo’s mining history, after more than 20 years of service at his retirement, a bronze life-sized statue was unveiled in his honour'. Central Deborah Gold Mine history: At its peak, Central Deborah Gold Mine reached a depth of 412 metres. It has 17 separate levels and 15 kilometres of drives and cross cuts (tunnels). The Central Deborah was very much a hands-on mine and the conditions that the miners worked in would be considered shocking by today's standards – being lowered underground in a cage with only two sides, often working ankle to knee deep in water, filling up to 32 ore trucks a shift by hand which were then pushed a mile or more along rails in the drives, working by carbide lamp, breathing in the fumes and rock dust and communication by bells. Geez, they were ironmen. However, at the time working conditions were considered to be among the best on the goldfields at Central Deborah, after all it was one of the only mines that had hot showers. Following Central Deborah Gold Mine's closure, the Bendigo skyline began to noticeably change. Obvious remnants of mining such as poppet heads, engine rooms, service quarters, battery houses and chimneys were steadily disappearing. After intense lobbying by the local community, the Bendigo City Council purchased the still very much intact Central Deborah Gold Mine in 1970 for a mere $6,000 to ensure that a vital link to Bendigo's historic golden past was maintained. The Bendigo Trust was then formed to oversee the operations of the Central Deborah Gold Mine, which led to the surface of the mine being opened to the public in 1971. Initially the surface was open for just 12 hours a week and as the demand for viewing a part of Bendigo's history increased, so did the opening hours. In 1974 the mine was gazetted as a Public Historical Purposes Reserve and attracted such visitors as H.R.H Prince Charles. By far the greatest shortcoming at this stage was that no one could view the underground workings, as these had become flooded. After what could only be described as a monumental effort by everyone involved, Level 2 of the mine was officially opened to the public by the Premier of Victoria, the Honourable John Cain, on 20 June 1986, which brought to fruition a long standing dream.Black and white photograph. Ray Beer, underground at Central Deborah Gold Mine, standing alongside wooden sign 'Murrell's Corner'. Sign is placed horizontally on timber supports; side of drive visible in background. Ray is wearing bib and brace overalls and hard hat with a belt around his waist. He is giving a 'thumbs up' sign. gold mining, central deborah gold mine, ray beer, mine manager -
 Ringwood and District Historical Society
Document, State School 4688 Heathmont, c 1969
S.S, No 4688, Francis Street, Heathmont, 3135 History Two A4 pages of notes on the beginnings of the Heathmont S.S The text is:- STATE SCHOOL No 4698 Frances Street Heathmont, 3135 HISTORY School classes at Heathmont commenced in the original Methodist Church building in Canterbury Road in 1952 with Mr A.J. McKinlay as Head Teacher in charge of a school of 80 pupils. Shortly afterwards both a Parents and Citizens Association and the first School Committee were formed. Mr J.B. Harper was appointed as president of the Association and Mr H. Walker was elected as chairmen of the Committee, while Mr T. Jago acted as secretary to both bodies. Later in that same year the district Inspector, Mr H. Fleigner since retired and still a Heathmont resident, woe instrumental in obtaining a site for the establishment of the present Heathmont School at the corner of Frances Street and Balfour Avenue. The land was purchased from Mr. Handasyde, an orchardist of Wantirna South. In March 1963 a Bristol prefabricated aluminium building comprising four classrooms and an office was occupied. On April 21st, 1953 the school was opened officially by the Minister for Education, the Hon. A.E. Shepherd MLA. By December of that year the attendance had increased to 191 pupils, Mr N. Gillham was Head Teacher at the time. In February 1955 Mr. K. Gerraty succeeded Mr Gillham and by 1957 attendance had risen to 326 pupils necessitating the provision of additional light timber construction classrooms. Meanwhile the subdivision of large areas of local orchard land into housing estates with its resulting rapidly increasing population presented a persistent school accommodation problem that was met temporarily by the hiring of district church halls to accommodate a steadily rising attendance. Fortunately the tradition of voluntarily contributing to school funds and voluntarily providing labour initiated by the original parent bodies in 1952 was maintained. Then Mr V. Milligan commenced as Head Teacher in 1959, much of the steeply contoured playground area had been terraced, a football oval formed and the basketball court and assembly areas were sealed. These improvements were finally completed largely due to the enthusiasm, vigor and work effected by the School Committee under the chairmanship of Ringwood Councillor Mr JM McRae, as is borne out by the following report by Mr R.J. Chapman, District Inspector in 1961. "The local support by parents given to the Head Teacher and his staff is exceptional and I express my appreciation of their outstanding service." Mr Milligan's contribution to progress, however, lay equally in the internal educational development, particularly with regard to the teaching of reading. A course in the mechanics of speed reading, involving the use of the tachistoscope reading rate controllers and programmed comprehension sets was introduced and a start was made in the building up of a library of literature and reference books. As a result the Education Department appointed a Teacher-librarian to ensure continuity and further progress with this Reading scheme. A feature of Heathmont School is the splendid modern Art/Craft room opened while Mr L. Sebire was head teacher in 1966. This building and courtyard, linked to the original building by a covered way was designed by Mr Salvatore who acted as honorary architect, and was completed by Mr John F. Swan at a cost of �10,000 of which 52% was provided by a School Committee Co-operative loan and 42% by Departmental special grant. Materials used were white sandstone brick and oregon pine. The building bears the name of Councillor J.M. McRae Art Centre as a tribute to the man who did so much to enable its construction. An Art/Craft specialist teacher is provided by the Education Department. As attendance continued to increase to 520 children in 1969, additional accommodation became an urgent necessity. Following negotiations conducted by Mr A. Lethbridge School Committee President, Mr JJ Egan, former Principal and the present Principal, Mr A.S. Don the Education Department Assisted by a second Committee Co-operative loan, purchased the adjacent Baptist Church property thus providing much needed extra accommodation and playground area The newly acquired building is at present in use as two temporary classrooms, but will subsequent be used as a utility rope. A smaller room has been converted to a canteen operated daily by the Parents and Citizens Association, thus providing both a service to the pupils and a source of income. +Additional Keywords: McKinlay, Mr.A G Harper, Mr J.B Walker,Mr.H Fleigner, Mr.H Handasyde, Mr. G Shepherd, Hon. A.E. MLA Gillham, Mr.K Garraty, Mr.K Milligan, Mr.V McRae, Mr. J.M. Chapman,Mr.R.J. Sebire,Mr.L Salvatore,Mr. Swann,Mr.John F. Lethbridge, mr.A Egan,Mr.J.J. Don,Mr.A.S. -
 Flagstaff Hill Maritime Museum and Village
Book, Abandoned
This item is from the ‘Pattison Collection’, a collection of books and records that was originally owned by the Warrnambool Mechanics’ Institute, which was founded in Warrnambool in 1853. By 1886 the Warrnambool Mechanics’ Institute (WMI) had grown to have a Library, Museum and Fine Arts Gallery, with a collection of “… choice productions of art, and valuable specimens in almost every branch and many wonderful national curiosities are now to be seen there, including historic relics of the town and district.” It later included a School of Design. Although it was very well patronised, the lack of financial support led the WMI in 1911 to ask the City Council to take it over. In 1935 Ralph Pattison was appointed as City Librarian to establish and organise the Warrnambool Library as it was then called. When the WMI building was pulled down in 1963 a new civic building was erected on the site and the new Warrnambool Library, on behalf of the City Council, took over all the holdings of the WMI. At this time some of the items were separated and identified as the ‘Pattison Collection’, named after Ralph Pattison. Eventually the components of the WMI were distributed from the Warrnambool Library to various places, including the Art Gallery, Historical Society and Flagstaff Hill. Later some were even distributed to other regional branches of Corangamite Regional Library and passed to and fro. It is difficult now to trace just where all of the items have ended up. The books at Flagstaff Hill Maritime Village generally display stamps and markings from Pattison as well as a variety of other institutions including the Mechanics’ Institute itself. RALPH ERIC PATTISON Ralph Eric Pattison was born in Rockhampton, Queensland, in 1891. He married Maude Swan from Warrnambool in 1920 and they set up home in Warrnambool. In 1935 Pattison accepted a position as City Librarian for the Warrnambool City Council. His huge challenge was to make a functional library within two rooms of the Mechanics’ Institute. He tirelessly cleaned, cleared and sorted a disarrayed collection of old books, jars of preserved specimens and other items reserved for exhibition in the city’s museum. He developed and updated the library with a wide variety of books for all tastes, including reference books for students; a difficult task to fulfil during the years following the Depression. He converted all of the lower area of the building into a library, reference room and reading room for members and the public. The books were sorted and stored using a cataloguing and card index system that he had developed himself. He also prepared the upper floor of the building and established the Art Gallery and later the Museum, a place to exhibit the many old relics that had been stored for years for this purpose. One of the treasures he found was a beautiful ancient clock, which he repaired, restored and enjoyed using in his office during the years of his service there. Ralph Pattison was described as “a meticulous gentleman whose punctuality, floorless courtesy and distinctive neat dress were hallmarks of his character, and ‘his’ clock controlled his daily routine, and his opening and closing of the library’s large heavy doors to the minute.” Pattison took leave during 1942 to 1945 to serve in the Royal Australian Navy, Volunteer Reserve as Lieutenant. A few years later he converted one of the Museum’s rooms into a Children’s Library, stocking it with suitable books for the younger generation. This was an instant success. In the 1950’s he had the honour of being appointed to the Victorian Library Board and received more inspiration from the monthly conferences in Melbourne. He was sadly retired in 1959 after over 23 years of service, due to the fact that he had gone over the working age of council officers. However he continued to take a very keen interest in the continual development of the Library until his death in 1969. WARRNAMBOOL'S MECHANICS' INSTITUTE Warrnambool's Mechanics' Institute (or Institution as it was sometimes called) was one of the earliest in Victoria. On 17th October 1853 a meeting was held where it was resolved to request the Lieutenant Governor of the Colony to grant land for the erection of a Mechanics' Institutes building. A committee was formed at the meeting and Richard Osburne chaired the first meeting of this committee. The land on the North West corner of Banyan and Merri Streets was granted but there were no funds to erect the building. The Formal Rights of the Warrnambool Mechanics' Institute's encompassed its aims and these were officially adopted in1859; "This Institution has for its object the diffusion of literary, scientific, and other useful knowledge amongst its members, excluding all controversial subjects, religious or political. These objects are sought to be obtained by means of a circulating library, a reading room, the establishment of classes, debates, and the occasional delivery of lectures on natural and experimental philosophy, mechanics, astronomy, chemistry, natural history, literature, and the useful and ornamental arts, particularly those which have a more immediate reference to the colony." The Warrnambool Mechanics' Institute opened its first reading room in November1884 in the National School building at the corner of Banyan and Timor Streets. The Institute was funded by member subscription, payable on a quarterly, half yearly or yearly basis. Samuel Hannaford, the Manager of the Warrnambool Bank of Australasia, was the first Honorary Secretary of the Mechanics' Institutes, and an early President and Vice-President. He also gave several of the early lectures in the Reading Room. Another early Secretary, Librarian and lecturer was Marmaduke Fisher, the teacher at the National School. Lecture topics included The Poets and Poetry of Ireland', 'The Birth and Development of the Earth', 'The Vertebrae - with Remarks on the pleasures resulting from the study of Natural History' and 'Architecture'. In 1856 the Reading Room was moved to James Hider's shop in Timor Street, and by 1864 it was located in the bookshop of Davies and Read. In the 1860's the Mechanics' Institute struggled as membership waned but in 1866, after a series of fund raising efforts, the committee was able to purchase land in Liebig Street, on a site then called Market Square, between the weighbridge and the fire station. A Mechanics' Institute building was opened at this site in August 1871. The following year four more rooms were added to the main Reading Room and in 1873 the Artisan School of Design was incorporated into the Institute. The same year Joseph Archibald established a Museum; however it deteriorated when he was transferred to Bendigo in 1877. In 1880, with Archibald's return to Warrnambool, the Museum was re-established, and in 1885 a new building was built at the back of the Institute to accommodate the re-created School of Design, the Art Gallery and the Museum. In 1887 the Museum section was moved to the former court house in Timor Street (for some time the walls of the building formed part of the TAFE cafeteria but all is now demolished)). In 1911 the Museum was transferred back to the original building and the management of the Mechanics' Institute was handed over to the Warrnambool City Council. The Museum and Art Gallery became one and housed many fine works of art, and the Library continued to grow. The building was well patronised, with records showing that at the beginning of the 20th century there were between 500 and 800 visitors. During World War One the monthly figures were in the thousands, with 3,400 people visiting in January 1915. The Museum was a much loved Institution in Warrnambool until the contents of the Museum and Art Gallery were removed to make room for the Warrnambool City Council Engineers' Department. The contents were stored but many of the items were scattered or lost. When the original building was demolished the site became occupied by the Civic Centre, which included the new City Library. (The library was temporarily located in the old Palais building in Koroit Street.) In the process of reorganisation the Collection was distributed amongst the community groups: -The new City Library took some of the historic books and some important documents, historic photographs and newspapers. -The Art Gallery kept the 19th Century art collection and some of the artefacts from the museum. -The Historic Society has some items -The State Museum has some items -Some items were destroyed -Flagstaff Hill Maritime Village has old newspapers, Government Gazettes, most of the Mechanics' Institute Library, ledgers and documents connected to the Mechanics' Institute Library, some framed and unframed art works and some photographs. The Warrnambool Mechanics' Institute Library book collection is deemed to be of great importance because it is one of the few collections in an almost intact state, and many of the books are now very rare and of great value. Jules Verne (1828–1905) Jules Verne pursued his writing career after finishing law school in 1849, during this time he was writing poetry and short stories. He began to hit his stride after meeting publisher Pierre-Jules Hetzel in1862, who nurtured many of the works that would later comprise the author's 54 novels the (Voyages Extraordinaires). Often referred to as the "Father of Science Fiction," Verne wrote books about a variety of innovations and technological advancements years before they were practical realities. In 1856, Verne met and fell in love with Honorine de Viane, a young widow with two daughters. They married in 1857, and in 1861, the couple's only child, Michel Jean Pierre Verne, was born. Realizing he needed a stronger financial foundation, Verne began working as a stockbroker. However, he refused to abandon his writing career, and that year he published his first book, The 1857 Salon (Le Salon de 1857). In all Verne authored more than 60 books as well as dozens of plays, short stories and librettos. He conjured hundreds of memorable characters and imagined countless innovations years before their time, including stories about submarine and space travel, terrestrial flight and deep-sea exploration. Jules Verne died in 1905, at his residence in the French city of Amiens, stricken with diabetes, on March 24, 1905. Verne had many memorable novels, his most famous being Five Weeks in a Balloon, Journey to the Centre of the Earth, From the Earth to the Moon, Around the World in Eighty Days, In Search of the Castaways and Twenty Thousand Leagues under the Sea Additional works surfaced decades later. Backwards to Britain based on his many trips to the United Kingdom was finally printed in 1989, 130 years after it was written. Also Paris in the Twentieth Century, originally considered too far-fetched with its depictions of skyscrapers, gas-fuelled cars and mass transit systems, followed in 1994. Citation Information Biography.com Editors Jules Verne Biography: https://www.biography.com/writer/jules-verne The Pattison Collection, along with other items at Flagstaff Hill Maritime Village, was originally part of the Warrnambool Mechanics' Institute’s collection. The Warrnambool Mechanics’ Institute Collection is primarily significant in its totality, rather than for the individual objects it contains. Its contents are highly representative of the development of Mechanics' Institute libraries across Australia, particularly Victoria. A diversity of publications and themes has been amassed, and these provide clues to our understanding of the nature of and changes in the reading habits of Victorians from the 1850s to the middle of the 20th century. The collection also highlights the Warrnambool community’s commitment to the Mechanics’ Institute, reading, literacy and learning in the regions, and proves that access to knowledge was not impeded by distance. These items help to provide a more complete picture of our community’s ideals and aspirations. The Warrnambool Mechanics Institute book collection has historical and social significance for its strong association with the Mechanics Institute movement and the important role it played in the intellectual, cultural and social development of people throughout the latter part of the nineteenth century and the early twentieth century. The collection of books is a rare example of an early lending library and its significance is enhanced by the survival of an original collection of many volumes. The Warrnambool Mechanics' Institute’s publication collection is of both local and state significance. Abandoned Author: Jules Verne Publisher: Samson Low, Marston, Searle & Rivington Date: 1892Label on spine cover with typed text PAT 843 VER Front loose endpaper has sticker from Warrnambool Public Library covered by a sticker from Corangamite Regional Library Service Inside front loose endpaper has a stamp from Warrnambool Mechanics Institutewarrnambool, shipwrecked-coast, flagstaff-hill, flagstaff-hill-maritime-museum, maritime-museum, shipwreck-coast, flagstaff-hill-maritime-village, shipwrecked-artefact, book, pattison collection, warrnambool library, warrnambool mechanics’ institute, ralph eric pattison, corangamite regional library service, warrnambool city librarian, mechanics’ institute library, victorian library board, warrnambool books and records, warrnambool children’s library, great ocean road, abandoned, jules verne -
 Flagstaff Hill Maritime Museum and Village
Domestic object - Bowl, Late 19th or early 20th Century
The Process of Making Pottery Decorating, Firing, Glazing, Making, Technical There is a rhythm and flow to clay. It can’t be done all at once! Even the making process! It can take weeks to get everything done, especially if you can only work on your pottery once a week! Even though we have three hour classes, it’s often just not enough time! Here is an overview of some of the processes so you have a bit more grasp on some of the technical stuff! Step One – Design There are SO many ideas out there for making stuff in clay! From delicate porcelain jewellery, through to heavy sculptural work and everything in between. Deciding your direction is sometimes not that easy – when you first start, try everything, you will naturally gravitate to the style that you enjoy! The options and variations are endless and can get a wee bit overwhelming too! Check in with me before you start to ensure your ideas will work, what order you might do things, how you could achieve the look you are seeking and any other technical data required! Step Two – Making Clay is thixotropic. This means that as you work with it, the clay first gets sloppier and wetter, before is begins to dry in the atmosphere. For most things, you simply can’t do all parts of the project at once. An example of work order might look like: Get last weeks work out from the shelves Prepare clay for today’s work – roll your clay, prepare balls for throwing, make the first stage of a pinch pot) Clean up last week’s work and put it on the shelf for bisque firing Check that you have any glazing to do – and do enough of it that you will have time to finish your main project Do the next step of your next project – there might be a further step that can’t be complete immediately, in that case, wrap your work well and put onto the shelves. Letting your work rest for a while can really help keep your work clean and professional looking. Many things require bagging under plastic to keep it ready for work the next week – put your name on the outside of the bag so you can find your work easily. We have stickers and markers. Consider how you want to decorate your work – coloured slip can be applied at a fairly wet stage (remembering that it will make your work even wetter!). Trying to apply slip to dry clay won’t work! If you want to do sgraffito – you will need to keep the work leather hard (a state of dryness where you can still work the clay with a little effort and a little water and care). Step Three – Drying Most of the time your work can go into the rack uncovered to let it dry out for the following week. If you want to continue forming or shaping you will need to double bag your work – put your work on a suitable sized bat and put the bat in a bag so the base of the bag is under the bat, then put another bag over the top of the work and tuck the top of the bag under the bat. If you want to trim (or turn) your thrown work the following week, it should also be double bagged. If your work is large, delicate, or of uneven thicknesses, you should lightly cover your work for drying. When considering the drying process, bare in mind the weather, humidity and wind! The hotter and dryer, the faster things dry and work can dry unevenly in the shelves – this can lead to cracking – another time to lightly cover your work for drying. Step Four – Trimming and Cleaning Up Your work is dry! It is called greenware now and it is at it’s most fragile! Handle everything with two hands. I often refer to soft hands – keep everything gentle and with your fingers spread as much as possible. Try to not pick up things like plates too much, and always with both hands! Before your work can be bisque fired it should be “cleaned up”. You work won’t go into the kiln if it has sharp edges – when glazed, sharp edges turn into razor blades! Use a piece of fly wire to rub the work all over – this will scratch a little so be light handed. Use a knife or metal kidney to scrape any areas that require a bit more dynamic treatment than the fly wire offers! Finally, a very light wipe over with a slightly damp sponge can help soften and soothe all of your edges and dags! Trimming thrown work: If you are planning to trim (or turn) your thrown work (and you should be), make sure you bag it well – your work should be leather hard to almost dry for easiest trimming. Use this step to finish the work completely – use a metal kidney to polish the surface, or a slightly damp sponge to give a freshly thrown look. Wipe the sponge around the rim after trimming, and check the inside of the pot for dags! Trimming slip cast work: Usually I will trim the rims of your work on the wheel the following day to make that stage easier, however you will still need to check your work for lumps and bumps. Last but not least – check that your name is still clearly on the bottom of your work. Step Five – Bisque Firing When the work is completely dry it can go into the bisque kiln. The bisque kiln is fired to 1000°C. This process burns off the water in the clay as well as some of the chemically bound water. The structure of the clay is not altered that much at this temperature. Inside the bisque kiln, the work is stacked a little, small bowl inside a larger bowl and onto a heavy plate. Smaller items like decorations or drink coasters might get stacked several high. Consideration is paid to the weight of the stack and shape of the work. A bisque kiln can fire about one and a half times the amount of work that the glaze kiln can fire. The firing takes about 10 hours to complete the cycle and about two days to cool down. Once it has been emptied the work is placed in the glaze room ready for you to decorate! Step Six – Glazing Decorating your work with colour can be a lot of fun – and time consuming! There are three main options for surface treatment at this stage: Oxide Washes Underglazes Glazes Washes and underglazes do not “glaze” the work – It will still need a layer of glaze to fully seal the clay (washes don’t need glaze on surfaces not designed for food or liquid as they can gloss up a little on their own). Underglazes are stable colourants that turn out pretty much how they look in the jar. They can be mixed with each other to form other colours and can be used like water colours to paint onto your work. Mostly they should have a clear glaze on top to seal them. Oxides are a different species – the pink oxide (cobalt) wash turns out bright blue for instance. They don’t always need a glaze on top, and some glazes can change the colour of the wash! The glazes need no other “glaze” on top! Be careful of unknown glaze interactions – you can put any combination of glaze in a bowl or on a plate, but only a single glaze on the outside of any vertical surface! Glazes are a chemical reaction under heat. We don’t know the exact chemicals in the Mayco glazes we use. I can guess by the way they interact with each other, however, on the whole, you need to test every idea you have, and not run the test on a vertical surface! Simply put, glaze is a layer of glass like substance that bonds with the clay underneath. Clay is made of silica, alumina and water. Glaze is made of mostly silica. Silica has a melting point of 1700°C and we fire to 1240°C. The silica requires a “flux” to help it melt at the lower temperature. Fluxes can be all sorts of chemicals – a common one is calcium – calcium has a melting point of 2500°C, however, together they both melt at a much lower temperature! Colourants are metal oxides like cobalt (blue), chrome (green through black), copper (green, blue, even red!), manganese (black, purple and pink) iron (red brown), etc. Different chemicals in the glaze can have dramatic effects. for example, barium carbonate (which we don’t use) turns manganese bright pink! Other elements can turn manganese dioxide brown, blue, purple and reddish brown. Manganese dioxide is a flux in and of itself as well. So, glazes that get their black and purple colours, often interact with other glazes and RUN! Our mirror black is a good example – it mixes really well with many glazes because it fluxes them – causes them to melt faster. It will also bring out many beautiful colours in the glazes because it’s black colouring most definitely comes from manganese dioxide! Glaze chemistry is a whole subject on it’s own! We use commercial Mayco glazes on purpose – for their huge range of colour possibilities, stability, cool interactions, artistic freedom with the ability to easily brush the glazes on and ease of use. We currently have almost 50 glazes on hand! A major project is to test the interactions of all glazes with each other. That is 2,500 test tiles!!!! I’m going to make the wall behind the wheels the feature wall of pretty colours! Step Seven – Glaze (Gloss or sometimes called “Glost”) Firing Most of the time this is the final stage of making your creation (but not always!) The glaze kiln goes to 1240°C. This is called cone 6, or midrange. It is the low end of stoneware temperatures. Stoneware clays and glazes are typically fired at cone 8 – 10, that is 1260 – 1290°C. The energy requirement to go from 1240°C to 1280°C is almost a 30% more! Our clay is formulated to vitrify (mature, turn “glass-like”) at 1240°, as are our glazes. A glaze kiln take around 12 hours to reach temperature and two to three days to cool down. Sometimes a third firing process is required – this is for decoration that is added to work after the glaze firing. For example – adding precious metals and lustres. this firing temperature is usually around 600 – 800°C depending upon the techniques being used. There are many students interested in gold and silver trims – we will be doing this third type of firing soon! After firing your work will be in the student finished work shelves. Remember to pay for it before you head out the door! There is a small extra charge for using porcelain clay (it’s more than twice the price of regular clay), and for any third firing process! Once your work has been fired it can not turn back into clay for millennia – so don’t fire it if you don’t like it! Put it in the bucket for recycling. https://firebirdstudios.com.au/the-process-of-making-pottery/ The bowl is an example of kitchenware used in the 19th century and still in use today.Bowl white ceramic. Crack on side. Badly stained.Backstamp very faint and unable to be read.flagstaff hill, warrnambool, shipwrecked-coast, flagstaff-hill, flagstaff-hill-maritime-museum, maritime-museum, shipwreck-coast, flagstaff-hill-maritime-village, mixing bowl, food preparation, kitchen equipment, ceramic -
 Flagstaff Hill Maritime Museum and Village
Domestic object - Bowl
The Process of Making Pottery Decorating, Firing, Glazing, Making, Technical There is a rhythm and flow to clay. It can’t be done all at once! Even the making process! It can take weeks to get everything done, especially if you can only work on your pottery once a week! Even though we have three hour classes, it’s often just not enough time! Here is an overview of some of the processes so you have a bit more grasp on some of the technical stuff! Step One – Design There are SO many ideas out there for making stuff in clay! From delicate porcelain jewellery, through to heavy sculptural work and everything in between. Deciding your direction is sometimes not that easy – when you first start, try everything, you will naturally gravitate to the style that you enjoy! The options and variations are endless and can get a wee bit overwhelming too! Check in with me before you start to ensure your ideas will work, what order you might do things, how you could achieve the look you are seeking and any other technical data required! Step Two – Making Clay is thixotropic. This means that as you work with it, the clay first gets sloppier and wetter, before is begins to dry in the atmosphere. For most things, you simply can’t do all parts of the project at once. An example of work order might look like: Get last weeks work out from the shelves Prepare clay for today’s work – roll your clay, prepare balls for throwing, make the first stage of a pinch pot) Clean up last week’s work and put it on the shelf for bisque firing Check that you have any glazing to do – and do enough of it that you will have time to finish your main project Do the next step of your next project – there might be a further step that can’t be complete immediately, in that case, wrap your work well and put onto the shelves. Letting your work rest for a while can really help keep your work clean and professional looking. Many things require bagging under plastic to keep it ready for work the next week – put your name on the outside of the bag so you can find your work easily. We have stickers and markers. Consider how you want to decorate your work – coloured slip can be applied at a fairly wet stage (remembering that it will make your work even wetter!). Trying to apply slip to dry clay won’t work! If you want to do sgraffito – you will need to keep the work leather hard (a state of dryness where you can still work the clay with a little effort and a little water and care). Step Three – Drying Most of the time your work can go into the rack uncovered to let it dry out for the following week. If you want to continue forming or shaping you will need to double bag your work – put your work on a suitable sized bat and put the bat in a bag so the base of the bag is under the bat, then put another bag over the top of the work and tuck the top of the bag under the bat. If you want to trim (or turn) your thrown work the following week, it should also be double bagged. If your work is large, delicate, or of uneven thicknesses, you should lightly cover your work for drying. When considering the drying process, bare in mind the weather, humidity and wind! The hotter and dryer, the faster things dry and work can dry unevenly in the shelves – this can lead to cracking – another time to lightly cover your work for drying. Step Four – Trimming and Cleaning Up Your work is dry! It is called greenware now and it is at it’s most fragile! Handle everything with two hands. I often refer to soft hands – keep everything gentle and with your fingers spread as much as possible. Try to not pick up things like plates too much, and always with both hands! Before your work can be bisque fired it should be “cleaned up”. You work won’t go into the kiln if it has sharp edges – when glazed, sharp edges turn into razor blades! Use a piece of fly wire to rub the work all over – this will scratch a little so be light handed. Use a knife or metal kidney to scrape any areas that require a bit more dynamic treatment than the fly wire offers! Finally, a very light wipe over with a slightly damp sponge can help soften and soothe all of your edges and dags! Trimming thrown work: If you are planning to trim (or turn) your thrown work (and you should be), make sure you bag it well – your work should be leather hard to almost dry for easiest trimming. Use this step to finish the work completely – use a metal kidney to polish the surface, or a slightly damp sponge to give a freshly thrown look. Wipe the sponge around the rim after trimming, and check the inside of the pot for dags! Trimming slip cast work: Usually I will trim the rims of your work on the wheel the following day to make that stage easier, however you will still need to check your work for lumps and bumps. Last but not least – check that your name is still clearly on the bottom of your work. Step Five – Bisque Firing When the work is completely dry it can go into the bisque kiln. The bisque kiln is fired to 1000°C. This process burns off the water in the clay as well as some of the chemically bound water. The structure of the clay is not altered that much at this temperature. Inside the bisque kiln, the work is stacked a little, small bowl inside a larger bowl and onto a heavy plate. Smaller items like decorations or drink coasters might get stacked several high. Consideration is paid to the weight of the stack and shape of the work. A bisque kiln can fire about one and a half times the amount of work that the glaze kiln can fire. The firing takes about 10 hours to complete the cycle and about two days to cool down. Once it has been emptied the work is placed in the glaze room ready for you to decorate! Step Six – Glazing Decorating your work with colour can be a lot of fun – and time consuming! There are three main options for surface treatment at this stage: Oxide Washes Underglazes Glazes Washes and underglazes do not “glaze” the work – It will still need a layer of glaze to fully seal the clay (washes don’t need glaze on surfaces not designed for food or liquid as they can gloss up a little on their own). Underglazes are stable colourants that turn out pretty much how they look in the jar. They can be mixed with each other to form other colours and can be used like water colours to paint onto your work. Mostly they should have a clear glaze on top to seal them. Oxides are a different species – the pink oxide (cobalt) wash turns out bright blue for instance. They don’t always need a glaze on top, and some glazes can change the colour of the wash! The glazes need no other “glaze” on top! Be careful of unknown glaze interactions – you can put any combination of glaze in a bowl or on a plate, but only a single glaze on the outside of any vertical surface! Glazes are a chemical reaction under heat. We don’t know the exact chemicals in the Mayco glazes we use. I can guess by the way they interact with each other, however, on the whole, you need to test every idea you have, and not run the test on a vertical surface! Simply put, glaze is a layer of glass like substance that bonds with the clay underneath. Clay is made of silica, alumina and water. Glaze is made of mostly silica. Silica has a melting point of 1700°C and we fire to 1240°C. The silica requires a “flux” to help it melt at the lower temperature. Fluxes can be all sorts of chemicals – a common one is calcium – calcium has a melting point of 2500°C, however, together they both melt at a much lower temperature! Colourants are metal oxides like cobalt (blue), chrome (green through black), copper (green, blue, even red!), manganese (black, purple and pink) iron (red brown), etc. Different chemicals in the glaze can have dramatic effects. for example, barium carbonate (which we don’t use) turns manganese bright pink! Other elements can turn manganese dioxide brown, blue, purple and reddish brown. Manganese dioxide is a flux in and of itself as well. So, glazes that get their black and purple colours, often interact with other glazes and RUN! Our mirror black is a good example – it mixes really well with many glazes because it fluxes them – causes them to melt faster. It will also bring out many beautiful colours in the glazes because it’s black colouring most definitely comes from manganese dioxide! Glaze chemistry is a whole subject on it’s own! We use commercial Mayco glazes on purpose – for their huge range of colour possibilities, stability, cool interactions, artistic freedom with the ability to easily brush the glazes on and ease of use. We currently have almost 50 glazes on hand! A major project is to test the interactions of all glazes with each other. That is 2,500 test tiles!!!! I’m going to make the wall behind the wheels the feature wall of pretty colours! Step Seven – Glaze (Gloss or sometimes called “Glost”) Firing Most of the time this is the final stage of making your creation (but not always!) The glaze kiln goes to 1240°C. This is called cone 6, or midrange. It is the low end of stoneware temperatures. Stoneware clays and glazes are typically fired at cone 8 – 10, that is 1260 – 1290°C. The energy requirement to go from 1240°C to 1280°C is almost a 30% more! Our clay is formulated to vitrify (mature, turn “glass-like”) at 1240°, as are our glazes. A glaze kiln take around 12 hours to reach temperature and two to three days to cool down. Sometimes a third firing process is required – this is for decoration that is added to work after the glaze firing. For example – adding precious metals and lustres. this firing temperature is usually around 600 – 800°C depending upon the techniques being used. There are many students interested in gold and silver trims – we will be doing this third type of firing soon! After firing your work will be in the student finished work shelves. Remember to pay for it before you head out the door! There is a small extra charge for using porcelain clay (it’s more than twice the price of regular clay), and for any third firing process! Once your work has been fired it can not turn back into clay for millennia – so don’t fire it if you don’t like it! Put it in the bucket for recycling. https://firebirdstudios.com.au/the-process-of-making-pottery/ This bowl is an example of kitchenware used in the 19th century and still in use today.Bowl white ceramic plain that has two sets of edging around lip. Inside bowl has plaster designed to look like cooking mixture.flagstaff hill, warrnambool, shipwrecked-coast, flagstaff-hill, flagstaff-hill-maritime-museum, maritime-museum, shipwreck-coast, flagstaff-hill-maritime-village, kitchen equipment, ceramic -
 Flagstaff Hill Maritime Museum and Village
Domestic object - Bowl, J & G Meakin, Late 19th or early 20th Century
The Process of Making Pottery Decorating, Firing, Glazing, Making, Technical There is a rhythm and flow to clay. It can’t be done all at once! Even the making process! It can take weeks to get everything done, especially if you can only work on your pottery once a week! Even though we have three hour classes, it’s often just not enough time! Here is an overview of some of the processes so you have a bit more grasp on some of the technical stuff! Step One – Design There are SO many ideas out there for making stuff in clay! From delicate porcelain jewellery, through to heavy sculptural work and everything in between. Deciding your direction is sometimes not that easy – when you first start, try everything, you will naturally gravitate to the style that you enjoy! The options and variations are endless and can get a wee bit overwhelming too! Check in with me before you start to ensure your ideas will work, what order you might do things, how you could achieve the look you are seeking and any other technical data required! Step Two – Making Clay is thixotropic. This means that as you work with it, the clay first gets sloppier and wetter, before is begins to dry in the atmosphere. For most things, you simply can’t do all parts of the project at once. An example of work order might look like: Get last weeks work out from the shelves Prepare clay for today’s work – roll your clay, prepare balls for throwing, make the first stage of a pinch pot) Clean up last week’s work and put it on the shelf for bisque firing Check that you have any glazing to do – and do enough of it that you will have time to finish your main project Do the next step of your next project – there might be a further step that can’t be complete immediately, in that case, wrap your work well and put onto the shelves. Letting your work rest for a while can really help keep your work clean and professional looking. Many things require bagging under plastic to keep it ready for work the next week – put your name on the outside of the bag so you can find your work easily. We have stickers and markers. Consider how you want to decorate your work – coloured slip can be applied at a fairly wet stage (remembering that it will make your work even wetter!). Trying to apply slip to dry clay won’t work! If you want to do sgraffito – you will need to keep the work leather hard (a state of dryness where you can still work the clay with a little effort and a little water and care). Step Three – Drying Most of the time your work can go into the rack uncovered to let it dry out for the following week. If you want to continue forming or shaping you will need to double bag your work – put your work on a suitable sized bat and put the bat in a bag so the base of the bag is under the bat, then put another bag over the top of the work and tuck the top of the bag under the bat. If you want to trim (or turn) your thrown work the following week, it should also be double bagged. If your work is large, delicate, or of uneven thicknesses, you should lightly cover your work for drying. When considering the drying process, bare in mind the weather, humidity and wind! The hotter and dryer, the faster things dry and work can dry unevenly in the shelves – this can lead to cracking – another time to lightly cover your work for drying. Step Four – Trimming and Cleaning Up Your work is dry! It is called greenware now and it is at it’s most fragile! Handle everything with two hands. I often refer to soft hands – keep everything gentle and with your fingers spread as much as possible. Try to not pick up things like plates too much, and always with both hands! Before your work can be bisque fired it should be “cleaned up”. You work won’t go into the kiln if it has sharp edges – when glazed, sharp edges turn into razor blades! Use a piece of fly wire to rub the work all over – this will scratch a little so be light handed. Use a knife or metal kidney to scrape any areas that require a bit more dynamic treatment than the fly wire offers! Finally, a very light wipe over with a slightly damp sponge can help soften and soothe all of your edges and dags! Trimming thrown work: If you are planning to trim (or turn) your thrown work (and you should be), make sure you bag it well – your work should be leather hard to almost dry for easiest trimming. Use this step to finish the work completely – use a metal kidney to polish the surface, or a slightly damp sponge to give a freshly thrown look. Wipe the sponge around the rim after trimming, and check the inside of the pot for dags! Trimming slip cast work: Usually I will trim the rims of your work on the wheel the following day to make that stage easier, however you will still need to check your work for lumps and bumps. Last but not least – check that your name is still clearly on the bottom of your work. Step Five – Bisque Firing When the work is completely dry it can go into the bisque kiln. The bisque kiln is fired to 1000°C. This process burns off the water in the clay as well as some of the chemically bound water. The structure of the clay is not altered that much at this temperature. Inside the bisque kiln, the work is stacked a little, small bowl inside a larger bowl and onto a heavy plate. Smaller items like decorations or drink coasters might get stacked several high. Consideration is paid to the weight of the stack and shape of the work. A bisque kiln can fire about one and a half times the amount of work that the glaze kiln can fire. The firing takes about 10 hours to complete the cycle and about two days to cool down. Once it has been emptied the work is placed in the glaze room ready for you to decorate! Step Six – Glazing Decorating your work with colour can be a lot of fun – and time consuming! There are three main options for surface treatment at this stage: Oxide Washes Underglazes Glazes Washes and underglazes do not “glaze” the work – It will still need a layer of glaze to fully seal the clay (washes don’t need glaze on surfaces not designed for food or liquid as they can gloss up a little on their own). Underglazes are stable colourants that turn out pretty much how they look in the jar. They can be mixed with each other to form other colours and can be used like water colours to paint onto your work. Mostly they should have a clear glaze on top to seal them. Oxides are a different species – the pink oxide (cobalt) wash turns out bright blue for instance. They don’t always need a glaze on top, and some glazes can change the colour of the wash! The glazes need no other “glaze” on top! Be careful of unknown glaze interactions – you can put any combination of glaze in a bowl or on a plate, but only a single glaze on the outside of any vertical surface! Glazes are a chemical reaction under heat. We don’t know the exact chemicals in the Mayco glazes we use. I can guess by the way they interact with each other, however, on the whole, you need to test every idea you have, and not run the test on a vertical surface! Simply put, glaze is a layer of glass like substance that bonds with the clay underneath. Clay is made of silica, alumina and water. Glaze is made of mostly silica. Silica has a melting point of 1700°C and we fire to 1240°C. The silica requires a “flux” to help it melt at the lower temperature. Fluxes can be all sorts of chemicals – a common one is calcium – calcium has a melting point of 2500°C, however, together they both melt at a much lower temperature! Colourants are metal oxides like cobalt (blue), chrome (green through black), copper (green, blue, even red!), manganese (black, purple and pink) iron (red brown), etc. Different chemicals in the glaze can have dramatic effects. for example, barium carbonate (which we don’t use) turns manganese bright pink! Other elements can turn manganese dioxide brown, blue, purple and reddish brown. Manganese dioxide is a flux in and of itself as well. So, glazes that get their black and purple colours, often interact with other glazes and RUN! Our mirror black is a good example – it mixes really well with many glazes because it fluxes them – causes them to melt faster. It will also bring out many beautiful colours in the glazes because it’s black colouring most definitely comes from manganese dioxide! Glaze chemistry is a whole subject on it’s own! We use commercial Mayco glazes on purpose – for their huge range of colour possibilities, stability, cool interactions, artistic freedom with the ability to easily brush the glazes on and ease of use. We currently have almost 50 glazes on hand! A major project is to test the interactions of all glazes with each other. That is 2,500 test tiles!!!! I’m going to make the wall behind the wheels the feature wall of pretty colours! Step Seven – Glaze (Gloss or sometimes called “Glost”) Firing Most of the time this is the final stage of making your creation (but not always!) The glaze kiln goes to 1240°C. This is called cone 6, or midrange. It is the low end of stoneware temperatures. Stoneware clays and glazes are typically fired at cone 8 – 10, that is 1260 – 1290°C. The energy requirement to go from 1240°C to 1280°C is almost a 30% more! Our clay is formulated to vitrify (mature, turn “glass-like”) at 1240°, as are our glazes. A glaze kiln take around 12 hours to reach temperature and two to three days to cool down. Sometimes a third firing process is required – this is for decoration that is added to work after the glaze firing. For example – adding precious metals and lustres. this firing temperature is usually around 600 – 800°C depending upon the techniques being used. There are many students interested in gold and silver trims – we will be doing this third type of firing soon! After firing your work will be in the student finished work shelves. Remember to pay for it before you head out the door! There is a small extra charge for using porcelain clay (it’s more than twice the price of regular clay), and for any third firing process! Once your work has been fired it can not turn back into clay for millennia – so don’t fire it if you don’t like it! Put it in the bucket for recycling. https://firebirdstudios.com.au/the-process-of-making-pottery/This bowl was made by renowned pottery company J & G Meakin of England. The firm was established in the mid-1800's. The bowl is an example of kitchenware used in the 19th century and still in use today.Bowl; white ceramic, round and tapering inwards towards base. Made by J and G Meakin England.On base, 'Ironstone China Reg SOL 391413' with symbolflagstaff hill, flagstaff hill maritime museum and village, warrnambool, maritime museum, maritime village, great ocean road, shipwreck coast, mixing bowl, food preparation, j & g meakin, pottery, stoke-on-trent, kitchen equipment, ceramic -
 Flagstaff Hill Maritime Museum and Village
Domestic object - Plate
The Process of Making Pottery Decorating, Firing, Glazing, Making, Technical There is a rhythm and flow to clay. It can’t be done all at once! Even the making process! It can take weeks to get everything done, especially if you can only work on your pottery once a week! Even though we have three hour classes, it’s often just not enough time! Here is an overview of some of the processes so you have a bit more grasp on some of the technical stuff! Step One – Design There are SO many ideas out there for making stuff in clay! From delicate porcelain jewellery, through to heavy sculptural work and everything in between. Deciding your direction is sometimes not that easy – when you first start, try everything, you will naturally gravitate to the style that you enjoy! The options and variations are endless and can get a wee bit overwhelming too! Check in with me before you start to ensure your ideas will work, what order you might do things, how you could achieve the look you are seeking and any other technical data required! Step Two – Making Clay is thixotropic. This means that as you work with it, the clay first gets sloppier and wetter, before is begins to dry in the atmosphere. For most things, you simply can’t do all parts of the project at once. An example of work order might look like: Get last weeks work out from the shelves Prepare clay for today’s work – roll your clay, prepare balls for throwing, make the first stage of a pinch pot) Clean up last week’s work and put it on the shelf for bisque firing Check that you have any glazing to do – and do enough of it that you will have time to finish your main project Do the next step of your next project – there might be a further step that can’t be complete immediately, in that case, wrap your work well and put onto the shelves. Letting your work rest for a while can really help keep your work clean and professional looking. Many things require bagging under plastic to keep it ready for work the next week – put your name on the outside of the bag so you can find your work easily. We have stickers and markers. Consider how you want to decorate your work – coloured slip can be applied at a fairly wet stage (remembering that it will make your work even wetter!). Trying to apply slip to dry clay won’t work! If you want to do sgraffito – you will need to keep the work leather hard (a state of dryness where you can still work the clay with a little effort and a little water and care). Step Three – Drying Most of the time your work can go into the rack uncovered to let it dry out for the following week. If you want to continue forming or shaping you will need to double bag your work – put your work on a suitable sized bat and put the bat in a bag so the base of the bag is under the bat, then put another bag over the top of the work and tuck the top of the bag under the bat. If you want to trim (or turn) your thrown work the following week, it should also be double bagged. If your work is large, delicate, or of uneven thicknesses, you should lightly cover your work for drying. When considering the drying process, bare in mind the weather, humidity and wind! The hotter and dryer, the faster things dry and work can dry unevenly in the shelves – this can lead to cracking – another time to lightly cover your work for drying. Step Four – Trimming and Cleaning Up Your work is dry! It is called greenware now and it is at it’s most fragile! Handle everything with two hands. I often refer to soft hands – keep everything gentle and with your fingers spread as much as possible. Try to not pick up things like plates too much, and always with both hands! Before your work can be bisque fired it should be “cleaned up”. You work won’t go into the kiln if it has sharp edges – when glazed, sharp edges turn into razor blades! Use a piece of fly wire to rub the work all over – this will scratch a little so be light handed. Use a knife or metal kidney to scrape any areas that require a bit more dynamic treatment than the fly wire offers! Finally, a very light wipe over with a slightly damp sponge can help soften and soothe all of your edges and dags! Trimming thrown work: If you are planning to trim (or turn) your thrown work (and you should be), make sure you bag it well – your work should be leather hard to almost dry for easiest trimming. Use this step to finish the work completely – use a metal kidney to polish the surface, or a slightly damp sponge to give a freshly thrown look. Wipe the sponge around the rim after trimming, and check the inside of the pot for dags! Trimming slip cast work: Usually I will trim the rims of your work on the wheel the following day to make that stage easier, however you will still need to check your work for lumps and bumps. Last but not least – check that your name is still clearly on the bottom of your work. Step Five – Bisque Firing When the work is completely dry it can go into the bisque kiln. The bisque kiln is fired to 1000°C. This process burns off the water in the clay as well as some of the chemically bound water. The structure of the clay is not altered that much at this temperature. Inside the bisque kiln, the work is stacked a little, small bowl inside a larger bowl and onto a heavy plate. Smaller items like decorations or drink coasters might get stacked several high. Consideration is paid to the weight of the stack and shape of the work. A bisque kiln can fire about one and a half times the amount of work that the glaze kiln can fire. The firing takes about 10 hours to complete the cycle and about two days to cool down. Once it has been emptied the work is placed in the glaze room ready for you to decorate! Step Six – Glazing Decorating your work with colour can be a lot of fun – and time consuming! There are three main options for surface treatment at this stage: Oxide Washes Underglazes Glazes Washes and underglazes do not “glaze” the work – It will still need a layer of glaze to fully seal the clay (washes don’t need glaze on surfaces not designed for food or liquid as they can gloss up a little on their own). Underglazes are stable colourants that turn out pretty much how they look in the jar. They can be mixed with each other to form other colours and can be used like water colours to paint onto your work. Mostly they should have a clear glaze on top to seal them. Oxides are a different species – the pink oxide (cobalt) wash turns out bright blue for instance. They don’t always need a glaze on top, and some glazes can change the colour of the wash! The glazes need no other “glaze” on top! Be careful of unknown glaze interactions – you can put any combination of glaze in a bowl or on a plate, but only a single glaze on the outside of any vertical surface! Glazes are a chemical reaction under heat. We don’t know the exact chemicals in the Mayco glazes we use. I can guess by the way they interact with each other, however, on the whole, you need to test every idea you have, and not run the test on a vertical surface! Simply put, glaze is a layer of glass like substance that bonds with the clay underneath. Clay is made of silica, alumina and water. Glaze is made of mostly silica. Silica has a melting point of 1700°C and we fire to 1240°C. The silica requires a “flux” to help it melt at the lower temperature. Fluxes can be all sorts of chemicals – a common one is calcium – calcium has a melting point of 2500°C, however, together they both melt at a much lower temperature! Colourants are metal oxides like cobalt (blue), chrome (green through black), copper (green, blue, even red!), manganese (black, purple and pink) iron (red brown), etc. Different chemicals in the glaze can have dramatic effects. for example, barium carbonate (which we don’t use) turns manganese bright pink! Other elements can turn manganese dioxide brown, blue, purple and reddish brown. Manganese dioxide is a flux in and of itself as well. So, glazes that get their black and purple colours, often interact with other glazes and RUN! Our mirror black is a good example – it mixes really well with many glazes because it fluxes them – causes them to melt faster. It will also bring out many beautiful colours in the glazes because it’s black colouring most definitely comes from manganese dioxide! Glaze chemistry is a whole subject on it’s own! We use commercial Mayco glazes on purpose – for their huge range of colour possibilities, stability, cool interactions, artistic freedom with the ability to easily brush the glazes on and ease of use. We currently have almost 50 glazes on hand! A major project is to test the interactions of all glazes with each other. That is 2,500 test tiles!!!! I’m going to make the wall behind the wheels the feature wall of pretty colours! Step Seven – Glaze (Gloss or sometimes called “Glost”) Firing Most of the time this is the final stage of making your creation (but not always!) The glaze kiln goes to 1240°C. This is called cone 6, or midrange. It is the low end of stoneware temperatures. Stoneware clays and glazes are typically fired at cone 8 – 10, that is 1260 – 1290°C. The energy requirement to go from 1240°C to 1280°C is almost a 30% more! Our clay is formulated to vitrify (mature, turn “glass-like”) at 1240°, as are our glazes. A glaze kiln take around 12 hours to reach temperature and two to three days to cool down. Sometimes a third firing process is required – this is for decoration that is added to work after the glaze firing. For example – adding precious metals and lustres. this firing temperature is usually around 600 – 800°C depending upon the techniques being used. There are many students interested in gold and silver trims – we will be doing this third type of firing soon! After firing your work will be in the student finished work shelves. Remember to pay for it before you head out the door! There is a small extra charge for using porcelain clay (it’s more than twice the price of regular clay), and for any third firing process! Once your work has been fired it can not turn back into clay for millennia – so don’t fire it if you don’t like it! Put it in the bucket for recycling. https://firebirdstudios.com.au/the-process-of-making-pottery/Ceramics have evolved over thousands of years.White earthenware dinner plate. Crazing evident all over.Backstamped ‘Made in England S LTD’flagstaff hill, warrnambool, shipwrecked-coast, flagstaff-hill, flagstaff-hill-maritime-museum, maritime-museum, shipwreck-coast, flagstaff-hill-maritime-village, ceramics, tableware -
 Flagstaff Hill Maritime Museum and Village
Domestic object - Plate, Johnson Bros
The Process of Making Pottery Decorating, Firing, Glazing, Making, Technical There is a rhythm and flow to clay. It can’t be done all at once! Even the making process! It can take weeks to get everything done, especially if you can only work on your pottery once a week! Even though we have three hour classes, it’s often just not enough time! Here is an overview of some of the processes so you have a bit more grasp on some of the technical stuff! Step One – Design There are SO many ideas out there for making stuff in clay! From delicate porcelain jewellery, through to heavy sculptural work and everything in between. Deciding your direction is sometimes not that easy – when you first start, try everything, you will naturally gravitate to the style that you enjoy! The options and variations are endless and can get a wee bit overwhelming too! Check in with me before you start to ensure your ideas will work, what order you might do things, how you could achieve the look you are seeking and any other technical data required! Step Two – Making Clay is thixotropic. This means that as you work with it, the clay first gets sloppier and wetter, before is begins to dry in the atmosphere. For most things, you simply can’t do all parts of the project at once. An example of work order might look like: Get last weeks work out from the shelves Prepare clay for today’s work – roll your clay, prepare balls for throwing, make the first stage of a pinch pot) Clean up last week’s work and put it on the shelf for bisque firing Check that you have any glazing to do – and do enough of it that you will have time to finish your main project Do the next step of your next project – there might be a further step that can’t be complete immediately, in that case, wrap your work well and put onto the shelves. Letting your work rest for a while can really help keep your work clean and professional looking. Many things require bagging under plastic to keep it ready for work the next week – put your name on the outside of the bag so you can find your work easily. We have stickers and markers. Consider how you want to decorate your work – coloured slip can be applied at a fairly wet stage (remembering that it will make your work even wetter!). Trying to apply slip to dry clay won’t work! If you want to do sgraffito – you will need to keep the work leather hard (a state of dryness where you can still work the clay with a little effort and a little water and care). Step Three – Drying Most of the time your work can go into the rack uncovered to let it dry out for the following week. If you want to continue forming or shaping you will need to double bag your work – put your work on a suitable sized bat and put the bat in a bag so the base of the bag is under the bat, then put another bag over the top of the work and tuck the top of the bag under the bat. If you want to trim (or turn) your thrown work the following week, it should also be double bagged. If your work is large, delicate, or of uneven thicknesses, you should lightly cover your work for drying. When considering the drying process, bare in mind the weather, humidity and wind! The hotter and dryer, the faster things dry and work can dry unevenly in the shelves – this can lead to cracking – another time to lightly cover your work for drying. Step Four – Trimming and Cleaning Up Your work is dry! It is called greenware now and it is at it’s most fragile! Handle everything with two hands. I often refer to soft hands – keep everything gentle and with your fingers spread as much as possible. Try to not pick up things like plates too much, and always with both hands! Before your work can be bisque fired it should be “cleaned up”. You work won’t go into the kiln if it has sharp edges – when glazed, sharp edges turn into razor blades! Use a piece of fly wire to rub the work all over – this will scratch a little so be light handed. Use a knife or metal kidney to scrape any areas that require a bit more dynamic treatment than the fly wire offers! Finally, a very light wipe over with a slightly damp sponge can help soften and soothe all of your edges and dags! Trimming thrown work: If you are planning to trim (or turn) your thrown work (and you should be), make sure you bag it well – your work should be leather hard to almost dry for easiest trimming. Use this step to finish the work completely – use a metal kidney to polish the surface, or a slightly damp sponge to give a freshly thrown look. Wipe the sponge around the rim after trimming, and check the inside of the pot for dags! Trimming slip cast work: Usually I will trim the rims of your work on the wheel the following day to make that stage easier, however you will still need to check your work for lumps and bumps. Last but not least – check that your name is still clearly on the bottom of your work. Step Five – Bisque Firing When the work is completely dry it can go into the bisque kiln. The bisque kiln is fired to 1000°C. This process burns off the water in the clay as well as some of the chemically bound water. The structure of the clay is not altered that much at this temperature. Inside the bisque kiln, the work is stacked a little, small bowl inside a larger bowl and onto a heavy plate. Smaller items like decorations or drink coasters might get stacked several high. Consideration is paid to the weight of the stack and shape of the work. A bisque kiln can fire about one and a half times the amount of work that the glaze kiln can fire. The firing takes about 10 hours to complete the cycle and about two days to cool down. Once it has been emptied the work is placed in the glaze room ready for you to decorate! Step Six – Glazing Decorating your work with colour can be a lot of fun – and time consuming! There are three main options for surface treatment at this stage: Oxide Washes Underglazes Glazes Washes and underglazes do not “glaze” the work – It will still need a layer of glaze to fully seal the clay (washes don’t need glaze on surfaces not designed for food or liquid as they can gloss up a little on their own). Underglazes are stable colourants that turn out pretty much how they look in the jar. They can be mixed with each other to form other colours and can be used like water colours to paint onto your work. Mostly they should have a clear glaze on top to seal them. Oxides are a different species – the pink oxide (cobalt) wash turns out bright blue for instance. They don’t always need a glaze on top, and some glazes can change the colour of the wash! The glazes need no other “glaze” on top! Be careful of unknown glaze interactions – you can put any combination of glaze in a bowl or on a plate, but only a single glaze on the outside of any vertical surface! Glazes are a chemical reaction under heat. We don’t know the exact chemicals in the Mayco glazes we use. I can guess by the way they interact with each other, however, on the whole, you need to test every idea you have, and not run the test on a vertical surface! Simply put, glaze is a layer of glass like substance that bonds with the clay underneath. Clay is made of silica, alumina and water. Glaze is made of mostly silica. Silica has a melting point of 1700°C and we fire to 1240°C. The silica requires a “flux” to help it melt at the lower temperature. Fluxes can be all sorts of chemicals – a common one is calcium – calcium has a melting point of 2500°C, however, together they both melt at a much lower temperature! Colourants are metal oxides like cobalt (blue), chrome (green through black), copper (green, blue, even red!), manganese (black, purple and pink) iron (red brown), etc. Different chemicals in the glaze can have dramatic effects. for example, barium carbonate (which we don’t use) turns manganese bright pink! Other elements can turn manganese dioxide brown, blue, purple and reddish brown. Manganese dioxide is a flux in and of itself as well. So, glazes that get their black and purple colours, often interact with other glazes and RUN! Our mirror black is a good example – it mixes really well with many glazes because it fluxes them – causes them to melt faster. It will also bring out many beautiful colours in the glazes because it’s black colouring most definitely comes from manganese dioxide! Glaze chemistry is a whole subject on it’s own! We use commercial Mayco glazes on purpose – for their huge range of colour possibilities, stability, cool interactions, artistic freedom with the ability to easily brush the glazes on and ease of use. We currently have almost 50 glazes on hand! A major project is to test the interactions of all glazes with each other. That is 2,500 test tiles!!!! I’m going to make the wall behind the wheels the feature wall of pretty colours! Step Seven – Glaze (Gloss or sometimes called “Glost”) Firing Most of the time this is the final stage of making your creation (but not always!) The glaze kiln goes to 1240°C. This is called cone 6, or midrange. It is the low end of stoneware temperatures. Stoneware clays and glazes are typically fired at cone 8 – 10, that is 1260 – 1290°C. The energy requirement to go from 1240°C to 1280°C is almost a 30% more! Our clay is formulated to vitrify (mature, turn “glass-like”) at 1240°, as are our glazes. A glaze kiln take around 12 hours to reach temperature and two to three days to cool down. Sometimes a third firing process is required – this is for decoration that is added to work after the glaze firing. For example – adding precious metals and lustres. this firing temperature is usually around 600 – 800°C depending upon the techniques being used. There are many students interested in gold and silver trims – we will be doing this third type of firing soon! After firing your work will be in the student finished work shelves. Remember to pay for it before you head out the door! There is a small extra charge for using porcelain clay (it’s more than twice the price of regular clay), and for any third firing process! Once your work has been fired it can not turn back into clay for millennia – so don’t fire it if you don’t like it! Put it in the bucket for recycling. https://firebirdstudios.com.au/the-process-of-making-pottery/Ceramics have evolved over thousands of years.A white earthenware side plate with a gadroon edge. Has water marks and chips on front.‘Johnson Bros England Reg No 15587’flagstaff hill, warrnambool, shipwrecked-coast, flagstaff-hill, flagstaff-hill-maritime-museum, maritime-museum, shipwreck-coast, flagstaff-hill-maritime-village, johnson bros, ceramics, tableware -
 Flagstaff Hill Maritime Museum and Village
Domestic object - Plate, Alfred Meakin
The Process of Making Pottery Decorating, Firing, Glazing, Making, Technical There is a rhythm and flow to clay. It can’t be done all at once! Even the making process! It can take weeks to get everything done, especially if you can only work on your pottery once a week! Even though we have three hour classes, it’s often just not enough time! Here is an overview of some of the processes so you have a bit more grasp on some of the technical stuff! Step One – Design There are SO many ideas out there for making stuff in clay! From delicate porcelain jewellery, through to heavy sculptural work and everything in between. Deciding your direction is sometimes not that easy – when you first start, try everything, you will naturally gravitate to the style that you enjoy! The options and variations are endless and can get a wee bit overwhelming too! Check in with me before you start to ensure your ideas will work, what order you might do things, how you could achieve the look you are seeking and any other technical data required! Step Two – Making Clay is thixotropic. This means that as you work with it, the clay first gets sloppier and wetter, before is begins to dry in the atmosphere. For most things, you simply can’t do all parts of the project at once. An example of work order might look like: Get last weeks work out from the shelves Prepare clay for today’s work – roll your clay, prepare balls for throwing, make the first stage of a pinch pot) Clean up last week’s work and put it on the shelf for bisque firing Check that you have any glazing to do – and do enough of it that you will have time to finish your main project Do the next step of your next project – there might be a further step that can’t be complete immediately, in that case, wrap your work well and put onto the shelves. Letting your work rest for a while can really help keep your work clean and professional looking. Many things require bagging under plastic to keep it ready for work the next week – put your name on the outside of the bag so you can find your work easily. We have stickers and markers. Consider how you want to decorate your work – coloured slip can be applied at a fairly wet stage (remembering that it will make your work even wetter!). Trying to apply slip to dry clay won’t work! If you want to do sgraffito – you will need to keep the work leather hard (a state of dryness where you can still work the clay with a little effort and a little water and care). Step Three – Drying Most of the time your work can go into the rack uncovered to let it dry out for the following week. If you want to continue forming or shaping you will need to double bag your work – put your work on a suitable sized bat and put the bat in a bag so the base of the bag is under the bat, then put another bag over the top of the work and tuck the top of the bag under the bat. If you want to trim (or turn) your thrown work the following week, it should also be double bagged. If your work is large, delicate, or of uneven thicknesses, you should lightly cover your work for drying. When considering the drying process, bare in mind the weather, humidity and wind! The hotter and dryer, the faster things dry and work can dry unevenly in the shelves – this can lead to cracking – another time to lightly cover your work for drying. Step Four – Trimming and Cleaning Up Your work is dry! It is called greenware now and it is at it’s most fragile! Handle everything with two hands. I often refer to soft hands – keep everything gentle and with your fingers spread as much as possible. Try to not pick up things like plates too much, and always with both hands! Before your work can be bisque fired it should be “cleaned up”. You work won’t go into the kiln if it has sharp edges – when glazed, sharp edges turn into razor blades! Use a piece of fly wire to rub the work all over – this will scratch a little so be light handed. Use a knife or metal kidney to scrape any areas that require a bit more dynamic treatment than the fly wire offers! Finally, a very light wipe over with a slightly damp sponge can help soften and soothe all of your edges and dags! Trimming thrown work: If you are planning to trim (or turn) your thrown work (and you should be), make sure you bag it well – your work should be leather hard to almost dry for easiest trimming. Use this step to finish the work completely – use a metal kidney to polish the surface, or a slightly damp sponge to give a freshly thrown look. Wipe the sponge around the rim after trimming, and check the inside of the pot for dags! Trimming slip cast work: Usually I will trim the rims of your work on the wheel the following day to make that stage easier, however you will still need to check your work for lumps and bumps. Last but not least – check that your name is still clearly on the bottom of your work. Step Five – Bisque Firing When the work is completely dry it can go into the bisque kiln. The bisque kiln is fired to 1000°C. This process burns off the water in the clay as well as some of the chemically bound water. The structure of the clay is not altered that much at this temperature. Inside the bisque kiln, the work is stacked a little, small bowl inside a larger bowl and onto a heavy plate. Smaller items like decorations or drink coasters might get stacked several high. Consideration is paid to the weight of the stack and shape of the work. A bisque kiln can fire about one and a half times the amount of work that the glaze kiln can fire. The firing takes about 10 hours to complete the cycle and about two days to cool down. Once it has been emptied the work is placed in the glaze room ready for you to decorate! Step Six – Glazing Decorating your work with colour can be a lot of fun – and time consuming! There are three main options for surface treatment at this stage: Oxide Washes Underglazes Glazes Washes and underglazes do not “glaze” the work – It will still need a layer of glaze to fully seal the clay (washes don’t need glaze on surfaces not designed for food or liquid as they can gloss up a little on their own). Underglazes are stable colourants that turn out pretty much how they look in the jar. They can be mixed with each other to form other colours and can be used like water colours to paint onto your work. Mostly they should have a clear glaze on top to seal them. Oxides are a different species – the pink oxide (cobalt) wash turns out bright blue for instance. They don’t always need a glaze on top, and some glazes can change the colour of the wash! The glazes need no other “glaze” on top! Be careful of unknown glaze interactions – you can put any combination of glaze in a bowl or on a plate, but only a single glaze on the outside of any vertical surface! Glazes are a chemical reaction under heat. We don’t know the exact chemicals in the Mayco glazes we use. I can guess by the way they interact with each other, however, on the whole, you need to test every idea you have, and not run the test on a vertical surface! Simply put, glaze is a layer of glass like substance that bonds with the clay underneath. Clay is made of silica, alumina and water. Glaze is made of mostly silica. Silica has a melting point of 1700°C and we fire to 1240°C. The silica requires a “flux” to help it melt at the lower temperature. Fluxes can be all sorts of chemicals – a common one is calcium – calcium has a melting point of 2500°C, however, together they both melt at a much lower temperature! Colourants are metal oxides like cobalt (blue), chrome (green through black), copper (green, blue, even red!), manganese (black, purple and pink) iron (red brown), etc. Different chemicals in the glaze can have dramatic effects. for example, barium carbonate (which we don’t use) turns manganese bright pink! Other elements can turn manganese dioxide brown, blue, purple and reddish brown. Manganese dioxide is a flux in and of itself as well. So, glazes that get their black and purple colours, often interact with other glazes and RUN! Our mirror black is a good example – it mixes really well with many glazes because it fluxes them – causes them to melt faster. It will also bring out many beautiful colours in the glazes because it’s black colouring most definitely comes from manganese dioxide! Glaze chemistry is a whole subject on it’s own! We use commercial Mayco glazes on purpose – for their huge range of colour possibilities, stability, cool interactions, artistic freedom with the ability to easily brush the glazes on and ease of use. We currently have almost 50 glazes on hand! A major project is to test the interactions of all glazes with each other. That is 2,500 test tiles!!!! I’m going to make the wall behind the wheels the feature wall of pretty colours! Step Seven – Glaze (Gloss or sometimes called “Glost”) Firing Most of the time this is the final stage of making your creation (but not always!) The glaze kiln goes to 1240°C. This is called cone 6, or midrange. It is the low end of stoneware temperatures. Stoneware clays and glazes are typically fired at cone 8 – 10, that is 1260 – 1290°C. The energy requirement to go from 1240°C to 1280°C is almost a 30% more! Our clay is formulated to vitrify (mature, turn “glass-like”) at 1240°, as are our glazes. A glaze kiln take around 12 hours to reach temperature and two to three days to cool down. Sometimes a third firing process is required – this is for decoration that is added to work after the glaze firing. For example – adding precious metals and lustres. this firing temperature is usually around 600 – 800°C depending upon the techniques being used. There are many students interested in gold and silver trims – we will be doing this third type of firing soon! After firing your work will be in the student finished work shelves. Remember to pay for it before you head out the door! There is a small extra charge for using porcelain clay (it’s more than twice the price of regular clay), and for any third firing process! Once your work has been fired it can not turn back into clay for millennia – so don’t fire it if you don’t like it! Put it in the bucket for recycling. https://firebirdstudios.com.au/the-process-of-making-pottery/Ceramics have evolved over thousands of years.Earthenware dessert plate, cream colour. Made by Alfred Meakin, England. Backstamped ‘Alfred Meakin England’. flagstaff hill, warrnambool, shipwrecked-coast, flagstaff-hill, flagstaff-hill-maritime-museum, maritime-museum, shipwreck-coast, flagstaff-hill-maritime-village, alfred meakin, ceramics, earthenware, kitchenware -
 Flagstaff Hill Maritime Museum and Village
Domestic object - Jug
The Process of Making Pottery Decorating, Firing, Glazing, Making, Technical There is a rhythm and flow to clay. It can’t be done all at once! Even the making process! It can take weeks to get everything done, especially if you can only work on your pottery once a week! Even though we have three hour classes, it’s often just not enough time! Here is an overview of some of the processes so you have a bit more grasp on some of the technical stuff! Step One – Design There are SO many ideas out there for making stuff in clay! From delicate porcelain jewellery, through to heavy sculptural work and everything in between. Deciding your direction is sometimes not that easy – when you first start, try everything, you will naturally gravitate to the style that you enjoy! The options and variations are endless and can get a wee bit overwhelming too! Check in with me before you start to ensure your ideas will work, what order you might do things, how you could achieve the look you are seeking and any other technical data required! Step Two – Making Clay is thixotropic. This means that as you work with it, the clay first gets sloppier and wetter, before is begins to dry in the atmosphere. For most things, you simply can’t do all parts of the project at once. An example of work order might look like: Get last weeks work out from the shelves Prepare clay for today’s work – roll your clay, prepare balls for throwing, make the first stage of a pinch pot) Clean up last week’s work and put it on the shelf for bisque firing Check that you have any glazing to do – and do enough of it that you will have time to finish your main project Do the next step of your next project – there might be a further step that can’t be complete immediately, in that case, wrap your work well and put onto the shelves. Letting your work rest for a while can really help keep your work clean and professional looking. Many things require bagging under plastic to keep it ready for work the next week – put your name on the outside of the bag so you can find your work easily. We have stickers and markers. Consider how you want to decorate your work – coloured slip can be applied at a fairly wet stage (remembering that it will make your work even wetter!). Trying to apply slip to dry clay won’t work! If you want to do sgraffito – you will need to keep the work leather hard (a state of dryness where you can still work the clay with a little effort and a little water and care). Step Three – Drying Most of the time your work can go into the rack uncovered to let it dry out for the following week. If you want to continue forming or shaping you will need to double bag your work – put your work on a suitable sized bat and put the bat in a bag so the base of the bag is under the bat, then put another bag over the top of the work and tuck the top of the bag under the bat. If you want to trim (or turn) your thrown work the following week, it should also be double bagged. If your work is large, delicate, or of uneven thicknesses, you should lightly cover your work for drying. When considering the drying process, bare in mind the weather, humidity and wind! The hotter and dryer, the faster things dry and work can dry unevenly in the shelves – this can lead to cracking – another time to lightly cover your work for drying. Step Four – Trimming and Cleaning Up Your work is dry! It is called greenware now and it is at it’s most fragile! Handle everything with two hands. I often refer to soft hands – keep everything gentle and with your fingers spread as much as possible. Try to not pick up things like plates too much, and always with both hands! Before your work can be bisque fired it should be “cleaned up”. You work won’t go into the kiln if it has sharp edges – when glazed, sharp edges turn into razor blades! Use a piece of fly wire to rub the work all over – this will scratch a little so be light handed. Use a knife or metal kidney to scrape any areas that require a bit more dynamic treatment than the fly wire offers! Finally, a very light wipe over with a slightly damp sponge can help soften and soothe all of your edges and dags! Trimming thrown work: If you are planning to trim (or turn) your thrown work (and you should be), make sure you bag it well – your work should be leather hard to almost dry for easiest trimming. Use this step to finish the work completely – use a metal kidney to polish the surface, or a slightly damp sponge to give a freshly thrown look. Wipe the sponge around the rim after trimming, and check the inside of the pot for dags! Trimming slip cast work: Usually I will trim the rims of your work on the wheel the following day to make that stage easier, however you will still need to check your work for lumps and bumps. Last but not least – check that your name is still clearly on the bottom of your work. Step Five – Bisque Firing When the work is completely dry it can go into the bisque kiln. The bisque kiln is fired to 1000°C. This process burns off the water in the clay as well as some of the chemically bound water. The structure of the clay is not altered that much at this temperature. Inside the bisque kiln, the work is stacked a little, small bowl inside a larger bowl and onto a heavy plate. Smaller items like decorations or drink coasters might get stacked several high. Consideration is paid to the weight of the stack and shape of the work. A bisque kiln can fire about one and a half times the amount of work that the glaze kiln can fire. The firing takes about 10 hours to complete the cycle and about two days to cool down. Once it has been emptied the work is placed in the glaze room ready for you to decorate! Step Six – Glazing Decorating your work with colour can be a lot of fun – and time consuming! There are three main options for surface treatment at this stage: Oxide Washes Underglazes Glazes Washes and underglazes do not “glaze” the work – It will still need a layer of glaze to fully seal the clay (washes don’t need glaze on surfaces not designed for food or liquid as they can gloss up a little on their own). Underglazes are stable colourants that turn out pretty much how they look in the jar. They can be mixed with each other to form other colours and can be used like water colours to paint onto your work. Mostly they should have a clear glaze on top to seal them. Oxides are a different species – the pink oxide (cobalt) wash turns out bright blue for instance. They don’t always need a glaze on top, and some glazes can change the colour of the wash! The glazes need no other “glaze” on top! Be careful of unknown glaze interactions – you can put any combination of glaze in a bowl or on a plate, but only a single glaze on the outside of any vertical surface! Glazes are a chemical reaction under heat. We don’t know the exact chemicals in the Mayco glazes we use. I can guess by the way they interact with each other, however, on the whole, you need to test every idea you have, and not run the test on a vertical surface! Simply put, glaze is a layer of glass like substance that bonds with the clay underneath. Clay is made of silica, alumina and water. Glaze is made of mostly silica. Silica has a melting point of 1700°C and we fire to 1240°C. The silica requires a “flux” to help it melt at the lower temperature. Fluxes can be all sorts of chemicals – a common one is calcium – calcium has a melting point of 2500°C, however, together they both melt at a much lower temperature! Colourants are metal oxides like cobalt (blue), chrome (green through black), copper (green, blue, even red!), manganese (black, purple and pink) iron (red brown), etc. Different chemicals in the glaze can have dramatic effects. for example, barium carbonate (which we don’t use) turns manganese bright pink! Other elements can turn manganese dioxide brown, blue, purple and reddish brown. Manganese dioxide is a flux in and of itself as well. So, glazes that get their black and purple colours, often interact with other glazes and RUN! Our mirror black is a good example – it mixes really well with many glazes because it fluxes them – causes them to melt faster. It will also bring out many beautiful colours in the glazes because it’s black colouring most definitely comes from manganese dioxide! Glaze chemistry is a whole subject on it’s own! We use commercial Mayco glazes on purpose – for their huge range of colour possibilities, stability, cool interactions, artistic freedom with the ability to easily brush the glazes on and ease of use. We currently have almost 50 glazes on hand! A major project is to test the interactions of all glazes with each other. That is 2,500 test tiles!!!! I’m going to make the wall behind the wheels the feature wall of pretty colours! Step Seven – Glaze (Gloss or sometimes called “Glost”) Firing Most of the time this is the final stage of making your creation (but not always!) The glaze kiln goes to 1240°C. This is called cone 6, or midrange. It is the low end of stoneware temperatures. Stoneware clays and glazes are typically fired at cone 8 – 10, that is 1260 – 1290°C. The energy requirement to go from 1240°C to 1280°C is almost a 30% more! Our clay is formulated to vitrify (mature, turn “glass-like”) at 1240°, as are our glazes. A glaze kiln take around 12 hours to reach temperature and two to three days to cool down. Sometimes a third firing process is required – this is for decoration that is added to work after the glaze firing. For example – adding precious metals and lustres. this firing temperature is usually around 600 – 800°C depending upon the techniques being used. There are many students interested in gold and silver trims – we will be doing this third type of firing soon! After firing your work will be in the student finished work shelves. Remember to pay for it before you head out the door! There is a small extra charge for using porcelain clay (it’s more than twice the price of regular clay), and for any third firing process! Once your work has been fired it can not turn back into clay for millennia – so don’t fire it if you don’t like it! Put it in the bucket for recycling. https://firebirdstudios.com.au/the-process-of-making-pottery/The form of the jug has been in use for many centuries.Stoneware jug. Two tone brown glaze with pierced lip behind spout. Spout chipped.None.flagstaff hill, warrnambool, shipwrecked-coast, flagstaff-hill, flagstaff-hill-maritime-museum, maritime-museum, shipwreck-coast, flagstaff-hill-maritime-village, jug, ceramic jug -
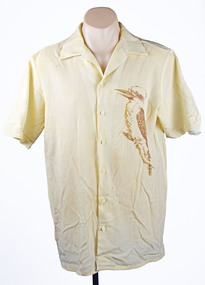 National Wool Museum
Clothing - 1984 Los Angeles Olympics Men's Opening Ceremony Shirt, c. 1984
On the 1984 Los Angeles Olympic Uniforms donator Doug wrote- During the 1980s the Australian wool industry was at its most prosperous times with record numbers of sheep producing wool receiving ever increasing values due to the success of the Reserve Price Scheme, and the overall guidance of the Australian Wool Corporation (AWC). As a humble technician, my role was a low profile newly created position of “Controller, Technical Marketing” where wool was to be marketed on its technical properties, as distinct from the “Product Marketing Group” which exploited trhe traditional high profile approach of marketing wool;s superior fashion attributes. The Woolmark was the tool central to this approach. When the forthcoming Los Angeles Olympic Games was announced, the Product Marketing Group seized upon the chance to show the world that we could make top fashion garments and display them on our elite athletes on the world stage. A concept was launched using a contemporary top designer, Adel Weiss, with the most exclusive fabrics and knits available, and all with a lot of hype. This launch failed dismally for the following reasons- - The designer did a wonderful job presenting an excellent fashion range on perfect skinny models. The AOC however wanted a uniform which had an obvious Australian appearance when fitted to elite, and frequently muscular, athletes. - The fabrics chosen did not reflect the performance required by travelling athletes, there was no recognition of the need for ‘easy care.’ - There was no recognition given to the problem of measuring, manufacturing and distribution of a range of articles when the selected athlete could be domiciled anywhere in Australia. - There was no appreciation of such historical facts as Fletcher Jones, who had been unofficial suppliers dating back to the 1954 Olympics in Melbourne, and the Fletcher Jones board member, who was also an AWC board member, and was not in favour of the change. The project passed from Product Marketing to Public Relations, a big spending off-shoot of the AWC Chairman David Asimus, and due to the day to day operations of the project was passed to me and PR took care of the financial matters. The first task was to meet with the AOC and find out exactly their requirements. This lead to the production of a design and manufacturing brief, cointaining exact time lines for each event required to ensure an appropriate uniform on every athlete chosen to represent his/her country on the date given for the Opening Ceremony in Los Angeles. Working backwards the timeline becomes- 1. Noted the exact date of the Opening Ceremony. 2. Estimated the date for distributing completed garments to each athlete. 3. Estimated the time span available for measuring each athlete and commence making each component of the ensemble to the individual measurements of each athlete. 4. Decided the date for making the final choice of uniform design concept. 5. Decided the date for distribution of the design brief to selected designers. These five steps were spread out over a two year period. The Commonwealth Games occur midway between each Olympic Games, work on the Olympic uniform commences the week after the Commonwealth Games closing ceremony and MUST be ready by the prescribed day two years hence. The project also had to remain cognisant of trade politics existing within the span of the task, as well as the temperament of designers in general. It is no overstatement to say that in the past every designer in Australia believed they could, and should, be chosen to design the Australian Uniform. The final choice of designer almost always faced criticism from the fashion press and any designer who had been overlooked. However, with the contenders receiving an exacting brief the numbers of serious contenders greatly reduced. The Los Angeles Olympic Uniforms. A further reason for the AWC bid failure to design the LA uniform was that the AOC had already chosen Prue Acton to design it. This was based on her proven performance during previous games as she had a talent for creating good taste Australiana. Her design concepts also considered the effect when they were viewed on a single athlete as well as the impact when viewed on a 400 strong team coming on to the arena. A blazer trouser/skirt uniform in bright gold was chosen for the formal uniform. It was my task to select a pure wool faille fabric from Foster Valley weaving mill and have sufficient woven and ready within the prescribed timeline. The trouser/skirt fabric selected was a 60/40 wool polyester plain weave fabric from Macquarie Worsted. This fabric had a small effect thread of linen that was most attractive when dyed to match some eucalyptus bark Prue had brought back from central Australia. For the Opening Ceremony uniform, Prue designed a series of native fauna, a kookaburra for the men’s shirt and a pleated skirt with a rural scene of kangaroos, hills and plants. This presented an insurmountable printing challenge to the local printing industry as it had an unacceptably large repeat size and the number required (50) was also commercially unacceptable. The solution was a DIY mock up at RMIT and the employment of four student designers. The fabric selected for this garment was a light weight 19 micron, pure wool with a very high twist yarn in alternating S and Z twist, warp and weft. This fabric proved to be the solution to a very difficult problem, finding a wool product which is universally acceptable when worn next to the sin by young athletes competing in the heat of a Los Angeles summer. Modifications to this fabric were developed to exploit its success when facing the same problem in future games. Garment Making- The most exacting garment in the ensemble is the tailored blazer, plus the related trouser/skirt. Unfortunately tailoring athletes that come in various shapes and sizes such as; - Weight lifters develop an enormous chest, arms and neck size. A shirt made to a neck size of 52 would produce a shirt with cuffs extending well beyond the wearer’s hands. - Basketball players are up to 7 feet tall and garments relying ona chest measurement grading would produce a shirt with cuffs extending only to elbow length. - Swimmers develop enormous shoulders and slim hips, cyclists by contrast develop thighs I liken to tree trunks and a uniform featuring tight trousers must be avoided at all cost. Suffice to say many ensembles require specialist ‘one off’ treatment for many athletes. Meanwhile there is a comfortable in between group who can accept regular sizes so you can cater for these by having back up stock with plenty of built in contingencies. Athletes may be domiciled anywhere in Australia, this creates a fundamental problem of taking their measurements. The Fletcher Jones organisation was key to answering this problem due to their presence in every capital city, as well as many provincial towns around Australia. Each athlete on being selected for the Olympic Team was simultaneously requested to visit their nearest Fletcher Jones shop. The standardised measurement data collected was shared with the other manufacturers, e.g. Pelaco Shirts, Holeproof Socks and Knitwear, Maddison Belts, and even Hush Puppy Shoes. As the time for the Games approached the AOC made arrangements for combining meeting of all. Selected available athletes at the Australian Institute of Sport, Canberra, where, among other things, they were fitted and supplied with their uniform. The method evolved as follows.Men’s cream coloured button up, collared shirt. Images of a kookaburra have been printed onto the shirt, a single kookaburra on the left breast and a pair of kookaburras on the reverse of the shirt. The kookaburras are printed in a brown tone to complement the cream colour of the fabric.On tag - FMaustralian wool corporation, 1984 los angeles olympics, olympic uniforms, men's uniforms, sport, athletes