Showing 2469 items matching " black bridge"
-
 Ballarat Tramway Museum
Newspaper, The Courier Ballarat, Geelong tram extensions, early 1940's
Newspaper clipping from The Courier, early 1940's about the Melbourne Electric Lighting Co. notifying the Councils that it is prepared to extend the tram to North Geelong and run trams to Belmont and Highton when the new bridge is erected across the Barwon after the war. Item opposite a an advertisement "Don't be caught in a Blackout" - no date on the cutting. Item was contained within the back cover of Reg Item 5485 - Service Exercise Book, black covers, with label, red binding titled "No. 2 - Ballarat Tramways & S.E.C. Systems" - see list. On the rear of the cutting are numerous public notices for Ballarat. geelong -
 Ballarat Tramway Museum
Newspaper, The Courier Ballarat, "New Move to Retain Buninyong Line", 5/06/1953 12:00:00 AM
Newspaper clipping from The Courier, 5-6-1953 titled "New Move to Retain Buninyong Line", about a letter from Minister of Transport that the Victorian Railways were not prepared to maintain the bridges on the line that was closed in 1947, despite representations from the Shire of Buninyong. The Shire was asking for assistance from other Councils and Members of Parliament. Item was contained within the back cover of Reg Item 5485 - Service Exercise Book, black covers, with label, red binding titled "No. 2 - Ballarat Tramways & S.E.C. Systems" - see list. buninyong railway -
 Ballarat Tramway Museum
Ephemera - Timetable, Wal Jack, notes on the Ballarat Tramways overhead, 1940's - 1950's
Yields information about the Ballarat overhead, track layouts, terminals and the Sebastopol type cars.Three hand written foolscap pages with notes on the Ballarat Tramways overhead, the Sebastopol tramcars axle boxes, double ended sidings at Victoria St and Lydiard St North, possible track extensions, Viewpoint terminus, Forest City signs, View Point Loop and Bridge St relaying in 1957. Contained within Reg Item 5507 - Foolscap binder with green covers, black binding edge and metal clips. overhead, terminus, view point, signals, sebastopol type -
 Ballarat Tramway Museum
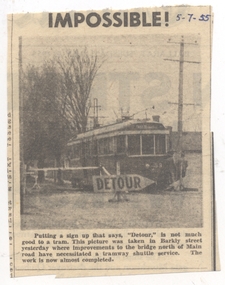
Newspaper, The Courier Ballarat, "Bridge Work Cuts Tram Line", "Impossible", Jun. 1955
Yields information about the work to rebuild the bridge over the creek on the Mt Pleasant Line.Newspaper cuttings pasted onto a single foolscap sheet, titled "Bridge Work Cuts Tram Line" dated 7/6/1955, with handwritten notes associated with the work on the Mt Pleasant line, Barkly St, Pennyweight Creek, underneath. Loose within the book was another cutting titled "Impossible", featuring a tram at the work site and the Detour sign - dated 5-7-1955, noting the work in almost complete. Contained within Reg Item 5507 - Foolscap binder with green covers, black binding edge and metal clips. barkly st, mt pleasant, bridges -
 Ballarat Tramway Museum
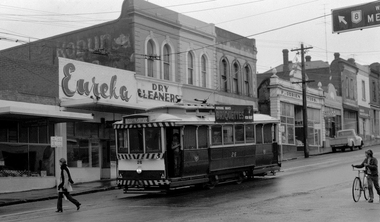
Photograph - Digital image, 1970s
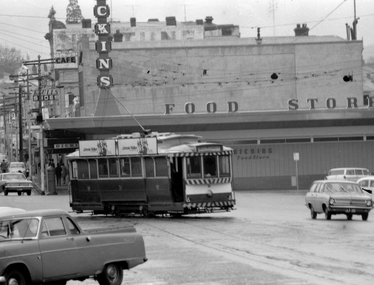
Yields information about the Bakery St Hill on the Victoria St route.Digital image, black and white, of No. 26 at Stones Corner, junction of Bridge, Victoria and Main St, Bakery Hill. No the young girl in slacks walking in front of the tram, the boy wheeling the bike down the street and the young boy standing in the front door of the tram. In the background is Eureka Dry Cleaners, an old Robur tea ad on a building, F. O'Brien Motors. The tram has the destination of Gardens via Sturt St West and a SEC Briquettes Roof advert. Photo taken by Peter Bruce 1970's and 1971, prior to the closure of the Ballarat tramway system. Peter's Title of image: "No. 26 Victoria and Bridge"trams, tramways, stones corner, bakery hill, victoria st, bridge st, tram 26 -
 Ballarat Tramway Museum
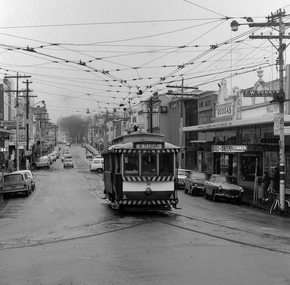
Photograph - Digital image, 1970s
Yields information about the Mt Pleasant route and Main St.Digital image, black and white, of No. 30 outbound to Mt Pleasant in Main St Ballarat, Humffray St. Photo taken by Peter Bruce 1970's and 1971, prior to the closure of the Ballarat tramway system. Peter's Title of image: "No. 30 Bridge and Main"trams, tramways, main st, mt pleasant, tram 30 -
 Ballarat Tramway Museum
Photograph - Digital image Set of 2, Peter Bruce, "No.30 Bridge and Main", 1970s
Yields information about Bridge St Ballarat and its associated shopping strip.Digital image, black and white, two images, of No. 30 in Bridge St. 4605.1 - at Stones Corner, enroute to Mt Pleasant with Rodda's, Gill & O'Keffe, C.W. Pennan, ANZ Bank and other shops in the background. Note the signal lamps on the right hand side of the photo above the tram stop sign and how the overhead was arranged at this junction. 4605.2 - at Grenville St end, with Faulls Shoes, Suttons HMV and other shops in the background. Photo taken by Peter Bruce 1970's and 1971, prior to the closure of the Ballarat tramway system. Peter's Title of image: "No.30 Bridge and Main" and "No. 30 Bridge St up end".trams, tramways, bridge st, mt pleasant, tram 30 -
 Ballarat Tramway Museum
Photograph - Digital image, 1970s
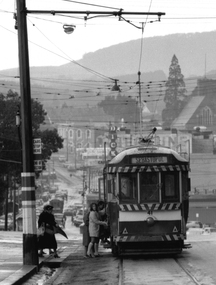
Yields information about the Sturt St and Grenville St intersection.Digital image, black and white, of No. 31 entering Sturt St from Bridge St, with S E Dickins Food store in the background. Tram has two Johnnie Walker Whiskey roof advertisements. Photo taken by Peter Bruce 1970's and 1971, prior to the closure of the Ballarat tramway system. Peter's Title of image: "No. 31 Dickins"trams, tramways, sturt st, bridge st, tram 31 -
 Ballarat Tramway Museum
Photograph - Digital image, Peter Bruce, "No. 41 Loading for Sebas", 1970s
Yields information about the stop in the City on the south side of Sturt St and loading passengers.Digital image, black and white, of No. 41 loading passengers for Sebastopol at the city terminus. A number of passengers, including one carrying an umbrella are boarding. Shows the signage at the city stop. In the background is Bridge St, looking along to Victoria St and Mt Warrenheip. Another tram is in Bridge St. Photo taken by Peter Bruce 1970's and 1971, prior to the closure of the Ballarat tramway system. Peter's Title of image: "No. 41 Loading for Sebas"trams, tramways, city, sturt st, bridge st, sebastopol, tram 41 -
 Ballarat Tramway Museum
Photograph - Digital image, 1970s
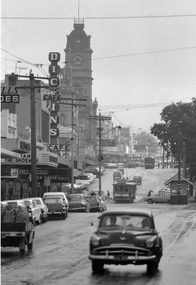
Yields information about the Sturt St. and Bridge St and some of the cars that used the street - a Plymouth.Digital image, black and white, of a scene in Bridge St looking back towards the Town Hall and Sturt St, showing a Plymouth motor vehicle, a single trucker and a bogie car in Sturt St. Shows the Dickins store, Williams the Shoeman, Roger David Store. Photo taken by Peter Bruce 1970's and 1971, prior to the closure of the Ballarat tramway system. Peter's Title of image: "Plymouth Bridge St"trams, tramways, bridge st, sturt st, town hall -
 Ballarat Tramway Museum
Photograph - Black & White Photograph/s, Wal Jack, 10/04/1950 12:00:00 AM
Black and White print contained within the Wal Jack Bendigo and Geelong Album, see Reg Item 5003 for more details. Photo of Bendigo Birney No. 27 crossing the bridge entering the depot 10-4-1950, Photo by Wal Jack. Printed on Ilford paper. i1 - scan of print in the album i2 - rear of image i3 - scan of negative at 3200dpi added 6/6/2020. On the rear in blue ink "SEC Bendigo Birney #27 crossing over creek near depot 10-4-50" with Wal Jack copyright stamp in the top right hand corner and the number "T210" written in.trams, tramways, bendigo, depot, birney, tram 27 -
 Ballarat Tramway Museum
Photograph - Black & White Photograph/s - set of 7, Keith Kings, 20/10/1962 12:00:00 AM
Black and White print contained within the Wal Jack Bendigo and Geelong Album, see Reg Item 5003 for more details. Set of seven images of the ARHS Special tour of Bendigo on 20-10-1962. .1 - Trams 28, 30, 21, 7 and 19 in Pall Mall .2 - 18, 26, 29, 11 and 5 at the Bridge St loop on the North Bendigo line. .3 - 28, 30, 21, 7, 19 on "down" line and 18, 26, 29, 11, 5 and service car 3 on "up" line, View St Opposite Oval .4 - 28, 30, 21, 7, and 19 at Eaglehawk .5 - 28, 30, 21 in North Bendigo siding and 7 and 9 in Thunder St - photo taken in Thunder St. .6 - ditto photo taking from vacant land on the south side of the terminus, along with No. 6 the service tram. .7 - 28, 30, 21, 7, 19 in View St with Goodyear and Caltex signs in the photo and the Commercial Banking Company of Australia building in the background. Most printed on Ilford paper.On rear in ink. .1 - "28, 30, 21, 7, 19 Pall Mall 20-10-62" .2 - "Bendigo ARHS Convoy "A" on Bridge St loop, Nos. 18, 26, 29, 11, 5 20/10/62" with Keith Kings copy right stamp printed in top right hand corner and number "N(y)(12)" written in. .3 - "18, 26, 29, 11, 5 and service car 3 on "up" line, 28, 30, 21, 7, 19 on "down" View St 20-8-62" .4 - "28, 30, 21, 7, and 19 Eaglehawk 20-10-62" .5 - "19, 7 in, 28, 30, 21 in spur siding Nth Bendigo 20/10/62" .6 - "28, 30, 21, 7, 19 plus No. 6 service car Nth B/go 20/10/62" .7 - "Bendigo ARHS Convoy "B" - 28, 30, 21, 7, 19 Charing Cross, 20/10/62" with Keith Kings copy right stamp printed in top right hand corner and number "N(y)(14)" written in.trams, tramways, bendigo, arhs, tours, eaglehawk, north bendigo, view st, tram 28, tram 30, tram 21, tram 7, tram 19, tram 6, tram 18, tram 26, tram 29, tram 11, tram 3 -
 Ballarat Tramway Museum
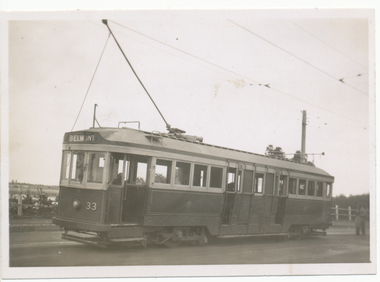
Photograph - Black & White Photograph/s, 29/03/1948 12:00:00 AM
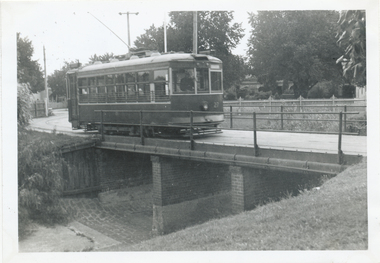
Black and White print contained within the Wal Jack Bendigo and Geelong Album, see Reg Item 5003 for more details. Photo of Geelong No. 33 on the Barwon Bridge, with the destination of Belmont. Photo by Leon Marshall Wood, 29-3-1948. Printed on Kodak Velox paper. On rear in ink "Geelong 29.3.48, Barwon Bridge". Has the L. M Wood copyright stamp on rear.trams, tramways, geelong, belmont, tram 33 -
 Bendigo Historical Society Inc.
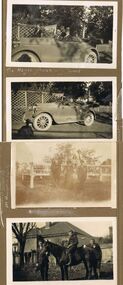
Photograph - HILDA HILL COLLECTION: BLACK AND WHITE PHOTOS, 1923
Series of Black & White Photos Total 4 depicting post war life for the Hill Family & Friends. The Hayes' Family Buick, 4 occupants and two men standing on offside of vehicle, two men in front seat are wearing dark suits and hats, two ladies in rear seat wear dark clothing, one has a hat, man standing beside the car in dark suit white shirt and black tie, other man nearer the back is wearing a grey suit, wooden cross in background near rear of vehicle, trellis fence left background, short white picket fence right background, 'Durvol'. This photo has two men in the front seat, both wearing grey suits white shirts and black ties, driver only wears a hat, in the rear seat are two ladies wearing dark clothing, one wears a hat, and a male wearing a dark suit white shirt and dark tie, Note anti kick guards below each door. At Hanging Rock family group, three gentlemen one lady and two young girls, standing next to a road bridge with wooden railings, two males are dressed in dark suits white shirts and dark ties, one wears a hat, man sitting on bridge rail wears a grey suit white shirt and dark tie, the two young girls are wearing light coloured clothing. Martin, Jack, Tom & Dolly the Horse, three boys wearing dark clothing, two boys are wearing white shirts and dark ties, Dolly is dark coloured, background shows gable roofed house with one chimney, end of veranda , large tree left background, wooden paling fence, 'Durvol' property Kyneton 1923.Hilda Hill Pesdonal Collectionaustralia, history, post war life -
 Bendigo Historical Society Inc.
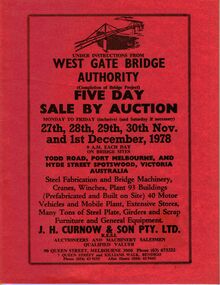
Document - IAN DYETT COLLECTION: AUCTION CATALOGUE - WEST GATE BRIDGE AUTHORITY
Three orange covered auction catalogues with black printing for a sale on 27th, 28th, 29th, 30th Nov. and 1st December, 1978 under instructions from West Gate Bridge Authority. For sale was steel fabrication and bridge machinery, cranes, winches, plant 93 buildings (prefabricated and built on site) 40 motor vehicles and mobile plant, extensive stores, many tons of steel plate, girders and scrap, furniture and general equipment. J. H. Curnow & Son Pty. Ltd. Were the auctioneers.business, auctioneers, j h curnow & son pty ltd, ian dyett collection - auction catalogue - west gate bridge authority, j h curnow & son pty. ltd, f c dyett, i m dyett, bolton bros print -
 Bendigo Historical Society Inc.
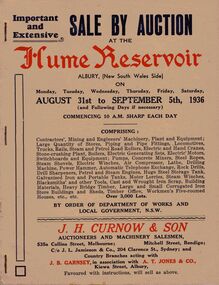
Document - IAN DYETT COLLECTION: AUCTION CATALOGUE - HUME RESERVOIR
Pale beige auction catalogue with red and dark blue printing for a sale held from the 31st August to 5th September 1936 at the Hume Reservoir, Albury, (New South Wales Side) By Order of Department of Works and Local Government, N. S. W. For sale was Contractors', Mining and Engineers' Machinery, Plant and Equipment, Stores, Locomotives, Tools, Petrol and Steam Engines, Tanks, Scrap, Building Materials, Heavy Bridge Timber, Buildings, and Workmen's Five-roomed Houses, etc. J. H. Curnow & Son were the auctioneers. Black and white photos include Lots 2065 and 2622 Kelly & Lewis Engine and Condensing Plant with G.E.C. Dynamo, Generating 300 K.W.; Lot 2018 Locomotive; Lots 2617 and 2618 Steam Road Rollers; Lot 2069 Administrative Offices; and Lot 93 Locomotives (Victorian Side).business, auctioneers, j h curnow & son pty ltd, ian dyett collection - auction catalogue - hume reservoir, department of works and local government nsw, j h curnow & son, j l jamieson & co, j b garnsey, a t jones, bolton bros pty ltd -
 Bendigo Historical Society Inc.
Book - GERMAN HERITAGE SOCIETY COLLECTION: DRESDEN 1885 LOOSE PICTORIAL CARDS
Item 5. Dresden 1885: loose pictorial cards (numbered on back). Red Photo folder with red cover with black and gold decoration. Dresden printed in gold on the front. Has four fold out cards held by the red material to hold the cards in place. Photos are: 1. Palace of the Great Garden, Dresden, 2. German Annual Gymnasium Fete, Dresden, 3. The Zwinger, Dresden, 4. Avenue in the Great Garden, Dresden, 5. Military Barracks and Albert Bridge, 6. New Tower and Elbe on Augustus Bridge, Dresden. 7. Katholische Kirche und Terrasse.Verlag v. Rommler & Jonas, K.S. Hof-Phoogn. Dresden 1885books, collections, buildings of dresden, german heritage society collection - dresden 1885 loose pictorial cards, palace of the great garden, dresden, german annual gymnasium fete, dresden, the zwinger, dresden, avenue in the great garden dresden, military barracks and albert bridge, new tower and elbe on augustus bridge, dresden -
 Bendigo Historical Society Inc.
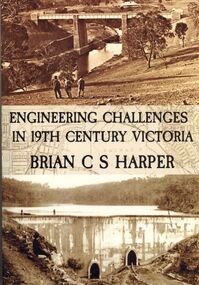
Book - ENGINEERING CHALLENGES IN 19TH CENTURY VICTORIA
Engineering Challenges in 19th Century Victoria by Brian C S Harper, or Brian Harper, soft cover 256 pages with black and white photographs. Book includes information on the construction of the Bendigo Railway Line, Coliban Water Scheme, Lower Stony Creek Dam, the Saltwater Railway Bridge, and the Taradale Railway Viaduct. Transferred to Specimen Cottage for use June 2016 Missing from Specimen Cottage. Check sale items 8.12.22Brian C. S. Harperbooks, technical, engineering -
 Bendigo Historical Society Inc.
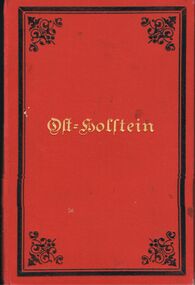
Book - GERMAN HERITAGE SOCIETY COLLECTION: HOLSTEIN: A PICTORIAL ALBUM
Item 7. Red photo album with black border and black decoration in each corner. Name imprint in gold. Fold out card pages held together with red tape. Inside front cover is cream with black pattern. Names of photos are: 1. The Town of Eutin, Holstein, 2. The Angling Bridge, Lake Uglei, 3. Hostelery at Lake Uglei, 4. Lake Keller, Holstein, 5. Melente, 6. Gremsuhlen, (Wellenbad), 7. Taken from Rotunds, Gremsuhlen, 8. Hotel Gremsuhlen, 9. Lake Dick, Holstein, 10. Lake Dick, Holstein, 11. The Town of Plon, Holstein.Lipsuis & Tischer's Ansichten aus dem ostichen Holstein.books, collections, holstein, german heritage society collection - holstein: a pictorial album -
 Ballarat Tramway Museum
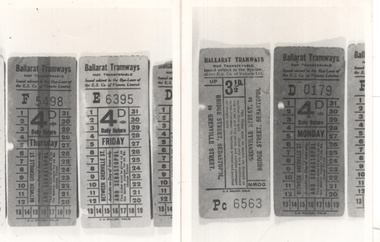
Photograph - ESCo Ballarat tram tickets, late 1920s
Set of two Black and white photographs of Electric Supply Co of Victoria (ESCo) Grenville St to Sebastopol tickets. Three of the tickets have been printed for use on specific weekdays. The fourth ticket was printed for use between Grenville St and Bridge St Sebastopol. Possibly 1920s issues. Photographer unknown.Yields information about ESCo tickets used for specific days or trips.Black and white photograph on plain paper - set of twotrams, tramways, esco, tickets -
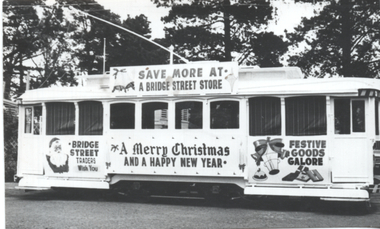 Ballarat Tramway Museum
Photograph - Bridge St Traders Xmas tram 17, Dec. 1967
Black and white photograph of tram 17 decorated for Bridge St traders Christmas Tram Dec. 1967. Photographed at the SECV depot and has been trimmed for use in TMSV Running Journal Jan. 1968, photographer not named. See item 2353 for a colour photo of the tram.Yields information about the 1967 Bridge St traders Christmas tram.Black and white photograph on plain paper.has "P16A" and " S/S" in ink on the rear.trams, tramways, depot, secv, bridge st traders, christmas trams, decorated trams, tram 17 -
 Bayside Gallery - Bayside City Council Art & Heritage Collection
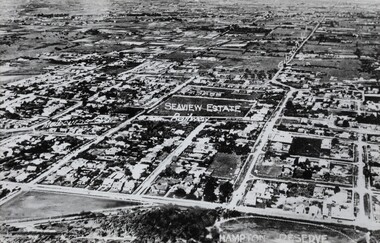
Photograph, Sandringham, 1922
sandringham, aerial, victoria, suburbs, photograph, airspy, beach street, bridge street, crisp street, seaview, hampton reserve, hampton, trevor barker beach oval -
 Bayside Gallery - Bayside City Council Art & Heritage Collection
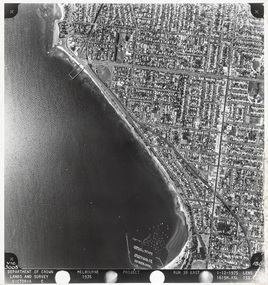
Photograph, Department of Crown Lands and Survey, Victoria, Melbourne Project: Brighton, Hampton, Sandringham, 1976
The Department of Crown Lands and Survey (1857-1983) was responsible for the administration of survey and mapping and the sale, occupation and management of crown land throughout its existence. This aerial photograph shows parts of Brighton, Hampton and Sandringham and was taken on 1 December 1976brighton, department of crown lands and survey, aerial photograph, bayside, port phillip bay, map, cartographic material, hampton, sandringham, green point, sandringham yacht club, south road, beach road, hampton street, melbourne project 1976 -
 Ballarat Tramway Museum
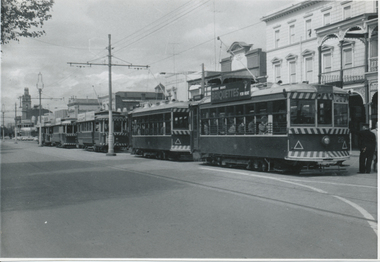
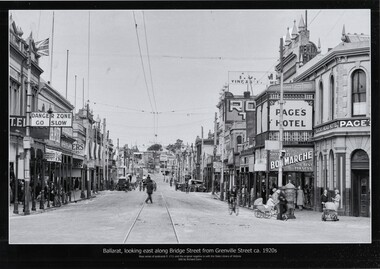
Photograph - Black & White copy photograph, Rose Stereograph Co, "Ballarat looking east along Bridge St from Grenville St c1920s"
Original photograph by Rose Series Postcard P1711 with the original image held by the State Library of Victoria. Edited by Richard Conn. Purchased by the Museum.Provides information about the appearance of Bridge St during the 1920's, shows the tram tracks and overhead. Has in the view a number of road signs, shops, Super Spirit, Shell, Junction Service Station, motor vehicles, cyclists, Bon Marche, ladies with prams, a post box and Page's Bucks Head Hotel.Black & White copy photograph view A4 size, titled "Ballarat looking east along Bridge St from Grenville St c1920s", from a Rose Series Postcard, P1711. Original image held by the State Library of Victoria.ballarat, grenville st, bucks head hotel, bridge st, road signs, bon marche, tramways -
 Ballarat Tramway Museum
Postcard - Bridge Sreet Ballarat Vic, VSM Melbourne
Postcard - Bridge Sreet, Ballarat Vic showing tram tracks, a number of horse drawn carts and cabs. On the far right, a tram stop sign can be seen, along with men talking. In the view are shops, businesses or advertisements for: Junction Boot Store, Havelock Tobacco, Halls Corner, A Bregeut Ales & Butter shop, W A Stark Wines and Spirits, Velvet Soap, Thomas Dunstan? Leather Merchant.Yields infomation about the corner of Bridge Street, Main Road and Victoria Streets.Black and white postcard titled Bridge Sreet Ballarat Vic, looking west from the corner of Bridge Street, Main Road and Victoria Streets 1910c. Divided back type, published by VSM Melboune and printed in Prussia.bridge street, ballarat, stones corner, victoria street, main road, tramways, tram track, horse drawn vehicles -
 Ballarat Tramway Museum
Photograph - Ballarat 15 in Victoria Street, Bob Lilburn, early 1950s
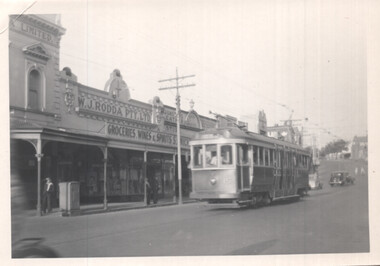
Photo shows Ballarat bogie tram 15 in Bridge Street Ballarat, near Stones Corner. The tram arrived in Ballarat in Oct. 1945 and was renumbered to No. 36 in Sept 1953. Photo early 1950s. In the background is W J Rodda Pty Ltd Grocery, wines and spirits store and Dunstan's leather store. Note the metal box on the footpath - could be an Electric Supply Co. cable power terminal box.Yields information about bogie tram 15, early 1950s.Black and White photograph of Ballarat 15 in Bridge StreetHas in ink on rear " R Lilburn"ballarat, tramways, trams, stones corner, bridge st, tram 15, esco, w j rodda -
 Ballarat Tramway Museum
Photograph - QGR Commissioners Special on bridge near Wallangarra, Keith Kings, 27/3/1958
Wal Jack swapped photographs with his correspondents. This photo by Keith Kings, a railway photograph of a QGR Commissioners Special on a bridge near Wallangarra hauled by BB18 1/4 class locomotive No. 916.Demonstrates a photograph that would have been sent to Wal Jack by Keith Kings.Black and white photograph of BB18 1/4 steam loco 916 on a Commissioners Special to Wallangarra.Has details of the photograph on the rear. Keith Kings photo number A(a)(14)letter, wal jack, keith kings, qgr, railways, wallangarra -
 Ballarat Tramway Museum
Album, Brian Andrews, UR1 - 300 Photo - Bendigo, Ballarat trams, 1968
Album compiled by the photographer containing generally 89 x 124mm of: • Bendigo – 151 black and white prints • Ballarat – 119 black and white prints and some colour • Melbourne – 20 colour and black and white prints - featuring Queensway, the Hump, Royal Park, route 82, Dandenong Road, Glenferrie Road, Barkers Road and Hawthorn Bridge. • Rome, Hong Kong and Toronto – 14 prints See items 8638 to 8642 for negatives of the Ballarat and Bendigo photos and related image files held on the BTM Demonstrates the work of the photographer.Album - heavy plastic covered covers, with 100 sewn and glued paper sheets each side with three plastic sleeves for photographs with a negative pocket page at the rear. See list of btm8637 - Ballarat list.doc for a location listing of the Ballarat photographs.trams, tramways, ballarat, bendigo, melbourne, hong kong, toronto, rome, brian andrews -
 Ballarat Tramway Museum
Photograph - Black & White Photograph/s
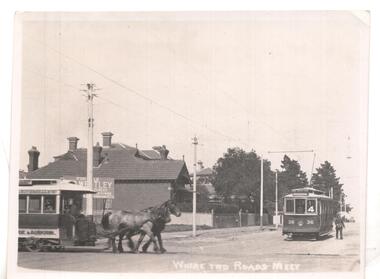
Black & white photo ex Postcard? titled 'Where two roads meet', showing a horse tram ( Hawthorn Bridge to Auburn Road (Riversdale Road) and Prahran and Malvern No. 36 on Glenferrie Road with Deepdene destination, at the intersection of Riversdale & Glenferrie Roads, Hawthorn. Corner block (SE) behind photo has a 'For Sale' sign on it, with houses in background. Now a block of shops. Tram No. 36 is an F class car, later renumbered - see p14 of Destination City, 4th edition. See also inscriptions. Questions: How horse tram number determined and date of photograph??`` Reimaged 17/7/2017 both front and back.'T101, No. 26 horse tram of Hawthorn Tramway Trust in Riversdale Road. No. 36 toastrack (enclosed cross seat) of the Prahran & Malvern Trams in Glenferrie Road, Hawthorn 1917. Horse trams ran from Auburn Road to Hawthorn Bridge and connected with the Richmond cable trams. W.Jack.'trams, tramways, pmtt, horse trams, riversdale road, glenferrie rd , tram f 36 -
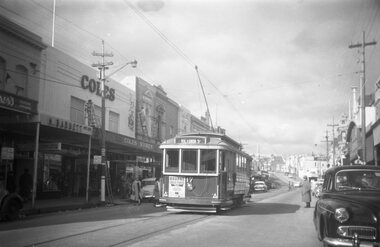 Ballarat Tramway Museum
Photograph - Black and White photocopy, Travis Jeffrey, 1959 or 1960
Negative No. N378 and black and white print made by a laser printer (stored in folder) of Ballarat No. 17 outbound in Bridge St. for Victoria St. in 1959 or 1960. Photo taken after tram has passed. Has Bourne liquid plastic ad on rear of tram. Two small triangles in corners. Car number over headlight. Photographed by tram stop, with Coles store in background. A few parked cars and some cars on the streets. Date of photo on folder - 11/6/1960. Note: Reg Item 858 of Ron Fluck of 31/12/58 shows tram number to the side of the headlight while Wal Jack (Reg. Item 396) of 23/1/61 shows tram fitted with dash canopy lights. Large print of this photo made for display 1995c. Item updated when negative added to collection - 11/5/2003. Hi -Res Image available for this photo, on CD ex Harris House of Photography see Reg Item - 4457. Original negative rescanned 24/5/2020 and image file updated. Paper print of original photo in folder 73.Paper folder that contained the negative had "NR34A" in red ink, "BA5" in pencil, date stamp of "11 Jun 1960" on front, and on rear date stamps "26 Sep 1962" and "6 Oct 1962".trams, tramways, ballarat, coles, victoria st., bridge st., tram 17