Showing 2413 items
matching street parade
-
 Ballarat Tramway Museum
Photograph - Digital image Set of 3, Peter Waugh, 16/05/2014 12:00:00 AM
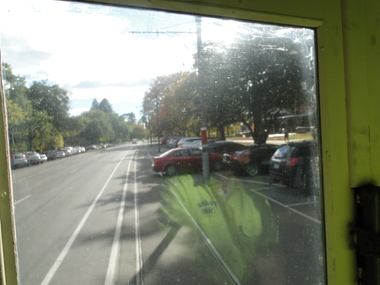
Set of three digital images: .1 - Digital image of Wendouree Parade taken from the cabin of Tram 8 on 16/5/2014. The driver, Geoff Gardner is partly shown in the reflection on the windscreen. A red car can be seen reversing into the path of the tram as it approaches the stop south of Pipers Restaurant. .2 - Digital image of Wendouree Parade taken from the cabin of Tram 8, on 16/5/2014. The driver, Geoff Gardner can be seen. Pipers Restaurant is just visible. .3 - Digital image of Wendouree Parade taken from the cabin of Tram 8, on 16/5/2014. The view is back over the tank looking south along Wendouree Parade.trams, tramways, botanical gardens, street scene, track cleaner, wendouree parade, windscreens, scrubber tram, tram 8 -
 Ballarat Tramway Museum
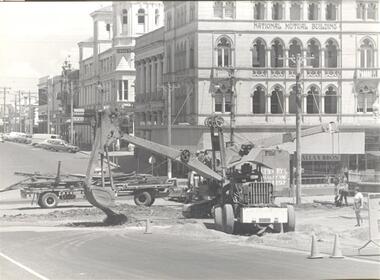
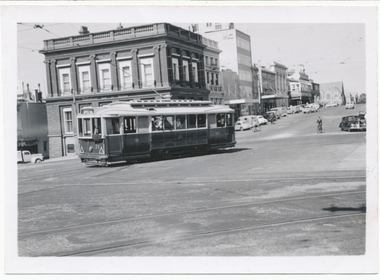
Photograph - Digital image, track removal at the corner of Sturt and Lydiard Sts, early 1972
Yields information about the track removal during early 1972 at the corner of Sturt and Lydiard Streets and the equipment used.Digital image (and copy print) of track removal at the corner of Sturt and Lydiard Sts, Feb. 1972 with the National Mutual and other buildings in the background. Has a "dragline" type excavator, crane and truck carrying rails in the photograph. Possibly originally a Courier Photograph. See Reg Item 2214 for work at this intersection 2/2/1972. From the Victoria Collections website - sourced by Ron Scholten July 2014.trams, tramways, road works, track removal, lydiard st north -
 Ballarat Tramway Museum
Photograph - Digital image Set of 10, Tony Smith, 1971
Yields information about Ballarat Tramways and trams prior to the closure of the tramway system.Set of 10 digital images of Ballarat trams prior to closure, scanned from original slides by Tony Smith, 1971 prior to closure of the system. .1 - 37 at the Lydiard St North terminus, with the shelter in the background. .2 - 33 at the Mount Pleasant terminus, has the corner store with a "The Sun" advertisement and the general store on the right side of the road in the background. Has signs for Streets Ice Cream and Coca Cola. Also has the tram stop signs - painted pole and enamel sign. .3 -33 arriving at the Mt Pleasant terminus with the conductor stepping off the back step, a lady walking across to the tram. Tram has a Twin Lakes sign. .4 - 11 at Victoria St terminus, with conductor turning the pole. Tram has a Twin Lakes sign. IN the background is the rail bridge over the Eureka line and a shelter. .5 - 11 in bound from Victoria St, shows the bleakness of the street at the time. Tram has Twin Lakes and a SEC Briquettes signs. .6 - 12 outbound to Mt Pleasant in Main St and the corner with Humffray St. Tram has a Twin Lakes sign. .7 - 11 in bound from Victoria St, in Bridge St, with junction in background. Tram has Twin Lakes and a SEC Briquettes signs. In the background are Rodda's, C.W. Pennant wall papers and Gill and O'Keffe footwear stores. .8 - 21 in Wendouree Parade, in bound to Victoria St, with the Lake in the background, near Macarthur St. .9 - 21 ditto, nearing the Macarthur St junction. Has the shelter and tram stop signage for View Point in the background. .10 - 34 sitting on the depot fan, 2 road, ready to run out. Has Mt Pleasant as the destination.trams, tramways, lydiard st north, mount pleasant terminus, victoria st, main st, bridge st, wendouree parade, macarthur st, view point, depot, tram 37, tram 33, tram 11, tram 12, tram 21, tram 34 -
 Ballarat Tramway Museum
Photograph - Digital image Set of 10, Tony Smith, 5/09/1971 12:00:00 AM
Yields information about Ballarat Tramways and trams prior to the closure of the tramway system.Set of 10 digital images of Ballarat trams prior to closure, scanned from original slides by Tony Smith, 1971 prior to closure of the system. This set of slides, possibly on the last weekend of Mt Pleasant services - closure took place on 5/9/1971. .1 - 13 outbound in Barkly St, Mt Pleasant - with another single trucker and the Ballarat Fire Station in the background. .2 - Bogie tram and single trucker at Grant St Loop. Has the Mobile service station on the right hand side. Note the family sitting on the steps of a house on the left side watching proceedings. .3 - 14 (Mt Pleasant) and 39 ditto. .4 - 27? and 39 crossing at the Morrison St loop. .5 - 14 and another single trucker at Mt Pleasant terminus. Has the corner store in the background with adverts for Robur Tea, Womens Weekly and Coca Cola. .6 - 39 and two single truckers at the Mt Pleasant terminus. .7 - View looking south along Ripon St from Mair St, with power station buildings on the right hand side. Shows the power distribution poles on the street. .8 - Scrubber tram on 0 road with tennis court alongside. .9 - 40 running special in Wendouree Parade, near the Haddon St intersection. .10 - 40 turning from Macarthur St into Drummond St Nth.trams, tramways, mt pleasant, barkly st, grant st, victoria park, sturt st west, ripon st, view st, depot, wendouree parade, drummond st nth, macarthur st, closure, tram 14, tram 39, tram 13, tram 26, tram scrubber, 40 -
 Ballarat Tramway Museum
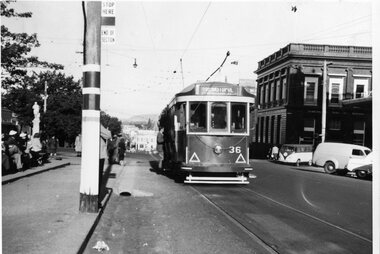
Photograph - Black & White Photograph/s, mid to late 1950's
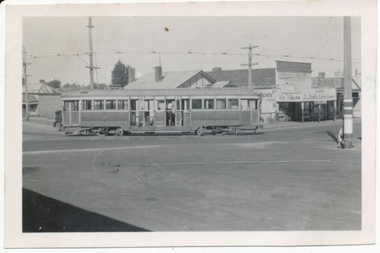
Demonstrates the use of the trams in the city area of Ballarat, late 1950's and their use.Black and white photograph of Ballarat 36 at the city terminus, Sturt and Lydiard streets, south side. The tram has the destination of Sebastopol. In the background is the Commonwealth Bank. Passengers are waiting on the seats in the median strip with some boarding the tram. Tram stop pole with stop sign and end of section sign. Photographer unknown - see history of object.In the rear in pencil - "Ballarat"trams, tramways, sturt st, lydiard st, city, tram 36 -
 Ballarat Tramway Museum
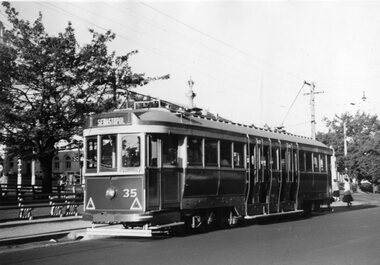
Photograph - Black & White Photograph/s, mid to late 1950's
Demonstrates the use of the trams in the city area of Ballarat, late 1950's and their use.Black and white photograph of Ballarat 35 at the city terminus, Sturt and Lydiard streets, south side. The tram has the destination of Sebastopol. Photographer unknown - see history of object.In the rear in pencil - "Ballarat"trams, tramways, sturt st, lydiard st, city, tram 35 -
 Ballarat Tramway Museum
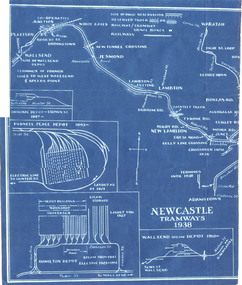
Drawing, "Newcastle Tramways 1938", 1938
Blue print drawings titled ""Newcastle Tramways 1938" printed on two sheets showing the track layout for the Newcastle Tramways in 1938 Has depot layouts, railway crossings, street names and major waterways. From the Wal Jack Collection. No details of made them.wal jack, newcastle, track layout -
 Ballarat Tramway Museum
Drawing, "Sydney Tramways 1948", 1948
Set of four Blueprint drawings titled ""Sydney Tramways 1948" showing the track layout for the Sydney Tramways. Has depot layouts, railway crossings, street names and major waterways. Does not show the Manly tramway system. From the Wal Jack Collection. No details of who made them.wal jack, sydney, track layout -
 Ballarat Tramway Museum
Photograph - Black & White Photograph/s, 1897
Yields information and demonstrates information about the use of Ballarat No. 29 as a service tram in 1943. This tram was seldom used in traffic, very few photographs exist of it.Black and white photograph of King St Sydney with cable trams, at the intersection of King and George St, looking east. Has a cable set (dummy No. 13) with destination of King St. Has Packers Liverpool Arms, Royal Exchange Hotel and other shops in the background and many well dressed people.Typed on rear "New South Wales Government Cable Tramways" "King and George Streets in 1897 showing Cable Dummy No. 13 and trailer." "594.AA."trams, tramways, sydney, cable trams -
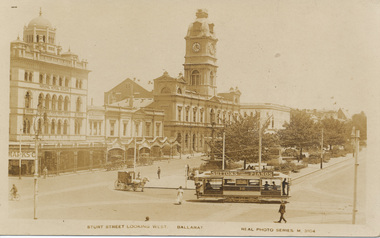 Ballarat Tramway Museum
Photograph - Digital image, c1921
Yields information the buildings, buildings and scene at the intersection of Sturt and Lydiard St with a tram crossing the road.Digital image from the Wal Jack Ballarat Album of a postcard - titled ""Sturt Street, Looking West, Ballarat" with ESCo tram No. 16 crossing from Sturt St south side (from Grenville St) into Lydiard St North. Has conductor on rear footstep. Appears to be taken on a hot day. Real Photo Series M 3104. Has a number of horse carts in the photograph. Tram has an advertisement for Suttons Pianos on the roof. Card produced by Valentines & Sons Publishing Co. Ltd. See rear of card for company location details. In the photo are advertisements or buildings for: National Mutual Building, Town Hall, and Marks & Co. Wal has dated the photo about 1921 in his album notes. For rear of postcard - see image i2.trams, tramways, esco, sturt st, lydiard st, town hall, tram 16 -
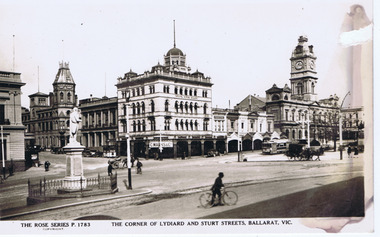 Ballarat Tramway Museum
Photograph - Digital image, Rose Stereograph Co, "Corner of Lydiard and Sturt Streets, Ballarat", c1929
Digital image titled "The Corner of Lydiard and Sturt Streets Ballarat Vic", photo looks south west from the Post Office steps towards the south west corner - has Craigs Hotel, National Mutual Life, town hall shops including Anderson Printer and the Town Hall in the picture along with Robbie Burns statue. The Rose Series Postcard No. P 1783. An ESCo tram is parked at the tram stop - No. 5? A number of horse drawn and motor vehicles are in the photograph. Wal has dated the photo about 1930 on the rear of the postcard and about 1929 in his album notes. See item 9193 for a copy print.Yields information the buildings, buildings and scene at the intersection of Sturt and Lydiard St with a number of vehicles in the view.Digital image from the Wal Jack Ballarat Album of a postcard .trams, tramways, esco, lydiard st, sturt st, town hall, tram 5 ? -
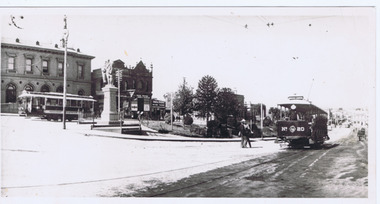 Ballarat Tramway Museum
Photograph, Wal Jack, ESCo cross bench tram No. 20 and ESCo 2, c1910
Photo of ESCo cross bench tram No. 20 and ESCo 2 at the intersection of Sturt and Lydiard Streets, with the post office in the background, Summerscales offices, Robbie Burns statue, Vita Studio, and George Payne Jewellers in the background. The conductor on the rear of No. 2 is holding the trolley rope, while the driver of No. 20 is watching the road closely. The conductor of the tram is reboarding or about to alight. No. 20 has the destination of Gardens via Convent. Other trams are in the background. Wal has dated the photograph about 1909. Note the point frog or pan in the overhead above No. 20. See image i2 for the rear of the photograph and image i3 for a hi-res scan of the photograph. See image i4 for a hi-res scan of the copy negative, with a drawing pin mark in the top left-hand corner,Yields information about the use of ESCo trams c1910 and the overhead.Digital image from the Wal Jack Ballarat Album.On rear of photograph in ink: "T161, Ballarat Tramways No. 20 Summer Car & No. 2 old Type, Sturt St. Ballarat 1909 / W. Jack Collection."trams, tramways, esco, cross bench tram, sturt st, post office, lydiard st, tram 20, tram 2 -
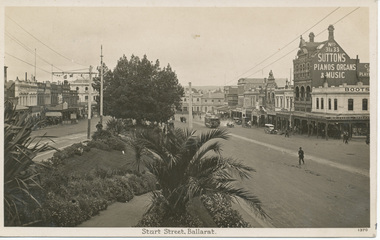 Ballarat Tramway Museum
Photograph - Digital image, Tramway Museum Society of Victoria (TMSV), c1930
Yields information the appearance of Sturt St from Lydiard St looking east, with a number of vehicles and building sin the background.Digital image from the Wal Jack Ballarat Album of a postcard looking south east from the intersection of Sturt and Lydiard St with Suttons store and Boots in the background - c1930 with a number of motor cars in the street scene. Post card has title "Sturt St Ballarat" and number "1370". Manufacture of postcard not shown. For rear of postcard - see image i2.On rear of photograph in pencil "Ballarat Railway Station 27-12-32" and "3d" in the stamp box.trams, tramways, sturt st, esco -
 Ballarat Tramway Museum
Photograph - Digital image, Wal Jack, Mar. 1954
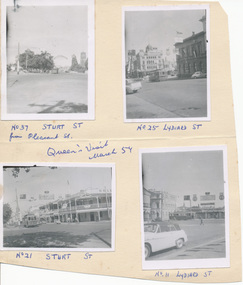
Yields information on the decorations and tramcars and street scenes at the time of the Queens visit to Ballarat.Digital image from the Wal Jack Ballarat Album of a series of four small black and white photographs taken during the Queen Elizabeth II visit to Ballarat, March 1954. Captions under each photograph in ink. 1 - No. 37 at Pleasant St, looking east along Sturt St. - see Neg 993 2 - No. 25 at Lydiard St with the National Mutual Building in the background - see Neg 991. 3 - No. 21 - Sturt St at Dawson St with Golden City Hotel in the background - see Neg 992 4 - No. 17 Lydiard St taken from the railway station car park - see also Reg Item 5300 for a better photograph and Wal's notes on rear which says No. 17, not 11 - see Neg 994 All photographs include some of the decorations for the Royal Visit. Photographer - not stated, but sheet in Wal's handwriting. May not be Wal Jack based on the negative size, smaller than 120 which Wal used at the time. See image i2 for rear of photograph. See image i3 for hi res scan of print. See image i4 for hi res scan of negative N993 See image i5 for hi res scan of negative N994 See image i6 for hi res scan of negative N995 See image i7 for hi res scan of negative N996 On rear of the Manila sheet which has been cut from another sheet are "No. 11 Victoria St terminus 25-6-57".trams, tramways, royal visit, lydiard st, pleasant st, sturt st, tram 37, tram 25, tram 21, tram 17 -
 Ballarat Tramway Museum
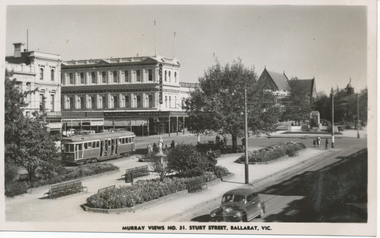
Photograph - Digital image, Murray Views, Murray Views No. 31 Sturt Street Ballarat Vic, c1950
Yields information the appearance of Sturt St and Doveton about 1950 with an SEC bogie tram in the photograph.Digital image from the Wal Jack Ballarat Album of a black and white postcard, titled "Murray Views No. 31, Sturt Street Ballarat Vic" , photo looking south west at corner of Doveton and Sturt St with the Harry Davies store in the background. Bogie tram No. 22 is outbound in the street. Has many people in the median strip. Photo c1950. Published by Murray Views, Gympie Queensland - real photo. For rear of postcard - see image i2.trams, tramways, sturt st, doveton st, tram 22 -
 Ballarat Tramway Museum
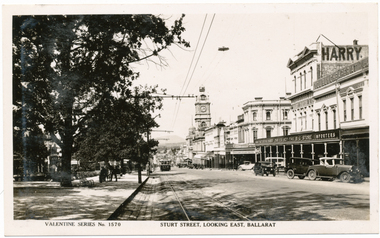
Photograph - Digital image, Valentine & Sons Publishing Co, c1932
Yields information the appearance of Sturt St at Dawson St looking east.Digital image from the Wal Jack Ballarat Album of a Valentines Postcard taken from the corner of Sturt and Dawson St looking east along the southside of Sturt St, Has then tram No. 29 (later No. 17) west bound in the street. In the photo are the Town Hall, Harry Davies store and Taylors Sturt Hotel along with many motor cars. Note the street light suspended between two bracket arms. For rear of postcard - see image i2. Published by Valentine Publishing Co. Queen St Melbourne. Wal's album notes dates the photo as "1934"on rear in pencil "Gardens via Ripon 1932"trams, tramways, sturt st, dawson st, tram 29 -
 Ballarat Tramway Museum
Photograph - Digital image, Wal Jack, 5/04/1958 12:00:00 AM
Yields information the appearance of the SEC tramcar No. 21, and the south east corner of Sturt and Lydiard Streets in 1958 and an AETA tour.Digital image from the Wal Jack Ballarat Album of trams No. 21 turning from Lydiard St into Sturt St while on an AETA tour special, 5 April 1958. Has the AETA sign on the rear of the tram. In the background are the Commonwealth Bank, the MLC building. Includes a number of cyclists in the photograph. See image i2 for rear of photograph. See image i3 for hi res scan of print. See image i4 for hi res scan of negativeon rear of photo in ink, "SEC Ballarat, No. 21 as AETA Special turning into Sturt St from Lydiard St Nth, 5-4-58." in the top right hand corner is the Wal Jack stamp with number "T246" written intrams, tramways, sturt st, lydiard st, aeta, tram 21 -
 Ballarat Tramway Museum
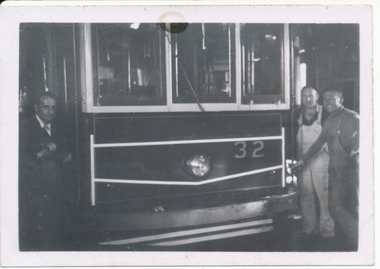
Photograph - Digital image, Wal Jack, 1/01/1945 12:00:00 AM
Yields information the appearance of the SEC tramcar No. 21, and the south east corner of Sturt and Lydiard Streets in 1958 and an AETA tour.Digital image from the Wal Jack Ballarat Album of No. 32 at the Barkly St terminus, Mt Pleasant, 1-1-1945. Has the corner of the milk bar in the photograph. Note the clock in the photograph on the left hand side of the print. See image i2 for rear of photograph. See image i3 for hi res scan of print. See image i4 for hi res scan of negativeon rear of photo in ink, "Ballarat, No. 32. Mt Pleasant terminus. 11.20am, 1/1/45. Note plate on trolley wire". In the top right hand corner is the W. Jack stamp and has the negative number T68.trams, tramways, mt pleasant, barkly st, tram 32 -
 Ballarat Tramway Museum
Photograph - Digital image, 8/03/1955 12:00:00 AM
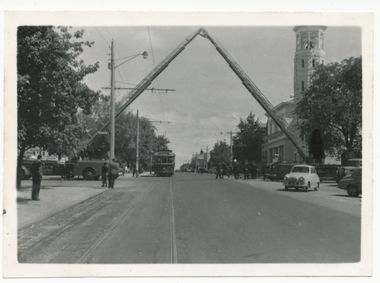
Yields information about the preparations undertaken by the Ballarat Fire Brigade to form a welcoming arch for a visiting Governor General..Digital image from the Wal Jack Ballarat Album of Ballarat No. 20 passing under the two LaFrance fire brigade ladders forming an arch outside the Ballarat City Fire station on 8/3/1955 to greet the Governor General Sir William Slim, Sturt and Raglan Streets. Wal's album notes say "No. 20 passing under 2-100' extension ladders as an arch to welcome Sir William Slim, Governor General. Sturt and Raglan St 8-3-1955." See image i2 for rear of photograph. See image i3 for hi res scan of print. See image i4 for hi res scan of negative\ Neville Britton of the BTM advised 2/5/2020: Seven LaFrance 100' ladders built by the American LaFrance Company, of Elmira, New York arrived in Australia in 1942 as part of the WW2 lend lease program. One each to Perth, Brisbane and Adelaide. Four initially to the MFB but within a short period of time went to the CFA. One each to Geelong City FS, Ballarat City FS and Bendigo FS. The fourth was a stand in and was located at the Ballarat FS when not required. Thus the two ladders in the photo at the Ballarat City FS. I was a volunteer at Ballarat City FB from 1967 and commenced my career employment there in 1970. The two LaFrance ladders were still in Ballarat at that time. In the mid 70's the 'spare' was allocated to the Dandenong FS. They were retired in the 1980's. The four Victorian ladders still survive. Ex Geelong City is at the Fire Services Museum Victoria. They have a second one that was acquired by a private collector. It was neglected and returned to the FSMV in poor condition. Ex Ballarat City was driven to Sydney and remains at the Museum of Fire at Penrith. The fourth one was acquired by a private collector and stored in a shed in North Geelong and never moved. He recently died and it may have been sold. They had a V12 petrol engine with all ignition parts duplicated. So two Distributors, two ignition coils and two spark plugs per cylinder. Splash feed engine lubrication.On rear in ink. Top right hand corner "T175" within the Wal Jack stamp. "SEC Ballarat No. 20 passing under the two LaFrance yank extension ladders ( to greet the Governor General Sir William Slim) Sturt and Raglan Streets. and the date "8 Mar 1955"trams, tramways, sturt st, governors, fire station, ceremonies, tram 20 -
 Ballarat Tramway Museum
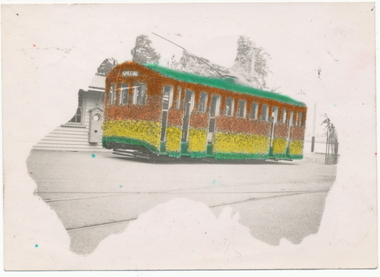
Photograph - Digital image, L.W. Torr Best Street Bowen Hill and Brisbane Q, 4/03/1939 12:00:00 AM
Yields information about Ballarat tram 29 when it was dressed for the Floral Festival and the launch of the tram and how it was used by a small photograph publisher for sales.Digital image from the Wal Jack Ballarat Album of a postcard featuring the 1939 Floral Tram, photograph at the depot, rendered in colour and positioned within an outline of a map of Australia. Wal's notes date it as 4-3-1939. Uses the same base photo similar to 1369, but without the motor bike in the rear. On the rear has a the stamp "L.W. Torr Best Street Bowen Hill, Brisbane Q" See image i2 for rear of photograph. See Reg Item 7000 for a hand coloured image.Stamped on the rear of the photograph "L.W. Torr Best Street Bowen Hills, Brisbane Q" and the date stamp "5 May 1939"trams, tramways, floral tram, decorated trams, depot, tram 29 -
 Ballarat Tramway Museum
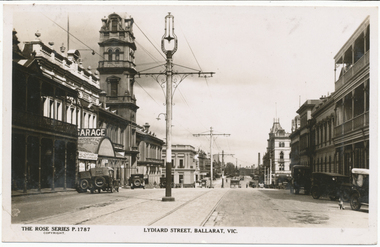
Photograph - Digital image, Rose Stereograph Co, c1930
Yields information the appearance of Lydiard St north, centre poles and buildings.Digital image from the Wal Jack Ballarat Album of Rose Series postcard No. P 1787, of Lydiard St North looking south from near Mair St. shows the centre poles prior to their removal. A number of motor cars are parked in the street, a dog on the right hand side, and ESCo tram has just rounded the corner and about to climb the small hill. Published by Rose Stereograph Co., Armadale Victoria. For rear of postcard - see image i2.in pencil on rear "Old type of electric tram"trams, tramways, esco, lydiard st, poles -
 Ballarat Tramway Museum
Photograph - Black & White Photograph/s, 1930's or early 1940's
Yields information about No. 28 late 1930's how the tram appeared at the time.Black and white photograph of Geelong No. 15, Birney, at the Eastern Park terminus, 1930's or 1940's? Tram has the destination of City. Photographer not known. The house behind the tram was able to be identified as 493 Ryrie St Geelong, shows up in Google Street View the verandah details. Two copies held.trams, tramways, geelong, eastern park, tram 15 -
 Ballarat Tramway Museum
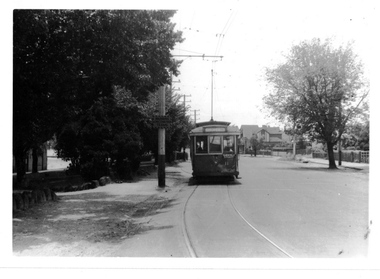
Photograph - Digital image, Wal Jack, 6/01/1951 12:00:00 AM
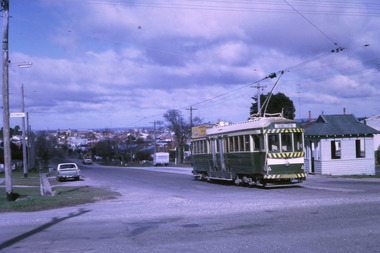
Yields information about the streetscape in Wendouree Parade near Webster St.Digital image from the Wal Jack Ballarat Album of a photograph of the No. 11 in Wendouree Parade, near Webster St, View Point line, 6-1-1951, Photo by Wal Jack. The tram has the destination of City and an auxiliary board saying "Grenville Street" . Note the "Warning Oncoming Trams" sign adjacent to the tram. See image i2 for rear of photograph. See image i3 for hi res scan of print. See image i4 for hi res scan of negativeOn rear of photograph in ink "SEC, Ballarat No. 11 in Wendouree Pde near Webster St, View Point Line 6-1-51" and Wal Jack stamp in top right hand corner with number "T1277" written in.trams, tramways, view point, webster st, wendouree parade, tram 11 -
 Ballarat Tramway Museum
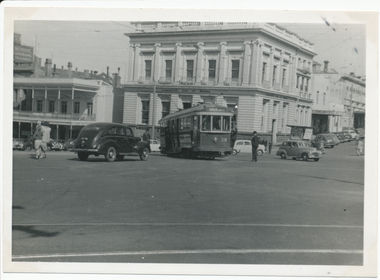
Photograph - Digital image, Wal Jack, 7/03/1953 12:00:00 AM
Yields information about the street scene of the SE corner of Sturt and Lydiard Streets in 1953.Digital image from the Wal Jack Ballarat Album of a photograph of No. 39 turning out of Sturt St into Lydiard St North, tram has the destination of Gardens via Sturt St. Photo Wal Jack 7-3-1953. Has the Commonwealth Bank in the background and many motor vehicles. Has an Inspector riding the footboard and a conductor watching and fending off motor cars. See image i2 for rear of photograph. See image i3 for hi res scan of print. See image i4 for hi res scan of negativeOn rear of photograph in ink "SEC, Ballarat No. 39 into Lydiard St North ex Victoria St 7th March 53 2.50pm" and Wal Jack stamp in top right hand corner with number "T156" written in.trams, tramways, sturt st, lydiard st north, inspectors, conductors, tram 39 -
 Ballarat Tramway Museum
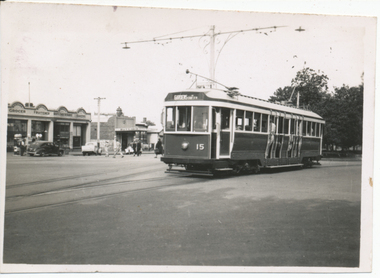
Photograph - Digital image, Wal Jack, 14/12/1945 12:00:00 AM
Yields information about the early use of Ballarat's 2nd bogie tram and its first day in service.Digital image from the Wal Jack Ballarat Album of No. 15 running to Gardens via Sturt St west leaving Sturt St at Pleasant St to run into Sturt St West. First day in service. Note street lights, W. R Hearn Grocer and Fruitier, a boot and shoe repairer and baker in the background and Davies Butcher. Also Texaco petrol pumps in the street. See image i2 for rear of photograph. See image i3 for hi res scan of print. See image i4 for hi res scan of negativeIn ink on rear " SEC Ballarat Tramways bogie. 15 ex M&MTB 132 14-12-45 (on first day in service in Sturt St from Pleasant St)" with number "T536" within Wal Jack photo stamp.trams, tramways, sturt st, pleasant st, tram 15 -
 Ballarat Tramway Museum
Photograph - Digital image, Ken Magor, 28/12/1950 12:00:00 AM
Yields information about the early use of Ballarat's bogie trams and the curve from Main Rd into Barkly St on the Mt Pleasant route.Digital image from the Wal Jack Ballarat Album of Ballarat 35 turning from Barkly St Mount Pleasant route into Main Road, 28-12-1950. Photo by Ken Magor. Shows the shops behind the tram - Milk bar - diary - advertising ice cream, Robur tea, fruits and confectionery. See image i2 for rear of photograph.On rear in ink "No. 35 from Mount Pleasant turning out of Barkly St into Main Street 28-12-50" and Ken Magor stamp with Neg No. "1901" written in.trams, tramways, mt pleasant, barkly st, main road, tram 35 -
 Ballarat Tramway Museum
Photograph - Digital image, Wal Jack, Reflective tape trial, Oct. 1956
Yields information about the considerations taken in Ballarat to provide reflective tape onto the front of trams to provide warning to motorists and the poor street lighting at the time.Digital image from the Wal Jack Ballarat Album of first style of reflective tape on one end of No. 32 at the depot. Wal's notes that the style was not used. Triangles were used instead. Has three workers standing along the tramcar. No details of who took the photo but has Wal's handwriting on the rear. See image i2 for rear of photograph. See image i3 for hi res scan of print. See image i4 for hi res scan of negative Image5298i4a - cleaned image of 9/2021.On rear in ink "First type of Reflective tape Oct. '56"trams, tramways, safety, reflecting tape, modifications, tram 32 -
 Ballarat Tramway Museum
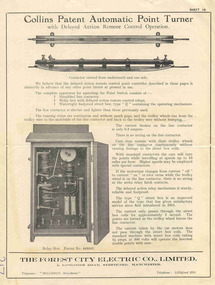
Pamphlet, The Forest City Electric Co. Limited England, "Collins Patent Automatic Point Turner", c1940's?
Yields information about the types of automatic point Turing mechanisms used on tramway systems, not actually used in Ballarat or Bendigo.Four page Pamphlet or Brochure Forest City No. 19, "Collins Patent Automatic Point Turner". Four page printed brochure with illustrations 1940’s? describing the Point turning mechanism with illustrations, of the equipment, method of operation advantages, wiring, the street box and curb (kerb) control box. c1940's? Has “217” in biro in bottom left hand corner.trams, tramways, forest city signals, level crossings, signals -
 Ballarat Tramway Museum
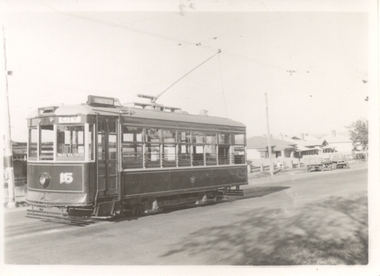
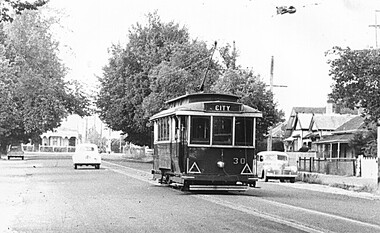
Photograph - Digital image, Late 1950's
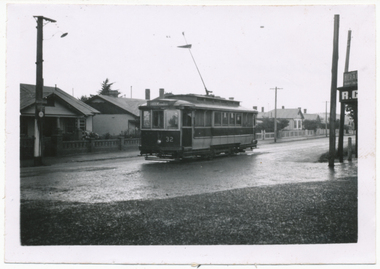
Yields information the appearance and details about SEC Tram No. 30 in the 1950's in bound along Ripon St on the View Point Line.Digital scan from the Ben Parle collection of SEC No. 30 in Ripon St, in bound to the City of the View Point line. Photo 1950's or early 1960 prior to introduction of dash canopy lighting. Has the houses either side of the street in view. Photo received with the Ben Parle slides 09/2004. trams, tramways, ripon st, view point, tram 30 -
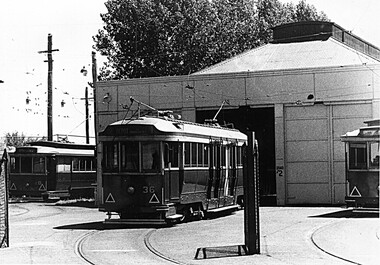 Ballarat Tramway Museum
Photograph - Digital image, Late 1950's
Yields information the appearance and details about the depot and trams 20 and 36 in the late 1950's.Digital scan from the Ben Parle collection of SEC No. 36 on No. 2 road at the depot and No. 20 on 0 road at the depot. Photo 1950's or early 1960 prior to introduction of dash canopy lighting. Has the houses either side of the street in view. Photo received with the Ben Parle slides 09/2004. trams, tramways, depot, tram 20, tram 36