Showing 4783 items matching " tables"
-
 Flagstaff Hill Maritime Museum and Village
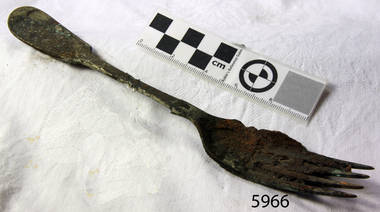
Fork
HISTORY OF THE LOCH ARD The LOCH ARD belonged to the famous Loch Line which sailed many ships from England to Australia. Built in Glasgow by Barclay, Curdle and Co. in 1873, the LOCH ARD was a three-masted square rigged iron sailing ship. The ship measured 262ft 7" (79.87m) in length, 38ft (11.58m) in width, 23ft (7m) in depth and had a gross tonnage of 1693 tons. The LOCH ARD's main mast measured a massive 150ft (45.7m) in height. LOCH ARD made three trips to Australia and one trip to Calcutta before its final voyage. LOCH ARD left England on March 2, 1878, under the command of Captain Gibbs, a newly married, 29 year old. She was bound for Melbourne with a crew of 37, plus 17 passengers and a load of cargo. The general cargo reflected the affluence of Melbourne at the time. On board were straw hats, umbrella, perfumes, clay pipes, pianos, clocks, confectionary, linen and candles, as well as a heavier load of railway irons, cement, lead and copper. There were items included that intended for display in the Melbourne International Exhibition in 1880. The voyage to Port Phillip was long but uneventful. At 3am on June 1, 1878, Captain Gibbs was expecting to see land and the passengers were becoming excited as they prepared to view their new homeland in the early morning. But LOCH ARD was running into a fog which greatly reduced visibility. Captain Gibbs was becoming anxious as there was no sign of land or the Cape Otway lighthouse. At 4am the fog lifted. A man aloft announced that he could see breakers. The sheer cliffs of Victoria's west coast came into view, and Captain Gibbs realised that the ship was much closer to them than expected. He ordered as much sail to be set as time would permit and then attempted to steer the vessel out to sea. On coming head on into the wind, the ship lost momentum, the sails fell limp and LOCH ARD's bow swung back. Gibbs then ordered the anchors to be released in an attempt to hold its position. The anchors sank some 50 fathoms - but did not hold. By this time LOCH ARD was among the breakers and the tall cliffs of Mutton Bird Island rose behind the ship. Just half a mile from the coast, the ship's bow was suddenly pulled around by the anchor. The captain tried to tack out to sea, but the ship struck a reef at the base of Mutton Bird Island, near Port Campbell. Waves broke over the ship and the top deck was loosened from the hull. The masts and rigging came crashing down knocking passengers and crew overboard. When a lifeboat was finally launched, it crashed into the side of LOCH ARD and capsized. Tom Pearce, who had launched the boat, managed to cling to its overturned hull and shelter beneath it. He drifted out to sea and then on the flood tide came into what is now known as LOCH ARD Gorge. He swam to shore, bruised and dazed, and found a cave in which to shelter. Some of the crew stayed below deck to shelter from the falling rigging but drowned when the ship slipped off the reef into deeper water. Eva Carmichael had raced onto deck to find out what was happening only to be confronted by towering cliffs looming above the stricken ship. In all the chaos, Captain Gibbs grabbed Eva and said, "If you are saved Eva, let my dear wife know that I died like a sailor". That was the last Eva Carmichael saw of the captain. She was swept off the ship by a huge wave. Eva saw Tom Pearce on a small rocky beach and yelled to attract his attention. He dived in and swam to the exhausted woman and dragged her to shore. He took her to the cave and broke open case of brandy which had washed up on the beach. He opened a bottle to revive the unconscious woman. A few hours later Tom scaled a cliff in search of help. He followed hoof prints and came by chance upon two men from nearby Glenample Station three and a half miles away. In a state of exhaustion, he told the men of the tragedy. Tom returned to the gorge while the two men rode back to the station to get help. By the time they reached LOCH ARD Gorge, it was cold and dark. The two shipwreck survivors were taken to Glenample Station to recover. Eva stayed at the station for six weeks before returning to Ireland, this time by steamship. In Melbourne, Tom Pearce received a hero's welcome. He was presented with the first gold medal of the Royal Humane Society of Victoria and a £1000 cheque from the Victorian Government. Concerts were performed to honour the young man's bravery and to raise money for those who lost family in the LOCH ARD disaster. Of the 54 crew members and passengers on board, only two survived: the apprentice, Tom Pearce and the young woman passenger, Eva Carmichael, who lost all of her family in the tragedy. Ten days after the LOCH ARD tragedy, salvage rights to the wreck were sold at auction for £2,120. Cargo valued at £3,000 was salvaged and placed on the beach, but most washed back into the sea when another storm developed. The wreck of LOCH ARD still lies at the base of Mutton Bird Island. Much of the cargo has now been salvaged and some was washed up into what is now known as LOCH ARD Gorge. Cargo and artefacts have also been illegally salvaged over many years before protective legislation was introduced. One of the most unlikely pieces of cargo to have survived the shipwreck was a Minton porcelain peacock - one of only seven in the world. The peacock was destined for the Melbourne International Exhibition in 1880. It had been well packed, which gave it adequate protection during the violent storm. Today, the Minton peacock can be seen at the Flagstaff Hill Maritime Museum in Warrnambool. From Australia's most dramatic shipwreck it has now become Australia's shipwreck artefact and is one of very few 'objects' on the Victorian State Heritage Register most valuable. The LOCH ARD shipwreck is of State significance – Victorian Heritage Register S 417 Flagstaff Hill’s collection of artefacts from LOCH ARD is significant for being one of the largest collections of artefacts from this shipwreck in Victoria. It is significant for its association with the shipwreck, which is on the Victorian Heritage Register (VHR S417). The collection is significant because of the relationship between the objects, as together they have a high potential to interpret the story of the LOCH ARD. The LOCH ARD collection is archaeologically significant as the remains of a large international passenger and cargo ship. The LOCH ARD collection is historically significant for representing aspects of Victoria’s shipping history and its potential to interpret sub-theme 1.5 of Victoria’s Framework of Historical Themes (living with natural processes). The collection is also historically significant for its association with the LOCH ARD, which was one of the worst and best known shipwrecks in Victoria’s history. Silver plated copper alloy table fork from the wreck of the Loch Ard. Some very little verdigris and silver oxide. Amount of encrustation covers the fork tines. Hallmark is visible. flagstaff hill, warrnambool, shipwrecked coast, flagstaff hill maritime museum, maritime museum, shipwreck coast, flagstaff hill maritime village, great ocean road, loch line, loch ard, captain gibbs, eva carmichael, tom pearce, glenample station, mutton bird island, loch ard gorge, fork -
 Flagstaff Hill Maritime Museum and Village
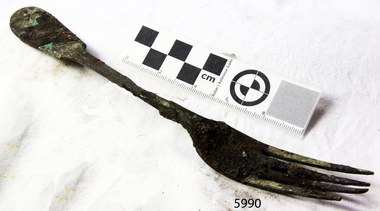
Fork
HISTORY OF THE LOCH ARD The LOCH ARD belonged to the famous Loch Line which sailed many ships from England to Australia. Built in Glasgow by Barclay, Curdle and Co. in 1873, the LOCH ARD was a three-masted square rigged iron sailing ship. The ship measured 262ft 7" (79.87m) in length, 38ft (11.58m) in width, 23ft (7m) in depth and had a gross tonnage of 1693 tons. The LOCH ARD's main mast measured a massive 150ft (45.7m) in height. LOCH ARD made three trips to Australia and one trip to Calcutta before its final voyage. LOCH ARD left England on March 2, 1878, under the command of Captain Gibbs, a newly married, 29 year old. She was bound for Melbourne with a crew of 37, plus 17 passengers and a load of cargo. The general cargo reflected the affluence of Melbourne at the time. On board were straw hats, umbrella, perfumes, clay pipes, pianos, clocks, confectionary, linen and candles, as well as a heavier load of railway irons, cement, lead and copper. There were items included that intended for display in the Melbourne International Exhibition in 1880. The voyage to Port Phillip was long but uneventful. At 3am on June 1, 1878, Captain Gibbs was expecting to see land and the passengers were becoming excited as they prepared to view their new homeland in the early morning. But LOCH ARD was running into a fog which greatly reduced visibility. Captain Gibbs was becoming anxious as there was no sign of land or the Cape Otway lighthouse. At 4am the fog lifted. A man aloft announced that he could see breakers. The sheer cliffs of Victoria's west coast came into view, and Captain Gibbs realised that the ship was much closer to them than expected. He ordered as much sail to be set as time would permit and then attempted to steer the vessel out to sea. On coming head on into the wind, the ship lost momentum, the sails fell limp and LOCH ARD's bow swung back. Gibbs then ordered the anchors to be released in an attempt to hold its position. The anchors sank some 50 fathoms - but did not hold. By this time LOCH ARD was among the breakers and the tall cliffs of Mutton Bird Island rose behind the ship. Just half a mile from the coast, the ship's bow was suddenly pulled around by the anchor. The captain tried to tack out to sea, but the ship struck a reef at the base of Mutton Bird Island, near Port Campbell. Waves broke over the ship and the top deck was loosened from the hull. The masts and rigging came crashing down knocking passengers and crew overboard. When a lifeboat was finally launched, it crashed into the side of LOCH ARD and capsized. Tom Pearce, who had launched the boat, managed to cling to its overturned hull and shelter beneath it. He drifted out to sea and then on the flood tide came into what is now known as LOCH ARD Gorge. He swam to shore, bruised and dazed, and found a cave in which to shelter. Some of the crew stayed below deck to shelter from the falling rigging but drowned when the ship slipped off the reef into deeper water. Eva Carmichael had raced onto deck to find out what was happening only to be confronted by towering cliffs looming above the stricken ship. In all the chaos, Captain Gibbs grabbed Eva and said, "If you are saved Eva, let my dear wife know that I died like a sailor". That was the last Eva Carmichael saw of the captain. She was swept off the ship by a huge wave. Eva saw Tom Pearce on a small rocky beach and yelled to attract his attention. He dived in and swam to the exhausted woman and dragged her to shore. He took her to the cave and broke open case of brandy which had washed up on the beach. He opened a bottle to revive the unconscious woman. A few hours later Tom scaled a cliff in search of help. He followed hoof prints and came by chance upon two men from nearby Glenample Station three and a half miles away. In a state of exhaustion, he told the men of the tragedy. Tom returned to the gorge while the two men rode back to the station to get help. By the time they reached LOCH ARD Gorge, it was cold and dark. The two shipwreck survivors were taken to Glenample Station to recover. Eva stayed at the station for six weeks before returning to Ireland, this time by steamship. In Melbourne, Tom Pearce received a hero's welcome. He was presented with the first gold medal of the Royal Humane Society of Victoria and a £1000 cheque from the Victorian Government. Concerts were performed to honour the young man's bravery and to raise money for those who lost family in the LOCH ARD disaster. Of the 54 crew members and passengers on board, only two survived: the apprentice, Tom Pearce and the young woman passenger, Eva Carmichael, who lost all of her family in the tragedy. Ten days after the LOCH ARD tragedy, salvage rights to the wreck were sold at auction for £2,120. Cargo valued at £3,000 was salvaged and placed on the beach, but most washed back into the sea when another storm developed. The wreck of LOCH ARD still lies at the base of Mutton Bird Island. Much of the cargo has now been salvaged and some was washed up into what is now known as LOCH ARD Gorge. Cargo and artefacts have also been illegally salvaged over many years before protective legislation was introduced. One of the most unlikely pieces of cargo to have survived the shipwreck was a Minton porcelain peacock - one of only seven in the world. The peacock was destined for the Melbourne International Exhibition in 1880. It had been well packed, which gave it adequate protection during the violent storm. Today, the Minton peacock can be seen at the Flagstaff Hill Maritime Museum in Warrnambool. From Australia's most dramatic shipwreck it has now become Australia's shipwreck artefact and is one of very few 'objects' on the Victorian State Heritage Register most valuable. The LOCH ARD shipwreck is of State significance – Victorian Heritage Register S 417 Flagstaff Hill’s collection of artefacts from LOCH ARD is significant for being one of the largest collections of artefacts from this shipwreck in Victoria. It is significant for its association with the shipwreck, which is on the Victorian Heritage Register (VHR S417). The collection is significant because of the relationship between the objects, as together they have a high potential to interpret the story of the LOCH ARD. The LOCH ARD collection is archaeologically significant as the remains of a large international passenger and cargo ship. The LOCH ARD collection is historically significant for representing aspects of Victoria’s shipping history and its potential to interpret sub-theme 1.5 of Victoria’s Framework of Historical Themes (living with natural processes). The collection is also historically significant for its association with the LOCH ARD, which was one of the worst and best known shipwrecks in Victoria’s history. Silver plated copper alloy table fork from the wreck of the Loch Ard. Some very little verdigris but silver oxide present. Large amount of encrustation covers the fork tines.flagstaff hill, warrnambool, shipwrecked coast, flagstaff hill maritime museum, maritime museum, shipwreck coast, flagstaff hill maritime village, great ocean road, loch line, loch ard, captain gibbs, eva carmichael, tom pearce, glenample station, mutton bird island, loch ard gorge, fork -
 Flagstaff Hill Maritime Museum and Village
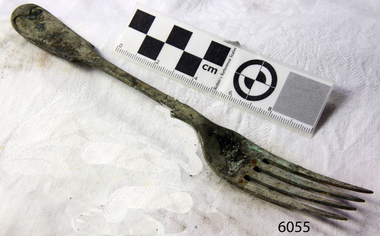
Fork
HISTORY OF THE LOCH ARD The LOCH ARD belonged to the famous Loch Line which sailed many ships from England to Australia. Built in Glasgow by Barclay, Curdle and Co. in 1873, the LOCH ARD was a three-masted square rigged iron sailing ship. The ship measured 262ft 7" (79.87m) in length, 38ft (11.58m) in width, 23ft (7m) in depth and had a gross tonnage of 1693 tons. The LOCH ARD's main mast measured a massive 150ft (45.7m) in height. LOCH ARD made three trips to Australia and one trip to Calcutta before its final voyage. LOCH ARD left England on March 2, 1878, under the command of Captain Gibbs, a newly married, 29 year old. She was bound for Melbourne with a crew of 37, plus 17 passengers and a load of cargo. The general cargo reflected the affluence of Melbourne at the time. On board were straw hats, umbrella, perfumes, clay pipes, pianos, clocks, confectionary, linen and candles, as well as a heavier load of railway irons, cement, lead and copper. There were items included that intended for display in the Melbourne International Exhibition in 1880. The voyage to Port Phillip was long but uneventful. At 3am on June 1, 1878, Captain Gibbs was expecting to see land and the passengers were becoming excited as they prepared to view their new homeland in the early morning. But LOCH ARD was running into a fog which greatly reduced visibility. Captain Gibbs was becoming anxious as there was no sign of land or the Cape Otway lighthouse. At 4am the fog lifted. A man aloft announced that he could see breakers. The sheer cliffs of Victoria's west coast came into view, and Captain Gibbs realised that the ship was much closer to them than expected. He ordered as much sail to be set as time would permit and then attempted to steer the vessel out to sea. On coming head on into the wind, the ship lost momentum, the sails fell limp and LOCH ARD's bow swung back. Gibbs then ordered the anchors to be released in an attempt to hold its position. The anchors sank some 50 fathoms - but did not hold. By this time LOCH ARD was among the breakers and the tall cliffs of Mutton Bird Island rose behind the ship. Just half a mile from the coast, the ship's bow was suddenly pulled around by the anchor. The captain tried to tack out to sea, but the ship struck a reef at the base of Mutton Bird Island, near Port Campbell. Waves broke over the ship and the top deck was loosened from the hull. The masts and rigging came crashing down knocking passengers and crew overboard. When a lifeboat was finally launched, it crashed into the side of LOCH ARD and capsized. Tom Pearce, who had launched the boat, managed to cling to its overturned hull and shelter beneath it. He drifted out to sea and then on the flood tide came into what is now known as LOCH ARD Gorge. He swam to shore, bruised and dazed, and found a cave in which to shelter. Some of the crew stayed below deck to shelter from the falling rigging but drowned when the ship slipped off the reef into deeper water. Eva Carmichael had raced onto deck to find out what was happening only to be confronted by towering cliffs looming above the stricken ship. In all the chaos, Captain Gibbs grabbed Eva and said, "If you are saved Eva, let my dear wife know that I died like a sailor". That was the last Eva Carmichael saw of the captain. She was swept off the ship by a huge wave. Eva saw Tom Pearce on a small rocky beach and yelled to attract his attention. He dived in and swam to the exhausted woman and dragged her to shore. He took her to the cave and broke open case of brandy which had washed up on the beach. He opened a bottle to revive the unconscious woman. A few hours later Tom scaled a cliff in search of help. He followed hoof prints and came by chance upon two men from nearby Glenample Station three and a half miles away. In a state of exhaustion, he told the men of the tragedy. Tom returned to the gorge while the two men rode back to the station to get help. By the time they reached LOCH ARD Gorge, it was cold and dark. The two shipwreck survivors were taken to Glenample Station to recover. Eva stayed at the station for six weeks before returning to Ireland, this time by steamship. In Melbourne, Tom Pearce received a hero's welcome. He was presented with the first gold medal of the Royal Humane Society of Victoria and a £1000 cheque from the Victorian Government. Concerts were performed to honour the young man's bravery and to raise money for those who lost family in the LOCH ARD disaster. Of the 54 crew members and passengers on board, only two survived: the apprentice, Tom Pearce and the young woman passenger, Eva Carmichael, who lost all of her family in the tragedy. Ten days after the LOCH ARD tragedy, salvage rights to the wreck were sold at auction for £2,120. Cargo valued at £3,000 was salvaged and placed on the beach, but most washed back into the sea when another storm developed. The wreck of LOCH ARD still lies at the base of Mutton Bird Island. Much of the cargo has now been salvaged and some was washed up into what is now known as LOCH ARD Gorge. Cargo and artefacts have also been illegally salvaged over many years before protective legislation was introduced. One of the most unlikely pieces of cargo to have survived the shipwreck was a Minton porcelain peacock - one of only seven in the world. The peacock was destined for the Melbourne International Exhibition in 1880. It had been well packed, which gave it adequate protection during the violent storm. Today, the Minton peacock can be seen at the Flagstaff Hill Maritime Museum in Warrnambool. From Australia's most dramatic shipwreck it has now become Australia's shipwreck artefact and is one of very few 'objects' on the Victorian State Heritage Register most valuable. The LOCH ARD shipwreck is of State significance – Victorian Heritage Register S 417 Flagstaff Hill’s collection of artefacts from LOCH ARD is significant for being one of the largest collections of artefacts from this shipwreck in Victoria. It is significant for its association with the shipwreck, which is on the Victorian Heritage Register (VHR S417). The collection is significant because of the relationship between the objects, as together they have a high potential to interpret the story of the LOCH ARD. The LOCH ARD collection is archaeologically significant as the remains of a large international passenger and cargo ship. The LOCH ARD collection is historically significant for representing aspects of Victoria’s shipping history and its potential to interpret sub-theme 1.5 of Victoria’s Framework of Historical Themes (living with natural processes). The collection is also historically significant for its association with the LOCH ARD, which was one of the worst and best known shipwrecks in Victoria’s history. Silver plated copper alloy table fork from the wreck of the Loch Ard. Some a little verdigris and much silver oxide. Encrustation on whole of fork. Fork is bent and tine broken.flagstaff hill, warrnambool, shipwrecked coast, flagstaff hill maritime museum, maritime museum, shipwreck coast, flagstaff hill maritime village, great ocean road, loch line, loch ard, captain gibbs, eva carmichael, tom pearce, glenample station, mutton bird island, loch ard gorge, electroplated cutlery, fork -
 Flagstaff Hill Maritime Museum and Village
Fork
HISTORY OF THE LOCH ARD The LOCH ARD belonged to the famous Loch Line which sailed many ships from England to Australia. Built in Glasgow by Barclay, Curdle and Co. in 1873, the LOCH ARD was a three-masted square rigged iron sailing ship. The ship measured 262ft 7" (79.87m) in length, 38ft (11.58m) in width, 23ft (7m) in depth and had a gross tonnage of 1693 tons. The LOCH ARD's main mast measured a massive 150ft (45.7m) in height. LOCH ARD made three trips to Australia and one trip to Calcutta before its final voyage. LOCH ARD left England on March 2, 1878, under the command of Captain Gibbs, a newly married, 29 year old. She was bound for Melbourne with a crew of 37, plus 17 passengers and a load of cargo. The general cargo reflected the affluence of Melbourne at the time. On board were straw hats, umbrella, perfumes, clay pipes, pianos, clocks, confectionary, linen and candles, as well as a heavier load of railway irons, cement, lead and copper. There were items included that intended for display in the Melbourne International Exhibition in 1880. The voyage to Port Phillip was long but uneventful. At 3am on June 1, 1878, Captain Gibbs was expecting to see land and the passengers were becoming excited as they prepared to view their new homeland in the early morning. But LOCH ARD was running into a fog which greatly reduced visibility. Captain Gibbs was becoming anxious as there was no sign of land or the Cape Otway lighthouse. At 4am the fog lifted. A man aloft announced that he could see breakers. The sheer cliffs of Victoria's west coast came into view, and Captain Gibbs realised that the ship was much closer to them than expected. He ordered as much sail to be set as time would permit and then attempted to steer the vessel out to sea. On coming head on into the wind, the ship lost momentum, the sails fell limp and LOCH ARD's bow swung back. Gibbs then ordered the anchors to be released in an attempt to hold its position. The anchors sank some 50 fathoms - but did not hold. By this time LOCH ARD was among the breakers and the tall cliffs of Mutton Bird Island rose behind the ship. Just half a mile from the coast, the ship's bow was suddenly pulled around by the anchor. The captain tried to tack out to sea, but the ship struck a reef at the base of Mutton Bird Island, near Port Campbell. Waves broke over the ship and the top deck was loosened from the hull. The masts and rigging came crashing down knocking passengers and crew overboard. When a lifeboat was finally launched, it crashed into the side of LOCH ARD and capsized. Tom Pearce, who had launched the boat, managed to cling to its overturned hull and shelter beneath it. He drifted out to sea and then on the flood tide came into what is now known as LOCH ARD Gorge. He swam to shore, bruised and dazed, and found a cave in which to shelter. Some of the crew stayed below deck to shelter from the falling rigging but drowned when the ship slipped off the reef into deeper water. Eva Carmichael had raced onto deck to find out what was happening only to be confronted by towering cliffs looming above the stricken ship. In all the chaos, Captain Gibbs grabbed Eva and said, "If you are saved Eva, let my dear wife know that I died like a sailor". That was the last Eva Carmichael saw of the captain. She was swept off the ship by a huge wave. Eva saw Tom Pearce on a small rocky beach and yelled to attract his attention. He dived in and swam to the exhausted woman and dragged her to shore. He took her to the cave and broke open case of brandy which had washed up on the beach. He opened a bottle to revive the unconscious woman. A few hours later Tom scaled a cliff in search of help. He followed hoof prints and came by chance upon two men from nearby Glenample Station three and a half miles away. In a state of exhaustion, he told the men of the tragedy. Tom returned to the gorge while the two men rode back to the station to get help. By the time they reached LOCH ARD Gorge, it was cold and dark. The two shipwreck survivors were taken to Glenample Station to recover. Eva stayed at the station for six weeks before returning to Ireland, this time by steamship. In Melbourne, Tom Pearce received a hero's welcome. He was presented with the first gold medal of the Royal Humane Society of Victoria and a £1000 cheque from the Victorian Government. Concerts were performed to honour the young man's bravery and to raise money for those who lost family in the LOCH ARD disaster. Of the 54 crew members and passengers on board, only two survived: the apprentice, Tom Pearce and the young woman passenger, Eva Carmichael, who lost all of her family in the tragedy. Ten days after the LOCH ARD tragedy, salvage rights to the wreck were sold at auction for £2,120. Cargo valued at £3,000 was salvaged and placed on the beach, but most washed back into the sea when another storm developed. The wreck of LOCH ARD still lies at the base of Mutton Bird Island. Much of the cargo has now been salvaged and some was washed up into what is now known as LOCH ARD Gorge. Cargo and artefacts have also been illegally salvaged over many years before protective legislation was introduced. One of the most unlikely pieces of cargo to have survived the shipwreck was a Minton porcelain peacock - one of only nine in the world. The peacock was destined for the Melbourne International Exhibition in 1880. It had been well packed, which gave it adequate protection during the violent storm. Today, the Minton peacock can be seen at the Flagstaff Hill Maritime Museum in Warrnambool. From Australia's most dramatic shipwreck it has now become Australia's most valuable shipwreck artefact and is one of very few 'objects' on the Victorian State Heritage Register. [References: Flagstaff Hill Maritime Village information sheets and documents] Flagstaff Hill’s collection of artefacts from LOCH ARD is significant for being one of the largest collections of artefacts from this shipwreck in Victoria. It is significant for its association with the shipwreck, which is on the Victorian Heritage Register (VHR S417). The collection is significant because of the relationship between the objects, as together they have a high potential to interpret the story of the LOCH ARD. The LOCH ARD collection is archaeologically significant as the remains of a large international passenger and cargo ship. The LOCH ARD collection is historically significant for representing aspects of Victoria’s shipping history and its potential to interpret sub-theme 1.5 of Victoria’s Framework of Historical Themes (living with natural processes). The collection is also historically significant for its association with the LOCH ARD, which was one of the worst and best known shipwrecks in Victoria’s history. Silver plated copper alloy table forks - entrèe from the wreck of the Loch Ard. Length 7⅛ " Some verdigris and silver oxide. Very light encrustation on fork. Hallmark visible.flagstaff hill, warrnambool, shipwrecked coast, flagstaff hill maritime museum, maritime museum, shipwreck coast, flagstaff hill maritime village, great ocean road, loch line, loch ard, captain gibbs, eva carmichael, tom pearce, glenample station, mutton bird island, loch ard gorge, fork -
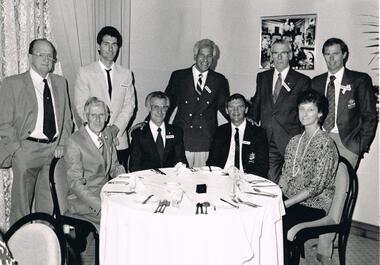
 Mission to Seafarers Victoria
Photograph, Christmas Day 1914 at St John's College, 1914
The Mission and the Ladies Harbour Light Guild organised many social events for seamen especially during the Christmas period. This one is one o the many events organised at the St John's College (formerly Cumloden College between 1891-1905) on 195-201 Alma Road, St Kilda East, in what seems to be the gymnasium (as per the ring hanging from the ceiling on the right). The reverend seen at the back could be Canon John Stephen Hart, successor of Canon Reginald Stephen, who welcomed the groups at the school on this occasions.The photograph depicts a group of seamen seated at tables inside a room waiting for a dinner to be served. Only one lady dressed in white is amongst them. At the back a reverend can be seen standing.Xmas Day 1914 at St John's Collegewwi, st john's college, cumloden college, dinner, christmas, lhlg, st kilda east, alma road -
 4th/19th Prince of Wales's Light Horse Regiment Unit History Room
Booklet, Hazell, Watson & Viney Ltd, War Gases Learn and Live, late 1930's or early 1940's
A soft covered illustrated handbook produced for the public, civil defence services and the home guard covering the nature of war gases, gas attacks, protection, first aid and gas detection tablePrice 6dhandbook, war gases -
Glenelg Shire Council Cultural Collection
Photograph - Photograph - Port of Portland staff, n.d
Port of Portland Authority ArchivesBack: Dean Humphries & Stephen Kingport of portland archives, staff -
 Bendigo Historical Society Inc.
Book - BUSH COLLECTION: LEATHER WALLET (S.A.BUSH), ca. 1880
Leather wallet belonging to Samuel Albert Bush, stamped 'S.A.B.' on front of wallet. Inside the wallet is a photograph of two males (medical students) apparently at the dissecting table - presumably Melbourne University.medicine, education - university -
 Bendigo Historical Society Inc.
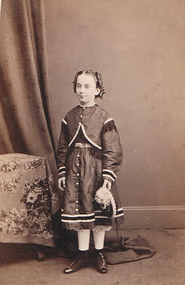
Photograph - GUINEY COLLECTION: CARTE DE VISITE, 1860-1880
Carte de Visite Photographed by Bent at Batchelder's Centre of Pall Mall Sandhurst. B & W Photograph of a young girl standing beside a table. Name written on the back of the card - HannahBent -
 Bendigo Historical Society Inc.
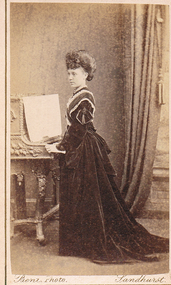
Photograph - GUINEY COLLECTION: CARTE DE VISITE, 1860-1880
Carte de Visite Photographed by Bent at Batchelder's Centre of Pall Mall Sandhurst. B & W Photograph of a young woman in full length dark coloured gown standing beside a table.Bent -
 Bendigo Historical Society Inc.
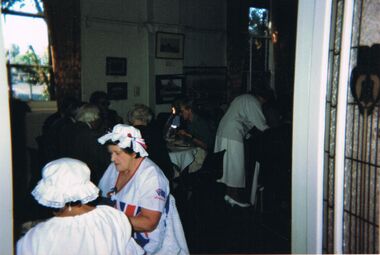
Photograph - DUDLEY HOUSE COLLECTION: SITTING AT DINNER TABLE
COLLECTION OF colour PHOTOGRAPHS re Mrs Watson ( Honoured in Australia Day Awards, Australia day 26.1.1988 - planting of red flowering gum at Dudley House. Guests sitting at dinner tables.photograph, person, female, mrs watson ( honoured in australia day awards, australia day 26.1.1988 - planting of red flowering gum at dudley house. -
 Bendigo Historical Society Inc.
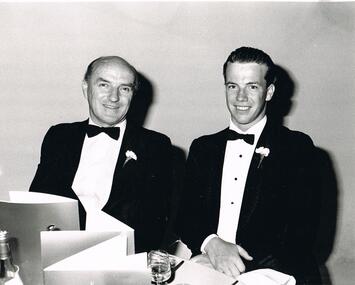
Photograph - BENDIGO ADVERTISER COLLECTION: SPORTS STAR AWARDS PRESENTATIONS
Black and white photograph, multiple people, photograph of Marcus Lovett and Father David sitting together at a dinner table. Bendigo Advertiser description on back of photo: Marcus Lovett and Father Davidrecreations, sports, awards -
 Bendigo Historical Society Inc.
Photograph - BENDIGO ADVERTISER COLLECTION: SPORTS STAR AWARDS PRESENTATIONS
Black and white photograph, multiple people, photograph of a entire room of older people around a dinner table. Bendigo Advertiser description on back of photo: Sports Honorcap With Story Catch "Honor"recreations, sports, awards -
Tatura Irrigation & Wartime Camps Museum
Photograph, A. Beilharz, 1940's
Made in Camp 3, possibly originally part of the 4 x 4 red gum which supported the shed.Colour photograph of wooden carpenter planes, wooden jewel cases and on left a table on which is a portion of a beanie or tea cosy. Coloured red with a black and brown circle and brown/faune lining.camp 3, hand made objects, wooden objects, camp 3 hand crafts, camp 3 carpenter planes, a. beilharz, templer society -
Tatura Irrigation & Wartime Camps Museum
Book, 1945
Book used by internee's child at Camp 3Brown patterned line ruled book. Handwritten for Geometry, Trigonometry and 2 sheets with written tests. Arithmetical and multiplication tables on back. White label "Helmut Ruff, Geometry (exercises), Trigonometry"Helmut Ruff, Geometry (exercises) Trigonometrybook, maths, education, ruff h, camp 3, tatura, ww2 camp 3, books, school -
Tatura Irrigation & Wartime Camps Museum
Book - Exercise, 1943
Book used by internee's child at Camp 3Shades of blue exercise book. Handwritten. Used for geometry. Part of sheet of blotting paper. Arithmetical and multiplication tables on back cover. White label "Helmut Ruff, Geometry (Book 3)""Helmut Ruff, Geometry (Book 3)"education, geometry, ruff h, camp 3, tatura, ww2 camp 3, books, school -
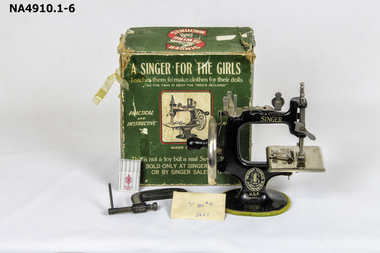 Whitehorse Historical Society Inc.
Leisure object - Singer Sewing Machine - Miniature working model, C1928
The Singer sewing machine was purchased [in New Plymouth, NZ] by the donor, Yvonne's, parents as a birthday/Christmas present when she was about six or maybe a little older – therefore about 1935. Much, much later, in the 1960s, it was given to her daughter, Susan, who like Yvonne seldom used it because if the seam was not correctly tied off the whole seam unravelled.Singer sewing machine and original box. Intended as girls sewing machine to teach them to make dolls clothes. Metal with Singer logo and clamp to secure to table top, with appropriate needles.Singerdomestic items, sewing -
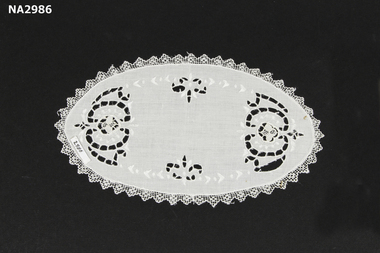 Whitehorse Historical Society Inc.
Textile - Doyley
From the estate of the late Jean Ord, mother of the donor.A oval white dressing table doyley edged in lace with cutwork and embroidery in white, large flower design with needle lace centre at each end and a smaller design at each side centrally.manchester, table linen, handcrafts, embroidery -
 Dandenong/Cranbourne RSL Sub Branch
Functional object - Wallet, Circa 1940's
Wallet belonging to a member of the 2nd AIFBrown leather wallet with metal Rising Sun badge on the front containing currency of various nations and denominations. Also a copy of "Table Tops" dated 11SEP1945 and a motor spirit ration ticket.Genuine calf on a tag inside -
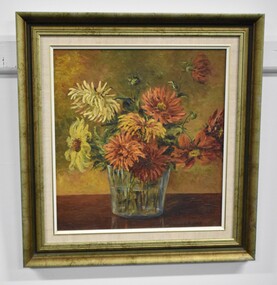 Tatura Irrigation & Wartime Camps Museum
Painting - Oil Painting, Flowers, 1942
The flowers in this painting were grown and tended to with love by Hans Beck in Tatura Camp 3.A glass vase containing orange, white and yellow flowers. The vase half filled with water and is sitting on a wooden table. The background is a mustard colour. The painting has a gold frame and with linen matt.C Rippertstill life, oil painting, flowers -
 Bendigo Historical Society Inc.
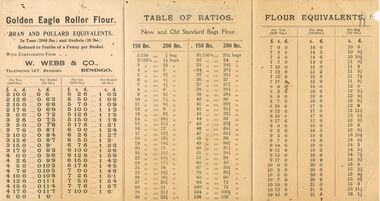
Document - RANDALL COLLECTION: W.WEBB & CO., BENDIGO, BRAN, FLOUR & POLLARD EQUIVALENTS
Document, W.Webb & Co., Bendigo Telephone 127 Bendigo, Golden Eagle Roller Flour, Bran and Pollard Equivalents, Table of Ratios, New and Old Standard Bags Flour, Flour Equivalents.document -
 Beechworth Honey Archive
"Wooden" Diary by Frank Lebbell Frost
This is the diary of Frank L. Frost; a beekeeper who worked in North-East Victoria. It covers from 1915 to 1924.This diary is very significant as it gives details about the methods used by early beekeepers in Australia. As it also contains information such as location and condition of flowering plants preferred by bees in specific locations, this diary is very significant because it can be used to see how those locations have changed over the years.Hand-written diary containing notes, maps, drawings, charts, tables, some newspaper cuttings and financial information. It contains approximately 72 pages. The original diary was encased in wooden frames.hand written, hand-written, diary, beekeeper, record, frost, beechworth honey -
 Lakes Entrance Historical Society
Photograph - Johnsonville School, 1985
Black and white photograph of group of people standing around the picnic table and barbecue following the cutting of the ribbons to open the newly installed portable school room at primary school. Johnsonville Victoriaschools, celebrations -
 Lakes Entrance Historical Society
Photograph - Esplanade Lakes Entrance, 1999
Date made 10 April 1999Color photograph of Esplanade and waterfront. It shows vessels moored at jetty path beside Lakes, seats and picnic tables and newly planted trees on lawn verge of highway. Lakes Entrance VictoriaThe Esplanade Lakes Entrance 10/4/99 (on back)jetties, waterfront, boats and boating -
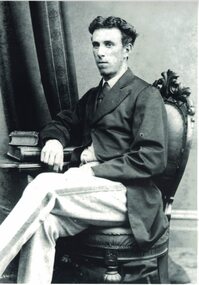 Linton and District Historical Society Inc
Photograph, John Gow Linton
Black and white copy of original portrait showing a man wearing light coloured pants and long dark jacket, seated in a carved chair, resting his right elbow on books on a table.john gow linton -
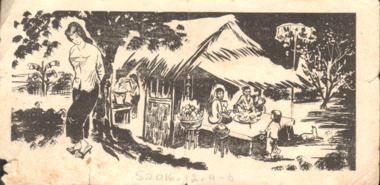 National Vietnam Veterans Museum (NVVM)
Document, Joint US Public Office (JUSPAO), Propaganda Leaflet, 1962 (Approximate)
Black and white leaflet. Picture of a traditional hut with family around table. Lady with her hands tied behind her back under nearby tree. All writing in Vietnamese script.leaflet, propaganda, sgt a moylan, 4 platoon, b coy, 7 rar, 7th battalion, 16063, royal australian infantry corps, arnold george moylan -
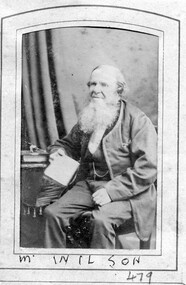 Linton and District Historical Society Inc
Photograph, Mr W. Wilson ("Daddy" Wilson)
Mr Wilson was a member of the Linton Methodist congregation, and a local preacher, who was known as "Daddy" Wilson. He died in 1890, age 83, and is buried in Linton cemetery.Sepia photograph of an older bearded man wearing jacket waistcoat fob chain and trousers, seated with left arm on lap, right arm resting on side table hand holding a book."Mr Wilson".mr w. wilson, william wilson ("daddy" wilson), surman collection -
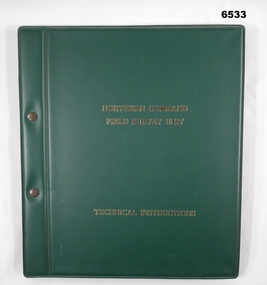 Bendigo Military Museum
Manual - Royal Australian Survey Corps - Northern Command Field Survey Unit Technical Instructions 1966-73, Northern Command Field Survey Unit, Brisbane, Aug 1966 - Feb 1973
The Royal Australian Survey had Field Survey Units located in most States of Australia. Northern Command Field Survey Unit was located in Brisbane. This folder contains technical Instructions for tasks carried out by the Unit from Survey control and data capture through to Field completion. The folder is held together by Chicago screws so that Instructions could be updated when necessary. Instruction No1 Production Data Records Aug 1966 23x pages, Instruction No2 Standard Operating Procedure for B8 Stereoplotting Oct 1967 4 x pages, Instruction No3 Provisional Compilation Specifications 1:100 mapping contouring Oct 1967 (Missing), Instruction No4 Horizontal Control Station Summaries Aug 1972 13 x pages, Instruction No5 Airphotography Mar 1972 8 x pages, Instruction No6 Reconnaisance Station marking and Station Notes Aerodist Operations Mar 1972, 13 x pages, Instruction No7 Field Completion Feb 1973, 7 x pages.A hard green plastic covered manual of 68 x paper pages of typed text diagrams and tables, some fold out Annexes. The pages are held together with two Chicago screwsWhite # "5 " inside front and back coversroyal australian survey corps, rasvy, fortuna, army survey regiment, army svy regt, asr, norther command field survey unit -
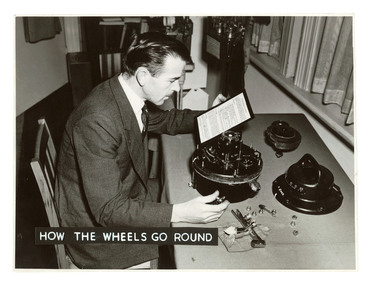 Geoffrey Kaye Museum of Anaesthetic History
Photograph, c1940s
Black and white photograph of a man sitting at a table where he is studying the workings of an Oxford vaporiser which is in parts, and reading the accompanying information panel. There is other anaesthetic equipment around him.•Handwritten in black ink by Geoffrey Kaye on reverse: Frame 20. •Handwritten in grey pencil on reserve: 23. 20 has been crossed out. •Caption on bottom of photograph written in white ink on black paper and glued down: HOW THE WHEELS GO ROUND. oxford vaporiser, anaesthetic equipment -
 Eltham District Historical Society Inc
Negative - Photograph, J.A. McDonald, Heidelberg-Kinglake Road, Sep 1959
Job 56M430 Contractor Hone Just south of east abutment and access road to house showing block in table drain and wash towards Diamond CreekRecord of various Shire of Eltham infrastructure works undertaken during the period of 1952-1962 involving bridge and road reconstruction projects, sometimes with Eltham Shire Council Project Reference numbers quoted. It was during this period that a number of significant improvements were made to roads and new bridges constructed within the shire that remain in place as of present day (2022). In many situations, the photos provide a tangible visible record of infrastructure that existed throughout the early days of the Shire. The album was put together by or under the direction of the Shire Engineer, J.A. McDonald.infrastructure, shire of eltham, bridge construction, 1959-09, heidelberg-kinglake road, road construction