Showing 2842 items matching "wests road"
-
 Mt Dandenong & District Historical Society Inc.
Photograph
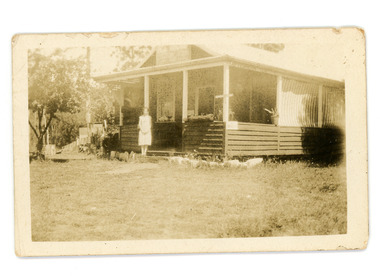
Jim Keogh owned Lot 7 of the Village Settlement. When the new CRB road went through c1920 his block was cut through leaving a small triangle of land on the high side of the CRB road. He built a shop on this piece of land. The store burned down 31/12/1939. The woman on the step in this photo is Win Woodcock.Sepia image of a woman standing in front of a wooden store. Handwritten inscription on reverse by John Lundy-ClarkeJim Keogh's shop on the north west corner of Falls and Main Roads. Opposite diagonally from St Michael's Church of England. photo Nov 1926.jim keogh, keogh, store, shop, crb road, win woodcock -
 Mt Dandenong & District Historical Society Inc.
Photograph
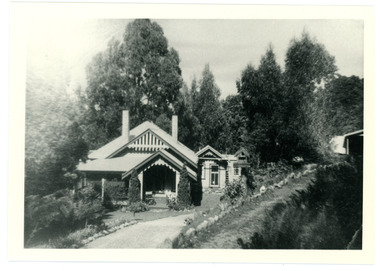
Alf Dorey took up LOTs 6 and 7 in Section 2 . He lived in a house of split timbers on the slope west of where 'The Welkin' was built. Alf sold his LOTs in sections - a piece of LOT 6 going to Edwin L Bell who engaged Ern Badenhop to build a house known as The WelkinBlack and white photograph showing a driveway leading to an ornate house nestled in the trees. Another building can be seen on the rhs. Reverse of photograph has handwritten description by John Lundy-Clarke."The Welkin" Built about 1919 for Bell of matchmaking fame, by Ern Badenhop on Lot 6 Sect 2 Vill. Set. A. DOREY's. Was run as a guest house by Peters family.alf dorey, edwin l bell, bell, ern badenhop, badenhop, the welkin, welkin, peters -
 Mt Dandenong & District Historical Society Inc.
Photograph, Mountjoy Guest-House
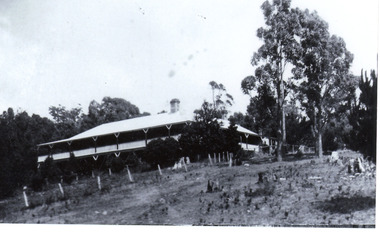
Mountjoy Guest-House showing north and west aspect. The guest house was run by the Jeeves family from 1908 to c1943. After the death of her husband Ellis in 1921, the guest house was run by Eliza Jeeves (nee Hand).Black and white photograph showing large guest house building with gum trees at the side and a cleared area in front. A single chimney is visible.guest house, mountjoy -
 Mt Dandenong & District Historical Society Inc.
Photograph, Eliza Hand on the Verandah of her Shop 1907, 1907
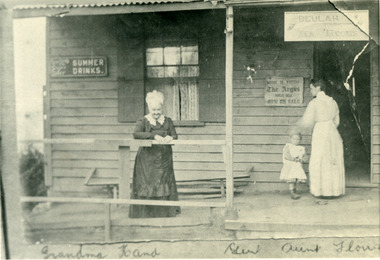
... down but the room is still there (1974) facing Ridge Road... Ridge Road at the west end of the complex. Eliza died 1918 ...1907 photoghraph of Eliza Hand (Grandma Hand), Florence Hand (Aunt Florrie) and little Gert on the verandah of the Beulah Tea Rooms at FiveWays (The Gap). This photograph has a detailed inscription on the back handwritten by John Lundy-Clarke in 1974.1907. Eliza Hand on the verandah of her shop at Kalorama gap with her daughter Florence. Opened as "Beulah Tearooms" it was made a post office in 1909 and Florence Hand became post mistress. It remained active till 1923 when, the building having been sold to Miss McPhee she built the Fiveways store alongside and moved the post office to another room. The verandah was pulled down but the room is still there (1974) facing Ridge Road at the west end of the complex. Eliza died 1918. Florence died 1968.beulah tea rooms, fiveways, the gap, florence hand, eliza hand, miss mcphee, post office -
 Lara Heritage and Historical inc.
Compact
... West cnr. Forest Road South & Canterbury Road West Lara geelong ...This compact was owned by Rose Alice Normington, nee Lupton. She was born in Roto, NSW in 1880 and moved to Victoria with her parents and siblings when she was five years old. They settled in Barker's Creek via Castlemaine. In 1899 Rose married Maurice Normington Jnr who also lived in Barker's Creek. They had six daughters and one son. Rose Normington died in 1966. Information provided by Pam Strijder 2017 - granddaughter of Rose Normington. I think this compact would originate from early in the twentieth century, based on the fact that it contains a zipper.This compact is an example of a high-quality compact which it is thought would be widely owned by ladies early in the twentieth century.Round, black leather lady's powder compact with embroidered top. Zipper on side. Nilcompact -
 Southern Sherbrooke Historical Society Inc.
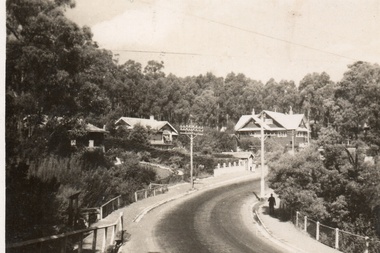
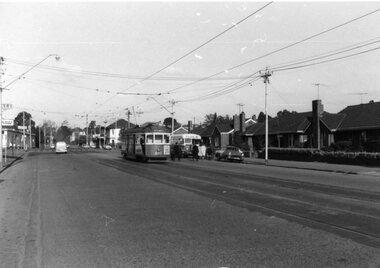
Postcard - Postcard-original-Swans Bend Belgrave, Vic. c.1940s, A Bend In The Road, Belgrave
Sepia-toned postcard featuring bend coming into Belgrave Township from the west. Later known as Swans Corner. Dr Shirley Francis's house in centre of photo. Photo shows a hillside with three houses above the road. A man walks along the lower side of the road. c. 1920s. -
 Southern Sherbrooke Historical Society Inc.
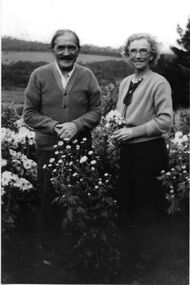
Photograph - Charles Macauley Gray & Minnie Gray
B&w photo of Charles Macauley Gray (sometimes spelled in records as Grey) and Williamina (Minnie) Gray, nee Wilson, lived on a 40-acre farm on the north-west corner of Belgrave-Hallam and Wellington Roads. They are standing among flowers and rolling hills are visible behind them. Both are wearing cardigans over casual clothes. Copy of original photo donated to our society by Kath Oram, a founding member. -
 Ballarat Tramway Museum
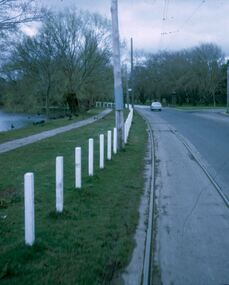
Photograph - Digital Image, Peter Knife, BTM Tram 18 Depot Junction, 19/4/2014
... November and December 2014 and the road moved to the west.... This location was rebuilt during November and December 2014 and the road ...Set of three colour images of BTM tram 18 running in at the end of an operating day. The first image shows the driver at the rear of the tramcar and the next two of the tram crossing Wendouree Parade into the depot. This location was rebuilt during November and December 2014 and the road moved to the west for bicycle safety. Photo by Peter Knife 19/4/2014.Yields information about Ballarat Tramway Museum operations in Wendouree Parade and tram 18Set of three Digital images of colour slides.tramways, tramcars, btm, wendouree parade., depot junction, tram 18 -
 Ballarat Tramway Museum
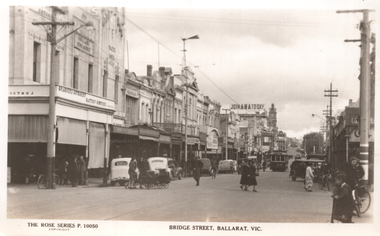
Postcard, Rose Stereograph Co, "Bridge Street, Ballarat Vic.", late 1930s
The photo shows tram 12 in Bridge St Ballarat on its way to Mt Pleasant. The photo is of Bridge St looking west from Peel St. In the photo are a butcher, a newsagent, a sign "Join ANA Today", along with two ladies with prams crossing the road. Wal Jack on the rear of the photo notes it is about 1940. Based on the cars in the photo, late 1930s. Item 5463 has a poor quality negative of this postcard. Yields information about Bridge St Ballarat during the late 1930sPostcard black and white, divided back, with a handwritten note on rear.See image 2 for details of the handwritten note by Wal Jack on the rear. tramways, trams, bridge st, tram 12 -
 Ballarat Tramway Museum
Slide - 27 mm sq slide/s - set of 11, Lilian Butler, Wendouree Parade and Sturt St West, Sep. 1971
Yields information about the streetscapes of Ballarat depot to Pleasant St route and in particular buildings and people that crewed the trams.Set of eleven Colour 27 x 27 mm slide in a Kodachrome cardboard mount. .1 - Wendouree Parade looking west towards St Aidans Drive - the gate pillars can be seen. .2 - ditto looking west - Fairyland .3 - ditto looking towards Gardens Loop .4 - No. 41 at Gardens Loop, with destination of Gardens via Drummond North .5 - ditto showing Mt Pleasant .6 - ditto, just past the now BTM Depot Junction. .7 - Carlton St - showing the gates .8 - Looking towards Hamilton Ave from within Carlton St loop with the signal showing red. .9 - Turning from Hamilton Ave into Sturt St West. .10 - Sturt St west looking east with the Loreto convent walls on the left hand side. .11 - Sturt St - Pleasant St intersection - showing road surface, a tram coming towards the intersection and buildings on either side. Slide mount date September 1971. Photo from the collection of Lilian Butler.ballarat, tramways, trams, wendouree parade, st aidans drive, gardens loop, depot junction, carlton st, carlton st loop, signals, sturt st west, pleasant st, tram 41 -
 Ballarat Tramway Museum
Photograph - Black & White Photograph/s set of 2, Charles Craig, 1950s
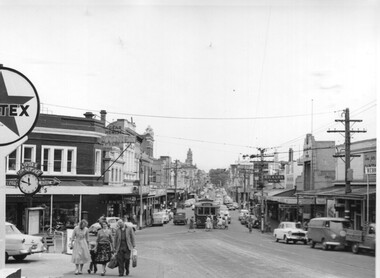
Yields information about the traffic and appearance of Bridge St during the 1950's.Set of two black and white photographs of trams in Bridge St at the intersection with Main Road and Victoria St .1 - tram at the intersection with Stones Corner and other shops in the background. Includes the Caltex services station, the Listers for Service clock and direction sign, with many people leaving the tram and walking along Victoria St. Has the Gear Chemist, Ricksha Paint and other shops in the view. .2 - No. 28 - for Gardens via Sturt St West and the intersection. Photo possibly early 1950's. Both photos by Charles Craig trams, tramways, bridge st, main road, victoria st, tram 28 -
 Ballarat Tramway Museum
Photograph - Black & White Photograph/s, Negative, Ellis Collection, c1950
Yields information about the appearance of Bridge St and the use of the trams c1950.Black and white photograph of a bogie tram 22 west bound in Bridge St. Has a group of ladies on either side of the road waiting to board? Note the signs on the poles on either side of the roadway. Has the Waratah Motors, Roger David stores on the west side of the street. c1950. Note the road lifting over the Yarrowee River bridge. The two signs on either side of the road "No Parking over 1 hour Park 1 Foot from kerb" Negative number 1140. Negative scanned at 2400dpi. On the top edge of one of the prints "same as 1094"trams, tramways, ballarat, bridge st, signs, tram 22 -
 Ballarat Tramway Museum
Slide - 35mm slide/s, David Verrier, 6/10/1964 12:00:00 AM
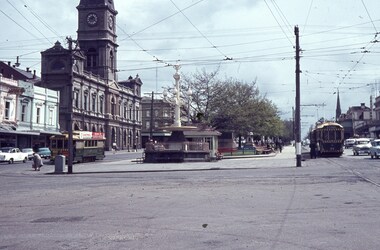
Yields information about the appearance of the City Centre tramway area, and the tram services that ran from there.Agfa colour slide, white blue plastic mount. Photograph by David Verrier of looking west at the intersection of Sturt and Lydiard St with trams 28 (south side)( Gardens), and on the north side tram 34 (Mt Pleasant) and behind it No. 40 (Lydiard St North). Has the Town Hall, tram stop shelter and the fountain in the view. Note the traction power electrical box on the corner with an elderly lady about to cross the road. Photo taken 6/10/1964.On back of slide in pencil "Tues 6/10/64 Ballarat, Sturt and Lydiard St, RT 34 Mt Pleasant, 40 Lydiard Nth LT 28 Gardens"tramways, trams, sturt st, tramway centre, lydiard st, town hall, tram 34, tram 40, tram 28 -
 Ballarat Tramway Museum
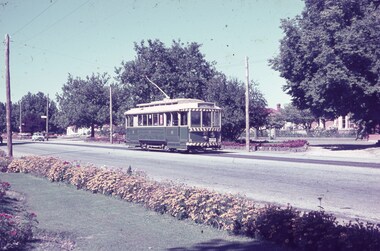
Slide - 35mm slide/s, Keith Caldwell, c1963
Yields information about 21 and the Victoria St route.Agfa colour slide, white cardboard mount, photo by Keith Caldwell undated, c1963. Tram 21 in bound in Victoria St showing the card beds on either side of there road. Tram has the destination of Gardens via Sturt St West and a Whitehorse Whiskey advert on the front panel. tramways, trams, victoria st, tram 21 -
 Ballarat Tramway Museum
Photograph - Colour Photograph/s, Austin Brehaut, Mar. 1999
Set of 23 photographs taken by Austin Brehaut during March and April 1999 of power poles along the former tram routes that still have signs of the former tram stops. An accompanying note (scanned) written by Austin Brehaut is reproduced below in Other Information - see related documents. 1096.1 - Sturt St at Doveton St., south (down) side. .2 - Drummond St. Sth (east side) outside St. Patrick's School between Dana and Eyre St. .3 - Drummond St. Sth, cnr Urquhart St. (east side) .4 - Drummond St. Sth, cnr South St. (east side) .5 - Drummond St. Sth, cnr Sebastopol St. (east side) .6 - Drummond St. Sth, cnr Latrobe St. (east side) .7 - Drummond St. Sth, cnr Darling St. .8 - Sturt St. cnr Ripon St. (North East side) .9 - Ripon St. Nth, cnr Sussex St. .10 - Ripon St. Nth, cnr Mair St. (South West Corner) .11 - Ripon St. Nth, cnr Mair St. (North East Corner) .12 - Macarthur St. cnr Burbank St. (up side) .13 - Lydiard St. Nth, cnr Clarendon St. (east side) .14 - Lydiard St. Nth, cnr Howard St. (west side) .15 - Lydiard St. Nth, cnr Gregory St. (west side) .16 - Lydiard St. Nth, cnr Howitt St. (west side) .17 - Lydiard St. Nth, near Walker St., (east side) .18 - Lydiard St. Nth, cnr Landsborough St. (east side) .19 - Barkly St. cnr Main Road (up side) .20 - Barkly St. near Haymes Cres (down side) .21 - Barkly St., near Young St. (down side) .22 - Barkly St, Cameron St (up side) .23 - Barkly St., at Cobden St. terminus (west side) .1 - April 99, .2 > .10, 9/3/99, .11 > .18 - March 1999, .19 > .23 - April 1999. See also Reg. Item 768.1 > 768.6 for another group of tram stop photos in Drummond St. in 1997. On Fujifilm paper.On rear of each photo in blue ink is location at date at the top of the photo and in the bottom right hand corner - initials "APB"tram stops, power poles, barkly st., lydiard st. nth, ripon st., sturt st., drummond st. sth -
 Ballarat Tramway Museum
Newspaper, The Courier Ballarat, "In Retrospect", 20/09/1994 12:00:00 AM
Newspaper cutting from The Courier, Ballarat, Tuesday 20/9/1994 of the reproduction of a postcard photograph showing an ESCo tram soon after opening running west bound in Sturt St with the Town Hall in the background. Shows the development of the Gardens at the time and buildings on either side of Sturt St. and type of poles etc. The tram is fitted with a destination board on the front dash - the type used soon after opening in 1905. Caption of the photo says "Trams run up Sturt St and people relax in this postcard sent in December 1907. Ballarat's Town Hall is pictured at right." Also has an item in the "In Retrospect" section of the newspaper, about the construction of a new road to avoid two level crossings between Talbot and Clunes. Item compiled by Lorrie BrownIn bottom right hand corner, in blue ink "Tues 20/9/94".trams, tramways, sturt st, esco, town hall -
 Ballarat Tramway Museum
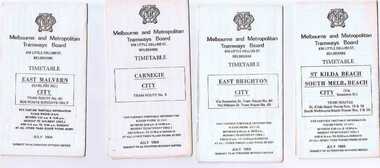
Ephemera - Timetable/s, Melbourne and Metropolitan Tramways Board (MMTB), Set of 24 MMTB Melbourne tram timetables, 1969
... 55 & 56, West Coburg - City - (William St.) - Domain Road... Road) - City # .3 - Route 5 - Malvern Burk Road, - City # .4 ...Set of 24 MMTB timetables for various routes, dated July 1969. Generally includes Sat and Suns, Good Friday and Christmas day as well as weekdays, unless noted otherwise. Also includes a map of the route, detailed time points, sections, connecting services, fares, and organisation address - 616 Little Collins St. Melbourne. Have been folded into ten portions. All on white paper unless noted otherwise. Items shown with an # - have a sticker modifying timetable information details on the front page. 1154.1 - Route 4 - Carnegie - City .2 - Route 4D - East Malvern (Darling Road) - City # .3 - Route 5 - Malvern Burk Road, - City # .4 - Route 6 - Glen Iris - City # .5 - Route 7 - Camberwell - City # .6 - Route 8 - Toorak - City # .7 - Routes 9, 10 and 12 - South Melbourne and St Kilda Beach - City (Brunswick St.) - via Collins St. .8 - Routes 10, 11 - West Preston and routes 9 & 9A Northcote .9 - Routes 15 & 22 - Moreland and 1 & 21 - East Coburg .10 - Route - 15 & 16 - St Kilda Beach and 1 & 2A - South Melbourne Beach - via Swanston St. .11 - Route 19 - North Coburg - City # .12 - Route 42 - Mont Albert - City # .13 - Routes 48 - North Balwyn and Burwood - City .14 - as above, but for Saturdays and Sundays on pink paper .15 - Routes 55 & 56, West Coburg - City - (William St.) - Domain Road. .16 - Route 57 - West Maribyrnong - City .17 - Route 59 - Essendon (Aerodrome) - City .18 - Route 64 & 65 - East Brighton - City .19 - Route 69 - Kew Cotham Road - St. Kilda Beach # .20 - Route 70 - Wattle Park - City # .21 - Routes 77 - Prahran - City, 78 - North Richmond - Prahran, 79 - North Richmond - St Kilda Beach .22 - Route 82 - Footscray to Moonee Ponds .23 - Route 88 - East Preston - City and Route 96, East Brunswick - City .24 - as above but for Saturdays and Sundays on pink paper. Images of a sample of documents added 16-11-2013.mmtb, timetables, melbourne -
 Ballarat Tramway Museum
Slide - 35mm slide/s - set of 14, Noel Simons, 22/05/1971 12:00:00 AM
... Parade Ballarat Ballarat goldfields Tramways trams Sturt St. West ...Set of 14 transparencies taken on 22/5/1971. 1170.1 - No. 31 outbound in Sturt St. West near Murray St. - has "To read pack Tilt Train" roof advert. 1170.2 - No. 31 ditto, near Russel St. loop. 1170.3 - No. 14 in Wendouree Parade at what is now BTM Depot Junction, near Toilet block. 1170.4 - No. 31 in Wendouree Parade at the North Gardens, approaching St. Aidans Drive 1170.5 - Scrubber car on "O " road with tennis court alongside. 1170.6 - Scrubber, 43 and 3 8 on 0 road at depot. 1170.7 - 3 8 and 43 on 0 road at depot 1170.8 - 38 on 0 road at depot, showing sharpness of 0 road curves. 1170.9 - 39 and 40 inside depot. 40 has "To read pack, tilt tram" roof advertisement. 1170. 10 - Tram 27 passes the depot gates, east bound with Lake Wendouree in the background. 1170.11 - SEC Depot, from Wendouree Parade, with No. 38 on "O" road. 1170.12 - trams 14 and 30 at depot loop, Wendouree Parade 1170.13 - ditto 1170.14 - "Cars take following line" sign on tram stop pole at Wendouree Parade Loop. All have date stamp of "28 Apr 1971" in purple ink on base. All blue ink unless otherwise noted. 1170.1 - "No. 31 in Sturt St. West between Murray and Wonliss Sts." 1170.2 - "No. 31 approaching Russell St. Loop in Sturt St. West Ballarat" 1170.3 - "No. 14 Gardens" 1170.4 - "No. 3 1 North Gardens 1170.5 - "Track cleaner car (formerly No. 23) at Wendouree Depot" 1170.6 - "Track cleaner, No. 43 and No. 38 at Wendouree Depot" 1170.7 - "No. 43 and No. 38 at Wendouree Depot" 1170.8 - "No. 38 gazes across Lake Wendouree from depot" 1170.9 - "Nos 3 9 and 40 in Wendouree Depot" 1170.10 - "No. 27 passing Wendouree Depot" 1170.11 - "Wendouree Depot with No. 38 on road No. "O" on left. 1170.12 - "Depot Loop" 1170.13 - "Depot Loop" 1170.14 - "Depot" tramways, trams, sturt st. west, wendouree parade, o road, depot, depot loop, signs, bliss bombs, tram 14, tram 27, tram 30, tram 31, tram 38, tram 39, tram 40, tram 43, tram scrubber -
 Ballarat Tramway Museum
Slide - 35mm slide/s - set of 9, Noel Simons, Sept. 1971
Set of 9 Kodak Ready-mount with slides made from the Association of Railway Enthusiast Provincial Tramways film strip. Reference Item 2560 details the ARE Film Strip, and provide references to other slides. See also Reg. item 1164. 1174.9 on plain white mount. 1174.1 - Tram 40 North bound for Lydiard St. North at the Railway Gates, with the gates closed. Tram carrying a heavy load of passengers. Railway station building and car park in background. Taken from the signal box. 1174.2 - Tram 12 bound for Gardens, photographed across the median strip plantation near Dawson St. Image i2a - adjusted 9/2021 to remove colour cast. 1174.3 - Tram 43 in bound along Wendouree Parade near Barrett Ave, passing a former tram stop and with "Warning Oncoming Trams" sign mounted on an adjacent pole. See also Reg. item 1172.1 for a photo taken in May 1971. This photo taken after the closure of the Victoria St. line, as the tram stop has been painted out. 1174.4 - Looking along the track to Sebastopol terminus on the west side of Albert St. - telephoto shot showing bogie tram in the far distance. Shows the nature of the track, poles, tram stop frequency and in the fare distance the terminus. Also show the trees that used to be along this section of the track. 1174.5 - No. 42 showing "Special" in Macarthur St. approaching Drummond St. north. Photo taken from under the verandah of a shop on the south side of the street that were many years later to become the Tramcar Restaurant. Note metal fence to cemetery. 1174.6 - Nos. 21 (Sebastopol) crossing 14 (Lydiard St. Nth) at the loop between Sayle and Grey St. Photo taken looking south. 1174.7 - No. 12 bound for Mt Pleasant, in Bridge St. about to stop at the junction for the two routes. Telephoto photo looking west along Bridge St. with many cars in the photo. Very few people on the street itself. 1174.8 - No. 30 and 17 at the City Terminus, on the north side of Sturt St. Taken from the Post Office corner with the Town Hall in the background. 1174.9 - No. 39 inbound along Sturt St. West. with many cars on the road. Bus stop on a pole on the other side of the road.1174.1 - "No. 40 on Lydiard St. North service waits at the level crossing at Ballarat Railway Station." 1174.2 - "No. 12 bound for 'Gardens' seen across the centre plantation in Sturt St." 1174.3 - "Barrett Ave." 1174.4 - "The Sebastopol route near the terminus" 1174.6 - "Nos. 21 and 14 crossing at Sayle St. Loop on Sebastopol route" 1174.7 - "No. 12 at Eastern end of Bridge St." 1174.8 - "Nos. 30 and 17 in Sturt St. at Cnr of Lydiard St." 1174.9 - "No. 39 City bound from 'Gardens" in Sturt St. West" All have date stamp of "Sep 1971" in black ink. Writing in blue ink.tramways, trams, lydiard st. nth, railway crossing, sturt st, wendouree parade, sebastopol, macarthur st., bridge st., sturt st. west, tram 12, tram 14, tram 17, tram 21, tram 30, tram 39, tram 40, tram 42, tram 43 -
 Ballarat Tramway Museum
Slide - 35mm slide/s - set of 24, Noel Simons, 20/05/1971 12:00:00 AM
Set of 24 transparencies taken on 20/5/1971 on Kodak mounts. 1195.1 - Bendigo 19 arriving at Charing Cross en route to North Bendigo with Fountain Plaza and the City Family Hotel in the background. No. 19 has two roof ads for the SEC. -'Electricity better for cooking' and 'Everything's under control in my all electric kitchen' 1195.2 - as above, but standing at the Charing cross stop, with the Beehive Stores and other buildings along the east side of Pall Mall in the background. 1195.3 - No 21 ex Golden Square crossing View St. trackwork in front of No. 25 waiting to depart for Quarry Hill. No.21 has two roof ads (as for No.19 in 1195.1) and No.25 has one SEC roof ad and another. Ezywalkin sign in the background, and Fountain Plaza. 1195.4 - as for 1195.3, but after 21 has arrived and 25 left for Quarry Hill. Has Ezywalkin store and the Beehive store in the background. 1195.5 - No. 5 at the Eaglehawk terminus. Photo taken with a cannon in foreground looking along High St. Eaglehawk. Has shops on the west side of High St. in the background. 1195.6 - No. 5 at the Eaglehawk terminus, close up of the rear of the tram - note tow bar arrangement. Has destination of Quarry Hill. 1195.7-Nos.25 and 5 crossing at the Thorpe St. Loop, California Gully. No. 25 bound for Eaglehawk (has SEC Briquette and electric cooking roof ads) and 5 en route for Quarry Hill with a SEC and Cinzano roof ad. 1195.8 - as for 1195.7, but after trams have passed each other. Has Borough Auto Service building in the background. 1195.9 - No. 5 in Mt Korong Road, towards Bamard Street, photo taken after tram has passed photographer. 1195.10 - No. 30 at the Golden Square terminus with the Milk Bar on the right hand side of the photograph. 1195.11 - No. 30 inbound at Fire Station Loop, High St. Golden Square. Has old fire station in the background. Passengers are boarding the tramcar. 1195.12 - No. 30 in High St, bound for North Bendigo between Vine and Wattle Streets. 1195.13 - No. 5 bound for Eaglehawk waits at Iron Bark Gully Loop, at Hayes St. 1195.14 - No. 5 and No. 2 crossing at Iron Bark Gully Loop. 1195.15 - No. 5 bound for Eaglehawk leaving the Manchester Loop, Long gully. 1195.16 - No. 5 passing William Street, Long Gully en route to Eaglehawk. 1195.17 - No. 5 just before the California Gully Crossing Loop. 1195.18 - Nos. 5 and 26 crossing at California Gully crossing Loop. No. 5 heading to Eaglehawk, 26, Quarry Hill. 1195.19 - No. 5 in High St. Eaglehawk with Bob Moyle's Victoria Hotel and the TAB in the background. 1195.20 - No. 5 in High St. Eaglehawk approaching the terminus. Photo taken after the tram has passed the photographer. Has Foodland store and J. Best Fruit supply in the background, along with Eaglehawk Town Hall. 1195.21 - No. 5 at the Eaglehawk terminus, photo taken along seldom used track along High St. 1195.22 - as for 1195.22 - but at the very end of the track. 1195.23 - No. 5 en route for Quarry Hill climbs High St. Eaglehawk with the Victoria Hotel and Eaglehawk Town Hall in the background. 1195.24 - No. 5 and 25 crossing at Jobs Gully Loop. Note 25 has a black on white destination roll, while No. 5 has a white on black destination roll. Information written on in black ink and date stamped on purple ink. 1195.1 - "No. 19 arrives at Charing Cross Bendigo from Golden Square" 1195.2 - "No. 19 about to leave Charing Cross for North Bendigo" 1195.3 - "No. 25 awaiting departure for Quarry Hill, watches No. 21 arrive at Charring Cross from Golden Square" 1195.4 - "No. 21 on North Bendigo service and No. 25 on Quarry Hill run await departure at Charing Cross" 1195.5 - "No. 5 at Eaglehawk terminus" 1195.6 - "No. 5 at Eaglehawk terminus" 1195.7 - "Nos. 5 and 25 crossing at Thorpe St. Loop, California". 1195.8 - "Nos. 25 and 5 crossing Thorpe St. Loop, California Gully". 1195.9 - "No. 5 descending Mt Korong Rd. towards Bamard St." 1195.10 - "Birney car No. 30 at Golden Square terminus" 1195.11 - "Birney car No. 30 in High Street near Thistle Street (Fire Station Loop)" 1195.12 - "No. 30 in High St. between vine and Wattle Streets" 1195.13 - "No. 25 at Hayes Street Loop Iron Bark". 1195.14 - "Nos. 2 and 5 crossing at Hayes Street Loop Iron Bark" 1195.15 - "No. 5 at Manchester Loop opposite Havilah Road, Long Gully" 1195.16 - "No. 5 passing William Street, Long Gully". 1195.17 - "No. 5 at California Gully" 1195,18 - "Nos. 26 and 5 at Thorpe St. Loop, California Gully". 1195.19 - "No. 5 in High St. Eaglehawk". 1195.20 - "No. 5 approaching Eaglehawk terminus" 1195.21 - "No. 5 at Eaglehawk terminus" 1195.22 - "No. 5 at Eaglehawk terminus" 1195.23 - "No. 5 in High St. Eaglehawk" tramways, trams, bendigo, charing cross, eaglehawk, california gully, golden square, iron bark gully, jobs gully, tram 2, tram 5, tram 19, tram 21, tram 25, tram 26, tram 30 -
 Ballarat Tramway Museum
Slide - 35mm slide/s - set of 32, Noel Simons, 25/02/1971 12:00:00 AM
Set of 31 transparencies taken on 25/2/1972 on Kodak mounts. 1201.1 - Bendigo No. 26 in Bond St. just after leaving Long Gully en route for Quarry Hill. Has Norris Supermarket in background. Has two SEC roof ads. 1201.2 - No. 26 climbing View St. from Charing Cross en route to Eaglehawk. Has ANZ bank and AMOCO service station in background. 1201.3 - as for 1201.3, but after tram has passed photographer. Has buildings west of Mackenzie St. in photograph. 1201.4 - Tram stop and centre of the road pole with two "CARS STOP BY REQUEST" signs mounted on pole at the corner of Mackenzie St. 1201.5 - same position as for 1201.3, but with No. 5 descending the street. 1201.6 - same position as for 1201.2, but with No. 5 descending the street. Photo taken after tram has passed photographer. 1201.7 - No. 7 in Nolan St. from across the park at Lake Weeroona. 1201.8 - No. 7 entering McCrae St from Nolan St. - distant view. Note "TRAM "sign on left hand side under tree and overhead in McCrae St. from former track that once was in this street. 1201.9 - No. 7 in High St. with Cathedral in background. Tram en route to North Bendigo. Note scaffolding around Cathedral main spire area. 1201.10 - No. 7 crossing Bendigo Creek bridge in High St. near Golden Square. Has a Caltex Service station in the background. 1201.11 - No. 7 at Golden Square terminus with Sunburst Fruit Juices and a Peters Ice cream delivery vans alongside. 1201.12 - as for 1201.11 but photo taken from behind tram, with the end of the rails in the photograph. 1201.13 - No. 7 and 21 in Pall Mall at Charing Cross with No. 5 in the background. Taken some distance away from the location. 1201.14 - No. 7 at Golden Square terminus, taken a short distance from the tram terminus. Shows Milk Bar on right hand side and the hotel on the left hand side. Taken from the south side of the roadway. 1201.15 - as from 1201.14 but taken from the north side of the roadway. 1201.16 - No 5 waiting at California Gully loop. Distant photo showing surrounds 1201.17 - No. 5 en route for Quarry Hill crossing No. 26 at California Gully. 1201.18 - No. 26 at Eaglehawk terminus with Eaglehawk Town Hall and Post Office in background. 1201.19 - No. 21 arriving at Charing Cross en route to North Bendigo. Has Alexandra Fountain in the background, ANZ bank RACV building, and other buildings on the north side of Pall Mall or Nolan St. 1201.20 - No. 26 en route for Quarry Hill at Charing Cross, with crew standing by front door. Has Colonial Mutual life building, Armstrong Tyre Service (Firestone) and a sign for Cohns Drinks in the background. 1201.21 - as for 1201.20 but with No. 5 en route to Eaglehawk now in photograph. 1201.22 - No. 26 at Quarry Hill terminus. 1201.23 - No. 26 at Quarry Hill terminus, view of front portion of tram only from a gate at the Bendigo cemetery. 1201.24 - Track at the end of the Quarry Hill line showing the point blades of the former "Y" terminus and the overhead for this. 1201.25 - No. 2 at the Quarry Hill terminus, looking along the former Trackwork. 1201.26 - as for 1201.25 1201.27 - number not used. 1201.28 - Golden Square terminus from some distance from the actual terminus, showing the Warning sign "TRAM" for motorists from the south. No. 7 at the terminus. 1201.29 - No. 7 passing through the Golden Square shopping centre. Numerous cars and pedestrians. Tram en route for North Bendigo. 1201.30 - No. 7 in High St. Golden Square, en route for North Bendigo. Photo taken after tram has passed photographer. 1201.31 - No. 7 in High St. just past Wattle St. with the Cathedral in the background. Tram has two SEC roof ads good side on photo, 'Everything's fine in my all electric kitchen' and 'Electrical cooking - clean, quick, economical'. 1201.32 - No. 7 in High St. nearing Wattle St. Has Cathedral in the background. Photo taken after tram has passed photographer.Information written on in black ink and date stamped on purple ink. 1201.1 - "No. 26 in Bond St just after leaving Long Gully" 1201.2 - "No. 26 climbing View St. from Charing Cross" 1201.3 - "No. 26 ascending View St. from Charing Cross (At Mackenzie St.)" 1201.4 - "View St. & Mackenzie St." 1201.5 - "No. 5 in View St. near Mackenzie St." 1201.6 - "No. 5 in View St. nearing Charing Cross." 1201.7 - "No. 7 in Nolan St. seen from Lake Weeroona Park." 1201.8 - "No. 7 entering McRae St. from Nolan St. Note "TRAM" warning sign on left. 1201.9 - "No. 7 in High St. passing Short St." 1201.10 - "No. 7 crossing Bendigo Creek bridge in High St. near Golden Square." 1201.11 - "No. 7 at Golden Square terminus" 1201.12 - "No. 7 at Golden Square terminus" 1201.13 - "No 7, 21 and 5 at Charing Cross" 1201.14 - "No. 7 at Golden Square terminus" 1201.15 - "No. 7 at Golden Square terminus" 1201.16 - "No 5 waiting at California Gully loop." 1201.17 - "Nos. 5 and 26 crossing at California Gully loop" 1201.18 - "No. 26 at Eaglehawk terminus" 1201.19 - "No. 21 arriving at Charing Cross from Golden Square" 1201.20 - "No. 26 at Charing Cross" 1201.21 - "Nos. 5 and 26 at Charing Cross." 1201.22 - "No. 26 at Quarry Hill terminus" 1201.23 - "No. 26 at Quarry Hill terminus seen through the gates of the Bendigo Cemetery." 1201.24 - "Quarry Hill terminus showing remains for former double track layout abandoned before 1964." 1201.25 - "No. 2 at Quarry Hill terminus" 1201.26 - "No. 2 at Quarry Hill terminus" 1201.28 - "The Southern approach to Golden Square with No. 7 standing at the terminus, "TRAM" warning sign on the left. 1201.29 - "No. 7 passing through Golden Square Shopping Centre" 1201.30 - "No. 7 in High St. Golden Square" 1201.31 - "No. 7 in High St. passing Wattle St." 1201.32 - "No. 7 in High St. nearing Wattle St."tramways, trams, bendigo, bond st., view st., nolan st., high st., eaglehawk, california gully, charing cross, quarry hill, trackwork, tram 2, tram 5, tram 7, tram 21, tram 26 -
 Ballarat Tramway Museum
Slide - 35mm slide/s - set of 25, Noel Simons, 26/02/1972 12:00:00 AM
Set of 25 transparencies taken on 26/2/1972 on Kodak mounts. 1204.1 - Bendigo No. 5 - just arrived at Manchester Loop near Havilah Road, Long Gully. Photo taken after tram has passed photographer. 1204.2 - No. 26 in Backhaus St. Long Gully passing William St, en route to Quarry Hill. Photo taken after tram has passed photographer. 1204.3 - No. 5 climbing the High St. Hill Eaglehawk, heading for Quarry Hill with the buildings on the West side of High St. in the background, including the Eaglehawk Town Hall. 1204.4 - as for 1204.3, but tram close up. 1204.5 - as for 1204.3, but after tram has passed photographer. 1204.6 - No. 5 at intersection of Mt Korong Road Ironbark and Calder Highway, with the AMPOL service 'station in the background. Photo taken after tram has passed photographer. 1204.7 - No. 26 en route to Quarry Hill shortly after leaving Needle Loop, passing William St., Long Gully. 1204.8 - No. 5 at California Gully Loop, picking up a passenger, with the shops at Long Gully in the background. Photo taken after tram has passed photographer. 1204.9 - No. 5 in Long Gully, en route to Quarry Hill. Photo taken after tram has passed photographer. 1204.10 - No. 2 at Eaglehawk terminus with the Eaglehawk Town Hall and Post Office in the background. Tram has two SEC roof ads. 1204.11 - No. 2 at Eaglehawk terminus, close up. 1204.12 - as for 1204.11, but through the park gates. 1204.13 - as for 1204.11, but with tram stop shelters in the foreground and buildings on the West side of High St in the background. 1204.14 - No. 2 in Mt. Korong Rd, midway between California Gully Loop and Needle Loop. Photo taken after tram has passed photographer. 1204.15 - No. 5 in Long Gully, en route to Quarry Hill. 1204.16 - as for 1204.15, but with trams departed loop. Has an ESSO service station in the background. 1204.17 - No. 26 leaves Charing Cross up View St.. Photo taken after tram has passed photographer. Has Armstrong Tyre Service, Cohns Drinks ad on a building and the T&G building in the background. Also Firestone ads on the tyre service building. 1204.18 - No. 5 waits at Charing Cross with the Alexandra Fountain in the background. Tram has two SEC roof ads, 'Everything s fine in my all electric kitchen' and 'Electricity Best for Cooking'. Has RACV, Colonial Mutual Life buildings in the background and the planting areas around Charing Cross gardens in the foreground. 1204.19 - No. 21 en route to North Bendigo arrives at Charing Cross, with passengers waiting to board. No. 5 in the background. In the background is the Fountain Gate Plaza building and the City Family Hotel. 1204.20 - as for 1204.19, but with No. 7 en route to Golden Square. 1204.21 - as for 1204.19, but closer up. 1204.22 - as for 1204.18 1204.23 - No. 25 in Nolan St. near the crossing of Bendigo Creek, running a special tram tour. 1204.24 - No. 25 on a special charter, in Weeroona Ave. at Cnr of Caledonia St. passing the Gas works. 1204.25 - Nos. 25 (showing Golden Square), 7 and 26 at Charing Cross. Has fountain in the background.Information written on in blue ink and date stamped on purple ink. 1204.1 - "No. 5 at Manchester Loop, near Havilah Rd. Long Gully." 1204.2 - "No. 26 in Backhaus St. Long Gully passing William St." 1204.3 - "No. 5 in High St. Eaglehawk." 1204.4 - "No. 5 in High St. Eaglehawk." 1204.5 - "No. 5 in High St. Eaglehawk." 1204.6 - "No. 5 in Mt. Korong Rd., Ironbark, passing Calder Highway Junctn." 1204.7 - "No. 26 shortly after leaving Needle Loop, passing William St., Long Gully. No. 5 cresting hill in distance." 1204.8 - "No. 5 at California Gully Loop." 1204.9 - "No. 5 in Long Gully" 1204.10 - "No. 2 at Eaglehawk terminus." 1204.11 - "No. 2 at Eaglehawk terminus." 1204.12 - "No. 2 at Eaglehawk terminus." 1204.13 - "No. 2 at Eaglehawk terminus." 1204.14 - "No. 2 in Mt. Korong Rd, midway between California Gully Loop and Needle Loop. 1204.15 - "Nos. 2 and 26 crossing at Long Gully." 1204.16 - "No. 26 leaves Long Gully loop for Eaglehawk as No. 2 pulls out of the far end towards Bendigo" 1204.17 - "No. 26 beginning the climb up View St. from Charing Cross." 1204.18 - "No. 5 at Charing Cross." 1204.19 - "No 21 arrives at Charing Cross from Golden Square while No. 5 awaits departure time for Eaglehawk." 1204.20 - "Nos. 7, 21, and 2 (behind which is No. 5) at Charing Cross." 1204.21 - "Nos. 7, 21, and 2 at Charing Cross." 1204.22 - "No. 5 at Charing Cross." 1204.23 - "No. 25 in Nolan St. near Bendigo creek crossing" 1204.24 - "No. 25 in Weeroona Ave. at cnr of Caledonia St." 1204.25 - "Nos. 25, 7, 26 and 2 (behind 26) at Charing Cross."tramways, trams, bendigo, eaglehawk, long gully, california gully, charing cross, north bendigo, tram 2, tram 5, tram 7, tram 21, tram 25, tram 26 -
 Ballarat Tramway Museum
Album - Photo Album, Newstar, 1960s to 1970's
Photographic album containing 39 Colour postcards of Melbourne trams. The album consists of 30 leaves of dark grey heavy paper with three creases on left hand side of sheet, bound into a heavy bluey grey folder, embossed in gold 'Scrap Book" and bound with bluey grey string with two holes. The cover has been embossed with a the blue grey in swirls. Inside of back cover is a white label, "A New Star Product", with a please ask for No. with "425" stamped on. Postcards have been glued into the album. Entries have been kept to a single line - cards are able to be dated from buildings, whether the trams have marker lights, types of motor cars and general Melbourne history. Image files in page number order. Image 15 is of book. All taken with a electronic camera. Page 1 - Night photo - Flinders and Swanston St. - with "Greetings from Huntingdale" embossed in gold. Flinders St. station, with "Greetings from Huntingdale" embossed in gold. (post 1972 ) St. Kilda road with the Shrine of Remembrance in the background and W2 453 inbound on route 6. (post 1974) Page 2 - Bourke St, looking from Parliament House westwards, with Z8 inbound - after 13/8/1975 on route 89. Bourke St, looking east from Queen St., night photo, early 1970's. Princes Bridge looking towards Flinders St. Station Page 3 - Flinders St. Station, from Princes Gate buildings, - Photo E. Ludwig, John Hinde Studios. Bourke St. from Queen St, looking east, late 1960's - all W's. - W7 1026 east bound on route 88. Flinders St and Swanston St. corner, from Princes Bridge - night photo - W5 756 northbound route 15. Page 4 - W2 584 inbound route 64, St. Kilda Road and Nolan St., late 1960s - photograph. Princes Bridge, looking over Yarra River to the east. (pre Concert Hall) St. Kilda Road, with Shine of Remembrance in background, W2 303 inbound route 4D, mid 1960's. Page 5 - Flinders and Swanston St, W2 530 outbound route 8, early 1970's. Swanston and Collins St., W2 596 westbound in Collins St. City Square built - 1st version. (post 1972) St Kilda Road, with Shine in background, W2 298 and others, route 8 and 72. (post 1972) Page 6 - Flinders and Swanston St., W2, inbound route 5 on a wet evening. (mid 1970's) W2 515 outbound, Collins St., late 1960's, with Town Hall in background. (early 1970's, prior to lights) Collins St. looking west at Russell St with W2 637outbound route 42, early 1960's. Page 7 - Swanston St looking south at Little Bourke, W2's 373 route 67 and 374?(route 5), southbound, early 1970's Flinders St. Station, looking west in Flinders St., early 1970's, at dusk. Melbourne Town Hall with City Square from the North West (early 1970's) Page 8 - Bourke St looking east from Queen St. with W7 1005 inbound on route 96 - early 1970's. Bourke St. looking west from Exhibition St. with W6 976 outbound on route 95 - early 1970's. Swanston St. looking south from Lonsdale, with W2 484 on route 64, W2 228 and W2 364 in photo - early 1970's. Page 9 - Swanston looking south from north of Lonsdale St with many tramcars in photo - mid 1970's. St Kilda Road, with Shrine in background, W2 345 outbound route 4, SW6 913 inbound route 4 - prior to 1970. St Kilda Road, with Shrine in background, with trams in photo - early 1970's. (Photo loose in album - National View postcard by Murfett Ltd. Aust.) Page 10 - Postcard - TMSV? of 1041 and cable car set at Preston Workshops. 1041 in Bourke St., looking east from Queen St. - early 1970's - 1974? Collins St. looking east from Elizabeth St. with W2 253 inbound route 11, and W2 224 outbound - rout 47, early 1970's Page 11 - TMSV Postcard, X217 in Dandenong Road with L class in background. Shrine of Remberance from BP building, looking towards the city with St. Kilda Road on the left. Princes Gate and Flinders St. from the SEC buildings in Flinders St. looking south east - mid 1960's. Page 12 - Swanston St. at Flinders St. looking north at dusk. Flinders St. station at Swanston St with trams crossing at intersection - late 1960's Flinders St. station with W2 327 outbound. Page 13 - Temporary City Square at Collins and Swanston St. with tramcars at intersection. Wellington Parade (Mugs Alley), looking towards the City, with W2 546 inbound on route 38 - mid to late 1960's. Page 14 - Swanston St. looking south, at Lonsdale St, W2 432 inbound route 7 - late 1960's or early 1970's. Partly loose in album - National View postcard by Murfett Ltd. Aust. trams, tramways, photo album, melbourne, postcards -
 Ballarat Tramway Museum
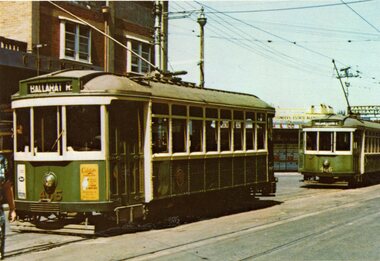
Postcard - Illustration/s, McCarron Bird, MMTB tram postcards
Set of nine of printed illustrations - postcard size of Melbourne and Metropolitan Tramways Board Tramcars produced in 1978. Separate card for each class of tramcar featured, with notes, statistics, MMTB name. Each card also has printers name and date on back. Not a formal postcard, no place for a stamp. 1810.1 - X1 - 465 with 466 in background. Photographed at Footscray station terminus, c1962. 465 has destination of "Ballarat Rd." 1810.2 - Z7 in Victoria Parade, c1975 - has destination of "West Preston - Regent St." and route number "13". 1810.3 - Cable car set (No. 1) - photographed at Preston Workshops 1810.4 - L104 - showing destination of Carnegie and route number 67. 1810.5 - Y469 - showing destination of "Wattle Park - Elgar Road", possibly with Wattle Park in background. 1810.6 - T180 - showing "Special", while on a charter. 1810.7 - W7 1022 - showing destination "West Preston", route 11, freshly painted. 1810.8 - X2676 - freshly painted. 1810.9 - W2511 - fitted with marker lights, freshly painted, showing "City" - route 11. Cards 8 and 9 added 9/3/2018 from Donation of John Ruyg. trams, tramways, melbourne, mmtb, tramcars -
 Ballarat Tramway Museum
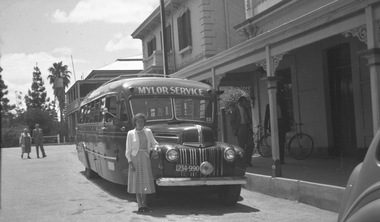
Photograph - B&W print of donated negative - set of 9, Ron E. Fluck
Black and white print of a donated negatives. Print made 8/1998. Various photos taken by Ron Fluck or other members of the Fluck family of various tour buses during the late 1940's and early 1950's. 886.1 - Mylor Service bus Ford V8, SA234990, Strathalbyn 5-1-1951 - standing alongside is Ron Fluck's first wife Joan (advised by Ron 09/2007) 886.2 - Pykes Cadillac Panorama Hotel, Sublime point, Bulli Pass NSW and Ron Fluck, 29-6-1951. 886.3 - Bonds REO #6, West Vic. (see also 886.9) 886.4 - Marks Ballarat, 2 Ansairs, TL943 and TL 975, Ocean Road, Melba Gully Crowes Vic - 25-3-1951. 886.5 - Parlourcars White bus, No. 29, Melbourne Hills Warburton - 13-8-1950 886.6 - Cellulose Bus, semi trailer, Millicent - 24-10-1947 with Claude Perkins Pty Ltd. hardware store in background. 886.7 - Kilkenny - Morphett - Henley Beach bus service, breakdown, Grange Road, Findon, Chev. car, Ron Fluck and D.Kay, 22-1-1949. Photo by E.G.Fluck. 886.8 - As for 886.2, NSW TV 338. 886.9 - Bonds Reo #6, Side Load, SA 2337, Diamond T motor, S.E. of SA - 23-10-1947. All images replaced by high res scan of the negatives 17/1/2019/tramways, trams, mylor service, parlourcars, bonds, marks of ballarat -
 Ballarat Tramway Museum
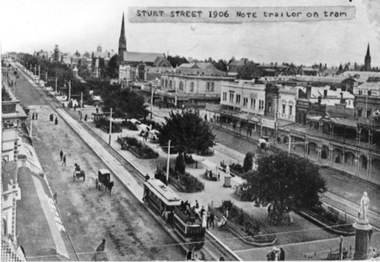
Photograph - Black & White Photograph/s, 1906
Black and white photograph of Sturt St. looking west from Town Hall 1906. Shows a ESCo tram hauling an ex-horse trailer (spelt "trailer"). Has some other horse drawn vehicles in photo and a number of pedestrians. Shows the newly formed tramway road surface, poles etc. Has "Snows" store sign on left hand side of photograph and buildings along the north side of the Sturt St. Other buildings shown are William Day & Son, Walter Connell, Anderson & Morse coach builders. See also Reg Item No. 1671 for the same item, but with out the typed note stuck on the top edge.trams, tramways, esco, sturt st., ballarat -
 Ballarat Tramway Museum
Postcard, John Phillips, Doveton St. and Sturt St
B&W print and scanned images of a coloured postcard lent to the BTM by Mr. Norm DePomeroy, Dec. 1997. Image is an ESCo tram near the intersection of Doveton St. and Sturt St. travelling west along the south side of Sturt. Steet. Photo taken soon after opening of the electric trams. Shows buildings along the north side of Sturt St. and the building at the SE corner of Doveton St. ESCo tram has destination board on the front dash of the tram. Note very similar to item 834, but shadows are different, road surface different and trees have leaves. 1 copy held at 8/98. Postcard posted 25/7/1907. See Reg item 4004 for another postcard using this image within a map of Australia. See 838i3. In top of image are the words "Sturt Street, Ballarat"trams, tramways, esco, sturt st, postcards, doveton st -
 Ballarat Tramway Museum
Photograph - Black & White Photograph/s, mid to Late 1965
Set of two Black and white photographs of the pile driving for the reconstruction of the Maribyrnong River Bridge from a tramway only bridge to a dual road/tram bridge. The road bridge is in the background. On Kodak paper. Photo during the 2nd half of 1965. 1419.1 - Early in the process of pile driving - Bridge tram track has been reduced to single track and the former outbound line is in use for construction purposes. 1419.2 - Roadway west of bridge looking east. Shows temporary single track arrangement which allowed the operating track to switch to the south side when piling completed. W5 682 West Maribyrnong on route 57 coming off the bridge. See P.Winspur note - and Rail News Victoria May 2000, page 50. Features a photograph of a tour on the bridge on 1/10/1966.trams, tramways, maribyrnong river bridge, bridge construction, trackwork, mmtb, tram 682 -
 Ballarat Tramway Museum
Photograph - Black & White Photograph/s, mid to Late 1965
Set of seven Black and white photographs of the arrangements and work for the track reconstruction at the intersection of Hoddle St/Punt Rd and Bridge Road Richmond late 1965. On Kodak paper. 1420.1 - Bridge Road looking east at River St. crossover (Hawthorn bridge in distant background). Tram-bus connection at a weekend. Note driver's uniform. Conductor walking to bus with passengers. Conductors often worked through on the bus and next tram at this time to save crews. 1420.2 - Bridge Road at Punt Rd and Hoddle St. intersection looking north west. Reconstruction of curves. Would probably be a Sunday given that new rails are in situ. 1420.3 - Ditto - looking south east 1420.4 - looking south east 1420.5 - looking east - replacement bus service passing with old cable winding house in the background. Concrete being placed. 1420.6 - Wellington Parade at Simpson St. crossover looking east. Bus-tram connection. Bus 542 and tram 966 (Kew Depot) 1420.7 - ditto - bus 570 and tram 850 (Camberwell). See P.Winspur note - see data sheet for Reg. item 1418.trams, tramways, bridge road, tram - bus connections, trackwork, mmtb, tram 939, tram 966, tram 850 -
 Ballarat Tramway Museum
Photograph - Black & White Photograph/s, Nov. 1965
Set of seven Black and white photographs on Kodak paper for the arrangements and work for the track reconstruction of Commercial Road Prahran. Series of photos show Down track already complete. Probably second half of October or early November 1965. (Electric Traction 11/65) (Unusual to have two jobs at once - see Hawthorn Rd - Reg item 1421). Series show the construction method. Temporary track formed by progressively lifting original track on to side of road each night. Relaying then follows progressively. Pictures show almost completed section (1423.1 &2), concreting (1423.3), new rails in situ (1423.4&5),newly moved track (1423.6&7), excavation taking place (1423.7) 1421.1 - Commercial Rd looking west at Charles St showing ramp to temporary city bound track. 1423.2 Ditto - just west of Charles St. 1423.3 Ditto - corner Perth St on left, Hyland St on right. 1423.4 Ditto - between Perth and Donald Sts. Scrubber car No 9. 1423.5 Ditto - looking east between Perth and Donald Sts. - W5 723 on new track, W5 722 on temporary track. 1423.6 Ditto - looking east. Max Hotel on corner of Donald St. 1423.7 Ditto - looking east at corner of Alfred St. Scrubber car No 9. See P.Winspur note with item 1418.trams, tramways, commercial road, reconstruction, trackwork, mmtb, tram 9, tram 723, tram 722