Showing 313 items
matching tram 35
-
 Ballarat Tramway Museum
Financial record - Receipt/s, Dave Kellett, payments of Union fees, mid 1960's
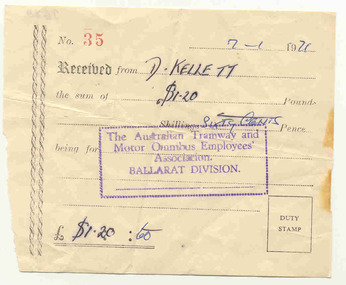
Has a strong association with tram crews and the trammies union - receipt for the payment of union fees - probably 3 weeks worth, given the holiday period.Receipt No. 35, dated 7/1/1971 torn from a receipt book. Written out for Dave Kellett, $1.20 and 60c, on a pounds shillings pence form, with a stamp of "The Australian Tramway and Motor Omnibus Employees' Association Ballarat Division". Indicates payments of Union fees.Handwriting - see image.trams, tramways, ballarat, employees, unions, receipts -
 Ballarat Tramway Museum
Newspaper, The Courier Ballarat, "Ballarat's tourist tramway carries 100,000th passenger", Oct. 1978
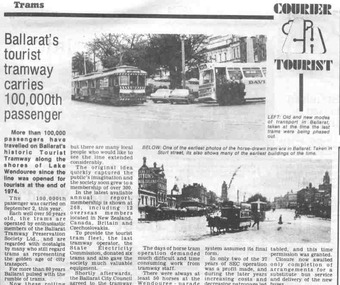
Has a strong association with the story of the BTPS in its first four years, developing the Museum, acquiring additional trams and a brief history of the SEC trams in Ballarat.Newspaper clipping from The Courier, Ballarat, dated 10/1978, titled "Ballarat's tourist tramway carries 100,000th passenger". Printed in a "Courier Tourist" Section, gives details of the 100,000th passenger, BTPS history, that of the trams in Ballarat, closure. On the rear of the sheet continues story and gives details of the then BTPS fleet (14, 26, 27 & 28, 48 and 40). Notes that the BTPS had by then acquired No. 39, W3 661, W4 671, 33 and 11, 121, 35 and X1 463. Features photos of a bus and single truck trams together at Grenville St, a horse tram arriving at Grenville St and a photo of the BTPS depot with No. 40, 27 and 28 on the depot fan. See Reg Item 3784 for a Courier print of the replacement buses and trams at the city loop."10/78" in ink on the top of the 2nd sheetbtps, depot, depot extensions, celebrations -
 Ballarat Tramway Museum
Film - Movie Film & Box, Kodak, 1960
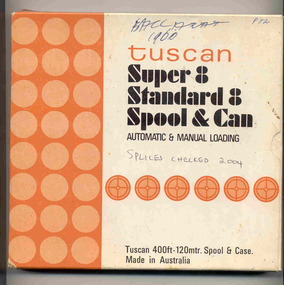
Yields information in movie film format of Ballarat trams in 1960, how the system operated and was used by people., Yields information in movie film format of Ballarat trams in 1960, how the system operated and was used by people.Movie film - 8mm, approx. 17.5 mins, with leader strip on a plastic reel, within a black and white plastic box, titled "Ballarat No. 1. 1960" contained with a cardboard box, 'Tuscan Super 8 and Standard 8 Spool and Can' . Has been transferred to DVD - see Reg item 4100 as Segment No. 1. Filmed and made by Ben Parle. Also transferred to DVD by Rod Cook Oct. 2015, via Roger Greenwood for use in his DVD, "The City of Ballarat Trams, Gardens & Gold" of 2016. See Reg Item 6883. Synopsis: based on time. 0:00 Starts with bogies cars crossing railway level crossing (34?, 39?) 0:30 SEC Logo 0:45 Ballarat Station sign and intro “Some City Scenes” 0:49 35 turning from Lydiard St Nth to Sturt St towards Grenville St with Commonwealth Bank in view. and then 42 returning 1:19 42 showing Mt Pleasant, turns from Sturt St into Lydiard St Nth 1:53 Tramway road works in Lydiard St Nth, near intersection with Mair St with Jelbart Road roller in use, starts with an SEC roadworks sign. 2:12 39 passing the works out bound to Lydiard St Nth. 2:46 Good view of the roller working before 35 arrives. 3:01 35 passing the works in bound with 3:29 14 crossing Lydiard St in Sturt St, towards Grenville St 3:47 Trams in City Loop 3:55 21 coming up the hill 4:04 31 entering Bridge St from Sturt St with Bucks Head Hotel in the background. 4:27 Overhead work at corner of Sturt and Lydiard, with view of the sign at the City terminus “Trams leave here for Sebastopol, Gardens, View Point.” 4:34 Passengers getting off and then onto 38, ex Lydiard St Nth at city terminus including a young lady wearing gloves and a wheeling a pram hurriedly the photographer. A number of other prams in the view as well as. The Conductor helps to unload the pram. 5:07 41 proceeding up Sturt St, appears to have just rained. 5:26 11 using the Dawson St crossover, with a motor car doing a U turn as well. 6:00 14 descending Sturt St towards the City, filmed at Dawson St. 6:11 Title “The Gardens via Drummond St North Line” 6:16 19 showing Victoria St, turning from Drummond St Nth into Sturt St. 6:28 30 inbound in Drummond St Nth, approach and trailing shots. Trailing shot ahs the hospital in the background. 6:49 31 outbound, Drummond St Nth, approach and trailing shots, trees are in autumn colours. 7:04 12, inbound Drummond St Nth, with Macarthur St in the background, stopping to pick up a lady, approach and trailing shots and then entering the Mill St crossing loop. 7:53 14 outbound in Drummond St Nth, dropping a lady passenger off and then turning into Macarthur St and then tram going away. 8:37 View of overhead junction at View Point Jtn. 8:45 View of “Cars Stop Here” sign and pole sign “To City Only” 8:55 30 inbound in Wendouree Parade, stops to pick up passenger, and then a trailing shot of tram entering Macarthur St loop 9:37 View of “Cars Stop Here”, “End of Section” and timetable boards at Haddon St. 9:50 34, pausing at Haddon St and then proceeding towards depot – approach and trailing shots, with “Warning Oncoming Trams” sign in shot. 10:27 “Warning Oncoming Trams” sign 10:32 34 crossing 12 at the Martin Ave loop 10:48 39? Wendouree Parade, near Barrett Ave, stopping and letting off passengers. 11:24 30 passing depot junction and then trailing shot of it entering Tram Sheds or Depot Loop and then proceeding towards the City. 12:11 Shot of the “Caution Beware of Trams” sign at the depot. 12:14 25 stopping at depot junction and then trailing shot of it going toward Forrest St. 12:47 12 passing Depot Junction, trailing shot. 13:07 Shot of :Electricity Supply Department, Ballarat Branch” sign at depot. 13:13 View of a destination showing “Depot” on a bogie tram 13:15 Title “Some Depot Scenes” 13:19 View of a trolley pole and then 13 leaving the depot through the gates, destination showing “View Point”. 13:54 View of trolley pole and then 32 stopping at the depot gates. 14:08 12 (Sunny view) running out onto Wendouree Parade and then a bogie tram approaching Depot Loop. 14:43 View of 42 running in with a single trucker behind in Wendouree Parade, and another single trucker running out. 15:02 Title “Some Scenes in the Gardens” 15:05 25 running through the Gardens, approach and trailing shots, near our Depot Junction. 15:55 View of “No Parking East of Loop” sign 15:59 View of overhead and then trackwork (with points removed), but overhead still in position at the Old Gardens Loop or Gardens South Loop and then 12 entering the loop from the south and then a trailing shot looking along the Parade. 16:33 View of “Cars Stop Here” and “End of Section” and then timetable boards at Gardens Loop. 16:55 View of 34 leaving the loop 17:14 Title “The End”Written labels giving title information on outside of box.trams, tramways, ballarat, sebastopol, lydiard st north, victoria st, mt pleasant, sturt st west -
 Ballarat Tramway Museum
Photograph - B&W print of donated negative, John Webster, 11/4/1953
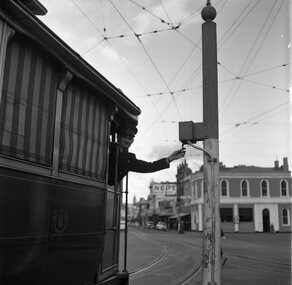
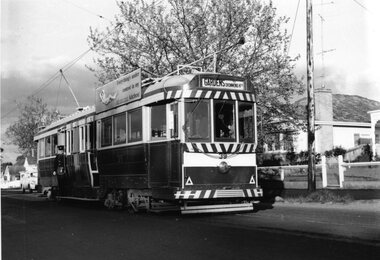
Yields information about the Bucks Head Hotel and demonstrates the way the signals were set in Bridge St for either the Mt Pleasant or Victoria St routesBlack and digital white print from a scan of a donated negative of a driver leaning out from a single trucker to set the switch on the signal for either the Victoria St or Mt Pleasant routes. Has the Bucks Head Hotel in the background. Shows the pole the signal controller or switch was mounted on. Black and White print made from scan of negative. Original Negative stored with Negatives. Image rescanned from copy neg and updated 31/5/2020. See On this basis, the envelope and marking matches that of Reg Item 4158, photo of No. 40, by John Webster and assumed taken on the same day as Item 4157, 4158, 4168, 4178 - 11/4/1953. Contained within Envelope No. 33.On left hand side of the negative in ink is "EI 35".tramways, trams, sturt st, grenville st, signals, bridge st -
 Ballarat Tramway Museum
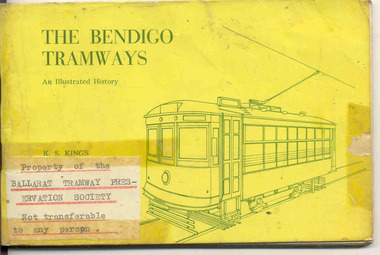
Book, Keith Kings, "The Bendigo Tramways", Feb. 1972
Yields information about the history of Bendigo Tramways and has a strong association with the closure of the system in 1972 and the author.An illustrated History of the Bendigo Tramways. 80 pages, gloss art paper, in black ink with a yellow card cover in green ink, saddle bound. Details history of Bendigo tramways, its tramcars and the involvement of the various operators. Has maps and photographs. Has been covered with a plastic covering material with a typed note "Property of the Ballarat Tramway Preservation Society, Not transferable to any person" underlined in red ink and position underneath the plastic covering. See also Reg item 326 for other copies of this book and scans of the map pages.Notes on pages 2, 14, 35, 38, 42, 44, 48, 49, 51 - 55, 57, 58, 61 - 65, 70, 73, 76 and 79 - in pencil under the photograph captions,trams, tramways, bendigo, history -
 Ballarat Tramway Museum
Slide - 35mm slide/s, Travis Jeffrey, late 1960's or early 1970's
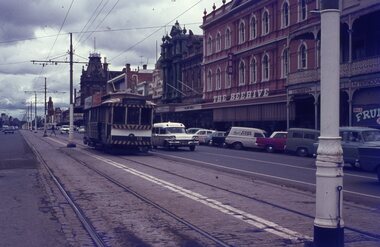
... Mall Beehive Building tram 19 "BES 35" in pencil Agfa plastic ...Agfa plastic mount (blue base, white cover) with a photo of Bendigo No. 19 in Pall Mall, nearing Charing Cross. Tram has the destination of Golden Square Photo taken late 1960's early 1970's. Photo has the Beehive, the Shamrock Hotel in the background. Radio station 3BO can be seen on the Beehive building. No. 19 has two SEC roof advertisements. Note the point bar on the pole on the right hand side of the photograph."BES 35" in penciltramways, trams, bendigo, pall mall, beehive building, tram 19 -
 Ballarat Tramway Museum
Postcard, Rose Stereograph Co, Bendigo talking tram No. 470, mid 1990's
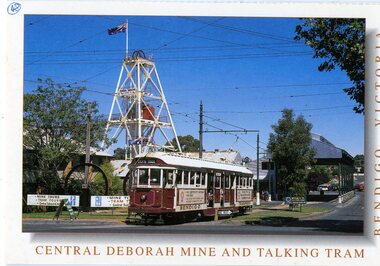
Colour postcard of Bendigo talking tram No. 470 leaving the Central Deborah Mine, in the Bendigo Talking tram livery with the mine poppet head in the background. Postcard has "Central Deborah Mine and Talking Tram / Bendigo Victoria" around the edges. Two copies held. Ex Melbourne W2 470, later to be renumbered as Bendigo 35 Reproduced by the Rose Stereograph Co of Glen Waverley. Photo courtesy of Neil Cutts. Has the Rose Co. symbol on the rear of the card, along with areas for the stamp and address block. Rose Series Card No. 3157.Copy 2, has "48" in a circle in the top left hand corner of the front of the card and on the rear, the same number, and a "William F Scott" address label on the bottom left hand corner, and inscription "early 1990s" in ink.trams, tramways, bendigo, central deborah, bendigo trust -
 Ballarat Tramway Museum
Photograph - Black & White Photograph/s, Doug Colquhoun, May. 1969
Yields information about Ballarat's trams in the early 1970's and the street scape around Lake Wendouree.Black and white print of Ballarat 35, northbound in Drummond St North (check on this ). Tram has the destination of "Gardens via Drummond Nth" and SEC roof advertisement "Everything's under control in my all electric kitchen. Two copies. Photo by Doug Colquhoun, 5/1969. Note the conductor standing on the footstep on the wrong side (for traffic operation) of the tram - could have been a posed photograph. Photo print courtesy of Port Dock Railway Museum, now the National Railway Museum. See worksheet 4311 for letter and details of prints sent to Bill Scott, 19/10/2001. Any photo credit to mention NRM Collection.On rear of copy 1 "SEC Ballarat / 39 /Sturt St East / 5/1969 3743 / D.A. Colquhoun" and "75" in the top right hand corner. Copy 2 "DAC" in ink, bottom right hand corner.trams, tramways, conductors, drummond st nth, tram 39 -
 Ballarat Tramway Museum
Newspaper, The Courier Ballarat, "Town and Country Journal", 13/07/2009 12:00:00 AM
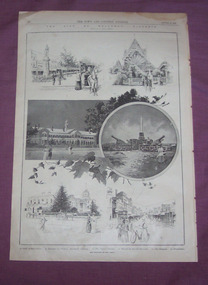
Yields information about Ballarat in 1899 and the way that information communication, style of writing and magazine printing was done at the turn of the century.Newspaper clipping, - set of three pages - from the Town and Country Journal August 19, 1899. 4443.1 - pages 31 and 32 - see images 4431i1, i6 and i7 Page 31 - Australian Insects Page 32 - Illustration of Sturt St, Entrance to fernery, Orphan Asylum, Eureka Stockade, the Hospital, West St (Bridge St). 4443.2 - pages 35 and 36 - see images 4443i2, i3, i8 to i12 Features photos of Hon. Peter Lalor, Ballarat, Batchelor's Newsagency Ballarat, Sumerscales Book and Stationery Depot, Ballarat Mining Exchange, Bradford (UK) steam tram and trailer, New Electric tram for Sydney and article titled "A contrast in Transit Facilities" 4443.3 - pages 33 and 34 - see images 443i5, i6 and i13 to i15 Features an article on the City of Ballarat, with photos by P. Black of Ballarat. Has photos of The Post Office, Sturt St from Town Hall, Sturt St from Grenville St with a horse tram in the photograph, and three photos of the Botanic Gardens.ballarat, sturt st, gardens, horse trams -
 Ballarat Tramway Museum
Ephemera, Wal Jack, Wal Jack notebook, 1940's
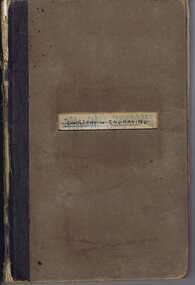
Demonstrates Wal Jack's records, hand written in a recycled notebook. Note - several sheets have been cut from the book - appear to be done before use by Wal. The crossed out sheets have not been imaged - these have been transferred by Wal to Reg Item 5507 and re-ordered. Image 30 shows a sample of a crossed out page. See related documents for a pdf file of the contents. Scan No. BTM5623iX Page No. Title or Subject Notes 1 Front 2 Inside Cover Addresses for Jack McLean, John Buckland Trooper Larsen Inside front cover. 3 1 Note re NSWT steam tram motor, MMTB PCC import issues, Peter Duckett seeking info and Photo of Julien’s battery tram on test in Melbourne 4 2 MMTB No. 8, 4, photos, Tyrell’s of Sydney photos, Perth 63 dimensions and MMTB plans for Domain Road & St Kilda Rd Jtn. 5 3 Notes re NSWGR P32, VR locos at Wodonga 13/10/1941, SAR V Class V143, SAR locos – W and Wx 6 4 NSW Private locos, Woy Woy quarry and AGL at Mortlake 5 Blank 6 Blank 7 7 First cable trams – links to photos T154, 29, 154 (Adelaide) 8 8 T156, Powelltown, Ray Pearson Negs 9 9 QR B18 ¼ locos, Ray Pearson’s scrap book, PMTT Zeppelin style trams, MMTB T class locations and 178/179 rebuilding. 10 10 Hawthorn horse tramway, VR Black Rock terminus sketch 11 11 NSW Tramways, Ryde, MMTB L class, Geelong tramway notes 12 12 Locomotive “Ballarat” in WA, Brisbane and various contacts. 13 13 Notes re VR News – 1943, H class, derailments, max speeds, Koondrook tramway and Geelong level crossing. Individual typed sheets pasted onto page – loose within book. 14 to 17 14/17 List of MMTB trams to 877 and work trams Some errors noted. 18 18 Newspaper cutting – Tram Record Day revenue (Brisbane 10/1943), Steam Trams at Journey’s end – Sydney – 6/1943 list of equipment being sold by Sydney Ferries, at Parramatta, 6/1943. MMTB Tram crossings in Melbourne, list of Sydney photos sent to Wal. Cuttings and Individual typed sheets pasted onto page. 19 19 Midland locos WA, VR open wagon stencils and a siding at Mt. Evelyn. Individual typed sheets pasted onto page. 20 20 Note re Sydney four wheel tourist trams and Hawthorn Max. Traction cars locations c1945. 21 to 23 21/23 Notes on Geelong Bogie trams and carrying flags for declaration of Newtown and Chilwell as a city – 1/10/1949 (See also Reg Item 5641) 24 to 26 24/26 Notes on Wellington Corporation Tramcars 37 27 Kelburn – Karoi cable line Wellington 28 to 29 28/29 Auckland Tramway Board tramcars notes 30/31 Blank 30 32/33 Notes on Ballarat tramcars – ESCo Crossed out 34/37 Ditto – SEC Crossed out 38 Music for the people notes Crossed out 39 Notes on Ballarat trams with tail lights Crossed out 40/43 Notes on Ballarat bogie trams Crossed out 44/45 Notes on SEC tram controllers, dead man and truck lengths. Crossed out 31 45 List of Ballarat Destination roll – Dec 1949 32, 33 46/47 Notes on Bendigo Bogie Trams – 1940’s 34 48 Bendigo Destination roll on a Birney tram Easter 1950, notes on tram tail lights and fares on the Bendigo system. 49 Blank – though headed “Bendigo Birney Trams” 50 Notes trams used on special days in Ballarat Crossed out 51 Ditto and No. 24 and 23 Crossed out 52 Ditto, 15, 11, 23 and Gold tram Crossed out 53 Notes on 34 caused delays, 5/1950, and use of 23 as gold tram Crossed out 54 Notes on repair to track at Sturt and Drummond 6/1951 Crossed out - see Reg Item 7720. 55 Notes on track work in Ballarat early 1950’s Crossed out 56/57 Notes on 33, 37, pay as you enter signs and 1953 special workings Crossed out 58/60 Notes trams used on special days in Ballarat Crossed out 61/64 Blank 35 65 “Salute to the Cable Tram” – transcription of text from Truck and Bus Transportation (July 1948) 36, 37 66/67 Continued from above and list cable tram routes, opening, closing, length and route colours. 38 68 List of photos in Truck and Bus Transportation, Anniversary Issue July 1948 of cable trams. 69 Blank 39 70 Notes on Brunswick TT, Fitzroy TT colours, Adelaide Service trams and MMTB route lengths. 40 71 Notes on HTT colours, tramcars, PMTT trams and colours and NMETL colours, trams and route destination signs 41 72 Notes on MMTB routes, cable and other Melbourne tram disposals, and sale of cable trams and storage at Brunswick. 42 73 Blank - page was headed Lugarno, Switzerland and Italian border 42 Handwritten sheet – photos to get – R. Field and Peter Duckett. 43, 44 74/75 Listing of trains on all lines leaving Ballarat and days run. 45 77 Listing of negatives sent to K. Rogers in 1944 and list of MMTB Max. Traction bogie trams 117 to 138 and disposal 46 77 Listing of MMTB trams, - appears to be something to do with photos or negs held. 47 78 Listing of Ray’s (Pearson) negs /photos of Brisbane trams and other railway photos. 79 Blank 48 80 Prices of pine timber in 4/1942, list of photos “I want”, notes re VR Train length, Ironbark Gully bridge, 3817 in Harden smash 7/1948 and 1948 Ballarat destination roll. Partly crossed out. Rear Cover. Has a strong association with Wal Jack, his work to collect and record both railway and tramway information. Yields information about tramways in Ballarat, Bendigo, Geelong and other cities tramways and railways.Grey covered book with black binding containing 40 lined sheets (80 pages) with handwritten notes with the front cover partly cut out and the words "Jewellery & Engraving" book written in. Contains some newspaper clippings and pasted typed notes as listed below. The image number of each sheet is given. See individual pdf files. trams, tramways, mmtb, ballarat, bendigo, sydney, brisbane, railways, geelong, new zealand, victorian railways, sec, esco -
 Ballarat Tramway Museum
Book, USA Department of Commerce, "Electrolysis and its Mitigation", 1918
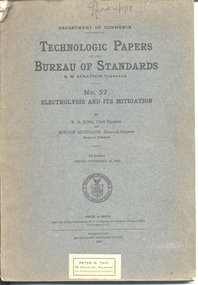
Book - 9 sections, 140 pages + covers, stapled and bound within dark green covers, issues by the USA Department of Commerce, Technological Papers, Bureau of Standards, No. 52, "Electrolysis and its Mitigation", 2nd Edition 1918, price 35 cents. Has index and looks at various aspects of Electrolysis and railway negative returns. Has authors of E. B. Rosa Chief Physicist and Burton McCollum, Electrical Engineer of the Bureau of Standards.On bottom of cover has "Peter G. Tait 90 William St Melbourne" label. and on top edge "Recd 4/10/19" in ink.trams, tramways, tramways, electrolysis -
 Ballarat Tramway Museum
Photograph - Colour Print, Lilian Butler, Sep. 1971
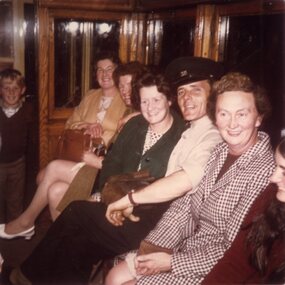
Has a strong association with SEC Ballarat tram crews and the closure of the SEC operated Ballarat system.Colour print of Conductor (No. 35) H. M. Van Oorschot on Tram No. 42, Sunday 19th September 1971, final night of the tram service along with a group of other passengers. Photo printed on Kodak Paper. Photograph by Lilian Butler? in ink on rear "On Tram No. 42, Sunday 19th September 1971, final night of the tram service in Ballarat. With my compliments Lilian Butler".trams, tramways, crews, conductors, closure, last tram, passengers, interiors, tram 42 -
 Ballarat Tramway Museum
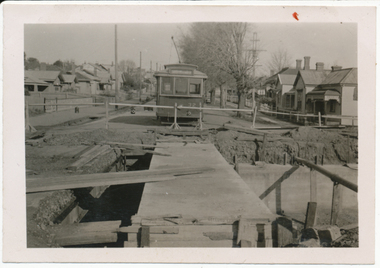
Photograph - Digital image, Wal Jack, 12/06/1955 12:00:00 AM
Yields information the reconstruction of the Canadian Creek Bridge in 1955.Digital image from the Wal Jack Ballarat Album of No. 32 at Canadian Creek bridge in Barkly St, Mt Pleasant during the reconstruction of the bridge. Photo dated 12-6-55 and shows the reconstruction work in progress. Tram was isolated to enable the service in Barkly St during the reconstruction of the Canadian Creek bridge during June-July 1955, see Reg Item 5155, 5157 as well and 5301, 5302 and 5305. No. 35 was the service car, shows the detour sign as well See image i2 for rear of photograph.On rear in ink "SEC Ballarat No. 32 in Barkly St at Steinfield St Bridge under repairs. 13-6-55." In top right hand corner is Wal Jack stamp with number T178 written in.trams, tramways, mt pleasant, canadian creek, barkly st, tram 32 -
 Ballarat Tramway Museum
Photograph - Digital image, Wal Jack, 19/06/1955 12:00:00 AM
Yields information the reconstruction of the Canadian Creek Bridge in 1955.Digital image from the Wal Jack Ballarat Album of No. 32 at Canadian Creek bridge in Barkly St, Mt Pleasant during the reconstruction of the bridge. Shows the new concrete base for the track in position. Photo dated 19-6-55 and shows the reconstruction work in progress. Tram was isolated to enable the service in Barkly St during the reconstruction of the Canadian Creek bridge during June-July 1955, see Reg Item 5155, 5157 as well and 5301, 5302 and 5305 and 7735. See image i2 for rear of photograph. See image i3 for hi res scan of print. See image i4 for hi res scan of negativeOn rear in ink "SEC Ballarat No. 35 east of creek, No. 32 concrete slabs for tram track placed across new box girders, Barkly St Ballarat East 19-6-55." In top right hand corner is Wal Jack stamp with number T179 written in.trams, tramways, mt pleasant, canadian creek, barkly st, bridges, tram 32 -
 Ballarat Tramway Museum
Negative - Copy, Ray Pearson
Set of 15 copy negatives, of black and white photographs of Victorian Railway trams from Ray Pearson Collection, taken by Dave Macartney in 1975c. Original negative held in the negative file. Scanned at 2400 dpi and cropped as necessary. Images as shown replaced by scan from the original Ray Pearson Album provided by Mal Rowe, April 2020 or that there is a better image. .1 - No. 1 - retained. .2 - Cr. T. Bent driving 1st spike - replaced .3 - Works car at Elwood - replaced .4 - No. 23 at Sandringham - replaced .5 - No. 35 at St Kilda - replaced .6 - ditto - replaced .7 - No. 51 at Sandringham - retained. .8 - St Kilda station view - retained. .9 - No. 3 cross bench car at Elwood - replaced .10 - No. 7 end view - replaced .11 - No. 5 at St Kilda Station - replaced .12 - No. 6 cross bench car side on view - replaced .13 - Cr. T. Bent driving 1st spike - replaced .14 - No. 7 - retained. .15 - Enclosed cross bench car at Sandringham - retained. trams, tramways, victorian railways, st kilda, sandringham -
 Ballarat Tramway Museum
Photograph - Colour Photograph/s - set of 2, John Phillips, early 1996
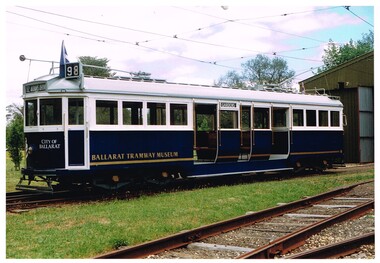
.1 - Colour print of Ballarat Tramway Museum W4 671 outside the Ballarat depot, following repainting to the blue colour scheme mid 1990's. Photographed by John Phillips for the Dept. of Transport. .2 - W4 671 running in Melbourne, during early 1996, on the City Circle in Spring St Melbourne, advertising the Ballarat Begonia Festival with the Princes Theatre and Holmes Colleges buildings in the background. Has number "96-35-25" on rear. Printed on Kodak paper.Each photo has on the rear a "Copyright Department of Infrastructure with details for reordering and a hand written letters "JP"trams, tramways, ballarat, btm, w4 class, spring st, tram 671 -
 Ballarat Tramway Museum
Photograph - Digital image, Keith Kings, 7/04/1962 12:00:00 AM
Yields information about the arrangements made to transport ARHS members on a tram tour of Ballarat in 1962.Digital image from the Wal Jack Ballarat Album of a photograph of the ARHS Specials outside the tram depot on tour on 7/4/1962. Keith Kings Photograph N(e)(11). Tram Nos. (from rear) 41, 28, 36, 14, 37, 33, 35, 31, 38. Printed on Ilford paper. See image i2 for rear of photographOn rear of photograph in ink "Ballarat, ARHS specials shunting into Depot for lunch layover. Nos. 41, 28, 36, 14, 37, 33, 35, 31, 38. No. 20 is behind camera with "photo party" for Warrenheip. Sat. 7/4/62" and has Keith Kings stamp and number N(e)(11) in bottom right hand corner.trams, tramways, arhs, special trams, wendouree parade, tram 38 -
 Ballarat Tramway Museum
Photograph - Digital image, Wal Jack, 7/04/1962 12:00:00 AM
Yields information about the trams used and how they were arranged at the railway station for a major tour group visit in 1962.Digital image from the Wal Jack Ballarat Album of a photograph of the ten trams to be used for the ARHS visit to Ballarat 7-4-62. Ten trams used as listed in the inscriptions below. No. 20 the lead tram, has an SEC roof Advertisements, Ilford Film and The Age advert on the back dash panel. See image i2 for rear of photograph. See image i3 for hi res scan of print. See image i4 for hi res scan of negativeOn rear of photograph in ink "SEC, Ballarat ARHS Specials to Gardens (10 trams) No. 20, 31, 31, 38 in order, others 14, 28, 33, 35, 36,37 from Railway level crossing Lydiard St Nth 7-4-62" and Wal Jack stamp in top right hand corner with number "T1265" written in.trams, tramways, arhs, tours, lydiard st nth, railway station, tram 20 -
 Ballarat Tramway Museum
Programme, City of Ballarat and Creative Brand Studio, "Ballarat Heritage Weekend", May. 2010
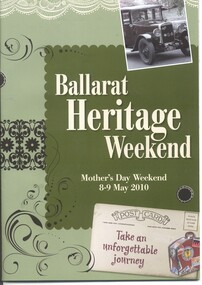
Fifty two page programme book titled ""Ballarat Heritage Weekend" for Mother's Day Weekend 9 - 9 May 2010. Outlines events that were planned to be undertaken during the weekend, exhibitions, events, gardens museums and activities, including guided tours and maps with photographs of the various locations. The BTM provided a free tram service using the horse tram and one electric tram. Horse Tram rides listed under activities page 33 and 35 and the BTM listed under Museums page 43.trams, tramways, city of ballarat, heritage, horse tram, btm -
 Ballarat Tramway Museum
Photograph - Black & White Photograph/s, Oct. 1939
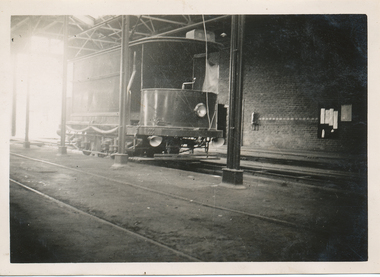
Black and White print contained within the Wal Jack Bendigo and Geelong Album, see Reg Item 5003 for more details. Photo of Bendigo sprinkler or scrubber tram just inside the depot October 1939. Shows the curtains around one side of the tram, hose lines and lights underneath the ends of the tram. Printed on Velox paper with a Kodak Print stamp. i1 - scan of print in the album i2 - rear of image i3 - scan of negative at 3200dpi added 6/6/2020.On the rear in pencil the number "35"trams, tramways, bendigo, sprinkler tram, scrubber tram, sprinkler, scrubber -
 Ballarat Tramway Museum
Photograph - Black & White Photograph/s, Wal Jack, 1940
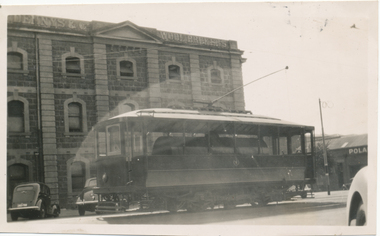
Black and White print contained within the Wal Jack Bendigo and Geelong Album, see Reg Item 5003 for more details. Photograph of the Geelong Scrubber, sprinkler or water tram in Corio Terrace 1940. Photo has a large "blotch" in the negative over the tramcar itself. No details as to photographer. Printed on Kodak Velox Paper, but negative located in the Wal Jack negative envelopes. i1 - scan of print in the album i2 - rear of image i3 - scan of negative at 3200dpi added 18/6/2020.On rear is "35-" in penciltrams, tramways, geelong, corio terrace, scrubber tram, sprinkler tram, scrubber, water tram, sprinkler -
 Ballarat Tramway Museum
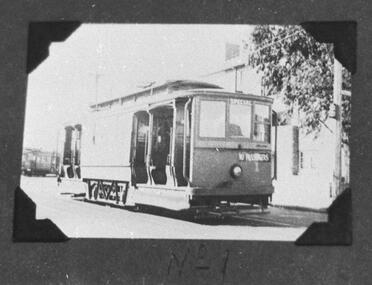
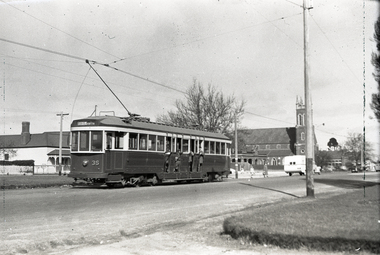
Negative, Wal Jack, mid 1950's
Yields information about tram services on the Victoria St line and passengers.Negative and Digital images of the Wal Jack Ballarat Negative file of No. 35 inbound in Victoria St, at the King St loop picking up passengers at the tram stop. Tram has the destination of Gardens via Sturt St West. In the background is St Alipius church. mid 1950'strams, tramways, victoria st, king st, passengers, tram stop -
 Ballarat Tramway Museum
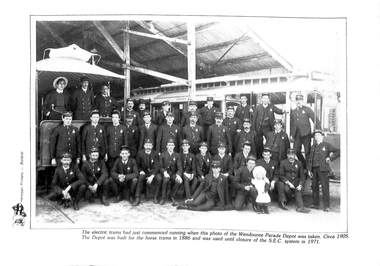
Photograph - Illustration/s, ESCo crew photo
Illustration Black and white print of a group of ESCO employees in uniform in front of the tram depot with two tram behind. All wearing uniform caps except one wearing a straw hat. 35 men in uniform, one baby and in the back is a man not in uniform. Photo used in the 1986 - 1987 Annual Report on the rear cover. Original print not held by the Museum. Glenise Kellett advised 1/2020 that the man lying on the ground is Arthur Willem (Bill) Evan Gunn, tram conductor, buried 10/7/1919.trams, tramways, esco, employees, group photo -
 Ballarat Tramway Museum
Photograph - Kodak Duplicate slide
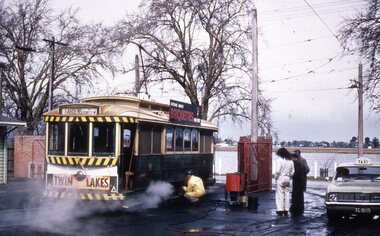
Shows the truck of Ballarat tram 11 being cleaned, possibly before being loaded and transported to the Daylesford Museum, 9/1971. The tram has a Twin Lakes advertisement.Yields information about the work undertaken to clean trams possibly prior to being transported to a new location. The tram was given to the Daylesford Museum.Kodak duplicate colour slide, cardboard mount - TMSV Sales.In pencil "Ballarat Depot 35" and TMSV Sales stamp.sec, ballarat trams, cleaning, tmsv, tram 11, tramway, trams -
 Kew Historical Society Inc
Postcard - Kew East State School No.3161, 35 Kitchener Street, c.1927
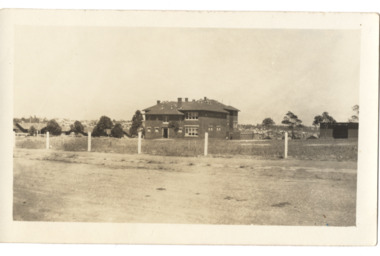
What is now Kew East Primary School was opened on its current site in Kitchener Street in 1923. The Kew East and Mont Albert Heritage Gap Study (August 2020) established that: 'Kew East Primary School No. 3136 is historically significant for the evidence it provides of an early phase in the development of Kew East which gathered momentum from the 1920s, as housing developed rapidly and the population increased in response to the extension of the High Street tram to Harp Road then Burke Road then improved tram connections between the area and the city.'A rare and early photograph of the school taken four years after its construction. Small, sepia coloured photographic positive of East Kew State School. The two storey red brick building was opened in 1923. This view, three years after its construction shows preliminary fencing and undeveloped playing grounds.schools -- kew east (vic.), government schools -- kew -- kew east, strathalbyn street -
 Melbourne Tram Museum
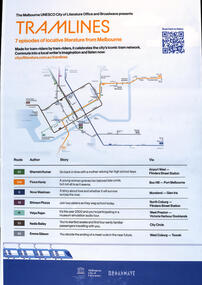
Poster - 7 episodes of tram stories, City of Melbourne, "Tramlines", 2023
Poster published as part of promotion of "7 episodes of locative literature from Melbourne" featuring various stories of Melbourne tram routes from the riders perspective; Shamini Kumar route 59 Fiona Hardy route 109 Nova Weetman route 6 Shivaun Piozza - route 19 Vidya Rajan route 11 Nadia Bailey route 35 Emma Gibson route 58 Includes a map of the central city tram lines. Sponsored by the City of Melbourne and Broadwave. Oct. 2023Demonstrates a series of stories evolving around Melbourne tram routes and life.Poster - A2 printed in full colour.tramways, stories, melbourne, podcasts, tram routes -
 Melbourne Tram Museum
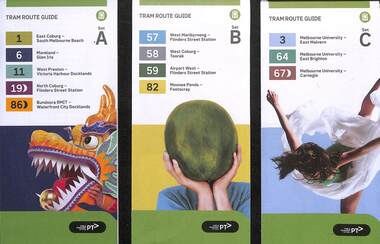
Ephemera, Public Transport Victoria (PTV), "Tram Route Guide", 2/2024
Route Guides published Feb. 2024, by Public Transport Victoria listing the stops, interchanges with bus and other tram services, ticketing zones, estimated frequencies with adverts for Night tram services, TramTracker and Myki tickets. On the rear is a large map, and a short summary of the routes list in the guide. .1 - Set A - Routes 1, 6, 11, 19 and 86 .2 - Set B - Routes 57, 58, 59 and 82 .3 - Set C - Routes 3, 64 and 67 .4 - Set D - Routes 48, 70, 75, 78 and 109 .5 - Set E - Routes 5, 6, 16, 58 and 72 .6 - Set F - Routes 12, 30, 35, 96 See item 2279 for an earlier versions.Demonstrates a PTV published tram route guide of 2024.Set of 6 pamphlets folded A2 to DL sheets, full colour.trams, tramways, timetables, route guides, maps, route 1, route 3, route 5, route 6, route 11, route 19, route 86, route 57, route 58, route 59, route 82, route 64, route 67, route 48, route 70, route 75, route 78, route 109, route 16, route 72, route 12, route 30, route 35, route 96 -
 Ballarat Tramway Museum
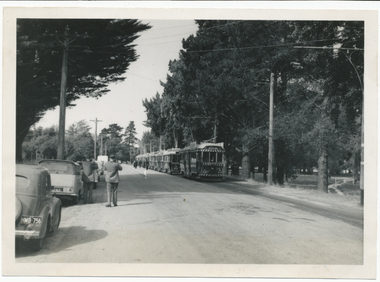
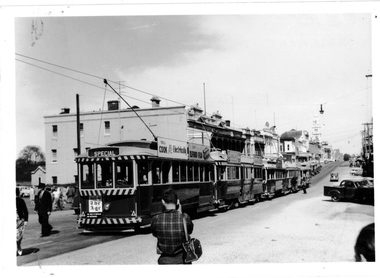
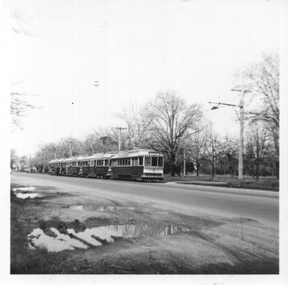
Photograph - Tram Tour - Sturt St West, 5-10-1969
Photograph showing four trams, led by No. 21 and three bogies in Sturt St West on a tram tour of Ballarat. Based on the tours database - see reference - the tour took place on the 5-10-1969, the ARE and SPER in conjunction with the Vintage Train. Trams used were 21, 37, 41 and 35.Yields information about the 1969 Vintage Train, tour in conjunction with SPER and the ARE.Black and white print with photographers notes on the rear in ink.In ink "Tramcade Sturt St en route to Gardens 7/10/69"tramcars, trams, tours, are, sper, vintage train, tram 21 -
 Ballarat Tramway Museum
Album - Postcards & Photographs - Vic Solomons and others - Australian Tramways, Vic Solomons, 2023
Contains 184 images of postcards and photographs collected primarily by Vic Solomons of Sydney, with others from the collection of Wal Jack and Warren Doubleday. Covers almost all of Australia's tramway systems. 1 Post Card Hay St Perth Looking East No 3 Unknown Perth 2 Post Card Cars 30 & 90 both on Route 19 pass in Barrack St looking South Perth WA 1935.02.18 Perth 3 Post Card Hay St Looking East Perth WA Unknown Perth 4 Post Card William St Perth WA Unknown Perth 5 Post Card Perth from Shaftsbury Hotel Unknown Perth 6 Post Card Hay St Perth WA Looking East Unknown Perth 7 Post Card Barrack St Perth Unknown Perth 8 Post Card Murray Views No 3 High St Showing Town Hall Fremantle WA Unknown Fremantle 9 Post Card High St Fremantle WA Unknown Fremantle 10 Post Card View of Bolder City Golden Mile in the Background (Section No 1) 1908.08.20 Kalgoolie 11 Post Card Hannan St Kalgoolie 1900.08.19 Kalgoolie 12 Post Card Hannan St Kalgoolie WA (No 2) Unknown Kalgoolie 13 Post Card Intersection Hannan & Maritana Sts Kalgoolie WA Unknown Kalgoolie 14 Post Card Hannan St Kalgoolie Unknown Kalgoolie 15 Post Card Lane Street Bolder City Unknown Kalgoolie 16 Post Card Hobart Double Deck Tram Unknown Hobart 17 Post Card Macquarie St Hobart Unknown Hobart 18 Photo Liverpool Street Hobart Unknown Hobart 19 Photo Hobart 21 Unknown Hobart 20 Photo Hobart 14 in Elizabeth St Hobart Unknown Hobart 21 Post Card Macquarie St Hobart Unknown Hobart 22 Post Card Macquarie St Hobart Tas Unknown Hobart 23 Photo Double Decker Tram 3 at G.P.O. Hobart Tas No 31 Unknown Hobart 24 Post Card Double Decker Tram 19 Hobart Tas A B Series No 24 Unknown Hobart 25 Photo Hobart Municipal Tramways Tas No 95 Unknown Hobart 26 Post Card Elizabeth St Hobart Unknown Hobart 27 Post Card Elizabeth St Hobart Unknown Hobart 28 Post Card Elizabeth St Hobart Unknown Hobart 29 Post Card Elizabeth St Hobart Tas Unknown Hobart 30 Post Card HMT 21 with crew at Beach Road Terminus Unknown Hobart 31 Post Card HMT 9 & another with crew at Beach Road Terminus. Front cover photo of Destination GPO 1921.01.00 Hobart 32 Post Card Cascade Road and Mount Wellington Hobart Unknown Hobart 33 Post Card Elizabeth St Hobart Unknown Hobart 34 Post Card Elizabeth St Hobart Unknown Hobart 35 Post Card Elizabeth St Hobart 1915.04.07 Hobart 36 Post Card Macquarie St Hobart Tas Unknown Hobart 37 Post Card Macquarie St showing Post Office Hobart 1908.03.12 Hobart 38 Post Card Hobart Municipal Tramways 21 Unknown Hobart 39 Post Card Elizabeth St Hobart Tas Unknown Hobart 40 Post Card Liverpool Street Hobart Unknown Hobart 41 Post Card Electric Tram Launceston Tas 446 W J Little Photo 1919.02.08 Launbceston 42 Post Card Launceston Tram no 3 1911.08.30 Launbceston 43 Post Card Launceston Tram no 3 passes tram No 1 Unknown Launbceston 44 Post Card Tram 6 at Trevallyn a popular suburb Launceston Tasmania Unknown Launbceston 45 Post Card Tram 7 at Trevallyn Road Terminus Launceston Tasmania Unknown Launbceston 46 Post Card Tram 4 in Brisbane St Launceston Unknown Launbceston 47 Post Card Tram 9 in Brisbane St Launceston Tasmania Unknown Launbceston 48 Post Card Camerom Street Launceston Tasmania Unknown Launbceston 49 Post Card Murray Views No 15 Jetty Road Glenelg Terminus 1962-02-08 Adelaide 50 Post Card Bay Tram at Jetty Road Terminus Glenelg SA Unknown Adelaide 51 Post Card Tram 3 in King William Street Adelaide S Aust Unknown Adelaide 52 Post Card Valentine Series No 3065 The Old Horse Tram Victor Harbour Unknown Victor Harbour 53 Post Card Bourke Street Melbourne with Cable Car Looking East 1904.04.25 Melbourne 54 Post Card Opening of New Electric Tramway Elsternwick 1913-11-13 Melbourne 55 Post Card Cable trams in Clarendon St Sth Melb Unknown Melbourne 56 Post Card Pall Mall from Charing Cross Bendigo Unknown Bendigo 57 Post Card Tram 4 & 7 pass at The Fountain and Mitchell Street Bendigo Vic Rose Series P 3198 Unknown Bendigo 58 Post Card M&MTB 133 at Charing Cross bound for Eaglehawk Bendigo Vic Murray Views No 45 Unknown Bendigo 59 Post Card Pall Mall Bendigo Vic Unknown Bendigo 60 Post Card Charing Cross & Mitchell St Bendigo Trams passing 1919.00.00 Bendigo 61 Post Card Pall Mall Looking East Unknown Bendigo 62 Post Card Electric Trams and City Hotel Bendigo Vic Unknown Bendigo 63 Post Card Moorabool Street Geelong V 23 Unknown Geelong 64 Post Card Murray Views No 3 Moorabool Street Geelong Vic Unknown Geelong 65 Post Card The Rose Series P 2487 Ryrie Street Geelong Vic Unknown Geelong 66 Post Card Southern Cross Series 2696 Ryrie Stret Geelong Vic Unknown Geelong 67 Post Card The Rose Series P 1490 Ryrie Street Geelong Vic 1920-03-04 Geelong 68 Post Card Valentine Series No 1568 Lower Sturt Street Ballarat Unknown Ballarat 69 Post Card Rose Series P 1710 Sturt Street Ballarat Victoria Unknown Ballarat 70 Post Card Sturt Street Ballarat Victoria Unknown Ballarat 71 Post Card Horse Tram In Sturt Street Ballarat 1905.11.10 Ballarat 72 Post Card Sturt Street Ballarat Looking North-West Unknown Ballarat 73 Post Card Shoppes Square Sturt Street Ballarat Looking North Unknown Ballarat 74 Post Card Junction Sturt and Lydiard Streets Ballarat 1909-09-01 Ballarat 75 Post Card The Electric Supply Co Souvenir Tram Ticket No 3085of the opening of Electric System August 18 1905 1905.08.18 Ballarat 76 Post Card Sturt Street Ballarat Victoria 1907.11.25 Ballarat 77 Post Card Off to the Gardens Electric Tram Ballarat Unknown Ballarat 78 Post Card Sturt Street Ballarat 1907.04.16 Ballarat 79 Post Card Sturt Street Ballarat Looking East Electric tram with Double Deck Trailer 1911.04.17 Ballarat 80 Post Card Sturt Street Ballarat Looking East Unknown Ballarat 81 Post Card Sturt Street Ballarat Looking West 1911.03.01 Ballarat 82 Post Card Town Hall and Sturt Street Ballarat Unknown Ballarat 83 Post Card Lydiard Street Ballarat 1906.11.23 Ballarat 84 Post Card Looking North along Adelaide Street from George Street Brisbane Sidues Series No 764 Unknown Brisbane 85 Post Card Looking South along Queen Street from the Creek Street Intersection Brisbane Qld Sirues Series No 1379 Unknown Brisbane 86 Post Card George Street from near Supreme Court Brisbane Unknown Brisbane 87 Post Card Queen and Eagle Streets Brisbane 1907.07.04 Brisbane 88 Post Card Queen Street showing His Majesty’s Theatre Brisbane Unknown Brisbane 89 Post Card Queen Street Treasury Building 1908.01.20 Brisbane 90 Post Card G P O and Queen Street Brisbane Unknown Brisbane 91 Post Card Queen Street Brisbane Looking from Wharf Street Unknown Brisbane 92 Post Card Customs House Brisbane 1905.02.16 Brisbane 93 Post Card Queen St Brisbane 1905.09.16 Brisbane 94 Post Card Queen St Brisbane 1907.11.19 Brisbane 95 Post Card Treasury Buildings Brisbane Unknown Brisbane 96 Post Card Queen and Eagle Streets Brisbane Unknown Brisbane 97 Post Card The Valley Corner Brisbane Unknown Brisbane 98 Post Card Brisbane Queen Street opposite General Post Office Unknown Brisbane 99 Post Card North Quay and Milton Beach Brisbane Q Unknown Brisbane 100 Post Card Victoria Bridge Brisbane South Side 1907.08.14 Brisbane 101 Post Card Victoria Bridge Brisbane Unknown Brisbane 102 Post Card Breakfast Creek Bridge Brisbane Q Unknown Brisbane 103 Post Card Melbourne Street Station South Brisbane Queensland Unknown Brisbane 104 Post Card General Post Office Queen Street Brisbane 1955.09.23 Brisbane 105 Post Card Customs House Brisbane 1904.11.04 Brisbane 106 Post Card Queen St Brisbane 1919.11.00 Brisbane 107 Post Card Queen St Brisbane Sidues Series No 627 Unknown Brisbane 108 Post Card Creek Street Brisbane Queensland Unknown Brisbane 109 Post Card Customs House and Garden Reach Brisbane Queensland 1910.00.08 Brisbane 110 Post Card Queen and Creek Streets Brisbane 1909.06.07 Brisbane 111 Post Card Queensland National Bank andd Queen Street Brisbane Queensland Unknown Brisbane 112 Post Card Queen Street and Treasury Buildings Brisbane 0000.09.07 Brisbane 113 Post Card Queen Street showing “Courier” Buildings Brisbane Unknown Brisbane 114 Post Card Intersection George & Roma Streets Brisbane Q 1916.05.11 Brisbane 115 Post Card Adelaide Street Brisbane Q Unknown Brisbane 116 Post Card G P O Queen Street Brisbane Q Unknown Brisbane 117 Post Card Treasury Building Brisbane 1906.03-20 Brisbane 118 Post Card Queen and Eagle Streets Brisbane 1907.02.01 Brisbane 119 Post Card Queen St Brisbane Unknown Brisbane 120 Post Card Queen St Brisbane Q Unknown Brisbane 121 Post Card Victoria Bridge Brisbane 1906.07.30 Brisbane 122 Post Card An Unusual View showing Head of Queen Street Victoria Bridge & South SideSuburbs Brisbane Q Unknown Brisbane 123 Post Card Petries Bight Brisbane Q Unknown Brisbane 124 Post Card South End Victoria Bridge Brisbane Q Unknown Brisbane 125 Post Card Customs House Brisbane Unknown Brisbane 126 Post Card Photo of toastrack car circa 1910 Unknown Brisbane 127 Post Card Treasury Buildings Brisbane Unknown Brisbane 128 Post Card East Street Rockhampton with Steam Tram & trailer Unknown Rockhampton 129 Post Card Post Office Rockhampton with steam tram Unknown Rockhampton 130 Post Card East Street Rockhampton with Steam Trams Rose Series P 7154 Unknown Rockhampton 131 Post Card William Street Rockhampton Rose Series P 7156 Unknown Rockhampton 132 Post Card Central East Street Rockhampton Q with Steam Trams Unknown Rockhampton 133 Photo Sturt St Ballarat Unknown Ballarat 134 Photo Bridge Street Ballarat Unknown Ballarat 135 Post Card George St Sydney Unknown Sydney 136 Post Card Elizabeth St Sydney Unknown Sydney 137 Post Card Railway Square Unknown Sydney 138 Post Card Sydney Harbor Bridge - pending receipt 139 Post Card Kings Cross - Mowbray Series with description on rear from C Roy G Field Unknown Sydney 140 Post Card Kings Cross - Mowbray Series with description on rear from C Roy G Field Unknown Sydney 141 Post Card Central Railway Station Sydney - Rose Series P6033 1954-01-26 Sydney 142 Post card William Street Darlinghurst looking towards City - Rose Series P6602 unknown Sydney 143 Post Card Circular Quay Sydney - Rose Series P6680 Unknown Sydney 144 Post Card View at Manly NSW - Rose Series B1003 Unknown Sydney 145 Post Card Hunter St Newcastle NSW - Rose Series P7843 Unknown Newcastle 146 Post Card Bank Corner Newcastle NSW - Mowbray Series No. 155 Unknown Newcastle 147 Post Card Hunter St Newcastle NSW Unknown Newcastle 148 Post Card Criterion Hotel Hunter St Newcastle NSW Unknown Newcastle 149 Photo Horse tram at Newtown Station 1894 to 1898 - PTC photo c1894 Newtown 150 Photo Steam tram motor No 3 at Railway Square 1879 1879 Sydney 151 Photo Railway steam tram c1900 with a horse drawn double deck bus c1900 Sydney 152 Photo Steam motor 5A and doubled deck bus Unknown Sydney 153 Photo Steam motor 53A with detail notes on rear 1922 Sydney 154 Photo Cable tram set at Milsons Point ferry terminal c1900 Sydney 155 Photo Early Sydney electric car - Ocean St - Rose Bay Unknown Sydney 156 Photo George St looking souoth c1905 c1905 Sydney 157 Photo Tram 165 at Circular Quay Unknown Sydney 158 Photo Tramcar ferry or transporter at The Spit Unknown Sydney 159 Photo tram 882 George St at Marti Place, 1937 1937 Sydney 160 Photo Tram 826 Railway Sq area Unknown Sydney 161 Photo Railway Sq in background, Broadway with double decker bus and toastrack car late 1930s Sydney 162 Photo Coupled St Pitt St? - photo Ben Parle Feb. 1950 Sydney 163 Photo Electric tram No. 2 - North Sydney with side trolley pole running Unknown Sydney 164 Photo George St - Horden's Corner Unknown Sydney 165 Photo George St at Martin Place c1920 Sydney 166 Photo Castlereagh St Sydney c1928 c1928 Sydney 167 Photo Railway Sqare c1920 c1920 Sydney 168 Photo Darling St Countereweight Unknown Sydney 169 Photo Trolley bus depot Unknown Sydney 170 Photo Trolley bus No. 14 Unknown Sydney 171 Photo Newcastle Railway Station with steam tram - Wharf Road?? Unknown Newcastle 172 Photo High St West Maitland - steam tram Unknown Maitland 173 Photo High St West Maitland - steam tram Unknown Maitland 174 Post Card Argent St near tram terminal Broken Hill NSW c1900 Broken Hill 175 postcard Argent St looking south Broken Hill - with Ken Magor's notes on rear Unknown Broken Hill 176 Photo Toronto - steam tram 61A Unknown Toronto 177 Photo 124A trial run 1911? Sutherland - Cronulla line 1911 Sutherland 178 Photo 103A at a tram stop Unknown Sydney 179 Photo Cable tram set at Crows Nest terminus grip car 12, trailer 22 Unknown Sydney 180 Photo Cable tram Queens Square Sydney 1903 Sydney 181 Photo cars 2078 and 2077 Chatswood late 1950s Sydney 182 Photo car 1877 Balmain area late 1950s Sydney 183 Photo Trolley bus - Rockdale destination Late 1950s Sydney 184 Photo Broken Hill steam tram - motor 18A North Tram Unknown Broken Hill 185 Photo Millars Point Sydney NSW - ferry/tram interchange, unknown Sydney All items imaged including the rear or back where there was writing of information. All files stored on the Museum's Photo Collections directory. Demonstrates through the medium of many images, Australian tramway systems and Ballarat's place in them.Album - heavy card covers, plastic lined with postcard or 6x4 photo sleeves.australia, tramways, postcards, photographs, steam trams, horse trams, cable trams, trolley buses -
 Melbourne Tram Museum
Pamphlet, Yarra Trams, Tram Service Changes, 2022
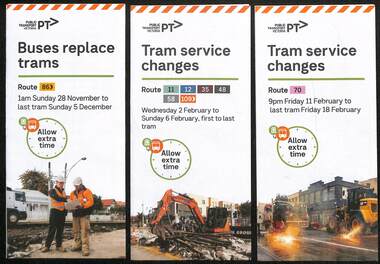
.1 - pamphlet provided at tram stops giving details of the works and bus services for 86 - Merri Creek Bridge works .2 - ditto - for provision of a super stop in William St at Collins St including replacement bus services on route 58 .3 - as for .1 - track reconstruction in Swan St between Stanley St and Stawell St Richmond or BurnleyShows the methods that Yarra Trams customers are advised of changes due to track replacement works..1 - Pamphlet - DL, three fold DL - Buses replace trams - route 86 - 28/11/2021 to 5 December 2021 - Route 86 .2 - Pamphlet - DL, four fold DL - Tram Service changes 2/2/2022 to 6/2/2022 - Routes 11, 12, 35, 48, 58 and 109 .3 - Pamphlet - DL, four fold DL - Tram Service changes - 11/2022 to 18/2/2022 - Route 70tram works, track work, route 58, yarra trams, ptv, route 86, merri creek, bridges, super stops, trams, tramways, richmond, burnley, route 70, collins st, william st