Showing 5071 items
matching victoria st.
-
 Melbourne Tram Museum
Newspaper, The Age, "Tram limit warning on Yarra Bridge", 28/7/2011
... Victoria St... on Yarra Bridge". about structural issues with the Victoria St... Bridge". about structural issues with the Victoria St Richmond ...Newspaper clipping from The Age titled "Tram limit warning on Yarra Bridge". about structural issues with the Victoria St Richmond bridge. Notes the bridge was 127 years old at the time. VicRoads placed a tram restriction of one tram on the bridge at any one time, pending repairs. Has a photo of C class tram 3028, crossing the bridge, with scaffolding on one side. Item by Clay Lucas, photo by Joe Armao.Yields information about the Victoria St bridge, Kew and the need for repairs.Newspaper cutting from The Age, 28/7/2011tramways, bridges, victoria st, vicroads, repairs -
 Ballarat Tramway Museum
Photograph - Colour Photograph/s, Jim Seletto, c1960
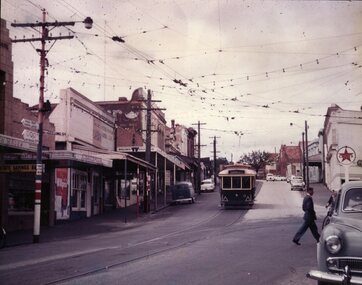
... Victoria St... and Main Streets. Tram No. 11 is arriving from Victoria St... Parade Ballarat Ballarat goldfields Ballarat Bridge St Victoria ...Colour Photograph of SEC tram No. 11, prior to fitting of dash Canopy lighting, c1960, at the intersection of Bridge and Main Streets. Tram No. 11 is arriving from Victoria St. and is about to cross the junction with the Mt. Pleasant line. Trams stops are visible on poles, as is the overhead arrangement, shops on both sides. Tram has large reflective triangles on cab front. Caltex service station sign on right side of photograph. On pole with tram stop sign is a sign with the Olympic rings, pointing way to Lake Wendouree.ballarat, bridge st, victoria st, olympics, tram 11 -
 Ballarat Tramway Museum
Slide - 35mm slide/s, Chas Bevan, 19/12/1970 12:00:00 AM
... Victoria St... to descend the Bakery Hill in Victoria St, inbound. Tram has... the Bakery Hill / Victoria St hill area. Tramways trams Victoria St ...Yields information about the Bakery Hill / Victoria St hill area.Colour slide - 35mm - of Ballarat single trucker 31, about to descend the Bakery Hill in Victoria St, inbound. Tram has the destination of Gardens via Sturt St West. Has the Stones Corner building in the background, Mack Hotel and an advertisement for Beaurepaires tyres. Tram 31 has an a Twin Lakes advertisement and Bliss Bombs (To read pack: Tilt Tram) roof advertisement. Photo taken by Chas Bevan on Saturday 19-12-1970. Note the change since the roundabout for Humffray St was built."Ballarat trams ? Highway. East 19-12-70 - Myers Xmas"tramways, trams, victoria st, bakery hill, stones corner, humffray st, tram 14, tram 17 -
 Ballarat Tramway Museum
Photograph - Set of four black and white negatives of Ballarat trams, Warren Doubleday, 3-3-1968
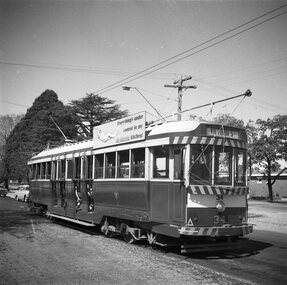
... Victoria St... at Victoria St, before destination reset .2 - Tram No. 11... at Victoria St, before destination reset .2 - Tram No. 11 ...Photos - 3-3-1968, of: .1 - Ballarat bogie tram 34 at Victoria St, before destination reset .2 - Tram No. 11 at the Sebastopol terminus, Albert St. Has a Twin Lakes advert. .3 - Tram No. 11 at the Lydiard St terminus, with a person and a crew member looking at the Twin Lakes sign. Tram has a roof advertisement for Briquettes. .4 - Ballarat No. 20, inbound to Lydiard St passing through the Skipton St crossing loop.Yields information about the operation of the Ballarat tramway system that was operated by the State Electricity Commission of Victoria.Set of four black and white negatives of Ballarat Tramways, 120 size. ballarat, trams, tramways, tram 34, victoria st, tram 11, sebastopol, twin lakes, briquettes, lyiard st north, tram 20, skipton st loop -
 Melbourne Tram Museum
Photograph - Newspaper, Herald Sun, "The Steam roller won", 11/4/1923
... Victoria St... of an accident with a steam roller in Victoria St North Richmond, on 10/4... trams accidents Victoria St On rear in ink "M&MTB Damaged cable ...Photo shows a damaged grip car with bent staunchions and the grip mechanism being lifted with a block and tackle by a uniformed tramway man. The actual cutting notes that a lady's leg was injured in the incident.Yields information about damage to a grip car and lifting the grip out of position.Black and white print notes on the rear.On rear in ink "M&MTB Damaged cable tram grip car, result of an accident with a steam roller in Victoria St North Richmond, on 10/4/1923. Copy ex 'Sun' 11/4/23 in C Craig Collection. (15/7/71) and K S KIngs stamp with number '95-21'. "tramways, trams, cable trams, accidents, victoria st -
 Ballaarat Mechanics' Institute (BMI Ballarat)
Queen Victoria square, Sturt St Ballarat
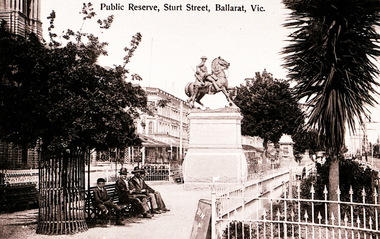
... Queen Victoria square, Sturt St Ballarat... Victoria Square Queen Victoria square, Sturt St Ballarat ...This photograph is from the Max Harris Collection held by the Ballaraat Mechanics' Institute. Please contact BMI for all print and usage inquiries.ballarat, sturt, queen victoria square -
 Ballarat Tramway Museum
Negative - Set of 2, Geoff Grant, 25/06/1955 12:00:00 AM
... Victoria St... 1615.2 - in Victoria St., North Richmond, just to the west... Victoria St Victoria Parade AETA Tour tram SW6 888 Negatives ...Negatives No. N352 and N353 and black and white prints made by a laser printer (stored in folder ) of tram SW6's 888 travelling to Preston Depot on AETA tour (Australian Electric Traction Association) on 25/6/1955. Tram has AETA tour signs and the slogan "Electric Transport a Necessity - Protects your investment, builds your city, creates business". In route number box is letter "B". Geoff Grant's envelope notes the photos as being taken from the cabin of SW6 887. 1615.1 - In Victoria Parade - note hedges 1615.2 - in Victoria St., North Richmond, just to the west of the railway overbridge. Negative scanned hi res and imaged updated 22/5/2020.trams, tramways, melbourne, victoria st, victoria parade, aeta tour, tram sw6 888 -
 Ballarat Tramway Museum
Album - Photo Album, c1970
... Victoria St... in Victoria St. .3 - End of No. 42, with the destination "Haddon St... person. Trams tramways Ballarat Albert St Sebastopol Victoria St ...Set of 16 photos of Ballarat tram system taken 1970c on a tour by an unknown Qld based person.Photo album containing 16 colour prints. Photo album has heavy card covers, covered in black textured plastic containing 12 clear plastic photo sleeves held with a white comb binder. Photos of Ballarat prior to closure, c1970. Photographer unknown. Donated by Peter Hyde of Brisbane Tramway Museum to BTM 3/2/2010, from a deceased estate. Photos apparently taken on a tram tour. .1 - No. 42 and a single trucker inbound in Sturt St. .2 - taken from tram ascending Bakery St hill in Victoria St. .3 - End of No. 42, with the destination "Haddon St via Drummond Nth" .4 - No. 11 and 42 in Lydiard St Nth, near the railway station. No. 11 showing special. .5 - photo of three people on the tour. .6 - Trams reversing at the Victoria St terminus .7 - ditto .8 - 11, 42 and 12? in Lydiard St North by railway station. .9 - Three trams at Sebastopol terminus. .10 - View in Albert St Sebastopol looking north along the track on the side of the road. .11 - View of the tram crossing in Albert St. .12 - 27 and 42 crossing Albert St Sebastopol. .13 - View of Albert St from the tram, north of the crossing looking at the reserved track 14. - Lydiard St North looking south .15 - 42 at the railway level crossing. .16 - View south of the railway level crossing, three trams, with passengers alighting.trams, tramways, ballarat, albert st, sebastopol, victoria st, sturt st, lydiard st nth, railway crossing -
 Ballarat Tramway Museum
Photograph - Black & White Photograph/s, The Courier Ballarat, 16/09/1970 12:00:00 AM
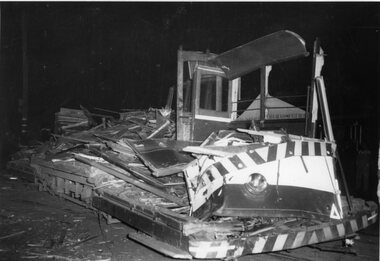
... Victoria St.... the collision with a semi trailer in Victoria St. Ballarat on Sept 16... in Ballarat. trams tramways Accidents 20 Collision Victoria St. tram ...Yields information about the incidents/accidents that can occur on a street tramway system - collisions resulting in the rare virtual total demolition of a tram in Ballarat.Black and white photograph of SEC Ballarat No. 20 following the collision with a semi trailer in Victoria St. Ballarat on Sept 16, 1970. See item Reg. No. 1088 for full details and newspaper publication of this photograph. Shows the tram after the event. Has a compulsory stop pole visible in the background of the photograph. Photograph taken by the Ballarat Courier. See also Reg items No. 551 for photo in poor condition, 2788, 2789 for other photographs, 1088 and 1075 for newspaper reports. 2nd copy in good condition, added 29/5/05.On rear stamped in black ink "Ballarat Courier / Press Photograph / - Copyright - ", in bottom left hand corner date stamp in light blue ink "15 Oct. 1970" (date of printing by Courier presumably) and above in pencil "No. 20". 2nd copy has the Courier stamp.trams, tramways, accidents, 20, collision, victoria st., tram 20 -
 Ballarat Tramway Museum
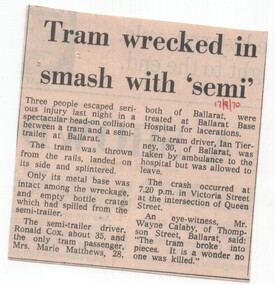
Newspaper, "Tram wrecked in smash with 'semi' ", 17/09/1970 12:00:00 AM
... Victoria St... and account of an eye-witness. Location given as Victoria St... Victoria St Collision In red ink in upper right hand corner, '17/9 ...Newspaper clipping from a newspaper (possibly Melbourne Sun) of 17/9/1970, reporting on the a head - on collision or accident between tram and a semi trailer in Ballarat the previous night. Reports on the injuries to the passenger (Maree Matthews), truck driver (Ronald Cox) and the tram driver (Ian Tierney), gives names and details, time of collision, location and the name and account of an eye-witness. Location given as Victoria St. and Queen St. Reference item with Reg. No. 551 for photo and other details of references etc. See also items Reg Nos. 1088, 1089.In red ink in upper right hand corner, '17/9/70'trams, tramways, accidents, 20, victoria st, collision -
 Ballarat Tramway Museum
Slide - 35mm slide/s, Peter Moses, Jan. 1966
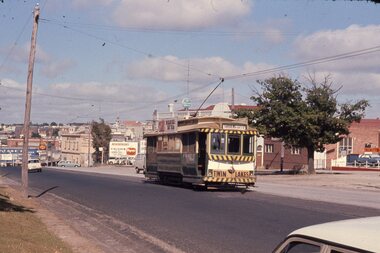
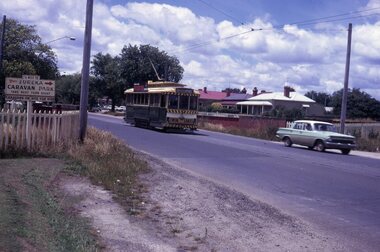
... Victoria St... Victoria St. terminus crossing the Buninyong or Eureka Siding... Parade Ballarat Ballarat goldfields Tramways trams Victoria St ...Photo of SEC Ballarat Tram No. 11, west bound after leaving Victoria St. terminus crossing the Buninyong or Eureka Siding railway Bridge. Tram fitted with a "Twin Lakes" and SEC Briquettes roof advertisement and has destination of "Gardens via Sturt St. West". On the left side of the photograph is a roadside advertisement for the "Eureka Caravan Park". Note scanning error in the photograph. Kodak cardboard mount slide, taken by Peter Moses January 1966. Actual slide does not give the year, but slide fitted in with numbering sequence for 1966.On back of slide in blue ink in bottom right hand corner "P. Moses".tramways, trams, victoria st, railway bridge, tram 11 -
 Ballarat Tramway Museum
Slide - 35mm slide/s, Ben Parle, Jan. 1954
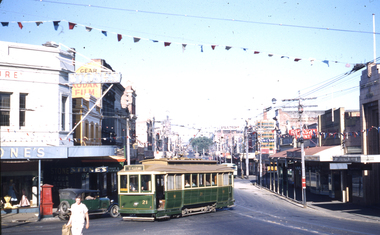
... Victoria St.... Photo of Ballarat No. 21 at the intersection of Bridge, Victoria... St Stones Corner Victoria St tram 21 "Sturt St Ballarat" "1 ...Kodachrome Transparency - 35mm slide - cardboard mount, with one side with red border and words "Kodachrome Transparency" top and bottom. On the other side is "Made in England" and "View from this side". Photo taken by Ben Parle 1/1954. Photo of Ballarat No. 21 at the intersection of Bridge, Victoria St and Main St, turning into Main Rd from Bridge St. Tram has the destination of Mt. Pleasant. Buildings in the background are Stones stores, Rickson's Paint (?). Advertising for ANZ bank, Kodak film. For high resolution scan see btm2817h.tif "Sturt St Ballarat" "1/54"tramways, trams, bridge st, main st, stones corner, victoria st, tram 21 -
 Melbourne Tram Museum
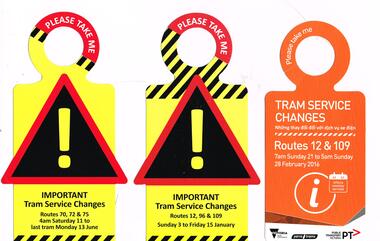
Pamphlet, Public Transport Victoria (PTV), "Tram service changes", 2016
... Victoria St.../2016 for the reconstruction of Victoria St between Hoddle... for the reconstruction of Victoria St between Hoddle and Church St. .2 - Routes ...Set of 3 pamphlets or hanging notices to around tram handrails, cut out advised of the changes to services due to tramway or other works. .1 - Route 12 and 109, Sunday 21/2/2016 - 28/2/2016 for the reconstruction of Victoria St between Hoddle and Church St. .2 - Routes 12, 96 and 109 - Sunday 3/1/2016 to 15/1/2016 for the redevelopment of the Clarendon St junction and installation of a Superstops. .3 - Routes 70, 72 and 75 - Saturday 11/6/2016 to 13/6/2016 for trackwork.trams, tramways, trackwork, bus replacement, notices and information, route 12, route 109, route 96, route 70, route 72, route 75, victoria st, clarendon st, superstops, tram stops, tram 3521 -
 Melbourne Tram Museum
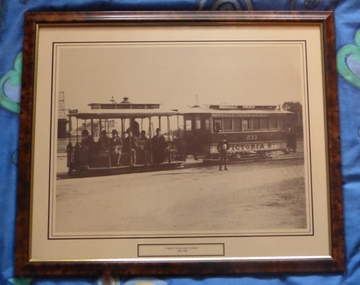
Print - Framed Print, "Cable Tram and Dummy - 1890 - 1900", 1900
... Victoria St... 233, at the Victoria St Terminus, c1900. Has a factory... Trams tramways Melbourne Victoria St Cable Trams tram 233 ...Framed and glazed photograph of cable tram set, trailer 233, at the Victoria St Terminus, c1900. Has a factory and water tank in the background. Cable tram dummy is loaded with gentlemen and there is a paper boy in front of the trailer. Print mounted onto a wooden chip board and sealed with brown tape around the edges. Two screwed frame hanging supports on either side with one run of string between them. Frame - brown and gold with a buff and black line framed around the photograph. Print has the title "Cable Tram and Dummy - 1890 - 1900".On rear in ink at the top - "Donated to Hawthorn Tram Museum Feb. 19th 2012 Ron Scholten"trams, tramways, melbourne, victoria st, cable trams, tram 233 -
 Ballarat Tramway Museum
Slide - 35mm slide/s, Travis Jeffrey, 1961
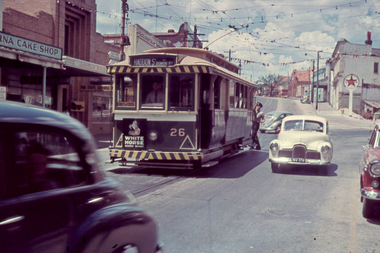
... Victoria St... of No. 26 at the junction of Bridge and Victoria St. turning pole... Haddon St Victoria St tram 26 "BAS 18" in pencil Agfa plastic ...Agfa plastic mount (blue base, white cover) of a photograph of No. 26 at the junction of Bridge and Victoria St. turning pole, with destination of Haddon St, with the Verna Cake shop, State Savings Bank of Victoria and Caltex Service station in the background.. Tram is in the process of being fitted with dash canopy lights and tiger strips and White Horse Whiskey advertisement on the back dash panel. Photo taken early 1961. Slide rescanned at 3200 dpi 24-10-2020, jpg replaced, tiff file retained. This file was scanned in 2003 and may show colour changes."BAS 18" in penciltramways, trams, bridge st, haddon st, victoria st, tram 26 -
 Ballarat Tramway Museum
Photograph - Digital image, c1925
... Victoria St... from E-bay, of ESCo No. 12 in Victoria St Ballarat, c1925... the appearance and the use of ESCo tram 12 in Victoria St and has ...Yields information about the appearance and the use of ESCo tram 12 in Victoria St and has a strong association with those photographed on the steps of the tram.Digital Copy of a photograph purchased by David Critchley from E-bay, of ESCo No. 12 in Victoria St Ballarat, c1925, possibly at the King St loop. Tram has the destination of Orphanage, a Viceroy Tea advertisement, a Coliseum roof advert and an "Pay as You Leave" sign. Note the positioning of the tram number on the route footsteps. The tram still has track brakes and the footstep boards are yet to be cut back or shortened. Tram has four men in suits standing on the running board with the driver or motorman in the doorway of the tram as well. Image not to be formally published without owners permission or knowledge.On the rear of the print is a stamp of "Alpha Print Box Hill" with the number "88"trams, tramways, esco, victoria st, orphanage, motormen, tram 12 -
 Melbourne Tram Museum
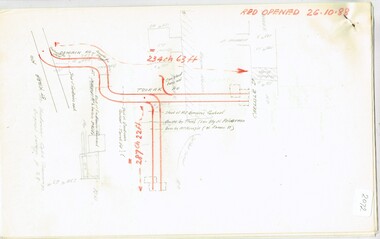
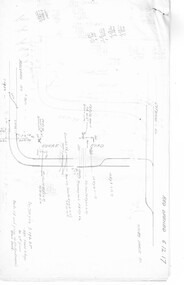
Document - Research Notes, H. S. McComb, development and timing of the "PMTT" part 3, 1950's
... Victoria St..., Glenhuntly Road, Victoria St cable tram terminus, Barkers Road... Junction, Glen Huntly Road, Glenhuntly Road, Victoria St cable tram ...Set of papers, handwritten concerning the development and timing of the "PMTT", Prahran and Malvern - about 30 sheets. Prepared by H. S. McComb - gives layout of the PMTT system, of track layout, opening dates, sketches of various junctions, bridges, track miles, junctions: Kew Junction, Glen Huntly Road, Glenhuntly Road, Victoria St cable tram terminus, Barkers Road, Commercial Road, Malvern Road, Hawthorn Road, Balaclava Junction, Caulfield station loop, Glenferrie Road. Items 2041 to 2052 within box 72.3 in a brown folder marked "PMTT" in red pencil.trams, tramways, pmtt, malvern, routes, track, kew junction, victoria st, barkers rd, glenhuntly rd, malvern rd, caulfield, hawthorn rd, balaclava rd, balaclava junction, glenferrie rd -
 Ballarat Tramway Museum
Photograph - Digital image Set of 8, 21/08/1971 12:00:00 AM
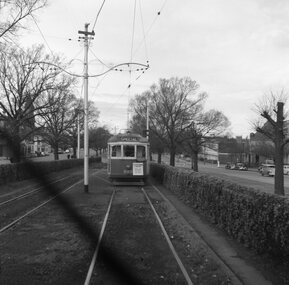
... Victoria St... 31 has the destination of Victoria St. Geoff Dean and his... tramways Railway Station Macarthur St Victoria St Sturt St Lydiard ...Yields information about the SEC Ballarat trams in the months before the closure of the SEC Tramway system. Yields information about the streetscape. Set of 8 Digital images, scanned from slides by Graeme Cleak, scanning by Peter Winspur 9/2011. .1 - Slide FS14 - No. 31 and 32 crossing at the High St Loop in Macarthur St. Tram 31 has the destination of Victoria St. Geoff Dean and his mini on the right hand side of the photograph. Another depot bound single trucker in the photograph, .2 - Slide FS3 - 31 outbound in Victoria St, with St Alipius church in the background. .3 - Slide FS5 - No. 31, and four other trams, some running special at Sturt and Lydiard Sts during the ARHS tour of that day. Has the ANZ Bank and SEC offices in the background. .4 - Slide FS9 - Nos. 39, 26 and two other trams in Lydiard St for the ARHS tour with Reid's Palace, Macleod & Co and J.J. Collier buildings in the background along with other buildings in Lydiard St North. Taken from the Provincial Hotel. .5 - Slide FS11 - No. 26 northbound showing Special running through the level crossing at Ballarat with the Kennedy Murray General Carrier in the background. Taken from the Provincial Hotel. .6 - Slide FS13 - No. 32 turning from Sturt St into Drummond Street North showing Depot via Drummond North, with the Southern Cross Hotel, Rimmington Bros and J.A, Malpass(?) buildings in the background. .7 - Slide FR35 - night shot of No. 17 (with Twin Lakes sign) and No. 32 in Nos 3 and 4 roads at the depot. .8 - Slide FR34 - night shot of the front of the depot - as above and No. 43 on "0" road. All photos 21-8-1971 trams, tramways, railway station, macarthur st, victoria st, sturt st, lydiard st north, level crossings, depot, tram 31, tram 32, tram 39, tram 26, tram 17, tram 43 -
 Ballarat Tramway Museum
Photograph - Digital image Set of 10, Tony Smith, 1971
... Victoria St... West) and 27 (Victoria St with Twin Lakes sign) crossing... system. Trams tramways King St Victoria St Sturt St West Sturt St ...Yields information about Ballarat Tramways and trams prior to the closure of the tramway system.Set of 10 digital images of Ballarat trams prior to closure, scanned from original slides by Tony Smith, 1971 prior to closure of the system. The following photos have suffered colour change and showing some deterioration - fungal growth. .1 - 13 (Sturt St West) and 27 (Victoria St with Twin Lakes sign) crossing at King St loop with St Alipius church in the background. .2 - 13 (Sturt St West) and 17? (Mt Pleasant) crossing at Parker St loop, with the Ballarat College in the background. .3 - Single trucker, inbound, approaching the Parker St Loop, showing Mt Pleasant. .4 - 30 in Sturt St, descending the hill to Grenville St, with other trams in the background, including Woolworths Big W and the Dickins Store. Also has the 8 hour monument. 30 showing City. .5 - 37 running Special, no passengers, crossing Lydiard St Nth, heading for Grenville St. Has the Titanic bandstand, Mechanics Institute in the background. .6 - 33 and three other single truckers in the City Loop - has the Ballarat Gas Co and other buildings in the background. .7 - 37 showing Special passing 33 and other trams parked in the City Loop. Has Dickins, Ballarat Gas Co, Edmonds, Patersons store in the background. .8 - 17 crossing Lydiard St Nth in Sturt St. 17 has destination of Gardens via Drummond Nth, and a Twin Lakes sign. Includes the T&G sign in the background. .9 - 31, a single trucker and bogie tram crossing at Depot loop, Wendouree Parade - 31 showing Victoria St. .10 - 17 waiting in Gardens Loop, showing Mt Pleasant.trams, tramways, king st, victoria st, sturt st west, sturt st, grenville st, city loop, gardens loop, wendouree parade, tram 13, tram 27, tram 30, tram 37, tram 33, tram 17, tram 31 -
 Melbourne Tram Museum
Document - Research Notes, H. S. McComb, Domain Road, Park St, Toorak Road and Chapel St lines, c1930
... Victoria St... Melbourne beach lines via City Road and Victoria St respectively... Victoria St North Melbourne Flemington Rd Notes 6 pages, pinned ...Notes 6 pages, pinned together, giving details, opening dates, terminals, depot entries, sheave pits, curves, for the Domain Road, Park St, Toorak Road and Chapel St lines. Second set of notes 4 pages for the Port Melbourne and South Melbourne beach lines via City Road and Victoria St respectively. Single page sketches for both the Flemington Road via North Melbourne and Spencer St to North Melbourne lines - no dimensions or survey notes. Items 2064 to 2075 within box 72.3 in a brown folder marked "MT&O Co." red pencil on the front cover.trams, tramways, mto co, cable trams, drawings, reports, surveys, toorak rd, chapel st, south melbourne beach, port melbourne, city rd, victoria st, north melbourne, flemington rd -
 Melbourne Tram Museum
Document - Research Notes, H. S. McComb, development and timing of the "PMTT" - part 2, 1950's
... Victoria St... Road, Victoria St cable tram terminus, Kew Depot, Candy Corner... Surveys Victoria St Whitehorse Rd Malvern Depot St Kilda Candy ...Set of papers, handwritten concerning the development and timing of the "PMTT", Prahran and Malvern - about 40 sheets. Prepared by H. S. McComb - gives layout of the PMTT system, primarily of Burke Road, sketches of track layout, opening dates, sketches of various junctions, bridges, track miles, junctions, reconciliation of track lengths from various sources includes Whitehorse Road, Victoria St cable tram terminus, Kew Depot, Candy Corner, St Kilda terminus, Malvern Depot, High St, Items 2041 to 2052 within box 72.3 in a brown folder marked "PMTT" in red pencil.trams, tramways, pmtt, malvern, routes, track, kew depot, burke rd, surveys, victoria st, whitehorse rd, malvern depot, st kilda, candy corner -
 Ballarat Tramway Museum
Slide - 35mm slide/s - set of 4, Dave Simpson, late 1960's early 1970's
... Victoria St... of Stones Corner, corner of Bridge St, Victoria St and Main Road... trams Main Road Bridge St Victoria St Stones Corner tram 26 tram ...Yields information about Stones Corner and the traffic situation in Bridge St.Set of four 35mm slides - Anscochrome white plastic mounts of Stones Corner, corner of Bridge St, Victoria St and Main Road. .1 - shows the overhead arrangements, with a tram about to enter Bridge St from Main Road. Has the Caltex service station in the background, also advert or roof signs for Viscount Ambassador Caravans, K&O (Digger) Schonell Sports Cycles and Electrical store. .2 - No. 26 inbound with many passengers - showing Mt Pleasant - could be running a Special. .3 - ditto with many cars in the photograph. .4 - tram 39 about to enter Bridge St from Main Road - has a red letter box on corner.tramways, trams, main road, bridge st, victoria st, stones corner, tram 26, tram 39 -
 Melbourne Tram Museum
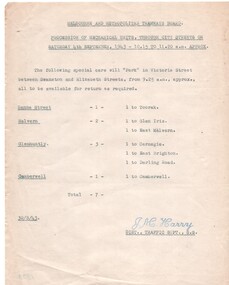
Document - Notice, Melbourne & Metropolitan Tramways Board (MMTB), "Procession of Mechanical Units, Through City Streets", 30/08/1943 12:00:00 AM
... Victoria St... in Victoria St and destinations. Signed by J. M. Harry, District... Trams tramways MMTB World War 2 Parades Swanston St Victoria St ...Set of two Typed quarto sheets, MMTB Notice, re processions through city streets of army or military units during 1943 - gives times, special cars need and where they were to be parked in Victoria St and destinations. Signed by J. M. Harry, District Traffic Superintendent using a rubber stamp. .1 - Mechanical units - 4/9/1943 - 7 trams - dated 30/8/1943 trams, tramways, mmtb, world war 2, parades, swanston st, victoria st -
 Flagstaff Hill Maritime Museum and Village
Plane Compass, 1941-1943
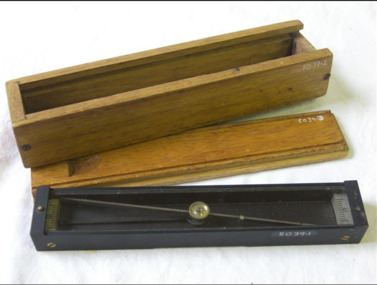
... to 655 Victoria St. It appears that he, or some one else may...Victoria St, Melbourne, Richmond, Victoria, Australia... since 1935 at 657 Victoria St J W Handley began to produce ...This compass is the type used by an artillery unit of the Australian Military Forces during World War 2 and made by J W Handley. Although having owned the factory site since 1935 at 657 Victoria St J W Handley began to produce various items for the Australian Military forces after purchasing and expanding the factory to 655 Victoria St. It appears that he, or some one else may already have been occupying the site for industrial purposes, such as (Manufacturing, Foundry and Electroplating) since at least 1929. J W Handley Pty Ltd was actively producing items for the Military during the war years, a newspaper article from 1939 shows the factory in production and employing 420 people during 1939. J W Handley after the war moved into producing other non military items including a range of fishing reels. The company ceased trading in 1987 and was deregistered as J W Handley Pty Ltd in 1990.The item demonstrates the industrial capability of Australia at the start of World War 2. This item is actively sort by collectors of Australian Military memorabilia and represents a time in Australian history when the country was at war and the general population was concerned about an invasion from Japanese forces. It also therefor is of social significance as many Australians served in the Military forces at that time and the item is complete and in very good condition.A plane table compass, sometimes referred to as a trough compass, used by surveyors and artillery crew to accurately establish magnetic north. The compass is precision machined of brass material with a long needle to ensure accuracy. The compass scale is marked with a centre zero (for magnetic north) and graduations indicating plus and minus five degrees. The compass is housed in a protective wooden case with a sliding lid. The lid has a brass slide which locks the compass needle during periods when the compass is not in use.J.W.H./V Mark 11 D↑D. Made by J W Handley Richmond Melbourne, Victoria. Serial No 353flagstaff hill, warrnambool, shipwrecked-coast, flagstaff-hill, flagstaff-hill-maritime-museum, maritime-museum, shipwreck-coast, flagstaff-hill-maritime-village, trough compass, navigation instrument, surveyor's instrument, j w handley, artillery, australian army, trough, plane compass, world war 2 -
 Flagstaff Hill Maritime Museum and Village
Plane Compass, 1941-1943
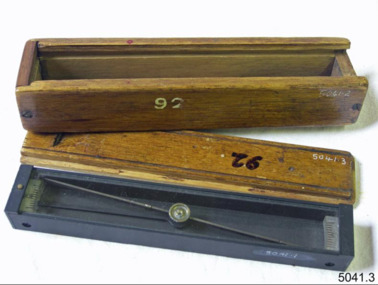
... to 655 Victoria St. It appears that he, or some one else may...Victoria St, Melbourne, Richmond, Victoria, Australia... since 1935 at 657 Victoria St J W Handley began to produce ...This compass is the type used by an artillery unit of the Australian Military Forces during World War 2 and made by J W Handley. Although having owned the factory site since 1935 at 657 Victoria St J W Handley began to produce various items for the Australian Military forces after purchasing and expanding the factory to 655 Victoria St. It appears that he, or some one else may already have been occupying the site for industrial purposes, such as (Manufacturing, Foundry and Electroplating) since at least 1929. J W Handley Pty Ltd was actively producing items for the Military during the war years, a newspaper article from 1939 shows the factory in production and employing 420 people during 1939. J W Handley after the war moved into producing other non military items including a range of fishing reels. The company ceased trading in 1987 and was deregistered as J W Handley Pty Ltd in 1990.The item demonstrates the industrial capability of Australia at the start of World War 2. This item is actively sort by collectors of Australian Military memorabilia and represents a time in Australian history when the country was at war and the general population was concerned about an invasion from Japanese forces. It also therefor is of social significance as many Australians served in the Military forces at that time and the item is complete and in very good condition.A plane table compass, sometimes referred to as a trough compass, used by surveyors and artillery crew to accurately establish magnetic north. The compass is precision machined of brass material with a long needle to ensure accuracy. The compass scale is marked with a centre zero (for magnetic north) and graduations indicating plus and minus five degrees. The compass is housed in a protective wooden case with a sliding lid. The lid has a brass slide which locks the compass needle during periods when the compass is not in use.J.W.H./V Mark 11 D↑D. Made by J W Handley Richmond Melbourne, Victoria. Serial number 92 flagstaff hill, warrnambool, shipwrecked-coast, flagstaff-hill, flagstaff-hill-maritime-museum, maritime-museum, shipwreck-coast, flagstaff-hill-maritime-village, trough compass, navigation instrument, surveyor's instrument, j w handley, artillery, australian army, trough, plane compass, world war 2 -
 Flagstaff Hill Maritime Museum and Village
Plane Compass, 1941-1943
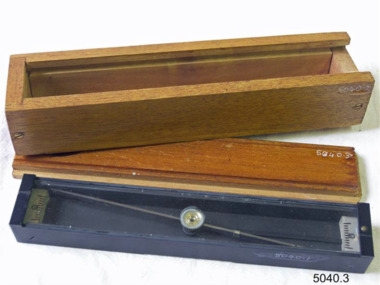
... to 655 Victoria St. It appears that he, or some one else may...Victoria St, Melbourne, Richmond, Victoria, Australia... since 1935 at 657 Victoria St J W Handley began to produce ...This compass is the type used by an artillery unit of the Australian Military Forces during World War 2 and made by J W Handley. Although having owned the factory site since 1935 at 657 Victoria St J W Handley began to produce various items for the Australian Military forces after purchasing and expanding the factory to 655 Victoria St. It appears that he, or some one else may already have been occupying the site for industrial purposes, such as (Manufacturing, Foundry and Electroplating) since at least 1929. J W Handley Pty Ltd was actively producing items for the Military during the war years, a newspaper article from 1939 shows the factory in production and employing 420 people during 1939. J W Handley after the war moved into producing other non military items including a range of fishing reels. The company ceased trading in 1987 and was deregistered as J W Handley Pty Ltd in 1990.The item demonstrates the industrial capability of Australia at the start of World War 2. This item is actively sort by collectors of Australian Military memorabilia and represents a time in Australian history when the country was at war and the general population was concerned about an invasion from Japanese forces. It also therefor is of social significance as many Australians served in the Military forces at that time and the item is complete and in very good condition.A plane table compass, sometimes referred to as a trough compass, used by surveyors and artillery crew to accurately establish magnetic north. The compass is precision machined of brass material with a long needle to ensure accuracy. The compass scale is marked with a centre zero (for magnetic north) and graduations indicating plus and minus five degrees. The compass is housed in a protective wooden case with a sliding lid. The lid has a brass slide which locks the compass needle during periods when the compass is not in use.J.W.H./V Mark 11 D↑D. Made by J W Handley Richmond Melbourne, Victoria. Serial number 1279flagstaff hill, warrnambool, shipwrecked-coast, flagstaff-hill, flagstaff-hill-maritime-museum, maritime-museum, shipwreck-coast, flagstaff-hill-maritime-village, trough compass, navigation instrument, surveyor's instrument, j w handley, artillery, australian army, trough, plane compass, world war 2 -
 Flagstaff Hill Maritime Museum and Village
Plane Compass, 1941-1943
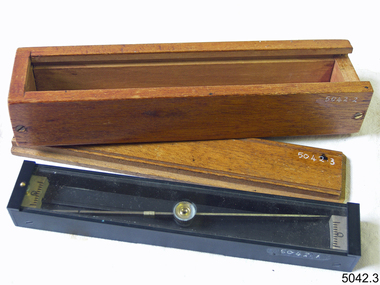
... to 655 Victoria St. It appears that he, or some one else may...Victoria St, Melbourne, Richmond, Victoria, Australia... since 1935 at 657 Victoria St J W Handley began to produce ...This compass is the type used by an artillery unit of the Australian Military Forces during World War 2 and made by J W Handley. Although having owned the factory site since 1935 at 657 Victoria St J W Handley began to produce various items for the Australian Military forces after purchasing and expanding the factory to 655 Victoria St. It appears that he, or some one else may already have been occupying the site for industrial purposes, such as (Manufacturing, Foundry and Electroplating) since at least 1929. J W Handley Pty Ltd was actively producing items for the Military during the war years, a newspaper article from 1939 shows the factory in production and employing 420 people during 1939. J W Handley after the war moved into producing other non military items including a range of fishing reels. The company ceased trading in 1987 and was deregistered as J W Handley Pty Ltd in 1990.The item demonstrates the industrial capability of Australia at the start of World War 2, this item is actively sort by collectors of Australian Military memorabilia and represents a time in Australian history when the country was at war and the general population was concerned about an invasion from Japanese forces. It also therefor is of social significance as many Australians served in the Military forces at that time and the item is complete and in very good condition.A plane table compass, sometimes referred to as a trough compass, used by surveyors and artillery crew to accurately establish magnetic north. The compass is precision machined of brass material with a long needle to ensure accuracy. The compass scale is marked with a centre zero (for magnetic north) and graduations indicating plus and minus five degrees. The compass is housed in a protective wooden case with a sliding lid. The lid has a brass slide which locks the compass needle during periods when the compass is not in use.J.W.H./V Mark 11 D�D. Made by J W Handley Richmond Melbourne, Victoria. Serial number 1333 on boxflagstaff hill, warrnambool, shipwrecked-coast, flagstaff-hill, flagstaff-hill-maritime-museum, maritime-museum, shipwreck-coast, flagstaff-hill-maritime-village, trough compass, navigation instrument, surveyor's instrument, j w handley, artillery, australian army, trough, plane compass, world war 2 -
 Ballarat Tramway Museum
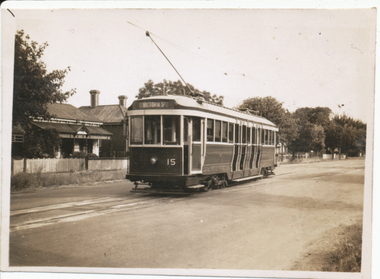
Photograph - Digital image, Wal Jack, 14/12/1945 12:00:00 AM
... running out to Victoria St in Drummond St North at Duncan St... C132 on first day runs 14-12-45 Gardens - Victoria St run... day runs 14-12-45 Gardens - Victoria St run. Photo taken ...Yields information about the early use of Ballarat's 2nd bogie tram and its first day in service.Digital image from the Wal Jack Ballarat Album of No. 15 running out to Victoria St in Drummond St North at Duncan St. Tram has the destination of Victoria St. Taken by Wal Jack on 14-12-1945. See image i2 for rear of photograph. See image i3 for hi res scan of print. See image i4 for hi res scan of negativeIn ink on rear " SEC Ballarat Tramways bogie. 15 ex M&MTB C132 on first day runs 14-12-45 Gardens - Victoria St run. Photo taken in Drummond St North and showing No. 15 entering loop from Duncan St." with number "T537" within Wal Jack photo stamp.trams, tramways, drummond st nth, bogie trams, tram 15 -
 Melbourne Tram Museum
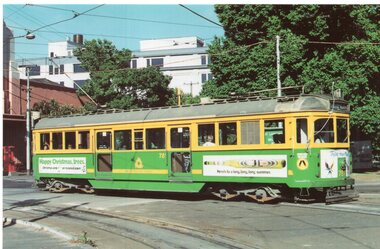
Postcard, Railmac, SW5 781 turning from Brunswick St into Victoria Parade, 1995
... SW5 781 turning from Brunswick St into Victoria Parade... Brunswick St into Victoria Parade, 26/11/1990 going to St Kilda... into Victoria Parade, 26/11/1990 going to St Kilda Beach. Has adverts ...Postcard - full colour - of tram SW5 781 turning from Brunswick St into Victoria Parade, 26/11/1990 going to St Kilda Beach. Has adverts for been (its going to be a long hot summer) and Christmas Cards on recycled paper. Has details of the tram type on the rear. Photo by Steve McNicol. Divided back, published by Railmac number S059 RMtrams, tramways, sw5 class, victoria parade, tram 781 -
 Melbourne Tram Museum
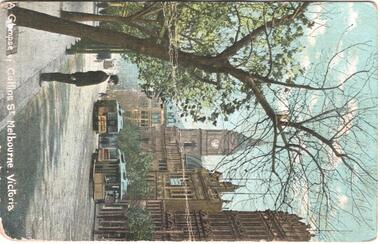
Postcard, "A Glimpse of Collins St Melbourne Victoria", mid 1900's?
... "A Glimpse of Collins St Melbourne Victoria"...-1900's. Titled "A Glimpse of Collins St Melbourne Victoria...-1900's. Titled "A Glimpse of Collins St Melbourne Victoria ...Image of Collins St looking west from Russell St with two cable trams in the view. Includes the Town Hall. Printed mid-1900's. Titled "A Glimpse of Collins St Melbourne Victoria". On the rear is a handwritten message and address - the removal of the stamp has obscured name. No printer details other than a number "B135/841" and in the bottom right hand corner "No. 8". Second copy in good order.Yields information about Collins St eastern end.Divided back postcard featuring a coloured image - Two copies held.trams, tramways, collins st, cable trams, town hall