Showing 364 items
matching a2-1022
-
 Melbourne Tram Museum
Poster, Yarra Trams, "A history of Melbourne Trams", c2002
Printed colour posters - one each of A2 and A3 size, titled "A history of Melbourne Trams", featuring a cable car set, trams V214, HTT 8, W1 380, X2 676, Y613, W5 758, SW6 909, Z 166, A 241, B1 2001, C3005 and D 5001, with year and class and a short description and history. Has the Yarra Trams logo in the bottom right hand corner. 2nd A3 sized copy added 21/04/2017 from David Frost items received late 2016.trams, tramways, posters, melbourne, mmtb, yarra trams, tram 214, tram 8, tram 380, tram 676, tram 613, tram 758, tram 909, tram 166, tram 241, tram 2001, tram 3005, tram 5001 -
 Ringwood and District Historical Society
Flyer, Land Auction Advertisement, Mullum Rise, Ringwood - 1970
Double sided leaflet with aerial view of part of Ringwood showing subdivision site, terms of sale, layout of streets and allotments, and summary of local features and services.Land auction, Saturday, 10th October (1970). 45 home sites. Subdivision includes Mullum Mullum Road, Hugh Street, Rollington Drive, Cassandra Court, and Jeffrey Drive. Surveyors - R.G. Lee Pty. Ltd., 6 Davis Street, Richmond. Agents - N.R. Reid & Co., 173 Coleman Parade, Glen Waverley, (Telephone) 560 0355 A.H. 560 0361 and Safeway Centre, Boronia Road, Boronia, (Telephone) 762 1022 A.G. 795 2887, also at East Malvern and Mount Waverley. -
 Ballarat Tramway Museum
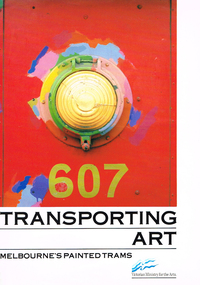
Programme, Artistic Licence, "Transporting Art", 1983
.1 - Folded A2 (into A4 sheets) printed on gloss paper, featuring headlights from some of the Transporting Art program. Document acts as a catalogue for a 1983 Arts Exhibition. Gives a background to the project, lists the trams, notes on the artists, notes from the artists on their work, black and white images of the tram parts. Printed for the Victorian Ministry for the Arts Gallery, exhibition 12/9 to 14/10 1983 .2 - three page A4 document - stapled in the top left hand side "Transporting Art - Impressions of the Painted Trams Project" - listing photographs and photographers. See pdf file. trams, tramways, transporting art, decorated trams, exhibitions -
 Melbourne Tram Museum
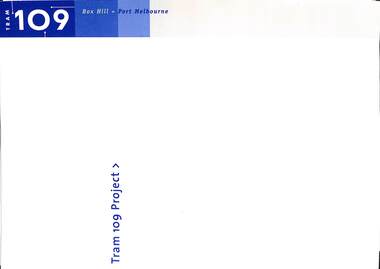
Document - Opening of Box Hill Extension Route 109 Press documents, Ministry of Transport, May 2003
Produced for the opening of the Box Hill Extension, 2 May 2003, extending the tram line from Union Road Mont Albert to Station Street Box Hill. Became known as Route 109 - Port Melbourne Box Hill.Provides the background to the 2003 extension of the Mont Albert tram to Box Hill.Documents - mainly folded to A4 enclosed within a card folder prepared for the event. .1 - folder - folded card to hold the following items .2 - 10 fold DL pamphlet providing map, technical information and tram stops. .3 - A2 folded sheet for the Route 109 project - introduction by the Minister for Transport, Peter Batchelor .4 - A3 folded sheet giving background history to the area .5 - 2 page Press Release dated 2/5/2003 .6 - A4 sheet with CD containing a photo of the 30/9/1916 Opening by Mr. A Bailey trams, tramways, new tramway, box hill, opening, route 109, mont albert -
 Melbourne Tram Museum
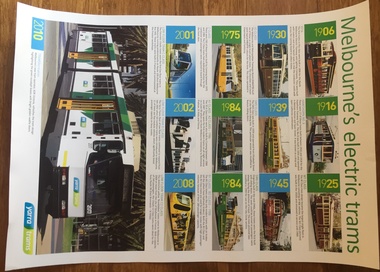
Poster, Yarra Trams, "Melbourne's electric trams", Late 2009 or early 2010
Printed colour poster - A2 size, titled "Melbourne's electric trams", featuring trams V214, HTT 8, W1 380, X2 676, SW5 758, SW6 909, Z 166, A 241, B1 2001, C3005, D 5001, C1 5113 (Bumblebee) and B2017 with year and class and a short description and history. Has the Yarra Trams logo in the bottom right hand corner. Issued at the time KDR took over Yarra Trams, late 2009 or early 2010. Two copies held. See Reg Item 497 for a version when the E class commenced.trams, tramways, posters, melbourne, mmtb, yarra trams, tram 214, tram 8, tram 380, tram 676, tram 758, tram 909, tram 166, tram 241, tram 2001, tram 3005, tram 5001, tram 5113, tram 2017 -
 Melbourne Tram Museum
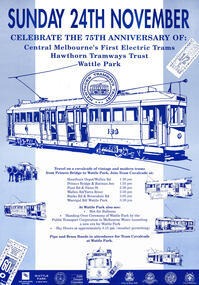
Poster, Public Transport Corporation (PTC), "Celebrate the 75th Anniversary of Central Melbourne's First electric trams - Hawthorn Tramways Trust - Wattle Park", Nov. 1991
Poster - A2 size, printed on gloss paper in blue ink, for the "Celebrate the 75th Anniversary of Central Melbourne's First electric trams - Hawthorn Tramways Trust - Wattle Park", Sunday 24/11/1991. Gives event details, cavalcade of trams, times. Has the various logos of councils who made up the trust on the bottom edge along with other supporting organisations. Has images of trams and tickets. Includes the event to hand over Wattle Park from Public Transport Corporation PTC to Melbourne Water. See Reg Item 5402 for a program of the events.trams, tramways, htt, wattle park, ptc, 75th anniversary, cavalcade -
 Moorabbin Air Museum
Document (item) - Wamira Documents and drawings
-
 Melbourne Tram Museum
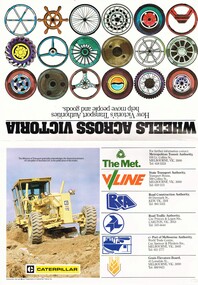
Pamphlet, Victoria Transport, "Wheels across Victoria", c1985
Pamphlet, folded A2 size sheet to A4 landscape, full colour printed, titled "Wheels across Victoria", sub-titled "How Victoria's Transport Authorities help move people and goods" Provides information on the activities of the Road Construction Authority, Road Traffic Authority, Metropolitan Transit Authority, RCA, RTA, MTA. V/Line, GEB and Ports, Grain Elevators Board and the various port authorities. On the inside has a introduction by the Minister for Transport Tom Roper and a game for up to 6 people moving markers from Gippsland to the NW corner of the state. Uses a dice. Published by Victoria Transport with the assistance of Caterpillar Australia ltd. Has the various authority logos.trams, tramways, rta, rca, vline, mta, victorian government -
 Ballarat Tramway Museum
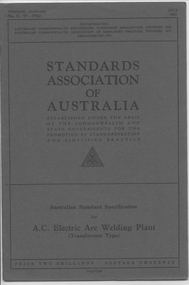
Book, Australian Commonwealth Engineering Standards Association, "AC Electric Arc Welding Plant - Transformer type", "Brass water fittings - stop, bib, globe and ferrule or main taps", "Vegetable tanned leather belting", "Rubber Conveyor and Power Transmission Belting", "Maintenance of Portable Chemical Fire Extinguishers of the Acid-Alkali and Foam Types", "Copper Tubes", "Portland Cement", 1928 - 1942
.1 - Book - 12 pages + brown covers, side stapled, issued by the Australian Standards Association, "AC Electric Arc Welding Plant - Transformer type", C97-1942, July 1942. .2 - Book - 40 pages + grey covers, side stapled, issued by the Australian Commonwealth Engineering Standards Association, Tentative Australian Standard B1 - "Brass water fittings - stop, bib, globe and ferrule or main taps", B1-1928, August 1928. .3 - Book - 20 pages + grey covers, side stapled, issued by the Australian Commonwealth Engineering Standards Association, Tentative Australian Standard B4 - "Vegetable tanned leather belting", B4 - 1929, January 1929. .4 - Book - 16 pages + grey covers, side stapled, issued by the Australian Commonwealth Engineering Standards Association, Tentative Australian Standard B3 - Rubber Conveyor and Power Transmission Belting", B3 - 1929, March 1929. .5 - Book - 8 pages + green covers, side stapled, issued by the Australian Standards Association, "Maintenance of Portable Chemical Fire Extinguishers of the Acid-Alkali and Foam Types", CA 18-1941, May 1941. .6 - Book - 16 pages + grey covers, side stapled, issued by the Australian Commonwealth Engineering Standards Association, Tentative Australian Standard B2 - "Copper Tubes", B2 - 1928, July 1928. .7 - Book - 28 pages + grey covers, side stapled, issued by the Australian Commonwealth Engineering Standards Association, Australian Standard A2 - "Portland Cement", includes tests, A2-1926, December 1926. On top right hand corner has the date stamp of the "The Electric Supply Co. of Victoria Ltd Ballarat" .2 - 3 Sep 1928 .3 - 19 Jan 1929 .4 - 3 Apr 1929 .5 - SEC Stamp - ? 1941 .6 - 20 July 1928 .7 - 17 Apr 1934trams, tramways, power station, standards, materials -
 Warrnambool and District Historical Society Inc.
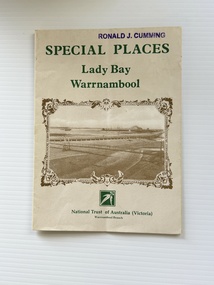
Pamphlet - Special Places Lady Bay Warrnambool, Philprint Warrnambool, 1989
This pamphlet was produced for the Warrnambool Branch of the National Trust of Australia (Victoria) for Heritage Week, April 16-23, 1989 and contains information written by Warrnambool residents about their locality. This was a co-operative venture by people with a common interest in protecting the natural environment near their home. Areas covered in the written information include: Formation of the Coast, Archaeological survey, Gunditjmara History, vegetation, history and recreational uses of the Lady Bay area. The map shows special places of interest including past and present navigational aids, sites of shipwrecks and other historical places of interest. The Warrnambool Branch of the National Trust was originally formed in March 1969 and merged with the Port Fairy Branch in late 1970. In October 1979, the Warrnambool Branch was reformed and operated into the late 1990's. This is an example of a publication produced by the Warrnambool Branch of the National Trust Australia (Victoria). It provides historical information and perspectives of the recreational uses in and around Lady Bay Warrnambool.An A2 piece of buff coloured thick paper folded into eight to make an A5 pamphlet. The front cover has green printing with the National Trust symbol of three eucalyptus leaves in green. There is a brown sepia photograph showing a view across Lady Bay with the suspension bridge across the Merri River in the foreground, Viaduct Road in the middle ground and the breakwater in the background. There is a purple inked stamp on the top right hand corner. The rear cover has brown writing and includes logos of bodies who assisted with the publication. There is a brown line drawing of the viaduct and pier at the Warrnambool Breakwater. The inside of the unfolded pamphlet contains a map of Lady Bay and adjacent area showing places of interest and shipwrecks marked in red circlesFront cover: Special Places Lady Bay Warrnambool National Trust of Australia (Victoria) Warrnambool Branch Ronald J. Cummingwarrnambool, lady bay warrnambool, national trust australia victoria warrnambool branch, heritage week 1989, lady bay shipwrecks -
 Surrey Hills Historical Society Collection
Photograph, D716 steam train at Mont Albert Station, 1919, 1919
The photo was taken at 8.15am on Friday 12 September 1919. The D class was a passenger and mixed traffic steam locomotive which operated on the Victorian Railways from 1902 to 1974. Originally it was introduced on mainline express passenger services, but they were quickly superseded by the much larger A2 class and were relegated to secondary and branch line passenger and goods service, where they continued in service for the next fifty years. The D716 was probably built at the Newport Workshops, post 1910 and before 1914. The expansion of Melbourne's population into new suburbs early in the 20th century, and the delay of the suburban electrification project, meant there was the need for faster and more powerful steam locomotives for the suburban rail network. In 1908, the basic design was adapted to create a more powerful locomotive. They were put to work on longer and hillier suburban routes including the Lilydale line. A total of 58 were built between 1908 and 1913. See wikipedia for a more detailed history of the D class locomotives. Electric trains replaced steam in 1922. Mr William Holmes of 'Lugano', Mont Albert Road was in charge of the design and introduction of the electrification of the Melbourne rail system.Black and white photo of a steam train approaching the platform at Mont Albert station. Rear in blue biro in Jocelyn Hall's handwriting: "Hamilton St Mont Albert / probably 1919".mont albert station, railways, trains, d class locomotives, norman carter, steam trains -
 Montmorency–Eltham RSL Sub Branch
Medal - Medal Group, WW1, 2166 Lieutenant Reginald Frank Barratt
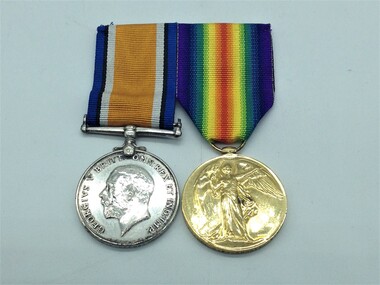
Information from "The AIF Project" Lieutenant Reginald Frank Barratt was born in 1879 in Withington, Manchester, Lancashire, England. Regimental number 2166. 3rd Field Artillery Brigade, Military District 3 and Military District 6. Arrived in Australia in 1903 aged 24. Address was Mount Street, Heidelberg, Victoria. Occupation - Farmer. Enlistment date was 17th August 1914. Served with the 68 Battery Royal Field Artillery during the South African War. Rank on enlistment was Sergeant. Embarkation details - Unit embarked from Melbourne, Victoria on board Transport A2 Geelong on 19th September 1914. Rank Lieutenant - Unit 1st Divisional Ammunition Column. Information from the Roll of Honour - Awarded Royal Human Society Medal for saving three lives from drowning in Orange River during South African War. Wounded at Zillebeke, near Ypres, Belgium. Died of wounds 22nd August 1917 at the age of 38. Buried at Bedford House Cemetery, Enclosure No 2, (Plot 1, R0w F, Grave 23), Zillebeke, Belgium. Panel number , Roll of Honour Australian War Memorial British War Medal - The medal was struck by the Royal Mint, is a silver disc 36mm in diameter with a straight clasp suspended without swivel. The obverse shows Sir Bertram Mackennal's bare headed effigy of King George V facing left with the legend 'GEORGIVS V BRITT:OMN:REX ET IND:IMD - "George V, King of all the British Isles & Emperor of India". The reverse, designed by William McMillan, shows St George, naked on horseback and armed with a short sword, an allegory of the physical & mental strength which achieved victory of Prussianism. The horse tramples on the Prussian eagle shield and the emblems of death, a skull and cross bones. In the background are ocean waves and just off centre near the right upper time is the risen sun of victory. The years 1914-1918 appear on the perimeter in the left and right fields respectively. The watered silk ribbon is 32mm wide with 3mm wide royal blue band, 2mm wide black band, 3mm wide white band repeated in reverse order and separated by 16mm wide orange band. Victory Medal - The medal is bronze disc 36mm in diameter with a winged figure of Victory on the obverse. The reverse has the words 'THE GREAT WAR FOR CIVILIZATION 1914-1918', all surrounded by a laurel leaf. The watered silk ribbon is 32mm wided has two rainbow design with the violet from each rainbow on the outside edges, moving through to a central red stripe where both rainbows meet.The recipients name, rank and unit are impressed on the bottom edge of the medals - Lieut F Barratt AIF -
 Federation University Historical Collection
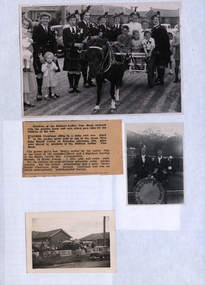
Photograph - Photograph - Black and White, Ballarat Ladies Highland Pipe Band Photographs and Newspaper Article
"After the war Pipe-Major Duncan McLennan, moved to Ballarat and took up a position as cadet instructor and leader of the Ballarat Highland Pipe Band and the Ballarat Ladies Pipe Band. " (Victorian Historical Journal Vol. 85, No. 1, June 2014)A1 - Black and white photograph of band members with children in horse and cart. A2 - Newspaper article relating to the above mentioned photograph. A3 - Black and White photograph of Drum major and member of band. A4 - Black and White photograph of Ballarat Ladies Highland Pipe Band Bazaar B1 - Black and White photograph of piper in uniform B2 - Black and White photograph of Drum Major in uniform B3 - Black and White photograph of Drum Major in uniform on stairs B4 - List of Members. C1 - Black and White photograph of pipe band marching. C2 - Black and white photograph of Ladies Drum Major with Lew Zilles and Mrs Zilles C3 - Black and white photograph of Mr & Mrs Zilles, Mr and Mrs Bennett and Joan Bolden Gift of Margaret Bennett, 2019A1 - Outside 19 Waller Avenue where the ladies pipe band held a fair to raise money for new drums. The horse and cart was hired to give children rides around the "island". Trevor in the cart - striped shirt. M. Bennett. Ballarat Courier Press Photograph. A3 - Ballarat - Margaret Smith - Base drummer and Margaret Bennett - Drum Major, outside I & R Morley Doveton Street. A4 - Ballarat Ladies Highland Pipe Band Bazaar 1959. 19 Waller Ave, Ballarat B1 - 183 B2 - Margaret Bennett the Drum Major of Ballarat Ladies Pipe Band. Taken on front porch of 19 Waller Avenue B3 - Ballarat City Oval. Drum Major Margaret Bennett nee Reynolds. C1 - Copyright The Ballarat Courier Proprietary Limited C2 - Mrs Zilles, Lew Zilles, and Margaret Bennett. Progress Photos, Midway Arcade, 256 Collins St, Melbourne C3 - Mr & Mrs Zilles, Margaret and John Bennett, Joan Bolden (Parker) ladies pipe band, members, members list, ladies highland pipe band, photograph, black and white photograph -
 Ballarat Tramway Museum
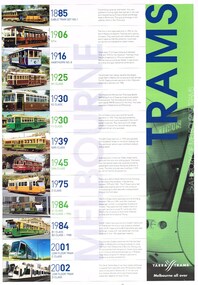
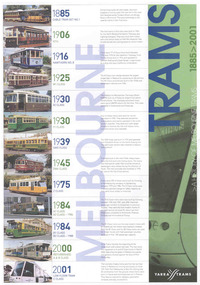
Poster, Yarra Trams, "Melbourne Trams 1885 - 2001", 2001
Colour poster featuring a history or Melbourne (MMTB) tramcars from 1885 to 2001. Features a Cable Car set, and electric trams V, M, W1, X2, Y1, SW5, SW6, Z, A1, B1, A & B class refurbished and C class - Citadels trams. Has dates and brief history of each type. Issued by Yarra trams at the time of the launch of the Citadels trams. 2009.1 - A3 size, collected by BTM at the time of the launch - 12/10/2001 - See Rail News Victoria, Nov. 2001. 2009.2 - A2 size, collected by BTM during the Moomba day, 10/3/2002 from Yarra Trams display. See Reg Item 2982 for similar poster with D class tram and Rail News Victoria, November 2001.trams, tramways, citadels, mmtb, melbourne -
 Eltham District Historical Society Inc
Photograph, George Coop, Diesel-electric rail cars in the Railmotor Yard at Spencer Street Station, c.1951
This photo was taken the same time as EDHS_04673-36 an A2-class Steam Locomotive 987 sitting on the other side of the platform at Spencer Street Railway Station. 280HP Walker Railmotor Walker Railmotors are diesel railcars, or train sets, that were designed to improve the passenger services on Victorian branchlines in Australia. They were practically a bus service on rails. These motors entered service in 1948 with the 102 hp and the 154 hp units. The 102 hp units were built until 1955 and the 153 hp units stopped being built one year before. The 280 hp units were built from 1950-1951. The engine and drive systems were built by the Walker Railcar Company in Wigan, England, and the bodies were built by Martin & King in Melbourne, Victoria, Australia. The railcars were put together by Victorian Railways. The railcars were, in the end, gradually replaced by a diesel electric railcar from 1978 on. Amazingly these railcars survived to this time, even though they were in direct competition with the bus service. By 1980 no Walker Railmotor cars or trainsets were in service. Very few are preserved. REF: Walker Railmotors, https://locomotive.fandom.com/wiki/Walker_RailmotorsDigital TIFF file Scan of black and white 620 format contact printgeorge coop collection, spencer street railway station, walker railmotor -
 Ballarat Tramway Museum
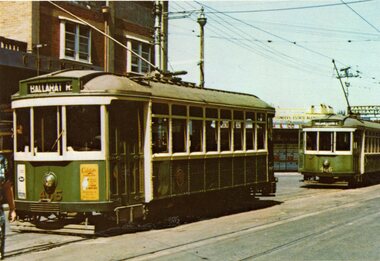
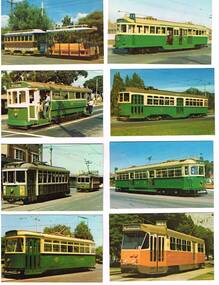
Postcard - Illustration/s, McCarron Bird, MMTB tram postcards
Set of nine of printed illustrations - postcard size of Melbourne and Metropolitan Tramways Board Tramcars produced in 1978. Separate card for each class of tramcar featured, with notes, statistics, MMTB name. Each card also has printers name and date on back. Not a formal postcard, no place for a stamp. 1810.1 - X1 - 465 with 466 in background. Photographed at Footscray station terminus, c1962. 465 has destination of "Ballarat Rd." 1810.2 - Z7 in Victoria Parade, c1975 - has destination of "West Preston - Regent St." and route number "13". 1810.3 - Cable car set (No. 1) - photographed at Preston Workshops 1810.4 - L104 - showing destination of Carnegie and route number 67. 1810.5 - Y469 - showing destination of "Wattle Park - Elgar Road", possibly with Wattle Park in background. 1810.6 - T180 - showing "Special", while on a charter. 1810.7 - W7 1022 - showing destination "West Preston", route 11, freshly painted. 1810.8 - X2676 - freshly painted. 1810.9 - W2511 - fitted with marker lights, freshly painted, showing "City" - route 11. Cards 8 and 9 added 9/3/2018 from Donation of John Ruyg. trams, tramways, melbourne, mmtb, tramcars -
 Bendigo Historical Society Inc.
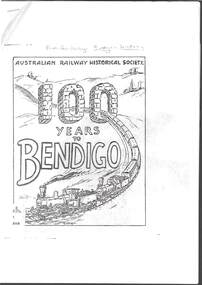
Book - RAILWAYS COLLECTION: AUSTRALIAN RAILWAYS HISTORICAL SOCIETY 100 YEARS TO BENDIGO
Railways Collection-Stapled A4 paper Booklet (Commemorating the Centenary of the opening of the railway from Melbourne to Bendigo , 20.10.1962 ) - Australian Railways Historical Society ''100 Years to Bendigo''. The front page has a sketch by Ted Healey of two old trains pulling passenger carriages.There are some black and white photos. The inside cover shows steam Loco with a caption - Down Great Northern Limited express in 1938 Double headed by A2 .972 and A2.883 passing Footscray. (photo : J.L. Buckland ) Page 2 has a photo of a Postcard - 450 Tons of Gold - Pages 10-12 provide information on the Locomotives and carriages that were used. Page 23 has a photo of G Class Light Lines 4-4-0 and V Class Compound 2-8-0 Locos at Bendigo Engine shed in the early 1900's.railways, bendigo to melbourne, 450 tons of gold - -
 Ballarat Tramway Museum
Memorabilia - Display Board with mounted signs, Graeme Sewell, 5/02/2004 12:00:00 AM
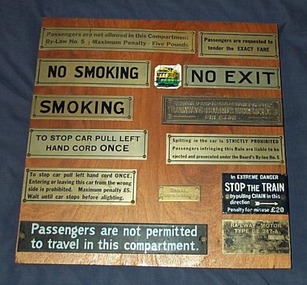
Varnished wooden panel fitted with 13 different tramway or railway related signs and one small image of a Melbourne Tramcar. The panel consists of two pieces of plywood glued to wooden backing boards. The signs have been fixed to the panel with brass screws - either round or countersunk. The signs are: "Passengers are not allowed in this Compartment / By-Law No. 5 Maximum Penalty - Five Pounds" "Passengers are requested to tender the EXACT FARE" "NO SMOKING" "NO EXIT" "SMOKING" "DESIGNED AND MANUFACTURED AT THE / TRAMWAYS BOARD'S WORKSHOPS / PRESTON" "TO STOP CAR PULL LEFT / HAND CORD ONCE" "Spitting in the car is STRICTLY PROHIBITED / Passengers infringing this Rule are liable to be ejected and prosecuted under the Board's By-law No. 5" "To stop car pull left hand cord ONCE / Entering or leaving this car from the wrong side is prohibited. Maximum penalty L5." "SPARE / CONTROLLER KEY" "In EXTREME DANGER / STOP THE TRAIN / by pulling CHAIN in this direction / Penalty for misuse L20" "Passengers are not permitted / to travel in this compartment." "RAILWAY MOTOR / TYPE GE 247-A / DL 2755000 SERIAL No. A2320 / AUSTRALIAN MANUFACTURE / AUSTRALIAN GENERAL ELECTRIC LIMITED / P.1022" L = pound symbol Signs collected by Graeme Sewell who assembled the Display Board during the 1980's.trams, tramways, signs, railways, tramways, passengers -
 Melbourne Tram Museum
Photograph - Illustration/s, Melbourne & Metropolitan Tramways Board (MMTB), 1978
Set of eight of printed illustrations - postcard size of Melbourne and Metropolitan Tramways Board Tramcars produced in 1978. Separate card for each class of tramcar featured, with notes, statistics, MMTB name. Each card also has printers name and date on back. Not a formal postcard, no place for a stamp. 446.1 - Cable car set (No. 1) - photographed at Preston Workshops 446.2 - T 180 - showing "Special", while on a charter. 446.3 - X1 - 465 with 466 in background. Photographed at Footscray terminus, c1962. 465 has destination of "Ballarat Rd." 446.4 - Y 469 - showing destination of "Wattle Park - Elgar Road", possibly with Wattle Park in background. 446.5 - W2 511, showing destination of "City" and route 11. 446.6 - X2 676, showing "Special". 446.7 - W7 1022 - showing destination "West Preston", route 11, freshly painted. 446.8 - Z1 7 in Victoria Parade, c1975 - has destination of "West Preston - Regent St." and route number "13". 446.9 - L 104 on a route 67 Carnegie. 446.9 added 7/4/15, otherwise two copies of each held. 2nd copy of 446.9 added 28/5/2015. See Reg Item 994 for a packaged set of these photographs..trams, tramways, melbourne, mmtb, tramcars, tram 1, tram 180, tram 465, tram 466, tram 469, tram 511, tram 1022, tram 7, tram 104, z1 class, t class, x1 class, y class, w2 class, w7 class, l class, route 67, route 13, route 11 -
 Melbourne Tram Museum
Album - David Frost Slide Collection, David Frost
Photo - see pdf file for further information. Number Brief Description date DFC1 A general view from the former railway platform at Port Melb Station looking towards Station Pier on opening day 20-12-1987 DFC2 A2 285 in the Tramway Platform at Port Melbourne Station on opening Day 20-12-1987 DFC3 A2 285 in the Tramway Platform at Port Melbourne Station on opening Day 20-12-1987 DFC4 A2 285 in the Tramway Platform at Port Melbourne Station on opening Day 20-12-1987 DFC5 A2 273 at St Kilda Tramway Station on opening day 22-11-1987 DFC6 A2 273 turning from Fitzroy St into St Kilda Tramway Station on opening day 22-11-1987 DFC7 B1 2001 at St Kilda Tramway Station turning into Fitzroy St on opening day 22-11-1987 DFC8 B1 2002 enters St Kilda Tramway Station on opening day 22-11-1987 DFC9 An A2 approaches St Kilda Tramway Station on opening day 22-11-1987 DFC10 Concreting the connecting curve from Fitroy St into St Kilda Station c July 1987 DFC11 An MTA AEC MKVI bus in Grey St St Kilda at Dalgety St with Tramway works in the background c July 1987 DFC12 Grey St St Kilda at Dalgety St with Tramway works in the background in Fitzroy St c July 1987 DFC13 Concreting the connecting curve from Fitroy St into St Kilda Station c July 1987 DFC14 Restaurant Tram 442 in Fitzroy St at Grey St Passing MTA bus 59 outside St Kilda Station c1986 DFC15 Former VR tram stop sign painted on a pole at Glenhuntly Rd & Broadway DFC16 Former VR Elwood Tram Depot under demolition 1996 DFC17 Former VR Elwood Tram Depot under demolition 1996 DFC18 Former VR Elwood Tram Depot under demolition 1996 DFC19 Former VR Elwood Tram Depot under demolition 1996 DFC20 Former VR Elwood Tram Depot under demolition 1996 DFC21 Former VR Elwood Tram Depot under demolition 1996 DFC22 Former VR Elwood Tram Depot under demolition 1996 DFC23 Former VR Elwood Tram Depot under demolition 1996 DFC24 MTS Tower waggon in use at the former VR Elwood Tram Depot under demolition 1996 DFC25 A Sign advertising the sale of the Former VR Elwood Tram Depot – 10/8/1996 1996 DFC26 Former VR Elwood Tram Depot under demolition 1996 DFC27 Interior of a shed at the former VR Elwood Tram Depot under demolition 1996 DFC28 Former VR Elwood Tram Depot under demolition 1996 DFC29 Former VR Elwood Tram Depot under demolition 1996 DFC30 Former VR Elwood Tram Depot under demolition 1996 DFC31 VR 20, former breakdown car in Bob Prentice’s Back Yard Jan 1974 DFC32 VR 20 on a low loader en route to Bob Prentice’s for preservation 1959 DFC33 VR 20 as the breakdown car on the St Kilda Electric Street Railway c1955 DFC34 VR 39 waits in St Kilda St as breakdown car 20 enters Elwood Depot c1955 DFC35 VR 54 and 50 in the rear yard of Elwood Depot c1958 DFC36 VR 50 in the rear yard of Elwood Depot c1958 DFC37 VR 50 in the rear yard of Elwood Depot c1958 DFC38 VR 28 in St Kilda St outside Elwood depot after the line had been cut back to this point c1958 DFC39 VR 29 in St Kilda St outside Elwood depot after the line had been cut back to this point c1958 DFC40 VR 35 passes 28 on the St Kilda Electric Street Railway c1955 DFC41 VR 39 on the St Kilda Electric Street Railway c1955 DFC42 Y1 613 on a tour c1970 DFC43 VR 54 in St Kilda St outside Elwood Depot c1955 DFC44 VR 28 at Brighton Beach Terminus c1955 DFC45 VR 33 being washed in the wash bay at the rear of Elwood Depot c1955 DFC46 VR 20 breakdown car running into Elwood Depot c1955 DFC47 VR 3 in the rear yard at Elwood Depot c1955 DFC48 VR 51 on an AETA Tour running out of Elwood Depot c1958 DFC49 VR 28 on the St Kilda Electric Street Railway c1955 DFC50 VR 28 with crew in St Kilda St outside Elwood depot after the line had been cut back to this point 1959 DFC51 VR 52 in Grey St near Fitzroy St c1958 DFC52 VR 51 on a AETA Tour passes 33 in Grey St near Fitzroy St c1958 DFC53 VR 29 in Grey St near Fitzroy St c1958 DFC54 VR51 on an AETA Tour shunts as 52 waits on the St Kilda Electric Street Railway c1958 DFC55 VR 51 on the Black Rock Electric Street Railway c1955 DFC56 VR 28 in St Kilda St outside Elwood depot after the line had been cut back to this point c1958 DFC57 Combined Rail-Tram Tickets of the Black Rock Electric Street Railway Feb 1975 DFC58 Combined Rail-Tram Tickets of the St Kilda Electric Street Railway Feb 1975 DFC59 Electric Street Railway & Motor Coach Paper Tear off Tickets Feb 1975 DFC60 VR 52 & 53 on Rt 82 pass in Cordite Ave near Wests Rd Sept 1975 DFC61 Z 68 & 52 in East Preston Depot in M&MTB Livery c1977 DFC62 Copy photo of VR 18 in Elwood Depot c1910 DFC63 VR 51 as a one man car at Black Rock Terminus c1955 DFC64 VR 53 on Rt 82 in Droop St Footscray Jan 1974 DFC65 B2 2027 on Rt 96 in South Melb Station c1988 DFC66 VR 20 as preserved in Bob Prentice’s backyard High St Prahran Jan 1974 DFC67 VR 700 on Rt 82 in Droop St Footsray c1978 DFC68 VR 28 as the last car from ST Kilda Station 28-2-1959 DFC69 VR 700 at the Rt 82 Moonee Ponds Terminus c1978 DFC70 VR 52 waiting time at the Rt 82 Footscray Terminus, the driver intently stares at the bundy clock as the Braid and the Connie gossip Jul 1972 DFC71 VR 54 shunting outside Elwood Depot to return to St Kilda Station 1959 DFC72 SW6 969 in MTA Livery blocking the entrance to South Melb Depot presumably during the scratch ticket dispute Jan 1990 DFC73 VR 52 & 53 on Rt 82 pass in Droop St Footscray Sept 1975 DFC74 VR 700 after withdrawl in the Newport Railway museum in the process of a repaint c1985 DFC75 VR 700 after withdrawl in the Newport Railway museum in the process of a repaint c1985 DFC76 VR 700 on Rt 82 in Droop St Footsray at The Cresent c1978 DFC77 VR 700 on Rt 82 in Droop St Footsray c1978 DFC78 Former VR tram depot in use as an MTA Bus depot c1990 DFC79 VR 52 waiting time at the Rt 82 Footscray Terminus Jul 1972 DFC80 VR 52 waiting time at the Rt 82 Footscray Terminus with Connie changing the pole Jul 1972 DFC81 VR 52 at the Rt 82 Moonee Ponds Terminus with the crew chatting 7-12-1974 DFC82 VR 52 on Rt 82 on the reserved track in Raleigh Rd Ascot Vale Jan 1974 DFC83 VR 53 on Rt 82 in Leeds St Footscray about to turn into Hopkins St April 1976 DFC84 VR 53 on Rt 82 in Droop St Footsray Jan 1974 DFC85 VR 700 on Rt 82 in Droop St Footsray at Hopkins St c1978 DFC86 Z 52 in MTA livery on Rt 19 in Elizabeth St near Bourke St c1985 DFC87 VR 52 at the Rt 82 Moonee Ponds Terminus Jul 1972 DFC88 VR 53 at the Rt 82 Footscray Terminus Jan 1974 DFC89 VR 52 freshly outshopped from the workshops and W7 1011 at the Bourke St Terminus with 52 on display for the 1968 railway exhibition 1968 DFC90 Painting of W class 369 in Chocolate & Cream c1930 DFC91 Charing Cross, Bendigo at night c1965 DFC92 Ballarat ? c1965 DFC93 Bendigo 18 on an AETA tour in McCrae St near Tramway Ave c1965 DFC94 View from the roof of a tram in the body shop at Preston Workshops 1977 DFC95 View from the roof of a tram in the body shop at Preston Workshops 1977 DFC96 View from the roof of a tram in the body shop at Preston Workshops showing the panto on 546 1977 DFC97 Interior view of Carlton Control Centre showing desk and wall panel c1968 DFC98 W2 493 on Rt 55 in Kingsway outside South Melb Depot Aug 1973 DFC99 W2 496 in Sturt St at Kingsway on Rt 1 Jul 1973 DFC100 Z class truck c1975 DFC101 Z3 116 in Bourke St at King St as new c1979 DFC102 Bob Prentice on tour c1968 DFC103 SW6 900 as an advertising tram for Newsday at night 1969 DFC104 597 Jul 1973 DFC105 W2 480 on Rt 3 passing under the railway bridge at Caulfield Oct 1972 DFC106 Interior view of Carlton Control Centre showing desk c1968 DFC107 SW6 856 on Rt 77 at night Jul 1973 DFC108 W2 496 in Sturt St at Kingsway on Rt 1 Jul 1973 DFC109 PCC 980 on a tour at South Melb Depot c1968 DFC110 SW6 856 on Rt 77 at night Jul 1973 DFC111 View from the roof of a tram in the body shop at Preston Workshops showing the panto on 546 1977 DFC112 Dandenong Rd from Chapel St Nov 1968 DFC113 A Z class car turns from Gertrude into Nicholson St c1990 DFC114 SW6 900 as an advertising tram for Newsday at night 1969 DFC115 Port Melbourne Station showing Centennial bridge and station building prior to closure. 10-1987 DFC116 Port Melbourne station with train prior to closure, looking south 10-1987 Demonstrates the work of David Frost in photography and or collecting slides.Assembled album in a black presentation folder of 116 colour slides, 6 slide sleeves, collected or photographed by David Frost. Many are TMSV or Windsor Publications slides. All photographs have been scanned and placed on the Museum's G drive. A list of all photographs with details has been compiled. melbourne, tramways, trams, vr trams, elwood, st kilda light rail, port melbourne, opening, elwood depot, buses -
Moorabbin Air Museum
Document - Wamira NIA E-1 Drawings and documents
-
 Federation University Historical Collection
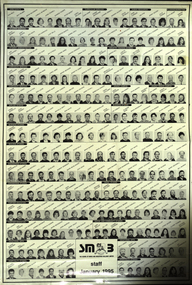
Poster, Ballarat School of Mines Staff, 1995, 1995
The Ballarat School of Mines is a predecessor institution of Federation University Austraila.An A2 poster showing small black and white portraits of each staffmember at the Ballarat School of Mines. Names include: Curriculum Services - John Kemp, Roger McFarlane, Leanne Gingell, Sandra Glover, Doug Seymour. Human Resources - Ross Furness, Ian Pym, Jenny Gough, Julie Thomas. Planning/Marketing - Keith Boast, Simone Byrne Student Services - Brian Webber, Janet McGie, Jani White, Jan Harwood, Judy Mills, Kirsten Martin, Barrie Frith, Tania Gaunt, Pam Merrett, Heather Durrant, Jola Piskozub, Frances Ratcliffe, Ian Robinson, Merill Potter, Lorelli Huggins, Maureen Auchettl, Fiona Angus, Natalie Howard. Corporate Services - Graham Penhall, Phil Dixon, Ron Sutton, Ron Lucas, Robert Munt, Garry Christie, Don Lawless, Bernie Stevens, David Fithall, Rebeccah Parker, Craig Holloway. Ararat Campus - David Haddow, Kim Knight, Kevin Martin, Maureen Green, Ian Harris, Adrian McMillan, Frank Parker, Keith Akers. Rural Studies - Andrew Sullivan, Gary Lyttle, Ian Best, Graham Shearer, Malcolm Trainer, Ross Holton, Anthony Thake, Paul Norquay, John Harrison. ballarat school of mines, staff, ron wild, max palmer, heather durant, vl d'angri, alistair heighway, neville french -
Moorabbin Air Museum
Mixed media (item) - Brian Ridgeway Collection Miscellaneous aircraft photos, newspaper items etc. See under "Description" Section
-
 Melbourne Tram Museum
Album - Robert Thomson Slide Collection, "9.9.1988 to 16.9.1988"
Photo - see pdf file for further information. Number Brief Description RT055 Bundoora Extension - RT056 Bundoora Extension - tram 261 - "Special" route 00 RT057 Bundoora Extension - tram 86 - "Bundoora" route 86 RT058 St Kilda - Esplanade - Carlisle RT059 Relay - Danks St RT060 "City Brunswick St" - route 12 RT061 tram 1003 - "City Brunswick St"- route 12 RT062 track work on route 12 RT063 tram 774 - "City Brunswick St"- route 12 RT064 track work RT065 light rail - tram 2005 - "Depot" RT066 light rail - tram 273 - "Port Melbourne" - route 111 RT067 St Kilda Light Rail Station -tram 291- "St Kilkda Beach - route 06 RT068 St Kilda Rd - tram 830 - "City" - route 6 RT069 StKildaRd-tram928-"??"-route05 RT070 St Kilda - tram 272 - "East Brunswick" - route 96 RT071 Elizabeth St Terminus - tram 80 - "Ascot Vale" - route 9 RT072 West Coburg Reserved Track - tram 78 - "Domain & St Kilda Rds" - route 56 RT073 West Coburg Terminus - tram 66 - "Domain & St Kilda Rds" - route 56 RT074 West Coburg Terminus - tram 87 - "Domain & St Kilda Rds" - route 56 RT075 Batman Ave Terminus - tram 118 - "Wattle Park" - route 70 RT076 Collins St Terminus - tram 1022 - "West Preston" - route 11 RT077 North Balwyn Terminus - tram 255 - "City - Lonsdale St" - route 48 RT078 Kew Cotham Rd Terminus - tram 865 - "St Kilda Beach via Balaclava Rd" - route 69 RT079 St Kilda esplanade - Carlisle - tram 946 - "Kew Cotham Rd" - route 69 - tram 295 - "East Brunswick" - route 96 RT080 West Preston Terminus - tram 943 - "St Kilda Beach" - route 10 RT081 Mont Albert Terminus - tram 250 - "Mont Albert" - route 42 RT082 Carnegie Single Line - tram 998 - "City" - route 67 RT083 Carnegie Single Line - tram 736 - "Carnegie" - route 67 RT084 Carnegie terminus - tram 736 - "City" - route 67 RT085 East Brighton Terminus - tram 914 - "City" - route 64 RT086 St Kilda Jct - tram 998 - "East Malvern Darling Rd" - route 3 & tram 969 - "City" route 3 RT087 Bourke St Spencer St - tram 271 - "St Kilda Beach" - route 96 RT088 Preston Railway Overbridge - "Northcote via St Georges Rd" - route 9 RT089 Victoria Parade - tram 906 - "Mont Albert" - route 42 & tram 252 - "City" - route 42 RT090 Victoria Parade - tram 1025 - "City Spencer St" - route 31Demonstrates the work of Robert Thomson in photography, collection and/or production of slidesAssembled album in a black presentation folder of 36 colour slides, collected or produced by Robert Thomson. All photographs have been scanned and placed on the Museum's G drive. A list of all photographs with details has been compiled. melbourne, tramways, trams, track construction -
 Melbourne Tram Museum
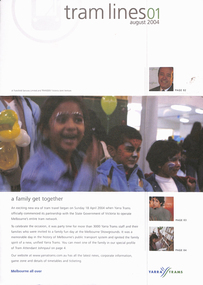
Magazine, Yarra Trams, "Tramlines", 2004 - 2009
Set of 15 issues of Yarra Trams Magazine "Tramlines" All folded A3 unless noted otherwise. 1 - Issue 1 - August 2004 - staff event, message from CEO Hubert Guyot, new control centre, route 96, Olympic torch relay, tram 431, new livery, meet Johnpaul tram attendant. .1A - Issue 2 - December 2004 - customer satisfaction, tram attendants, remembrance day, CEO message, new routes, Camberwell depot, staff profile and tramways band. .2 - issue 3 - May 2005 - Fleet operations control centre opens, (photo), Balaclava Junction upgrade, grand union, Melbourne Uni superstop, fund raising. .3 - issue 4 - August 2005 - Congratulations to Lenny Bates 50, departure of Hubert, route 75 extended to Vermont South, fare evasion, trackwork and Superstops in Flinders St and Bourke St, East Preston Depot and think tram project. .4 - Issue 5 - December 2005 - folded A3 sheet, plain paper, colour photos - with articles on congestion, advertising campaign success re fare evaders, new platform stops in Flinders St, Network improvements and getting ready for the 2006 Commonwealth games featuring a cartoon poster of a tram in a race (see Reg item 1235 for the actual poster). Has a message from Dennis Cliche - new CEO. .5 - Issue 6 - May 2006 - folded A2 sheet, gloss paper, items re Commonwealth games, Karachi W-11 tram, Remembrance day, network improvements, Grand Prix, good Friday appeal, and the forthcoming centenary celebrations. Centre page spread has a large number of photos of staff during the Commonwealth Games. .6 - Issue 7 - October 2006 - folded A2 sheet, gloss paper, colour photos of the Centenary Art Tram (5006), Myki, network improvements, memories of 1906, Luna Party Tram (1011) with centre page spread of a photo of 5006 outside Luna Park, and the various tram images featured on the tramcar. See also Reg Item 864 for details of the making of the art work. .7 - Issue 8 - December 2006 - folded A3 sheet, gloss paper, colour photos of the "Tram It 2006" event, light rail, TramTracker being launched, Essendon, Centenary celebrations and "for the love of trams". .8 - Issue 9 - May 2007 - six pages - traffic condition, green depots, Joyce Barry, plaque at Brunswick Depot, fund raising, platform stops, trackwork, TramTracker, Police tram. .9 - Issue 10 - September 2007 - MSO tram, students travels, Transport Challenge 2007, website, TramTracker by SMS. .10 - Issue 11 - Melbourne trams a heritage icon, fund raising, TramTracker, cable tram tracks in Abbotsford St, route 86 to the Waterfront City Docklands, hailing trams. 11 - Issue 12 - Mulhouse tram, Bumblebee, on the docks, fundraising, St Kilda Road upgrades, TramTracker. .12 - Issue 13 - Bumblebee C2 class trams, traffic congestion, wind power tram, Flinders St trackwork. .13 - Issue 14 - Silver Paralympians on tram, green wind powered trams. .14 - Issue 15 - TramTracker Jake, film festival, Public Transport Ombudsman - Simon Cohen, Operations Centre, .15 - Issue 16 - 6 pages - tram performance, TramTracker at tram stops and iPhones, Mike Talks, Myki. All have the Yarra Trams logo on the front cover.trams, tramways, yarra trams, tickets, commonwealth games, flinders st, grand prix, karachi w-11 tram, construction, luna park, essendon depot, centenary, tramtracker, olympic games, control centre, balaclava junction, trackwork, grand union, melbourne university, superstops, vermont south, route 75, flinders st, bourke st, brunswick depot, cable trams, docklands, mulhouse, c2 class, flinders st, environment, ombudsman, myki, tramways band -
 Melbourne Tram Museum
Ephemera - Tram Route Guides, Public Transport Victoria (PTV), "Tram Route Guide", 4/2017 to 5/2018
Set of 6 Tram Route Guides, published during April 2017, following the introduction of route 58. Consolidates into 6 folders the previous individual guides for each route.. Each comprises a A2 folded sheet, full colour printed on non-gloss paper. Has the Yarra Trams and PTV logos, listing the stops, interchanges with bus and other tram services, ticketing zones, estimated frequencies with adverts for Night tram services, TramTracker and Myki tickets. On the rear is a large map, a list of the other route guides and a short summary of the routes list in the guide. .1 - Set A - Routes 1, 6, 11, 19 and 86 .2 - Set B - Routes 57, 58, 59 and 82 .3 - Set C - Routes 3, 3a, 64 and 67 .4 - Set D - Routes 48, 78, 75, 78 and 109 .5 - Set E - Routes 5, 6, 16, 58 and 72 .6 - Set F - Routes 12, 30, 35, 96 .7 - as for .1 A - dated May 2017 .8 - as for .2 B- dated 20 May 2018 .9 - as for .3 C- dated 20 May 2018 .10 - as for .4 D - dated 20 May 2018 .11 - as for .6 F - dated 20 May 2018 (E was not updated as at 17-7-2018) .12 - as for .1, dated 16/9/2018. .13 - Set A - dated 1 June 2019 .14 - Set B - dated 1 Jan 2019 .15 - Set C - dated 1 Jan 2019 .16 - Set D - dated 1 June 2019 .17 - Set E - dated 1 Jan 2019 .18 - Set F - dated 1 Jan 2019 .19 - Set F - dated 1 June 2019 Collected during 2019, added 2/1/2020.trams, tramways, timetables, maps, route 1, route 3, route 3a, route 5, route 6, route 8, route 11, route 12, route 30, route 35, route 19, route 48, route 57, route 58, route 59, route 70, route 72, route 75, route 78, route 82, route 86, route 96, route 109, east coburg, south melbourne, malvern, glen iris, moreland, toorak, west maribyrnong, wattle park, docklands, camberwell, vermont south, footscray, moonee ponds -
Tarnagulla History Archive
Set of Maps (Mining & Local Area), various
David Gordon Collection. A set of mining documents, maps and plans: 1. Dunolly Deep Leads - showing location and names of deep lead gold deposits in region around Dunolly including at Tarnagulla and Newbridge. Geological Survey of Victoria, Department of Minerals and Energy. Bulletin No. 62, Map No. 4 Dunolly (770 x 485 mm). 2. Poseidon Lead (Facsimile) 3. Nick O Time Lead (Facsimile) 4. Happy Go Lucky Mine prospectus and plan (colour copy) 5. Jones Creek GM Co. (Raven & Gourlay's) Waanyarra - Prospectus (colour copy) 6. Poseidon Area Plan (colour copy) and Poseidon Area map (B&W copy). 7. Cross-section diagram of Spread Eagle Reef 8. New Birthday Gold Mine - area map (colour copy) and mine cross-section ( (colour copy). 9. Cross section of Poverty Reef, by Department of Mines (B&W copy, 2 parts on A2 paper) 10. Time-Lease Graph for Watts Reef, Specimen Reef, Stony Reef, Poverty Reef (second page in detail), created by Eric WIlkinson for Ref Mining NL, 1995 11. 1859 Plan of the Gold Workings & Township of Sandy Creek, Shewing the Mining Leases, Extended Claims & Machinery by R.J. McMillan, Mining Surveyor (B&W copy) 12. Longitundinal and Transverse Vertical Sections of Poverty Reef, Sandy Creek 1859, by R.J. McMillan, Mining Surveyor (B&W copy) 13. Tarnagulla Locality Plan (B&W copy) 14. Universal Grid Reference Map (Topographic) for Laanecoorie North (2 copies) 15. Universal Grid Reference Map (Topographic) for Inglewood South 16. Poverty Reef, Plan showing shafts and early tenements, created by Eric WIlkinson for Ref Mining NL, 1995 17. Locality Map of mining leases in Tarnagulla 18. Plan and Elevation of part of Poverty Reef, Sandy Creek, showing the claims and positions of the shaft. by R.J. McMillan, Mining Surveyor (Facsimile, composed of taped together components) 19.Plan and Elevation of part of Poverty Reef, Sandy Creek, showing the claims and positions of the shaft. by R.J. McMillan, Mining Surveyor (Facsimile, composed of taped together components) -
 Melton City Libraries
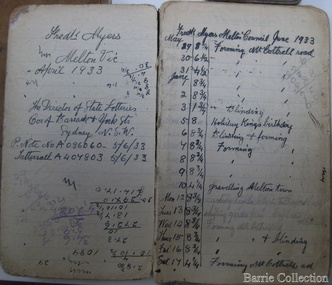
Book, Frederick Myers work notebooks/diaries, 1923-1933
FREDERICK THOMAS MYERS Born 20th February 1877 at Melton Married Martha Mary Watson 30th April 1908 at the Manse 101 Gore Street Fitzroy according to the rites of the church (Cong) – Congregational. Died Bacchus Marsh and District War Memorial Hospital 30th April 1963 Frederick lived in Melton all his life. Work Notebooks/ diary 1901 – 1905 No 1 1901 Shearing Tally Rockbank, 1901, 1902. Lists 3 Combs 6.0, 12 Cutters 5.0, Tab 1.6 Jongebloed account – Tobacco, matches sardines. Shearing shed 1904 Tuppal 20 Aug. Daily Tally of sheep shorn Total 1730 E C Shopping list - 6 pages of household items, Leader, Age and Weekly Times Tomato Sauce- recipe written in ink Toolern Road Hours worked 35 ½ Reverse order from back cover – Harwood 29th Aug 1902 Shearing Tally 1083 November 1902 - List of dates Mon- Sat. Nov 3rd - Fri Dec 5th E Chalmer. Tally of hours worked. Jan 1903 Thur 1st - 31st Toohey Keilor Road, Feb – March 14th Payment L75:4:9 J Walker April 1903 – 23rd 18 Cutters 7:6 5 Combs 10:0 2 Tab 3:0 Ticket 15:0 Total 1:15:6 Tucker 3:12:6 Other pages are calculations related to hours worked and amounts The notebook contains 26 pages with some blank and other torn out. It measures 2 ½ x 4 inches with a hard black cover. FREDERICK MYERS Workbook/ Diary No 2 Opening 5 pages – Gottfried Jongebloed account - paid 2/11/04 List of grocery and household items. E Chalmer -Pr Boots, 8:9 Tab 1:8 Leader 3’ Reverse order Eynesbury 7th Oct 1904 Shearing Tally 1635 Tucker payment L1:18:6 Tuppal 20th Aug 1904 Tally 1636 [ 4 weeks and 4 days] Feb 1905 Melton 1st – 13, Toolern Rd 14th , April Braybrook Rd. Melton town, G Hobbs Boundary Rd, Melton May G Hobbs 2 pages of food expenses and amount paid Simpson & Co – Butcher account and amount paid Mon 5th –July 22nd Toohey days and hour worked 34 yards Tuppal 20th Aug additional list 1735 Eynesbury 3rd Oct additional list 2093 Diagram 3 drawings in ink –a type of tool Nov 21 1904 List Dunmore Stn Orford Vic Barwidgee Stn Caramut Vic Wharparanna Stn via Tocumural N.S.W. Puckawidgee vis Aug Deniliquin N.S.W. Bundure Stn via Aug Jerilderie Trawalla Ballarat Oct Woorywooryte Oct Vic Yancannia Bourke July Pretty Tower Stn Beaufort November Size of Notebook 2 ¼ x 5 inches. WORK NOTEBOOK 1909, 1910 Wandook 17th Aug 1909. 21 days of shearing 1248 Total. Payment L14 ?? Boomanoomana 23 Sept 1909. 17 days shearing 1124 Total. L13.12.9 Eynesbury 20th Oct 1909. 17 days shearing 1587 Total L17. 13.0 Cobran Aug 13 1910 Studs Rams Total 3397 List of expenses includes 12 cutters, 3 combs, Union ticket, matches, tobacco stamps. Miller, J Egan. Eynesbury Oct 1910 Total 1467 Lal Lal Nov 21 Total 1172 For Backache Tincture of Gentian Compound one ounce Syrup of Rhubarb one ounce Liquid Barkola Compound one ounce Syrup of Ginger five ounce Dose a teaspoonful after each meal and one at bedtime John Collins, Woodside Via Yarram Yarram Mr Fisken Lal Lal Via Yendon Woodlawn Deniliquin 15th October Oct 12th 1911 Eucla Jarrett Barfold 21,000 7? Shearers Clark Moir Estate 10th Aug 1910-1911 Income amounts Shearing income. Mc Donald – thrasher Keating Toohey Cobran 1911 Studs and Rams 1793 Cobran 14th Aug per man 1500 Golf Hill 26th Sept per man 1900 Cobran 14th Aug Cut out 23rd Sept 2368 payment L21..19..4 [after expenses] Spring Plains Oct 2nd 1022 Total Barfold 2636 Total Chaffcutting J.B. Loft Feb 17th - 31 ½ hours John Minns Toohey Started Deep Creek Whelahan Ballarat Rd May 25th Mr J Walker Koohnamu Stn via Junta S.A. N Aitken Bringlibit via Kyneton Income list 1911 to 1912 and amounts earned Cobran L29..0..9 , Spring Plains Barfold L42..6..3, John Minns L4..8..0, J.B. Loft L3..0..6, D Whelahan L22.. 6..0, E Toohey L15.. 1..0, = total L123..2..6 John Minns 12..0, JB Loft 4.. D Whelahan L10..2..0, Barrie L11..5. Total Amount L145..5..6. Cobran 1912 15th Aug 1922 total Rams double. Expenses include 12 + 6 Cutters, 2+2+2 Combs, Political fund, Ticket, Mess Account, Hut Keeper, Hospital, Cook Total L11..8..3. Station Rd - L11..2..9. Golf Hill Sept 26 Cut out 31 Oct Total 2332 Lal Lal Nov 6th 19th 1912 6 days Total 1066 Contracts – Cameron, Barrie, McKay, Toohey, Stn Rd ? Cobran 1913 – Aug 14- 1913 Total 1621 Cobran 1621 Kyneton Park 515 Golf Hill 2144 Lal Lal 1066 Total 5,346 1913 – 1914 Income 5, 350 sheep Local contracts E. Barrie, Greig, Weir, S Barrie, Jongebloed, Burton, E Toohey, Total L133..3..0. Trench & Moran L19..8..0. End of front section of Notebook Work notebooks belonging to Frederick Myers local identities -
 Melbourne Tram Museum
Album - Charles Craig - part 1 of 2, 1950s to 1970s
Photo - see pdf file for further information. Number Brief Description CC1 S178 at Elsternwick level crossing track works CC2 Building East Preston Depot 1955 CC3 Camberwell depot – post WW2 – lots of trams and a black cat CC4 W2 584 and SW6 958 northbound – Chapel St and Brighton Road CC5 W2 357 – southbound, Chapel St Brighton Road CC6 Pascoe Vale Road, Raceday working – note the signal CC7 The Preston Workshops - The Argus, post WW2, 223, 647 et al CC8 923 or is it 922 being built at Preston – The Argus photo - CC8A 832 being positioned onto trucks at Preston after an overhaul – Argus Photo – see also CC306 CC9 Footscray depot` CC10 W5 797 in St Kilda Road during track works – 1950s CC11 W2 457 at Kew Post Office CC12 Wellington Parade – W2 432, 492 and 337 – special event CC13 Swan St line up of trams – football? Or other special event – Sinclair’s bus on the right side. CC14 W2 630 being washed at a depot – The Argus photo CC15 Royal Park line at Flemington Road – W2 355 and W5 786 CC16 Nicholson St track construction from a tram cab CC17 T181 on tour at Gordon St CC18 T181 on Maribyrnong Bridge CC19 Ditto at River St just off bridge CC20 As for CC18 CC21 At Raleigh Rd CC22 T181 at Footscray depot CC23 Track construction, Nicholson, just north of Gertrude CC24 Commissioning overhead Bourke St tram 988 CC25 Queens Parade – 997 and 994 CC26 Swapping trolley wheel to skid – commissioning CC27 Track construction in Gertrude St CC28 985 in Queens Parade running special CC29 997 in Queens Parade CC30 1033 at North Fitzroy – AETA Special CC31 Bourke St at Elizabeth St – has passengers on board CC32 W6 985, 996 Queens Parade, Mk 3 bus 333 CC33 As above CC34 Showing construction at Nicholson & Gertrude – Bourke St CC35 W2 223 on Burnley temporary bridge – VR track expansion CC36 W5 823 – ditto CC37 Tram on old bridge prior to removal CC38 W2 433 on temporary bridge with new bridge beams and old track CC39 Looking down showing temporary single track – Swan St CC40 Tait train passing under tram bridge CC41 SW6 on single line – off loading CC42 W2 547 at City Road Junction CC43 City Road Jtn – 1969 – 596 and 771 CC44 City Road Jtn – 1969 – 596 and 771 (same as CC45 438 in Flinders St CC46 355 somewhere CC47 552 somewhere CC47A 364 at Preston Workshops? CC48 W2 334 on Traverser – Preston Workshops CC49 Wellington pade – large line up of trams, c1950 925, and 611 CC50 W2 493 Franklin st – advertising for Savings Certificates CC51 Possibly 551 with advertising for fund raising for Blind institute CC52 249 at Hawthorn – Riversdale Junction – with a Tally Ho and Village Fair Aux. board CC53 MMTB Postcard of 511 CC54 Wattle Park terminus with Single line warning sign CC55 Wattle Park Duplication CC56 36 at Domain Junction – 833 CC57 36 at Domain Junction CC58 36 at Domain Junction with 810 and 833 CC59 36 in Swanston by Flinders St Station CC60 36 in Spencer St at A’Beckett CC61 36 crossing Collins St CC62 36 crossing Collins St CC63 36 northbound in St Kilda Road with Shrine in background CC64 36 northbound in Swanston St at Flinders St CC65 Postcard – Ballarat 36 in Domain Road CC66 Postcard - Stampshow – Hawthorn Horse tram CC67 Postcard - Stampshow – Peace cable tram CC68 Postcard - 1041 and cable car set 1 at Preston CC69 Postcard - Colins & Elizabeth – greetings from old Melbourne CC70 Postcard - Cable car set at Preston CC71 Postcard - Twentyman’s cable cars CC72 Postcard - Nu-color-vue – horse tram 256 CC73 Cable car set – Market & Flinders CC74 Cable trams at Twentymans’ in their shed CC75 Cable tram track at Bourke & Spencer prior to removal CC76 Cable tram bogie at Preston Workshops – used as a dolly CC77 Cable trams at Twentymans’ CC78 Postcard - Valentines – Bourke looking west from Swanston CC79 Postcard - Rose 3938 – Bourke at Swanston – the Leviathan building CC80 Postcard - Valentines – Elizabeth St looking south from Collins – No. 19 CC81 Postcard - Rose P4765 – Bourke St Melbourne CC82 Postcard - Rose 4090 – cable tram passing Parliament house CC83 Postcard - Valentines – GPO Elizabeth St CC84 Interior of cable trailer with clothing on a set CC85 Elizabeth St looking north CC86 Cigarette card - Collins St No. 41- WD HO Wills CC87 Postcard - Rialto building with cable set CC88 Postcard - Valentines - Swanston at Flinders looking north CC89 CC90 Q 150 Hanna St – dated on rear CC91 176 turning – photo ex Alan Jungworth CC92 161 on Princes Bridge – minimum fare 4d sign and Inspector CC93 459 at Point Ormond CC94 158 at Gordon St – side on view CC95 X 217 in Swanston St CC96 X 217 in Swanston St with an East Brighton destination CC97 T177 CC98 T177 Peel St – no destination roll – being transferred? CC99 X1 462 in Glenhuntly Road to Point Ormond CC100 X1 462 in Glenhuntly Road to Elsternwick Rly Station CC101 X1 462 in Glenhuntly Road to Point Ormond CC102 Q 150 Hanna St CC103 190 at Camberwell Depot CC104 T182 at Footscray CC105 X1 466 and W2 at Footscray CC106 190 at Camberwell Depot CC107 X1 467 Barkly St Footscray CC108 X2 679 turning into William St from La Trobe St CC109 X2 677 Glenhuntly Road with Point Ormond Destination CC110 Postcard T180 CC111 Postcard format – X1 467 on a truck – see also CC178 CC112 Postcard format – X1 467 at Wantirna South CC113 Q200 and SW6 896 at Thornbury – has labels on rear CC114 T177, Ballarat Road – has labels on rear CC115 T178 at Point Ormond CC116 Postcard X1 465 and 466 CC117 Postcard – X2 676 CC118 Postcard – TMSV X2 217 CC119 810 on temporary bridging – 24-12-67 CC120 W2 575 – Queens Parade junction in, still temporary bridging, substation under construction CC121 Forming Queens Parade Junction base slab CC122 W2 596 prior to tramway works – all tracks still in position CC123 It’s a mass of reinforcing – bridging being formed CC124 Looking north with substation being built CC125 Looking east with some rather tight curves, Wellington St still in use CC126 SW6 958 ex Wellington St with all tracks and signal box and buildings. CC127 Victoria Pde at Gisborne looking east – at least 4 cars CC128 SW6 893? With dash canopy lights and SW6 862 and a man with a newspaper CC129 SW6 894 on the S curves, with tram in Wellington St CC130 Similar photo CC131 W2 564 turning into Wellington St – the concrete tracks are not that old CC132 W2 552 running out of Wellington St CC133 W5 732 from Fitzroy St into St Kilda Road with next iteration in position – very wonky CC134 W5 764 turning into Fitzroy St CC135 SW6 947 turning from Wellington St CC136 W2 586 running out of High St CC137 W2 500 turning into Wellington St CC138 W2 543 in Wellington St inbound CC139 L103 with St Kilda Junction destination, and a tower truck on right CC140 Workmen – new track in Queensway in use CC141 Ditto CC142 L103 in Queensway, and another car in bound CC143 Looking east along Wellington St which has been taken out of use. Also a MMTB Roller CC144 W5 824 and a W2 and all types of wobbly temporary track CC145 W2 354 to High St CC146 Sw6 947 on the S bends CC147 W2 500 looking north – tram on the S bends CC148 SW6 896 leaving the S bend CC149 W2 357 and a MMTB City bus with trees/gardens on the side CC150 W5 817 Elliot Ave – see also CC302 CC151 W2 552 – note the large trolley bridge CC152 W2 550 at depot or workshops CC153 1B truck CC154 SW2 432 CC155 W2 155 at Glenhuntly CC156 SW6 937 on AETA tour? CC157 X2 677 on Footscray service – Ballarat Rd? CC158 W2 641 – High St Kew? CC159 SW6 847 – Power St Hawthorn CC160 Simpson St – big line up CC161 W2 546 truck No. 1? CC162 W2s at Glenhuntly depot CC163 No. 15 truck under 899 CC164 206 and other junk at Preston Workshops CC165 W in Swanston St Melbourne – Rose series card CC166 Y1 613 Batman Ave?? or William St at Collins CC167 Tram plans CC168 X 217 Swanston St – see also 95 and 96 CC169 217 in Swanston St – same as 95 CC169A 192 in St Kilda Road at Princes bridge CC170 192 in St Kilda Road at Princes bridge CC171 Bendigo 3 arriving Malvern depot – being unloaded CC172 Ditto CC173 T180 at a depot CC174 X1 463 wheel set CC175 C30 – dog car side view – close up CC176 C30 dog car CC177 206 and 30 at Preston Workshops CC178 X1 467 on a truck – see CC111 also CC179 42 CC180 42 at a depot, no destination box CC181 W2 556 1A type truck CC182 Flinders St Station – Rose Series CC183 W7 1035 Spring – Nicholson St CC184 W7 1022 MMTB Post Card CC185 Adelaide 178 – has on rear – R. Lilburn 4/82 CC186 Adelaide 175 – has on rear – R. Lilburn 4/82 CC187 Y1 610 on AETA tour CC188 Y1 610 on AETA tour with large group – Point Ormond CC189 AETA display – has GH55-32 in pencil on rear CC190 AETA display – has GH55-29 in pencil on rear CC191 Y1 610 on AETA tour with large group – Point Ormond CC192 VR 53 at Footscray CC193 VR cars 40 and 34 at Elwood wash dock CC194 W7 1024 as the 1970 Christmas tram CC195 Geelong – loading a set of 22E trucks CC196 Geelong 10 and 23 running an AETA special CC197 Geelong – AETA special CC198 Geelong 7 at Junction CC199 Geelong 10, in the city CC200 Geelong 33 with Belmont destination CC201 Geelong 15 Eastern Park destination 29-3-1948 CC202 Geelong 23 at Railway Station – 29-3-1948 CC203 Geelong 23 at Railway Station – 29-3-1948 CC204 Geelong – loading a bogie tram CC205 Geelong – loading a bogie tram CC206 Geelong 40 – loaded on truck CC207 Geelong 40 – on jacks CC208 Geelong 40 on jacks – 19 behind CC209 Geelong 38 with two workers on either side CC210 – 214 Australian Historic Tramways stamp folder and set CC215 Bendigo 17 at depot – has dup JBS on rear CC216 Bendigo 20, 29 bogie and straight sill car at Charing Cross CC217 Bendigo one man bogie Pall Mall CC218 Bendigo – Bogie 23, other cars and welding truck at depot CC219 Bendigo 7 with Quarry Hill destination CC220 Bendigo 21 with Lake Weerona destination CC221 ESCo 18 Ballarat CC222 Ballarat bogie 22 on AETA special CC223 Ditto CC224 Ballarat 34 at Stones Corner – R Lilburn CC225 Ballarat 15 in Bridge St – R Lilburn CC226 Ballarat 40 at Gardens – R Lilburn CC227 Ballarat 37 running out of depot – R Lilburn CC228 Postcard – Valentines – Sturt St with loaded horse tram trailer CC229 AETA Geelong tram tour ticket – 29-3-1948 CC230 Postcard – Geelong – Valentine 2114 – T&G building CC231 Postcard – PMTT ! – High St Malvern CC232 Postcard – Empire – Glenferrie Road, Malvern at Wattletree Rd CC233 Postcard Y469, MMTB CC234 Postcard Z2 Spring St CC235 Postcard – Z1 MMTB CC236 Postcard – Stamp Show W1 431 CC237 Postcard – Stamp show B2005 CC238 Postcard – Stamp show W6 982 CC239 Postcard – Valentines 1264 – Johnstone Park with tram in distance CC240 Postcard – Rose 10711 – Swanston and Lonsdale – Hospital and W232 CC241 Postcard – Rose 4827 – Fitzroy St St Kilda W2 362 and 548 CC242 Postcard – Valentines – 939 – St Kilda War Memorial, W and a R? CC243 Postcard – Valentines – 572 – St Kilda War Memorial, W 413 and 140? CC244 Postcard – Valentines – 938 – Uper and Lower Esplanade – L 104 CC245 Postcard – St Kilda Rd at Princes Bridge Y1 and W CC246 Postcard – Biscay BG82 – W5 814 - CC247 Postcard – Biscay 796112 – Bourke St looking west CC248 Postcard – Biscay 796109 – Bourke St looking east CC249 Postcard – Biscay 2AUS58 – Z5 Bourke St CC250 Postcard – Biscay BG 249 – Swanston St CC251 Postcard – National View – St Kilda Rd – shrine and Prince Henrys W2 405 CC252 Postcard – Nu color vue – 11 ML 156 – St Kilda Rd CC253 Postcard – Nu color vue – 11 ML 153 – Swanston St CC254 Postcard – Nu Color vue – Collins St 442 CC255 Postcard – Pitt card – Adelaide – H 364 at Victoria St CC256 Postcard – SPER L/P 154 CC257 Postcard – BTMS – 550 CC258 Postcard – SPER – Brisbane 295 CC259 Adelaide 131 at Burnside – has R Lilburn on card, c1911 CC260 Adelaide 194 CC261 Adelaide 235, with two crew, The News photo CC262 Rockhampton, outside post office – has source of photo details CC263 Sydney – 2086 and 2062 arriving Circular Quay CC264 Sydney – P class – Pitt St? CC265 Sydney – 1610 at Circular Quay CC266 Brisbane 99 and 468 CC267 Sydney with bridge behind CC268 Steam tram Paramatta Park – 103 CC269 Sydney – Museum Station =- Elizabeth St CC270 Sydney – weed burner 137S at a loop Demonstrates the work of Charles Craig in photography and collection of prints.Assembled album in a black presentation folder of 270 photographs from the Charles Craig Collection - 86 sleeves - part 1 of 2. All photographs have been scanned and placed on the Museum's G drive. A list of all photographs with details where possible has been compiled. Victorian Provincial, Launceston, Hobart and Sydney tram photos have been transferred to other Museums, image files retained.melbourne, tramways, tramcars, trams, charles craig, st kilda junction, trackworks -
 Melbourne Tram Museum
Album - Photographs - Comeng Dandenong, 1980s - 1990s
In March 2024, Milissa Box (DTP) was at a trash and treasure market. She'd found a $5 photo album for sale with some photos that she thought might be of interest… From what I can gather it belonged to the gentleman pictured who was a worker at Dandenong in the Comeng and ABB eras. He appears to have worked on the Z3, A1/A2, B1/B2 class trams, Hong Kong LRVs, Comeng Melbourne suburban trains, and later the extra Victorian-purchased XP power cars and XAM sleepers to enable the Riverina XPT to be extended to Melbourne. It's clear he was very proud of the vehicles he'd helped to build. I have scanned a selection of the images, which appear to be a mix of official builder's portraits, team photos, and self-taken shots showing candid everyday scenes on the shop floor. There are also images of the launch of the XP power cars with then-Victorian Premier Joan Kirner; and some personal visits to see the Flying Scotsman, Victorian Goldfields Railway, Coal Creek, etc. Filename Description Date Comeng Scans 2024-03-05 0001 Three Comeng workers (including the photographer) stand in front of Comeng suburban train 697M (Chopper unit) c. June-July 1989 Comeng Scans 2024-03-05 0002 Three Comeng workers (including the photographer) stand in front of Comeng suburban train 697M (Chopper unit) c. June-July 1989 Comeng Scans 2024-03-05 0003 Hong Kong Light Rail Phase 1 LRV 1013 being lifted onto its transport loader c. 1987-88 Comeng Scans 2024-03-05 0004 Walter Wright transport truck (Mack) waits to draw a heavy transport platform out of a shed at Comeng Dandenong. Hong Kong Phase I LRV (1024) can be seen inside the shed c. 1988 Comeng Scans 2024-03-05 0005 Hong Kong Light Rail Phase 1 LRV 1013 on its transport loader in a shed at Comeng Dandenong ready for transport c. 1988 Comeng Scans 2024-03-05 0006 Hong Kong Light Rail Phase 1 LRV 1013 on its transport loader in a shed at Comeng Dandenong ready for transport c. 1988 Comeng Scans 2024-03-05 0007 The photographer is pictured fitting components to the cab of a Phase I Hong Kong LRV No 1026 c. 1988 Comeng Scans 2024-03-05 0008 Hong Kong Light Rail Phase 1 LRV 1013 on its transport loader at Comeng Dandenong ready for transport c. 1988 Comeng Scans 2024-03-05 0009 Hong Kong Light Rail Phase 1 LRV 1013 on its transport loader at Comeng Dandenong ready for transport c. 1988 Comeng Scans 2024-03-05 0010 Hong Kong Light Rail Phase 1 LRV 1013 on its transport loader at Comeng Dandenong ready for transport c. 1988 Comeng Scans 2024-03-05 0011 The photographer and a colleague are pictured in the car park posing for a photo at Comeng Dandenong c. 1988 Comeng Scans 2024-03-05 0012 The photographer and a colleague are pictured inside the cab of Comeng suburban train 697M, posing for a photo at Comeng Dandenong c. 1989 Comeng Scans 2024-03-05 0013 A stainless steel Hitachi train bodyshell is being transported on a truck-trailer. Possibly taken at Martin and King in Bayswater, under transport to the station for railing to Somerton for fitout. This is a later series M car with the rear-mounted pantograph (note the mounting lugs above the non-driving end) c. 1980 Comeng Scans 2024-03-05 0014 A shot at Comeng Dandenong of the onsite workforce standing in front of a Phase I Hong Kong LRV. c.1987-88 Comeng Scans 2024-03-05 0015 A shot at Comeng Dandenong of the onsite workforce standing in front of a Phase I Hong Kong LRV. c.1987-88 Comeng Scans 2024-03-05 0016 Hong Kong Light Rail Phase 1 LRV 1038 on its transport loader at Port of Melbourne ready for transport c. 1988 Comeng Scans 2024-03-05 0017 Three Comeng workers (including the photographer) stand in front of a workbench at Comeng Dandenong c. June-July 1989 Comeng Scans 2024-03-05 0018 A newly completed Comeng train (wearing VicRail teacup orange) on the factory access track at Comeng Dandenong c. 1981 Comeng Scans 2024-03-05 0019 A newly completed Z3 class tram on a transporter, with its bogie frames waiting transport to Preston Workshops for final fitout and commissioning c. 1981 Comeng Scans 2024-03-05 0020 A newly completed Comeng train (wearing VicRail teacup orange) on the factory access track at Comeng Dandenong c. 1981 Comeng Scans 2024-03-05 0021 A newly completed Z3 class tram on a transporter, with its bogie frames waiting transport to Preston Workshops for final fitout and commissioning c. 1981 Comeng Scans 2024-03-05 0022 A Comeng/ABB artist impression presumably part of their bid for the Double Decker demonstrator train for Melbourne. Note the similarity to similar Comeng sets constructed for Sydney. c. Nov 1989 – April 1990 Comeng Scans 2024-03-05 0023 Victorian Railways steam locomotive K 169 on static display at Coal Creek. c. 1980s Comeng Scans 2024-03-05 0024 Comeng suburban train carriage 1190T on a traverser in the yard at Comeng Dandenong. c. June-July 1989 Comeng Scans 2024-03-05 0025 Comeng suburban train carriages the yard at Comeng Dandenong. c. June-July 1989 Comeng Scans 2024-03-05 0026 Comeng suburban train carriages the yard at Comeng Dandenong. c. June-July 1989 Comeng Scans 2024-03-05 0027 Comeng suburban train carriages the yard at Comeng Dandenong. c. June-July 1989 Comeng Scans 2024-03-05 0028 Comeng suburban train carriages the yard at Comeng Dandenong. c. June-July 1989 Comeng Scans 2024-03-05 0029 Comeng suburban train in a shed at Comeng Dandenong. c. June-July 1989 Comeng Scans 2024-03-05 0030 Comeng suburban train carriage 1190T on a traverser in the yard at Comeng Dandenong – possible Factory Acceptance Inspection by the Met c. June-July 1989 Comeng Scans 2024-03-05 0031 Comeng suburban train carriage 1190T being tractor-shunted in the yard at Comeng Dandenong – possible Factory Acceptance Inspection by the Met c. June-July 1989 Comeng Scans 2024-03-05 0032 Two Comeng workers carry a train part (possibly a first aid kit) for fitting to a Comeng suburban train. c. June-July 1989 Comeng Scans 2024-03-05 0033 Comeng suburban train carriage 1190T on a traverser in the yard at Comeng Dandenong – possible Factory Acceptance Inspection by the Met. One of the Met staff appears to be giving one of the Comeng workers a kiss on the cheek. c. June-July 1989 Comeng Scans 2024-03-05 0034 A B2 Class tram is on a low-loader multiwheel transport trailer waiting transport to Preston Workshops; while what appears to be a classic AP6 Valiant Safari Wagon is in the foreground. c. June-July 1989 Comeng Scans 2024-03-05 0035 A B2 Class tram is on a low-loader multiwheel transport trailer waiting transport to Preston Workshops; while a worker poses for a photo with his hand on the rigging. c. June-July 1989 Comeng Scans 2024-03-05 0036 A B2 Class tram is on a low-loader multiwheel transport trailer waiting transport to Preston Workshops; An HT Holden Belmont sedan has been posed in front to appear as if it is towing the heavy vehicle. c. June-July 1989 Comeng Scans 2024-03-05 0037 A B2 Class tram is on a low-loader multiwheel transport trailer waiting transport to Preston Workshops; An HT Holden Belmont sedan has been posed in front to appear as if it is towing the heavy vehicle. c. June-July 1989 Comeng Scans 2024-03-05 0038 A1 Class tram 232 is pictured up on stands while various A/B class tram cab frames are in the foreground in various stages of assembly. Of note, 232 appears to have been returned to Dandenong for major repair or other work, and shows signs of having been in traffic for some time (weathering and wear) c. June-July 1989 Comeng Scans 2024-03-05 0039 various A/B class tram cab frames are in the foreground in various stages of assembly. c. June-July 1989 Comeng Scans 2024-03-05 0040 A group of Comeng Dandenong workers stopped on a tea break. c. June-July 1989 Comeng Scans 2024-03-05 0041 An A/B Class tram cab being fitted out with electronics and controls. c. June-July 1989 Comeng Scans 2024-03-05 0042 A new Comeng suburban train in Metropolitan Transit livery on the test track at Comeng Dandenong. c. mid 1980s Comeng Scans 2024-03-05 0043 A new Comeng suburban train in Metropolitan Transit livery on the test track at Comeng Dandenong. c. mid 1980s Comeng Scans 2024-03-05 0044 Interior shot of a new Comeng suburban train at Comeng Dandenong. c. mid 1980s Comeng Scans 2024-03-05 0045 Interior shot of a new Comeng suburban train at Comeng Dandenong. c. mid 1980s Comeng Scans 2024-03-05 0046 The exterior sign at Dandenong showing ABB brand. Early 1990s Comeng Scans 2024-03-05 0047 A B2 Class tram is on a low-loader multiwheel transport trailer waiting transport to Preston Workshops. Early 1990s Comeng Scans 2024-03-05 0048 The Brush generator and Paxman Valenta engine as fitted inside a new XP power car for NSW Countrylink (paid for by Victoria) c. 1992 Comeng Scans 2024-03-05 0049 An exterior shot of a new Countrylink XP power car for NSW under construction (paid for by Victoria) c. 1992 Comeng Scans 2024-03-05 0050 Two new XAM class XPT sleeper carriages under construction at Comeng Dandenong c. 1992 Comeng Scans 2024-03-05 0051 A B2 class tram under construction at Comeng Dandenong Early 1990s Comeng Scans 2024-03-05 0052 A B2 class tram under construction at Comeng Dandenong Early 1990s Comeng Scans 2024-03-05 0053 An exterior shot of a new Countrylink XP power car for NSW being moved out of the shed c. 1992 Comeng Scans 2024-03-05 0054 An exterior shot of a new Countrylink XP power car at Comeng Dandenong c. 1992 Comeng Scans 2024-03-05 0055 An exterior shot of a new Countrylink XP power car at Comeng Dandenong c. 1992 Comeng Scans 2024-03-05 0056 An exterior shot of a new Countrylink XP power car at Comeng Dandenong c. 1992 Comeng Scans 2024-03-05 0057 B2 class trams under construction at Comeng Dandenong Early 1990s Comeng Scans 2024-03-05 0058 An XP Powercar from NSW wearing the Intercity XPT Candy Livery at Comeng Dandenong. It is not known if this was originally painted in this livery (incorrectly) or if this was one of the first delivered series transported to Dandenong to aid the construction process of the four additional locomotives. Early 1990s Comeng Scans 2024-03-05 0059 Melbourne B2 Class tram B2.2100 (renumbered from 2102) painted in the distinctive Chocolate and Cream livery to mark the completion of 100 B2 class trams Early 1990s Comeng Scans 2024-03-05 0060 A factory forklift wearing a hand painted “We love Labo(u)r” cardboard sign, possibly in connection to a media event with the Victorian Premier onsite at Comeng Dandenong. c. 1992 Comeng Scans 2024-03-05 0061 An exterior shot of a new Countrylink XP power car at Comeng Dandenong c. 1992 Comeng Scans 2024-03-05 0062 Two new new Countrylink XP power cars under construction and final fitout at Comeng Dandenong c. 1992 Comeng Scans 2024-03-05 0063 An exterior shot of a new Countrylink XP power car on the traverser at Comeng Dandenong c. 1992 Comeng Scans 2024-03-05 0064 A B2 Class tram is on a low-loader multiwheel transport trailer waiting transport to Preston Workshops. A large banner is draped on the side explaining that this is the 106th vehicle delivered to the Public Transport Corporation (B2.2108). c. Oct 1992 (based on delivery date) Comeng Scans 2024-03-05 0065 Victorian Premier Joan Kirner addresses a group of dignitaries in front of an ABB banner inside the main administration building at Dandenong, on the occasion of the first XPT power car purchased by Victoria being unveiled at a media event c. 1992 Comeng Scans 2024-03-05 0066 An ABB executive addresses a group of dignitaries in front of an ABB banner inside the main administration building at Dandenong, on the occasion of the first XPT power car purchased by Victoria being unveiled at a media event c. 1992 Comeng Scans 2024-03-05 0067 Victorian Premier Joan Kirner addresses the media in front of a completed XP class XPT power car at Dandenong, on the occasion of the first XPT power car purchased by Victoria being unveiled at a media event c. 1992 Comeng Scans 2024-03-05 0068 An exterior shot of a new Countrylink XP power car at Comeng Dandenong c. 1992 Comeng Scans 2024-03-05 0069 A Melbourne B2 class tram undergoing testing on the test circuit at ABB Dandenong c. early 1990s Comeng Scans 2024-03-05 0070 An XPlorer type DMU emerges from a shed at ABB Dandenong c.1994 Comeng Scans 2024-03-05 0071 Voith final drive axle mounted units for XPlorer railcars waiting to be fitted at Dandenong. c.1994 Comeng Scans 2024-03-05 0072 A completed XAM class sleeper carriage at ABB Dandenong. c.1993 Comeng Scans 2024-03-05 0073 Completed XPlorer railcars wait transfer to South Dynon for bogie exchange and transfer to NSW at ABB Dandenong. c. 1994 Comeng Scans 2024-03-05 0074 A clipping from an ABB internal newsletter outlining the staff-led initiative to commemorate the 100th B2 class tram with a special livery c.1992 Has photographs of ABB, Steamrail tours, Castlemaine and Maldon Railway, Fying Scotsman 4472 visit and Puffing Billy.Yields information about the people and events at Commonwealth Engineering plant Dandenong and the activities of the unknown compiler.Album containing 40 leaves, photos in a heavy card 3 ring spring binder.comeng, commonwealth engineering co., tramcars, hong kong, nsw, sydney, melbourne, railways, the met, b class, cmr, steam engines, abb, asea brown boveri