Showing 3397 items
matching australian story
-
 Orbost & District Historical Society
black and white photograph, early 20th century - 1910?
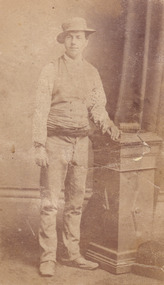
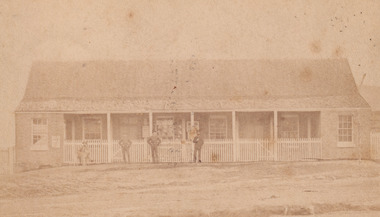
From L-R : Nathan Spielvogel, Hector Young, Percy Watt and George Holden. . Taken on the front porch at Illfracombe in 1908 after the four men had enjoyed a weekend fishing There appears to be a photo hanging on the wall in the background which looks like it could be of a young Marion Watt and the family's dog, a golden retriever In "The Gum Sucker at Home: Bound for Croajingolong 1908" by Nathan Spielvogel, published in Mary Gilbert's Personalities and Stories of the Early Orbost District, 3rd edition, p. 107-116, Spielvogel talks of his trip to Orbost, and fishing with Watt, Bruce and Young aboard Percy Watt's boat, the Maris Stella. Spielvogel's story says Young was the secretary at James & Birds auctioneers and "was one of the builders of the first foot bridge over the Backwater". It says George Holden was a Bank Manager at the Bank of Victoria. (info. from Campbell Watt) This photograph shows Mr Nathan Spielvogel on the left. He was a school teacher at the Orbost State School following Mr Rowe. Nathan Frederick Spielvogel (1874-1956), teacher, writer and historian, was born on 10 May 1874 at Ballarat, Victoria, son of Newman Frederick Spielvogel, pawnbroker, and his wife Hannah, née Cohen. As well as his stories he published a number of books about the history of Ballarat. Spielvogel taught at Orbost for at least a year Nathan Frederick Spielvogel (1874–1956) was a teacher, writer and historian. As a country schoolteacher, he traveled widely in the eastern Australian outback and also made a journey to London. Spielvogel gained distinction as one of the only Australian Jewish writers of his time. Many of his early books were best-sellers. He has an association with the history of Orbost having spent a year as a teacher at Orbost. The Watt family were early Marlo settlers.A black / white photograph / postcard of four men sitting around a small table playing cards. Two of the men have pillows behind their heads. Three are smoking pipes.on back - "On R - N. Spielvogel"spielvogel-nathan-orbost -
 Orbost & District Historical Society
black and white photograph, April 20 1970
Sir Henry Bolte, premier of Victoria, renamed Cape Everard at Point Hicks during the Centenary of Cook's Landings on April 20, 1970. There is no land feature at Cook's coordinates of 38°0'S and 148°53'E, a point which lies several miles out to sea and under 50 fathoms of water. Captain Cook invented Point Hicks so that he could conceal Bass Strait and the insularity of Tasmania. The Admiralty had issued its usual instructions to hide strategically important discoveries that could become security risks. Captain Hicks was James Cook`s senior lieutenant. There has been some dispute as to whether Zachary Hicks actually saw Point Hicks or whether he saw Ram Head about 20 kilometres further up the coast. Although Cook named the promontory Point Hicks it was changed to Cape Everard in 1843.. In 1970 the Victorian government changed the name Cape Everard to 'Point Hicks'. It lies on dry land, about 22 nautical miles (41 km) northeast of Cook's phantom Point Hicks, where it preserves the story of Cook's first landfall in Australia. This is a contemporary pictorial record of a significant event in East Gippsland's history.A black / white photograph of a man in a suit making a speech with the audience standing behind him. He is standing in front of an octagonal-shaped directional marker set ointo a stone support. There is a policeman behind him. In the background to the right is a lighthouse.on front - "20th April 1970, Sir Henry Bolte renames C. Everard as Pt Hicks" handwritten in block letterscook-james-point-hicks cape-everard bolte-henry -
 Orbost & District Historical Society
book, From "White Knowle" to "Pumpkin Point", 2004
Peter Nixon, the author of this book, grew up on the family farm on the Snowy River. He entered Federal Parliament in 1961 as the Member for Gippsland, holding various portfolios before retiring in 1983. The Nixon family has been in the Orbost district since 1885.This book records the history of the Nixon family and its association with Orbost.A book, titled From White Knowle to Pumpkin Point, the Nixons from 1593. On the cover is a coloured photograph of Pumpkin Point, taken by Peter Nixon, the author. There is a b/w photograph of James Nixon, with the caption, James Nixon 1832-1899 and Family, beneath it. The book is a compilation of stories and b/w photographs of the the first three generations of Nixons in Australia. There is a brief history of the Nixons in 1593 - the earliest records.2136.1 has "With compliments Peter Nixon 6/7/04" inside.nixon-family orbost-history nixon-james pumpkin-point snowy-river -
 Orbost & District Historical Society
book, A Corner Full of Characters, 1981
Born in Richmond, Victoria, in 1947 Bruce Pascoe is a school teacher, deck hand, barman, farmer, Director of Commonwealth Australian Studies project, editor, publisher, and works in Indigenous language retrieval. He published and edited Australian Short Storiesquarterly magazine for 16 years, and was joint winner (with David Foster) of Australian Literature Award (1999) and winner of the Radio National Short Story Competition (1998).( ref macquariepenanthology.com.au/BrucePascoe.html) He is married to Lyn Harwood, has two children and lives at Gipsy Point, Far East Gippsland in Victoria. A paperback book with tree sketch on the front cover . This is in black ink. The title is "A Corner Full of Characters" , the history, yarns and stories from the corner of a continent. The book wass compiled by Bruce Passcoe who was a secondary school teacher in Orbost in the 1980's.pascoe-bruce gippsland -
 Orbost & District Historical Society
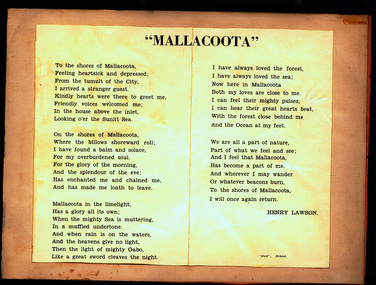
poem, Mallacoota
The poem, "Mallacoota", as in this copy, does not appear to be noted in any of the lists of poems attributed to Henry Lawson. NOTE: Information provided by David Williams on 13/12/2021 is that "this poem in your collection is by Edward Harrington (indeed not Lawson)". Edward P Harrington (1895-1966) was born in Shepparton, served in Palestine in W W I with the 4th Light Horse Regiment, tried farming, but his lifelong passion was for story-telling through poetry. He is described as the 'last bush balladist' in Australia, and was a close friend of E J Brady and John Shaw Neilson. It was likely that he came to Mallacoota as a guest of E J Brady who had a camp for writers and poets there. He produced 5 collections of verse: Songs of War and Peace; Boundary Bend and Other Ballads; My Old Black Billy and other Songs of the Australian Outback; The Kerrigan Boys and other Australian Verses; and Swagless Swaggie and Other Ballads.His "Mallacoota" poem is printed in the Swagless Swaggie collection (1957). https://adb.anu.edu.au/biography/harrington-edward-philip-10431 Poetry associated with a place in East Gippsland. A copy of a printed poem titled "Mallacoota" with unknown author. It is pasted onto a cardboard backing. Although attributed to Henry Lawson in this printed copy, information is that it is by Edward Harrington.poem - edward harrington - bush balladist - mallacoota -
 Orbost & District Historical Society
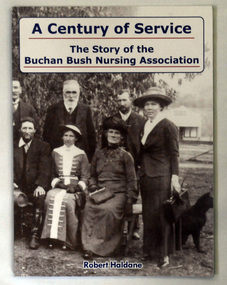
book, Black Rainbow, A Century of Service, August 2011
Author, Robert Haldane, retired from the Victoria Police Force in August 2001, after almost thirty-four years service but has maintained his local links in East Gippsland, Victoria, Australia. He is an Associate of the Gippsland Heritage Journal and a contributing author to the Gippsland Heritage Journal and Gippsland Country Life magazine. This book is a significant reference tool for the history of nursing in East Gippsland.A soft covered 70 pp book titled A Century of Service the Story of The Buchan Bush Nursing Association. On the front cover is a sepia photograph of a group of people and a dog in 19th century dress.buchan bush-nursing haldane-robert -
 The Beechworth Burke Museum
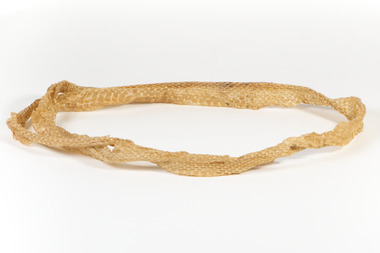
Animal specimen - Snake Skin, Trustees of the Australian Museum, 1860-1880
There is no known information about the species of snake that this skin belongs to. However, generally speaking, Australia has over two hundred known species of snakes. They are elongated, legless and carnivorous reptiles with scaly, textured skin. Snakes are especially important in Aboriginal dreaming, representing one of the great and powerful forces of nature and spirit. In the Rainbow Serpent Dreamtime story, they are considered the great life giver and protector of water, which is their spiritual home. This specimen is part of a collection of almost 200 animal specimens that were originally acquired as skins from various institutions across Australia, including the Australian Museum and the National Museum of Victoria, as well as individuals such amateur anthropologist Reynell Eveleigh Johns between 1860-1880. These skins were then mounted by members of the Burke Museum Committee and put-on display in the formal space of the Museum’s original exhibition hall where they continue to be on display. This display of taxidermy mounts initially served to instruct visitors to the Burke Museum of the natural world around them, today it serves as an insight into the collecting habits of the 19th century. This specimen is part of a significant and rare taxidermy mount collection in the Burke Museum. This collection is scientifically and culturally important for reminding us of how science continues to shape our understanding of the modern world. They demonstrate a capacity to hold evidence of how Australia’s fauna history existed in the past and are potentially important for future environmental research. This collection continues to be on display in the Museum and has become a key part to interpreting the collecting habits of the 19th century.Caramel coloured long snake skin curled around in an oval shape.taxidermy mount, taxidermy, animalia, burke museum, beechworth, australian museum, skin, reynell eveleigh johns, snake skin, snake, reptile -
 The Beechworth Burke Museum
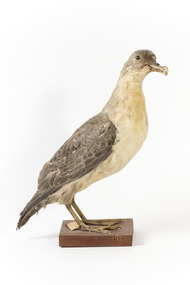
Animal specimen - Grey Petrel, Trustees of the Australian Museum, 1860-1880
The Grey Petrel is commonly seen around New Zealand and rarely around mainland Australia. They are large birds with a grey-white-brown colouring who fly just above the water and are often solitary. They mainly eat squid and fish which they catch by shallow diving. Their scientific name, Procellaria cinerea, is derived from Saint Peter and the story of his walking on water. The Grey Petrel can appear to run on water as they prepare to take off. This specimen is part of a collection of almost 200 animal specimens that were originally acquired as skins from various institutions across Australia, including the Australian Museum and the National Museum of Victoria, as well as individuals such amateur anthropologist Reynell Eveleigh Johns between 1860-1880. These skins were then mounted by members of the Burke Museum Committee and put-on display in the formal space of the Museum’s original exhibition hall where they continue to be on display. This display of taxidermy mounts initially served to instruct visitors to the Burke Museum of the natural world around them, today it serves as an insight into the collecting habits of the 19th century. This specimen is part of a significant and rare taxidermy mount collection in the Burke Museum. This collection is scientifically and culturally important for reminding us of how science continues to shape our understanding of the modern world. They demonstrate a capacity to hold evidence of how Australia’s fauna history existed in the past and are potentially important for future environmental research. This collection continues to be on display in the Museum and has become a key part to interpreting the collecting habits of the 19th century.The Grey Petrel is a large bird with a grey and cream coloured plumage. It has short legs with webbed feet and a stout bill. The specimen stands on a wooden pedestal with a paper tag tied around its right leg. The eyes are small and made of a dark coloured glass.15a Great Grey Petrel - Catalogue, page 40.taxidermy mount, taxidermy, animalia, burke museum, beechworth, australian museum, skin, reynell eveleigh johns, bird, grey petrel -
 The Beechworth Burke Museum
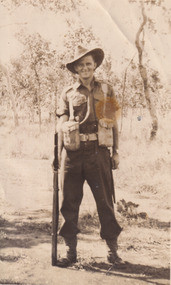
Photograph, c.1914
This photograph depicts a soldier, credited on the reverse as Fred Foster. The young man is dressed in military attire and is standing tall with a gun beside him. He is located in the Australian bush and the date of the photograph is unknown. Frederick “Fred” Arthur Foster was nephew to famous Bushranger Edward “Ned” Kelly. He was born on the 15th of March 1889 in Forbes, New South Wales. He was the eldest son of Catherine “Kate” Kelly and William Henry “Bricky” Foster. After the death of his mother in October of 1898 from apparent drowning, Foster (then aged 9) was raised by his grandmother Ellen Kelly (née Quinn) at Eleven Mile Creek in Victoria. On the 29th of June 1915, 26 year old Foster travelled to Melbourne, Victoria and enlisted in the Australian Army. He was a Private in the 17th Infantry Battalion (originally C.Company, 47th battalion). He previously was attached to the 55th Battalion but transferred in 1916. Prior to enlisting in the army, Foster worked as a Bee Keeper and served in the 16th Light Horse regiment at Benalla. Foster had blue eyes, brown hair and was of Presbyterian faith. On the 28th of February 1917, Foster travelled to France aboard SS “Golden Eagle”. He was killed in action in Lagnicourt, France on the 15th of April 1917 at 28 years old. The Battle in Lagnicourt France, on the Western Front, occurred from the 1st of March to the 30th of April of 1917 and was the location of fierce fighting between Germany and the British Empire. Germany became aware of a weakness they had along the Hindenburg Line, one of these weaknesses was located in Lagnicourt which is a small village in Northern France. Therefore, the Germans decided to launch a counter-attack in this area on the 15th of April at dawn. During this fight, German forces captured several batteries of the 1st Australian Division’s artillery but the Australians led a strong counter-attack by four of their battalions and recaptured the village and most of the guns from the German forces. German forces were forced into a premature withdrawal. This battle was not undertaken in typical WW1 “trench” style warfare. Instead, the battle was up on the ground in what was described as “old open style warfare”. In this battle, slightly more than 1000 casualties were Australian, with 300 of these prisoners of war. German forces suffered a loss of over 2300 casualties with 360 taken captive. Foster was one of 43 in his regiment who died, 87 were wounded and 51 reported missing. Foster was buried at location in Lagnicourt and whilst the grave was initially marked, it is now unknown. Foster’s service, alongside those who fell at Lagnicourt, is commemorated at the Australian National Memorial in Villers-Bretonneux, France along with other national Australian memorial sites.Photography played an important part in World War 1. Photographs of men in their military uniforms served as propaganda during the Great War to reassure civilians back at home of the military prowess of their nation and the bravery of their men. It did this while hiding the true horrors which faced the men in battle. These photographs, which includes those taken at home prior to embarking overseas like Fred Foster’s, act as censored memory for those who have lost a loved one at war. It enables families to remember their relatives in their youth and standing proudly rather than having to face the actual danger and horror which faced these men at the front line. The battle of Lagnicourt France was a victory for the European Empire and therefore, men who lost their lives protecting their countries became heroes and were awarded posthumous medals for their service. Photos of soldiers in their uniforms, were undertaken by men like Foster, so their families would be able to retain their memories and likeness before they embarked for war. Many men were killed or horribly wounded so these images were important for reminding families about their sons/ husbands/ brothers/ cousins and friends. This photo is a part of the Burke Museum Kelly album which includes numerous photographs relating to the Kelly Gang. As the son of Kate Kelly and William “Bricky” Foster, Fred Foster is an important part of the Kelly story after the execution of Edward “Ned” Kelly which has information it can impart relating to the history of the family after 1880. Whilst an important element of the Kelly Album, Foster’s photograph is also historically important in its own right for its connection to the Great War and the experiences of a soldier at the Western Front.Original sepia rectangular photograph developed on matte photographic paper, unmounted.Reverse: (Top right corner of reverse:) FRED FOSTER/ (Top centre of reverse:) Kate Kelly's son.kelly album, fred foster, kate kelly, photograph, australian soldier, the kelly gang, australian bush, burke museum, sepia photo, gum trees, family of the kelly gang, world war i, langnicourt, france, great war, 1917, ned kelly, frederick foster, william "bricky" foster, ellen kelly, military history, australian military -
 The Beechworth Burke Museum
Photograph, c. 1917
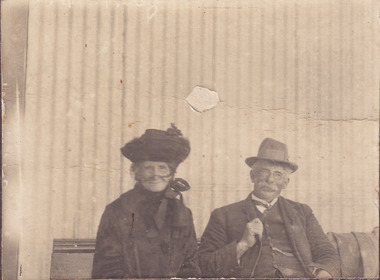
This photograph features a woman and a man, both older, seated together on a bench at Benalla railway station, c.1917. The woman on the left, wearing a hat and face veil is Mrs Kelly (Ellen Quinn Kelly), Ned Kelly’s mother and the man beside her is Ned Griffiths. Born in 1832 in Ireland, Ellen married John ‘Red’ Kelly, an ex-convict who also originated from Ireland, in 1851. She met Kelly after emigrating to Australia with her parents. Ellen and John Kelly had 7 children, the eldest of these is the infamous Bushranger Edward "Ned" Kelly. John Kelly died in 1866. Ellen had 7 children to care for and not much money so she relocated the family to Greta where she had relatives. Ellen remarried in 1874 to a young George King, an American originally from California. The couple married in Benalla and together they had 3 children. Ellen and King's children would later adopt the surname Kelly after George disappeared in 1877. Ellen spent three years in prison for the assault of Constable Fitzpatrick (an incident surrounded by mythology and uncertainty). She later passed away in her early 90s on the 27th of March 1923 at Greta. In this photograph, Albert "Ned" Griffiths wears a hat, full suit, and glasses. He is Ellen Kelly's son-in-law from his marriage to her daughter Grace Kelly. Ned Griffiths was born in 1871 and died in 1939. He married Grace Kelly in 1889 in Benalla and together the couple had nine children.This photograph is part of the Burke Museum "Kelly album" which includes a significant collection of photographs and artefacts connected to Ned Kelly and the Kelly Gang. Ned Kelly and his gang have become ingrained in Australian popular culture and thus many museums, art galleries and private collections house material connected to the Kelly story which allows the events and people to be researched and interpreted. Individuals like Ellen Kelly played an essential part in the Kelly story which have been adapted for popular culture. The study of these individuals through their images and records can help researchers to correctly interpret their involvement with Ned Kelly and the Kelly gang.Original sepia rectangular photograph developed on matte photographic paper, mounted on board.Reverse: (Top half of reverse) Mrs Kelly/Mother of Ned Kelly And Mr Ned Griffiths her/ Son in law – husband/ Of Grace Kelly/ (Down right side of lower half of reverse) 855-184-1kelly album, ellen kelly, ned griffiths, photograph, grace kelly, mourning attire, ned kelly, mother, son-in-law, the kelly gang, burke museum, sepia photo, mounted photo, victoria, benalla, australia, 1917, benalla railway station -
 The Beechworth Burke Museum
Photograph - Carte de Visite
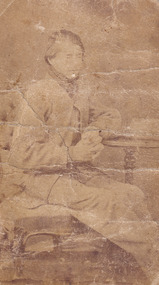
A Carte de Visite (hereafter CdV) (also known as a calling card) was popular within the mid-19th Century. It is a small card with a photographic portrait mounted on it. These cards were exchanged during the Victorian era (peaking in the 1860s) between families and friends. This particular CdV was captured by John Paul Carolin in c.1877. Carolin was a two time Mayor of Bendigo (1889-1990 and 1907-1908) and ran a photography studio on Piper Street in Kyneton from 1866. This photograph depicts a young Daniel “Dan” Kelly posing for his photograph while sitting on an ornate chair and leaning his elbow on a small pedestal table. Dan was approximately seven years younger than his famous brother, Edward “Ned” Kelly. He was born in 1861 to John “Red” Kelly (an Irish ex-convict) and Ellen Quinn. In march 1878, Dan was wanted for arrest on the charge of horse stealing. This event, known commonly as the “Fitzpatrick Incident” resulted in the formation of the Kelly Gang as it is known in popular culture today. After the incident the Kelly Gang disappeared into the bush and a 100 pound award was issued for their arrest. During this period the gang robbed banks including those at Jerilderie, Euroa and Benalla. On the 28th of June 1880, Dan Kelly died at Glenrowan in what was the Kelly Gang’s final stand: the Siege of Glenrowan. Following this event, Dan’s elder brother Ned is the sole survivor of the Kelly Gang until he is executed at the Melbourne Gaol on the 11th of November 1880. The circumstances around the deaths of Dan Kelly and Steve Hart are controversial but it is generally accepted that they died in a suicide pact inside the Ann Jones Inn.This photograph is part of the Burke Museum "Kelly album" which includes a significant collection of photographs and artefacts connected to Ned Kelly and the Kelly Gang. Ned Kelly and his gang have become ingrained in Australian popular culture and thus many museums, art galleries and private collections house material connected to the Kelly story which allows the events and people to be researched and interpreted. Individuals like Dan Kelly played an essential part in the Kelly story which have been adapted for popular culture. The study of these individuals through their images and records can help researchers to correctly interpret their involvement with Ned Kelly and the Kelly gang.Sepia, rectangular, postcard on boardObverse: Carolin Photograph Kyneton / Reverse PHOTOGRAPHED / FROM LIFE / ADVANCE AUSTRALIA / BY / J.P. CAROLIN, / KYNETON. / VICTORIA. / COPIES MAY BE HAD ON / APPLICATION. / DK/Dan Kelly/9 2 48/7#carte de visite, kelly gang, dan kelly, daniel kelly, fitzpatrick, ned kelly, steve hart, joe byrne, ann jones inn, glenrowan, kyneton, 1877, john paul carolin, carolin -
 The Beechworth Burke Museum
Photograph - Carte de Visite, James Bray, 1870
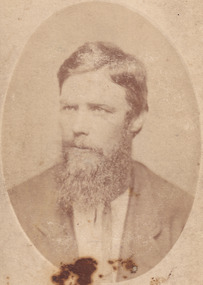
A Carte de Visite (hereafter CdV) (also known as a calling card) was popular within the mid-19th Century. It is a small card with a photographic portrait mounted on it. These cards were exchanged during the Victorian era (peaking in the 1860s) between families and friends. This particular CdV was captured by James Bray in c.1870. Bray who worked as a professional photographer in Camp Street Beechworth from 1870-1891. He was one of four men who photographed the Kelly Gang after the siege in Glenrowan in 1880. He is also renowned for his previous work photographing members of the Kelly gang. Depicted in this photograph is Isaiah “Wild” Wright. Wright was born in approximately 1846 in County Monaghan, Ireland. At age 11, Wright arrived with his father John Wright, mother Margaret and younger siblings in Victoria on the 9th of July 1857. They sailed on the ship ‘Carleton’ which left from Liverpool in England. Wright was stood 5 foot 11 inches tall and had brown hair with hazel eyes. He had a scar on the inside corner of his left eyebrow, a large scar on his right cheek and a scar on the back of his head. Over the years in Australia, Wright was sentenced on numerous (particularly of horse theft) charges and spent time in Pentridge, Hulk Sacramento and Hulk Sandridge. Wright married Bridget Lloyd in 1973. Through this marriage he was connected to the Kelly family as Bridget’s mother was one of Ellen Kelly’s (Ellen was the mother of Edward “Ned” Kelly) sisters. Wright is famous for his participation in the horse stealing incident of 1871 and subsequent bare knuckle fight against Ned Kelly that occurred in 1874. In 1878, Bridget and Isaiah Wright became parents to John "Jack" Thomas Wright. Jack Wright was an Australian rules footballer who played for Geelong in the Victorian Football League 1902-1906. Wright passed away on the 29th of May 1911.This photograph is part of the Burke Museum "Kelly album" which includes a significant collection of photographs and artefacts connected to Ned Kelly and the Kelly Gang. Ned Kelly and his gang have become ingrained in Australian popular culture and thus many museums, art galleries and private collections house material connected to the Kelly story which allows the events and people to be researched and interpreted. Individuals like Isaiah “Wild” Wright played an essential part in the Kelly story which have been enlarged and adapted for popular culture. The study of these individuals thorugh their images and records can help researchers to correctly interpret their involvement with Ned Kelly and the Kelly gang. Artefacts and photographs pertaining to the Kelly gang are particularly valuable for Australian museums. This particular photograph is significant for its connection to Beechworth photographer James Bray who is responsible for many images depicting members of the Kelly Gang. Sepia oval CDV printed on Card. Obverse: J.E. Bray/ Photo Reverse: 10238 Portrait & Landscape/ Photographer J E Bray Signature Beechworth/ Victoria/ Negatives Kept. Copies 5I/. Each May/ Be Had By Forwarding Name And Address/ Accompanied With Remittance To/ The Amount Of Order/ Photographs Coloured In Watercolourskelly album, kelly gang, beechworth, wild wright, boxing, burke museum, imperial hotel, bare-knuckle boxing, isaiah wright, ned kelly, isaiah wild wright, horse theft, hulk sacramento, calling card, pentridge, james bray, cdv, carte de visite -
 The Beechworth Burke Museum
Photograph - Carte de Visite, James Bray, 1870
This photograph was taken in c.1870 and depicts Aaron Sherrtt who is best known for his involvements with, and eventual assassination by, the Kelly gang. He stands upright in the image with his arm leaning on a podium which reaches his hip. He is wearing an outfit for which he was infamous. Richard Warren, son of the proprietor of the Ovens and Murray Advertiser once stated that “anyone seeing [Aaron] coming down Ford Street would ask, “Who the hell’s this? Some advance agent for the circus?”’. The outfit Aaron wore for this particular photoshoot is reminiscent of this quote. He wears an unusual spotted shirt with a waistcoat and a sash is tied at his waist. He wears boots which turn up slightly at the toes. The hat is a “pork pie” hat which is worn in the typical “Greta Mob” style with the chinstrap under the nose. Aaron Sherritt was born in 1854 in Prahran, Melbourne, to Irish Protestant parents John and Anne. Sherritt stood at 5 foot 10. He had hazel eyes, dark brown hair and pale olive skin. Sherritt was childhood friends with Kelly Gang member, Joe Byrne, having previously attended the same school. Both men had a reputation for stealing horses and on one occasion, after stealing and butchering a cow, Sherritt and Byrne were convicted to six months in Beechworth Gaol (1876). Sherritt, along with Byrne, were reportedly recruited by Ned Kelly in 1877 in stealing stock; however, Sherritt never became a fully-fledged member of the Kelly Gang. Nevertheless, Sherritt scouted for the Kelly Gang in 1878. He later struck a deal with the police (specifically, with Chief Commissioner Standish) to save Joe Byrne's life in exchange for leading the police to the other members of the Gang. From then on, Aaron Sherritt lived the dangerous life of a double agent, providing police with what is assumed today to have been outdated or incorrect information in return for money. On the 26th of June 1880, Aaron Sherritt was murdered in the Woolshed Valley. He was approximately 23-25 years old at death. This event marked the start of the Kelly gang’s last days. Sherritt was murdered by Byrne in front of his wife, 15 year old and heavily pregnant Ellen “Belle” Sherritt and her mother Ellen Barry. Also in the Sherritt dwelling on this particular night were four policemen. The intention behind Sherritt’s murder was for the police to send word to Melbourne that the Kelly gang had murdered Sherritt and a police train would be sent to Glenrowan where the rest of the Kelly gang were waiting. This plan did not go as predicted and ultimately the Kelly gang fell at Glenrowan in 1880. This photograph was taken by James Bray who worked as a professional photographer in Camp Street Beechworth from 1870-1891. He was one of four men who photographed the Kelly Gang after the siege in Glenrowan in 1880. He is also renowned for his previous work photographing members of the Kelly gang. This photograph is part of the Burke Museum "Kelly album" which includes a significant collection of photographs and artefacts connected to Ned Kelly and the Kelly Gang. Ned Kelly and his gang have become ingrained in Australian popular culture and thus many museums, art galleries and private collections house material connected to the Kelly story which allows the events and people to be researched and interpreted. Artefacts and photographs pertaining to the Kelly gang are particularly valuable for Australian museums. This particular photograph is significant for its connection to Beechworth photographer James Bray who is responsible for many images depicting members of the Kelly Gang. The photograph is also of artistic significance as an example of a Carte de Viste dating to 1880 and it's connection to Aaron Sherritt.Sepia rectangular photograph printed on card. Obverse: J.E.Bray./ Photo/ Beechworth Reverse: Portrait & Landscape/ Photographer 5/ Aaron Sherritt J E Bray Signature Beechworth/ Victoria Beware (almost erased out) Negatives Kept. Copies 5I/.Each May/ Be Had By Forwarding Name And Address/ Accompanied With Remittance To/ The Amount Of Order/ Photographs Coloured In Water Colours 10237. kelly album, woolshed valley, 1870s, kelly gang, joe byrne, ned kelly, aaron sherritt, james bray, beechworth, burke museum -
 The Beechworth Burke Museum
Photograph - Carte de Visite
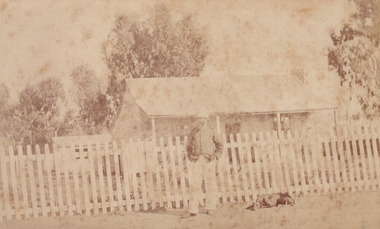
This Carte-de-viste (CdV) previously belonged to the donor's grandfather, Daniel Mullins who was a Police Officer stationed at Glenrowan soon after the Kelly gang siege. It is unclear; however, whether or not the man depicted in the photograph is Daniel Mullins or a different police officer. The Police Station at Glenrowan depicted in this CdV stood during the events of the Kelly gang's siege. Today, the siege has become an important part of Australian culture and Ned Kelly and the Kelly Gang (comprising of Ned Kelly, Dan Kelly, Steve Hart and Joe Byrne) has become ingrained in Australian history and mythology. A CdV is a sepia toned photograph mounted on card and is generally of a small size. This particular style was first patented by Andre Adolphe Eugene Disdéri (1819-1889) in 1854. In 1857, the CdV was introduced to England and after photographs of Queen Victoria, Prince Albert and their family were taken using CdV in 1860 the popularity of this method reached a peak. This photograph is part of the Burke Museum "Kelly album" which includes a significant collection of photographs and artefacts connected to Ned Kelly and the Kelly Gang. Ned Kelly and his gang have become ingrained in Australian popular culture and thus many museums, art galleries and private collections house material connected to the Kelly story which allows the events and people to be researched and interpreted. Items pertaining to the Kelly gang, including photographs like this one which depicts a police officer standing outside of the Glenrowan Police Station, are of great historical significance. Photographs like this can provide valuable information on the architecture, lifestyle and dress of colonial Australia. When studied, photographs have the ability to shed more light on the events of the Kelly gang and colonial Australia. This photograph is also of artistic significance because of the popularity of the CdV during the nineteenth century.A sepia toned photograph mounted on grey card with rounded corners. The image has been captured by an unknown photographer and depicts the outside the Glenrowan Police Station. In front of the Station stands an unidentified policeman and lying on the ground behind the policeman is a medium sized dog with dark colouring. The Police Station depicted in this photograph is a classic example of Australian country colonial architecture typically seen dating to the nineteenth century. It has the typical features of an Australian colonial 'miners' cottage' with the gable roof and a skillion at rear. A white picket fence is stands between the Station and the policeman. A small building is located at the rear of the Station which may have served as a lockup.BMM 8083kelly album, glenrowan, police, police station, photograph, ned kelly, australia, colonial australia, victoria, james bray, william e barnes, daniel mullins -
 The Beechworth Burke Museum
Photograph - Carte de Visite
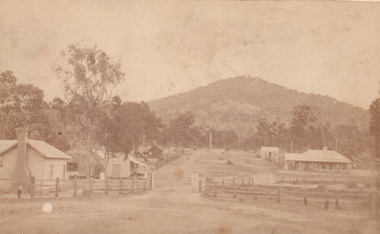
In July of 1880, Ann Jones' successful hotel in Glenrowan burnt to the ground during the Kelly siege. She had opened her business in the year prior having been unsuccessful in her attempt to run a tea-room business in Wangaratta. The first building on this particular site was the home Ann Jones had built for herself and her family. Two years later she converted the home and added the hotel to the rear of the structure. One year later it was burnt to the ground. This image depicts the streetscape of Glenrowan in 1883, three years after the siege. Importantly, it reveals the appearance of several buildings which can reveal information for how Glenrowan (as a small town) might have stood during the siege. These buildings are of typical Australian colonial "miner's cottage" style. On what would have been the site of Ann Jones' hotel, to the far left of the photograph, a police station stands. This police station was built before April 1883. This image was captured by an unknown photographer. This Carte-de-viste (CdV) previously belonged to the donor's grandfather, Daniel Mullins who was a Police Officer stationed at Glenrowan soon after the Kelly gang siege. Today, the siege has become an important part of Australian culture and Ned Kelly and the Kelly Gang (comprising of Ned Kelly, Dan Kelly, Steve Hart and Joe Byrne) has become ingrained in Australian history and mythology. A CdV is a sepia toned photograph mounted on card and is generally of a small size. This particular style was first patented by Andre Adolphe Eugene Disdéri (1819-1889) in 1854. In 1857, the CdV was introduced to England and after photographs of Queen Victoria, Prince Albert and their family were taken using CdV in 1860 the popularity of this method reached a peak.This photograph is part of the Burke Museum "Kelly album" which includes a significant collection of photographs and artefacts connected to Ned Kelly and the Kelly Gang. Ned Kelly and his gang have become ingrained in Australian popular culture and thus many museums, art galleries and private collections house material connected to the Kelly story which allows the events and people to be researched and interpreted. Artefacts and photographs pertaining to the Kelly gang are particularly valuable for Australian museums. This particular photograph is significant for its connection to the Glenrowan Siege and Ann Jones' Hotel which burnt down during the siege in June 1880. Taken in 1883, this photograph (taken by an unidentified photographer) has the opportunity to provide information about the townscape of Glenrowan shortly after the siege. It also provides important insight into the architecture and layout of the town. To the far right of the image, the photograph depicts the police station which was built on the site of Ann Jones' Hotel which can provide important information for the Kelly story and how the town evolved following 1880. It is also interesting to emphasise that the police station was built on the site of Ned Kelly and the Kelly gang's last stand.This photograph is a sepia image of the Glenrowan streetscape depicting several buildings. The newly built police station (in 1883) stands on the far right of the image on the site of the former Ann Jones Hotel. On the left are several buildings built in typical 'miner's cottage' Australian colonial style. This includes the gable roof with the skillion at rear. An unidentifiable individual stands next to the chimney of the front left building. Numerous paddocks appear in the image, particularly in the front right and the rear of the houses contain many trees. To the rear of the image, there is a mountain. A street runs through the centre of the photograph.Glenrowan / taken 1.4.83 ... / BMM 8086kelly album, ned kelly, glenrowan, police history, police, australian architecture, streetscape, glenrowan 1883, 1883, dan kelly, steve hart, joe byrne, carte-de-viste, james bray, daniel mullins, william e barnes, colonial australia, police station, photograph -
 The Beechworth Burke Museum
Photograph - Carte de Visite, William E Barnes
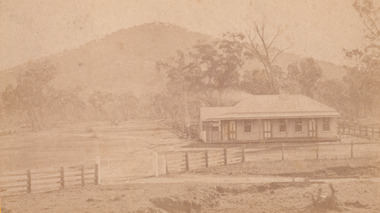
In July of 1880, Ann Jones' successful hotel in Glenrowan burnt to the ground during the Kelly siege. She had opened her business in the year prior having been unsuccessful in her attempt to run a tea-room business in Wangaratta. The first building on this particular site was the home Ann Jones had built for herself and her family. Two years later she converted the home and added the hotel to the rear of the structure. One year later it was burnt to the ground. This image depicts the streetscape of Glenrowan in 1883, three years after the siege. Importantly, it reveals the appearance of several buildings which can reveal information for how Glenrowan (as a small town) might have stood during the siege. These buildings are of typical Australian colonial "miner's cottage" style. On what would have been the site of Ann Jones' hotel, to the far left of the photograph, a police station stands. This police station was built before April 1883. This Carte-de-viste (CdV) taken by renowned Wangaratta based photographer William Edward Barnes previously belonged to the donor's grandfather, Daniel Mullins who was a Police Officer stationed at Glenrowan soon after the Kelly gang siege. Today, the siege has become an important part of Australian culture and Ned Kelly and the Kelly Gang (comprising of Ned Kelly, Dan Kelly, Steve Hart and Joe Byrne) has become ingrained in Australian history and mythology. A CdV is a sepia toned photograph mounted on card and is generally of a small size. This particular style was first patented by Andre Adolphe Eugene Disdéri (1819-1889) in 1854. In 1857, the CdV was introduced to England and after photographs of Queen Victoria, Prince Albert and their family were taken using CdV in 1860 the popularity of this method reached a peak.This photograph is part of the Burke Museum "Kelly album" which includes a significant collection of photographs and artefacts connected to Ned Kelly and the Kelly Gang. Ned Kelly and his gang have become ingrained in Australian popular culture and thus many museums, art galleries and private collections house material connected to the Kelly story which allows the events and people to be researched and interpreted. Artefacts and photographs pertaining to the Kelly gang are particularly valuable for Australian museums. This particular photograph is significant for its connection to Wangaratta based photographer William Edward Barnes and to the Glenrowan Siege and Ann Jones' Hotel which burnt down during the siege in June 1880. Taken in 1883, this photograph has the opportunity to provide information about the townscape of Glenrowan shortly after the siege. It also provides important insight into the architecture and layout of the town. To the far right of the image, the photograph depicts the police station which was built on the site of Ann Jones' Hotel which can provide important information for the Kelly story and how the town evolved following 1880. It is also interesting to emphasise that the police station was built on the site of Ned Kelly and the Kelly gang's last stand.This photograph is a sepia image mounted on yellow card which depicts the newly built police station (in 1882) which stands on the far right of the image on the site of the former Ann Jones Hotel. A fence appears through the lower front of the image and an open paddock is to the left. In the rear centre of the image, there is a mountain. In front of the mountain are many trees, most of them gum. The police station is a one storey structure with a veranda and there are three doorways visible in the image. The image depicts four windows on the front of the station.W.E.Barnes / photographer / Wangaratta / ...1882 / BMM8087kelly album, william barnes, wangaratta photographer, carte-de-viste, glenrowan, 1882, police station, ann jones inn, ann jones hotel, kelly siege, glenrowan siege, colonial australia -
 The Beechworth Burke Museum
Photograph - Carte de Visite, William E Barnes
In July of 1880, Ann Jones' successful hotel in Glenrowan burnt to the ground during the Kelly siege. She had opened her business in the year prior having been unsuccessful in her attempt to run a tea-room business in Wangaratta. The first building on this particular site was the home Ann Jones had built for herself and her family. Two years later she converted the home and added the hotel to the rear of the structure. One year later it was burnt to the ground. This image depicts the police station in 1882 on what would have been the site of Ann Jones' hotel. This Carte-de-viste (CdV) taken by renowned Wangaratta based photographer William Edward Barnes previously belonged to the donor's grandfather, Daniel Mullins who was a Police Officer stationed at Glenrowan soon after the Kelly gang siege. Today, the siege has become an important part of Australian culture and Ned Kelly and the Kelly Gang (comprising of Ned Kelly, Dan Kelly, Steve Hart and Joe Byrne) has become ingrained in Australian history and mythology. A CdV is a sepia toned photograph mounted on card and is generally of a small size. This particular style was first patented by Andre Adolphe Eugene Disdéri (1819-1889) in 1854. In 1857, the CdV was introduced to England and after photographs of Queen Victoria, Prince Albert and their family were taken using CdV in 1860 the popularity of this method reached a peak.This photograph is part of the Burke Museum "Kelly album" which includes a significant collection of photographs and artefacts connected to Ned Kelly and the Kelly Gang. Ned Kelly and his gang have become ingrained in Australian popular culture and thus many museums, art galleries and private collections house material connected to the Kelly story which allows the events and people to be researched and interpreted. Artefacts and photographs pertaining to the Kelly gang are particularly valuable for Australian museums. This particular photograph is significant for its connection to Wangaratta based photographer William Edward Barnes and to the Glenrowan Siege and Ann Jones' Hotel which burnt down during the siege in June 1880. Taken in 1882, this photograph has the opportunity to provide information about the townscape of Glenrowan shortly after the siege. It also provides important insight into the architecture and layout of the town. To the far right of the image, the photograph depicts the police station which was built on the site of Ann Jones' Hotel which can provide important information for the Kelly story and how the town evolved following 1880. It is also interesting to emphasise that the police station was built on the site of Ned Kelly and the Kelly gang's last stand.Sepia coloured photograph with a faded appearance. Image depicts four policemen with three standing and one sitting on a chair outside the Glenrowan police station. The station takes up the majority of the image and is placed in the centre of the photo. The four men are positioned on the left side of the station. The station is a large building with a gabled roof and extensions built into the veranda on either side. In between these extensions, the property has a white picket fence which runs from the extensions directly beneath the veranda enclosing the front of the structure. The letters 1, 2, 3, 4 are written on the yellow paper on which the image is situated and relate to the images in the photo. The reverse of the photo provides the names of each policeman and reveals the image as being from the collection of William E Barnes a Wangaratta based photographer.Obverse: 1. 2. 3. 4. Reverse: No. 1. is Mullins, D. G. / 2. Lord, Edward. / 3. Millar, Allex. / 4. Hedberg, O. G. / All Comrades / Glenrowan Police Station / 1 August 1882 / W. E. Barnes / Photographer / Wangaratta /kelly album, william barnes, wangaratta photographer, carte-de-viste, glenrowan, 1882, police station, ann jones inn, ann jones hotel, kelly siege, glenrowan siege, colonial australia, ned kelly, steve hart, joe byrne, william e barnes -
 The Beechworth Burke Museum
Photograph - Carte de Visite, William E Barnes
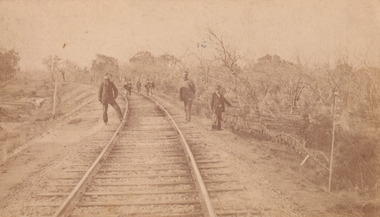
This Carte-de-visite (CdV) taken by renowned Wangaratta based photographer William Edward Barnes previously belonged to the donor's grandfather, Daniel Mullins who was a Police Officer stationed at Glenrowan soon after the Kelly gang siege. Today, the siege has become an important part of Australian culture and Ned Kelly and the Kelly Gang (comprising of Ned Kelly, Dan Kelly, Steve Hart and Joe Byrne) has become ingrained in Australian history and mythology. A CdV is a sepia toned photograph mounted on card and is generally of a small size. This particular style was first patented by Andre Adolphe Eugene Disdéri (1819-1889) in 1854. In 1857, the CdV was introduced to England and after photographs of Queen Victoria, Prince Albert and their family were taken using CdV in 1860 the popularity of this method reached a peak. In this photograph, eight men stand along the railway line near Glenrowan. The photo dates to shortly after 1880 and references the attempt by the Kelly gang to derail a police train in June 1880 on those very tracks. Ultimately, this plan failed and the police train was never derailed. Ned Kelly and the Kelly gang took their final stand at Glenrowan which has been immortalised through Australian popular culture.This photograph is part of the Burke Museum "Kelly album" which includes a significant collection of photographs and artefacts connected to Ned Kelly and the Kelly Gang. Ned Kelly and his gang have become ingrained in Australian popular culture and thus many museums, art galleries and private collections house material connected to the Kelly story which allows the events and people to be researched and interpreted. Artefacts and photographs pertaining to the Kelly gang are particularly valuable for Australian museums. This particular photograph is significant for its connection to Wangaratta based photographer William Edward Barnes and to the Glenrowan Siege of June 1880. Taken at an unknown time, after the siege at Glenrowan, this image depicts eight gentlemen standing about the railway line near Glenrowan. This is a reference to the Kelly gang's plan to derail a train which would barrel up to Glenrowan after news reached Melbourne that Aaron Sherritt had been shot by Joe Byrne in the Woolshed Valley. This image is important for its artistic information that it can provide about the Kelly story and the fashion and streetscape of Glenrowan.This sepia coloured Carte de Visite is attached to yellow cardboard. The obverse of the photo depicts the railway line near Glenrowan around 1880s. The rails are positioned in the centre of the image and are made on an incline of earth. In the foreground are three men, two standing next to the rails and one slightly off to the right of the image. In the background are trees which line the side of the rails and slightly in front of these trees is a group of five men standing on the rails. The reverse of the image is yellow card and contains printed and pencil writing. The printed writing is in the centre of the card. It reveals that the photographer was William E Barnes from Wangaratta. The pencil writing provides the inscription stating that the photo was taken near Glenrowan around the time of Ned Kelly.Pencil: Railway line near / Glen Rowan / Kelly's time / Printed: W. E. Barnes / Photographer / Wangaratta / BMM 8089 /kelly album, glenrowan, glenrowan siege, carte-de-visite, glenrowan railway, ned kelly, kelly gang, last stand, colonial australia, kelly siege, train, railway line, railway, sepia, photography, william e barnes, william barnes -
 The Beechworth Burke Museum
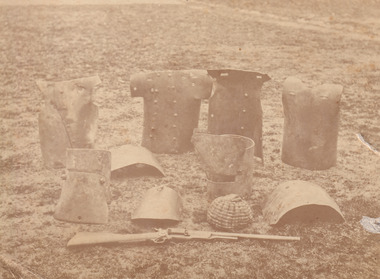
Photograph, James Bray, 1880
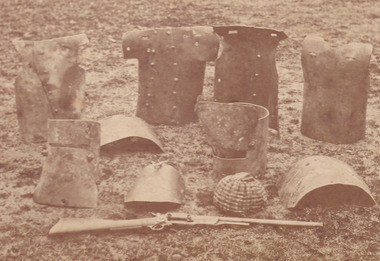
This photograph was taken by James Bray who worked as a professional photographer in Camp Street Beechworth from 1870-1891. He was one of four men who photographed the Kelly gang after the siege in Glenrowan in 1880. He is also renowned for his previous work photographing members of the Kelly gang. The photograph depicts pieces of the Kelly gang's armour crafted from plough mouldboards which are arranged on the ground. The exact relation of each piece of armour to the Kelly members was unclear for many years following the siege because the suits were disassembled without documentation and rearranged by guesswork. It was through photographs like this one, which depict the armour very soon after the siege that enabled researchers, in 2002, to reunite each of the suits with their correct pieces. This image is identified as a "Cabinet Portrait". This refers to a photograph mounted on a hard piece of cardboard. They are larger and thicker than the Carte de Visite and gradually replaced the latter in popularity after the 1860s. Identifying features of the Cabinet Portrait is on the front of the image which is generally embossed (or printed) with the details of the photographer. In the case of this image, James Bray is identified as photographer. The image is yellow in tone which compliments the gold coloured mount of the photograph. This photograph is part of the Burke Museum "Kelly album" which includes a significant collection of photographs and artefacts connected to Ned Kelly and the Kelly Gang. Ned Kelly and his gang have become ingrained in Australian popular culture and thus many museums, art galleries and private collections house material connected to the Kelly story which allows the events and people to be researched and interpreted. Artefacts and photographs pertaining to the Kelly gang are particularly valuable for Australian museums. This particular photograph is significant for its connection to Beechworth photographer James Bray who is responsible for many images depicting members of the Kelly gang. The photograph is also of artistic significance as an example of a Cabinet Portrait dating to 1880. This image was commissioned by the police shortly after the defeat of the Kelly gang at Glenrowan. The armour was collected and placed on the ground for photography. No care was taken to retain the correct grouping of the armour and therefore, the identity of each piece to the correct owner was unclear for many years. Photographs of the armour taken at the time, like this one, helped researchers to reconstruct the correct armour and identify which pieces belonged to which member of the Kelly gang which is significant for Australian history. This photograph has the capacity to provide important information about the construction of the armour used by the Kelly gang at Glenrowan and importantly dates to 1880.This photograph is a cabinet portrait commissioned by the police depicting the Kelly armour arranged on the ground at Glenrowan following the siege by Ned Kelly and the Kelly gang in 1880. The armour includes helmets, breastplates a rifle and the inner knitted helmet worn by Ned Kelly. kelly album -
 The Beechworth Burke Museum
Photograph
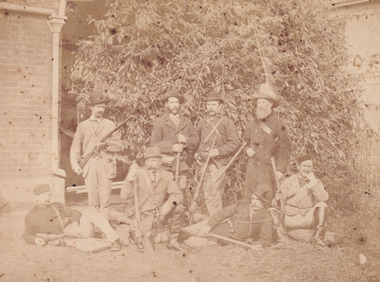
According to the Victorian Patents Office Copyright Collection (VPOCC) index, Barnes' image was first published on July 3, 1880. Many of the photographs taken by William Barnes concerned with the Kelly Gang were registered with the VPOCC which has ensured their survival in the State Library of Victoria today. Thus image includes the depiction of Sergeant Arthur Loftus Maule Steele (kneeling in front row) surrounded by seven other men. These men are identified as belonging to the Wangaratta police who played a key part in the destruction of the Kelly Gang at Glenrowan. These men could include Constables Causey, Montiford, Patrick Healey, Walsh, William Moore, Dixon and James Dwyer. It is also suggested that the individual standing back right (in the dark coat) is Constable Hugh Bracken, a key figure in the Glenrowan Siege. The police in this image display their firearms in a manner which reflects photographs of hunters, an element which was typical for this period. This photograph is part of the Burke Museum "Kelly album" which includes a significant collection of photographs and artefacts connected to Ned Kelly and the Kelly Gang. Ned Kelly and his gang have become ingrained in Australian popular culture and thus many museums, art galleries and private collections house material connected to the Kelly story which allows the events and people to be researched and interpreted. Artefacts and photographs pertaining to the Kelly gang are particularly valuable for Australian museums. This particular photograph is significant for its connection to Wangaratta photographer William Barnes who is responsible for having taken and registered many images depicting members of the Kelly gang. The photograph is also of artistic significance as an example of a photograph dating to 1880. This image depicts members of the Wangaratta police shortly after the defeat of the Kelly gang at Glenrowan. This photograph has the capacity to provide important information about the police who took part in Glenrowan 1880 and depicts key figures like Sergeant Steele.Sepia photograph taken by professional photographer William Edward Barnes (1941-1916) in June of 1880. The photo depicts a contingent of Wangaratta police who were at the capture of the Kelly gang at Glenrowan on the 28th of June 1880. This group of eight men are photographed standing in front of foliage and between the sides of two brick structures. Four men stand upright behind four other men who are depicted in either a sitting, semi-lying or kneeling position.W.E.Barnes / photographer / Wangaratta / BMM8085 Police responsible / for Kelly's capture / (D.S. not there)kelly album, glenrowan, police, wangaratta police, ned kelly, ned kelly glenrowan, william barnes, photography, 1880, australian history, police photograph, sargent steele, sergeant steele -
 The Beechworth Burke Museum
Photograph, James Bray, 1880
This photograph was taken by James Bray who worked as a professional photographer in Camp Street Beechworth from 1870-1891. He was one of four men who photographed the Kelly gang after the siege in Glenrowan in 1880. He is also renowned for his previous work photographing members of the Kelly gang. The photograph depicts pieces of the Kelly gang's armour crafted from plough mouldboards which are arranged on the ground. The exact relation of each piece of armour to the Kelly members was unclear for many years following the siege because the suits were disassembled without documentation and rearranged by guesswork. It was through photographs like this one, which depict the armour very soon after the siege that enabled researchers, in 2002, to reunite each of the suits with their correct pieces. This image is identified as a "Cabinet Portrait". This refers to a photograph mounted on a hard piece of cardboard. They are larger and thicker than the Carte de Visite and gradually replaced the latter in popularity after the 1860s. Identifying features of the Cabinet Portrait is on the front of the image which is generally embossed (or printed) with the details of the photographer. In the case of this image, James Bray is identified as photographer. The image is yellow in tone which compliments the gold coloured mount of the photograph.This photograph is part of the Burke Museum "Kelly album" which includes a significant collection of photographs and artefacts connected to Ned Kelly and the Kelly Gang. Ned Kelly and his gang have become ingrained in Australian popular culture and thus many museums, art galleries and private collections house material connected to the Kelly story which allows the events and people to be researched and interpreted. Artefacts and photographs pertaining to the Kelly gang are particularly valuable for Australian museums. This particular photograph is significant for its connection to Beechworth photographer James Bray who is responsible for many images depicting members of the Kelly gang. The photograph is also of artistic significance as an example of a Cabinet Portrait dating to 1880. This image was commissioned by the police shortly after the defeat of the Kelly gang at Glenrowan. The armour was collected and placed on the ground for photography. No care was taken to retain the correct grouping of the armour and therefore, the identity of each piece to the correct owner was unclear for many years. Photographs of the armour taken at the time, like this one, helped researchers to reconstruct the correct armour and identify which pieces belonged to which member of the Kelly gang which is significant for Australian history. This photograph has the capacity to provide important information about the construction of the armour used by the Kelly gang at Glenrowan and importantly dates to 1880.Sepia rectangular photograph printed on cardReverse: Mrs. E. E. Smith / Loch St. / Beechworth / 1880 / JAMES E. BRAY / Photographer / BEECHWORTH / R. & M. HARVEY / AUTHORISED NEWSAGENTE / AND GIFT SHOP / BEECHWORTH PHONE 114 / (upside down) P/C Neg / 41 --np of armour & / (torn sticker with)fle. Ned Kellys Riflekelly album, ned kelly, kelly armour, armour, rifle -
 The Beechworth Burke Museum
Postcard
... information about the popularity of the Kelly story in Australia ...This Australian yesteryear postcard was published by Cobb & Co in circa 1990. It is a sepia toned artwork of the Ann Jones Inn in Glenrowan which was taken prior to 1880. The building at rear in this photograph was the private residence of Ann Jones, a migrant from Tipperary, Ireland. Two years after building her private residence, in 1878/1879, Ann Jones added the Inn to the front of the building which is depicted in the postcard. In 1880 the Inn was burned to the ground during the Kelly Gang siege. After the siege, Ann Jones and her children continued to live on the same location in a makeshift hut. This hut was later replaced with a dwelling using compensation money provided to Ann from the government for the loss of her property and goods; however, she was denied a new trading licence which did not enable her to re-establish her previously successful business. The reverse of this postcard provides a snippet of information into the Glenrowan siege, for which this site is most well-known. It outlines the role and demise of the members of the Kelly Gang but what it does not include is how Ann Jones, owner of the Inn depicted on the postcard, was impacted. Ann’s son of 13 years, Johnny was killed during the siege, and a bullet grazed the forehead of her daughter, Jane Jones. Jane would die two years after this event from tuberculosis, but it was believed by Ann that the cause was grief for the death of her brother and distress at having witnessed the siege. Ann was provided with 100 pounds in compensation money for the loss of her children. Her husband, Owen Jones passed away late 1880 and in 1891 Ann Jones remarried. She died at the age of 80 in 1910. The “last stand” of the Kelly Gang at this location is estimated by Dr Stuart Dawson of Monash University to have taken less than 10 minutes in duration. During and following this time, the life of Ann Jones was turned upside down and everything she had worked for in the preceding years was now in ruins. This postcard has the capacity to reveal information about the popularity of the Kelly story in Australia. It was created in approximately the 1990s which perhaps reveals a resurgence in interest into the Kelly Gang and Australian history when card was made. This image, and others depicting the Ann Jone’s Inn, have the ability to shed light on the Kelly story and the events of the Glenrowan Siege. Additionally, they can reveal information into the life of a female business owner during the 1870-1880 period. Archaeological research has been conducted at this site by LaTrobe University and a study of these images alongside the analysis of the material culture found at this location can help to build more comprehensive understanding into life in Australia during this period and Ann Jones herself.Sepia rectangular postcard printed on cardObverse: [Illegible] Reverse: G4/ 3276/ Australian / Yesteryear / cards/ correspondence / address / Published by Cobb & Co (03) 5766 2409 / The Glenrowan Inn owned by Ann Jones. / It was this Inn in which the Kelly Gang imprisoned / 62 people, while waiting for the special train / carrying the police to arrive from Benalla. On 28th / June 1880, following a seige which lasted over 12 / hours, Ned Kelly was captured. Joe Byrne was shot, / and the Inn was set on fire in an attempt to flush out / the two remaining outlaws, Dan Kelly and Steve / Hart. However, some time prior, the two boys, it / was believed, had committed suicide, as a result, / their bodies were incinerated beyond recognition. / A sepia tone facsimile of / an early Australian photograph. /kelly album, postcard, glenrowan inn, kelly siege, australia yesteryear card, cobb & co publisher, ned kelly capture, jones ann, dan kelly, joe byrne, steve hart, fire, train, police, benalla, 28 june 1880 -
 The Beechworth Burke Museum
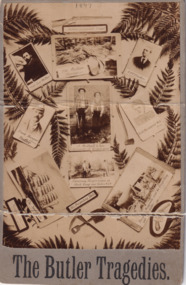
Photograph, Enterprise Photo Company, 1897
The photograph depicts eleven vignettes relating to the murders of Captain Lee Weller, Charles Burgess and Arthur Preston by Frank Butler (born Richard Ashe, alias Frank Harwood). Some historians consider Butler to be Australia's first serial killer. Butler submitted written advertisements to the classified columns of the Sydney Morning Herald newspaper looking for people to join him in prospecting for gold. Butler took his victims into the Blue Mountains in New South Wales and told fabricated stories of gold mines worth thousands of pounds. He then made his victims dig their own graves under the guise that they were digging for gold. He would then shoot them, take their valuables, and bury them.Sepia rectangular photograph printed on matte photographic paper mounted on card.Obverse: 1897 / Butler's inseparable Friend / Cap ' Lee Weller / The Victim Burgess / A OT Preston / Frank Harwood / alias / Butler / J. Mulhall & Son / discoverers of Burgess grave / Butlers supposed Wife / Frisco / Examining Burgess corpse at Black Range near Parkes NSW / The Swanhda / His Prospecting Tools / Burgs Waggonette used for Prospecting sold Butler / (?) / The Butler Tragedies Reverse: BMMA03308 / Removal story of the / 1997.3119 / Butler murders near / Parkes NSW 1897 / 84 - 35 - 1 / Enterprise Photo Company, / 26 Elizabeth Street, / SYDNEY. /entertainment album, captain lee weller, charles burgess, arthur preston, frank harwood, frank butler, crime, blue mountains, new south wales, murder, tragedy, gold, gold mine, sydney morning herald, swanhilda, richard ashe -
 Flagstaff Hill Maritime Museum and Village
Photograph
HISTORY OF THE LOCH ARD The LOCH ARD belonged to the famous Loch Line which sailed many ships from England to Australia. Built in Glasgow by Barclay, Curdle and Co. in 1873, the LOCH ARD was a three-masted square rigged iron sailing ship. The ship measured 262ft 7" (79.87m) in length, 38ft (11.58m) in width, 23ft (7m) in depth and had a gross tonnage of 1693 tons. The LOCH ARD's main mast measured a massive 150ft (45.7m) in height. LOCH ARD made three trips to Australia and one trip to Calcutta before its final voyage. LOCH ARD left England on March 2, 1878, under the command of Captain Gibbs, a newly married, 29 year old. She was bound for Melbourne with a crew of 37, plus 17 passengers and a load of cargo. The general cargo reflected the affluence of Melbourne at the time. On board were straw hats, umbrella, perfumes, clay pipes, pianos, clocks, confectionary, linen and candles, as well as a heavier load of railway irons, cement, lead and copper. There were items included that intended for display in the Melbourne International Exhibition in 1880. The voyage to Port Phillip was long but uneventful. At 3am on June 1, 1878, Captain Gibbs was expecting to see land and the passengers were becoming excited as they prepared to view their new homeland in the early morning. But LOCH ARD was running into a fog which greatly reduced visibility. Captain Gibbs was becoming anxious as there was no sign of land or the Cape Otway lighthouse. At 4am the fog lifted. A man aloft announced that he could see breakers. The sheer cliffs of Victoria's west coast came into view, and Captain Gibbs realised that the ship was much closer to them than expected. He ordered as much sail to be set as time would permit and then attempted to steer the vessel out to sea. On coming head on into the wind, the ship lost momentum, the sails fell limp and LOCH ARD's bow swung back. Gibbs then ordered the anchors to be released in an attempt to hold its position. The anchors sank some 50 fathoms - but did not hold. By this time LOCH ARD was among the breakers and the tall cliffs of Mutton Bird Island rose behind the ship. Just half a mile from the coast, the ship's bow was suddenly pulled around by the anchor. The captain tried to tack out to sea, but the ship struck a reef at the base of Mutton Bird Island, near Port Campbell. Waves broke over the ship and the top deck was loosened from the hull. The masts and rigging came crashing down knocking passengers and crew overboard. When a lifeboat was finally launched, it crashed into the side of LOCH ARD and capsized. Tom Pearce, who had launched the boat, managed to cling to its overturned hull and shelter beneath it. He drifted out to sea and then on the flood tide came into what is now known as LOCH ARD Gorge. He swam to shore, bruised and dazed, and found a cave in which to shelter. Some of the crew stayed below deck to shelter from the falling rigging but drowned when the ship slipped off the reef into deeper water. Eva Carmichael had raced onto deck to find out what was happening only to be confronted by towering cliffs looming above the stricken ship. In all the chaos, Captain Gibbs grabbed Eva and said, "If you are saved Eva, let my dear wife know that I died like a sailor". That was the last Eva Carmichael saw of the captain. She was swept off the ship by a huge wave. Eva saw Tom Pearce on a small rocky beach and yelled to attract his attention. He dived in and swam to the exhausted woman and dragged her to shore. He took her to the cave and broke open case of brandy which had washed up on the beach. He opened a bottle to revive the unconscious woman. A few hours later Tom scaled a cliff in search of help. He followed hoof prints and came by chance upon two men from nearby Glenample Station three and a half miles away. In a state of exhaustion, he told the men of the tragedy. Tom returned to the gorge while the two men rode back to the station to get help. By the time they reached LOCH ARD Gorge, it was cold and dark. The two shipwreck survivors were taken to Glenample Station to recover. Eva stayed at the station for six weeks before returning to Ireland, this time by steamship. In Melbourne, Tom Pearce received a hero's welcome. He was presented with the first gold medal of the Royal Humane Society of Victoria and a £1000 cheque from the Victorian Government. Concerts were performed to honour the young man's bravery and to raise money for those who lost family in the LOCH ARD disaster. Of the 54 crew members and passengers on board, only two survived: the apprentice, Tom Pearce and the young woman passenger, Eva Carmichael, who lost all of her family in the tragedy. Ten days after the LOCH ARD tragedy, salvage rights to the wreck were sold at auction for £2,120. Cargo valued at £3,000 was salvaged and placed on the beach, but most washed back into the sea when another storm developed. The wreck of LOCH ARD still lies at the base of Mutton Bird Island. Much of the cargo has now been salvaged and some was washed up into what is now known as LOCH ARD Gorge. Cargo and artefacts have also been illegally salvaged over many years before protective legislation was introduced. One of the most unlikely pieces of cargo to have survived the shipwreck was a Minton porcelain peacock - one of only nine in the world. The peacock was destined for the Melbourne International Exhibition in 1880. It had been well packed, which gave it adequate protection during the violent storm. Today, the Minton peacock can be seen at the Flagstaff Hill Maritime Museum in Warrnambool. From Australia's most dramatic shipwreck it has now become Australia's most valuable shipwreck artefact and is one of very few 'objects' on the Victorian State Heritage Register. Flagstaff Hill’s collection of artefacts from LOCH ARD is significant for being one of the largest collections of artefacts from this shipwreck in Victoria. It is significant for its association with the shipwreck, which is on the Victorian Heritage Register (VHR S417). The collection is significant because of the relationship between the objects, as together they have a high potential to interpret the story of the LOCH ARD. The LOCH ARD collection is archaeologically significant as the remains of a large international passenger and cargo ship. The LOCH ARD collection is historically significant for representing aspects of Victoria’s shipping history and its potential to interpret sub-theme 1.5 of Victoria’s Framework of Historical Themes (living with natural processes). The collection is also historically significant for its association with the LOCH ARD, which was one of the worst and best known shipwrecks in Victoria’s history. Photograph of Loch Ard Gorge. Photograph taken some distance from the Gorge. Three men in the Gorge and outlines of steps can be seen. Right hand side of the photograph is written "Loch Ard Gorge"flagstaff hill, warrnambool, shipwrecked coast, flagstaff hill maritime museum, maritime museum, shipwreck coast, flagstaff hill maritime village, great ocean road, loch line, loch ard, captain gibbs, eva carmichael, tom pearce, glenample station, mutton bird island, loch ard gorge, photograph of loch ard gorge, photograph -
 Flagstaff Hill Maritime Museum and Village
Painting
HISTORY OF THE LOCH ARD The LOCH ARD belonged to the famous Loch Line which sailed many ships from England to Australia. Built in Glasgow by Barclay, Curdle and Co. in 1873, the LOCH ARD was a three-masted square rigged iron sailing ship. The ship measured 262ft 7" (79.87m) in length, 38ft (11.58m) in width, 23ft (7m) in depth and had a gross tonnage of 1693 tons. The LOCH ARD's main mast measured a massive 150ft (45.7m) in height. LOCH ARD made three trips to Australia and one trip to Calcutta before its final voyage. LOCH ARD left England on March 2, 1878, under the command of Captain Gibbs, a newly married, 29 year old. She was bound for Melbourne with a crew of 37, plus 17 passengers and a load of cargo. The general cargo reflected the affluence of Melbourne at the time. On board were straw hats, umbrella, perfumes, clay pipes, pianos, clocks, confectionary, linen and candles, as well as a heavier load of railway irons, cement, lead and copper. There were items included that intended for display in the Melbourne International Exhibition in 1880. The voyage to Port Phillip was long but uneventful. At 3am on June 1, 1878, Captain Gibbs was expecting to see land and the passengers were becoming excited as they prepared to view their new homeland in the early morning. But LOCH ARD was running into a fog which greatly reduced visibility. Captain Gibbs was becoming anxious as there was no sign of land or the Cape Otway lighthouse. At 4am the fog lifted. A man aloft announced that he could see breakers. The sheer cliffs of Victoria's west coast came into view, and Captain Gibbs realised that the ship was much closer to them than expected. He ordered as much sail to be set as time would permit and then attempted to steer the vessel out to sea. On coming head on into the wind, the ship lost momentum, the sails fell limp and LOCH ARD's bow swung back. Gibbs then ordered the anchors to be released in an attempt to hold its position. The anchors sank some 50 fathoms - but did not hold. By this time LOCH ARD was among the breakers and the tall cliffs of Mutton Bird Island rose behind the ship. Just half a mile from the coast, the ship's bow was suddenly pulled around by the anchor. The captain tried to tack out to sea, but the ship struck a reef at the base of Mutton Bird Island, near Port Campbell. Waves broke over the ship and the top deck was loosened from the hull. The masts and rigging came crashing down knocking passengers and crew overboard. When a lifeboat was finally launched, it crashed into the side of LOCH ARD and capsized. Tom Pearce, who had launched the boat, managed to cling to its overturned hull and shelter beneath it. He drifted out to sea and then on the flood tide came into what is now known as LOCH ARD Gorge. He swam to shore, bruised and dazed, and found a cave in which to shelter. Some of the crew stayed below deck to shelter from the falling rigging but drowned when the ship slipped off the reef into deeper water. Eva Carmichael had raced onto deck to find out what was happening only to be confronted by towering cliffs looming above the stricken ship. In all the chaos, Captain Gibbs grabbed Eva and said, "If you are saved Eva, let my dear wife know that I died like a sailor". That was the last Eva Carmichael saw of the captain. She was swept off the ship by a huge wave. Eva saw Tom Pearce on a small rocky beach and yelled to attract his attention. He dived in and swam to the exhausted woman and dragged her to shore. He took her to the cave and broke open case of brandy which had washed up on the beach. He opened a bottle to revive the unconscious woman. A few hours later Tom scaled a cliff in search of help. He followed hoof prints and came by chance upon two men from nearby Glenample Station three and a half miles away. In a state of exhaustion, he told the men of the tragedy. Tom returned to the gorge while the two men rode back to the station to get help. By the time they reached LOCH ARD Gorge, it was cold and dark. The two shipwreck survivors were taken to Glenample Station to recover. Eva stayed at the station for six weeks before returning to Ireland, this time by steamship. In Melbourne, Tom Pearce received a hero's welcome. He was presented with the first gold medal of the Royal Humane Society of Victoria and a £1000 cheque from the Victorian Government. Concerts were performed to honour the young man's bravery and to raise money for those who lost family in the LOCH ARD disaster. Of the 54 crew members and passengers on board, only two survived: the apprentice, Tom Pearce and the young woman passenger, Eva Carmichael, who lost all of her family in the tragedy. Ten days after the LOCH ARD tragedy, salvage rights to the wreck were sold at auction for £2,120. Cargo valued at £3,000 was salvaged and placed on the beach, but most washed back into the sea when another storm developed. The wreck of LOCH ARD still lies at the base of Mutton Bird Island. Much of the cargo has now been salvaged and some was washed up into what is now known as LOCH ARD Gorge. Cargo and artefacts have also been illegally salvaged over many years before protective legislation was introduced. One of the most unlikely pieces of cargo to have survived the shipwreck was a Minton porcelain peacock - one of only nine in the world. The peacock was destined for the Melbourne International Exhibition in 1880. It had been well packed, which gave it adequate protection during the violent storm. Today, the Minton peacock can be seen at the Flagstaff Hill Maritime Museum in Warrnambool. From Australia's most dramatic shipwreck it has now become Australia's most valuable shipwreck artefact and is one of very few 'objects' on the Victorian State Heritage Register. Flagstaff Hill’s collection of artefacts from LOCH ARD is significant for being one of the largest collections of artefacts from this shipwreck in Victoria. It is significant for its association with the shipwreck, which is on the Victorian Heritage Register (VHR S417). The collection is significant because of the relationship between the objects, as together they have a high potential to interpret the story of the LOCH ARD. The LOCH ARD collection is archaeologically significant as the remains of a large international passenger and cargo ship. The LOCH ARD collection is historically significant for representing aspects of Victoria’s shipping history and its potential to interpret sub-theme 1.5 of Victoria’s Framework of Historical Themes (living with natural processes). The collection is also historically significant for its association with the LOCH ARD, which was one of the worst and best known shipwrecks in Victoria’s history. Painting of The Loch Ard oil on board depicting wreck. It shows stormy sea and coastline in background. Ship appears to be capsized.flagstaff hill, warrnambool, shipwrecked coast, flagstaff hill maritime museum, maritime museum, shipwreck coast, flagstaff hill maritime village, great ocean road, loch line, loch ard, captain gibbs, eva carmichael, tom pearce, glenample station, mutton bird island, loch ard gorge, painting -
 Flagstaff Hill Maritime Museum and Village
Photograph
HISTORY OF THE LOCH ARD The LOCH ARD belonged to the famous Loch Line which sailed many ships from England to Australia. Built in Glasgow by Barclay, Curdle and Co. in 1873, the LOCH ARD was a three-masted square rigged iron sailing ship. The ship measured 262ft 7" (79.87m) in length, 38ft (11.58m) in width, 23ft (7m) in depth and had a gross tonnage of 1693 tons. The LOCH ARD's main mast measured a massive 150ft (45.7m) in height. LOCH ARD made three trips to Australia and one trip to Calcutta before its final voyage. LOCH ARD left England on March 2, 1878, under the command of Captain Gibbs, a newly married, 29 year old. She was bound for Melbourne with a crew of 37, plus 17 passengers and a load of cargo. The general cargo reflected the affluence of Melbourne at the time. On board were straw hats, umbrella, perfumes, clay pipes, pianos, clocks, confectionary, linen and candles, as well as a heavier load of railway irons, cement, lead and copper. There were items included that intended for display in the Melbourne International Exhibition in 1880. The voyage to Port Phillip was long but uneventful. At 3am on June 1, 1878, Captain Gibbs was expecting to see land and the passengers were becoming excited as they prepared to view their new homeland in the early morning. But LOCH ARD was running into a fog which greatly reduced visibility. Captain Gibbs was becoming anxious as there was no sign of land or the Cape Otway lighthouse. At 4am the fog lifted. A man aloft announced that he could see breakers. The sheer cliffs of Victoria's west coast came into view, and Captain Gibbs realised that the ship was much closer to them than expected. He ordered as much sail to be set as time would permit and then attempted to steer the vessel out to sea. On coming head on into the wind, the ship lost momentum, the sails fell limp and LOCH ARD's bow swung back. Gibbs then ordered the anchors to be released in an attempt to hold its position. The anchors sank some 50 fathoms - but did not hold. By this time LOCH ARD was among the breakers and the tall cliffs of Mutton Bird Island rose behind the ship. Just half a mile from the coast, the ship's bow was suddenly pulled around by the anchor. The captain tried to tack out to sea, but the ship struck a reef at the base of Mutton Bird Island, near Port Campbell. Waves broke over the ship and the top deck was loosened from the hull. The masts and rigging came crashing down knocking passengers and crew overboard. When a lifeboat was finally launched, it crashed into the side of LOCH ARD and capsized. Tom Pearce, who had launched the boat, managed to cling to its overturned hull and shelter beneath it. He drifted out to sea and then on the flood tide came into what is now known as LOCH ARD Gorge. He swam to shore, bruised and dazed, and found a cave in which to shelter. Some of the crew stayed below deck to shelter from the falling rigging but drowned when the ship slipped off the reef into deeper water. Eva Carmichael had raced onto deck to find out what was happening only to be confronted by towering cliffs looming above the stricken ship. In all the chaos, Captain Gibbs grabbed Eva and said, "If you are saved Eva, let my dear wife know that I died like a sailor". That was the last Eva Carmichael saw of the captain. She was swept off the ship by a huge wave. Eva saw Tom Pearce on a small rocky beach and yelled to attract his attention. He dived in and swam to the exhausted woman and dragged her to shore. He took her to the cave and broke open case of brandy which had washed up on the beach. He opened a bottle to revive the unconscious woman. A few hours later Tom scaled a cliff in search of help. He followed hoof prints and came by chance upon two men from nearby Glenample Station three and a half miles away. In a state of exhaustion, he told the men of the tragedy. Tom returned to the gorge while the two men rode back to the station to get help. By the time they reached LOCH ARD Gorge, it was cold and dark. The two shipwreck survivors were taken to Glenample Station to recover. Eva stayed at the station for six weeks before returning to Ireland, this time by steamship. In Melbourne, Tom Pearce received a hero's welcome. He was presented with the first gold medal of the Royal Humane Society of Victoria and a £1000 cheque from the Victorian Government. Concerts were performed to honour the young man's bravery and to raise money for those who lost family in the LOCH ARD disaster. Of the 54 crew members and passengers on board, only two survived: the apprentice, Tom Pearce and the young woman passenger, Eva Carmichael, who lost all of her family in the tragedy. Ten days after the LOCH ARD tragedy, salvage rights to the wreck were sold at auction for £2,120. Cargo valued at £3,000 was salvaged and placed on the beach, but most washed back into the sea when another storm developed. The wreck of LOCH ARD still lies at the base of Mutton Bird Island. Much of the cargo has now been salvaged and some was washed up into what is now known as LOCH ARD Gorge. Cargo and artefacts have also been illegally salvaged over many years before protective legislation was introduced. One of the most unlikely pieces of cargo to have survived the shipwreck was a Minton porcelain peacock - one of only nine in the world. The peacock was destined for the Melbourne International Exhibition in 1880. It had been well packed, which gave it adequate protection during the violent storm. Today, the Minton peacock can be seen at the Flagstaff Hill Maritime Museum in Warrnambool. From Australia's most dramatic shipwreck it has now become Australia's most valuable shipwreck artefact and is one of very few 'objects' on the Victorian State Heritage Register. Flagstaff Hill’s collection of artefacts from LOCH ARD is significant for being one of the largest collections of artefacts from this shipwreck in Victoria. It is significant for its association with the shipwreck, which is on the Victorian Heritage Register (VHR S417). The collection is significant because of the relationship between the objects, as together they have a high potential to interpret the story of the LOCH ARD. The LOCH ARD collection is archaeologically significant as the remains of a large international passenger and cargo ship. The LOCH ARD collection is historically significant for representing aspects of Victoria’s shipping history and its potential to interpret sub-theme 1.5 of Victoria’s Framework of Historical Themes (living with natural processes). The collection is also historically significant for its association with the LOCH ARD, which was one of the worst and best known shipwrecks in Victoria’s history. Photograph of Loch Ard Gorge c1900flagstaff hill, warrnambool, shipwrecked coast, flagstaff hill maritime museum, maritime museum, shipwreck coast, flagstaff hill maritime village, great ocean road, loch line, loch ard, captain gibbs, eva carmichael, tom pearce, glenample station, mutton bird island, loch ard gorge, photograph of loch ard gorge, photograph -
 Flagstaff Hill Maritime Museum and Village
Calendar
HISTORY OF THE LOCH ARD The LOCH ARD belonged to the famous Loch Line which sailed many ships from England to Australia. Built in Glasgow by Barclay, Curdle and Co. in 1873, the LOCH ARD was a three-masted square rigged iron sailing ship. The ship measured 262ft 7" (79.87m) in length, 38ft (11.58m) in width, 23ft (7m) in depth and had a gross tonnage of 1693 tons. The LOCH ARD's main mast measured a massive 150ft (45.7m) in height. LOCH ARD made three trips to Australia and one trip to Calcutta before its final voyage. LOCH ARD left England on March 2, 1878, under the command of Captain Gibbs, a newly married, 29 year old. She was bound for Melbourne with a crew of 37, plus 17 passengers and a load of cargo. The general cargo reflected the affluence of Melbourne at the time. On board were straw hats, umbrella, perfumes, clay pipes, pianos, clocks, confectionary, linen and candles, as well as a heavier load of railway irons, cement, lead and copper. There were items included that intended for display in the Melbourne International Exhibition in 1880. The voyage to Port Phillip was long but uneventful. At 3am on June 1, 1878, Captain Gibbs was expecting to see land and the passengers were becoming excited as they prepared to view their new homeland in the early morning. But LOCH ARD was running into a fog which greatly reduced visibility. Captain Gibbs was becoming anxious as there was no sign of land or the Cape Otway lighthouse. At 4am the fog lifted. A man aloft announced that he could see breakers. The sheer cliffs of Victoria's west coast came into view, and Captain Gibbs realised that the ship was much closer to them than expected. He ordered as much sail to be set as time would permit and then attempted to steer the vessel out to sea. On coming head on into the wind, the ship lost momentum, the sails fell limp and LOCH ARD's bow swung back. Gibbs then ordered the anchors to be released in an attempt to hold its position. The anchors sank some 50 fathoms - but did not hold. By this time LOCH ARD was among the breakers and the tall cliffs of Mutton Bird Island rose behind the ship. Just half a mile from the coast, the ship's bow was suddenly pulled around by the anchor. The captain tried to tack out to sea, but the ship struck a reef at the base of Mutton Bird Island, near Port Campbell. Waves broke over the ship and the top deck was loosened from the hull. The masts and rigging came crashing down knocking passengers and crew overboard. When a lifeboat was finally launched, it crashed into the side of LOCH ARD and capsized. Tom Pearce, who had launched the boat, managed to cling to its overturned hull and shelter beneath it. He drifted out to sea and then on the flood tide came into what is now known as LOCH ARD Gorge. He swam to shore, bruised and dazed, and found a cave in which to shelter. Some of the crew stayed below deck to shelter from the falling rigging but drowned when the ship slipped off the reef into deeper water. Eva Carmichael had raced onto deck to find out what was happening only to be confronted by towering cliffs looming above the stricken ship. In all the chaos, Captain Gibbs grabbed Eva and said, "If you are saved Eva, let my dear wife know that I died like a sailor". That was the last Eva Carmichael saw of the captain. She was swept off the ship by a huge wave. Eva saw Tom Pearce on a small rocky beach and yelled to attract his attention. He dived in and swam to the exhausted woman and dragged her to shore. He took her to the cave and broke open case of brandy which had washed up on the beach. He opened a bottle to revive the unconscious woman. A few hours later Tom scaled a cliff in search of help. He followed hoof prints and came by chance upon two men from nearby Glenample Station three and a half miles away. In a state of exhaustion, he told the men of the tragedy. Tom returned to the gorge while the two men rode back to the station to get help. By the time they reached LOCH ARD Gorge, it was cold and dark. The two shipwreck survivors were taken to Glenample Station to recover. Eva stayed at the station for six weeks before returning to Ireland, this time by steamship. In Melbourne, Tom Pearce received a hero's welcome. He was presented with the first gold medal of the Royal Humane Society of Victoria and a £1000 cheque from the Victorian Government. Concerts were performed to honour the young man's bravery and to raise money for those who lost family in the LOCH ARD disaster. Of the 54 crew members and passengers on board, only two survived: the apprentice, Tom Pearce and the young woman passenger, Eva Carmichael, who lost all of her family in the tragedy. Ten days after the LOCH ARD tragedy, salvage rights to the wreck were sold at auction for £2,120. Cargo valued at £3,000 was salvaged and placed on the beach, but most washed back into the sea when another storm developed. The wreck of LOCH ARD still lies at the base of Mutton Bird Island. Much of the cargo has now been salvaged and some was washed up into what is now known as LOCH ARD Gorge. Cargo and artefacts have also been illegally salvaged over many years before protective legislation was introduced. One of the most unlikely pieces of cargo to have survived the shipwreck was a Minton porcelain peacock - one of only nine in the world. The peacock was destined for the Melbourne International Exhibition in 1880. It had been well packed, which gave it adequate protection during the violent storm. Today, the Minton peacock can be seen at the Flagstaff Hill Maritime Museum in Warrnambool. From Australia's most dramatic shipwreck it has now become Australia's most valuable shipwreck artefact and is one of very few 'objects' on the Victorian State Heritage Register. Flagstaff Hill’s collection of artefacts from LOCH ARD is significant for being one of the largest collections of artefacts from this shipwreck in Victoria. It is significant for its association with the shipwreck, which is on the Victorian Heritage Register (VHR S417). The collection is significant because of the relationship between the objects, as together they have a high potential to interpret the story of the LOCH ARD. The LOCH ARD collection is archaeologically significant as the remains of a large international passenger and cargo ship. The LOCH ARD collection is historically significant for representing aspects of Victoria’s shipping history and its potential to interpret sub-theme 1.5 of Victoria’s Framework of Historical Themes (living with natural processes). The collection is also historically significant for its association with the LOCH ARD, which was one of the worst and best known shipwrecks in Victoria’s history. Calendar printed by Terang Express for December 1923 with picture of Loch Ard Gorge and survivors of wreck and also story of the episode. Has some large tears in it.flagstaff hill, warrnambool, shipwrecked coast, flagstaff hill maritime museum, maritime museum, shipwreck coast, flagstaff hill maritime village, great ocean road, loch line, loch ard, captain gibbs, eva carmichael, tom pearce, glenample station, mutton bird island, loch ard gorge, calendar, terang express -
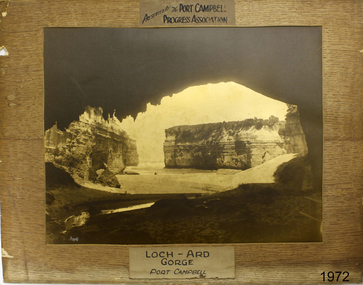 Flagstaff Hill Maritime Museum and Village
Photograph - Coastal Scene, Foyle Photographic Studio, Loch Ard Gorge Port Campbell, 1889-1919
The photograph shows the popular tourist attraction, Loch Ard Gorge, which is located along the Great Ocean Road in Victoria, near Port Campbell. The gorge is named after the famous sailing ship, the LOCH ARD, that was wrecked there in 1878. Only two of the 54 passengers and crew survived. FOYLE “Foyle” written on the photograph is the name of Foyle’s Photographic studio. At the time of the photograph, the studio was owned by both Charles and Lilian Foyle (sometimes known as Lillian or Lily), either of whom could have taken this photograph. They also worked together at a later date on the photographs, sketches and paintings of the famous and historical Pioneers’ Honour Board, which is currently on view in the Warrnambool Library. Foyles Photography was the studio of James Charles Foyle. He owned “Foyle’s Photo Card Studios” in Liebig St, Warrnambool, which operated between 1889 – 1919. A letter to the editor (by Mr Edward Vidler) in the Melbourne Argus, 3rd August 1907, mentions that in that year Warrnambool would celebrate the 60th anniversary of its proclamation as a town, and that talented local artist Miss Lily Foyle would paint 200 portraits in watercolour of the pioneers who settled in the district prior to 1860. The Pioneer Honour Board can still be seen on display in the Warrnambool Library. In the Warrnambool Standard, Dec. 1917, “Mr Foyle’s studio was awarded the contract to decorate rail cars on newly opened Trans-Continental railway, assisted by his sister, Miss Findlay.” HISTORY OF THE LOCH ARD The LOCH ARD belonged to the famous Loch Line which sailed many ships from England to Australia. Built-in Glasgow by Barclay, Curdle and Co. in 1873, the LOCH ARD was a three-masted square-rigged iron sailing ship. The ship measured 262ft 7" (79.87m) in length, 38ft (11.58m) in width, 23ft (7m) in depth and had a gross tonnage of 1693 tons. The LOCH ARD's main mast measured a massive 150ft (45.7m) in height. LOCH ARD made three trips to Australia and one trip to Calcutta before its final voyage. LOCH ARD left England on March 2, 1878, under the command of Captain Gibbs, a newly married, 29-year-old. She was bound for Melbourne with a crew of 37, plus 17 passengers and a load of cargo. The general cargo reflected the affluence of Melbourne at the time. Onboard were straw hats, umbrella, perfumes, clay pipes, pianos, clocks, confectionary, linen and candles, as well as a heavier load of railway irons, cement, lead and copper. There were items included that intended for display in the Melbourne International Exhibition in 1880. The voyage to Port Phillip was long but uneventful. At 3 am on June 1, 1878, Captain Gibbs was expecting to see land and the passengers were becoming excited as they prepared to view their new homeland in the early morning. But LOCH ARD was running into a fog which greatly reduced visibility. Captain Gibbs was becoming anxious as there was no sign of land or the Cape Otway lighthouse. At 4 am the fog lifted. A man aloft announced that he could see breakers. The sheer cliffs of Victoria's west coast came into view, and Captain Gibbs realised that the ship was much closer to them than expected. He ordered as much sail to be set as time would permit and then attempted to steer the vessel out to sea. On coming head-on into the wind, the ship lost momentum, the sails fell limp and LOCH ARD's bow swung back. Gibbs then ordered the anchors to be released in an attempt to hold its position. The anchors sank some 50 fathoms - but did not hold. By this time LOCH ARD was among the breakers and the tall cliffs of Mutton Bird Island rose behind the ship. Just half a mile from the coast, the ship's bow was suddenly pulled around by the anchor. The captain tried to tack out to sea, but the ship struck a reef at the base of Mutton Bird Island, near Port Campbell. Waves broke over the ship and the top deck was loosened from the hull. The masts and rigging came crashing down knocking passengers and crew overboard. When a lifeboat was finally launched, it crashed into the side of LOCH ARD and capsized. Tom Pearce, who had launched the boat, managed to cling to its overturned hull and shelter beneath it. He drifted out to sea and then on the flood tide came into what is now known as LOCH ARD Gorge. He swam to shore, bruised and dazed, and found a cave in which to shelter. Some of the crew stayed below deck to shelter from the falling rigging but drowned when the ship slipped off the reef into deeper water. Eva Carmichael had raced onto the deck to find out what was happening only to be confronted by towering cliffs looming above the stricken ship. In all the chaos, Captain Gibbs grabbed Eva and said, "If you are saved Eva, let my dear wife know that I died like a sailor". That was the last Eva Carmichael saw of the captain. She was swept off the ship by a huge wave. Eva saw Tom Pearce on a small rocky beach and yelled to attract his attention. He dived in and swam to the exhausted woman and dragged her to shore. He took her to the cave and broke and opened the case of brandy, which had washed up on the beach. He opened a bottle to revive the unconscious woman. A few hours later Tom scaled a cliff in search of help. He followed hoof prints and came by chance upon two men from nearby Glenample Station three and a half miles away. In a state of exhaustion, he told the men of the tragedy. Tom returned to the gorge while the two men rode back to the station to get help. By the time they reached LOCH ARD Gorge, it was cold and dark. The two shipwreck survivors were taken to Glenample Station to recover. Eva stayed at the station for six weeks before returning to Ireland, this time by steamship. In Melbourne, Tom Pearce received a hero's welcome. He was presented with the first gold medal of the Royal Humane Society of Victoria and a £1000 cheque from the Victorian Government. Concerts were performed to honour the young man's bravery and to raise money for those who lost family in the LOCH ARD disaster. Of the 54 crew members and passengers on board, only two survived: the apprentice, Tom Pearce and the young woman passenger, Eva Carmichael, who lost all of her family in the tragedy. Ten days after the LOCH ARD tragedy, salvage rights to the wreck were sold at auction for £2,120. Cargo valued at £3,000 was salvaged and placed on the beach, but most washed back into the sea when another storm developed. The wreck of LOCH ARD still lies at the base of Mutton Bird Island. Much of the cargo has now been salvaged, and some of it was washed up into what is now known as LOCH ARD Gorge. Cargo and artefacts have also been illegally salvaged over many years before protective legislation was introduced. One of the most unlikely pieces of cargo to have survived the shipwreck was a Minton porcelain peacock - one of only nine in the world. The peacock was destined for the Melbourne International Exhibition in 1880. It had been well packed, which gave it adequate protection during the violent storm. Today, the Minton peacock can be seen at the Flagstaff Hill Maritime Museum in Warrnambool. From Australia's most dramatic shipwreck it has now become Australia's most valuable shipwreck artefact and is one of very few 'objects' on the Victorian State Heritage Register.Flagstaff Hill’s collection of artefacts from LOCH ARD is significant for being one of the largest collections of artefacts from this shipwreck in Victoria. It is significant for its association with the shipwreck, which is on the Victorian Heritage Register (VHR S417). The collection is significant because of the relationship between the objects, as together they have a high potential to interpret the story of the LOCH ARD. The LOCH ARD collection is archaeologically significant as the remains of a large international passenger and cargo ship. The LOCH ARD collection is historically significant for representing aspects of Victoria’s shipping history and its potential to interpret sub-theme 1.5 of Victoria’s Framework of Historical Themes (living with natural processes). The collection is also historically significant for its association with the LOCH ARD, which was one of the worst and best-known shipwrecks in Victoria’s history. Foyle's photographs date from the late 19th century to the early 20th century, representing a time of growth in the Warrnambool district and a time when the still relatively new technology of photography was more available to the community.Photograph of Loch Ard Gorge. This sepia coloured rectangular photograph is mounted on a brown cardboard backing that has a wood grain pattern. The photograph has an inscription above it, below it, and in the bottom left corner. It was made for the purpose of a presentation by the Port Campbell Progress Association. Printed above the photograph "PRESENTED BY THE PORT CAMPBELL / PROGRESS ASSOCIATION". Printed below the photograph "LOCH ARD GORGE / PORT CAMPBELL". Hand written on bottom left corner "Foyle". flagstaff hill, warrnambool, shipwrecked coast, flagstaff hill maritime museum, maritime museum, shipwreck coast, flagstaff hill maritime village, great ocean road, loch line, loch ard, captain gibbs, eva carmichael, tom pearce, glenample station, mutton bird island, loch ard gorge, photograph, port campbell, port campbell progress association, foyle photograph, foyle photographic studio warrnambool, warrnambool photo studio -
 Rye RSL Sub Branch
Newsletter, Commando Association, MV Krait, After 1966
One of the most important and successful attacks on merchant ships inside an enemy harbour during world war two by English and Australian Commandoes or Special Unit Forces, launched from Australia. Nil deaths by the Commandoes were recorded, and 40000 tons of enemy ships were damaged or destroyed. To enlighten RSL Members and the public, the history of the MV Krait and the importance of our Military History. The newsletter has a typed story and pictures of members of M and Z Special Force. Krait took a small force on one of its missions and they sank about 38,000 tons of Japanese shipping in Singapore Harbour in 1943. The newsletters front page has pink large writng on a white background. The word Krait and a photo of it on the Brisbane River. The newsletter is 4 pages with a photo of the men on board on page 2. Page 3 has another photo of the Krait. It is on loan from Mr.Jim Muir, world war two, pamphlet, short story, mv krait, motor vessel, singapore, singapore harbour, 1943 -
 Flagstaff Hill Maritime Museum and Village
Spoon, circa 1878
This tea spoon is from the wreck of the LOCH ARD, a Loch Line ship of 1,693 tons which sailed from Gravesend, London, on 2 March 1878 with 17 passengers and a crew of 36 under Captain George Gibbs. “The intention was to discharge cargo in Melbourne, before returning to London via the Horn with wool and wheat”. Instead, on 1 June 1878, after 90 days at sea, she struck the sandstone cliffs of Mutton Bird Island on the south west coast of Victoria, and sank with the loss of 52 lives and all her cargo. The manifest of the LOCH ARD listed an array of manufactured goods and bulk metals being exported to the Colony of Victoria, with a declared value of £53,700. (202 bills of lading show an actual invoice value of £68, 456, with insurance underwriting to £30,000 of all cargo). Included in the manifest is the item of “Tin hardware & cutlery £7,530”. This teaspoon is one of 482 similar items of electro-plated cutlery from the LOCH ARD site, comprising spoons and forks of various sizes but all sharing the same general shape or design and metallic composition. 49 of these pieces display a legible makers’ mark — the initials “W” and “P” placed within a raised diamond outline, which is in turn contained within a sunken crown shape — identifying the manufacturer as William Page & Co of Birmingham. An electroplater’s makers’ marks, unlike sterling silver hallmarks, are not consistent identifiers of quality or date and place of manufacture. A similar line of five impressions was usually made to impress the consumer with an implication of industry standards, but what each one actually signified was not regulated and so they varied according to the whim of the individual foundry. In this case, the maker’s marks are often obscured by sedimentary accretion or removed by corrosion after a century of submersion in the ocean. However sufficient detail has survived to indicate that these samples of electro-plated cutlery probably originated from the same consignment in the LOCH ARD’s cargo. The following descriptions of maker’s marks are drawn from 255 tea spoons, 125 dessert spoons, and 99 table forks. These marks are clearly visible in 66 instances, while the same sequence of general outlines, or depression shapes, is discernible in another 166 examples. 1. A recessed Crown containing a raised Diamond outline and the initials “W” and “P” (the recognised trademark of William Page & Co) 2. An impressed Ellipse containing a raised, pivoted, Triangle in its lower part and bearing a Resurrection Cross on its upper section (a possible dissenting church symbol reflecting religious affiliation); OR a rounded Square impression containing a raised, ‘lazy’, letter “B” (possibly mimicking sterling silver hallmark signifying city of manufacture i.e. Birmingham) 3. An impressed rounded Square filled with a raised Maltese Cross (the base metal composite of nickel silver was also known as ‘German silver’ after its Berlin inventors in 1823) 4. A recessed Circle containing a Crab or Scarab Beetle image; OR a recessed Circle containing a rotated ‘fleur de lys’ or ‘fasces’ design 5. A depressed Diamond shape enclosing a large raised letter “R” and a small raised letter “D” (mimicking the U.K. Patent Office stamp which abbreviated the term ‘registered’ to “RD”, but also included date and class of patent) Suggested trade names for William Page & Co’s particular blend of brass plating are ‘roman silver’ or ‘silverite’. This copper alloy polishes to a lustrous gold when new, discolouring to a murky grey with greenish hue when neglected. HISTORY OF THE LOCH ARD The LOCH ARD belonged to the famous Loch Line which sailed many ships from England to Australia. Built in Glasgow by Barclay, Curdle and Co. in 1873, the LOCH ARD was a three-masted square rigged iron sailing ship. The ship measured 262ft 7" (79.87m) in length, 38ft (11.58m) in width, 23ft (7m) in depth and had a gross tonnage of 1693 tons. The LOCH ARD's main mast measured a massive 150ft (45.7m) in height. LOCH ARD made three trips to Australia and one trip to Calcutta before its final voyage. LOCH ARD left England on March 2, 1878, under the command of Captain Gibbs, a newly married, 29 year old. She was bound for Melbourne with a crew of 37, plus 17 passengers and a load of cargo. The general cargo reflected the affluence of Melbourne at the time. On board were straw hats, umbrella, perfumes, clay pipes, pianos, clocks, confectionary, linen and candles, as well as a heavier load of railway irons, cement, lead and copper. There were items included that intended for display in the Melbourne International Exhibition in 1880. The voyage to Port Phillip was long but uneventful. At 3am on June 1, 1878, Captain Gibbs was expecting to see land and the passengers were becoming excited as they prepared to view their new homeland in the early morning. But LOCH ARD was running into a fog which greatly reduced visibility. Captain Gibbs was becoming anxious as there was no sign of land or the Cape Otway lighthouse. At 4am the fog lifted. A man aloft announced that he could see breakers. The sheer cliffs of Victoria's west coast came into view, and Captain Gibbs realised that the ship was much closer to them than expected. He ordered as much sail to be set as time would permit and then attempted to steer the vessel out to sea. On coming head on into the wind, the ship lost momentum, the sails fell limp and LOCH ARD's bow swung back. Gibbs then ordered the anchors to be released in an attempt to hold its position. The anchors sank some 50 fathoms - but did not hold. By this time LOCH ARD was among the breakers and the tall cliffs of Mutton Bird Island rose behind the ship. Just half a mile from the coast, the ship's bow was suddenly pulled around by the anchor. The captain tried to tack out to sea, but the ship struck a reef at the base of Mutton Bird Island, near Port Campbell. Waves broke over the ship and the top deck was loosened from the hull. The masts and rigging came crashing down knocking passengers and crew overboard. When a lifeboat was finally launched, it crashed into the side of LOCH ARD and capsized. Tom Pearce, who had launched the boat, managed to cling to its overturned hull and shelter beneath it. He drifted out to sea and then on the flood tide came into what is now known as LOCH ARD Gorge. He swam to shore, bruised and dazed, and found a cave in which to shelter. Some of the crew stayed below deck to shelter from the falling rigging but drowned when the ship slipped off the reef into deeper water. Eva Carmichael had raced onto deck to find out what was happening only to be confronted by towering cliffs looming above the stricken ship. In all the chaos, Captain Gibbs grabbed Eva and said, "If you are saved Eva, let my dear wife know that I died like a sailor". That was the last Eva Carmichael saw of the captain. She was swept off the ship by a huge wave. Eva saw Tom Pearce on a small rocky beach and yelled to attract his attention. He dived in and swam to the exhausted woman and dragged her to shore. He took her to the cave and broke open case of brandy which had washed up on the beach. He opened a bottle to revive the unconscious woman. A few hours later Tom scaled a cliff in search of help. He followed hoof prints and came by chance upon two men from nearby Glenample Station three and a half miles away. In a state of exhaustion, he told the men of the tragedy. Tom returned to the gorge while the two men rode back to the station to get help. By the time they reached LOCH ARD Gorge, it was cold and dark. The two shipwreck survivors were taken to Glenample Station to recover. Eva stayed at the station for six weeks before returning to Ireland, this time by steamship. In Melbourne, Tom Pearce received a hero's welcome. He was presented with the first gold medal of the Royal Humane Society of Victoria and a £1000 cheque from the Victorian Government. Concerts were performed to honour the young man's bravery and to raise money for those who lost family in the LOCH ARD disaster. Of the 54 crew members and passengers on board, only two survived: the apprentice, Tom Pearce and the young woman passenger, Eva Carmichael, who lost all of her family in the tragedy. Ten days after the LOCH ARD tragedy, salvage rights to the wreck were sold at auction for £2,120. Cargo valued at £3,000 was salvaged and placed on the beach, but most washed back into the sea when another storm developed. The wreck of LOCH ARD still lies at the base of Mutton Bird Island. Much of the cargo has now been salvaged and some was washed up into what is now known as LOCH ARD Gorge. Cargo and artefacts have also been illegally salvaged over many years before protective legislation was introduced. One of the most unlikely pieces of cargo to have survived the shipwreck was a Minton porcelain peacock - one of only seven in the world. The peacock was destined for the Melbourne International Exhibition in 1880. It had been well packed, which gave it adequate protection during the violent storm. Today, the Minton peacock can be seen at the Flagstaff Hill Maritime Museum in Warrnambool. From Australia's most dramatic shipwreck it has now become Australia's most valuable shipwreck artefact and is one of very few 'objects' on the Victorian State Heritage Register. The LOCH ARD shipwreck is of State significance – Victorian Heritage Register S 417. Flagstaff Hill’s collection of artefacts from LOCH ARD is significant for being one of the largest collections of artefacts from this shipwreck in Victoria. It is significant for its association with the shipwreck, which is on the Victorian Heritage Register (VHR S417). The collection is significant because of the relationship between the objects, as together they have a high potential to interpret the story of the LOCH ARD. The LOCH ARD collection is archaeologically significant as the remains of a large international passenger and cargo ship. The LOCH ARD collection is historically significant for representing aspects of Victoria’s shipping history and its potential to interpret sub-theme 1.5 of Victoria’s Framework of Historical Themes (living with natural processes). The collection is also historically significant for its association with the LOCH ARD, which was one of the worst and best known shipwrecks in Victoria’s history. Unrestored tea spoon from the wreck of the LOCH ARD. The spoon design has a flattened fiddle-back handle, with a thin stem or shank, flared collar, and elongated bowl. The spoons metallic composition is a thin layer of brass alloy which has partially corroded back to a nickel-silver base metal. Approximately 30%of original electroplating remains. Small amount of concretion on stem.flagstaff hill, warrnambool, shipwrecked coast, flagstaff hill maritime museum, maritime museum, shipwreck coast, flagstaff hill maritime village, great ocean road, loch line, loch ard, captain gibbs, eva carmichael, tom pearce, glenample station, mutton bird island, loch ard gorge, electroplated cutlery, loch ard shipwreck, nickel silver, william page & co, birmingham, brass plating, makers marks