Showing 360 items matching "bank hotel"
-
 Numurkah & District Historical Society
Various items from Mitchell family (see list)
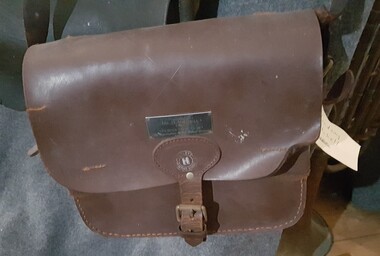
This ammunition bag was used by Harry Mitchell (son of Lindsay Mitchell) at the Bendigo Rifle Club in 1959, the bag was designed to hold 303 riffle bullets used in target shooting or could hold 7 cartridges for a shotgun. The Gladstone bag was very popular in the 1940/50 era, it fitted on the handlebars of a bicycle and it was used by footballers and sportsmen. A couple bottles of beer would fit comfortably in the bag and was.used to take beer home after the hotels closed at 6pm. These two articles were donated by Lindsay Mitchell to the Numurkah Historical Society. The Sunbeam Mixmaster belonged by Marjory Welch, Nana of Margaret Mitchell and would have been used in late 1930 and during 1940's. It was painted and used by Linda Mitchell, (great great grand daughter) when at universitv in 1987 White Sunbeam Mixmaster was purchased by Margaret Mitchell 1965. lt was her first mixmaster after she was married in 1964 The bread bins. The green and white belonged to Mary Mitchell (Lindsay Mitchell's Mother) The colourful bread bin belonged to Lorna Welch (Margaret Mitchell's Mother) 1 x Ammunition bag, (1950's), 1 x Gladstone bag (1950's), 2 x tin bread bins, 1 x White Coloured Sunbeam Mixmaster (1965) , 1 x Cream-coloured Sunbeam Mixmaster (1940's), 1 x Red Fly-spray can (1950's)mitchell family, gladstone bag, mixmaster, school bag, bread bin, kitchen, ammunition bag, sunbeam, flysprayer -
 Numurkah & District Historical Society
Slides / Photos / Brush/comb sets / Telescopic view photo set / Tie pin
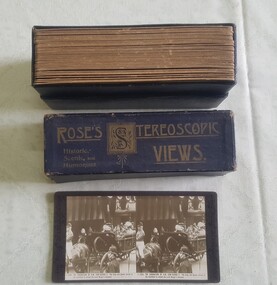
All of these items were donated by Jock Adams (He was on the Ulupna Island Committee and hence some of the donated photosPhotos - Morgan's Beach, Coonanga Homestead, Barmah Hotel, Ulupna Island Slides - Moira Forest shrubs etc 2 x Brush comb sets Sword/Dagger Tie Pin King George V Coronation Stereo Telescopic View photo set (1911)jock adams, tie-pin, photos, brush-comb set, telescopic view photos, slides -
 Numurkah & District Historical Society
Double-sided Kerosene Lamp
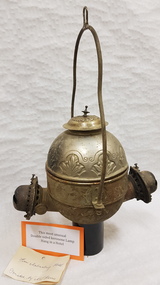
Lmap was hung in the old Malmsbury HotelSpherical shaped lamp made of tin, decorative features on this part, which holds the kerosene. Protruding from either side are two kerosene burners (no glass with this lamp). Lamp has a large handle lamp, lantern, kerosene -
 Ballarat Tramway Museum
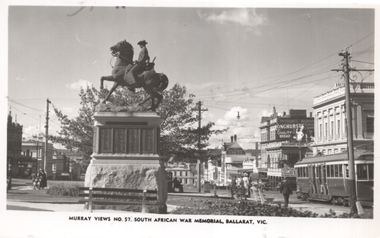
Postcard, Murray Views, "Murray Views No. 57 South African War Memorial Ballarat Vic", 1948
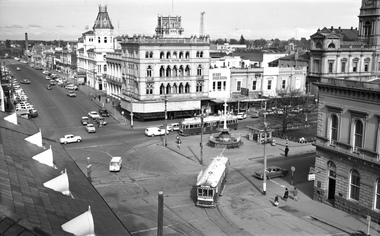
Photo features South African or Boer War Memorial in the Sturt Street central median near Lydiard St with SEC No. 35 (former MMTB and Hawthorn Tramways Trust tramcar). An advert for Longhurst Quality Bread is adjacent to the Mechanics Institute building. Also in the view are the Commonwealth Bank, the Ballarat Gas Co and Beacham's Unicorn Hotel.Yields information about the South African War Memorial in Sturt St.Postcard black and white, plain back, with a handwritten note on rear.In ink on rear "Bogie No. 35 (1948 shot)" tramways, trams, sturt st, boer war memorial, tram 35 -
 Ballarat Tramway Museum
Slide - 27 mm sq slide/s, Lilian Butler, bus stop sign at the corner of Sturt and Lydiard St, late 1971 or early 1972
The sign dates from the time of the closure of the SEC Ballarat system.Yields information about the replacement tram stops at Sturt and Lydiard Sts and the information boards provided at the time.Hanimex white cardboard mount colour slide of the bus stop sign at the corner of Sturt and Lydiard St for the Lydiard St, Victoria St, Mt Pleasant and Buninyong services, along with an adjacent timetable board. Has the Commonwealth Bank, the Mechanics Institute and the Unicorn hotel in the background. A car is parked in the bus stop. Photo from the collection of Lilian Butler. ballarat, tramways, trams, sturt st, bus stops, tram replacement, closure, victoria st, mt pleasant, lydiard st -
 Ballarat Tramway Museum
Negative - Set of 4, Campbell Duncan, 2/07/1971 12:00:00 AM
Set of 4 photographs taken on 28/2/1971 by Campbell Duncan of trams on the Lydiard St North line between Sturt St and the Railway Station. .1 - No. 40 just after entering Lydiard St Nth, with Craigs Hotel, National Mutual Building and the ANZ bank in the background. .2 No. 36 entering the double track near the railway station with No. 40 waiting. Has buildings on the east side of the street, including JJ Coller & Co and Reid's Coffee Palace in the background. .3 - ditto .4 - Nos 36 and 40 crossing on the double track in Lydiard St North,trams, tramways, lydiard st north, tram 36 tram 40 -
 Ballarat Tramway Museum
Negative - Set of 3, Campbell Duncan, 10/08/1971 12:00:00 AM
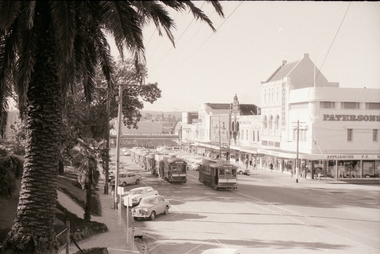
... towards Lydiard St with the Coors Private Hotel, the Commonwealth... towards Lydiard St with the Coors Private Hotel, the Commonwealth ...Yields information about tram operations and the street views in the area of the City Loop, Sturt St.Set of 3 photographs taken on 10/8/1971 by Campbell Duncan of trams in the City Loop area of Sturt St. .1 - With 5 trams, headed by No. 40, in the loop, No 26 passes the loop. In the background are the various shops and stores on the south side of Sturt St, the including Patersons store. .2 - No. 26 climbing towards Lydiard St with the Coors Private Hotel, the Commonwealth Bank and the National Mutual building in the view. The tram has the destination of Gardens via Sturt St West, and a Briquettes roof advertisement. .3 - No. 27 - passes the assembled trams in the loop with the Dickins and Thomas buildings in the background. The tram has a Twin Lakes sign.trams, tramways, sturt st, city loop, tram 26 tram 40 tram 27 -
 Ballarat Tramway Museum
Photograph - Digital image Set of 10, George Coop, 1968 - 1970
... to Lydiard St, with the Cook's Private Hotel, the Commonwealth Bank... to Lydiard St, with the Cook's Private Hotel, the Commonwealth Bank ...Yields information about the tram operations and the landscape views of the Sturt St median strip.Ten (10) Digital images taken by George Coop during the period 1968 - 1970, of SEC trams in Sturt St, between the City and Pleasant Streets. .1 - Tram 26 climbing the Sturt St hill to Lydiard St, with the Cook's Private Hotel, the Commonwealth Bank and the National Mutual Life building in the background. Photo taken from the Titanic Bandstand. .2 - Tram 40 Sturt St, enough to Lydiard St North just before Raglan St. Has a lady passenger by the tram stop. .3 - Tram 30 - Sturt St north side, near Armstrong St, - has a blue framing line around the photograph. .4 - Tram 39, Sturt St, near Doveton St, shows the rotunda in the median strip. .5 - Tram 18, with median step in view. .6 - Tram 31, with two Johnnie Walker whiskey roof adverts, outside the National Mutual Life building with the Alan Bros Jewellers and Golden Star Chinese Cafe in the view. .7 - Tram 31, Sturt St south side with Town Hall and the Golden City Hotel in the view. Tram has destination of Gardens via Drummond North. .8 - Tram 41 - ditto - going to Sebastopol. .9 - Tram 13, south side, Gardens via Sturt West, about , near Ripon St, with the Ampol service station in the background and about to pick up a lady passenger .10 - Tram 17, near Doveton St. Has a Twin Lakes sign and a Wilkinson Sword Razor Bladese roof advert. trams, tramways, sturt st, raglan st, passengers, doveton st, tram 26, tram 40, tram 30, tram 39, tram 18, tram 31, tram 41, tram 13, tram 17 -
 Ballarat Tramway Museum
Slide - 35mm slide/s, Keith Caldwell, 8/03/1960 12:00:00 AM
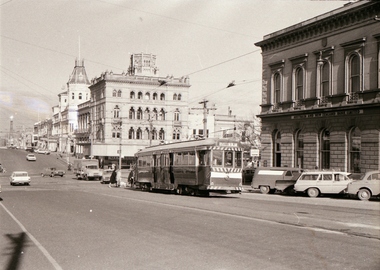
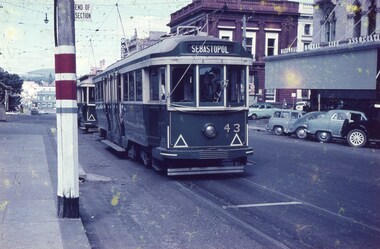
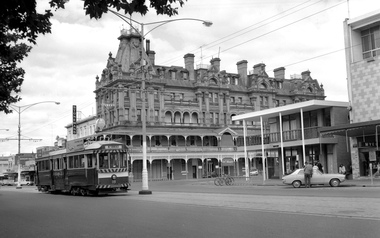
... are the Bucks Head Hotel, the Commonwealth Bank and the national Mutual.... In the view are the Bucks Head Hotel, the Commonwealth Bank ...Yields information about the city tram stop and the surround buildings.Agfa colour slide, white cardboard mount, photo by Keith Caldwell on 8/3/1960 of: Tram 43 at the city tram stop, Sturt and Lydiard St, with the destination of Sebastopol. Has trams parked in the City Loop, a single trucker behind No. 43. In the view are the Bucks Head Hotel, the Commonwealth Bank and the national Mutual Life buildings. Slide is blotchy and has mould marks.Stamped on bottom of slide "8 Mar 60"., In ink "BxAT"tramways, trams, sturt st, lydiard st, tram 43 -
 Ballarat Tramway Museum
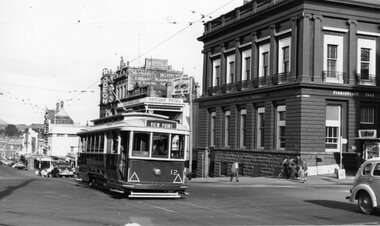
Photograph - Digital image, John Ward, 20/08/1971 12:00:00 AM
Yields information about the Sturt St and Lydiard St intersection just before closure and tram operations.Digital image of bogie tram 35 turning from Sturt St into Lydiard St North and tram 39 at the south side of the City tram stop at the corner. Has Craig's Hotel, the National Mutual building, Berry Anderson, Gemmola's Pharmacy, the Town Hall and the ANZ bank in the view. An Inspector can be seen near the tram stop. Photo taken from the Post Office tower. Photo by John Ward 20 August 1971. Slide title "04709 200871 7173-G SECV bogie trams 39 & 35 Sturt St to Lydiard St North Ballarat Vic"trams, tramways, sturt st, lydiard st, post office, city terminus, tram 39, tram 35 -
 Ballarat Tramway Museum
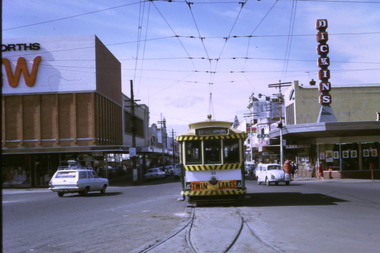
Photograph - Digital image, John Ward, 1/01/1972 12:00:00 AM
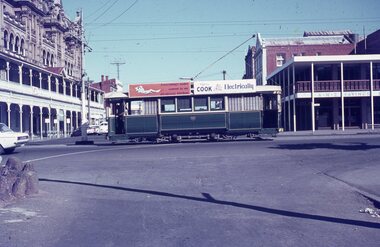
... Mall at Williamson St with the Shamrock Hotel and the ANZ Bank... Hotel and the ANZ Bank in the background. Has signs ...Digital image of the Bendigo 18 to North Bendigo in Pall Mall at Williamson St with the Shamrock Hotel and the ANZ Bank in the background. Has signs for Stonemasons and Myers in the photo. Photo by John Ward 01-01-1972 Slide title "04759 010172 7208-H SECV bogie tram 18 Pall Mall at Williamson St Bendigo Vic"trams, tramways, bendigo, pall mall, north bendigo, tram 18 -
 Ballarat Tramway Museum
Slide - 35mm slide/s - set of 32, Noel Simons, 25/02/1971 12:00:00 AM
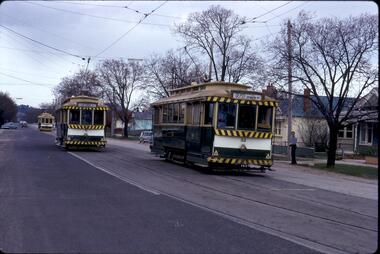
Set of 31 transparencies taken on 25/2/1972 on Kodak mounts. 1201.1 - Bendigo No. 26 in Bond St. just after leaving Long Gully en route for Quarry Hill. Has Norris Supermarket in background. Has two SEC roof ads. 1201.2 - No. 26 climbing View St. from Charing Cross en route to Eaglehawk. Has ANZ bank and AMOCO service station in background. 1201.3 - as for 1201.3, but after tram has passed photographer. Has buildings west of Mackenzie St. in photograph. 1201.4 - Tram stop and centre of the road pole with two "CARS STOP BY REQUEST" signs mounted on pole at the corner of Mackenzie St. 1201.5 - same position as for 1201.3, but with No. 5 descending the street. 1201.6 - same position as for 1201.2, but with No. 5 descending the street. Photo taken after tram has passed photographer. 1201.7 - No. 7 in Nolan St. from across the park at Lake Weeroona. 1201.8 - No. 7 entering McCrae St from Nolan St. - distant view. Note "TRAM "sign on left hand side under tree and overhead in McCrae St. from former track that once was in this street. 1201.9 - No. 7 in High St. with Cathedral in background. Tram en route to North Bendigo. Note scaffolding around Cathedral main spire area. 1201.10 - No. 7 crossing Bendigo Creek bridge in High St. near Golden Square. Has a Caltex Service station in the background. 1201.11 - No. 7 at Golden Square terminus with Sunburst Fruit Juices and a Peters Ice cream delivery vans alongside. 1201.12 - as for 1201.11 but photo taken from behind tram, with the end of the rails in the photograph. 1201.13 - No. 7 and 21 in Pall Mall at Charing Cross with No. 5 in the background. Taken some distance away from the location. 1201.14 - No. 7 at Golden Square terminus, taken a short distance from the tram terminus. Shows Milk Bar on right hand side and the hotel on the left hand side. Taken from the south side of the roadway. 1201.15 - as from 1201.14 but taken from the north side of the roadway. 1201.16 - No 5 waiting at California Gully loop. Distant photo showing surrounds 1201.17 - No. 5 en route for Quarry Hill crossing No. 26 at California Gully. 1201.18 - No. 26 at Eaglehawk terminus with Eaglehawk Town Hall and Post Office in background. 1201.19 - No. 21 arriving at Charing Cross en route to North Bendigo. Has Alexandra Fountain in the background, ANZ bank RACV building, and other buildings on the north side of Pall Mall or Nolan St. 1201.20 - No. 26 en route for Quarry Hill at Charing Cross, with crew standing by front door. Has Colonial Mutual life building, Armstrong Tyre Service (Firestone) and a sign for Cohns Drinks in the background. 1201.21 - as for 1201.20 but with No. 5 en route to Eaglehawk now in photograph. 1201.22 - No. 26 at Quarry Hill terminus. 1201.23 - No. 26 at Quarry Hill terminus, view of front portion of tram only from a gate at the Bendigo cemetery. 1201.24 - Track at the end of the Quarry Hill line showing the point blades of the former "Y" terminus and the overhead for this. 1201.25 - No. 2 at the Quarry Hill terminus, looking along the former Trackwork. 1201.26 - as for 1201.25 1201.27 - number not used. 1201.28 - Golden Square terminus from some distance from the actual terminus, showing the Warning sign "TRAM" for motorists from the south. No. 7 at the terminus. 1201.29 - No. 7 passing through the Golden Square shopping centre. Numerous cars and pedestrians. Tram en route for North Bendigo. 1201.30 - No. 7 in High St. Golden Square, en route for North Bendigo. Photo taken after tram has passed photographer. 1201.31 - No. 7 in High St. just past Wattle St. with the Cathedral in the background. Tram has two SEC roof ads good side on photo, 'Everything's fine in my all electric kitchen' and 'Electrical cooking - clean, quick, economical'. 1201.32 - No. 7 in High St. nearing Wattle St. Has Cathedral in the background. Photo taken after tram has passed photographer.Information written on in black ink and date stamped on purple ink. 1201.1 - "No. 26 in Bond St just after leaving Long Gully" 1201.2 - "No. 26 climbing View St. from Charing Cross" 1201.3 - "No. 26 ascending View St. from Charing Cross (At Mackenzie St.)" 1201.4 - "View St. & Mackenzie St." 1201.5 - "No. 5 in View St. near Mackenzie St." 1201.6 - "No. 5 in View St. nearing Charing Cross." 1201.7 - "No. 7 in Nolan St. seen from Lake Weeroona Park." 1201.8 - "No. 7 entering McRae St. from Nolan St. Note "TRAM" warning sign on left. 1201.9 - "No. 7 in High St. passing Short St." 1201.10 - "No. 7 crossing Bendigo Creek bridge in High St. near Golden Square." 1201.11 - "No. 7 at Golden Square terminus" 1201.12 - "No. 7 at Golden Square terminus" 1201.13 - "No 7, 21 and 5 at Charing Cross" 1201.14 - "No. 7 at Golden Square terminus" 1201.15 - "No. 7 at Golden Square terminus" 1201.16 - "No 5 waiting at California Gully loop." 1201.17 - "Nos. 5 and 26 crossing at California Gully loop" 1201.18 - "No. 26 at Eaglehawk terminus" 1201.19 - "No. 21 arriving at Charing Cross from Golden Square" 1201.20 - "No. 26 at Charing Cross" 1201.21 - "Nos. 5 and 26 at Charing Cross." 1201.22 - "No. 26 at Quarry Hill terminus" 1201.23 - "No. 26 at Quarry Hill terminus seen through the gates of the Bendigo Cemetery." 1201.24 - "Quarry Hill terminus showing remains for former double track layout abandoned before 1964." 1201.25 - "No. 2 at Quarry Hill terminus" 1201.26 - "No. 2 at Quarry Hill terminus" 1201.28 - "The Southern approach to Golden Square with No. 7 standing at the terminus, "TRAM" warning sign on the left. 1201.29 - "No. 7 passing through Golden Square Shopping Centre" 1201.30 - "No. 7 in High St. Golden Square" 1201.31 - "No. 7 in High St. passing Wattle St." 1201.32 - "No. 7 in High St. nearing Wattle St."tramways, trams, bendigo, bond st., view st., nolan st., high st., eaglehawk, california gully, charing cross, quarry hill, trackwork, tram 2, tram 5, tram 7, tram 21, tram 26 -
 Ballarat Tramway Museum
Slide - 35mm slide/s - set of 12, Noel Simons, 28 Feb. 1972
Set of 12 transparencies taken on 28/2/1972 on Kodak mounts. 1207.1 - Bendigo 26 and 2 at Charing Cross. 26 en route for Eaglehawk, 2 for Quarry Hill. Has the Colonial Mutual Life, Armstrong Tyre Service, and Australian Mutual Provident Society buildings and a Cohns Drinks ad. in the background. 1207.2 - as for 1207.1 but with Alexandra fountain in the foreground. 1207.3 - No. 2 in Mitchell St. heading for Quarry Hill. Photo taken after tram has passed photographer. Has buildings on either side of Mitchell St. in the background, including the Plaza Theatre. 1207.4 - No. 6 en route for Golden Square departing Charing Cross. Has the RACV and ANZ bank in the background. 1207.5 - No. 2 crossing Pall Mall to enter Charing Cross ex Quarry Hill, with the Fountain Plaza in the background. 1207.6 - No. 6 arriving Charing Cross ex Golden Square with No. 21 alongside. No. 21 has the SEC ad. 'Everything's fine in my all electric kitchen.' Has the City Family Hotel and the Fountain Plaza shopping centre in the background. 1207.7 - No. 5 at Charing Cross en route for Quarry Hill with No. 2 behind. No. 2 has two SEC roof ads, 'Everything s fine in my all electric kitchen' and 'Electricity best for cooking'. RACV building in the background. Tram crews are discussing the day in the front of the tram. 1207. 8 - No. 21 in High St. Bendigo with the Cathedral in the background. No. 21 has two SEC roof ads, 'Everything's fine in my all electric kitchen' and 'Electricity best for cooking'. 1207.9 - No. 6 in High St. Bendigo with the Cathedral in the background. 1207.10 - No. 6 in High St. Bendigo, just past Wattle St. Photo taken after the tram has passed the photographer from within the Highway Car Sales yard. 1207.11 - No. 26 bound for Eaglehawk at the end of the double track in View St., note signal contactors, tram stop and section signs mounted on pole. 1207.12 - No. 26 turning from View St. into Barnard St.Information written on in blue ink and date stamped on purple ink. 1207. 1- "Nos. 26 and 2 at Charing Cross." 1207.2 - "Nos. 26 and 2 at Charing Cross." 1207.3 - "No. 2 in Mitchell St. just after leaving Charing Cross." 1207.4 - "No.6 leaving Charing Cross for Golden Square." 1207.5 - "No. 2 arriving at Charing Cross from Quarry Hill." 1207.6 - "No. 21 waits at Charing Cross as No. 6 arrives from Golden Square." 1207.7 - "No 5 at Charing Cross with No. 2 lurking behind." 1207.8 - "No. 21 in High St. at cnr of Wattle St." 1207.9 - "No. 6 in High St. at cnr of Wattle St." 1207.10 - "No. 6 in High St. between Wattle and Vine Sts." 1207.11 - "No. 26 at end of double track in View St. near Barnard. St. 1207.12 - "No. 26 seen at dusk turning from View St. into Barnard St."tramways, trams, bendigo, charing cross, high st, view st., tram 2, tram 5, tram 6, tram 21, tram 26 -
 Ballarat Tramway Museum
Slide - 35mm slide/s, Travis Jeffrey, c1970
Plastic mount (black base, white cover) of a Bendigo tram, possibly No. 7 (Ballarat style doors and roof advertisements - no slides showing No. 6 with roof ads - see example of btm reg. item 2642), travelling in Pall Mall with the Shamrock Hotel, at Williamson St. Also the ANZ Savings bank in the background. Photo by Travis Jeffrey, c1970. Tram has two SEC roof advertisements.tramways, trams, bendigo, pall mall, tram 7? -
 Ballarat Tramway Museum
Photograph - Black & White Photograph/s and Black and White photograph/s - mounted, John Phillips, 1968
Yields information about the use of the trams in Bridge St - the major shopping strip at the time in Ballarat, shows the nature of the strip, the passengers (all ladies) and the motor cars in use at the time.Black and white print of No. 28, picking up four lady passengers at the junction in Bridge St, Stones Corner. Tram has the destination of Victoria St. Photo taken late 1960's, early 1970's. In the photo are the Bank of NSW buildings, Gear Chemist and Hotel on the Corner of Peel and Bridge Sts. Print and photo by John Phillips. Second copy added 13/4/2009 - see history .1 - Black and White photograph mounted on heavy cardboard backing, used for display purposes. On rear of second print - "Copyright John Phillips 1968 Bridge St" and in bottom right hand corner "William Scott" and address label.tramways, trams, bridge st, stones corner, passengers, tram 28 -
 Ballarat Tramway Museum
Photograph - Digital image Set of 8, 21/08/1971 12:00:00 AM
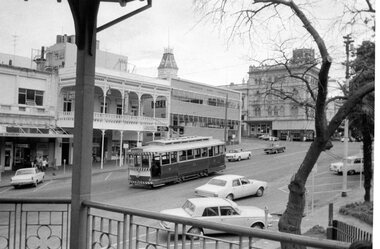
Yields information about the SEC Ballarat trams in the months before the closure of the SEC Tramway system. Yields information about the streetscape. Set of 8 Digital images, scanned from slides by Graeme Cleak, scanning by Peter Winspur 9/2011. .1 - Slide FS14 - No. 31 and 32 crossing at the High St Loop in Macarthur St. Tram 31 has the destination of Victoria St. Geoff Dean and his mini on the right hand side of the photograph. Another depot bound single trucker in the photograph, .2 - Slide FS3 - 31 outbound in Victoria St, with St Alipius church in the background. .3 - Slide FS5 - No. 31, and four other trams, some running special at Sturt and Lydiard Sts during the ARHS tour of that day. Has the ANZ Bank and SEC offices in the background. .4 - Slide FS9 - Nos. 39, 26 and two other trams in Lydiard St for the ARHS tour with Reid's Palace, Macleod & Co and J.J. Collier buildings in the background along with other buildings in Lydiard St North. Taken from the Provincial Hotel. .5 - Slide FS11 - No. 26 northbound showing Special running through the level crossing at Ballarat with the Kennedy Murray General Carrier in the background. Taken from the Provincial Hotel. .6 - Slide FS13 - No. 32 turning from Sturt St into Drummond Street North showing Depot via Drummond North, with the Southern Cross Hotel, Rimmington Bros and J.A, Malpass(?) buildings in the background. .7 - Slide FR35 - night shot of No. 17 (with Twin Lakes sign) and No. 32 in Nos 3 and 4 roads at the depot. .8 - Slide FR34 - night shot of the front of the depot - as above and No. 43 on "0" road. All photos 21-8-1971 trams, tramways, railway station, macarthur st, victoria st, sturt st, lydiard st north, level crossings, depot, tram 31, tram 32, tram 39, tram 26, tram 17, tram 43 -
 Ballarat Tramway Museum
Photograph - Digital Image, Black & White Photograph/s, Marc Dahlstrom, c1971
Digital image from a black and white print of tram 42 running a "Special" climbing the Sturt St hill up to Lydiard St, shows the steep hill. In the background is Cooks Private Hotel, Ballarat Travel Centre, Commonwealth Bank, National Mutual Building and Alan Bros. Photo by Marc Dahlstrom c1971. 5056.1 - physical print of the same image, with the Marc Dahlstrom stamp on the rear - added 8-5-2016.On rear is the Marc Dahlstrom stamp.trams, tramways, sturt st, lydiard st, tram 42 -
 Ballarat Tramway Museum
Photograph - Digital image, c1971
... are a Discount store, a Thrifty furniture van, Cooks Private Hotel... furniture van, Cooks Private Hotel, the Commonwealth Bank ...Yields information about Ballarat streetscape and its trams in the closing days of the SEC tramway system.Digital image from a black and white print of tram 31 climbing the hill in Sturt St up to Lydiard St, shows the steepness of the hill. Tram has two Johnnie Walker whisky roof advertisements, a Twin Lakes sign and is showing Special. In the background are a Discount store, a Thrifty furniture van, Cooks Private Hotel, the Commonwealth Bank and the National Mutual Building. Photo by Marc Dahlstrom c1971.On rear is the Marc Dahlstrom stamp.trams, tramways, sturt st, lydiard st, tram 31 -
 Ballarat Tramway Museum
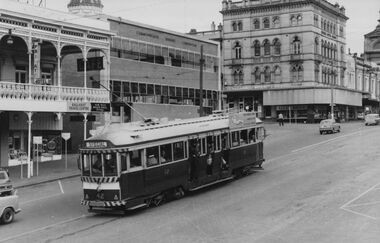
Photograph - Black & White Photograph/s, Doug Colquhoun, 24/03/1959 12:00:00 AM
Yields information about Ballarat's scrubber tram in early 1960's.Black and white print of Ballarat 32, crossing Lydiard St, in Sturt St with the destination of Gardens via Sturt St West. Has the Commonwealth Bank, Odeon theatre, Mechanics Institute, Ballarat Gas Co, Unicorn Hotel, and Colonial Mutual Life buildings in the background, along with a number of motor vehicles. Photo Doug Colquhoun 24/3/1959. Photo print courtesy of Port Dock Railway Museum, now the National Railway Museum. See worksheet 4311 for letter and details of prints sent to Bill Scott, 19/10/2001. Any photo credit to mention NRM Collection.On rear of copy "SEC Ballarat #32 / Sturt St @ Lydiard / 24/3/59 / Douglas A Colquhoun.trams, tramways, sturt st, lydiard st, tram 32 -
 Ballarat Tramway Museum
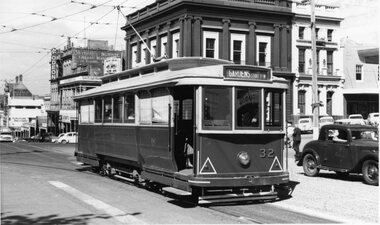
Photograph - Black & White Photograph/s, Doug Colquhoun, 23/03/1959 12:00:00 AM
Yields information about the Eaglehawk terminus, tram 18 and the tram liveries in 1963.Black and white print of Ballarat 12, crossing Lydiard St, in Sturt St with the destination of Gardens via View Point. Has the Commonwealth Bank, Odeon theatre, Mechanics Institute, Ballarat Gas Co, Unicorn Hotel, and Colonial Mutual Life buildings in the background. A group of children with bicycles are on the corner and the newspaper seller stand. Photo Doug Colquhoun 23/3/1959. Photo print courtesy of Port Dock Railway Museum, now the National Railway Museum. See worksheet 4311 for letter and details of prints sent to Bill Scott, 19/10/2001. Any photo credit to mention NRM Collection.On rear of copy In top left hand corner "72) No . 71 withdrawn" a yellow label with "24" crossed out over a sticker "Photo No. Reduced to 82% 145x80 see photocopy for masking" and "22" crossed out in the top right hand corner. In the lower left hand corner "SEC Ballarat #12 / Sturt St @ Lydiard / 23/3/59 / Douglas A Colquhoun"trams, tramways, sturt st, lydiard st, tram 12 -
 Ballarat Tramway Museum
Photograph - Digital image Set of 10, Tony Smith, 1971
Yields information about Ballarat Tramways and trams prior to the closure of the tramway system.Set of 10 digital images of Ballarat trams prior to closure, scanned from original slides by Tony Smith, 1971 prior to closure of the system. .1 - 33 leaving Bridge St at Grenville St. Tram has destination of Gardens via Sturt St West and a Twin Lakes advert. Has Dickins and Woolworths in the background. .2 - 31 and another single trucker at the Victoria St terminus. Has the widened highway beyond the terminus in the background and Meagher's Hotel. .3 - 21 on the Dawson St cross over (has the destination of Mt Pleasant) with 37 in Sturt St, enroute to Lydiard St Nth. Has St Patrick's Cathedral in the background. .4 - 21 on crossover. .5 - 21 on crossover, waiting for 34 to pass by. .6 - 21 at Stones Corner, Bridge St., has Gear Chemist in the background, along with Bank of NSW. Tram has the destination of Mt Pleasant. .7 - 27 descending the Victoria St hill to Stones Corner, Main St junction. Tram has the destination of Gardens via Drummond St Nth. Has the Viscount ambassador Caravans site in the background. .8 - 21 outbound to Mt Pleasant at the Grant St loop in Barkly St. .9 - 21 and 34 at Grant St loop in Barkly St. .10 - 21 at Mt Pleasant terminus, showing Special. Has a person standing alongside the tram. On the adjacent shop is a "The Sun" sign.trams, tramways, grenville st, sturt st, victoria st, sturt st, dawson st, bridge st, stones corner, mt pleasant, grant st, barkly st, tram 33, tram 31, tram 21, tram 37, tram 34 -
 Ballarat Tramway Museum
Photograph - Digital image Set of 10, Tony Smith, 1971
Yields information about Ballarat Tramways and trams prior to the closure of the tramway system.Set of 10 digital images of Ballarat trams prior to closure, scanned from original slides by Tony Smith, 1971 prior to closure of the system. .1 - 35 and 43 crossing at Urquhart St, Drummond St Sth. 35 outbound to Sebastopol, 43 to Lydiard St Nth. .2 - 35 in Lydiard St North, about to turn into Sturt St, with the Commonwealth Bank and National Mutual, Craig's Hotel in the background. Note the tram stop signs on the pole nearest to the Post Office. Tram has destination of Sebastopol. .3 - 39 and 41 at Grey St Loop, on a wet day. 39 showing Lydiard St Nth, 41 Special. .4 - two bogie trams (35?) and 41? Albert St, south of Grey St Loop. .5 - two bogies trams (41 and 35?) and a single trucker at the Sebastopol terminus. 41 showing Special. .6 - two bogies trams (41, 35?) and single trucker at the Grey St Loop, waiting for another bogie tram to arrive. Has a "Bounds" running alongside the tram. On a wet muddy day. .7 - two single truckers crossing at Gregory St loop, Lydiard St. Nth. - photo out of focus. .8 - 35 and single trucker crossing at ditto. .9 - 39 and another bogie tram waiting for two other trams to meet at Gregory St. loop. .10 - two single truckers crossing at the King St loop, Victoria St - out of focus and over exposed.trams, tramways, urquhart st, drummond st sth, lydiard st nth, sturt st, albert st, sebastopol, grey st loop, gregory st, king st, tram 35, tram 43, tram 39, tram 41 -
 Ballarat Tramway Museum
Photograph - Digital image Set of 10, Tony Smith, 1971
Yields information about Ballarat Tramways and trams prior to the closure of the tramway system.Set of 10 digital images of Ballarat trams prior to closure, scanned from original slides by Tony Smith, 1971 prior to closure of the system. The following photos have suffered colour change and showing some deterioration - fungal growth. .1 - 35 (Sebastopol), with the Town Hall and Gemmola's chemist in the background. Tram waiting at the tram stop. .2 - 27 at Victoria St loop, showing Gardens via Drummond St Nth. .3 - 35 at Armstrong St inbound showing Lydiard St Nth. Has the Commonwealth bank in the background. .4 - 32 westbound in Sturt St between Dawson and Lyon Streets, tram has the destination of Gardens via Drummond Nth. Has the Town Hall and other buildings in the background. .5 - 17 inbound at Dawson St. Tram has destination of Mt Pleasant. .6 - 39 picking up passengers at the tram stop on the west side of Dawson St. Has the Ritzy cafe and the Golden City hotel in the background. Tram appears to be well loaded with lady passengers and has a "Everything under my control in my all electric kitchen" SEC roof ad. .7 - 37 using the Dawson St crossover - has St Patricks Cathedral in the background. .8 - 21 entering the depot with Lake Wendouree in the background. .9 - 11 sitting in 0 road at the depot. .10 - 41 at the depot on 2 road. Tram has two Johnny Walker Whiskey roof adverts.trams, tramways, sturt st, victoria st, dawson st, lake wendouree, wendouree parade, depot, tram 35, tram 27, tram 32, tram 17, tram 39, tram 37, tram 21, tram 11, tram 41 -
 Ballarat Tramway Museum
Photograph - Digital image Set of 10, Tony Smith, 1971
Yields information about Ballarat Tramways and trams prior to the closure of the tramway system.Set of 10 digital images of Ballarat trams prior to closure, scanned from original slides by Tony Smith, 1971 prior to closure of the system. .1 - 21 - night photo - at Sebastopol terminus .2 - 13 at Victoria St terminus .3 - 13 arriving at the Sturt St stop at Lydiard St, from Grenville St. Tram has the destination of Gardens via Sturt St West. Has the Commonwealth Bank and Mechanics institute in the background. .4 - 21 at Mill St loop, Drummond St Nth, enroute to Gardens via Drummond Nth. .5 - 26? about to turn from Drummond St Nth into Macarthur St with passengers boarding and leaving the tram. .6 - 21 northbound in Drummond St north at Mair St with an old hotel in the background. .7 - 33 at Lydiard St Nth, with many passengers boarding. Has the cemetery gates in the background. .8 - 26 waiting in the Martin Ave loop. Tram has the destination of Gardens via Drummond St Nth. .9 - 31 crossing 26 at the Martin Ave Loop. .10 - 26 at Gardens Loop with passengers getting off the tram. Tram has the destination of Mt Pleasant. The stop signage is visible to the right of the tram.trams, tramways, night photo, sebastopol, victoria st, sturt st, drummond st nth, mill st loop, macarthur st, mair st, lydiard st nth, martin ave, wendouree parade, tram 21, tram 13, tram 26, tram 31 -
 Ballarat Tramway Museum
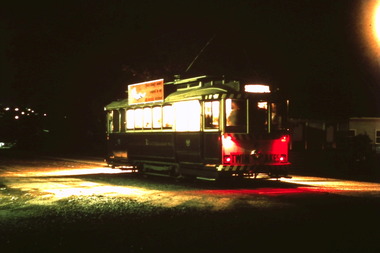
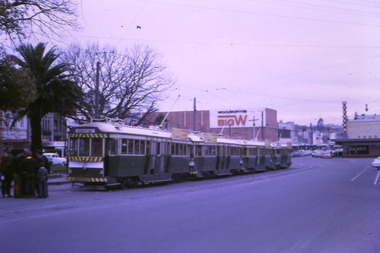
Photograph - Digital image Set of 7, Tony Smith, 19/09/1971 12:00:00 AM
Yields information about Ballarat Tramways and trams prior to the closure of the tramway system.Set of 7 digital images of Ballarat trams prior to closure, scanned from original slides by Tony Smith, 1971 prior to closure of the system. This set of slides appears to be the last day of operations - 19/9/1971 .1 - Four bogie trams parked in city loop with Woolworth's Big W and Dickins in the background. Not well focused. first tram 37 - see Reg Item 6158.6. .2 - 42 at Sturt and Lydiard St, north side, night photo with crew standing by the tram stop sign. Has the post office in the background. .3 - bogie tram at the south side, night photo, has the Commonwealth Bank in the background. .4 - 39 (at the rear of the four bogie trams parked in the City loop), night photo, looking west. .5 - 42 at Sebastopol terminus with the Royal Mail Hotel in the background - night photo. .6 - bogie tram and 39 parked in the city loop - two have now departed. Has Dickins, Gear Chemist and Edments Hartleys stores in the background. .7 - 34 at Sturt and Lydiard St north side.trams, tramways, closure, night photo, city loop, post office, tram 37, tram 42, tram 39, tram 34 -
 Ballarat Tramway Museum
Photograph - Digital image, Wal Jack, 25/04/1959 12:00:00 AM
Yields information about the appearance of Lydiard St north and two of the Ballarat trams in 1959 and tram operations during closure of Sturt St.Digital image from the Wal Jack Ballarat Album of No. 40 and 14 in Sturt St, shunting during the Anzac day march. Appears to have a group of trammies on the right side of the photograph alongside a motor vehicle. Photograph 25-4-1959 Wal Jack Photograph. Has the ANZ Bank, National Mutual and Craigs hotel in the photograph along with a number of motor vehicles. See image i2 for rear of photograph. See image i3 for hi res scan of print. See image i4 for hi res scan of negativeOn rear of photograph in ink "SEC Ballarat, No. 14 to Lydiard St Nth on up track, No. 40 ex Mt Pleasant on "down" in Lydiard St Nth, during Anzac Day march in Sturt St. 25-4-59" and Wal Jack stamp in top right hand corner with "T250" written in ink.trams, tramways, lydiard st north, sturt st, tram 14, tram 40 -
 Ballarat Tramway Museum
Photograph - Digital image, 1970s
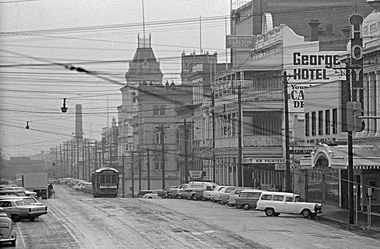
... . Has the George Hotel, the CBC Bank, Hoyts Regent, and other.... Has the George Hotel, the CBC Bank, Hoyts Regent, and other ...Yields information about the Lydiard St Nth landscape looking south.Digital image of a bogie tram travelling north in Lydiard St North between Sturt and Mair Sts, with many parked cars. Has the George Hotel, the CBC Bank, Hoyts Regent, and other buildings in the view. Photo taken by Peter Bruce 1970's and 1971, prior to the closure of the Ballarat tramway system. Peter's Title of image: "Gloomy Lydiard St"trams, tramways, lydiard st nth -
 Ballarat Tramway Museum
Photograph - Digital image, 1970s
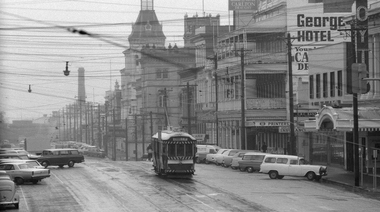
... cars. Has the George Hotel, the CBC Bank, Hoyts Regent..., with many parked cars. Has the George Hotel, the CBC Bank, Hoyts ...Yields information about Lydiard St between Mair and Sturt Streets.Digital image, black and white, of No. 38 travelling north in Lydiard St North between Sturt and Mair Sts, with many parked cars. Has the George Hotel, the CBC Bank, Hoyts Regent, and other buildings in the view. See also Reg Item 4580 for a later photograph, probably 38 too. Photo taken by Peter Bruce 1970's and 1971, prior to the closure of the Ballarat tramway system. Peter's Title of image: "No. 38 Lydiard St near Mair St."trams, tramways, lydiard st, tram 38 -
 Ballarat Tramway Museum
Photograph - Black & White Photograph/s, Wal Jack, May. 1949
Black and White print contained within the Wal Jack Bendigo and Geelong Album, see Reg Item 5003 for more details. Photo of Car No. 32 and single trucker 22, Moorabool St. No. 32 has the destination of North, No. 22 Belmont. In the background is the Bank of New South Wales, Geelong Nursery Nook, McGills, Hotel Cullen. Photo May 1949. No details on photographer though there is an initial on the photograph. i1 - scan of print in the album i2 - rear of image i3 - scan of negative at 3200dpi added 27/6/2020.On rear in pencil "Geelong May 1949, 32 and 22 new and old, 8 wheeler and 4 wheeler, North & Belmont, Coming and Going / Moorabool St / Ryrie St in the foreground."trams, tramways, geelong, ryrie st, moorabool st, bogie trams, tram 32, tram 22 -
 Bendigo Historical Society Inc.
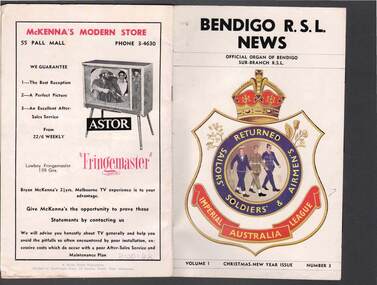
Document - R.S.L. BENDIGO COLLECTION: BENDIGO R.S.L. NEWS VOL. 1 NO. 3
Bendigo R.S.L. News Volume 1, Number 3 Christmas-New Year Issue. Red, blue, yellow and gold badge on the front cover. Contains advertisements from local businesses, Bendigo R.S.L. Office Bearers 1960, news, notes from Clubs, an article titled 'When the Japs Broke Out at Cowra' and a short obituary of Sir Horace Robertson.A Wicks Knott Publication, Printed by Southdown Press, 33 Rosslyn Street, West Melbourne.magazine, organization, bendigo rsl, r.s.l. bendigo collection - bendigo r.s.l. news vol. 1 no. 3, ashmans dry cleaners, h q radio service, f c straub, hampel furniture products, pierce grenfell, ron meurer, h w snell, axedale quarries, a l & k stringer, excavations, al & b g pearce, w mcculloch & co, bendigo motor co, m g taylor, fair-view upholsterers, alwyn nelson, northern terrazzo co, l fawssett & co, bendigo sub-branch r.s.s, &, a.i.l.a., col j w swatton, h a w morey, s thompson, g j baker, j k barnes, a c harridge, j harrison, t h hume, w h pinder, d e mcgregor, f e schilling, g g styles, c vaughan, j e fay, geo j baker, a v palmer, n mclaren young, e m vains & co, g e h rowell, a v & l e smith, j r palmers, graham lowe refrigeration service, a w pulfer motors, b r burns, vic palmer, golden square dry cleaners, j w carter & sons, alltyre service pty ltd, ian wills, bill nicholls jack watts, the robyn, a g power, leo a hughes, bendigo manchester house, frank wilson, hesse bros, frank bouchier, your typewriter sales and service, tom heenan, win patten, bendigo legacy, r wilson, w e p carruthers, antonian café, kairn's auto-bits, cohns, jeffreys bread, 4th armoured regt social club, g e baldwin, bendigo & district ex-p.o.w. social club, w hargreaves, d gregor, bendigo r.s.l. ladies auxiliary, mrs h morey, mrs p floyd, mrs w hocking, mrs h sims, mrs t hall, rsl women's council of victoria, mr & mrsa kersting, w coates, a bolitho, w hocking, n mcivor, perretts, martin washington, e a bennett pty ltd, john burgoyne, 38th battalion (a.i.f.) social club, j plim c findlay, ex-navelmen's club, t staley, airforce association, a stevens, t grimes, rats of tobruk association, j ferguson, catholic war veterans' association, j noonan, t coppock, dads' association, w murphy, bendigo legacy club, win patten, t h iser, t h runnalls, legacy house, 105 anti-tank regiment social club, alwyn nelson, laurie townsing, bendigo repatriation local committee, v w hosking, w rex porter, g a pethard, f t dunphy, l m porter, e h duus, lt col thomas waitson williams dso, ric coulson, r ball & son, lorraine florist, neol searle pty ltd, bendigo and district t & p i social club, e j taylor, t wellins, w phelan, g keily, l boyd, t tuddenham, e butler, g armstrong, geo j baker, easter fair society, bendigo agricultural society, 6th battalion (a.i.f.) social club, f t dunphy, w green, r c wright, bendigo showgrounds r.a.a.o.c. camp club, j j davies, e p perrett, t g heenan, w rex porter, fred coulson, harry hall, alan bath, tom hume, ted commons, geo h baker, percy floyd, stan hunter, joe wagland, railway sub-section r.s.l., g brown, don chalmer pty ltd, bendigo timber co pty ltd, g p hyett, a w comber, w nichols, maurice f noonan, allans walk delicatessen, r b webb, jack l lyons, perrow, s paints, t c sheers, provincial motors (bendigo) pty ltd, banjo paterson, will ogilvey, ben hall, joe gardiner, major bob ramsay mc, 53rd batt., major e v timms, ww1, 2nd a.i.f., f m carson, tooranie house, brian abe, p e dunstan, a lam sun, don murray, windermere hotel, bendigo disposals, frank a hill & co, fitzpatrick's, sandhurst dairies pty ltd, m williamson, george symon's dairy, w h oakley, sir horace robertson, british commonwealth occupation forces, australian light horse, state savings bank, royal military college, golden fleece service station, j w williams, tomlins simmie pty ltd, clark king & co pty ltd, mckenna's modern store, bryan mckenna, wicks knott publication, southdown press