Showing 425 items
matching junction station
-
 El Dorado Museum Association Inc.
Photograph (item) - Digital Image
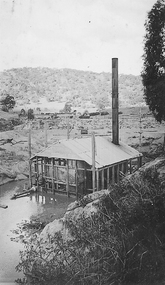
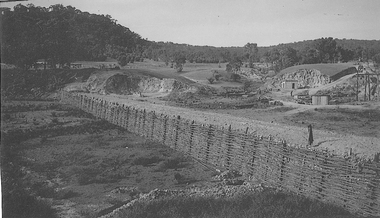
Cocks Pioneer Barge. Cocks Pioneer Electric Gold & Tin Mine Company was formed in 1899. The company's first power station, located at the eastern end of the valley began operating with its 340 Kilowatt steam-powered generator. By 1909, from 2,500,000 cubic yards worked, reported recovery was 17,284 ounces of gold and 224 tons of tin ore. By 1909, Cocks Pioneer’s power plant had become inadequate and uneconomical. The barge was floated downstream about a mile, but lost time caused the operations to cease. Following testing, a new mine was established by diverting Reid's Creek at a cost of £25,000. Settling dams were built, one of which held 1,935,900 cubic feet. Sold earth banks, built against a wall of stringy bark saplings constructed and laced with vertical props, were built. In 1914, the company was reformed as Cock’s Pioneer Gold and Tin Mines NL, another power station was constructed at the western end of the township, near the junction of Clear and Reid's Creeks. From 6,800,000 cubic yards of material processed, the returns were 64,397 ounces of gold and 855 ton of tin. Cocks Pioneer mine then moved the barge downs stream and continued sluicing. In 1929 Cocks Pioneer Electric Gold and Tin Mining Company ceased operations due to a drop in values. Cock’s Pioneer Gold and Tin Mines NL carried on large-scale hydraulic sluicing operations until 1941. mining, gold, tin, barge, sluicing, gold mining, tin mining, cocks pioneer, el dorado, eldorado -
 El Dorado Museum Association Inc.
Photograph (item) - Digital Image
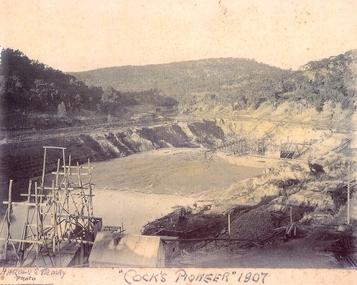
Cocks Pioneer, 1907. Cocks Pioneer Electric Gold & Tin Mine Company was formed in 1899. The company's first power station, located at the eastern end of the valley began operating with its 340 Kilowatt steam-powered generator. By 1909, from 2,500,000 cubic yards worked, reported recovery was 17,284 ounces of gold and 224 tons of tin ore. By 1909, Cocks Pioneer’s power plant had become inadequate and uneconomical. The barge was floated downstream about a mile, but lost time caused the operations to cease. Following testing, a new mine was established by diverting Reid's Creek at a cost of £25,000. Settling dams were built, one of which held 1,935,900 cubic feet. Sold earth banks, built against a wall of stringy bark saplings constructed and laced with vertical props, were built. In 1914, the company was reformed as Cock’s Pioneer Gold and Tin Mines NL, another power station was constructed at the western end of the township, near the junction of Clear and Reid's Creeks. From 6,800,000 cubic yards of material processed, the returns were 64,397 ounces of gold and 855 ton of tin. Cocks Pioneer mine then moved the barge downs stream and continued sluicing. In 1929 Cocks Pioneer Electric Gold and Tin Mining Company ceased operations due to a drop in values. Cock’s Pioneer Gold and Tin Mines NL carried on large-scale hydraulic sluicing operations until 1941. Handwritten across front: 'HAROLD S. TEMBY / Photo'; '"COCKS PIONEER" 1907'.mining, gold, tin, open cut, barge, gold mining, tin mining, cocks pioneer, el dorado, eldorado -
 El Dorado Museum Association Inc.
Photograph (item) - Digital Image
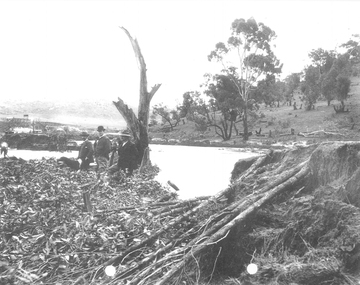
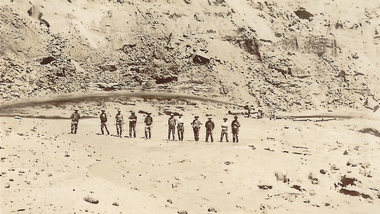
Cocks Pioneer after Flood. Cocks Pioneer Electric Gold & Tin Mine Company was formed in 1899. The company's first power station, located at the eastern end of the valley began operating with its 340 Kilowatt steam-powered generator. By 1909, from 2,500,000 cubic yards worked, reported recovery was 17,284 ounces of gold and 224 tons of tin ore. By 1909, Cocks Pioneer’s power plant had become inadequate and uneconomical. The barge was floated downstream about a mile, but lost time caused the operations to cease. Following testing, a new mine was established by diverting Reid's Creek at a cost of £25,000. Settling dams were built, one of which held 1,935,900 cubic feet. Sold earth banks, built against a wall of stringy bark saplings constructed and laced with vertical props, were built. In 1914, the company was reformed as Cock’s Pioneer Gold and Tin Mines NL, another power station was constructed at the western end of the township, near the junction of Clear and Reid's Creeks. From 6,800,000 cubic yards of material processed, the returns were 64,397 ounces of gold and 855 ton of tin. Cocks Pioneer mine then moved the barge downs stream and continued sluicing. In 1929 Cocks Pioneer Electric Gold and Tin Mining Company ceased operations due to a drop in values. Cock’s Pioneer Gold and Tin Mines NL carried on large-scale hydraulic sluicing operations until 1941. mining, gold, tin, barge, floods, gold mining, tin mining, cocks pioneer, el dorado, eldorado, men -
 El Dorado Museum Association Inc.
Photograph (item) - Digital Image
Cocks Pioneer Barge, c. 1900s. Cocks Pioneer Electric Gold & Tin Mine Company was formed in 1899. The company's first power station, located at the eastern end of the valley began operating with its 340 Kilowatt steam-powered generator. By 1909, from 2,500,000 cubic yards worked, reported recovery was 17,284 ounces of gold and 224 tons of tin ore. By 1909, Cocks Pioneer’s power plant had become inadequate and uneconomical. The barge was floated downstream about a mile, but lost time caused the operations to cease. Following testing, a new mine was established by diverting Reid's Creek at a cost of £25,000. Settling dams were built, one of which held 1,935,900 cubic feet. Sold earth banks, built against a wall of stringy bark saplings constructed and laced with vertical props, were built. In 1914, the company was reformed as Cock’s Pioneer Gold and Tin Mines NL, another power station was constructed at the western end of the township, near the junction of Clear and Reid's Creeks. From 6,800,000 cubic yards of material processed, the returns were 64 397 ounces of gold and 855 ton of tin. Cocks Pioneer mine then moved the barge downs stream and continued sluicing. In 1929 Cocks Pioneer Electric Gold and Tin Mining Company ceased operations due to a drop in values. Cock’s Pioneer Gold and Tin Mines NL carried on large-scale hydraulic sluicing operations until 1941. mining, gold, tin, sluicing, gold mining, tin mining, barge, cocks pioneer, el dorado, eldorado -
 El Dorado Museum Association Inc.
Photograph (item) - Digital Image
Cocks Pioneer Electric Gold & Tin Mine Company was formed in 1899. The company's first power station, located at the eastern end of the valley began operating with its 340 Kilowatt steam-powered generator. By 1909, from 2,500,000 cubic yards worked, reported recovery was 17,284 ounces of gold and 224 tons of tin ore. By 1909, Cocks Pioneer’s power plant had become inadequate and uneconomical. The barge was floated downstream about a mile, but lost time caused the operations to cease. Following testing, a new mine was established by diverting Reid's Creek at a cost of £25,000. Settling dams were built, one of which held 1,935,900 cubic feet. Sold earth banks, built against a wall of stringy bark saplings constructed and laced with vertical props, were built. In 1914, the company was reformed as Cock’s Pioneer Gold and Tin Mines NL, another power station was constructed at the western end of the township, near the junction of Clear and Reid's Creeks. From 6,800,000 cubic yards of material processed, the returns were 64,397 ounces of gold and 855 ton of tin. Cocks Pioneer mine then moved the barge downs stream and continued sluicing. In 1929 Cocks Pioneer Electric Gold and Tin Mining Company ceased operations due to a drop in values. Cock’s Pioneer Gold and Tin Mines NL carried on large-scale hydraulic sluicing operations until 1941. mining, gold, tin, barge, sluicing, gold mining, tin mining, cocks pioneer, el dorado, eldorado -
 El Dorado Museum Association Inc.
Photograph (item) - Digital Image
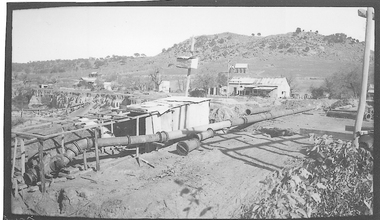
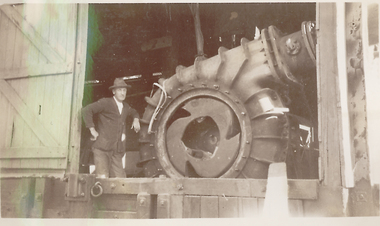
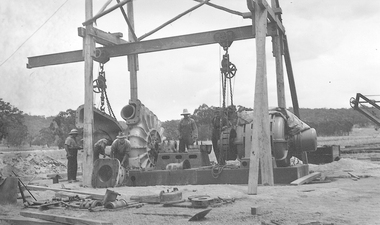
Cocks Pioneer Engine c1930s. Cocks Pioneer Electric Gold & Tin Mine Company was formed in 1899. The company's first power station, located at the eastern end of the valley began operating with its 340 Kilowatt steam-powered generator. By 1909, from 2,500,000 cubic yards worked, reported recovery was 17,284 ounces of gold and 224 tons of tin ore. By 1909, Cocks Pioneer’s power plant had become inadequate and uneconomical. The barge was floated downstream about a mile, but lost time caused the operations to cease. Following testing, a new mine was established by diverting Reid's Creek at a cost of £25 000. Settling dams were built, one of which held 1,,935,900 cubic feet. Sold earth banks, built against a wall of stringy bark saplings constructed and laced with vertical props, were built. In 1914, the company was reformed as Cock’s Pioneer Gold and Tin Mines NL, another power station was constructed at the western end of the township, near the junction of Clear and Reid's Creeks. From 6,800,000 cubic yards of material processed, the returns were 64,397 ounces of gold and 855 ton of tin. Cocks Pioneer mine then moved the barge downs stream and continued sluicing. In 1929 Cocks Pioneer Electric Gold and Tin Mining Company ceased operations due to a drop in values. Cock’s Pioneer Gold and Tin Mines NL carried on large-scale hydraulic sluicing operations until 1941. mining, gold, tin, gold mining, tin mining, machinery, engines, men, cocks pioneer, el dorado, eldorado -
 El Dorado Museum Association Inc.
Photograph (item) - Digital Image
Cocks Pioneer Electric Gold & Tin Mine Company was formed in 1899. The company's first power station, located at the eastern end of the valley began operating with its 340 Kilowatt steam-powered generator. By 1909, from 2,500,000 cubic yards worked, reported recovery was 17,284 ounces of gold and 224 tons of tin ore. By 1909, Cocks Pioneer’s power plant had become inadequate and uneconomical. The barge was floated downstream about a mile, but lost time caused the operations to cease. Following testing, a new mine was established by diverting Reid's Creek at a cost of £25 000. Settling dams were built, one of which held 1,935,900 cubic feet. Sold earth banks, built against a wall of stringy bark saplings constructed and laced with vertical props, were built. In 1914, the company was reformed as Cock’s Pioneer Gold and Tin Mines NL, another power station was constructed at the western end of the township, near the junction of Clear and Reid's Creeks. From 6,800,000 cubic yards of material processed, the returns were 64,397 ounces of gold and 855 ton of tin. Cocks Pioneer mine then moved the barge downs stream and continued sluicing. In 1929 Cocks Pioneer Electric Gold and Tin Mining Company ceased operations due to a drop in values. Cock’s Pioneer Gold and Tin Mines NL carried on large-scale hydraulic sluicing operations until 1941. gold, tin, mining, sluicing, gold mining, tin mining, cocks pioneer, el dorado, eldorado -
 El Dorado Museum Association Inc.
Photograph (item) - Digital Image
Cocks Pioneer Electric Gold & Tin Mine Company was formed in 1899. The company's first power station, located at the eastern end of the valley began operating with its 340 Kilowatt steam-powered generator. By 1909, from 2,500,000 cubic yards worked, reported recovery was 17,284 ounces of gold and 224 tons of tin ore. By 1909, Cocks Pioneer’s power plant had become inadequate and uneconomical. The barge was floated downstream about a mile, but lost time caused the operations to cease. Following testing, a new mine was established by diverting Reid's Creek at a cost of £25,000. Settling dams were built, one of which held 1,935,900 cubic feet. Sold earth banks, built against a wall of stringy bark saplings constructed and laced with vertical props, were built. In 1914, the company was reformed as Cock’s Pioneer Gold and Tin Mines NL, another power station was constructed at the western end of the township, near the junction of Clear and Reid's Creeks. From 6,800,000 cubic yards of material processed, the returns were 64,397 ounces of gold and 855 ton of tin. Cocks Pioneer mine then moved the barge downs stream and continued sluicing. In 1929 Cocks Pioneer Electric Gold and Tin Mining Company ceased operations due to a drop in values. Cock’s Pioneer Gold and Tin Mines NL carried on large-scale hydraulic sluicing operations until 1941. mines, mining, tin, gold, tin mining, gold mining, sluicing, cocks pioneer, el dorado, eldorado -
 El Dorado Museum Association Inc.
Photograph (item) - Digital Image
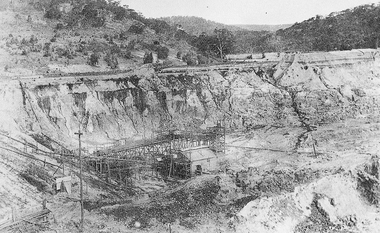
Cocks Pioneer Gold & Tin Mines NL sluicing works, open cut hydraulic mine. Cocks Pioneer Electric Gold & Tin Mine Company was formed in 1899. The company's first power station, located at the eastern end of the valley began operating with its 340 Kilowatt steam-powered generator. By 1909, from 2,500,000 cubic yards worked, reported recovery was 17,284 ounces of gold and 224 tons of tin ore. By 1909, Cocks Pioneer’s power plant had become inadequate and uneconomical. The barge was floated downstream about a mile, but lost time caused the operations to cease. Following testing, a new mine was established by diverting Reid's Creek at a cost of £25,000. Settling dams were built, one of which held 1,935,900 cubic feet. Sold earth banks, built against a wall of stringy bark saplings constructed and laced with vertical props, were built. In 1914, the company was reformed as Cock’s Pioneer Gold and Tin Mines NL, another power station was constructed at the western end of the township, near the junction of Clear and Reid's Creeks. From 6,800,000 cubic yards of material processed, the returns were 64,397 ounces of gold and 855 ton of tin. Cocks Pioneer mine then moved the barge downs stream and continued sluicing. In 1929 Cocks Pioneer Electric Gold and Tin Mining Company ceased operations due to a drop in values. Cock’s Pioneer Gold and Tin Mines NL carried on large-scale hydraulic sluicing operations until 1941. mines, mining, gold, tin, gold mining, tin mining, sluicing, men, cocks pioneer, el dorado, eldorado -
 El Dorado Museum Association Inc.
Photograph (item) - Digital Image
Cocks Pioneer Electric Gold & Tin Mine Company was formed in 1899. The company's first power station, located at the eastern end of the valley began operating with its 340 Kilowatt steam-powered generator. By 1909, from 2,500,000 cubic yards worked, reported recovery was 17,284 ounces of gold and 224 tons of tin ore. By 1909, Cocks Pioneer’s power plant had become inadequate and uneconomical. The barge was floated downstream about a mile, but lost time caused the operations to cease. Following testing, a new mine was established by diverting Reid's Creek at a cost of £25 000. Settling dams were built, one of which held 1,935,900 cubic feet. Sold earth banks, built against a wall of stringy bark saplings constructed and laced with vertical props, were built. In 1914, the company was reformed as Cock’s Pioneer Gold and Tin Mines NL, another power station was constructed at the western end of the township, near the junction of Clear and Reid's Creeks. From 6,800,000 cubic yards of material processed, the returns were 64,397 ounces of gold and 855 ton of tin. Cocks Pioneer mine then moved the barge downs stream and continued sluicing. In 1929 Cocks Pioneer Electric Gold and Tin Mining Company ceased operations due to a drop in values. Cock’s Pioneer Gold and Tin Mines NL carried on large-scale hydraulic sluicing operations until 1941. mining, mines, gold, tin, gold mining, tin mining, sluicing, cocks pioneer, el dorado, eldorado -
 El Dorado Museum Association Inc.
Photograph (item) - Digital Image
Cocks Pioneer Electric Gold & Tin Mine Company was formed in 1899. The company's first power station, located at the eastern end of the valley began operating with its 340 Kilowatt steam-powered generator. By 1909, from 2,500,000 cubic yards worked, reported recovery was 17,284 ounces of gold and 224 tons of tin ore. By 1909, Cocks Pioneer’s power plant had become inadequate and uneconomical. The barge was floated downstream about a mile, but lost time caused the operations to cease. Following testing, a new mine was established by diverting Reid's Creek at a cost of £25 000. Settling dams were built, one of which held 1,935,900 cubic feet. Sold earth banks, built against a wall of stringy bark saplings constructed and laced with vertical props, were built. In 1914, the company was reformed as Cock’s Pioneer Gold and Tin Mines NL, another power station was constructed at the western end of the township, near the junction of Clear and Reid's Creeks. From 6,800,000 cubic yards of material processed, the returns were 64,397 ounces of gold and 855 ton of tin. Cocks Pioneer mine then moved the barge downs stream and continued sluicing. In 1929 Cocks Pioneer Electric Gold and Tin Mining Company ceased operations due to a drop in values. Cock’s Pioneer Gold and Tin Mines NL carried on large-scale hydraulic sluicing operations until 1941. Handwritten across photograph: "PIONEER" - ELDORADO / F FOXCROFT PHOTO.mining, mines, gold, tin, gold mining, tin mining, sluicing, cocks pioneer, el dorado, eldorado -
 El Dorado Museum Association Inc.
Photograph (item) - Digital Image
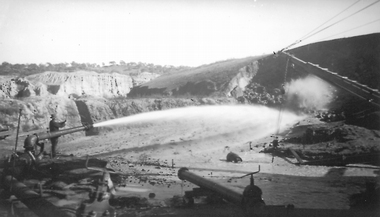
Image of Cocks Pioneer Mine nozzle. Cocks Pioneer Electric Gold & Tin Mine Company was formed in 1899. The company's first power station, located at the eastern end of the valley began operating with its 340 Kilowatt steam-powered generator. By 1909, from 2,500,000 cubic yards worked, reported recovery was 17,284 ounces of gold and 224 tons of tin ore. By 1909, Cocks Pioneer’s power plant had become inadequate and uneconomical. The barge was floated downstream about a mile, but lost time caused the operations to cease. Following testing, a new mine was established by diverting Reid's Creek at a cost of £25 000. Settling dams were built, one of which held 1,935,900 cubic feet. Sold earth banks, built against a wall of stringy bark saplings constructed and laced with vertical props, were built. In 1914, the company was reformed as Cock’s Pioneer Gold and Tin Mines NL, another power station was constructed at the western end of the township, near the junction of Clear and Reid's Creeks. From 6,800,000 cubic yards of material processed, the returns were 64,397 ounces of gold and 855 ton of tin. Cocks Pioneer mine then moved the barge downs stream and continued sluicing. In 1929 Cocks Pioneer Electric Gold and Tin Mining Company ceased operations due to a drop in values. Cock’s Pioneer Gold and Tin Mines NL carried on large-scale hydraulic sluicing operations until 1941. mines, mining, hydraulic mining, men, tin, gold, tin mining, gold mining, sluicing, cocks pioneer, el dorado, eldorado -
 El Dorado Museum Association Inc.
Photograph (item) - Digital Image
Cocks Pioneer new engines. Cocks Pioneer Electric Gold & Tin Mine Company was formed in 1899. The company's first power station, located at the eastern end of the valley began operating with its 340 Kilowatt steam-powered generator. By 1909, from 2,500,000 cubic yards worked, reported recovery was 17,284 ounces of gold and 224 tons of tin ore. By 1909, Cocks Pioneer’s power plant had become inadequate and uneconomical. The barge was floated downstream about a mile, but lost time caused the operations to cease. Following testing, a new mine was established by diverting Reid's Creek at a cost of £25 000. Settling dams were built, one of which held 1,935,900 cubic feet. Sold earth banks, built against a wall of stringy bark saplings constructed and laced with vertical props, were built. In 1914, the company was reformed as Cock’s Pioneer Gold and Tin Mines NL, another power station was constructed at the western end of the township, near the junction of Clear and Reid's Creeks. From 6,800,000 cubic yards of material processed, the returns were 64,397 ounces of gold and 855 ton of tin. Cocks Pioneer mine then moved the barge downs stream and continued sluicing. In 1929 Cocks Pioneer Electric Gold and Tin Mining Company ceased operations due to a drop in values. Cock’s Pioneer Gold and Tin Mines NL carried on large-scale hydraulic sluicing operations until 1941. mines, mining, tin, gold, tin mining, gold mining, hydraulic mining, cocks pioneer, el dorado, eldorado -
 El Dorado Museum Association Inc.
Photograph (item) - Digital Image
Cocks Pioneer Barge with new pump and punt. Cocks Pioneer Electric Gold & Tin Mine Company was formed in 1899. The company's first power station, located at the eastern end of the valley began operating with its 340 Kilowatt steam-powered generator. By 1909, from 2,500,000 cubic yards worked, reported recovery was 17,284 ounces of gold and 224 tons of tin ore. By 1909, Cocks Pioneer’s power plant had become inadequate and uneconomical. The barge was floated downstream about a mile, but lost time caused the operations to cease. Following testing, a new mine was established by diverting Reid's Creek at a cost of £25,000. Settling dams were built, one of which held 1,935,900 cubic feet. Sold earth banks, built against a wall of stringy bark saplings constructed and laced with vertical props, were built. In 1914, the company was reformed as Cock’s Pioneer Gold and Tin Mines NL, another power station was constructed at the western end of the township, near the junction of Clear and Reid's Creeks. From 6,800,000 cubic yards of material processed, the returns were 64,397 ounces of gold and 855 ton of tin. Cocks Pioneer mine then moved the barge downs stream and continued sluicing. In 1929 Cocks Pioneer Electric Gold and Tin Mining Company ceased operations due to a drop in values. Cock’s Pioneer Gold and Tin Mines NL carried on large-scale hydraulic sluicing operations until 1941. mines, mining, gold, tin, gold mining, tin mining, watercraft, punt, boats, men, cocks pioneer, el dorado, eldorado -
 El Dorado Museum Association Inc.
Photograph - Digital Image
Cocks Pioneer nozzle working. Cocks Pioneer Electric Gold & Tin Mine Company was formed in 1899. The company's first power station, located at the eastern end of the valley began operating with its 340 Kilowatt steam-powered generator. By 1909, from 2,500,000 cubic yards worked, reported recovery was 17,284 ounces of gold and 224 tons of tin ore. By 1909, Cocks Pioneer’s power plant had become inadequate and uneconomical. The barge was floated downstream about a mile, but lost time caused the operations to cease. Following testing, a new mine was established by diverting Reid's Creek at a cost of £25,000. Settling dams were built, one of which held 1,935,900 cubic feet. Sold earth banks, built against a wall of stringy bark saplings constructed and laced with vertical props, were built. In 1914, the company was reformed as Cock’s Pioneer Gold and Tin Mines NL, another power station was constructed at the western end of the township, near the junction of Clear and Reid's Creeks. From 6,800,000 cubic yards of material processed, the returns were 64,397 ounces of gold and 855 ton of tin. Cocks Pioneer mine then moved the barge downs stream and continued sluicing. In 1929 Cocks Pioneer Electric Gold and Tin Mining Company ceased operations due to a drop in values. Cock’s Pioneer Gold and Tin Mines NL carried on large-scale hydraulic sluicing operations until 1941. mines, mining, miners, men, gold, tin, gold mining, tin mining, hydraulic, cocks pioneer, el dorado, eldorado -
 El Dorado Museum Association Inc.
Photograph - Digital Image
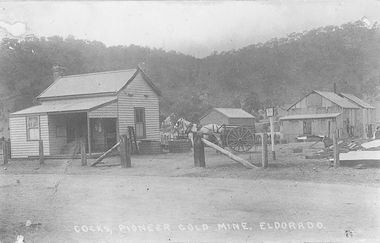
Cocks Pioneer Office and Milne's horse and cart. Cocks Pioneer Electric Gold & Tin Mine Company was formed in 1899. The company's first power station, located at the eastern end of the valley began operating with its 340 Kilowatt steam-powered generator. By 1909, from 2,500,000 cubic yards worked, reported recovery was 17,284 ounces of gold and 224 tons of tin ore. By 1909, Cocks Pioneer’s power plant had become inadequate and uneconomical. The barge was floated downstream about a mile, but lost time caused the operations to cease. Following testing, a new mine was established by diverting Reid's Creek at a cost of £25 000. Settling dams were built, one of which held 1,935,900 cubic feet. Sold earth banks, built against a wall of stringy bark saplings constructed and laced with vertical props, were built. In 1914, the company was reformed as Cock’s Pioneer Gold and Tin Mines NL, another power station was constructed at the western end of the township, near the junction of Clear and Reid's Creeks. From 6,800,000 cubic yards of material processed, the returns were 64,397 ounces of gold and 855 ton of tin. Cocks Pioneer mine then moved the barge downs stream and continued sluicing. In 1929 Cocks Pioneer Electric Gold and Tin Mining Company ceased operations due to a drop in values. Cock’s Pioneer Gold and Tin Mines NL carried on large-scale hydraulic sluicing operations until 1941. Handwritten on image: COCKS, PIONEER GOLD MINE, ELDORADOmines, mining, horses, cart, transport, gold, tin, gold mining, tin mining, buildings, cocks pioneer, el dorado, eldorado -
 El Dorado Museum Association Inc.
Photograph - Digital Image
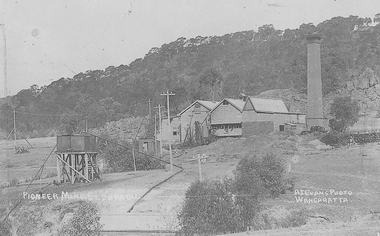
Cocks Pioneer Power Station No 1. Cocks Pioneer Electric Gold & Tin Mine Company was formed in 1899. The company's first power station, located at the eastern end of the valley began operating with its 340 Kilowatt steam-powered generator. By 1909, from 2 500 000 cubic yards worked, reported recovery was 17 284 ounces of gold and 224 tons of tin ore. By 1909, Cocks Pioneer’s power plant had become inadequate and uneconomical. The barge was floated downstream about a mile, but lost time caused the operations to cease. Following testing, a new mine was established by diverting Reid's Creek at a cost of £25 000. Settling dams were built, one of which held 1 935 900 cubic feet. Sold earth banks, built against a wall of stringy bark saplings constructed and laced with vertical props, were built. In 1914, the company was reformed as Cock’s Pioneer Gold and Tin Mines NL, another power station was constructed at the western end of the township, near the junction of Clear and Reid's Creeks. From 6,800,000 cubic yards of material processed, the returns were 64 397 ounces of gold and 855 ton of tin. Cocks Pioneer mine then moved the barge downs stream and continued sluicing. In 1929 Cocks Pioneer Electric Gold and Tin Mining Company ceased operations due to a drop in values. Cock’s Pioneer Gold and Tin Mines NL carried on large-scale hydraulic sluicing operations until 1941. Handrwitten on right side of image: PIONEER MINE ELDORADO Handwritten on left side of image: AJ EVANS PHOTO / WANGARATTAmines, mining, gold, tin, gold mining, tin mining, sluicing, hydraulic mining, energy, power station, cocks pioneer, el dorado, eldorado -
 El Dorado Museum Association Inc.
Photograph - Digital Image
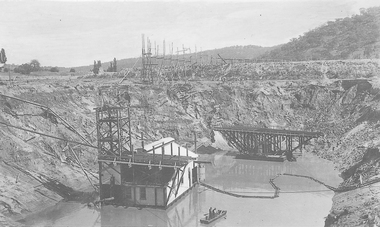
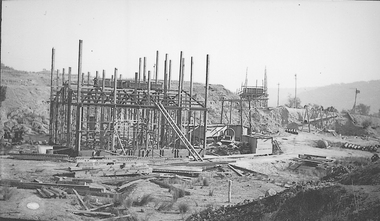
Construction of New Barge, Cocks Pioneer. Cocks Pioneer Electric Gold & Tin Mine Company was formed in 1899. The company's first power station, located at the eastern end of the valley began operating with its 340 Kilowatt steam-powered generator. By 1909, from 2,500,000 cubic yards worked, reported recovery was 17,284 ounces of gold and 224 tons of tin ore. By 1909, Cocks Pioneer’s power plant had become inadequate and uneconomical. The barge was floated downstream about a mile, but lost time caused the operations to cease. Following testing, a new mine was established by diverting Reid's Creek at a cost of £25 000. Settling dams were built, one of which held 1,935,900 cubic feet. Sold earth banks, built against a wall of stringy bark saplings constructed and laced with vertical props, were built. In 1914, the company was reformed as Cock’s Pioneer Gold and Tin Mines NL, another power station was constructed at the western end of the township, near the junction of Clear and Reid's Creeks. From 6,800,000 cubic yards of material processed, the returns were 64,397 ounces of gold and 855 ton of tin. Cocks Pioneer mine then moved the barge downs stream and continued sluicing. In 1929 Cocks Pioneer Electric Gold and Tin Mining Company ceased operations due to a drop in values. Cock’s Pioneer Gold and Tin Mines NL carried on large-scale hydraulic sluicing operations until 1941. mines, mining, gold, tin, gold mining, tin mining, sluicing, barge, construction, cocks pioneer, el dorado, eldorado -
 El Dorado Museum Association Inc.
Photograph - Digital Image
Creek Diversion, Cocks Power. Cocks Pioneer Electric Gold & Tin Mine Company was formed in 1899. The company's first power station, located at the eastern end of the valley began operating with its 340 Kilowatt steam-powered generator. By 1909, from 2 500 000 cubic yards worked, reported recovery was 17 284 ounces of gold and 224 tons of tin ore. By 1909, Cocks Pioneer’s power plant had become inadequate and uneconomical. The barge was floated downstream about a mile, but lost time caused the operations to cease. Following testing, a new mine was established by diverting Reid's Creek at a cost of £25 000. Settling dams were built, one of which held 1 935 900 cubic feet. Sold earth banks, built against a wall of stringy bark saplings constructed and laced with vertical props, were built. In 1914, the company was reformed as Cock’s Pioneer Gold and Tin Mines NL, another power station was constructed at the western end of the township, near the junction of Clear and Reid's Creeks. From 6,800,000 cubic yards of material processed, the returns were 64 397 ounces of gold and 855 ton of tin. Cocks Pioneer mine then moved the barge downs stream and continued sluicing. In 1929 Cocks Pioneer Electric Gold and Tin Mining Company ceased operations due to a drop in values. Cock’s Pioneer Gold and Tin Mines NL carried on large-scale hydraulic sluicing operations until 1941. mines, mining, gold, tin, gold mining, tin mining, creeks, cocks pioneer, el dorado, eldorado -
 El Dorado Museum Association Inc.
Photograph - Digital Image
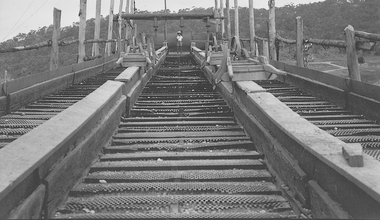
Riffle Boards on Barge, c1934. In sluicing, riffles are used to trap heavier gold particles as water washes over them. Cocks Pioneer Electric Gold & Tin Mine Company was formed in 1899. The company's first power station, located at the eastern end of the valley began operating with its 340 Kilowatt steam-powered generator. By 1909, from 2 500 000 cubic yards worked, reported recovery was 17 284 ounces of gold and 224 tons of tin ore. By 1909, Cocks Pioneer’s power plant had become inadequate and uneconomical. The barge was floated downstream about a mile, but lost time caused the operations to cease. Following testing, a new mine was established by diverting Reid's Creek at a cost of £25 000. Settling dams were built, one of which held 1 935 900 cubic feet. Sold earth banks, built against a wall of stringy bark saplings constructed and laced with vertical props, were built. In 1914, the company was reformed as Cock’s Pioneer Gold and Tin Mines NL, another power station was constructed at the western end of the township, near the junction of Clear and Reid's Creeks. From 6,800,000 cubic yards of material processed, the returns were 64 397 ounces of gold and 855 ton of tin. Cocks Pioneer mine then moved the barge downs stream and continued sluicing. In 1929 Cocks Pioneer Electric Gold and Tin Mining Company ceased operations due to a drop in values. Cock’s Pioneer Gold and Tin Mines NL carried on large-scale hydraulic sluicing operations until 1941. mines, mining, gold, gold mining, barge, riffles, sluicing, men, cocks pioneer, el dorado, eldorado -
 El Dorado Museum Association Inc.
Photograph - Digital Image
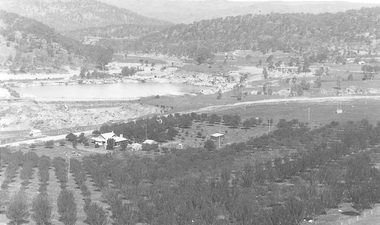
C Rankins Almond Orchard & Cocks Pioneer Pond, 1930s. Cocks Pioneer Electric Gold & Tin Mine Company was formed in 1899. The company's first power station, located at the eastern end of the valley began operating with its 340 Kilowatt steam-powered generator. By 1909, from 2 500 000 cubic yards worked, reported recovery was 17 284 ounces of gold and 224 tons of tin ore. By 1909, Cocks Pioneer’s power plant had become inadequate and uneconomical. The barge was floated downstream about a mile, but lost time caused the operations to cease. Following testing, a new mine was established by diverting Reid's Creek at a cost of £25 000. Settling dams were built, one of which held 1 935 900 cubic feet. Sold earth banks, built against a wall of stringy bark saplings constructed and laced with vertical props, were built. In 1914, the company was reformed as Cock’s Pioneer Gold and Tin Mines NL, another power station was constructed at the western end of the township, near the junction of Clear and Reid's Creeks. From 6,800,000 cubic yards of material processed, the returns were 64 397 ounces of gold and 855 ton of tin. Cocks Pioneer mine then moved the barge downs stream and continued sluicing. In 1929 Cocks Pioneer Electric Gold and Tin Mining Company ceased operations due to a drop in values. Cock’s Pioneer Gold and Tin Mines NL carried on large-scale hydraulic sluicing operations until 1941. mines, mining, farms, farming, almonds, sluicing, rankins, cocks pioneer, el dorado, eldorado -
 El Dorado Museum Association Inc.
Photograph - Digital Image
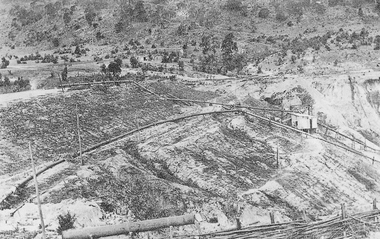
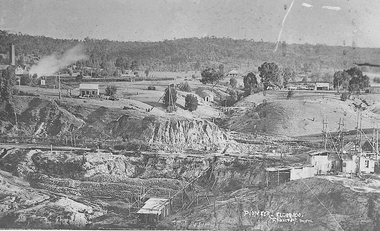
Cocks Pioneer, East El Dorado, early 1920s. Cocks Pioneer Electric Gold & Tin Mine Company was formed in 1899. The company's first power station, located at the eastern end of the valley began operating with its 340 Kilowatt steam-powered generator. By 1909, from 2 500 000 cubic yards worked, reported recovery was 17 284 ounces of gold and 224 tons of tin ore. By 1909, Cocks Pioneer’s power plant had become inadequate and uneconomical. The barge was floated downstream about a mile, but lost time caused the operations to cease. Following testing, a new mine was established by diverting Reid's Creek at a cost of £25 000. Settling dams were built, one of which held 1 935 900 cubic feet. Sold earth banks, built against a wall of stringy bark saplings constructed and laced with vertical props, were built. In 1914, the company was reformed as Cock’s Pioneer Gold and Tin Mines NL, another power station was constructed at the western end of the township, near the junction of Clear and Reid's Creeks. From 6,800,000 cubic yards of material processed, the returns were 64 397 ounces of gold and 855 ton of tin. Cocks Pioneer mine then moved the barge downs stream and continued sluicing. In 1929 Cocks Pioneer Electric Gold and Tin Mining Company ceased operations due to a drop in values. Cock’s Pioneer Gold and Tin Mines NL carried on large-scale hydraulic sluicing operations until 1941. mines, mining, gold, gold mining, cocks pioneer, sluicing, el dorado, eldorado -
 El Dorado Museum Association Inc.
Photograph - Digital Image
Moving Cocks Pioneer Barge, c1930s. Cocks Pioneer Electric Gold & Tin Mine Company was formed in 1899. The company's first power station, located at the eastern end of the valley began operating with its 340 Kilowatt steam-powered generator. By 1909, from 2,500,000 cubic yards worked, reported recovery was 17,284 ounces of gold and 224 tons of tin ore. By 1909, Cocks Pioneer’s power plant had become inadequate and uneconomical. The barge was floated downstream about a mile, but lost time caused the operations to cease. Following testing, a new mine was established by diverting Reid's Creek at a cost of £25,000. Settling dams were built, one of which held 1,935,900 cubic feet. Sold earth banks, built against a wall of stringy bark saplings constructed and laced with vertical props, were built. In 1914, the company was reformed as Cock’s Pioneer Gold and Tin Mines NL, another power station was constructed at the western end of the township, near the junction of Clear and Reid's Creeks. From 6,800,000 cubic yards of material processed, the returns were 64,397 ounces of gold and 855 ton of tin. Cocks Pioneer mine then moved the barge downs stream and continued sluicing. In 1929 Cocks Pioneer Electric Gold and Tin Mining Company ceased operations due to a drop in values. Cock’s Pioneer Gold and Tin Mines NL carried on large-scale hydraulic sluicing operations until 1941. mines, mining, gold, tin, gold mining, tin mining, men, miners, barge, sluicing, hydraulic, cocks pioneer, el dorado, eldorado -
 El Dorado Museum Association Inc.
Photograph (item) - Digital Image
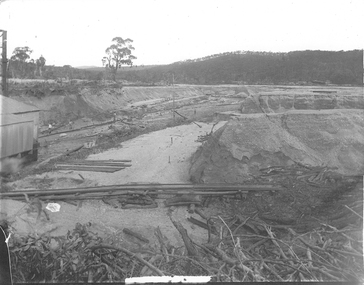
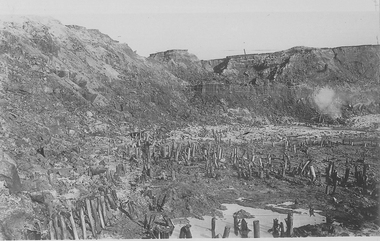
Cocks Pioneer old mine timbers. Cocks Pioneer Electric Gold & Tin Mine Company was formed in 1899. The company's first power station, located at the eastern end of the valley began operating with its 340 Kilowatt steam-powered generator. By 1909, from 2,500,000 cubic yards worked, reported recovery was 17,284 ounces of gold and 224 tons of tin ore. By 1909, Cocks Pioneer’s power plant had become inadequate and uneconomical. The barge was floated downstream about a mile, but lost time caused the operations to cease. Following testing, a new mine was established by diverting Reid's Creek at a cost of £25 000. Settling dams were built, one of which held 1,935,900 cubic feet. Sold earth banks, built against a wall of stringy bark saplings constructed and laced with vertical props, were built. In 1914, the company was reformed as Cock’s Pioneer Gold and Tin Mines NL, another power station was constructed at the western end of the township, near the junction of Clear and Reid's Creeks. From 6,800,000 cubic yards of material processed, the returns were 64,397 ounces of gold and 855 ton of tin. Cocks Pioneer mine then moved the barge downs stream and continued sluicing. In 1929 Cocks Pioneer Electric Gold and Tin Mining Company ceased operations due to a drop in values. Cock’s Pioneer Gold and Tin Mines NL carried on large-scale hydraulic sluicing operations until 1941. mining, gold, tin, open cut, gold mining, tin mining, cocks pioneer, el dorado, eldorado -
 Uniting Church Archives - Synod of Victoria
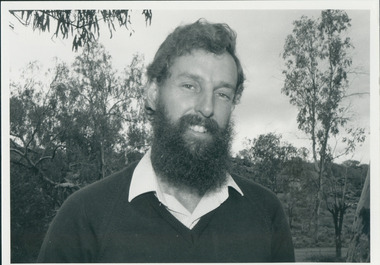
Photograph, St Philip's College Alice Springs - Principal Chris Tudor & Deputy Principal Chris Eldridge, 09/1986
In 1945 the Reverend Harry Griffiths, who worked for the Methodist Inland Mission in Alice Springs, saw the need for a boarding facility for children of families living in remote areas in Central Australia who needed access to schools. He and his wife established Griffiths House, on a site in the town centre, and for many years it became home for students from all over the Outback, including many young Aboriginal people. In the late 1950's the Rev Fred McKay, successor to the Rev John Flynn as Superintendent of the Australian Inland Mission, lobbied the United Church in the Northern Territory to build and expand on this important start. Together the Presbyterian, Methodist and Congregational churches embarked on a missionary venture to develop St Philip's College - a new, larger residential hostel which would one day become a full boarding school. An ideal site - 22 acres of bush at the junction of the Charles and Todd Rivers and backing on to the Telegraph Station National Park - was secured and after six years of planning, construction began in 1964. Fred McKay led the legendary work parties comprised of volunteers from all over Australia who travelled to Alice Springs, paying their own way and volunteering their expertise, time and labour, to turn a dream into a reality. This fantastic tradition continues today, with work parties arriving each mid-year holiday. On 13 February 1965 the first boarders moved in to St Philip's College. For the first 24 years, therefore, St Philip's College operated as a residential hostel only. The College’s ninth Headmaster, Mr Christopher Tudor, arrived in 1986. He and the Council Chairman, Mrs Jan Heaslip, judged that the time was right to complete the original plan to turn St Philip’s College into a fully fledged independent boarding/day school, serving not only “bush” families, but also the growing population of Alice Springs. The then College Council embraced the idea and three years of frantic, determined preparation and planning commenced, culminating in an extensive $2 million building program in 1988. To this day there continues to be further development with the new landscaping underway near The Minnamurra Hall, Reception and Rivergum Cafe, plus the recent completion of the Science & Food Technology building and the new Rivergum Cafe.Head & Shoulders of Chris Eldridgest. philip's college, tudor, chris, eldridge, chris -
 Uniting Church Archives - Synod of Victoria
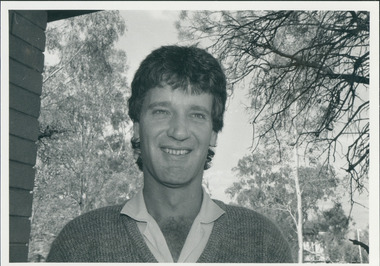
Photograph, St Philip's College Alice Springs - Principal Chris Tudor & Deputy Principal Chris Eldridge, 09/1986
In 1945 the Reverend Harry Griffiths, who worked for the Methodist Inland Mission in Alice Springs, saw the need for a boarding facility for children of families living in remote areas in Central Australia who needed access to schools. He and his wife established Griffiths House, on a site in the town centre, and for many years it became home for students from all over the Outback, including many young Aboriginal people. In the late 1950's the Rev Fred McKay, successor to the Rev John Flynn as Superintendent of the Australian Inland Mission, lobbied the United Church in the Northern Territory to build and expand on this important start. Together the Presbyterian, Methodist and Congregational churches embarked on a missionary venture to develop St Philip's College - a new, larger residential hostel which would one day become a full boarding school. An ideal site - 22 acres of bush at the junction of the Charles and Todd Rivers and backing on to the Telegraph Station National Park - was secured and after six years of planning, construction began in 1964. Fred McKay led the legendary work parties comprised of volunteers from all over Australia who travelled to Alice Springs, paying their own way and volunteering their expertise, time and labour, to turn a dream into a reality. This fantastic tradition continues today, with work parties arriving each mid-year holiday. On 13 February 1965 the first boarders moved in to St Philip's College. For the first 24 years, therefore, St Philip's College operated as a residential hostel only. The College’s ninth Headmaster, Mr Christopher Tudor, arrived in 1986. He and the Council Chairman, Mrs Jan Heaslip, judged that the time was right to complete the original plan to turn St Philip’s College into a fully fledged independent boarding/day school, serving not only “bush” families, but also the growing population of Alice Springs. The then College Council embraced the idea and three years of frantic, determined preparation and planning commenced, culminating in an extensive $2 million building program in 1988. To this day there continues to be further development with the new landscaping underway near The Minnamurra Hall, Reception and Rivergum Cafe, plus the recent completion of the Science & Food Technology building and the new Rivergum Cafe.Head & Shoulders of Chris Tudor.st. philip's college, tudor, chris, eldridge, chris -
 Uniting Church Archives - Synod of Victoria
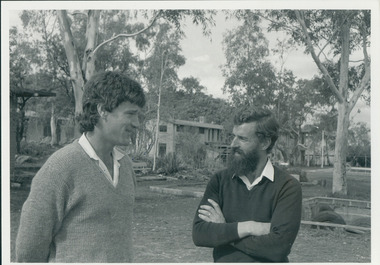
Photograph, St Philip's College Alice Springs - Principal Chris Tudor & Deputy Principal Chris Eldridge, 09/1986
In 1945 the Reverend Harry Griffiths, who worked for the Methodist Inland Mission in Alice Springs, saw the need for a boarding facility for children of families living in remote areas in Central Australia who needed access to schools. He and his wife established Griffiths House, on a site in the town centre, and for many years it became home for students from all over the Outback, including many young Aboriginal people. In the late 1950's the Rev Fred McKay, successor to the Rev John Flynn as Superintendent of the Australian Inland Mission, lobbied the United Church in the Northern Territory to build and expand on this important start. Together the Presbyterian, Methodist and Congregational churches embarked on a missionary venture to develop St Philip's College - a new, larger residential hostel which would one day become a full boarding school. An ideal site - 22 acres of bush at the junction of the Charles and Todd Rivers and backing on to the Telegraph Station National Park - was secured and after six years of planning, construction began in 1964. Fred McKay led the legendary work parties comprised of volunteers from all over Australia who travelled to Alice Springs, paying their own way and volunteering their expertise, time and labour, to turn a dream into a reality. This fantastic tradition continues today, with work parties arriving each mid-year holiday. On 13 February 1965 the first boarders moved in to St Philip's College. For the first 24 years, therefore, St Philip's College operated as a residential hostel only. The College’s ninth Headmaster, Mr Christopher Tudor, arrived in 1986. He and the Council Chairman, Mrs Jan Heaslip, judged that the time was right to complete the original plan to turn St Philip’s College into a fully fledged independent boarding/day school, serving not only “bush” families, but also the growing population of Alice Springs. The then College Council embraced the idea and three years of frantic, determined preparation and planning commenced, culminating in an extensive $2 million building program in 1988. To this day there continues to be further development with the new landscaping underway near The Minnamurra Hall, Reception and Rivergum Cafe, plus the recent completion of the Science & Food Technology building and the new Rivergum Cafe.Tudor and Eldridge in conversation with the College in the background.st. philip's college, tudor, chris, eldridge, chris -
 Hume City Civic Collection
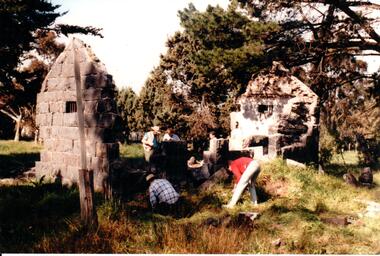
Photograph, c 1993
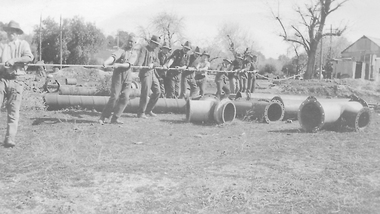
Aitkens Gap Police Lock up was originally constructed at The Gap which was south of the junction of Gap Road (Sunbury Road) and Calder Highway (Victoria St/Mt. Alexander Road). It was part of a police complex which was a changeover station for the gaol escort. The goal was relocated and rebuilt in the police station grounds in Sunbury in 1993.A coloured photograph of five men working on the removal of Aitkens Gap Gaol from its original site. Two end walls of the gaol are standing and the work is being done on the front and back of the building. Conifers and cypress trees are growing around the site.peter free, aitkens gap gaol, police historical association, sunbury police station, george evans collection -
 Whitehorse Historical Society Inc.
Map, Victorian Railways, Blackburn to Ringwood, 1919
Schematic plan of rail line with notes of all signals and junctions. Signed by Gus. Ballard, Chief Engineer of Ways of Works.Schematic plan of rail line with notes of all signals and junctions. Signed by Gus. Ballard, Chief Engineer of Ways of Works.Schematic plan of rail line with notes of all signals and junctions. Signed by Gus. Ballard, Chief Engineer of Ways of Works.victorian railways, blackburn railway station, tunstall railway station, nunawading railway station, mitcham railway station, ringwood railway station -
 Whitehorse Historical Society Inc.
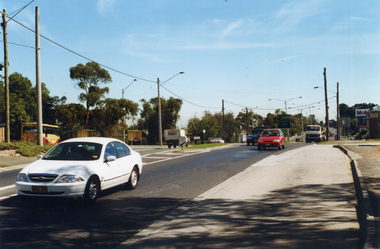
Photograph, Prior to Construction of Mitcham Road, 1/02/2000 12:00:00 AM
Coloured photograph of Mitcham Road, looking towards Springvale Road Junction. Donvale Bus Terminus on left, Mobil Service Station on right, as is a small shopping centre which consisted in earlier days as only a family operated general store. This photograph was taken just prior to widening of Mitcham Road.mitcham road, donvale, springvale road