Showing 270 items matching "railway signals"
-
 Canterbury History Group
Photograph - Canterbury Road from Bradshaws Garage looking west, 1950, 1950
... Crossings Railway Gates Signal Boxes Vintage Cars Trucks Black ...Black and white photograph of Canterbury Road looking to the west from the front of Bradshaws Garage 1950canterbury, canterbury road, canterbury post office, railway crossings, railway gates, signal boxes, vintage cars, trucks -
 Wodonga & District Historical Society Inc
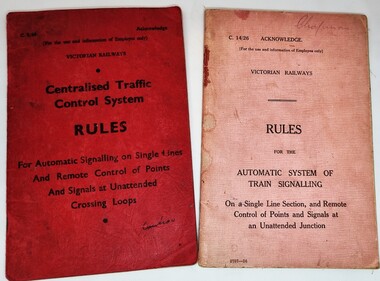
Manual - Traffic control and signals manuals, Victorian Railways, 1969 & 1927
... Railways Victoria Railways Signalling systems These manuals were ...These manuals were printed by Victorian Railways in 1927 and 1969 and therefore document the changes in signalling systems over this time frame.2 small booklets for instruction related to traffic control and signals, Both have paper covers, one on red paper and the other is pink. Each one is bound with staples along the centre fold and printed in black ink.fiction These manuals were printed by Victorian Railways in 1927 and 1969 and therefore document the changes in signalling systems over this time frame.vline training, railways victoria, railways signalling systems -
 Wodonga & District Historical Society Inc
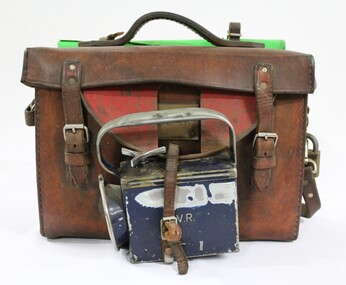
Functional object - Victorian Railways Guard's Satchel c. 1970s
The leather satchel with printed information and equipment including instruction manuals, report sheets, rubber stamps and books was issued to Barry Ryan when he started working as a guard for Victorian Railways in Wodonga in 1972. It was in use until he became a locomotive train driver in 1987, when guards no longer worked on the trains.The leather satchel has local significance as it was used by a guard on the Victorian Railways in Wodonga and the railway was an important factor in the development of Wodonga. It also has state significance as part of the Victorian railways equipment for train guards, and is representative given that it's a complete kit with the green signal flag, lamp and the instruction manuals, report sheets, rubber stamps and books in the satchel.Brown leather Victorian Railways guard's satchel, with a leather handle and shoulder strap. There is a rolled up green signal flag attached behind the handle on the top and a dark blue metal lamp attached to the front of the satchel. The lamp has a green filter in front of the bulb, so it would emit green light. The raised letters "V.R." are located on the front and top surfaces of the blue metal lamp, and the number "2749" is engraved on the back surface. The name "B. RYAN" is engraved in the front surface of the lamp. The number "2544' is stamped into a brass plate on the front of the satchel. There is a semi-circular red painted iron disk hinged to the front of leather satchel with a cut out area in the centre to show the number on the brass plate. The lamp is attached to lower rim of the semi-circular red painted iron disk. Inside the leather satchel there are instruction manuals, report sheets, rubber stamps and books relating to the work as a guard on the Victorian railways, as the satchel was used by the donor Barry Ryan when he started working as a guard for Victorian Railways in Wodonga in 1972. "V.R." in raised letters on the front and top surfaces of the metal torch. "B. RYAN" engraved in the front surface of the torch. "2749" engraved into the back surface of the metal torch. "2544" stamped into the surface of the brass plate on the front of the leather satchel. victorian railways, v.r., victorian trains, trains, train guards, leather satchel, satchel, wodonga -
 Wodonga & District Historical Society Inc
Certificate - Australian Railways Union, Victorian Branch, Past Officers Certificate, Wodonga Sub-Branch, 1926
The Wodonga line and train station opened in November 1873 when the section of the line from Wangaratta was completed. The expansion of the railways to the northeast of Victoria occurred after the Victorian Government took over the railways in 1867 and the trains serviced large towns such as Seymour, Wangaratta and Wodonga, as well as smaller towns along the way. The north- east train line to Wodonga remained a significant factor in the development of Wodonga as a rural city in the 20th century. The Past Officers Certificate has local significance as it was presented to Wodonga resident, Lachlan McEachern, who was President of the Wodonga Sub-Branch of the Victorian Branch of the Australian Railways Union, and there are other items that belonged to Mr Eachern in the collection of the Wodonga Historical Society. It also has wider significance as an example of a Past Officers certificate dated to the 1920s, as other examples in the collection of Museums Victoria are later and are dated to the 1930s, 1940s and 1950s. Dark brown wooden frame with a lighter brown wood and gold inner border on a Past Officers Certificate from the Victorian Branch of the Australian Railways Union, presented to L. McEachern in 1926, in recognition of services rendered as President of the Wodonga Sub-Branch. The certificate is a colour lithograph with black and white photolithograph images and a red embossed seal. The inscription on the certificate is surrounded by two Corinthian columns and a background illustration of a signal gantry at Flinders St Station. The signatures of the State President and State Secretary are faded. At the bottom of the certificate, there are black and white images of a suburban electric passenger train, "Unity Hall" which is the building where the Australian Railway Union offices were located and a steam train."AUSTRALIAN RAILWAYS UNION" "A.R.U" "AUSTRALIAN RAILWAYS / UNION / VICTORIAN BRANCH" "Presented to / L.McEachern / In Recognition / of Services Rendered / As President / of the Wodonga Sub-Branch /Year 1926" "State President / State Secretary"australian railways union, a.r.u., a.r. u. victorian branch, wodonga sub-branch, victorian railways, v.r., past officers certificate, flinders st station, railway unions, trade unions -
 Wodonga & District Historical Society Inc
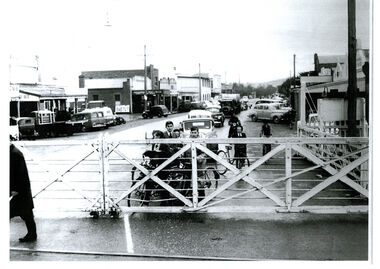
Photograph - High Street, Wodonga Level Crossing, 1954
This image is representative of many photographs illustrating the level crossing in the centre of Wodonga. Since its opening in 1873 the railway line had crossed High Street, originally called Sydney Road. It bisected the city with level crossing gates frequently stopping the flow of traffic and pedestrians as trains passed through. Signal Box B stood on the eastern side of the High Street level crossing and a big wheel closed and opened the gates. On 17th September, 1961, it was replaced by boom gates and flashing lights. The railway crossing was removed from High Street as part of the Wodonga Rail Bypass project. This involved a 5.5 kilometres bypass, the elimination of 11 level crossings and the relocation of the Wodonga station. It was moved from its original central location to a position on a new line on the northern edge of the town. The old station closed on 8 November 2008 and the new station opened on 25 June 2011.This image has local and statewide significance as it captures the former crossing in a major railway system. The railways played a critical role in opening up Victoria and connecting Australia for trade, business, social communication and transport.A black and white photo of the railway level crossing in High Street, Wodonga with gates closed. The Melbourne to Sydney railway line went through the centre of Wodonga and trains frequently held up internal vehicular and pedestrian traffic in the main street. railways wodonga, wodonga railway relocation, high st wodonga rail crossing -
 Wodonga & District Historical Society Inc
Photograph - Fred Rochow Railways Collection - Signalman Alan Neviandt, 24 August 1988
The Fred Rochow Railways Collection incorporates photos related to the operation of the Wodonga Railway Station including different types of trains and railways staff C. 1930 – 1990. It was donated to the Wodonga Historical Society by Fred Rochow, a railwayman who spent many years based in Wodonga. He joined the Victorian Railways on 17th June l947 and retired in 1988. For some time, he was a member of the Australian Federated Union of Locomotive Enginemen and served a term as a member of the Trades Hall Council. He had an extensive knowledge of the struggles that took place to achieve better conditions for railway workers. Fred worked for many years as a fireman and then worked his way up the ranks to driver, experiencing many changes from the days of steam locomotives through to diesel trains, locomotives and even the modern XPT train. He worked throughout Victoria at different stages of his career, with his final working years focused on the northeast of Victoria and the Albury to Melbourne line. After his retirement, Fred continued to share his love of steam miniature trains with the community.This collection has local and statewide significance as it captures images of trains, locomotives and personnel who operated the railway services in Wodonga and throughout Northeast Victoria. The railways played a critical role in opening up Victoria and connecting Australia for trade, business, social communication and transport.Signalman Alan Neviandt descending stairs at Wodonga Signal Box A on 24 August 1988.fred rochow, steam locomotives australia, len gregson, david naldrett, train drivers wodonga -
 Wodonga & District Historical Society Inc
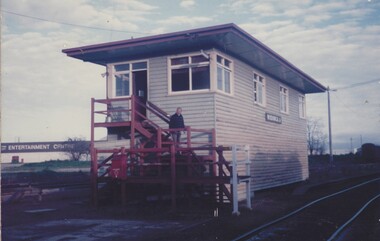
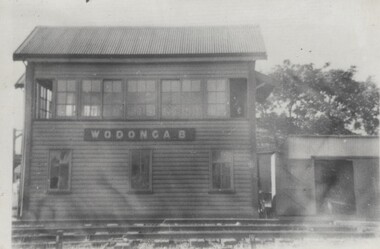
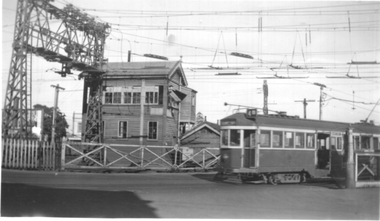
Photograph - Fred Rochow Railways Collection - Signal Box B, Wodonga Station, Before 1964
... Railways Collection - Signal Box B, Wodonga Station ...The Fred Rochow Railways Collection incorporates photos related to the operation of the Wodonga Railway Station including different types of trains and railways staff C. 1930 – 1990. It was donated to the Wodonga Historical Society by Fred Rochow, a railwayman who spent many years based in Wodonga. He joined the Victorian Railways on 17th June l947 and retired in 1988. For some time, he was a member of the Australian Federated Union of Locomotive Enginemen and served a term as a member of the Trades Hall Council. He had an extensive knowledge of the struggles that took place to achieve better conditions for railway workers. Fred worked for many years as a fireman and then worked his way up the ranks to driver, experiencing many changes from the days of steam locomotives through to diesel trains, locomotives and even the modern XPT train. He worked throughout Victoria at different stages of his career, with his final working years focused on the northeast of Victoria and the Albury to Melbourne line. After his retirement, Fred continued to share his love of steam miniature trains with the community.This collection has local and statewide significance as it captures images of trains, locomotives and personnel who operated the railway services in Wodonga and throughout Northeast Victoria. The railways played a critical role in opening up Victoria and connecting Australia for trade, business, social communication and transport.Signal Box B was located on the south-east side of the High Street level crossing and controlled the High Street gates. A big wheel was used to operate the gates. The Signal Box B was demolished on May 10th, 1964, when the standard gauge line to Albury was completed. On front of building "WODONGA B"railways wodonga, fred rochow, wodonga signal box b -
 Wodonga & District Historical Society Inc
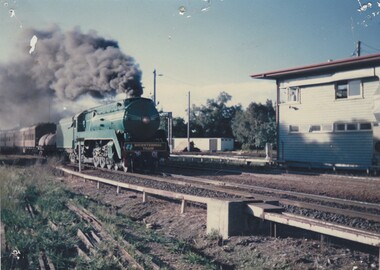
Photograph - Fred Rochow Railways Collection - Bicentennial Train Locomotive 3801 passing Wodonga Signal box, 29 October 1988
The Fred Rochow Railways Collection incorporates photos related to the operation of the Wodonga Railway Station including different types of trains and railways staff C. 1930 – 1990. It was donated to the Wodonga Historical Society by Fred Rochow, a railwayman who spent many years based in Wodonga. He joined the Victorian Railways on 17th June l947 and retired in 1988. For some time, he was a member of the Australian Federated Union of Locomotive Enginemen and served a term as a member of the Trades Hall Council. He had an extensive knowledge of the struggles that took place to achieve better conditions for railway workers. Fred worked for many years as a fireman and then worked his way up the ranks to driver, experiencing many changes from the days of steam locomotives through to diesel trains, locomotives and even the modern XPT train. He worked throughout Victoria at different stages of his career, with his final working years focused on the northeast of Victoria and the Albury to Melbourne line. After his retirement, Fred continued to share his love of steam miniature trains with the community.This collection has local and statewide significance as it captures images of trains, locomotives and personnel who operated the railway services in Wodonga and throughout Northeast Victoria. The railways played a critical role in opening up Victoria and connecting Australia for trade, business, social communication and transport.Bicentennial Train hauled by Locomotive 3801 passing the Wodonga Signal box. Locomotive 3801 was built by Sydney company The Clyde Engineering Co. Ltd., Granville in 1943 as the first of five streamlined (C) 38-class locomotives for the New South Wales Government Railways’ top-link express passenger duties. The delivery of 3801 was much delayed due to wartime labour & material shortages, together with competing wartime construction priorities. After many years of service, 3801 had been scheduled for withdrawal in 1962 due to deteriorating mechanical condition, but rail enthusiasts raised sufficient funds to cover the cost of its overhaul. 3801 joined the collection of the New South Wales Rail Transport Museum (NSWRTM), Enfield on withdrawal from NSWGR service and continued in operation as a tour locomotive. It hauled the “Western Endeavour” on the first crossing of the Australian continent by a standard gauge train from Sydney to Perth and return in August – September 1970. 3801 also stars in the railway film ‘A Steam Train Passes’ made by Film Australia in 1974 By 1976 had been withdrawn from service due to poor boiler condition and placed on static display by the Rail Transport Museum in Thirlmere, NSW. The Locomotive remained in Thirlmere until 1983 when it was decided it should be restored for the Australian Bicentenary in 1988. A new organisation was created specifically for the purpose of operating 3801, and thus 3801 Limited was incorporated on 5th June 1985. Work on the locomotive was completed after three years, with 3801 making its debut at a special Railway Ball hosted in its honour on 29th November 1986. During the Australian Bicentenary celebrations in 1988, it operated an extensive program across Australia visiting every mainland capital accessible by rail including an appearance at AusSteam ’88 in Melbourne in October 1988, stopping over in Wodonga on the way. After the company’s 20-year lease on the locomotive expired in 2006 Railcorp chose not to extend the agreement, and the locomotive returned to the Rail Transport Museum at Thirlmere (now the NSW Rail Museum). 3801 was withdrawn from service in 2007 for major boiler repairs. Locomotive 3801 was officially relaunched at Sydney's Central Station on Friday 12 March 2021 by Her Excellency, the Honourable Margaret Beazley AC QC, Governor of New South Wales.On front of locomotive Australia Bicentennial logo and sign "BICENTENNIAL TRAIN/3801" railways wodonga, fred rochow, locomotive r761, bicentennial train, locomotive 3801 -
 Ballarat Heritage Services
Photograph - Photograph - Colour, Signal box, Lydiard Street, Ballarat Railway Station
... Ballarat Railway Station signal box Weatherboard Signal box ...Weatherboard Signal box at the Ballarat Railway Stationballarat railway station, signal box -
 Ballarat Tramway Museum
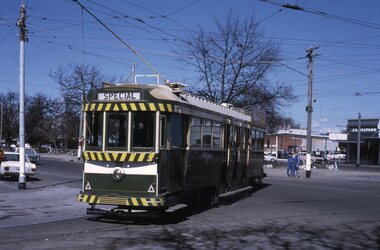
Slide - Set of 7, Warren Doubleday, Ballarat - last Saturday of full operations, 21/8/1971
Photos taken on the last Saturday of full operations by the SECV in Ballarat prior to the first closure of the Victoria St line on 22/8/1971. 1 - Tram 42 running a special inbound in Albert St Sebastopol with a closed Antiques shop in the background. 2 - Trams 26 and 30 Grant St loop on the Mt Pleasant line. 3 - Tram 39 using the Dawson St cross over with tram 26 behind. 4 - Tram 26 on Dawson St cross over 5 - Tram 31 or 32? in Lydiard St north crossing over the level crossing with Reids Coffee Palace, the Provincial Hotel and the signal gantry in the view. 6 - Running through the Gardens with the McDonald Gates and a wedding. 7 - Tram 30 turning from Macarthur St into Wendouree Parade View Point with the tram stop shelter and Swans in the view.Yields information about the last full Saturday of SEC Tramway operations in Ballarat and has a strong association with the archivist. Set of 7 Kodachrome colour slides - cardboard mountsHave the photographer's slide numbers written on them.trams, tramways, closure, tram 26, wendouree parade, barkly st, tram 42, tram 30, level crossing, lydiard st nth, railway, ballarat station, view point, macarthur st -
 Ballarat Tramway Museum
Slide - Set of 6, Warren Doubleday, Ballarat - last day of the Lydiard St Nth to Sebastopol line, 19/9/1971
Photos taken on the last day of the SECV operated tram services in Ballarat 19/9/1971 1 - Tram 39 running out as Special at corner of Sturt and Drummond St North. Has the Mobil Service station and J A Malpass shop in the background. 2 - Tram 40 waiting at the railway gates. Has the Kennedy Murray Pty Ltd General Carrier office in the background and the railway goods shed. Photo taken from the signal box. 3 - Tram 42 in Lydiard St North with Reids Coffee Palace and the Provincial Hotel in the background. The street is very quiet. 4 - Tram 39 at the Lydiard St North terminus. 5 - Tram 40 at the Lydiard St North terminus. Note the shelter and the tram stop pole. 6 - Tram 40 using the Dawson St Crossover with St Patricks Cathedral behind.Yields information about the last day of SEC public operations in Ballarat.Set of 6 Kodachrome colour slides - cardboard mounts. Sixth one in a green card mount.Have the photographer's slide numbers written on them.trams, tramways, closure, tram 35, tram 34, tram 42, tram 40, lydiard st north, level crossing, dawson st -
 Melbourne Tram Museum
Photograph - Tram 361 Elsternwick level crossing, Ken Winney, May 1947
Black and white photograph showing W2 class tram 361 (Glen Huntly Depot, route 4B) crossing the railway at Elsternwick. Has the signal box and the wooden gates in the background. Shows the large superstructure supporting the overhead. Photo by Ken Winney May 1947.Yields information about the Elsternwick level crossing in 1947.Photograph with typed details on the rear.Typed "Elsternwick Tram/train level crossing showing W2 type car no. 361 MMTB May 1967" and the K J Magor stamp with "K Winney" typed in. trams, tramways, w2 class, tram 391, elsternwick, level crossing -
 Flagstaff Hill Maritime Museum and Village
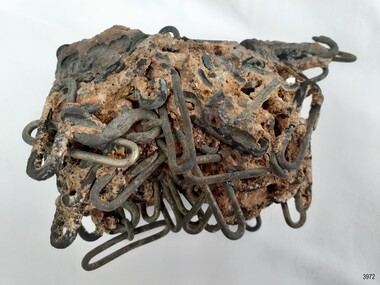
Functional object - "S" Hook Buckle, Ca. 1855
The "S" hook buckles were grouped together under the sea as part of the cargo of the vessel Schomberg. "S" hook buckles are used for fastening two ends of fabric together such as harness belts, trouser belts and similar items. The buckles were recovered in October 1980 by the Flagstaff Hill Sub-Aqua Group, Peter Ronald, Barry Lowther and Jeff Bell. ABOUT THE SCHOMBERG (October 6 to December 27, 1855)- When the ship Schomberg was launched in 1855, she was considered the most perfect clipper ship ever to be built. James Baine’s Black Ball Line had commissioned her for their fleet of passenger liners. The Aberdeen builders designed her to sail faster than the clippers designed the three-masted wooden clipper ship to be fast. The timber used for the diagonal planking was British oak with layers of Scottish larch. This luxury emigrant vessel was designed for superior comfort. She had ventilation ducts to provide air to the lower decks and a dining saloon, smoking room, library and bathrooms for the first-class passengers. The master for Schomberg’s maiden voyage was Captain ‘Bully’ Forbes. He drunkenly predicted at her launch that he would make the journey between Liverpool and Melbourne in 60 days. Schomberg departed Liverpool on 6 October 1855 with 430 passengers and 3000 tons of cargo including iron rails and equipment intended the build the Geelong Railway and a bridge over the Yarra from Melbourne to Hawthorn. The poor winds slowed Schomberg’s sail across the equator. She was 78 days out of Liverpool when she ran aground on a sand spit near Peterborough, Victoria, on 27 December; the sand spit and currents were not marked on Forbes’s map. The ship’s Chief Officer spotted the coastal steamer SS Queen at dawn and sent a signal. The master of the SS Queen approached the stranded vessel and all of Schomberg’s passengers safely disembarked. In 1975, 120 years after the Schomberg was wrecked, divers from Flagstaff Hill found an ornate communion set at the wreck site along with many other artefacts. In 1978 a diamond ring was discovered under the concretion in the lid of the communion set, which is currently on display. Former Director of Flagstaff Hill, Peter Ronald, had salvaged most of the artefacts from the wreck. This group of "S" hook buckles and conglomeration of buckles is significant as an example of an item in common use in the mid-19th century and the items carried on ship as cargo. The Schomberg collection as a whole is of historical and archaeological significance at a State level. Flagstaff Hill’s collection of artefacts from the Schomberg is also significant for its association with the Victorian Heritage Registered shipwreck (VHR S 612). The collection is of prime significance because of the relationship between the objects salvaged, as together they help us to interpret the story of the Schomberg. The collection as a whole is historically significant for representing aspects of Victoria's maritime history and its potential to interpret social and historical themes. "S" hook buckles; oval silver alloy buckles contained within a conglomeration of materials from the sea. The group was recovered from the wreck of the Schomberg.flagstaff hill, warrnambool, flagstaff hill maritime museum, maritime museum, shipwreck coast, flagstaff hill maritime village, great ocean road, shipwreck artefact, schomberg, horse harness fitting, harness hardware, "s" hook buckle, "s" hook buckles, conglomeration of buckles, belt buckle, fastener, quick release fastener, flagstaff hill sub-aqua group, peter ronald, barry lowther, jeff bell -
 Victorian Railway History Library
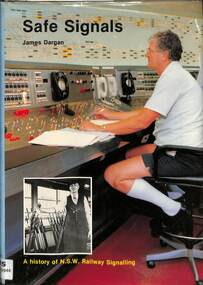
Book, Dargan, James, Safe Signals A history of N.S.W. Railway Signalling, 1989
... Wales Railways signalling systems. index, ill, p.226. Safe ...A history of the New South Wales Railways signalling systems.index, ill, p.226.A history of the New South Wales Railways signalling systems.signals and signalling - new south wales, railroads - signalling - new south wales - history -
Canterbury History Group
Photograph - Canterbury Railway Station 1898, 1898
Three photocopied images of Canterbury Railway Station in 1898. Donated to the Canterbury History Group by Mr Norman Mills who digitised the photographs left to him by a relative.Includes copies of the old photographs before digitisation and a letter from Mr Mills.canterbury, canterbury railway station, pedestrian underpass, stationmaster's house, gaslights, signals, hansom cabs, steam trains -
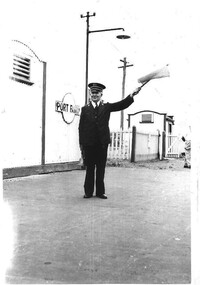 Hymettus Cottage & Garden Ballarat
Photograph, Port Fairy Station
The photograph shows the station master Mr John (Jack) Taffe at Port Fairy, Victoria in the late 1950s signalling for the train to depart using flag and bell. The Port Fairy Railway station was closed twenty years later in 1977.port fairy, railway history, taffe, stationmaster, railway station closures, trains, train station. -
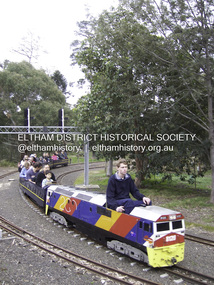 Eltham District Historical Society Inc
Photograph - Digital Photograph, Marguerite Marshall, Diamond Valley Railway, Eltham Lower Park, 7 September 2008
Kids of all ages enjoy the Miniature Railway. Published: Nillumbik Now and Then / Marguerite Marshall 2008; photographs Alan King with Marguerite Marshall.; p163 On Sundays in Eltham thousands of children, mums, dads and grandparents can be seen travelling around Lower Eltham Park in tiny trains. They are among the two and half million passengers who have travelled on the Diamond Valley Railway since it officially began in 1961. The miniature railway originally operated from the 1940s at Chelsworth Park, Ivanhoe, until flooding caused it to be moved to the Eltham Lower Park in 1959. The railway is modelled on the 1920s era – the heyday of passenger rail travel – and the trains are built on a scale of two inches to the foot (1/6). Although not exact replicas, trains include models of the Spirit of Progress, Puffing Billy, The Overland, Dog Boxes, Vic Rail S class, G class and a NSW 81 Class. The three and a half kilometres of track is set amongst native plants and picnic areas. A friendly hoot or the clang of a bell occasionally punctuates the tranquillity as a train emerges from a treed bend with passengers excitedly waving to onlookers. For $3 the train takes you on a 13-minute two-kilometre ride. Passengers sit in single file in the narrow train, which clatters along tracks built to the scale of the Australian narrow gauge of three feet six inches (1.1m). These are used in Queensland, South Australia, Tasmania and Western Australia. Safety standards are stringently kept. Even before you buy a ticket notices tell you that you must wear closed shoes. You can even borrow these, and you are given a pair of socks for the ride! Blue-overalled volunteers check tickets, see you aboard, and drive the train. They are mainly retired men who can at last devote their time to what little boys dream of – playing with trains. Passengers are instructed in safe behaviour, then the station master waves a white flag and off we go. The guard sits at the back with his whistle and green flag at the ready. The winding track, fringed by native trees and bushes planted by volunteers, stands on crown land managed by Nillumbik Council. The train clatters along the track and crosses a bridge over a drain elevated by name to The Blow Fly Creek. We pass by Meadmore Junction at a speed of three kilometres an hour. Then on through a tunnel, accompanied by squeals of delight, and after a few moments of blackness, light glimmers at the end. On we go, past the original platform, along another route past busy Main Road through Pine Creek Station, over a bridge and through another tunnel with more screams of delight.Then a signal stops us before the ‘all clear’ to return to our original point of departure. The railway services its passengers – the largest number of any miniature railway in Australia – with a fleet including: six diesel locomotives, three steam locomotives, eight sets of passenger cars and one battery electric Dog Box set. Members also privately own 20 locomotives and powered carriage sets as well as four carriage sets.1 All the trains are stored on-site in workshops, sheds and a tunnel. The railway is entirely run by volunteers, so that all ticket money is used for maintenance and extensions, and some goes to local charities. Since 1991, the entire railway has been rebuilt, including an upgraded signalling system. About half of the 120 volunteer members are active with about 35 working each Sunday, and a dozen or so working every Wednesday. Members are trained to positions of station assistant, booking officer, train guard, train driver or signalman. Members construct new carriages and locomotives as well as maintaining track, signalling and rolling stock.This collection of almost 130 photos about places and people within the Shire of Nillumbik, an urban and rural municipality in Melbourne's north, contributes to an understanding of the history of the Shire. Published in 2008 immediately prior to the Black Saturday bushfires of February 7, 2009, it documents sites that were impacted, and in some cases destroyed by the fires. It includes photographs taken especially for the publication, creating a unique time capsule representing the Shire in the early 21st century. It remains the most recent comprehenesive publication devoted to the Shire's history connecting local residents to the past. nillumbik now and then (marshall-king) collection, diamond valley railway, eltham lower park -
 Melbourne Tram Museum
Photograph - Black and White - cable tram alarm signalling device - set of three
Photograph shows the device used to send a "telegraph" signal to the winding or engine house. They were positioned along the track and enabled the tram crew or a cable tram worker to send a signal about the cable. The crew member would set the pointer and depress the trigger. This sent the signal which was recorded on a telegraph tape, indicating the signal and the location of an incident. Installed by the Melbourne Tramway and Omnibus Co. (MTOCo) This photograph is Public Records Office photo H165, 166 and 167 in the Victorian Railways collection.Yields information about the type of equipment the MTOCo used to operate the cable tram system.Set of three Photographs - Black and White of a Melbourne cable tram signalling device.trams, tramways, cable trams, mtoco, signalling, cables, engine houses -
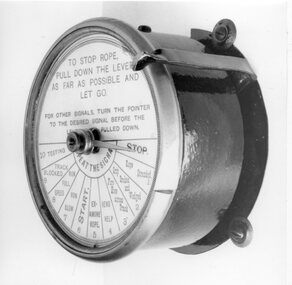
Bendigo Historical Society Inc.
Document - VLINE BENDIGO SIGNALLING DIAGRAM NO.44/89, 1989
... BHS Collection BENDIGO Utilities railways Detailed ...BHS CollectionDetailed signalling diagram showing signal and interlocking arrangements, produced 1989 for Bendigo Rail Yard.bendigo, utilities, railways -
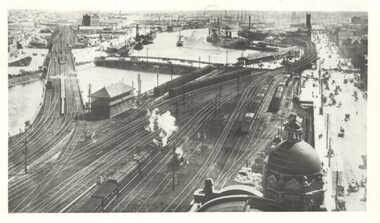 Melbourne Tram Museum
Photograph - Yarra River from Flinders St Station clock tower, Town and Country Journal, 1909
... . In the view are are steam hauled suburban trains, Flinders St A signal ...Photos show the Yarra river and the shipping turning basin that was used prior to the construction of the Spencer St bridge. In the view are are steam hauled suburban trains, Flinders St A signal box, Queensbridge, and the wharves on either side of the river. The viaduct was expanded to four tracks in 1915. Yields information about Yarra River, Flinders St railway station yards and shipping,Set of two photographs looking west from the Flinders St Station clocktower. over the Yarra River and station yards.On rear of both prints in ink: 1 – Melbourne - West from clock tower on Flinders St station - “Town and Country Journal 21/7/1909” Copy neg Mark Plummer collections ex late John Alfred collection. .2 - Melbourne, Looking west along Flinders St from clocktower of Flinders St station. Copy neg Mark Plummer collections ex late John Alfred collection. Has “T&C 20/12/09” in pencil on rear. bridges, flinders st station, yarra river, wharves, railways, signal boxes, queens bridge, shipping -
 Melbourne Tram Museum
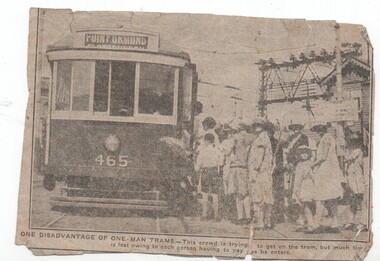
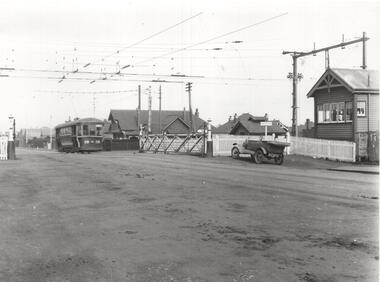
Newspaper, One man trams - their disadvantage when crowded, c1920's
... Elsternwick, with the signal box and railway overhead... loading passengers at Glenhuntly Road Elsternwick, with the signal ...Newspaper cutting from an unknown Melbourne newspaper with a photo of X1 465 loading passengers at Glenhuntly Road Elsternwick, with the signal box and railway overhead in the background. Notes the disadvantage of one many trams, with a large crowd having to pay separately as they enter. Has on the rear a piece of The Age with the date Wednesday 26 October to mend the cutting which has been torn. Dress of the ladies is 1920's with large hats. Tram has the destination of Point Ormond.trams, tramways, point ormond, one man trams, glenhuntly rd, elsternwick, level crossings, tram 465, x1 class, mmtb -
 Melbourne Tram Museum
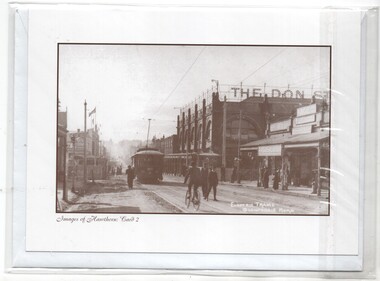
Photograph - Card with Envelope, Hawthorn Historical Society Inc, "Images of Hawthorn: Card 2", c2000
Card with a with an envelope and contained within a plastic envelope: Photo of a PMTT electric tram in Glenferrie Road, at the railway level crossing. Shows "The Don" department store and the level crossing catch point disc signal on the left hand side. Photo c1913. Has details of the photograph, source and the Hawthorn Historical Society on the rear of the card. One of a series of five cards.trams, tramways, hawthorn, glenferrie rd, level crossings, pmtt -
 Melbourne Tram Museum
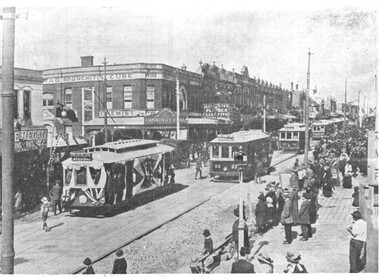
Photograph - Black & White Photograph/s, Bob Prentice, 13/11/1913 12:00:00 AM
Black and white photograph of the opening of the tramway along Glen Huntly Road, 13-11-1913. Shows the decorated tram and trams 53 and 63 along with others in the photograph and the unfinished natures of the road surface. Photograph taken near the Elsternwick railway level crossing - has the disc signal for the catch points in the foreground. Has the shop of Rankin and Ev?al chemist in the photograph. A similar Photograph features on page 61 of Ian Brady's book on the PMTT, "Melbourne's Foremost Municipal Tramway". Photograph from the Bob Prentice Collection. Has been removed from sheet with remains of the sheet on the rear with handwritten note on rear.trams, tramways, pmtt, glenhuntly rd, railway crossing, elsternwick, tram 53, tram 63 -
 Melbourne Tram Museum
Document - Notice, Melbourne & Metropolitan Tramways Board (MMTB), "Reconstruction of Burnley Railway Bridge in Swan Street, Jun. 1969
Set of four notices regarding trackwork and reconstruction printed on foolscap paper. Signed by R. C. Drummond as Traffic Manager. .1 - Notice No. D1507 "Reconstruction of Burnley Railway Bridge in Swan Street - Sunday 13th April 1969" giving details of tram and bus rearrangements, procedure at the bridge for buses. .2 - Notice No. D1508 - regarding Burnley St rail bridge and the single line working that applied during the bridge reconstruction period - dated 10/4/1969. .3 - Notice No. D1546 about reconstruction of tram tracks in Collins St between Swanston and Elizabeth on Sunday 22 June 1969. Two pages, has been stapled in the top left hand corner. Gives bus and tram rearrangements. Dated 18/6/1969. .4 - Notice No. D1550 about reconstruction of tram tracks in Collins St near King St for 29 June 1969.. Two pages, has been stapled in the top left hand corner. Gives bus and tram rearrangements. Dated 24/6/1969.trams, tramways, mmtb, trackwork, burnley, swan st, signals, collins st -
 Melbourne Tram Museum
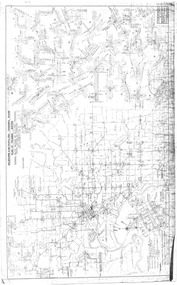
Drawing, Melbourne & Metropolitan Tramways Board (MMTB), "Plan of Tramway System - showing route mileage of electric tramways", Late 1960's
Drawings - dyeline print - titled - "Plan of Tramway System - showing route mileage of electric tramways" - Principal Junctions and intersections shown diagrammatically. Map of system shown at 40 chains to the inch. Drawing No. P6050. Shows crossovers, signal cabins, automatic points, closed cable tram lines in the city area, roads, railways and stations. Originally signed by Perway Engineer - 31-7-1951, last update March 1963. Has a list in the bottom left hand corner of abandoned cable tram lines. See Reg Item 1638 for a 1987 version and 3642 for a 1941 version.trams, tramways, mmtb, trackwork, tramways, junction, map -
 Melbourne Tram Museum
Drawing, Melbourne & Metropolitan Tramways Board (MMTB), "Plan of Tramway System - showing route mileage of electric tramways", Late 1960's
Set of 9 A3 photocopy of a drawing - of a dyeline print that had been mounted onto a cloth backing and had been kept up to date with regard to extensions and closures or opening and closing - titled - "Plan of Tramway System - showing route mileage of electric tramways" - Principal Junctions and intersections shown diagrammatically. Map of system shown at 40 chains to the inch. Copy of Drawing No. P6050. Shows crossovers, signal cabins, automatic points, closed cable tram lines in the city area, Port Melbourne, roads, railways and stations. Has extensions to Mill Park up to April 1987. Shows the Port Melbourne, North Melbourne (Spencer and Abbotsford Sts) and Collingwood cable lines, the Footscray system lines and the Point Ormond lines. See also Reg Item 1561 for a late 1960's print and 3642 for a 1941 version.trams, tramways, mmtb, trackwork, tramways, junction, map -
 Melbourne Tram Museum
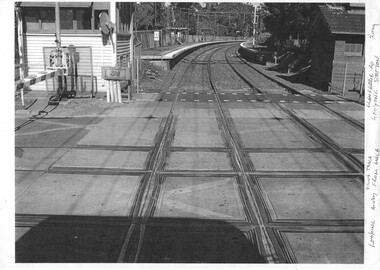
Photograph - Black & White Photograph/s, 2009
Set of two Photographs printed on A4 sheet, photocopy - of the rail tram level crossing at Glenferrie Road, Kooyong showing the rubber inserts and the level crossing - taken from the cab of a train in either direction. Shows the level crossing, platform and track, along with part of the signal box and boom barriers.1 - "Looking away down track from Melbourne - Glenferrie Rd Kooyong Station - 2009" 2 - "Looking towards Melbourne up track - Glenferrie Rd Kooyong Station - 2009"trams, tramways, kooyong, level crossings, glenferrie road, tramway square, railway squares -
 Melbourne Tram Museum
Photograph - Black & White Photograph/s, mid 1921
Photograph, Black and White, of the Level Crossing in Lygon St with the inner Circle Railway North Carlton, with Melbourne Brunswick and Coburg Tram No. 19 crossing with the interlocked gates and signal box in the view. Photo mid 1921. The level crossing was electrified on 5-7-1921, but the wires etc would have been positioned earlier. See Weekly Notice Extracts 1894-1994, published 1996.In ink on the rear: "Melbourne - Ex Coburg Trust route / No. 19 in Lygon St at railway crossing North Carlton / (later No. 166) After 10/8/1920. Has KSK stamp and Number LWR-3 and CEE 13 in to right hand corner.trams, tramways, lygon st, north carlton, level crossings, mbctt, tram 19, s class -
 Melbourne Tram Museum
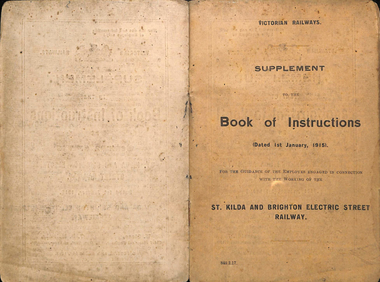
Document - Instruction, Victorian Railways, "Supplement to the Book of Instructions re the working of the St Kilda and Brighton Electric Street Railway, dated 1/1/1915", Jan. 1915
Instruction - 12 off white or light brown pages + white cloth card cover centre stapled titled "Supplement to the Book of Instructions re the working of the St Kilda and Brighton Electric Street Railway, dated 1/1/1915". Gives changes to a previous issued rule book, bell signals, air brake orders, operating orders, operation while running and instructions cancelled. Issued under the name of W. Stone Chief Electrical Engineer and T. B. Molomby General Superintendent of Transportation.trams, tramways, victorian railways, vr, st kilda brighton, rules, employees, safeworking -
 Melbourne Tram Museum
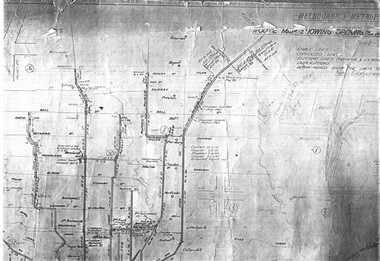
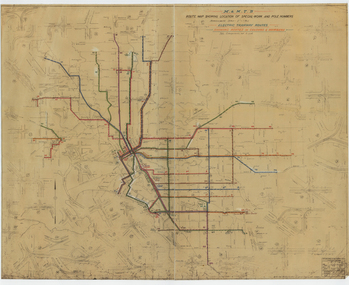
Drawing, Melbourne & Metropolitan Tramways Board (MMTB), "Route Map showing location of special work and pole numbers" "Electric Tramway Routes - showing routes in colours and numbers", late 1941
... No. P5799. Shows crossovers, track layouts at junctions, signal... crossovers, track layouts at junctions, signal cabins roads, railways ...Map of the system shown at two inches = 1 mile. Drawing No. P5799. Shows crossovers, track layouts at junctions, signal cabins roads, railways and stations. Originally signed by Perway Engineer - 20/12/1940, though originally drawn in 1922. Has been marked up in coloured pencil to show the routes and route numbers. The plan shows the lines to Maribyrnong Munitions works along Cordite Ave and Wests Road and the track from Moonee Ponds to Union Road, which opened in July 1941, but not the extension to Essendon Airport built-in 1942. See Reg Item 1561 for a 1963 version and 1683 for a 1987 versionDemonstrates the use of a MMTB drawing to show tram routes and their route numbers at the time.Drawings - dyeline cloth backed print - titled - "Route Map showing location of special work and pole numbers" and subtitled - "Electric Tramway Routes - showing routes in colours and numbers". trams, tramways, mmtb, trackwork, tramways, junction, map, world war 2