Showing 281 items
matching service street bridge
-
 Department of Health and Human Services
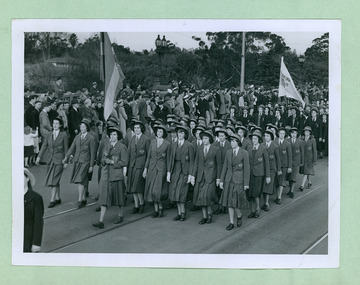
Different College groups marching over Princes Bridge towards Flinders Street Station and the salute base in front of the Melbourne Town Hall on Swanston Street, Melbourne CBD Australia, from the War Memorial - Department of Health – National Fitness Office (Sports & Recreation) – Historical Press Release Photo Collection
Department of Health – National Fitness Office (Sports & Recreation) – Historical Press Release Photo - Empire Youth Day & Royals on Tour CollectionDepartment of Health – National Fitness Office (Sports & Recreation) – Historical Press Release Photo - Empire Youth Day & Royals on Tour Collection -
 Department of Health and Human Services
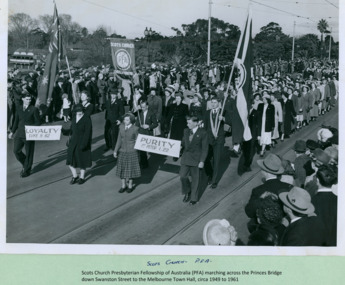
Scots Church & The Presbyterian Fellowship of Australia ( PFA ) crossing Princes Bridge marching towards the Melbourne Town Hall on Swanston Street, Melbourne CBD Australia, from the War Memorial - Department of Health – National Fitness Office (Sports & Recreation) – Historical Press Release Photo Collection
Department of Health – National Fitness Office (Sports & Recreation) – Historical Press Release Photo - Empire Youth Day & Royals on Tour CollectionDepartment of Health – National Fitness Office (Sports & Recreation) – Historical Press Release Photo - Empire Youth Day & Royals on Tour Collection -
 Department of Health and Human Services
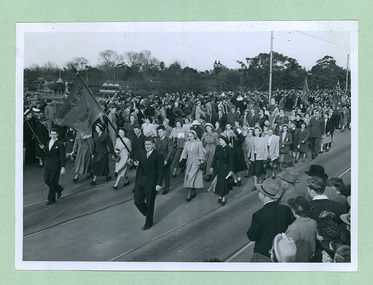
Churches of Christ group crossing Princes Bridge marching towards the Melbourne Town Hall on Swanston Street, Melbourne CBD Australia, from the War Memorial - Department of Health – National Fitness Office (Sports & Recreation) – Historical Press Release Photo Collection
Department of Health – National Fitness Office (Sports & Recreation) – Historical Press Release Photo - Empire Youth Day & Royals on Tour CollectionDepartment of Health – National Fitness Office (Sports & Recreation) – Historical Press Release Photo - Empire Youth Day & Royals on Tour Collection -
 Department of Health and Human Services
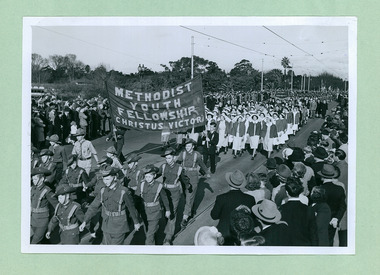
Army Cadets, Nurses, and Methodist Youth Fellowship & Council crossing Princes Bridge marching towards the Melbourne Town Hall on Swanston Street, Melbourne CBD Australia, from the War Memorial - Department of Health – National Fitness Office (Sports & Recreation) – Historical Press Release Photo Collection
Department of Health – National Fitness Office (Sports & Recreation) – Historical Press Release Photo - Empire Youth Day & Royals on Tour CollectionDepartment of Health – National Fitness Office (Sports & Recreation) – Historical Press Release Photo - Empire Youth Day & Royals on Tour Collection -
 Department of Health and Human Services
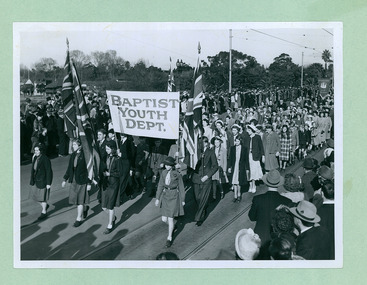
Baptist Youth Department group crossing Princes Bridge marching towards the Melbourne Town Hall on Swanston Street, Melbourne CBD Australia, from the War Memorial - Department of Health – National Fitness Office (Sports & Recreation) – Historical Press Release Photo Collection
Department of Health – National Fitness Office (Sports & Recreation) – Historical Press Release Photo - Empire Youth Day & Royals on Tour CollectionDepartment of Health – National Fitness Office (Sports & Recreation) – Historical Press Release Photo - Empire Youth Day & Royals on Tour Collection -
 Department of Health and Human Services
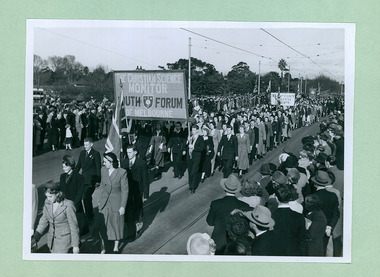
The Christian Science Monitor Youth Forum ( CSMYF ) group crossing Princes Bridge marching towards the Melbourne Town Hall on Swanston Street, Melbourne CBD Australia, from the War Memorial - Department of Health – National Fitness Office (Sports & Recreation) – Historical Press Release Photo Collection
Department of Health – National Fitness Office (Sports & Recreation) – Historical Press Release Photo - Empire Youth Day & Royals on Tour CollectionDepartment of Health – National Fitness Office (Sports & Recreation) – Historical Press Release Photo - Empire Youth Day & Royals on Tour Collection -
 Department of Health and Human Services
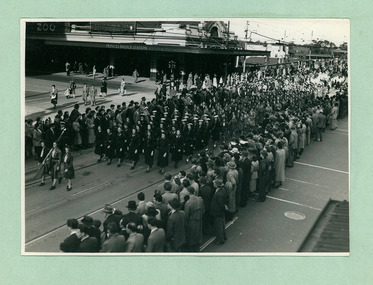
Girl Guides crossing Flinders Street next to Princes Bridge Station marching towards the Melbourne Town Hall on Swanston Street, Melbourne CBD Australia, from the War Memorial - Department of Health – National Fitness Office (Sports & Recreation) – Historical Press Release Photo Collection
Department of Health – National Fitness Office (Sports & Recreation) – Historical Press Release Photo - Empire Youth Day & Royals on Tour CollectionDepartment of Health – National Fitness Office (Sports & Recreation) – Historical Press Release Photo - Empire Youth Day & Royals on Tour Collection -
 Department of Health and Human Services
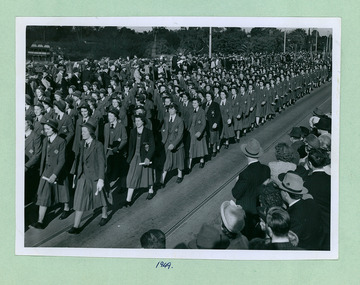
A College group crossing Princes Bridge marching towards the Melbourne Town Hall on Swanston Street, Melbourne CBD Australia, from the War Memorial 1949 - Department of Health – National Fitness Office (Sports & Recreation) – Historical Press Release Photo Collection
Department of Health – National Fitness Office (Sports & Recreation) – Historical Press Release Photo - Empire Youth Day & Royals on Tour CollectionDepartment of Health – National Fitness Office (Sports & Recreation) – Historical Press Release Photo - Empire Youth Day & Royals on Tour Collection -
 Department of Health and Human Services
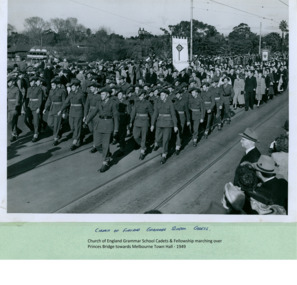
Church of England Grammar School Cadets marching over Princes Bridge towards the Melbourne Town Hall on Swanston Street, Melbourne CBD Australia, from the War Memorial 1949 - Department of Health – National Fitness Office (Sports & Recreation) – Historical Press Release Photo Collection
Department of Health – National Fitness Office (Sports & Recreation) – Historical Press Release Photo - Empire Youth Day & Royals on Tour CollectionDepartment of Health – National Fitness Office (Sports & Recreation) – Historical Press Release Photo - Empire Youth Day & Royals on Tour Collection -
 Department of Health and Human Services
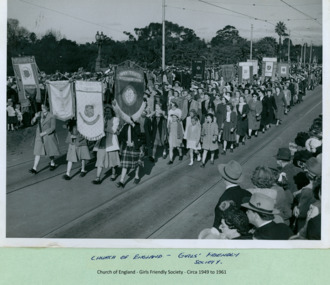
Christian groups from Coburg, East Brunswick, Williamstown and South Melbourne marching over Princes Bridge towards the Melbourne Town Hall on Swanston Street, Melbourne CBD Australia, from the War Memorial - Department of Health – National Fitness Office (Sports & Recreation) – Historical Press Release Photo Collection
Department of Health – National Fitness Office (Sports & Recreation) – Historical Press Release Photo - Empire Youth Day & Royals on Tour CollectionDepartment of Health – National Fitness Office (Sports & Recreation) – Historical Press Release Photo - Empire Youth Day & Royals on Tour Collection -
 Department of Health and Human Services
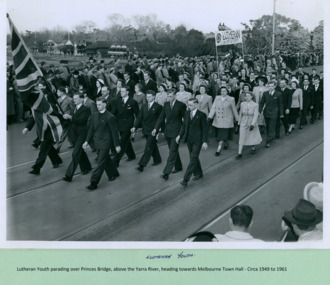
Lutheran Youth marching over Princes Bridge towards the Melbourne Town Hall on Swanston Street, Melbourne CBD Australia, from the War Memorial - Department of Health – National Fitness Office (Sports & Recreation) – Historical Press Release Photo Collection
Department of Health – National Fitness Office (Sports & Recreation) – Historical Press Release Photo - Empire Youth Day & Royals on Tour CollectionDepartment of Health – National Fitness Office (Sports & Recreation) – Historical Press Release Photo - Empire Youth Day & Royals on Tour Collection -
 Department of Health and Human Services
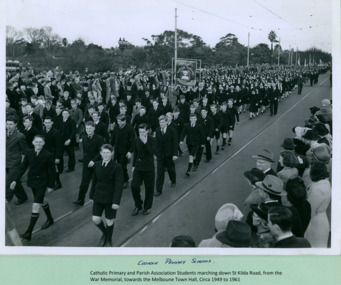
Catholic Primary Schools and Parish association Students marching over Princes Bridge towards the Melbourne Town Hall on Swanston Street, Melbourne CBD Australia, from the War Memorial - Department of Health – National Fitness Office (Sports & Recreation) – Historical Press Release Photo Collection
Department of Health – National Fitness Office (Sports & Recreation) – Historical Press Release Photo - Empire Youth Day & Royals on Tour CollectionDepartment of Health – National Fitness Office (Sports & Recreation) – Historical Press Release Photo - Empire Youth Day & Royals on Tour Collection -
 Department of Health and Human Services
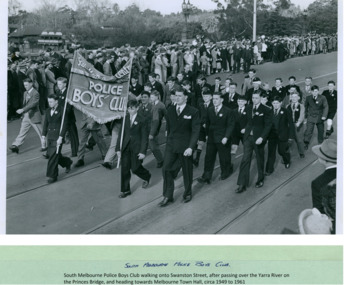
South Melbourne Police Boys' Club marching over Princes Bridge heading towards the Melbourne Town Hall on Swanston Street, Melbourne CBD Australia, from the War Memorial - Department of Health – National Fitness Office (Sports & Recreation) – Historical Press Release Photo Collection
Department of Health – National Fitness Office (Sports & Recreation) – Historical Press Release Photo - Empire Youth Day & Royals on Tour CollectionDepartment of Health – National Fitness Office (Sports & Recreation) – Historical Press Release Photo - Empire Youth Day & Royals on Tour Collection -
 Department of Health and Human Services
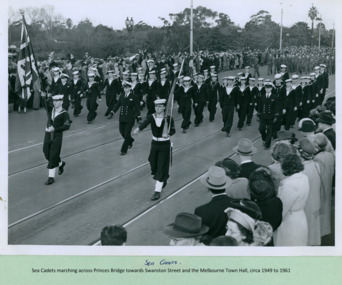
Sea Cadets crossing Princes Bridge marching towards the Melbourne Town Hall on Swanston Street, Melbourne CBD Australia, from the War Memorial - Department of Health – National Fitness Office (Sports & Recreation) – Historical Press Release Photo Collection
Department of Health – National Fitness Office (Sports & Recreation) – Historical Press Release Photo - Empire Youth Day & Royals on Tour CollectionDepartment of Health – National Fitness Office (Sports & Recreation) – Historical Press Release Photo - Empire Youth Day & Royals on Tour Collection -
 Department of Health and Human Services
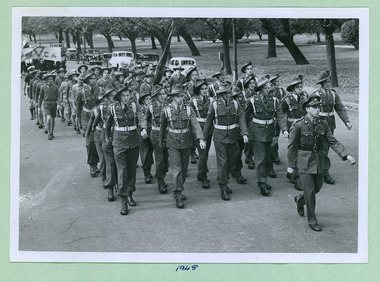
Army Cadets crossing Princes Bridge marching towards the Melbourne Town Hall on Swanston Street, Melbourne CBD Australia, from the War Memorial - Department of Health – National Fitness Office (Sports & Recreation) – Historical Press Release Photo Collection
Department of Health – National Fitness Office (Sports & Recreation) – Historical Press Release Photo - Empire Youth Day & Royals on Tour CollectionDepartment of Health – National Fitness Office (Sports & Recreation) – Historical Press Release Photo - Empire Youth Day & Royals on Tour Collection -
 Department of Health and Human Services
Army Cadets marching towards Princes Bridge and then on to the Melbourne Town Hall on Swanston Street, Melbourne CBD Australia, from the War Memorial - Department of Health – National Fitness Office (Sports & Recreation) – Historical Press Release Photo Collection
Department of Health – National Fitness Office (Sports & Recreation) – Historical Press Release Photo - Empire Youth Day & Royals on Tour CollectionDepartment of Health – National Fitness Office (Sports & Recreation) – Historical Press Release Photo - Empire Youth Day & Royals on Tour Collection -
 Ballarat Tramway Museum
Negative - Set of 5, Campbell Duncan, 2/07/1971 12:00:00 AM
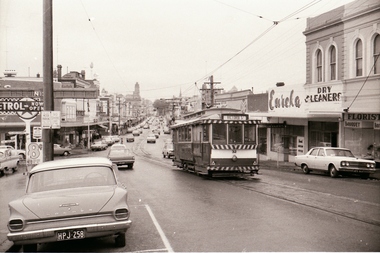
Yields information about tram operations and the street views at Stones Corner.Set of 4 photographs taken on 28/2/1971 by Campbell Duncan of trams at Stones Corner - Bridge St, Victoria St and Main Road. .1 - No. 32 leaving Bridge St, climbing Victoria St, for Victoria St. In the view are Eureka Dry Cleaners, Caltex Service Station, Stones Corner and a busy Bridge St. .2 - No. 27? City bound in Bridge St with Stones Corner buildings, K&O (Digger) Schonell Sports Cycles Electrical store, Kodak, Gear Chemist, State Savings Bank of Victoria. .3 - No. 34 for Mt Pleasant, as above and with H. Whitefield Hair Dresser shop in the view. .4 - ditto with tram at the junction and a passenger alighting. .5 - ditto with tram turning the corner for Mt Pleasant.trams, tramways, bridge st, stones corner, victoria st, tram 32 tram 27? tram 34 -
 Ballarat Tramway Museum
Slide - 35mm slide/s, Noel Simons, 21/11/1962 12:00:00 AM
Set of 17 transparencies taken on 21/11/1962 on Kodak mounts. 1188.1 - Bendigo No. 11 at Depot Junction McCrae and Arnold St. with driver/conductor changing points. 1188.2 - Bendigo No. 4 at Charing Cross, side on photo, with City Club Hotel and Alexandra Fountain in the background. Tram has Castrol and SEC 'Electric Cooking' ads. 1188.3 - Bendigo No. 4 climbing View St. after tram has passed photographer. Tram has Streets Ice Cream and Cohns Soft Drinks ad on rear dash panel. In the background are the buildings in View St., including the Princess Theatre. Tram has destination of Eaglehawk. 1188.4 - Trams 2 and 4 crossing at the California Gully or Thorpe St Loop. 1188.5 - Bendigo 4 in Mt Korong Road. Tram inbound with destination of Quarry Hill, just leaving Garden Gully Loop. 1188.6 - Bendigo 4 and 17 crossing at the Hayes St. or Iron Bark Gully Loop. No. 17 bound for Eaglehawk, No. 4, Quarry Hill. 17 has two SEC roof ads and a white horse whiskey ad. 1188.7 - No. 17 bound for Eaglehawk, soon after leaving California Gully. Has large mullock heap in background. 1188.8 - Bendigo 2 and 17 crossing at the Thorpe St. or California Gully Loop. Has butchers shop in background. 1188.9 - Bendigo 17 at the Eaglehawk terminus. Has destination of Quarry Hill. In background is the hotel and shops at the terminus, showing ads for "Melbourne Bitter". Tram has two SEC 'Electric Cooking' ads. Driver and conductor about to assist two lady passengers with a pram and baby. 1188.10 - No. 17 at Eaglehawk terminus, awaiting departure. Has Eaglehawk Town Hall and Post Office in background. Tram has a Whitehorse Whiskey ad on the front dash panel. 1188.11 - No. 3 in High St. Eaglehawk, with destination of Eaglehawk. Has the shops on the south side of High St. in the background, including the Eaglehawk fish shop. Tram has two roof ads, one an SEC roof ad, and Cohns Drinks and Streets Ice cream ads on front dash panel. 1188.12 - as above, but after tram has passed photographer. Note the centre of the road poles. 1188.13 - No. 2 outbound for Eaglehawk at the intersection of Mt. Korong Road and the Calder Highway. Photo taken after the tram has passed the photographer. Has an Ampol service station in the background. 1188.14 - No. 11 leaving the Bendigo depot, crossing the bridge, with the Scrubber car in the background. 1188.15 - No. 21 at the North Bendigo terminus. Tram has destination of Golden Square and Cohns drink ad on front dash and two roof ads on side. 1188.16 - No. 11 on Golden Square route, in High St. at intersection with Old High St. 1188.17 - No. 11 at the Golden Square terminus, conductor turning the pole. Hotel on the left side of the photo. Note the road works barrier and red flag behind the tram. Slide has an end of roll mark on the right hand side of the image.Information written on in black ink and date stamped on purple ink. 1188.1 - "Birney car No. 11 in McCrae St. at Cnr of Arnold about to run into depot, Bendigo" 1188.2 - "No. 4 at Alexandra Fountain, Charing Cross Bendigo" 1188.3 - "No. 4 climbing the View St. Hill from Charing Cross, Bendigo (Eaglehawk Route)" 1188.4 - "No. 4 and 2 at Thorpe St. Loop, California Gully" 1188.5 - "No. 4 in Mt Korong Rd., Long Gully, Near Havilah Rd. (Bendigo) (Eaglehawk Route)" 1188.6 - "Nos. 17 and 4 crossing on Hayes St. Loop, Ironbark, Bendigo" 1188.7 - "No. 17 soon after leaving California Gully (Eaglehawk Route)" 1188.8 - "No.2 and 17 crossing on Thorpe St. Loop, California Gully (Eaglehawk Route)" 1188.9 - "No. 17 at Eaglehawk terminus" 1188.10 - "No. 17 at Eaglehawk terminus" 1188.11 - "No. 3 in High St. Eaglehawk" 1188.12 - "No. 3 nearing Eaglehawk terminus" 1188.13 - "No. 2 in Mt. Korong Rd., Ironbark. Calder highway on left (Eaglehawk route) 1188.14 - "Birney car No. 11 leaving Bendigo depot. Scrubber car at rear" 1188.15 - "No. 21 at North Bendigo Terminus" 1188.16 - "Birney car No. 11 in High St. Bendigo at intersection with Old High Street (Golden Square Route)" 1188.17 - "Birney Car No. 11 at Golden Square terminus, High St., Bendigo". tramways, trams, bendigo, depot junction, charing cross, view st., eaglehawk, north bendigo, golden square, tram 2, tram 3, tram 4, tram 11, tram 17, tram 21, tram scrubber -
 Ballarat Tramway Museum
Slide - 35mm slide/s - set of 32, Noel Simons, 25/02/1971 12:00:00 AM
Set of 31 transparencies taken on 25/2/1972 on Kodak mounts. 1201.1 - Bendigo No. 26 in Bond St. just after leaving Long Gully en route for Quarry Hill. Has Norris Supermarket in background. Has two SEC roof ads. 1201.2 - No. 26 climbing View St. from Charing Cross en route to Eaglehawk. Has ANZ bank and AMOCO service station in background. 1201.3 - as for 1201.3, but after tram has passed photographer. Has buildings west of Mackenzie St. in photograph. 1201.4 - Tram stop and centre of the road pole with two "CARS STOP BY REQUEST" signs mounted on pole at the corner of Mackenzie St. 1201.5 - same position as for 1201.3, but with No. 5 descending the street. 1201.6 - same position as for 1201.2, but with No. 5 descending the street. Photo taken after tram has passed photographer. 1201.7 - No. 7 in Nolan St. from across the park at Lake Weeroona. 1201.8 - No. 7 entering McCrae St from Nolan St. - distant view. Note "TRAM "sign on left hand side under tree and overhead in McCrae St. from former track that once was in this street. 1201.9 - No. 7 in High St. with Cathedral in background. Tram en route to North Bendigo. Note scaffolding around Cathedral main spire area. 1201.10 - No. 7 crossing Bendigo Creek bridge in High St. near Golden Square. Has a Caltex Service station in the background. 1201.11 - No. 7 at Golden Square terminus with Sunburst Fruit Juices and a Peters Ice cream delivery vans alongside. 1201.12 - as for 1201.11 but photo taken from behind tram, with the end of the rails in the photograph. 1201.13 - No. 7 and 21 in Pall Mall at Charing Cross with No. 5 in the background. Taken some distance away from the location. 1201.14 - No. 7 at Golden Square terminus, taken a short distance from the tram terminus. Shows Milk Bar on right hand side and the hotel on the left hand side. Taken from the south side of the roadway. 1201.15 - as from 1201.14 but taken from the north side of the roadway. 1201.16 - No 5 waiting at California Gully loop. Distant photo showing surrounds 1201.17 - No. 5 en route for Quarry Hill crossing No. 26 at California Gully. 1201.18 - No. 26 at Eaglehawk terminus with Eaglehawk Town Hall and Post Office in background. 1201.19 - No. 21 arriving at Charing Cross en route to North Bendigo. Has Alexandra Fountain in the background, ANZ bank RACV building, and other buildings on the north side of Pall Mall or Nolan St. 1201.20 - No. 26 en route for Quarry Hill at Charing Cross, with crew standing by front door. Has Colonial Mutual life building, Armstrong Tyre Service (Firestone) and a sign for Cohns Drinks in the background. 1201.21 - as for 1201.20 but with No. 5 en route to Eaglehawk now in photograph. 1201.22 - No. 26 at Quarry Hill terminus. 1201.23 - No. 26 at Quarry Hill terminus, view of front portion of tram only from a gate at the Bendigo cemetery. 1201.24 - Track at the end of the Quarry Hill line showing the point blades of the former "Y" terminus and the overhead for this. 1201.25 - No. 2 at the Quarry Hill terminus, looking along the former Trackwork. 1201.26 - as for 1201.25 1201.27 - number not used. 1201.28 - Golden Square terminus from some distance from the actual terminus, showing the Warning sign "TRAM" for motorists from the south. No. 7 at the terminus. 1201.29 - No. 7 passing through the Golden Square shopping centre. Numerous cars and pedestrians. Tram en route for North Bendigo. 1201.30 - No. 7 in High St. Golden Square, en route for North Bendigo. Photo taken after tram has passed photographer. 1201.31 - No. 7 in High St. just past Wattle St. with the Cathedral in the background. Tram has two SEC roof ads good side on photo, 'Everything's fine in my all electric kitchen' and 'Electrical cooking - clean, quick, economical'. 1201.32 - No. 7 in High St. nearing Wattle St. Has Cathedral in the background. Photo taken after tram has passed photographer.Information written on in black ink and date stamped on purple ink. 1201.1 - "No. 26 in Bond St just after leaving Long Gully" 1201.2 - "No. 26 climbing View St. from Charing Cross" 1201.3 - "No. 26 ascending View St. from Charing Cross (At Mackenzie St.)" 1201.4 - "View St. & Mackenzie St." 1201.5 - "No. 5 in View St. near Mackenzie St." 1201.6 - "No. 5 in View St. nearing Charing Cross." 1201.7 - "No. 7 in Nolan St. seen from Lake Weeroona Park." 1201.8 - "No. 7 entering McRae St. from Nolan St. Note "TRAM" warning sign on left. 1201.9 - "No. 7 in High St. passing Short St." 1201.10 - "No. 7 crossing Bendigo Creek bridge in High St. near Golden Square." 1201.11 - "No. 7 at Golden Square terminus" 1201.12 - "No. 7 at Golden Square terminus" 1201.13 - "No 7, 21 and 5 at Charing Cross" 1201.14 - "No. 7 at Golden Square terminus" 1201.15 - "No. 7 at Golden Square terminus" 1201.16 - "No 5 waiting at California Gully loop." 1201.17 - "Nos. 5 and 26 crossing at California Gully loop" 1201.18 - "No. 26 at Eaglehawk terminus" 1201.19 - "No. 21 arriving at Charing Cross from Golden Square" 1201.20 - "No. 26 at Charing Cross" 1201.21 - "Nos. 5 and 26 at Charing Cross." 1201.22 - "No. 26 at Quarry Hill terminus" 1201.23 - "No. 26 at Quarry Hill terminus seen through the gates of the Bendigo Cemetery." 1201.24 - "Quarry Hill terminus showing remains for former double track layout abandoned before 1964." 1201.25 - "No. 2 at Quarry Hill terminus" 1201.26 - "No. 2 at Quarry Hill terminus" 1201.28 - "The Southern approach to Golden Square with No. 7 standing at the terminus, "TRAM" warning sign on the left. 1201.29 - "No. 7 passing through Golden Square Shopping Centre" 1201.30 - "No. 7 in High St. Golden Square" 1201.31 - "No. 7 in High St. passing Wattle St." 1201.32 - "No. 7 in High St. nearing Wattle St."tramways, trams, bendigo, bond st., view st., nolan st., high st., eaglehawk, california gully, charing cross, quarry hill, trackwork, tram 2, tram 5, tram 7, tram 21, tram 26 -
 Ballarat Tramway Museum
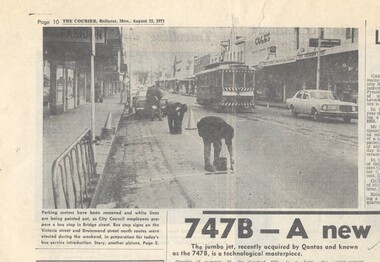
Newspaper, The Courier Ballarat, Installing bus stops in Bridge St, 23/08/1971 12:00:00 AM
Yields information about the closure of the SEC Ballarat system in particular the changes made to Bridge St.Newspaper clipping pasted onto a single sheet of paper with two Punch holes on the left hand side with one hole through the photograph within the cutting. Clipping from The Courier, Ballarat, Monday, 23/8/1971 (newspaper date, with page 10), with a photo and associated caption of Council employees painting out parking lines in Bridge St. in preparation for a bus stop. Has a single truck tram in the photo heading along Bridge St. for the city. Caption notes that the work was being done in preparation for the bus service introduction. Photograph taken either Saturday afternoon after shops closed or on Sunday as street has very few cars in it. See Reg item 3767 for print of photograph. 1069.2 - copy of cutting, image added 10/9/2013, from a donation by Dave Macartney.In red ink in upper central right hand corner, "21/8/71"trams, tramways, closure, bus changeover, bridge st, bus stops -
 Ballarat Tramway Museum
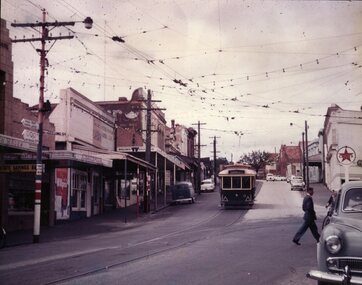
Photograph - Colour Photograph/s, Jim Seletto, c1960
Colour Photograph of SEC tram No. 11, prior to fitting of dash Canopy lighting, c1960, at the intersection of Bridge and Main Streets. Tram No. 11 is arriving from Victoria St. and is about to cross the junction with the Mt. Pleasant line. Trams stops are visible on poles, as is the overhead arrangement, shops on both sides. Tram has large reflective triangles on cab front. Caltex service station sign on right side of photograph. On pole with tram stop sign is a sign with the Olympic rings, pointing way to Lake Wendouree.ballarat, bridge st, victoria st, olympics, tram 11 -
 Ballarat Tramway Museum
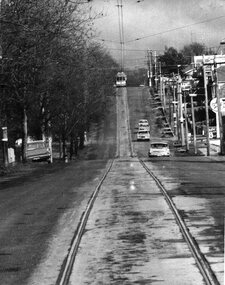
Photograph - Black & White Photograph/s, Peter Bruce, c1970
Black and white photograph of Barkly St. Mt Pleasant taken with a long telephoto lens. Single truck Tram on the top of a hill at terminus, with the photographer on or near the top of the`next hill in centre of track. Four cars travelling towards photographer. Sign of Caltex Service station on right side of photograph. with trees on left. Shows nature of street construction - deep gutters with "bridge" crossings. See also item No. 559, possibly tram No. 31. Would appear to be taken at about the same time, not parked Holden station wagon on left hand side of photo.trams, tramways, ballarat, barkly st, mt pleasant -
 Ballarat Tramway Museum
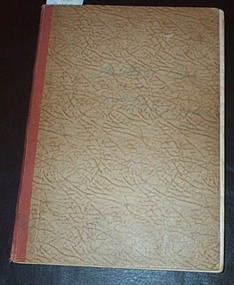
Book, H.P. James, "In Other Days", late 1930's
ESCo Employee Hours Work Record book that has been used by an ESCo/SEC inspector, H. P. James as a record / note book for his personal collection or papers or journal titled "In Other Days". Book sewn with string in 36 page sections, blank end papers, board covers with stipple paper out sides and Rexene cloth binding. Comprising plain paper end papers and 104 printed pages (52 leaves), with each sheet printed in black on feint ruled paper for recording the hours worked and other details of drivers and conductors employed by ESCo. Printed for daily use, with Day and date page headings - made out for the 1930's. Text generically printed feint ruled paper. Images: Book - i1 Inside front cover - i2 Members Certificate - i3 Photo of H.P. James and index page - i4 Has been used to gather mementos such as photos, articles, newspaper clippings, letters and other miscellaneous documents on Ballarat local history. Newspaper cuttings etc often have side notes written by Mr. James. Inside front cover has certificate recording Mr. James membership to the Ballarat Historical Society (on Australasian Historical Record Society paper) for 1937 - 1938. A side note records Mr. James elected as Vice President in 1939. Receipt signed by Edward Crimmins (See Reg. Item 2486) Has a table of contents for pages 1 to 65. Opposite is a photograph of Mr. James dressed for the Ballarat Tramways Social Club function - See Reg. Item No. 506 Primary items are: 1 - Newspaper cutting "A stroll along Bridge St. 50 years ago" - Nathan F. Speilvogel. 3 - Newspaper cutting "What I Remember of Early Ballarat" - James Sainsberry. 4 - Newspaper cutting "Magnet that Made Ballarat - New Monument Marks Gold Discovery" 7 - Newspaper cutting "Romance of a Ballarat Street Block" - Speilvogel 9 - Newspaper cutting "Sixty years of Dana St. School"- Speilvogel 11 - Newspaper cutting "The White Flat - its Transitions of Service - Historical Review" - J. Hargreaves 15 - Newspaper cutting "Memories of Russell Square - Fireman's Carnivals" - James 16 - Notes on the Alfred Hall 17 - Newspaper cutting - "Alfred Hall" - James 21 - Letter re Russell Square dated 24/2/38, J. McLeish 23 - Newspaper cutting "The First Train to Ballarat" 25 - Newspaper cutting "Story of Ballarat's Horse Trams 1887 to 1913", James - see Reg. Item 2489. 27 - Photos and Newspaper cutting of items re horse trams, and photo of ESCo No. 18 - See Reg. Items 2490, 2491 and 2492. 28 - ESCo opening ticket (See other Reg. Items 608 for examples of this) ticket No. 1595. 29 - Newspaper cutting "Story of Ballarat's Electric Trams", James, See Reg. Item 2493. 30 - Poster - SEC - Ballarat "The New System of Fares and Sections" - 3/10/1997 - See Reg. Item 2494. SEC - Tourist Ticket - See Reg. Item 2495 ESCo - 3d check ticket - See Reg. Item 2496 31 - Tickets and handwritten notes - with reference to page 51 ESCo 1d - See Reg. Item 2497 (2 No.) ESCo/SEC? - lunch hour weekly ticket - See Reg. Item 2498 ESCo/SEC? - Morning and evening weekly ticket - See Reg. Item 2499 ESCo/SEC? - 3d Adult Transfer - See Reg. Item 2500 ESCo/SEC? - 2d child Transfer - See Reg. Item 2501 ESCo - 1.1/2 child ticket - See Reg. Item 2502 ESCo - 3d Adult ticket - See Reg. Item 2503 Extract of an item titled "History of Ballarat Tramways", SEC Magazine, Feb. 1939 - See Reg. Item 2504 2d ESCo token (See other reg items 1794 and 1943 for details of this object) - sewn into page. 33 - Handwritten notes "Alfred Hall" 35 - Handwritten notes "Russell Square" 36, 37 - miscellaneous cuttings from the Courier for 1939 and 1940 39 - Newspaper cutting "South Street Band Contests" - cutting dated 27/10/1932. (See images - i5 to 41, 43, - ditto - contest results 44 - Photo of the Tramway Shelter in Sturt Street being removed - Courier dated 18/12/1923 - see Reg Item 2523. 45 - Extract of April 1938 from SEC Magazine, photos of the launch of the illuminated Ballarat Centenary tram - see Reg Item 2524. 47 - Newspaper cutting "Peeps into the Past" 48 - Listing of "Members of Returned Soldiers Band", Ballarat, dated 18/11/1919. 49 - Newspaper cutting "Ballarat, The Home of the Band Contests", dated 27/10/1932. 51 - Handwritten notes - "Tram Fares methods of collection" - See Reg. Item 2505. 53 - Newspaper cutting "100 years ago", Port Phillip Herald for 1840. 54 - Black and white photo of a gathering of people (tramway?) at the Showgrounds - See Reg. Item 2506 55 - Six black and white photos with handwritten notes ESCo 19 or 20 - See Reg. Item 2507 Group of ESCo employees by ESCo tram - See Reg. Item 2508 Photo of ESCo employee, Si Barker - See Reg. Item 2509 Photo of ESCo company bus - See Reg. Item 2510 (See also Reg Item 3813) Photo of No. 25 - Barkly St - See Reg. Item 2511 Photo of two ESCo employees - See Reg. Item 2512 56 - Loose newspaper cutting "San Francisco Struggle Buggies" - cable trams - The Age 15/3/1947 57 - Letter from Mr. Pringle of ESCo to Inspector James and Handwritten notes on ESCo management - See Reg. Item 2513 Handwritten notes on the token systems - See Reg. Item 2514 59 - Page titled "Bundy clocks and meters" but no notes 61 - Hand drawn map of Ballarat tramways with notes on tracks - horse, SEC and ESCo and loops - See Reg. Item 2515. 63 - Miscellaneous newspaper cuttings and photo of the Arch of Victory 64 - Photo of W. J.K. Dunstan ??? (has notes written on back, but difficult to read)* - Notes on rear of photo p64. "49 years in service W.J.K. Dunstan Office Manager Ballarat Branch Retired 18/3/46" 65 - Newspaper cutting "Old Victorian Schooldays, letters and reminiscences by past scholars". 67 - Newspaper cuttings - photo of Ballarat Choral Union and Urquhart St. school 69 - Newspaper cutting "Saint with a top hat" 71, 73 - Newspaper cutting "District Mining Disasters of By-Gone Days" - John Hargreaves 75 - Newspaper cutting "The Ballarat Courier" banners for 2/9/1939 - outbreak of World War Two - normal and a special edition. 77, 79 - Newspaper cutting "My Youth in Ballarat" - T.P. Long. 81 - Two photos and handwritten notes showing trams in Sturt St and the line up of horse trams - See Reg Item 2516. 83 - Newspaper cutting "Theatrical History - The Charlie Napier" - Speilvogel 85, 87 - Newspaper cutting "Story of the Eureka Stockade Monument" - Speilvogel 89 - Newspaper cutting "The Beginning of Buninyong" - Speilvogel 91 - Newspaper cutting "St. David's Day" 93, 95 - Newspaper cutting "From 1856 to 1894, Ballarat's Foremost Citizen Major (William Collard) Smith Recalled - J. Hargreaves. 97 - Newspaper cutting "All Electrical Exhibition / Ballarat's Electric Supply, its development" - 1936, See Reg. Item 2517. 98 - Loose photo of the ESCo Power station chimney and steeplejacks - See Reg. Item 2518. 98 - Loose sheet of paper about the origin of the ESCo trams - See Reg. Item 2525. 99 - Newspaper cutting - about Electricity in Ballarat and tramway services, and handwritten notes on ESCo Inspectors - See Reg. Item 2519 100, 101 - Newspaper cuttings - "Mr. Melbourne Day by Day" cartoon series and the artist's death notice dated 22/8/1939. 102 - Poster - Dana Street School Jubilee Re-union, has N. Speilvogel and H. James as joint secretaries. 103 - Newspaper cutting of various photos and a scene of a gold train at Bendigo 104 - Newspaper cuttings - Bob Menzies and Adolph Hitler and backs of Melbourne tram tickets - "School Boy Howlers". 105 - Letter in an envelope to H.P. James dated 11/10/1937, by a person about the building of the tram sheds at Wendouree - See Reg. Item 2520. Newspaper cutting of the opening of the tramway to Lydiard St. North from Gregory St. - See Reg. Item 2521 Loose item - 1/- SEC Tourist Ticket No. A2676 - See Reg. Item 2522.Many in pencil and inktrams, tramways, h.p. james, esco, horse trams, ballarat, civic history -
 Ballarat Tramway Museum
Film - Movie Film & Box, Kodak, 1960
Yields information in movie film format of Ballarat trams in 1960, how the system operated and was used by people., Yields information in movie film format of Ballarat trams in 1960, how the system operated and was used by people.Movie film - 8mm, approx. 30mins, with leader strip on a plastic reel, within a black and white plastic box, titled "Ballarat No. 1. 1960". Has been transferred to DVD - see Reg item 4100 as Segment No. 2. Made by Ben Parle. Also transferred to DVD by Rod Cook Oct. 2015, via Roger Greenwood for use in his DVD, "The City of Ballarat Trams, Gardens & Gold" of 2016. See Reg Item 6883. Synopsis: based on time. 0:00 View of typed introduction, noting that this is a pictorial record of Ballarat. 0:10 Title “The Tramways of Ballarat 1960, Part 1” 0:16 13, showing “View Point” at Stones Corner, Bridge St, east end, with trolley pole being turned, while another single trucker heads out towards Mt Pleasant. 0:25 13 leaving Stones Corner, short approach and then longer trailing shot of the tram going towards the City in Bridge St. 0:44 View out of front of tram in Bridge St heading towards the City, with cars in the photo, then passing through city Loop, no trams in the loop and running up to Lydiard St Nth and crossing the road. 1:22 Running up Sturt St from Armstrong St, passes over Dawson St X-over and up to the next intersection, Lyons St. 1:54 Title “The View Point Line” 1:59 19 inbound, in Ripon St, from crossing Mair St, towards camera and then passing away and turning into Sturt St. 2:49 View of a “Warning Oncoming Trams” sign 2:52 19 in Ripon St, going to View Point, crossing Webster St towards camera, then going away through the disconnected Victoria Ave loop, pass the “Warning Oncoming Trams” sign. Note very windy scene with people running across roads. 3:17 19 in Wendouree Parade, in bound, though showing destination View Point, going away from the camera, past the View Point Hotel. 3:39 19 coming towards camera near Excerpt or Devon St and then going away towards the terminus. 4:04 19 at the terminus, stationary, with a single trucker 3?, passing from Macarthur St into Wendouree Parade, behind 19. 4:20 33 coming towards camera in Wendouree Parade from St Aidans Drive, stopping to pick up passenger at Forest St and then going away towards the City, photographed from near the depot, on a wet and windy day. 4:54 35 in Wendouree Parade, coming towards the Camera from St Aidans Drive and then going away with the Gardens Loop area in the background. Tram stops at stop to let a passenger off. 5:28 21 leaving Gardens Loop for the City via the Depot, green light in signal can be seen. 5:43 28?, closely followed by 26 turn from Drummond St South into Sturt St. 6:18 Scene opens with shot of “Sebastopol” destination on a bogie tram. 6:21 Title “The Sebastopol Line” 6:24 21 turning from Sturt St into Drummond St Sth with destination of Bell St and then going away from the camera. 6:55 38 in Drummond St Sth, coming towards the camera and then passing the camera with Sturt St just in the view. 7:10 21, showing Gregory St, in Drummond St Sth, approaching and then going away, entering the Urquhart St Loop, 7:39 34 in Drummond St Sth (location check required (Latrobe?)), approaches camera, picks up passengers and the goes away. 8:09 39 at ? Street, turns from Drummond St Sth into Skipton St, after picking up and setting down passengers, bound for Sebastopol 8:55 35 inbound in Skipton St passes through the Bell Street Loop, and then goes away from the camera. 9:33 42 outbound in Skipton St, approaches the camera, passes and then crosses over the half the road into Albert St. 10:00 39 inbound in Albert St – location? 10:31 34 outbound for Sebastopol, approaches camera and just starts to pass by. 10:36 34 in Grey St crossing loop, crosses 42 inbound. 10:59 39 outbound in Albert St, with shopping centre in bound, approaches camera, passes and then crosses over Albert St. Mid morning scene. 11:39 39 inbound, Albert St south, approaches camera and then passes and the crosses over Albert St. 12:16 41 outbound in Albert St passes the camera, and pulls into the terminus with the conductor getting out on the back bumper to pull the pole down as the tram stops and a passenger walks into the Royal Hotel. 12:39 Title “The Lydiard Street North Line” 12:44 Filmed from the Hotel balcony, 21 inbound in Lydiard St Nth passes over Mair St, stops while 33 passes in the other direction. 13:18 With the red light showing on the Seymour St loop signal, 33 inbound for Sebastopol stops and picks up many passengers, passes the camera and runs past the VRI building in the background and through the loop. Possibly filmed on a Sunday given the ladies dresses and quieter streets. 14:01 30 outbound, passes the camera and stops at Macarthur St. Filmed alongside the brick wall of the cutting. 14:28 30 inbound arrives, passes through the Gregory St loop and then proceeds past the camera, making a stop to pick up passengers. 15:14 28 in Lydiard St Nth – location?, approaches and goes away from the camera, north of Gregory St. 15:34 28 ditto location? 15:53 21 arrives at the terminus with passengers getting on and off. 16:11 View of the a vertical positioned “End of Section” sign on a pole at the terminus and then lifting the camera to see the timetable board and the stop sign. 16:33 31 in Bridge St passing Morseheads and then turning into Sturt St, stops at the Grenville St stop, while another single trucker comes down to the stop from the City. 16:58 31 outbound in Bridge St, with destination of Victoria St. 17:14 Title “The Victoria Street Line” 17:18 31 outbound to Victoria St from Stones Corner. Starts with an overhead shot, shows clock at the Caltex service station,. 17:37 31 inbound approaching Bakery Hill and then descending to the junction after it passes camera. 18:09 25 climbing outbound in Victoria St, passing the camera, to then pass through the King St loop. 18:47 25 inbound in Victoria St, passing the camera, then pass through the King St loop, with St Alypius Church in the background. 19:36 14 approaching the rail bridge in Victoria St and stopping at the 2nd last stop to left of passengers. 20:01 14 leaving the terminus and approaching the camera and the a short sequence going away, to the next stop to pick up quite a few passengers. 20:14 “Trams Stop Here” sign, metal wrap around on a steel pole. 20:16 Title “The Mount Pleasant Line” 20:21 11 inbound in Main St, with a passenger leaping off the tramcar and another getting off just before the junction. 20:45 11 passes the junction and then proceeds away from the camera in Bridge St. 21:04 30 outbound in Main St, then turns into Barkly St, a bus (Eclipse Motors) passes in Main St just before the sequence ends. 21:31 30 inbound near Steinfield St. (exact location?) 21:49 25 approaches the camera, then proceeds away and passes through the Grant St. loop. 22:29 25 inbound, windy day, between Grant and Cobden, (exact location?), with a horse drawn bread van in the view and the breadman walking behind the tram as it passes. 23:02 11 outbound in Barkly St, (exact location?) 23:37 11 inbound in Barkly St (exact location?) 23:44 Mt Pleasant terminus signage 23:50 30 approaches the terminus and then stops with the conductor alighting turning the pole, passengers getting on and off and the driver appearing at the other end. 24:32 Title “The Gardens Via Sturt St. West Line” 24:35 21 outbound in Sturt St near Raglan St, approaches and passes the Camera. 25:09 12, showing City Oval, approaches and passes the camera, outbound near Windermere St. 25:33 13 showing View Point, goes away from the camera – location? 25:44 12 comes from St. West, inbound passes the camera and then stop as the next stop next Talbot St? 26:21 Short sequence of a “Warning Oncoming Trams” sign 26:28 42 inbound in Sturt St West, just before Ripon St, view coming towards camera and then going away to cross Ripon St. 27:10 34 passes through the Parker St loop 27:25 35 or 39 inbound past the college in Sturt St West 28:04 41 outbound at the Russell St curve, passes away from the camera. 28:11 35? inbound passes away from the camera through the Victoria Park or Morrison St loop, swinging out into the roadway. 28:29 View of timetable sign at Hamilton Ave. 28:37 35 turning from Sturt St West into Hamilton Ave, can see the conductor changing over the barrier rails. 29:11 42 inbound, crosses another bogie tram (35?) at Carlton St loop then passes the camera and goes past the Olympic rings monument. 29:42 12 approaches the Carlton St gates. 30:07 12 outbound, crosses a bogie tram in the loop with both trams then leaving the loop. 30:20 Title “End of Part One” Written labels giving title information on outside of box.trams, tramways, ballarat, sebastopol, lydiard st north, victoria st, mt pleasant, sturt st west -
 Ballarat Tramway Museum
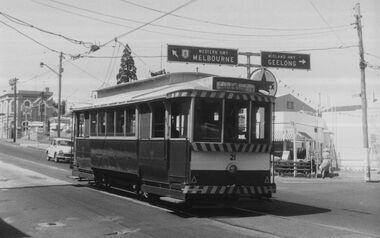
Photograph - Digital image, c1971
Yields information about Ballarat streetscape and its trams in the closing days of the SEC tramway system.Digital image from a black and white print of tram 21 at the intersection of Bridge, Victoria Streets and Main Road, inbound to the Gardens via Sturt St West. Has the Caltex service station, the Munster Arms Hotel in the background. CRB Road signage for Melbourne and Geelong over the tram. At Stones Corner. Photo by Marc Dahlstrom c1971. On rear is the Marc Dahlstrom stamp.trams, tramways, bridge st, victoria st, main st, stones corner, tram 21 -
 Ballarat Tramway Museum
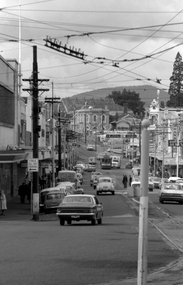
Photograph - Digital image, Peter Bruce, "Bridge St", 1970s
Yields information about the Bridge St landscape looking east.Digital image of a view looking east along Barkly St from Grenville St showing a tram a the intersection of the Mt Pleasant and Victoria St lines (Stones Corner). Has the shops on both side of the street in view. In the far distance is the Caltex service station. Photo taken by Peter Bruce 1970's and 1971, prior to the closure of the Ballarat tramway system. Peter's Title of image: "Bridge St"trams, tramways, ballarat, bridge st -
 Bendigo Historical Society Inc.
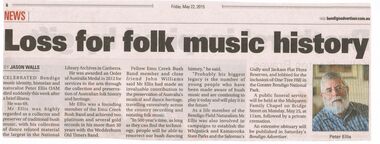
Newspaper - PETER ELLIS COLLECTION: NEWSPAPER ARTICLE, 22nd May, 2015
Newspaper article from the Bendigo Advertiser stuck on A4 printer paper. Article is dated Friday, May 22, 2015. Article is accompanied by a picture of Peter Ellis and is captioned as such. Article is written by Jason Walls and is titled Loss for folk music history. Article reads: Celebrated Bendigo Music identity, historian and naturalist Peter Ellis OAM died suddenly this week after a brief illness. He was 69. Mr Ellis was highly regarded as a collector and preserver of traditional bush music, with his collection of dance related material the largest in the National Library Archives in Canberra. He was award an Order of Australia Medal in 2012 for services to the arts through the collection and preservation of Australian folk history and heritage. Mr Ellis was a founding member of the Emu Creek Bush Band and achieved two platinum and several gold records in his more than 30 years with the Wedderburn Old Timers Band. Fellow Emu Creek Bush Band member and close friend John Williams said Mr Ellis had made an invaluable contribution to the preservation of Australia's musical and dance heritage, travelling extensively across the country recording and notating folk music. 'In 500 year's time, as long as they can find the technology, people will be able to resurrect our bush dancing history,' he said. 'Probably his biggest legacy is the number of young people who have been made aware of bush music and are continuing to play it today and will play it in the future.' As a life member of the Bendigo Field Naturalists Mr Ellis was also involved in campaigns to establish the Whipstick and Kamarooka State Parks and the Saloman's Gully and Jackass Flat Flora Reserves, and lobbied for the inclusion of One Tree Hill in the Greater Bendigo National Park. A public funeral service will beheld at the Mulqueen Family Chapel on Bridge Street on Monday, May 25, at 11am, followed by a private cremation. An extensive obituary will be published in Saturday's Bendigo Advertiser.person, individual, peter ellis oam -
 Bendigo Historical Society Inc.
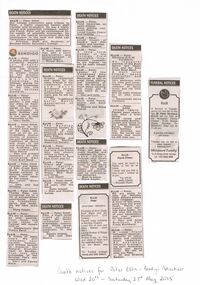
Newspaper - PETER ELLIS COLLECTION: NEWSPAPER CLIPPINGS
A4 sheet white printer paper with 8 newspaper clippings glued on. Handwritten note reads: Death notices for Peter Ellis - Bendigo Advertiser Wed 20th - Saturday 23rd May 2015. Death Notices. Ellis - Peter OAM. Our college community pays tribute to Peter, a highly respected former staff member and ex-student. He was a highly valued and supportive colleague, mentor and friend. Peter will be remembered for his wealth of scientific knowledge, his love of the natural environment and his contribution to the local and state Lab Technicians Associations. - Principal, staff and Students of Bendigo Senior Secondary College. City of Greater Bendigo. Ellis- Peter. A gentle man with a wonderful passion for Greater Bendigo's natural, built and musical heritage, Peter will be greatly missed by the Greater Bendigo Heritage Advisory Committee. He willingly shared his love and knowledge of the rich and unique heritage around us. Ellis - Peter Nicolaus OAM. You went so quickly. I will miss our trips to Festivals doing crosswords on the way. My sympathy to both families and Brian a great mate to the last. A void impossible to fill. - Mary Smith. Ellis- Peter OAM. A tribute to our intrepid band leader of 34 years who took us on an unforgettable musical journey of preserving and teaching the traditions of dance and music to old and young throughout Australia. You are irreplaceable ' Dirty Pierre' - Past and present members of the celebrated Emu Creek Bush Band. Ellis - Peter OAM. Founder and leader of Emu Creek Bush Band. Australia's largest collector of dancing history. A great friend taken far too young. Au revoir 'Dirty Pierre' - John and Sue Williams. Ellis - Peter OAM. Thanks Pete, you introduced me to a life of extraordinary experiences, amazing friendships, dance and music. We did have some fun. - Marg Hogan. Ellis - Peter. We are so saddened by your passing. Your music and great sense of humour will remain with us. - Wedderburn Old Timers Band. Ellis - Peter. A friend of many years. We will remember your warmth, humour and tireless pursuit to preserve the Natural Environment of Bendigo. Your love and knowledge of the Bendigo Flora was inspirational. - Mary and Patrick Ward. Ellis- Peter. A music and dance man with a warm appreciation and encouragement of diverse talent. - Winzar boys. Death Notices. Ellis - Peter. Greatly respected and loved by his many friends in the traditional music and dance movement across Australia. His achievements were many and he will be missed. - The Traditional Social Dance Association of Victoria. Ellis - Peter. The Bendigo Historical Society is saddened at the passing of fine musician and friend Peter Ellis. - Committee and members, Bendigo Historical Society. Ellis- Peter. A talented musician and long time friend who was always willing to help us. - Members of Euro fest Choir and Inc. Ellis - Peter. Friend and neighbour, nature's gentleman at rest. Sincere sympathy to Robyn, Rick, Ryan and Doug. - Judy Monti. Ellis- Peter OAM Fond memories of 28 years with the band. Sadly Missed. - Stan and Heather Symes. Death Notices. Ellis - Peter OAM Pete, a much loved friend of many years. We fondly remember your knowledge, humour and those great times together, especially in the bush. Deeply missed. - Rob and Glen Moors. Death Notices. Ellis- Peter. Fond memories, so sadly missed. Keep playing your music Peter. Loved cousin Cheryl and families. Ellis -Peter. Loved cousin of Sandra and Phil Jubber and families. Deeply Missed. Ellis - Peter. A long term member of the Bendigo Field Naturalist Club. Deepest sympathy to his friends, he will be sadly missed by all. Ellis - Peter. Leader of the 'Celebrated Emu Creek Bush Band' Memories of lots of great times playing and travelling all over. We learned so much about dancing and music and it just won't be the same. - Don and Julie. Ellis - Peter. Much loved friend, dancer and band leader. - Dianne and Doug Pearse. Death Notices. Ellis - Peter. Peter, you gave so much laughter and happiness to many, many people through your lovely nature and your brilliant music to listen to and dance to. You have left a legacy of music, books and dance as well as unforgettable memories. Rest in peace. - Diana Austin. Death Notices Ellis Peter 27/3/1946 - 18/5/2015 Formerly of Emu Creek Bush Band and the Wedderburn Old Timers). Passed away suddenly at Bendigo Hospice. Loved son of Joan and Allan Nielsen (both Dec). Loving brother of Robyn and Doug. Brother-in-law of Rick and Uncle of Ryan and the extended family. Let the music play on… For Funeral arrangements see later edition. Death Notices. Ellis - Peter Nicolaus O.A.M. Suddenly. An inaugural member of the Bush Dance and Music Club and the Emu Creek Bush Band. A much loved friend, dance instructor and musician. Very generous with his time and knowledge. Passionate collector of dance music and old time dances. Will be sadly missed by all who knew him. - Devastated dance members. Ellis- Peter. OAM 27/3/46 - 18/5/15 Passed away peacefully after a brief illness. Much loved and irreplaceable brother, cousin and uncle to the Lilford, Datson, Burns, Shaw and Kitch families. You enriched our lives. No words can express how much we will miss you. Ellis Pierre (Peter) You were as much a father to me as an uncle. I never told you that or how much I looked up to you. You will be sadly missed - Boswald ( Ryan). Ellis - Peter. We are going to miss our Monday night dinners before rehearsal. A lover of fine wine, good food and great music. Pierre, our Maestro and fearless band leader, we will miss the sound of your squeeze box and your passion for the music. - Paul and Alida Robinson, Emu Creek Bush Band. Ellis - Peter. A close friend colleague, musician, authority on native plants and colonial music researcher. An enormous influence in preserving early Australian dance and dance music. We will all miss you Pete. - Jill and Graeme Balaam. Funeral Notices Ellis. A service of thanksgiving for the life of the late Mr Peter Nicolaus Ellis will be held at the Mulqueen Family Chapel, 15-25 Bridge street, Bendigo on MONDAY (May 25) at 11.00am. A private cremation will follow. Tributes can be left at www.heavenaddress.com Mulqueen Family 15-25 Bridge street, Bendigo Est. 1853 5443 4455.person, individual, peter ellis oam -
 Bendigo Historical Society Inc.
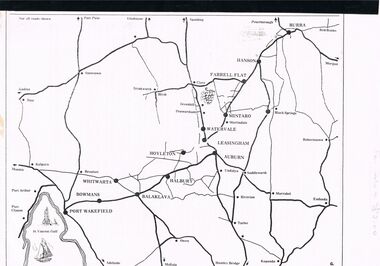
Document - GERMAN HERITAGE SOCIETY COLLECTION: BUILDINGS, MINES & PLACES
Collection of Articles with a map of part of South Australia north of Adelaide. Contains articles and photos about Tailem Bend, Murray Bridge, Kapunda, Burra, Clare, Penwortham, Sevenhill, Eudunda, Mintaro, Watervale, The House of Quelltaler, Leasingham and Auburn. It also contains a story by Gaye Sprenglewski.societies, service clubs, german heritage society, german heritage society collection - colllection of articles about buildings, mines & places, tailem bend, murray bridge, kapunda, burra, clare, penwortham, sevenhill, eudunda, mintaro, watervale, the house of quelltaler, leasingham, auburn, gaye sprenglewski. -
 Kew Historical Society Inc
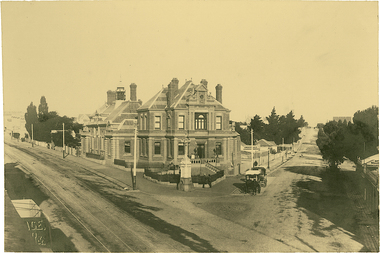
Photograph, J F C Farquhar, The Post Office, 1891
At the beginning of the 1890s, the Kew businessman and Town Councillor, Henry Kellett, commissioned J.F.C. Farquhar to photograph scenes of Kew. These scenes included panoramas as well as pastoral scenes. The resulting set of twelve photographs was assembled in an album, Kew Where We Live, from which customers could select images for purchase.The preamble to the album describes that the photographs used the ‘argentic bromide’ process, now more commonly known as the gelatine silver process. This form of dry plate photography allowed for the negatives to be kept for weeks before processing, hence its value in landscape photography. The resulting images were considered to be finely grained and everlasting. Evidence of the success of Henry Kellett’s venture can be seen today, in that some of the photographs are held in national collections.It is believed that the Kew Historical Society’s copy of the Kellett album is unique and that the photographs in the book were the first copies taken from the original plates. It is the first and most important series of images produced about Kew. The individual images have proved essential in identifying buildings and places of heritage value in the district.A panoramic photograph of the junction of High Street and Cotham Road. The photographer centres the point-of-view on the Kew Post Office and adjacent Court House. These were designed in the Queen Anne style by the Public Works Department's architect J Harvey and completed in 1888. The complex is important because it demonstrates a departure from the contemporaneously favoured High Victorian Classical to the Queen Anne style in the design of civic buildings. The earlier Jubilee Fountain in front of the Post Office was erected by the Kew Borough Council to commemorate the Golden Jubilee of Queen Victoria in 1887. It was created to a design of the architects Reed, Henderson and Smart. The fountain was later relocated to the Alexandra Gardens to make way for the Kew War Memorial. The tram tracks in High Street were used by the horse tram, which ran from the Victoria Street Bridge to the Boroondara General Cemetery. The tram was replaced by an electrified service in 1915.The Post Officekew post office, kew illustrated, kew where we live, photographic books, henry kellett