Showing 1480 items
matching terminus
-
 Ballarat Tramway Museum
Slide - 35mm slide/s, Travis Jeffrey, 1961
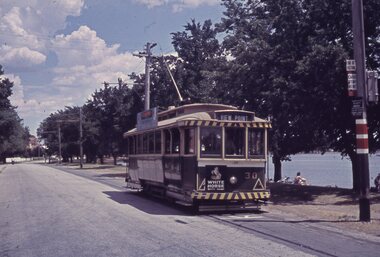
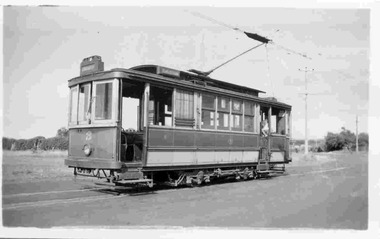
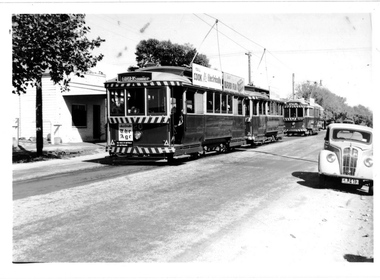
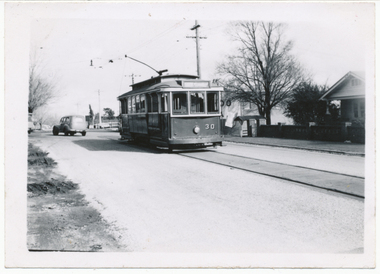
Agfa plastic mount (blue base, white cover) of a photograph of No. 30, Wendouree Parade, View Point terminus. Tram is in the process of being fitted with dash canopy lights and tiger strips. Tram has destination of View Point, has a SF Motors Pty Ltd, roof advertisement and an advertisement for White Horse Whiskey on the front dash panel. Note terminal markings on road, timetable and section insulator box on pole. Photo taken early 1961. Slide rescanned at 3200 dpi 24-10-2020, jpg replaced, tiff file retained. This file was scanned in 2003 and may show colour changes. "BAS 20" in penciltramways, trams, view point, terminus, wendouree parade, tram 30 -
 Wodonga & District Historical Society Inc
Award - Darts Trophy - Terminus Dart Club Doubles Championship, 1985
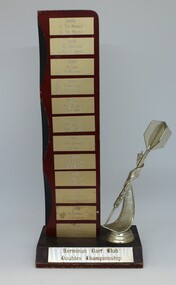
The Terminus Hotel was one of the earliest hotels in Wodonga, with clear links to the establishment of the railway line. It was an important business and meeting place from the original construction in 1873 until 1st June 1998 the Terminus Hotel when it was destroyed by fire. It provided a popular venue for social activities, including competitive darts, both through its own competition and as part of the Albury-Wodonga District Darts Association. The remains of the building were demolished in 1999. This is a perpetual trophy for the Terminus Dart Club Doubles Championship from 1985 to 1992.The Terminus Hotel was an important meeting place in Wodonga for more than 100 years. This item is representative of one of the social and sporting activities it provided for members of the local community.A wood and metal engraved trophy with stylised dart mounted on the side.At base: " TERMINUS DART CLUB/ DOUBLES CHAMPIONSHIP" On vertical list - top to bottom 1985 J. DEKRUIFF/ H. DEKRUIFF 1985 R. HUDSON/ A. FLEMING 1986 K. COOK/ H.M. COOK 1986 TONY LOWE / K.A.COOK 1987 J. DEKRUIFF/ A. FLEMING 1987 L. STOKES / K. MERRILESS 1988 J. DEKRUIFF/ T. LOWE 1989 ROB BENNETT/ B. STEWART 1989 L. BRUCE/B. STEWART 1991 J. DEKRUIFF/ P. HOLLINGSWORTH 1992 B. TINGWELL/ S. GRIFFITHS 1992 B. TINGWELL / C. BLUNDEN terminus hotel darts, terminus hotel wodonga, sport and recreation -
 Ballarat Tramway Museum
Photograph - Black & White Photograph/s - set of 4, George Bishop, Dec. 1971
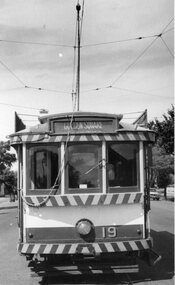
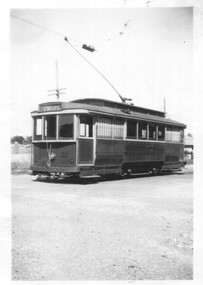
Set of four Black and white photographs of Bendigo No. 19 at or near Golden Square terminus 12/1971. Photos by George Bishop. .1 - End of view of tram at terminus, showing destination "Golden Square" .2 - Tram nearing terminus .3 - Tram arriving at terminus .3 - View of tram at terminus and with conductor about to turn the pole with Billy Rodda's Golden Square Hotel in the background. No. 19 has two SEC roof advertisements for electric cooking.On the back of the photos in ink or pencil in ink are captions regarding No. 19, Golden Square, Bendigo and "George Bishop Photo"tramways, trams, bendigo, golden square, tram 19 -
 Ballarat Tramway Museum
Photograph - Copy - Black & White - Sturt and Grenville Streets Ballarat, 1920s
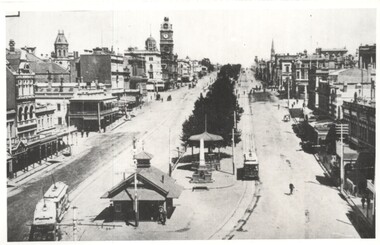
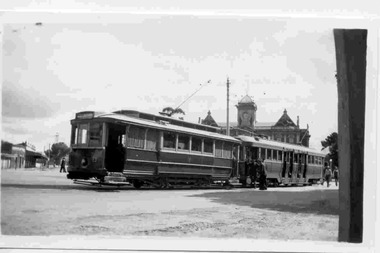
Photo taken from the store on the corner of Sturt and Grenville Street looking west along Sturt St, shows three trams at the terminus, including the large waiting room shelter. Shows the buildings along Sturt St with few pedestrians. Yields information about the view from Grenville St looking west along Sturt St BallaratCopy Photograph - Black & White - Sturt and Grenville Streets Ballarat Details the image on the rear of the print in ink. "Ballarat - Sturt St, westwards from Grenville St with trams at the City terminus. Note: Large old waiting room on roadway. Tram Nos Left 5 or 6? right - 13? Copy neg Mark Plummer collections ex late John Alfred collection. ballarat, grenville st, shelters, sturt st, esco, tram 13, tram 5 -
 Ballarat Tramway Museum
Photograph - Black & White Photograph/s, Wal Jack, 7/10/1939 12:00:00 AM
Black and White print contained within the Wal Jack Bendigo and Geelong Album, see Reg Item 5003 for more details. Photo of No. 19 at the Lake Weeroona Terminus, 7-10-1939, with the driver turning the trolley pole. The tram has the destination of Golden Square. i1 - scan of print in the album i2 - rear of image i3 - scan of negative at 3200dpi added 6/6/2020. On rear in ink "SEC Bendigo, No. 19 (ex MMTB 185) at Lake Weeroona terminus 7-10-39" with the Wal Jack copyright stamp in the top right hand corner and the number "T189" written in.trams, tramways, bendigo, lake weeroona, tram 19 -
 Ballarat Tramway Museum
Photograph - Black & White Photograph/s, Keith Kings, 28/08/1948 12:00:00 AM
Black and White photograph contained with Reg. Item 1902 - Photo Album from Keith Kings to Les Denmead 1970. Photograph of SEC Geelong, No 14 at the Eastern Park terminus, 28/8/1948. Has some houses in the background. Keith Kings No. B(m)(6) Scanning: i - image file, p - presentation file, b - back of photograph.Stamp in top left hand corner and handwritten number with "K.S. Kings No. B(m)(6) Copyright reserved". In blue ink "Geelong / No. 14 / Birney Safety Car / Eastern Park Terminus / 28/8/48"trams, tramways, geelong, eastern park, tram 14 -
 Ballarat Tramway Museum
Photograph - Black & White Photograph/s, Keith Kings, 8/01/1955 12:00:00 AM
Black and White photograph contained with Reg. Item 1902 - Photo Album from Keith Kings to Les Denmead 1970. Photograph of SEC Geelong, 39 at West terminus. Date of photograph 8/1/1955. Tram has destination of "EAST". Keith Kings No. L(k)(8) Scanning: i - image file, p - presentation file, b - back of photograph.Stamp in top left hand corner and handwritten number with "K.S. Kings No. L(k)(8) Copyright reserved". In blue ink "Geelong / No. 39 / As converted for "one-man" operation. / West terminus 8/1/55."trams, tramways, geelong, west, tram 39 -
 Ballarat Tramway Museum
Photograph - Black & White - set of 2 - Ballarat Tram 31, Bob Lilburn, 1950's
Shows the appearance of Ballarat tram 31 during the 1950's.Yields information about the tram appearance during the 1950's prior to being fitted with dash canopy lighting.Black & White Photograph of Ballarat Tram 31 - pre 1960 .1 - At the Lydiard St North terminus .2 - Sturt St at the city terminus.Has notes re location and tram on the rear in ink.ballarat, sturt st, lydiard st north, tram 31, tramways, trams -
 Ballarat Tramway Museum
Photograph - Digital image, Joy Waller, 19/09/1971 12:00:00 AM
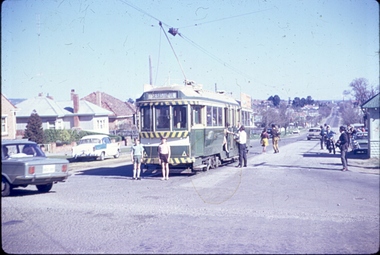
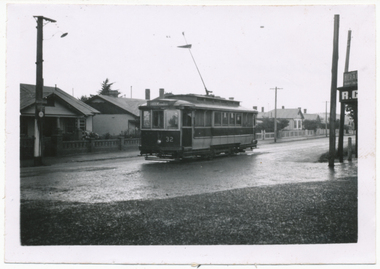
Copy of a colour slide showing Tram 42 in Lydiard Street North, at the terminus. This photo is taken from the north east looking down Lydiard Street. Two boys are standing at the rear of the tram. Has a number of people boarding the tram or standing around taking photographs.trams, tramways, ballarat trams, crews, houses, last day, lydiard st nth, secv tramways, street scene, terminus, tramway closure, maximum traction, tram 42 -
 Ballarat Tramway Museum
Photograph - Black & White Photograph/s, Keith Kings, Feb. 1951
Black and White photograph contained with Reg. Item 1902 - Photo Album from Keith Kings to Les Denmead 1970. Photograph of SEC Geelong, No 3 at East terminus, Feb. 1951. Tram has destination of "Chilwell" at the front and "East" on the side. No buildings in the background of the photo. Keith Kings No. E(q)(3) Scanning: i - image file, p - presentation file, b - back of photograph.Stamp in top left hand corner and handwritten number with "K.S. Kings No. E(q)(3) Copyright reserved". In blue ink "Geelong / No. 3, as converted for "one-man" operation / East Terminus 2/51".trams, tramways, geelong, east, tram 3 -
 Ballarat Tramway Museum
Photograph - Digital image, Wal Jack, 1/01/1945 12:00:00 AM
Yields information the appearance of the SEC tramcar No. 21, and the south east corner of Sturt and Lydiard Streets in 1958 and an AETA tour.Digital image from the Wal Jack Ballarat Album of No. 32 at the Barkly St terminus, Mt Pleasant, 1-1-1945. Has the corner of the milk bar in the photograph. Note the clock in the photograph on the left hand side of the print. See image i2 for rear of photograph. See image i3 for hi res scan of print. See image i4 for hi res scan of negativeon rear of photo in ink, "Ballarat, No. 32. Mt Pleasant terminus. 11.20am, 1/1/45. Note plate on trolley wire". In the top right hand corner is the W. Jack stamp and has the negative number T68.trams, tramways, mt pleasant, barkly st, tram 32 -
 Ballarat Tramway Museum
Photograph - Black & White Photograph/s and Digital Image, Wal Jack, 20/08/1955 12:00:00 AM
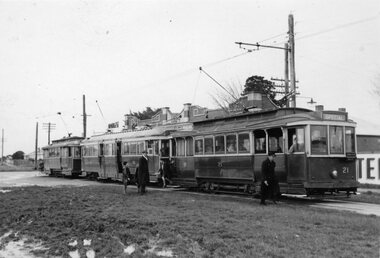
Yields information about the trams used in an AETA 1955 tour and the appearance of the terminal area at the time.Black and white photograph of three Ballarat trams at the Sebastopol terminus, 31, 38 and 21, AETA Golden Jubilee of Electric Tramways in Ballarat, 20/8/1955, photo by Keith Kings. Has the Royal Mail Hotel in the background. The foreground is very muddy. 4176.1 - same photograph from the Wal jack Album - see i2 and i3 for front and rear details.On rear in ink. "AETA; Ballarat - Golden Jubilee of Electric Tramways; Passenger car 31 and Specials 38 and 21 at Sebastopol terminus; 28/8/55" and Keith Kings stamp with number P(c)(6) in ink. 4176.1 - as above. tramways, trams, sebastopol, aeta, tram 31, tram 38, tram 21 -
 Ballarat Tramway Museum
Negative - Set of 3, Campbell Duncan, 28/12/1970 12:00:00 AM
Yields information about the terminus at Sebastopol and signage.Set of three photographs of No. 26 at the Sebastopol terminus - 28/12/1970 .1 - 26 at the terminus, looking north. Has a Bliss Bombs roof advert - "Share bliss - make a friend". Tram has the destination of Lydiard St North. .2 - Tram timetable sign at the terminus, with a "Cars stop here" sign and the Fosters sign in the background. .3 - No. 26 at the terminus with the driver turning the pole.trams, tramways, albert st, signs, sebastopol, drivers, tram 26 -
 Ballarat Tramway Museum
Photograph - Digital image, Wal Jack, Tram 20 AETA tour Mt Pleasant, 21/04/1962
Photograph of the three trams at the Mt Pleasant terminus during an AETA tour 21-4-1962. No. 20 the service tram, 18 and 37 the tour trams. No. 20 has Advertisements for the SEC, Ilford Film and a dash panel advert for The Age newspaper. See image i2 for rear of photograph. See image i3 for hi res scan of print. See image i4 for hi res scan of negativeYields information about the trams used for an AETA visit in 1962 and worked within the service trams.Digital image from the Wal Jack Ballarat Album. On rear of photograph in ink "SEC, Ballarat AETA Special Tour, No. 20 Service car, Nos. 18 and 37 as specials, Mt Pleasant terminus 21-4-62" and Wal Jack stamp in top right hand corner with number "T1268" written in.trams, tramways, aeta, tours, special trams, mt pleasant, tram 20, tram 18, tram 37 -
 Phillip Island and District Historical Society Inc.
Photograph, c 1900
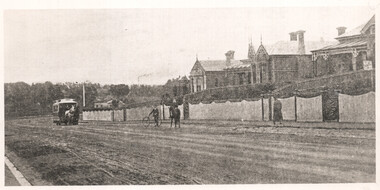
Track leading down to two piers. Boat shed, horse and cart adjacent to pier in foreground. Ferry and fishing boat moored at end of pier. Large tree on left of picture. Phillip Island coastline on far side of water.Griffiths Point Coal pier terminus of the Coal Tramway.Phillip Island from San Remo Harbourlocal history, photography, photographs, slides, film, coal tramway, piers, san remo, black & white photograph, miss elms san remo -
 Ballarat Tramway Museum
Photograph - Black & White Photograph/s, Charles Craig, early 1970's
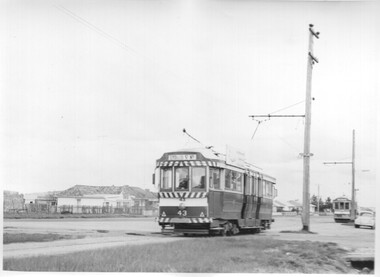
Yields information about the use of the use of the Sebastopol line and the terminus during the last days of the SEC operated system when a number of Special trams were operated.Black and White photograph of two bogie cars at the Sebastopol terminus - No. 43 is on the way to Lydiard St North and the tram at the terminus, possibly No. 41 (see previous Reg item 6778) is waiting. The style of the houses at the terminus is in the background. Photo by Charles Craig possibly early 1970's. trams, tramways, albert st, sebastopol, tram 41, tram 43 -
 Ballarat Tramway Museum
Photograph - Black & White - Series of four photographs of Ballarat tram 39 on tour 1950's, Bob Lilburn, 1950's
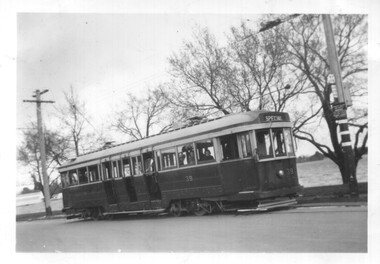
Shows the appearance of Ballarat tram 39 at various locations while on a Special tour.Yields information about the tram appearance during the 1950's prior to being fitted with dash canopy lighting.Series of four Black & White Photographs of Ballarat Tram 39 - pre 1960 .1 - at the View Point terminus .2 - at Lydiard St North terminus - two people standing by the tram - the gent could be the photographer. .3 - at the tram depot .4 - at the Gardens terminus in Wendouree Parade. Has notes re location and tram on the rear in ink.ballarat, wendouree parade, view point, lydiard st north, tram 39, tramways, trams -
 Melbourne Tram Museum
Photograph - VR tram 25, c1920s
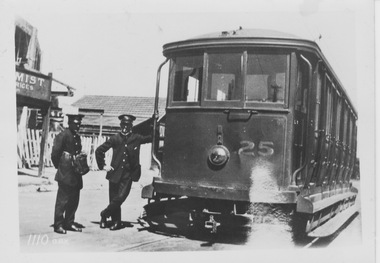
The photograph shows VR tram 25 with uniformed tram crew standing on the ground beside the driver's cab entrance with the driver holding a hand rail. On the left is part of a chemist shop verandah and a picket fence. VR 25 originally operated on the broad gauge track from St Kilda Station to Brighton, then in 1919 was converted to standard gauge to operate on the Sandringham to Black Rock line. The location of this photograph is the Black Rock terminus.Yields information about VR tram 25Black and white photograph with notes on the rear.In biro on the rear "Melbourne K J Magor No. per K Train 1110 aBx"vr tram, tram 25, uniformed crew, picket fance, st kilda station, brighton, sandringham, balck rock, broad gauge, standard gauge, terminus -
 Ballarat Tramway Museum
Photograph - Digital image, Wal Jack, 29/06/1955 12:00:00 AM
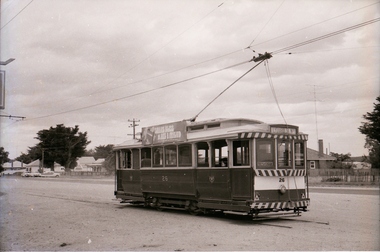
Yields information the appearance of the SEC tramcar No. 30 and the Mt Pleasant tram terminus during the reconstruction of the bridge over Canadian Creek.Digital image from the Wal Jack Ballarat Album of No. 30 at the Barkly St terminus, Mt Pleasant, 29-6-1955. Wal has the album notes of "standby car". Was provided to enable the service in Barkly St during the reconstruction of the Canadian Creek bridge during June-July 1955, see Reg Item 5157 as well and 5301, 5302 and 5305. See image i2 for rear of photograph. See image i3 for hi res scan of print. See image i4 for hi res scan of negativeon rear of photo in ink, "SEC Ballarat, No. 30 at Barkly St terminus (out of use). Mt Pleasant 29-6-55" In the top right hand corner is the W.Jack stamp but no negative number.trams, tramways, mt pleasant, barkly st, canadian creek, tram 30 -
 Ballarat Tramway Museum
Photograph - Black & White Photograph/s, Keith Kings, Apr. 1950
Black and White photograph contained with Reg. Item 1902 - Photo Album from Keith Kings to Les Denmead 1970. Photograph of SEC Bendigo trams No.13 and 26 at the Eaglehawk terminus, Easter Saturday, April 1950. Has Eaglehawk town hall in the background. Keith Kings No. D(k)(5) Scanning: i - image file, p - presentation file, b - back of photograph.Stamp in top left hand corner and handwritten number with "K.S. Kings No. D(k)(5)) Copyright reserved". In blue ink "Bendigo / No.13 - converted for "one Man" operation on the "Ballarat " style. / No. 26 / Eaglehawk terminus / Easter Saturday, 4/50".trams, tramways, bendigo, eaglehawk, tram 13, tram 26 -
 Ballarat Tramway Museum
Photograph - Black & White Photograph/s, Wal Jack, 26/03/1939 12:00:00 AM
Black and White print contained within the Wal Jack Bendigo and Geelong Album, see Reg Item 5003 for more details. Photo of Geelong No. 15 at the Wharf terminus, Moorabool St, 26-3-1939. Photo by Wal Jack. Tram has the destination of Newtown. In the background are the Australian Steamships Pty Ltd Office and Sailor's Rest building. Printed on Ilford paper. i1 - scan of print in the album i2 - rear of image i3 - scan of negative at 3200dpi added 6/6/2020. On rear in ink "SEC Geelong No. 15 Birney at Moorabool St Wharf terminus. 26-3-1939." Has the Wal Jack copyright stamp in the top right hand corner with the number "T264" written in.trams, tramways, geelong, moorabool st, wharf, tram 15 -
 Ballarat Tramway Museum
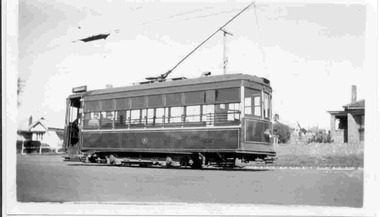
Photograph - Black & White Photograph/s, Wal Jack, 3/01/1954 12:00:00 AM
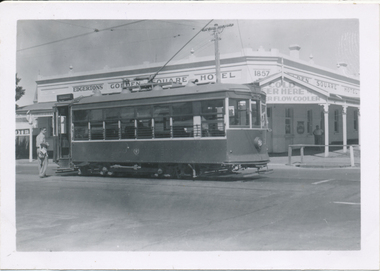
Black and White print contained within the Wal Jack Bendigo and Geelong Album, see Reg Item 5003 for more details. Photo of Bendigo Birney No. 30 at Golden Square Terminus, 3/1/1954. Has Edgerton's Golden Square Hotel in the background with date of 1857 on building corner and "Cold Beer Here and "?..er flow cooler" on the front verandah of the hotel. Note the railing around the drainage channel. i1 - scan of print in the album i2 - rear of image i3 - scan of negative at 3200dpi added 6/6/2020. On the rear in blue ink "SEC Bendigo Birney No. 30 at Golden Square terminus 3rd Jan '54" with Wal Jack copyright stamp in the top right hand corner and the number "T215" written in.trams, tramways, bendigo, golden square, birney, tram 30 -
 Bendigo Historical Society Inc.
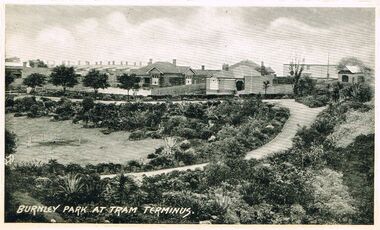
Postcard - BLACK AND WHITE POSTCARD: PHOTOGRAPH OF BURNLEY PARK AT TRAM TERMINUS
postcard - photograph of Burnley Park at Tram Terminus - black and whiteSemco seriespostcard, photograph, various themes -
 Ballarat Tramway Museum
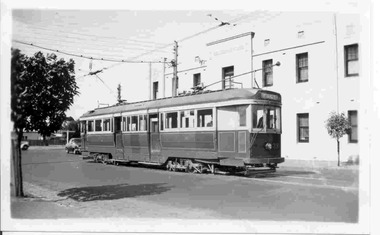
Photograph - Black & White Photograph/s, Keith Kings, 7/03/1958 12:00:00 AM
Black and White photograph contained with Reg. Item 1902 - Photo Album from Keith Kings to Les Denmead 1970. Photograph of SEC Bendigo tram No. 12 at Golden Square terminus with the Golden Square hotel in the background. Has a "Fosters Lager sign" on the wall. Tram has destination of "Nth Bendigo". Photo taken 7/3/1958. Keith Kings No. A(d)(15) Scanning: i - image file, p - presentation file, b - back of photograph.Stamp in top left hand corner and handwritten number with "K.S. Kings No. A(d)(15) Copyright reserved". In blue ink "Bendigo / No.12 / As converted for "One Man" operation / Golden Square terminus 7/3/58"trams, tramways, golden square, bendigo, tram 12 -
 Melbourne Tram Museum
Photograph - Riversdale Road Horse tram, c1900
The photograph shows a Hawthorn / Auburn horse tramway with a horse tram having turned from Power St into Riversdale Road. c1900? The Hawthorn tram depot was built in 1915/16 in the area where the trees are.Yields information a Auburn / Hawthorn horse tram in Riversdale Road.Black and white photograph with notes on the rear.In pencil on the rear "No 14, 050, Auburn terminus of the Hawthorn Tramway"tramcars, tramways, horse trams, riversdale road -
 Ballarat Tramway Museum
Photograph - Black & White Photograph/s - set of 2, Keith Kings, 6/03/1954 12:00:00 AM
Black and White photograph contained with Reg. Item 1902 - Photo Album from Keith Kings to Les Denmead 1970. Photograph of SEC Geelong, No 16 at the Eastern Park terminus on 6/3/1954. Tram showing destination of "Garden St" Keith Kings No. I(x)(8) Scanning: i - image file, p - presentation file, b - back of photograph. 1929.1 - same photograph from the Wal Jack album, see Reg Item 5003, added 12/8/2013.Stamp in top left hand corner and handwritten number with "K.S. Kings No. I(x)(8) Copyright reserved". In blue ink "Geelong / No. 16 / "Pengelley" car as converted for "one-man" operation / Eastern Park terminus 6/3/54". 1929.1 - Stamp in top left hand corner and handwritten number with "K.S. Kings No. I(x)(viii) Copyright reserved". In blue ink "Geelong / No. 16 at Eastern Park terminus Royal visit day. / Note: Flags on roof."trams, tramways, geelong, eastern park, tram 16 -
 Ballarat Tramway Museum
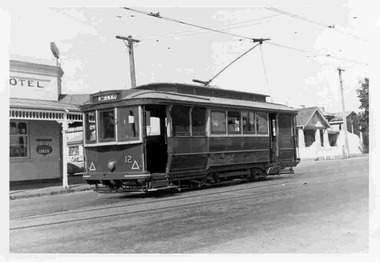
Photograph - Black & White Photograph/s, Wal Jack, 7/10/1939 12:00:00 AM
Black and White print contained within the Wal Jack Bendigo and Geelong Album, see Reg Item 5003 for more details. Photo of No. 2 at the Eaglehawk terminus, 7-10-1939, High St, with the Park Hotel in the background. Photo by Wal Jack. Tram has the destination of Quarry Hill. Printed on Ilford paper. i1 - scan of print in the album i2 - rear of image i3 - scan of negative at 3200dpi added 7/6/2020. On the rear in blue ink "SEC Bendigo No 2 (ex MMTB 115 M class) in High St Eaglehawk (terminus) 7th Oct. 1939." with Wal Jack copyright stamp in the top right hand corner and the number "T194" written in.trams, tramways, bendigo, high st, eaglehawk, tram 2 -
 Melbourne Tram Museum
Newspaper, The Age, "Dispute over tram stop may travel to the High Court", 11/01/2005 12:00:00 AM
.1 - Newspaper clipping from The Age 11/1/2005, titled "Dispute over tram stop may travel to the High Court", about issues with the construction of a new terminus - Melbourne University - in Swanston St. Notes the issues, protests by Paul Mees PTUA, Sue Chambers of Carlton Residents Association, appears to VCAT, Supreme Court. Quotes Hubert Guyot CEO of Yarra. Has a photo of Paul Mees standing in the track work area, all track removed and a image of the finished project. Photo by Penny Stephens, report by Dan Silkstone, Transport Reporter. Item not dated, date determined by an online search. .2 - Yarra Trams newspaper notice advising of the works between 7/1 and 19/1 - temporary tram changes, road changes and general advice.trams, tramways, swanston st, melbourne university, superstops, terminus, trackwork -
 Ballarat Tramway Museum
Photograph - Digital image, Wal Jack, 21/04/1962 12:00:00 AM
Yields information about the trams used for an AETA visit in 1962 and worked within the service trams.Digital image from the Wal Jack Ballarat Album of a photograph of the three trams at the Mt Pleasant terminus during an AETA tour 21-4-1962. No. 11 the service tram, 18 and 37 the tour trams. No. 11 has Advertisements for the SEC, and a dash panel advert for The Age newspaper. See image i2 for rear of photograph. See image i3 for hi res scan of print. See image i4 for hi res scan of negativeOn rear of photograph in ink "SEC, Ballarat AETA Special Tour, Nos. 18 and 37 as specials, No. 11 as service car, Sebastopol terminus, 21st April 1962" and Wal Jack stamp in top right hand corner with number "T1269" written in.trams, tramways, aeta, tours, special trams, sebastopol, tram 11, tram 18, tram 37 -
 Ballarat Tramway Museum
Slide - 35mm slide/s - set of 13, Noel Simons, 24/05/1971 12:00:00 AM
Set of 13 transparencies taken on 24/5/1971 on Kodak mounts. 1200.1 - No. 7 en route to Golden Square turning from Bridge St. into Nolan St. Photo taken after tram has passed photographer. Tram has a briquettes roof ad. 1200.2 - No. 21 in McCrae St. just before Nolan St. Photo taken after tram has passed photographer. 1200.3 - No. 7 in Nolan St at corner with McCrae St. Passenger boarding tram at a tram stop. 1200.4 - No 7 turning from Nolan into McCrae St. with Golden Fleece service station in background. 1200.5 - No. 7 in Thunder St en route to North Bendigo. Photo taken after tram has passed photographer. 1200.6 - No. 5 en route to Eaglehawk just after leaving Needle Loop between Long Gully and California Gully. 1200.7 - No. 5 at the start of the double track in High St. Eaglehawk. 1200.8 - No. 5 at Eaglehawk terminus showing "Depot" with Leo A Hughes Photographer advertisement on building in background. 1200.9 - No. 5 at Eaglehawk terminus. Has two SEC roof ads 'Everything's fine in my all electric kitchen' and 'Electricity best for cooking'. 1200.10 - No. 5 at Eaglehawk terminus, with canon, war memorial outside Town Hall and Leo A Hughes Photographer advertisement on building in background. 1200.11 - No. 5 in McCrae St. about to enter Arnold St. and depot. Tram showing depot, has driver changing points. 1200.12 - No. 5 in Arnold St. Photo taken looking up the centre of the access track - shows the overhead at depot junction. 1200.13 - Depot entrance with signage at depot entrance and depot building in background.Information written on in black ink and date stamped on purple ink. 1200.1 - "No. 7 entering Nolan St. from Bridge St." 1200.2 -"No. 21 in McRae St. about to turn into Nolan St." 1200.3 - "No. 7 in Nolan St. at corner of McRae St." 1200.4 - "No. 7 turning from Nolan St. into McRae St." 1200.5 - "No. 7 in Thunder St. just after turning from Caledonia St." 1200.6 - "No. 5 just after leaving Needle Loop between Long Gully and California Gully. 1200.7 - "No. 5 in High St. Eaglehawk at start of double track." 1200.8 - "No. 5 at Eaglehawk terminus" 1200.9 - "No. 5 at Eaglehawk terminus" 1200.10 - "No. 5 at Eaglehawk terminus."\ 1200.11 - "No. 5 in McCrae St. about to enter Arnold St." 1200.12 - "No. 5 in Arnold St." 1200.13 - "Entrance to Bendigo Tram Depot, No. 5 running into shed."tramways, trams, bendigo, mccrae st, north bendigo, california gully, eaglehawk, depot, tram 5, tram 7, tram 21