Showing 217 items
matching tram 2013
-
 Melbourne Tram Museum
Photograph - Black & White Photograph/s, The Met, c1985
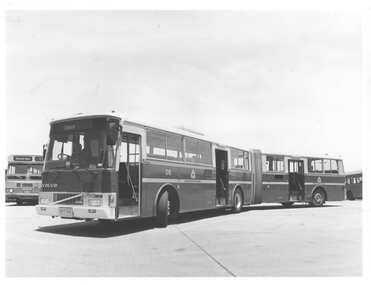
Black and white photograph of Volvo Articulated bus in "The Met" colours, c1985, Number 06 at Doncaster depot. Has other buses in the background. Model No. B10ML on radiator. Web site: http://www.showbus.co.uk/Australia/gallery/met2.htm accessed 20/8/2013 - says under a photo of a similar bus: "In 1985 Japan took delivery of 100 Volvo B10ML articulated buses for services to the World Expo in Tokyo. The order caused a stir at the time as Japan was self-sufficient in bus production. However articulated buses were not street legal, so after the Expo the buses were all exported. Seventy nine of them ended up in Australia, popping up all over the country."On rear in ink "MTA Newly acquired Volvo Artic Bus"trams, tramways, the met, buses, doncaster, tram 6 -
 Melbourne Tram Museum
Photograph - Set of 3 Black & White Photograph/s, John Dare, 1975
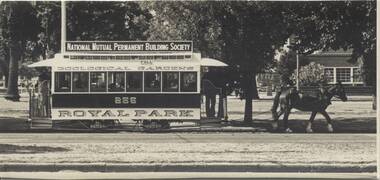
... &article=adtrams) accessed 22/8/2013 gives the advertising tram...&article=adtrams) accessed 22/8/2013 gives the advertising tram ...Set of three photograph by John Dare, 9/3/1975 of the operation of the TMSV horse Royal Park Zoo tram, No. 256, in the South Melbourne Football ground loop. .1 - Side of view of the tram with horse. .2 - With "Seven Colour Television Tram" passing on the inbound track. .3 - general view of the tram. The adtrams article (http://www.vicsig.net/index.php?page=trams&article=adtrams) accessed 22/8/2013 gives the advertising tram as SW6 900. image i4 - scan of three back of the photographs.On .1 and .3 - On rear ink "Recently restored horse tram was one of the highlights of the Labour Day weekend when it operated on a loop of track opposite the South Melbourne Football Ground. 9/3/75". Along with the ARHS Photo collection and John Dare name and address stamp. On .2 - as for .1, but with the additional words "Here it is seen paralleling the seven colour television tram"trams, tramways, horse trams, tmsv, south melbourne loop, advertising trams, tram 256, tram 900 -
 Melbourne Tram Museum
Photograph - Set of 3 Black & White Photograph/s, Melbourne & Metropolitan Tramways Board (MMTB), 1970's
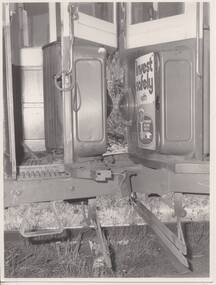
... by the MMTB. VicSig.net. web site accessed 23/8/2013, notes...Melbourne Tram Museum 8 Wallen Road Hawthorn melbourne ...Set of three photos collision damage to W2 449, possibly after a Preston workshop collision with W2 488. 488 appears to have little damage, while 449 has bumper pushed in. 488 has cabin advertisements for King Auto Electrics of Deepdene and RESI Permanent building society. 449 has an advertisement for Condor pipe tobacco. Assumed made during the 1970's by the MMTB. VicSig.net. web site accessed 23/8/2013, notes that the tram was sold during 1980.trams, tramways, accidents, collision, preston workshops, tram 488, tram 449, w2 class, mmtb -
 Melbourne Tram Museum
Photograph - Set of 3 Black & White Photograph/s, The Met, Jul. 1986
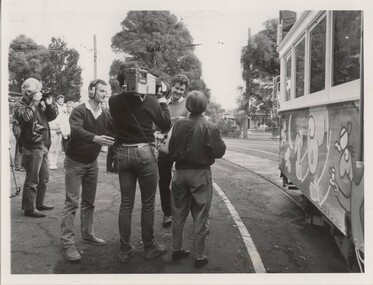
... site accessed 23/8/2013, notes that the tram was launched.... web site accessed 23/8/2013, notes that the tram was launched ...Set of three photos of the launch of Michael Leunig Art tram No. 816 at Preston Workshops with Transport Minister Tom Roper. Part of the Transporting Arts Scheme. VicSig.net. web site accessed 23/8/2013, notes that the tram was launched during July 1986. Photographed at Preston Workshops. .1 - Artist being interview by the Press with tram alongside. .2 - View of tram. .3 - Tom Roper and Michael Leunig. See also Reg Item 560 for first day ticket, issued on Sunday 13/7/1986.In ink on rear of each photo .1 - "Artist Michael Leunig @PWS with #816" .2 - "Artist Leunig painted 721" .3 - "Minister for Transport Tom Roper and artist Leunig @PWS"trams, tramways, transporting art, preston workshops, minister for transport, decorated trams, tram 816 -
 Ballarat Tramway Museum
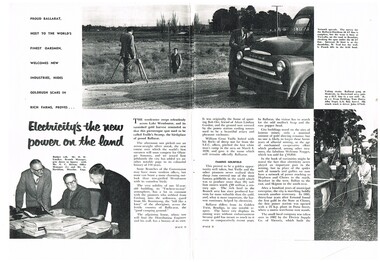
Document - Photocopies, State Electricity Commission of Victoria (SECV), "Electricity's the new power on the land", c1995
Yields information about the SEC activities in the Ballarat district during the mid 1950's and has a strong association with a number of people in the article.Photocopy of ?/1956 pages 2- 7 of SEC News featuring SEC activities in the Ballarat area, trams, personnel, black and white photographs, 3 A3 size sheets. Titled "Electricity's the new power on the land". Images added and record revised 30/10/2013trams, tramways, secv, ballarat trams, personnel, power supply -
 Melbourne Tram Museum
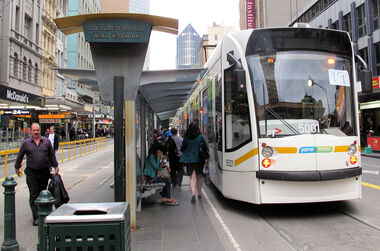
Photograph - Set of 6 digital images of the Sir Robert Risson Tram Terminus - Elizabeth St, Mal Rowe, 2004 to 2010
All images from Mal Rowe, except No. 6 from Marcus Wong 1 - D class 5001 at the terminus showing the sign at the south end - 23-9-2013 2 - B class 2088 looking south - 30-7-2010 3 - B class 2128 looking south - 12-2003 4 - Sign on Combino D1 3501 5 - D1 3501 - in Swanston Street at Victoria St - 16-3-2004. Was given the name of Sir Robert Risson, but was removed when the PTC livery was applied in June 2014. 6 - Plaque Feb. 1994, laid by Alan Brown, Minister for Public TransportYields information about the Sir Robert Risson Tram TerminusSet of 6 images of the Sir Robert Risson Tram Terminus in Elizabeth St at Flinders St.tramways, robert risson, elizabeth street, memorials, plaque, d class, d1 class, b class, tram 5001, tram 2088, tram 2128, tram 3501 -
 Melbourne Tram Museum
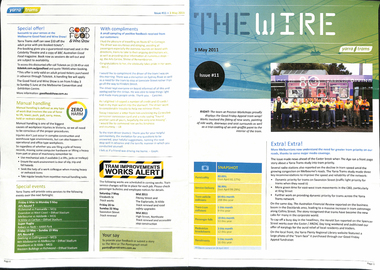
Magazine, Yarra Trams, "The Wire", 5/2011 to 1/2015
... , new chime on trams. .22 - No. 70 - 9/10/2013 - Art comes alive..., new chime on trams. .22 - No. 70 - 9/10/2013 - Art comes alive ...0 - No 9 - 1/4/2011 - Rhinos on skateboards, Did you know, Spencer St works, .1 - No. 11 of 3/5/2011 with the revised Yarra trams logo, traffic priority, work over Easter in Spencer St at Bourke and Collins St, Good Friday appeal, safety, passenger feedback and future works. .2 - No. 13 - 31/5/2011 - new uniform, cleaning, CEPR, trackwork - Fitzroy St, Northcote, Rhino, Carlton Control. .3 - No. 14 - 15/6/2011 - Haymarket Roundabout, accessibility, maintenance, CSE. 3a - No. 16 - 19/7/2011 - Managers on the move, Trevor Jones, Yarra's vision, Richard Ch'ng and Rhino update. .4 - No. 17 - 2/8/2011 - High St Westgarth trackwork, Swanston St, IMF CEO visit .5 - No. 18 - 16/8/2011 - Performance benchmarks met, Preston Workshops, repairs to 3018, tram signal priority. .6 - No . 19 - 30/8/2011 - New E class trams, routes "a" or "d", TramTracker in shelters, police, fare evasion .7 - No. 20 - 15/9/2011 - Football trams, Superstops, Bridge Road, Rhinos. .8 - No. 21 - 27/9/2011 - CEO's journey to work, accessibility, increased patronage, E class. .8a - No. 22 - 11/10/2011 - Minister Mulder visit, E class, Customer experience, Elizabeth Kerdelhue Corporate Affairs Director, flood indicator in Wellington Parade, Keolis - Orleans and PTV coming your way. .9 - No. 23 - 25/10/2011 - forthcoming royal visit, opening for Footscray Road extension, Rhinos, Stockholm .10 - No. 24 - 8/11/2011- Royal visit, photos, Z3 158, route 86 works in High St. (see htd5043i21 for a image from an unknown newspaper of the actual event - features Z3 158.) .11 - No. 25 - 22/11/2011 - new staff guide, Gold Coast tram line, Macarthur St, overhead, fund raising, route numbering update. .12 - No. 26 - 6/12/2011 - Swanston St Superstops, Newmarket bridge strikes, rhinos. .13 - No. 27 - 20/12/2011 - Christmas carnival, Lenny Bates, portable crossover, uniforms. .14 - No. 28 - 17/1/2012 - Passing of Len Bates, Myki, Gardiner railway station. 14a - No. 29 - 31/1/2012 - Southbank depot, patronage, myki, think like a passenger, fatigue management, .15 - No. 30 - 15/2/2012 - visit of Keolis, SNCF people, list of Executive leadership team with photos, Swanston St works, Myki introduction. .16 - No. 31 - 29/2/2012 - patronage up, tram postage stamps, Myki, rhinos. .17 - No. 32 - 14/3/2012 - St Kilda Rd trackwork, fund raising, Southbank Depot extensions, Myki, driving conditions, grand prix. .18 - No. 33 - 30/3/2012 - introduction of the PTV, end of MetLink and Transport Ticketing Authority, changes in management structure, trackwork, Gold Coast tramway and Keolis. .19 - No. 34 - Dr Jake - Royal children's Hospital super stop, route 96 - Premium line. .20 - No. 35, 2/5/2012 - Revision of Rules, trackwork in St Kilda Road and Elizabeth St, Myki, safety - Zero Harm. .21 - No. 69 - 25/9/2013 - Passengers paying their way, E class update, Mal Ashworth retires, progress report, feedback, new chime on trams. .22 - No. 70 - 9/10/2013 - Art comes alive, tram 925, driver simulator at Preston Workshops, E class project, 90th Glen Huntly. .23 - No. 83 - 23/4/2014 - Screen time for trams, new PIDs on B class, assistance animals, Operations Centre, Preston Workshops, Electrical log sheets to SLV. .24 - No. 89 - 23/7/2014 - punctuality, refresh of network map (fold-out map), women drivers. .25 - No. 97 - 19/11/2014 - Revitalising route 96, Keolis news, free tram zone, guide dogs. .26 - No. 99 - 17/12/2014 - Accessibility week, new uniform top for CSE's, free tram zone, world trade centre stop upgrade, heat stress, Art tram 158. .27 - No. 100 - 14/1/2015 - Route 96 complete, New Years eve free travel, fare compliance, patronage down, .28 - No. 12 - 16/5/2011 - Gold coast tramway, performance dashboard, tramworks and the rhino .29 - No. 16 - 19/7/2011 - Depot managers, tevor jones, record patronage, vision, rhino .30 - No. 17 - 2/8/2011 - High St Westgarth works, Duncan Smith, David Clarke Training, Swanston St works, and Preston Workshops . .32 - No. 39 - 28/6.2012 - maintenance, Emmanual Sorin, transformation, fare evasion, and Combino in Potsdam. .33 - No. 105 - 25/3/2015 - Grand Prix, Elgin and Lygon upgrade, Camberwell Junction, PTV hub, overhead.Demonstrates Yarra trams staff newsletters.Set of 33 Yarra Trams internal newsletter "The Wire", All A4, printed in full colour. All four pages unless noted otherwise, full colour, performance snapshot on front cover.trams, tramways, yarra trams, traffic control, trackwork, spencer st, fund raising, operations, rhinos, carlton control, high st, haymarket, preston workshops, e class, route numbers, bridge road, wellington parade, ptv, royal visit, footscray road, new tramway, gold coast, macarthur st, swanston st, superstops, newmarket, gardiner, burke road, level crossings, railway squares, myki, metlink, tickets, route 96, rules, st kilda road, elizabeth st, tram 158, tram 925, glen huntly depot, simulator, b class, opeations centre, art trams, patronage