Showing 2412 items
matching street parade
-
 Surrey Hills Historical Society Collection
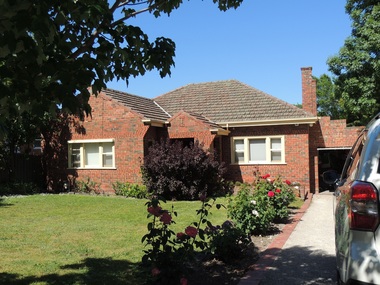
Photograph - 12 Rostrevor Parade, Mont Albert, The Street Where You Live Project
Photos documenting this address as part of a photographic series undertaken by volunteer photographers during 2013 and 2014 for The Street Where You Live Project. This was organised through the Surrey Hills Neighbourhood Centre and covered the postcode 3127 in the cities of Boroondara and Whitehorse.These photos provide a snapshot of real estate in the suburbs of Mont Albert and Surrey Hills during a period of rapid change with many properties on large blocks demolished to create higher density residential development or renewal of single dwellings. At particular risk were properties not covered by heritage overlays, especially interwar housing and post 1950's housing. -
 Surrey Hills Historical Society Collection
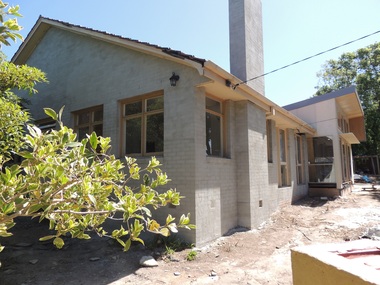
Photograph - 13 Rostrevor Parade, Mont Albert, The Street Where You Live Project
Photos documenting this address as part of a photographic series undertaken by volunteer photographers during 2013 and 2014 for The Street Where You Live Project. This was organised through the Surrey Hills Neighbourhood Centre and covered the postcode 3127 in the cities of Boroondara and Whitehorse.These photos provide a snapshot of real estate in the suburbs of Mont Albert and Surrey Hills during a period of rapid change with many properties on large blocks demolished to create higher density residential development or renewal of single dwellings. At particular risk were properties not covered by heritage overlays, especially interwar housing and post 1950's housing. -
 Surrey Hills Historical Society Collection
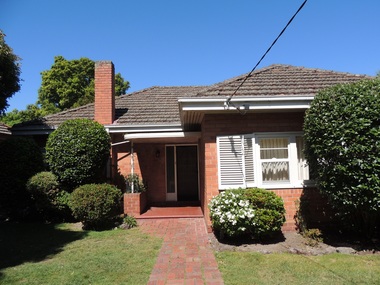
Photograph - 14 Rostrevor Parade, Mont Albert, The Street Where You Live Project
Photos documenting this address as part of a photographic series undertaken by volunteer photographers during 2013 and 2014 for The Street Where You Live Project. This was organised through the Surrey Hills Neighbourhood Centre and covered the postcode 3127 in the cities of Boroondara and Whitehorse.These photos provide a snapshot of real estate in the suburbs of Mont Albert and Surrey Hills during a period of rapid change with many properties on large blocks demolished to create higher density residential development or renewal of single dwellings. At particular risk were properties not covered by heritage overlays, especially interwar housing and post 1950's housing. -
 Surrey Hills Historical Society Collection
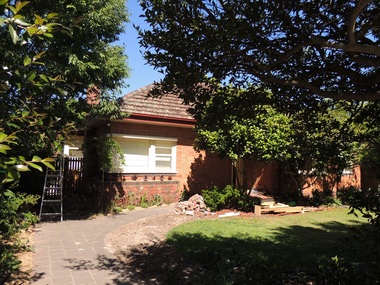
Photograph - 14A Rostrevor Parade, Mont Albert, The Street Where You Live Project
Photos documenting this address as part of a photographic series undertaken by volunteer photographers during 2013 and 2014 for The Street Where You Live Project. This was organised through the Surrey Hills Neighbourhood Centre and covered the postcode 3127 in the cities of Boroondara and Whitehorse.These photos provide a snapshot of real estate in the suburbs of Mont Albert and Surrey Hills during a period of rapid change with many properties on large blocks demolished to create higher density residential development or renewal of single dwellings. At particular risk were properties not covered by heritage overlays, especially interwar housing and post 1950's housing. -
 Kew Historical Society Inc
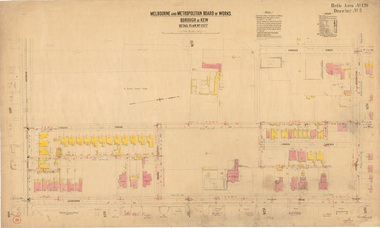
Plan, Borough of Kew Detail Plan No.1577, 1904
The Melbourne and Metropolitan Board of Works (MMBW) plans were produced from the 1890s to the 1950s. They were crucial to the design and development of Melbourne's sewerage and drainage system. The plans, at a scale of 40 feet to 1 inch (1:480), provide a detailed historical record of Melbourne streetscapes and environmental features. Each plan covers one or two street blocks (roughly six streets), showing details of buildings, including garden layouts and ownership boundaries, and features such as laneways, drains, bridges, parks, municipal boundaries and other prominent landmarks as they existed at the time each plan was produced. (Source: State Library of Victoria)This plan forms part of a large group of MMBW plans and maps that was donated to the Society by the Mr Poulter, City Engineer of the City of Kew in 1989. Within this collection, thirty-five hand-coloured plans, backed with linen, are of statewide significance as they include annotations that provide details of construction materials used in buildings in the first decade of the 20th century as well as additional information about land ownership and usage. The copies in the Public Record Office Victoria and the State Library of Victoria are monochrome versions which do not denote building materials so that the maps in this collection are invaluable and unique tools for researchers and heritage consultants. A number of the plans are not held in the collection of the State Library of Victoria so they have the additional attribute of rarity.Original survey plan, issued by the MMBW to a contractor with responsibility for constructing sewers in the area identified on the plan within the Borough of Kew. The plan was at some stage hand-coloured, possibly by the contractor, but more likely by officers working in the Engineering Department of the Borough and later Town, then City of Kew. The hand-coloured sections of buildings on the plan were used to denote masonry or brick constructions (pink), weatherboard constructions (yellow), and public buildings (grey). MMBW Plan No.1577 includes some of the most significant houses in Kew: Herbert Henty’s ‘Roxeth’ (now part of Trinity Grammar), ‘Butleigh Wooton’, ‘Bokara’ and ‘Harrow’. It also includes the streets that have since changed their names. That part of College Parade linked to Glenferrie Road is now named College Place, College Parade now extends further north, and Charles Street did not yet reach Barkers Road. Roxeth is one of a number of Henty houses in Kew. Herbert Henty made his home here and was elected a member of Kew Municipal Council in 1864 and mayor in 1868-69. Walter Henry Serle, of Harrow served in the First World War. He was awarded the Military Medal ‘’For conspicuous bravery and devotion to duty. On 29th September near BELLICOURT he showed the greatest bravery and determination when his platoon was attacked by enemy bombing parties. It was due largely to his personal efforts that all the attacks were repulsed. Until wounded, his utter disregard of personal safety and boldness in dealing with the attacks were the means of saving the situation and were an inspiring example to his men.’melbourne and metropolitan board of works, detail plans, maps - borough of kew, mmbw 1577, cartography -
 Kew Historical Society Inc
Archive (Sub-series) - Subject File, Kew Historical Society, Gardens (Kew), 1979
Various partiesReference, Research, InformationSecondary Values (KHS Imposed Order)Correspondence and newspaper articles/clippings relating to historic gardens in Kew. The oldest item is a letter from the National Trust Victoria announcing their two-year garden study and seeking information on gardens in Kew. Mavis Rolley, Secretary of the Society, made handwritten notes in response, which are kept in the file. She refers to: the pear trees planted by William Oswin in c. 1845 near what is now the Burke Road Bridge (she notes that a search for the trees at the time of the construction of the Eastern Freeway was unsuccessful), a camellia planted by the Dannocks near the corner of Derby and High Street, a c.1876 pine tree in Field Place, Henty Court, an 1875 Moreton Bay fig at Tarring, Ruyton, a Moreton Bay fig at Roxeth, Trinity Grammar, an 1840s oak tree and a 120-year old olive tree at Fairholme, Barry Street, 1870 pine trees at D’Estaville, Barry Street, trees at Turinville, Barnard Grove, dating to 1846, pine trees dating from 1845-6 on the Willsmere Farm, red gums in Victoria Park, pine trees in the Cemetery dating from the 1860s, trees in the Alexandra Gardens and at Kew Primary School, palm trees at La Verna, Sackville Street dating from the 1890s, the trees and gardens at Ross House (Charleville), and the trees at Merridale, Sackville Street which date from the 1880s, a magnolia at Lalla Rookh. These dates are probably highly contestable. Other handwritten notes from 1979 about significant gardens included: 5 Molesworth Street, Red Bluff - Redmond Street (garden now destroyed), Campion House, Studley Park Road, Raheen, Studley Park Road, Ross House, Cotham Road (Charleville), 7 Adeney Avenue, 20-21 Belmont Avenue, 52 Mary Street, an Edna Walling garden on the corner of Argyle Road and Victor Avenue, Merridale, Sackville Street, Roseneath, and Reno, St John’s Parade.gardens - private - kew (vic), garden design - kew (vic), kew horticultural societygardens - private - kew (vic), garden design - kew (vic), kew horticultural society -
 Kew Historical Society Inc
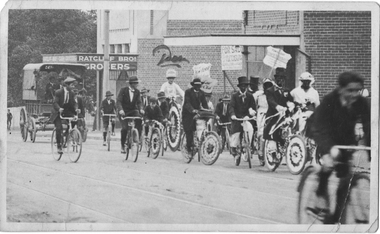
Photograph - Dark Town Wedding, 1922
A photograph of a fund-raising procession from 1922. The now politically incorrect use of black face by the participants and the naming of the card has been included on Victorian Collections as representing the values of the period.The subject matter and original description is interesting as a reflection of social values by white Australians in the 1920s.Photograph of a fund-raising bicycle ride in High Street, Kew in 1922. Donated by Alva Allen in 1987.Dark Town Wedding 1922 Bride Bert Williams, Groom Mrs Stromach, Father Jack Allen, Best man ***, Pastor Snowy Raymond, Man on Penny Farthing Don Allen, won the Sun Office prize for the best decorated bike. Also in picture Ray Allen, Lawrie Allen. Don riding in procession. Ava Allen almost *** Picture taken in High Street Kew in 1922 *** riding in processionfund-raising - kew (vic), parades - kew (vic) -
 Kew Historical Society Inc
Photograph - House, 47 Derby Street, Kew, Nita Green, 1979
Nita Green was a member the Society and owner of Reno in St John's Parade, Kew. She was clearly a skilled photographer from the examples of photographs taken by and processed by her.Double fronted weatherboard house at 47 Derby Street, taken in 1979 before modifications to the facade had occurred. The front of the house is dominated by a large elm tree. The house has a central portico and door with sash windows on either side. "47 Derby Street / Donated by Nita Green 1979 / taken and processed by her"47 derby street -- kew (vic.), houses - derby street (kew) -
Kew Historical Society Inc
Journal, Kewriosity : April 1985
Occasional Care [Centre] is a winner [Strathalbyn Street] / p1. And what a Parade it was! [Kew Festival] / p1. Community Notices - General; Clubs and societies; Religious notices; Politics; Auxiliaries; Support Groups] / p2&8. Update: Notes from Council - Trees: Our heritage [street trees] / Cr Robin Saunders [Mayor of Kew] p3. Doorknock in traffic management Area 5 / p4. Driver needed! [Kew Community Bus] / p4. We have a place for your child! [Davis Street Kindergarten] / p4. Council supports Community Employment Program / p4. New Residents Kit / p4. What is a playgroup? [Highbury Grove Playgroup] / p5. Future planning for children's services / p5. Don't burn those leaves / p5. Kew Community House [short courses] / p5. Youth Page: What does the Youth Services Officer do? Junior footballers: where are you? [Kew Football Club]; Youth groups - let more people know about your club; Recreation and enjoyment / p6. Proposed Kew Full Day Care Centre / p7. Greek Easter / p7. "Spring" Festivals and the origins of the Easter Bunny / p7. This Kewriosity is being delivered to you by - Kew Preschool Support Group [Woodlands Avenue Baptist Church Hall] / p8. A fond farewell to A.C.K.D.A. [Artists’ Co-operative for the Kew/Deepdene area] / p8.Kewriosity was a local newsletter combining Kew Council and community news. It was published between November 1983 and June 1994, replacing an earlier Kewriosity [broad] Sheet (1979-84). In producing Kewriosity, Council aimed to provide a range of interesting and informative articles covering its deliberations and decision making, together with items of general interest and importance to the Kew community and information not generally available through daily media outlets.non-fictionOccasional Care [Centre] is a winner [Strathalbyn Street] / p1. And what a Parade it was! [Kew Festival] / p1. Community Notices - General; Clubs and societies; Religious notices; Politics; Auxiliaries; Support Groups] / p2&8. Update: Notes from Council - Trees: Our heritage [street trees] / Cr Robin Saunders [Mayor of Kew] p3. Doorknock in traffic management Area 5 / p4. Driver needed! [Kew Community Bus] / p4. We have a place for your child! [Davis Street Kindergarten] / p4. Council supports Community Employment Program / p4. New Residents Kit / p4. What is a playgroup? [Highbury Grove Playgroup] / p5. Future planning for children's services / p5. Don't burn those leaves / p5. Kew Community House [short courses] / p5. Youth Page: What does the Youth Services Officer do? Junior footballers: where are you? [Kew Football Club]; Youth groups - let more people know about your club; Recreation and enjoyment / p6. Proposed Kew Full Day Care Centre / p7. Greek Easter / p7. "Spring" Festivals and the origins of the Easter Bunny / p7. This Kewriosity is being delivered to you by - Kew Preschool Support Group [Woodlands Avenue Baptist Church Hall] / p8. A fond farewell to A.C.K.D.A. [Artists’ Co-operative for the Kew/Deepdene area] / p8. publications -- city of kew (vic.), kewriosity, council newsletters, community newsletters -
Kew Historical Society Inc
Journal, The Kewriosity Sheet Vol.4 No.3 : October 1982
St Paul's School for the Blind and Visually Handicapped / p1. Volunteer drivers needed [Kew Community Bus] / p1. East Central Weights and Measures Union / p1. Uniting Church East Kew - Dairy [sic] for October / p2. Save the Children Fund / p2. Kew Skin Diving Club / p2. Kew Library [Deafness Awareness Week] / p2. St Paul's luncheon and fashion parade / p2. Scouts 50th anniversary dinner [6th Kew Scouts] / p3. Kew Garden Club / p3. R.A.A.V. [Rheumatism and Arthritis Association of Victoria] / p3. Patchwork quilts [Exhibition; Australian Quilters Association] / p3. Cabaret [Kew Baptist Church Young People's Cabaret] / p3. Hyde Park Fellowship [Hyde Park Uniting Church] / p3. Annual Fete [St Paul's East Kew] / p3. They built well: State School No. 1075, Peel Street, Kew [school history] / p4. Native Plant Group / p4.The Kewriosity Sheet (1979-83) was first published in the City of Kew (Victoria) in June 1979 as a two-sided 'community newssheet'. It aimed to: 'share news about Kew happenings and Kew people, and to exchange ideas about living in Kew'. Later issues gradually evolved into a 4-page, quarto sized publication. The Kewriosity Sheet was superseded by the Kew Council publication 'Kewriosity' (1983-1994).non-fictionSt Paul's School for the Blind and Visually Handicapped / p1. Volunteer drivers needed [Kew Community Bus] / p1. East Central Weights and Measures Union / p1. Uniting Church East Kew - Dairy [sic] for October / p2. Save the Children Fund / p2. Kew Skin Diving Club / p2. Kew Library [Deafness Awareness Week] / p2. St Paul's luncheon and fashion parade / p2. Scouts 50th anniversary dinner [6th Kew Scouts] / p3. Kew Garden Club / p3. R.A.A.V. [Rheumatism and Arthritis Association of Victoria] / p3. Patchwork quilts [Exhibition; Australian Quilters Association] / p3. Cabaret [Kew Baptist Church Young People's Cabaret] / p3. Hyde Park Fellowship [Hyde Park Uniting Church] / p3. Annual Fete [St Paul's East Kew] / p3. They built well: State School No. 1075, Peel Street, Kew [school history] / p4. Native Plant Group / p4.community publications --- kew (vic.), the kewriosity sheet, newsletters - kew (vic.) -
!['Reno', St John's Parade [Kew]](/media/collectors/550653872162f11fb04854aa/items/658d16120f23e8f1e738df53/item-media/658d16680f23e8f1e738e098/item-fit-380x285.jpg) Kew Historical Society Inc
Kew Historical Society IncPhotograph - 'Reno', St John's Parade [Kew], c. 1965
‘Reno’, stood on the east side of St John’s Parade. Its earliest recorded owner was the architect Samuel Cocking who lived there from c.1865 until his death in 1888. The original landholding was bordered by Cotham Road, Glenferrie Road, Wellington Street, and Charles Street. The garden including rare plants supplied by Baron Von Mueller, surrounds the cottage in a tangled frenzy. Despite a ‘local significance’ classification by the National Trust, the house was demolished in 1977.This work forms part of the collection assembled by the historian Dorothy Rogers (1905-1973), donated to the Kew Historical Society by her son in 2015. The manuscripts, photographs, maps, and documents were sourced by her from both family and local collections or produced as references for her print publications. Many were directly used by Rogers in writing ‘Lovely Old Homes of Kew’ (1961) and 'A History of Kew' (1973), or the numerous articles on local history that she produced for suburban newspapers. Most of the photographs in the collection include detailed annotations in her hand. The Rogers Collection provides a comprehensive insight into the working habits of a historian from the 1960s to the 1970s. Original monochrome photograph of Reno, St John's Parade, Kew. Pictured are the garage in the distance at left, the weatherboard house with its simple verandah, and the overgrown front garden.Annotation verso: "Reno. St Johns Parade. Reno. Miss Green".dorothy rogers, reno.-- st john's parade (kew) -
 Kew Historical Society Inc
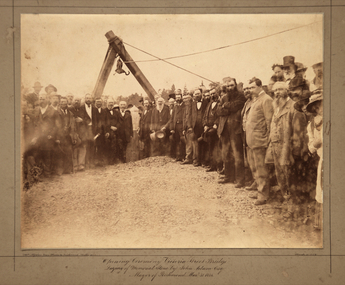
Photograph, Opening Ceremony Victoria Street Bridge: Laying of memorial stone by John Adam Esq. Mayor of Richmond, 1884
A formal group photograph of the grand opening of the Victoria Street Bridge on March 31 1884. The Argus was to report that: ‘The ceremony of laying the memorial stone of the Victoria-bridge, which connects Kew and Hawthorn with Richmond and Collingwood, was performed yesterday afternoon by the mayor of Richmond (Mr John Adam) in the presence of a large assemblage. Among the gentlemen present at yesterday’s proceedings were the mayor of Collingwood (Mr. M. Dwyer), the Mayor of Melbourne (Councillor C. Smith, M.L. A.) the mayor of Kew (Mr. Barnard), Mr. J. A. B. Koch and Mr. W. W. Shelley (ex mayors of Richmond), Mr. Joseph Bosisto, M.L.A., the Hon. L. L. Smith, Councillor De Mole (ex mayor of Kew), Mr. Jas. Lancashire and Mr. Winter (ex mayors of Ricmond), Mr. Walker (ex mayors of Collingwood), Mr. Johnson (engineer), Mr. C. Rowan, C.E. (engineer of the bridge alterations) and the town clerks of Richmond, Collingwood and Kew.’ Following the opening ceremony ‘… a ponderous steam roller was driven over the structure, with a view to test, or rather to demonstrate its stability … Most of the gentlemen present walked over the bridge, after which they were grouped by a photographer, with the memorial stone as a central feature, and several views of the scene were taken’.An original, rare silver albumen mounted and titled photograph of an important event in 19th century Melbourne.Original photograph mounted on display card of the opening of the Victoria Street Bridge. The original photograph is very faded and has been enhanced to improve the image's viewability.On the reverse of the card is an indecipherable stamp and an inscription identifying the photographers. "T. W. & C. A. McAlpine Bros, Photographers &., Campbell Parade East Richmond Melbourne March 31.1884victoria street bridge, john adam, m. dwyer, c. smith, barnard, j.a.b. koch, w.w. shelley, bridge, kew, collingwood, l.l. smith, joseph bosisto -
 Kew Historical Society Inc
Functional object - Wrought iron nails from 'Reno', St John's Parade, c. 1864
Comparatively few weatherboard houses in Kew survived from the early years of settlement into the second half of the 20th century. One such property was ‘Reno’, which once stood on the east side of St John’s Parade. Its earliest recorded owner was the architect Samuel Cocking who lived there from c.1865 until his death in 1888. The original landholding was bordered by Cotham Road, Glenferrie Road, Wellington Street, and Charles Street. The southern portion of this land included a fine orchard, with many imported trees. The old summer house, at first in the orchard, was later removed to the house garden. The MMBW Detail Plan No.1576 (1904) shows the remaining portion of the original land holding, including a semi-circular pathway at the front, and garden features such as an aviary, a fountain and grotto, and a fernery. None of these are apparent in photographs dating from the 1960s, where the garden, which once included rare plants provided by Baron Von Mueller, surrounds the cottage in a tangled frenzy. Despite a ‘local significance’ classification by the National Trust, the house was demolished in 1977.7 square headed iron nails collected from Reno before its demolition. In envelope marked with the name Joy Stewartreno, nails, samuel cocking -
![Wallpaper from 'Reno', St John's Parade [Kew]](/media/collectors/550653872162f11fb04854aa/items/57975996d0cdd1098c81d980/item-media/579759ded0cdd1098c81f6fa/item-fit-380x285.jpg) Kew Historical Society Inc
Kew Historical Society IncDecorative object - Wallpaper sample from 'Reno', St John's Parade, 1890s
Comparatively few weatherboard houses in Kew survived from the early years of settlement into the second half of the 20th century. One such property was ‘Reno’, which once stood on the east side of St John’s Parade. Its earliest recorded owner was the architect Samuel Cocking who lived there from c.1865 until his death in 1888. The original landholding was bordered by Cotham Road, Glenferrie Road, Wellington Street, and Charles Street. The southern portion of this land included a fine orchard, with many imported trees. The old summer house, at first in the orchard, was later removed to the house garden. The MMBW Detail Plan No.1576 (1904) shows the remaining portion of the original land holding, including a semi-circular pathway at the front, and garden features such as an aviary, a fountain and grotto, and a fernery. None of these are apparent in photographs dating from the 1960s, where the garden, which once included rare plants provided by Baron Von Mueller, surrounds the cottage in a tangled frenzy. Despite a ‘local significance’ classification by the National Trust, the house was demolished in 1977. Wallpaper fragment from ‘Reno’. This small fragment of floral wall paper is a bolder design than the delicately drawn flowers in 1977.0005.1. The flowers in this example were impressionistically created using printing blocks that allowed for different thicknesses of paint to be applied in the hand-blocking process. wallpaper, reno, st john's parade, kew -
![Wallpaper from 'Reno', St John's Parade [Kew]](/media/collectors/550653872162f11fb04854aa/items/57975a62d0cdd1098c8232a8/item-media/57975cabd0cdd1098c836f91/item-fit-380x285.jpg) Kew Historical Society Inc
Kew Historical Society IncDecorative object - Wallpaper sample from 'Reno', St John's Parade, 1870s
Comparatively few weatherboard houses in Kew survived from the early years of settlement into the second half of the 20th century. One such property was ‘Reno’, which once stood on the east side of St John’s Parade. Its earliest recorded owner was the architect Samuel Cocking who lived there from c.1865 until his death in 1888. The original landholding was bordered by Cotham Road, Glenferrie Road, Wellington Street, and Charles Street. The southern portion of this land included a fine orchard, with many imported trees. The old summer house, at first in the orchard, was later removed to the house garden. The MMBW Detail Plan No.1576 (1904) shows the remaining portion of the original land holding, including a semi-circular pathway at the front, and garden features such as an aviary, a fountain and grotto, and a fernery. None of these are apparent in photographs dating from the 1960s, where the garden, which once included rare plants provided by Baron Von Mueller, surrounds the cottage in a tangled frenzy. Despite a ‘local significance’ classification by the National Trust, the house was demolished in 1977.Wallpaper fragment from ‘Reno’. This large single example is interesting as it represents a change in fashion and style from the finely drawn flowers (1971.0002.1) of an older paper, parts of which can be seen behind this sample. Typically the updating of wallpapers was accomplished by laying a new paper over the old. The ‘newer’ wallpaper is of a single colour, the tone of which may have suffered from colour distortion due to ageing. The new block-printed design, featuring repeated sprays of flowers and leaves combines a bold use of colour with an elegance of design.reno, st john's parade, kew, samuel cocking, wallpaper -
![Wallpaper fragment - Reno, St John's Parade [Kew]](/media/collectors/550653872162f11fb04854aa/items/57975cd6d0cdd1098c838ddb/item-media/57975d42d0cdd1098c83c222/item-fit-380x285.jpg) Kew Historical Society Inc
Kew Historical Society IncDecorative object - Wallpaper sample from 'Reno', St John's Parade, 1870s
Comparatively few weatherboard houses in Kew survived from the early years of settlement into the second half of the 20th century. One such property was ‘Reno’, which once stood on the east side of St John’s Parade. Its earliest recorded owner was the architect Samuel Cocking who lived there from c.1865 until his death in 1888. The original landholding was bordered by Cotham Road, Glenferrie Road, Wellington Street, and Charles Street. The southern portion of this land included a fine orchard, with many imported trees. The old summer house, at first in the orchard, was later removed to the house garden. The MMBW Detail Plan No.1576 (1904) shows the remaining portion of the original land holding, including a semi-circular pathway at the front, and garden features such as an aviary, a fountain and grotto, and a fernery. None of these are apparent in photographs dating from the 1960s, where the garden, which once included rare plants provided by Baron Von Mueller, surrounds the cottage in a tangled frenzy. Despite a ‘local significance’ classification by the National Trust, the house was demolished in 1977. Wallpaper fragment from ‘Reno’. These three boldly designed samples from a single room are in shades of green and brown, highlighted by yellow and red floral sprays. While more accurately printed and coloured, the fragment lacks the freedom of design of the earlier samples.wallpaper, reno, st john's parade, kew, samuel cocking -
![Reno, St John's Parade [Kew] - Reno, St John's Parade [Kew]](/media/collectors/550653872162f11fb04854aa/items/57975dcbd0cdd1098c840aaf/item-media/57975e31d0cdd1098c84343d/item-fit-380x285.jpg) Kew Historical Society Inc
Kew Historical Society IncDecorative object - Wallpaper samples from 'Reno', St John's Parade, 1880-1910
Comparatively few weatherboard houses in Kew survived from the early years of settlement into the second half of the 20th century. One such property was ‘Reno’, which once stood on the east side of St John’s Parade. Its earliest recorded owner was the architect Samuel Cocking who lived there from c.1865 until his death in 1888. The original landholding was bordered by Cotham Road, Glenferrie Road, Wellington Street, and Charles Street. The southern portion of this land included a fine orchard, with many imported trees. The old summer house, at first in the orchard, was later removed to the house garden. The MMBW Detail Plan No.1576 (1904) shows the remaining portion of the original land holding, including a semi-circular pathway at the front, and garden features such as an aviary, a fountain and grotto, and a fernery. None of these are apparent in photographs dating from the 1960s, where the garden, which once included rare plants provided by Baron Von Mueller, surrounds the cottage in a tangled frenzy. Despite a ‘local significance’ classification by the National Trust, the house was demolished in 1977.Wallpaper fragment from ‘Reno’. These two large fragments of wallpaper have a formality of design that is accentuated by the wide borders and narrow vertical lines that separate the repeated designs of rose garlands in vases on a vertical trellis design. The design is in tones of pink and green with gilding.reno, st john's parade, kew, samuel cocking, wallpaper -
![Wallpaper from 'Reno', St John's Parade [Kew]](/media/collectors/550653872162f11fb04854aa/items/57975eabd0cdd1098c846619/item-media/57975ee7d0cdd1098c8484f7/item-fit-380x285.jpg) Kew Historical Society Inc
Kew Historical Society IncDecorative object - Wallpaper samples from 'Reno', St John's Parade, 1880-1914
Comparatively few weatherboard houses in Kew survived from the early years of settlement into the second half of the 20th century. One such property was ‘Reno’, which once stood on the east side of St John’s Parade. Its earliest recorded owner was the architect Samuel Cocking who lived there from c.1865 until his death in 1888. The original landholding was bordered by Cotham Road, Glenferrie Road, Wellington Street, and Charles Street. The southern portion of this land included a fine orchard, with many imported trees. The old summer house, at first in the orchard, was later removed to the house garden. The MMBW Detail Plan No.1576 (1904) shows the remaining portion of the original land holding, including a semi-circular pathway at the front, and garden features such as an aviary, a fountain and grotto, and a fernery. None of these are apparent in photographs dating from the 1960s, where the garden, which once included rare plants provided by Baron Von Mueller, surrounds the cottage in a tangled frenzy. Despite a ‘local significance’ classification by the National Trust, the house was demolished in 1977. Wallpaper fragment from ‘Reno’. This small fragment is part of the larger design shown in the previous sample (1971.0002.5). It includes a detail of the trellis element from the larger scheme.wallpaper, samuel cocking, reno, st john's parade, kew -
![Letter Plate, 'Reno', St John's Parade [Kew]](/media/collectors/550653872162f11fb04854aa/items/57a03863d0cdd1210435bac1/item-media/57a038b1d0cdd1210435f155/item-fit-380x285.jpg) Kew Historical Society Inc
Kew Historical Society IncFunctional object - Letter Plate, 'Reno', St John's Parade, c.1900
Comparatively few weatherboard houses in Kew survived from the early years of settlement into the second half of the 20th century. One such property was ‘Reno’, which once stood on the east side of St John’s Parade. Its earliest recorded owner was the architect Samuel Cocking who lived there from c.1865 until his death in 1888. The original landholding was bordered by Cotham Road, Glenferrie Road, Wellington Street, and Charles Street. The southern portion of this land included a fine orchard, with many imported trees. The old summer house, at first in the orchard, was later removed to the house garden. The MMBW Detail Plan No.1576 (1904) shows the remaining portion of the original land holding, including a semi-circular pathway at the front, and garden features such as an aviary, a fountain and grotto, and a fernery. None of these are apparent in photographs dating from the 1960s, where the garden, which once included rare plants provided by Baron Von Mueller, surrounds the cottage in a tangled frenzy. Despite a ‘local significance’ classification by the National Trust, the house was demolished in 1977.Brass letter plate, originally from the front door of Reno in St John's Parade, Kew. Donated by Miss McDowell in 1977, in the year the house was demolished.reno, st john's parade, kew -
 Kew Historical Society Inc
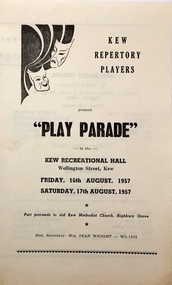
Programme - Theatre Programme, Play Parade, 1957
From the early 1950s, the Kew Repertory Players performed more substantial, if less spectacular fare in the Recreation Hall, and later in the new Kew City Hall, after the former’s demolition in 1960. Their repertoire ranged from plays by Noel Coward to J.B. Priestley. Many of their programmes, the earliest from 1953, and the last from 1965, form part of our collection.Arthur Henry Dear was an employee of the City of Kew, acting as Hall Keeper of the Kew Recreation Hall in Wellington Street, and later the new Kew City Hall in Cotham Road. The Arthur Dear Collection contains memorabilia - tickets, programmes, invitations - as well as his identification badge. Items in the collection dates from the 1940s to the 1970s The Kew Recreation Hall (Wellington Street) and later the Kew City Hall (Cotham Road) were major locations in suburban Melbourne in the postwar period for civic and private events including theatre productions and exhibitions. The Arthur Dear Collection (in conjunction with the scrapbooks compiled by Marion Tilley) provide a comprehensive snapshot of performing arts in Kew during the 1940s, 1950s and 1960s. The collection includes valuable data about performances, performers, directors etc., during this period. Programme issued by The Kew Repertory Players for performances in August 1957 of three plays - Sad About Europe by Philip Johnson, Fumed Oak by Noel Coward, The Rose and Crown by J.B. Priestley - in the Kew Recreation Hall. The 4-page programme includes cast lists, and advertisements for local businesses.sad about europe, philip johnson, fumed oak, noel coward, the rose and crown, j.b. priestley, kew repertory players, arthur dear collection, performing arts -- kew -- victoria, kew recreation hall -- wellington street, theatre memorabilia -
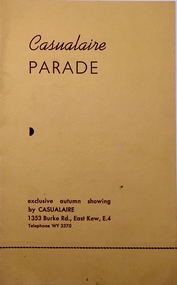 Kew Historical Society Inc
Programme, Casualaire Parade, Undated
The Kew Recreation Hall (1880-1960 was a major venue for civic events, exhibitions, theatre, concerts and in this case a commercial fashion parade.Arthur Henry Dear was an employee of the City of Kew, acting as Hall Keeper of the Kew Recreation Hall in Wellington Street, and later the new Kew City Hall in Cotham Road. The Arthur Dear Collection contains memorabilia - tickets, programmes, invitations - as well as his identification badge. Items in the collection dates from the 1940s to the 1970s. The Kew Recreation Hall (Wellington Street) and later the Kew City Hall (Cotham Road) were major locations in suburban Melbourne in the postwar period for civic and private events including theatre productions and exhibitions. The Arthur Dear Collection (in conjunction with the scrapbooks compiled by Marion Tilley) provide a comprehensive snapshot of performing arts in Kew during the 1940s, 1950s and 1960s. The collection includes valuable data about performances, performers, directors etc., during this period. Programme for an exclusive Autumn showing by Casualaire, 1353 Burke Road, East Kew, compered by Gwynne Harrisonfashion - kew, casualaire, gwynne harrison, valerie jacobson, lyle sampson, joan heathfield, mary rose campbell, marie johnson, arthur dear collection, kew recreation hall -- wellington street -- kew (vic.) -
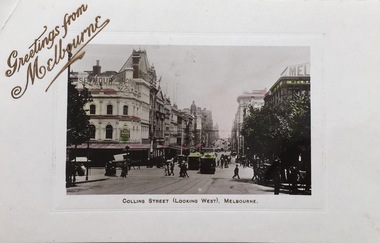 Kew Historical Society Inc
Postcard, Collins Street (looking West), Melbourne, 1907-1914
The Kew Historical Society's postcard collection includes views of Kew, Melbourne and Greater Melbourne as well as those including overseas scenes sent or received from Europe or the Middle East. They date from the 1890s to the 2000s. These postcards may or may not include the name of the publisher or printer. A number of the cards were published as parts of popular series. A way of dating early postcards is to identify whether the reverse was divided by a central line which became the norm after 1902 in the United Kingdom. However, other postcards produced after this date do not always conform to this print layout.Early postcard of MelbourneSepia tinted postcard of Collins Street, Melbourne, Th postcard design includes a line separating the address from the message on the reverse, which dates it after 1902. The stamp on the card is a red Victorian stamp with the head of Queen Victoria in use 1901-1911.Front title - Collins Street (looking West), Melbourne Reverse. - Mrs Garahy, Creek Parade, Clunes, Vic / Dear Mollie / All join with me in wishing you and our dear mother a very prosperous and happy New Year. I am enjoying my holidays very much. I heard Melba last week and went to the pantomime Humpty Dumpty. - it was all lovely. I’ll tell you all about them when I return to Clunes. We were all home for Xmas Day. The first time for 17 years. Fondest love. N.C. / I cut my right hand very badly last Monday and have not been able to write till today. N.C.postcards -- melbourne (vic.), collins street --- melbourne (vic) -
![Wallpaper sample from 'Reno', St John's Parade [Kew]](/media/collectors/550653872162f11fb04854aa/items/5670dfde2162f10b54fac48a/item-media/5797600bd0cdd1098c854c29/item-fit-380x285.jpg) Kew Historical Society Inc
Kew Historical Society IncDecorative object - Wallpaper sample from 'Reno', St John's Parade, 1850-1880
Comparatively few weatherboard houses in Kew survived from the early years of settlement into the second half of the 20th century. One such property was ‘Reno’, which once stood on the east side of St John’s Parade. Its earliest recorded owner was the architect Samuel Cocking who lived there from c.1865 until his death in 1888. The original landholding was bordered by Cotham Road, Glenferrie Road, Wellington Street, and Charles Street. The southern portion of this land included a fine orchard, with many imported trees. The old summer house, at first in the orchard, was later removed to the house garden. The MMBW Detail Plan No.1576 (1904) shows the remaining portion of the original land holding, including a semi-circular pathway at the front, and garden features such as an aviary, a fountain and grotto, and a fernery. None of these are apparent in photographs dating from the 1960s, where the garden, which once included rare plants provided by Baron Von Mueller, surrounds the cottage in a tangled frenzy. Despite a ‘local significance’ classification by the National Trust, the house was demolished in 1977.Original sample of nineteenth century wallpaper from one of the earliest homes in Kew (Victoria).Wallpaper fragment from ‘Reno’. These two samples of light brown Victorian-period wallpaper were overprinted with flowers and leaves that are outlined in maroon. Flowers and foliage are painted in blue of varying intensity, giving the impression of being hand painted. The style of this wallpaper would have been suited to a bedroom or drawing room.wallpaper, samuel cocking, reno, st john's parade, kew -
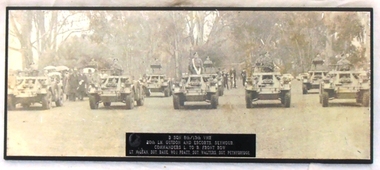 8th/13th Victorian Mounted Rifles Regimental Collection
Photograph, 1970 circa
Trooping of the 20th Light Horse guidon through the streets of Seymour Victoria to mark a significant occasion in the towns long connection with the Regiment. A parade involving seven Ferret Scout cars was an unusual event. This photograph was displayed in the ORs Mess at the 8th/13th VMR depot Wangaratta until closure of the depot when the photo was passed to the Regimental Collection. Rare photograph of a mounted escort to a regimental guidon during the 1970s using ferret scout cars.Black and White photograph mounted on chipboard backing with black chamfered edges showing 7 Ferret Scout cars in two ranks in parade order on a road in a rural setting flanked by gum trees.On plastic name plate at centre lower edge of photo "B Squadron 8th/13th VMR 20th LH Guidon and Escorts, Seymour. Commanders L to R Front Row Lt. Mclean, Sgt. Roue, W.O.1 Pratt, Sgt. Walters, Sgt. Pethybridge.seymour, ferret scout car, mclean john lieutenant, 20th light horse -
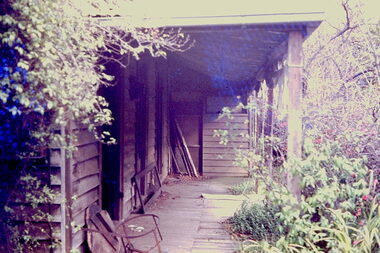 Kew Historical Society Inc
Slide - 'Reno', St John 's Parade, 1977
‘Reno’, stood on the east side of St John’s Parade. Its earliest recorded owner was the architect Samuel Cocking who lived there from c.1865 until his death in 1888. The original landholding was bordered by Cotham Road, Glenferrie Road, Wellington Street, and Charles Street. The southern portion of this land included a fine orchard, with many imported trees. The old summer house, at first in the orchard, was later removed to the house garden. The MMBW Detail Plan No.1576 (1904) shows the remaining portion of the original land holding, including a semi-circular pathway at the front, and garden features such as an aviary, a fountain and grotto, and a fernery. The garden including rare plants supplied by Baron Von Mueller, surrounds the cottage in a tangled frenzy. Despite a ‘local significance’ classification by the National Trust, the house was demolished in 1977.Rare photograph of an historically important weatherboard cottage in St John's Parade.Colour positive transparency (slide) of the verandah of 'Reno' in St John's Parade, Kew (demolished 1977). historic houses -- kew (vic.), reno -- st john's parade -- kew (vic.) -
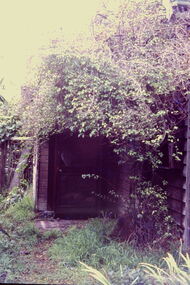 Kew Historical Society Inc
Slide - 'Reno', St John 's Parade, 1977
‘Reno’, stood on the east side of St John’s Parade. Its earliest recorded owner was the architect Samuel Cocking who lived there from c.1865 until his death in 1888. The original landholding was bordered by Cotham Road, Glenferrie Road, Wellington Street, and Charles Street. The southern portion of this land included a fine orchard, with many imported trees. The old summer house, at first in the orchard, was later removed to the house garden. The MMBW Detail Plan No.1576 (1904) shows the remaining portion of the original land holding, including a semi-circular pathway at the front, and garden features such as an aviary, a fountain and grotto, and a fernery. The garden including rare plants supplied by Baron Von Mueller, surrounds the cottage in a tangled frenzy. Despite a ‘local significance’ classification by the National Trust, the house was demolished in 1977.Rare photograph of an historically important weatherboard cottage in St John's Parade.Colour positive transparency (slide) of the a doorway of 'Reno' in St John's Parade, Kew (demolished 1977). historic houses -- kew (vic.), reno -- st john's parade -- kew (vic.) -
 Kew Historical Society Inc
Slide - 'Reno', St John 's Parade, 1977
‘Reno’, stood on the east side of St John’s Parade. Its earliest recorded owner was the architect Samuel Cocking who lived there from c.1865 until his death in 1888. The original landholding was bordered by Cotham Road, Glenferrie Road, Wellington Street, and Charles Street. The southern portion of this land included a fine orchard, with many imported trees. The old summer house, at first in the orchard, was later removed to the house garden. The MMBW Detail Plan No.1576 (1904) shows the remaining portion of the original land holding, including a semi-circular pathway at the front, and garden features such as an aviary, a fountain and grotto, and a fernery. The garden including rare plants supplied by Baron Von Mueller, surrounds the cottage in a tangled frenzy. Despite a ‘local significance’ classification by the National Trust, the house was demolished in 1977.Rare photograph of an historically important weatherboard cottage in St John's Parade.Colour positive transparency (slide) of the verandah of 'Reno' in St John's Parade, Kew (demolished 1977). historic houses -- kew (vic.), reno -- st john's parade -- kew (vic.) -
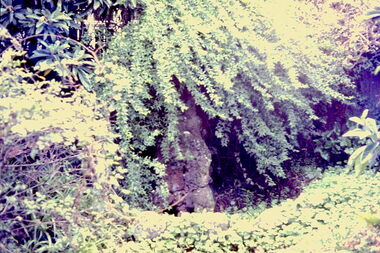 Kew Historical Society Inc
Slide - Grotto of 'Reno', St John 's Parade, 1977
‘Reno’, stood on the east side of St John’s Parade. Its earliest recorded owner was the architect Samuel Cocking who lived there from c.1865 until his death in 1888. The original landholding was bordered by Cotham Road, Glenferrie Road, Wellington Street, and Charles Street. The southern portion of this land included a fine orchard, with many imported trees. The old summer house, at first in the orchard, was later removed to the house garden. The MMBW Detail Plan No.1576 (1904) shows the remaining portion of the original land holding, including a semi-circular pathway at the front, and garden features such as an aviary, a fountain and grotto, and a fernery. The garden including rare plants supplied by Baron Von Mueller, surrounds the cottage in a tangled frenzy. Despite a ‘local significance’ classification by the National Trust, the house was demolished in 1977.Rare photograph of an historically important weatherboard cottage in St John's Parade.Colour positive transparency (slide) of the grotto in the garden of 'Reno' in St John's Parade, Kew (demolished 1977). historic houses -- kew (vic.), reno -- st john's parade -- kew (vic.) -
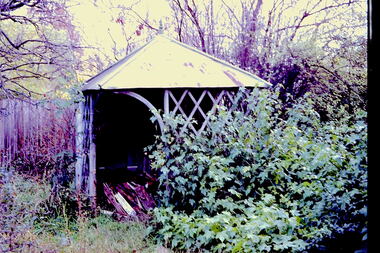 Kew Historical Society Inc
Slide - Former Summerhouse in the Garden of 'Reno', St John 's Parade, 1977
‘Reno’, stood on the east side of St John’s Parade. Its earliest recorded owner was the architect Samuel Cocking who lived there from c.1865 until his death in 1888. The original landholding was bordered by Cotham Road, Glenferrie Road, Wellington Street, and Charles Street. The southern portion of this land included a fine orchard, with many imported trees. The old summer house, at first in the orchard, was later removed to the house garden. The MMBW Detail Plan No.1576 (1904) shows the remaining portion of the original land holding, including a semi-circular pathway at the front, and garden features such as an aviary, a fountain and grotto, and a fernery. The garden including rare plants supplied by Baron Von Mueller, surrounds the cottage in a tangled frenzy. Despite a ‘local significance’ classification by the National Trust, the house was demolished in 1977.Rare photograph of an historically important weatherboard cottage in St John's Parade.Colour positive transparency (slide) of the former summerhouse in the garden of 'Reno' in St John's Parade, Kew (demolished 1977). historic houses -- kew (vic.), reno -- st john's parade -- kew (vic.) -
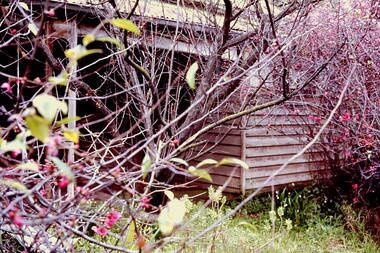 Kew Historical Society Inc
Slide - 'Reno', St John 's Parade, 1977
‘Reno’, stood on the east side of St John’s Parade. Its earliest recorded owner was the architect Samuel Cocking who lived there from c.1865 until his death in 1888. The original landholding was bordered by Cotham Road, Glenferrie Road, Wellington Street, and Charles Street. The southern portion of this land included a fine orchard, with many imported trees. The old summer house, at first in the orchard, was later removed to the house garden. The MMBW Detail Plan No.1576 (1904) shows the remaining portion of the original land holding, including a semi-circular pathway at the front, and garden features such as an aviary, a fountain and grotto, and a fernery. The garden including rare plants supplied by Baron Von Mueller, surrounds the cottage in a tangled frenzy. Despite a ‘local significance’ classification by the National Trust, the house was demolished in 1977.Rare photograph of an historically important weatherboard cottage in St John's Parade.Colour positive transparency (slide) of the garden of 'Reno' in St John's Parade, Kew (demolished 1977). historic houses -- kew (vic.), reno -- st john's parade -- kew (vic.)