Showing 3946 items matching "buildings - ballarat"
-
 Ballarat Tramway Museum
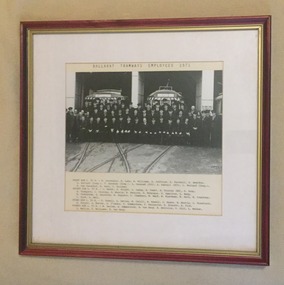
Photograph - Framed Photographs, Williams Studios and Ballarat, 1971
Yields information about the Ballarat tramway staff at the time of closure of the SEC operated system. Demonstrate framing of photographs.Framed Black and white photograph, mounted (partly loose) onto heavy card of the SEC Ballarat tram crews shortly before the closure of the tramway system in front of the depot building with three tramcars behind. Has a printed list of all employees or staff underneath. Titled "Ballarat Tramways Employees 1971". Frame - wooden, red stained wood with a painted gold coloured frame, glazed, with a cut cardboard piece on stippled paper. Rear backing sheet - brown leather type printed finish with a fold out section stapled to the rear to enable the photograph to be stood upright. Backing piece has been nailed to the frame. See Reg Item 1861 for further details of the photograph and list of employees.trams, tramways, ballarat, sec crews, personnel, staff photo, closure -
 Ballarat Tramway Museum
Negative, Bruce Herbert, "Bendigo and Ballarat Trams (AETA Convention) 30 Mar 1975", 30/03/1975 12:00:00 AM
Negative folder - made by ROW1 International of West Germany containing 40 No. 35 mm negatives of the AETA 1975 Convention visit to Ballarat and Bendigo on 30-3-1975. 17 photos of Ballarat and 23 of Bendigo. Bendigo photos: 1 - No. 28 at the depot 2 - ditto 3 - 24 and another bogie tram in side the depot 4 - No. 3? inside the depot 5 - 12, scrubber - 17 and two bogie trams 6 - scrubber and other bogie trams. 7 - general view with 24 and other bogie trams 8 - ditto 9 - Four trams at the Gold Mine, lead by 28. 10 - 19 at the Gold Mine 11 - single trucker with "tram tours" sign on the front 12 - 28 and two other cars at the Joss House, North Bendigo 13 - 19 and two other cars at the Joss House 14 - 30 at depot junction and loop 15 - 28 and 18 16 - 18 in the loop 17 - 28 and 18 McCrae St 18 - 28, 18 and 30 ditto 19 - 19 20 - No. 18 and 28 in Pall Mall with The Beehive in the background. Outside the building is an American Doughnut Kitchen van. The junction trackwork for the Eaglehawk lines remain in position. 21 - No. 30 northbound, with the City Family Hotel and other shops in the background. 22 - ditto and the cenotaph, 23 - B74 on a train at Spencer St. trams, tramways, btps, ballarat, aeta, bendigo, bendigo trust, depot, mccrae st, tram 28 tram 19 tram 30 tram 18 tram 24 tram 3 tram 12 tram 17 tram scrubber -
 Ballarat Tramway Museum
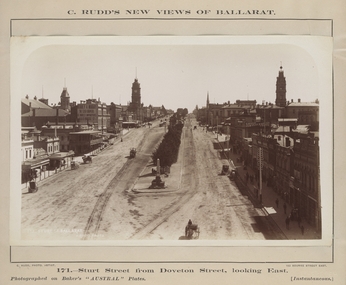
Photograph - Digital image, Fred Hardie, Sturt St Ballarat, looking from the Post Office tower, 1892
Yields information about the appearance of Sturt St and the Town Hall from the Post Office c1892Digital image from the George Washington Wilson and Co. photographic collection held by the University of Aberdeen - see related documents for information and their website for reproduction permissions. It notes that Fred Hardie was sent to Australia in 1892. There are some 41 Ballarat images available on the website. Sturt St Ballarat, looking from the Post Office tower towards the Town Hall and the intersection of Armstrong St- photo number GB 0231 MS 3792/A1995. Has a number of horse cabs in the background, and various buildings. There are no horse trams in the background. See: https://www.abdn.ac.uk/special-collections/about-george-washington-wilson-383.php - accessed 29-12-2017.trams, tramways, sturt st, horse cabs, armstrong st -
 Ballarat Tramway Museum
Photograph - Digital image, c1885
Yields information about the appearance of the intersection of Grenville and Bridge St prior to the opening of the horse tram service.Digital image of Bridge St looking east from the intersection of Sturt and Grenville St Ballarat, prior to the construction of the horse tram line, c1885. Shows the NE corner prior to the construction of the Nichol and Alan Building. Has the W. M. Bean? store on the corner, F. B. Wilson, Bucks Head Hotel, a paper hangings supplier, watchmaker and other stores. Postcard or image has title "Bridge St, looking East from Sturt St, Ballarat"trams, tramways, bridge st, grenville st, sturt st -
 Ballarat Tramway Museum
Photograph - Digital image, Charles Rudd, c1890?
... from the Nicholl and Alan building looking west along Sturt St...", the Cash Drapers on the Ballarat Mechanics Institute building ...Yields information about the appearance of Sturt St following the introduction of the horse trams.Digital image from the State Library of Victoria website image No. H39558/12, a Charles Rudd photograph showing a view from the Nicholl and Alan building looking west along Sturt St. Shows the buildings along either side of Sturt St and a horse tram descending the hill. Very little other traffic in the photograph. Has signs for "C. Huck - The Queen's studio photo" and "Morrey and Murray", the Cash Drapers on the Ballarat Mechanics Institute building. Note the caption of the photograph is incorrect. See image btm7019i2.pdf for the SLV link - correct as of 31-12-17. See image i2 for a more detailed photograph.trams, tramways, grenville st, sturt st, horse trams -
 Ballarat Tramway Museum
Photograph - Digital image, Chris Phillips, c1970
Yields information about the use of trams, destinations and shunting in Lydiard St North prior to closure.Digital image of two trams in Lydiard St north near Sturt St. Both trams have the destination of City Oval (may have been taken just prior to that of Reg Item 7023). and No. 26 may be about to shunt on the crossover. Has the Post Office, the Mining Exchange and other buildings in the background.trams, tramways, lydiard st north, city oval, tram 26, tram 27 -
 Ballarat Tramway Museum
Photograph - Digital image Set of 2, Chris Phillips, c1970
Yields information about the use of trams in the vicinity of Hospital Corner.Set of two digital images of trams at Hospital corner, c1970 by Chris Phillips.. .1 - No 39 inbound in Sturt St, about to cross Drummond St. Has the Hospital in the background and the tram stop. Tram has the destination of Mt Pleasant. .2 - No. 17 crossing Sturt St from Drummond St South. Has the destination of Lydiard St North. Has the buildings on the corner and the various directional signs in the view. Tram has a SEC roof advert - everything's under control in my all electric kitchen. Ritchie's food and liquor store in the background.trams, tramways, hospital corner, sturt st, drummond st, tram 39, tram 17 -
 Ballarat Tramway Museum
Photograph - Digital image Set of 2, Chris Phillips, c1971
Yields information about the tram track in Albert St Sebastopol and its appearance.Set of two digital images of the tram track in Albert St Sebastopol c1971 by Chris Phillips. .1 - looking north in Albert St at the Grey St loop - shows the road conditions and poles along with the tram stop. .2 - possibly looking north on the western side of Albert St with two men about to board the tram with cameras in hand. Has a "Waller" name on building in background.trams, tramways, sebastopol, albert st, grey st loop -
 Ballarat Tramway Museum
Photograph - Digital image Set of 7, Chris Phillips, early 1960's
Yields information about tramway operations in Sturt St c1970.Set of 7 digital images of trams in Sturt St, c1970 - Photos by Chris Phillips. .1 - No. 26, in bound near Armstrong St - destination of Mt Pleasant St. Has the Commercial Bank of Australia building in the background - CBC .2 - No. 26 in bound to City, near Hospital Corner. .3 - No. 17 near the Doveton St intersection, has a roof advert "Make Bliss Not Love". Has the State Savings Bank, CAGA Finance, CBC bank buildings in the background. .4 - No. 12 in bound with the destination of Gardens via Sturt St West, at the corner of Dawson and Sturt St. Shows the tram stop. Has the R. E. Hayden Real Estate building in the background. .5 - No. 39 inbound at Hospital corner. .6 - No. 39 at the City terminus with the Post Office in the background. .7 - No. 43 outbound to the Gardens Via Sturt St west near Drummond St. Has the Marshall battery centre, Morris Ellis & Sons, Pope Mowers and The Ballarat Modern Diary in the background. Also a sign for AWA car radio.trams, tramways, sturt st, hospital corner, doveton st, dawson st, tram stops, tram 26, tram 17, tram 12, tram 39 -
 Ballarat Tramway Museum
Photograph - Digital image, Chris Phillips, c1970
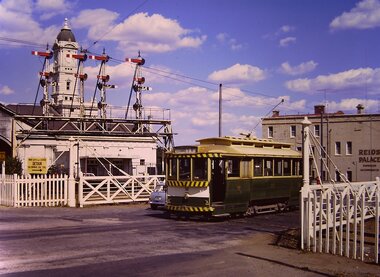
Yields information about the tram operations at the Lydiard St level crossing and the Ballarat Railway Station.Digital image of No. 32 crossing the Lydiard St North level crossing at Ballarat Railway Station . Tram has the destination Lydiard St North. In the background is the station building, clock tower and the signal gantry. On the right hand side is Reids Coffee Palace.trams, tramways, lydiard st north, level crossings, ballarat railway station, tram 32 -
 Ballarat Tramway Museum
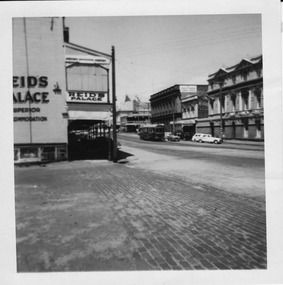
Photograph - Digital image, Chris Phillips, late 1950's?
Yields information about the tram operations in Lydiard St North during the 1950's and the appearance of the buildings.Digital image, black and white, of a bogie tram north bound in Lydiard St North with the various buildings on the west side of the street - 1950's photo, prior to the installation of the lights on the tramcars. Has Reid's Coffee Palace in the photograph. Taken from the Railway Station entry.trams, tramways, lydiard st north, tram 13 -
 Ballarat Tramway Museum
Functional Object - Electrical conduit, 21/01/2018 12:00:00 AM
Yields information about the materials and the methods of installing electrical domestic cables in Ballarat houses during the 1920's.Section of timber or wooden electrical conduit used in houses c1920, to contain wires for electrical lamps and fittings. Consists of a timber base (very light softwood - ??) with two slots that was nailed to a wall and after the cable installed a cover strip applied. Has one end mitred or cut at 45 degrees. See Early Electrical wiring systems in American buildings - L. D. Mitchelltrams, tramways, esco, electrical equipment, house extensions, houses, electricity -
 Ballarat Tramway Museum
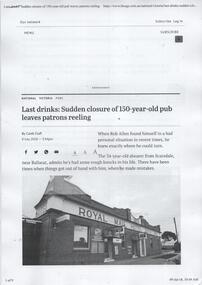
Newspaper, The Courier Ballarat, "Last Drinks: Sudden closure of 150-year-old pub leaves patron reeling", 9/07/2018 12:00:00 AM
Print of a website report in The Age, dated 8/7/2018 titled "Last Drinks: Sudden closure of 150-year-old pub leaves patron reeling" about the closure of the Sebastopol Royal Mail Hotel, written by Caleb Cluff of The Courier, printed in The Age on 9/7/2018. Has photo of the Hotel by Kate Healy, tram outside the hotel by Andrew Cook, a photograph of the original hotel building See pdf file for a complete article.royal mail hotel, hotels, sebastopol, closure -
 Ballarat Tramway Museum
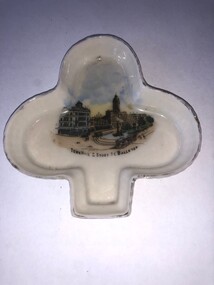
Functional Object - Ash Tray, Wiltshaw and Robinson, mid to late 1900's
Demonstrates domestic items manufactured soon after the establishment of the tramway systems in Ballarat.Ash Tray - white glazed on front, unglazed rear with gold edge trim, light weight China in the shape of a "spade" with an image of the intersection of Sturt St and Lydiard St from the Post Office looking at the buildings on the south side of Sturt St including the Town Hall with two electric trams and the tram lines in the view. One of the trams is hauling a trailer. Possibly made mid to late 1900's. On rear has the makers stamp of "W&R Stoke on Trent" http://nicholnack.com.au/wiltshaw-robinson-patterns/index.php - accessed details that it is the mark of Wiltshaw and Robinson.tramways, trams, ash tray, sturt st, lydiard st, town hall -
 Ballarat Tramway Museum
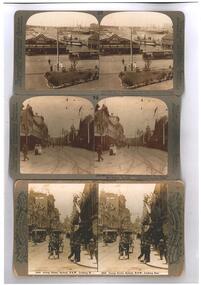
Photograph - Black & White Photograph/s, Underwood & Underwood and Rose Stereoscopic Views, 1908
Photographic reproduction - sepia coloured of a three stereo pair images with details on the sides. Originals made by Underwood and Underwood of Arlington New Jersey and Westwood New Jersey USA or the Rose Stereoscopic of Melbourne. Printed on A4 size ink-jet printer. Set of three: 1 - Circular quay Sydney with Ferries and a bogie combination car in the view, dated 1980, Image No. (37)-10265. 2 - Auckland Queens St with a complex tram junction in the view. Image No. (72)-10800 3 - George St Sydney looking towards the Queen Victoria building. Image No. 2666 Has trams in the views, centre poles and decorations on the centre poles.trams, tramways, sydney, auckland, stereo photograph -
 Ballarat Tramway Museum
Photograph - Digital image Set of 2, Doug Colquhoun, c1955
Set of six digital images of Geelong trams photographed by Doug Colquhoun. .1 - No. 3 with destination of Station turning from Ryrie into Moorabool St with the Bank of New South Wales in the background. The conductor is watching the traffic. .2 - No. 4 - at the Railway Station or Beach terminus? .3 - No. 5 - in Ryrie St? .4 - No. 19 in St. with E. R. Sparrow & Co Auctioneer and Wool Broker building in the background - Moorabool St, tram has the destination of Beach. .5 - No. 23 with the conductor leaning against the bumper bar chatting to a man. Tram has the destination of North. Has a Kodak - E. A. O'Meara Chemist shop in the background. Ryrie and Moorabool Streets Geelong looking south along Moorabool St, along with a Safety Zone sign. .6 - No. 34 with the destination of Belmont.trams, tramways, geelong, ryrie st, moorabool st, conductors, north, beach, belmont, safety zone, tram 3, tram 4, tram 5, tram 19, tram 23, tram 34 -
 Ballarat Tramway Museum
Photograph - Digital image Set of 2, Doug Colquhoun, c1955
Set of two colour digital images of Geelong trams photographed by Doug Colquhoun? .1 - Geelong No 8 at the Chilwell terminus, c1955. Note the tram stop furniture on the pole behind. Tram has the destination of Beach. .2 - Trams 31 and 34 photographed in Moorabool St at a Safety Zone stop. Safety Zone stop sign in photograph. Trams have the destination of Belmont and North. Kays pastries and Austral Art Furnishers stores building in the background.trams, tramways, geelong, north, belmont, moorabool st, safety zone, tram 8, tram 31, tram 34 -
 Ballarat Tramway Museum
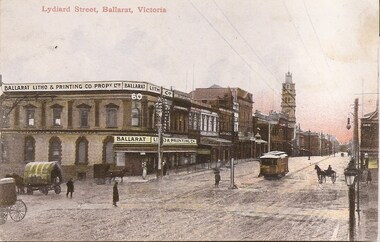
Postcard, Ballarat Litho & Printing Co, Lydiard St North, 1905
Yields information about the corner of Mair and Lydiard St soon after the Ballarat Electric Tramway opened.Digital Image of and ESCo tram north bound in Lydiard St North, at the intersection with Mair St. Shows the Ballarat Litho and Printing Co Propy Ltd building on the corner. Note the centre poles and the pole in the middle of the intersection. Has a number of horse drawn vehicles. Photo taken soon after opening as the destination sign is on the dash panel. From the Facebook group of old time photographs of yesterday. Titled "Lydiard St Ballarat Victoria"trams, tramways, mair st, lydiard st north, esco, postcards -
 Ballarat Tramway Museum
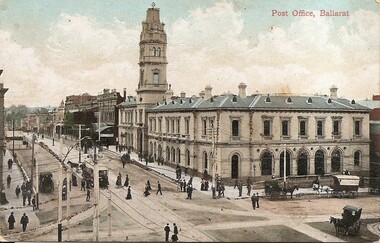
Postcard, ESCo tram north bound in Lydiard St North
Yields information about the corner of Sturt St and Lydiard St soon after the Ballarat Electric Tramway opened.Digital Image of and ESCo tram north bound in Lydiard St North, at the intersection with Sturt St. Shows the Ballarat Post Office and other buildings in Lydiard St. Note the centre poles the new tram tracks. Photo taken soon after opening as the destination sign is on the dash panel. There are a number of lines of dark brown piles of earth? Work still being undertaken. Titled "Post Office Ballarat". From the Facebook group of old time photographs of yesterday.trams, tramways, sturt st, lydiard st north, esco, postcards -
 Ballarat Tramway Museum
Photograph - Black & White Photograph/s, Lee A Ratten, 8/06/1928 12:00:00 AM
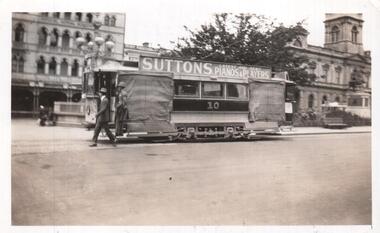
Yields information about the appearance of an ESCo Ballarat tram late 1920's.Black and white photograph of Ballarat ESCo No. 10 at the corner of Sturt and Lydiard St with the Town Hall and the National Mutual building in the background. The tram has the open compartment completely covered. Has a Sutton's roof advertisement. Dated 8/6/1928. Track brakes have been removed. Photo Lee A Ratten - see related document and Reg Item 7185.On rear in pencil (very faint) - "Ballarat Car 10, 4 wheel comb, Sturt St, 8/6/1928.trams, tramways, esco, sturt st, tram 10 -
 Ballarat Tramway Museum
Photograph - Black & White Photograph/s, Lee A Ratten, early to mid 1950's
Black and white photograph of Geelong 36, destination North and the intersection of Ryrie and Moorabool Streets with the Union Bank of Australia building in the background. Early to mid 1950's. Photo possibly Lee A Ratten - see related document and Reg Item 7185.trams, tramways, geelong, north, ryrie st, moorabool st, tram 36 -
 Ballarat Tramway Museum
Photograph - Black & White Photograph/s, Lee A Ratten, late 1940's to early to mid 1950's
Black and white photograph of Bendigo 12 in possibly Mitchell St. Photograph, late 1940's to early to mid 1950's, Destination not able to be read. Has a building with the word "Gas" in the background. Photo possibly Lee A Ratten - see related document and Reg Item 7185.trams, tramways, bendigo, mitchell st, tram 12 -
 Ballarat Tramway Museum
Photograph - Black & White Photograph/s, Lee A Ratten, late 1940's to early to mid 1950's
Black and white photograph of Geelong No. 34 turning from Ryrie St into Moorabool St. Tram has the destination of West. In the background is the Union Bank of Australia building and a set of bar traffic lights. Photo possibly Lee A Ratten - see related document and Reg Item 7185.trams, tramways, geelong, ryrie st, moorabool st, traffic lights, tram 34 -
 Ballarat Tramway Museum
Photograph - Black & White Photograph/s, Lee A Ratten, late 1940's to early to mid 1950's
Yields information about tram operations in Ballarat using City Loop.Black and white photograph of Ballarat 25 and another single trucker at the City Loop. Tram 25 has the destination of City. In the background are the building on the west side of Sturt St and an advertisement for Penfolds Wines. Photo possibly Lee A Ratten - see related document and Reg Item 7185.trams, tramways, ballarat, sturt st, city loop, tram 25 -
 Ballarat Tramway Museum
Photograph - Black & White Photograph/s, Lee A Ratten, 6/06/1928 12:00:00 AM
Black and white photograph of Bendigo No. 9 Pall Mall 6/6/1928 at the intersection with Mitchell St, Charing Cross with the City Club Hotel in the background. Behind No. 9 is No. 12 or 18? No. 9 has a roof advertisement for Lyric Lightning. On the left hand side is a horse drawn cart and shows a verandah on the building on the North East corner of the intersection. On the rear of copy 1 has the photo stamp of Lee A Ratten of 51 Cotham Road Kew. On the second print is a hand written note which matches the writing of Lee Ratten. trams, tramways, bendigo, pall mall, charing cross, tram 9 -
 Ballarat Tramway Museum
Photograph - Digital Image, Greg Triplett, Tram 42 in Lydiard St between Rly Station & Sturt St destination Sebastopol, 19-9-1971
... Image of Ballarat tram 42 southbound in Lydiard St North... Gallery and the Ballarat Mining Exchange buildings ...Image of Ballarat tram 42 southbound in Lydiard St North nearing Sturt St with the Ballarat Art Gallery and the Ballarat Mining Exchange buildings in the background. Note the parking meters on the footpath. Taken on the last day of operation of the Ballarat tramway system - 19-9-1971Yields information about the last day of operation of the Ballarat SEC tramways.Digital image - 120 negative tramways, tramcars, ballarat, last day, closure, tram 42, lydiard st north, fine art gallery, mining exchange, parking meters -
 Ballarat Tramway Museum
Photograph - Digital Image, Greg Triplett, Tram waiting in Sturt St by Boer War Memorial, 19-9-1971
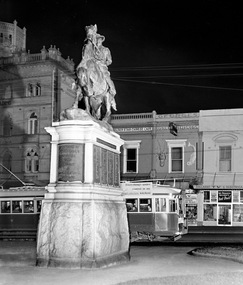
Image of a Ballarat bogie car waiting at the City stop with the Boer War Memorial in front. Taken on the last day of operation of the SEC Ballarat tramway system - 19-9-1971. In the background is the National Mutual building, Golden Star Chinese Cafe, Georges Oyster / fish shop and Ballarat TV and Electrical store which looks a bit of wreck inside.Yields information about the last day of operation of the Ballarat SEC tramways.Digital image - 120 negative tramways, tramcars, ballarat, last day, closure, sturt st, boer war memorial -
 Ballarat Tramway Museum
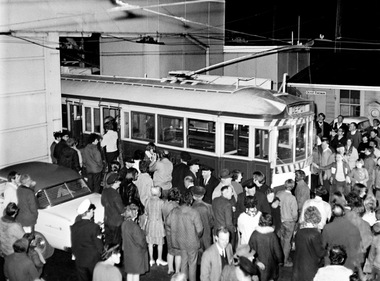
Photograph - Digital Image, Greg Triplett, No 40 the very last tram entering the depot building-The End - Greg Triplett, 19-9-1971
No 40 the very last tram entering the depot building. After the tram entered the building, the doors closed and a sign saying "The End" was shown. Greg Triplett Taken on the last day of operation of the SEC Ballarat tramway system - 19-9-1971. Yields information about the last day of operation of the Ballarat SEC tramways.Digital image - 120 negative tramways, tramcars, ballarat, last day, closure, tram 40, last tram, ballarat depot -
 Ballarat Tramway Museum
Photograph - Black and White - tram 17 Sturt and Lydiard Sts City, A T Miles, 26/8/1971
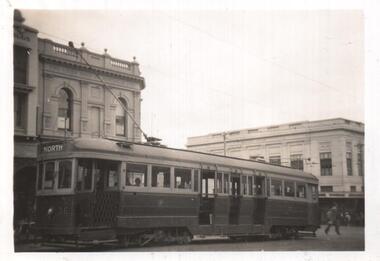
Black and White - tram 17 (Grey St Sebastopol), arriving at the City tram stop, Sturt and Lydiard Streets, Ballarat. Has the Commonwealth bank building in the background along with an ESCo/SEC switch box. Taken by A T Miles 26/8/1971.Yields information about tram operations in Ballarat, shortly before the closure.Photograph - black and white print with notes on rear. A T Miles stamp and location and date notes.tramways, trams, sturt st, tram 17, commonwealth bank -
 Ballarat Tramway Museum
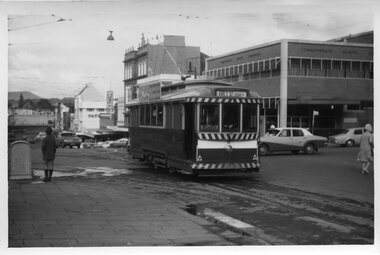
Photograph - Digital Image, Peter Knife, Tram 38 Albert St Sebastopol, 10/5/1969
Digital image of tram 38 inbound in Albert St Sebastopol with the now Carmel Welsh Presbyterian church in the background. The church hall next to the bluestone church as since been replaced with an office-type building. The tram has the destination of Mt Pleasant which is unusual for this line and has a "Trotting Bray Raceway Friday Night" auxiliary board. Photo by Peter Knife 10/5/1969. Yields information about Ballarat's trams in May 1969.Digital image of a colour slide.tramways, tramcars, ballarat, tram 38, albert st, sebastopol, presbyterian church