Showing 6842 items matching " cars"
-
 Melbourne Tram Museum
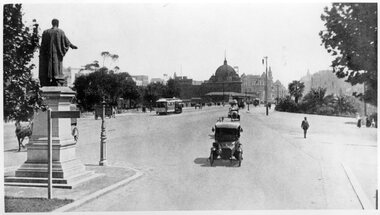
Photograph - Black and White - St Kilda Road near City Road
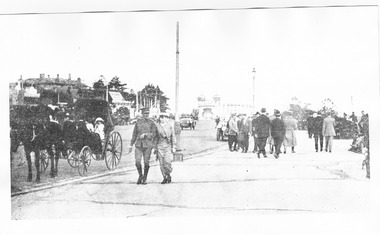
Photo 1 - looking north from the point where St Kilda Road widened after crossing Princes Bridge. Has the Edmund Fitzgibbon monument on the left. One cable tram set is making its way into the City. Has Flinders St Station in the background, along with a number of motor cars and one horse drawn vehicle behind the monument and another behind a sign. In the far distance is an advertisement for The Herald newspaper. Photo 1910c Photo 2 - looking south from near the end of the bridge, with seven cable cars in the view, along with motors cars and two horse drawn vehicles. Government House can be seen on the left horizon.Yields information about St Kilda Road c1910.Set of two black and white photographs of" .1 - St Kilda Road near City Road looking north - with Edmund FitzGibbon monument .2 - looking southtramways, trams, cable cars, flinders street station, st kilda road, princes bridge, monuments, edmund fitzgibbon -
 Ringwood and District Historical Society
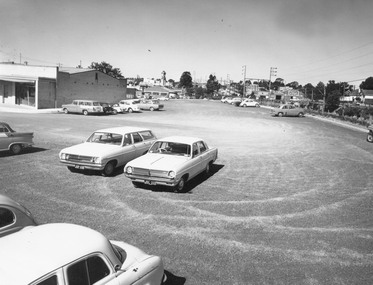
Photograph, Car park at rear of Ringwood Shopping Centre (undated)
Written on back of photograph, "Parking back of Murray Place. E. Post. John Gallagher photography." Catalogue card reads, "Car park at rear of Ringwood Shopping Centre." -
 Ballarat Tramway Museum
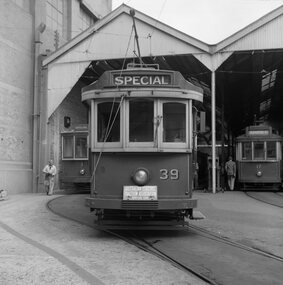
Negative - Set of 2, Geoff Grant, 2/04/1955 12:00:00 AM
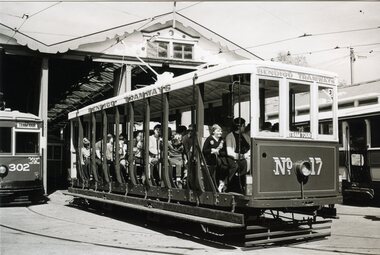
Negative No. 265 and colour print made by colour laser printer (stored in folder ) of a head on shot of No. 39 in front of the Geelong depot, by Geoff Grant on 2/4/1955 while on an Australian Electric Traction Association tour. Other trams in view are 1 and 17. .1 - Copy large format print from Lloyd Rogers collection via Robert Green 2/2014. Added 4-4-2019 - 2 copies added. Original negative scanned at hi res 18/5/2020 and image updated.On small copy ex Robert Green in ink "Geelong car shed, 2-4-1955, ARHS Neg" On large print in pencil "Geelong 2-4-1955"trams, tramways, geelong, aeta, depot, tram 39 tram 1 tram 17 -
 Ballarat Tramway Museum
Photograph - Black & White Photograph/s, 5/09/1971 12:00:00 AM
Yields information about the last tram to depart from the Mt Pleasant terminus at the time of the closure of the tram line in Sept. 1971.Black and white photograph of Ballarat No. 39 at the Mt Pleasant terminus on 5/9/1971, last tram to leave the terminus before the line closed. Has a number of people in the background, and the Milk bar at the terminus with the Robur, The Sun and Women's Weekly magazine advertisements on the building. Photographer unknown at the time of cataloguing. See Reg Item 2908 for a Courier Article.On rear in ink "TS(2)" and in pencil "Mt Pleasant, last car WO 39 5-9-71" and pencil marks showing how the photo is to be cropped for publication.tramways, trams, last tram, closure, mt pleasant, tram 39 -
 Ballarat Tramway Museum
Photograph - Black & White Photograph/s, William. F. Scott, 3/04/1983 12:00:00 AM
Yields information about the appearance of Bendigo Birney trams at the time of the opening of the tram services and Eaglehawk Town Hall.Black and white photograph, of Toastrack, Bendigo 17, with passengers outside the Bendigo Depot, photo by William F Scott 3/4/1983."22" in pencil in top left hand corner, and along bottom edge in ink "Bendigo Trust, car on tour 3/4/1983, William F. Scott photo".trams, tramways, bendigo, depot, tram 17 -
 Ballarat Tramway Museum
Photograph - Black & White Photograph/s, Lloyd Rogers, Jun. 1961
Yields information about the appearance of tram No. 28 and the Wendouree Parade, St Aidans Drive area, early 1960's.Black and white photograph of Ballarat tram No. 28 at St Aidans Drive, leaving the Gardens area, with the stone pillars in the background. In the background is Lake Wendouree. The tram has the destination of Victoria St and has an SEC briquettes ad on the front dash panel. Dated June 1961. Photo by Lloyd Rogers.In Pencil - "Lake Wendouree, Ballarat June 1961" and "ex M-113" and in ink "Car 28 - Lake Wendouree, Ballarat June 1961" and a number "10/4/61". trams, tramways, wendouree parade, st aidans drive, lake wendouree, tram 28 -
 Melbourne Tram Museum
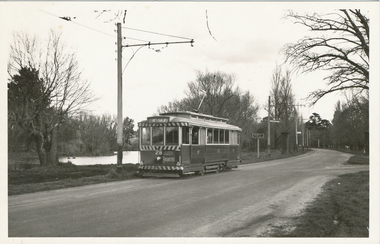
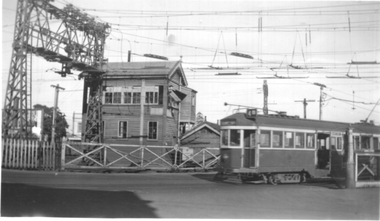
Photograph - Tram 361 Elsternwick level crossing, Ken Winney, May 1947
Black and white photograph showing W2 class tram 361 (Glen Huntly Depot, route 4B) crossing the railway at Elsternwick. Has the signal box and the wooden gates in the background. Shows the large superstructure supporting the overhead. Photo by Ken Winney May 1947.Yields information about the Elsternwick level crossing in 1947.Photograph with typed details on the rear.Typed "Elsternwick Tram/train level crossing showing W2 type car no. 361 MMTB May 1967" and the K J Magor stamp with "K Winney" typed in. trams, tramways, w2 class, tram 391, elsternwick, level crossing -
 Melbourne Tram Museum
Slide, Keith Kings, 9/03/1969 12:00:00 AM
35mm Kodak white cardboard colour slide by Keith Kings of Alf Twentyman's preserved cable tram set at his Northcote home, grip 436 and trailer 586 9/3/69.Keith Kings stamp and number "47-2", with details of exposure. "MMTB cable grip car 436 and Trailer 586 Alf Twentyman's Northcote. 9/3/1969.trams, tramways, cable trams, preserved trams, northcote, tram 436, tram 586 -
 Port Melbourne Historical & Preservation Society
Newspaper - Articles re burst water main in Liardet Street, Port Melbourne, 17 Dec 2014
In the early hours of Tuesday 16 December, 2014 a water main burst in Liardet St. The resulting sink-hole swallowed two cars and left a massive hole which took 8 days to repair and re-open the road. Several houses on the city side of Liardet St suffered water damage and water also entered the underground car park of the apartment block on the beach side.Newspaper clipping from "the Age" Wednesday, December 17, 2014. Also from Glen Eira /Port Phillip Leader, Tueday December 23 2014built environment - domestic, engineering - roads streets lanes and footpaths, engineering - canals and drainage, liardet street, water supply -
 Port Melbourne Historical & Preservation Society
Document - Sink-hole, Liardet Street, Port Melbourne, 17 Dec 2014
In the early hours of Tuesday 16 December, 2014 a water main burst in Liardet St. The resulting sink-hole swallowed two cars and left a massive hole which took 8 days to repair and re-open the road. Several houses on the city side of Liardet St suffered water damage and water also entered the underground car park of the apartment block on the beach side.Photos taken of the damage and vehicle recoveries when a sink-hole opened up on Liardet Street on Tuesday 16 December 2014.built environment - domestic, engineering - roads streets lanes and footpaths, engineering - canals and drainage, liardet street, water supply, fran egan -
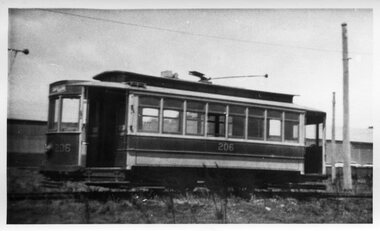 Melbourne Tram Museum
Photograph - Black and White - U206 at Preston Workshops, Ray Pearson, late 1940
Photo shows one of the tramcars originally built for The North Melbourne Electric Tramways and Lighting Co Ltd in 1906 and subsequently fitted with a windscreeen by the MMTB. Based on Reg Item 6370, photo possilby late 1940. See Reg Item 5758 for a photo of the tram as a Freight Car, 1950. Vicsig.net - 1938 (Converted to spare freight car, bad accident in 1947 and scrapped 1950.)Yields information about U class trams.Black and White photograph of MMTB U 206 Preston Workshops. On rear in ink - "MMTB U 206 Preston WS – RWO Pearson"tramways, trams, u class, preston workshops, u 206 -
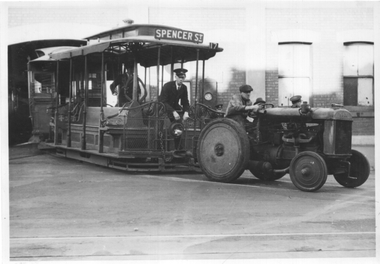 Melbourne Tram Museum
Photograph - Cable tram being towed out of North Fitzroy depot, The Age, late 1930s
The photograph shows a cable tram set being towed out of a car depot or car house by a tractor, North Fitzroy Nicholson St depot. The grip is in the raised position, with the gripman's hands on the brake levers. The conductor is waiting to pull the pin that secures the tow bar. The tram has the destination of Spencer St. Photo late 1930s or 1940. Note the Bundy clock on the depot wall.Yields information about towing a cable tram out of a car house probably shortly before closure of the cable tram system in 1940.Black and White photograph - printed on plain paper.On the rear has the Copyright stamp of The Age and pencil number "KM-M-007", Ken Magor stamp, "tram being towed out of depot" and number 4838.cable trams, tractor, towing cable tram, car house, north fitzroy depot -
 Ringwood and District Historical Society
Photograph, Photos of last houses to face demolition at Camberwell. c1970s, c1983
One of the last houses to face demolition.Single fronted weatherboard with striped veranda blind, brick chimney over front rooms with TV aerial. Green painted walls. Red painted iron roof over veranda and under veranda rail. Adjacent to Target entrance.The 'Miss Stayput' house in the car park out the front of Target in Camberwell. You can even see the Target logo on the building. The house was owned by Mary Campigli, who defied the council order to move, and won her case in court. She stayed in the house, surrounded by a car park until she died in 1983 at the age of 94. The house was finally demolished soon after. -
 City of Moorabbin Historical Society (Operating the Box Cottage Museum)
Manufactured Objects, bottle opener 'Lukey Mufflers', mid 20thC
Len Lukey was a Victorian Racing Car Driver in the 1950s & 1960s and established his Car Exhaust Muffler business in his backyard in Highett c 1970. In 1964 he purchased the site and then developed and operated the Phillip Island Car Racing Track until his death 1978. He designed the Lukey Racing Car Museum and Gardens at that site. The 1959 Australian Drivers Championship was a CAMS sanctioned motor racing title for drivers of Formula Libre cars. The championship winner was awarded the 1959 CAMS Gold Star. The series was won by Victorian racer Len Lukey driving his Cooper T45 Climax and in the opening round of the series his own much modified Cooper T23 which was known as the Lukey-Bristol. Lukey was one of only a few drivers who attempted to complete the gruelling twelve race schedule, the longest in ADC history. Lukey finished just two points ahead of his season long rival, Alec Mildren from the ACT [1] (Cooper-Climax). Stan Jones, the father of F1 World Champion Alan Jones, was third in the championship, using four different cars over the course of the series. Race victories were shared around with Mildren taking three wins. Lukey, Jones and Bill Patterson each took two wins, with single victories going to Jack Brabham, Bib Stillwell and New Zealand Maserati 250F racer Ross Jensen. Jack Brabham later became F1 World Champion 3 times. A steel bottle opener with engraved advertising for Lukey Mufflers Pty Ltd HighettAlong Shaft : LUKEY MUFFLERS / HIGHETT VICTORIA / XL 3641car part manufacturers, lukey mufflers pty ltd, highett, moorabbin, bentleigh, cheltenham, early settlers, bottle openers, steel manufacturer, brabham jack, formula one grand prix champions, jones alan, phillip island car racing track. -
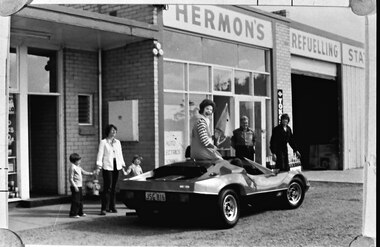 Southern Sherbrooke Historical Society Inc.
Photograph - Ronald McDonald at Hermon's business in Dandenong
B&W photo of Ronald McDonald at Hermon's business in Dandenong on the occasion of the opening of McDonalds in Dandenong. Photo shows a group of people outside Hermon's Refuelling Station (a brick building with a shop and a workshop). A woman stands, holding the hands of two children, aged about seven. A person dressed as Ronald McDonald sits on the back of a sports car. Bill Hermon and a mechanic stand further along. There is a driver in the car. According to Lyn McGillivray, daughter of Bill and Jean, "It was hilarious! Mum & Dad were asked if Ronald McDonald could get changed in our premises. They were in awe that this 'big-wig' would want/need to dress there for the short journey up the street to the new restaurant. I think it was us kids (young adults then) who set them straight!" The car is most likely a Purvis Eureka, a kit car based on a VW Beetle chassis. They were manufactured in Dandenong from 1974 - 1991. Information supplied by Jarrod Drager via Facebook. -
 Ballarat Tramway Museum
Slide - 35mm slide/s, Noel Simons, 21/11/1962 12:00:00 AM
Set of 17 transparencies taken on 21/11/1962 on Kodak mounts. 1188.1 - Bendigo No. 11 at Depot Junction McCrae and Arnold St. with driver/conductor changing points. 1188.2 - Bendigo No. 4 at Charing Cross, side on photo, with City Club Hotel and Alexandra Fountain in the background. Tram has Castrol and SEC 'Electric Cooking' ads. 1188.3 - Bendigo No. 4 climbing View St. after tram has passed photographer. Tram has Streets Ice Cream and Cohns Soft Drinks ad on rear dash panel. In the background are the buildings in View St., including the Princess Theatre. Tram has destination of Eaglehawk. 1188.4 - Trams 2 and 4 crossing at the California Gully or Thorpe St Loop. 1188.5 - Bendigo 4 in Mt Korong Road. Tram inbound with destination of Quarry Hill, just leaving Garden Gully Loop. 1188.6 - Bendigo 4 and 17 crossing at the Hayes St. or Iron Bark Gully Loop. No. 17 bound for Eaglehawk, No. 4, Quarry Hill. 17 has two SEC roof ads and a white horse whiskey ad. 1188.7 - No. 17 bound for Eaglehawk, soon after leaving California Gully. Has large mullock heap in background. 1188.8 - Bendigo 2 and 17 crossing at the Thorpe St. or California Gully Loop. Has butchers shop in background. 1188.9 - Bendigo 17 at the Eaglehawk terminus. Has destination of Quarry Hill. In background is the hotel and shops at the terminus, showing ads for "Melbourne Bitter". Tram has two SEC 'Electric Cooking' ads. Driver and conductor about to assist two lady passengers with a pram and baby. 1188.10 - No. 17 at Eaglehawk terminus, awaiting departure. Has Eaglehawk Town Hall and Post Office in background. Tram has a Whitehorse Whiskey ad on the front dash panel. 1188.11 - No. 3 in High St. Eaglehawk, with destination of Eaglehawk. Has the shops on the south side of High St. in the background, including the Eaglehawk fish shop. Tram has two roof ads, one an SEC roof ad, and Cohns Drinks and Streets Ice cream ads on front dash panel. 1188.12 - as above, but after tram has passed photographer. Note the centre of the road poles. 1188.13 - No. 2 outbound for Eaglehawk at the intersection of Mt. Korong Road and the Calder Highway. Photo taken after the tram has passed the photographer. Has an Ampol service station in the background. 1188.14 - No. 11 leaving the Bendigo depot, crossing the bridge, with the Scrubber car in the background. 1188.15 - No. 21 at the North Bendigo terminus. Tram has destination of Golden Square and Cohns drink ad on front dash and two roof ads on side. 1188.16 - No. 11 on Golden Square route, in High St. at intersection with Old High St. 1188.17 - No. 11 at the Golden Square terminus, conductor turning the pole. Hotel on the left side of the photo. Note the road works barrier and red flag behind the tram. Slide has an end of roll mark on the right hand side of the image.Information written on in black ink and date stamped on purple ink. 1188.1 - "Birney car No. 11 in McCrae St. at Cnr of Arnold about to run into depot, Bendigo" 1188.2 - "No. 4 at Alexandra Fountain, Charing Cross Bendigo" 1188.3 - "No. 4 climbing the View St. Hill from Charing Cross, Bendigo (Eaglehawk Route)" 1188.4 - "No. 4 and 2 at Thorpe St. Loop, California Gully" 1188.5 - "No. 4 in Mt Korong Rd., Long Gully, Near Havilah Rd. (Bendigo) (Eaglehawk Route)" 1188.6 - "Nos. 17 and 4 crossing on Hayes St. Loop, Ironbark, Bendigo" 1188.7 - "No. 17 soon after leaving California Gully (Eaglehawk Route)" 1188.8 - "No.2 and 17 crossing on Thorpe St. Loop, California Gully (Eaglehawk Route)" 1188.9 - "No. 17 at Eaglehawk terminus" 1188.10 - "No. 17 at Eaglehawk terminus" 1188.11 - "No. 3 in High St. Eaglehawk" 1188.12 - "No. 3 nearing Eaglehawk terminus" 1188.13 - "No. 2 in Mt. Korong Rd., Ironbark. Calder highway on left (Eaglehawk route) 1188.14 - "Birney car No. 11 leaving Bendigo depot. Scrubber car at rear" 1188.15 - "No. 21 at North Bendigo Terminus" 1188.16 - "Birney car No. 11 in High St. Bendigo at intersection with Old High Street (Golden Square Route)" 1188.17 - "Birney Car No. 11 at Golden Square terminus, High St., Bendigo". tramways, trams, bendigo, depot junction, charing cross, view st., eaglehawk, north bendigo, golden square, tram 2, tram 3, tram 4, tram 11, tram 17, tram 21, tram scrubber -
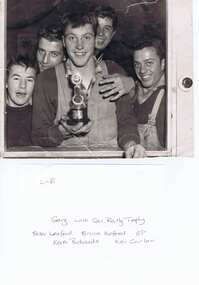 Greensborough Historical Society
Photograph - Digital Image, Gary Partington and friends 1961, 1961_
Gary Partington with car rally trophy, and friends, 1961. Includes Peter Leaford, Bruce Kofoed, Keith Richards and Ken Carlon.Digital copy of black and white photographHand written captiongary partington -
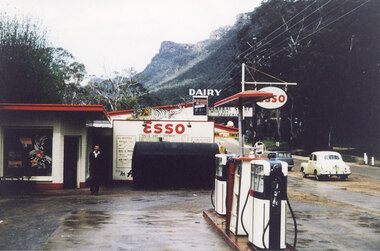 Halls Gap & Grampians Historical Society
Photograph - Coloured, C 1960
The proprietor standing in front of the Esso garage. Probably taken at the same time as record 252 (as the yellow car appears to be in the same spot).Photo shows a man standing in front of an Esso garage building. There are petrol pumps in the foreground. A yellow early model Holden and a blue station wagon are parked on the road in the right of the Picture. General Store and Dairy signs can be seen behind the garage and the Wonderland Range can be seen in the background.buildings, shops -
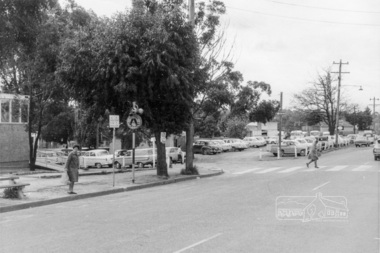 Eltham District Historical Society Inc
Photograph, Looking northwest acroos Main Road from near Arthur Street, Eltham, February 1968, Feb 1968
Shows the car parking on the west side of Main Road, part of the Post Office on left and the pedestrian crossing from the railway station.In February 1968 an unknown person took a series of photos from the Eltham Hotel at Pitt Street heading north along Main Road through the shopping centre to just north of Elsa Court covering the length of the section of Main Road which was duplicated shortly thereafter. Shows the condition and environment of the streesscape of Main Road, Eltham immediately prior to the duplication between Pitt Street and Elsa Court through the shopping centre. Also shows a number of shops and businesses that operated at that time.Black and white photographduplication, eltham, main road, carparks, railway station, post office -
 Eltham District Historical Society Inc
Photograph, Queuing to join classes at the Eltham Living and Learning Centre
The building is the side view of the stables and coach house, which is now a cleared area following a fire in the 1980s adjacent to the car parkBlack and white photographclasses, eltham living and learning centre -
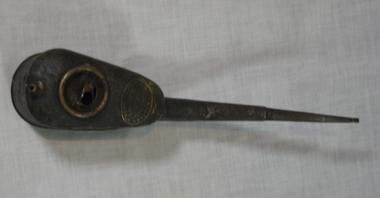 Federation University Historical Collection
Tool - Object, Oil Can
Probably used at the Ballarat School of Mines. Fisher and Ludlow was a British car body manufacturing company based in Castle Bromwich, Birmingham.Two oil cans (or brass oil feeders) with flat base and long neck. (a) Miniature cylindrical body with flat base, and long narrow spout. Head of flow adjuster is missing. Made by Fisher & Ludlow, Birmingham. (b) Has a miniature plug with chain attached, and a decorative scrolled handle. Made by Whites. oil, tools, ballarat school of mines, whites, motor mechanics, fisher and ludlow -
 St Kilda Historical Society
Photograph, Upper Esplanade St Kilda, c. 1914
c1914 people promenading on Upper Esplanade. Man in military uniform, horse drawn carriage and motor cars, Luna Park in background black and white photograph, unmounted, copy, fair conditionMelbourne Suburbs St Kilda -
 St Kilda Historical Society
Postcard, 1 and 3 Gurner Street, St Kilda, 1970s
photo taken in 1973, 1960s/ 70s car parkedin the street, 'Victorian' house on left has 1950s-70s filled in verandablack and white photograph, unmounted, fair conditionstamped on back: Graeme S. Breydon, 204 Carlisle St, Balaclava, 3183, phone 94 2886 -
 Robin Boyd Foundation
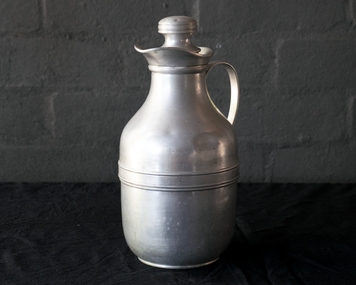
Functional object - Appliance
The Boyd family recall that Robin Boyd always took a thermos filled with tea on drives to look at land, houses or new cars.Thermos/jug with cork stopper, aluminium body and stopper handleThermos/jug with cork stopper, aluminium body and stopper handlecookware, walsh st kitchenware, robin boyd -
 Ballarat Base Hospital Trained Nurses League
Sheila Prendergast Photo Album 1941-1944, commenced training June 1941
Car trouble!! Back L-R: ?, Elsa Wilkie. Front L-R: Margaret Ying, Alice Fechner. Nursing friends.wilkie, ying, fechner, nursing friends, car, ballarat, hospital, 1940s, prendergast -
 Stawell Historical Society Inc
Photograph, Main Street Stawell before the Mall
Stawell Main street before Mall looking West. Earles Supermarket on left Commonwealth Bark on right. Cars parked in Street.stawell streetscape -
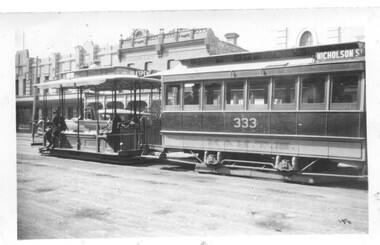 Melbourne Tram Museum
Photograph - Cable tram - Nicholson St Fitzroy, A Anderson, 1928
Photograph shows a cable car set, trailer 333, at the Nicholson St terminus North Fitzroy before returning to Spencer St. Yields information about cable trams in Nicholson St during 1928.Black and white photo with source notes on the rear.in ink on rear "Cable train, Fitzroy, Melbourne. Taken 1928 (son is on dummy) when on Holidays in Victoria. Photo by A Anderson"tramcars, tramways, cable trams, nicholson st, north fitzroy, tram 333 -
 Stawell Historical Society Inc
Photograph, Stawell Main Street with a man in front of C. Hunt and Sons 1960's
B/W 1960's C Hunt & Sons Building. 3 Holden cars parked out front and man waving. -
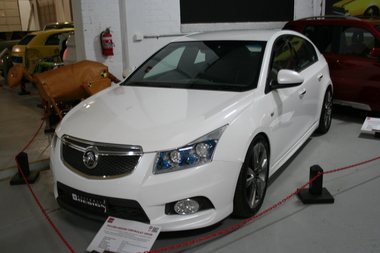 Trafalgar Holden Museum
Vehicle - Chevrolet/Holden Cruze concept
This car was globally developed as a four door sedan, then a hatch back version was introduced from 2011, replacing in Australia, the Holden Astra. Globally developed small car, developed by GMHWhite 4 door hatchback sedan, fitted with 5 spoke alloy wheels. Honeycomb grille, fog lights mounted in bumper bar.Round Holden emblem mounted both grille and boot centrevehicle, holden, cruze -
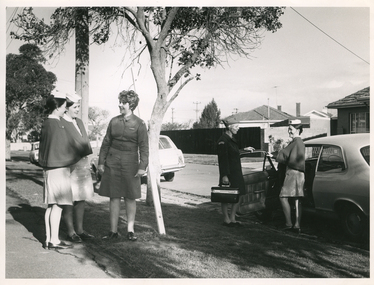 Royal District Nursing Service (now known as Bolton Clarke)
Photograph - Photograph, black and white, Barry Sutton, 24.06.1971
The three student nurses are from Footscray Hospital. The photograph is taken outside the RDNS Footscray Centre where Sister Ellen Anderson is the Supervisor. Sister McHugh is about to take one of the student nurses with her to observe her giving nursing care to patients in the community. During their training, Student nurses from several hospitals either attended the Royal District Nursing Service (RDNS), Education Department, or, a RDNS Nurse Educator travelled to the appropriate hospital’s Education Department to educate the Trainees on District nursing through the RDNS Community Nursing Program. Following the lectures Students went to a RDNS Centre and each student accompanied a Sister for a week observing and gaining knowledge of all facets of nursing care in the home. This gave them an insight into the home conditions and situations patients faced following discharge from hospital. During 1971 there were 584 student nurses who received field experience with RDNS.Black and white photograph showing two Royal District Nursing Service (RDNS), Sisters and three student nurses Two student nurses, in their light coloured hospital uniforms, white caps, and dark capes are on the left of the photograph standing on the footpath and nature strip facing Sister E. Anderson, who is standing to the left of a tree on the nature strip. She has short dark curled hair and is looking to her right towards the nurses. She is wearing her RDNS grey long sleeve uniform dress. A grey coloured car is at the kerb to the right of the photograph. Standing by its front open passenger door is RDNS Sister Clare McHugh, who is wearing her grey uniform coat, with RDNS insignia on the upper area of the sleeve, and she is wearing a grey peaked hat over her short light coloured hair. She is holding her rectangular nursing case in her right hand and her left hand is resting on the top of the open car door. The inside padding of the door can be seen. A hospital uniformed student nurse is standing at the opened passenger door close to the car. Part of two white cars are seen in front of the grey car. Two trees are seen in the left background and houses and trees are seen to the right.Photographers stamp. Quote No. KH 64royal district nursing service, rdns, rdns education to student nurses, sister e. anderson, sister clare mchugh, rdns uniform