Showing 4098 items
matching postcards - photographs
-
 Federation University Historical Collection
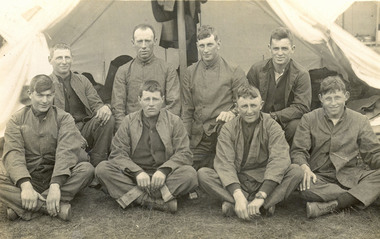
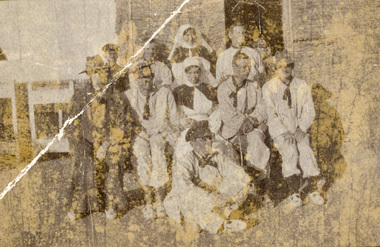
Postcard, Eight Men Outside a Tent, c1917
... Sauchieburn Ascot postcard Black and white photograph showing eight ...HENRY SMERDON (Harry) HOLMES was born in 1897 at the family property, ’Sauchieburn’, 17 km north of Ballarat, in the Ascot district. He was the youngest of four children. After finishing his education at St Patrick’s College, Ballarat, Henry joined the Holmes family farming interests. At the age of 18 he enlisted and served with AIF in Egypt, France and Belgium 1915-1918. Henry served at the famous battlegrounds of Ypes and Somme in the Australian Army 8th Battalion. He was a Driver with the 4th D.A.C. [Jane Dyer May 2024] Black and white photograph showing eight men outside a tent. They are most probably World War One soldiers in the Australian Imperial Forces (AIF). The postcard is of "The Ascot" boys. Includes [Samuel] Gordon Spittle, Henry [Harry] Holmes's first cousin, and other Ascot lads and district connections: neighbours including a Wrigley son, Ascot State School classmates and football mates from Clunes / Creswick districts. The man in the front row, second from the right is probably my great-grandfather Henry [Harry] Holmes. The man far left in the back row is probably his cousin, Samuel Gordon Spittle [Jane Dyer 2024]harry holmes, world war one, tent, aif, soldiers, uniform, henry smerdon holmes, sauchieburn, ascot, postcard -
 Federation University Historical Collection
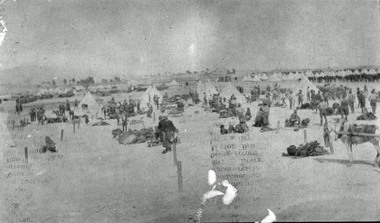
Photograph - black and white, Harry Holmes, Australian Soldiers Breaking Camp at Metras, c1916
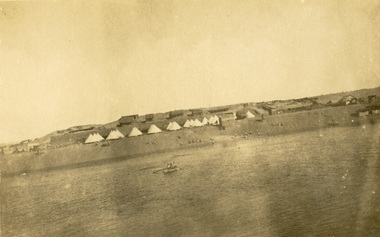
The postcard was sent by Harry Holmes who was a member of the Australian Imperial Force based in Egypt at the time. He sent a number of postcards home to his family in Ascot, Victoria. Egypt was a major base for the AIF from December 1914. A number of campaigns were fought in this theatre. There were two campaigns involving the AIF. Note that not all the fighting was actually geographically in Egypt. (http://www.aif.adfa.edu.au:8888/about3.html) This photograph is significant because it was taken by a soldier (rather than an official war artist) and shows one of the daya to day activities experienced by Australian Soldiers in Egypt during World War One.A number of tents and soldiers in a dry landscape. They are Australian Soldiers At Metras, Egypt during World War One. Verso: 'Breaking Camp at Metras prior to making our departure from there on March 28th.'chatham family archive, chatham, holmes, harry holmes, world war, world war 1, world war one, world war i, metras, egypt -
![Postcard - photographic, A. Gordon Spittle [and Harry Holmes?] , 1916, 23/03/1916](/media/collectors/4f729f6797f83e0308601707/items/4ffe16342162ef0da4e1a9a6/item-media/4ffe169c2162ef0da4e1a9bc/item-fit-380x285.jpg) Federation University Historical Collection
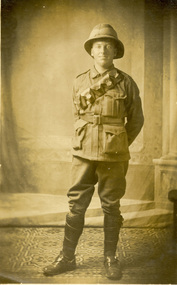
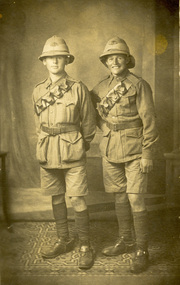
Federation University Historical CollectionPostcard - photographic, A. Gordon Spittle [and Harry Holmes?] , 1916, 23/03/1916
Gordon Spittle was the youngest of Three brothers. He grew up in Creswick and attended Creswick Grammar School. Gordon purchased 'Mt Cavern' in 1912. It had 4 years of a 10 year lease to run. His mother and father took delivery of it on 1 April 1916. They lived there and farmed it until Gordon returned from active service in May 1919. S. Gordon Spittle married Violet Holmes and both lived at "Mt Cavern" until their deaths. Gordon died in 1942 aged 51. Violet Holmes-Spittle died in 1949 aged 56. Handwritten lower front 'Do we look down hearted?' Handwritten verso 'Egypt, March 23rd 1916. Dear Mrs Troup. Your very fine and interesting letter dated Feb 15th came to hand to-day and needless to add was delighted to receive it, and can promise you that I'll answer it at my earliest opportunity. We are now having a better time since we came to this part, as we are able to enjoy a little of city life, although we have a good deal more work to do, & which is mostly carting goods to & from the ships & railway stations etc, all of which is interesting & quite a change from our life on the Desert. Hope this card finds you in good health. I will now have to say au revoir for the present with kindest regards to Mr Troup, self and family. From your very sincere friends, A. Gordon Spittle."Two uniformed Australian soldiers pose for a photograph during World War One.chatham family archive, chatham, holmes, world war, world war 1, world war i, world war one, france, spittle, gordon spittle -
 Federation University Historical Collection
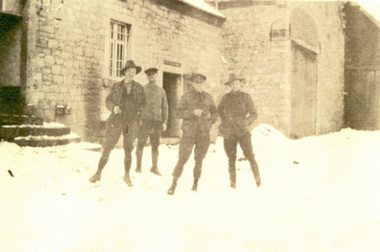
Postcard, Harold Reid, c1916
Harold Reid, dressed in Australian Army uniform poses for a photograph during World War One. Verso 'Harold Reid, taken at place where we have our maps printed.'chatham family archive, chatham, holmes, world war, world war 1, world war i, world war one, france, harold reid, reid -
 Federation University Historical Collection
Photograph - postcard, Cam Williamson, World War One AIF Soldiers at the Suez, c1916
... Soldiers at the Suez Photograph postcard Cam Williamson ...Harry Holmes and his battalion friends photographed aspects of their time on the Suez Canal, Egypt. Egypt was a major base for the AIF from December 1914. A number of campaigns were fought in this theatre. There were two campaigns involving the AIF. Note that not all the fighting was actually geographically in Egypt. (http://www.aif.adfa.edu.au:8888/about3.html) This photograph is significant because it was taken by a soldier (rather than an official war artist) and shows one of the day to day activities experienced by Australian Soldiers in Egypt during World War One.1) Four Australian soldiers during World War One in Egypt .2) Soldiers watch while two men 'fight' on a greasy pole during World War One .3) Australian soldiers stand at the grave of a German Officer at the Suez Canal, Egypt.2) Verso - "greasy Pole Fight" .3) verso: - Snap taken at grave of German officer killed in the first tussel (sic) with Turk at the Canalchatham family archive, chatham, holmes, world war, world war 1, world war i, world war one, egypt, cam williamson, greasy pole, ship, vessel, burial -
 Federation University Historical Collection
Photograph - postcard, S. Gordon Spittle, Australians at the World War One Suez Hospital, January 1916, c 07 January 1916
... Suez Hospital, January 1916 Photograph postcard S. Gordon ...This photograph was with a number of others associated with Harry Holmes of Ascot, Victoria. The postcard was written on by Harry Holmes who was a member of the Australian Imperial Force based in Egypt at the time. Nurse Kirkham is Laurie Hemsley Kirkham She was admitted to the Suez Public Hospital (Abbassia) post 06 January 1916. She left Australia with a group of South Australian nurses. Egypt was a major base for the AIF from December 1914. A number of campaigns were fought in this theatre. There were two campaigns involving the AIF. Note that not all the fighting was actually geographically in Egypt. (http://www.aif.adfa.edu.au:8888/about3.html) The Nurse Kirkam mentioned by the writer is probably Sarah Alice Kirkham, Staff Nurse with the Australian Army Nursing Service. Nurse Kirkham was from North Perth, Western Australia. She was posted to the Auxiliary Hospital, Egypt on 09 November 1915 leaving for France on 23 June 1916. Samuel Gordon Spittle (8005) enlisted into the AIF on 17 July 1915, a member of the 18th Australian Army Service Corps (AASC). He left Alexandria on 15 June 1916 disembarking at Marseilles 24 June 1916. Harry Holmes was discharged from a hospital in Egypt on 15 August 1919. He was awarded the Military Medal promulgated on 11 December 1919. (NAA: B2455, Spittle Samuel Gordon) Not only does this photograph portray life in Egypt during World War War, it highlights the role played by members of the Australian Army Nursing Service in both professional and social activities in the theatre of war.Two Australian nurses and a number of Australian soldiers in Hospital Uniform pose for a photograph in Egypt during World War One. Verso: "A little group of Australians at Suez Hospital Joe F[awcett] & I [Gordon Spittle] are standing in the back row with Nurse Kirkham standing between, she is on the short side so stood on a box. Gordon S."chatham family archive, chatham, holmes, world war, world war 1, world war i, world war one, france, gordon spittle, kirkham, suez, egypt, samuel gordon spittle, joe fawcett, laurie kirkham, nurse kirkham, suez hospital, laurie helmsley kirkham, l.a. kirkham, harry holmes, nurses -
 Federation University Historical Collection
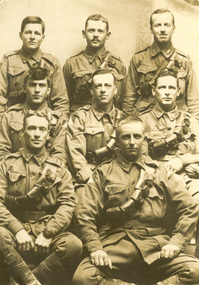
Photograph - Postcard, Joe Fawcett and Jack Nase, c1916
... and Jack Nase. Joe Fawcett and Jack Nase Photograph Postcard ...Image of two Australian soldiers in uniform during World War One. They are Joe Fawcett and Jack Nase.Verso: "Joe Fawcett and Jack Nase"chatham family archive, chatham, holmes, world war, world war 1, world war i, world war one, fawcett, nase, joe fawcett, joseph fawcett, jack nase -
 Federation University Historical Collection
Postcard - photographic, Sergeant French and Driver French, c1916
Image of the French brothers posing from a photograph while dressed in the AIF uniform during World War One.Verso in pencil: "On the left is Sergeant French and on the right is Driver Frenchchatham family archive, chatham, holmes, world war, world war 1, world war i, world war one, france. french -
 Federation University Historical Collection
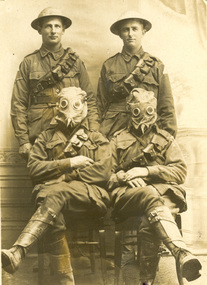
Photograph - Postcard, Australian soldiers in Helmets and Gas Masks
... in Helmets and Gas Masks Photograph Postcard ...Four uniformed Australian soldiers pose for a photograph during World War One. The two seated soldiers wear gas masks. Standing left to right: Gordon Spittle, Harry Holmes Sitting: Jack Nase, Joe FawcettVerso: Snap taken in our fighting headgear. We always were (sic) the iron helmets when near the trenches, and the front helmets are gas helmets.chatham family archive, chatham, holmes, world war, world war 1, world war i, world war one, france -
 Federation University Historical Collection
Postcard - photographic, The Ascot Boys, c1916
Photograph of the Ascot boys who served with Harry Holmes at the front during World War One. Harry Holmes in the front. Ray Blight in centrechatham family archive, chatham, holmes, world war, world war 1, world war i, world war one, france, ray blight, harry holmes -
 Federation University Historical Collection
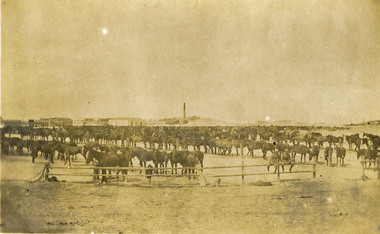
Postcard - photographic, Australian Horse Lines at Metra
Metras, SuezSepia photograph of the Australian horse lines in Egypt during World War one. Verso: 'Portion of the Remount Depots horse lines at Metra.'chatham family archive, chatham, holmes, world war, world war 1, world war i, world war one, suez, horse -
 Federation University Historical Collection
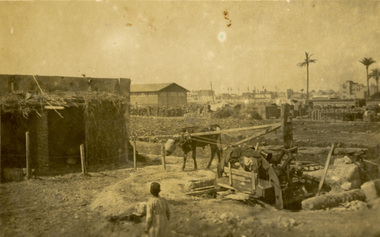
Photograph - black and white postcard, Native Waterwheel
... Photograph - black and white postcard... A.O.D. Native Waterwheel Photograph - black and white postcard ...Verso: 'Native water wheel and buildings near A.O.D.chatham family archive, chatham, holmes, world war, world war 1, world war i, world war one, -
 Federation University Historical Collection
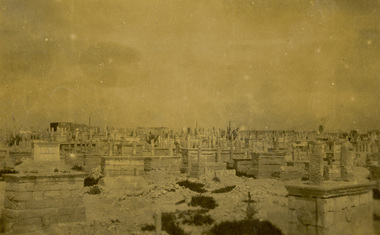
Postcard - photographic, Cemetery Near Metras, Alexandria, Egypt, c1916
The photograph is associated with Harry Holmes who was a member of the Australian Imperial Force based in Egypt at the time. Egypt was a major base for the AIF from December 1914. A number of campaigns were fought in this theatre. There were two campaigns involving the AIF. Note that not all the fighting was actually geographically in Egypt. (http://www.aif.adfa.edu.au:8888/about3.html) A photograph of the cemetery at Metras, Alexandria, Egypt. It shows many graves and monuments.Verso: 'Snap taken of the Egyptian Cemetery near our camp at Metras, Alexandria.'chatham family archive, chatham, holmes, world war, world war 1, world war i, world war one, harry holmes, metras, alexandria, egypt -
 Federation University Historical Collection
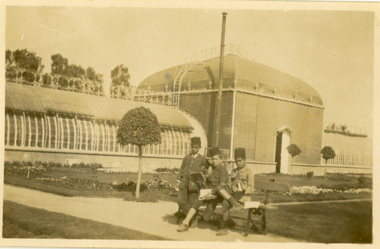
Postcard - photographic, Nouza Gardens, Egypt, c1916
The photograph is associated with Harry Holmes who was a member of the Australian Imperial Force based in Egypt at the time. Egypt was a major base for the AIF from December 1914. A number of campaigns were fought in this theatre. There were two campaigns involving the AIF. Note that not all the fighting was actually geographically in Egypt. (http://www.aif.adfa.edu.au:8888/about3.html) Four postcards of Nouza Gardens, alexandria, Eygpt. .1) Two English soldiers walk down a tree lined avenue at Nouza gardens .2) Garden setting with fernery building on the right. .3) Gardens with towered building in the centre of the photograph .4) Three Egyptian boys who acted as guide to Australian Soldiers Harry Holmes and his friends sit on a seat in front of a fernery building. .1) Aveue at entrance to Nouza gardens, Two tommies in the foreground. .2) View at gardens. Nouza .3) View taken at Nouza Gardens, Alexandria. .4) The fernery at Nouza Gardens. Very pretty inside. the three boys we picked up and they acted as our guides. chatham family archive, chatham, holmes, world war, world war 1, world war i, world war one, harry holmes, nouza gardens, alexandria, egypt -
 Federation University Historical Collection
Photograph - Sepia Postcard, Suez Canal Camp, c1916
... Photograph - Sepia Postcard... Canal Camp Photograph - Sepia Postcard ...The postcard was written on by Harry Holmes who was a member of the Australian Imperial Force based in Egypt at the time. Egypt was a major base for the AIF from December 1914. A number of campaigns were fought in this theatre. There were two campaigns involving the AIF. Note that not all the fighting was actually geographically in Egypt. (http://www.aif.adfa.edu.au:8888/about3.html) Sepia photograph showing a number of tents used by Australian soldiers during World War One, with the Suez Canal in the foreground. Verso "A camp five miles from ours. Snap take [3 words covered in blue pencil by the censor - they appear to say 'across the Canalchatham family archive, chatham, holmes, world war, world war 1, world war i, world war one, harry holmes, suez canal, egypt -
 Federation University Historical Collection
Photograph - black and white postcard, Gordon Spittle, Monument to Mohamed Aly, Alexandria, Egypt, 30/03/1916
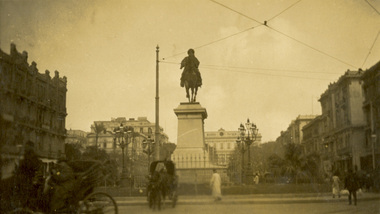
... Photograph - black and white postcard.... Gordon. 30/3/16 Black and white postcard showing a statue ...The photograph is associated with Harry Holmes and Gordon Spittle who were members of the Australian Imperial Force based in Egypt at the time. Egypt was a major base for the AIF from December 1914. A number of campaigns were fought in this theatre. There were two campaigns involving the AIF. Note that not all the fighting was actually geographically in Egypt. (http://www.aif.adfa.edu.au:8888/about3.html) Gordon Spittle was the youngest of Three brothers. He grew up in Creswick and attended Creswick Grammar School. Gordon purchased 'Mt Cavern' in 1912. It had 4 years of a 10 year lease to run. His mother and father took delivery of it on 1 April 1916. They lived there and farmed it until Gordon returned from active service in May 1919. He married Violet Holmes and both lived at "Mt Cavern" until their deaths. Gordon died in 1942 aged 51. Violet Holmes-Spittle dies in 1949 aged 56. Black and white postcard showing a statue in the middle of a townscape in Alexandria, Egypt. The monument is Mohamed Aly.Verso "Monument to Mohamed Aly which is erected in the square Alexandria. Gordon. 30/3/16chatham family archive, chatham, holmes, world war, world war 1, world war i, world war one, egypt, spittle, gordon spittle, -
 Federation University Historical Collection
Postcard, Kodak, Sydney Harbour Bridge, c1949, 13/10/1949
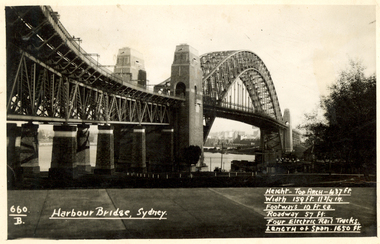
Postcard written by Frank Wright to a friend, W. Snelling in London. Frank Wright was a renown resident of Smeaton, where he was born. He lived at Laura Villa, and attended Smeaton State School. His father William was a gold miner and his mother's name was Sarah. Their family won many singing and instrumental awards. Frank was tutored by Percy Code and was awarded a gold medal for the highest marks in the ALCM examinations in the British Colonies at the age of seventeen years. He became the Australian Open Cornet Champion by the age of eighteen. A year later, Frank conducted the City of Ballarat Band, and later the Ballarat Soldiers’ Memorial Band. He formed the Frank Wright Frisco Band and Frank Wright and his Coliseum Orchestra. These bands won many South Street awards, and Frank as conductor won many awards in the Australian Band Championship contest. In 1933 Frank Wright sailed to England to conduct the famous St Hilda’s Band and was later appointed Musical Director of the London County Council, where he organized many amazing concerts in parks, in and around the London district. He was made Professor of Brass and Military Band Scoring and conducted at the Guildhall of Music and Drama. Frank was often invited to adjudicate Brass Band Championships around Europe, in Australia, including South Street and in New Zealand. The Frank Wright Medal at the Royal South Street competition is awarded to an individual recognized as making an outstanding contribution to brass music in Australia.Black and white photograph of the Sydney Harbour Bridge. A small section of the city and water can be seen beneath the arched span of the bridge.Written in white on front - 660.B, Harbour Bridge, Sydney., Height-Top arch - 437 ft.,Width 159 ft. 11 3/4 in., Footways 10 ft. ea., Roadway 57 ft., Four Electric Rail Tracks., Length of span 1650 ft. Handwritten on back - Message to W. Snelling in London from Frank Wrightfrank wright, cornet, conductor, sydney harbour bridge -
 Federation University Historical Collection
Photograph - Black and White, E.A. Sweetman 7 Son Ltd, Bath from Pulteney Bridge and the Pump Room, Bath
Black and white photographic postcard showing Bath from Pulteney Bridge and the Pump Room, Bath.chatham family archive, bath, pump room -
 Federation University Historical Collection
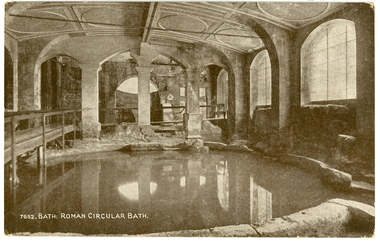
Photograph - Black and White, The Photochrome Co. Ltd, Bath
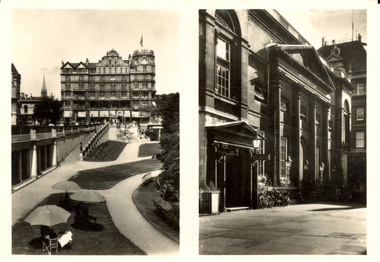
The Roman Baths complex is a site of historical interest in the English city of Bath. The house is a well-preserved Roman site for public bathing. The Roman Baths themselves are below the modern street level. There are four main features: the Sacred Spring, the Roman Temple, the Roman Bath House and the Museum, holding finds from Roman Bath. The buildings above street level date from the 19th century. . Two black and white postcards of views of Bath. .1) Roman Circular Bath .2) Empire Hotel and Bridge, Bathchatham family archive, roman, bath -
 Federation University Historical Collection
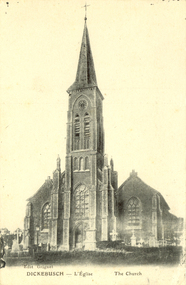
Postcard - black and white, Church at Dickebusch, c1916
A Commonwealth War Graves Commission (CWGC) burial ground, the Dickebusch Old Military Cemetery, is a burial ground for the dead of the First World War and the Second World War. It is located at Dickebusch in the Ypres Salient in Belgium on the Western Front of the first war. Dickebusch (now Dikkebusch) is a village and commune in the Province of West Flanders, 5 kilometres South-West of Ypres on the road to Bailleul.Black and white photograph of a church with a steeple with a clocktower. The church was bombed in 1917 during World War One. This card was purchased by an Australian soldier, probably Henry Smerdon Holmes, during World War One. chatham-holmes family collection, dickebusch, belgium, ypres salient, dikkebusch, world war one -
 Federation University Historical Collection
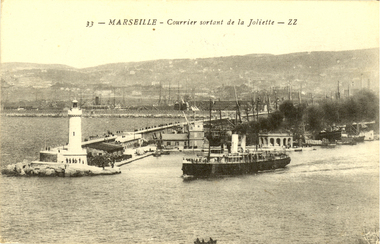
Postcard - black and white, Courrier Sortant de la Joliette, Marseille
La Joliette is a neighbourhood of the 2nd arrondissement of Marseille located at the start of the autonomous port of Marseille. Black and white photograph of a sea going vessel carrying the outgoing mail of the Port of Joliette. A lighthouse is located to the left.chatham-holmes family collection, la joliette, marseille, france, port, boat, ship, vessel, phare sainte marie -
 Federation University Historical Collection
Photograph - Image, Rose Stereograph Co, Law Courts Building, Ballarat, Vic
Also known as the Ballarat State Offices, this building is now part of the Federation University Australia Arts Academy.Copy of an Rose Postcard showing the Ballarat Law Courts in Camp Street nearing completion, but still with scaffolding in place. This image is from the State Library of Victorian Collection Accession no(s) H32492/7755 former ballarat law courts, former ballarat state offices, camp street, ballarat, arts academy, federation university australia, law, legal, courthouse -
 Federation University Historical Collection
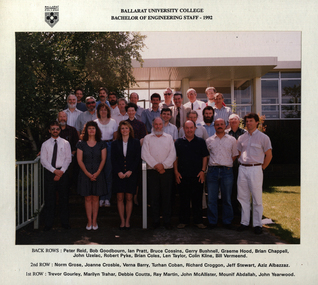
Postcard - colour, Ballarat University College Bachelor of Engineering Staff, 1992
Colour photograph taken at Mount Helen of the Ballarat University College Bachelor of Engineering Staff. Back Rows: Peter Reid, Bob Goodbourn, Ian Pratt, Bruce COssins, Gerry Bushnell, Graeme Hood, Brian Chappell, John Uzelac, Robert Pyke, Brian Coles, Len Taylor, Colin Kline, Bill Vermeend 2nd Row: Norm Grose, Joanne Crosbie, Verna barry, Turhan Coban, Richard Croggon, Jeff Stewart, Aziz Albazzaz Front Row: Trevor Gourley, Marilyn Trahar, Debbie Coutts, Ray Martin, John McAllister, Mounif Abdallah, John Yearwoodcolin kline, engineering, peter reid, bob goodbourn, ian pratt, bruce cossins, gerry bushnell, graeme hood, brian chappell, john uzelac, robert pyke, brian coles, len taylor, colin kline, bill vermeend, norm grose, joanne crosbie, verna barry, turhan coban, richard croggon, jeff stewart, aziz albazzaz, trevor gourley, marilyn trahar, debbie coutts, ray martin, john mcallister, mounif abdallah, john yearwood, ballarat university college -
 Flagstaff Hill Maritime Museum and Village
Letter - William Ferrier, 14th November 1905
The letter to William Ferrier of South Warrnambool from the Prime Minister and the Parliament of the Commonwealth recognised the significance of William’s brave and courageous lifesaving act to the people of Australia; “They all feel that your conduct was worthy of the best deeds done by British sailors in the past and they are proud to know that Australia can produce such as you.” The story of that brave rescue follows on below … The ship from which the sailors were rescued was the three-masted, iron and steel barquentine the La Bella, built in Norway in 1893. She was one of two iron and steel ships by Johan Smith, The company was one of the leading shipping families in Tvedestrand, Norway. She was significant to Norwegian shipping, being one of only 27 iron and steel ships ever built in Norway. She was registered in New Zealand and engaged from 1902 in inter-colonial trading of timber in the Pacific, between New Zealand and Australia and was often in Port Phillip Bay, Victoria. On 5th October 1905, the twelve-year-old La Bella left Lyttleton, New Zealand carrying a cargo of timber bound for Warrnambool, Australia. She was manned by a crew of twelve: the Master, (Captain Mylius, previously 1st Mate of La Bella, appointed Captain to La Bella on 6th February 1903) 2 Mates, Cook, six able seamen, one ordinary seaman and a boy. Bad weather en route caused her to shelter at Burnie on Tasmania's North West coast. On November 10th, the 37th day of her journey, La Bella approached Warrnambool. Captain Mylius steered her towards Lady Bay Channel in heavy south-west seas and evening mist. He ordered the helmsman to steer for the light. As the ship came round, a tremendous sea struck her on the port quarter, causing her to breach broadside in a north-westerly direction into breakers. The helm was brought round twice more, but each time heavy seas broke over her, the third time throwing the La Bella on to a submerged reef in Lady Bay now known as La Bella Reef (about 100 yards from the Warrnambool breakwater). The sea was so rough that it even wrenched a one-and-a-half ton anchor from its fastenings and into the sea. As Captain Mylius headed to the steel wheelhouse, intending to send up a rocket flare, a huge sea slammed the steel door into him (resulting in massive bruising front and back) Despite his injuries he still managed to set off a blue light, which he held up in his hands. La Bella’s lifeboats were filled with seawater and broke up on their chocks. The blue light was the first indication to people on the shore that there was a ship in distress. The Harbour Master, Captain Roe (who lived in the Harbour Master’s House opposite Flagstaff Hill), organised a group of volunteers to crew the lifeboat because the trained crew was unavailable; the crewmen were working on a steamer in Port Fairy at the time. He then poured oil onto the water to try and smooth the sea. At around 11 pm three of the crew took shelter in the steel forecastle but the sea crashed into it and broke it up. While the rest of the crew and onlookers watched helplessly in the moonlight the bodies were washed away into the sea, never to be seen again. Some of the crew lashed themselves to the weather rail to keep from being washed away. Watson, the ordinary seaman, became tangled in the rigging lines and was too weak to move, so the 2nd Mate, Robertson, put a line onto him so that he wouldn’t wash off. Around 11 pm three of the crew were unconscious from exhaustion. The situation on La Bella was becoming dangerous. The 2nd Mate moved to the ‘house’ and soon afterwards the ship slipped in the heavy sea. The lashings of the 1st Mate and the ‘boy’ Denham had kept them safe until about 2 am when they were washed overboard; no one was able to help. One by one, the exhausted crew were being washed overboard, too weak to hold on any longer. During the night the La Bella had broken into two and the deckhouse ran out towards the sea. Two more men drowned when trying to reach the lifeboat. By sunrise, the only survivors of the twelve were the Master, 2nd Mate and three seamen. Early in the morning, Captain Roe used the rocket apparatus on shore to try and shoot a line to the ship for a safer rescue but each attempt fell short of the target. Several attempts were made by the lifeboat to rescue the stricken sailors, but the rough conditions made this difficult for the boat to get close enough to the ship and the lifeboat had to return to shore. During a final attempt to reach the ship Captain Mylius ordered his men to jump into the sea. Leonard Robertson, 2nd mate, jumped and swam towards the lifeboat, taking hold of the boat hook offered to him. Oscar Rosenholme managed to reach the boat floating on a piece of timber from the ship’s load and a third survivor, Noake, also made the boat. Along with the lifeboat rescue crew, 25-year-old William Ferrier rowed his small dingy through the heavy seas and managed to rescue the Captain, whom he landed on the breakwater. Ferrier then returned to the ship to attempt a final rescue, losing his oars and rowlocks into the high sea. Using just a spare paddle he skulled towards the La Bella, reaching her stern in time to cut loose the lone surviving sailor, Payne, from the lashing that held him to the ship; the terrified sailor dropped from the ship and into the dingy. Shortly after the last man was rescued, the La Bella was lifted by a huge wave and crashed back down on the reef; she broke up and sank. The ordeal had lasted ten hours. The survivors were taken to the nearby Bay View Hotel and gratefully received warm food and clothing, medical attention and a place to sleep. In the following days, an unidentified body of a young person has washed ashore; it was either Watson or Denham. The body was buried in the Warrnambool cemetery with an appropriate gravestone and inscription. William Ferrier became a national hero as news of the daring rescue spread. In recognition of his bravery in the two daring rescues, he was awarded the Silver Medal for Bravery by the Royal Humane Society and was honoured in the letter from the Prime Minister and the Parliament of the Commonwealth, telegrams and a cheque for £20 from the Governor-General, over £150 subscribed by the public, including Warrnambool and district and readers of The Argus, and a gold medal from the Glenelg Dinghy Club of South Australia. Ferrier’s rescue efforts are one of the most heroic in Victoria’s shipwreck history. (William Ferrier’s son, Frank, received a similar award almost fifty years later when he helped rescue four members of the crew on the yacht Merlan after it ran on to a reef near the Point Lonsdale Lighthouse. ) The wreck of La Bella now lies on her port side in 13 metres of sheltered water inside the reef she struck. The bow section is relatively intact and part of the stern has drifted north-easterly towards the mouth of the Hopkins River. The reef the La Bella struck now bears its name. Those five rescued from the La Bella were Captain George Mylius, Leonard Robertson (2nd Mate, 21 years old), R. Payne, Oscar Rosenholme and Jack Noake. Those seven who lost their lives were Mr Coulson (1st mate), Charles Jackman (cook) Gustave Johnson, Pierre Johann and Robert Gent (all able seamen), Harry Watson (ordinary seaman) and Jack Denham (ship’s boy), Captain Mylius was found guilty of careless navigation; he had sailed into the bay without the services of a pilot. His Master Certificate was suspended for twelve months. Later he was also charged with the manslaughter of one of the crew who had died when the La Bella was wrecked but found not guilty. The event’s adverse publicity and damage to his career took a toll on his health and he died of a heart attack six months after the wreck; he was only thirty-seven. His body was buried in the Melbourne General Cemetery. The La Bella was “the best documented of all sailing ships owned in New Zealand”. Her record books, ship logs, correspondence and supporting papers are still available. At the time of the tragedy, she was owned by Messers David C.Turnbull and Co. of Timaru, New Zealand timber merchants and shipping agents, who had purchased her on 13th December 1901. A detailed account of the last journey of La Bella can be read in “Leonard Robertson, the Whangaroa & La Bella” written by Jack Churchouse, published in 1982 by Millwood Press Ltd, Wellington, NZ. As well as this letter, Flagstaff Hill’s La Bella Collection includes a photograph of the wrecked La Bella, a brass rail holder and a postcard of William Ferrier with four of the survivors. Some 15 – 17 ships are believed to have sunk in Lady Bay, but only two have been discovered on the seafloor; the “La Bella” and the “Edinburgh Castle”. Both wrecks are popular diving sites and are preserved as significant historical marine and marine archaeological sites. This original congratulatory letter sent to William Ferrier by the Prime Minister and Government of Australia demonstrates the importance attached to his efforts for Victoria and to Australia. The letter is part of the La Bella Collection and is significant at both a local and state level. Its connection to the La Bella shipwreck and the rescue of five survivors highlights the dangers of Victoria’s Shipwreck Coast. The letter to William Ferrier from the Australian Government acknowledges the bravery of ordinary Australians who risked their lives to save victims of shipwrecks along the coast. The letter is significant to the history of Warrnambool as it honours William Ferrier, a local fisherman whose descendants continue to live in the area. It highlights the way of life of people who lived in coastal towns in 19th century Victoria and the effects of shipwrecks upon them. The letter connects to the postcard of William Ferrier with four of the five rescued crew, the photograph of the wreck of the La Bella and the artefact from the wreck, the rail holder. This letter is significant because of its association with the sailing ship “La Bella”. The “La Bella” is of local and state and national significance. It is one of the only two shipwrecks discovered in Lady Bay, Warrnambool, out of the 15-17 shipwrecks in the bay. Letter to William Ferrier of South Warrnambool from the Prime Minister and Members of Parliament commending him on his bravery. The printed letterhead includes a coat of arms in the top centre and the official address. The letter is very neatly hand written in black pen and includes 4 signatures of Members of Parliament. The rectangular paper is cream coloured with some yellow/brown discolouring. It has the letterhead on the right hand side of it and the written letter begins below the letterhead. The paper has been folded so that the right side becomes the cover page of the letter. The writing is continued onto the inside right hand page of the folded paper and the writing ends here. There is more recent writing on the bottom right hand corner of the back page. The paper has been officially folded in half a total 3 times and there is heavy discolouration on the sections that form the front and back of the folded letter. There is a 4th fold line that is less pronounced that the other folds and would make the paper the size to fit into a pocket. At several fold creases the paper has worn through. The edges of the paper have minor tears. The printed coat of arms is that of the House of Representatives. Underneath is printed “The Parliament of the Commonwealth, / Parliament House / Melbourne”. The hand written, letter is dated “14th November, 1905” and addressed to “Mr. William Ferrier / South Warrnambool” The letter begins “The Speaker, the Prime Minister and Members of the Ministry and its supporters, the Leader and Members of the Opposition, the Leader and Members of the Labour Party, being all the Members of the House of Representatives of the Federal Parliament of Australia” … It continues “desire to express to you their appreciation of your bravery in skulling out to the wreck of the “La Bella” at Warrnambool on Saturday, 11th November, 1905, and recovering therefrom two of the crew who were in imminent danger of their lives. They all feel that your conduct was worthy of the best deeds done by British sailors in the past and they are proud to know that Australia can produce such as you.” The letter is “Signed on behalf of the Members – Speaker (Frederick Holder ), Deputy Leader of the Opposition (Joseph Cook ), Prime Minister (Alfred Deakin), Leader of the Labour Party ( J.C. Watson)” On the back of the letter is blue ink handwriting “OWNER / G. FERRIER / TO. BE. PHOTOGRAPHED / 27-4-76”la bella, william ferrier, bill ferrier, lady bay, 1905, 10th november 1905, 11th november 1905, parliament of the commonwealth, prime minister, australian government, new zealand, flagstaff hill, warrnambool, shipwrecked coast, flagstaff hill maritime museum, maritime museum, shipwreck coast, flagstaff hill maritime village -
 Flagstaff Hill Maritime Museum and Village
Functional object - Rail holder, About 1893, when the ship was made
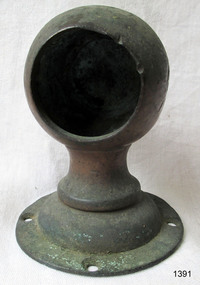
This brass rail holder fixture would have been used to hold the end of a rail in place. There is no information as to where the fitting or rail would have been placed on the ship; sailing ships had many brass fittings. It was recovered from the wreck of the La Bella, which lies at the bottom of the Warrnambool Harbour. Some 15 ships are believed to have been wrecked in Lady Bay, but only two have been discovered on the sea floor; the La Bella and the Edinburgh Castle. Both wrecks are popular diving sites and are preserved as significant historical marine and marine archaeological sites. The story of the final voyage of the La Bella is summarised as follows … The ship from which the sailors were rescued was the three-masted, iron and steel barquentine the La Bella, built in Norway in 1893. She was one of two iron and steel ships by Johan Smith, the company being one of the leading shipping families in Tvedestrand, Norway. She was significant to Norwegian shipping, being one of only 27 iron and steel ships ever built in Norway. She was registered in New Zealand and engaged from 1902 in inter-colonial trading of timber in the pacific, between New Zealand and Australia and was often in Port Phillip Bay, Victoria. On 5th October, 1905, the twelve year old La Bella left Lyttleton, New Zealand carrying a cargo of timber bound for Warrnambool, Australia . She was manned by a crew of twelve: the Master, (Captain Mylius, previously 1st Mate of La Bella, appointed Captain to La Bella on 6th February 1903) 2 Mates, Cook, six able seamen, one ordinary seaman and a boy. . Bad weather en route caused her to shelter at Burnie on Tasmania's North West coast. On November 10th, the 37th day of her journey, La Bella approached Warrnambool. Captain Mylius steered her towards Lady Bay Channel in heavy south-west seas and evening mist. He ordered the helmsman to steer for the light. As the ship came round, a tremendous sea struck her on the port quarter, causing her to breach broadside in a north-westerly direction into breakers. The helm was brought round twice more, but each time heavy seas broke over her, the third time throwing the La Bella on to a submerged reef in Lady Bay now known as La Bella Reef (about 100 yards from the Warrnambool breakwater). The sea was so rough that it even wrenched a one-and-a-half ton anchor from its fastenings and into the sea. As Captain Mylius headed to the steel wheelhouse, intending to send up a rocket flare, a huge sea slammed the steel door into him (resulting in massive bruising front and back) Despite his injuries he still managed to set off a blue light, which he held up in his hands. La Bella’s lifeboats were filled with sea water and broke up on their chocks. The blue light was the first indication to people on shore that there was a ship in distress. The Harbour Master, Captain Roe (who lived in the Harbour Master’s House opposite Flagstaff Hill), organised a group of volunteers to crew the lifeboat because the trained crew was unavailable; the crewmen were working on a steamer in Port Fairy at the time. He then poured oil onto the water to try and smooth the sea. At around 11pm three of the crew took shelter in the steel forecastle but the sea crashed into it and broke it up. While the rest of the crew and onlookers watched helplessly in the moonlight the bodies were washed away into the sea, never to be seen again. Some of the crew lashed themselves to the weather rail to keep from being washed away. Watson, the ordinary seaman, became tangled in the rigging lines and was too weak to move, so the 2nd Mate, Robertson, put a line onto him so that he wouldn’t wash off. Around 11pm three of the crew were unconscious from exhaustion. The situation on La Bella was becoming dangerous. The 2nd Mate moved to the ‘house’ and soon afterwards the ship slipped in the heavy sea. The lashings of the 1st Mate and the ‘boy’ Denham had kept them safe until about 2am when they were washed overboard; no one was able to help. One by one, the exhausted crew were being washed overboard, too weak to hold on any longer. During the night the La Bella had broken into two and the deckhouse ran out towards the sea. Two more men drowned when trying to reach the lifeboat. By sunrise the only survivors of the twelve were the Master, 2nd Mate and three seamen. Early in the morning Captain Roe used the rocket apparatus on shore to try and shoot a line to the ship for a safer rescue but each attempt fell short of the target. Several attempts were made by the lifeboat to rescue the stricken sailors, but the rough conditions made this difficult for the boat to get close enough to the ship and the lifeboat had to return to shore. During a final attempt to reach the ship Captain Mylius ordered his men to jump into the sea. Leonard Robertson, 2nd mate, jumped and swam towards the lifeboat, taking hold of the boat hook offered to him. Oscar Rosenholme managed to reach the boat floating on a piece of timber from the ship’s load and a third survivor, Noake, also made the boat. Along with the lifeboat rescue crew, 25 year old William Ferrier rowed his small dingy through the heavy seas and managed to rescue the Captain, whom he landed on the breakwater. Ferrier then returned to the ship to attempt a final rescue, losing his oars and rowlocks into the high sea. Using just a spare paddle he skulled towards the La Bella, reaching her stern in time to cut loose the lone surviving sailor, Payne, from the lashing that held him to the ship; the terrified sailor dropped from the ship and into the dingy. Shortly after the last man was rescued, the La Bella was lifted by a huge wave and crashed back down on the reef; she broke up and sank. The ordeal had lasted ten hours. The survivors were taken to the nearby Bay View Hotel and gratefully received warm food and clothing, medical attention and a place to sleep. In the following days an unidentified body of a young person was washed ashore; it was either Watson or Denham. The body was buried in the Warrnambool cemetery with an appropriate gravestone and inscription. William Ferrier became a national hero as news of the daring rescue spread. In recognition of his bravery in the two daring rescues he was awarded the Silver Medal for Bravery by the Royal Humane Society and was honoured in the letter from the Prime Minister and the Parliament of the Commonwealth, telegrams and a cheque for £20 from the Governor General, over £150 subscribed by the public, including Warrnambool and district and readers of The Argus, and a gold medal from the Glenelg Dinghy Club of South Australia. Ferrier’s rescue efforts are one of the most heroic in Victoria’s shipwreck history. (William Ferrier’s son, Frank, received a similar award almost fifty years later, when he helped rescue four members of the crew on the yacht Merlan, after it ran on to a reef near the Point Lonsdale Lighthouse. ) The wreck of La Bella now lies on her port side in 13 metres of sheltered water inside the reef she struck. The bow section is relatively intact and part of the stern has drifted north-easterly towards the mouth of the Hopkins River. The reef the La Bella struck now bears its name. Those five rescued from the La Bella were Captain George Mylius, Leonard Robertson (2nd Mate, 21 years old), R. Payne, Oscar Rosenholme and Jack Noake. Those seven who lost their lives were Mr Coulson (1st mate), Charles Jackman (cook) Gustave Johnson, Pierre Johann and Robert Gent (all able seamen), Harry Watson (ordinary seaman) and Jack Denham (ship’s boy), Captain Mylius was found guilty of careless navigation; he had sailed into the bay without the services of a pilot. His Master Certificate was suspended for twelve months. Later he was also charged with manslaughter of one of the crew who had died when the La Bella was wrecked, but found not guilty. The event’s adverse publicity and damage to his career took a toll on his health and he died of a heart attack six months after the wreck; he was only thirty-seven. His body was buried in the Melbourne General Cemetery. The La Bella was “the best documented of all sailing ships owned in New Zealand”. Her record books, ship logs, correspondence and supporting papers are still available. At the time of the tragedy, she was owned by Messers David C.Turnbull and Co. of Timaru, New Zealand timber merchants and shipping agents, who had purchased her on 13th December 1901. A detailed account of the last journey of La Bella can be read in “Leonard Robertson, the Whangaroa & La Bella” written by Jack Churchouse, published in 1982 by Millwood Press Ltd, Wellington, NZ. Some 15 – 17 ships are believed to have sunk in Lady Bay, but only two have been discovered on the seafloor; the “La Bella” and the “Edinburgh Castle”. Both wrecks are popular diving sites and are preserved as significant historical marine and marine archaeological sites. As well as this letter, Flagstaff Hill’s La Bella Collection includes a photograph of the wrecked La Bella, a brass rail holder and a postcard of William Ferrier with four of the survivors. This original congratulatory letter sent to William Ferrier by the Prime Minister and Government of Australia demonstrates the importance attached to his efforts for Victoria and to Australia. The letter is part of the La Bella Collection and is significant at both a local and state level. Its connection to the La Bella shipwreck and the rescue of five survivors highlights the dangers of Victoria’s Shipwreck Coast. The letter to William Ferrier from the Australian Government acknowledges the bravery of ordinary Australians who risked their lives to save victims of shipwrecks along the coast. The letter is significant to the history of Warrnambool as it honours William Ferrier, a local fisherman whose descendants continue to live in the area. It highlights the way of life of people who lived in coastal towns in 19th century Victoria and the effects of shipwrecks upon them. The letter connects to the postcard of William Ferrier with four of the five rescued crew, the photograph of the wreck of the La Bella and the artefact from the wreck, the rail holder. This item is significant because of its association with the sailing ship “La Bella” . the “La Bella” is of local and state and national significance. It is one of the only two shipwrecks discovered in Lady Bay, Warrnambool, out of the 15-17 shipwrecks in the bay. Brass rail holder from the wreck "La Bella". This rail holder would have been used as a fitting for the end of a rail. It is made up of two parts and looks a little like a goblet in shape. The top is a hollow spherical shape with a circular hole cut out on one side, into which the end of a round rail would fit. There are two gouge marks close to each other on one side of the hole, about one centimetre apart, at 1 and 2 o’clock position. The sphere has a hollow pipe-like stem with a screw thread turned into the outside of the lower section and the bottom of the stem has been flared out after having the base fitted. The base is round and has a mound in the centre. The edge has four evenly spaced fixture holes around its edge. The metal shows signs of pitting and has mild encrustation. The fitting of the base is loose, allowing it to swivel in a complete circle. The top of the sphere is rough and has a dent in it. Underneath the base there is verdigris; some has flaked off and reveals a bright golden colour underneath. rail holder, brass rail holder, la bella, lady bay, norway, 1893, new zealand, captain mylius, william ferrier, flagstaff hill, warrnambool, shipwrecked coast, flagstaff hill maritime museum, maritime museum, shipwreck coast, flagstaff hill maritime village -
 Flagstaff Hill Maritime Museum and Village
Postcard - Ships, Willets Photo, Victorian Training Ships, 1915
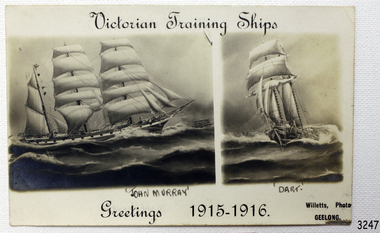
The photographic postcard was made in 1915-1916 by Willets Photography in Geelong. It is one of a series called 'Victorian Training Ships and it featured the sailing ships John Murry and the Dart'. The John Murry was commissioned by the Victorian Government for the training of juvenile offenders from 1910-1918 and anchored just off Williamstown, Victoria. The ship was previously named Loch Ryan. The Dart was named such in 1882, and in 1904 the New South Wales Government purchased her for use as a training ship. ln 1912 the Victorian Government bought her for use as a tender, to support the John Murry training ship until she was again sold in 1919 to the owner of a shipping and trading agency. The postcard is significant for its association with sailing ships and with training ships. It is also significant for its representation of two training ships used for rehabilitation. This form of treatment became controversial so the project didn't last for many years. None-the-less, it is part of our Victorian history.Black and white postcard picturing two sailing ships plus printed and handwritten text. The ships are the John Murry and the Dart. The postcard is in the series 'Victorian Training Ships'. Made by Willets of Geelong. Printed on front "Victorian Training Ships", "Greetings 1915-1916" and "Willets PHOTO / GEELONG" Written in ink below ships "John Murry" & "Dart". flagstaff hill, warrnambool, willets photo geelong, greeting card, 1915-1916, postcard, victorian training ships, sailing ships, john murry, dart, maritime museum, maritime village, maritine photograph, training ships, juvenile reformation, loch ryan, willis photography, geelong photographer, williamstown -
 Flagstaff Hill Maritime Museum and Village
Postcard
... macedonia photograph postcard exchange studios sydney Printed ...Black And White postcard of a steam ship in port. Printed on the picture is "Exchange Studios", "R M S Macedonia" and " - - - (date) / Sydney". (Sh 190 Ships M - R)Printed on the picture is "Exchange Studios", "R M S Macedonia" and " - - - (date) / Sydney". flagstaff hill, warrnambool, shipwrecked-coast, flagstaff-hill, flagstaff-hill-maritime-museum, maritime-museum, shipwreck-coast, flagstaff-hill-maritime-village, r m s macedonia, photograph, postcard, exchange studios, sydney -
 Yarra Glen & District Historical Society
Sepia postcards, Yarra Glen bridge
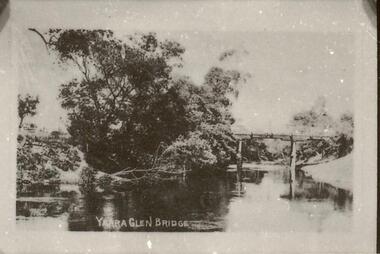
Photograph of wooden bridge over the Yarra River taken from a point just north of the river crossing at Yarra Glen early 20th century. The town of Yarra Glen is to the right (out of frame). A post and rail fence indicates the road to Yering and Lilydale to the east of the bridge. A bend of the river is in the foreground and trees line the eastern bank.On back of postcard at the top "POST CARD". On the left hand side "THIS SPACE MAY BE USED FOR PRINTED OR WRITTEN MATTER". On the right hand side "ONLY THE ADDRESS TO BE WRITTEN HERE". In a box in the right hand corner "A HALF-PENNY STAMP TO BE PLACED HERE". Along the left hand margin "Ajax series. Printed in England" yarra river, post and rail fence, wooden bridge, river crossing, river bridge, yarra glen bridge, yering -
 Yarra Glen & District Historical Society
Sepia postcards, The watering place Yarra Glen
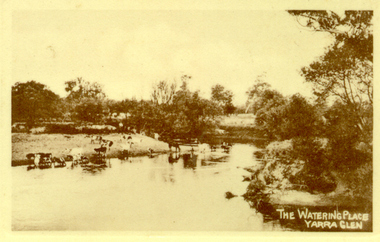
Sepia photograph taken from a point just north of the bridge over the Yarra River at Yarra Glen. A small herd of cattle and a horse are on the river bank and in the water. A horse with rider stands on the bank.On back of postcard at the top "POST CARD". On the left hand side "THIS SPACE MAY BE USED FOR PRINTED OR WRITTEN MATTER”. On the right hand side "ONLY THE ADDRESS TO BE WRITTEN HERE”. In a box in the right hand corner "A HALF-PENNY STAMP TO BE PLACED HERE". Along the left hand margin "Ajax series. Printed in England". horse, yarra river, yarra glen, cattle, horse and rider, river -
 Yarra Glen & District Historical Society
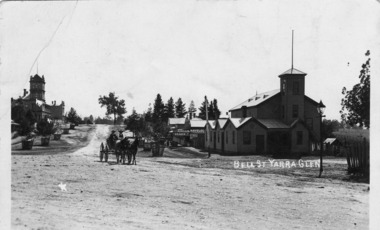
Black and white postcards, Bell St Yarra Glen c.1900
Photograph taken from the junction of Bell and King Streets looking north up Bell Street early 20th century. On the eastern side of Bell Street (left hand side of photograph) is the Victoria Hall. Behind the hall is a newsagency and behind that is the bakery. The pine trees at the top of the hill are at 'Point Pleasant', home of the Herbert family. On the western side of Bell Street can be seen the Grand Hotel and the Colonial Bank. The street trees are in wooden tree guards. In the middle foreground are two men in a buggy drawn by two horses.On back of the postcard at the top "POST CARD". Under those words are "CORRESPONDENCE" on the left and "ADDRESS ONLY" on the right.yarra glen, point pleasant, victoria hall, horse drawn vehicle, bell street, bakery, herbert, newsagency, newsagent, bakers shop, horse buggy, buggy