Showing 3859 items
matching third
-
 Bay Steamers Maritime Museum
model steam engine
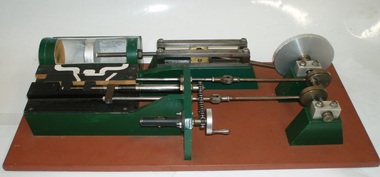
This model was found in the collection of Bay Steamers Maritime Museum. It is not knowt who created it but it is supposed that it was constructed to educate the many masters of the Wattle in the operation of a steam engine - a not so common mode of power these days. A Bay Steamers Maritime Museum examined the model in March 2012 and discovered that is was in poor repair. Using his existing knowledge, and with reference to some historic texts, he made some repairs and returned the model to working order. Here is his anaylsis of the situation as an excerpt from the Bay Steamers Maritime Museum newsletter Steamlines May 2012 "I was confronted with a model of a steam engine used years ago as a training aid for hopeful steam engineers. Already having a knowledge of steam operations, I considered a museum write-up for that model a ‘piece of cake’. However, on turning the model’s crankshaft, the valve timing seemed ‘out of kilter’ with the movement of the piston. Problem was that the two eccentrics on the crankshaft were not properly secured to it. Eventually I fastened the two eccentrics to the crankshaft where I felt that they should be and then realized that one of them had a chain-driven valve-timing device attached. This would be adjusted while an engine was running to achieve best performance and fuel economy whilst in operation by accurately controlling the period of time during which steam under pressure from the boiler would be admitted to the cylinder and give greater time for the steam to expand in the cylinder, move the piston and turn the crankshaft and thus, drive the attached apparatus. When the valves were correctly set up it was then possible to get the model to function properly.The model comprises a green section, which is the actual the model mounted on a brown painted board. There are two parts of the model, painted white representing the steam passages, and black representing the cast- iron portions of the cylinder-block casting, and of the main valve sliding between the cylinder a second sliding valve. Of the black portions, one slides back and forth being connected to a rod which is connected to an eccentric clamped to the crankshaft and is the nearer to the flywheel of two eccentrics. This eccentric is attached to the crankshaft at an angle of 90 degrees to the crank-pin attached to the flywheel. To operate the model simply turn the flywheel by means of the handle attached to its crank-pin. A second eccentric is also attached to the crankshaft, further away from the first eccentric, and it is adjusted to operate 90 degrees from the first eccentric (that is, 180 degrees from the crank-pin) A piston (painted silver) is located in a plastic cylinder and has a piston rod which passes through one end of the cylinder, (in actual practice a steam-proof gland seals the cylinder against loss of steam) terminating in a cross-head slide between four rails guiding it. From this cross-head, a connecting rod joins the piston-rod to the flywheel via the crank-pin attached to the flywheel which is part of the crankshaft. (In actual practice, a flywheel may not be used, particularly in a multi-cylinder engine.) The white portions of the model painted nearest to the cylinder represent the two steam ports cast into the main cylinder block, whilst one section painted in between those two represents the exhaust outlet (which may be connected to a condenser to conserve water, or to the open air). The main slide valve has three white-painted portions painted thereon. It has two white-painted marks representing the steam passages to the steam ports into the cylinder, and a third section in between the other two, being that part of the valve through which exhaust steam passes in line with the ports in the cylinder block. By rotating the flywheel, the operations of an engine will be observed as steam is admitted to the main valve via the gap between the two jaws of two moveable portions of a second sliding valve which is operated by the second eccentric attached to the crank-shaft. This eccentric is used to finely tune the valve timing of this model to obtain best running results of an engine. There are various methods used for reversing a steam engine. model compound steam engine, steam engine, model, crankshaft, valve, flywheel, wattle, engineer, eccentrics -
 Bendigo Historical Society Inc.
Newspaper - PETER ELLIS COLLECTION: BENDIGO ADVERTISER SATURDAY DECEMBER 3, 1998, 3rd December, 1998
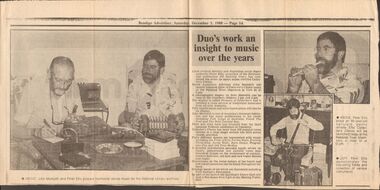
Newspaper cutting from Bendigo Advertiser, dated Saturday, December 3, 1988 - Page 14. Photo on left is captioned: ABOVE: John Meredith and Peter Ellis prepare traditional dance music for the National Library archives. Top right picture is captioned: ABOVE: Peter Ellis plays and 80-year-old celluloid penny whistle. Ellis' 'Collector's Choice' will be launched today at the National Trust chambers in View St at 3 pm. LEFT: Peter Ellis demonstrates the one string fiddle and collection of various instruments. Article reads: Duo's work an insight to music over the years. Local musical identity and Australian social dance authority Peter Ellis, co-author of the Bicentennial publication 200 Dancing Years, has completed his series on dance music entitled 'Collector's Choice'. Noted Australian folklorist John Meredith will launch volume three of Collector's Choice today at the National Trust chambers in View St at 3 pm. A photographic display by John Meredith can be seen at the chambers between 2pm and 5pm. The display is called Pioneers of Performers and it exhibits a cross section of traditional musicians from all over Australia. Fifty superb black and white toned prints will also be on display. John Meredith is one of Australia's foremost folklorists and has many publications to his credit including Folk Songs of Australia, Frank the Poet and The Wild Colonial Boy. Peter and John have just returned from the third national folklore conference in Canberra. Collector's Choice has more than 300 popular tunes written in a clear single melody line with guitar chords provided. Forty different dances are represented with music including the Pride of Erin, Parma Waltz, Evening Three-step, Swing Waltz, Barn Dance, Progressive Jive and Old Time Medley. A detailed introduction provides handy advice on choice, presentation and suitable tunes plus historical details on the evolvement of colonial, modern ballroom, old time and new vogue dances and music. Illustrations on the social history of the bands and individual musicians can be found throughout the book. Bendigo bands of old which are illustrated including Cyril Sawyer's Swingsters. As part of the launch the Sandhurst Dance Club will host a free dance from 8pm at the Marong Public Hall.Bendigo advertiserperson, individual, peter ellis oam -
 Red Cliffs Military Museum
Document, Life history of Sgt. William Carroll, (estimated); early -mid 1990
This short history is in a display of photos and a copy of a letter written home by Sgt Carroll to his Aunt.A brief written life history from birth to death of William Carroll service Number 815. As written by a member of Red Cliffs R.S.L. in consultation with the family.Born in Wangaratta in 1891, was a drover and boundary rider in Queensland when enlisted.Sgt. Carroll was one of the original members of the 21st Battalion, 6th Brigade, 1st AIF, which was formed at Broadmeadows early 1915. The battalion embarked from Melbourne on the Uylsses on the 8th May 1915 enroute to the Middle East. Saw action Middle East> Gallipoli>Middle East to reform and reorganise > Western Front> Somme> Bullecourt> Ypres> Somme> Mont St. Quentin> Villiers Bretonneux> Hamel Mutiny./ Sgt. Carroll was twice wounded in action (at Fluers and Broondseinde)and was recommended for the Distinguished Conduct Medal, with a Sgt Cozens (No 825 also original member, on the 15th September 1916, for exceptional zeal in the performance of their duties and coolness in action, which had a great affect on the moral of their mem. He was discharged medically unfit with gun wounds to his left knee and back. Of the full Battalion strength of the original Officers and men, there were 16 Officers and 24 Or's left. 21st Battalion left buried on foreign soil 47 Officers and 827 Or's. It was the highest decorated Battalion of the 6th Brigade. Listed are some of the Battles and Misfortunes that Sgt. Carrol survived to return to Australia. Torpedoed on the troop ship Southland enroute to Gallipoli 1915;/ First Australian troops to Garrison Cairo; First Australian Infantry Unit into line in France; Last out of the line; Staging a successful mutiny; 21st Battalion was disbanded in 1918. Sgt. Carroll was given block 276 Red Cliffs, he sold his block in 1982. He was interested in Community affairs and was involved in ADFA, RSL, Mildura Club, and Mildura Show Society and was the third last Red Cliffs Soldier Settler to die. He was in his 100th year.medal, distinguished, battalion, aif, 21st, 6th, brigade, 1st, mutiny, gallipoli, wangaratta, 1891, boundary, rider, ulysses, middle, east, western, front, conduct -
 City of Greater Bendigo - Civic Collection
Award - Set of Twenty Two Security Loan Honour Pennants, Commonwealth of Australia, c 1946 - 1963
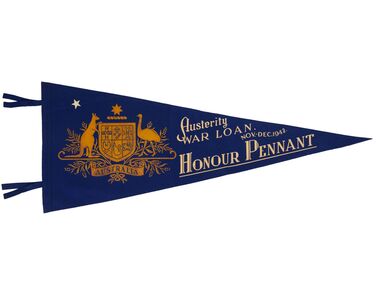
Australia, like many countries involved in both the First and Second World Wars realised that they would need more funds to resource their campaigns, so war loan programs were developed. These programs encouraged the population to purchase government war bonds which would be repaid with interest at a later time while immediately assisting the war effort. Post WW2 the government continued to encourage citizens to save money in an attempt to curb inflation. Security loans formed part of this countries economic program from the 1940's onwards. Districts were allocated a quota for which they encouraged citizens to subscribe and pennants were awarded for the highest per capita payment amongst the town population. In 1946 Bendigo was the first country city in Australia to record a quota success for the Second Security Loan, raising £260,480 from 1953 subscribers. Triangle felt screen printed pennants, various colours with two ties along left side. Pennants range in date from 1942 until 1963. 253.1 Blue felt triangle pennant with two ties on long side. Gold printed Commonwealth of Australia Coat of Arms, cream printed text and one star top left of crest. Dimensions: 1010mm W x 355 H x 3mm 253.2 Blue felt triangle pennant with two ties on long side. Gold printed Commonwealth of Australia Coat of Arms, printed cream, red and blue coloured text . One cream coloured printed star top left of crest. Dimensions: 985 W x 367 H x 3mm 253.3 Blue felt triangle pennant with two ties on long side. Gold printed Commonwealth of Australia Coat of Arms, printed cream, red and blue coloured text . One cream coloured printed star top left of crest. Dimensions: 955W x 355 H x 3mm 253.4 Green felt triangle pennant with two ties on long side. Gold printed Commonwealth of Australia Coat of Arms, printed cream, red and green coloured text . One cream coloured printed star top left of crest. Dimensions: 970 W x 367 H x 3mm 253.5 Green felt triangle pennant with two ties on long side. Gold printed Commonwealth of Australia Coat of Arms, printed yellow, pink and green coloured text . Two cream coloured printed stars top left of crest. Dimensions: 975 W x 370 H x 3mm 253.6 Red felt triangle pennant with two ties on long side and remnants of bronze ribbon stapled to long side. Yellow printed Commonwealth of Australia Coat of Arms, printed white, yellow, cream and light blue text . Two cream coloured printed stars top left of crest. One light blue star centre right. Dimensions: 1055 W x 355 H x 3mm 253.7 Light blue felt triangle pennant with two ties on long side and bronze ribbon stapled to long side. Yellow printed Commonwealth of Australia Coat of Arms, printed red, white and dark blue text . One cream coloured printed star top left of crest. Dimensions: 966 W x 355 H x 3mm 253.8 Green felt triangle pennant with two ties on long side. Yellow printed Commonwealth of Australia Coat of Arms, printed pink, white and yellow text . One cream coloured printed star top left of crest. Dimensions: 970 W x 350 H x 3mm 253.9 Red felt triangle pennant with two ties on long side and remnants of bronze ribbon stapled to long side. Yellow, blue, red and cream printed Commonwealth of Australia Coat of Arms with printed black, white and light blue text. Additional text on long side of pennant adjacent to ties. Three cream coloured printed stars top left of crest. Dimensions: 965 W x 350 H x 3mm 253.10 Blue felt triangle pennant with two ties on long side and remnants of bronze ribbon attached to ties. Yellow printed Commonwealth of Australia Coat of Arms with printed dark blue, cream and red text. Two cream coloured printed stars top left of crest. Dimensions: 930 W x 365 H x 3mm 253.11 Red felt triangle pennant with two ties on long side. Yellow, blue, red and cream printed Commonwealth of Australia Coat of Arms with light blue and cream text. Three cream coloured printed stars top left of crest. Dimensions: 1025 W x 355H x 2mm 253.12 Dark blue felt triangle pennant with two ties on long side. Yellow printed Commonwealth of Australia Coat of Arms with light blue text. Additional text on long side of pennant adjacent to ties. One cream coloured printed star top left of crest. Dimensions: 920 W x 338 H x 3mm 253.13 Dark blue felt triangle pennant with two ties on long side. Yellow printed Commonwealth of Australia Coat of Arms with maroon text. One cream coloured printed star top left of crest. Dimensions: 930 W x 360 H x 3mm 253.14 Dark blue felt triangle pennant with two ties on long side. Yellow printed Commonwealth of Australia Coat of Arms with yellow text. Two cream coloured printed stars top left of crest. Dimensions 910 W x 345 H x 3mm 253.15 Dark blue felt triangle pennant with two ties on long side. Yellow printed Commonwealth of Australia Coat of Arms with light blue text. one cream coloured printed star top left of crest. Dimensions: 905 W x 345 H x 3mm. 253.16 Dark blue felt triangle pennant with two ties on long side. Yellow printed Commonwealth of Australia Coat of Arms with brown text. One cream coloured printed star top left of crest. Dimensions: 930 W x 360 H x 3mm 253.17 Dark blue felt triangle pennant with two ties on long side. Yellow printed Commonwealth of Australia Coat of Arms with blue text. One cream coloured printed star top left of crest. Dimensions: 915 W x 350 H x 3mm 253.18 Dark blue felt triangle pennant with two ties on long side. Yellow printed Commonwealth of Australia Coat of Arms with blue text. One cream coloured printed star top left of crest. Dimensions: 950 W x 355 H x 3mm 253.19 Dark blue felt triangle pennant with two ties on long side. Yellow printed Commonwealth of Australia Coat of Arms with blue text. One cream coloured printed star top left of crest. Dimensions: 950 W x 355 H x 3mm 253.20 Dark blue felt triangle pennant with two ties on long side. Yellow printed Commonwealth of Australia Coat of Arms with cream text. One cream coloured printed star top left of crest. Dimensions: 965 W x 360 H x 3mm 253.21 Dark blue felt triangle pennant with two ties on long side. Yellow printed Commonwealth of Australia Coat of Arms with blue text. One cream coloured printed star top left of crest. Dimensions: 950 W x 365 H x 3mm 253.22 Dark blue felt triangle pennant with two ties on long side. Yellow printed Commonwealth of Australia Coat of Arms with cream text. One cream coloured printed star top left of crest. Dimensions: 940 W x 365 H x 3mm 253.1 Austerity /War Loan / Nov - Dec 1942 / Honour Pennant 253.2 Second / Security Loan / Oct - Nov 1946 / Honour Pennant 253.3 Third / Security Loan / April - May 1947 / Honour Pennant 253.4 Fourth / Security Loan / Oct - Nov 1947 / Honour Pennant 253.5 Fifth / Security Loan / April - May 1948 / Honour Pennant 253.6 Seventh/ Security Loan / March – April 1949 / Bendigo 253.7 Eighth / Security Loan / Sept – Oct 1949 / Honour Pennant 253.8 Ninth / Security Loan / March 1950 / Honour Pennant 253.9 Special Award / Tenth / Security Loan / August 1950 / City of Bendigo 253.10 Eleventh/ Security Loan / Nov-Dec 1950 / Honour Pennant 253.11 Special Award / 12th Security Loan / may- June 1951 / City of Bendigo 253.12 Sixteenth / Security Loan / Nov-Dec 1952 / Honour Pennant 253.13 Eighteenth / Security Loan / Sept – Oct 1953 / Honour Pennant 253.14 Nineteenth / Security Loan / March 1954 / Honour Pennant 253.15 Commonwealth / Security Loan / August 1954 / Honour Pennant 253.16 Commonwealth / Security Loan / august 1954 / Honour Pennant 253.17 Commonwealth / Security Loan / August 1956 / Honour Pennant 253.18 Commonwealth / Security Loan / August 1957 / Honour Pennant 253.19 Commonwealth / Security Loan / May 1960/ Honour Pennant 253.20 Commonwealth / Security Loan / September 1960/ Honour Pennant 253.21 Commonwealth / Security Loan / February March 1961/ Honour Pennant 253.22 Commonwealth / Security Loan / February 1963 / Honour Pennant commonwealth loan scheme, city of greater bendigo awards -
 Mission to Seafarers Victoria
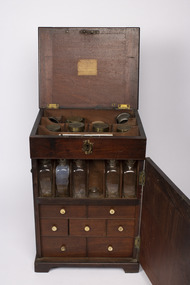
Furniture - Volum Medicine chest
This chest is the typical mid-18th century model. Thought to have belonged to captain James Volum.A medicine chest was a necessity for all sea journeys. Sometimes surgeons were onboard ships if there were passengers but on merchant ships, the captain had to be able able to look after his crew. A medium size mahogany cabinet with four protruding feet, small free hinged handles on left and right sides which are positioned approximately 5/8ths up from the bottom of the item, these handles can hinge 100 degrees upwards. The front and back 6/8ths of the cabinet can hinge open, as can the top of. Both front and back doors can be locked closed with their own respective hook latch which is on both sides of the cabinet. The top lid can be locked by interacting with a metallic keyhole which is present on the front of the cabinet close to the top. Revealed by opening the top lit is storage location with two rows of three storage spaces and one row of four. Revealed by opening the front door, is a single shelf with six divided locations for an equal number of glass containers, though only five remain in complete form. Below this self are three rows of drawers of differing dimensions, each with a small white knob. There are two drawers of equal width in the first row. Each drawer has four equally divided sliding pieces on its top face. When removed, these lids reveal a respective small space. Present on small paper labels on each of these lids are identifiers of the material which was stored. There are three equally sized drawers in the second row, which are less wide than the previous row. Only two of the drawers in this row have lids, of which each only have a single lid which covers a single compartment, each of these have a single label on them. The middle drawer contains a small glass mortar and pestle which are restrained by small wooden fixtures within the drawer. There are two drawers of equal width and greater height than any of the previous drawers in the third row. The first drawer has a single compartment containing multiple vials of varying dimensions, some of which feature a paper label with a respective inscription. Some of these vials are broken. In the second drawer has no lid which covers its four equally sized glasses. These are restricted by a wooded piece with four circular cut-outs. Revealed by opening the back door are two equally sized and spaced shelves which both have four divided locations which are filled by eight respective glass containers. These glass containers are of similar design to those in the front compartment but are larger. Some of these glass jars have paper labels like those found on previous glass containers.Label on top lid:volum collection, medecine chest, portable furniture, geelong, peterhead, scotland, captain, seafaring, whaling, london, bishopsgate, old gravel lane, london docks, tobacco dock, james burrows -
 Bendigo Historical Society Inc.
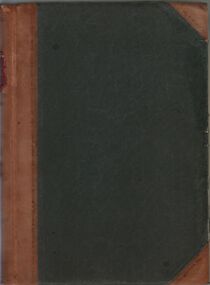
Document - HANRO COLLECTION: HANRO JOURNAL
Hanro Journal: The front has a solid front and back cover and is of a green material with a marble type pattern trimmed at the top and bottom right hand corners with light brown suede triangles. The curved spine of the book is also light brown suede and the binding extends to 4cm on to the cover. 5.5cm down from the top of the spine is a 4.9 x 3.3cm red sticker with gold trim top and bottom of three strips and flowers under and on top of the third strips. The sticker has a tear and dog ears at the bottom. In gold in the centre is the word JOURNAL. The back of the journal is the same as the front but has more wear noticeable at top left and a tear at the bottom. Inside the cover is a paper lining of blue and cream mottled background with red uneven swirl a cream cloth spine with cotton thread for attaching. When the Journal is closed the pages form a colourful pattern of red, yellow, blue and green. Inside the book is light blue paper, on the left top hand written in pencil is 11/-, underneath that is 20/-. Numbers 24100, 27236, 25951, 25844 and some dacomb shorthand further down the page. On the right hand side centre of the page is the heading, hand written in black ink which has been underlined in red is *Hanro (Aust) Bendigo Knitting Mills Pty Ltd May 13th 1926* Page 1 of the Journal :- The Journal is all hand written in black ink and ruled up in red pen. At the top headed *Journal*, underlined in red. The page is ruled up into ten columns of various sizes. First column is the date May 1926. The page lists the distribution of Ordinary and Deferred Shared and their amounts. Next is Expenditure, for the land and buildings and setting up of the business, plant and equipment and various assets acquired from Bendigo Knitting Mills Pty Ltd. At the back of the book is a Debit Note From *Hands chin & Ornis S.A. Liestal (Suisse) to *Hanro* (Aust.) Bendigo Knitting Mills Pty. Ltd. Dated 10th September 1932. Debit Note No. 319. *Our payment to Messrs. Jacky, Maeder & C0, Basle as per your letter of August 10th 1932. SFr. 37.70 pounds * Then hand written in pencil is *Charged ? 168*` Also at the back is a group of letters with a hand written note in pencil, on the front dated 20/01/33 attached with a metal clip and pin reads *Bad Debts to be written off* under that it lists the names, where they are from and the amount owning and the total. Box 116Bbendigo, industry, hanro journal., hanro. journal -
 Southern Sherbrooke Historical Society Inc.
Document - Helen Gibson obituary
-
 Federation University Historical Collection
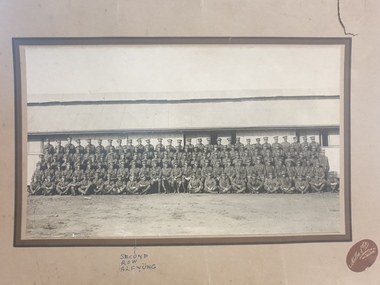
Photograph, Melba & Co, 7th Australian Infantry Training Battalion WW1
George Alfred Yung, known as Alf, pictured in the second row, 10th from the left, enlisted on 25/02/1916; embarked on 19/02/1917; was killed during the battle of Menin Gate at Yrpres, Belgium on 20/09/1917. https://www.awm.gov.au/collection/U51447 The 7th Battalion was among the first infantry units raised for the AIF during the First World War. Like the 5th, 6th and 8th Battalions, it was recruited from Victoria and, together with these battalions, formed the 2nd Brigade. The battalion was raised by Lieutenant Colonel H. E. "Pompey" Elliott within a fortnight of the declaration of war in August 1914 and embarked just two months later. After a brief stop in Albany, Western Australia, the battalion proceeded to Egypt, arriving on 2 December. It later took part in the ANZAC landing on 25 April 1915, as part of the second wave. Ten days after the landing, the 2nd Brigade was transferred from ANZAC to Cape Helles to help in the attack on the village of Krithia. The attack captured little ground but cost the brigade almost a third of its strength. The Victorian battalions returned to ANZAC to help defend the beachhead, and in August the 2nd Brigade fought at the battle of Lone Pine. While holding positions captured by the 1st Brigade, four members of the 7th Battalion, Corporal A. S. Burton, Acting Corporal W. Dunstan, Lieutenant W. Symons and Captain F. H. Tubb, earned the Victoria Cross - Burton posthumously. The battalion served at ANZAC until the evacuation in December. After the withdrawal from Gallipoli in December 1915, the battalion returned to Egypt. In March 1916, it sailed for France and the Western Front and entered the front line trenches for the first time on 3 May. The battalion's first major action in France was at Pozieres in the Somme valley where it fought between 23-27 July and 15-21 August. After Pozieres the battalion manned trenches in the Ypres salient in Belgium, before returning to the Somme valley. It saw out the horrendous winter of 1916-1917 rotating between training, working parties and duty in the trenches. In early 1917, the Germans withdrew to the Hindenburg Line and the 7th Battalion participated in the brief advance that followed and then came to a grinding halt before Bullecourt. The battalion was withdrawn from the front line for training on 9 May 1917 and did not return to action until the Ypres offensive of September and October. It fought major battles at Menin Road on 20 September and Broodseinde on 4 October, and then spent much of ensuing winter in the Ypres mud. In March and April 1918 the 7th helped stop the German spring offensive in northern France and later participated in the Allies' own great offensive of 1918, that began with the battle of Amiens on 8 August. The advance by British and empire troops on 8 August was the greatest success in a single day on the Western Front, one that German General Erich Ludendorff described as, "the black day of the German Army in this war". The battalion continued operations until late September 1918. At 11 am on 11 November 1918, the guns fell silent. The November armistice was followed by the peace treaty of Versailles signed on 28 June 1919. In November 1918 members of the AIF began to return to Australia for demobilisation and discharge. In March, the battalion was so reduced that it and the 6th Battalion were amalgamated to form a composite battalion. In turn, this battalion was merged with another, formed from the 5th and 8th Battalions, to form the 2nd Brigade Battalion. https://www.awm.gov.au/collection/U51447army, soldier, alf yung, 7th australian infantry battalion -
 Mission to Seafarers Victoria
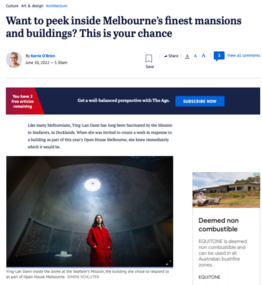
Article, Kerrie O'Brien, Want to peek inside Melbourne’s finest mansions and buildings? This is your chance, 30 June 2022
Open House 2022: "Like many Melburnians, Ying-Lan Dann has long been fascinated by the Mission to Seafarers, in Docklands. When she was invited to create a work in response to a building as part of this year’s Open House Melbourne, she knew immediately which it would be. Taking a peek behind the closed doors of some of Melbourne’s finest and most interesting buildings is a core premise of the weekend event, now in its 15th year. During that time, the program has grown from half a dozen buildings to a 200-plus strong list that extends to Ballarat and Bendigo. “[It’s] much more expansive and citizen-led,” says Fleur Watson, Open House Melbourne’s executive director. “As a public festival, it has always had a spirit of generosity, this gesture of opening up and allowing visitors to come and look and experience things.” Swinging open their doors at the end of the month will be some of the city’s finest mansions, including Villa Alba in Kew and Brighton’s Billilla, the Cairo flats in Fitzroy, the newly renovated Jewish Museum designed by Kerstin Thompson, the Melbourne Quakers Centre, the Albanian Mosque in Carlton North and many more. Considering how to approach the event this year, held remotely for the past two, Watson decided to explore beyond the traditional, with associate professor and director of curatorial practice at Monash University Tara McDowell. The two have co-curated an exhibition of works to run concurrently with the Open House program, called Take Hold of the Clouds. That’s where Dann’s work, Circular Temporalities, comes in, one of seven commissions around town in which local and international artists respond to chosen buildings or sites. A lecturer in interior design at RMIT as well as an artist, she is interested in time and finding different mediums to show things in flux and, having grown up on Phillip Island, she often uses water as a theme. When she started spending time at the Mission, Dann found there was an oculus at the top of the dome, known as the Norla Dome. She thought about how that small but significant opening related to where sailors spent so many months of the year, the sky being the only thing they would see much of the time, stars guiding the way in times gone by, and of the recent stories she’d heard about sailors being trapped at sea during COVID. Built in the Arts and Craft style between 1916 and 1919 and designed by architect Walter Butler, the Mission includes a chapel, clubroom, Chaplain’s house, a small cottage and the Norla Dome, which was apparently inspired by the Pantheon. The Mission was funded by the government and the Ladies Harbour Lights Guild, who Dann was also intrigued by. “One of the things those women identified is that life at sea is very dangerous [and they] wanted to give them a space of sanctuary and support,” she says, adding that for many years, the dome was used as a gymnasium. Her work inside the dome includes a 35-minute loop film, recorded from the ferry during the crossing from Queenscliff to Sorrento. The horizon takes up about a third of the shot and moves as the waves rise and fall, mirroring the journeys made by the sailors who found refuge at the mission over the years; it will be projected onto a gauze-like fabric, allowing glimpses of the building behind. Dann also plans to activate the site over the course of the weekend and will read a poem by Justin Clemens.The articles gives an insight of the création of the artwork by Ying-Lan Dann. digital copy of an article with photographs published in the Ageopen house melbourne, 2022, ying-lan dann, take hold of the clouds, norla dome, exhibition, the age, cultural events -
 Flagstaff Hill Maritime Museum and Village
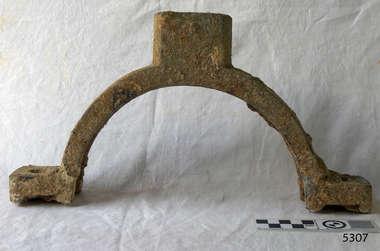
Bearing cap, (estimated); Before The Newfield completion in 1889
This bearing cap is thought to be from a donkey winch engine, (or steam donkey, or donkey winch), which is a small secondary steam engine with a cylindrical shaped boiler. In 19th century merchant sailing a steam donkey was often used in marine applications such as to help raise and lower larger sails, load and unload cargo or to power pumps. The bearing cap could have been used on the donkey engine to hold the rod of the winch gear wheel in place, or bolted to another bearing cap around the neck on the top of the boiler’s cylinder, connecting it to the flue. The Newfield was a three-masted iron and steel barque, built in Dundee, Scotland, in 1889 by Alexander Stephen and Sons. It was owned by the Newfield Ship Company in 1890 and later that year It was registered in Liverpool to owners Brownells and Co. The Newfield left Sharpness, Scotland, on 28th May 1892 with a crew of 25 under the command of Captain George Scott and on 1st June left Liverpool. She was bound for Brisbane, Australia, with a cargo of 1850 tons of fine rock salt, the main export product of Sharpness. At about 9pm on 28th August 1892, in heavy weather, Captain Scott sighted, between heavy squalls, the Cape Otway light on the mainland of Victoria but, due to a navigational error (the ship’s chronometers were wrong), he assumed it to be the Cape Wickham light on King Island, some 40 miles south. He altered his course to the north, expecting to enter Bass Strait. The ship was now heading straight for the south west Victorian coast. At about 1:30am the Newfield ran aground on a reef about 100 yards from shore and one mile east of Curdie’s Inlet, Peterborough. The ship struck heavily three times before grounding on an inner shoal with 6 feet of water in the holds. Rough sea made the job of launching lifeboats very difficult. The first two lifeboats launched by the crew were smashed against the side of the ship and some men were crushed or swept away. The third lifeboat brought eight men to shore. It capsized when the crew tried to return it to the ship for further rescue The rescue was a difficult operation. The Port Campbell Rocket Crew arrived and fired four rocket lines, none of which connected with the ship. Peter Carmody, a local man, volunteered to swim about one mile off shore to the ship with a line to guide the fourth and final lifeboat safely to shore. He was assisted by James McKenzie and Gerard Irvine. Seventeen men survived the shipwreck but the captain and eight of his crew perished. The Newfield remained upright on the reef with sails set for a considerable time as the wind slowly ripped the canvas to shreds and the sea battered the hull to pieces. The Marine Board inquiry found the wreck was caused by a "one man style of navigation" and that the Captain had not heeded the advice of his crew. According to Jack Loney ‘… when the drama was over . . the Newfield was deserted except for the Captain’s dog and two pigs.’ Peter Carmody was awarded the Bramley-Moore medal by the Liverpool Shipwreck and Humane Society for Saving Life at Ssea, which he received by mail on January 21st 1893. The medal and a letter of congratulations were donated to Flagstaff Hill Maritime Museum by Peter Carmody’s grand-daughter Norma Bracken and her son Stuart Bracken on 25th May 2006. The Bearing Cap joins other items in the Newfield collection.Flagstaff Hill’s collection of artefacts from the Newfield is significant for its association with the shipwreck Newfield, which is listed on the Victorian Heritage Registry. The collection is significant because of the relationship between the objects. The Newfield collection is archaeologically significant as the remains of an international cargo ship. The Newfield collection is historically significant for representing aspects of Victoria’s shipping history and its association with the shipwreck.Brass bearing cap from the wreck of the sailing ship “Newfield” is possibly from a donkey winch engine. The half-circle shaped cuff with a rectangular brass block attached to the outside of each end of the half-circle. Both blocks have a round hole in their centre and are approximately the same depth and width as the cuff. Midway around the half-circle cuff is another brass block that is about twice the depth of the cuff. It appears to have been a circular shape that has been modified to match the width of the collar, having had the sides of the circle cut off to leave straights edge parallel to the edges of the cuff. In the centre of this block is another hole, and there appears to be the head of a bolt inside this hole. The bearing cap is lightly encrusted.1893, flagstaff hill, flagstaff hill maritime museum, maritime museum, warrnambool, newfield, 1892, 28 august 1892, port campbell, shipwreck, nineteenth century, ship, curdie s river, victorian shipwrecks, barque, ship wreck, 29 august 1892, 19th century, bearing cap, donkey engine, donkey winch, steam donkey -
 Flagstaff Hill Maritime Museum and Village
Nail, circa 1810
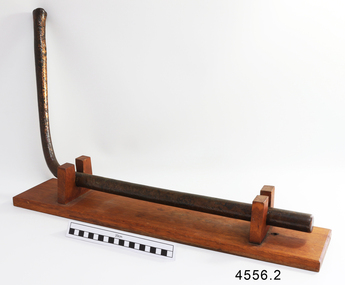
This copper nail, sometimes known as a ‘Dumpy Bolt’ or spike, was salvaged from the hull of the wreck of the “George III”. It dates back to at least 1810. It was found by an abalone diver on the south east coast of Tasmania. The nail would have been used to hold the layers of the ship’s keel frame and the planking together. The nail has been passed from the abalone diver to an interested business man on a trip to the south of Hobart, on again to the business man’s close friend who then donated it to Flagstaff Hill Maritime Village. The metal of nails such as this one, after being in the sea for a long time, become affected by the natural reaction of the sea water, causing it to degenerate and thin, and the stress from the force of the sea over the years alters its shape. Iron nails had been used on ships previously, but they quickly corroded in the salt; ships needed regular, costly and time-consuming maintenance to replace the iron nails. Towards the end of the 18th century the British Navy trialled the use of copper nails, finding them to be very successful. Merchant ships began to adopt this process in the early 19th century, although it made ship building very expensive and was more often used for ships such as the “George III” that sailed on long voyages. The three masted sailing ship “George III” was a convict transport ship built in Deptford, England, in 1810. On 14th December 1834 she left Woolwich, England, bound for Hobart Town, Van Diemen’s Land (Tasmania), under Captain William Hall Moxey. She was carrying 220 male convicts plus crew, guards and their families, totalling 294 persons (another 2 were during the voyage). Amongst the cargo were military stores including several copper drums of gun powder. On 27th January 1835 the “George III” was near the Equator, about half way into her journey. A fire broke out and the gun powder was in danger of explosion, threatening the whole ship. Two convicts braved the heat and smoke, entered the store and seized the gun powder drums, suffering burns for their efforts but saving a probable disaster. The fire destroyed some of the provisions and food was scarce. Many became ill with scurvy and some died during the journey. Nearing the end of their journey on 10th April 1835 the “George III” was headed through the D'Entrecasteaux Channel, south east Tasmania, between the mainland and Bruny Island. She was sailing in the moonlit night to hasten her arrival in port due to the great number of sick on board. She struck uncharted rocks, known only to the local whalers, between Actaeon Reef and Southport Lagoon and within hours began to break up. The ship’s boats were used to first rescue the women and children. Firearms were used to help quell the panic of the convicts below decks and some were killed by the shots. Many convicts, including the sick, were drowned. In all, 133 lives were lost including 5 of the crew, guards and their families. It was the third worst shipping disaster in Tasmanian waters. A monument in honour of the prisoners who perished in the “George III” has been erected, noting the date of the wreck as “Friday 10th April 1835.” (NOTE: there are a few differences between sources regarding dates of the shipwreck, some saying March and others April 1835. There are also differences in the figures of those on board and the number of lives lost.) The copper nail is significant as an example of sailing ship construction; fasteners used in the early 19th century on ships carrying convicts to Australia. The nail is also significant for its association with the ship “George III”. The “George III” is registered on the Australian National Shipwreck Database, ID 7195 as an Historic Shipwreck. She is the third worst shipwreck in Tasmanian waters. She is also associated with Early Australian History and the transportation of convicts to Australia. The incident of the fire on board and the bravery of the convicts in making the gun powder safe is an example of the social character of the people in early Tasmanian colonisation. Copper nail (also called a Dumpy bolt or spike) from the convict ship George III, wrecked in 1835. Nail is long, bent in an ‘L’ shape about 3/5ths along, tapering from both ends to the bend. Both ends are flat and do not taper to a point, nor have a thread. The shorter end has been polished, showing bright copper. There is pitting along the nail and virdigris is evident on the longer, unpolished end. The nail is displayed with the longer section resting on a wooden board between two ‘U’ shaped uprights, the shorter section upright. flagstaff hill, warrnambool, shipwrecked coast, flagstaff hill maritime museum, maritime museum, shipwreck coast, flagstaff hill maritime village, great ocean road, george iii, ship construction, ship nail, 1835 shipwreck, 19th century shipwreck, william moxey, d'entrecasteaux channel, convict transportation, copper nail, dumpy bolt, spike, keel nail -
 Flagstaff Hill Maritime Museum and Village
Equipment - Foundry Patterns set, Briggs Brass Foundry, Early 20th century
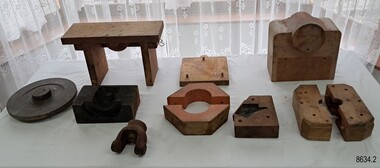
The wooden crate contains a set of patterns or moulds that were once used at Briggs’ Brass Foundry for making sand moulds. The traditional method of sand casting is over 2000 years old. It is part of a crafted process used to make brass and copper alloy goods suited to marine use; bells, boat hooks, cowls, propellers, handles, lids, rowlocks, hooks, letters, bolts, rail holders, brackets, deck plates, flanges, rudder guides, portholes and covers. Briggs’ Bronze is a copper-based alloy made from local ingots of copper, tin, zinc and lead in carefully measured quantities. The finished product is non-corrosive and can last indefinitely. The crate of patterns was donated by the Briggs family in the early years of Flagstaff Hill, along with other related items such as brassware, tools and machinery. The donated items were displayed in a simulated Brass Foundry in the Village. The items were on show from the completion of the building in 1986 until 1994 when the building was repurposed. The patterns represent the trades of foundering and metalwork, both supporting maritime industries such as shipwrights and boatbuilders. Farmers, manufacturers and other local industries also needed the castings made by foundries. The Brass Foundry display was one of the early ‘working craft’ shops at Flagstaff Hill. It included a historic Cornish chimney that was set up as a working model, telling the story of heat from furnaces to smelt metal, which would then be poured into the sand moulds. This chimney is made from specially curved bricks and is about two-thirds of its full height when originally located at the Grassmere Cheese factory. HISTORY of BRIGGS BRASS FOUNDRY: - The family business was founded in 1912 by Herbert Harrison Briggs (1963-1931) with his son George Edward Briggs, trading as Briggs & Son Foundry at 70 Wellington Street, Collingwood. Younger son Cyril Falkiner McKinnon Briggs joined the foundry in 1922, and it was renamed H H Briggs & Sons Foundry. Both sons ran the firm after Herbert’s death in 1931, making products mainly for marine purposes. They became Bell Founders in 1936 and were known for their specialty of high-quality ship bells. They produced miniature varieties of these and other decorative items such as small propellers. The firm became known as Briggs Marine Foundry. The great-granddaughter of Herbert Briggs inherited the Briggs Brass Bell, similar to the one at Flagstaff Hill. Cyril became the sole family member of the firm in 1965. The Briggs Marine was an exhibitor at the 1965 Boat Show, where he advertised as “non-ferrous founders” and “Bell Specialists”. The foundry relocated to Chesterville Rd, Moorabbin. Cyril passed away in 1967. It is thought that either Cyril or his business partner Frank Lee donated the objects from the Briggs’ Foundry around the time when the business moved to Moorabbin. However, Flagstaff Hill hadn’t been thought about until 1972. The donated items were registered in the Collection in 1986 but they could have been in storage from an earlier date. In October of that same year, Briggs Marine restored Schomberg Bell, a shipwreck artefact from the collection at Flagstaff Hill. Peter Oram, who had worked for the previous owners of Briggs Marine as a fitter and turner, took over the firm in 2014, reviving some of the old casts for current use. The business is now located at Seaford in Victoria and is part of Alliance Casting & Engineering Solutions (Alliance Casting Pty Ltd). In 2016 the original Collingwood Foundry building was repurposed as a thriving business hub named The Foundry. The crate and its patterns are significant for their association with brass foundries locally and generally in coastal areas of Victoria. Marine industries such as ship and boat building rely on good quality castings for their machinery, equipment and fittings. The patterns are associated with the long-running firm, Briggs Brass Foundry, that specialised in cast goods for the marine industry, ready to supply the needs for once-off or mass-produced items. Their products would have been fitted to sail and steam vessels along coastal Victoria including Warrnambool. Briggs Marine is also associated with the Schomberg Bell in Flagstaff Hill, restoring the bell to is former state to show an example of the bell from a luxury mid-19th century vessel. The craft of sand-casting from carved wooden patterns to create metal is an example of skills from the past that are still used today. Wooden rectangular crate with removable wooden lid. Inside is a set of wooden patterns of various shapes and sizes for making sand moulds in a metal foundry. The crate is made from thick wooden planks nailed together. The extended wooden struts on the long sides form a frame to hold the wooden lid. A pair of metal handles are at each short end of the crate, fixed with strong metal bolds. Between each pair of handles is an inscription stamped into the wood. The underside of the crate has red paint splashes. There are insect holes in the wood but no sign of current infestation. Stamped: "H.33 / II" (H may be N or a square B)flagstaff hill maritime museum and village, great ocean road, shipwreck coast, pattern, mould, foundry, brass foundry, metal foundry, crate, box, wooden container, briggs, traditional method, trade, sand cast, cast, brass alloy, copper alloy, marine equipment, marine tools, marine fittings, briggs' bronze, copper tin zinc lead, non-corrosive, briggs family, brassware, metalware, foundering, metalwork, maritime, casting, cornish chimney, curved bricks, grassmere cheese factory, 1912, herbert harrison briggs, h h briggs, george edward briggs, briggs & son foundry, collingwood, cyril falkiner mckinnon briggs, cyril briggs, h h briggs & sons foundry, bell founders, schomberg bell, alliance casting & engineering solutions, collingwood foundry, ship chandlers, marine products, flagstaff hill, warrnambool, maritime museum, maritime village, briggs & son brass foundry, briggs marine, moorabbin -
 Flagstaff Hill Maritime Museum and Village
Decorative object - Sword, 1871 or earlier
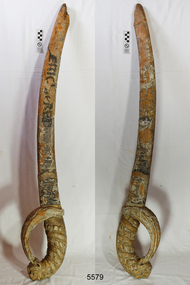
This wooden sword is said to “possibly be the only remaining part of the figurehead from the sailing ship Eric the Red.” It was previously part of the collection of the old Warrnambool Museum and the entry in its inventory says “Wooden sword, portion of the figurehead, held by “Eric the Red” at the bow.” A large part of the ship’s hull was found on the rocks and a figurehead may have been attached or washed up on the shore. The shipping records for E. & A. Sewall, the builders, owners and managers of Eric the Red, are now preserved in the Maine Maritime Museum. There is no photograph on record of Eric the Red but photographs of other ships built around that time by the same company show that these did not have figureheads, and there is no record found of a figurehead for Eric the Red being ordered or paid for. Further research is being carried out. The ship building company E. & A. Sewall, from Bath, Maine, USA, built Eric the Red, a wooden, three masted clipper ship. She had 1,580 tons register and was the largest full-rigged ship built at Bath, Maine, USA in 1871. She was built and registered by Arthur Sewall, later to become the partnership E. & A. Sewall, and was the 51st ship built by this company. The annually-published List of Merchant Vessels of the U.S. shows that Bath was still the home port of Eric the Red in 1880. The vessel was named after the Viking discoverer, Eric the Red, who was the first European to reach the shores of North America (in 980AD). The ship Eric the Red at first traded in coal between America and Britain, and later traded in guano nitrates from South America. In 1879 she was re-metalled and was in first class condition. On 10th June 1880 (some records say 12th June) Eric the Red departed New York for Melbourne and then Sydney. She had been commissioned by American trade representatives to carry a special cargo of 500 exhibits (1400 tons) - about a quarter to a third of America’s total exhibits - from America for the U.S.A. pavilion at Melbourne’s first International Exhibition. The exhibits included furniture, ironmongery, wines, chemicals, dental and surgical instruments, paper, cages, bronze lamp trimmings, axles, stamped ware, astronomical and time globes, samples of corn and the choicest of leaf tobacco. Other general cargo included merchandise such as cases of kerosene and turpentine, brooms, Bristol's Sarsaparilla, Wheeler and Wilson sewing machines, Wheeler’s thresher machine, axe handles and tools, cases of silver plate, toys, pianos and organs, carriages and Yankee notions. The Eric the Red left New York under the command of Captain Z. Allen (or some records say Captain Jacques Allen) and 24 other crew including the owner’s son third mate Ned Sewall. There were 2 saloon passengers also. On 4th September 1880 the ship had been sailing for an uneventful 85 days and the voyage was almost at its end. Eric the Red approached Cape Otway in a moderate north-west wind and hazy and overcast atmosphere. Around 1:30am Captain Allen sighted the Cape Otway light and was keeping the ship 5-6 miles offshore to stay clear of the hazardous Otway Reef. However he had badly misjudged his position. The ship hit the Otway Reef about 2 miles out to sea, south west of the Cape Otway light station. Captain Allen ordered the wheel to be put ‘hard up’ thinking that she might float off the reef. A heavy sea knocked the man away from the wheel, broke the wheel ropes and carried away the rudder. The sea swamped the lifeboats, the mizzenmast fell, with all of its rigging, then the mainmast fell and the ship broke in two. Some said that the passenger Vaughan, who was travelling for his health and not very strong, was washed overboard and never seen again. The ship started breaking up. The forward house came adrift with three of the crew on it as well as a longboat, which the men succeeded in launching and keeping afloat by continually bailing with their sea boots. The captain, the third mate (the owner’s son) and others clung to the mizzenmast in the sea. Then the owner’s son was washed away off the mast. Within 10 minutes the rest of the ship was in pieces, completely wrecked, with cargo and wreckage floating in the sea. The captain encouraged the second mate to swim with him to the deckhouse where there were other crew but the second mate wouldn’t go with him. Eventually the Captain made it to the deckhouse and the men pulled him up. At about 4:30am the group of men on the deckhouse saw the lights of a steamer and called for help. At the same time they noticed the second mate and the other man had drifted nearby, still on the spur, and pulled them both onto the wreck. The coastal steamer Dawn was returning to Warrnambool from Melbourne, its sailing time different to its usual schedule. Cries were heard coming from out of the darkness. Captain Jones sent out two life boats, and fired off rockets and blue lights to illuminate the area. They picked up the three survivors who were in the long boat from Eric the Red. Two men were picked up out of the water, one being the owner’s son who was clinging to floating kerosene boxes. At daylight the Dawn then rescued the 18 men from the floating portion of the deckhouse, which had drifted about 4 miles from where they’d struck the reef. Shortly after the rescue the deckhouse drifted onto breakers and was thrown onto rocks at Point Franklin, about 2 miles east of Cape Otway. Captain Jones had signalled to Cape Otway lighthouse the number of the Eric the Red and later signalled that there was a wreck at Otway Reef but there was no response from the lighthouse. The captain and crew of the Dawn spent several more hours searching unsuccessfully for more survivors, even going back as far as Apollo Bay. On board the Dawn the exhausted men received care and attention to their needs and wants, including much needed clothing. Captain Allen was amongst the 23 battered and injured men who were rescued and later taken to Warrnambool for care. Warrnambool’s mayor and town clerk offered them all hospitality, the three badly injured men going to the hospital and others to the Olive Branch Hotel, then on to Melbourne. Captain Allen’s leg injury prevented him from going ashore so he and three other men travelled on the Dawn to Portland. They were met by the mayor who also treated them all with great kindness. Captain Allen took the train back to Melbourne then returned to America. Those saved were Captain Z. Allen (or Jacques Allen), J. Darcy chief mate, James F. Lawrence second mate, Ned Sewall third mate and owner’s son, John French the cook, C. Nelson sail maker, Clarence W. New passenger, and the able seamen Dickenson, J. Black, Denis White, C. Herbert, C. Thompson, A. Brooks, D. Wilson, J. Ellis, Q. Thompson, C. Newman, W. Paul, J. Davis, M. Horenleng, J. Ogduff, T. W. Drew, R. Richardson. Four men had lost their lives; three of them were crew (Gus Dahlgreen ship’s carpenter, H. Ackman steward, who drowned in his cabin, and George Silver seaman) and one a passenger (J. B. Vaughan). The body of one of them had been found washed up at Cape Otway and was later buried in the lighthouse cemetery; another body was seen on an inaccessible ledge. Twelve months later the second mate James F. Lawrence, from Nova Scotia, passed away in the Warrnambool district; an obituary was displayed in the local paper. The captain and crew of the Dawn were recognised by the United States Government in July 1881 for their humane efforts and bravery, being thanked and presented with substantial monetary rewards, medals and gifts. Neither the ship, nor its cargo, was insured. The ship was worth about £15,000 and the cargo was reportedly worth £40,000; only about £2,000 worth had been recovered. Cargo and wreckage washed up at Apollo Bay, Peterborough, Port Campbell, Western Port and according to some reports, even as far away as the beaches of New Zealand. The day after the wreck the government steam ship Pharos was sent from Queenscliff to clear the shipping lanes of debris that could be a danger to ships. The large midship deckhouse of the ship was found floating in a calm sea near Henty Reef. Items such as an American chair, a ladder and a nest of boxes were all on top of the deckhouse. As it was so large and could cause danger to passing ships, Captain Payne had the deckhouse towed towards the shore just beyond Apollo Bay. Between Apollo Bay and Blanket Bay the captain and crew of Pharos collected Wheeler and Wilson sewing machines, nests of boxes, bottles of Bristol’s sarsaparilla, pieces of common American chairs, axe handles, a Wheelers’ Patent thresher and a sailor’s trunk with the words “A. James” on the front. A ship’s flag-board bearing the words “Eric the Red” was found on the deckhouse; finally those on board the Pharos had the name of the wrecked vessel. During this operation Pharos came across the government steamer Victoria and also a steamer S.S. Otway, both of which were picking up flotsam and wreckage. A whole side of the hull and three large pieces of the other side of the hull, with some of the copper sheathing stripped off, had floated on to Point Franklin. Some of the vessels yards and portions of her masts were on shore. The pieces of canvas attached to the yards and masts confirmed that the vessel had been under sail. The beach there was piled with debris several feet high. There were many cases of Diamond Oil kerosene, labelled R. W. Cameron and Company, New York. There were also many large planks of red pine, portions of a small white boat and a large, well-used oar. Other items found ashore included sewing machines (some consigned to ‘Long and Co.”) and notions, axe and scythe handles, hay forks, wooden pegs, rolls of wire (some branded “T.S” and Co, Melbourne”), kegs of nails branded “A.T. and Co.” from the factory of A. Field and Son, Taunton, Massachusetts, croquet balls and mallets, buggy fittings, rat traps, perfumery, cutlery and Douay Bibles, clocks, bicycles, chairs, a fly wheel, a cooking stove, timber, boxes, pianos, organs and a ladder. (Wooden clothes pegs drifted in for many years). There seemed to be no personal luggage or clothing. The Pharos encountered a long line, about one and a half miles, of floating wreckage about 10 miles off land, south east of Cape Otway, and in some places about 40 feet wide. It seemed that more than half of it was from Eric the Red. The ship’s crew rescued 3 cases that were for the Melbourne Exhibition and other items from amongst the debris. There were also chairs, doors, musical instruments, washing boards, nests of trunks and fly catchers floating in the sea. Most of the goods were saturated and smelt of kerosene. A section of the hull lies buried in the sand at Parker River Beach. An anchor with chain is embedded in the rocks east of Point Franklin and a second anchor, thought to be from Eric the Red, is on display at the Cape Otway light station. (There is a photograph of a life belt on the verandah of Rivernook Guest House in Princetown with the words “ERIC THE RED / BOSTON”. This is rather a mystery as the ship was registered in Bath, Maine, USA.) Parts of the ship are on display at Bimbi Park Caravan Park and at Apollo Bay Museum. Flagstaff Hill Maritime Village also has part of the helm (steering wheel), a carved wooden sword (said to be the only remaining portion of the ship’s figurehead; further research is currently being carried out), a door, a metal rod, samples of wood and a medal for bravery. Much of the wreckage was recovered by the local residents before police and other authorities arrived at the scene. Looters went to great effort to salvage goods, being lowered down the high cliff faces to areas with little or no beach to collect items from the wreckage, their mates above watching out for dangerous waves. A Tasmanian newspaper reports on a court case in Stawell, Victoria, noting a man who was caught 2 months later selling tobacco from the wreckage of Eric the Red. Some of the silverware is still treasured by descendants of Mr Mackenzie who was given these items by officials for his help in securing the cargo. The gifts included silver coffee and tea pots, half a dozen silver serviette rings and two sewing machines. The wreck and cargo were sold to a Melbourne man who salvaged a quantity of high quality tobacco and dental and surgical instruments. Timbers from the ship were salvaged and used in the construction of houses and sheds around Apollo Bay, including a guest house, Milford House (since burnt down in bushfires), which had furniture, fittings and timber on the dining room floor from the ship. A 39.7 foot long trading ketch, the Apollo, was also built from its timbers by Mr Burgess in 1883 and subsequently used in Tasmanian waters. It was the first attempt at ship building in Apollo bay. In 1881 a red light was installed about 300 feet above sea level at the base of the Cape Otway lighthouse to warn ships when they were too close to shore; It would not be visible unless a ship came within 3 miles from it. This has proved to be an effective warning. The State Library of Victoria has a lithograph in its collection depicting the steamer Dawn and the shipwrecked men, titled. "Wreck of the ship Eric the Red, Cape Otway: rescue of the crew by the Dawn".The Eric the Red is historically significant as one of Victoria's major 19th century shipwrecks. (Heritage Victoria Eric the Red; HV ID 239) The wreck led to the provision of an additional warning light placed below the Cape Otway lighthouse to alert mariners to the location of Otway Reef. The site is archaeologically significant for its remains of a large and varied cargo and ship's fittings being scattered over a wide area. The site is recreationally and aesthetically significant as it is one of the few sites along this coast where tourists can visit identifiable remains of a large wooden shipwreck, and for its location set against the background of Cape Otway, Bass Strait, and the Cape Otway lighthouse. (Victorian Heritage Database Registration Number S239, Official Number 8745 USA)This carved wooden sword, recovered from the Eric the Red, is possibly the only portion of the figurehead recovered after the wreck. There are spirals carved from the base of the handle to the top of the sword. The hilt of the sword is a lion’s head holding its tail in its mouth, the tail forming the handle. The blade of the sword has engraved patterns on it. Tiny particles of gold leaf and dark blue paint fragments can be seen between the carving marks. There are remnants of yellowish-orange and crimson paint on the handle. At some time after the sword was salvaged the name of the ship was hand painted on the blade in black paint. The tip of the sword has broken or split and the remaining part is charcoal in appearance. On both the tip and the base of the handle are parts made where the sword could have been joined onto the figurehead There is a white coating over some areas of the sword, similar to white lead putty used in traditional shipbuilding. The words “ERIC the RED” have been hand painted on the blade of the sword in black paint sometime after it was salvaged.flagstaff hill, flagstaff hill maritime museum and village, warrnambool, maritime museum, maritime village, great ocean road, shipwreck coast, sword, wooden sword, eric the red, carved sword, figurehead, snake head on sword -
 Flagstaff Hill Maritime Museum and Village
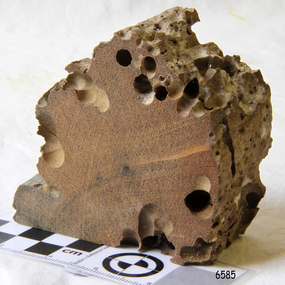
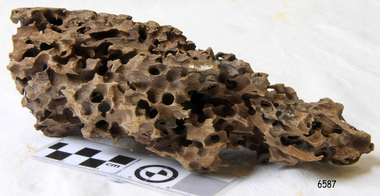
Wood Sample, about 1871
This piece of timber from the ship Eric the Red has been eaten through by the marine animals called Teredo Worms, sometimes called sea worms or ‘termites of the sea’. The worms bore holes into wood that is immersed in sea water and bacteria inside the worms digest the wood. Shipbuilders tried to prevent this problem by using coatings of tar, wax, lead or pitch. In the 18th and 19th centuries the outside of their ships were sheathed in copper or a combination of copper and zinc (called Muntz metal) and would be re-metalled periodically to ensure the sheathing would remain effective. In more recent times the ships are protected with a toxic coating. The American ship Eric the Red was a wooden, three masted clipper ship. She had 1,580 tons register and was the largest full-rigged ship built at Bath, Maine, USA in 1871. She was built and registered by Arthur Sewall, later to become the partnership E. & A. Sewall, the 51st ship built by this company. The annually-published List of Merchant Vessels of the U.S. shows Bath was still the home port of Eric the Red in 1880. The vessel was named after the Viking discoverer, Eric ‘the Red-haired’ Thorvaldsson , who was the first European to reach the shores of North America (in 980AD). The ship Eric the Red at first traded in coal between America and Britain, and later traded in guano nitrates from South America. In 1879 she was re-metalled and was in first class condition. On 10th June 1880 (some records say 12th June) Eric the Red departed New York for Melbourne and then Sydney. She had been commissioned by American trade representatives to carry a special cargo of 500 exhibits (1400 tons) – about a quarter to a third of America’s total exhibits - for the U.S.A. pavilion at Melbourne’s first International Exhibition. The exhibits included furniture, ironmongery, wines, chemicals, dental and surgical instruments, paper, cages, bronze lamp trimmings, axles, stamped ware, astronomical and time globes, samples of corn and the choicest of leaf tobacco. Other general cargo included merchandise such as cases of kerosene and turpentine, brooms, Bristol's Sarsaparilla, Wheeler and Wilson sewing machines, Wheeler’s thresher machine, axe handles and tools, cases of silver plate, toys, pianos and organs, carriages and Yankee notions. The Eric the Red left New York under the command of Captain Zaccheus Allen (or some records say Captain Jacques Allen) and 24 other crew including the owner’s son third mate Ned Sewall. There were also 2 saloon passengers on board. The ship had been sailing for an uneventful 85 days and the voyage was almost at its end. As Eric the Red approached Cape Otway there was a moderate north-west wind and hazy and overcast atmosphere. On 4th September 1880 at about 1:30am Captain Allen sighted the Cape Otway light and was keeping the ship 5-6 miles offshore to stay clear of the hazardous Otway Reef. However he had badly misjudged his position. The ship hit the Otway Reef about 2 miles out to sea, south west of the Cape Otway light station. Captain Allen ordered the wheel to be put ‘hard up’ thinking that she might float off the reef. The sea knocked the helmsman away from the wheel, broke the wheel ropes and carried away the rudder. The lifeboats were swamped, the mizzenmast fell, with all of its rigging, then the mainmast also fell and the ship broke in two. Some said that the passenger Vaughan, who was travelling for his health and not very strong, was washed overboard and never seen again. The ship started breaking up. The forward house came adrift with three of the crew on it as well as a longboat, which the men succeeded in launching and keeping afloat by continually bailing with their sea boots. The captain, the third mate (the owner’s son) and others clung to the mizzenmast in the sea. Then the owner’s son was washed away off the mast. Within 10 minutes the rest of the ship was in pieces, completely wrecked, with cargo and wreckage floating in the sea. The captain encouraged the second mate to swim with him to the deckhouse where there were other crew but the second mate wouldn’t go with him. Eventually the Captain made it to the deckhouse and the men pulled him up. At about 4:30am the group of men on the deckhouse saw the lights of a steamer and called for help. At the same time they noticed the second mate and the other man had drifted nearby, still on the spur, and pulled them both onto the wreck. The coastal steamer SS Dawn was returning to Warrnambool from Melbourne, its sailing time different to its usual schedule. She was built in 1876 and bought by the Portland and Belfast Steam Navigation Co. in 1877. At the time of this journey she was commanded by Captain Jones, and was sailing between Melbourne and Portland via Warrnambool. The provedore of the Dawn, Benjamin Lear, heard cries of distress coming through the portholes of the saloon. He gave the alarm and the engines were stopped. Cries could be heard clearly, coming from the land. Captain Jones sent out crew in two boats, and fired off rockets and blue lights to illuminate the area. They picked up the three survivors who were in the long boat from Eric the Red. Two men were picked up out of the water, one being the owner’s son who was clinging to floating kerosene boxes. At daylight the Dawn then rescued the 18 men from the floating portion of the deckhouse, which had drifted about 4 miles from where they’d struck the reef. Shortly after the rescue the deckhouse drifted onto breakers and was thrown onto rocks at Point Franklin, about 2 miles east of Cape Otway. Captain Jones had signalled to Cape Otway lighthouse the number of the Eric the Red and later signalled that there was a wreck at Otway Reef but there was no response from the lighthouse. The captain and crew of the Dawn spent several more hours searching unsuccessfully for more survivors, even going back as far as Apollo Bay. On board the Dawn the exhausted men received care and attention to their needs and wants, including much needed clothing. Captain Allen was amongst the 23 battered and injured men who were rescued and later taken to Warrnambool for care. Warrnambool’s mayor and town clerk offered them all hospitality, the three badly injured men going to the hospital for care and others to the Olive Branch Hotel, then on to Melbourne. Captain Allen’s leg injury prevented him from going ashore so he and three other men travelled on the Dawn to Portland. They were met by the mayor who also treated them all with great kindness. Captain Allen took the train back to Melbourne then returned to America. Those saved were Captain Zaccheus Allen (or Jacques Allen), J. Darcy chief mate, James F. Lawrence second mate, Ned Sewall third mate and owner’s son, John French the cook, C. Nelson sail maker, Clarence W. New passenger, and the able seamen Dickenson, J. Black, Denis White, C. Herbert, C. Thompson, A. Brooks, D. Wilson, J. Ellis, Q. Thompson, C. Newman, W. Paul, J. Davis, M. Horenleng, J. Ogduff, T. W. Drew, R. Richardson. Four men had lost their lives; three of them were crew (Gus Dahlgreen ship’s carpenter, H. Ackman steward, who drowned in his cabin, and George Silver seaman) and one a passenger (J. B. Vaughan). The body of one of them had been found washed up at Cape Otway and was later buried in the lighthouse cemetery; another body was seen on an inaccessible ledge. Twelve months later the second mate James F. Lawrence, from Nova Scotia, passed away in the Warrnambool district; an obituary was displayed in the local paper. Neither the ship, nor its cargo, was insured. The ship was worth about £15,000 and the cargo was reportedly worth £40,000; only about £2,000 worth had been recovered. Cargo and wreckage washed up at Apollo Bay, Peterborough, Port Campbell, Western Port and according to some reports, even as far away as the beaches of New Zealand. The day after the wreck the government steam ship Pharos was sent from Queenscliff to clear the shipping lanes of debris that could be a danger to ships. The large midship deckhouse of the ship was found floating in a calm sea near Henty Reef. Items such as an American chair, a ladder and a nest of boxes were all on top of the deckhouse. As it was so large and could cause danger to passing ships, Captain Payne had the deckhouse towed towards the shore just beyond Apollo Bay. Between Apollo Bay and Blanket Bay the captain and crew of Pharos collected Wheeler and Wilson sewing machines, nests of boxes, bottles of Bristol’s sarsaparilla, pieces of common American chairs, axe handles, a Wheelers’ Patent thresher and a sailor’s trunk with the words “A. James” on the front. A ship’s flag-board bearing the words “Eric the Red” was found on the deckhouse; finally those on board the Pharos had the name of the wrecked vessel. During this operation Pharos came across the government steamer Victoria and also a steamer S.S. Otway, both of which were picking up flotsam and wreckage. A whole side of the hull and three large pieces of the other side of the hull, with some of the copper sheathing stripped off, had floated on to Point Franklin. Some of the vessels yards and portions of her masts were on shore. The pieces of canvas attached to the yards and masts confirmed that the vessel had been under sail. The beach there was piled with debris several feet high. There were many cases of Diamond Oil kerosene, labelled R. W. Cameron and Company, New York. There were also many large planks of red pine, portions of a small white boat and a large, well-used oar. Other items found ashore included sewing machines (some consigned to ‘Long and Co.”) and notions, axe and scythe handles, hay forks, wooden pegs, rolls of wire (some branded “T.S” and Co, Melbourne”), kegs of nails branded “A.T. and Co.” from the factory of A. Field and Son, Taunton, Massachusetts, croquet balls and mallets, buggy fittings, rat traps, perfumery, cutlery and Douay Bibles, clocks, bicycles, chairs, a fly wheel, a cooking stove, timber, boxes, pianos, organs and a ladder. (Wooden clothes pegs drifted in for many years). There seemed to be no personal luggage or clothing. The Pharos encountered a long line, about one and a half miles, of floating wreckage about 10 miles off land, south east of Cape Otway, and in some places about 40 feet wide. It seemed that more than half of it was from Eric the Red. The ship’s crew rescued 3 cases that were for the Melbourne Exhibition and other items from amongst the debris. There were also chairs, doors, musical instruments, washing boards, nests of trunks and fly catchers floating in the sea. Most of the goods were saturated and smelt of kerosene. A section of the hull lies buried in the sand at Parker River Beach. An anchor with chain is embedded in the rocks east of Point Franklin and a second anchor, thought to be from Eric the Red, is on display at the Cape Otway light station. (There is a photograph of a life belt on the verandah of Rivernook Guest House in Princetown with the words “ERIC THE RED / BOSTON”. This is rather a mystery as the ship was registered in Bath, Maine, USA.) Parts of the ship are on display at Bimbi Park Caravan Park and at Apollo Bay Museum. Flagstaff Hill Maritime Village also has part of the helm (steering wheel), a carved wooden sword (said to be the only remaining portion of the ship’s figurehead; further research is currently being carried out), a door, a metal rod, several samples of wood and a medal for bravery, awarded to Nelson Johnson, a crew member of the S.S. Dawn by the U.S. President, for the rescue of the crew. Much of the wreckage was recovered by the local residents before police and other authorities arrived at the scene. Looters went to great effort to salvage goods, being lowered down the high cliff faces to areas with little or no beach to collect items from the wreckage, their mates above watching out for dangerous waves. A Tasmanian newspaper reports on a court case in Stawell, Victoria, noting a man who was caught 2 months later selling tobacco from the wreckage of Eric the Red. Some of the silverware is still treasured by descendants of Mr Mackenzie who was given these items by officials for his help in securing the cargo. The gifts included silver coffee and tea pots, half a dozen silver serviette rings and two sewing machines. A Mr G.W. Black has in his possession a medal and a purse that were awarded to his father, another Dawn crew member who was part of the rescue team. The medal is inscribed and named “To John Black ….” (from “Shipwrecks” by Margaret E. Mackenzie, 3rd edition, published 1964). The wreck and cargo were sold to a Melbourne man who salvaged a quantity of high quality tobacco and dental and surgical instruments. Timbers from the ship were salvaged and used in the construction of houses and sheds around Apollo Bay, including a guest house, Milford House (since burnt down in bushfires), which had furniture, fittings and timber on the dining room floor from the ship. A 39.7 foot long trading ketch, the Apollo, was also built from its timbers by Mr Burgess in 1883 and subsequently used in Tasmanian waters. It was the first attempt at ship building in Apollo bay. In 1881 a red light was installed about 300 feet above sea level at the base of the Cape Otway lighthouse to warn ships when they were too close to shore; It would not be visible unless a ship came within 3 miles from it. This has proved to be an effective warning. Nelson Johnson, recipient of the medal for bravery, married Elizabeth Howard in 1881 and they had 10 children. They lived in South Melbourne, Victoria. Nelson died in 1922 in Fitzroy Victoria, age 66. In 1895 the owners of the S.S. Dawn, the Portland and Belfast Steam Navigation Co., wound up and sold out to the Belfast Company who took over the Dawn for one year before selling her to Howard Smith. She was condemned and sunk in Suva in 1928. The State Library of Victoria has a lithograph in its collection depicting the steamer Dawn and the shipwrecked men, titled. "Wreck of the ship Eric the Red, Cape Otway: rescue of the crew by the Dawn".The wood (timber) sample is listed on the Collections Australia Database, Heritage Victoria, number 239 00010 A “The Eric the Red is historically significant as one of Victoria's major 19th century shipwrecks. (Heritage Victoria Eric the Red; HV ID 239) The wreck led to the provision of an additional warning light placed below the Cape Otway lighthouse to alert mariners to the location of Otway Reef. The site is archaeologically significant for its remains of a large and varied cargo and ship's fittings being scattered over a wide area. The site is recreationally and aesthetically significant as it is one of the few sites along this coast where tourists can visit identifiable remains of a large wooden shipwreck, and for its location set against the background of Cape Otway, Bass Strait, and the Cape Otway lighthouse.“ (Victorian Heritage Database Registration Number S239, Official Number 8745 USA) Wood sample from the wreck of the ship Eric the Red. Triangular shaped, full of sea worm (Teredo worm) holes. The wood is dark in colour and is very light in weight.flagstaff hill, warrnambool, shipwrecked-coast, flagstaff-hill, flagstaff-hill-maritime-museum, maritime-museum, shipwreck-coast, flagstaff-hill-maritime-village, shipwreck-artefact, eric-the-red, zaccheus-allen, sewall, 1880, melbourne-exhibition, cape-otway, otway-reef, wood-sample, s.s.-dawn -
 Flagstaff Hill Maritime Museum and Village
Wood Sample, About 1871
This piece of timber from the ship Eric the Red has been eaten through by the marine animals called Teredo Worms, sometimes called sea worms or ‘termites of the sea’. The worms bore holes into wood that is immersed in sea water and bacteria inside the worms digest the wood. Shipbuilders tried to prevent this problem by using coatings of tar, wax, lead or pitch. In the 18th and 19th centuries the outside of their ships were sheathed in copper or a combination of copper and zinc (called Muntz metal) and would be re-metalled periodically to ensure the sheathing would remain effective. In more recent times the ships are protected with a toxic coating. The American ship Eric the Red was a wooden, three masted clipper ship. She had 1,580 tons register and was the largest full-rigged ship built at Bath, Maine, USA in 1871. She was built and registered by Arthur Sewall, later to become the partnership E. & A. Sewall, the 51st ship built by this company. The annually-published List of Merchant Vessels of the U.S. shows Bath was still the home port of Eric the Red in 1880. The vessel was named after the Viking discoverer, Eric ‘the Red-haired’ Thorvaldsson , who was the first European to reach the shores of North America (in 980AD). The ship Eric the Red at first traded in coal between America and Britain, and later traded in guano nitrates from South America. In 1879 she was re-metalled and was in first class condition. On 10th June 1880 (some records say 12th June) Eric the Red departed New York for Melbourne and then Sydney. She had been commissioned by American trade representatives to carry a special cargo of 500 exhibits (1400 tons) – about a quarter to a third of America’s total exhibits - for the U.S.A. pavilion at Melbourne’s first International Exhibition. The exhibits included furniture, ironmongery, wines, chemicals, dental and surgical instruments, paper, cages, bronze lamp trimmings, axles, stamped ware, astronomical and time globes, samples of corn and the choicest of leaf tobacco. Other general cargo included merchandise such as cases of kerosene and turpentine, brooms, Bristol's Sarsaparilla, Wheeler and Wilson sewing machines, Wheeler’s thresher machine, axe handles and tools, cases of silver plate, toys, pianos and organs, carriages and Yankee notions. The Eric the Red left New York under the command of Captain Zaccheus Allen (or some records say Captain Jacques Allen) and 24 other crew including the owner’s son third mate Ned Sewall. There were also 2 saloon passengers on board. The ship had been sailing for an uneventful 85 days and the voyage was almost at its end. As Eric the Red approached Cape Otway there was a moderate north-west wind and hazy and overcast atmosphere. On 4th September 1880 at about 1:30am Captain Allen sighted the Cape Otway light and was keeping the ship 5-6 miles offshore to stay clear of the hazardous Otway Reef. However he had badly misjudged his position. The ship hit the Otway Reef about 2 miles out to sea, south west of the Cape Otway light station. Captain Allen ordered the wheel to be put ‘hard up’ thinking that she might float off the reef. The sea knocked the helmsman away from the wheel, broke the wheel ropes and carried away the rudder. The lifeboats were swamped, the mizzenmast fell, with all of its rigging, then the mainmast also fell and the ship broke in two. Some said that the passenger Vaughan, who was travelling for his health and not very strong, was washed overboard and never seen again. The ship started breaking up. The forward house came adrift with three of the crew on it as well as a longboat, which the men succeeded in launching and keeping afloat by continually bailing with their sea boots. The captain, the third mate (the owner’s son) and others clung to the mizzenmast in the sea. Then the owner’s son was washed away off the mast. Within 10 minutes the rest of the ship was in pieces, completely wrecked, with cargo and wreckage floating in the sea. The captain encouraged the second mate to swim with him to the deckhouse where there were other crew but the second mate wouldn’t go with him. Eventually the Captain made it to the deckhouse and the men pulled him up. At about 4:30am the group of men on the deckhouse saw the lights of a steamer and called for help. At the same time they noticed the second mate and the other man had drifted nearby, still on the spur, and pulled them both onto the wreck. The coastal steamer SS Dawn was returning to Warrnambool from Melbourne, its sailing time different to its usual schedule. She was built in 1876 and bought by the Portland and Belfast Steam Navigation Co. in 1877. At the time of this journey she was commanded by Captain Jones, and was sailing between Melbourne and Portland via Warrnambool. The provedore of the Dawn, Benjamin Lear, heard cries of distress coming through the portholes of the saloon. He gave the alarm and the engines were stopped. Cries could be heard clearly, coming from the land. Captain Jones sent out crew in two boats, and fired off rockets and blue lights to illuminate the area. They picked up the three survivors who were in the long boat from Eric the Red. Two men were picked up out of the water, one being the owner’s son who was clinging to floating kerosene boxes. At daylight the Dawn then rescued the 18 men from the floating portion of the deckhouse, which had drifted about 4 miles from where they’d struck the reef. Shortly after the rescue the deckhouse drifted onto breakers and was thrown onto rocks at Point Franklin, about 2 miles east of Cape Otway. Captain Jones had signalled to Cape Otway lighthouse the number of the Eric the Red and later signalled that there was a wreck at Otway Reef but there was no response from the lighthouse. The captain and crew of the Dawn spent several more hours searching unsuccessfully for more survivors, even going back as far as Apollo Bay. On board the Dawn the exhausted men received care and attention to their needs and wants, including much needed clothing. Captain Allen was amongst the 23 battered and injured men who were rescued and later taken to Warrnambool for care. Warrnambool’s mayor and town clerk offered them all hospitality, the three badly injured men going to the hospital for care and others to the Olive Branch Hotel, then on to Melbourne. Captain Allen’s leg injury prevented him from going ashore so he and three other men travelled on the Dawn to Portland. They were met by the mayor who also treated them all with great kindness. Captain Allen took the train back to Melbourne then returned to America. Those saved were Captain Zaccheus Allen (or Jacques Allen), J. Darcy chief mate, James F. Lawrence second mate, Ned Sewall third mate and owner’s son, John French the cook, C. Nelson sail maker, Clarence W. New passenger, and the able seamen Dickenson, J. Black, Denis White, C. Herbert, C. Thompson, A. Brooks, D. Wilson, J. Ellis, Q. Thompson, C. Newman, W. Paul, J. Davis, M. Horenleng, J. Ogduff, T. W. Drew, R. Richardson. Four men had lost their lives; three of them were crew (Gus Dahlgreen ship’s carpenter, H. Ackman steward, who drowned in his cabin, and George Silver seaman) and one a passenger (J. B. Vaughan). The body of one of them had been found washed up at Cape Otway and was later buried in the lighthouse cemetery; another body was seen on an inaccessible ledge. Twelve months later the second mate James F. Lawrence, from Nova Scotia, passed away in the Warrnambool district; an obituary was displayed in the local paper. Neither the ship, nor its cargo, was insured. The ship was worth about £15,000 and the cargo was reportedly worth £40,000; only about £2,000 worth had been recovered. Cargo and wreckage washed up at Apollo Bay, Peterborough, Port Campbell, Western Port and according to some reports, even as far away as the beaches of New Zealand. The day after the wreck the government steam ship Pharos was sent from Queenscliff to clear the shipping lanes of debris that could be a danger to ships. The large midship deckhouse of the ship was found floating in a calm sea near Henty Reef. Items such as an American chair, a ladder and a nest of boxes were all on top of the deckhouse. As it was so large and could cause danger to passing ships, Captain Payne had the deckhouse towed towards the shore just beyond Apollo Bay. Between Apollo Bay and Blanket Bay the captain and crew of Pharos collected Wheeler and Wilson sewing machines, nests of boxes, bottles of Bristol’s sarsaparilla, pieces of common American chairs, axe handles, a Wheelers’ Patent thresher and a sailor’s trunk with the words “A. James” on the front. A ship’s flag-board bearing the words “Eric the Red” was found on the deckhouse; finally those on board the Pharos had the name of the wrecked vessel. During this operation Pharos came across the government steamer Victoria and also a steamer S.S. Otway, both of which were picking up flotsam and wreckage. A whole side of the hull and three large pieces of the other side of the hull, with some of the copper sheathing stripped off, had floated on to Point Franklin. Some of the vessels yards and portions of her masts were on shore. The pieces of canvas attached to the yards and masts confirmed that the vessel had been under sail. The beach there was piled with debris several feet high. There were many cases of Diamond Oil kerosene, labelled R. W. Cameron and Company, New York. There were also many large planks of red pine, portions of a small white boat and a large, well-used oar. Other items found ashore included sewing machines (some consigned to ‘Long and Co.”) and notions, axe and scythe handles, hay forks, wooden pegs, rolls of wire (some branded “T.S” and Co, Melbourne”), kegs of nails branded “A.T. and Co.” from the factory of A. Field and Son, Taunton, Massachusetts, croquet balls and mallets, buggy fittings, rat traps, perfumery, cutlery and Douay Bibles, clocks, bicycles, chairs, a fly wheel, a cooking stove, timber, boxes, pianos, organs and a ladder. (Wooden clothes pegs drifted in for many years). There seemed to be no personal luggage or clothing. The Pharos encountered a long line, about one and a half miles, of floating wreckage about 10 miles off land, south east of Cape Otway, and in some places about 40 feet wide. It seemed that more than half of it was from Eric the Red. The ship’s crew rescued 3 cases that were for the Melbourne Exhibition and other items from amongst the debris. There were also chairs, doors, musical instruments, washing boards, nests of trunks and fly catchers floating in the sea. Most of the goods were saturated and smelt of kerosene. A section of the hull lies buried in the sand at Parker River Beach. An anchor with chain is embedded in the rocks east of Point Franklin and a second anchor, thought to be from Eric the Red, is on display at the Cape Otway light station. (There is a photograph of a life belt on the verandah of Rivernook Guest House in Princetown with the words “ERIC THE RED / BOSTON”. This is rather a mystery as the ship was registered in Bath, Maine, USA.) Parts of the ship are on display at Bimbi Park Caravan Park and at Apollo Bay Museum. Flagstaff Hill Maritime Village also has part of the helm (steering wheel), a carved wooden sword (said to be the only remaining portion of the ship’s figurehead; further research is currently being carried out), a door, a metal rod, several samples of wood and a medal for bravery, awarded to Nelson Johnson, a crew member of the S.S. Dawn by the U.S. President, for the rescue of the crew. Much of the wreckage was recovered by the local residents before police and other authorities arrived at the scene. Looters went to great effort to salvage goods, being lowered down the high cliff faces to areas with little or no beach to collect items from the wreckage, their mates above watching out for dangerous waves. A Tasmanian newspaper reports on a court case in Stawell, Victoria, noting a man who was caught 2 months later selling tobacco from the wreckage of Eric the Red. Some of the silverware is still treasured by descendants of Mr Mackenzie who was given these items by officials for his help in securing the cargo. The gifts included silver coffee and tea pots, half a dozen silver serviette rings and two sewing machines. A Mr G.W. Black has in his possession a medal and a purse that were awarded to his father, another Dawn crew member who was part of the rescue team. The medal is inscribed and named “To John Black ….” (from “Shipwrecks” by Margaret E. Mackenzie, 3rd edition, published 1964). The wreck and cargo were sold to a Melbourne man who salvaged a quantity of high quality tobacco and dental and surgical instruments. Timbers from the ship were salvaged and used in the construction of houses and sheds around Apollo Bay, including a guest house, Milford House (since burnt down in bushfires), which had furniture, fittings and timber on the dining room floor from the ship. A 39.7 foot long trading ketch, the Apollo, was also built from its timbers by Mr Burgess in 1883 and subsequently used in Tasmanian waters. It was the first attempt at ship building in Apollo bay. In 1881 a red light was installed about 300 feet above sea level at the base of the Cape Otway lighthouse to warn ships when they were too close to shore; It would not be visible unless a ship came within 3 miles from it. This has proved to be an effective warning. Nelson Johnson, recipient of the medal for bravery, married Elizabeth Howard in 1881 and they had 10 children. They lived in South Melbourne, Victoria. Nelson died in 1922 in Fitzroy Victoria, age 66. In 1895 the owners of the S.S. Dawn, the Portland and Belfast Steam Navigation Co., wound up and sold out to the Belfast Company who took over the Dawn for one year before selling her to Howard Smith. She was condemned and sunk in Suva in 1928. The State Library of Victoria has a lithograph in its collection depicting the steamer Dawn and the shipwrecked men, titled. "Wreck of the ship Eric the Red, Cape Otway: rescue of the crew by the Dawn".The wood (timber) sample is listed on the Collections Australia Database, Heritage Victoria, number 239 00010 A “The Eric the Red is historically significant as one of Victoria's major 19th century shipwrecks. (Heritage Victoria Eric the Red; HV ID 239) The wreck led to the provision of an additional warning light placed below the Cape Otway lighthouse to alert mariners to the location of Otway Reef. The site is archaeologically significant for its remains of a large and varied cargo and ship's fittings being scattered over a wide area. The site is recreationally and aesthetically significant as it is one of the few sites along this coast where tourists can visit identifiable remains of a large wooden shipwreck, and for its location set against the background of Cape Otway, Bass Strait, and the Cape Otway lighthouse.“ (Victorian Heritage Database Registration Number S239, Official Number 8745 USA) Wood sample from the wreck of the ship Eric the Red. Oblong shaped, full of sea worm (Teredo worm) holes. The wood is dark in colour and is very light in weight. flagstaff hill, warrnambool, shipwrecked-coast, flagstaff-hill, flagstaff-hill-maritime-museum, maritime-museum, shipwreck-coast, flagstaff-hill-maritime-village, shipwreck-artefact, eric-the-red, zaccheus-allen, sewall, 1880, melbourne-exhibition, cape-otway, otway-reef, wood-sample, s.s.-dawn -
 Flagstaff Hill Maritime Museum and Village
Domestic object - Bowl, Late 19th or early 20th Century
The Process of Making Pottery Decorating, Firing, Glazing, Making, Technical There is a rhythm and flow to clay. It can’t be done all at once! Even the making process! It can take weeks to get everything done, especially if you can only work on your pottery once a week! Even though we have three hour classes, it’s often just not enough time! Here is an overview of some of the processes so you have a bit more grasp on some of the technical stuff! Step One – Design There are SO many ideas out there for making stuff in clay! From delicate porcelain jewellery, through to heavy sculptural work and everything in between. Deciding your direction is sometimes not that easy – when you first start, try everything, you will naturally gravitate to the style that you enjoy! The options and variations are endless and can get a wee bit overwhelming too! Check in with me before you start to ensure your ideas will work, what order you might do things, how you could achieve the look you are seeking and any other technical data required! Step Two – Making Clay is thixotropic. This means that as you work with it, the clay first gets sloppier and wetter, before is begins to dry in the atmosphere. For most things, you simply can’t do all parts of the project at once. An example of work order might look like: Get last weeks work out from the shelves Prepare clay for today’s work – roll your clay, prepare balls for throwing, make the first stage of a pinch pot) Clean up last week’s work and put it on the shelf for bisque firing Check that you have any glazing to do – and do enough of it that you will have time to finish your main project Do the next step of your next project – there might be a further step that can’t be complete immediately, in that case, wrap your work well and put onto the shelves. Letting your work rest for a while can really help keep your work clean and professional looking. Many things require bagging under plastic to keep it ready for work the next week – put your name on the outside of the bag so you can find your work easily. We have stickers and markers. Consider how you want to decorate your work – coloured slip can be applied at a fairly wet stage (remembering that it will make your work even wetter!). Trying to apply slip to dry clay won’t work! If you want to do sgraffito – you will need to keep the work leather hard (a state of dryness where you can still work the clay with a little effort and a little water and care). Step Three – Drying Most of the time your work can go into the rack uncovered to let it dry out for the following week. If you want to continue forming or shaping you will need to double bag your work – put your work on a suitable sized bat and put the bat in a bag so the base of the bag is under the bat, then put another bag over the top of the work and tuck the top of the bag under the bat. If you want to trim (or turn) your thrown work the following week, it should also be double bagged. If your work is large, delicate, or of uneven thicknesses, you should lightly cover your work for drying. When considering the drying process, bare in mind the weather, humidity and wind! The hotter and dryer, the faster things dry and work can dry unevenly in the shelves – this can lead to cracking – another time to lightly cover your work for drying. Step Four – Trimming and Cleaning Up Your work is dry! It is called greenware now and it is at it’s most fragile! Handle everything with two hands. I often refer to soft hands – keep everything gentle and with your fingers spread as much as possible. Try to not pick up things like plates too much, and always with both hands! Before your work can be bisque fired it should be “cleaned up”. You work won’t go into the kiln if it has sharp edges – when glazed, sharp edges turn into razor blades! Use a piece of fly wire to rub the work all over – this will scratch a little so be light handed. Use a knife or metal kidney to scrape any areas that require a bit more dynamic treatment than the fly wire offers! Finally, a very light wipe over with a slightly damp sponge can help soften and soothe all of your edges and dags! Trimming thrown work: If you are planning to trim (or turn) your thrown work (and you should be), make sure you bag it well – your work should be leather hard to almost dry for easiest trimming. Use this step to finish the work completely – use a metal kidney to polish the surface, or a slightly damp sponge to give a freshly thrown look. Wipe the sponge around the rim after trimming, and check the inside of the pot for dags! Trimming slip cast work: Usually I will trim the rims of your work on the wheel the following day to make that stage easier, however you will still need to check your work for lumps and bumps. Last but not least – check that your name is still clearly on the bottom of your work. Step Five – Bisque Firing When the work is completely dry it can go into the bisque kiln. The bisque kiln is fired to 1000°C. This process burns off the water in the clay as well as some of the chemically bound water. The structure of the clay is not altered that much at this temperature. Inside the bisque kiln, the work is stacked a little, small bowl inside a larger bowl and onto a heavy plate. Smaller items like decorations or drink coasters might get stacked several high. Consideration is paid to the weight of the stack and shape of the work. A bisque kiln can fire about one and a half times the amount of work that the glaze kiln can fire. The firing takes about 10 hours to complete the cycle and about two days to cool down. Once it has been emptied the work is placed in the glaze room ready for you to decorate! Step Six – Glazing Decorating your work with colour can be a lot of fun – and time consuming! There are three main options for surface treatment at this stage: Oxide Washes Underglazes Glazes Washes and underglazes do not “glaze” the work – It will still need a layer of glaze to fully seal the clay (washes don’t need glaze on surfaces not designed for food or liquid as they can gloss up a little on their own). Underglazes are stable colourants that turn out pretty much how they look in the jar. They can be mixed with each other to form other colours and can be used like water colours to paint onto your work. Mostly they should have a clear glaze on top to seal them. Oxides are a different species – the pink oxide (cobalt) wash turns out bright blue for instance. They don’t always need a glaze on top, and some glazes can change the colour of the wash! The glazes need no other “glaze” on top! Be careful of unknown glaze interactions – you can put any combination of glaze in a bowl or on a plate, but only a single glaze on the outside of any vertical surface! Glazes are a chemical reaction under heat. We don’t know the exact chemicals in the Mayco glazes we use. I can guess by the way they interact with each other, however, on the whole, you need to test every idea you have, and not run the test on a vertical surface! Simply put, glaze is a layer of glass like substance that bonds with the clay underneath. Clay is made of silica, alumina and water. Glaze is made of mostly silica. Silica has a melting point of 1700°C and we fire to 1240°C. The silica requires a “flux” to help it melt at the lower temperature. Fluxes can be all sorts of chemicals – a common one is calcium – calcium has a melting point of 2500°C, however, together they both melt at a much lower temperature! Colourants are metal oxides like cobalt (blue), chrome (green through black), copper (green, blue, even red!), manganese (black, purple and pink) iron (red brown), etc. Different chemicals in the glaze can have dramatic effects. for example, barium carbonate (which we don’t use) turns manganese bright pink! Other elements can turn manganese dioxide brown, blue, purple and reddish brown. Manganese dioxide is a flux in and of itself as well. So, glazes that get their black and purple colours, often interact with other glazes and RUN! Our mirror black is a good example – it mixes really well with many glazes because it fluxes them – causes them to melt faster. It will also bring out many beautiful colours in the glazes because it’s black colouring most definitely comes from manganese dioxide! Glaze chemistry is a whole subject on it’s own! We use commercial Mayco glazes on purpose – for their huge range of colour possibilities, stability, cool interactions, artistic freedom with the ability to easily brush the glazes on and ease of use. We currently have almost 50 glazes on hand! A major project is to test the interactions of all glazes with each other. That is 2,500 test tiles!!!! I’m going to make the wall behind the wheels the feature wall of pretty colours! Step Seven – Glaze (Gloss or sometimes called “Glost”) Firing Most of the time this is the final stage of making your creation (but not always!) The glaze kiln goes to 1240°C. This is called cone 6, or midrange. It is the low end of stoneware temperatures. Stoneware clays and glazes are typically fired at cone 8 – 10, that is 1260 – 1290°C. The energy requirement to go from 1240°C to 1280°C is almost a 30% more! Our clay is formulated to vitrify (mature, turn “glass-like”) at 1240°, as are our glazes. A glaze kiln take around 12 hours to reach temperature and two to three days to cool down. Sometimes a third firing process is required – this is for decoration that is added to work after the glaze firing. For example – adding precious metals and lustres. this firing temperature is usually around 600 – 800°C depending upon the techniques being used. There are many students interested in gold and silver trims – we will be doing this third type of firing soon! After firing your work will be in the student finished work shelves. Remember to pay for it before you head out the door! There is a small extra charge for using porcelain clay (it’s more than twice the price of regular clay), and for any third firing process! Once your work has been fired it can not turn back into clay for millennia – so don’t fire it if you don’t like it! Put it in the bucket for recycling. https://firebirdstudios.com.au/the-process-of-making-pottery/ The bowl is an example of kitchenware used in the 19th century and still in use today.Bowl white ceramic. Crack on side. Badly stained.Backstamp very faint and unable to be read.flagstaff hill, warrnambool, shipwrecked-coast, flagstaff-hill, flagstaff-hill-maritime-museum, maritime-museum, shipwreck-coast, flagstaff-hill-maritime-village, mixing bowl, food preparation, kitchen equipment, ceramic -
 Flagstaff Hill Maritime Museum and Village
Domestic object - Bowl
The Process of Making Pottery Decorating, Firing, Glazing, Making, Technical There is a rhythm and flow to clay. It can’t be done all at once! Even the making process! It can take weeks to get everything done, especially if you can only work on your pottery once a week! Even though we have three hour classes, it’s often just not enough time! Here is an overview of some of the processes so you have a bit more grasp on some of the technical stuff! Step One – Design There are SO many ideas out there for making stuff in clay! From delicate porcelain jewellery, through to heavy sculptural work and everything in between. Deciding your direction is sometimes not that easy – when you first start, try everything, you will naturally gravitate to the style that you enjoy! The options and variations are endless and can get a wee bit overwhelming too! Check in with me before you start to ensure your ideas will work, what order you might do things, how you could achieve the look you are seeking and any other technical data required! Step Two – Making Clay is thixotropic. This means that as you work with it, the clay first gets sloppier and wetter, before is begins to dry in the atmosphere. For most things, you simply can’t do all parts of the project at once. An example of work order might look like: Get last weeks work out from the shelves Prepare clay for today’s work – roll your clay, prepare balls for throwing, make the first stage of a pinch pot) Clean up last week’s work and put it on the shelf for bisque firing Check that you have any glazing to do – and do enough of it that you will have time to finish your main project Do the next step of your next project – there might be a further step that can’t be complete immediately, in that case, wrap your work well and put onto the shelves. Letting your work rest for a while can really help keep your work clean and professional looking. Many things require bagging under plastic to keep it ready for work the next week – put your name on the outside of the bag so you can find your work easily. We have stickers and markers. Consider how you want to decorate your work – coloured slip can be applied at a fairly wet stage (remembering that it will make your work even wetter!). Trying to apply slip to dry clay won’t work! If you want to do sgraffito – you will need to keep the work leather hard (a state of dryness where you can still work the clay with a little effort and a little water and care). Step Three – Drying Most of the time your work can go into the rack uncovered to let it dry out for the following week. If you want to continue forming or shaping you will need to double bag your work – put your work on a suitable sized bat and put the bat in a bag so the base of the bag is under the bat, then put another bag over the top of the work and tuck the top of the bag under the bat. If you want to trim (or turn) your thrown work the following week, it should also be double bagged. If your work is large, delicate, or of uneven thicknesses, you should lightly cover your work for drying. When considering the drying process, bare in mind the weather, humidity and wind! The hotter and dryer, the faster things dry and work can dry unevenly in the shelves – this can lead to cracking – another time to lightly cover your work for drying. Step Four – Trimming and Cleaning Up Your work is dry! It is called greenware now and it is at it’s most fragile! Handle everything with two hands. I often refer to soft hands – keep everything gentle and with your fingers spread as much as possible. Try to not pick up things like plates too much, and always with both hands! Before your work can be bisque fired it should be “cleaned up”. You work won’t go into the kiln if it has sharp edges – when glazed, sharp edges turn into razor blades! Use a piece of fly wire to rub the work all over – this will scratch a little so be light handed. Use a knife or metal kidney to scrape any areas that require a bit more dynamic treatment than the fly wire offers! Finally, a very light wipe over with a slightly damp sponge can help soften and soothe all of your edges and dags! Trimming thrown work: If you are planning to trim (or turn) your thrown work (and you should be), make sure you bag it well – your work should be leather hard to almost dry for easiest trimming. Use this step to finish the work completely – use a metal kidney to polish the surface, or a slightly damp sponge to give a freshly thrown look. Wipe the sponge around the rim after trimming, and check the inside of the pot for dags! Trimming slip cast work: Usually I will trim the rims of your work on the wheel the following day to make that stage easier, however you will still need to check your work for lumps and bumps. Last but not least – check that your name is still clearly on the bottom of your work. Step Five – Bisque Firing When the work is completely dry it can go into the bisque kiln. The bisque kiln is fired to 1000°C. This process burns off the water in the clay as well as some of the chemically bound water. The structure of the clay is not altered that much at this temperature. Inside the bisque kiln, the work is stacked a little, small bowl inside a larger bowl and onto a heavy plate. Smaller items like decorations or drink coasters might get stacked several high. Consideration is paid to the weight of the stack and shape of the work. A bisque kiln can fire about one and a half times the amount of work that the glaze kiln can fire. The firing takes about 10 hours to complete the cycle and about two days to cool down. Once it has been emptied the work is placed in the glaze room ready for you to decorate! Step Six – Glazing Decorating your work with colour can be a lot of fun – and time consuming! There are three main options for surface treatment at this stage: Oxide Washes Underglazes Glazes Washes and underglazes do not “glaze” the work – It will still need a layer of glaze to fully seal the clay (washes don’t need glaze on surfaces not designed for food or liquid as they can gloss up a little on their own). Underglazes are stable colourants that turn out pretty much how they look in the jar. They can be mixed with each other to form other colours and can be used like water colours to paint onto your work. Mostly they should have a clear glaze on top to seal them. Oxides are a different species – the pink oxide (cobalt) wash turns out bright blue for instance. They don’t always need a glaze on top, and some glazes can change the colour of the wash! The glazes need no other “glaze” on top! Be careful of unknown glaze interactions – you can put any combination of glaze in a bowl or on a plate, but only a single glaze on the outside of any vertical surface! Glazes are a chemical reaction under heat. We don’t know the exact chemicals in the Mayco glazes we use. I can guess by the way they interact with each other, however, on the whole, you need to test every idea you have, and not run the test on a vertical surface! Simply put, glaze is a layer of glass like substance that bonds with the clay underneath. Clay is made of silica, alumina and water. Glaze is made of mostly silica. Silica has a melting point of 1700°C and we fire to 1240°C. The silica requires a “flux” to help it melt at the lower temperature. Fluxes can be all sorts of chemicals – a common one is calcium – calcium has a melting point of 2500°C, however, together they both melt at a much lower temperature! Colourants are metal oxides like cobalt (blue), chrome (green through black), copper (green, blue, even red!), manganese (black, purple and pink) iron (red brown), etc. Different chemicals in the glaze can have dramatic effects. for example, barium carbonate (which we don’t use) turns manganese bright pink! Other elements can turn manganese dioxide brown, blue, purple and reddish brown. Manganese dioxide is a flux in and of itself as well. So, glazes that get their black and purple colours, often interact with other glazes and RUN! Our mirror black is a good example – it mixes really well with many glazes because it fluxes them – causes them to melt faster. It will also bring out many beautiful colours in the glazes because it’s black colouring most definitely comes from manganese dioxide! Glaze chemistry is a whole subject on it’s own! We use commercial Mayco glazes on purpose – for their huge range of colour possibilities, stability, cool interactions, artistic freedom with the ability to easily brush the glazes on and ease of use. We currently have almost 50 glazes on hand! A major project is to test the interactions of all glazes with each other. That is 2,500 test tiles!!!! I’m going to make the wall behind the wheels the feature wall of pretty colours! Step Seven – Glaze (Gloss or sometimes called “Glost”) Firing Most of the time this is the final stage of making your creation (but not always!) The glaze kiln goes to 1240°C. This is called cone 6, or midrange. It is the low end of stoneware temperatures. Stoneware clays and glazes are typically fired at cone 8 – 10, that is 1260 – 1290°C. The energy requirement to go from 1240°C to 1280°C is almost a 30% more! Our clay is formulated to vitrify (mature, turn “glass-like”) at 1240°, as are our glazes. A glaze kiln take around 12 hours to reach temperature and two to three days to cool down. Sometimes a third firing process is required – this is for decoration that is added to work after the glaze firing. For example – adding precious metals and lustres. this firing temperature is usually around 600 – 800°C depending upon the techniques being used. There are many students interested in gold and silver trims – we will be doing this third type of firing soon! After firing your work will be in the student finished work shelves. Remember to pay for it before you head out the door! There is a small extra charge for using porcelain clay (it’s more than twice the price of regular clay), and for any third firing process! Once your work has been fired it can not turn back into clay for millennia – so don’t fire it if you don’t like it! Put it in the bucket for recycling. https://firebirdstudios.com.au/the-process-of-making-pottery/ This bowl is an example of kitchenware used in the 19th century and still in use today.Bowl white ceramic plain that has two sets of edging around lip. Inside bowl has plaster designed to look like cooking mixture.flagstaff hill, warrnambool, shipwrecked-coast, flagstaff-hill, flagstaff-hill-maritime-museum, maritime-museum, shipwreck-coast, flagstaff-hill-maritime-village, kitchen equipment, ceramic -
 Flagstaff Hill Maritime Museum and Village
Domestic object - Bowl, J & G Meakin, Late 19th or early 20th Century
The Process of Making Pottery Decorating, Firing, Glazing, Making, Technical There is a rhythm and flow to clay. It can’t be done all at once! Even the making process! It can take weeks to get everything done, especially if you can only work on your pottery once a week! Even though we have three hour classes, it’s often just not enough time! Here is an overview of some of the processes so you have a bit more grasp on some of the technical stuff! Step One – Design There are SO many ideas out there for making stuff in clay! From delicate porcelain jewellery, through to heavy sculptural work and everything in between. Deciding your direction is sometimes not that easy – when you first start, try everything, you will naturally gravitate to the style that you enjoy! The options and variations are endless and can get a wee bit overwhelming too! Check in with me before you start to ensure your ideas will work, what order you might do things, how you could achieve the look you are seeking and any other technical data required! Step Two – Making Clay is thixotropic. This means that as you work with it, the clay first gets sloppier and wetter, before is begins to dry in the atmosphere. For most things, you simply can’t do all parts of the project at once. An example of work order might look like: Get last weeks work out from the shelves Prepare clay for today’s work – roll your clay, prepare balls for throwing, make the first stage of a pinch pot) Clean up last week’s work and put it on the shelf for bisque firing Check that you have any glazing to do – and do enough of it that you will have time to finish your main project Do the next step of your next project – there might be a further step that can’t be complete immediately, in that case, wrap your work well and put onto the shelves. Letting your work rest for a while can really help keep your work clean and professional looking. Many things require bagging under plastic to keep it ready for work the next week – put your name on the outside of the bag so you can find your work easily. We have stickers and markers. Consider how you want to decorate your work – coloured slip can be applied at a fairly wet stage (remembering that it will make your work even wetter!). Trying to apply slip to dry clay won’t work! If you want to do sgraffito – you will need to keep the work leather hard (a state of dryness where you can still work the clay with a little effort and a little water and care). Step Three – Drying Most of the time your work can go into the rack uncovered to let it dry out for the following week. If you want to continue forming or shaping you will need to double bag your work – put your work on a suitable sized bat and put the bat in a bag so the base of the bag is under the bat, then put another bag over the top of the work and tuck the top of the bag under the bat. If you want to trim (or turn) your thrown work the following week, it should also be double bagged. If your work is large, delicate, or of uneven thicknesses, you should lightly cover your work for drying. When considering the drying process, bare in mind the weather, humidity and wind! The hotter and dryer, the faster things dry and work can dry unevenly in the shelves – this can lead to cracking – another time to lightly cover your work for drying. Step Four – Trimming and Cleaning Up Your work is dry! It is called greenware now and it is at it’s most fragile! Handle everything with two hands. I often refer to soft hands – keep everything gentle and with your fingers spread as much as possible. Try to not pick up things like plates too much, and always with both hands! Before your work can be bisque fired it should be “cleaned up”. You work won’t go into the kiln if it has sharp edges – when glazed, sharp edges turn into razor blades! Use a piece of fly wire to rub the work all over – this will scratch a little so be light handed. Use a knife or metal kidney to scrape any areas that require a bit more dynamic treatment than the fly wire offers! Finally, a very light wipe over with a slightly damp sponge can help soften and soothe all of your edges and dags! Trimming thrown work: If you are planning to trim (or turn) your thrown work (and you should be), make sure you bag it well – your work should be leather hard to almost dry for easiest trimming. Use this step to finish the work completely – use a metal kidney to polish the surface, or a slightly damp sponge to give a freshly thrown look. Wipe the sponge around the rim after trimming, and check the inside of the pot for dags! Trimming slip cast work: Usually I will trim the rims of your work on the wheel the following day to make that stage easier, however you will still need to check your work for lumps and bumps. Last but not least – check that your name is still clearly on the bottom of your work. Step Five – Bisque Firing When the work is completely dry it can go into the bisque kiln. The bisque kiln is fired to 1000°C. This process burns off the water in the clay as well as some of the chemically bound water. The structure of the clay is not altered that much at this temperature. Inside the bisque kiln, the work is stacked a little, small bowl inside a larger bowl and onto a heavy plate. Smaller items like decorations or drink coasters might get stacked several high. Consideration is paid to the weight of the stack and shape of the work. A bisque kiln can fire about one and a half times the amount of work that the glaze kiln can fire. The firing takes about 10 hours to complete the cycle and about two days to cool down. Once it has been emptied the work is placed in the glaze room ready for you to decorate! Step Six – Glazing Decorating your work with colour can be a lot of fun – and time consuming! There are three main options for surface treatment at this stage: Oxide Washes Underglazes Glazes Washes and underglazes do not “glaze” the work – It will still need a layer of glaze to fully seal the clay (washes don’t need glaze on surfaces not designed for food or liquid as they can gloss up a little on their own). Underglazes are stable colourants that turn out pretty much how they look in the jar. They can be mixed with each other to form other colours and can be used like water colours to paint onto your work. Mostly they should have a clear glaze on top to seal them. Oxides are a different species – the pink oxide (cobalt) wash turns out bright blue for instance. They don’t always need a glaze on top, and some glazes can change the colour of the wash! The glazes need no other “glaze” on top! Be careful of unknown glaze interactions – you can put any combination of glaze in a bowl or on a plate, but only a single glaze on the outside of any vertical surface! Glazes are a chemical reaction under heat. We don’t know the exact chemicals in the Mayco glazes we use. I can guess by the way they interact with each other, however, on the whole, you need to test every idea you have, and not run the test on a vertical surface! Simply put, glaze is a layer of glass like substance that bonds with the clay underneath. Clay is made of silica, alumina and water. Glaze is made of mostly silica. Silica has a melting point of 1700°C and we fire to 1240°C. The silica requires a “flux” to help it melt at the lower temperature. Fluxes can be all sorts of chemicals – a common one is calcium – calcium has a melting point of 2500°C, however, together they both melt at a much lower temperature! Colourants are metal oxides like cobalt (blue), chrome (green through black), copper (green, blue, even red!), manganese (black, purple and pink) iron (red brown), etc. Different chemicals in the glaze can have dramatic effects. for example, barium carbonate (which we don’t use) turns manganese bright pink! Other elements can turn manganese dioxide brown, blue, purple and reddish brown. Manganese dioxide is a flux in and of itself as well. So, glazes that get their black and purple colours, often interact with other glazes and RUN! Our mirror black is a good example – it mixes really well with many glazes because it fluxes them – causes them to melt faster. It will also bring out many beautiful colours in the glazes because it’s black colouring most definitely comes from manganese dioxide! Glaze chemistry is a whole subject on it’s own! We use commercial Mayco glazes on purpose – for their huge range of colour possibilities, stability, cool interactions, artistic freedom with the ability to easily brush the glazes on and ease of use. We currently have almost 50 glazes on hand! A major project is to test the interactions of all glazes with each other. That is 2,500 test tiles!!!! I’m going to make the wall behind the wheels the feature wall of pretty colours! Step Seven – Glaze (Gloss or sometimes called “Glost”) Firing Most of the time this is the final stage of making your creation (but not always!) The glaze kiln goes to 1240°C. This is called cone 6, or midrange. It is the low end of stoneware temperatures. Stoneware clays and glazes are typically fired at cone 8 – 10, that is 1260 – 1290°C. The energy requirement to go from 1240°C to 1280°C is almost a 30% more! Our clay is formulated to vitrify (mature, turn “glass-like”) at 1240°, as are our glazes. A glaze kiln take around 12 hours to reach temperature and two to three days to cool down. Sometimes a third firing process is required – this is for decoration that is added to work after the glaze firing. For example – adding precious metals and lustres. this firing temperature is usually around 600 – 800°C depending upon the techniques being used. There are many students interested in gold and silver trims – we will be doing this third type of firing soon! After firing your work will be in the student finished work shelves. Remember to pay for it before you head out the door! There is a small extra charge for using porcelain clay (it’s more than twice the price of regular clay), and for any third firing process! Once your work has been fired it can not turn back into clay for millennia – so don’t fire it if you don’t like it! Put it in the bucket for recycling. https://firebirdstudios.com.au/the-process-of-making-pottery/This bowl was made by renowned pottery company J & G Meakin of England. The firm was established in the mid-1800's. The bowl is an example of kitchenware used in the 19th century and still in use today.Bowl; white ceramic, round and tapering inwards towards base. Made by J and G Meakin England.On base, 'Ironstone China Reg SOL 391413' with symbolflagstaff hill, flagstaff hill maritime museum and village, warrnambool, maritime museum, maritime village, great ocean road, shipwreck coast, mixing bowl, food preparation, j & g meakin, pottery, stoke-on-trent, kitchen equipment, ceramic -
 Flagstaff Hill Maritime Museum and Village
Domestic object - Plate
The Process of Making Pottery Decorating, Firing, Glazing, Making, Technical There is a rhythm and flow to clay. It can’t be done all at once! Even the making process! It can take weeks to get everything done, especially if you can only work on your pottery once a week! Even though we have three hour classes, it’s often just not enough time! Here is an overview of some of the processes so you have a bit more grasp on some of the technical stuff! Step One – Design There are SO many ideas out there for making stuff in clay! From delicate porcelain jewellery, through to heavy sculptural work and everything in between. Deciding your direction is sometimes not that easy – when you first start, try everything, you will naturally gravitate to the style that you enjoy! The options and variations are endless and can get a wee bit overwhelming too! Check in with me before you start to ensure your ideas will work, what order you might do things, how you could achieve the look you are seeking and any other technical data required! Step Two – Making Clay is thixotropic. This means that as you work with it, the clay first gets sloppier and wetter, before is begins to dry in the atmosphere. For most things, you simply can’t do all parts of the project at once. An example of work order might look like: Get last weeks work out from the shelves Prepare clay for today’s work – roll your clay, prepare balls for throwing, make the first stage of a pinch pot) Clean up last week’s work and put it on the shelf for bisque firing Check that you have any glazing to do – and do enough of it that you will have time to finish your main project Do the next step of your next project – there might be a further step that can’t be complete immediately, in that case, wrap your work well and put onto the shelves. Letting your work rest for a while can really help keep your work clean and professional looking. Many things require bagging under plastic to keep it ready for work the next week – put your name on the outside of the bag so you can find your work easily. We have stickers and markers. Consider how you want to decorate your work – coloured slip can be applied at a fairly wet stage (remembering that it will make your work even wetter!). Trying to apply slip to dry clay won’t work! If you want to do sgraffito – you will need to keep the work leather hard (a state of dryness where you can still work the clay with a little effort and a little water and care). Step Three – Drying Most of the time your work can go into the rack uncovered to let it dry out for the following week. If you want to continue forming or shaping you will need to double bag your work – put your work on a suitable sized bat and put the bat in a bag so the base of the bag is under the bat, then put another bag over the top of the work and tuck the top of the bag under the bat. If you want to trim (or turn) your thrown work the following week, it should also be double bagged. If your work is large, delicate, or of uneven thicknesses, you should lightly cover your work for drying. When considering the drying process, bare in mind the weather, humidity and wind! The hotter and dryer, the faster things dry and work can dry unevenly in the shelves – this can lead to cracking – another time to lightly cover your work for drying. Step Four – Trimming and Cleaning Up Your work is dry! It is called greenware now and it is at it’s most fragile! Handle everything with two hands. I often refer to soft hands – keep everything gentle and with your fingers spread as much as possible. Try to not pick up things like plates too much, and always with both hands! Before your work can be bisque fired it should be “cleaned up”. You work won’t go into the kiln if it has sharp edges – when glazed, sharp edges turn into razor blades! Use a piece of fly wire to rub the work all over – this will scratch a little so be light handed. Use a knife or metal kidney to scrape any areas that require a bit more dynamic treatment than the fly wire offers! Finally, a very light wipe over with a slightly damp sponge can help soften and soothe all of your edges and dags! Trimming thrown work: If you are planning to trim (or turn) your thrown work (and you should be), make sure you bag it well – your work should be leather hard to almost dry for easiest trimming. Use this step to finish the work completely – use a metal kidney to polish the surface, or a slightly damp sponge to give a freshly thrown look. Wipe the sponge around the rim after trimming, and check the inside of the pot for dags! Trimming slip cast work: Usually I will trim the rims of your work on the wheel the following day to make that stage easier, however you will still need to check your work for lumps and bumps. Last but not least – check that your name is still clearly on the bottom of your work. Step Five – Bisque Firing When the work is completely dry it can go into the bisque kiln. The bisque kiln is fired to 1000°C. This process burns off the water in the clay as well as some of the chemically bound water. The structure of the clay is not altered that much at this temperature. Inside the bisque kiln, the work is stacked a little, small bowl inside a larger bowl and onto a heavy plate. Smaller items like decorations or drink coasters might get stacked several high. Consideration is paid to the weight of the stack and shape of the work. A bisque kiln can fire about one and a half times the amount of work that the glaze kiln can fire. The firing takes about 10 hours to complete the cycle and about two days to cool down. Once it has been emptied the work is placed in the glaze room ready for you to decorate! Step Six – Glazing Decorating your work with colour can be a lot of fun – and time consuming! There are three main options for surface treatment at this stage: Oxide Washes Underglazes Glazes Washes and underglazes do not “glaze” the work – It will still need a layer of glaze to fully seal the clay (washes don’t need glaze on surfaces not designed for food or liquid as they can gloss up a little on their own). Underglazes are stable colourants that turn out pretty much how they look in the jar. They can be mixed with each other to form other colours and can be used like water colours to paint onto your work. Mostly they should have a clear glaze on top to seal them. Oxides are a different species – the pink oxide (cobalt) wash turns out bright blue for instance. They don’t always need a glaze on top, and some glazes can change the colour of the wash! The glazes need no other “glaze” on top! Be careful of unknown glaze interactions – you can put any combination of glaze in a bowl or on a plate, but only a single glaze on the outside of any vertical surface! Glazes are a chemical reaction under heat. We don’t know the exact chemicals in the Mayco glazes we use. I can guess by the way they interact with each other, however, on the whole, you need to test every idea you have, and not run the test on a vertical surface! Simply put, glaze is a layer of glass like substance that bonds with the clay underneath. Clay is made of silica, alumina and water. Glaze is made of mostly silica. Silica has a melting point of 1700°C and we fire to 1240°C. The silica requires a “flux” to help it melt at the lower temperature. Fluxes can be all sorts of chemicals – a common one is calcium – calcium has a melting point of 2500°C, however, together they both melt at a much lower temperature! Colourants are metal oxides like cobalt (blue), chrome (green through black), copper (green, blue, even red!), manganese (black, purple and pink) iron (red brown), etc. Different chemicals in the glaze can have dramatic effects. for example, barium carbonate (which we don’t use) turns manganese bright pink! Other elements can turn manganese dioxide brown, blue, purple and reddish brown. Manganese dioxide is a flux in and of itself as well. So, glazes that get their black and purple colours, often interact with other glazes and RUN! Our mirror black is a good example – it mixes really well with many glazes because it fluxes them – causes them to melt faster. It will also bring out many beautiful colours in the glazes because it’s black colouring most definitely comes from manganese dioxide! Glaze chemistry is a whole subject on it’s own! We use commercial Mayco glazes on purpose – for their huge range of colour possibilities, stability, cool interactions, artistic freedom with the ability to easily brush the glazes on and ease of use. We currently have almost 50 glazes on hand! A major project is to test the interactions of all glazes with each other. That is 2,500 test tiles!!!! I’m going to make the wall behind the wheels the feature wall of pretty colours! Step Seven – Glaze (Gloss or sometimes called “Glost”) Firing Most of the time this is the final stage of making your creation (but not always!) The glaze kiln goes to 1240°C. This is called cone 6, or midrange. It is the low end of stoneware temperatures. Stoneware clays and glazes are typically fired at cone 8 – 10, that is 1260 – 1290°C. The energy requirement to go from 1240°C to 1280°C is almost a 30% more! Our clay is formulated to vitrify (mature, turn “glass-like”) at 1240°, as are our glazes. A glaze kiln take around 12 hours to reach temperature and two to three days to cool down. Sometimes a third firing process is required – this is for decoration that is added to work after the glaze firing. For example – adding precious metals and lustres. this firing temperature is usually around 600 – 800°C depending upon the techniques being used. There are many students interested in gold and silver trims – we will be doing this third type of firing soon! After firing your work will be in the student finished work shelves. Remember to pay for it before you head out the door! There is a small extra charge for using porcelain clay (it’s more than twice the price of regular clay), and for any third firing process! Once your work has been fired it can not turn back into clay for millennia – so don’t fire it if you don’t like it! Put it in the bucket for recycling. https://firebirdstudios.com.au/the-process-of-making-pottery/Ceramics have evolved over thousands of years.White earthenware dinner plate. Crazing evident all over.Backstamped ‘Made in England S LTD’flagstaff hill, warrnambool, shipwrecked-coast, flagstaff-hill, flagstaff-hill-maritime-museum, maritime-museum, shipwreck-coast, flagstaff-hill-maritime-village, ceramics, tableware -
 Flagstaff Hill Maritime Museum and Village
Domestic object - Plate, Johnson Bros
The Process of Making Pottery Decorating, Firing, Glazing, Making, Technical There is a rhythm and flow to clay. It can’t be done all at once! Even the making process! It can take weeks to get everything done, especially if you can only work on your pottery once a week! Even though we have three hour classes, it’s often just not enough time! Here is an overview of some of the processes so you have a bit more grasp on some of the technical stuff! Step One – Design There are SO many ideas out there for making stuff in clay! From delicate porcelain jewellery, through to heavy sculptural work and everything in between. Deciding your direction is sometimes not that easy – when you first start, try everything, you will naturally gravitate to the style that you enjoy! The options and variations are endless and can get a wee bit overwhelming too! Check in with me before you start to ensure your ideas will work, what order you might do things, how you could achieve the look you are seeking and any other technical data required! Step Two – Making Clay is thixotropic. This means that as you work with it, the clay first gets sloppier and wetter, before is begins to dry in the atmosphere. For most things, you simply can’t do all parts of the project at once. An example of work order might look like: Get last weeks work out from the shelves Prepare clay for today’s work – roll your clay, prepare balls for throwing, make the first stage of a pinch pot) Clean up last week’s work and put it on the shelf for bisque firing Check that you have any glazing to do – and do enough of it that you will have time to finish your main project Do the next step of your next project – there might be a further step that can’t be complete immediately, in that case, wrap your work well and put onto the shelves. Letting your work rest for a while can really help keep your work clean and professional looking. Many things require bagging under plastic to keep it ready for work the next week – put your name on the outside of the bag so you can find your work easily. We have stickers and markers. Consider how you want to decorate your work – coloured slip can be applied at a fairly wet stage (remembering that it will make your work even wetter!). Trying to apply slip to dry clay won’t work! If you want to do sgraffito – you will need to keep the work leather hard (a state of dryness where you can still work the clay with a little effort and a little water and care). Step Three – Drying Most of the time your work can go into the rack uncovered to let it dry out for the following week. If you want to continue forming or shaping you will need to double bag your work – put your work on a suitable sized bat and put the bat in a bag so the base of the bag is under the bat, then put another bag over the top of the work and tuck the top of the bag under the bat. If you want to trim (or turn) your thrown work the following week, it should also be double bagged. If your work is large, delicate, or of uneven thicknesses, you should lightly cover your work for drying. When considering the drying process, bare in mind the weather, humidity and wind! The hotter and dryer, the faster things dry and work can dry unevenly in the shelves – this can lead to cracking – another time to lightly cover your work for drying. Step Four – Trimming and Cleaning Up Your work is dry! It is called greenware now and it is at it’s most fragile! Handle everything with two hands. I often refer to soft hands – keep everything gentle and with your fingers spread as much as possible. Try to not pick up things like plates too much, and always with both hands! Before your work can be bisque fired it should be “cleaned up”. You work won’t go into the kiln if it has sharp edges – when glazed, sharp edges turn into razor blades! Use a piece of fly wire to rub the work all over – this will scratch a little so be light handed. Use a knife or metal kidney to scrape any areas that require a bit more dynamic treatment than the fly wire offers! Finally, a very light wipe over with a slightly damp sponge can help soften and soothe all of your edges and dags! Trimming thrown work: If you are planning to trim (or turn) your thrown work (and you should be), make sure you bag it well – your work should be leather hard to almost dry for easiest trimming. Use this step to finish the work completely – use a metal kidney to polish the surface, or a slightly damp sponge to give a freshly thrown look. Wipe the sponge around the rim after trimming, and check the inside of the pot for dags! Trimming slip cast work: Usually I will trim the rims of your work on the wheel the following day to make that stage easier, however you will still need to check your work for lumps and bumps. Last but not least – check that your name is still clearly on the bottom of your work. Step Five – Bisque Firing When the work is completely dry it can go into the bisque kiln. The bisque kiln is fired to 1000°C. This process burns off the water in the clay as well as some of the chemically bound water. The structure of the clay is not altered that much at this temperature. Inside the bisque kiln, the work is stacked a little, small bowl inside a larger bowl and onto a heavy plate. Smaller items like decorations or drink coasters might get stacked several high. Consideration is paid to the weight of the stack and shape of the work. A bisque kiln can fire about one and a half times the amount of work that the glaze kiln can fire. The firing takes about 10 hours to complete the cycle and about two days to cool down. Once it has been emptied the work is placed in the glaze room ready for you to decorate! Step Six – Glazing Decorating your work with colour can be a lot of fun – and time consuming! There are three main options for surface treatment at this stage: Oxide Washes Underglazes Glazes Washes and underglazes do not “glaze” the work – It will still need a layer of glaze to fully seal the clay (washes don’t need glaze on surfaces not designed for food or liquid as they can gloss up a little on their own). Underglazes are stable colourants that turn out pretty much how they look in the jar. They can be mixed with each other to form other colours and can be used like water colours to paint onto your work. Mostly they should have a clear glaze on top to seal them. Oxides are a different species – the pink oxide (cobalt) wash turns out bright blue for instance. They don’t always need a glaze on top, and some glazes can change the colour of the wash! The glazes need no other “glaze” on top! Be careful of unknown glaze interactions – you can put any combination of glaze in a bowl or on a plate, but only a single glaze on the outside of any vertical surface! Glazes are a chemical reaction under heat. We don’t know the exact chemicals in the Mayco glazes we use. I can guess by the way they interact with each other, however, on the whole, you need to test every idea you have, and not run the test on a vertical surface! Simply put, glaze is a layer of glass like substance that bonds with the clay underneath. Clay is made of silica, alumina and water. Glaze is made of mostly silica. Silica has a melting point of 1700°C and we fire to 1240°C. The silica requires a “flux” to help it melt at the lower temperature. Fluxes can be all sorts of chemicals – a common one is calcium – calcium has a melting point of 2500°C, however, together they both melt at a much lower temperature! Colourants are metal oxides like cobalt (blue), chrome (green through black), copper (green, blue, even red!), manganese (black, purple and pink) iron (red brown), etc. Different chemicals in the glaze can have dramatic effects. for example, barium carbonate (which we don’t use) turns manganese bright pink! Other elements can turn manganese dioxide brown, blue, purple and reddish brown. Manganese dioxide is a flux in and of itself as well. So, glazes that get their black and purple colours, often interact with other glazes and RUN! Our mirror black is a good example – it mixes really well with many glazes because it fluxes them – causes them to melt faster. It will also bring out many beautiful colours in the glazes because it’s black colouring most definitely comes from manganese dioxide! Glaze chemistry is a whole subject on it’s own! We use commercial Mayco glazes on purpose – for their huge range of colour possibilities, stability, cool interactions, artistic freedom with the ability to easily brush the glazes on and ease of use. We currently have almost 50 glazes on hand! A major project is to test the interactions of all glazes with each other. That is 2,500 test tiles!!!! I’m going to make the wall behind the wheels the feature wall of pretty colours! Step Seven – Glaze (Gloss or sometimes called “Glost”) Firing Most of the time this is the final stage of making your creation (but not always!) The glaze kiln goes to 1240°C. This is called cone 6, or midrange. It is the low end of stoneware temperatures. Stoneware clays and glazes are typically fired at cone 8 – 10, that is 1260 – 1290°C. The energy requirement to go from 1240°C to 1280°C is almost a 30% more! Our clay is formulated to vitrify (mature, turn “glass-like”) at 1240°, as are our glazes. A glaze kiln take around 12 hours to reach temperature and two to three days to cool down. Sometimes a third firing process is required – this is for decoration that is added to work after the glaze firing. For example – adding precious metals and lustres. this firing temperature is usually around 600 – 800°C depending upon the techniques being used. There are many students interested in gold and silver trims – we will be doing this third type of firing soon! After firing your work will be in the student finished work shelves. Remember to pay for it before you head out the door! There is a small extra charge for using porcelain clay (it’s more than twice the price of regular clay), and for any third firing process! Once your work has been fired it can not turn back into clay for millennia – so don’t fire it if you don’t like it! Put it in the bucket for recycling. https://firebirdstudios.com.au/the-process-of-making-pottery/Ceramics have evolved over thousands of years.A white earthenware side plate with a gadroon edge. Has water marks and chips on front.‘Johnson Bros England Reg No 15587’flagstaff hill, warrnambool, shipwrecked-coast, flagstaff-hill, flagstaff-hill-maritime-museum, maritime-museum, shipwreck-coast, flagstaff-hill-maritime-village, johnson bros, ceramics, tableware -
 Flagstaff Hill Maritime Museum and Village
Domestic object - Plate, Alfred Meakin
The Process of Making Pottery Decorating, Firing, Glazing, Making, Technical There is a rhythm and flow to clay. It can’t be done all at once! Even the making process! It can take weeks to get everything done, especially if you can only work on your pottery once a week! Even though we have three hour classes, it’s often just not enough time! Here is an overview of some of the processes so you have a bit more grasp on some of the technical stuff! Step One – Design There are SO many ideas out there for making stuff in clay! From delicate porcelain jewellery, through to heavy sculptural work and everything in between. Deciding your direction is sometimes not that easy – when you first start, try everything, you will naturally gravitate to the style that you enjoy! The options and variations are endless and can get a wee bit overwhelming too! Check in with me before you start to ensure your ideas will work, what order you might do things, how you could achieve the look you are seeking and any other technical data required! Step Two – Making Clay is thixotropic. This means that as you work with it, the clay first gets sloppier and wetter, before is begins to dry in the atmosphere. For most things, you simply can’t do all parts of the project at once. An example of work order might look like: Get last weeks work out from the shelves Prepare clay for today’s work – roll your clay, prepare balls for throwing, make the first stage of a pinch pot) Clean up last week’s work and put it on the shelf for bisque firing Check that you have any glazing to do – and do enough of it that you will have time to finish your main project Do the next step of your next project – there might be a further step that can’t be complete immediately, in that case, wrap your work well and put onto the shelves. Letting your work rest for a while can really help keep your work clean and professional looking. Many things require bagging under plastic to keep it ready for work the next week – put your name on the outside of the bag so you can find your work easily. We have stickers and markers. Consider how you want to decorate your work – coloured slip can be applied at a fairly wet stage (remembering that it will make your work even wetter!). Trying to apply slip to dry clay won’t work! If you want to do sgraffito – you will need to keep the work leather hard (a state of dryness where you can still work the clay with a little effort and a little water and care). Step Three – Drying Most of the time your work can go into the rack uncovered to let it dry out for the following week. If you want to continue forming or shaping you will need to double bag your work – put your work on a suitable sized bat and put the bat in a bag so the base of the bag is under the bat, then put another bag over the top of the work and tuck the top of the bag under the bat. If you want to trim (or turn) your thrown work the following week, it should also be double bagged. If your work is large, delicate, or of uneven thicknesses, you should lightly cover your work for drying. When considering the drying process, bare in mind the weather, humidity and wind! The hotter and dryer, the faster things dry and work can dry unevenly in the shelves – this can lead to cracking – another time to lightly cover your work for drying. Step Four – Trimming and Cleaning Up Your work is dry! It is called greenware now and it is at it’s most fragile! Handle everything with two hands. I often refer to soft hands – keep everything gentle and with your fingers spread as much as possible. Try to not pick up things like plates too much, and always with both hands! Before your work can be bisque fired it should be “cleaned up”. You work won’t go into the kiln if it has sharp edges – when glazed, sharp edges turn into razor blades! Use a piece of fly wire to rub the work all over – this will scratch a little so be light handed. Use a knife or metal kidney to scrape any areas that require a bit more dynamic treatment than the fly wire offers! Finally, a very light wipe over with a slightly damp sponge can help soften and soothe all of your edges and dags! Trimming thrown work: If you are planning to trim (or turn) your thrown work (and you should be), make sure you bag it well – your work should be leather hard to almost dry for easiest trimming. Use this step to finish the work completely – use a metal kidney to polish the surface, or a slightly damp sponge to give a freshly thrown look. Wipe the sponge around the rim after trimming, and check the inside of the pot for dags! Trimming slip cast work: Usually I will trim the rims of your work on the wheel the following day to make that stage easier, however you will still need to check your work for lumps and bumps. Last but not least – check that your name is still clearly on the bottom of your work. Step Five – Bisque Firing When the work is completely dry it can go into the bisque kiln. The bisque kiln is fired to 1000°C. This process burns off the water in the clay as well as some of the chemically bound water. The structure of the clay is not altered that much at this temperature. Inside the bisque kiln, the work is stacked a little, small bowl inside a larger bowl and onto a heavy plate. Smaller items like decorations or drink coasters might get stacked several high. Consideration is paid to the weight of the stack and shape of the work. A bisque kiln can fire about one and a half times the amount of work that the glaze kiln can fire. The firing takes about 10 hours to complete the cycle and about two days to cool down. Once it has been emptied the work is placed in the glaze room ready for you to decorate! Step Six – Glazing Decorating your work with colour can be a lot of fun – and time consuming! There are three main options for surface treatment at this stage: Oxide Washes Underglazes Glazes Washes and underglazes do not “glaze” the work – It will still need a layer of glaze to fully seal the clay (washes don’t need glaze on surfaces not designed for food or liquid as they can gloss up a little on their own). Underglazes are stable colourants that turn out pretty much how they look in the jar. They can be mixed with each other to form other colours and can be used like water colours to paint onto your work. Mostly they should have a clear glaze on top to seal them. Oxides are a different species – the pink oxide (cobalt) wash turns out bright blue for instance. They don’t always need a glaze on top, and some glazes can change the colour of the wash! The glazes need no other “glaze” on top! Be careful of unknown glaze interactions – you can put any combination of glaze in a bowl or on a plate, but only a single glaze on the outside of any vertical surface! Glazes are a chemical reaction under heat. We don’t know the exact chemicals in the Mayco glazes we use. I can guess by the way they interact with each other, however, on the whole, you need to test every idea you have, and not run the test on a vertical surface! Simply put, glaze is a layer of glass like substance that bonds with the clay underneath. Clay is made of silica, alumina and water. Glaze is made of mostly silica. Silica has a melting point of 1700°C and we fire to 1240°C. The silica requires a “flux” to help it melt at the lower temperature. Fluxes can be all sorts of chemicals – a common one is calcium – calcium has a melting point of 2500°C, however, together they both melt at a much lower temperature! Colourants are metal oxides like cobalt (blue), chrome (green through black), copper (green, blue, even red!), manganese (black, purple and pink) iron (red brown), etc. Different chemicals in the glaze can have dramatic effects. for example, barium carbonate (which we don’t use) turns manganese bright pink! Other elements can turn manganese dioxide brown, blue, purple and reddish brown. Manganese dioxide is a flux in and of itself as well. So, glazes that get their black and purple colours, often interact with other glazes and RUN! Our mirror black is a good example – it mixes really well with many glazes because it fluxes them – causes them to melt faster. It will also bring out many beautiful colours in the glazes because it’s black colouring most definitely comes from manganese dioxide! Glaze chemistry is a whole subject on it’s own! We use commercial Mayco glazes on purpose – for their huge range of colour possibilities, stability, cool interactions, artistic freedom with the ability to easily brush the glazes on and ease of use. We currently have almost 50 glazes on hand! A major project is to test the interactions of all glazes with each other. That is 2,500 test tiles!!!! I’m going to make the wall behind the wheels the feature wall of pretty colours! Step Seven – Glaze (Gloss or sometimes called “Glost”) Firing Most of the time this is the final stage of making your creation (but not always!) The glaze kiln goes to 1240°C. This is called cone 6, or midrange. It is the low end of stoneware temperatures. Stoneware clays and glazes are typically fired at cone 8 – 10, that is 1260 – 1290°C. The energy requirement to go from 1240°C to 1280°C is almost a 30% more! Our clay is formulated to vitrify (mature, turn “glass-like”) at 1240°, as are our glazes. A glaze kiln take around 12 hours to reach temperature and two to three days to cool down. Sometimes a third firing process is required – this is for decoration that is added to work after the glaze firing. For example – adding precious metals and lustres. this firing temperature is usually around 600 – 800°C depending upon the techniques being used. There are many students interested in gold and silver trims – we will be doing this third type of firing soon! After firing your work will be in the student finished work shelves. Remember to pay for it before you head out the door! There is a small extra charge for using porcelain clay (it’s more than twice the price of regular clay), and for any third firing process! Once your work has been fired it can not turn back into clay for millennia – so don’t fire it if you don’t like it! Put it in the bucket for recycling. https://firebirdstudios.com.au/the-process-of-making-pottery/Ceramics have evolved over thousands of years.Earthenware dessert plate, cream colour. Made by Alfred Meakin, England. Backstamped ‘Alfred Meakin England’. flagstaff hill, warrnambool, shipwrecked-coast, flagstaff-hill, flagstaff-hill-maritime-museum, maritime-museum, shipwreck-coast, flagstaff-hill-maritime-village, alfred meakin, ceramics, earthenware, kitchenware -
 Flagstaff Hill Maritime Museum and Village
Domestic object - Jug
The Process of Making Pottery Decorating, Firing, Glazing, Making, Technical There is a rhythm and flow to clay. It can’t be done all at once! Even the making process! It can take weeks to get everything done, especially if you can only work on your pottery once a week! Even though we have three hour classes, it’s often just not enough time! Here is an overview of some of the processes so you have a bit more grasp on some of the technical stuff! Step One – Design There are SO many ideas out there for making stuff in clay! From delicate porcelain jewellery, through to heavy sculptural work and everything in between. Deciding your direction is sometimes not that easy – when you first start, try everything, you will naturally gravitate to the style that you enjoy! The options and variations are endless and can get a wee bit overwhelming too! Check in with me before you start to ensure your ideas will work, what order you might do things, how you could achieve the look you are seeking and any other technical data required! Step Two – Making Clay is thixotropic. This means that as you work with it, the clay first gets sloppier and wetter, before is begins to dry in the atmosphere. For most things, you simply can’t do all parts of the project at once. An example of work order might look like: Get last weeks work out from the shelves Prepare clay for today’s work – roll your clay, prepare balls for throwing, make the first stage of a pinch pot) Clean up last week’s work and put it on the shelf for bisque firing Check that you have any glazing to do – and do enough of it that you will have time to finish your main project Do the next step of your next project – there might be a further step that can’t be complete immediately, in that case, wrap your work well and put onto the shelves. Letting your work rest for a while can really help keep your work clean and professional looking. Many things require bagging under plastic to keep it ready for work the next week – put your name on the outside of the bag so you can find your work easily. We have stickers and markers. Consider how you want to decorate your work – coloured slip can be applied at a fairly wet stage (remembering that it will make your work even wetter!). Trying to apply slip to dry clay won’t work! If you want to do sgraffito – you will need to keep the work leather hard (a state of dryness where you can still work the clay with a little effort and a little water and care). Step Three – Drying Most of the time your work can go into the rack uncovered to let it dry out for the following week. If you want to continue forming or shaping you will need to double bag your work – put your work on a suitable sized bat and put the bat in a bag so the base of the bag is under the bat, then put another bag over the top of the work and tuck the top of the bag under the bat. If you want to trim (or turn) your thrown work the following week, it should also be double bagged. If your work is large, delicate, or of uneven thicknesses, you should lightly cover your work for drying. When considering the drying process, bare in mind the weather, humidity and wind! The hotter and dryer, the faster things dry and work can dry unevenly in the shelves – this can lead to cracking – another time to lightly cover your work for drying. Step Four – Trimming and Cleaning Up Your work is dry! It is called greenware now and it is at it’s most fragile! Handle everything with two hands. I often refer to soft hands – keep everything gentle and with your fingers spread as much as possible. Try to not pick up things like plates too much, and always with both hands! Before your work can be bisque fired it should be “cleaned up”. You work won’t go into the kiln if it has sharp edges – when glazed, sharp edges turn into razor blades! Use a piece of fly wire to rub the work all over – this will scratch a little so be light handed. Use a knife or metal kidney to scrape any areas that require a bit more dynamic treatment than the fly wire offers! Finally, a very light wipe over with a slightly damp sponge can help soften and soothe all of your edges and dags! Trimming thrown work: If you are planning to trim (or turn) your thrown work (and you should be), make sure you bag it well – your work should be leather hard to almost dry for easiest trimming. Use this step to finish the work completely – use a metal kidney to polish the surface, or a slightly damp sponge to give a freshly thrown look. Wipe the sponge around the rim after trimming, and check the inside of the pot for dags! Trimming slip cast work: Usually I will trim the rims of your work on the wheel the following day to make that stage easier, however you will still need to check your work for lumps and bumps. Last but not least – check that your name is still clearly on the bottom of your work. Step Five – Bisque Firing When the work is completely dry it can go into the bisque kiln. The bisque kiln is fired to 1000°C. This process burns off the water in the clay as well as some of the chemically bound water. The structure of the clay is not altered that much at this temperature. Inside the bisque kiln, the work is stacked a little, small bowl inside a larger bowl and onto a heavy plate. Smaller items like decorations or drink coasters might get stacked several high. Consideration is paid to the weight of the stack and shape of the work. A bisque kiln can fire about one and a half times the amount of work that the glaze kiln can fire. The firing takes about 10 hours to complete the cycle and about two days to cool down. Once it has been emptied the work is placed in the glaze room ready for you to decorate! Step Six – Glazing Decorating your work with colour can be a lot of fun – and time consuming! There are three main options for surface treatment at this stage: Oxide Washes Underglazes Glazes Washes and underglazes do not “glaze” the work – It will still need a layer of glaze to fully seal the clay (washes don’t need glaze on surfaces not designed for food or liquid as they can gloss up a little on their own). Underglazes are stable colourants that turn out pretty much how they look in the jar. They can be mixed with each other to form other colours and can be used like water colours to paint onto your work. Mostly they should have a clear glaze on top to seal them. Oxides are a different species – the pink oxide (cobalt) wash turns out bright blue for instance. They don’t always need a glaze on top, and some glazes can change the colour of the wash! The glazes need no other “glaze” on top! Be careful of unknown glaze interactions – you can put any combination of glaze in a bowl or on a plate, but only a single glaze on the outside of any vertical surface! Glazes are a chemical reaction under heat. We don’t know the exact chemicals in the Mayco glazes we use. I can guess by the way they interact with each other, however, on the whole, you need to test every idea you have, and not run the test on a vertical surface! Simply put, glaze is a layer of glass like substance that bonds with the clay underneath. Clay is made of silica, alumina and water. Glaze is made of mostly silica. Silica has a melting point of 1700°C and we fire to 1240°C. The silica requires a “flux” to help it melt at the lower temperature. Fluxes can be all sorts of chemicals – a common one is calcium – calcium has a melting point of 2500°C, however, together they both melt at a much lower temperature! Colourants are metal oxides like cobalt (blue), chrome (green through black), copper (green, blue, even red!), manganese (black, purple and pink) iron (red brown), etc. Different chemicals in the glaze can have dramatic effects. for example, barium carbonate (which we don’t use) turns manganese bright pink! Other elements can turn manganese dioxide brown, blue, purple and reddish brown. Manganese dioxide is a flux in and of itself as well. So, glazes that get their black and purple colours, often interact with other glazes and RUN! Our mirror black is a good example – it mixes really well with many glazes because it fluxes them – causes them to melt faster. It will also bring out many beautiful colours in the glazes because it’s black colouring most definitely comes from manganese dioxide! Glaze chemistry is a whole subject on it’s own! We use commercial Mayco glazes on purpose – for their huge range of colour possibilities, stability, cool interactions, artistic freedom with the ability to easily brush the glazes on and ease of use. We currently have almost 50 glazes on hand! A major project is to test the interactions of all glazes with each other. That is 2,500 test tiles!!!! I’m going to make the wall behind the wheels the feature wall of pretty colours! Step Seven – Glaze (Gloss or sometimes called “Glost”) Firing Most of the time this is the final stage of making your creation (but not always!) The glaze kiln goes to 1240°C. This is called cone 6, or midrange. It is the low end of stoneware temperatures. Stoneware clays and glazes are typically fired at cone 8 – 10, that is 1260 – 1290°C. The energy requirement to go from 1240°C to 1280°C is almost a 30% more! Our clay is formulated to vitrify (mature, turn “glass-like”) at 1240°, as are our glazes. A glaze kiln take around 12 hours to reach temperature and two to three days to cool down. Sometimes a third firing process is required – this is for decoration that is added to work after the glaze firing. For example – adding precious metals and lustres. this firing temperature is usually around 600 – 800°C depending upon the techniques being used. There are many students interested in gold and silver trims – we will be doing this third type of firing soon! After firing your work will be in the student finished work shelves. Remember to pay for it before you head out the door! There is a small extra charge for using porcelain clay (it’s more than twice the price of regular clay), and for any third firing process! Once your work has been fired it can not turn back into clay for millennia – so don’t fire it if you don’t like it! Put it in the bucket for recycling. https://firebirdstudios.com.au/the-process-of-making-pottery/The form of the jug has been in use for many centuries.Stoneware jug. Two tone brown glaze with pierced lip behind spout. Spout chipped.None.flagstaff hill, warrnambool, shipwrecked-coast, flagstaff-hill, flagstaff-hill-maritime-museum, maritime-museum, shipwreck-coast, flagstaff-hill-maritime-village, jug, ceramic jug -
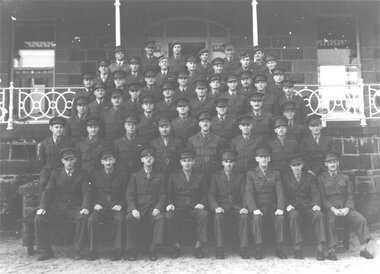 Lara RSL Sub Branch
79th Fighter Squadron, Wooloomanata
The 79th Fighter Squadron was initially formed at Laverton on the 26th April, 1943 under the command of flying ace Squadron Leader Alan Rawlinson, but within seven days moved to Wooloomanata Homestead on the Geelong-Bacchus Marsh Rd, No 1580 in Victoria. It was a Spitfire Squadron and used Wooloomanata as a training base before flying. It was disbanded 20th October, 1945.Of national Significance as a Spitfire Squadron training camp in Lara Districts during WW2Glossy photo and A4 documentOn the back of the photo is "No:15 Course 18th April 1943 on the steps of Wooloomanata Homestead Southern Side". On the bottom is a list of the names of those in the photo. Left to Right Rear Row: Maj. K. Ewen, Capt. N.F. Attree, Capt. C.N. Bucknell, Capt. J.L. McKenzie, Capt. C.D. Seabrook, Lt. W.G. Foley. Second row from rear: Maj. C. Dumble, Capt. A. Tavener, Maj. F. Langford, Maj. T.A.R. Cleave, Capt. M.D. Waller, Capt. J.B. Ainslie, Capt. G.M.Taylor. Third row from rear: Capt. E.K. Jennings, Lt. J.H. Loxton, Capt. D.J. Breheny, Lt. R.V. Stephens, Capt J.W.D. Cornell, Maj. C.A. Ricketts, Lt. A.R. Creswick. Fourth row from rear: Lt. W. Ruthven (V.C.), Capt. R.C. Tomkins, Capt. R.J.Bermingham, Maj. A.E. Arnott, Capt. L.S. Ralton, Maj. F.L. Edmunds, Capt. W.E. Paterson. Fifth row from rear: Maj. H.W. Stockwell, Capt. C.A. Ferry, Maj. A.C. Jennings, Capt. W.L. Hart, Maj. R.R. Marston, Capt. R.A. Cameron, Capt. R.W.M. Page. Sixth Row from rear: Lt. A.E. Pizzy, Capt. A.G. Yungman, Maj.T.G. Court, Maj. J.B. Chapman, Maj. H.F. Gough, Maj. P.L. Barbour, Maj. H.M. Heward, Maj. E.C. Nolte. Front Row: Lt. G.H. Rowden, Capt. C.J.F. Pollett, Maj. A.E.Bunbury, Lt-Col. E.W. Bundey, Major W.A. Cronk, Capt. B.V. Eames, Lt. N.D. Anderson, Maj. C.A. Lotherington. Absent: Lt. R.R. Webster, Lt. R.B. Blackwell The A4 is a written description of a brief history of the 79th Fighter Squadron79th fighter squadron, raaf, wooloomanata, spitfire, world war 2, ww2, peter anderson, southern command training school, 15 course 18th april 1943 -
 Federation University Historical Collection
Book, Gippsland Institute of Advanced Education Handbooks, 1970-1985
.1) 1977 Gippsland Institute of Advanced Education Handbook with white cover .2) 1978 Gippsland Institute of Advanced Education Handbook with blue/black cover .3) 1979 Gippsland Institute of Advanced Education Handbook with orange cover .4) 1980 Gippsland Institute of Advanced Education Handbook with yellow/brown cover .5) 1981 Gippsland Institute of Advanced Education Handbook with grey/black cover .6 1984 Gippsland Institute of Advanced Education Handbook with blue cover .7) 1985 Gippsland Institute of Advanced Education Handbook with purple cover .8) 1989 Gippsland Institute of Advanced Education Handbook with white/purple/grey/red/blue cover .7) 1985 Gippsland Institute of Advanced Education Handbook with pale green cover. .9) 1974 Gippsland Institute of Advanced Education Handbook with orangeand white cover .10) 1975 Gippsland Institute of Advanced Education Handbook with green and white cover .11) 1976 Gippsland Institute of Advanced Education Handbook with white cover .12) 1986 Gippsland Institute of Advanced Education Handbook with mid-blue cover .13) 1987 Gippsland Institute of Advanced Education Handbook with red cover .14) 1988 Gippsland Institute of Advanced Education Handbook with red cover .15) 1973 Gippsland Institute of Advanced Education Handbook with brown cover .16) 1972 Gippsland Institute of Advanced Education Handbook with pale green cover .17) 1971 Gippsland Institute of Advanced Education Handbook with mid-blue cover non-fictiongippsland institute of advanced education, giae, gippsland, churchill, morwell, electricty, handbook, gippsland campus -
 Flagstaff Hill Maritime Museum and Village
Functional object - Padlock, c. 1855
This padlock has been salvaged from the wrecked sailing ship SCHOMBERG. It is not known whether the padlock was a part of the ship’s equipment or if it was among personal effects or cargo. At some point in time the padlock has been mounted and sealed in resin, perhaps for both display and preservation purposes. ABOUT THE SCHOMBERG When SCHOMBERG was launched in 1855, she was considered the “Noblest ship that ever floated on water.” SCHOMBERG’s owners, the Black Ball Line, commissioned the ship for their fleet of passenger liners. She was built by Alexander Hall of Aberdeen. Overall she had accommodation for 1000 passengers. SCHOMBERG’s 34 year old master, Captain ‘Bully’ Forbes, (James Nicol Forbes) was born in Aberdeen in 1821 and rose to fame with his record-breaking voyages on the famous Black Ball Line ships; MARCO POLO and LIGHTNING. On this, the SCHOMBERG’s maiden voyage, he was going to break records. SCHOMBERG departed Liverpool 6 October 1855 flying the sign “Sixty Days to Melbourne”. She carried 430 passengers and 3000 tons cargo including iron rails and equipment intended to build the Melbourne to Geelong Railway and a bridge over the Yarra from Melbourne to Hawthorn. She also carried a cow for fresh milk, pens for fowls and pigs, 90,000 gallons of water for washing and drinking, 17,000 letters and 31,800 newspapers. The ship and cargo was insured for $300,000, a fortune for the time. The winds were poor as she sailed across the equator, slowing SCHOMBERG’s journey considerably. Land was first sighted on Christmas Day, at Cape Bridgewater near Portland, and Captain Forbes followed the coastline towards Melbourne. Forbes was said to be playing cards when called by the Third Mate Henry Keen, who reported land about 3 miles off, Due in large part to the captain's regarding a card game as more important than his ship, it eventually ran aground on a sand spit near Curdie's Inlet (about 56 km west of Cape Otway) on 26 December 1855, 78 days after leaving Liverpool. The sand spit and the currents were not marked on Forbes’s map. The crew from the scouting party advised Forbes to wait until morning before trying to take the passengers to safety in the lifeboats because the rough seas could easily overturn the small vessels. The ship’s Chief Officer spotted SS QUEEN at dawn and signalled the steamer. The master of the SS QUEEN approached the stranded vessel and all of SCHOMBERG’s passengers and crew were able to disembark safely. The SCHOMBERG was lost and with her, Forbes’ reputation. The Black Ball Line’s Melbourne agent sent a steamer to retrieve the passengers’ baggage from the SCHOMBERG. Other steamers helped unload her cargo until the weather changed and prevented the salvage teams from accessing the ship. Later one plunderer found a case of Wellington boots, but alas, all were for the left foot! Local merchants Manifold & Bostock bought the wreck and cargo, but did not attempt to salvage the cargo that was still on board the ship. They eventually sold it on to a Melbourne businessman and two seafarers. In 1864, after two of the men drowned when they tried to reach SCHOMBERG, salvage efforts were abandoned. Parts of the SCHOMBERG were washed ashore on the south island of New Zealand in 1870, nearly 15 years after the wreck. The wreck now lies in 825 metres of water and the shape of the ship can still be seen due to the remaining railway irons, girders and the ship’s frame. A variety of goods and materials can be seen scattered about nearby. Flagstaff Hill holds many items salvaged from the SCHOMBERG including a ciborium (in which a diamond ring was concealed), communion set, ship fittings and equipment, personal effects, a lithograph, tickets, menu and photograph from the SCHOMBERG. This brass padlock is registered as an artefact in the SCHOMBERG collection. The SCHOMBERG collection as a whole is of historical and archaeological significance at a State level, listed on the Victorian Hertage Register VHR S612. Flagstaff Hill’s collection of artefacts from the SCHOMBERG is significant for its association with the Victorian Heritage Registered shipwreck. The collection is primarily significant because of the relationship between the objects, as together they have a high potential to interpret the story of the SCHOMBERG. The SCHOMBERG collection is archaeologically significant as the remains of an international passenger ship. The shipwreck collection is historically significant for representing aspects of Victoria’s shipping history and its potential to interpret sub-theme 1.5 of Victoria’s Framework of Historical Themes (living with natural processes). The collection is also historically significant for its association with the shipwreck and the ship, which was designed to be fastest and most luxurious of its day. The SCHOMBERG collection meets the following criteria for assessment: Criterion A: Importance to the course, or pattern, of Victoria’s cultural history. Criterion B: Possession of uncommon, rare or endangered aspects of Victoria’s cultural history. Criterion C: Potential to yield information that will contribute to an understanding of Victoria’s cultural Brass Padlock lying in a wooden block and encased in resin. The wood encasing the padlock has seven man-made holes in it, perhaps used to hand as a display. There was a paper label with an inscription on the top and bottom of the wood immediately surrounding the padlock. the brass has tarnished. Recovered from the wreck of the Schomberg in 1974.Marked on block - "Recovered 1974 'Schomberg'"flagstaff hill, warrnambool, shipwrecked-coast, flagstaff-hill, flagstaff-hill-maritime-museum, maritime-museum, shipwreck-coast, flagstaff-hill-maritime-village, padlock, schomberg shipwreck, brass padlock circa 1855, object salvaged from shipwreck, captain bully forbes, 19th century security hardware, sjouvenir, security, brass padlock -
Bendigo Historical Society Inc.
Document - TOWN HALL, THE BENDIGO CHORAL SOCIETY, 17 December, 1919
Town Hall, The Bendigo Choral Society. (Season 1919-Third Concert) Eleventh Grand Concert, Town Hall. Wednesday, December 17th, 1919. Artists: Miss Claire Colgan, Miss Myrtle Knight, Mr E H Collett, Mr A E Sayer. Conductor: Mr W C Frazier, A.R.C.O. Pianiste: Miss Muriel Hyett, L.A.B. Patron-His Worship the Mayor (Cr. J H Curnow). President-Mr H M Leggo. Vice-Presidents-Sir John Quick, Cr. C W Beebe, Mr Oscar Flight, Mr E S Cahill, Mr D Berrriman, Mr A L Bolton, Mr G E Bolton, Dr W G Long, DR O Penfold, Mr J G Oliphant, Mr Alf E Wallis, Mr A Whitehead, Mr W Watts. From the performing Members-Mr E H Collett, Mr A W McGibboney. Conductor-Mr W C Frazier, A.R.C.O. Sub-Conductor- Mr E A Miller, Pianist-Miss Muriel Hyett, L.A.B. Ass. Sec.-Mr Fred A Wittscheibi. Treasurer-Mr D H Holden. Librarians-Mr R J Duguid & G L McCoy. Auditors-Mr H T Bayton, A.A.I.S. * Harold Walker. Committee-Office Bearers: Mesdames T Scott, & Chisholm, & Misses Colgan, Gall, Field & Wheaton, & Messrs Sleeman, Jeffrey, McClure, Brown, F J Walter & Frank Wittscheibe. Subscribers may book at Flights on and After 12th December, without extra fee. Holders of 2/2 tickets may also book by paying difference, 1/1. Admission- 2/2/ Reserved, 1/1/ Ordinary, including tax. J Hudspeth, Hon. Secretary, 85 Wills Street, Bendigo. Programme. 'Comfort Ye' 'Every Valley' 'And the Glory', Hungarian Danse' No.3, 'Softly Sighs', 'Fire, Fire my Heart', 'Spring', 'Best Pair of Sirens', ' Legende', 'Eleanore', 'Dream Wind', 'Ave Maria', 'Fantasie Pastorale', 'O Great is the Depth'. 'Dream Wind' Words by William Sharp. 'Fire, Fire My Heart' Words by Morley. 'Blest Sirens' ''Voice'' and ''Verse'' Words by Milton. The Bendigo Choral Society. Exists for the worthy production of the choral works of the great composers. Under the leadership of Mr Frazier it cam fairly claim to have accomplished this, at least in some degree, during the past year. Works have been. . . . . . Note - The rehearsals will be resumed 2nd week in February, 1920. Annual Meeting 3rd week. A and b are same, a is in excellent condition, b has some slight discoloration on the back. Both have been folded in half and in half againBolton Bros, Printersprogram, theatre, the bendigo choral society -
Bendigo Historical Society Inc.
Document - BENDIGO TOWN HALL, THE MUSIC ADVANCEMENT SOCIETY OF BENDIGO, 1952
a/ The Music Advancement Society of Bendigo presents the 'Astra' Chamber Orchestral Society. Conductor: Madame Asta Flack. Soloist: Boris Stupel, Violinist. Town Hall, Bendigo, Saturday, 23 February, 1952, 8pm. Hon. Secs: Madge Edgar, Merle Bockholt. Includes Programme. Orchestra. Piano: Mary Crompton. Advertisements: Frank J Every & Sons, Hargreaves St., Bendigo. Phone 874. Allan's, Allans' Walk Bendigo. Edgars Authorised Newsagency, 293 Hargreaves St., Bendigo. Telephone 238. b/ The Music Advancement Society of Bendigo presents the Second Concert 1952 Series. Cellist: Otto Veit. Pianist: Bernice Lehmann. Town Hall, Bendigo. Sat 5th, April, 1952, 8.15pm. Hon. Sec.: Madge Edgar, Merle Bockholt. Advertisements: Alan C Hampton, Newsagent Bookseller Stationer. 243 Mitchell St., Bendigo. Phone 421. Allan's 'The Home of Music' Bendigo. c/ The Music Advancement Society of Bendigo presents the Third Concert 1952 Series. Flautist: John Amadio. Soprano: Marie Collier. Pianist: Meryl Ross. Town Hall, Bendigo. Saturday, 2nd August, 1952, 8.15pm. Hon. Sec: Madge Edgar, Merle Bockholt. Advertisements: Frank J Every & Sons, Hargreaves Street, Bendigo. Ph: 874. Allan's for the Latest Classical Recordings. Allan's Walk, Bendigo. Edgars' 293 Hargreaves St. Bendigo. Telephone 238. d/ The Music Advancement Society of Bendigo presents the Fourth Concert 1952 Series in association with The Argus, Melbourne. Argus Lieder Prizewinners: Merlyn Todd, Margaret Bourne, Accompanist: Phyllis House. Paul McDermott Quartette. Paul McDermott First Violin. Leon La Gruta Second violin. Paul O'Brien Viola. Otti Veit 'Cello. Town Hall, Bendigo on Saturday, 20th September 1952. 8.15pm. Hon. Sec.: Madge Edgar, Merle Bockholt. Broadcast by 3LO, 9.30 - 10.00pm. Advertisements: A C Hampton, Mitchell Street, Bendigo. Whatever you are needing for writing or reading. Booked, Stationery, Newspapers and Magazines. Allan's, Allans' Walk, Bendigo. Beale Pianos. Moderately priced. Easy terms arranged. Edgars' Booksellers, Stationers, Authorised Newsagents, 293 Hargreaves St. Bendigo. Telephone 238. Insert: National Theatre Movement of Australia, Bendigo Branch. The Three Arts Festival, October 11th - 16th, Halls as advertised. Saturday, 11th Oct.: Victoria Anderson & Viola Morris. Monday, 13th Oct.: The Late Edwina Black. Wednesday, 15th Oct.: Bendigo Orchestra & Shakespeare Society. Thursday, 16th Oct.: Vocal & Instrumental Concert. Ticket costing listed, bookings at Allan's opens for Season's Bookings 1st Oct. and for separate Concerts on 6th October.Bolton Bros. Pty. Ltd., Printers, Bendigoprogram, theatre, music advancement society of bendig, a/ the music advancement society of bendigo presents 'astra' chamber orchestral society. conductor: madame asta flack. soloist: boris stupel, violinist. town hall, bendigo, 23 feb, 1952. hon. secs: madge edgar, merle bockholt. includes programme. orchestra. piano: mary crompton. advertisements: frank j every & sons, hargreaves st., bendigo. phone 874. allan's, allans' walk bendigo. edgars authorised newsagency, 293 hargreaves st., bendigo. ph 238. b/ second concert 1952 series. cellist: otto veit. pianist: bernice lehmann.. 5th, april, 1952. advertisements: alan c hampton, newsagent bookseller stationer. 243 mitchell st., bendigo. ph 421. allan's 'the home of music' bendigo. c/ third concert 1952 series. flautist: john amadio. soprano: marie collier. pianist: meryl ross. 2nd august, 1952, 8.15. hon. sec: madge edgar, merle bockholt. advertisements: frank j every & sons, hargreaves street, bendigo. ph: 874. allan's for the latest classical recordings. allan's walk, bendigo. edgars' 293. bendigo. ph 238. d/ fourth concert 1952 the argus, melbourne. argus lieder prizewinners: merlyn todd, margaret bourne, accompanist: phyllis house. paul mcdermott quartette. paul mcdermott first violin. leon la gruta second violin. paul o'brien viola. otti veit 'cello. town hall, bendigo on saturday, 20th september 1952. broadcast by 3lo, 9.30 - 10.00pm. advertisements: a c hampton, bendigo.. allan's, allans' walk, bendigo. beale pianos. moderately priced. edgars'. bendigo. telephone 238. insert: national theatre movement of australia, bendigo branch. the three arts festival, october 11th - 16th, halls as advertised. 11th oct.: victoria anderson & viola morris. 13th oct.: the late edwina black. wednesday, 15th oct.: bendigo orchestra & shakespeare society. 16th oct.: vocal & instrumental concert -
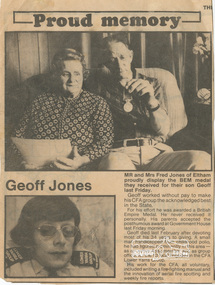 Eltham District Historical Society Inc
Document - Folder, Jones, 1979
Fred, Gwenda and Geoff Jones Contents 1. Proud memory; Geoff Jones, Diamond Valley News, 21 Nov 1979 2. Sudden death of 'much loved man', Diamond Valley News, 13 Feb 1979 3. Honor for a community friend, Diamond Valley News, 8 March 1995 (On reverse, 'Diverse program to entice riders' about St Andrews Saddle Club and fgeatures a photo of Debbie Jones) Gwendoline (Gwenda) Grace Watson Davies, only daughter of Mr. William Watson Davies and Mrs. Grace Davies (nee Hayes) of Arthur Street, Eltham was born in Newport, 18 February 1908. Gwenda grew up in Arthur Street and when she left school she was employed as an officer at the State Bank of Victoria, Chief Accountants Department, Head Office, Elizabeth Street, Melbourne. On October 20, 1937 after ten years of service, Gwenda submitted her letter of resignation effective November 26th as she was to be married in the near future to Fred Jones. Frederick Geoffrey Jones, born 7 January 1911, third son of Mr. and Mrs. W. Jones of Napoleon Street, Eltham, married Gwenda at the Eltham Methodist Church on 27 November 1937. They made their home at ‘Llangollen’, Arthur Street, Eltham, a new house Fred had constructed earlier that year opposite the Shire Offices. Their residence was recorded in the Electoral Rolls from 1963-1980 as 6 Arthur Street, Eltham which was situated on the corner of Arthur Street and present-day Commercial Place. In the 1970s their home was sold and demolished to make way for the new shops. They built a new home at the top of the hill in Bible Street. In the Electoral Rolls for 1943-1980, Frederick’s occupation was recorded as a Plumber’s Assistant. Fred was also a long-standing member of the Eltham Cemetery Trust. He was first appointed 26 April 1944 and resigned 17 July 1957 to be appointed to the Warringal and Eltham Joint Trust where he served till February 1980. He then re-joined the Eltham Cemetery Trust and served a further 14 years till his resignation on 24 August 1994. In total, Fred represented the interests of Eltham Cemetery for 50 years (1944-1994). Gwenda and Fred were blessed with a son, Frederick William Jones in March 1942. Sadly, Frederick only lived two days and was buried at Eltham Cemetery on March 11. It is not known whether his grave is marked. A second son, Geoffrey Morris Jones arrived 25 November 1944 but he sadly contracted polio as a child. A fall down the front steps of Fred and Gwenda’s new home in Bible Street culminated in Geoff’s death from a heart attack whilst in transit to the Austin Hospital on February 6, 1979, at age 34. He was also interred in the Eltham Cemetery. Geoff was posthumously awarded the British Empire Medal for his services to fire safety at the CFA. A small man, handicapped from his childhood polio, he had figured prominently in the area as an active Apex member and as group officer for the 13 local brigades in the CFA Lower Yarra Group. His work for the CFA, all voluntary, included writing a fire-fighting manual and the innovation of aerial fire spotting and weekly fire reports. Gwendoline and Fred were presented with Geoff’s B.EM. award at Government House. Four years later on the anniversary of Geoff’s death, Gwenda could not sleep and collapsed in the hallway at home from a heart attack, 6 February 1983 at age 74. She was interred with her son Geoff, at Eltham Cemetery on February 9th. Fred died 31 July 1997 at age 86 and was also interred at Eltham Cemetery. A memorial plaque to Gwenda, Fred and Geoff lies within the lawn cemetery at Eltham Cemetery.Newsprint clippingscfa, eltham cemetery, eltham cemetery trust, frederick geoffrey jones, geoffrey morris jones b.e.m., gwendoline grace watson jones (nee davies), lower yarra group, debbie jones, st andrews saddle club -
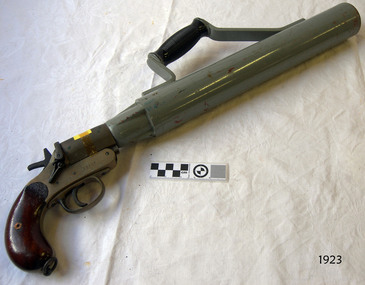 Flagstaff Hill Maritime Museum and Village
Equipment - Line throwing pistol, 1925-1945
This is a SPRA, or Schermuly’s Pistol Rocket Apparatus. The large firearm type pistol would have been used to throw a line between ships, usually in the event of saving lives. The line throwing pistol consists of a long barrel with handle attached, a pistol grip and trigger, which fires a short blank cartridge. Accessories for the pistol included: flares, 12 gauge adaptor (to shoot 12 gauge flares), a wood plunger, and boxes of faked line. The stamp on the handle, Crown over "NP" is a Birmingham Proof House mark that dates the pistol between 1904 and 1954. However Schermuly's line throwing pistol was invented in the 192s and used on British Naval Ships from 1929. The serial number '22507' is only 806 numbers later than one on sale as a British Military WWII issue SRPA '21701'. This pistol appears to be made 125-1945. The apparatus was used as a life saving device for crew and passengers on vessels in distress that were only a few hundred metres from shore, often eliminating the need to launch a boat and risk lives to go out to the vessel in dangerous conditions. It could also be used from ship to ship rescue. The pistol would launch a line from shore to the vessel. The line would be attached to the vessel, then shore crew would send out equipment, including a breeches buoy, in which the stranded people could be pulled to shore. It has saved many lives at sea. The cartridge is loaded into the breech of the pistol and the rocket is inserted into the muzzle. On pulling the trigger, the gases generated by the fired cartridge eject the rocket on its correct line of flight, and at the same time, burst through the waterproof disc and ignite the propellant mixture, which carries the rocket and line on the remainder of the flight. The rocket consists of a weldless steel case filled with propellant mixture sealed in by a waterproof disc. Fixed to the rocket case is a direction bridle, to the end of which a short length of flexible steel wire is attached, this in turn being connected to the end of the line to be thrown. A complete rocket set, or line throwing kit. would include a wood carrying case, two coils of faked line in separate compartments, three rockets and a can of six cartridges. William Schermuly (1857 – 1929) - Founder of the Schermuly business. In 1897 he invented a trough-fired, line throwing apparatus. In 1920 he and his third son, Alfred James Schermuly, invented the pistol rocket apparatus and promoted this overseas during the 1920s. The system was approved by the British Navy in 1929 through an Act of Parliament, which made it compulsory for ships over 500 tons to carry this equipment. The company, Schermuly Pistol Rocket Apparatus Ltd., grew quickly during and after World War II but business eased off during the 1970s before it eventually closed in the 1990s. Saving lives in Warrnambool – The coastline of South West Victoria is the site of over 600 shipwrecks and many lost lives; even in Warrnambool’s Lady Bay there were around 16 known shipwrecks between 1850 and 1905, with eight lives lost. Victoria’s Government responded to the need for lifesaving equipment and, in 1858, the provision of rocket and mortar apparatus was approved for the lifeboat stations. In 1859 the first Government-built lifeboat arrived at Warrnambool Harbour and a shed was soon built for it on the Tramway Jetty, followed by a rocket house in 1864 to safely store the rocket rescue equipment. In 1878 the buildings were moved to the Breakwater (constructed from 1874-1890), and in 1910 the new Lifeboat Warrnambool arrived with its ‘self-righting’ design. For almost a hundred years the lifesaving and rescue crews, mostly local volunteers, trained regularly to rehearse and maintain their rescue skills. They were summoned when needed by alarms, gunshots, ringing bells and foghorns. In July 1873 a brass bell was erected at Flagstaff Hill specifically to call the rescue crew upon news of a shipwreck. Some crew members became local heroes but all served an important role. Rocket apparatus was used as recently as the 1950s. This line-throwing pistol is part of he Rocket Launching Equipment used to perform life-saving rescue at sea from the 1920s. It is significant for its connection with local history, maritime history and marine technology. Lifesaving has been an important part of the services performed from Warrnambool's very early days, supported by State and Local Government, and based on the methods and experience of Great Britain. Hundreds of shipwrecks along the coast are evidence of the rough weather and rugged coastline. Ordinary citizens, the Harbour employees, and the volunteer boat and rescue crew, saved lives in adverse circumstances. Some were recognised as heroes, others went unrecognised. In Lady Bay, Warrnambool, there were around 16 known shipwrecks between 1850 and 1905. Many lives were saved but tragically, eight lives were lost.Pistol, line-throwing, SPRA (Schermuly's Pistol Rocket Apparatus). This line throwing pistol has a wooden pistol grip, brass trigger mechanism, and a long, wide, steel barrel with Bakelite handle attached to the top. Inscriptions are stamped onto the pistol.Stamped on handle: "5" and "[symbol of a Crown] above NP" , "22507", "[within oval] SPRA" Stamped on barrel: "L22507".gun, pistol, flagstaff hill, warrnambool, shipwrecked coast, flagstaff hill maritime museum, maritime museum, flagstaff hill maritime village, great ocean road, line throwing, line throwing pistol, spra, schermuly's pistol rocket apparatus, sea rescue, pyrotechnicks, marine technology, schermuly pistol rocket apparatus ltd., william schermuly, alfred schermuly, pistol line thrower, flagstaff hill maritime museum and village, maritime village, lady bay, warrnambool harbour, port of warrnambool, shipwreck, life-saving, lifesaving, rescue crew, rescue, rocket rescue, rocket crew, beach rescue, line rescue, rescue equipment, rocket firing equipment, rocket rescue equipment, maritime accidents, shipwreck victim, rocket equipment, rescue boat, lifeboat, volunteer lifesavers, volunteer crew, life saving rescue crew, lifesaving rescue crew, rocket apparatus, rocket rescue method, shore to ship, rocket apparatus rescue, stranded vessel, line throwing mortar, rocket rescue apparatus, line thrower, lifeboat warrnambool, rocket machine, rocket head, rocket launcher, rocket line, beach rescue set, rocket set, schermuly, line-firing pistol, line throwing gun, pistol rocket apparatus, line throwing cartridge, line-throwing rocket, firearm, life saving, lsrc -
Glen Eira Historical Society
Document - ROTARY CLUB OF CAULFIELD
This file contains 13 official documents pertaining to the Rotary Club of Caulfield: 1/A typewritten copy of the constitution of the Rotary Club of Caulfield (undated). Said document is essentially an instruction manual detailing how the Club is to be administered and the duties of officials. 2/A page (unclear if intended for use as a poster or letter) announcing a Business Persons Breakfast to be held at St. Anthony’s Parish Hall on 19/11/1986, wherein Jeff Kennett, M.L.A., Leader of the Opposition of the Parliament of Victoria, will deliver a speech titled ‘Responsibility Before Rights’. 3/A booklet announcing the 25th anniversary celebration of the Rotary Club of Caulfield, to be held at Tudor Court on 24/02/1987. Contains the menu, national anthem, programme, and two lists – one of the founding members of the Club and one of the extant members of the Club. 4/Two copies of a booklet announcing a dinner, to be held at Tudor Court on 10/11/1987, wherein charter will be presented to the Rotary Club of Caulfield-Rosstown by District Governor Ian Knight. Contains a list of extant staff, the menu, the programme, a description of the history of the ‘Wembley Wheel of Friendship’, a list of charter members, and an account of the etymology of the name ‘Rosstown’. 5/Two copies of a page featuring four items of relevance to the Rotary Club of Caulfield. The first is an article (titled ‘Rotary scholar makes it’, author unspecified, source unspecified, undated) about Club scion Mark Collard receiving an MBA from Clarkson University. The second is an article (titled ‘New Caulfield Rotary’, author unspecified, source unspecified, undated) about the presentation dinner to which item 7 pertains. (This article is not present in its entirety, trailing off at the end.) The third is an announcement of a ‘progressive dinner’ to be held on 28/11/1987, also containing an announcement of a bicentennial conference to be held on 19/03/1988. The fourth is an announcement of what appears to be the initiation of some sort of historical re-enactment, the proceeds of which will fund the Rotary Club’s ‘Polio Plus’ project. A title (‘A Long Haul Through Caulfield’) suggests this item may be the header section of an article about said event, but if so, the remainder is not present. Contains three black-and-white photographs; one of Collard with an unidentified woman (presumably his wife), one of Club President Howie Dunlop congratulating Charter President Geoff Oscar, and one of some men riding on a horse-drawn cart. 6/Two copies of a booklet announcing a President Changeover Dinner, to be held on 28/06/1988. Contains the menu, programme, and a list of extant members. 7/Two copies of the weekly bulletin of the Rotary Club of Caulfield, dated 28/06/1988. Contains lists of faculty, notification of the Club’s decision to admit women, notification of upcoming events, a biography of guest speaker Fred Epstein, and a list of the times and places of alternative meetings. 8/Two photocopied statements of the receipts and expenditure of the Rotary Club of Caulfield, one for the period 01/10/1989 – 30/06/1990, and one for the period 01/07/1990 – 27/08/1990. 9/The photocopied minutes of a New Members Committee Meeting of the Rotary Club of Caulfield, dated 02/08/1990. Objects of discussion include fundraising methods and application of funds. 10/A booklet announcing Change Over Night, dated 21/06/1994. Contains the programme, menu, national anthem, and a list of extant faculty. 11/4 unbound pages announcing the winners of the Rotary Youth Photographic Awards, dated 1995 (a more specific date than this is not given). (Pages contain no photographs.) 12/A small note announcing the Murrumbeena Community Market, to be held on 04/12/2010, of which the Rotary Club of Caulfield is one of the sponsors. 13/A booklet announcing a dinner to celebrate the 50th anniversary of the Rotary Club of Caulfield, to be held on 23/02/2012. Contains the programme, menu, a list of past presidents, a description of the history of the Gifu Vase (a trophy in the Club’s possession), and a list of some of the charity projects the Club has been engaged in.rotary club of caulfield, clubs and associations, charitable organisations, kennett jeff m.l.a., st. anthony’s parish hall, grange road, neerim road, glenhuntly, festivals and celebrations, tudor court, gray robin, baird jack, lord john, king john, crittenden doug, gelme anthony, hunkin ed. rev., fryer roy, quine john, bedford f., bell jim, bunny d., cripps e., don john, epstein fred, hattam j., howard w., kerry g., kumnick j., kurrie s., lord l., morrison charles, nelson h., parton willis, perry bruce, pollard r., price f., skuse e., stillwell g., tilley norman, tomlinson charles, watson don, webster j., wilson duncan, fincher roy, wheller john, allen selwyn, christopher don, cohen godfrey, davis keith, davis lloyd, dornbierer w., dunlop howie, fillmore wally, ford john, ford peter, forshaw ken, gales brian, green myer, hind jim, humphreys john, hunter ian, lewis ray, melville jack, oscar geoff, penaluna harry, perlen louis, rampling ross, ronaldson keith, sherlock max, sicklemore graham, smith barry, stapleton ted, summers ron, tovey david, rotary club of caulfield-rosstown, knight ian, tudor court, kooyong road, bellmaine mark, langfelder kurt, morris rob, rome graeme, alma club, wilks street, wills david, blankfield mark, awards, wembley wheel of friendship, bellmaine loretta, cunningham david, cunningham jean, davis pam, davis rex, davis judith, forshaw hannah, graham jeremy, graham kara, hassing andre, hassing arlette, jacobs frank, jacobs june, langfelder judy, morris robert, morris angela, nettlebeck rosalie, oscar enid, rattray john, rattray diana, rome lorraine, sarah ted, sarah denise, sherlock helen, smith suzanne, stapleton jackie, turner brook, turner vicki, tuhiwai tamati, tuhiwai ravina, will arnold, will claire, rosstown, ross william murray, rosstown sugar works, collard mark, rotary foundation, keller chuck, campbell felicitie mrs., campbell jack cr., knight genny, albury civic centre, green tess, tantram avenue, quine gwen, beaver street, rosalind ray, rosalind lweis, devon street, little company of mary hospital, polio plus, smith ian, jackson adrian, miller peter, spence bert, wheller denise, coffey bill, financial documents, receipts, gilmartin e., moran d., kaan a., fillmore wal, coleman peter, coleman moyrha, wesley college elsternwick big band, puddy mark, fradkin barry, fitzgerald gerald, renton robert, herschberg gedeon, kinston david, montgomery peter, dawes shane, silberberg henry, zazryn ben, cohen michael, rotary youth photographic awards, photographic competitions, photography, terry ted mr., terry e. a. mr., eldridge hannah, cottral anne, abdullahi khalid, gostin cassie, podlabeniouk lena, diyab ahmed, draca julijana, pevkoski danilla, wooster heath, lesar dion, sansoni rachel, leatham chelsea, townsend jessie, barker megan, fitzgerald megan, maokhamphiou anthony, smith naomi, fraser sue-ellen, white tanya, murrumbeena community market, koornang uniting church, murrumbeena road, welsh heather, robinson david, kesselschmidt sima, potasz sophie, southwick david, cheyne gordon, ryall keith, arianti listy, westbrook natasha, pollard bob, hancock irey, lovett jack, cooper alby, rundle john, patkin nehama, mcmullen adele, douglas jennie, preston mark, resubal loreto, gifu vase, aoki seiichi, operation firewood, alfred hospital, bus of knowledge, australia day breakfast, bethlehem hospital, caulfield hospital