Showing 3272 items
matching little
-
 Brighton Historical Society
Swimsuit, Ada of California
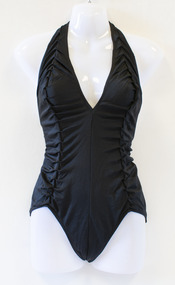
Ada of California was a Melbourne swimwear company founded in the early 1950s by Brighton locals Ada and Toni Murkies. Born in Poland in 1922, Ada was 17 when the Second World War reached her doorstep. She and her family were torn from their home by Soviet soldiers and sent to a brutal labour camp in Siberia as part of a series of mass deportations. In order to escape the horrific conditions of the camp, Ada and her sister Barbara joined the Soviet-backed Polish Army. During her time in the military she became close with a handsome young Jewish officer, Lieutenant Antoni Murkies, who later became her husband. After the war Toni was awarded 15 medals including the highest Polish military honour, the Virtuti Militari. Ada was awarded 10 medals, including the Order of the Cross of Grunwald. Emigrating to Australia as postwar refugees in 1948, Ada and Toni arrived in Melbourne with little to their name. Working initially in garment factories and building their connections, by the mid-1950s the couple were able to start a company of their own, with Ada designing the garments and Toni managing the business. Within ten years, Ada of California swimwear was being sold in department stores throughout Australia, and the Murkies family were able to build a permanent home of their own in Brighton. By the early 1980s they had acquired several other major labels, including Watersun. This swimsuit is believed to be one of a large quantity of samples, seconds and unsold Ada Productions stock donated to Brighton Historical Society in late 1990 by Brian Samuel, who worked at the company between 1979 and 1990.Black one-piece swimsuit with deep v-neck and low-cut back and high-cut legs. Halter neck. Ruched sides. Label in side: "ada / 16"swimwear, ada of california, ada productions, melbourne designers, ada murkies, toni murkies -
 Brighton Historical Society
Swimsuit, Ada of California
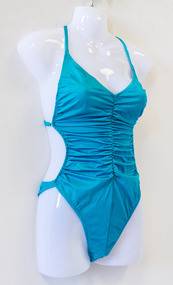
Ada of California was a Melbourne swimwear company founded in the early 1950s by Brighton locals Ada and Toni Murkies. Born in Poland in 1922, Ada was 17 when the Second World War reached her doorstep. She and her family were torn from their home by Soviet soldiers and sent to a brutal labour camp in Siberia as part of a series of mass deportations. In order to escape the horrific conditions of the camp, Ada and her sister Barbara joined the Soviet-backed Polish Army. During her time in the military she became close with a handsome young Jewish officer, Lieutenant Antoni Murkies, who later became her husband. After the war Toni was awarded 15 medals including the highest Polish military honour, the Virtuti Militari. Ada was awarded 10 medals, including the Order of the Cross of Grunwald. Emigrating to Australia as postwar refugees in 1948, Ada and Toni arrived in Melbourne with little to their name. Working initially in garment factories and building their connections, by the mid-1950s the couple were able to start a company of their own, with Ada designing the garments and Toni managing the business. Within ten years, Ada of California swimwear was being sold in department stores throughout Australia, and the Murkies family were able to build a permanent home of their own in Brighton. By the early 1980s they had acquired several other major labels, including Watersun. This swimsuit is believed to be one of a large quantity of samples, seconds and unsold Ada Productions stock donated to Brighton Historical Society in late 1990 by Brian Samuel, who worked at the company between 1979 and 1990.Blue backless one-piece swimsuit with ruching up sides and front. Halter neck. Straps loop down over hooks at the back.Label in side: "ada / 12"swimwear, ada of california, ada productions, melbourne designers, ada murkies, toni murkies -
 Brighton Historical Society
Swimsuit, late 1950s - early 1960s
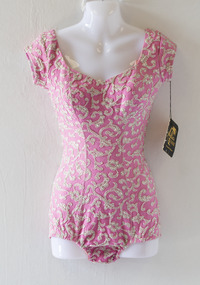
Ada of California was a Melbourne swimwear company founded in the early 1950s by Brighton locals Ada and Toni Murkies. Born in Poland in 1922, Ada was 17 when the Second World War reached her doorstep. She and her family were torn from their home by Soviet soldiers and sent to a brutal labour camp in Siberia as part of a series of mass deportations. In order to escape the horrific conditions of the camp, Ada and her sister Barbara joined the Soviet-backed Polish Army. During her time in the military she became close with a handsome young Jewish officer, Lieutenant Antoni Murkies, who later became her husband. After the war Toni was awarded 15 medals including the highest Polish military honour, the Virtuti Militari. Ada was awarded 10 medals, including the Order of the Cross of Grunwald. Emigrating to Australia as postwar refugees in 1948, Ada and Toni arrived in Melbourne with little to their name. Working initially in garment factories and building their connections, by the mid-1950s the couple were able to start a company of their own, with Ada designing the garments and Toni managing the business. Within ten years, Ada of California swimwear was being sold in department stores throughout Australia, and the Murkies family were able to build a permanent home of their own in Brighton. By the early 1980s they had acquired several other major labels, including Watersun. This swimsuit is believed to be one of a large quantity of samples, seconds and unsold Ada Productions stock donated to Brighton Historical Society in late 1990 by Brian Samuel, who worked at the company between 1979 and 1990.Pink short-sleeved one-piece swimsuit with silver lamé embellishment. Sweetheart neckline and low-cut back with metal zip. A black and gold swing tag is attached to one sleeve.Label in bra: “Ada OF CALIFORNIA / MIRACULOUS s-t-r-e-t-c-h BRI-NYLON / 34” Swing tag, front: black with gold text and palm tree logo. “Ada / OF CALIFORNIA / ‘Limited Edition’”. Back: gold with black text. “‘Limited Edition’”. Interior: “Congratulations on your choice of ADA OF CALIFORNIA ‘Limited Edition” Swimsuit contoured for your discriminating taste. / Style 546 / Size 34 / Price £11.9.6”. Care instructions also included.swimwear, ada productions, ada of california, ada murkies, toni murkies, melbourne designers -
 Forests Commission Retired Personnel Association (FCRPA)
Fire Beater - Canvas, c 1930s
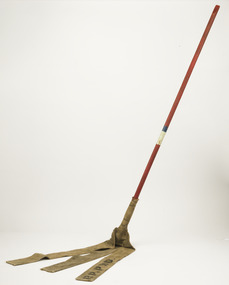
Bushfire perimeter rather than bushfire area is the main control problem for firefighters on the ground. A conundrum rapidly compounded by spot fires. A small 5 ha fire can be nearly 1 km around the perimeter. That's a long way to build a control line by hand in rough bush. Dry firefighting techniques by hand were mostly confined to “knocking down” or “beating out” the flames, as well as "digging out". Digging or raking a “mineral earth” trail down to bare dirt proved most effective in forest fuels which, unlike grass, tend to retain heat and smoulder. Early tools were whatever happened to be close at hand. They were simple and primitive and included shovels, slashers, axes, hoes, beaters and rakes. A cut branch to beat the flames was often the only thing available. Farming and logging tools, developed over centuries of manual labour, and readily available at local hardware stores came into use, but little thought was given to size, weight, and balance. This canvas hose beater was based on a century-old design which used lengths of canvas fire hose rivetted together and lashed with wire to a broom handle. The hose was be soaked in water to improve its effectiveness. If the flames were more than a metre or so the user was generally not able to get close enough to extinguish the fire It's recommend that users lift no more than above knee height to conserve energy and let the beater to the work. For years foresters experimented with combination tools. In about 1952 fire beaters and other implements were being replaced with Rakuts and later RakehoesEarly firefighting toolBushfire beater - Canvas with wooden handleR P PWD (Public Works Department) The handle has painted markings which indicate which FCV District it belonged to.bushfire, forests commission victoria (fcv) -
 Whitehorse Historical Society Inc.
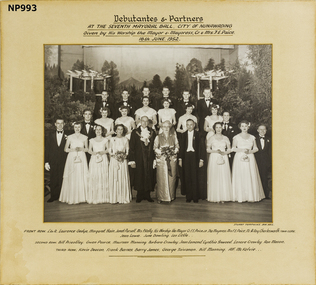
Photograph, Mayoral Ball 1952 - City of Nunawading, 18/06/1952 12:00:00 AM
Framed photo of Debutantes and Partners at 7th Mayoral Ball, City of Nunawading, given by Mayor and Mayoress, Cr. and Mrs F.E. Paice 18/6/1952. On Display: Local History Room, Nunawading Branch Library. On display in Library since 1991.gedye, laurence, ham, margaret, pursell, janet, kelly, mrs. h. p., paice, frank e., paice, mrs f.e., charlesworth, albert roy, lowe, jean, dowling, june, little, les, priestly, bill, pearce, gwen, manning, maureen, crawley, barbara, lamond, jean, inwood, cynthia, crawley, lenore, mason, ron, deacon, kevin, barnes, frank, james, barry, toivonen, george, manning, bill, mckelvie, alf., debutante ball, city of nunawading, debutantes -
 Ringwood and District Historical Society
Photograph, Landys home (formerly Patersons). Byways estate area (East Ringwood). 5 Views. (c1968)
SS0261 is the covering letter from Beth Little, dated 31/3/1969, which states: "Please fined enclosed the photographs I took of Landy's 80 yr. old home which was moved just before last Christmas to another site on their estate...it was built by some people by the name of Patterson and originally included the Byways Estate and other land which extended up to about Lillis Crt. The land known as Byways Estate was sold off to a Mr Best by a later owner so far as I can find out.." Written on back of photographs: SS0261a:From about where the feed shed was. SS0261b:Looking up driveway towards the east. Landys home (formerly Patersons). Byways estate area (East Ringwood) SS0261c:Eastern side of house (officially the front). SS0261d:Stable and feed shed now demolished. Wooden tank on right-hand side. SS0261e:Southern side. Well to left of far end of house wall -
 Eltham District Historical Society Inc
Document - Newspaper article, Eltham's growth has been rapid in recent years, c.1960
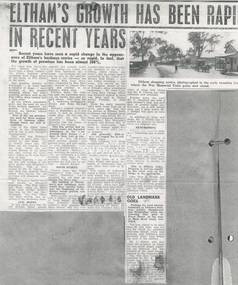
ELTHAM’S GROWTH HAS BEEN RAPID IN RECENT YEARS Unknown local paper c.1960s Recent years have seen a rapid change in the appearance of Eltham’s business centre - so rapid, in fact, that the growth of premises has been almost 300%. For more than thirty-five years Eltham had little more than a dozen traders - the town's business area spreading from Pryor Street in the north, to Pitt Street in the south. The greatest density of businesses - no more than a handful of shops - were situated in the present shopping centre but other essential services such as the Post Office, were located half a mile away. As the town's population grew and the need for more shops became apparent, the growth was centralised around the railway station and Shire hall. Few of the old premises are used for their original form of business today, though many are still in existence. One of the oldest (seen clearly in the illustration) still in use is now Ferrari's Greengrocery. This shop was Eltham's butchery in early days, conducted by Jim Ryan. Up to twenty years ago, Mr. Ryan ran his business from the shop. whilst his son toured Eltham in his horse and cart, cutting his customers' orders as he went from door to door. Another business - one of the few still trading in the same goods-was Burgoyne's Hardware. This is now owned by Mr. R. Clinton, a new shop has recently been added and shortly the old premises will disappear completely. The Burgoyne family were well known to Eltham's population. The Post Office and Store (then in Main Road, near Bridge Street) was run by Mr. and Mrs. Burgoyne. The Post Office was later moved, and attached to the hardware store. OLD HOTEL In this same area was the old Eltham Hotel, almost opposite the present hotel. The building still stands, but has been converted into a house. The hitching rail can still be seen by the roadside. Back in the township was Barber's Blue Gum store, later conducted by Mrs. Burges (mother of Garnet Burges) and claimed to be Eltham's oldest shop. Further down the road, just past the hardware store, was the barber shop and billiard saloon. Next door was E. J. Andrew's news agency, library and State Savings Bank. Eltham's original chemist's shop, or dispensary as it was called, is now an electrical repair shop. On this side of the street too, was Mrs. Monteith - Draper. Mr Monteith was the owner of Eltham' s bus service. This bus service had no regular route, but deposited passengers at the point nearest their homes - a. door to door taxi service. Next to Mrs. Monteith stood another grocery - and general store, and next again, the local blacksmith. Another of Butcher Ryan's sons was Eltham's blacksmith and obviously an enterprising man he conducted a timber business next door to his smithy's shop. These two premises are still run by one man - Garnet Burges. BOOM STARTS Twenty years ago, when Thompson's took over Eltham's pharmacy they occupied the old shop adjoining the Shire hall. The building of Thompson's new premises, from which· they operate today, was the beginning of Eltham's recent growth and development. With another grocery store and a bakery at the corner of York Street, a butcher near Franklin Street, a cobbler's shop opposite the State School (did you ever wonder what that-little building attached to one of Eltham's oldest houses had been?), and an estate agency conducted by Mr. Clark, now Eltham Real Estate - only one trader remained - and today, still carries on, the only original owner of one of Eltham's .oldest established businesses - Mr. Dave Lyon, of Lyon Bros. Garage, which was formerly located in what was later used as Chenowyth's Foundry in Main Road. From the early twenties until little more than six or seven years ago that was the picture of Eltham. Some businesses had changed hands - many years before Mr. C. Rains had acquired Andrew's news agency, Mrs. Monteith's drapery had become Mrs. R. Smith's home-made cake shop, to change again and again to many other types of business. But generally, Eltham was unchanged, for nearly thirty years. Then suddenly new shops mushroomed. The new news agency and drapery, the chemist and adjoining shops, a new butcher, a green grocer and several more. POPULATION DOUBLED In the space of a few years, fifteen new shops, two banks, a restaurant and a post office were built at Eltham. New types of businesses found a ready market in an area which was quickly almost doubling its population. A little over twelve months ago, another wave of progress hit Eltham. Since then eight more shops have been built - a cake shop and fish shop in Dalton [sic – Dudley] Street - for building areas are unprocurable in the Main Street shopping centre now – have been built by Mr. D. Kimball; a new ladies’ and children’s wear shop has been opened by Rains; Eltham Dry Cleaners have another of these new shops, and Mr. R. Clinton has built elaborate new premises. Further down the road, Mr. C. Campbell has built a new butcher's shop, and next door, at present under construction, are a self service store and a shop which Mr. J. Hodges will open on completion. In addition to these new shops, Mr. J. Millett has extended his grocery to almost twice its original size. FLOURISHING Outside the central area, other businesses are flourishing. Latimer's felt factory is being developed in a picturesque rustic setting; P. J. Timber and Trading Company have recently completed a large showroom and timber yard, and in the town itself Nicholson and Merritt are now completing the extension of their foot wear factory to double its former area. This is Eltham today. Progress is moving rapidly in this rural area on the fringe of the metropolis. Less than a decade has seen vast development. The years to complete that span of time will see even greater changes and greater prosperity in this heart: of the Diamond Valley. OLD LANDMARK GOES Perhaps the most famous landmark in Eltham's' business section disappeared last Wednesday when the towering blue gum in Pryor Street at the rear of Main Road shops was felled. The tree, stated to be more than 80 feet high, was the one for which the adjoining café was named, when that business was Eltham’s only provision store, long before the turn of the century. Mr. J. Millett, who now owns the property on which the tree stood, deeply regretted its removal, but was mindful of the need for expansion in the business area. The "Old Blue Gum" was removed by Mr. A. Wilson, expert tree feller, from Heidelberg. Its proportions might be assessed by these facts – it took a gang of experienced men two days to completely fell and clear the tree, and, falling sections being brought down by cable tipped electricity wires on the opposite side of Pryor Street.andrew's news agency, bakery, barber shop, barber's blue gum store, billiard saloon, blacksmith, blue gum, burgoyne's hardware, butcher, cake shop, chemist's shop, chenowyth's foundry, cobbler's shop, dave lyon, dispensary, draper shop. mr monteith, dudley street, e. j. andrew's news agency, electrical repair shop, eltham bus service, eltham butchery, eltham dry cleaners, eltham hotel, eltham railway station, eltham real estate, eltham shire hall, eltham shopping centre, eltham shops, eltham town centre, estate agency, expert tree feller, ferrari's greengrocery, fish shop, foot wear factory, franklin street, garnet burges, general store, grocery, heidelberg, horace clark, jim ryan, ladies’ and children’s wear shop, latimer's felt factory, library, lyon bros. garage, main road, mr. a. wilson, mr. c. campbell, mr. c. rains, mr. d. kimball, mr. j. hodges, mr. j. millett, mr. r. clinton, mrs. burges, mrs. monteith, mrs. monteith's drapery, mrs. r. smith's home-made cake shop, nicholson and merritt, p. j. timber and trading company, pitt street, post office, pryor street, self service store, shopping centre, state savings bank, taxi service, thompson's pharmacy, york street -
 Emerald Museum & Nobelius Heritage Park
Golf Trophy
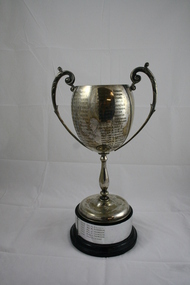
Emerald Country Club Associates Ladies Championship Trophy from 1937 to 1996Local golf club trophy donated by ex committee member Rosalie LeakeSilver Golf Trophy Cup (Ladies) on wooden base.. engraved with winners from 1937 to 1996 Emerald Country Club Associates E.M..KENNON CUP 1937 Mrs G.L. Elkins 1938 Mrs T.W. Gunnersen 1939 Mrs Norman 1940 Mrs A. Baker 1946 Mrs L.A. Fenton 1947 Mrs A.L. Newold 1948 Mrs C. Bedgood 1949 Mrs A. Baker 1950 Miss P. Massey 1951 Mrs W.H. Symon 1952 Mrs W.H. Symon 1953 Mrs A.L. Newbold 1954 Mrs W.H. Symon 1955 Miss M. Jamison 1956 Mrs W.H. Symon 1957 Miss J. Mellor 1958 Mrs L. Bulmer 1959 Mrs W.H. Symon 1960 Miss J. Mellor 1961 Mrs E. Hoy 1962 Mrs L. Bulmer 1963 Miss D. Smith 1964 Mrs N. Tuxen 1965 Mrs M. Hanger 1966 Mrs A. Howard 1967 Mrs R. Morgan 1968 Mrs P. Young 1969 Mrs J. Little 1970 Mrs J. Fountain 1971 Miss P. Jackson 1972 Mrs J. Little 1973 Mrs J. Houghton 1974 Mrs J. Meldrum 1975 Mrs. B. Barraclough 1976 Mrs J. Meldrum 1977 Mrs F. Gooch 1978 Mrs S. Hunter 1979 Ms F. Fenton 1980 Mrs J. Martin 1981 Mrs C. Grand-Court 1982 Mrs J. Pugh 1983 Mrs M. Ruigrok 1984 Mrs P. Summers 1985 Miss A. Scurry 1986 Mrs P. White 1987 Mrs M. Ruigrok 1988 Mrs P. White 1989 J. Ross 1990 Miss B. Bates 1991 Ms A. Felgate 1992 Ms M. Purbrick 1993 Ms J. Thomson 1994 Ms J Tomson 1995 Ms J Thomson 1996 Mrs R. Leake emerald country club, wm kennon cup, golf trophy 1937 to 1996 -
 Ballarat Clarendon College
Framed photograph, Ballarat College 19 October 1877
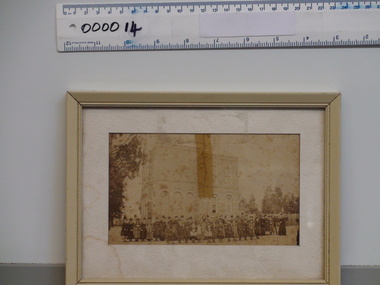
Faded, sepia toned photograph, with stained cream-coloured cardboard mount and timber frame. The photograph was taken on 19 October 1877 and features the building then used by Ballarat College on the grounds of St Andrews Kirk, Sturt Street Ballarat. The foundation stone for this building was laid 12th September 1874. Grouped in front of the building are a line of 13 girls and two boys. Behind them stands a line of 26 older looking girls, and three men stand in the background. From 1877-1891 Ballarat College was co-educational, so it is likely that the girls in this photograph are the first years’ cohort of female students in 1877. The woman standing to the far right, a little apart from the line of girls could be the ‘Lady Principal’. Handwritten on the back of the photograph: ‘F.I. Schulze / Oct 19th 1877 / Ballarat College Sturt St. / In posse(s)ion (sic) of Florence Hewett - nee Schultze / died 1935 / Presented by her daughter / Irene Hewett' Florence Ida Schultze (PY1882) attended Ballarat College from 1877-1882. She married George Hewett (1878) who attended in 1877. George’s two sisters, Mary (PY1877) and Margaret (PY1881) also attended Ballarat College. It is highly likely that all four old collegians are in this photograph. Florence and George’s son, Reginald Schulze Hewett (PY1905) attended Ballarat College from 1902-1905. Their daughter, Irene Harriet Hewett (not a student of Ballarat College) donated this framed photograph to the BCC Archives.Handwritten on back of the photograph: F.I. Schulze / Oct 19th 1877 / Ballarat College Sturt St. / In posse(s)ion (sic) of Florence Hewett - nee Schultze / died 1935 / Presented by her daughter / Irene Hewett'ballarat college, 1877, st andrews kirk -
 Federation University Historical Collection
Newspaper, Lal Lal Iron and Coal as reported in the Ballarat Courier, 10/07/1923
.1) Pages 7 to 10 of the Ballarat Courier, 10 July 1923. Page 7 includes the article 'Cheap electricity' and poses questions such as 'should Ballarat look to Morwell for cheap power?', and should an independent power plant be installed at Crockers, Arnolds, Harry Hall, Ewins, Harry Davies, Fred Halls, The London Drapery there. Page 9 includes articles on Ripon's roads, Mount Cole Springs; Soldier Settlement Rates Beaufort; Creswick brass band Officers; Daylesford Road Deviation to Hepburn Springs; Dereel Public Telephone; State Electricity Supply for Beaufort; Newlyn Valedictory to Mr and Mrs W. E. Bennett Page 9 - Racing at Ascot; Avoca Golf Tournament, Chinese Herbalists Page 10 - Auctions and house sales Advertisements include Harry Davies; Fred Halls; C. Marks and Co., London Drapery, Creer the Cashman; Chamberlain's Cough Remedy; Cornell's Little Liver Pills; Paynes; W. Fley Chemist; Bickart and Dawson; Rivers; Allchin Bros; J. Bartam & Son .2) Ballarat Courier, 30 July 1937, page 1 and 2 Page 1 reports Lal Lal's Iron Ore Company being formed. Page 2 reports the Prospectus of the lal lal Iron and Steel Blast Furnaces Mining Company, No Liability; Mining News - Wattle Gully; Commercial News Advertisements include Crockers, Arnolds, Harry Hall, Ewins, Harry Davies, Fred Halls, The London Drapery electricity, lal lal, lal lal iron, lal lal coalfield, morwell, gippsland, crockers, arnolds, harry hall, ewins, harry davies, fred halls, the london drapery, lal lal brown coal, ripon's roads, mount cole springs, soldier settlement rates beaufort, creswick brass band officers, daylesford road deviation to hepburn springs, dereel public telephone, state electricity supply for beaufort, newlyn, w.e. bennett, ascot, avoca golf tournament, chinese herbalists, c. marks and co., london drapery, creer the cashman, chamberlain's cough remedy, cornell's little liver pills, paynes, w. fley chemist, bickart and dawson, rivers, allchin bros, j. bartam & son, lal lal iron and steel blast furnaces mining company, wattle gully -
 Bendigo Historical Society Inc.
Document - NEW CHUM RAILWAY MINE - GOLD MINES OF BENDIGO & EAGLEHAWK
Handwritten notes on the New Chum Railway Mine and other mines and connections between various mines underground. Descriptions of mines and their equipment. Mines mentioned are: New Chum Railway Mine, Eureka Extended, Shenandoah, Shamrock Mine, Young Chum, Old Chum, Little Chum, New Chum Tribute, Cravens, Garibaldi, New Chum Consolidated, Menzies, Ellesmere, Consolidated, Denis, Lansell's 222, New Chum United, Kochs & Hildebrandt Mine, Lazarus, Central Blue, Lazarus No 1 Coy, Hudson's, Burrows & Sterry, Victoria Tribute, North Old Chum, Lansell's Big 180, Sandhurst, Victoria Quartz, The Great Central Victoria (known as the 'Midway'), Victoria Consols, Advance, Adventure, Ironbark, Victoria Gold Mines Company, No 83 claim, The Hercules & Energetic, North Energetic, Victoria Pilot, Bendigo Amalgamated Goldfields Company, Pearl, Hercules No 1, Hercules New Chum, Great Extended Victoria, New Victoria Catherine, Mystery (later the Duke of Edinburgh), New St Mungo, Duchess Tribute, Extended South Devonshire, South Devonshirte, Duchess of Edinburgh, Princess Alexandia (later United Devonshire), Danes, United Devonshire, South Devonshire, Hopewell, Phoenix, Unicorn, Lady Barkly, Sadowa, Eastwood Lease, Ellenborough, Belmont & Saxby, York & Durham, Acadia, Williams United, Ulster, North Red White & Blue, North Deborah, Catherine Reef United, Central Catherine, Princess Alice, Catherine Reef United, Murchison, North Catherine (or Franklin), Catherine Reef Extended,document, gold, gold mines of bendigo & eaglehawk, new chum railway mine, gold mines of bendigo & eaglehawk, eureka extended, shenandoah, shamrock mine, young chum, old chum, little chum, new chum tribute, cravens, garibaldi, new chum consolidated, menzies, ellesmere, consolidated, denis, lansell's 222, new chum united, kochs & hildebrandt mine, lazarus, central blue, lazarus no 1 coy, hudson's, burrows & sterry, victoria tribute, north old chum, lansell's big 180, sandhurst, victoria quartz, the great central victoria (known as the 'midway'), victoria consols, advance, adventure, ironbark, victoria gold mines company, no 83 claim, the hercules & energetic, north energetic, victoria pilot, bendigo amalgamated goldfields company, pearl, hercules no 1, hercules new chum, great extended victoria, new victoria catherine, mystery (later the duke of edinburgh), new st mungo, duchess tribute, extended south devonshire, south devonshirte, duchess of edinburgh, princess alexandia (later united devonshire), danes, united devonshire, south devonshire, hopewell, phoenix, unicorn, lady barkly, sadowa, eastwood lease, ellenborough, belmont & saxby, york & durham, acadia, williams united, ulster, north red white & blue, north deborah, catherine reef united, central catherine, princess alice, catherine reef united, murchison, north catherine (or franklin), catherine reef extended, mr clark magee, john delbridge - engineers, a harkness & sons, mr lansell, b c v 8 studios, mr gibbs, mr barnet lazarus, mt alvernia hospital, p m g repeater station, john brown knitwear, mr burrows, mr sterry, john wybrants, mr wittschiebe, theodore ballerstadt, mr wm rae, california hill state school, freeman & coy -
 Bendigo Historical Society Inc.
Document - LONG GULLY HISTORY GROUP COLLECTION: FRENCH'S CORNER AND VILLAGE PARLIAMENTS
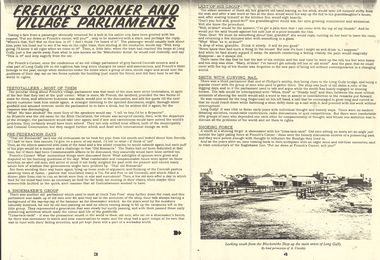
Copy of pages 3 and 4 titled French's Corner and Village Parliaments. Some passengers travelling on the tram would ask to be put down at French's corner. The conductor had no idea where it was. The passenger would be returning to where he used to live or work. The old who met at the pub corner were mostly teetotallers, but they met at the pub where the publican provided the two forms of seats for them and if business was slack he would join in the discussion. Another group met at Uncle Tom Foss' shop further down the road. This group was made up of old men over 80 and they met inside the shoemaker's shop. One old man used to go to his granddaughter's house and sit beside the kitchen fire and then he would tell her he had a pain beneath his ribs and she would give him a little wine to drink. Then he lost the last of his cronies and he went slowly up the hill and told his granddaughter he had nobody left but his old stick. The pain of being left without contemporaries made him forget about the pain in his side. There was another group that met at Philpot's smithy. The men would talk and argue while the smith was shoeing the horses. This smith has a long finger- nail on his left hand which he would use to pick up horse shoe nails as he was shoeing the horse. The bottom of the page has a photo of the main street of Long Gully taken from the Blacksmiths Shop.bendigo, history, long gully history group, the long gully history group - french's corner and village parliaments, manchester arms, french's hotel, mr french, uncle tom foss' shop, philpot's smithy, a crossley -
 Ballarat Tramway Museum
Ephemera - Timetable/s, Melbourne and Metropolitan Tramways Board (MMTB), Set of 14 MMTB Melbourne bus timetables, 1969
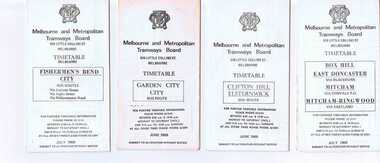
Set of 14 MMTB timetables for various bus routes, dated July 1969. Generally includes Sat and Suns, Good Friday and Christmas day as well as weekdays, unless noted otherwise. Also includes a map of the route, detailed time points, sections, connecting services, fares, and organisation address - 616 Little Collins St. Melbourne. Have been folded into eight or ten portions. All on white paper unless noted otherwise. Items shown with an # - have a sticker modifying timetable information details on the front page. Items shown with a % are larger size sheets of paper, folded into 10. 1155.1 - Clifton Hill - Elsternwick # .2 - Garden City - City # .3 - Fishermen's Bend - City .4 - Box Hill - East Doncaster via Blackburn, Mitcham via Donvale PO and Mitcham - Ringwood via Eastland .5 - Warrandyte via Templestowe, via East Doncaster, Donvale PO - City % .6 - Warrandyte, Park Orchards Ringwood .7 - Williamstown Rd., Footscray Railway Station, Ballarat Rd # .8 - Latrobe University, Northland, West Heidelberg - City # % .9 - Deer Park, Sunshine Park, Sunshine, Footscray - City # .10 - as above, but for Saturdays and Sundays on pink paper # .11 - Box Hill, Heidelberg, Templestowe .12 - Box Hill, North Blackburn .13 - East Kew, Box Hill, Doncaster .14 - Bullen, North Kew - City # % Images of a sample of documents added 16-11-2013. mmtb, timetables, melbourne -
Eltham District Historical Society Inc
Newspaper - Newsclipping, Nillumbik Mail, "A Memorial Avenue of Honour", A Journey in Time: A column about Nillumbik's history, Nillumbik Mail, 24 May 2000, p4, 2000
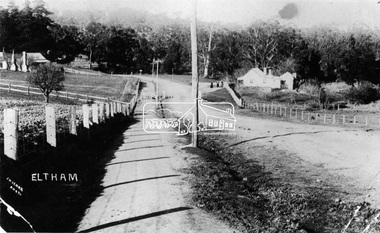
Main Road, Eltham, south from Brougham Street to Dalton Street, c.1911 View looking down Policeman’s Hill on Maria Street (Main Road) from near Brougham Street towards Dalton Street, site of the Avenue of Honour established in 1916-1917 in memory of the soldiers who served in the First World War, 1914-1918. At the bottom of the hill on the right is White Cloud Cottage, home of the Jarrold family, three women standing out front observing the photographer. The road passes over a culvert which runs to the west in front of the cottage. The cottage was originally located closer to the Diamond Creek but was subject to flooding. It was dragged by horse to the present site shown, which was chosen for the higher ground that had been created as a result of land fill being deposited here from the quarry further around the bend on Main Road (site of present-day Eltham Primary School carpark) where the stone had been quarried for building the State School in Dalton Street. Immediately at the end of the straight section of the main road can be seen the gas streetlamp in front of the Jarrold home and the pond at the bottom of Dalton Street. The cottage had previously been rented for use as a Police Station / residence prior to the building of the permanent police house and station at the corner of Maria and Brougham streets in 1859. At the time of collection of photos for the centenary of the Shire of Eltham (1971) the cottage was owned by the Skipper family and remains in the family to present day (2021). On the left is the Grant house on the corner of Main Road and Dalton Street now the present-day site of Eltham Clinic. Photographer: J.H. Clark John Henry Clark was the youngest of three boys born to William Henry Clark (1823-1877) and Maria White (1843-1914). He and his brothers, William Charles Clark (1872-1945), Clement Kent Clark (1874-1912) operated a photography business (Clark Bros.) from 25 Thomas Street, Windsor near Prahran during the period c.1894 to 1914. Following death of Clement in September 1912 and their mother in 1914, the Clark Bros business appears to have dissolved, the premises demolished, and a new house was under construction in 1915. John set up business independently in 1914 operating out of 29 Moor Street, Fitzroy where he is registered in the 1914 and 1915 Electoral Rolls. By 1916 John had relocated to Eltham where he continued his practice as a photographer and took many of the early images around the district of Little Eltham. Around 1930 John changed professions and opened a small cobbler's shop in 1931 near the pond opposite Dalton Street adjacent to the Jarrold family cottage. He never married and continued his profession as a bootmaker from this little shop, maintaining a close relationship with Mrs Jarrold for the rest of their lives. His bootmaker shop remains today beside the Whitecloud cottage and is one of only three remaining shops in the area from the early 20th century. There are a couple of images of Eltham taken by Clark Bros. in the Eltham District Historical Society collection, one such example being Hunniford’s Post Office with Miss Anne Hunniford out front (EDHS_00140 - marked on the back of the print, Clark Bros., 25 Thomas St. Windsor), which would date this image between c.1894 and 1914. Other early images of Eltham taken by John Henry Clark are marked on the face “J. H. Clark Photo” and it is assumed these are dated between 1914 and 1930. It is noted that the Grant of Probate for John H Clark of Eltham South dated 5 April !957 (513/387) records his occupation as "X Photographer".Newsprint pageNillumbik Mail publication details; Edition 4, 24 May 2000, p4dalton street, avenue of honour, eltham clinic, gas lamp, grant house, j.h. clark photo, jarrold cottage, jarrold family, main road, shire of eltham pioneers photograph collection, white cloud cottage -
 Eltham District Historical Society Inc
Negative - Photograph, J.H. Clark, Main Road, Eltham, south from Brougham Street to Dalton Street, c.1911
Main Road, Eltham, south from Brougham Street to Dalton Street, c.1911 View looking down Policeman’s Hill on Maria Street (Main Road) from near Brougham Street towards Dalton Street, site of the Avenue of Honour established in 1916-1917 in memory of the soldiers who served in the First World War, 1914-1918. At the bottom of the hill on the right is White Cloud Cottage, home of the Jarrold family, three women standing out front observing the photographer. The road passes over a culvert which runs to the west in front of the cottage. The cottage was originally located closer to the Diamond Creek but was subject to flooding. It was dragged by horse to the present site shown, which was chosen for the higher ground that had been created as a result of land fill being deposited here from the quarry further around the bend on Main Road (site of present-day Eltham Primary School carpark) where the stone had been quarried for building the State School in Dalton Street. Immediately at the end of the straight section of the main road can be seen the gas streetlamp in front of the Jarrold home and the pond at the bottom of Dalton Street. The cottage had previously been rented for use as a Police Station / residence prior to the building of the permanent police house and station at the corner of Maria and Brougham streets in 1859. At the time of collection of photos for the centenary of the Shire of Eltham (1971) the cottage was owned by the Skipper family and remains in the family to present day (2021). On the left is the Grant house on the corner of Main Road and Dalton Street now the present-day site of Eltham Clinic. Cross Ref: 0749 for another view of the Jarrold family home Photographer: J.H. Clark John Henry Clark was the youngest of three boys born to William Henry Clark (1823-1877) and Maria White (1843-1914). He and his brothers, William Charles Clark (1872-1945), Clement Kent Clark (1874-1912) operated a photography business (Clark Bros.) from 25 Thomas Street, Windsor near Prahran during the period c.1894 to 1914. Following death of Clement in September 1912 and their mother in 1914, the Clark Bros business appears to have dissolved, the premises demolished, and a new house was under construction in 1915. John set up business independently in 1914 operating out of 29 Moor Street, Fitzroy where he is registered in the 1914 and 1915 Electoral Rolls. By 1916 John had relocated to Eltham where he continued his practice as a photographer and took many of the early images around the district of Little Eltham. Around 1930 John changed professions and opened a small cobbler's shop in 1931 near the pond opposite Dalton Street adjacent to the Jarrold family cottage. He never married and continued his profession as a bootmaker from this little shop, maintaining a close relationship with Mrs Jarrold for the rest of their lives. His bootmaker shop remains today beside the Whitecloud cottage and is one of only three remaining shops in the area from the early 20th century. There are a couple of images of Eltham taken by Clark Bros. in the Eltham District Historical Society collection, one such example being Hunniford’s Post Office with Miss Anne Hunniford out front (EDHS_00140 - marked on the back of the print, Clark Bros., 25 Thomas St. Windsor), which would date this image between c.1894 and 1914. Other early images of Eltham taken by John Henry Clark are marked on the face “J. H. Clark Photo” and it is assumed these are dated between 1914 and 1930. It is noted that the Grant of Probate for John H Clark of Eltham South dated 5 April !957 (513/387) records his occupation as "X Photographer".This photo forms part of a collection of photographs gathered by the Shire of Eltham for their centenary project book,"Pioneers and Painters: 100 years of the Shire of Eltham" by Alan Marshall (1971). The collection of over 500 images is held in partnership between Eltham District Historical Society and Yarra Plenty Regional Library (Eltham Library) and is now formally known as the 'The Shire of Eltham Pioneers Photograph Collection.' It is significant in being the first community sourced collection representing the places and people of the Shire's first one hundred years.Digital image 4 x 5 inch B&W Negshire of eltham pioneers photograph collection, eltham, main road, jarrold family, dalton street, j.h. clark photo, white cloud cottage, avenue of honour, eltham clinic, gas lamp, grant house, jarrold cottage, 1900 -
 Flagstaff Hill Maritime Museum and Village
Tool - Leg Vice, Mid 19th Century
The blacksmith leg vise is also called the "solid box vise" and is one of the most important tools in the blacksmith's shop. It firmly holds hot iron while it is hammered, chiseled, or twisted. These are the only vises that are designed to take this kind of use day in and day out. A small 30-pound blacksmith's vise can survive pounding that would wreck a much heavier cast iron bench model. Three things make a blacksmith's vice special. One is that they are forgings, not cast iron or ductile iron. The second is the leg that provides support to the floor or from a sunken post. The last is the hinge, while not a perfect way to construct a vice the pin joint is durable and can take a considerable beating. If sheared it is easy to replace. These things all combine into a tool that can take decades of heavy use and abuse. Most in use is one to two hundred years old.Some of these vises were made by specialists such as Atwood of Stourbridge England, Steel City and Columbian in the U.S. and others were made in anvil manufacturing plants such as "Mousehole Forge" and "Peter Wright" in England and "Fisher-Norris" and others in North America. The design of these vises right down to the last chamfer seems to have been perfected in the 1600s and remained more or less the same until the 20th century. The bodies are forged wrought iron or mild steel and they have hard steel surfaces welded into the jaws. The jaws have little or very shallow serrations which are generally worn off.Around the turn of the 20th Century during the hey-day of the blacksmith shop in North America, these tools were considered so standard a commodity that they were sold without reference to the manufacturer. Very few were even marked with the maker's name. Size is best defined by weight as there is some variation in jaw size from manufacturer to manufacturer. They were sold by the pound and are still best judged by the pound.A vintage tool used in a Blacksmiths shop during the early 19th century to the beginning of the 20th century. Regarded as a significant into social history of the time.Leg Vice attached with screws to bench via a block of wood. Has large metal pole which practically reaches the floor. Also has a metal device to either tighten or slacken vice.flagstaff hill, warrnambool, shipwrecked-coast, flagstaff-hill, flagstaff-hill-maritime-museum, maritime-museum, shipwreck-coast, flagstaff-hill-maritime-village -
 Eltham District Historical Society Inc
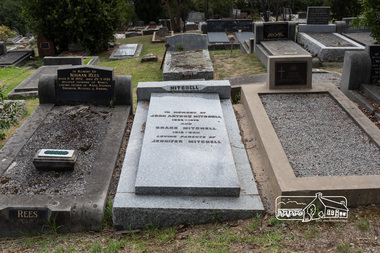
Photograph, Peter Pidgeon, Grave of John Arthur and Grace Mitchell, Eltham Cemetery, Victoria, 5 April 2021
Grace Mitchell, a talented artist in later life and baker, managed a pastry shop business near the corner of Mount Pleasant and Main roads, Eltham in the 1950s. Shortly after her marriage to Arthur Mitchell in 1948, Arthur incurred a head injury from an accident and was unable to work. Grace realised she needed to be home to care for her husband as well as earn an income. She managed the bureaucracy of council permits, and made modifications to her home with savings to get the business off the ground without having to borrow money. Grace and Arthur were avid gardeners and would grow, wash and mince vegetables for pasties while Grace handmade and rolled the pastry. They cooked and minced their own meat for the pies and the fruit for the sweet pies came from their orchard at the rear of the property. She also baked scones and cakes. With weekend visitors travelling to Eltham on the train for days trips, her reputation grew as the spot for afternoon tea. Grace’s daughter Jenni mentions the visit of dancer, Robert Helpmann and U.S. actress Katherine Hepburn in her Grace Mitchell: a short history [2012]. Reminiscences in We did open a school in Little Eltham: Eltham Primary School 209, 1856-2006 a history [2006] include a mention of Grace’s famous pastry shop and the Sunday afternoon visit by Helpmann and Hepburn. Grace operated her pastry shop for over 16 years. She supported the Shillinglaw Cottage Preservation Campaign to preserve the cottage through its Flavour of Eltham community cookbook published in 1964 and hosted cooking classes in the new Living and Learning Centre. Grace Mitchell passed away aged 95 years in 2011. In memory of John Arthur Mitchell 1905 – 1975 And Grace Mitchell 1916 – 2011 Loving parents of Jennifer MitchellBorn Digitaleltham cemetery, gravestones, grace mitchell, john arthur mitchell -
 Eltham District Historical Society Inc
Document - Folder, Watts
Family research queries John and Sarah Watts William and Mary Watts Both families were shoemakers. John and Sarah Watts arrived in Eltham circa 1850. John Watts was recorded in the initial 1858 Eltham Roads District Board rates book living in Little Eltham, also 1859 and 1860. The property then appears to be in the name of Thomas Watts from 1861 to 1863 at least. Thomas was married to Ann. According to a Facebook contact from family researcher Rosie Watts in Queensland, the children of John and Sara were Betsy aka Elizabeth, Ann, Maria, Robert and Sarah (later Jones). Sarah was born 1850, the only child born in Australia. Sarah Watts remained in Eltham and married a man by the name Meadows. On 24 January 1860 John Watts was asaulted by a beligerant drunk (John Castle) whilst sitting at the bar of the Fountain Hotel that evening. Castle without warning grabbed Watts by the throat, pushed him over and kicked him in the head with his heavy boots. Constable Lalor was called and Castle attempted to assault him as well. Watts was helped up, was sick and was taken home by his son and a Mr Wallace. He went to bed. Watts died April 11 and his wfe Sarah advised the Coroner's inquest held April 11 that he had never left his bed from that time. Castle was charged with manslaughter. He was found guilty by jury and sentenced to 18 months hard labour on the roads. John Watts is buried in Eltham Cemetery in an unmarked grave before records were kept. His wife, Sarah later Sarah Meadows (previously Watts, nee Tew) is buried there also along with her daughter Ann Southerly Head (nee Meadows). john watts, william watts, mary watts, john castle, manslaughter, fountain hotel, constable peter lalor, shoemaker, sarah meadows, sarah watts (nee tew) -
 Mission to Seafarers Victoria
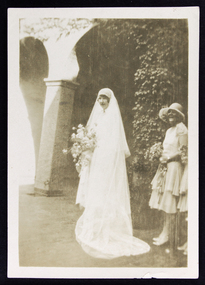
Photograph - Photograph, Sepia, 14 February 1928
Dora Walker was a student of Milverton school, one of the Ladies Schools, a branch of the Ladies Harbour Light's Guild. Amy Dora Walker (known as Dora) of East Malvern married Harold Priestley Simpson of Surrey Hills on 14 February 1928. The bride's maids were Ella Kendall and Molly Walker. The article in the Herald of the day describes the event: "WEDDING AT SEAMEN'S CHAPEL Reception at Hotel Windsor The pretty little chapel at the Sea men's Institute was packed with interested friends this afternoon, when Miss Dora Walker, one of the Mission's most enthusiastic and efficient voluntary helpers, chose it as the setting for her marriage with Mr H. P. Simpson, son of Mr and Mrs J. H. Simpson, of Mornington. A group of her fellow workers decorated the chapel with lovely pink and white gladioli, carnations and roses. The ceremony was performed by the Rev. J. R. Weller, chaplain of the Mission, and the bride was given away by her father, Mr A. W. Walker, of Manning road, East Malvern. She wore a lovely ivory georgette frock, the finely tucked skirt being fashioned with a deep transparent hem of Chantilly lace. Over it fell a beautiful Honiton lace veil mounted on tulle and arranged to give the ef fect of a train. Fragrant white roses composed her bouquet. Two attendants followed her down the aisle — her sister, Miss Molly Walker, and Miss Ella Kendall — both wearing dainty shrimp pink georgette frocks and large crinoline straw hats in the same shade with a dainty edging of tulle. They carried bouquets of pink cactus dahlias nnd delphiniums. Mr Louis Buscombe was best man, and Mr George Thompson grooms man. After the ceremony Mr and Mrs Walker entertained about 50 guests at the Hotel Windsor."A member of the Ladies Harbour Lights Guild, Dora is one of the few ladies who married at the Mission.Sepia toned photograph of bride and attendants in the courtyard of the Mission to Seafarers. The bride's dress is calf length and she is standing with her veil draped in front of her, holding a large bouquet. There is one attendant to the right of the photograph, wearing a layered calf length dress and holding a smaller bouquet. Both are standing in front of one of the columns in the courtyard which has ivy growing over it.Blue ink on rear of photograph: 4 49hat, flowers, veil, wedding, dress, ivy, columns, shoes, dora walker, dora simpson, milverton school, ladies school, lhlg, mrs h.p. simpson, mrs harry simpson, courtyard, amy dora walker, ella kendall, molly walker, reverend j.r. weller, david simpson -
 Eltham District Historical Society Inc
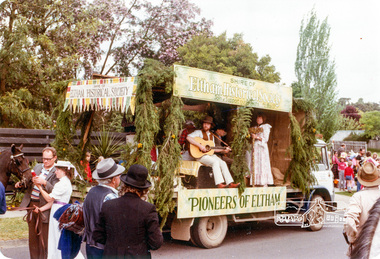
Photograph, Shire of Eltham Historical Society "Pioneers of Eltham" entry in the Eltham Community Festival Parade, 17 October 1981, 17/10/1981
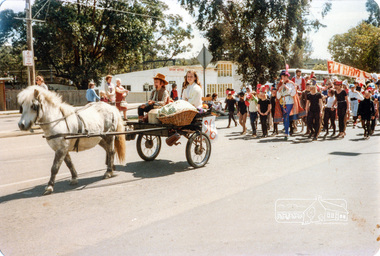
[from contemporary reports:] 1981: 16-18 October. “Pioneers of Eltham” and horse drawn vehicle. This year's festival will be held from 16th to 18th October, with the festival parade being held on Saturday 17th. In recent years the Society has participated in the parade and also organised a display for the festival. We have won prizes for our parade entry for the last two years. The committee has given preliminary consideration to our participation and it has been agreed that we should again enter the procession. This matter will be discussed at the September meeting. / The Society's float in the festival parade again won a prize. This year we won the prize for the best effort by a local group, donated by Bob Clarke's Menswear. As in previous years Peter Quirke has allowed us to use his truck as a float. Peter has formerly operated his fruiterer's business at Research and Diamond Creek and has recently opened a shop in the Eltham Village Arcade. Joh Ebeli, with a little more assistance from other members than in previous years, again did an excellent job in decorating the float. Members of the Victorian Folk Music Club again accompanied us on the float and their music helped create the appropriate mood. A new feature of our parade entry was the inclusion of horse drawn vehicles owned and driven by the Hennel family of Hurstbridge. They certainly added to a highly successful day. In the last issue of this Newsletter we mentioned the award won by the Society for its entry in the Eltham Community Festival Procession. We neglected to mention the award won by member and long-time Eltham resident, Jock Read for the “Best Eltham Theme.” Jock and his horse have been a feature of Eltham parades for years and in particular have established a local tradition in leading Anzac Day parades.Colour photographeltham festival, shire of eltham historical society, 1981, victorian folk music club -
 Eltham District Historical Society Inc
Photograph, Shire of Eltham Historical Society "Pioneers of Eltham" entry in the Eltham Community Festival Parade, 17 October 1981, 17/10/1981
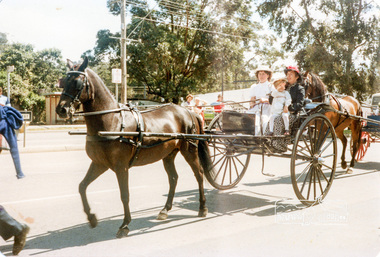
[from contemporary reports:] 1981: 16-18 October. “Pioneers of Eltham” and horse drawn vehicle. This year's festival will be held from 16th to 18th October, with the festival parade being held on Saturday 17th. In recent years the Society has participated in the parade and also organised a display for the festival. We have won prizes for our parade entry for the last two years. The committee has given preliminary consideration to our participation and it has been agreed that we should again enter the procession. This matter will be discussed at the September meeting. / The Society's float in the festival parade again won a prize. This year we won the prize for the best effort by a local group, donated by Bob Clarke's Menswear. As in previous years Peter Quirke has allowed us to use his truck as a float. Peter has formerly operated his fruiterer's business at Research and Diamond Creek and has recently opened a shop in the Eltham Village Arcade. Joh Ebeli, with a little more assistance from other members than in previous years, again did an excellent job in decorating the float. Members of the Victorian Folk Music Club again accompanied us on the float and their music helped create the appropriate mood. A new feature of our parade entry was the inclusion of horse drawn vehicles owned and driven by the Hennel family of Hurstbridge. They certainly added to a highly successful day. In the last issue of this Newsletter we mentioned the award won by the Society for its entry in the Eltham Community Festival Procession. We neglected to mention the award won by member and long-time Eltham resident, Jock Read for the “Best Eltham Theme.” Jock and his horse have been a feature of Eltham parades for years and in particular have established a local tradition in leading Anzac Day parades.Colour photographeltham festival, shire of eltham historical society, 1981 -
 Eltham District Historical Society Inc
Photograph, Shire of Eltham Historical Society "Pioneers of Eltham" entry in the Eltham Community Festival Parade, 17 October 1981, 17/10/1981
[from contemporary reports:] 1981: 16-18 October. “Pioneers of Eltham” and horse drawn vehicle. This year's festival will be held from 16th to 18th October, with the festival parade being held on Saturday 17th. In recent years the Society has participated in the parade and also organised a display for the festival. We have won prizes for our parade entry for the last two years. The committee has given preliminary consideration to our participation and it has been agreed that we should again enter the procession. This matter will be discussed at the September meeting. / The Society's float in the festival parade again won a prize. This year we won the prize for the best effort by a local group, donated by Bob Clarke's Menswear. As in previous years Peter Quirke has allowed us to use his truck as a float. Peter has formerly operated his fruiterer's business at Research and Diamond Creek and has recently opened a shop in the Eltham Village Arcade. Joh Ebeli, with a little more assistance from other members than in previous years, again did an excellent job in decorating the float. Members of the Victorian Folk Music Club again accompanied us on the float and their music helped create the appropriate mood. A new feature of our parade entry was the inclusion of horse drawn vehicles owned and driven by the Hennel family of Hurstbridge. They certainly added to a highly successful day. In the last issue of this Newsletter we mentioned the award won by the Society for its entry in the Eltham Community Festival Procession. We neglected to mention the award won by member and long-time Eltham resident, Jock Read for the “Best Eltham Theme.” Jock and his horse have been a feature of Eltham parades for years and in particular have established a local tradition in leading Anzac Day parades.Colour photographeltham festival, shire of eltham historical society, 1981 -
 Eltham District Historical Society Inc
Photograph, Jock Read, Eltham Community Festival Parade, 17 October, 1981, 17/10/1981
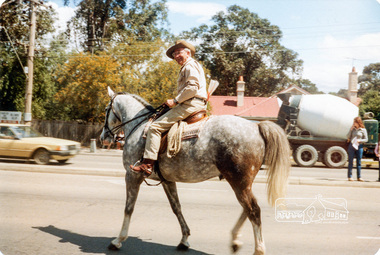
[from contemporary reports:] 1981: 16-18 October. “Pioneers of Eltham” and horse drawn vehicle. This year's festival will be held from 16th to 18th October, with the festival parade being held on Saturday 17th. In recent years the Society has participated in the parade and also organised a display for the festival. We have won prizes for our parade entry for the last two years. The committee has given preliminary consideration to our participation and it has been agreed that we should again enter the procession. This matter will be discussed at the September meeting. / The Society's float in the festival parade again won a prize. This year we won the prize for the best effort by a local group, donated by Bob Clarke's Menswear. As in previous years Peter Quirke has allowed us to use his truck as a float. Peter has formerly operated his fruiterer's business at Research and Diamond Creek and has recently opened a shop in the Eltham Village Arcade. Joh Ebeli, with a little more assistance from other members than in previous years, again did an excellent job in decorating the float. Members of the Victorian Folk Music Club again accompanied us on the float and their music helped create the appropriate mood. A new feature of our parade entry was the inclusion of horse drawn vehicles owned and driven by the Hennel family of Hurstbridge. They certainly added to a highly successful day. In the last issue of this Newsletter we mentioned the award won by the Society for its entry in the Eltham Community Festival Procession. We neglected to mention the award won by member and long-time Eltham resident, Jock Read for the “Best Eltham Theme.” Jock and his horse have been a feature of Eltham parades for years and in particular have established a local tradition in leading Anzac Day parades.Colour photographeltham festival, shire of eltham historical society, 1981, jock read -
 Flagstaff Hill Maritime Museum and Village
Equipment - Bosun's Chair, ca. 1922
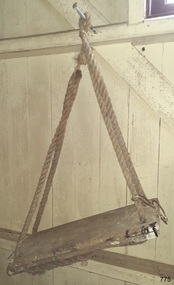
This Bosun's char was part of the equipment on the vessel 'Reginald M. It is typical of items included on board a vessel in the late 19th and early 20th century. The nautical word 'bosun' is an abbreviation of the word 'boatswain' who is the person responsible for the repair and maintenance of the vessel. It could be used when rigging the sails and for rescue at sea, along with a thick rope anchored on shore or a rope between ships. It could also be used to move passengers to and from a ship as well as cargo on, to and from the vessel. A bosun's chair is a simple piece of equipment made from a short plank of wood and a sturdy piece of rope. It looks a little like a child's swing but usually has a pulley system that allows the user to adjust the length of the hanging piece of rope, and in so-doing adjusts the height above the floor or ground or sea. In modern times a harness would also be worn by the bosun’s chair user for safety reasons. Bosun's chairs are also used by window cleaners, construction workers and painters. The bosun’s chair is sometimes just a short plank, or even a canvas sling. The REGINALD M - The vessel “Reginald M” was a two-masted coastal ketch, owned and built by Mr. Jack (John) Murch of Birkenhead, Port of Adelaide, South Australia. Its construction took approximately 6 months and it was launched at Largs Bay in 1922. The vessel had many owners and adventures over the years until it was purchased by Flagstaff Hill Maritime Museum & Village in 1975 from the Melbourne Ferry Company at auction. It was then used as an active display until 2016. Visitors could go aboard, turn the ship's wheel, go below deck and get the feel of the captain's quarters, sailors' quarters and the storage space available. The Reginald M was a popular exhibit for young and old, until 2016.This bosun's chair is significant for its connection to the maritime history. It has been used for rigging, painting, maintenance and importantly for life saving and safety. The bonus's chair is also significant because of its connection to the history of the vessel REGINALD M, the coastal trading ketch from South Australia built in 1922 and in existence until 2016. Its flat bottom, single chine shape illustrates a very simple but robust method of construction, compared to other round bilged examples of trading vessels. The Reginald M is listed on the Australian Register of Historic Vessels (ARHV Number: HV000562.)Bosun's chair; seat is a rectangular plank of wood with a hole drilled in each corner and three reinforcing wood lengths attached below the plank. The ends of two looped thick ropes have been threaded through the holes in the plank, crossed over then spliced together. The loops of rope above the plank have been tied with light rope. A roughly made wire hook is attached at the base of one length of rope. Top surface reveals indents where the bottom wooden pieces are joined to the top and some of the metal fixtures can be seen along the edge. There are remnants of white paint on the top.flagstaff hill, warrnambool, maritime village, maritime museum, flagstaff hill maritime museum & village, shipwreck coast, great ocean road, bosun's chair, bosuns chair, boatswains chair, rigging, maritime equipment, bosun's seat, life saving, marine technology, ship rigging -
 Flagstaff Hill Maritime Museum and Village
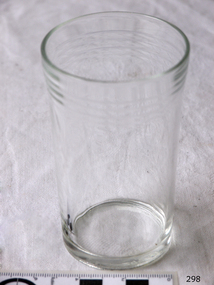
Domestic object - Glass
The art of making glass can be traced back to 2600 BC in Mesopotamia. Egyptians practised making glass around 2500 BC. Artificial glass first appeared in the Egyptian or the Mesopotamian civilization, whereas they used tools made out of volcanic glass obsidian in the Stone Age. Ancient China, however, discovered how to make glass a little later. Glass beads are known to be one of the earliest products made out of glass. Their creation is thought to be primarily accidental. In the later Bronze Age, glassmaking came to a halt. Glass was a luxury material back then. Archaeological excavations suggest the use of glass in England during the middle ages. In the 10th century, stained glass found a place in cathedrals and windows of palaces. After the Renaissance, architectural methods changed substantially, leading to a decrease in stained glass as a building material. Domestic use of glass increased following the industrial revolution. Vessels, glass windows, and glass beads gained popularity in Europe during this period. During the 19th century, many people preferred glass windows and doors as a decorative option. In the late 19th century, some designers brought back stained glass in decorative windows. It was during this period that Mr Tiffany discovered several methods to make domed glass handicrafts. People discovered the true versatility of using glass as a building material only in the 20th century. With glassmaking technology receiving an industrial boom, you could produce several different types of glass. Toughened glass, laminated glass, bulletproof glass, and smart glass all boosted the use of glass in buildings. Today, several skyscrapers, small and big homes, and offices use glass in almost all aspects of construction and design. https://www.aisglass.com/glass-made-step-step-process/The invention and development of glass, both as domestic items and in building, has been nothing short of revolutionary. Prior to the use of glass for windows, the interior of buildings were extremely dark, even during sunny days. The use of glass domestic objects, that could be easily washed, led to improved hygiene.Cylindrical drinking glass with stepped relief around lipNoneflagstaff hill, warrnambool, shipwrecked-coast, flagstaff-hill, flagstaff-hill-maritime-museum, maritime-museum, shipwreck-coast, flagstaff-hill-maritime-village, glass -
 Flagstaff Hill Maritime Museum and Village
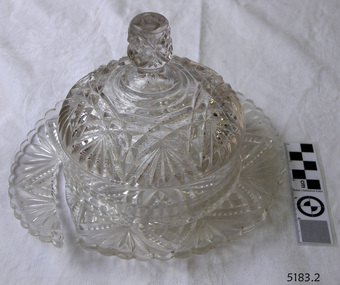
Domestic object - Butter Dish
The art of making glass can be traced back to 2600 BC in Mesopotamia. Egyptians practised making glass around 2500 BC. Artificial glass first appeared in the Egyptian or the Mesopotamian civilization, whereas they used tools made out of volcanic glass obsidian in the Stone Age. Ancient China, however, discovered how to make glass a little later. Glass beads are known to be one of the earliest products made out of glass. Their creation is thought to be primarily accidental. In the later Bronze Age, glassmaking came to a halt. Glass was a luxury material back then. Archaeological excavations suggest the use of glass in England during the middle ages. In the 10th century, stained glass found a place in cathedrals and windows of palaces. After the Renaissance, architectural methods changed substantially, leading to a decrease in stained glass as a building material. Domestic use of glass increased following the industrial revolution. Vessels, glass windows, and glass beads gained popularity in Europe during this period. During the 19th century, many people preferred glass windows and doors as a decorative option. In the late 19th century, some designers brought back stained glass in decorative windows. It was during this period that Mr Tiffany discovered several methods to make domed glass handicrafts. People discovered the true versatility of using glass as a building material only in the 20th century. With glassmaking technology receiving an industrial boom, you could produce several different types of glass. Toughened glass, laminated glass, bulletproof glass, and smart glass all boosted the use of glass in buildings. Today, several skyscrapers, small and big homes, and offices use glass in almost all aspects of construction and design. https://www.aisglass.com/glass-made-step-step-process/The invention and development of glass, both as domestic items and in building, has been nothing short of revolutionary. Prior to the use of glass for windows, the interior of buildings were extremely dark, even during sunny days. The use of glass domestic objects, that could be easily washed, led to improved hygiene.Moulded patterned glass butter dish. Base has been broken.None.flagstaff hill, warrnambool, shipwrecked-coast, flagstaff-hill, flagstaff-hill-maritime-museum, maritime-museum, shipwreck-coast, flagstaff-hill-maritime-village, glass, kitchen item, butter -
 City of Moorabbin Historical Society (Operating the Box Cottage Museum)
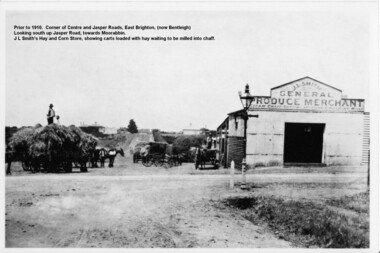
Photograph - Photograph Hay & Corn Store, Before 1910, Smith's Hay & Corn Store, Cnr. Centre and Jasper Roads, Bentleigh, Late 19th to early 20th Century
The first photograph was taken prior to 1910. The location is at the corner of Centre and Jasper Roads, East Brighton, (now known as Bentleigh). It is an early view of John L. and "Minnie" Smith's Hay and Corn Store, situated on the South West corner of those two roads. The first photo was taken prior to the introduction of electricity in the area. A gas lamp and horse "hitching post" can be seen "in shot". There are several loaded wagons waiting in line to have their hay milled to chaff. Farmers came from places as distant as Carrum to have their loads of hay milled into chaff. John Smith was born in 1860 in Point Nepean Road, Brighton, and Minnie was born in Patterson Road, Moorabbin, in a wattle and daub cottage with earthen floor and butter muslin over the windows. The couple married in 1884, Minnie was a devout Methodist and the family became very involved in the development of the local Methodist church. The couple had four children and during the 1890s Depression their first child died, they lost all their possessions, and John's family struggled to survive. Finally in the late 1890s JL Smith was able to rent a shed from Mr Henry Box on the corner of Centre and Jasper Roads, and he later purchased that property. With the gradual improvement in the economy, and the development of the successful market gardening industry in the Shire of Moorabbin, JL Smith's produce store became quite prosperous. Over some years the little "shed" developed into a thriving Hay and Corn Store. JL Smith went on to become Moorabbin Shire President in 1914. He and his wife were active in assisting soldiers returning injured from the 1st WW, in the local Methodist Church and other early community projects. Smith was a typical example of the majority of the early settlers in the Shire of Moorabbin, being god-fearing and devoted to the idea of service to the community. The photographs demonstrate the primitive conditions and early development of what is now a bustling and well-recognised area of Bentleigh, (known as east Brighton before 1907). The photo shows a gas lamp in use before the introduction of electricity in 1916. The Smith's story is representative of the many early pioneering traders, who elected to "set up shop", who suffered the adversity of the 1890s depression, but who survived and made their living in the largely undeveloped area of East Brighton ( now Bentleigh) district. Two black and white early photographs both of the same location. The photos are of the corner of Centre and Jasper Roads, Bentleigh. (Prior to 1907 this area was known as East Brighton.) Both photos show J.L Smith's General Merchant Produce store. "Steam Chaff Cutting and Corn Crushing Mills" and the surrounding area at differing stages. In the first photo taken prior to 1910, we can see there are several horse-drawn carts loaded with hay waiting to be milled, a gas lamp and a horse "hitching post". The store is just a single unadorned, shed. The later, second photo of the same area, shows improvements and the further development of that site. On the back of the photo "Hay and Corn Store -/ not later than 1910."/"Photographer /Victor C Smith,/ Phone Number XL1472"/hitching post, methodist church, smith minnie, moorabbin shire president, gas lamp, east brighton district, 1890s depression, wattle and daub cottage, centre road, jasper road, box henry, smith john l -
 Flagstaff Hill Maritime Museum and Village
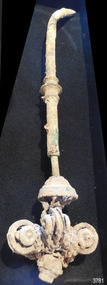
Functional object - Light Fitting, c. 1878
This light hanging mechanism could have been used for an adjustable chandelier with candle holders. It would likely be attached to the ceiling by its long stem to suspend the light fitting. A chain would have been threaded around each pulley, with one end joined to the top of the light fitting and the other end joined to a counter weight. The four counter weights would allow the light fitting to be raised or lowered to the desired height with little effort, to allow for lighting the candles or change the intensity of the light. This light fitting was once installed on the famous sailing ship, the Loch Ard, which was built in 1873 and tragically wrecked in 1878.The fitting was recovered from the wreck almost 100 years later, at the time it was discovered. LOCH ARD 1873-1878 – The Scottish-built clipper ship Loch Ard was bound for Melbourne in 1878 with 54 people on board. The mixed cargo it carried included items for the 1880 International Exhibition in Melbourne, one of which was the now famous Majorca ware Minton ‘Peacock’ statue. The Loch Ard was wrecked on June 1st when the ship crashed into Mutton Bird Island, east of Port Campbell. The only survivors were Tom Pearce, a crew member, and Eva Carmichael, a young passenger who was rescued by Pearce. The Gibsons, owners of nearby Glenample Homestead, cared for Tom, and for Eva who stayed longer before returning to Ireland. The wreck of the Loch Ard was discovered in 1967, before the introduction of the Victorian historic shipwreck legislation. In 1969 it was decided that all recovered material should be lodged with the Receiver of Wrecks. In 1980 Flagstaff Hill Maritime Museum Divers received a permit to recover artefacts from the wreck to safeguard them from looters. In 1982 the site was listed as a Historic Shipwreck, and the Maritime Archaeology Unit recovered loose artefact material. The light fitting is recognised as being historically significant as an example of lighting either as part of the ship ‘Loch Ard’ or part of the ship’s cargo, imported for use in Colonial Victoria in the 19th to early 20th century. Flagstaff Hill’s collection of artefacts from LOCH ARD is significant for being one of the largest collections of artefacts from this shipwreck in Victoria. It is significant for its association with the shipwreck, which is on the Victorian Heritage Register (VHR S417). The collection is significant because of the relationship between the objects, as together they have a high potential to interpret the story of the LOCH ARD. The LOCH ARD collection is archaeologically significant as the remains of a large international passenger and cargo ship. The LOCH ARD collection is historically significant for representing aspects of Victoria’s shipping history and its potential to interpret sub-theme 1.5 of Victoria’s Framework of Historical Themes (living with natural processes). The collection is also historically significant for its association with the LOCH ARD, which was one of the worst and best known shipwrecks in Victoria’s history. Light fitting; hanging mechanism with simple pulley wheels for pendant light. Metal pipe, closed and hooked at one end, stem has three decorative rings, and open end has a short narrower metal pipe inserted. Narrow pipe has a three tiered, scallop-edged dome attached to the end. The dome encloses remnants of broken chain length and is attached to a set of four pulley wheels arrayed in a circle with their edge sat right angles to each other. The light fitting was recovered from the wreck of the Loch Ard.flagstaff hill, warrnambool, shipwrecked coast, flagstaff hill maritime museum, maritime museum, shipwreck coast, flagstaff hill maritime village, great ocean road, shipwreck artefact, loch ard, victoria, eva carmichael, tom pearce, lighting, lidht fitting, pendant light, chandelier, pulley light, adjustable height light -
 Bendigo Historical Society Inc.
Photograph - The Ruschmeyers - Publicans of the Town and Country Hotel, Diamond Hill Bendigo
John Christopher Ruschmeyer arrived in Melbourne aged 26 aboard the 'Essex' from Hanover, Germany via London in 1864. Shortly after his arrival in Australia he travelled to the Bendigo diggings. He became one of many thousands of German diggers on the Central Victorian Goldfields. He married Elizabeth Little Shepherd (Morrison) in 1874, a widow who had travelled down from Brisbane after the death of her first husband (John Shepherd). He became a naturalized citizen in 1893. Shortly after his marriage and having mined Golden Gully for some years he turned to hotel keeping and was the licensee of the Town and Country Hotel in Woodward Road, Golden Gully up until his death in 1911. The family of 4 daughters and 3 sons survived him. The family of Ernest, Maude, Christopher, Ethel and Edith (twins), Charles and Dolly Ruschmeyer all lived in the Bendigo area. His sons continued working in the mining tradition. He is buried with his wife in the Bendigo Cemetery. After his death Elizabeth moved to Thistle St until her death in 1922. Christopher Ruschmeyer and his family lived in a small house (now part of a poultry farm) in Woodwood road opposite the TOWN AND COUNTRY HOTEL. A brother Ernest Walter Ruschmeyer lived in a house next to the hotel. Ernest built the house. After Ernest's death in 1927 another brother Charles Hex Ruschmeyer married Ernest's wife Gertrude. The hotel was first licensed in 1898 and closed in 1916. John Ruschmeyer was the licensee until his death in 1911. Elizabeth took over the license until 1912 when it was sold to a Catherine E Hoffaer. This information is provided by Neil Graham of Strathfieldsaye whose Grandfather on his Mother's side was John Ruschmeyer and John Christopher Ruschmeyer was his Great Grandfather.Digital image: image shows Town and Country Hotel, Diamond Hill. Ruschmeyer's were the publicans. Standing outside hotel, were from left, Ethel, Dolly, Maude, Edith, Elizabeth.person, family, ruschmeyer, john christopher ruschmeyer, town and country hotel, ruschmeyer, diamond hill bendigo -
 Surrey Hills Historical Society Collection
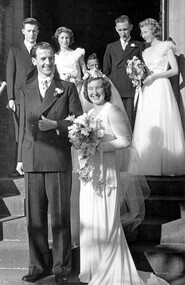
Work on paper - Photograph, Margaret Black's wedding 1st May 1948, 1948
Margaret Johnson was born and raised in the country. She came to Melbourne to attend secondary school at age eleven. She stayed with the family of her uncle, Dr Carrington, in their home / surgery still located at 174 Union Road, the Surrey Hills Medical Centre. Later, whilst waiting to commence her kindergarten training course, she met Jessie Black and they became firm friends and it was through Jessie that Margaret met Jessie’s brother and her future husband, Thorby Black. The Black family had been residents of Mont Albert for many years and Thorby was in the air force at the time. Margaret and Thorby were married at St Stephens Presbyterian Church in Surrey Hills on 1 May 1948. Her wedding dress was bought at Canns on the corner of Elizabeth Street & Flinders Lane. It was one in an exhibition held as part of a Surrey Hills Festival in the early 2000's. Like others in the exhibition, it no longer had its train and the sleeves have been shortened. Margaret recalled that after her wedding she wore it as an evening dress. Her bridesmaids’ dresses were a little unusual for the time, as they too were white and their flowers were subdued pink and blue. According to Margaret, the popular fashion was for brightly coloured dresses and bright flowers for the bridesmaids. The positioning of the garlands of flowers in their hair was also unusual. They were placed at the back so that the congregation could see them during the ceremony. Housing was in very short supply in the years following the war, so after they were married, Margaret and Thorby moved into a small flat created at Dr Carrington’s surgery. They later moved to a house built in 1926 in Black Street, Mont Albert, which continued to be Margaret’s home until her death. weddings, mrs margaret black, miss margaret johnson, mr thorby black, st stephens presbyterian church, bridal wear