Showing 2352 items
matching view st.
-
 Melbourne Tram Museum
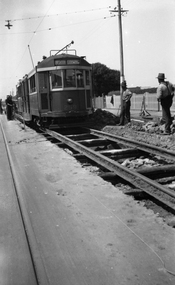
Negative, Wal Jack, c1946
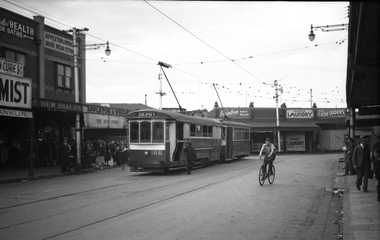
Black and white negative, by Wal Jack, of S class 166 (Destination, Depot) and an a X2 class in Leeds Street before Irving Street at the Footscray railway station. Photo may be taken on the same day as the other photos of S 166 - 21-4-1945 In the background are View Bakery, Appleton and Wright - Men's Wear, Rainbow Knit Wear, Marx's Laundry and at least one solider.trams, tramways, footscray, s class, leeds st, tram 166, x2 class., mmtb -
 Melbourne Tram Museum
Postcard, Biscay Greetings, A class 252 descending the Collins St hill, mid 1980's
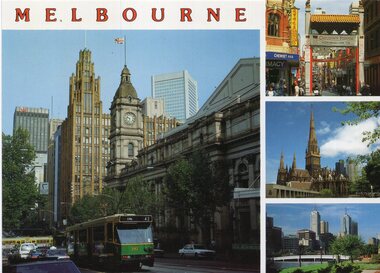
Colour postcard divided back, four photo panels - Biscay Greetings, 1. - A class 252 descending the Collins St hill to Swanston St with the Town Hall and the Manchester Unity building in the view 2 - China Town 3 - St Patrick's Cathedral 4 - Melbourne Skyline. Back has space for name and address, stamp and a message and details of the postcard. Produced by Biscay Greetings, possibly mid 1980's. Card No. BG333trams, tramways, collins st, tourism, a class, tram 252 -
 Melbourne Tram Museum
Postcard, Biscay Greetings, Four views of Melbourne including SW5 725, late1980's
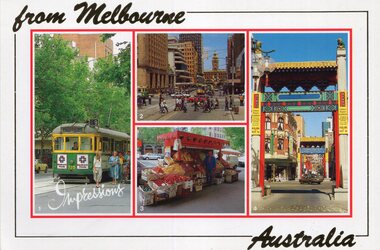
Colour postcard divided back, four photo panels - Biscay Greetings, 1. - SW5 725 in Collins St, route 9, Northcote 2 - Elizabeth St 3 - A fruit vendors cart 4 - China Town Back has space for name and address, stamp and a message and details of the postcard. Produced by Biscay Greetings, possibly mid 1980's. Card No. BG814 Has title "from Melbourne Australia - impressions"trams, tramways, collins st, tourism, sw5 class, elizabeth st, tram 252 -
 Melbourne Tram Museum
Postcard, Nu-color-Vue, Swanston St to the Shrine of Remembrance, early 1980's
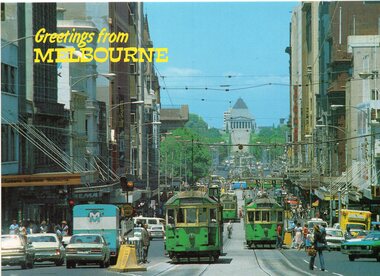
Colour postcard divided back, Nu-Color-Vue, looking along Swanston St to the Shrine of Remembrance from Lonsdale St, with a number of W2 class trams in the view. Back has space for name and address, stamp and a message and details of the postcard. Produced by Nu-Color-Vue, 1984/85 - card number 11ML 153 and NCV 5694. Has "Greetings from Melbourne" in yellow in the top left hand corner.trams, tramways, swanston st, st kilda road, shrine of remembrance, w2 class -
 Melbourne Tram Museum
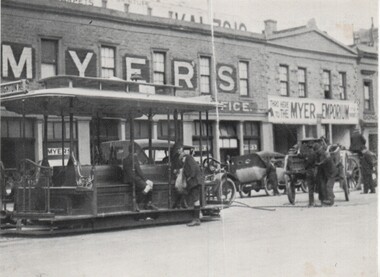
Postcard, Myer, Myer Lonsdale St Warehouse with a grip car, early 1980's
Black and white postcard, divided back with a photo of the Myer Lonsdale St Warehouse with a grip car in front prior to the construction of the 11 storey store. Card dated c1920. Has a number of motor vehicles and horse drawn vehicles in the view. Has space for a stamp on the rear and has card details and some notes about Myer itself.On rear in pencil "Purchased 21/6/1983"trams, tramways, lonsdale st, cable trams, grip tram, myer -
 Melbourne Tram Museum
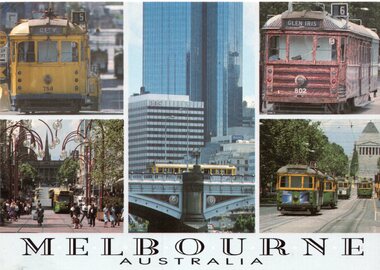
Postcard, Steve Parish Paddington Qld, Five views of Melbourne trams, late 1980's
Colour postcard 5 panel featuring Melbourne trams - SW5 758 (Route 5), 802 (Glen Iris Route 6) (both Transporting Art), Bourke St Mall and 847 in St Kilda Road with the Shrine in the background. The middle one is Princes Bridge with the City Skyline. Back has space for name and address, stamp and a message and details of the postcard. Produced by Steve Parish Postcards. Card No. PC311 and a historical note regarding trams on the back. Has "Melbourne Australia" along the bottom edge.trams, tramways, princes bridge, sw5 class, route 5, route 6, transporting art, tram 758, tram 802, tram 847 -
 Melbourne Tram Museum
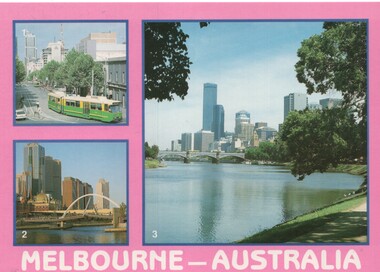
Postcard, Wayne Zerbe / North Australian Trading Co. for Kangaroo Gifts, Melbourne views including trams, early 1990's
Colour postcard, three panels: 1 - B class turning from Bourke into Spring St 2 - Walkway bridge (Evan Walker Bridge) over the Yarra 3 - City Skyline Back has space for name and address, stamp and a message and details of the postcard. Produced by Wayne Zerbe / North Australian Trading Co. for Kangaroo Gifts. Card No. KGL8 Has "Melbourne Australia" along the bottom edge.trams, tramways, bourke st, b class, melbourne -
 Melbourne Tram Museum
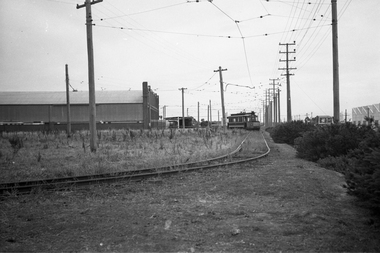
Negative, Wal Jack collection, c1930
Black and white negative from Wal Jack collection of W 259 or W2 during track reconstruction work on its way to North Coburg. The tram has not been fitted with a route number box. A number of workmen in the view "leaning on their shovels" as the tram goes past. Photo could be between Moreland Road and Bell St or in Lygon St before the end of the cable trams in Sydney Road Coburg. OR - in Moreland Road itself, having just left Nicholson St - note heavy wires at the rear of the tram. Photo can be dated from the date a route number box was fitted. Tram was converted to a W2 in Oct. 1931. Photo c1930. Photo may not be by Wal Jack as a size that he did not use.trams, tramways, w2 class, w class, north coburg, sydney road, lygon st, trackwork, tram 259 -
 Melbourne Tram Museum
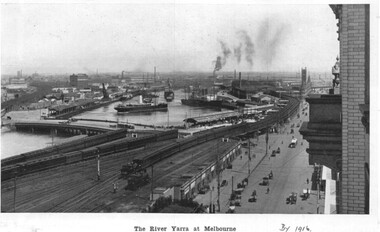
Photograph - Illustration, c1916
Illustration from a photograph reproduced in a magazine of the river Yarra, Flinders St railway yard, the viaduct, the swing basin, the wharves and Queens Bridge. Has a number of cable cars and trains in the view. Taken prior to the construction of the second or duplicate viaduct which was completed during 1915. Construction of the second viaduct on the south side of the original can be seen.in ink in bottom right hand comer "By 1916"trams, tramways, flinders st, railways, shipping, cable trams -
 Melbourne Tram Museum
Negative, Wal Jack, c1941
Black and white negative by Wal Jack of the Workshop Locomotive 18 and a U class car at the Preston Workshops on the track adjacent to St Georges Road. The then Preston tram depot is in the view on the right hand side. Image undated - could be 19-1-1941 or 13-10-1940 or another date.trams, tramways, preston workshops, u class, work trams, st georges road, tram 18 -
 Melbourne Tram Museum
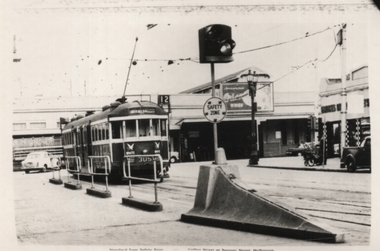
Photograph - Safety Zone prow & W2 305, Melbourne & Metropolitan Tramways Board (MMTB), 1961
Photo, an Official MMTB photograph, shows a safety zone concrete prow with a set of flashing lights at the intersection of Collins and Spencer Sts. In the view is W2 305 (Route 12, South Melbourne Beach). The tram has large experimental roof ventilators and two White Wings Tomato sauce adverts on the end panels. In the background are the Victorian Railways Spencer St buildings. Photo used in the 1961 MMTB Annual Report.Yields information about Safety zones and W2 305.Black and White photograph on plain paper.In ink on rear "Collins & Spencer"tramways, collins st., spencer st, safety zone, w2 class, tram 305 -
 Melbourne Tram Museum
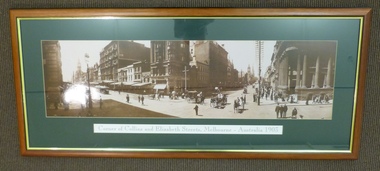
Print - Framed Print, Malvern Framing Gallery, "Corner of Collins and Elizabeth St, Melbourne, Australia 1903", 1997
Framed and glazed photograph of the corner of Collins and Elizabeth Streets Melbourne, looking North East. Wooden frame, brown and gold lining, green card cut to present photograph, with title ""Corner of Collins and Elizabeth St, Melbourne, Australia 1903". Has been lined with brown paper on rear. Two screwed frame hanging supports on either side with four runs of string between them. Has Post Office, Town Hall and Scots Church Towers in the view. One cable car set and one motorised car along with many horse drawn vehicles. Has signed buildings for: Falk Carter & Verner City Hotel M.A Alexander R.H. Alston Blitz's DentistOn rear in black felt pen "$N/XX" and "1997"trams, tramways, melbourne, collins st, cable trams, elizabeth st -
 Melbourne Tram Museum
Photograph - Set of 9 Black & White Photograph/s, Ray Marsh, CBD Melbourne in 17 Feb. 1972 - floods, 1970's
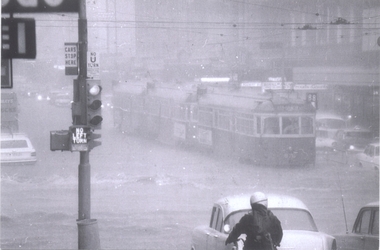
Set of seven black and white photographs of Ray Marsh, of the flooding that occurred in the centre of the CBD Melbourne in 17 Feb. 1972. See Timeline History of Melbourne Trams - Barry George et al. .1 - 876 and two other trams, inbound, Bourke - Elizabeth at the height of the downpour. .2 - ditto, after the rain - looking east, with Dunklings in the view. .3 - W2, route 49, Little Collins and Swanston St looking west. Has a sign advertising Bush walking and sporting equipment above. .4 - W2 591 - north bound in Elizabeth St Essendon, route 49 looking south at corner of Collins St. Digital image of The Age article for the event supplied by Mal Rowe 4/12/12 by e-mail. 2nd copies of .2, .3 and .4 added ex donation of Keith Kings. .7 - Looking south from Bourke St / Elizabeth St. .8 - Bourke St at Elizabeth St with W6 976 and 992 in Bourke St on their way to Spencer St. .9 - Line up of trams in Bourke St (looking west) tailed by W6 999,. route 88. - two copies held. See Reg Item 5995 for photos of Flinders St at Market St. and 6099 for other photos.Details of the event written on the back of photos collected by Keith Kings and the Ray Marsh stamp in green ink with his address details.trams, tramways, melbourne, flooding, elizabeth st, bourke st, tram 876, tram 591, tram 976, tram 992, tram 999 -
 Melbourne Tram Museum
Photograph - Black & White Photograph/s, Australian Govt. Department of Information, late 1940's
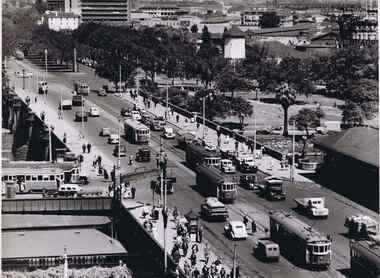
Black and white photograph taken from St Pauls Cathedral Melbourne, looking south over Princes Bridge, early 1950's. Has nine trams in the view, mainly W2's, but one W3 and many motor vehicles, trucks etc. Shows the gardens in the now Southbank area, the junction just past the bridge of South Melbourne tram line, Wirth Bros Circus and other buildings, Prince Henry's Hospital. In particular is an Olympic pool direction sign hanging below the Batman Ave tram sign. This would have been the pool in Batman Ave, nearer to Flinders St, within the Flinders St yard complex, not the 1956 pool. Directly below is a female pedestrian dress in the classic 1950's "Dior" look. Over the bridge on the west side is "The Trocadero" formerly The Green Mill Dance Hall opened on 07/09/1926. West of that again is "Olympia" run by Wirth's . In the distance is Prince Henry's Hospital, the tall section was built in 1942, since demolished. Rod Atkins noted that the Olympia burnt down in the early fifties about the same the Trocadia closed, so pre 1953. Note the centre pole is still place at the Sturt Street intersection. In Batman Ave we have two W2's 401 and earlier one. In St Kilda Road we have four W2's in foreground in then W3 - No. 667 then a W4 then a SW6 in the distance. Outbound on route 4D is 578, behind it is 340 on route 5. A safety zone is between 578 and 340.Stamped on rear "Australian Official Photograph / Department of Information" and the number "L3121" in pencil.trams, tramways, swanston st, princes bridge, melbourne, south melbourne, tram 401, tram 667, tram 578 -
 Melbourne Tram Museum
Document - Research Notes, Swanston Trams, "Swanston Trams / Malvern Depot", 1998
Four page research report, A4 sheets stapled in the top left hand corner, titled "Swanston Trams / Malvern Depot" giving details of the history of Malvern Depot and its tram routes. Produced in 1988 under the banner of Swanston Trams. Describes routes 5 (Malvern Burke Road), 6 (Glen Iris), 8 (Toorak), 16 ( St Kilda Beach), 69 (Kew Cotham Road), 72 (Camberwell), and the main problems from a safety view for each of the routes. Two copies held.trams, tramways, swanston trams, malvern depot, routes -
 Melbourne Tram Museum
Audio - Vinyl sound recording and jacket, Ormond Slater, Ewen Cameron, "Destination City", 1969
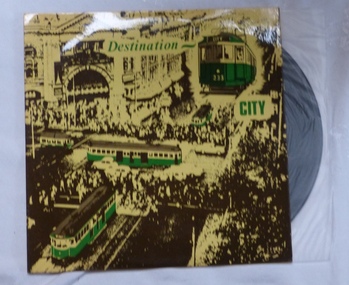
Record - vinyl based with paper card jacket and plastic record cover - 331/3 rpm microgroove vinyl record, or "LP", titled "Destination City". Jacket has a stylised view of the intersection of Flinders and Swanston Streets and Flinders St railway station with W2 233 in the top right hand corner. On the rear are extensive details of each of the 11 recording tracks featuring various trams around Melbourne. The vinyl disk itself has a blue label with the title, speed and side number. Produced and recorded by Ormond Slater and Ewen Cameron in 1969 with the assistance of the Australasian Post and the TMSV. Two copies held - 2nd copy added 18-9-15 - was on display in Main room until April 2015 - from Norm Cross. See Reg Item 1857 for a TMSV order form.trams, tramways, melbourne, sound recordings, vinyl records -
 Melbourne Tram Museum
Photograph - Set of two Black & White Photograph/s, The Age, 1979
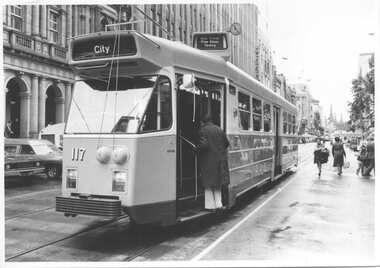
Set of two black and white photos from The Age of the first day of running Z3 117 in service. .1 -Z3 117 at the Elizabeth and Bourke St stop loading passengers. Tram has in the route number box a sign "New Trams free rides today". .2 - Interior view of tram with the conductors desk having a sign about free rides, another employee handing out pamphlets about the tram and passengers on the tram. From the Vicsig.net web site accessed 20/8/2013, gives the in service date of Z3 117 as 25/9/1979.Have "The Age" copyright stamp on the rear. In pencil, on both "Oct 1979, Z3 117 first day in service"trams, tramways, mmtb, z3 class, bourke st, tram 117 -
 Melbourne Tram Museum
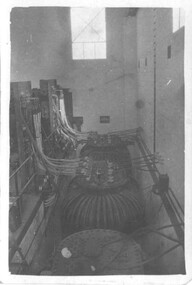
Photograph - Set of 6 Black & White Photograph/s, late 1920's
Set of six small black and white prints of the interior of St Kilda Substation, tramways, 1920's, possibly soon after installation or commissioning. .1 - transformers in a large pit. .2 - view over rotary converters to switchboard .3 - Rotary converter slip rings view .4 - Rotary converters .5 - switchboard .6 - General view of interior.On rear in ink "St Kilda" on all photostrams, tramways, mmtb, substation, st kilda, rotary converters, switchboards -
 Melbourne Tram Museum
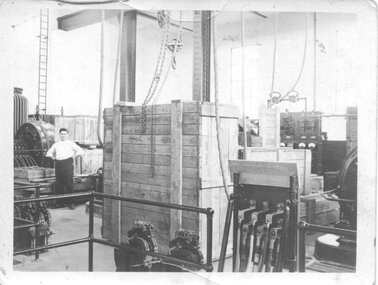
Photograph - Set of four Black & White Photograph/s, late 1920's
Set of four small black and white prints of the interior of the Carlton MMTB substation, Bouverie St, Carlton during the construction phase. Printed on Kodak paper. Has English Electric equipment. .1 - Boxes of equipment and some assembled items .2 - View of substation with rotary converter and a switch board .3 - ditto with a transformer behind .4 - ditto and more boxes. Items .1 to .3 feature a man in a white shirt. Item .3 has a hand written note and arrow "ME".On rear in ink "Carlton" on all photos, with "Control Station" in addition on item .1trams, tramways, mmtb, substation, carlton, rotary converters, switchboards, english electric -
 Melbourne Tram Museum
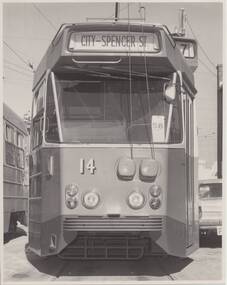
Photograph - Black & White Photograph/s, Melbourne & Metropolitan Tramways Board (MMTB), mid 1970's
Black and white photograph of the front view of MMTB Z 14, Preston Depot. Photo notes the fitting of two trolley retrievers to the tramcar. Has the destination of City-Spencer St and the run number 58 in the front window. Photo mid 1970's.On rear in ink "Z1 14 as delivered with two trolley retrievers". Has the MMTB stamp in the bottom right hand corner.trams, tramways, z class, mmtb, tram z 14 -
 Melbourne Tram Museum
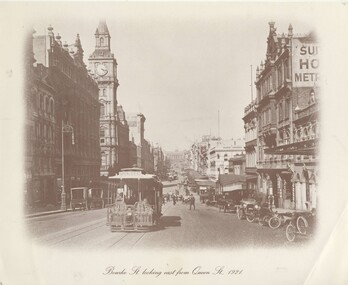
Photograph - Black & White Photograph/s, Original 1921, reproduction 1970's?
Copy photograph of an illustration, sepia toned of Bourke St looking east from about Queen St. Illustration in title gives date as 1921/ Has the Post Office, Myers, Leviathans, Music Gramophones shops in the view, along with cable trams, motor cars, horse drawn vehicles and motor bikes. See Reg Items 588 and 5274 for other copies.trams, tramways, bourke st, cable trams -
 Melbourne Tram Museum
Photograph - Set of two Black & White Photograph/s, Original 1921, reproduction 1970's?
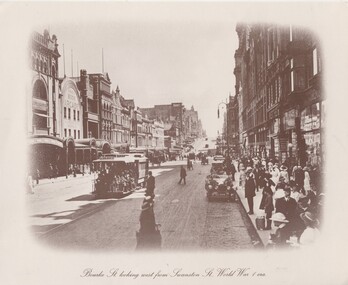
... of Nicholson St. In the view are Coles Book Arcade, Bull and Mouth... the destination of Nicholson St. In the view are Coles Book Arcade ...Copy photograph of an illustration, sepia toned of Bourke St looking west from Swanston St. Title of illustration says World War 1 era, thought appears to be more early to mid 1920's from the motor cars. Cable tram has the destination of Nicholson St. In the view are Coles Book Arcade, Bull and Mouth Hotel, Kino's, The Metropole and Danks. .2 - more extensive print - added 14-12-2018 - scanned in to sections.trams, tramways, bourke st, cable trams -
 Melbourne Tram Museum
Postcard, Murfett Publishers, W2 303 inbound, St Kilda Road, late 1960's
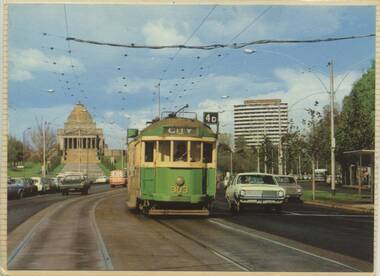
.1 - Colour postcard mounted onto cardboard of W2 303 inbound, St Kilda Road, late 1960's . Tram showing route 4D, which was replaced by route 3 in the renumbering of 3/10/1970 (See Reg item 252 also). Has the Shrine of Remembrance in the background, and the BP building on the right hand side. Tram has the destination of City. No details as to who printed the card as mounted on cardboard. .2 - same photograph but a wider view, published by National View by Murfett Publishers Australia. Has the details on the rear. See Reg Item 3558 for another similar print within an album.trams, tramways, st kilda rd, mmtb, shrine of remembrance, tram 303 -
 Melbourne Tram Museum
Photograph - Illustration/s, Melbourne & Metropolitan Tramways Board (MMTB), 1950's?
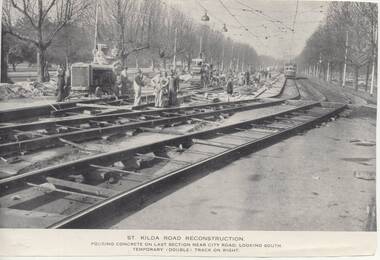
Series of three Black and white Illustrations, reproduction of a MMTB report of photographs of the reconstruction of St Kilda Road, near City Road c1955. .1 Photo titled "St Kilda Road Reconstruction Pouring concrete on last section near City Road, looking south. Temporary (double) track on right. Shows a large group of men working, including some looking at the camera. Shows the construction of temporary track. Has a wide bodied W outbound. Has the Shrine of Remembrance in the far distance. .2 - showing "New Work and some temporary work" - shows the "shoo fly" temporary track link between the side temporary track and the new track. Has a tram in the far distance. Photograph taken near Victoria Barracks. .3 - "General view from just south of City Road, looking south - temporary (double) track in foreground. Similar to .l Originally reproduced in a possibly an MMTB report - not a mid 50's annual. Entry revised 7/7/2017 following addition of items .2 and .3trams, tramways, mmtb, st kilda rd, trackwork, reconstruction -
 Melbourne Tram Museum
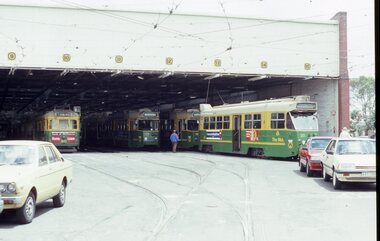
Photograph - Set of 11 Colour Print/s, Bill Davis, mid 1980's to 1990
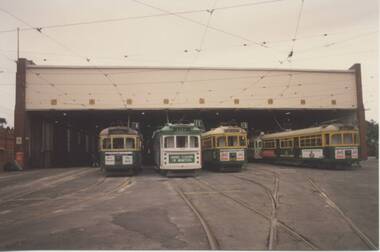
Set of 11 colour prints of Melbourne trams and locations during the mid 1980's to 1990, Photos not well focused. .1 - Group of four trams outside Malvern depot No. 2 shed. W7 1018 in Benetton clothing advertising livery March 1990 to early 1991. Along with 987, 876, 853. .2 - side on view of 1018. .3 - similar to .1 .4 - 1027, outbound, Princes Bridge with Arts Centre in the background. .5 - 1012, inbound ditto .6 - 929 inbound Swanston St, with Linea Hairdressing in the background. .7 - 885, outbound Swanston St, with Flinders St Station in the background. .8 - 847, ditto, between Collins and Flinders St, with Triple FM radio Ad. .9 - 913, ditto inbound. .10 - 897, at the Latrobe St terminus, Spencer St, with J. Wilson removalists advertisement on the front of the tram. Tram running route 9. .11 - ditto with the William Angliss College in the background. Features advertisements on trams for: Spring Valley drinks, Bank of Melbourne, Triple FM Radio, UDL drinks, Benetton, J. Wilson Removalists. All printed on Kodak paper.trams, tramways, ptc, malvern depot, swanston st, latrobe st, tram 1018, tram 1027, tram 987, tram 876, tram 853, tram 1012, tram 929, tram 885, tram 847, tram 913, tram 897 -
 Beaufort Historical Society
Photograph - Beaufort streetscape, View to Camp Hill
... Beaufort Historical Society 9 Livingstone st Beaufort 3373 ...View from Livingstone Street Beaufort towards Camp Hill. Shows Golden Age Hotel.Black & White PhotographPublished by E Smith Booksellerbeaufort, historic beaufort streetscape -
 Melbourne Tram Museum
slide - Colour - Melbourne Trams, David Verrier, Easter 1993
1 - Malvern Depot Easter 1993 - with trams 851, 170, 13, 20 in the view. 2 - SW6 855 at the South Melbourne beach terminus in Mills St. Middle Park 3 - Preston Workshops with trams 750, 50 and others. 4 - Z20 leaving Malvern Depot 5 - SW6 935 leaving Malvern depot - for City Route 5.Yields information about Melbourne trams - Easter 1993Set of five white Kodak Kodachrome slides.tramways, z3 class, b2 class, z1 class, malvern depot, tram 20, tram 13, tram 170, tram 851, tram 855, mills st, middle park, tram 750, tram 55, preston workshops, sw5 class, sw6 class, tram 935 -
 Melbourne Tram Museum
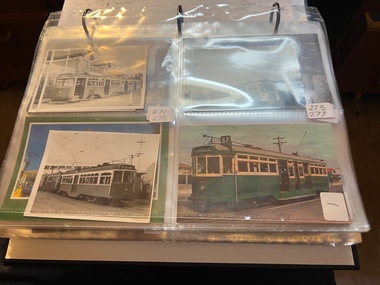
Album - Charles Craig - part 2 of 2, 1950s to 1970s
Photo - see pdf file for further information. Number Brief Description CC271 Y1 610 and another at Camberwell depot CC272 Ditto CC273 Y1 613 at Batman Ave CC274 Y1 611 Peel St North Melbourne CC275 Y 469 Camberwell depot CC276 Ditto CC277 Postcard – L104 – MMTB CC278 L103, Hawthorn Road CC279 L103, Hawthorn Road CC280 L103 Dandenong Road CC281 L103 and w5 847 Dandenong Road CC282 L104 on Preston Workshops traverser CC283 Flinders St station with Ws CC284 Flinders St looking south along St Kilda Road to Shrine CC285 Postcard – Nu Color vue – Flinders St CC286 Postcard – Valentines – Flinders St No. 13 CC287 Postcard – Rose Series – 13595 – has been trimmed CC288 Postcard – Rose Series – 10660 – Princes Bridge and Flinders St yard CC289 Postcard – Rose but has been trimmed of Flinders St CC290 Postcard – same as CC285 CC291 SW6 914 and another car in Swanston St by Flinders St CC292 SW6 903 and bus 436 with Flinders St Station in background CC293 W5 776 at Flinders St Station CC294 W2 596 at Flinders St Station CC295 L101 and W2 Swanston St by Ian Brady CC296 Postcard - Biscay BG 250 – A 281 - CC297 W5 779 Maribyrnong River CC298 SW5 787 Queensbridge St CC299A Duplicate copy CC299 Ditto CC300 W5 812 St Kilda Junction CC301 W5 721 Carnegie? - CC302 W5 817 Elliot Ave – see also CC150 CC303 CW5 682 CC304 CW5 682 Dandenong Road CC305 SW6 855 Power St Hawthorn CC306 Argus photo same as CC8A CC307 Freight car 19 leaving South Melbourne depot CC308 Freight car 19 at South Melbourne depot CC309 Cleaner 7 CC310 W2 295 and 8 at South Melbourne Depot CC311 Cleaners 5, 8 and 7 and S or T at South Melbourne depot CC312 Freight car 17 with crew member CC313 Cleaners 5, 8 and 7 along with a tower truck and another road motor CC314 Wheel Transport car 16 at Preston CC315 Cleaner 7 CC316 Cleaner 6 Brunswick Depot R Hudson and Bob Prentice CC317 SW6 867 in Swanston at Flinders CC318 SW6 850 at Chapel and Brighton Road CC319 SW6 914 at Batman Ave CC320 SW6 963 and W5 826 in Collins St near Spencer St CC321 Sw6 923 RAAF tram CC322 Same image at 318, but better has initials T McC (Tom McCaw) CC323 Sw6 963 In Collins at Spencer St CC324 SW6 947 in Collins at Spencer St CC325 Ditto with crew CC326 SW6 850 at Preston Workshop – Argus photo CC327 SW5 843 at Swan and church, severely derailed – Herald photo CC328 SW6 886 in Victoria Parade near La Trobe CC329 SW6 948 turning from Union St into Maribyrnong Road – single curve CC330 W5 731 CC331 SW5 on a 4D – Herald WT photo CC332 Sw6 867 Swanston St with driver carrying handles etc CC333 SW6 954 – Truganini Cres CC334 SW6 915 illuminated for Christmas, the CDA father Xmas special CC335 SW6 850 on route 77 side on view CC336 Sydney R class 1845 on trailer in a busy road CC337 Sydney R class 1845 on trailer CC338 Ditto CC339 Ditto – on trailer turning from a local street CC340 MMTB Emergency van CC341 Ditto CC342 Welding truck – Hopkins and Leeds CC343 Welding truck – Hopkins and Leeds CC344 Welding truck in Hopkins St Footscray CC345 Negative – Hobart tram 103 CC346 Launceston tram CC347 Trackwork – East Kew CC348 Trackwork and a W2 East Kews CC349 SW6 892 and trackwork – East Kew CC350 W4 670 – FRONT ON CC351 W3 654 – Brunswick Depot CC352 W3 666 – St Kilda Road and High St Demonstrates the work of Charles Craig in photography and collection of prints.Assembled album in a black presentation folder of 80 photographs from the Charles Craig Collection - 31 sleeves - part 2 of 2. All photographs have been scanned and placed on the Museum's G drive. A list of all photographs with details where possible has been compiled. Victorian Provincial, Launceston, Hobart and Sydney tram photos have been transferred to other Museums, image files retained.melbourne, tramways, tramcars, trams, charles craig -
 Melbourne Tram Museum
Album - David Frost Slide Collection, David Frost
Photo - see pdf file for further information. Number Brief Description date DFC1 A general view from the former railway platform at Port Melb Station looking towards Station Pier on opening day 20-12-1987 DFC2 A2 285 in the Tramway Platform at Port Melbourne Station on opening Day 20-12-1987 DFC3 A2 285 in the Tramway Platform at Port Melbourne Station on opening Day 20-12-1987 DFC4 A2 285 in the Tramway Platform at Port Melbourne Station on opening Day 20-12-1987 DFC5 A2 273 at St Kilda Tramway Station on opening day 22-11-1987 DFC6 A2 273 turning from Fitzroy St into St Kilda Tramway Station on opening day 22-11-1987 DFC7 B1 2001 at St Kilda Tramway Station turning into Fitzroy St on opening day 22-11-1987 DFC8 B1 2002 enters St Kilda Tramway Station on opening day 22-11-1987 DFC9 An A2 approaches St Kilda Tramway Station on opening day 22-11-1987 DFC10 Concreting the connecting curve from Fitroy St into St Kilda Station c July 1987 DFC11 An MTA AEC MKVI bus in Grey St St Kilda at Dalgety St with Tramway works in the background c July 1987 DFC12 Grey St St Kilda at Dalgety St with Tramway works in the background in Fitzroy St c July 1987 DFC13 Concreting the connecting curve from Fitroy St into St Kilda Station c July 1987 DFC14 Restaurant Tram 442 in Fitzroy St at Grey St Passing MTA bus 59 outside St Kilda Station c1986 DFC15 Former VR tram stop sign painted on a pole at Glenhuntly Rd & Broadway DFC16 Former VR Elwood Tram Depot under demolition 1996 DFC17 Former VR Elwood Tram Depot under demolition 1996 DFC18 Former VR Elwood Tram Depot under demolition 1996 DFC19 Former VR Elwood Tram Depot under demolition 1996 DFC20 Former VR Elwood Tram Depot under demolition 1996 DFC21 Former VR Elwood Tram Depot under demolition 1996 DFC22 Former VR Elwood Tram Depot under demolition 1996 DFC23 Former VR Elwood Tram Depot under demolition 1996 DFC24 MTS Tower waggon in use at the former VR Elwood Tram Depot under demolition 1996 DFC25 A Sign advertising the sale of the Former VR Elwood Tram Depot – 10/8/1996 1996 DFC26 Former VR Elwood Tram Depot under demolition 1996 DFC27 Interior of a shed at the former VR Elwood Tram Depot under demolition 1996 DFC28 Former VR Elwood Tram Depot under demolition 1996 DFC29 Former VR Elwood Tram Depot under demolition 1996 DFC30 Former VR Elwood Tram Depot under demolition 1996 DFC31 VR 20, former breakdown car in Bob Prentice’s Back Yard Jan 1974 DFC32 VR 20 on a low loader en route to Bob Prentice’s for preservation 1959 DFC33 VR 20 as the breakdown car on the St Kilda Electric Street Railway c1955 DFC34 VR 39 waits in St Kilda St as breakdown car 20 enters Elwood Depot c1955 DFC35 VR 54 and 50 in the rear yard of Elwood Depot c1958 DFC36 VR 50 in the rear yard of Elwood Depot c1958 DFC37 VR 50 in the rear yard of Elwood Depot c1958 DFC38 VR 28 in St Kilda St outside Elwood depot after the line had been cut back to this point c1958 DFC39 VR 29 in St Kilda St outside Elwood depot after the line had been cut back to this point c1958 DFC40 VR 35 passes 28 on the St Kilda Electric Street Railway c1955 DFC41 VR 39 on the St Kilda Electric Street Railway c1955 DFC42 Y1 613 on a tour c1970 DFC43 VR 54 in St Kilda St outside Elwood Depot c1955 DFC44 VR 28 at Brighton Beach Terminus c1955 DFC45 VR 33 being washed in the wash bay at the rear of Elwood Depot c1955 DFC46 VR 20 breakdown car running into Elwood Depot c1955 DFC47 VR 3 in the rear yard at Elwood Depot c1955 DFC48 VR 51 on an AETA Tour running out of Elwood Depot c1958 DFC49 VR 28 on the St Kilda Electric Street Railway c1955 DFC50 VR 28 with crew in St Kilda St outside Elwood depot after the line had been cut back to this point 1959 DFC51 VR 52 in Grey St near Fitzroy St c1958 DFC52 VR 51 on a AETA Tour passes 33 in Grey St near Fitzroy St c1958 DFC53 VR 29 in Grey St near Fitzroy St c1958 DFC54 VR51 on an AETA Tour shunts as 52 waits on the St Kilda Electric Street Railway c1958 DFC55 VR 51 on the Black Rock Electric Street Railway c1955 DFC56 VR 28 in St Kilda St outside Elwood depot after the line had been cut back to this point c1958 DFC57 Combined Rail-Tram Tickets of the Black Rock Electric Street Railway Feb 1975 DFC58 Combined Rail-Tram Tickets of the St Kilda Electric Street Railway Feb 1975 DFC59 Electric Street Railway & Motor Coach Paper Tear off Tickets Feb 1975 DFC60 VR 52 & 53 on Rt 82 pass in Cordite Ave near Wests Rd Sept 1975 DFC61 Z 68 & 52 in East Preston Depot in M&MTB Livery c1977 DFC62 Copy photo of VR 18 in Elwood Depot c1910 DFC63 VR 51 as a one man car at Black Rock Terminus c1955 DFC64 VR 53 on Rt 82 in Droop St Footscray Jan 1974 DFC65 B2 2027 on Rt 96 in South Melb Station c1988 DFC66 VR 20 as preserved in Bob Prentice’s backyard High St Prahran Jan 1974 DFC67 VR 700 on Rt 82 in Droop St Footsray c1978 DFC68 VR 28 as the last car from ST Kilda Station 28-2-1959 DFC69 VR 700 at the Rt 82 Moonee Ponds Terminus c1978 DFC70 VR 52 waiting time at the Rt 82 Footscray Terminus, the driver intently stares at the bundy clock as the Braid and the Connie gossip Jul 1972 DFC71 VR 54 shunting outside Elwood Depot to return to St Kilda Station 1959 DFC72 SW6 969 in MTA Livery blocking the entrance to South Melb Depot presumably during the scratch ticket dispute Jan 1990 DFC73 VR 52 & 53 on Rt 82 pass in Droop St Footscray Sept 1975 DFC74 VR 700 after withdrawl in the Newport Railway museum in the process of a repaint c1985 DFC75 VR 700 after withdrawl in the Newport Railway museum in the process of a repaint c1985 DFC76 VR 700 on Rt 82 in Droop St Footsray at The Cresent c1978 DFC77 VR 700 on Rt 82 in Droop St Footsray c1978 DFC78 Former VR tram depot in use as an MTA Bus depot c1990 DFC79 VR 52 waiting time at the Rt 82 Footscray Terminus Jul 1972 DFC80 VR 52 waiting time at the Rt 82 Footscray Terminus with Connie changing the pole Jul 1972 DFC81 VR 52 at the Rt 82 Moonee Ponds Terminus with the crew chatting 7-12-1974 DFC82 VR 52 on Rt 82 on the reserved track in Raleigh Rd Ascot Vale Jan 1974 DFC83 VR 53 on Rt 82 in Leeds St Footscray about to turn into Hopkins St April 1976 DFC84 VR 53 on Rt 82 in Droop St Footsray Jan 1974 DFC85 VR 700 on Rt 82 in Droop St Footsray at Hopkins St c1978 DFC86 Z 52 in MTA livery on Rt 19 in Elizabeth St near Bourke St c1985 DFC87 VR 52 at the Rt 82 Moonee Ponds Terminus Jul 1972 DFC88 VR 53 at the Rt 82 Footscray Terminus Jan 1974 DFC89 VR 52 freshly outshopped from the workshops and W7 1011 at the Bourke St Terminus with 52 on display for the 1968 railway exhibition 1968 DFC90 Painting of W class 369 in Chocolate & Cream c1930 DFC91 Charing Cross, Bendigo at night c1965 DFC92 Ballarat ? c1965 DFC93 Bendigo 18 on an AETA tour in McCrae St near Tramway Ave c1965 DFC94 View from the roof of a tram in the body shop at Preston Workshops 1977 DFC95 View from the roof of a tram in the body shop at Preston Workshops 1977 DFC96 View from the roof of a tram in the body shop at Preston Workshops showing the panto on 546 1977 DFC97 Interior view of Carlton Control Centre showing desk and wall panel c1968 DFC98 W2 493 on Rt 55 in Kingsway outside South Melb Depot Aug 1973 DFC99 W2 496 in Sturt St at Kingsway on Rt 1 Jul 1973 DFC100 Z class truck c1975 DFC101 Z3 116 in Bourke St at King St as new c1979 DFC102 Bob Prentice on tour c1968 DFC103 SW6 900 as an advertising tram for Newsday at night 1969 DFC104 597 Jul 1973 DFC105 W2 480 on Rt 3 passing under the railway bridge at Caulfield Oct 1972 DFC106 Interior view of Carlton Control Centre showing desk c1968 DFC107 SW6 856 on Rt 77 at night Jul 1973 DFC108 W2 496 in Sturt St at Kingsway on Rt 1 Jul 1973 DFC109 PCC 980 on a tour at South Melb Depot c1968 DFC110 SW6 856 on Rt 77 at night Jul 1973 DFC111 View from the roof of a tram in the body shop at Preston Workshops showing the panto on 546 1977 DFC112 Dandenong Rd from Chapel St Nov 1968 DFC113 A Z class car turns from Gertrude into Nicholson St c1990 DFC114 SW6 900 as an advertising tram for Newsday at night 1969 DFC115 Port Melbourne Station showing Centennial bridge and station building prior to closure. 10-1987 DFC116 Port Melbourne station with train prior to closure, looking south 10-1987 Demonstrates the work of David Frost in photography and or collecting slides.Assembled album in a black presentation folder of 116 colour slides, 6 slide sleeves, collected or photographed by David Frost. Many are TMSV or Windsor Publications slides. All photographs have been scanned and placed on the Museum's G drive. A list of all photographs with details has been compiled. melbourne, tramways, trams, vr trams, elwood, st kilda light rail, port melbourne, opening, elwood depot, buses -
 Melbourne Tram Museum
Document - Report, David Frost, Sale of 33 Fifth St Black Rock - tram shed
Documents related to the sale of 33 Fifth Street Black Rock, including two colour photocopies with the external and internal views of a shed said to be a former tram shed associated with the Sandringham to Black Rock horse tram line. Includes the City of Bayside heritage report and Hocking Stuart sales sheets for an auction on Saturday 4 August 2007. It would appear from Google Earth that all buildings were demolished.Yields information about the sale of a property said to be associated with the Black Rock tramway.Four A4 sheets - two colour and one colour sheet providing auction details.trams, railways, vr trams, sandringham, black rock tramway, sale of land, 33 fifth st black rock