Showing 23441 items matching "time-tables"
-
 Flagstaff Hill Maritime Museum and Village
Fork
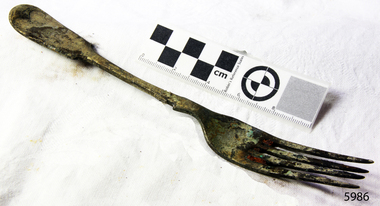
HISTORY OF THE LOCH ARD The LOCH ARD belonged to the famous Loch Line which sailed many ships from England to Australia. Built in Glasgow by Barclay, Curdle and Co. in 1873, the LOCH ARD was a three-masted square rigged iron sailing ship. The ship measured 262ft 7" (79.87m) in length, 38ft (11.58m) in width, 23ft (7m) in depth and had a gross tonnage of 1693 tons. The LOCH ARD's main mast measured a massive 150ft (45.7m) in height. LOCH ARD made three trips to Australia and one trip to Calcutta before its final voyage. LOCH ARD left England on March 2, 1878, under the command of Captain Gibbs, a newly married, 29 year old. She was bound for Melbourne with a crew of 37, plus 17 passengers and a load of cargo. The general cargo reflected the affluence of Melbourne at the time. On board were straw hats, umbrella, perfumes, clay pipes, pianos, clocks, confectionary, linen and candles, as well as a heavier load of railway irons, cement, lead and copper. There were items included that intended for display in the Melbourne International Exhibition in 1880. The voyage to Port Phillip was long but uneventful. At 3am on June 1, 1878, Captain Gibbs was expecting to see land and the passengers were becoming excited as they prepared to view their new homeland in the early morning. But LOCH ARD was running into a fog which greatly reduced visibility. Captain Gibbs was becoming anxious as there was no sign of land or the Cape Otway lighthouse. At 4am the fog lifted. A man aloft announced that he could see breakers. The sheer cliffs of Victoria's west coast came into view, and Captain Gibbs realised that the ship was much closer to them than expected. He ordered as much sail to be set as time would permit and then attempted to steer the vessel out to sea. On coming head on into the wind, the ship lost momentum, the sails fell limp and LOCH ARD's bow swung back. Gibbs then ordered the anchors to be released in an attempt to hold its position. The anchors sank some 50 fathoms - but did not hold. By this time LOCH ARD was among the breakers and the tall cliffs of Mutton Bird Island rose behind the ship. Just half a mile from the coast, the ship's bow was suddenly pulled around by the anchor. The captain tried to tack out to sea, but the ship struck a reef at the base of Mutton Bird Island, near Port Campbell. Waves broke over the ship and the top deck was loosened from the hull. The masts and rigging came crashing down knocking passengers and crew overboard. When a lifeboat was finally launched, it crashed into the side of LOCH ARD and capsized. Tom Pearce, who had launched the boat, managed to cling to its overturned hull and shelter beneath it. He drifted out to sea and then on the flood tide came into what is now known as LOCH ARD Gorge. He swam to shore, bruised and dazed, and found a cave in which to shelter. Some of the crew stayed below deck to shelter from the falling rigging but drowned when the ship slipped off the reef into deeper water. Eva Carmichael had raced onto deck to find out what was happening only to be confronted by towering cliffs looming above the stricken ship. In all the chaos, Captain Gibbs grabbed Eva and said, "If you are saved Eva, let my dear wife know that I died like a sailor". That was the last Eva Carmichael saw of the captain. She was swept off the ship by a huge wave. Eva saw Tom Pearce on a small rocky beach and yelled to attract his attention. He dived in and swam to the exhausted woman and dragged her to shore. He took her to the cave and broke open case of brandy which had washed up on the beach. He opened a bottle to revive the unconscious woman. A few hours later Tom scaled a cliff in search of help. He followed hoof prints and came by chance upon two men from nearby Glenample Station three and a half miles away. In a state of exhaustion, he told the men of the tragedy. Tom returned to the gorge while the two men rode back to the station to get help. By the time they reached LOCH ARD Gorge, it was cold and dark. The two shipwreck survivors were taken to Glenample Station to recover. Eva stayed at the station for six weeks before returning to Ireland, this time by steamship. In Melbourne, Tom Pearce received a hero's welcome. He was presented with the first gold medal of the Royal Humane Society of Victoria and a £1000 cheque from the Victorian Government. Concerts were performed to honour the young man's bravery and to raise money for those who lost family in the LOCH ARD disaster. Of the 54 crew members and passengers on board, only two survived: the apprentice, Tom Pearce and the young woman passenger, Eva Carmichael, who lost all of her family in the tragedy. Ten days after the LOCH ARD tragedy, salvage rights to the wreck were sold at auction for £2,120. Cargo valued at £3,000 was salvaged and placed on the beach, but most washed back into the sea when another storm developed. The wreck of LOCH ARD still lies at the base of Mutton Bird Island. Much of the cargo has now been salvaged and some was washed up into what is now known as LOCH ARD Gorge. Cargo and artefacts have also been illegally salvaged over many years before protective legislation was introduced. One of the most unlikely pieces of cargo to have survived the shipwreck was a Minton porcelain peacock - one of only seven in the world. The peacock was destined for the Melbourne International Exhibition in 1880. It had been well packed, which gave it adequate protection during the violent storm. Today, the Minton peacock can be seen at the Flagstaff Hill Maritime Museum in Warrnambool. From Australia's most dramatic shipwreck it has now become Australia's shipwreck artefact and is one of very few 'objects' on the Victorian State Heritage Register most valuable. The LOCH ARD shipwreck is of State significance – Victorian Heritage Register S 417 Flagstaff Hill’s collection of artefacts from LOCH ARD is significant for being one of the largest collections of artefacts from this shipwreck in Victoria. It is significant for its association with the shipwreck, which is on the Victorian Heritage Register (VHR S417). The collection is significant because of the relationship between the objects, as together they have a high potential to interpret the story of the LOCH ARD. The LOCH ARD collection is archaeologically significant as the remains of a large international passenger and cargo ship. The LOCH ARD collection is historically significant for representing aspects of Victoria’s shipping history and its potential to interpret sub-theme 1.5 of Victoria’s Framework of Historical Themes (living with natural processes). The collection is also historically significant for its association with the LOCH ARD, which was one of the worst and best known shipwrecks in Victoria’s history. Silver plated copper alloy table fork from the wreck of the Loch Ard. Some verdigris and very little encrustation on fork. Some silver oxide. Hallmark is partly visible.flagstaff hill, warrnambool, shipwrecked coast, flagstaff hill maritime museum, maritime museum, shipwreck coast, flagstaff hill maritime village, great ocean road, loch line, loch ard, captain gibbs, eva carmichael, tom pearce, glenample station, mutton bird island, loch ard gorge, electroplated cutlery, fork -
 Flagstaff Hill Maritime Museum and Village
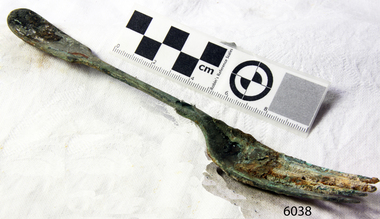
Fork
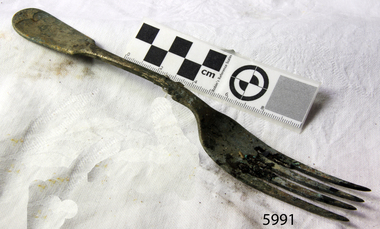
HISTORY OF THE LOCH ARD The LOCH ARD belonged to the famous Loch Line which sailed many ships from England to Australia. Built in Glasgow by Barclay, Curdle and Co. in 1873, the LOCH ARD was a three-masted square rigged iron sailing ship. The ship measured 262ft 7" (79.87m) in length, 38ft (11.58m) in width, 23ft (7m) in depth and had a gross tonnage of 1693 tons. The LOCH ARD's main mast measured a massive 150ft (45.7m) in height. LOCH ARD made three trips to Australia and one trip to Calcutta before its final voyage. LOCH ARD left England on March 2, 1878, under the command of Captain Gibbs, a newly married, 29 year old. She was bound for Melbourne with a crew of 37, plus 17 passengers and a load of cargo. The general cargo reflected the affluence of Melbourne at the time. On board were straw hats, umbrella, perfumes, clay pipes, pianos, clocks, confectionary, linen and candles, as well as a heavier load of railway irons, cement, lead and copper. There were items included that intended for display in the Melbourne International Exhibition in 1880. The voyage to Port Phillip was long but uneventful. At 3am on June 1, 1878, Captain Gibbs was expecting to see land and the passengers were becoming excited as they prepared to view their new homeland in the early morning. But LOCH ARD was running into a fog which greatly reduced visibility. Captain Gibbs was becoming anxious as there was no sign of land or the Cape Otway lighthouse. At 4am the fog lifted. A man aloft announced that he could see breakers. The sheer cliffs of Victoria's west coast came into view, and Captain Gibbs realised that the ship was much closer to them than expected. He ordered as much sail to be set as time would permit and then attempted to steer the vessel out to sea. On coming head on into the wind, the ship lost momentum, the sails fell limp and LOCH ARD's bow swung back. Gibbs then ordered the anchors to be released in an attempt to hold its position. The anchors sank some 50 fathoms - but did not hold. By this time LOCH ARD was among the breakers and the tall cliffs of Mutton Bird Island rose behind the ship. Just half a mile from the coast, the ship's bow was suddenly pulled around by the anchor. The captain tried to tack out to sea, but the ship struck a reef at the base of Mutton Bird Island, near Port Campbell. Waves broke over the ship and the top deck was loosened from the hull. The masts and rigging came crashing down knocking passengers and crew overboard. When a lifeboat was finally launched, it crashed into the side of LOCH ARD and capsized. Tom Pearce, who had launched the boat, managed to cling to its overturned hull and shelter beneath it. He drifted out to sea and then on the flood tide came into what is now known as LOCH ARD Gorge. He swam to shore, bruised and dazed, and found a cave in which to shelter. Some of the crew stayed below deck to shelter from the falling rigging but drowned when the ship slipped off the reef into deeper water. Eva Carmichael had raced onto deck to find out what was happening only to be confronted by towering cliffs looming above the stricken ship. In all the chaos, Captain Gibbs grabbed Eva and said, "If you are saved Eva, let my dear wife know that I died like a sailor". That was the last Eva Carmichael saw of the captain. She was swept off the ship by a huge wave. Eva saw Tom Pearce on a small rocky beach and yelled to attract his attention. He dived in and swam to the exhausted woman and dragged her to shore. He took her to the cave and broke open case of brandy which had washed up on the beach. He opened a bottle to revive the unconscious woman. A few hours later Tom scaled a cliff in search of help. He followed hoof prints and came by chance upon two men from nearby Glenample Station three and a half miles away. In a state of exhaustion, he told the men of the tragedy. Tom returned to the gorge while the two men rode back to the station to get help. By the time they reached LOCH ARD Gorge, it was cold and dark. The two shipwreck survivors were taken to Glenample Station to recover. Eva stayed at the station for six weeks before returning to Ireland, this time by steamship. In Melbourne, Tom Pearce received a hero's welcome. He was presented with the first gold medal of the Royal Humane Society of Victoria and a £1000 cheque from the Victorian Government. Concerts were performed to honour the young man's bravery and to raise money for those who lost family in the LOCH ARD disaster. Of the 54 crew members and passengers on board, only two survived: the apprentice, Tom Pearce and the young woman passenger, Eva Carmichael, who lost all of her family in the tragedy. Ten days after the LOCH ARD tragedy, salvage rights to the wreck were sold at auction for £2,120. Cargo valued at £3,000 was salvaged and placed on the beach, but most washed back into the sea when another storm developed. The wreck of LOCH ARD still lies at the base of Mutton Bird Island. Much of the cargo has now been salvaged and some was washed up into what is now known as LOCH ARD Gorge. Cargo and artefacts have also been illegally salvaged over many years before protective legislation was introduced. One of the most unlikely pieces of cargo to have survived the shipwreck was a Minton porcelain peacock - one of only seven in the world. The peacock was destined for the Melbourne International Exhibition in 1880. It had been well packed, which gave it adequate protection during the violent storm. Today, the Minton peacock can be seen at the Flagstaff Hill Maritime Museum in Warrnambool. From Australia's most dramatic shipwreck it has now become Australia's shipwreck artefact and is one of very few 'objects' on the Victorian State Heritage Register most valuable. The LOCH ARD shipwreck is of State significance – Victorian Heritage Register S 417 Flagstaff Hill’s collection of artefacts from LOCH ARD is significant for being one of the largest collections of artefacts from this shipwreck in Victoria. It is significant for its association with the shipwreck, which is on the Victorian Heritage Register (VHR S417). The collection is significant because of the relationship between the objects, as together they have a high potential to interpret the story of the LOCH ARD. The LOCH ARD collection is archaeologically significant as the remains of a large international passenger and cargo ship. The LOCH ARD collection is historically significant for representing aspects of Victoria’s shipping history and its potential to interpret sub-theme 1.5 of Victoria’s Framework of Historical Themes (living with natural processes). The collection is also historically significant for its association with the LOCH ARD, which was one of the worst and best known shipwrecks in Victoria’s history. Silver plated copper alloy table fork from the wreck of the Loch Ard. Some a verdigris and silver oxide. Fork has a little encrustation between tines. Hallmark visible.flagstaff hill, warrnambool, shipwrecked coast, flagstaff hill maritime museum, maritime museum, shipwreck coast, flagstaff hill maritime village, great ocean road, loch line, loch ard, captain gibbs, eva carmichael, tom pearce, glenample station, mutton bird island, loch ard gorge, electroplated cutlery, fork -
 Flagstaff Hill Maritime Museum and Village
Fork
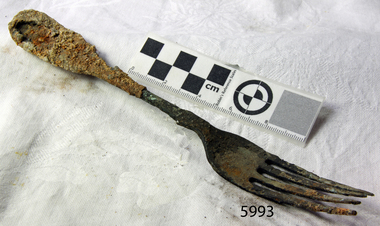
HISTORY OF THE LOCH ARD The LOCH ARD belonged to the famous Loch Line which sailed many ships from England to Australia. Built in Glasgow by Barclay, Curdle and Co. in 1873, the LOCH ARD was a three-masted square rigged iron sailing ship. The ship measured 262ft 7" (79.87m) in length, 38ft (11.58m) in width, 23ft (7m) in depth and had a gross tonnage of 1693 tons. The LOCH ARD's main mast measured a massive 150ft (45.7m) in height. LOCH ARD made three trips to Australia and one trip to Calcutta before its final voyage. LOCH ARD left England on March 2, 1878, under the command of Captain Gibbs, a newly married, 29 year old. She was bound for Melbourne with a crew of 37, plus 17 passengers and a load of cargo. The general cargo reflected the affluence of Melbourne at the time. On board were straw hats, umbrella, perfumes, clay pipes, pianos, clocks, confectionary, linen and candles, as well as a heavier load of railway irons, cement, lead and copper. There were items included that intended for display in the Melbourne International Exhibition in 1880. The voyage to Port Phillip was long but uneventful. At 3am on June 1, 1878, Captain Gibbs was expecting to see land and the passengers were becoming excited as they prepared to view their new homeland in the early morning. But LOCH ARD was running into a fog which greatly reduced visibility. Captain Gibbs was becoming anxious as there was no sign of land or the Cape Otway lighthouse. At 4am the fog lifted. A man aloft announced that he could see breakers. The sheer cliffs of Victoria's west coast came into view, and Captain Gibbs realised that the ship was much closer to them than expected. He ordered as much sail to be set as time would permit and then attempted to steer the vessel out to sea. On coming head on into the wind, the ship lost momentum, the sails fell limp and LOCH ARD's bow swung back. Gibbs then ordered the anchors to be released in an attempt to hold its position. The anchors sank some 50 fathoms - but did not hold. By this time LOCH ARD was among the breakers and the tall cliffs of Mutton Bird Island rose behind the ship. Just half a mile from the coast, the ship's bow was suddenly pulled around by the anchor. The captain tried to tack out to sea, but the ship struck a reef at the base of Mutton Bird Island, near Port Campbell. Waves broke over the ship and the top deck was loosened from the hull. The masts and rigging came crashing down knocking passengers and crew overboard. When a lifeboat was finally launched, it crashed into the side of LOCH ARD and capsized. Tom Pearce, who had launched the boat, managed to cling to its overturned hull and shelter beneath it. He drifted out to sea and then on the flood tide came into what is now known as LOCH ARD Gorge. He swam to shore, bruised and dazed, and found a cave in which to shelter. Some of the crew stayed below deck to shelter from the falling rigging but drowned when the ship slipped off the reef into deeper water. Eva Carmichael had raced onto deck to find out what was happening only to be confronted by towering cliffs looming above the stricken ship. In all the chaos, Captain Gibbs grabbed Eva and said, "If you are saved Eva, let my dear wife know that I died like a sailor". That was the last Eva Carmichael saw of the captain. She was swept off the ship by a huge wave. Eva saw Tom Pearce on a small rocky beach and yelled to attract his attention. He dived in and swam to the exhausted woman and dragged her to shore. He took her to the cave and broke open case of brandy which had washed up on the beach. He opened a bottle to revive the unconscious woman. A few hours later Tom scaled a cliff in search of help. He followed hoof prints and came by chance upon two men from nearby Glenample Station three and a half miles away. In a state of exhaustion, he told the men of the tragedy. Tom returned to the gorge while the two men rode back to the station to get help. By the time they reached LOCH ARD Gorge, it was cold and dark. The two shipwreck survivors were taken to Glenample Station to recover. Eva stayed at the station for six weeks before returning to Ireland, this time by steamship. In Melbourne, Tom Pearce received a hero's welcome. He was presented with the first gold medal of the Royal Humane Society of Victoria and a £1000 cheque from the Victorian Government. Concerts were performed to honour the young man's bravery and to raise money for those who lost family in the LOCH ARD disaster. Of the 54 crew members and passengers on board, only two survived: the apprentice, Tom Pearce and the young woman passenger, Eva Carmichael, who lost all of her family in the tragedy. Ten days after the LOCH ARD tragedy, salvage rights to the wreck were sold at auction for £2,120. Cargo valued at £3,000 was salvaged and placed on the beach, but most washed back into the sea when another storm developed. The wreck of LOCH ARD still lies at the base of Mutton Bird Island. Much of the cargo has now been salvaged and some was washed up into what is now known as LOCH ARD Gorge. Cargo and artefacts have also been illegally salvaged over many years before protective legislation was introduced. One of the most unlikely pieces of cargo to have survived the shipwreck was a Minton porcelain peacock - one of only seven in the world. The peacock was destined for the Melbourne International Exhibition in 1880. It had been well packed, which gave it adequate protection during the violent storm. Today, the Minton peacock can be seen at the Flagstaff Hill Maritime Museum in Warrnambool. From Australia's most dramatic shipwreck it has now become Australia's shipwreck artefact and is one of very few 'objects' on the Victorian State Heritage Register most valuable. The LOCH ARD shipwreck is of State significance – Victorian Heritage Register S 417 Flagstaff Hill’s collection of artefacts from LOCH ARD is significant for being one of the largest collections of artefacts from this shipwreck in Victoria. It is significant for its association with the shipwreck, which is on the Victorian Heritage Register (VHR S417). The collection is significant because of the relationship between the objects, as together they have a high potential to interpret the story of the LOCH ARD. The LOCH ARD collection is archaeologically significant as the remains of a large international passenger and cargo ship. The LOCH ARD collection is historically significant for representing aspects of Victoria’s shipping history and its potential to interpret sub-theme 1.5 of Victoria’s Framework of Historical Themes (living with natural processes). The collection is also historically significant for its association with the LOCH ARD, which was one of the worst and best known shipwrecks in Victoria’s history. Silver plated copper alloy table fork from the wreck of the Loch Ard. Length 8 " Some verdigris and a silver oxide. Fork has a heavy encrustation mainly on handle.flagstaff hill, warrnambool, shipwrecked coast, flagstaff hill maritime museum, maritime museum, shipwreck coast, flagstaff hill maritime village, great ocean road, loch line, loch ard, captain gibbs, eva carmichael, tom pearce, glenample station, mutton bird island, loch ard gorge, electroplated cutlery, fork -
 Flagstaff Hill Maritime Museum and Village
Fork
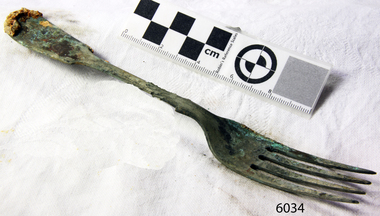
HISTORY OF THE LOCH ARD The LOCH ARD belonged to the famous Loch Line which sailed many ships from England to Australia. Built in Glasgow by Barclay, Curdle and Co. in 1873, the LOCH ARD was a three-masted square rigged iron sailing ship. The ship measured 262ft 7" (79.87m) in length, 38ft (11.58m) in width, 23ft (7m) in depth and had a gross tonnage of 1693 tons. The LOCH ARD's main mast measured a massive 150ft (45.7m) in height. LOCH ARD made three trips to Australia and one trip to Calcutta before its final voyage. LOCH ARD left England on March 2, 1878, under the command of Captain Gibbs, a newly married, 29 year old. She was bound for Melbourne with a crew of 37, plus 17 passengers and a load of cargo. The general cargo reflected the affluence of Melbourne at the time. On board were straw hats, umbrella, perfumes, clay pipes, pianos, clocks, confectionary, linen and candles, as well as a heavier load of railway irons, cement, lead and copper. There were items included that intended for display in the Melbourne International Exhibition in 1880. The voyage to Port Phillip was long but uneventful. At 3am on June 1, 1878, Captain Gibbs was expecting to see land and the passengers were becoming excited as they prepared to view their new homeland in the early morning. But LOCH ARD was running into a fog which greatly reduced visibility. Captain Gibbs was becoming anxious as there was no sign of land or the Cape Otway lighthouse. At 4am the fog lifted. A man aloft announced that he could see breakers. The sheer cliffs of Victoria's west coast came into view, and Captain Gibbs realised that the ship was much closer to them than expected. He ordered as much sail to be set as time would permit and then attempted to steer the vessel out to sea. On coming head on into the wind, the ship lost momentum, the sails fell limp and LOCH ARD's bow swung back. Gibbs then ordered the anchors to be released in an attempt to hold its position. The anchors sank some 50 fathoms - but did not hold. By this time LOCH ARD was among the breakers and the tall cliffs of Mutton Bird Island rose behind the ship. Just half a mile from the coast, the ship's bow was suddenly pulled around by the anchor. The captain tried to tack out to sea, but the ship struck a reef at the base of Mutton Bird Island, near Port Campbell. Waves broke over the ship and the top deck was loosened from the hull. The masts and rigging came crashing down knocking passengers and crew overboard. When a lifeboat was finally launched, it crashed into the side of LOCH ARD and capsized. Tom Pearce, who had launched the boat, managed to cling to its overturned hull and shelter beneath it. He drifted out to sea and then on the flood tide came into what is now known as LOCH ARD Gorge. He swam to shore, bruised and dazed, and found a cave in which to shelter. Some of the crew stayed below deck to shelter from the falling rigging but drowned when the ship slipped off the reef into deeper water. Eva Carmichael had raced onto deck to find out what was happening only to be confronted by towering cliffs looming above the stricken ship. In all the chaos, Captain Gibbs grabbed Eva and said, "If you are saved Eva, let my dear wife know that I died like a sailor". That was the last Eva Carmichael saw of the captain. She was swept off the ship by a huge wave. Eva saw Tom Pearce on a small rocky beach and yelled to attract his attention. He dived in and swam to the exhausted woman and dragged her to shore. He took her to the cave and broke open case of brandy which had washed up on the beach. He opened a bottle to revive the unconscious woman. A few hours later Tom scaled a cliff in search of help. He followed hoof prints and came by chance upon two men from nearby Glenample Station three and a half miles away. In a state of exhaustion, he told the men of the tragedy. Tom returned to the gorge while the two men rode back to the station to get help. By the time they reached LOCH ARD Gorge, it was cold and dark. The two shipwreck survivors were taken to Glenample Station to recover. Eva stayed at the station for six weeks before returning to Ireland, this time by steamship. In Melbourne, Tom Pearce received a hero's welcome. He was presented with the first gold medal of the Royal Humane Society of Victoria and a £1000 cheque from the Victorian Government. Concerts were performed to honour the young man's bravery and to raise money for those who lost family in the LOCH ARD disaster. Of the 54 crew members and passengers on board, only two survived: the apprentice, Tom Pearce and the young woman passenger, Eva Carmichael, who lost all of her family in the tragedy. Ten days after the LOCH ARD tragedy, salvage rights to the wreck were sold at auction for £2,120. Cargo valued at £3,000 was salvaged and placed on the beach, but most washed back into the sea when another storm developed. The wreck of LOCH ARD still lies at the base of Mutton Bird Island. Much of the cargo has now been salvaged and some was washed up into what is now known as LOCH ARD Gorge. Cargo and artefacts have also been illegally salvaged over many years before protective legislation was introduced. One of the most unlikely pieces of cargo to have survived the shipwreck was a Minton porcelain peacock - one of only seven in the world. The peacock was destined for the Melbourne International Exhibition in 1880. It had been well packed, which gave it adequate protection during the violent storm. Today, the Minton peacock can be seen at the Flagstaff Hill Maritime Museum in Warrnambool. From Australia's most dramatic shipwreck it has now become Australia's shipwreck artefact and is one of very few 'objects' on the Victorian State Heritage Register most valuable. The LOCH ARD shipwreck is of State significance – Victorian Heritage Register S 417 Flagstaff Hill’s collection of artefacts from LOCH ARD is significant for being one of the largest collections of artefacts from this shipwreck in Victoria. It is significant for its association with the shipwreck, which is on the Victorian Heritage Register (VHR S417). The collection is significant because of the relationship between the objects, as together they have a high potential to interpret the story of the LOCH ARD. The LOCH ARD collection is archaeologically significant as the remains of a large international passenger and cargo ship. The LOCH ARD collection is historically significant for representing aspects of Victoria’s shipping history and its potential to interpret sub-theme 1.5 of Victoria’s Framework of Historical Themes (living with natural processes). The collection is also historically significant for its association with the LOCH ARD, which was one of the worst and best known shipwrecks in Victoria’s history. Silver plated copper alloy table fork - entrée, from the wreck of the Loch Ard. Length 7⅛ " Some verdigris and silver oxide. Light encrustation on fork. Hallmark visible.flagstaff hill, warrnambool, shipwrecked coast, flagstaff hill maritime museum, maritime museum, shipwreck coast, flagstaff hill maritime village, great ocean road, loch line, loch ard, captain gibbs, eva carmichael, tom pearce, glenample station, mutton bird island, loch ard gorge, table fork - entrée, table fork, loch ard, entrée fork -
 Flagstaff Hill Maritime Museum and Village
Fork
HISTORY OF THE LOCH ARD The LOCH ARD belonged to the famous Loch Line which sailed many ships from England to Australia. Built in Glasgow by Barclay, Curdle and Co. in 1873, the LOCH ARD was a three-masted square rigged iron sailing ship. The ship measured 262ft 7" (79.87m) in length, 38ft (11.58m) in width, 23ft (7m) in depth and had a gross tonnage of 1693 tons. The LOCH ARD's main mast measured a massive 150ft (45.7m) in height. LOCH ARD made three trips to Australia and one trip to Calcutta before its final voyage. LOCH ARD left England on March 2, 1878, under the command of Captain Gibbs, a newly married, 29 year old. She was bound for Melbourne with a crew of 37, plus 17 passengers and a load of cargo. The general cargo reflected the affluence of Melbourne at the time. On board were straw hats, umbrella, perfumes, clay pipes, pianos, clocks, confectionary, linen and candles, as well as a heavier load of railway irons, cement, lead and copper. There were items included that intended for display in the Melbourne International Exhibition in 1880. The voyage to Port Phillip was long but uneventful. At 3am on June 1, 1878, Captain Gibbs was expecting to see land and the passengers were becoming excited as they prepared to view their new homeland in the early morning. But LOCH ARD was running into a fog which greatly reduced visibility. Captain Gibbs was becoming anxious as there was no sign of land or the Cape Otway lighthouse. At 4am the fog lifted. A man aloft announced that he could see breakers. The sheer cliffs of Victoria's west coast came into view, and Captain Gibbs realised that the ship was much closer to them than expected. He ordered as much sail to be set as time would permit and then attempted to steer the vessel out to sea. On coming head on into the wind, the ship lost momentum, the sails fell limp and LOCH ARD's bow swung back. Gibbs then ordered the anchors to be released in an attempt to hold its position. The anchors sank some 50 fathoms - but did not hold. By this time LOCH ARD was among the breakers and the tall cliffs of Mutton Bird Island rose behind the ship. Just half a mile from the coast, the ship's bow was suddenly pulled around by the anchor. The captain tried to tack out to sea, but the ship struck a reef at the base of Mutton Bird Island, near Port Campbell. Waves broke over the ship and the top deck was loosened from the hull. The masts and rigging came crashing down knocking passengers and crew overboard. When a lifeboat was finally launched, it crashed into the side of LOCH ARD and capsized. Tom Pearce, who had launched the boat, managed to cling to its overturned hull and shelter beneath it. He drifted out to sea and then on the flood tide came into what is now known as LOCH ARD Gorge. He swam to shore, bruised and dazed, and found a cave in which to shelter. Some of the crew stayed below deck to shelter from the falling rigging but drowned when the ship slipped off the reef into deeper water. Eva Carmichael had raced onto deck to find out what was happening only to be confronted by towering cliffs looming above the stricken ship. In all the chaos, Captain Gibbs grabbed Eva and said, "If you are saved Eva, let my dear wife know that I died like a sailor". That was the last Eva Carmichael saw of the captain. She was swept off the ship by a huge wave. Eva saw Tom Pearce on a small rocky beach and yelled to attract his attention. He dived in and swam to the exhausted woman and dragged her to shore. He took her to the cave and broke open case of brandy which had washed up on the beach. He opened a bottle to revive the unconscious woman. A few hours later Tom scaled a cliff in search of help. He followed hoof prints and came by chance upon two men from nearby Glenample Station three and a half miles away. In a state of exhaustion, he told the men of the tragedy. Tom returned to the gorge while the two men rode back to the station to get help. By the time they reached LOCH ARD Gorge, it was cold and dark. The two shipwreck survivors were taken to Glenample Station to recover. Eva stayed at the station for six weeks before returning to Ireland, this time by steamship. In Melbourne, Tom Pearce received a hero's welcome. He was presented with the first gold medal of the Royal Humane Society of Victoria and a £1000 cheque from the Victorian Government. Concerts were performed to honour the young man's bravery and to raise money for those who lost family in the LOCH ARD disaster. Of the 54 crew members and passengers on board, only two survived: the apprentice, Tom Pearce and the young woman passenger, Eva Carmichael, who lost all of her family in the tragedy. Ten days after the LOCH ARD tragedy, salvage rights to the wreck were sold at auction for £2,120. Cargo valued at £3,000 was salvaged and placed on the beach, but most washed back into the sea when another storm developed. The wreck of LOCH ARD still lies at the base of Mutton Bird Island. Much of the cargo has now been salvaged and some was washed up into what is now known as LOCH ARD Gorge. Cargo and artefacts have also been illegally salvaged over many years before protective legislation was introduced. One of the most unlikely pieces of cargo to have survived the shipwreck was a Minton porcelain peacock - one of only seven in the world. The peacock was destined for the Melbourne International Exhibition in 1880. It had been well packed, which gave it adequate protection during the violent storm. Today, the Minton peacock can be seen at the Flagstaff Hill Maritime Museum in Warrnambool. From Australia's most dramatic shipwreck it has now become Australia's shipwreck artefact and is one of very few 'objects' on the Victorian State Heritage Register most valuable. The LOCH ARD shipwreck is of State significance – Victorian Heritage Register S 417 Flagstaff Hill’s collection of artefacts from LOCH ARD is significant for being one of the largest collections of artefacts from this shipwreck in Victoria. It is significant for its association with the shipwreck, which is on the Victorian Heritage Register (VHR S417). The collection is significant because of the relationship between the objects, as together they have a high potential to interpret the story of the LOCH ARD. The LOCH ARD collection is archaeologically significant as the remains of a large international passenger and cargo ship. The LOCH ARD collection is historically significant for representing aspects of Victoria’s shipping history and its potential to interpret sub-theme 1.5 of Victoria’s Framework of Historical Themes (living with natural processes). The collection is also historically significant for its association with the LOCH ARD, which was one of the worst and best known shipwrecks in Victoria’s history Silver plated copper alloy table fork - entrée from the wreck of the Loch Ard. " Some verdigris and silver oxide. Encrustation on fork tines and handle. Hallmark partly visible.flagstaff hill, warrnambool, shipwrecked coast, flagstaff hill maritime museum, maritime museum, shipwreck coast, flagstaff hill maritime village, great ocean road, loch line, loch ard, captain gibbs, eva carmichael, tom pearce, glenample station, mutton bird island, loch ard gorge, fork, loch ard, electroplated cutlery -
 Brighton Historical Society
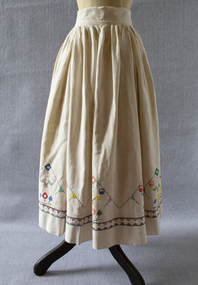
Skirt, late-nineteenth century & 1950s
This skirt belonged to Olga Black, a long-time Brighton resident. The linen used for the skirt were woven by Olga's great-grandmother Efstathia in the late-nineteenth century with flax grown on the island of Ithaca. In the 1950s, Olga made the fabric into a skirt, embellishing it with hand embroidery. Olga Maria Black was born in Melbourne in 1930, the daughter of Ithacan migrants Constantine and Toula Mavrokefalos. Constantine first emigrated to Australia in 1902, returning to Greece circa 1912-13 to serve his home country in the Balkan Wars. Toula's family had left Ithaca for Romania when she was only six months old, but she happened to be visiting the island at the very time that Constantine arrived, fresh from the war. Within three weeks they were married, and when Constantine returned to Melbourne in 1914 his new bride came with him. Constantine had trained as an accountant, but his qualifications were not recognised in Australia. Changing his surname to the Anglicised "Black", he started off working in his older brother Dionysios's cafés before going into business on his own. In 1917 he opened the Paris Residential Café at 54-56 Swanston Street, which offered both dining and accommodation. The business saw some years of success, but did not survive the Great Depression. Constantine died in 1944. Olga's mother Toula learned to sew as a child, while growing up in the Romanian village of Brila. She developed her skills making lace and embroidering items for her trousseau. Some of the linen she embroidered had been woven from flax on Ithaca by her own grandmother, Efstathia. During the Depression, when money was scarce, Toula embroidered at home, doing work for a factory in Flinders Lane. Using a cotton reel, a threepence and a sixpence she created and embroidered designs on hundreds of blouses. Olga spent her preschool days sitting at the table where her mother worked. Toula would involve Olga by allowing her to help choose the colour combinations. Toula lived with Olga in Brighton until her death in 1976. Olga inherited her mother's sewing skills. She re-invented some of Toula’s trousseau nightdresses and skilfully altered other clothing, making dresses which she wore around Brighton for many years.Ankle-length full cream linen skirt with multi-coloured cross stitch embroidery featuring mountains, birds and trees. Fullness is pleated into wide waist band. Left side opening. The fabric widths have been whipped together by hand probably at the time the cloth was woven in the late-nineteenth century. The skirt is machine stitched.skirt, linen, hand woven, embroidery, ithaca, migration, greek diaspora, olga black -
 Bendigo Military Museum
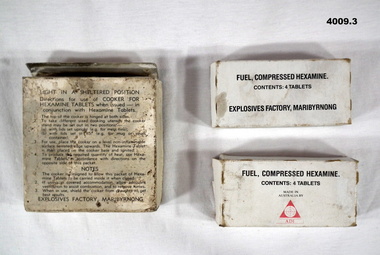
Equipment - HEXAMINE TABLETS, Explosives Factory
.1) Large size packet of fuel compressed heat tablets (4 only in box) for use in Hexamine stove for cooking. Each tablet has an effective burning time of 15 minutes. .2) Small packet of 4 Hexamine heat tablets .3) Small packet of (3 only) Hexamine heat tablets1. Large size packet of full compressed heat tablets (4 only in box) for use in hexamine stove for cooking. Each tablet has an effective burning time of 15 minutes. 2, Small packet of 4 hexamine heat tablets. 3. Small packet of 3 hexamine heat tablets.cooking, hexamine tablets -
 Federation University Historical Collection
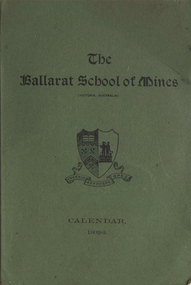
Book, Ballarat School of Mines Calendar, 1903
Contents include: Associateship and final certificates; Calendar for 1903; Discipline; Fees; Full Certificates issued; general regulations: Honorary Correspondents: Office Bearers; Professor and Lecturers; Results of exams; Statistics; Subscriptions and Donations; Subjects included in Regulation Technical Schools; Subjects on Instruction; Subjects included in Associateship course, Time table. Images include: Andrew Anderson, Lecture Rooms (Administration Building), Senior members of staff, School Buildings and Grounds, Linkenbach Table - Battery Laboratory, Engineering laboratory interior, junior Chemistry Laboratory; Assay Laboratory, Battery Laboratory interior, Maddern FurnaceCharcoal soft covered book at 100 pages. ballarat school of mines, andersnon\bickett, vale, warrington rogers, oddie, dunn, figgis, david ham, herman, lindsay, lonie, maddern, middleton, morrison, nevett, pearce, scott, woolcott, wanliss, r.e. williams, henry cuthbert, thomas hart, charles kent, frederick martell, newman, william bailey, hamilton, bechervaise, george russell, thomas bath, r.m. serjeant, peter matthews, theo williams, alfred mica smithh, daniel walker, hubert murphy, charles deane, arthur garrard, valentine anderson, douglas runtin, john balyney, l. cameron, dawbarn, a.e.c. kerr, john adams, edgar mcconnon, hall, john m. sutherland, usher, charles campbell, metallurgy, geology, certificate as mine manager, certificat as assayer, labratory, museum, land and mine surveying, applied mechanics, machine drawing and dedign, mechanics applied to mining, engineering laboratory, electrical department, state school lectures, excursions, mathematics, physics, geometry, photography, chemistry, organic chemistry, assaying, mining gelogy, mineralogy, petrology, algebra, trigonometry, mensuration, land surveying, mine surveying, steam and gas engines, dynamics and heat, sound and light, magnetism and electricity, electrical tecnology, botany, veterinary science, engineering drawing, electroplating -
 Bacchus Marsh & District Historical Society
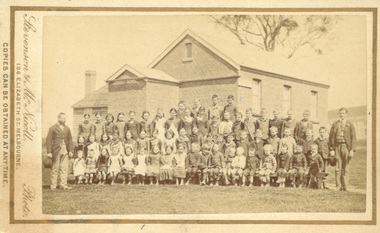
Photograph, Coimadai State School teachers and students 1883
Coimadai is a rural community located 10km north of Bacchus Marsh. The Coimadai School was opened in 1862. It was at first entirely funded by the local residents in the area. In these early years it was known as the Pyrete School after the nearby creek of that name. The building shown in this 1883 image was constructed in 1872 and replaced an earlier wooden structure. Over time the Coimadai School became a government funded and administered school. A famous pupil to attend the school was John Cain Senior, Premier of Victoria in the 1940s and 1950s, who attended the school for one year in 1893. This school still operates as a state primary school.Small sepia unframed photograph on card with gold border framing photograph. Housed in the album, 'Photographs of Bacchus Marsh and District in 1883 by Stevenson and McNicoll'. The image is a large group portrait of the pupils of the Coimadai State School and their two male teachers. There are about 60 pupils. The older children are standing in rows and a younger group of pupils is seated on forms or benches in front of them. One teacher stands on the right of the group of pupils and the other is on the left. The School building can be seen in the background.On the front: Stevenson & McNicoll. Photo. 108 Elizabeth St. Melbourne. COPIES CAN BE OBTAINED AT ANY TIME. On the back: LIGHT & TRUTH inscribed on a banner surmounted by a representation of the rising sun. Copies of this Portrait can be had at any time by sending the Name and Post Office Money Order or Stamps for the amount of order to STEVENSON & McNICOLL LATE BENSON & STEVENSON, Photographers. 108 Elizabeth Street, MELBOURNE schools, schools coimadai vic., stevenson and mcnicoll 1883 photographs of bacchus marsh and district -
 Bendigo Historical Society Inc.
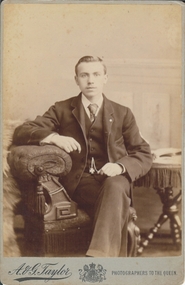
Photograph - MALE PORTRAIT, approx. 1920
Sepia photograph of young male, seated on upholstered chair, round table with fringed table cloth. Man in three piece suit, with fob watch, lapel pin and striped tie. 'A. & G. Taylor, Coat of arms. Photographers to the Queen,' printed on bottom of photo.A. & G. Taylor UKperson, individual, portrait male -
 Bendigo Historical Society Inc.
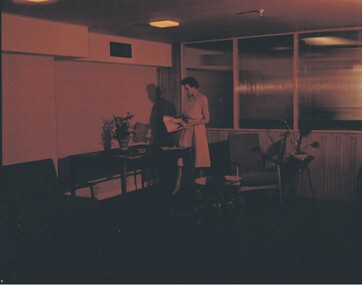
Negative - OLIVE PELL COLLECTION: NEGATIVE, 1950
A negative of a lady standing holding a magazine next to a table with a vase with flowers. She is wearing a light coloured dress, dark shoes and a necklace. Behind her a large opaque window, to the left there is a seat and a pot stand. to the right a setee, in the foreground a coffee table.person, individual, female -
 Flagstaff Hill Maritime Museum and Village
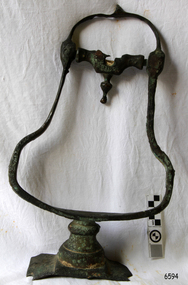
Functional object - Bell Bracket, ca 19th century
This brass bell bracket has been carefully shaped to fit around the shape of a bell. Its fitting allows it to swing freely. The bracket allows the bell to be fixed to a horizontal surface such as a s wooden frame, post or base. It may have been portable or fixed to a counter, desk or table. The bell may have been used to sound the time, to draw attention to an event such as a church surface, to signal a time to start or stop, or even as a percussion instrument.This metal bell bracket appears to be handmade and may have been used as a portable signal for a school or public meeting. It could have been used on a ship to signal the watch or the time.Bell bracket; the brass, bracket is bell-shaped with a removable hinged section across the top where the bell swung. The base is composed of a curved and shaped base stand. flagstaff hill, warrnambool, shipwrecked-coast, flagstaff-hill, flagstaff-hill-maritime-museum, maritime-museum, shipwreck-coast, flagstaff-hill-maritime-village, bell bracket, bell stand, bell frame, swinging bell, portable bell, bell ringing, signal -
 Kilmore Historical Society
LOCAL GOVERNMENT ACT 1915 AND INDEX, 1916
Local Government Act 1915 (N0. 2) and Rating on Unimproved Values Act 1915, together with Table of Sections Consolidated. Table of Cases and Index.Faded red-brown cloth cover with mid-brown leather spine and corners, worn at extremities, some staining to leather spine. Front hinge broken but not detached.449 pp. Fair condition.Various calculations pencilled inside back cover.local government law, kilmore court house library -
 Wodonga & District Historical Society Inc
Photograph - Codling Collection 01 - High Street East - Malibu Ice Cream Parlour, Crystal's Pizza and Wodonga Fish Shop, c1980
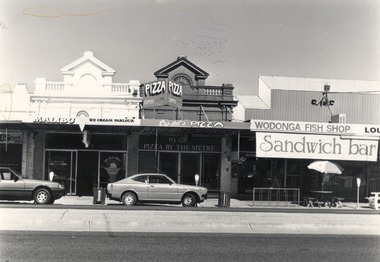
Miss Olive Codling was a Foundation Member and a Life Member of the Wodonga Historical Society. Many of her prize-winning photos are held in the Society Collection. She also held a range of roles and committee positions in a wide range of Wodonga community organisations. These included the Horticultural Society, the Wodonga Arts Council, the Wodonga Camera Club and the Wodonga Lapidary Club. This photo collection is significant as it documents how the businesses and buildings in Wodonga have evolved and contributed to community throughout the 20th century.Businesses located in High Street. Wodonga north of the recently developed Mann Central. Malibu Ice Cream was at one time McSwiney’s Chemist, and is now High X-Posure Lingerie. For a short time it was also the premises of Pauls Ski Shop, now located in Thomas Mitchell Drive, Wodonga. Crystal's Pizza was at one time Dempster's Café and is now Junction Pizza. In 2021 Wodonga Fish Shop is the location of Greg's Takeaway which was established in 1988.wodonga businesses, high st wodonga, malibu ice cream, crystals pizza, wodonga fish shop -
 Ballarat Tramway Museum
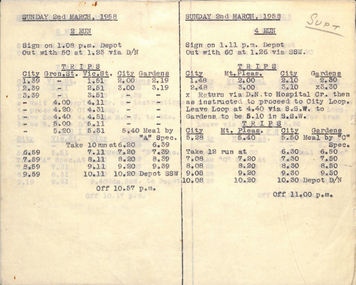
Document - Roster, State Electricity Commission of Victoria (SECV), "Sunday 2nd March 1958 timetables", 1958
Yields information about the crew management and rosters used on a Begonia Festival Sunday.Set of 12 typed sheets of the roster or timetables for "Sunday 2nd March 1958", Begonia Festival, of the various tram runs for crews detailing the time they sign on, what services they operate, times, meals, who relieves or takes them, and times finishing. Has some hand written notes. Tables or runs for 2, 4, 6, 8, 10, 12, 14, 16, 18, 20, Extras A, to K and Fc, Notes a Hc extra - c for conductor?In pencil in top right hand corner "Supt"trams, tramways, rosters, shifts, inspectors, timetables, crews, ballarat, begonia festival -
 Flagstaff Hill Maritime Museum and Village
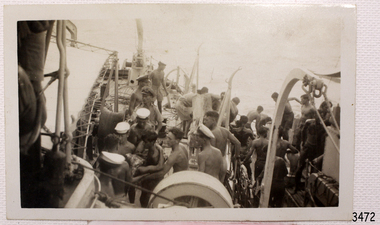
Photograph - Shipwreck rescue, Royal Australian Navy (RAN), HMAS Warrnambool J202, 13-09-1947
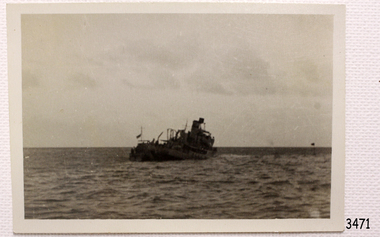
This photograph was taken at the scene of the wreck of the HMAS Warrnambool J202 on September 13th 1947. The photographer has captured the ship as it sinks at sea. The HMAS Warrnambool J202 was commissioned by the Royal Australian Navy for use as a minesweeper during World War II. The Bathurst Class Corvette, fitted out with a range of armaments, was launched in Sydney in 1941. The ship began service in Bass Strait in 1941. At the end of the year it called into its namesake city, Warrnambool, where the crew paraded for the public marching eastwards along Timor Street. A gift of books for the ship’s personnel and a plaque bearing the City of Warrnambool’s Coat of Arms were presented to the ship. The ship was involved in evacuating a family of nine from the Dutch East Indies that was later successful in its challenge of Australia’s Immigration Restriction Act (White Australia Polity). The ship had many other appointments around Australia. On 13th September 1947 HMAS Warrnambool was leading a flotilla of minesweepers in northern Queensland’s coastal waters, clearing mines previously laid to defend Australia. The ship hit a mine, which exploded and very quickly sunk the ship. Boats from the nearby ships rescued most of the seamen although one was killed at the time. The survivors were taken by the HMAS Swan II to Darwin, and they went from there to hospitals in Brisbane and Sydney. Three of these men later died from their injuries. A number of items were recovered by Navy divers in 1948 including the ship’s bell and a plaque with Warrnambool’s Coat of Arms. In 1972-75 the wreck was sold and other items were salvaged. In 1995 a memorial plaque was erected in Warrnambool near the RSL. NOTE: The RAN built a second HMAS Warrnambool FCPB204, launched in 1981 and decommissioned in 2005. There was also a steam ship SS Warrnambool built in London 1892 and broken up in 1926. [A more detailed history can be found in our Collection Record 3477.] This photograph is significant for its association with the lifesaving rescue of the crew and the sinking Royal Australian Navy vessel, HMAS Warrnambool (J202). The HMAS Warrnambool played a nationally significant role in overturning Australia’s Immigration Restriction Act 1901 (colloquially known as the White Australia policy). The ship rescued, and brought to Australia, Samuel and Annie Jacob and their family after they evacuated Dutch East India. The family was threatened with deportation and made the first successful appeal to High Court regarding that Act. The HMAS Warrnambool has - Local significance for being the namesake of the City of Warrnambool - Local significance, having docked in Warrnambool Harbour - Local significance, the crew having paraded in Timor Street, Warrnambool - State significance for its first patrol being in Bass Strait. - National significance, being present in Timor at the Japanese surrender - National significance, shown by the significance of the ship’s bell being curated as Military Heritage and Technology at the Australian War Memorial. - National significance as part of Australia’s defence force history, being one of only four Bathurst class corvettes lost while in Australian service, the only Bathurst class corvette lost after World War II, the only RAN vessel to be sunk by a mine, and associated with the last four Navy deaths of WWII Photograph of the sinking ship HMAS Warrnambool, sunk on 13-09-1947. The image shows the ship tilting towards port side and the bow dipping. This black and white photograph is one of a series of photographs taken at the time.flagstaff hill, maritime village, maritime museum, warrnambool, shipwreck coast, mort's dock & engineering co ltd, h.m.a.s. warrnambool, hmas warrnambool, hmas warrnambool i, hmas warrnambool j202, hmas swan ii, j202, world war ii, bathurst class corvette, royal australian navy, ran, sydney built ship, bass strait patrol, sea mine patrol, mine sweeper, mine clearance, navy divers, great barrier reef, cockburn reef, southern cross diving and salvage, warrnambool city council, cr j r astbury, mayor j r astbury, warrnambool patriotic fund, seal, coat of arms, dedicatory plaque, hmas warrnambool 1941, shipwreck by sea mine 1947, sinking ship, sunk ship, sea rescue, life saving, lifesaving, minesweeper -
 Flagstaff Hill Maritime Museum and Village
Photograph - Shipwreck rescue, Royal Australian Navy (RAN), 13-09-1947
This photograph was taken at the scene of the wreck of the HMAS Warrnambool J202 on September 13th 1947. The photographer has captured the crew being rescued, transferring from one vessel to another, which is likely to be the HMAS Swan II. The HMAS Warrnambool J202 was commissioned by the Royal Australian Navy for use as a minesweeper during World War II. The Bathurst Class Corvette, fitted out with a range of armaments, was launched in Sydney 1941. The ship began service in Bass Strait in 1941. At the end of the year it called into its namesake city, Warrnambool, where the crew paraded for the public marching eastwards along Timor Street. A gift of books for the ship’s personnel and a plaque bearing the City of Warrnambool’s Coat of Arms were presented to the ship. The ship was involved in evacuating a family of nine from the Dutch East Indies that was later successful in its challenge of Australia’s Immigration Restriction Act (White Australia Polity). The ship had many other appointments around Australia. On 13th September 1947 HMAS Warrnambool was leading a flotilla of minesweepers in northern Queensland’s coastal waters, clearing mines previously laid to defend Australia. The ship hit a mine, which exploded and very quickly sunk the ship. Boats from the nearby ships rescued most of the seamen although one was killed at the time. The survivors were taken by the HMAS Swan II to Darwin, and they went from there to hospitals in Brisbane and Sydney. Three of these men later died from their injuries. A number of items were recovered by Navy divers in 1948 including the ship’s bell and a plaque with Warrnambool’s Coat of Arms. In 1972-75 the wreck was sold and other items were salvaged. In 1995 a memorial plaque was erected in Warrnambool near the RSL. NOTE: The RAN built a second HMAS Warrnambool FCPB204, launched in 1981 and decommissioned in 2005. There was also a steam ship SS Warrnambool built in London 1892 and broken up in 1926. [A more detailed history can be found in our Collection Record 3477.] This photograph is significant for its association with the lifesaving rescue of the crew and the sinking Royal Australian Navy vessel, HMAS Warrnambool (J202). The HMAS Warrnambool played a nationally significant role in overturning Australia’s Immigration Restriction Act 1901 (colloquially known as the White Australia policy). The ship rescued, and brought to Australia, Samuel and Annie Jacob and their family after they evacuated Dutch East India. The family was threatened with deportation and made the first successful appeal to High Court regarding that Act. The HMAS Warrnambool has - Local significance for being the namesake of the City of Warrnambool - Local significance, having docked in Warrnambool Harbour - Local significance, the crew having paraded in Timor Street, Warrnambool - State significance for its first patrol being in Bass Strait. - National significance, being present in Timor at the Japanese surrender - National significance, shown by the significance of the ship’s bell being curated as Military Heritage and Technology at the Australian War Memorial. - National significance as part of Australia’s defence force history, being one of only four Bathurst class corvettes lost while in Australian service, the only Bathurst class corvette lost after World War II, the only RAN vessel to be sunk by a mine, and associated with the last four Navy deaths of WWII Photograph of the rescue of the crew from shipwreck HMAS Warrnambool, sunk on 13-09-1947. Survivors are helped from one vessel to another by seamen. This black and white photograph is one of a series of photographs taken at the time.flagstaff hill, maritime village, maritime museum, warrnambool, shipwreck coast, mort's dock & engineering co ltd, h.m.a.s. warrnambool, hmas warrnambool, hmas warrnambool i, hmas warrnambool j202, hmas swan ii, j202, world war ii, bathurst class corvette, royal australian navy, ran, sydney built ship, bass strait patrol, sea mine patrol, mine sweeper, mine clearance, navy divers, great barrier reef, cockburn reef, southern cross diving and salvage, warrnambool city council, cr j r astbury, mayor j r astbury, warrnambool patriotic fund, seal, coat of arms, dedicatory plaque, hmas warrnambool 1941, shipwreck by sea mine 1947, sinking ship, sunk ship, sea rescue, life saving, lifesaving, minesweeper -
 Lilydale RSL Sub Branch
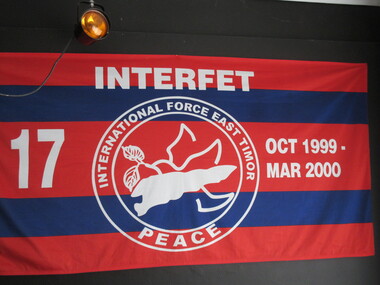
Flag, Panhandling Australia Pty Ltd, Interfet
Red and blue horizontal stripes. The words Interfet - ttop centre. No 17 LHS October 1999 - March 2000 RHS. Historical information - Double circle, in centre is a map of East Timor with floral emblem, surrounded by the words 'International Force East Timor, Peace at base of circle. -
 Vision Australia
Photograph - Image, Queensland Institute for the Blind matting, cane and mattress workshop, August 1952
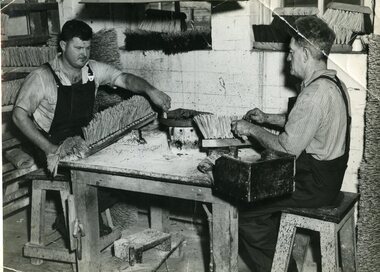
Fives images of the workshop machinery used by the Queensland Industrial Institute for the Blind in the manufacture of various products. 1 - Pitched brooms being made by Stewart Jewell (left) and Jack Dollier (right). 2 - Unknown worker at a basket station making a cane basket, surrounded by finished examples. 3 - Snowy Willis oversees the operation of the machine that bores holes into brush heads. 4 - Unknown worker operating a coir matting machine. There were apparently 10 such machines in use at the time this image was taken. 5 - Snowy Willis checking the bobbins being filled from a giant spool. In the background are empty bobbins stacked against walls and filled bobbins on spool holders. 6 - Roy Anderson checks the wadding on a recently filled mattress, whilst in the background Ellen McDevitt uses a portable sewing table to sew the ends of a filled mattress.6 x B/W photographs of the workshop machinery used by the Queensland Industrial Institute for the BlindC2-657: 2, Brush shop - pitch set brooms being made by blind workers C2-664: Basket shop - some of the various types of baskets made C2-654: Snowy Willis. Brush shop - a semi automatic brush stock boring machine in operation. C2-666: Matting shop - one of the ten coir matting looms in use. 1960. C2-659: Matting shop - bobbin winder and bobbin bank. C2-655: 15. 2 col wide. Bed shop wadding a fibre mattress. Also showing special sewing machine and movable table used in sewing the mouths of filled mattresses.queensland industrial institute for the blind, stuart jewell, jack dollier, snowy willis, roy anderson, ellen mcdevitt -
 Kyneton RSL Sub Branch
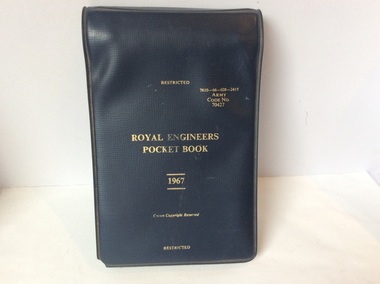
Artefact, Royal Engineers Pocket Book, Ministry of Defence 1967
Booklet hinged at the top. Dark blue plastic cover with gold lettering.Cover: Restricted Royal Engineers Pocket Book. 1967. Crown copyright reserved. Contents: black and white printed with diagrams and tables. -
 Melbourne Legacy
Photograph, Harelands Dining Room, 196
A photo of children at Harelands in the 1960s in the dining room doing their homework, helped by Legatees. Harelands was a residence run by Melbourne Legacy to take care of children whose fathers were deceased servicemen, and who may have been left orphans, or whose mother may have been unable to care for them herself, or they needed to stay in Melbourne for education. Harelands generally looked after children up to the age of 14. Harelands was built in the Queen Anne style and is now heritage listed.A record of the residence called Harelands.Black and white photo of children and two legatees in the Harelands dining room.Handwritten caption: 'Homework in the dining room after dinner. One of the men is Legatee Mellor. The boy in the front table is Harold King.'harelands, residences -
 City of Greater Bendigo - Civic Collection
Album - Collections of memorabilia from Alec and Helen Sandner's time as Mayor and Mayoress of the City of Greater Bendigo, 2012
Alec Sandner was a Strathfieldsaye Shire Councillor from 1982 -1987, Strathfieldsaye Shire President from 1985 – 86 and Mayor of Bendigo 2011 - 2012. This album provides at in depth understanding of the many responsibilities of a Mayor and Mayoress. The newspaper articles, mostly collected from the Bendigo Advertiser, provides commentary on the key issues of the times. Highlights of this time seven month period include a visit from Princess Charlene of Monaco to open the Grace Kelly exhibition at the Bendigo Art Gallery and Bendigo Library redevelopment and the Easter Fair. Eighty page black spiral bound scrapbook collection of memorabilia and newspaper articles commemorating Alec and Helen Sandner's time as Mayor and Mayoress of Bendigo. This album covers the month from November 4 2011 - June 13 , 2012 after Alec was elected Mayor. sandner collection, mayor alec sandner, alec and helen sander -
 Federation University Historical Collection
Document - Document - Booklet, VIOSH: Ballarat College of Advanced Education; Graduate Diploma in Occupational Hazard Management; Re-Accreditation Proposal, 1985
Victorian Institute of Occupational Safety and Health (VIOSH) Australia is the Asia-Pacific centre for teaching and research in occupational health and safety (OHS) and is known as one of Australia's leaders on the field. VIOSH has a global reputation for its innovative approach within the field of OHS management. VIOSH had its first intake of students in 1979. At that time the Institution was known as the Ballarat College of Advanced Education. In 1990 it became known as Ballarat University College, then in 1994 as University of Ballarat. It was 2014 that it became Federation University. VIOSH Australia students are safety managers, senior advisors and experienced OHS professionals. They come from all over Australia and industry. Students are taught active research and enquiry; rather than textbook learning and a one-size fits all approach. VIOSH accepts people into the Graduate Diploma of Occupational Hazard Management who have no undergraduate degree - on the basis of extensive work experience and knowledge. Booklet contains a detailed outline of the course for the Re-Accreditation Proposal in 1985. Extra information was requested and this was provided in a supplementary booklet in April 1986.Spiral bound booklet with red paper cover. Includes a Table of Contents. Re-accreditation proposal covers 104 pages with two Appendices. Separate section included with further information as requested.viosh, victorian institute of occupational safety and health, ballarat college of advanced education, occupational hazard management, course re-accreditation proposal, supplementary information -
 Warrnambool and District Historical Society Inc.
Coupon, Book Swinton, 1950s
This booklet comes from the Warrnambool business of Swintons Pty Ltd. It is a booklet used to affix coupons issued to customers of the business who received one coupon for every shilling spent in the Swintons store (buying groceries, dairy produce or ironmongery). When the booklet was filled with 200 stamps then the customer received five shillings in cash. William and Ann Swinton migrated to Australia in 1854 and for a decade William Swinton worked as a builder and carpenter in the Warrnambool area, erecting many buildings, including the Wangoom Presbyterian Church. In 1865 he opened a store in Timor Street, Warrnambool selling groceries, glassware, china and hardware. By 1888 the business was known as William Swintons and Sons. Branch stores were opened at Cudgee, Nullawarre, Wangoom, West Warrnambool and South Warrnambool. After William Swinton died his son Robert became the first managing director of Swintons Pty Ltd. In 1934 the business split, with George Swinton and Sons selling furnishings, clothing and glassware and Swintons Pty Ltd selling seeds, produce and hardware. Today the Swinton family still operates a furniture and bedding store in Timor Street. This booklet is of interest as an example of the promotional tools used by Swintons Pty Ltd in the mid 20th century. The current Swinton business in Timor Street is the oldest family business in Warrnambool and, with the name Swinton associated with businesses in Timor Street for 152 years it is amongst the oldest family businesses in Australia. This is a blue-coloured booklet used as a promotional tool by Swintons Pty Ltd of Warrnambool. There is blue printing on the front and back of the booklet and space on the back for the name of the owner of the booklet. It contains eight pages with spaces on each page to affix 25 blue adhesive coupons or stamps. The pages are stapled. There are 200 coupons affixed to the pages. A couple of the coupons are torn. Front Cover: Swintons Pty Ltd Timor Street Warrnambool Provision, Seed and Hardware Merchants Blue Cash Coupons Bank Book Coupons: Swintons Cash Coupon 1/- Groceries swinton family warrnambool, history of warrnambool -
 Flagstaff Hill Maritime Museum and Village
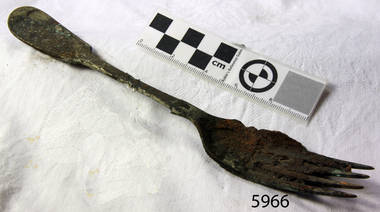
Fork
HISTORY OF THE LOCH ARD The LOCH ARD belonged to the famous Loch Line which sailed many ships from England to Australia. Built in Glasgow by Barclay, Curdle and Co. in 1873, the LOCH ARD was a three-masted square rigged iron sailing ship. The ship measured 262ft 7" (79.87m) in length, 38ft (11.58m) in width, 23ft (7m) in depth and had a gross tonnage of 1693 tons. The LOCH ARD's main mast measured a massive 150ft (45.7m) in height. LOCH ARD made three trips to Australia and one trip to Calcutta before its final voyage. LOCH ARD left England on March 2, 1878, under the command of Captain Gibbs, a newly married, 29 year old. She was bound for Melbourne with a crew of 37, plus 17 passengers and a load of cargo. The general cargo reflected the affluence of Melbourne at the time. On board were straw hats, umbrella, perfumes, clay pipes, pianos, clocks, confectionary, linen and candles, as well as a heavier load of railway irons, cement, lead and copper. There were items included that intended for display in the Melbourne International Exhibition in 1880. The voyage to Port Phillip was long but uneventful. At 3am on June 1, 1878, Captain Gibbs was expecting to see land and the passengers were becoming excited as they prepared to view their new homeland in the early morning. But LOCH ARD was running into a fog which greatly reduced visibility. Captain Gibbs was becoming anxious as there was no sign of land or the Cape Otway lighthouse. At 4am the fog lifted. A man aloft announced that he could see breakers. The sheer cliffs of Victoria's west coast came into view, and Captain Gibbs realised that the ship was much closer to them than expected. He ordered as much sail to be set as time would permit and then attempted to steer the vessel out to sea. On coming head on into the wind, the ship lost momentum, the sails fell limp and LOCH ARD's bow swung back. Gibbs then ordered the anchors to be released in an attempt to hold its position. The anchors sank some 50 fathoms - but did not hold. By this time LOCH ARD was among the breakers and the tall cliffs of Mutton Bird Island rose behind the ship. Just half a mile from the coast, the ship's bow was suddenly pulled around by the anchor. The captain tried to tack out to sea, but the ship struck a reef at the base of Mutton Bird Island, near Port Campbell. Waves broke over the ship and the top deck was loosened from the hull. The masts and rigging came crashing down knocking passengers and crew overboard. When a lifeboat was finally launched, it crashed into the side of LOCH ARD and capsized. Tom Pearce, who had launched the boat, managed to cling to its overturned hull and shelter beneath it. He drifted out to sea and then on the flood tide came into what is now known as LOCH ARD Gorge. He swam to shore, bruised and dazed, and found a cave in which to shelter. Some of the crew stayed below deck to shelter from the falling rigging but drowned when the ship slipped off the reef into deeper water. Eva Carmichael had raced onto deck to find out what was happening only to be confronted by towering cliffs looming above the stricken ship. In all the chaos, Captain Gibbs grabbed Eva and said, "If you are saved Eva, let my dear wife know that I died like a sailor". That was the last Eva Carmichael saw of the captain. She was swept off the ship by a huge wave. Eva saw Tom Pearce on a small rocky beach and yelled to attract his attention. He dived in and swam to the exhausted woman and dragged her to shore. He took her to the cave and broke open case of brandy which had washed up on the beach. He opened a bottle to revive the unconscious woman. A few hours later Tom scaled a cliff in search of help. He followed hoof prints and came by chance upon two men from nearby Glenample Station three and a half miles away. In a state of exhaustion, he told the men of the tragedy. Tom returned to the gorge while the two men rode back to the station to get help. By the time they reached LOCH ARD Gorge, it was cold and dark. The two shipwreck survivors were taken to Glenample Station to recover. Eva stayed at the station for six weeks before returning to Ireland, this time by steamship. In Melbourne, Tom Pearce received a hero's welcome. He was presented with the first gold medal of the Royal Humane Society of Victoria and a £1000 cheque from the Victorian Government. Concerts were performed to honour the young man's bravery and to raise money for those who lost family in the LOCH ARD disaster. Of the 54 crew members and passengers on board, only two survived: the apprentice, Tom Pearce and the young woman passenger, Eva Carmichael, who lost all of her family in the tragedy. Ten days after the LOCH ARD tragedy, salvage rights to the wreck were sold at auction for £2,120. Cargo valued at £3,000 was salvaged and placed on the beach, but most washed back into the sea when another storm developed. The wreck of LOCH ARD still lies at the base of Mutton Bird Island. Much of the cargo has now been salvaged and some was washed up into what is now known as LOCH ARD Gorge. Cargo and artefacts have also been illegally salvaged over many years before protective legislation was introduced. One of the most unlikely pieces of cargo to have survived the shipwreck was a Minton porcelain peacock - one of only seven in the world. The peacock was destined for the Melbourne International Exhibition in 1880. It had been well packed, which gave it adequate protection during the violent storm. Today, the Minton peacock can be seen at the Flagstaff Hill Maritime Museum in Warrnambool. From Australia's most dramatic shipwreck it has now become Australia's shipwreck artefact and is one of very few 'objects' on the Victorian State Heritage Register most valuable. The LOCH ARD shipwreck is of State significance – Victorian Heritage Register S 417 Flagstaff Hill’s collection of artefacts from LOCH ARD is significant for being one of the largest collections of artefacts from this shipwreck in Victoria. It is significant for its association with the shipwreck, which is on the Victorian Heritage Register (VHR S417). The collection is significant because of the relationship between the objects, as together they have a high potential to interpret the story of the LOCH ARD. The LOCH ARD collection is archaeologically significant as the remains of a large international passenger and cargo ship. The LOCH ARD collection is historically significant for representing aspects of Victoria’s shipping history and its potential to interpret sub-theme 1.5 of Victoria’s Framework of Historical Themes (living with natural processes). The collection is also historically significant for its association with the LOCH ARD, which was one of the worst and best known shipwrecks in Victoria’s history. Silver plated copper alloy table fork from the wreck of the Loch Ard. Some very little verdigris and silver oxide. Amount of encrustation covers the fork tines. Hallmark is visible. flagstaff hill, warrnambool, shipwrecked coast, flagstaff hill maritime museum, maritime museum, shipwreck coast, flagstaff hill maritime village, great ocean road, loch line, loch ard, captain gibbs, eva carmichael, tom pearce, glenample station, mutton bird island, loch ard gorge, fork -
 Flagstaff Hill Maritime Museum and Village
Fork
HISTORY OF THE LOCH ARD The LOCH ARD belonged to the famous Loch Line which sailed many ships from England to Australia. Built in Glasgow by Barclay, Curdle and Co. in 1873, the LOCH ARD was a three-masted square rigged iron sailing ship. The ship measured 262ft 7" (79.87m) in length, 38ft (11.58m) in width, 23ft (7m) in depth and had a gross tonnage of 1693 tons. The LOCH ARD's main mast measured a massive 150ft (45.7m) in height. LOCH ARD made three trips to Australia and one trip to Calcutta before its final voyage. LOCH ARD left England on March 2, 1878, under the command of Captain Gibbs, a newly married, 29 year old. She was bound for Melbourne with a crew of 37, plus 17 passengers and a load of cargo. The general cargo reflected the affluence of Melbourne at the time. On board were straw hats, umbrella, perfumes, clay pipes, pianos, clocks, confectionary, linen and candles, as well as a heavier load of railway irons, cement, lead and copper. There were items included that intended for display in the Melbourne International Exhibition in 1880. The voyage to Port Phillip was long but uneventful. At 3am on June 1, 1878, Captain Gibbs was expecting to see land and the passengers were becoming excited as they prepared to view their new homeland in the early morning. But LOCH ARD was running into a fog which greatly reduced visibility. Captain Gibbs was becoming anxious as there was no sign of land or the Cape Otway lighthouse. At 4am the fog lifted. A man aloft announced that he could see breakers. The sheer cliffs of Victoria's west coast came into view, and Captain Gibbs realised that the ship was much closer to them than expected. He ordered as much sail to be set as time would permit and then attempted to steer the vessel out to sea. On coming head on into the wind, the ship lost momentum, the sails fell limp and LOCH ARD's bow swung back. Gibbs then ordered the anchors to be released in an attempt to hold its position. The anchors sank some 50 fathoms - but did not hold. By this time LOCH ARD was among the breakers and the tall cliffs of Mutton Bird Island rose behind the ship. Just half a mile from the coast, the ship's bow was suddenly pulled around by the anchor. The captain tried to tack out to sea, but the ship struck a reef at the base of Mutton Bird Island, near Port Campbell. Waves broke over the ship and the top deck was loosened from the hull. The masts and rigging came crashing down knocking passengers and crew overboard. When a lifeboat was finally launched, it crashed into the side of LOCH ARD and capsized. Tom Pearce, who had launched the boat, managed to cling to its overturned hull and shelter beneath it. He drifted out to sea and then on the flood tide came into what is now known as LOCH ARD Gorge. He swam to shore, bruised and dazed, and found a cave in which to shelter. Some of the crew stayed below deck to shelter from the falling rigging but drowned when the ship slipped off the reef into deeper water. Eva Carmichael had raced onto deck to find out what was happening only to be confronted by towering cliffs looming above the stricken ship. In all the chaos, Captain Gibbs grabbed Eva and said, "If you are saved Eva, let my dear wife know that I died like a sailor". That was the last Eva Carmichael saw of the captain. She was swept off the ship by a huge wave. Eva saw Tom Pearce on a small rocky beach and yelled to attract his attention. He dived in and swam to the exhausted woman and dragged her to shore. He took her to the cave and broke open case of brandy which had washed up on the beach. He opened a bottle to revive the unconscious woman. A few hours later Tom scaled a cliff in search of help. He followed hoof prints and came by chance upon two men from nearby Glenample Station three and a half miles away. In a state of exhaustion, he told the men of the tragedy. Tom returned to the gorge while the two men rode back to the station to get help. By the time they reached LOCH ARD Gorge, it was cold and dark. The two shipwreck survivors were taken to Glenample Station to recover. Eva stayed at the station for six weeks before returning to Ireland, this time by steamship. In Melbourne, Tom Pearce received a hero's welcome. He was presented with the first gold medal of the Royal Humane Society of Victoria and a £1000 cheque from the Victorian Government. Concerts were performed to honour the young man's bravery and to raise money for those who lost family in the LOCH ARD disaster. Of the 54 crew members and passengers on board, only two survived: the apprentice, Tom Pearce and the young woman passenger, Eva Carmichael, who lost all of her family in the tragedy. Ten days after the LOCH ARD tragedy, salvage rights to the wreck were sold at auction for £2,120. Cargo valued at £3,000 was salvaged and placed on the beach, but most washed back into the sea when another storm developed. The wreck of LOCH ARD still lies at the base of Mutton Bird Island. Much of the cargo has now been salvaged and some was washed up into what is now known as LOCH ARD Gorge. Cargo and artefacts have also been illegally salvaged over many years before protective legislation was introduced. One of the most unlikely pieces of cargo to have survived the shipwreck was a Minton porcelain peacock - one of only seven in the world. The peacock was destined for the Melbourne International Exhibition in 1880. It had been well packed, which gave it adequate protection during the violent storm. Today, the Minton peacock can be seen at the Flagstaff Hill Maritime Museum in Warrnambool. From Australia's most dramatic shipwreck it has now become Australia's shipwreck artefact and is one of very few 'objects' on the Victorian State Heritage Register most valuable. The LOCH ARD shipwreck is of State significance – Victorian Heritage Register S 417 Flagstaff Hill’s collection of artefacts from LOCH ARD is significant for being one of the largest collections of artefacts from this shipwreck in Victoria. It is significant for its association with the shipwreck, which is on the Victorian Heritage Register (VHR S417). The collection is significant because of the relationship between the objects, as together they have a high potential to interpret the story of the LOCH ARD. The LOCH ARD collection is archaeologically significant as the remains of a large international passenger and cargo ship. The LOCH ARD collection is historically significant for representing aspects of Victoria’s shipping history and its potential to interpret sub-theme 1.5 of Victoria’s Framework of Historical Themes (living with natural processes). The collection is also historically significant for its association with the LOCH ARD, which was one of the worst and best known shipwrecks in Victoria’s history. Silver plated copper alloy table fork from the wreck of the Loch Ard. Some very little verdigris but silver oxide present. Large amount of encrustation covers the fork tines.flagstaff hill, warrnambool, shipwrecked coast, flagstaff hill maritime museum, maritime museum, shipwreck coast, flagstaff hill maritime village, great ocean road, loch line, loch ard, captain gibbs, eva carmichael, tom pearce, glenample station, mutton bird island, loch ard gorge, fork -
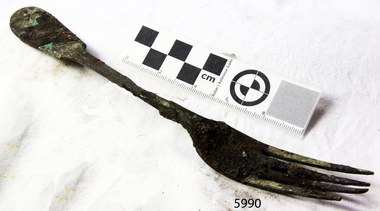 Flagstaff Hill Maritime Museum and Village
Fork
HISTORY OF THE LOCH ARD The LOCH ARD belonged to the famous Loch Line which sailed many ships from England to Australia. Built in Glasgow by Barclay, Curdle and Co. in 1873, the LOCH ARD was a three-masted square rigged iron sailing ship. The ship measured 262ft 7" (79.87m) in length, 38ft (11.58m) in width, 23ft (7m) in depth and had a gross tonnage of 1693 tons. The LOCH ARD's main mast measured a massive 150ft (45.7m) in height. LOCH ARD made three trips to Australia and one trip to Calcutta before its final voyage. LOCH ARD left England on March 2, 1878, under the command of Captain Gibbs, a newly married, 29 year old. She was bound for Melbourne with a crew of 37, plus 17 passengers and a load of cargo. The general cargo reflected the affluence of Melbourne at the time. On board were straw hats, umbrella, perfumes, clay pipes, pianos, clocks, confectionary, linen and candles, as well as a heavier load of railway irons, cement, lead and copper. There were items included that intended for display in the Melbourne International Exhibition in 1880. The voyage to Port Phillip was long but uneventful. At 3am on June 1, 1878, Captain Gibbs was expecting to see land and the passengers were becoming excited as they prepared to view their new homeland in the early morning. But LOCH ARD was running into a fog which greatly reduced visibility. Captain Gibbs was becoming anxious as there was no sign of land or the Cape Otway lighthouse. At 4am the fog lifted. A man aloft announced that he could see breakers. The sheer cliffs of Victoria's west coast came into view, and Captain Gibbs realised that the ship was much closer to them than expected. He ordered as much sail to be set as time would permit and then attempted to steer the vessel out to sea. On coming head on into the wind, the ship lost momentum, the sails fell limp and LOCH ARD's bow swung back. Gibbs then ordered the anchors to be released in an attempt to hold its position. The anchors sank some 50 fathoms - but did not hold. By this time LOCH ARD was among the breakers and the tall cliffs of Mutton Bird Island rose behind the ship. Just half a mile from the coast, the ship's bow was suddenly pulled around by the anchor. The captain tried to tack out to sea, but the ship struck a reef at the base of Mutton Bird Island, near Port Campbell. Waves broke over the ship and the top deck was loosened from the hull. The masts and rigging came crashing down knocking passengers and crew overboard. When a lifeboat was finally launched, it crashed into the side of LOCH ARD and capsized. Tom Pearce, who had launched the boat, managed to cling to its overturned hull and shelter beneath it. He drifted out to sea and then on the flood tide came into what is now known as LOCH ARD Gorge. He swam to shore, bruised and dazed, and found a cave in which to shelter. Some of the crew stayed below deck to shelter from the falling rigging but drowned when the ship slipped off the reef into deeper water. Eva Carmichael had raced onto deck to find out what was happening only to be confronted by towering cliffs looming above the stricken ship. In all the chaos, Captain Gibbs grabbed Eva and said, "If you are saved Eva, let my dear wife know that I died like a sailor". That was the last Eva Carmichael saw of the captain. She was swept off the ship by a huge wave. Eva saw Tom Pearce on a small rocky beach and yelled to attract his attention. He dived in and swam to the exhausted woman and dragged her to shore. He took her to the cave and broke open case of brandy which had washed up on the beach. He opened a bottle to revive the unconscious woman. A few hours later Tom scaled a cliff in search of help. He followed hoof prints and came by chance upon two men from nearby Glenample Station three and a half miles away. In a state of exhaustion, he told the men of the tragedy. Tom returned to the gorge while the two men rode back to the station to get help. By the time they reached LOCH ARD Gorge, it was cold and dark. The two shipwreck survivors were taken to Glenample Station to recover. Eva stayed at the station for six weeks before returning to Ireland, this time by steamship. In Melbourne, Tom Pearce received a hero's welcome. He was presented with the first gold medal of the Royal Humane Society of Victoria and a £1000 cheque from the Victorian Government. Concerts were performed to honour the young man's bravery and to raise money for those who lost family in the LOCH ARD disaster. Of the 54 crew members and passengers on board, only two survived: the apprentice, Tom Pearce and the young woman passenger, Eva Carmichael, who lost all of her family in the tragedy. Ten days after the LOCH ARD tragedy, salvage rights to the wreck were sold at auction for £2,120. Cargo valued at £3,000 was salvaged and placed on the beach, but most washed back into the sea when another storm developed. The wreck of LOCH ARD still lies at the base of Mutton Bird Island. Much of the cargo has now been salvaged and some was washed up into what is now known as LOCH ARD Gorge. Cargo and artefacts have also been illegally salvaged over many years before protective legislation was introduced. One of the most unlikely pieces of cargo to have survived the shipwreck was a Minton porcelain peacock - one of only seven in the world. The peacock was destined for the Melbourne International Exhibition in 1880. It had been well packed, which gave it adequate protection during the violent storm. Today, the Minton peacock can be seen at the Flagstaff Hill Maritime Museum in Warrnambool. From Australia's most dramatic shipwreck it has now become Australia's shipwreck artefact and is one of very few 'objects' on the Victorian State Heritage Register most valuable. The LOCH ARD shipwreck is of State significance – Victorian Heritage Register S 417 Flagstaff Hill’s collection of artefacts from LOCH ARD is significant for being one of the largest collections of artefacts from this shipwreck in Victoria. It is significant for its association with the shipwreck, which is on the Victorian Heritage Register (VHR S417). The collection is significant because of the relationship between the objects, as together they have a high potential to interpret the story of the LOCH ARD. The LOCH ARD collection is archaeologically significant as the remains of a large international passenger and cargo ship. The LOCH ARD collection is historically significant for representing aspects of Victoria’s shipping history and its potential to interpret sub-theme 1.5 of Victoria’s Framework of Historical Themes (living with natural processes). The collection is also historically significant for its association with the LOCH ARD, which was one of the worst and best known shipwrecks in Victoria’s history. Silver plated copper alloy table fork from the wreck of the Loch Ard. Some a little verdigris and much silver oxide. Encrustation on whole of fork. Fork is bent and tine broken.flagstaff hill, warrnambool, shipwrecked coast, flagstaff hill maritime museum, maritime museum, shipwreck coast, flagstaff hill maritime village, great ocean road, loch line, loch ard, captain gibbs, eva carmichael, tom pearce, glenample station, mutton bird island, loch ard gorge, electroplated cutlery, fork -
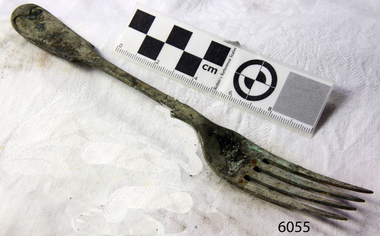 Flagstaff Hill Maritime Museum and Village
Fork
HISTORY OF THE LOCH ARD The LOCH ARD belonged to the famous Loch Line which sailed many ships from England to Australia. Built in Glasgow by Barclay, Curdle and Co. in 1873, the LOCH ARD was a three-masted square rigged iron sailing ship. The ship measured 262ft 7" (79.87m) in length, 38ft (11.58m) in width, 23ft (7m) in depth and had a gross tonnage of 1693 tons. The LOCH ARD's main mast measured a massive 150ft (45.7m) in height. LOCH ARD made three trips to Australia and one trip to Calcutta before its final voyage. LOCH ARD left England on March 2, 1878, under the command of Captain Gibbs, a newly married, 29 year old. She was bound for Melbourne with a crew of 37, plus 17 passengers and a load of cargo. The general cargo reflected the affluence of Melbourne at the time. On board were straw hats, umbrella, perfumes, clay pipes, pianos, clocks, confectionary, linen and candles, as well as a heavier load of railway irons, cement, lead and copper. There were items included that intended for display in the Melbourne International Exhibition in 1880. The voyage to Port Phillip was long but uneventful. At 3am on June 1, 1878, Captain Gibbs was expecting to see land and the passengers were becoming excited as they prepared to view their new homeland in the early morning. But LOCH ARD was running into a fog which greatly reduced visibility. Captain Gibbs was becoming anxious as there was no sign of land or the Cape Otway lighthouse. At 4am the fog lifted. A man aloft announced that he could see breakers. The sheer cliffs of Victoria's west coast came into view, and Captain Gibbs realised that the ship was much closer to them than expected. He ordered as much sail to be set as time would permit and then attempted to steer the vessel out to sea. On coming head on into the wind, the ship lost momentum, the sails fell limp and LOCH ARD's bow swung back. Gibbs then ordered the anchors to be released in an attempt to hold its position. The anchors sank some 50 fathoms - but did not hold. By this time LOCH ARD was among the breakers and the tall cliffs of Mutton Bird Island rose behind the ship. Just half a mile from the coast, the ship's bow was suddenly pulled around by the anchor. The captain tried to tack out to sea, but the ship struck a reef at the base of Mutton Bird Island, near Port Campbell. Waves broke over the ship and the top deck was loosened from the hull. The masts and rigging came crashing down knocking passengers and crew overboard. When a lifeboat was finally launched, it crashed into the side of LOCH ARD and capsized. Tom Pearce, who had launched the boat, managed to cling to its overturned hull and shelter beneath it. He drifted out to sea and then on the flood tide came into what is now known as LOCH ARD Gorge. He swam to shore, bruised and dazed, and found a cave in which to shelter. Some of the crew stayed below deck to shelter from the falling rigging but drowned when the ship slipped off the reef into deeper water. Eva Carmichael had raced onto deck to find out what was happening only to be confronted by towering cliffs looming above the stricken ship. In all the chaos, Captain Gibbs grabbed Eva and said, "If you are saved Eva, let my dear wife know that I died like a sailor". That was the last Eva Carmichael saw of the captain. She was swept off the ship by a huge wave. Eva saw Tom Pearce on a small rocky beach and yelled to attract his attention. He dived in and swam to the exhausted woman and dragged her to shore. He took her to the cave and broke open case of brandy which had washed up on the beach. He opened a bottle to revive the unconscious woman. A few hours later Tom scaled a cliff in search of help. He followed hoof prints and came by chance upon two men from nearby Glenample Station three and a half miles away. In a state of exhaustion, he told the men of the tragedy. Tom returned to the gorge while the two men rode back to the station to get help. By the time they reached LOCH ARD Gorge, it was cold and dark. The two shipwreck survivors were taken to Glenample Station to recover. Eva stayed at the station for six weeks before returning to Ireland, this time by steamship. In Melbourne, Tom Pearce received a hero's welcome. He was presented with the first gold medal of the Royal Humane Society of Victoria and a £1000 cheque from the Victorian Government. Concerts were performed to honour the young man's bravery and to raise money for those who lost family in the LOCH ARD disaster. Of the 54 crew members and passengers on board, only two survived: the apprentice, Tom Pearce and the young woman passenger, Eva Carmichael, who lost all of her family in the tragedy. Ten days after the LOCH ARD tragedy, salvage rights to the wreck were sold at auction for £2,120. Cargo valued at £3,000 was salvaged and placed on the beach, but most washed back into the sea when another storm developed. The wreck of LOCH ARD still lies at the base of Mutton Bird Island. Much of the cargo has now been salvaged and some was washed up into what is now known as LOCH ARD Gorge. Cargo and artefacts have also been illegally salvaged over many years before protective legislation was introduced. One of the most unlikely pieces of cargo to have survived the shipwreck was a Minton porcelain peacock - one of only nine in the world. The peacock was destined for the Melbourne International Exhibition in 1880. It had been well packed, which gave it adequate protection during the violent storm. Today, the Minton peacock can be seen at the Flagstaff Hill Maritime Museum in Warrnambool. From Australia's most dramatic shipwreck it has now become Australia's most valuable shipwreck artefact and is one of very few 'objects' on the Victorian State Heritage Register. [References: Flagstaff Hill Maritime Village information sheets and documents] Flagstaff Hill’s collection of artefacts from LOCH ARD is significant for being one of the largest collections of artefacts from this shipwreck in Victoria. It is significant for its association with the shipwreck, which is on the Victorian Heritage Register (VHR S417). The collection is significant because of the relationship between the objects, as together they have a high potential to interpret the story of the LOCH ARD. The LOCH ARD collection is archaeologically significant as the remains of a large international passenger and cargo ship. The LOCH ARD collection is historically significant for representing aspects of Victoria’s shipping history and its potential to interpret sub-theme 1.5 of Victoria’s Framework of Historical Themes (living with natural processes). The collection is also historically significant for its association with the LOCH ARD, which was one of the worst and best known shipwrecks in Victoria’s history. Silver plated copper alloy table forks - entrèe from the wreck of the Loch Ard. Length 7⅛ " Some verdigris and silver oxide. Very light encrustation on fork. Hallmark visible.flagstaff hill, warrnambool, shipwrecked coast, flagstaff hill maritime museum, maritime museum, shipwreck coast, flagstaff hill maritime village, great ocean road, loch line, loch ard, captain gibbs, eva carmichael, tom pearce, glenample station, mutton bird island, loch ard gorge, fork -
 Bendigo Military Museum
Photograph - PHOTOGRAPH VIETNAM, FRAMED, 1968
Photo taken by Geoff Murray No 3411521, Vietnam 3 Cav Regt 27.11.67 to 22.10.68, Survey Corp 15.10.69 to 15.10.70. Refer 638P.Colour photo, Vietnam showing an APC in the jungle. Label at bottom details time and place, frame is black wood.fsb coral, vietnam, apc’s -
 Bendigo Historical Society Inc.
Document - ROBERT GRAY FORD: A MAN BEFORE HIS TIME
Document, Robert Gray Ford - A Man Before His Time, was an Engineer and invented '' Ford's Rock Boring Machine''.document, names of bendigo pioneers, robert gray ford