Showing 743 items
matching gardens loop
-
 Ballarat Tramway Museum
Document - Digital Image, E-mail, John Phillips, "No. 569 Wednesday Photos Ballarat Trams 50 years since closure", 3/10/2021 12:00:00 AM
... - BTM 27 and 33 cross at Gardens Loop - see btm8193i4 8 - BTM... at Gardens Loop - see btm8193i4 8 - BTM 27in Wendouree Parade ...Yields information about the tram services in Ballarat operated by the SEC and the BTM or BTPS in relation to celebrating the 50 years of closure of the SEC system.E-mail dated 22-9-2021, from John Phillips containing eight digital images titled "No. 569 Wednesday Photos Ballarat Trams 50 years since closure" with personally recollections. 1 - seven page e-mail when printed - last page blank Photos 2 - 12 and 21 in Lydiard St North - see btm5383i 3 - 40 in Lydiard St North - see btm 4133i 4 - 28 in Bridge St - see btm 3219i 5 - 33 at Cemetery gates - see btm8193i2 6 - line up of trams tailed by tram 21 in Sturt St West - see btm8193i3 7 - BTM 27 and 33 cross at Gardens Loop - see btm8193i4 8 - BTM 27in Wendouree Parade - see btm8193i5 9 - 27 and 38 - the base for a postcard photo - see btm1781i1 trams, tramways, closure, lydiard st north, bridge st, btm, cemetery, sturt st west, wendouree parade -
 Ballarat Tramway Museum
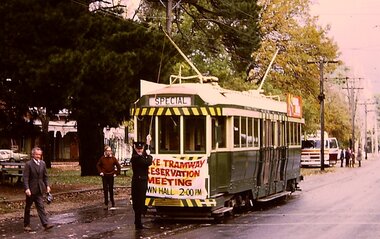
Photograph - Digital image Set of 3, Chris Phillips, 30/05/1971 12:00:00 AM
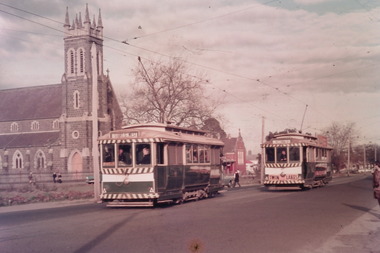
... Phillips. .1 - tram at Gardens loop with the motorman L Bird.../5/1971 by Chris Phillips. .1 - tram at Gardens loop ...Yields information about the special tram and the people involved at the time of the formation of the BTPS prior to closure of the SEC operated system.Set of three digital images of tram 36 advertising the Lake Tramway Preservation Meeting at the Town Hall 31/5/1971 by Chris Phillips. .1 - tram at Gardens loop with the motorman L Bird pulling the pole down - similar photo to that of The Age Newspaper, see Reg Item 2487. .2 - tram turning from Sturt St into Lydiard St North with the Post Office and the Mining Exchange buildings in the background. .3 - tram at the City stop, south side of Sturt St with the Town Hall and Myers in the background. Also has the tram stop signs in the photograph. See also Reg Item 1064 for the newspaper clipping, 2487 for a print of The Age photograph. See 7033i4 for notes on the tram and who made the banner - thought to be Tom Clark. Imagebtm7033i2bw - black and white version of the slide use in the Long Gallery imagebtm7033i2co - colour hi res scan.trams, tramways, lake wendouree, charters, museum establishment, btps, sturt st, gardens, lydiard st north -
 Ballarat Tramway Museum
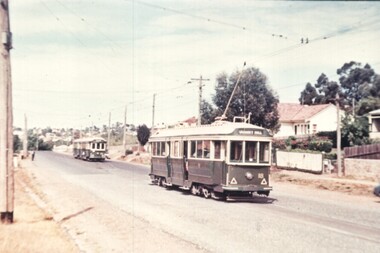
Photograph - Black & White Photograph/s - set of 22, Eldon Hogan, 8/12/1974 12:00:00 AM
... - the dust is flying. .19 - 40 at Gardens Loop .20 - ditto .21... - the dust is flying. .19 - 40 at Gardens Loop .20 - ditto .21 ...Set of 22 black and white photographs of the first trams along Wendouree Parade, 8 Dec. 1974 (See 1974-75 Annual Report) .1 - Rolf Jinks at depot Junction .2 - 27 entering Wendouree Parade - Clyde Croft .3 -ditto with Richard Gilbert with the flag .4 - 27 crossing the parade .5 - In Wendouree Parade .6 - ditto .7 -At St Aidans Drive .8 - ditto .9 - 27 returning to the depot .10 - ditto .11 - 40 returning to the depot .12 - 40 at the loop - Richard Gilbert and Clyde Croft .13 - ditto .14 -ditto .15 - 40 at St Aidans Drive .16 - ditto .17 - ditto .18 - the dust is flying. .19 - 40 at Gardens Loop .20 - ditto .21 - Wendouree Parade .22 - 40 entering the Parade. Photographer Eldon Hogan. Roll of negatives held - stored with negatives file.trams, tramways, btps, wendouree parade, first tram, testing, tram 27, tram 40 -
 Ballarat Tramway Museum
Photograph - Digital image Set of 10, 1971
... the pole. .2 - No. 27 and No. 30 Skipton St at the Bell St Loop... - Scrubber on 0 road at the depot .8 - No. 14 at Gardens Loop ...Yields information about Ballarat Tramways and trams prior to the closure of the tramway system.Set of 10 digital images of Ballarat trams prior to closure, scanned from original slides by Stuart Lodington, 1971 prior to closure of the system. .1 - No. 27 at Lydiard St North terminus with passengers alighting/boarding and an enthusiast about to turn the pole. .2 - No. 27 and No. 30 Skipton St at the Bell St Loop. .3 - No. 13 at the Mt Pleasant terminus, showing destination of Gardens via Drummond St North. .4 - Crews of No. 31 (Conductor and Driver) reversing pole of No. 31 at the depot. .5 - No. 11 inbound on Victoria St. .6 - Night view of a tram at a terminus. .7 - Scrubber on 0 road at the depot .8 - No. 14 at Gardens Loop with another tram behind and the driver standing in the front of the tram. .9 - No. 13 (Mt Pleasant) inbound in Sturt St with 14 behind. .10 - No. 26 northbound to Lydiard St north, about to cross Albert St Sebastopol with the SSW shop in the background. trams, tramways, sebastopol, lydiard st nth, skipton st, bell st, mt pleasant, victoria st, depot, albert st, tram 27, tram 30, tram 13, tram 11, scrubber, tram 14, tram 26 -
 Ballarat Tramway Museum
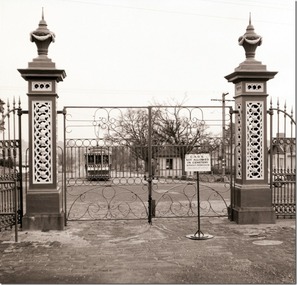
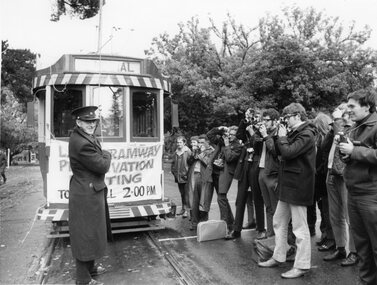
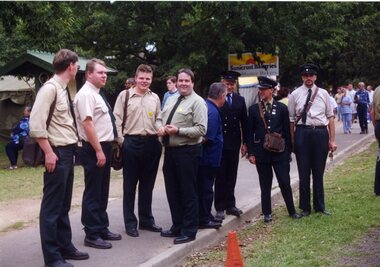
Photograph - Black & White Photograph/s - set of 2, The Age, 30/05/1971 12:00:00 AM
... cutting see Reg. Item 1064. Photographed at Gardens Loop.... For the newspaper cutting see Reg. Item 1064. Photographed at Gardens Loop ...Has a strong association with the formation of the Ballarat Tramway Preservation Society, the people involved in the photograph and the closure of the SEC Ballarat system.Black and white photograph of a group of tram enthusiasts, standing in front of tram 36 photographed on May 30, 1971, used in "The Age "article on May 31 of the setting up of the BTPS by a group of young people the previous day. For the newspaper cutting see Reg. Item 1064. Photographed at Gardens Loop, Wendouree Parade. Tram has a banner advertising a meeting for the Lake Tramway Preservation meeting. Included in the catalogue worksheet is a letter seeking the permission to use the photo in the Museum's Fares Please! and the reply of The Age, seeking payment of $93.50. Was not published. Photograph purchased by the Museum from The Age, August 2002. 2487.1 - 2nd image of this scene, wider view and driver looking at the cameraman - has badge Number "41" Ex William F Scott. Reg Item 3626, image 3, gives No. 41 at the date of the list, unknown, as L. Bird. See also Reg Item 1064 for the newspaper clipping and btm 7033 for other photos of the event by Chris Phillips and tramcar notes. COPYRIGHT OF THE AGE NEWSPAPER - See paper with the worksheetsOn rear in blue ink "Copyright" stamp and details of the owners of the photograph "The Age" .2 - as above with date "1972" in pencil.tramways, trams, lake wendouree, charters, museum establishment, btps, tram 36 -
 Ballarat Tramway Museum
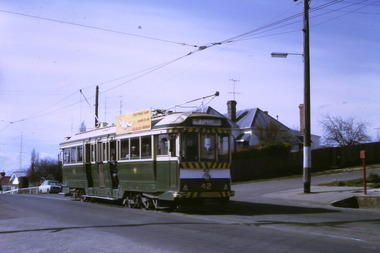
Film - Movie Film & Box, Kodak, 1960 to 1971
... signal. 02.31- Timetable sign at Gardens Loop 02.36 - No. 30...- Timetable sign at Gardens Loop 02.36 - No. 30 arriving at Loop ...Yields information in movie film format of Ballarat trams in 1960 through to 1971, how the system operated and was used by people, including special trams., Yields information in movie film format of Ballarat trams in 1960 through to 1971, how the system operated and was used by people, including special trams.Movie film - 8mm, approx. 15 mins, without leader strip on a plastic reel, within a clear plastic case - Standard 8, titled "Ballarat Trams". See Reg Item 4957 for DVD and Mini DVD. Has been transferred to DVD - see Reg item 4957 Made by Arthur Hill. Also transferred to DVD by Rod Cook Oct. 2015, via Roger Greenwood for use in his DVD, "The City of Ballarat Trams, Gardens & Gold" of 2016. See Reg Item 6883. In Arthur's letter - on file - Made between 1960 and August 1971. Synopsis: based on time. Between 1960 and 1968 0:00 Trams Ahead sign before the Victoria St terminus with 20 at terminus 0.14 - No. 20 leaving Victoria St terminus and being followed along Victoria St by car and then passengers jointing the tram at a tram stop. 00.40 - No. 12 (c1960) in bound along Lydiard St North and arriving in the Gregory St loop. 00.56 - No. 12 and 14 crossing at Gregory St. 01.20 - No. 33 and a bogie car crossing at depot loop. 01.31 - No. 18 travelling along Wendouree Parade with the Lake in the background. 01.42 - No 41 at depot junction and running into the depot No. 2 road with a short sequence of a tramway signal. 02.17 - SEC Sign at the depot gate, shot of 41 in No. 2 road, with the lights other way around, Caution beware of trams sign and a red signal. 02.31- Timetable sign at Gardens Loop 02.36 - No. 30 arriving at Loop and view of a signal with no lights showing. 02.48 - Destination roll being changed through a number of destinations. 03.26 - No. 20 arriving at Carlton St loop with the Olympic monument in the background and the red signal light going out. 03.31 - a lady standing at the front of No. 20, with an ice cream in hand, and No. 17 arriving at the Carlton St loop with a short sped up sequence and No. 20 departing from the loop, followed by No. 17 leaving the loop, heading into the city. 03.41 - No. 13 inbound from Sebastopol crossing Albert St and heading into the city. 04.12 - view of signal and contactor, the light going green and the tram passing underneath. 04.24 - No. 12 at the Sebastopol terminus and departing. 04.51 - No. 12 crossing Albert St Sebastopol. 05.16 - Following No. 12 along Albert St, with Borough Offices in background initially. 05.28 - No. 12 arriving at the Grey St loop with No. 14 arriving at the loop from the city and both trams departing. March 1971 05.58 - No. 30 being followed along Barkly St, Mt Pleasant and the pole being turned at the terminus 06.32 - No. 30 picking up a lady passenger. 06.38 - view from the front of a tram, with the drivers hand and a cigarette, view from the back of the tram, along the Mt Pleasant route and running through the loop and then turning into Main St - has the Ballarat (East) fire station in one sequence, and finally running along Main St. 07.35 - view from tram, with car turning into Bridge St. and then running into Sturt St passed the Parking Loop, and along Sturt St. 08.32 - Points at Drummond St North being changed, doors changed over and the tram running along Drummond St. North, through the Mill St loop and into Macarthur St and in Wendouree Parade, with the Lake Wendouree in view and crossing No. 12 at the Depot Loop, with crews chatting, past the depot, a lady passenger getting off the tram near Forest St., and arriving at Gardens Loop with the same lady passenger who got on in Barkly St, getting off the tram. 11.09 - view of No. 30 at Gardens Loop, departing the loop. August 1971 11.30 - R761 crossing Melton (Exford Wier) on the special train to Ballarat and then the bridge between Ballan and Gordon Stations. 12.16 - View from the front of a tram, following No. 26 along Lydiard St North, crossing at Gregory St and returning to the City. 12.39 - No. 14 and one other tram running along Albert St to Sebastopol, crossing No. 21 at Grey St and then to Sebastopol terminus, crossing Albert St and return and running along Albert St. 13.36 - No. 26, 39 crossing 13 at Gardens Loop. 14.00 - view looking across Lake Wendouree. 14.07 - 26 arriving at Victoria St, running part of Destination roll, passengers getting off with hotel in the background, trolley pole being turned and then with 39 following tram along Victoria St, crossing at the King St Loop. 15.07 - view of a trolley pole tracking through the overhead at curve 15.10 - end. Written labels giving title information on reel.trams, tramways, ballarat, sebastopol, lydiard st north, victoria st, mt pleasant, lake wendouree, depot, tram 12, tram 13, tram 14, tram 17, tram 18, tram 21, tram 26, tram 33, tram 39, tram 41 -
 Ballarat Tramway Museum
Slide - 35mm slide/s - set of 19, Noel Simons, 26/02/1972 12:00:00 AM
... - No. 26 entering Garden Gully Loop, Mt. Korong Road, Ironbark..." 1203.5 - "No. 2" 1203.6 - "No. 26 at Garden Gully Loop Mt Korong... at Garden Gully Loop Mt Korong Rd., Ironbark" 1203.7 - "No. 2 ...Set of 18 transparencies taken on 26/2/1972 on Kodak mounts. 1203.1 - Bendigo 5 at Eaglehawk terminus - with new traffic works. 1203.2 - No. 5 climbing the High St. hill Eaglehawk with the buildings on the east side in the photo. 1203.3 - No 2 descending the road over rail bridge at Job's Gully, heading for Quarry Hill. 1203.4 - as for 1202.3, but more side on. Tram has two SEC roof ads. 1203.5 - as for 1202.4 1203.6 - No. 26 entering Garden Gully Loop, Mt. Korong Road, Ironbark. Tram en route to Eaglehawk. Water column on right hand side of photograph. 1203.7 - No. 2 on the Eaglehawk route, Iron Bark area?, bound for Quarry Hill. 1203.8 - as for 1202.7, but photo taken after tram has past photographer. 1203.9 - No. 5 at Eaglehawk terminus, night photo. Tram has arrived at terminus, showing Quarry Hill, pole turned, but the tram lights have yet to be turned around. 1203.10 - as for 1202.9, but lights have been turned around. 1203.11 - No. 26 climbing the View St. Hill near the Commodore Hotel. Has Campbells Electrical Services building in the background. Photo taken after the tram has passed the photographer. 1203.12 - No. 7 end on photograph, at Golden Square, destination showing Golden Square - night photo. 1203.13 - number not used. 1203.14 - as for 1202.12, but partially side on, has a passenger looking out the tram. 1203.15 - as for 1202.12, but with hotel in the background. 1203.16 - No. 26 and 2 at Charing Cross, night photo. Tram 26 en route to Quarry Hill, 2 to Eaglehawk. 1203.17 - Interior photo of No. 26, at night. 1203.18 - No. 26 at the Quarry Hill terminus as night. 1203.19 - as for 1202.18, but central portion of the tramcar.Information written on in blue ink and date stamped on purple ink. 1203.1 - "No. 5 at Eaglehawk terminus" 1203.1 - "No. 5 in High St. Eaglehawk" 1203.3 - "No. 2" 1203.4 - "No. 2" 1203.5 - "No. 2" 1203.6 - "No. 26 at Garden Gully Loop Mt Korong Rd., Ironbark" 1203.7 - "No. 2" 1203.8 - "No. 2" 1203.9 - "No. 5 at Eaglehawk terminus" 1203.10 - "No. 5 at Eaglehawk terminus" 1203.11 - "No. 26 in View St. Near the Commodore Motel" 1203.12 - "No. 7 at Golden Square Terminus" 1203.14 - "No. 7 at Golden Square Terminus" 1203.15 - "No. 7 at Golden Square Terminus" 1203.16 - "Nos. 26 and 2 at Charing Cross" 1203.17 - "Interior of No. 26" 1203.18 - "No. 26 at the Quarry Hill terminus" 1203.19 - "No. 26 at the Quarry Hill terminus "tramways, trams, bendigo, eaglehawk, bridges, iron bark gully, night photo, quarry hill, golden square, tram 2, tram 5, tram 7, tram 26 -
 Ballarat Tramway Museum
Photograph - Digital image Set of 10, Tony Smith, 1971
... in the Martin Ave loop. Tram has the destination of Gardens via... Ave loop. Tram has the destination of Gardens via Drummond St ...Yields information about Ballarat Tramways and trams prior to the closure of the tramway system.Set of 10 digital images of Ballarat trams prior to closure, scanned from original slides by Tony Smith, 1971 prior to closure of the system. .1 - 21 - night photo - at Sebastopol terminus .2 - 13 at Victoria St terminus .3 - 13 arriving at the Sturt St stop at Lydiard St, from Grenville St. Tram has the destination of Gardens via Sturt St West. Has the Commonwealth Bank and Mechanics institute in the background. .4 - 21 at Mill St loop, Drummond St Nth, enroute to Gardens via Drummond Nth. .5 - 26? about to turn from Drummond St Nth into Macarthur St with passengers boarding and leaving the tram. .6 - 21 northbound in Drummond St north at Mair St with an old hotel in the background. .7 - 33 at Lydiard St Nth, with many passengers boarding. Has the cemetery gates in the background. .8 - 26 waiting in the Martin Ave loop. Tram has the destination of Gardens via Drummond St Nth. .9 - 31 crossing 26 at the Martin Ave Loop. .10 - 26 at Gardens Loop with passengers getting off the tram. Tram has the destination of Mt Pleasant. The stop signage is visible to the right of the tram.trams, tramways, night photo, sebastopol, victoria st, sturt st, drummond st nth, mill st loop, macarthur st, mair st, lydiard st nth, martin ave, wendouree parade, tram 21, tram 13, tram 26, tram 31 -
 Ballarat Tramway Museum
Photograph - Digital image Set of 10, 1971
... at the Bell St loop (see also btm4975i3) .5 - No. 32, Gardens, about... - No. 32, Gardens, about to enter the Carlton St loop, with Lake ...Yields information about Ballarat Tramways and trams prior to the closure of the tramway system.Set of 10 digital images of Ballarat trams prior to closure, scanned from original slides by Stuart Lodington, 1971 prior to closure of the system. .1 - No. 17 at the City Centre, Sturt St, south side, with Gardens via Sturt St on destination roll. Can see the ESCo switch box in the back and the stop and section sign on the adjacent pole. .2 - No. 26 at Sebastopol terminus alongside the Royal Mail Hotel. The tram has yet to turn the pole or the destination roll. Note the Bus Stop sign on the pole, just prior to closure. .3 - ditto .4 - No. 27 and 30 crossing in Skipton St at the Bell St loop (see also btm4975i3) .5 - No. 32, Gardens, about to enter the Carlton St loop, with Lake Wendouree in background, Wendouree Parade. .6 - No. 32 at Depot junction, good photo of depot trackwork entry area. .7 - No. 21, Wendouree Parade, Gardens area, north bound, showing Gardens via Sturt. .8 - No. 12, inbound on Sturt St west at a tram stop. Has destination of Mt. Pleasant. .9 - No. 27 at Lydiard St north terminus with the shelter in the background. .10 - No. 21 at Gardens Loop, tram has destination of Mt. Pleasant. Crews sitting in the saloon.trams, tramways, ballarat, sturt st, sebastopol, drummond st sth, wendouree parade, carlton st, depot, depot junction, trackwork, gardens, sturt st west, crews, tram 17, tram 26, tram 27, tram 32, tram 21, tram 12 -
 Ballarat Tramway Museum
Slide - 35mm slide/s - set of 20, Eldon Hogan, 18/07/1972 12:00:00 AM
... Wendouree Parade .9 - ditto tow .10 - being towed through Gardens... Wendouree Parade .9 - ditto tow .10 - being towed through Gardens ...Set of 20 No. 35mm Agfa colour blue and white plastic mount slide - of the move of Ballarat trams 38 and 40 from the old SEC Depot to the new BTPS depot, via the temporary access track on Tuesday 18 July 1972. .1 - Front of SEC depot with 38 and 40 still in shed, with back part demolished. .2 - No. 40 towed out of the depot by John Withers land rover. Noel Gipps taking photo. .3 - ditto .4 - No. 38 being towed out. .5 - No. 40 being towed out .6 - No. 38 departing Depot Junction .7 - No. 40 departing Depot Junction - the last tram. .8 - ditto, being towed along Wendouree Parade .9 - ditto tow .10 - being towed through Gardens Loop .11 - No. 38 being slewed across Wendouree Parade on channels .12 - No. 38 onto the access track. .13 - ditto, with 40 still on Wendouree Parade. .14 - No. 40 is being readied. .15 - No. 38 well up the access track. .16 - No. 40 is slewed across the road. .17 - No. 40 at right angles to the track - note the pole. .18 - No. 38 near the level crossing, with 28 and 14 outside the depot. .19 - No. 14, Bob Davies truck, 38 and 40 on the access track. .20 - Nos. 28 and 14 waiting to go into No. 1 road. See Fares Please!, September 1972.tramways, trams, depot, btps, moving trams, wendouree parade, tram 38, tram 40, tram 28, tram 14 -
 Ballarat Tramway Museum
Slide - 35mm slide/s - set of 7, Noel Simons, 22/11/1962 12:00:00 AM
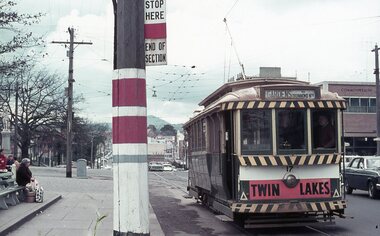
... sign. 1161.2 - tram 33 just before Gardens Loop in Wendouree... Lakes sign. 1161.2 - tram 33 just before Gardens Loop ...Set of 7 Kodachrome transparencies taken on 22/11/1962. 1161.1 - trams 38 and 20 in Sturt St. West at the Russell St. loop. No. 20 has possibly terminated and is showing "CITY" while 38 is showing "Mt Pleasant" Both trams fitted with dash canopy lighting, but no large white stripe. 20 has a Twin Lakes sign. 1161.2 - tram 33 just before Gardens Loop in Wendouree Parade, with destination of "Victoria St." Has a Twin Lakes sign. 1161.3 - tram 39 at corner of Lydiard St. North and Sturt St. with Post Office in background. 1161.4 - tram 40 turning from Sturt St into Lydiard St. North with Post Office in background and showing destination of Lydiard St. North. A blue Holden with red stripes for the Radio Cabs co. is in the foreground, along with pedestrians. 1161.5 - tram 41 in Sturt St. at the City terminus, showing destination of Mt Pleasant with Post Office and ANZ Bank buildings in background. Numerous people waiting on the seats at the tram stop. 1161.6 - tram 13 in Sturt St. near Doveton St. showing destination of Bell St. Many cars and pedestrians on the south side of Sturt St. Note the Austin motor car by the tram showing a stop signal. Tram 13 has a Twin Lakes sign. 1161.7 - trams 13, 26, and 39 in the City Loop near Bridge St. Has Morseheads and Grenville St. tram shelter in the background.1161.1 - "38 and 20 crossing in Sturt St. Ballarat near Russell Street" - in blue and black ink. The "Russell St" is a later addition, over white out. 1161.2 - "33 near Botanic Gardens terminus, Wendouree Parade, Ballarat" 1161.3 - "No. 39 in Lydiard St. Ballarat at Cnr. of Sturt St." 1161.4 - "No. 40 entering Lydiard St. from Sturt St. Ballarat" 1161.5 - "No. 41 in Sturt St. Ballarat at cnr of Lydiard St." 1161.6 - "No. 13 in Sturt St. Ballarat, at Cnr. of Doveton St." 1161.7 - "Nos. 13, 26, and 39 in Sturt St. Ballarat near Bridge St." All have date stamp of "22 Nov. 1962" in purple ink. All black ink unless otherwise noted.tramways, trams, ballarat, sturt st. west, wendouree parade, lydiard st., city loop, taxis, radio cabs, tram 13, tram 20, tram 26, tram 33, tram 38, tram 39, tram 40, tram 41 -
 Ballarat Tramway Museum
Photograph - Colour Photograph/s, Carolyn Dean, Mar. 1999
... - Group of tramway staff at Gardens Loop - used in May 1999 Fares.... On Kodak paper. 1094.1 - Group of tramway staff at Gardens Loop ...Set of 23 photographs taken by Carolyn Dean between 6/3/1999 and 16/4/1999 of the Begonia Festival operations and moving the ex SEC bike shed to Bungaree. On Kodak paper. 1094.1 - Group of tramway staff at Gardens Loop - used in May 1999 Fares Please! .2 - tram 40 at loop .3 - sign boards used in 1999 Begonia festival .4 - Welding joint 2-3 road - Warren Doubleday and Gary Wood .5 - ditto with Alastair Reither .6 - Fixing fence at Bungaree - John Phillips .7 - ditto .8 - ditto .9 - site for the hut to go at Bungaree .10 - ditto .11 - treated pine posts for stumps .12 - checking the layout - John Phillips .13 - cutting fire wood .14 - trimming trees .15 - Dismantling the roof on the shed at Ballarat East - John Phillips and Simon Jenkins .16 - roof off .17 - ditto .18 - the moving team - used in May 1999 Fares Please - see caption for people .19 - Lifting the shed out of position .20 - ditto .21 - ditto .22 - surveying the foundations - Peter Winspur, John Phillips and Alastair Reither .23 - ditto .1 > .3 - 6/3/1999: .4 & .5 - 7/3/1999: .6 > .13 - 20/3/1999: .14 - 21/3/1999: .15> .23 - 16/4/1999 See also Reg. No. 1095 and 1101 for next stage of the move. On rear of each photo in blue ink is date in the upper edge and on lower edge "Photo by Carolyn Dean"btm, sec bike shed, begonia festival, track repairs, tram 40 -
 Ballarat Tramway Museum
Photograph - Digital image Set of 10, Tony Smith, 1971
... . .5 - 42 and 21 crossing at Gardens Loop. 42 showing Mt... and 21 crossing at Gardens Loop. 42 showing Mt Pleasant, 21 ...Yields information about Ballarat Tramways and trams prior to the closure of the tramway system.Set of 10 digital images of Ballarat trams prior to closure, scanned from original slides by Tony Smith, 1971 prior to closure of the system. .1 - 42 in Barkly St - at top of hill, outbound to Mt Pleasant. Note the fire alarm on the right hand side of the photo. .2 - 42 and 21 crossing at Grant St Loop, Barkly St, Mt Pleasant. 42 outbound, 21 inbound. .3 - 34 and 21 crossing at Parker St Loop, with Ballarat College in the background. 42 in bound to City and Mt Pleasant, 21 showing Sturt St. West. .4 - 21, Wendouree Parade at the south end of the old parking loop. .5 - 42 and 21 crossing at Gardens Loop. 42 showing Mt Pleasant, 21 Gardens via Sturt St West. .6 - ditto .7 - 41 showing Special at intersection of Ripon St and Sturt St with a single trucker tram ex View Point waiting to turn into Sturt St. 41 has two Johnnie Walker Whiskey roof advertisements. .8 - Two single truckers - not well focused - 21? and 13? crossing at Mill St loop, has the hospital in the background. Conductor leaning out of the door on the outbound tram. .9 - 42, bogie tram and a single trucker at the City terminus (Sturt and Lydiard Sts). Has a group of SEC trammies standing alongside the tram. Has Racey's store and the SEC offices in the background. 42 has a briquettes roof advert. .10 - 34 in Sturt St, at the City terminus, with passengers getting onto the tram. Has the Town Hall, Myers store, Gemmola's Pharmacy in the background. Tram has the destination of Gardens via Drummond St. Nth. Has two trammies (crews) standing alongside the tram stop sign.trams, tramways, sturt st west, barkly st, grant st, parker st loop, sturt st, view point, ripon st, mill st loop, crews, town hall, tram 42, tram 21, tram 34, tram 41, tram 42 -
 Ballarat Tramway Museum
Film - Movie Film & Box, Kodak, 1960
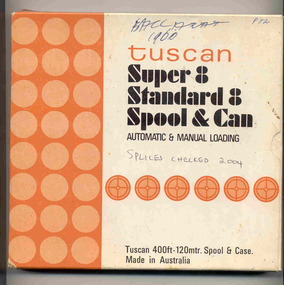
... Gardens Loop or Gardens South Loop and then 12 entering the loop... removed), but overhead still in position at the Old Gardens Loop ...Yields information in movie film format of Ballarat trams in 1960, how the system operated and was used by people., Yields information in movie film format of Ballarat trams in 1960, how the system operated and was used by people.Movie film - 8mm, approx. 17.5 mins, with leader strip on a plastic reel, within a black and white plastic box, titled "Ballarat No. 1. 1960" contained with a cardboard box, 'Tuscan Super 8 and Standard 8 Spool and Can' . Has been transferred to DVD - see Reg item 4100 as Segment No. 1. Filmed and made by Ben Parle. Also transferred to DVD by Rod Cook Oct. 2015, via Roger Greenwood for use in his DVD, "The City of Ballarat Trams, Gardens & Gold" of 2016. See Reg Item 6883. Synopsis: based on time. 0:00 Starts with bogies cars crossing railway level crossing (34?, 39?) 0:30 SEC Logo 0:45 Ballarat Station sign and intro “Some City Scenes” 0:49 35 turning from Lydiard St Nth to Sturt St towards Grenville St with Commonwealth Bank in view. and then 42 returning 1:19 42 showing Mt Pleasant, turns from Sturt St into Lydiard St Nth 1:53 Tramway road works in Lydiard St Nth, near intersection with Mair St with Jelbart Road roller in use, starts with an SEC roadworks sign. 2:12 39 passing the works out bound to Lydiard St Nth. 2:46 Good view of the roller working before 35 arrives. 3:01 35 passing the works in bound with 3:29 14 crossing Lydiard St in Sturt St, towards Grenville St 3:47 Trams in City Loop 3:55 21 coming up the hill 4:04 31 entering Bridge St from Sturt St with Bucks Head Hotel in the background. 4:27 Overhead work at corner of Sturt and Lydiard, with view of the sign at the City terminus “Trams leave here for Sebastopol, Gardens, View Point.” 4:34 Passengers getting off and then onto 38, ex Lydiard St Nth at city terminus including a young lady wearing gloves and a wheeling a pram hurriedly the photographer. A number of other prams in the view as well as. The Conductor helps to unload the pram. 5:07 41 proceeding up Sturt St, appears to have just rained. 5:26 11 using the Dawson St crossover, with a motor car doing a U turn as well. 6:00 14 descending Sturt St towards the City, filmed at Dawson St. 6:11 Title “The Gardens via Drummond St North Line” 6:16 19 showing Victoria St, turning from Drummond St Nth into Sturt St. 6:28 30 inbound in Drummond St Nth, approach and trailing shots. Trailing shot ahs the hospital in the background. 6:49 31 outbound, Drummond St Nth, approach and trailing shots, trees are in autumn colours. 7:04 12, inbound Drummond St Nth, with Macarthur St in the background, stopping to pick up a lady, approach and trailing shots and then entering the Mill St crossing loop. 7:53 14 outbound in Drummond St Nth, dropping a lady passenger off and then turning into Macarthur St and then tram going away. 8:37 View of overhead junction at View Point Jtn. 8:45 View of “Cars Stop Here” sign and pole sign “To City Only” 8:55 30 inbound in Wendouree Parade, stops to pick up passenger, and then a trailing shot of tram entering Macarthur St loop 9:37 View of “Cars Stop Here”, “End of Section” and timetable boards at Haddon St. 9:50 34, pausing at Haddon St and then proceeding towards depot – approach and trailing shots, with “Warning Oncoming Trams” sign in shot. 10:27 “Warning Oncoming Trams” sign 10:32 34 crossing 12 at the Martin Ave loop 10:48 39? Wendouree Parade, near Barrett Ave, stopping and letting off passengers. 11:24 30 passing depot junction and then trailing shot of it entering Tram Sheds or Depot Loop and then proceeding towards the City. 12:11 Shot of the “Caution Beware of Trams” sign at the depot. 12:14 25 stopping at depot junction and then trailing shot of it going toward Forrest St. 12:47 12 passing Depot Junction, trailing shot. 13:07 Shot of :Electricity Supply Department, Ballarat Branch” sign at depot. 13:13 View of a destination showing “Depot” on a bogie tram 13:15 Title “Some Depot Scenes” 13:19 View of a trolley pole and then 13 leaving the depot through the gates, destination showing “View Point”. 13:54 View of trolley pole and then 32 stopping at the depot gates. 14:08 12 (Sunny view) running out onto Wendouree Parade and then a bogie tram approaching Depot Loop. 14:43 View of 42 running in with a single trucker behind in Wendouree Parade, and another single trucker running out. 15:02 Title “Some Scenes in the Gardens” 15:05 25 running through the Gardens, approach and trailing shots, near our Depot Junction. 15:55 View of “No Parking East of Loop” sign 15:59 View of overhead and then trackwork (with points removed), but overhead still in position at the Old Gardens Loop or Gardens South Loop and then 12 entering the loop from the south and then a trailing shot looking along the Parade. 16:33 View of “Cars Stop Here” and “End of Section” and then timetable boards at Gardens Loop. 16:55 View of 34 leaving the loop 17:14 Title “The End”Written labels giving title information on outside of box.trams, tramways, ballarat, sebastopol, lydiard st north, victoria st, mt pleasant, sturt st west -
 Ballarat Tramway Museum
Film - Movie Film & Box, Kodak, 1960s
... photographers. 1:58 As above north of Gardens Loop in Wendouree Parade... photographers. 1:58 As above north of Gardens Loop in Wendouree Parade ...Yields information in movie film format of Ballarat trams in 1971 at the time of one of the closure tours and, a enthusiast tour, how the system operated and was used by people., Yields information in movie film format of Ballarat trams in 1971 at the time of one of the closure tours and, a enthusiast tour, how the system operated and was used by people.Movie film - 8mm, approx. 4.14 mins, with white leader strip on a plastic reel, within a Kodak movie yellow plastic container. Has been transferred to DVD - see Reg item 4100 as Segment No. 4. Filmed and made by an unknown person. Synopsis: based on time - Colour film Title "Ballarat trams specials" 0:00 No. 41 and two other bogie trams loading passengers outside the Ballarat railway station. 0:12 Image of R class loco and K class as 2nd loco at the station and train 0:18 Inside a bogie tram looking through saloon door showing the HTT logo. 0:23 From the front of a tram, or 39 turning from Lydiard St Nth into Sturt St and then proceeding along Sturt St. 0:31 Short sequence inside the tram with some passengers in the view 0:39 No. 21, showing Special in Sturt St West and then the two bogie trams following. 1:08 21 turning from Sturt St West into Hamilton Ave, followed by 41, 35 and 37 and then loading photographers. 1:58 As above north of Gardens Loop in Wendouree Parade. 2:07 Interior view of tram moving at speed, then Forest St corner showing church, and Wendouree Parade. 2:24 Drummond St Sth, crossing two trams at Bell St loop 2:29 Sebastopol line, from the window, heading towards the terminus. 2:44 No. 32 at Sebastopol terminus with the pole being turned. 3:01 Single trucker climbing Sturt St hill towards Lydiard St Nth. 3:17 No. 21 turning from Lydiard St Nth into Sturt St 3:31 Bogie tram climbing Sturt St hill towards Lydiard St Nth 3:55 Crossing the railway level crossing in Lydiard St Nth from the window of the tram. 4:02 Train departing from station – very poor sequence – appears to be a K class locomotive. 4:15 end Placed in a blue cardboard box specially made for the item 30/08/2010.trams, tramways, ballarat, vintage train, bell st, level crossings, lydiard st nth, sturt st west, tram 41, tram 39, tram 21, tram 35, tram 37, tram 32 -
 Ballarat Tramway Museum
Film - Movie Film & Box, Kodak, 1960
... with the Gardens Loop area in the background. Tram stops at stop to let... and then going away with the Gardens Loop area in the background. Tram ...Yields information in movie film format of Ballarat trams in 1960, how the system operated and was used by people., Yields information in movie film format of Ballarat trams in 1960, how the system operated and was used by people.Movie film - 8mm, approx. 30mins, with leader strip on a plastic reel, within a black and white plastic box, titled "Ballarat No. 1. 1960". Has been transferred to DVD - see Reg item 4100 as Segment No. 2. Made by Ben Parle. Also transferred to DVD by Rod Cook Oct. 2015, via Roger Greenwood for use in his DVD, "The City of Ballarat Trams, Gardens & Gold" of 2016. See Reg Item 6883. Synopsis: based on time. 0:00 View of typed introduction, noting that this is a pictorial record of Ballarat. 0:10 Title “The Tramways of Ballarat 1960, Part 1” 0:16 13, showing “View Point” at Stones Corner, Bridge St, east end, with trolley pole being turned, while another single trucker heads out towards Mt Pleasant. 0:25 13 leaving Stones Corner, short approach and then longer trailing shot of the tram going towards the City in Bridge St. 0:44 View out of front of tram in Bridge St heading towards the City, with cars in the photo, then passing through city Loop, no trams in the loop and running up to Lydiard St Nth and crossing the road. 1:22 Running up Sturt St from Armstrong St, passes over Dawson St X-over and up to the next intersection, Lyons St. 1:54 Title “The View Point Line” 1:59 19 inbound, in Ripon St, from crossing Mair St, towards camera and then passing away and turning into Sturt St. 2:49 View of a “Warning Oncoming Trams” sign 2:52 19 in Ripon St, going to View Point, crossing Webster St towards camera, then going away through the disconnected Victoria Ave loop, pass the “Warning Oncoming Trams” sign. Note very windy scene with people running across roads. 3:17 19 in Wendouree Parade, in bound, though showing destination View Point, going away from the camera, past the View Point Hotel. 3:39 19 coming towards camera near Excerpt or Devon St and then going away towards the terminus. 4:04 19 at the terminus, stationary, with a single trucker 3?, passing from Macarthur St into Wendouree Parade, behind 19. 4:20 33 coming towards camera in Wendouree Parade from St Aidans Drive, stopping to pick up passenger at Forest St and then going away towards the City, photographed from near the depot, on a wet and windy day. 4:54 35 in Wendouree Parade, coming towards the Camera from St Aidans Drive and then going away with the Gardens Loop area in the background. Tram stops at stop to let a passenger off. 5:28 21 leaving Gardens Loop for the City via the Depot, green light in signal can be seen. 5:43 28?, closely followed by 26 turn from Drummond St South into Sturt St. 6:18 Scene opens with shot of “Sebastopol” destination on a bogie tram. 6:21 Title “The Sebastopol Line” 6:24 21 turning from Sturt St into Drummond St Sth with destination of Bell St and then going away from the camera. 6:55 38 in Drummond St Sth, coming towards the camera and then passing the camera with Sturt St just in the view. 7:10 21, showing Gregory St, in Drummond St Sth, approaching and then going away, entering the Urquhart St Loop, 7:39 34 in Drummond St Sth (location check required (Latrobe?)), approaches camera, picks up passengers and the goes away. 8:09 39 at ? Street, turns from Drummond St Sth into Skipton St, after picking up and setting down passengers, bound for Sebastopol 8:55 35 inbound in Skipton St passes through the Bell Street Loop, and then goes away from the camera. 9:33 42 outbound in Skipton St, approaches the camera, passes and then crosses over the half the road into Albert St. 10:00 39 inbound in Albert St – location? 10:31 34 outbound for Sebastopol, approaches camera and just starts to pass by. 10:36 34 in Grey St crossing loop, crosses 42 inbound. 10:59 39 outbound in Albert St, with shopping centre in bound, approaches camera, passes and then crosses over Albert St. Mid morning scene. 11:39 39 inbound, Albert St south, approaches camera and then passes and the crosses over Albert St. 12:16 41 outbound in Albert St passes the camera, and pulls into the terminus with the conductor getting out on the back bumper to pull the pole down as the tram stops and a passenger walks into the Royal Hotel. 12:39 Title “The Lydiard Street North Line” 12:44 Filmed from the Hotel balcony, 21 inbound in Lydiard St Nth passes over Mair St, stops while 33 passes in the other direction. 13:18 With the red light showing on the Seymour St loop signal, 33 inbound for Sebastopol stops and picks up many passengers, passes the camera and runs past the VRI building in the background and through the loop. Possibly filmed on a Sunday given the ladies dresses and quieter streets. 14:01 30 outbound, passes the camera and stops at Macarthur St. Filmed alongside the brick wall of the cutting. 14:28 30 inbound arrives, passes through the Gregory St loop and then proceeds past the camera, making a stop to pick up passengers. 15:14 28 in Lydiard St Nth – location?, approaches and goes away from the camera, north of Gregory St. 15:34 28 ditto location? 15:53 21 arrives at the terminus with passengers getting on and off. 16:11 View of the a vertical positioned “End of Section” sign on a pole at the terminus and then lifting the camera to see the timetable board and the stop sign. 16:33 31 in Bridge St passing Morseheads and then turning into Sturt St, stops at the Grenville St stop, while another single trucker comes down to the stop from the City. 16:58 31 outbound in Bridge St, with destination of Victoria St. 17:14 Title “The Victoria Street Line” 17:18 31 outbound to Victoria St from Stones Corner. Starts with an overhead shot, shows clock at the Caltex service station,. 17:37 31 inbound approaching Bakery Hill and then descending to the junction after it passes camera. 18:09 25 climbing outbound in Victoria St, passing the camera, to then pass through the King St loop. 18:47 25 inbound in Victoria St, passing the camera, then pass through the King St loop, with St Alypius Church in the background. 19:36 14 approaching the rail bridge in Victoria St and stopping at the 2nd last stop to left of passengers. 20:01 14 leaving the terminus and approaching the camera and the a short sequence going away, to the next stop to pick up quite a few passengers. 20:14 “Trams Stop Here” sign, metal wrap around on a steel pole. 20:16 Title “The Mount Pleasant Line” 20:21 11 inbound in Main St, with a passenger leaping off the tramcar and another getting off just before the junction. 20:45 11 passes the junction and then proceeds away from the camera in Bridge St. 21:04 30 outbound in Main St, then turns into Barkly St, a bus (Eclipse Motors) passes in Main St just before the sequence ends. 21:31 30 inbound near Steinfield St. (exact location?) 21:49 25 approaches the camera, then proceeds away and passes through the Grant St. loop. 22:29 25 inbound, windy day, between Grant and Cobden, (exact location?), with a horse drawn bread van in the view and the breadman walking behind the tram as it passes. 23:02 11 outbound in Barkly St, (exact location?) 23:37 11 inbound in Barkly St (exact location?) 23:44 Mt Pleasant terminus signage 23:50 30 approaches the terminus and then stops with the conductor alighting turning the pole, passengers getting on and off and the driver appearing at the other end. 24:32 Title “The Gardens Via Sturt St. West Line” 24:35 21 outbound in Sturt St near Raglan St, approaches and passes the Camera. 25:09 12, showing City Oval, approaches and passes the camera, outbound near Windermere St. 25:33 13 showing View Point, goes away from the camera – location? 25:44 12 comes from St. West, inbound passes the camera and then stop as the next stop next Talbot St? 26:21 Short sequence of a “Warning Oncoming Trams” sign 26:28 42 inbound in Sturt St West, just before Ripon St, view coming towards camera and then going away to cross Ripon St. 27:10 34 passes through the Parker St loop 27:25 35 or 39 inbound past the college in Sturt St West 28:04 41 outbound at the Russell St curve, passes away from the camera. 28:11 35? inbound passes away from the camera through the Victoria Park or Morrison St loop, swinging out into the roadway. 28:29 View of timetable sign at Hamilton Ave. 28:37 35 turning from Sturt St West into Hamilton Ave, can see the conductor changing over the barrier rails. 29:11 42 inbound, crosses another bogie tram (35?) at Carlton St loop then passes the camera and goes past the Olympic rings monument. 29:42 12 approaches the Carlton St gates. 30:07 12 outbound, crosses a bogie tram in the loop with both trams then leaving the loop. 30:20 Title “End of Part One” Written labels giving title information on outside of box.trams, tramways, ballarat, sebastopol, lydiard st north, victoria st, mt pleasant, sturt st west -
 Ballarat Tramway Museum
Photograph - Digital image Set of 10, Tony Smith, 1971
... waiting at the tram stop. .2 - 27 at Victoria St loop, showing... at the tram stop. .2 - 27 at Victoria St loop, showing Gardens via ...Yields information about Ballarat Tramways and trams prior to the closure of the tramway system.Set of 10 digital images of Ballarat trams prior to closure, scanned from original slides by Tony Smith, 1971 prior to closure of the system. The following photos have suffered colour change and showing some deterioration - fungal growth. .1 - 35 (Sebastopol), with the Town Hall and Gemmola's chemist in the background. Tram waiting at the tram stop. .2 - 27 at Victoria St loop, showing Gardens via Drummond St Nth. .3 - 35 at Armstrong St inbound showing Lydiard St Nth. Has the Commonwealth bank in the background. .4 - 32 westbound in Sturt St between Dawson and Lyon Streets, tram has the destination of Gardens via Drummond Nth. Has the Town Hall and other buildings in the background. .5 - 17 inbound at Dawson St. Tram has destination of Mt Pleasant. .6 - 39 picking up passengers at the tram stop on the west side of Dawson St. Has the Ritzy cafe and the Golden City hotel in the background. Tram appears to be well loaded with lady passengers and has a "Everything under my control in my all electric kitchen" SEC roof ad. .7 - 37 using the Dawson St crossover - has St Patricks Cathedral in the background. .8 - 21 entering the depot with Lake Wendouree in the background. .9 - 11 sitting in 0 road at the depot. .10 - 41 at the depot on 2 road. Tram has two Johnny Walker Whiskey roof adverts.trams, tramways, sturt st, victoria st, dawson st, lake wendouree, wendouree parade, depot, tram 35, tram 27, tram 32, tram 17, tram 39, tram 37, tram 21, tram 11, tram 41 -
 Ballarat Tramway Museum
Slide - 35mm slide/s, Noel Simons, 21/11/1962 12:00:00 AM
... with destination of Quarry Hill, just leaving Garden Gully Loop. 1188.6... with destination of Quarry Hill, just leaving Garden Gully Loop. 1188.6 ...Set of 17 transparencies taken on 21/11/1962 on Kodak mounts. 1188.1 - Bendigo No. 11 at Depot Junction McCrae and Arnold St. with driver/conductor changing points. 1188.2 - Bendigo No. 4 at Charing Cross, side on photo, with City Club Hotel and Alexandra Fountain in the background. Tram has Castrol and SEC 'Electric Cooking' ads. 1188.3 - Bendigo No. 4 climbing View St. after tram has passed photographer. Tram has Streets Ice Cream and Cohns Soft Drinks ad on rear dash panel. In the background are the buildings in View St., including the Princess Theatre. Tram has destination of Eaglehawk. 1188.4 - Trams 2 and 4 crossing at the California Gully or Thorpe St Loop. 1188.5 - Bendigo 4 in Mt Korong Road. Tram inbound with destination of Quarry Hill, just leaving Garden Gully Loop. 1188.6 - Bendigo 4 and 17 crossing at the Hayes St. or Iron Bark Gully Loop. No. 17 bound for Eaglehawk, No. 4, Quarry Hill. 17 has two SEC roof ads and a white horse whiskey ad. 1188.7 - No. 17 bound for Eaglehawk, soon after leaving California Gully. Has large mullock heap in background. 1188.8 - Bendigo 2 and 17 crossing at the Thorpe St. or California Gully Loop. Has butchers shop in background. 1188.9 - Bendigo 17 at the Eaglehawk terminus. Has destination of Quarry Hill. In background is the hotel and shops at the terminus, showing ads for "Melbourne Bitter". Tram has two SEC 'Electric Cooking' ads. Driver and conductor about to assist two lady passengers with a pram and baby. 1188.10 - No. 17 at Eaglehawk terminus, awaiting departure. Has Eaglehawk Town Hall and Post Office in background. Tram has a Whitehorse Whiskey ad on the front dash panel. 1188.11 - No. 3 in High St. Eaglehawk, with destination of Eaglehawk. Has the shops on the south side of High St. in the background, including the Eaglehawk fish shop. Tram has two roof ads, one an SEC roof ad, and Cohns Drinks and Streets Ice cream ads on front dash panel. 1188.12 - as above, but after tram has passed photographer. Note the centre of the road poles. 1188.13 - No. 2 outbound for Eaglehawk at the intersection of Mt. Korong Road and the Calder Highway. Photo taken after the tram has passed the photographer. Has an Ampol service station in the background. 1188.14 - No. 11 leaving the Bendigo depot, crossing the bridge, with the Scrubber car in the background. 1188.15 - No. 21 at the North Bendigo terminus. Tram has destination of Golden Square and Cohns drink ad on front dash and two roof ads on side. 1188.16 - No. 11 on Golden Square route, in High St. at intersection with Old High St. 1188.17 - No. 11 at the Golden Square terminus, conductor turning the pole. Hotel on the left side of the photo. Note the road works barrier and red flag behind the tram. Slide has an end of roll mark on the right hand side of the image.Information written on in black ink and date stamped on purple ink. 1188.1 - "Birney car No. 11 in McCrae St. at Cnr of Arnold about to run into depot, Bendigo" 1188.2 - "No. 4 at Alexandra Fountain, Charing Cross Bendigo" 1188.3 - "No. 4 climbing the View St. Hill from Charing Cross, Bendigo (Eaglehawk Route)" 1188.4 - "No. 4 and 2 at Thorpe St. Loop, California Gully" 1188.5 - "No. 4 in Mt Korong Rd., Long Gully, Near Havilah Rd. (Bendigo) (Eaglehawk Route)" 1188.6 - "Nos. 17 and 4 crossing on Hayes St. Loop, Ironbark, Bendigo" 1188.7 - "No. 17 soon after leaving California Gully (Eaglehawk Route)" 1188.8 - "No.2 and 17 crossing on Thorpe St. Loop, California Gully (Eaglehawk Route)" 1188.9 - "No. 17 at Eaglehawk terminus" 1188.10 - "No. 17 at Eaglehawk terminus" 1188.11 - "No. 3 in High St. Eaglehawk" 1188.12 - "No. 3 nearing Eaglehawk terminus" 1188.13 - "No. 2 in Mt. Korong Rd., Ironbark. Calder highway on left (Eaglehawk route) 1188.14 - "Birney car No. 11 leaving Bendigo depot. Scrubber car at rear" 1188.15 - "No. 21 at North Bendigo Terminus" 1188.16 - "Birney car No. 11 in High St. Bendigo at intersection with Old High Street (Golden Square Route)" 1188.17 - "Birney Car No. 11 at Golden Square terminus, High St., Bendigo". tramways, trams, bendigo, depot junction, charing cross, view st., eaglehawk, north bendigo, golden square, tram 2, tram 3, tram 4, tram 11, tram 17, tram 21, tram scrubber -
 Ballarat Tramway Museum
Slide - 35mm slide/s - set of 17, Noel Simons, 20/11/1962 12:00:00 AM
... on the dash panel. 1187.5 - Bendigo No. 18 at Garden Gully crossing... No. 18 at Garden Gully crossing loop, in bound, with destination ...Set of 17 transparencies taken on 20/11/1962 on Kodak mounts. 1187.1 - Bendigo No. 2 at the Quarry Hill terminus, showing destination of Quarry Hill. Has Cohns Drinks and Streets Ice Cream ads on dash panel, a SEC 'electric cooking' roof ad and another roof ad. Shows the Y terminus at this location, but tram standing just before it. Overhead in position. 1187.2 - as above, but closer up. 1187.3 - as above, but from the north side, showing cemetery in the background. 1187.4 - Bendigo No.3 at Eaglehawk terminus. Tram showing destination of Quarry Hill. Has the various buildings at Eaglehawk in the background including the Foodland store. Has Streets Ice cream and White Horse Whiskey ads on the dash panel. 1187.5 - Bendigo No. 18 at Garden Gully crossing loop, in bound, with destination of Eaglehawk. Passengers waiting for an Eaglehawk tram at the stop. Has a white horse whiskey ad on dash panel and SEC roof ads. Conductor standing in doorway looking out. 1187.6 - Bendigo No. 7 inbound in Nolan St. at cnr of McCrae St. showing destination of Golden Square. Has Streets Ice cream ad on dash panel and a Castrol Roof ad. 1187.7 - Bendigo No. 19 at the North Bendigo terminus with railway level crossing in background. Tram has a Cohns Drinks ad and an SEC 'Electric Cooking' roof ad. 1187.8 - Bendigo No. 2 at the Quarry Hill terminus, looking back into Bendigo, showing destination of Eaglehawk. 1187.9 - Bendigo No. 21 in McCrae St, near Nolan St outbound for North Bendigo. Photo taken after tram has passed photographer. 1187.10 - Bendigo Nos. 4 and 26 at Charing Cross in View St. with fountain alongside and the Beehive, Ezywalkin Buildings in the background. No. 26 has a Sandhurst Milk and SEC 'Electric Cooking' roof ad. 1187.11 - close up of 22E maximum traction truck and folded footstep. 1187.12 - Bendigo No. 19 at Charing Cross terminus, after tram has passed photographer, showing destination of North Bendigo, with the Beehive building in the background and passengers boarding tram. 1187.13 - Bendigo No. 11, turning from View St. into Pall Mall, showing Special with the conductor holding point bar. Has the Beehive and Ezywalkin Buildings in the background. 1187.14 - No. 7 at Charing Cross terminus, in Pall Mall, bound for Golden Square. Has the Beehive and Ezywalkin buildings in the background and passengers waiting at the tram stop. 1187.15 - No. 18 at the Charing Cross terminus, bound for Eaglehawk. Has the Beehive and Ezywalkin buildings in the background and passengers waiting at the tram stop. Also has the 'Safety Zone' sign in the photograph. 1187.16 - No. 2 at Quarry Hill terminus, night or dusk photo. Tram showing destination of Depot. 1187.17 - No. 26 at Charing Cross, night photo. Tram has destination of Quarry Hill, but is on the line for Eaglehawk. Photo looks along Mitchell St. Also shows Safety Zone sign. Information written on in black ink and date stamped on purple ink. 1187.1 - "No. 2 at Quarry Hill terminus Bendigo" 1187.2 - "No. 2 at Quarry Hill terminus Bendigo" 1187.3 - "No. 2 at Quarry Hill terminus Bendigo" 1187.4 - "No. 3 at Eaglehawk terminus" 1187.5 - "No. 18 in Mt Korong Road, Long Gully at cnr of Havilah Road (Eaglehawk Route)" 1187.6 - "No. 7 in Nolan St. Bendigo, at Cnr of McCrae St., near lake Weeroona, (North Bendigo Route)' 1187.7 - "No. 19 at North Bendigo terminus" 1187.8 - "No. 2 at Quarry Hill terminus" 1187.9 - "No. 21 in McCrae St. Bendigo, near Nolan St. (North Bendigo Route) 1187.10 - "4 and 26 at Alexandra Fountain, Charing Cross Bendigo" 1187.11 - "Truck of Bogie Car, Bendigo Tramways" 1187.12 - "No. 19 in Pall Mall at Charing Cross, Bendigo" 1187.13 - "Birney car No. 11 entering Pall Mall from View St. at Charing Cross Bendigo" 1187.14 - "No. 7 in Pall Mall at Charing Cross, Bendigo" 1187.15 - "No. 18 at Alexandra Fountain, Charing Cross, Bendigo" 1187.16 - "No. 2 at Quarry Hill terminus, Bendigo" 1187.17 - "No. 26 at Alexandra Fountain, Charing Cross, Bendigo" tramways, trams, bendigo, quarry hill, eaglehawk, north bendigo, maximum traction, night photo, tram 2, tram 3, tram 4, tram 7, tram 11, tram 18, tram 19, tram 21, tram 26 -
 Flagstaff Hill Maritime Museum and Village
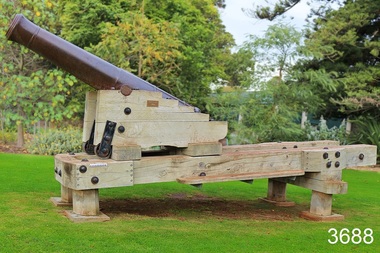
Weapon - Cannon, 1813
This 1813 cannon is classified as a carronade, having been made by the Carron Ironworks foundry in Stirling, Scotland in 1813. It is a large calibre, short range, gun mainly used on ships. The carronade model of cannon was first used when introduced into the British Royal Navy in the American War of the Revolution (1775-1883). This cannon was originally a 28pdr, 48cwt, 8ft gun. The date ‘1837’ on the barrel probably indicates the date that the Board of Ordinance accepted the change in size to a 32pdr. It may originally have been a naval gun and the conversion undertaken when it was brought ashore. It is very probably one of the 15 guns that are known to have constituted the defences of Victoria in 1860. This group of 32pdrs was the shorter model of the 4800width and 8ft length cannon and as such are different from the 32pdrs found in NSW. It was originally located on Cannon Hill in Warrnambool when it was the site of the Warrnambool Battery Western Artillery, formed in 1866. It was obsolete by the time of the 1887 fortifications, and was moved from the Warrnambool Fortifications to the Botanic Gardens in 1910, when the Fortifications were declared obsolete. HISTORIC INFORMATION ABOUT THE CANNON IN THE WARRNAMBOOL AREA In the years following the Crimean War (1854-1857J) there was a great concern in the Colony that Imperial Russia would attempt an invasion. Coastal defences in the colony of Victoria were greatly strengthened by the Government as a result. Warrnambool was originally protected by cannons at Cannon Hill, approximately 1 kilometer west of the Flagstaff Hill Fortifications. The cannons included two 1866 guns, both 80 Pound Rifled Muzzle Loaders (RML) purchased by Victoria’s Colonial Government. They were part of a shipment of 26 such guns sent from England in December 1866. They are registered as No. 23 (80cwt-2qr-0lbs) - Gun 1, and No.13 (81cwt-1qr-12lbs) - Gun 2. They were cast at the Royal Gun Factory, Woolwich Arsenal, in 1866 and have a 6.3 inch bore. Both barrels carry the Royal Cypher of Queen Victoria, Insignia of the Royal Engineers, within the Garter and Motto surmounted by the Crown, with the Royal Cypher of Queen Victoria within the Garter (letters in centre “VR”, motto “HONI SOIT QUI MAL Y PENSE”, "Shame be to him who thinks evil of it."). The guns were originally supplied with wooden carriages. (The Royal Arsenal at Woolwich, England, was established eleven years after the Restoration of King Charles II. It was the principal supplier of armaments to the British and Empire Governments. At the height of its operations during World War One the factory covered 1300 acres and employed very nearly 80,000 workers. Woolwich was the Headquarters of the Royal Artillery since the raising of that Regiment in 1716. The Arsenal was closed in the late 1960’s.) The two 80pdr cannons were transferred to the Warrnambool Garrison Artillery Battery Fortifications erected at Flagstaff Hill in 1887 as part of Victoria’s Coastal Defences. The original wooden carriages were subsequently replaced with the present iron garrison carriages in 1888. They are a “C” pivot. The ‘racers’ or curved track set into the floor of the gun emplacement (which enabled the guns to be traversed more quickly) are as specified for guns up to 10 inch, being of wrought iron 2.78 inches wide. A temporary third gun, now no longer on Flagstaff Hill’s site, was a 5 inch Rifled Breech Loading (BL) Armstrong gun mounted on an Elswick hydro pneumatic disappearing carriage It was faster to load and fire than the 80 pound RMLs and its arrival spelt the end of the older 80 pound guns’ useful life, apart from being used for practice sessions. The 5 inch BL gun was the main defensive weapon of the Warrnambool Battery until the Battery was downgraded in importance and the gun was recalled to Melbourne in 1910. The gun emplacement still remains in place set between the 2 80pdr cannon. The State of Victoria took over the ownership of the guns at the time of Australian Federation in 1901. In about 1901/1902 the Garrison Battery was converted to the Warrnambool Battery of the Australian Field Artillery (No 4 Field Battery). It was equipped with 4.7 inch naval guns mounted on field carriages. They were now a mobile unit but continued to use the Warrnambool Garrison area at Flagstaff Hill for practice. When the Fortifications were declared obsolete the two 80 Pounder RML were relocated to Cannon Hill in 1910. On the outbreak of World War 1 the 4.7 inch guns were recalled to Melbourne, and the Battery was disbanded. Most of the personnel probably re-enlisted in the local 4th Australian Light Horse Regiment. The two 80 Pounder RML were moved back to the Fortifications in 1973. They were both fully restored by Army First Year Apprentices at the Ordinance Factory in Bendigo in time for the centenary year of the fortifications in 1987. The guns are capable of firing 80 pound (32.3kg) armour piercing exploding shells 3.65kms out to sea. They were original manned by volunteers before a paid Garrison was established. Now the Guns are again fired by volunteers on Special Event days. Since restoration the Gun Number 1 had been fired on a regular basis but Gun Number 2 hadn’t been fired since the mid 1990’s. In April 2015 Gun Number 2 was serviced in preparation for the firing of both cannons on the ANZAC Centenary commemorations on April 25th 2015. Other guns from the original Cannon Hill location were obsolete by the time the 1887 Warrnambool Garrison Artillery Battery was built. These guns are (1) a 32 Pounder Muzzle Loading Smooth Bore (SB) cast in 1813 at the famous Carron Foundry, number 80837 and now located in the Warrnambool Botanic Gardens. It is now mounted on a replica carriage due to the original carriage being in a fragile condition (the original carriage stored under cover at Flagstaff Hill). (2) a 68 Pounder Muzzle Loading Smooth Bore cast in 1861 at the equally august Low Moor Foundry, number 10310 and now located on the lawn area at the entrance to Flagstaff Hill Maritime Village. It is still mounted on its original wooden garrison carriage. Its wooden slide compressor mechanism is fragile and now kept in Flagstaff Hill’s storage. There are only seven 32 Pounder SB made by Carron and fifteen 68 Pounder SB made at Low Moor known to exist in the State of Victoria Plaque attached to the carriage “This replica carriage was constructed by the Warrnambool Tritan Woodworkers club in conjunction with the generosity of local businesses and the Warrnambool community. The original carriage (circa 1860) was removed for restoration and is now located at Flagstaff Hill Maritime Village. The timber used for the replica carriage is Monterey Cypress, which was an early planting in the gardens. 2010 marked the centenary of the cannon’s relocation in the Warrnambool Botanic Gardens.” (Reference; Victorian Guns and Cannons, South Western Victoria Assessment, May 2008, item W/B/01; Flagstaff Hill Maritime Village datasheets and archives). There are only seven 32 Pounder SB made by Carron known to exist in the State of Victoria and this is one of them. On a world level, this cannon represents a high level of rarity. Further, as it has been modified (bored up) it is representative of the historical process of amending artillery in order to ensure a longer usefulness of each piece despite rapidly advancing artillery technology. The number of surviving carriages with traversing slides in this group in South Western Victoria is unique in Australia and probably in the World. Out of 10 such platforms surviving in Australia, the South Western Victorian group has half. Several survive around the world but probably not in such a large group. The wooden sliding compressor mechanism belonging to this cannon is extremely rare, and the only one in this South Western Victorian group of Guns and Cannons. As a whole, this cannon has undergone very little restoration or modification, giving it a high level of integrity. The City of Warrnambool is one of several custodians of a collection of artillery pieces of heritage significance at a state, national and international level. These pieces are directly related to the defence of south-west Victoria in the 19th century. The care and preservation come under the Heritage Act 1995. (Reference; Victorian Guns and Cannons, South Western Victoria Assessment, May 2008).Cannon, or carronade, 32pdr with wheels. Muzzle loading smooth bore (SB) cannon. Cannon has original wooden Burmese Teak carriage and slide with wrought iron fittings and iron wheels. Manufactured by Carron in Scotland, in 1813. It has been converted from a 28pdr. There is a loop for a rope on the cascabel, which was part of the original casting. Re-bored in 1837. Marks include Serial Number, Royal Cypher of King George III, broad arrow of proofing, and numbers to represent the weight. NOTE: The cannon is displayed in the Warrnambool Botanic Gardens and is mounted on a replica wooden carriage; the original wooden carriage is now stored under cover at Flagstaff Hill Maritime Village. This carriage has 4 wheels on swivel attachments and a central gear that allows the wheels to turn on rails. Pressed into left trunnion “80837 / CARRON / 1813”, cast on barrel“symbol (Royal Cypher of King George III”, “symbol (broad arrow of proofing)” and numbers “45-3-24 / 1837” . Cascable “CV” and marks with gradations from nought to three in quarters on each side, On the carriage the end of one of the main slide members carries the mark “W symbol (broad arrow) D” incised into the timber. Plaque attached to the carriage by the Warrnambool Tritan Woodworkers club, 2010, marking the centenary of the cannon’s relocation in the Warrnambool Botanic Gardens and the addition of the replica carriage. flagstaff hill, warrnambool, shipwrecked coast, flagstaff hill maritime museum, maritime museum, shipwreck coast, flagstaff hill maritime village, great ocean road, victoria’s coastal defences, warrnambool fortification, warrnambool garrison battery, ordinance, armaments, cannon hill fortifications, victorian colonial government, carron ironwroks foundary, 32pdr smooth bore cannon, 28pdr smooth bore cannon, 1813 cannon, carronade -
 Bendigo Military Museum
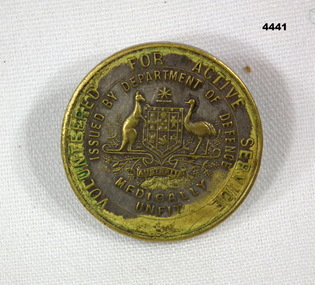
Badge - BADGE, VOLUNTEER, Aust Dept of Defence
This badge was found in a garden in Arnold Street, Bendigo. Not clear if WW1 or WW2, more likely WW1.Brass Badge. It has some evidence of writing that was originally on it. Moulded onto the front is the Aust Coat of Arms. Around the circumference are the words "Volunteered for Active Service" "Issued by Department of Defence" Medically Unfit. The rear has two loops welded in.On rear "Badge 60369."aust dept defence, badge -
 Eltham District Historical Society Inc
Photograph, Woodburn residence, mudbrick adobe (1949), Eltham Heritage Tour, 24 May 1992, 24/05/1992
ELTHAM HERITAGE TOUR The Society excursion on 24th May 1992 was arranged by David Bick, leader of the team carrying out the Shire's heritage study. David selected a number of sites or buildings identified in the study, some of them lesser known components of the Shire's heritage. The tour commenced at the Eltham Shire Office at 10.00 am. Travel was by private car and mini-bus with stops at about twelve locations for commentary by David.It included a short walk in Hurstbridge and lunch at Kinglake. Highlights of the tour included: - 10 am Leave from Shire Offices - 3 Important Trees - A Physical Link to Eltham's First Settlers - Toorak Mansion Gates - A Surviving Farm House - An Intact Circa 1900 Main Street - First Settlers - Gold Miners, and Timber-getters - An Early Hotel - A Pioneering Homestead - Changing Eltham Shire - 20th Century - 4 pm Afternoon Tea and Finish Tour Extract from ELTHAM CULTURAL HERITAGE TOUR (Newsletter No. 85, July 1992, by Bettina Woodburn) "In some respects Eltham is a 'back-water' and it has its own distinctive flavour. On the outskirts the homes date from the 1960's, 70's and 80s with a sprinkling of 'earth homes', mud-brick or pise, rammed dirt. Crossing Main Road into Beddoe Street and Thompson Crescent a very pleasant drive past pines and old fence lines, front lawns unfenced, the occasional ·old farm building, we eventually looked down on a huge circular roof of a 1992 adobe home. Other distinctive places included the Pauline Toner Butterfly Reserve, Gordon Ford's splendid garden at Fulling in Pitt Street, cypress hedges and old houses in Bridge Street and in every direction Eltham's special feature - a totally treed horizon. We were now in the part of the Shire closest to Melbourne - Montmorency - not on the way to anywhere, with no through road going across it, developed in the 1950's and 1960's with conventional gardens, now converted to native plants. The rail looped between Greensborough and Eltham and a shopping street (Were Street) served the area, growing up the hill from the station. It was a typical outer Melbourne suburb with lawns and roses with patches of originality. The shopping precinct still has 1950 characteristics - walls which sloped back, projecting roofs, the original shop fronts are nearly all tiled below the old windows. There's an air of past times about the School, the Dairy, the Butcher's (now a milk bar) and the Castlemaine stone face of the Commonwealth Bank. The final stop for the tour was at the mud-brick Woodburn residence, adobe of 1949 with additions. After War Service, Bill Woodburn had commenced an Architecture course at Melbourne University and after second year in the Christmas vacation, with his wife, Betti, built the two bedroom house - with amazing saving of costs. In the three and a half months they made over 3000 bricks (external walls 18" x 12" x 4", internal walls 12" x 9" x 4"), sifted top soil for mortar and laid them, on concrete foundations and slab floor, made all the structural window frames, door frames and roof members to carry 'super six' asbestos sheets, laboured for the electrician and plumber, did all the glazing and, still without electricity, moved in in March 1949. Rooms have been added, at first with glass walls, later using concrete blocks, to accommodate three daughters and a son. The house not only grew from the earth, but also with the family."Record of the Society's history and activities and highlighting various aspects of the Heritage Study undertaken by David Bick used to create the future heritage overlay for the Shire of Eltham and later Nillumbik Shire.Roll of 35mm colour negative film, 4 stripsKodak Gold 100 5095shire of eltham historical society, activities, heritage tour, woodburn house -
 Kiewa Valley Historical Society
Seal Skins Ski Straps / Soles, mid 1900's
These seal skin straps and webbing were introduced into the Victorian Alps by European engineers, conducting survey work for the SEC Hydro scheme in the late 1930s. This period in time produced many immigrants from a war torn Europe with highly developed technical skills. Many of these immigrants provided articles that were well suited to the alpine regions of Australia, ones they used in their homelands. These were times when the home grown cultures of the Anglo Saxon heritage of the earlier settlers within the Kiewa Valley became interwoven with the various European cultures and this formed, what in later years became the beginning of the Australian multi-cultural society. The Kiewa Valley and its surrounding regions where the major rural areas which did not progress in a so typical Aussie "dinky-di", "she'll be right" fashion. The European influence was however not too strong, so as to obliterate the flavour of the home grown rural society.The major populated sections of the upper Kiewa Valley and the Alpine regions were accelerated by the SEC Hydro Development which brought into the slow growing rural regions a quasi multi ethnic society, however this was only noticeable up to the time when the final Power Station was commissioned in the 1960s. The slight variations to the typical Australian rural settlements of the time were in some food preparations, winter apparel such as these seal skin straps and soles and "langlauf" (cross-country skis). The sealskins were sewn so that their grain ran from front to back thereby allowing the skins to grip going up hill and glide going downhill.The gardens and varieties of flowering shrubs and trees where also more in line with traditional European "outdoor" settings. Seal skin sewn onto one side of a strap of webbing. There is a webbing loop on the front that slips over a small point at the front of the ski. There is a webbing strap attached to the back of the seal skin sole coming over the back of ski that clips metal fasteners onto a loop of webbing behind the ski boot. alpine sports, snow skis, winter clothing, mount bogong recreational activities, snow sports -
 City of Moorabbin Historical Society (Operating the Box Cottage Museum)
Kitchen Equipment, Bread Knife 'Clauss', c1900
Clauss Cutlery’s long and vivid history started in early 1880’s when John Clauss and his younger brother Henrie established Elyria Shear Works in Elyria, Ohio. At one time the company was the largest manufacturer of scissors and shears in the world and was acquired by Acme United Corporation in 2004. John and Henrie Clauss, of German origin, started Elyria Shear Works from a one-room building in Elyria, Ohio Together with five employees, they began manufacturing scissors, shears, straight razors and serrated kitchen knives In August 1887, the Company moved to Fremont, Ohio to be near an accessible, abundant supply of natural gas which had recently been discovered. 1889, disaster struck as the plant was completely destroyed by fire, In 4 months Clauss built a new plant and was back in full operation and changed the company’s name to Clauss Shear Company. 1919 Clauss Shear merged with Henkel Company, to become Henkel-Clauss Company. Henkel Company was founded in 1906 to manufacture manicure and pedicure files, knives, shears and razors. After World War II, Clauss was unable to compete with European firms producing household scissors and shifted its focus to industrial scissors. In 1967 Clauss was taken over by Alco Standard Corporation who integrated Clauss into its existing structure to manufacture tools for industrial niche markets. Clauss made surgical scissors for eye operations, heavy duty metal cutting shears, poultry shears for gutting chickens and specialty items such as anti-acid, anti-magnetic tweezers for the electronics industry. Clauss had approximately 100 employees and produced about $18 million in annual revenues in the late 1980s, but profits continued to decline. In 2004, Acme United Corporation acquired the Clauss inventory, trademarks and brand names from Alco Industries for approximately $500,000A large Bread Knife with scalloped / serrated edge and looped handle Front : CLAUSS Back : FREEMONT / OHIOcutlery, knives, clauss shear company, ohio, freemont, market gardeners, early settlers, moorabbin, cheltenham, -
 City of Moorabbin Historical Society (Operating the Box Cottage Museum)
Manufactured Objects, x 6 buttons, white metal filigree, c1900
c1900 These white metal buttons could be attached to a dress or jacket to possibly match or enhance decorative silver, pewter or brass buckles that were attached by ribbons or straps to plain shoes for evening and special occasions . These buttons were worn by a lady in the family of Ailsa Hunt in Moorabbin Shire These decorative white metal buttons were a common accessory for early settler women in Moorabbin Shire c19006x square white metal buttons with filigree design and attachment loop at backdetachable silver buttons, footwear, shoes, buckles, clothing, silver, pewter, brass, white metal, victorian fashion, edwardian fashion, market gardeners, early settlers, moorabbin shire, bentleigh, mckinnon, moorabbin, cheltenham, wedding dresses, evening wear, -
 City of Moorabbin Historical Society (Operating the Box Cottage Museum)
Domestic object - Furnishings, bedroom candle stick holder, Circa late 1880s
Prior to the installation of gas and electric light, pioneers used candles for lighting after sunset. This ornate candle-stick holder most likely was used in the bedroom. The family of Miss May Curtis were early settlers in Moorabbin ShireSmall white ceramic candle stick holder with pink and yellow floral transfer-printed decoration on the rim. There is also a small raised area on the rim to hold a candle-snuffer. On one side there is a small ceramic "loop" attached as a carrying handle. This item broken beyond repair by brush tailed possum when he entered Cottage via chimney 27/4/2014furnishings, lights, lamps, candles, early settlers, pioneers, moorabbin, bentleigh, ormond, brighton, kitchenware, curtis may, market gardeners -
 City of Moorabbin Historical Society (Operating the Box Cottage Museum)
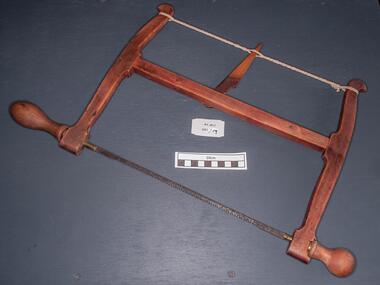
Tool - Bow saw with blade, 20thC
Traditionally, a bow saw is a woodworking tool used for straight or curved cuts. A bow saw is a type of frame saw. Its thin blade is held in tension by a frame. In English and American vocabulary it denotes a toothed blade suspended between two long narrow handles called "cheeks" that are supported and separated by a thin stretcher in the centre of the handles, making a wide H shape (the cheeks form the uprights of the H, the stretcher the crossbar of the H). The blade is kept in tension with a turnbuckle or a twisted cord that runs parallel to the blade between the two cheeks but on the opposite side of the stretcher. If a cord is used, the cord is twisted with a toggle attached to one loop of the cord, adding tension. The toggle hits the stretcher, which keeps the cord from untwisting. A finer version of the saw uses a narrow blade (1/4" or less) with handles that allow the user to hold the saw and turn the blade. In this context it is also known as a turning saw[2] which is larger than a coping saw.Early settlers in Moorabbin Shire had to be self reliant and made their own clothes, tools and equipment as they established their market gardens and farms. A wooden Bow saw with tensioning string, toggle and bladetools, woodwork, metalwork, carpentry, pioneers, market gardeners, early settlers, moorabbin, cheltenham, bentleigh, ormond -
 Ballarat Tramway Museum
Photograph - Colour Print, 1950's
Colour photograph of Bendigo 18 (Quarry Hill) crossing another bogie tram at one of the loops on the Eaglehawk line.On rear in ink "PMTT MMTB 35, Ball 40"trams, tramways, bendigo, eaglehawk, tram 18 -
 Ballarat Tramway Museum
Photograph - Digital image, Paul Nicholson, 22/08/1971 12:00:00 AM
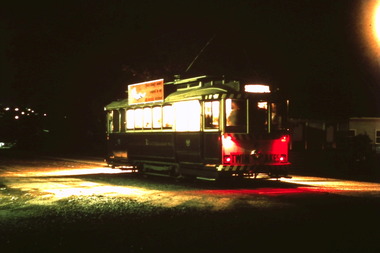
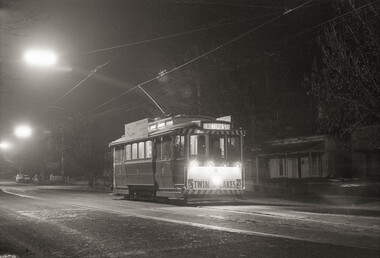
Yields information about the last tram to Victoria St at the time of closure of this line. Has a strong association with the photographer.Digital image of a night photograph provided by Paul Nicholson in an e-mail on 23/8/2021 of tram 31 outbound to Victoria St passing through the King St loop before forming the last tram service from Victoria St on 22/8/1971. trams, tramways, victoria st, last tram, night photo, king st, tram 31 -
 Ballarat Tramway Museum
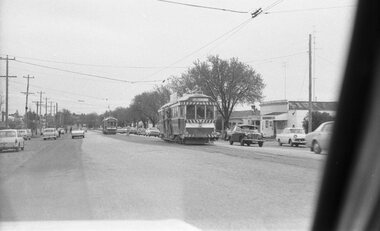
Negative - Set of 7, Warren Doubleday, 19/09/1971
Yields information about the last day of SEC Tramway operations in Ballarat and has a strong association with the archivist.Set of 7 - 35mm negatives, of the last day of operations in Ballarat on 19-9-1971 .1 - 34 and another bogie leave Skipton St loop .2 - At Urquhart St .3 - 39 outside Sebastopol Town Hall .4 - 42 crosses Albert St, note bus stop sign .5 - ditto with a "ancient" motor car in the view - the car is probably a lot younger than the tram. .6 - 37 leads 43, 34 and 40 in the City Loop at 5.40pm .7 - 42 on level crossing, Lydiard Sttrams, tramways, closure, skipton st, urquhart st, sebastopol, sebastopol town hall, city loop, sturt st, lydiard st, level crossing, tram 34 tram 39 tram 42 tram 37