Showing 298 items
matching motor show
-
 Melbourne Tram Museum
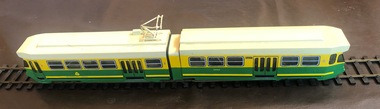
Functional object - Model tram, Preston Workshops, B1, number 2002, c1984
Model tram - B or B1, number 2002 made by The Met for their model tram at the Royal Show Melbourne c1985. Consists of: 1 - 2 x Fibreglass sections - one with a pantograph, painted in The Met colours with number 2002 with destination of "Special". Pantograph made from wire. 2 - small articulated section made from fibre glass and black vinyl, painted yellow and green. 3 - two sets of heavy duty electric motor, geared to two sets of four wheel bogies and one unmotorised bogie with a centre pins, washer and split pin that secured the articulated section of the tram. Each set number on side "MTA No. 7A and 9B" Made from brass, steel, plastic - purpose made. Placed with two sections of O gauge track - each 340mm long.trams, tramways, models, b class, the met, royal show -
 Melbourne Tram Museum
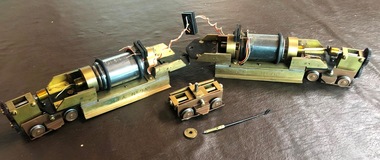
Functional object - Model tram, Preston Workshops, wheel set for an articulated tram made by The Met, c1984
Model tram wheel set for an articulated tram made by The Met for their model tram at the Royal Show Melbourne c1985. Two sets of heavy duty electric motor, geared to two sets of four wheel bogies and one unmotorised bogie with a centre pins, washer and split pin that secured the articulated section of the tram. Each set number on side "MTA No. 9A with motor section given "10" and 7B" Made from brass, steel, plastic - purpose made. Placed with two sections of O gauge track - each 340mm long.trams, tramways, models, b class, the met, royal show -
 Melbourne Tram Museum
Drawing, Victorian Railways, Bogie Car wiring diagram, c1950's
Set of four drawings of electrical and brake equipment on VR Tramcars. .1 - No. 1 - Bogie car wiring diagram - shows all equipment including lights, compressors, motors and switches. Has a different lighting circuit for the 52 to 54. 4 copies held. .2 - No. 2 - Air and Brake Equipment (Excluding one-man car) - shows all equipment including wipers, conductor's brake valve .3 - No. 3 - Pneumatic Equipment for One-man car - shows all equipment including door engines, emergency valves, emergency reservoirs, door valves and links to controller. .4 - No. 4 - Pneumatic Door Equipment - cars 52 to 54 - including door controller valve positions.trams, tramways, vr class tramcars, victorian railways, brakes, wiring diagrams, one man trams, air compressors -
 Melbourne Tram Museum
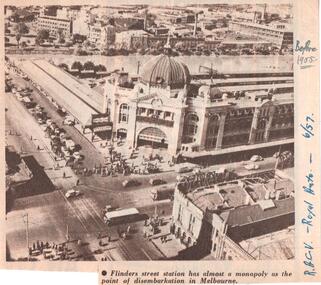
Document - Illustration/s, Royal Automobile club of Victoria (RACv), Jun. 1957
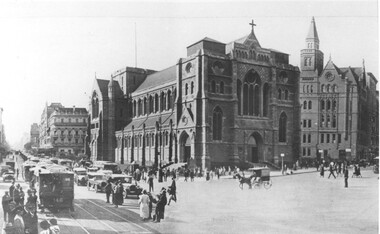
Illustration from the RACV Royal Auto magazine of June 1957 of an aerial view of Flinders St Station and buildings on the south side of the Yarra River, showing motor cars, trams and one bus. Also possibly shows the curve from Swanston St into Flinders St. Caption: "Flinders street station has almost a monopoly as the point of disembarkation in Melbourne"In ink on the side" "RACV - Royal Auto - 6/57 Before 1955"trams, tramways, flinders st station, swanston st -
 Melbourne Tram Museum
Album - Photo Album, Brian Weedon, Tramway photos, 1970 to 1980's
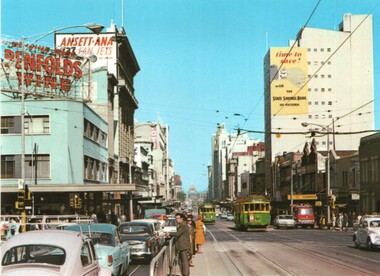
Photo Album - green card slip case containing heavy grey card covers front and rear, front protective page and 12 photo pages with adhesive surface and clear plastic sheet cover - on cardboard sheet bound by a heavy white comb binder marked "Photo Album" on the front inside cover. Each page has scanned to a pdf file. Page 1 - newspaper cutting and two photos of Ballarat No. 27 completing 1,000,000 miles. Item from "A Place in the Sun" written by Keith Dunstan. Photo of tram 27 by the Ballarat Courier. Date of Photo. 29/6/1968, taken prior to the TMSV Tour of that date. Black and white photograph of a group of the passengers on No. 27 during the celebration of the tram reaching 1,000,000 (million) miles in Ballarat. Glenys George, Brian Weedon, John Fitzsimons, Graeme Turnball, Paul Nicholson, Barry George and Kevin Clark. Page 2 - black and white photograph of Geelong Nos 2, 8, 4, 1 and another 4 wheel tramcar and a open cab motor bus photographed within the interior of Geelong depot, prior to 1924. From notes provided by David O'Neill, 12/2003, advises that bus driver is either Bill Hamaling or Charles Stafford. Gentlemen next to No. 8 could be Vic Phipps. Page 3 - Black and White photograph of Geelong No. 7 - c1912, soon after opening with driver, conductor and passengers. Shows the magnetic brake shoe. Page 4 - Black and White photograph of Geelong Cross bench tram No. 11 in Corio Tce, now Brougham St outside Marks Hotel. Tram has the destination of Newtown. Page 5 - Black and White photograph - T 180, showing "Pyrotechnic Fty" possibly on No. 9 Road at Malvern Depot Page 6 - Black and White photograph of L 105 prior to any modifications - see also Reg Item 2498 for another print. - ditto - interior view show off centre seats in the drop centre. Page 7 - Black and White photographs of W308 and W1 419 - - see also Reg Item 3422 for another print. Page 8 - Black and White photograph of W3 665 Page 9 - Black and White photograph of W4 670 - - see also Reg Item 3154 for another print. - ditto Interior view. Page 10 - Black and White photograph of SW6 850 with the dash canopy lighting - as built. - ditto Interior view - - see also Reg Item 674 and 3426 for another prints. Page 11 - not used. Page 12 - Black and White photographs of Y469 and X2 674 (This tram was later renumbered 680 - see page 30 of Destination City 5th Edition). - - see also Reg Item 3161 an d 3427 respectively for another prints. Page 13 - Black and White photographs of Y1 611 and an interior view - - see also Reg Item 3160 for another print. Page 14 - Set of 6 colour prints of Bendigo 28 decorated as the 1968 Myer Christmas tram, Birney 23 and 29. Page 15 - Set of 4 colour prints of Bendigo 3, 17, 6 and 17, Page 16 - Colour print of traffic and trams on Princes Bridge with Batman Ave terminus in the view. - Postcard of Swanston St looking south just north of Lonsdale St with W2 432 and another W2. See 3558.1 for a loose copy of the postcard - NuColorVue No. BP 1060-1 - titled on rear "A view towards the Shrine during peak traffic" Has signs advertising Penfolds Wines, Ansett-ANA, State Savings Bank and Foys. Page 17 - Set of two colour postcards - W2 405 and another tram southbound in St Kilda Road with the Prince Henry hospital in the background and Bourke St with W7 1026 and other trams in the view. Page 18 - Set of two photographs of W2's in Collins St at Spring St, with No. 512 in the view. Page 19 - View looking across the Gardens with two W2 class trams in Macarthur St. - W2 637 at corner of Collins and Exhibition St - see also Reg Item 1999 for another print. Page 20 - set of three colour photographs - W2 303 in bound on St Kilda Road, destination City, Route 4D, see also Reg Item 324 - W7 965 turning from Queens Road into St Kilda Road at St Kilda Junction. - W4 671 at South Melbourne Depot. Page 21 - not used Page 22 - MMTB Bus 702 Mark VI MMTB Freighter body and W7 1035 Page 23 - not used Page 24 - SEC coal locomotive 108 at night. Most photographs are MMTB Official. Listed 22-5-2019trams, tramways, melbourne, geelong, ballarat, bendigo, postcards, l class, interiors, new trams, mmtb, t class, w class, w1 class, w3 class, w4 class, sw6 class, y class, x2 class, princes bridge, batman ave, swanston st, st kilda rd, bourke st, collins st, macarthur st, st kilda junction, w7 class, buses, secv, tram 27, tram 2, tram 8, tram 1026, tram 4, tram 1, tram 11, tram 105, tram 308, tram 419, tram 665, tram 670, tram 850, tram 469, tram 674, tram 611, tram 23, tram 29, tram 17, tram 3, tram 6, tram 28, tram 405, tram 29, tram 432, tram 1017, tram 512, tram 303, tram 965, tram 671, tram 1035, tram 637 -
 Melbourne Tram Museum
Photograph - Set of 3 Black & White Photograph/s, Public Transport Corporation (PTC), early 1950's
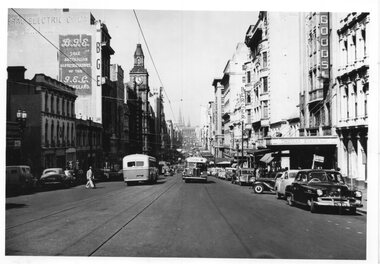
Set of three black and white prints of Bourke St, early 1950's with extensive traffic photographed in the afternoon. Photos have the cable tram track, GEC Australia (General Electric), BGE, Coles and Garrard, Myer, Post Office, Berger Paint, London Stores, Foys .1 - Looking east from about Queen St at 4pm, with two Mk 3 buses. - PTC H188 .2 - ditto with a double deck bus east bound at 215pm, PTC H189 .3 - ditto at 3pm, nearer to Elizabeth St with multiple double deck buses in the block between Elizabeth and Swanston St and extensive motor vehicle traffic. This print has been photographed from an image - has a screen. Photos maybe MMTB origin to show traffic levels in the streets. Photographed prior to the removal of double deck buses in Bourke St by January 1954. All have PTC Copyright Stamp on rear.trams, tramways, bourke st, elizabeth st, buses, double deck buses, post office, traffic control -
 Melbourne Tram Museum
Ephemera - Christmas Card, Peter Duckett, c1990
Christmas Cards prepared by Peter and Patti Duckett and sent to Keith Kings Printed photo on exterior with red printed ribbons, photo corners on inside with another photo and gold block print and the Duckett's address. Photographs by Peter Duckett or from his collection. Item not dated. Cover photo of St Kilda Junction mid 1960's, prior to the reconstruction of the junction detailed in the notes inside the card. Has the service station with the word "Flash" on the roof. Inside photo shows the junction in the cable tram era, with motor cars and the signal box"To Keith" in ink.trams, tramways, christmas cards, st kilda junction, cable trams -
 Melbourne Tram Museum
Newspaper, Royal Automobile club of Victoria (RACv), removal of the cable tram track in Victoria Parade, 1963 to 1971
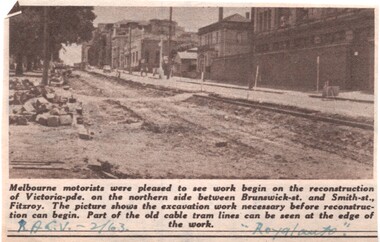
Set of 8 newspaper clippings, mid 1960's concerning traffic control and congestion issues. .1 - Royal auto - 2/1963 - reporting on the removal of the cable tram track in Victoria Parade between Brunswick and Smith St, noting the old cable tram lines. .2 - Royal auto - 1/65 - Photo of Toorak Road Toorak with a tram and parked cars. .3 - Royal auto - 8/64 on Chapel St with W2 324 (route 77, City) showing the impact of parked cars at 8.45am and a motor car trying to squeeze past. .4 - Royal auto - 9/64, Burke Road Camberwell, showing the impact of parked cars and trams. Photo includes SW6 934 (Route 7 Camberwell) .5 - Royal auto - 8/67 - Swanston St near Collins St. .6 - View of Toorak Road, Hartwell, W2 641 (Spencer St, route 74) photo 8/68 by John Shingler. shows the shopping centre. .7 - Royal auto - 9/64 - Johnston St Collingwood and buses. .8 - MMBW Living City Winter 1971 of Kew Junction, peak hour inbound noting the new Eastern Freeway will reduce congestion.Extensive notes on the rear of the photo, see image i2trams, tramways, congestion, traffic control, racv, chapel st, toorak road, victoria parade, cable trams, w2 class, sw6 class, burke road, camberwell, route 77, route 7, swanston st, kew junction, route 74, hartwell, johnston st, buses, tram 324, tram 641, tram 934 -
 Melbourne Tram Museum
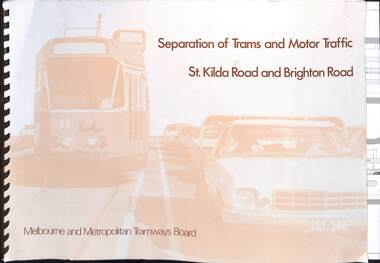
Document, Melbourne & Metropolitan Tramways Board (MMTB), "Separation of Trams and Motor Traffic - St Kilda Road and Brighton Road", May 1979
Document prepared to provide the concepts for separation of traffic along St Kilda Road and Brighton Road using safety bars, and reserved sections of roadway between Princes Bridge and Glen Huntly Road. Dated May 1979. Has an introduction, and notes the widening of St Kilda Road south of Cochrane St and its impact. Has colour photo of Z89 in Nicholson St where the Safety bars had been installed to separate traffic, installation of Safety Zones, photos of Gothenburg, Amsterdam, and Hanover showing traffic separation, graphs showing tram passenger movement in the am peak and road usage. Looks extensively at the Domain Interchange at Park and Domain Road and the suggested layout - which was implemented in Nov. 1986. Includes a photo of a very long line of trams northbound at this intersection which has undergone many changes location, to become during 2025 the entry to Anzac station. Six drawings show the proposed separation of traffic between Alexandra Ave and Glen Huntly RoadDemonstrates a planning document to separate road traffic from trams along St Kilda Road.Comb bound document titled "Separation of Trams and Motor Traffic - St Kilda Road and Brighton Road" - 12 sheets + card covers, some full colour pages with some sheets folded.tramways, st kilda road, traffic control, domain interchange, domain road, reserved track -
 Melbourne Tram Museum
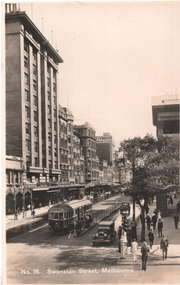
Postcard - Tram 543, Valentine's, "No. 16 Swanston Street, Melbourne", c1929
The postcard shows W2 543 with a Glen Iris destination, passing the Melbourne Town Hall in Swanston St at the Safety Zone with passengers boarding. Has several motor vehicles in view is an Ezywalkin advert on a building. The tram entered service on 17/11/1928 and was fitted with route number boxes during Feb. 1930, which dates the photo to c1929. The card was published by Valentine Publishing Co., printed in Great Britain as a Real Photograph.Yields information about Swanston St c1929.Black and White postcard, Divided back, unused.In pencil "$6-00"tramways, swanston st, w2 class, glen iris, tram 543 -
 Melbourne Tram Museum
Photograph - W class tramcar at the Holden Factory Woodville, R E Jackman, 14/3/1924
Black and white print of a W class tram body on dollies at the Holden Body Builders at Woodville Adelaide. Mr R E Jackman was the MMTB's Superintendent (Engineer) representing the Board in Adelaide for both the Holden contract and the contract with Perry Engineering for bogies or trucks for the W-class tram. Shows the tram basically complete on temporary dollies. See item 5554 for other digital images of the work.Yields information about the construction of new tramcars for the MMTB by HoldensBlack and white print with details on the rear.In red ink "Holdens Motor Body Builders", in black ink "14/3/24", in pencil "roof shows only partly painted" and the stamp of "R E Jackman"tramways, tramcars, w class, holden bodyworks, new tramcars, adelaide, construction -
 Melbourne Tram Museum
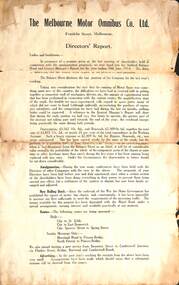
Document - Report, The Melbourne Motor Omnibus Co Ltd, "The Melbourne Motor Omnibus Co. Ltd", 30/6/1914
Annual report to share holders of "The Melbourne Motor Omnibus Co. Ltd" - dated 30 June 1914, detailing the company's activities, finances, planning, routes, buses, passengers carried, maintenance, and staff. Signed by F Massy Burnside, with J W C Downs Chairman of Directors. Gives details of the Mr Burnside the Manager. Shows the company at the time was not profitable.Yields information about a bus competitor to the cable trams, its operations, routes, and the impact of the First World War.Paper sheet off white paper, printed in black ink.buses, competition, annual reports -
 Melbourne Tram Museum
Photograph - Black and White photographs and digital images, Victorian Railways, c1926
.1 - Black and White photo of W 324 passing under the rail over bridge in Racecourse Road Newmarket between July 1925 and Nov. 1929. Tram was converted to a W2 in November 1929. The Doutta Galla Hotel in the background. On the left of the bridge is Newmarket Station and on the right of the photo is the fence of the stockyards. The bridge has an advert for Wolfes Schnapps and Blue? Label Tea. On the embankment is a sign for Life Guard Life Insurance? A lady is waiting at the tram stop. The photo is part of the VR Advertising series, made to show advertisers where signs could go. image i2 - cropped image showing the tramcar by itself. .2 and .3 - Z3 class 209 in about the same position, with a large KIA motor vehicle advertisement. The yellow crash beams and truck parking bay are a result of too many large trucks hitting the bridge. Photo by Warren Doubleday 26/4/2021On rear in ink "ADV 202"trams, tramways, newmarket, racecourse road, flemington, w class, tram stops, advertisements, z3 class, tram 324, tram 203 -
 Melbourne Tram Museum
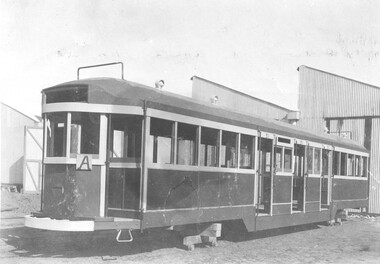
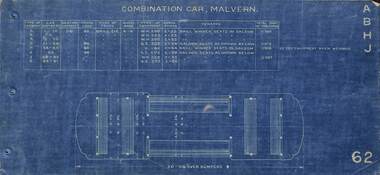
Drawing - Tramcar floor plans to 1923, Melbourne & Metropolitan Tramways Board (MMTB), c1924
Set of 16 floor plans of electric trams of the MMTB and the trusts from the A class of 1910 to W class of 1923. Shows floor plan, seats and a table with car numbers, loading, truck type, type of equipment, horse power, remarks and total weight. 1 - Malvern Combination - A, B, H, J classes 2 - Drop centre cars - Malvern - C, E and D classes 3 - Summer car - Malvern - F class 4 - Short saloon combination - Malvern G class 5 - Short saloon combination - Malvern K class 6 - Four motor bogie car - Malvern - L class 7 - Combination car - Hawthorn - M class 8 - Drop centre bogie car - Hawthorn - N and P class 9 - Closed bogie car - Hawthorn - O class 10 - Combination car, Preston - R and Q class 11 - Combination car, Coburg - S class 12 - Double saloon combination car - Coburg - T class 13 - Box Car Essendon U class 14 - Cross seat (toastrack) car, Essendon, V class 15 - Four motor bogie car - W class 16 - "Birney" Safety car - X class Plain copies - black on white paper held for all cars except the X class.Yields information about various classes of electric trams up to about 1923 that the MMTB absorbed from the Trusts and/or built themselves.Folder of 16 blue prints secured with three brass clips,tramways, tramcars, floor plans, drawings, a class, b class, c class, d class, e class, f class, g class, h class, k class, l class, m class, n class, o class, p class, q class, r class, s class, t class, u class, v class, x class, pmtt, htt, mbctt, fnptt -
 Melbourne Tram Museum
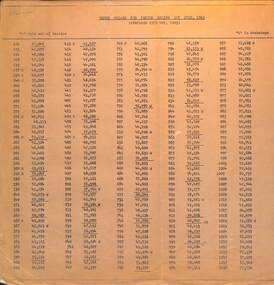
Administrative record - Set of 3 lists, Melbourne & Metropolitan Tramways Board (MMTB), "Truck Mileage", 1963-65
Lists provide information about the truck mileage for most trams at various dates: 1 - "Truck Mileage for period ending 1st June 1963 - noting it was prepared 15/5/1963 - shows trams in the Workshops or held out of service 2 - List of W2 class trams - High Mileage trucks - dated 24/5/1965 - prepared by R J Tippett - Inspecting Foreman. Also lists last 01, 02 and 03. 3 - list for trams 960 to 1040 showing when last truck change and motors - last date is June 1963. Demonstrates MMTB practices monitoring truck or bogie change over dates, mileage and workshop practices.Set of lists - photocopied, hand written or typedtrams, tramways, tramcars, wheels, w2 class, overhaul dates, maintenance, tramcar maintenance -
 Melbourne Tram Museum
Photograph, Swanston St and St Pauls Cathedral and tram 146, early 1920s
The photograph shows St Paul's Cathedral on the corner of Flinders and Swanston St Melbourne, before the construction of the spires during the 1930s. Several cable trams, including cable car 146 can be seen in Swanston St, along with many motor cars, buses and pedestrians. The photo is early 1920s. The cable line was converted to electric trams during 1925/1926.Yields information about St Paul's Cathedral and Swanston St cable trams.Photograph, black and white, plain papertrams, tramways, cable tram, swanston st, flinders st, tram 146, st paul's cathedral, buses -
 Melbourne Tram Museum
Photograph - Collins St - East end, 1920s
The photograph shows the east end of Collins St with a cable tram set inbound towards Spencer St between Exhibition and Spring Streets. The State Treasury building is in the far background. Some soft-top motor vehicles are in view along with a postal pillar or letterbox. Photo 1920sYields information about the east end of Collins St and cable trams.Black and white photograph, with source notes on the rear.In Pencil "Top of Collins St 1920s, (Duplicate Ray Pearson)trams, collins st, cable trams -
 Melbourne Tram Museum
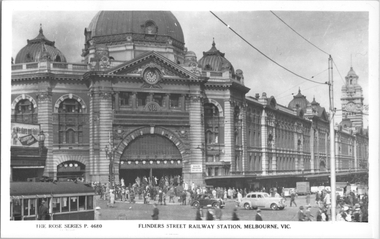
Postcard, Rose Stereograph Co, "Flinders St Railway station Melbourne", mid 1940s
Rose Series postcard No. P 4680 titled "Flinders St Railway station Melbourne", shows the entry to the station, one tram, and motor cars doing a hook turn. There is a Liberty Loan advert on the station verandah on the left side of the photograph.Yields information Swanston St during the mid 1940s.Postcard - printed real photograph with Rose Stereograph Co. name on the rear.tramways, trams, flinders st station, swanston st, w2 class, flinders st, railways, world war ii -
 Melbourne Tram Museum
Photograph - Cable tram - Bourke Street near Queen St, The Age, late 1930s
Photograph shows a cable tram set - climbing the Bourke St hill towards Queen St. There are several other cable trams in the view along with many motor cars. In the background are the BGE building, Warburton Franki, the GPO, Foys, and London Stores. Photo late 1930s or 1940.Yields information about Bourke St cable trams.Black and White photograph - printed on plain paper.On the rear has the Copyright stamp of The Age and pencil number "KM-M-002", Ken Magor stamp, "Bourke Street Melbourne" and number 4838.cable trams, bourke st, queen st, tramways -
 Melbourne Tram Museum
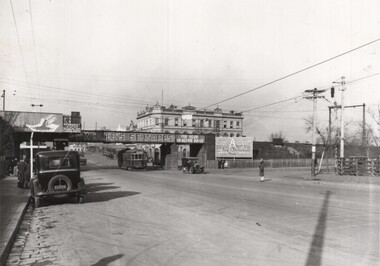
Photograph - Flinders St Station - Australian War Museum, 1922
The photograph shows the busy intersection of Flinders and Swanston St with Flinders St station, along with cable trams, motor vehicles, and pedestrians. The sign above the station entrance is advertising the "Australian War Museum" at the Exhibition Buildings. The reference dates its opening as ANZAC day 1922 and moving to Sydney in 1925. The photo was probably taken soon after it opened as the sign above the station entrance was regularly changed. Note the Safety Zone sign on the eastern side of the intersection for eastbound trams. At the time, trams stopped on either side of the intersection for passengers.Yields information the intersection of Flinders and Swanston St and the War Museum exhibition in the early 1920s.Black and White photograph - printed on plain paper.On the rear has pencil number "KM-M-008", and Ken Magor stamp.cable trams, flinders st station, war museum, flinders st, tramways, safety zone, swanston st -
 Melbourne Tram Museum
Photograph - Collins St east of Swanston St, c1920
The photograph shows Collins Street just to the east of Swanston St. Some 10 cable trams can be seen in the view, along with some horse-drawn vehicles and one open-top motor car. It would appear that a person is boarding the nearest cable tram (Victoria Bridge) from the centre of the road. Trees have been planted between Swanston and Spring St. In the background are signs for Ruskins Studios, W V Dunn Dentist, Kodak Limited incorporating Baker House, Coles Arcade, and Broothorn studios - see reference. The Town Hall is on the right.Yields information about Collins St c1920.Black and White photograph - printed on plain paper.On the rear has pencil number "KM-M-058".cable trams, tramways, collins st -
 Melbourne Tram Museum
Functional object - Tramcar component, C. Brose Wuppertal Germany, Set of destination indicator equipment that was fitted to Z3 and A class trams, c1985
Set of destination indicator equipment that was fitted to Z3 and A class trams. Each item consists of various electronic parts contained within a metal case that could have been cabled together. Equipment manufactured by (Carl) C. Brose of Wuppertal Germany and maintained by Font Electronics of Melbourne - some items have the manufacturers details on them along with the details of the maintenance company and serial numbers etc. Photo .1 - shows the set of equipment as placed on display in the training room. .1 - set of two route number boxes, three individual controlled blinds, driven by a motor and control gear. Has a Fluro light fitted internally. See images .2 to .5 .2 - Small side destination indicator, with driven blind, electronic equipment with motor on the underside of the box - for use in Z class trams - see images .6 to .9 .3 - as for .2, but with motor mounted right side, used in A class trams, see images .10 to .12 .4 - set of two control panels with selection equipment for selecting the destination (by number) and route number with indicators and start button - see image .13 to 14 .5 - set of two long main rolls indicators, with control gear and Fluro light internally, driven by an internal electric motor - see images 17 and 18 .6 - set of two linking mechanism for the various boxes with large cables cut off for each of the four tram boxes. Would have been control panel item .4 - see image 15 and 16. See e-mail from Simon dated 17/11/2014. See reg Item 4617 for a small side destination roll.trams, tramways, destination indicators, a class, z3 class, transport equipment -
 Melbourne Tram Museum
Photograph - Black & White Photograph/s, 1950's? to 1960's
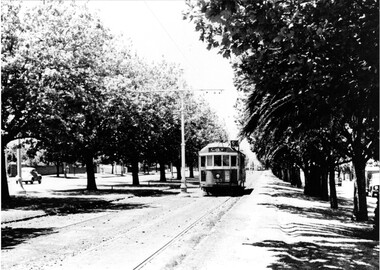
Black and white photograph of W2 363 inbound, Dandenong Road showing "City", route 5, possibly at the Hawthorn Road end - between Hawthorn and Kooyong Road, Malvern. Shows the many trees, centre poles and a few motor cars on the adjacent roadway. Printed on Fujichrome paper. Not known who took the photograph or when it was printed.Stamped in black ink on back "TMSV Sales"trams, tramways, dandenong rd, tram 363 -
 Melbourne Tram Museum
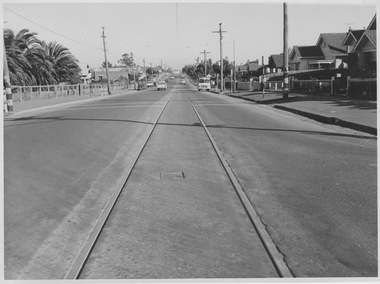
Photograph - Single track Nicholson St, East Coburg, Prior to 1967
Photograph shows single track section of tramway in Nicholson St, East Coburg looking south from Harding St. The rails are slightly sunken into bitumen covered roadway. Primary school grounds are at left, children's crossing in foreground with accompanying red and white bands painted on span poles and several motor vehicles are in the background. The models of motor vehicles and the future duplication of this track in late 1966 suggest the photograph's date of mid-1960s. This single track was the scene of many head-on collisions between south bound trams and northbound motor vehicles, especially at night.Yields information about remaining single track sections that were slow to be duplicated due to lack of funding. Black and white photograph with blue stamp and biro number on rearM&MTB Ref No. R25/1/183m&mtb, nicholson st, single track, east coburg, sunken rails -
 Melbourne Tram Museum
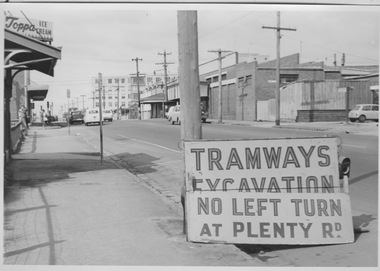
Photograph - Tramway excavation signage at Bell St and Plenty Rd, Preston, c1960s
Photograph shows Bell St, Preston looking eastward toward Plenty Rd with the newly constructed (1958-60) Preston and Northcote Community Hospital in the background. Signage in the foreground reads 'Tramway Excavation - No left turn at Plenty Rd' which may indicate works outside the East Preston tram depot (opened 1955) located in Plenty Rd less than 100 metres north of Bell St. In the mid-ground, several passengers wearing coats wait for a Bell St bus and numerous motor cars are shown on this narrow stretch of Bell St that would not be widened until the 1970s. While no note is attached, the model of motor cars suggest a date in the 1960s.Yields information about Bell St preston in 1960s Black and white photograph stuck to thick boardm&mtb, bell st, preston, plenty rd, tramway signage, preston and northcote community hospital, bell st widening -
 Melbourne Tram Museum
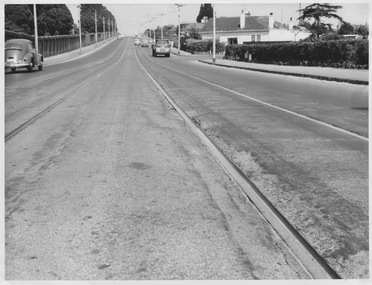
Photograph - Double track High St, Kew, 1960s or 1970s
Photograph shows double track section of tramway in High St, Kew looking southwest towards Childers St. The rails appear slightly sunken into the bitumen covered roadway, the Kew cemetery wall is prominent along the left of the roadway and numerous motor vehicles feature in the mid and background dating the photograph as 1960s or 1970s.Yields information about section of track before relaying in mas concrete. Black and white photographm&mtb, high st, kew, doulbe track, sunken track, childers st -
 Melbourne Tram Museum
Photograph - VR tram 34 departing St Kilda Station
Photograph taken from a second floor building shows bogie car VR tram 34 crossing Fitzroy St and M&MTB tracks after departing St Kilda Railway Station. All saloon windows are open, all sunshades raised and passengers aboard. A summers day with two male pedestrians and two motor vehicles in foreground. Yields information of Railways tramcar 34 and St Kilda Railway Station Black and white photograph with note on rear.Indistinct blue stamp and 'Summer 1959'victorian railways, vr tram 34, st kilda railway station, fitzroy st, m&mtb -
 Melbourne Tram Museum
Photograph - Safety Zone Flinders and Swanston, The Herald, Jan. 1954
Black and white photograph showing a crowded Safety Zone at the Swanston St stop for Flinders St. Has at least five trams in the view and shows how passengers could read route numbers as to their tram - can see routes 64, 8, 7 and 6 with possibly a 5 at the end of the line . Note the loudspeakers used by Inspectors to advise passengers of the trams and to stand clear when the trams were ready to depart. There is a wide variety of motor cars in the view. Photo by the Herald Sun 1/1954. A cropped version of this photo was used on page 4 of the January 1957 issue of Electric Traction - Courtesy of the City Development Association. Yields information about Melbourne tram route numbers and how they could be seen by passengers at safety zones.Photograph with hand written notes on rear and stamps on the rear.In ink "No. 5 - Cr Flinders and Swanston Streets, Jan 1954" and The Herald Sun copyright stamp.trams, tramways, swanston st, safety zone, route number boxes -
 Melbourne Tram Museum
Photograph - Cable trams - Princes Bridge, c1923
The photograph shows Princes Bridge, St Kilda Road, looking south, with a horse drawn cart, a cable tram set, two motor vehicles and pedestrians. Same hand writing on the rear as item 8279.Yields information about Bridge c1923. Black and white photo with hand written notes on the rear. Printed on Kodak paper."Flinders St bge Melbourne 1923"tramcars, tramways, cable trams, princes bridge, st kilda road -
 Bacchus Marsh & District Historical Society
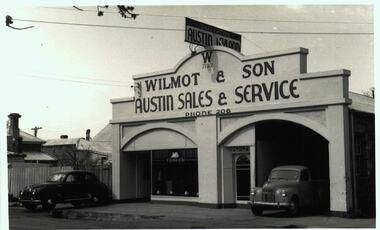
Photograph, Wilmot and Son Austin Sales and Service Main Street Bacchus Marsh
This building, located at 97 Main Street Bacchus Marsh, was built by Mr George Muir in 1920 using bluestone walls from Landsberg House, a former boarding school at Mt. Blackwood. In 1946 Mr W. J. Wilmot opened a car sales business which was sold in 1954 to trade as Stamford Motors. Subsequently, various businesses operated on this site, and is still in use, presently as an accountancy business.Black and white photographic print. Photograph dates from the 1940s and shows a bluestone building with lintels of local sandstone supporting a pediment with a sign advertising Austin cars fixed on top. Signage on the pediment reads: W 1930 WILMOT & SON AUSTIN SALES & SERVICE PHONE 206. The frontage is divided in two, both sections topped by an arch. The left-hand section is glass-fronted, the right section open for vehicle access. The door between the two sections is also arched. Two vehicles are parked at the front, a sedan and a ute, presumably both Austins. The bluestone building materials are visible at the side.shops bacchus marsh vic., main street bacchus marsh vic., garages, landsberg house, w j wilmot