Showing 254 items matching "railway trucks"
-
 Flagstaff Hill Maritime Museum and Village
Photograph - Vessel, Steam Ship, S.S. Rowitta, Early 20th century
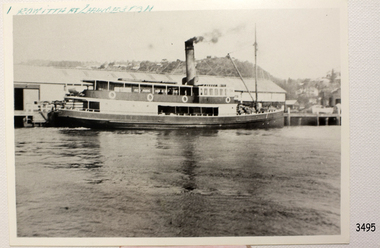
The subject of this photograph is the S.S.Rowilla, a passenger steam ferry built in Hobart for use in Tasmania's rivers, the Derwent and the Tamar. The photograph shows her docked at the Charles Street Wharf in Launceston. The S.S. Rowitta was built by Purdon & Featherstone, at Battery Point, Hobart (Tasmania) in 1909 from Huon Pine and Kauri planking. Her final configuration included three masts and a ship rig. S.S. Rowitta took its first voyage from Hobart to Launceston in 1909 and operated for 30 years as a passenger ferry on the Tamar and Derwent Rivers. She also served as a freighter, an army supply ship, a luxury charter ferry and a floating restaurant as well as a prawn boat at Lakes Entrance. (She has also been named “Sorrento” and “Tarkarri”.). In the very early days of Flagstaff Hill ‘Rowitta’ was purchased from Lakes Entrance by Warrnambool City Council and the Victorian State Government for $20,000. The Rowitta had a hull configuration very similar to a local boat named the SPECULANT, which played a key role in the Port of Warrnambool in the early 1900s. The Speculant was the largest ship ever registered with Warrnambool as her home port. Local owner and trader P J McGennan & Co, (Peter McGennan) used her as a freight carrier to Melbourne and timber trader between New Zealand and Victoria. She sunk at Cape Otway in 1911 on a voyage to Melbourne. In 1974 Rowitta was delivered to Port Fairy and then later sailed to Warrnambool’s Breakwater where she was lifted out of Lady Bay and loaded onto the back of a long transport truck and slowly and carefully driven along Pertobe Road, through the Surfside Caravan Park and over the railway line, into Flagstaff Hill’s Maritime Village. Transfer arrangements were coordinated by Jack Morse, of Morse Engineering, a member of the Flagstaff Hill Planning Board, and Ken Goyen, a local crane operator. The ‘Rowitta’ was originally acquired to be rebuilt to match the original SPECULANT. When finances became tight in 1976 a review of all plans ended in the decision to restore the “Rowitta” to her original configuration. She was then restored, renamed the original name of “Rowitta” and installed in the Village’s Harbour Lake to become one of the popular vessels on display for visitors to enjoy. It was the decision of the Advisory Committee to Flagstaff Hill to have Rowitta demolished in April 2015 due to extensive deterioration. Items associated with the Rowitta continue to be held in Flagstaff Hill Maritime Village’s Collection.The photograph of the passenger ferry S.S. Rowitta.is significant for its association with Tasmanian history from the early to mid-1900s. It is also connected to the history of the Rowitta, which was a large exhibit on display at Flagstaff Hill Maritime Village from the museum’s early beginnings until the vessel’s end of life 40 years later. The Rowitta represents the importance of coastal traders to transport, trade and communication along the coast of Victoria, between states, and in Australia before rail and motor vehicles. The vessel was an example of a ferry built in the early 20th century that served many different roles over its lifetime of over 100 years. Black and white photograph of the steamship S.S. Rowitta at Charles Street Wharf, Launceston. It shows the vessel docked at the Charles Street Wharf in Launceston. Smoke is coming from its funnel and there are people on board. There is a handwritten inscription on the top edge of the photograph. The vessel was built in 1909 by Purdon & Featherstone, Hobart. Blue-green handwriting on top left margin "ROWITTA AT LAUNCESTON"flagstaff hill, warrnambool, shipwrecked-coast, flagstaff-hill, flagstaff-hill-maritime-museum, maritime-museum, shipwreck-coast, flagstaff-hill-maritime-village, photograph, s.s. rowitta, charles street wharf,, launceston., purdon & featherstone, rowitta, tarkarri, speculant, purdon & featherstone of hobart, passenger ferry 1909, sorrento -
 Stawell Historical Society Inc
Photograph, Train Derailment near Glenorchy February 1971-- 6 Photos, 1971
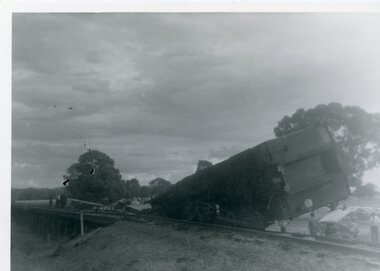
Series of six photographs of Train derailment near Glenorchy February 1971. These Photographs are copies o=from negatives held by the society - Made possible by grant 1991. These photographs taken of a train accident. The Afternoon Passenger Train - at the level crossing on the Warracknabeal - Stawell Road. There are 2 crossings on the road - This crossing is near the Wimmera River Rail Bridge. The cause of the accident - was a collision between a loaded Gravel truck and the passenger train. The Driver of the Truck was killed. 1231-2 B/w Photo of Train Smash near Glenorchy. This photo was donated from the estate of Mr Boothey in 2010, and is almost identical to one in 1231. This Photo is in album 4. B/W Photos of a Train Smash - 1231 The deisel Engine completely derailed off the rail line. 1231-1 showing the derailed rolling stock from another angle. Many onlookers. 1231-2 The Boogie is completely off the carriage 3 Photogrpahsstawell railways transport, glenochy -
 Ringwood and District Historical Society
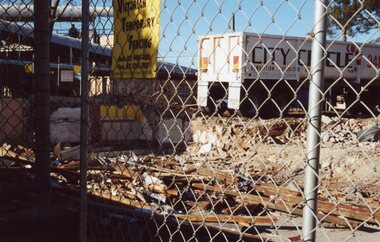
Photograph, Ringwood Railway Precinct circa 2009, demolishing buildings with dump truck
-
 Puffing Billy Railway
Number 14 - Shay Locomotive (Builder’s Number 2549), 22 June 1912
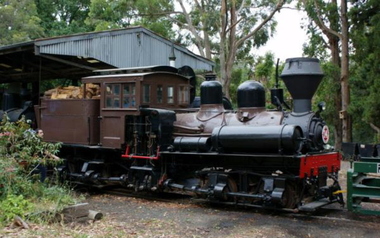
geared steam locomotive Built by the Lima Locomotive Works, USA in 1912 (Builder’s Number 2549). “Class a” 13 Ton (13.3 tonne) . This locomotive hauled freight on the Ali-Shan Forest Railway in Taiwan and is capable of pulling 90 Tons (91.8 tone) loads over steep gradients at low speeds. . This A-type Shay locomotive was built by Lima Locomotive Works, Ohio (builder's number 2549 of 1912) for the Alishan Forest Railway, Taiwan. The Alishan Forest Railway featured a large fleet of Shay locomotives and many still survive, together with a portion of the railway which is now a tourist operation. Alishan Shay No.14 was gifted to the Puffing Billy railway in 1971 by the Alishan Forest Railway - Taiwan Government forest Bureau and arrived on the 12th October 1971 at the Puffing Billy Museum at Menzies Creek. Loco: Shay No.14 ( Shop Number 2549 ) Class: A 18-2 ( 2-cylinders / 2-trucks Class A ) Built for: Alishan Forest Railway Bulit by Lima Locomotive Corporation In service 22 June 1912 Samuels, Samuels & Co., Ltd. (D), Taipei, Formosa (Japan); For: Alishan Forest RY #14, Kirun (Keelung), Formosa, (Japan) (1945) Alishan Forest RY #14, Keelung (Chilung), Taiwan (12 Oct 1971) Puffing Billy RY #14, Belgrave, Victoria, Australia Gauge 30" Status Preserved - In Storage at Museum There is only one original LIMA mark left on any of the Alishan RY Shays and it has no number. All of their Shays have been re-built, changing much of the original Lima product. Most were renumbered for various reasons without regard to Lima Shop Numbers over the years. "Girder Type Frame" details from http://www.shaylocomotives.com/data/lima3354/sn-2549.htm Historic - Industrial Narrow Gauge Railway - Geared Steam Locomotive which worked on the Alishan Forest Railway, Taiwan.geared steam locomotive - Class: A 18-2 ( 2-cylinders / 2-trucks Class A ) - made of wood and iron and wrought iron, Glass14puffing billy, shay, geared locomotive, steam locomotive, industrial narrow gauge railway, 2'6", ali shan forest railway -
 Ballarat Tramway Museum
Newspaper, "Old trams "much better than present homes"", 1954
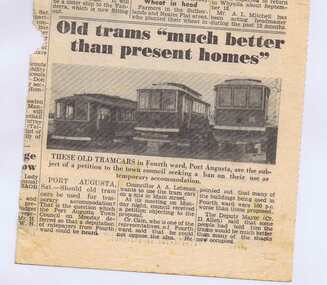
Newspaper clipping titled "Old trams "much better than present homes"" with photo of ex Adelaide single truckers cars (A class), on stands at Port Augusta for use as homes (Port Augusta Council to give approval) and on rear photo of new SA Railways Bluebird rail cars at Islington Workshops beginning trials. Item not dated. Item can be dated by knowledge of date Bluebird Railcars commenced trials. According to Railmac publication, "Railcars of S.A.R., to 1975, first Bluebird commenced service 10/54. images of both photos on file. Record updated and image added 21/9/2013.trams, tramways, adelaide, port augusta, bluebird railcars -
 Melbourne Tram Museum
Album - City Traffic Congestion, Various dates September 1954
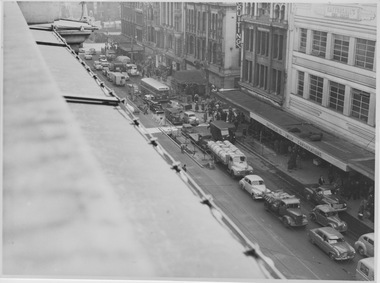
Six photographs showing traffic congestion that detains progress of trams in city streets. Road traffic congestion that detained tramcars in the city centre and on selected suburban roads had been a major concern to tramway operators dating back to the early 1900s. During the 1960s, and perhaps earlier, the Tramways Board regularly proposed ways of keeping motor traffic off the trams tracks, but little progress was achieved.Yields information about the perennial issue of motor traffic detaining trams. Incomplete series of photographs showing street traffic congestion in Flinders Street and Spencer Street5. Date 10/9/54, Time 1355 hrs, Flinders St, from Railway Buildings looking West over Degraves St. General traffic clear of tram tracks. 7. Date 17/9/54, Time 1355 hrs, Flinders St, from Railway Buildings looking West near Degraves St. 2 cars, 1 truck & 1 van parked & unattended. All moved within ten minutes. 8. Date 17/9/54, Time 1359 hrs, Flinders St, from Railway Buildings looking East towards Swanston St. Two utilities parked & unattended outside SEC. (Note policeman directing traffic.) See also Photo No 9. 9. Date 17/9/54, Time 1417 hrs, Flinders St, from Railway Buildings looking East towards Swanston St. Progressive view to No 8, two utilities in same position after 18 minutes. 12. Date 17/9/54, Time 1431 hrs, Flinders St, from Railway Building, Safety Zone at Swanston St. Progressive view to No 11 (missing from this album). Front truck about to leave after 10 minutes, rear truck remained parked. 11. Date 28/9/54, Time 0910 hrs, Spencer St, from roof of J S Gordon's near Flinders Lane, looking South. Three Northbound & 2 Southbound tramcars held up by truck caught in Southbound traffic when turning into lane. congestion, flinders st, spencer st, motor traffic -
 Melbourne Tram Museum
Photograph - VR single truck closed cross bench tram
Photograph shows a side view of a single truck closed cross-bench tram with trolley pole raised and depot workman in driver cabin. No tram number is visible. A coupling device appears to be a feature at one end. Behind the tram are trees and perhaps gardens. Contrary to the note attached to the rear of the photograph, this class of tram was manufactured in South Australia in 1913 by Pengelly and Company for the Victorian Railways.Yields information about VR closed cross bench trams Black and white photograph with typed description on rearTyped description reads: 'One society member has preserved this toast-rack or cross-bench tram in his backyard. It was built by the Victorian Railways in 1913 for their St Kilda-Brighton tramway and was purchased after the closure of the line in 1959.'victorian railways, closed cross bench, pengelley and company -
 Melbourne Tram Museum
Photograph - VR Single truck tram 3 second fleet
Photograph shows single truck VR tram 3 second fleet in Elwood Depot yard with trolley pole raised, weather blinds raised and destination Dickens St. The exterior of the tram appears to be in poor condition and it stands amid low grass with trees and a large building at the rear. Dickens St was an intermediate crossover about 2 km south of the St Kilda Station terminus and was used as a turnback for short run cars during peak hours.Yields information about VR tram 3 and Elwood Depot Black and white photograph with surface peeling at bottom of printvictorian railways, st kilda railway station, vr tram 3, second fleet, dickens st, elwood depot -
 Melbourne Tram Museum
Photograph - VR tram 2 first fleet with sister car
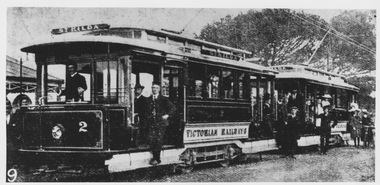
... of Railways tramcar 2 first fleet Victorian Railways single truck St ...Photograph shows single truck VR tram 2 first fleet with destination showing St Kilda, immediately in front of sister car with same destination (number obscured) and trolley poles on both cars are raised. Driver of VR 2 stands at controls with no driver windscreen and conductor stands on side running board. Numerous adults are shown aboard both trams and at sides and rear of cars with trees in the background. Yields information of Railways tramcar 2 first fleet Black and white photograph with number 9 showing in lower left corner of print from previous collection. Stamp and notes on rear Blue biro note ' MMTB Print (from TMSV collection?). victorian railways, single truck, st kilda, tram 2, first fleet -
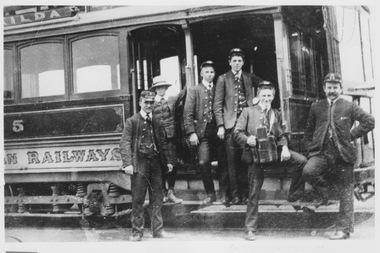 Melbourne Tram Museum
Photograph - VR tram 5 second fleet
... Victorian Railways single truck second fleet St Kilda VR tram 5 TMSV ...Photograph shows partial side view of VR single truck tram 5 second fleet showing destination St Kilda. Five uniformed crew and one young male stand at side step. Glass driver windscreen is visible.Below photo is embossed letter B from a previous display.Yields information of Railways tramcar 5 and crew Black and white photograph with stamp and notes on rear TMSV stamp, black biro writing 'Print from RH Prentice negative - August 1980 (Original from L Marshall Wood collection)'victorian railways, single truck, second fleet, st kilda, vr tram 5 -
 Melbourne Tram Museum
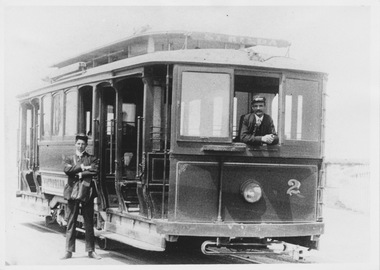
Photograph - VR tram 2 second fleet
... Photograph shows VR single truck tram 2 second fleet ...Photograph shows VR single truck tram 2 second fleet showing destination St Kilda. Driver leaning out of glass windscreen and conductor standing on roadway with arms folded.Yields information of Railways tramcar 2 and crew Black and white photograph with stamp and notes on rear TMSV stamp, black biro writing 'Print from RH Prentice negative - August 1980 (Original from L Marshall Wood collection)'victorian railways, single truck, vr tram 2, second fleet, st kilda -
 Ballarat Tramway Museum
Magazine - Extract from April 1984 issue of Newsrail, Doug Colquhoun, "Wal Jack's Ballarat", April 1984
Extract titled "Wal Jack's Ballarat" written by Doug Colquhoun about the letters he received from Wal over many years. Includes a photo of tram 25 loaded on a truck to be transferred to Bendigo, incorrectly credited to Doug. See item 1478 for the prints of the photograph.Yields information about Wal Jacks letters to his correspondents.Extract from the April 1984 issue of Newsrailwal jack, railways, transporting trams, tram 25, tramways -
 Ballarat Tramway Museum
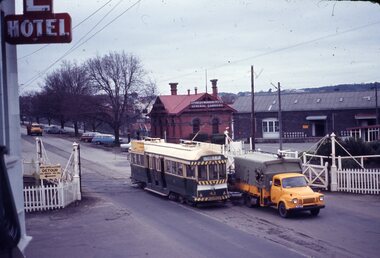
Slide - SECV Ballarat 43 and welding truck railway level crossing - set of 2, Ron Hood, 12/1970
... SECV Ballarat 43 and welding truck railway level crossing.... Slide SECV Ballarat 43 and welding truck railway level crossing ...Photograph by Ron Hood shows the SECV welding truck at the Ballarat Lydiard St level crossing with No. 43 passing on its way to Lydiard St North, December 1970. The welding truck was provided with a trolley pole to power the equipment in order to weld or repair rail joints. Photo taken from the Provincial Hotel. Has the level crossing, Kennedy Murray General Carriers and the Ballarat Goods shed in the view. In the far distance is a SECV truck. See items 2864 and 7700 for other photos of the welding truck.Yields information about the use of the welding truck in Ballarat to repair rail joints or the head of the rail.Set of two colour slides in hanimount cardboard mounts."Ballarat" in ink on one of the slides.tramways, trams, tram 43, level crossing, welding, trucks -
 Ballarat Tramway Museum
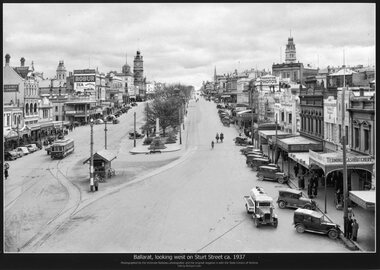
Photograph - Black & White copy photograph, Victorian Railways (VR), "Ballarat, looking west on Sturt St ca 1937"
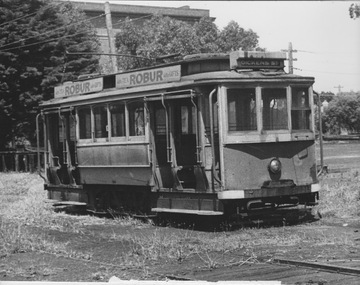
Original photograph by Victorian Railways, with the original image held by the State Library of Victoria. Edited by Richard Conn. Purchased by the Museum.Provides information about the appearance of Sturt St from Grenville St looking west. Tram No. 20 is travelling west. Note the many bikes parked on the shelter. Has in the view buildings of Ballaarat Gas Co, the Ballaarat Mechanics Institute with advertisements for Robur Tea and Davies Bread, Thornton for photos, Terminus Cash Butchery and a Vacuum Oil Co vehicle.Black & White copy photograph view A4 size, titled "Ballarat, looking west on Sturt St ca 1937". Original image by the Victorian Railways, c1937-1940. Looking from the top of a building in Grenville St. towards the West. Has a number of parked vehicles in kerbs, two people riding horses, a Vacuum Oil Co. truck in the bottom right hand corner and SEC tram 20 traveling west, just past the City Loop points. See also Reg Items 675, 4284 for other prints, 2981 for a colour postcard. For a similar view see Reg Item 8332. ballarat, vr photos, sturt st, robur tea, thornton, ballarat gas co, vacuum oil co, tram 20, shelters, tramways