Showing 3395 items
matching two handed
-
 Ballarat Tramway Museum
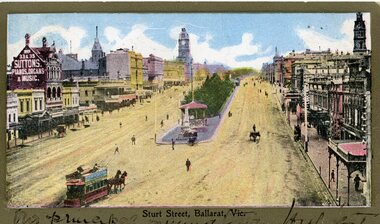
Postcard, Sturt St. from top of the Nicholl and Allan Building, c1904
... edge. 2437.1 - On the bottom of the postcard is a two line... of the postcard is a two line hand written message. On rear of postcard ...2437 - Printed colour postcard of the east end of Sturt St. from top of the Nicholl and Allan Building in Grenville St looking west. Has a horse tram leaving the Grenville St. terminus travelling up to Lydiard St. on the north side of Sturt St. Has the buildings on either side of Sturt St. in the view, including Suttons Music store. Titled "Sturt St Ballarat Vic" along the bottom edge. 2437.1 - On the bottom of the postcard is a two line hand written message. On rear of postcard is the address to a Miss C. Haurley of 4 Mortuary Road, South Shields England and two Victorian stamps - half penny (green) and one penny (red) stamps. Has been postmarked "North Melbourne Vic. Feb? 23 05" and over stamped "289" over the penny stamp. See images .1 and .2 2437.2 - On the bottom of the postcard is a single line hand written message. On the rear of postcard is the address to a Mr Frank Tucker, Glencairn, Park Avenue, Harrogate, England. Has two Victorian stamps, half penny (green) and one penny (red) stamps. Has been postmarked twice with the same stamp, "Ballarat East 16.01.04" or 16.11.04?? See images .3 and .4 See Reg Item 5103 for a black and photograph close up of the horse tram in the photo. trams, tramways, horse trams, sturt st, postcards, grenville st -
 Flagstaff Hill Maritime Museum and Village
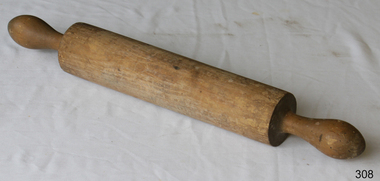
Domestic object - Wooden Rolling Pin, First half of 20th Century
... for tossing soft dough between the cook's two hands until it enlarges.... Hands are used as "rolling pins" for flattening dough against ...A rolling pin is a simple tool used to flatten dough. The first civilisation known to have used the rolling pin was the Etruscans. Their advanced farming ability, along with a tendency to cultivate many plants and animals never before used as food and turn them into sophisticated recipes, were passed to invading Greeks, Romans, and Western Europeans. Thanks to the Etruscans, these cultures are associated with gourmet cooking. To prepare their inventive foods, the Etruscans also developed a wide range of cooking tools, including the rolling pin. Although written recipes did not exist until the fourth century B.C., the Etruscans documented their love of food and its preparation in murals, on vases, and on the walls of their tombs. Cooking wares are displayed with pride; rolling pins appear to have been used first to thin-roll pasta that was shaped with cutting wheels. They also used rolling pins to make bread (which they called puls) from the large number of grains they grew. Natives of the Americas used more primitive bread-making tools that are favoured and unchanged in many villages. Chefs who try to use genuine methods to preserve recipes are also interested in both materials and tools. Hands are used as "rolling pins" for flattening dough against a surface, but also for tossing soft dough between the cook's two hands until it enlarges and thins by handling and gravity. Tortillas are probably the most familiar bread made this way. Over the centuries, rolling pins have been made of many different materials, including long cylinders of baked clay, smooth branches with the bark removed, and glass bottles. As the development of breads and pastries spread from Southern to Western and Northern Europe, wood from local forests was cut and finished for use as rolling pins. The French perfected the solid hardwood pin with tapered ends to roll pastry that is thick in the middle; its weight makes rolling easier. The French also use marble rolling pins for buttery dough worked on a marble slab. Glass is still popular; in Italy, full wine bottles that have been chilled make ideal rolling pins because they are heavy and cool the dough. Countries known for their ceramics make porcelain rolling pins with beautiful decorations painted on the rolling surface; their hollow centres can be filled with cold water (the same principle as the wine bottle), and cork or plastic stoppers cap the ends. Designs for most rolling pins follow long-established practices, although some unusual styles and materials are made and used. Within the family of wooden rolling pins, long and short versions are made as well as those that are solid cylinders (one-piece rolling pins) instead of the familiar style with handles. Very short pins called mini rolling pins make use of short lengths of wood and are useful for one-handed rolling and popular with children and collectors. Mini pins ranging from 5 to 7 in (12.7-17.8 cm) in length are called texturing tools and are produced to create steam holes and decorations in pastry and pie crusts; crafters also use them to imprint clay for art projects. These mini pins are made of hardwoods (usually maple) or plastic. Wood handles are supplied for both wood and plastic tools, however. Blown glass rolling pins are made with straight walls and are solid or hollow. Ceramic rolling pins are also produced in hollow form, and glass and ceramic models can be filled with water and plugged with stoppers. Tapered glass rolling pins with stoppers were made for many centuries when salt imports and exports were prohibited or heavily taxed. The rolling pin containers disguised the true contents. The straight-sided cylinder is a more recent development, although tapered glass pins are still common craft projects made by cutting two wine bottles in half and sealing the two ends together so that the necks serve as handles at each end.Tiny rolling pins are also twisted into shape using formed wire. The pins will not flatten and smooth pastry, and the handles do not turn. The metal pins are popular as kitchen decorations and also to hang pots, pans, and potholders. https://www.encyclopedia.com/sports-and-everyday-life/food-and-drink/food-and-cooking/rolling-pinThe use of the rolling pin to make thin pastry or pasta.Wooden rolling pin with some damage on cylinder section.None.flagstaff hill, warrnambool, shipwrecked-coast, flagstaff-hill, flagstaff-hill-maritime-museum, maritime-museum, shipwreck-coast, flagstaff-hill-maritime-village, rolling pin, cooking, pastry -
 Tatura Irrigation & Wartime Camps Museum
Domestic object - Sewing Box
... on the top two boxes. The left hand lid has a kookaburra sitting... with a lid on the top two boxes. The left hand lid has a kookaburra ...The sewing box was owned by Ian Baumert's mother, Magdalene (Magda) Baumert nee Beilharz who was an internee in Camp 3 compound B in Tatura WW2.Handmade, 2 x 3 tiered sewing box, made from scrap wood found in the camp. Each tier is held together by 3 pieces of wood that when you pull the handles apart it opens to get inside. One long box and 2 x 2 smaller boxes with a lid on the top two boxes. The left hand lid has a kookaburra sitting on a tree branch with a green circle behind. The letter "M" is below and to the right of the kookaburra. The right hand side has a green circle with a Koala and her baby on her back. The letter "B" is below and to the left of the koala. Each lid is held on with two hinges."M" "B" Magdalene (Magda) Baumert (nee Beilharz)ian baumert, magdalene baumert, magdalene beilharz, magda baumert, magda beilharz, camp 3 internee, sewing box, internee craft -
 Melbourne Tram Museum
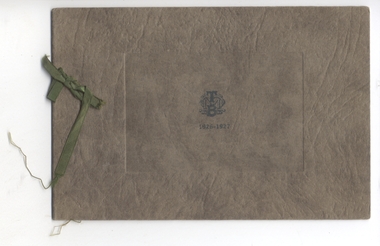
Ephemera - Christmas Card, Melbourne & Metropolitan Tramways Board (MMTB), 1926
... it would have taken some two hours to hand set the message... it would have taken some two hours to hand set the message ...M&MTB Season Greetings Card 1926 – 1927. The card consists of a heavily embossed brown cover with the MMTB logo on the front cover, with a printed sheet internally and tied together with a green ribbon. The photographs have been overlaid with a gold borders and the message has been printed in gold ink. An experienced printer estimated it would have taken some two hours to hand set the message, the press operator another two hours to get the registration correct before printing it and after printing allowed up to four days for the gold ink to dry before handling the paper again. This is certainly a work of art in terms of printing. Whether it was done by the M&MTB’s internal printing office is unknown. Of the view it would have only been sent to “select” people. On the front of the insert sheet is a photo of Dandenong Road, page 2 a message from The Board, page 3 a photo of Wattle Park, page 4 blank.trams, tramways, christmas cards, mmtb, dandenong rd, wattle park -
 Eltham District Historical Society Inc
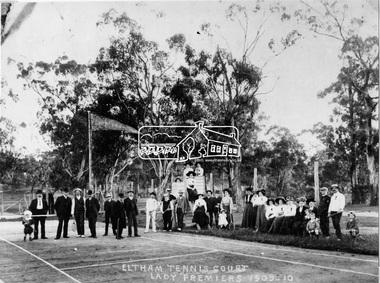
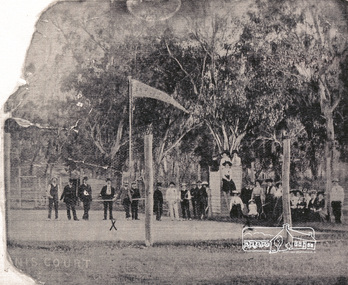
Negative - Photograph, Eltham Tennis Court. Lady Premiers 1909-1910, 1910
... in November all the requisites were to hand, two courts were marked... in November all the requisites were to hand, two courts were marked ...A large group of men and women pose for a photograph on Eltham tennis court. Although the photo is marked ”Lady Premiers”, this is not a typical formal sports group pose, with only two women identified as holding racquets. 33 individuals, including men and children and one dog pose for the camera, the majority of whom are not dressed to play tennis. The court shows clear markings for tennis and a flag is flying in the background. The photograph is taken from inside the wire enclosure. There are mature gum trees in the background. The tennis court was situated in Eltham South at Bremner’s Flats (near present day Wingrove Park). Cross Ref SEPP_0720 which is at an earlier level of development. The Eltham Lawn Tennis Club was formed on a Saturday evening, the 29th of October, 1898 at a meeting held at the Eltham State school. The meeting was large and representative. Twenty members were enrolled, and eight more have since been added. Officers and a committee were duly elected, and the Treasurer was instructed to purchase the necessary requisites without delay. By the end of the first week in November all the requisites were to hand, two courts were marked out, and practice begun. The formal opening of the Courts of this Club took place on Saturday, November 12, 1898, when 26 members and their friends assembled. After several sets had been contested an adjournment was made for tea provided by the members and nicely laid out under the shade of the trees. Afterwards, sets were again formed and the game was proceeded with in a lively spirit till nearly dark, when all dispersed having thoroughly enjoyed themselves during the afternoon. (Evelyn Observer, and South and East Bourke Record (Vic. : 1882 - 1902), Friday 18 November 1898, page 2)This photo forms part of a collection of photographs gathered by the Shire of Eltham for their centenary project book,"Pioneers and Painters: 100 years of the Shire of Eltham" by Alan Marshall (1971). The collection of over 500 images is held in partnership between Eltham District Historical Society and Yarra Plenty Regional Library (Eltham Library) and is now formally known as 'The Shire of Eltham Pioneers Photograph Collection.' It is significant in being the first community sourced collection representing the places and people of the Shire's first one hundred years.Digital image 4 x 5 inch B&W Negshire of eltham pioneers photograph collection, 1910, bremner's flat, eltham, eltham lawn tennis club, eltham tennis court, tennis court, wingrove park, laura williams, williams -
 Bendigo Historical Society Inc.
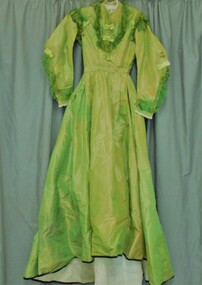
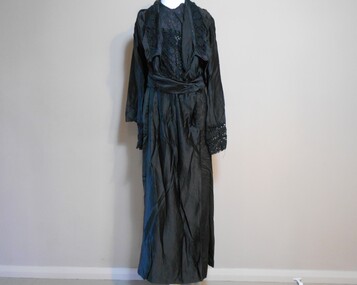
Clothing - VICTORIAN FULL LENGTH DRESS, WITH TRAIN, 1860's - 1870's
... blades. Skirt has two pleats on RHS front and two on left hand... pleats on RHS front and two on left hand side of back and a 7cm ...Green and gold shot silk dress. Hemline is edged with a binding of black velvet - one cm wide. Bodice lined with cream linen, sleeves lined with cream cotton, skirt lined with cream linen(?) or cotton(?). Long sleeves are shaped in a ""semi-circular'' shape at the elbow, and taper in at the wrist. Sleeves are trimmed with green fringing, and a flat green satin bow. Wrist is trimmed a 2cm wide band of cream cotton lace. Top of sleeve at shoulder is also trimmed with green and fringing encircling the sleeve top.High round neck is faced with a 1cm band, and a row of the cotton lace. Two bands of fringing give a rectangular "style'' effect on the front bodice, which is fastened at centre front with ten metal hooks, and nine hand stitched ''holes'' to fasten, and one hand stitched loop at the neckline. Fringing continues over the shoulder, into a 5-sided shape across the shoulder blades. Skirt has two pleats on RHS front and two on left hand side of back and a 7cm centre panel of tight pleating. Skirt extends into a train at back. An inside pocket is accessed from under a pleat in the RHS skirt.costume, female, victorian full length dress with train -
 Eltham District Historical Society Inc
Photograph, Eltham Tennis Court, 1910
... of the first week in November all the requisites were to hand, two... of the first week in November all the requisites were to hand, two ...Photocopy of damaged photograph of a large group of men and women posing for a photograph on the first Eltham tennis court. Group includes people identified with an 'X' as Maisie with Laura Williams and Pop. The photo is the same group of people taken at the same time as SEPP_0721 (Lady Premiers 1909-1910). This is not a typical formal sports group pose, with only two women identified as holding racquets. 33 individuals, including men and children and one dog pose for the camera, the majority of whom are not dressed to play tennis. The court shows clear markings for tennis and a flag is flying in the background. The photograph is taken from inside the wire enclosure. There are mature gum trees in the background. The tennis court was situated in Eltham South at Bremner’s Flats (near present day Wingrove Park). The information included with the photocopy suggested this was the opening of the first Eltham Tennis Court however this is inaccurate. The Eltham Lawn Tennis Club was formed on a Saturday evening, the 29th of October, 1898 at a meeting held at the Eltham State school. The meeting was large and representative. Twenty members were enrolled, and eight more have since been added. Officers and a committee were duly elected, and the Treasurer was instructed to purchase the necessary requisites without delay. By the end of the first week in November all the requisites were to hand, two courts were marked out, and practice begun. The formal opening of the Courts of this Club took place on Saturday, November 12, 1898, when 26 members and their friends assembled. After several sets had been contested an adjournment was made for tea provided by the members and nicely laid out under the shade of the trees. Afterwards, sets were again formed and the game was proceeded with in a lively spirit till nearly dark, when all dispersed having thoroughly enjoyed themselves during the afternoon. (Evelyn Observer, and South and East Bourke Record (Vic. : 1882 - 1902), Friday 18 November 1898, page 2)Photocopy of damaged photographwilliams, 1910, bremner's flat, eltham, eltham lawn tennis club, eltham tennis court, shire of eltham pioneers photograph collection, tennis court, wingrove park, laura williams -
 Southern Sherbrooke Historical Society Inc.
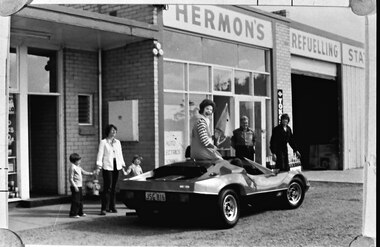
Photograph - Ronald McDonald at Hermon's business in Dandenong
... stands, holding the hands of two children, aged about seven... the hands of two children, aged about seven. A person dressed ...B&W photo of Ronald McDonald at Hermon's business in Dandenong on the occasion of the opening of McDonalds in Dandenong. Photo shows a group of people outside Hermon's Refuelling Station (a brick building with a shop and a workshop). A woman stands, holding the hands of two children, aged about seven. A person dressed as Ronald McDonald sits on the back of a sports car. Bill Hermon and a mechanic stand further along. There is a driver in the car. According to Lyn McGillivray, daughter of Bill and Jean, "It was hilarious! Mum & Dad were asked if Ronald McDonald could get changed in our premises. They were in awe that this 'big-wig' would want/need to dress there for the short journey up the street to the new restaurant. I think it was us kids (young adults then) who set them straight!" The car is most likely a Purvis Eureka, a kit car based on a VW Beetle chassis. They were manufactured in Dandenong from 1974 - 1991. Information supplied by Jarrod Drager via Facebook. -
 Brighton Historical Society
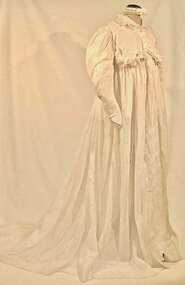
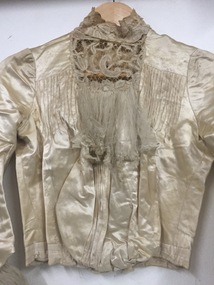
Clothing - Nightgown, Mid 19th Century
... A hand sewn ivory cotton muslin nightgown, c. 1842–1850... and palm of the hand in two flattened peaks. The front of the gown ...This nightgown is believed to have belonged to Mrs Thomas Anne Ward Cole, an early Brighton resident and wife of George Ward Cole. The item appears to have been made or altered to accommodate a pregnant belly, however purpose made maternity clothing was not common at this time. Mrs Ward-Cole’s six pregnancies took place in 1843, 1844, 1845, 1847, 1849 and 1851. The style of this garment in particular the shape of the sleeves would indicate that it is most likely to have been constructed in circa 1860, so whilst it appears to be a maternity item, and historically has been referred to as thus, this purpose cannot be confirmed. George Ward Cole was an early member of the Victorian Parliament and the family featured prominently in Melbourne Society in their time. They established a substantial home known as “St Ninians” at 10 Miller Street in 1841. The family reportedly entertained Melbourne’s first Royal visitor The Duke Of Edinburgh, Queen Victoria’s second son, at St Ninians in 1867. In later years St Ninians was subsequently subdivided and later demolishedA hand sewn ivory cotton muslin nightgown, c. 1842–1850. The bodice is made of delicately embroidered muslin in a floral design. The open flat collar features a scalloped lace frill underneath. The bodice fastens with thirteen mother of pearl buttons down the centre front. After the fourth button, the remaining buttons are concealed beneath a full gathered modesty skirt, which falls from just below the bust line. The modesty panel is secured horizontally across the bodice by six mother of pearl buttons. The sleeves finish over the back and palm of the hand in two flattened peaks. The front of the gown consisting of the modesty front is full length. The modesty gown at both sides joins two panels that are an integrated part of the bodice. At the centre back there is a very full gathered panel with lace trim that falls to create a train. It is semi-attached to the bodice with a top section secured with mother of pearl buttons and small ties. The purpose of this design feature is unknown. st ninians, george ward cole, brighton, night gown, thomas anne ward cole -
 Melbourne Tram Museum
Document - Folder with papers, Yarra Trams, "Tram 109 Project", Apr. 2003
... stapled in top left hand corner - two copies held. .5 - folded A3.../2003 - two pages stapled in top left hand corner - two copies ...Set of six documents contained within a card board folder marked "Tram 109 Project" issued at the time of the opening of the tramway. .1 - folded cardboard folder, with 109, State Government, Yarra Trams and VicRoads logos. .2 - pamphlet - fold out - 5 x 2 sections with map of the extension, location of tram stop either kerb or Superstops, notes on the extension and method of track construction - two copies held. .3 - foldout - 4 section - pocket map of stops and service frequencies. .4 - media release for the opening of the line - dated 2/5/2003 - two pages stapled in top left hand corner - two copies held. .5 - folded A3 sheet - printed single side - colour competition for the opening of the tramway, closing 28/4/15 and welcoming people to the opening celebrations. .6 - Colour book - 12 pages + card covers titled "The adventures of Tram 109" with the Alstom and Yarra Tram logos, cartoons or illustrations by Warwick Hook.trams, tramways, yarra trams, route 109, box hill, mont albert, superstops, tram stops, opening, colouring book -
 Bendigo Historical Society Inc.
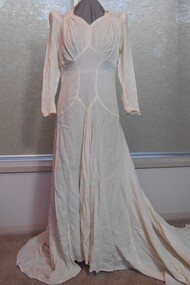
Clothing - CREAM WEDDING DRESS WITH EXTENDED TRAIN, 1930's
... panel - with V shape at lower edge-panel 33cm long. Two semi... to give weight and finish at the hemline. Two X 2.5cm loops, hand ...Long lily-pointed sleeves, fastened at the wrist with six X 0ne cm covered buttons and loops. A firm padded roll 19cm long, and eleven cm circumference sits at the shoulder at top of sleeve. A gathered panel on either side of the neckline forms a sweetheart neckline. Gathering under the bust, and a A shaped centre front panel - with V shape at lower edge-panel 33cm long. Two semi-circular panels 28 X 19cm from side seam to the centre front, and defining the shape of the peaked centre panel. A small inverted pleat comes from th ebottom peak of the centre panel. Skirt is circular and extends into a sweeping train.29 covered buttons with loops extend from the back neckline to the curved join at the hipline of bodice and skirt. A one cm band of fabric has been machine stitched around the hemline, and hand rolled and hand stitched to give weight and finish at the hemline. Two X 2.5cm loops, hand stitched are at the left and right sides, to slip over the fingers to hold the train above the ground.costume, female, cream wedding dress with extended train -
 Eltham District Historical Society Inc
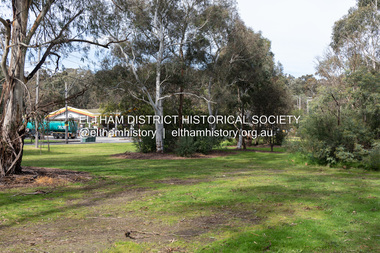
Photograph, Peter Pidgeon, Site of former Eltham Tennis Court, Wingrove Park, 2 Aug. 2022
... of the first week in November all the requisites were to hand, two... of the first week in November all the requisites were to hand, two ...View looking through Wingrove Park from near the Diamond Creek Trail towards the Coles Express Service Station and Mount Pleasant Road intersection. Comparison photo: SEPP_0720 Eltham Tennis Court, c.1909 and SEPP_0721 - Eltham Tennis Court, Lady Premiers 1909-1910 The tennis courts were located in Bremner’s Flats, present day Wingrove Park. The Eltham Lawn Tennis Club was formed on a Saturday evening, the 29th of October, 1898 at a meeting held at the Eltham State school. Twenty members were enrolled, and eight more shortly afterwards. Officers and a committee were duly elected, and the Treasurer was instructed to purchase the necessary requisites without delay. By the end of the first week in November all the requisites were to hand, two courts were marked out, and practice begun. The formal opening of the Courts of this Club took place on Saturday, November 12, 1898, when 26 members and their friends assembled. Part of a presentation by Peter Pidgeon to the Society, 13 August 2022 showcasing a series of photographs taken by John Henry Clark over the period 1895 to 1930. John Henry Clark was the youngest of three boys born to William Henry Clark (1823-1877) and Maria White (1843-1914). He and his brothers, William Charles Clark (1872-1945), Clement Kent Clark (1874-1912) operated a photography business (Clark Bros.) from 25 Thomas Street, Windsor near Prahran during the period c.1894 to 1914. Following death of Clement in September 1912 and their mother in 1914, the Clark Bros business appears to have dissolved, the premises demolished, and a new house was under construction in 1915. John set up business independently in 1914 operating out of 29 Moor Street, Fitzroy where he is registered in the 1914 and 1915 Electoral Rolls. By 1916 John had relocated to Eltham where he continued his practice as a photographer and took many of the early images around the district of Little Eltham. Around 1930 John changed professions and opened a small cobbler's shop in 1931 near the pond opposite Dalton Street adjacent to the Jarrold family cottage. He never married and continued his profession as a bootmaker from this little shop, maintaining a close relationship with Mrs Jarrold for the rest of their lives. His bootmaker shop remains today beside the Whitecloud cottage and is one of only three remaining shops in the area from the early 20th century.Comparative photo taken 2022 with one taken from same location over 100 years earlier by noted local photographer J.H. ClarkBorn Digitalbible street, eltham, j.h. clark photo (2022), bremner's flat, eltham lawn tennis club, eltham tennis court, main road, mount pleasant road, tennis court, wingrove park -
 Flagstaff Hill Maritime Museum and Village
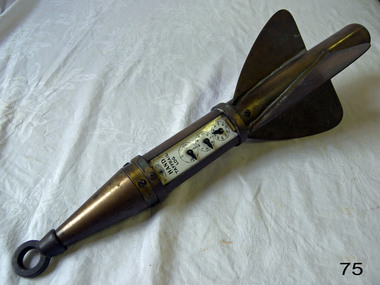
Instrument - Ship Log, 1880-1890
... . Additionally, John E Hand and his two sons, John L Hand and Bartram... and his two sons, John L Hand and Bartram Hand, were inventors ...The John E. Hand & Sons Company was founded in Philadelphia in 1873, quickly gaining a reputation as competent manufacturers of nautical instruments and compass adjusters. In fact, John Enos Hand, the company founder, is recognised as the first man in America to adjust a compass aboard an iron ship. The Hand Company built navigational equipment for all varieties of floating vessels, and operated a chain of retail outlets with “service stations” in numerous port cities, including Baltimore and New Orleans, until 1956. Service stations sold Hand instruments as well as other nautical paraphernalia and provided compass adjusting services. Additionally, John E Hand and his two sons, John L Hand and Bartram Hand, were inventors in their own right who patented design improvements for numerous instruments that were employed in the company’s work. Commercial and private contracts dominated the firm’s business until the late 1930s when the United States military began preparations for World War II. Although the Hand Company never completely abandoned its involvement with private industry, after World War II, military contracts monopolised their business. The Company obtained contracts with the Navy, Coast Guard and Marines to develop new instruments, and to build military-engineered nautical equipment. Of note are the wrist compass, developed for the Navy beginning in the 1950s, and the Mark VII Model 5 Navy Standard Binnacle. Although it moved numerous times, the Hand Company headquarters and factory remained in the Delaware Valley, occupying several buildings in Philadelphia and southern New Jersey. Maintaining its central office in Philadelphia well into the 1900s, the factory was moved to Atco, New Jersey around the turn of the twentieth century and subsequently to Haddon field, New Jersey. It moved one last time in the 1960s to Cherry Hill, New Jersey. In 1997, California-based Sunset Cliffs Merchandising Corporation purchased the Hand Company and all its assets for $100,000. "HAND" brand taffrail log by John F. Hand and Sons Co. Register is enclosed in log, has a glass front and 3 dials on an enameled surface, the first dial registers the miles up to 100, the second registers the units up to 10 mile, the third registers quarters of a mile. The item is rocket shaped with a three blade rotor and a rope ring attachment at one end; the rotor will spin when a rope is attached, allowing the apparatus dials to measure the ship's speed when it is dragged behind a ship. Diagram of the 'Hand' trademark with a compass card in the middle, inscription reads "John F Hand and Sons Co" and "PHILA-BALTO" ( Abbreviation for: Philadelphia / Baltimore) flagstaff hill, warrnambool, shipwrecked coast, flagstaff hill maritime museum, maritime museum, shipwreck coast, flagstaff hill maritime village, great ocean road, bartram hand, john enos hand, john f. hand and sons co, john l hand, john hand & sons instrument makers, john hand & sons of philadelphia, marine instrument, marine service station, mechanical ship log, nautical instrument, nautical navigation, navigational equipment, scientific instrument, ship log, ship log register, ship’s speed, sunset cliffs merchandising corporation, speed log, rocket log, harpoon log, taffrail log, taff rail log -
 Bendigo Historical Society Inc.
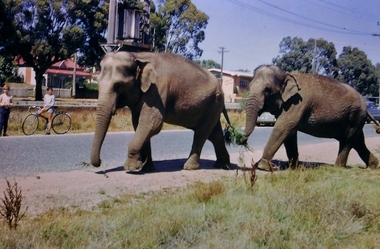
Slide - Images by Arthur Pulfer, 1957-1970
... this successful trip Tolmer led two other escorts before handing over his... this successful trip Tolmer led two other escorts before handing over his ...ROSEVIEW 407 High Street, Golden Square Bendigo "Roseview" was designed by Godfrey Eathorne and constructed in 1939. It is one of the few Streamline Moderne houses in the Central Goldfields region, and was one of the earliest constructed in the Bendigo region. It is an outstanding example of this style of housing. It resembles an ocean liner, and reflects the emphasis on the streamlining of methods of transportation. It utilizes both flat and curved surfaces and has little external ornamentation. The use of materials such as rounded glass windows and metal window and door frames reflects an innovative approach to construction consistent with the style. "Roseview" was constructed on a large scale, with large and spacious rooms. It reflects the prominent social status and wealth of the original owner, together with the desire for a building in 'the latest' style which was sure to attract attention and prominence in the region. It has been maintained largely in original condition. CARALULUP HOTEL 'The Sun' dated January 17, 1941 on the back. It states that 'The licence of Caralulup Hotel, near Talbot, has been surrendered, thus severing an 80 year association with the district' State Library of Victoria TOLMER GOLD ESCORT ROUTE The gold rush in New South Wales and Victoria left few able miners in South Australia. Bad economic conditions saw more than 15,000 men leave the Kapunda and Burra mines by the end of 1851. Alexander Tolmer, Commissioner of Police in 1852 proposed that the gold won by South Australians should be brought back to South Australia under an escort consisting of only a few men. In March a Gold Escort was on its way back to Adelaide with almost 6,000 ounces of gold for the vaults of the Treasury Building. After this successful trip Tolmer led two other escorts before handing over his duties. A total of eighteen gold escorts were made, the last one during November and December 1853 when Inspector Wyndham was in charge. You’ll find Gold Escort Route Monuments between Meningie, Coonalpyn and Tintinara.Many images from by Arthur Pulfer copied to slides. Twenty Slides of Bendigo: Bullen's Circus Bendigo February 1966 "Roseview", Pethard's Home at 407 High Street, Golden Square, Bendigo. 25th March 1957. House is possibly on the Midland Highway Epsom, Bendigo - 8 April 1955 Kangaroo Flat Bus Lines mini bus The Big Tree Sedgwick Road March 1972 The old Golden Gully Hotel Diamond Hill Road, Bendigo The old Lockup Eaglehawk Bendigo September 1967 Market Gardens - possibly North Bendigo North Deborah Mine photo taken from Breen Street 1958 Laying the track to get the engine into the park, looking down Mitchell Street Bendigo Engine R766 in the Victorian Railways Institute Park Railway Place Bendigo On the Methodist Church Steps Arnold street Bendigo Miner's Hut at Moliagul Basket Lunch - White Hills Botanical Gardens - St johns 100 year celebrations White Hills Swimming Pool February 1970 White Hills Botanical Gardens Bendigo Bendigo Show Parade 1958 The Arrival of the Cobb and Co Coach in Bendigo September 1963 history, bendigo, james lerk collection, golden square high school, dragon loong, white hill botanical gardens, 407 high street bendigo, r766 engine, bullens circus, caralulup, moligual, bendigo show, tolmer's gold route, kangaroo flat bus lines, eaglehawk lockup, arnold street methodist church, elephants -
 Bendigo Historical Society Inc.
Clothing - BLACK SILK-SATIN DRESS W/LACE,CUFFS,COLLAR,AND BODICE, BEADING, 1930's
... , is lightly gathered into a 13 cm deep lace cuff, fastening with two..., fastening with two metal hooks, and hand-stitched eyes. Sleeves ...Clothing. Black silk-satin fabric, mid-calf length dress, gathered from the waistline. A black, pleated cummerbund encircles the waist, fastening at the left side with three metal hooks, and hand stitched loops. Long set in sleeveshave a fine piping around the arm holes, and have a hand stitched neatening to finish. Shoulder seams are also piped. A long, narrow collar of lace, bound in 2.5 cm satin edging, attaches almost to the waistline-finishing just 9 cm above the waist. A 'bib front' attached at the right side to the bodice lining, attached to the eaistline, and closing on the left hand shoulder side, with metal hooks, and hand stitched loops. Bodice closes over the top with a metal press-stud. Front bodice has three tiny pleats on each shoulder seam and gathers into the waistline seam. Fine georgette fabric, backed with fine net fabric, is with tiny glass beads, and forms the top of the 'bib front'. Fine beading of tiny beads outlines the high round neck. Larger glass beads and silky lace trim the lower 'bib front'. The lg sleeves are gathered lightly at the shoulder, which isoutlined with fine piping. Cut as a straight piece of fabric, a rectangular 'wing effect' at the wrist, is lightly gathered into a 13 cm deep lace cuff, fastening with two metal hooks, and hand-stitched eyes. Sleeves are lined with fine fabric.costume, female, black silk satin dress -
 Bendigo Historical Society Inc.
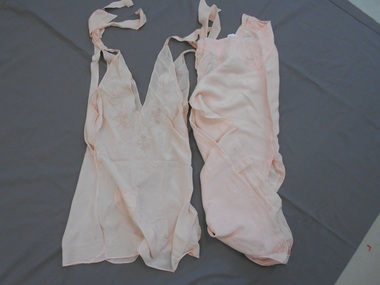
Clothing - PINK SILK PYJAMAS
... . The two buttons on the right hand side are missing. A panel.... The two buttons on the right hand side are missing. A panel ...Clothing. Deep V neckline, front and back, has a tapered tie, at the shoulder to 4.5 cm, and slanted at the lower edge of the tie. The V neckline has a fine binding finish as do the armholes, and the lower edge of the bodice. Shadow, and pulled thread embroidery, in a floral design, outlines the V neckline in the front. A tiny 10 cm x 10 cm heart shaped pocket is bound at the edges and sits at lower right front. A small dart, 1 cm x 6 cm long is below the armholes, on each side seam. Fabric is cut on the cross to add flair. A two cm x 60 cms tie attaches at each side seam, and would tie at the back. Clothing. Pyjama pants have a V shaped waistband 11 cm deep at front and back, below which is a small 1.5 cm wide pleat on either side of front and back. An 11 cm deep plackett on both side seams - on the left hand side two x 1 cm pearl buttons and buttonholes fasten the plackett. The two buttons on the right hand side are missing. A panel of shadow embroidery decorates the outside lower edge of the trouser leg. Fabric is woven with a floral design. Lower edge of legs are finished with a fine binding. 11 cm peak at waistband. Pants with hem 88 cms, width at ankles 64 cms.Silk and Rayon Made in Chinacostume, female, pink silk pyjamas (bodice) -
 Flagstaff Hill Maritime Museum and Village
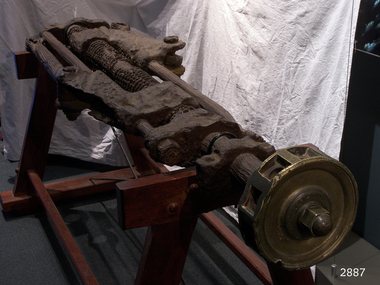
Machine - Steering Gear, 1889
... ). The steering was activated with lines attached to the blocks on the two... to the blocks on the two threads (half left hand, half right hand ...Steering Gear Operation: All steering was done from the stern of the ship and a steering mechanism was used to connect the rudder to the ship's wheel, often housed in a box-like construction behind the helm. The rudder was, in turn, mounted on a pintle or stern-post held in place by gudgeon's (sockets). The steering was activated with lines attached to the blocks on the two threads (half left hand, half right hand) of the steering gear. As the helmsman turned the helm in the direction in which he wished the ship to travel, the central screw of the steering gear, which was attached to the back of the helm, turned horizontally. This caused the rods on either side of the gear to move backwards or forwards at the same time, which then turned the pintle and rudder to port or starboard. A brief history of the Newfield (1889-1892): - The Newfield was an iron and steel sailing barque of 1306 tons, built in 1889 by Alexander Stephen & Sons Dundee (Yard No 89) for Brownelles & Co., Liverpool. The Newfield was on a voyage from Sharpness to Brisbane on 29 August 1892, with a cargo of 1850 tons of fine rock salt. The Cape Otway light had been sighted in squally, bumpy weather, but the captain was under the impression it was the King Island light. The ship’s chronometers were wrong, and orders were given to tack the ship away from the light, which headed it straight for the cliffs of the Victorian coast. The vessel struck rocks about 100 yards from shore, and five feet of water immediately filled the holds. The captain gave orders to lower the boats which caused a disorganised scramble for safety among the crew. The panic resulted in the deaths of nine men, including the captain when they drowned after the boats capsized in heavy seas. The seventeen men who regained the ship decided to wait until daylight and rowed to Peterborough in the ship’s jolly boat and gig after locals had failed to secure a rocket apparatus line to the ship. The Marine Board inquiry found the wreck was caused by a "one-man style of navigation" and that the captain had not heeded the advice of his crew.The Newfield wreck and its collection of recovered items are heritage listed and are regarded as historically significant. They represent aspects of Victoria’s shipping history and their potential for us today to interpret the maritime history and social themes of the time. The assemblage of various Newfield artefacts held in the Flagstaff Hill Museum is not only significant for its association with the shipwreck but helps archaeologists when examining the relationship between the objects to better understand our colonial marine past.Ship’s steering gear, cast iron, consists of a long round metal rod into which gears have been machined. The thread of the gear from one end to almost the centre winds in a left hand direction while the thread of the gear from the other end to almost the centre winds in the right hand direction. Each end of the rod has a metal coupler attached and two narrower round rods are also attached to the coupling, one each side of the gear rod, the same length as it and parallel to it. Two more ‘S’ shaped couplers are joined to the gear rod. Each of these have an opening through which the gear rod is threaded and can move along. There is another opening in these couplers through which one of the narrower rods is threaded. The other end of this coupler has half length metal rod attached to it by a bolt through the ring at the end of the rod. One end of the steering gear still has the brass hub of the ship’s wheel solidly attached. The hub no longer has its wooden spokes but the ten holes for the spokes can be easily recognised.Noneflagstaff hill, maritime museum, shipwreck coast, warrnambool, peter carmody, carmody, newfield, shipwreck, peterborough, south west victoria, rocket, rocket crew, shipwreck artefact, flagstaff hil maritime museum, steering, steering gear, screw steering gear, sailing ship -
 Bendigo Historical Society Inc.
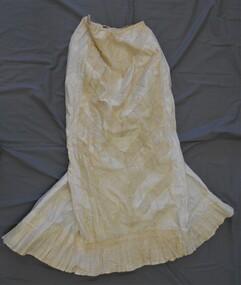
Clothing - MAGGIE BARBER COLLECTION: CRINOLETTE, 1870's
... petticoat. Plackett at the back, fastens with two metal hooks... at the back, fastens with two metal hooks, and hand-stitched loops ...Clothing. Cream polished cotton, full length half slip petticoat. Plackett at the back, fastens with two metal hooks, and hand-stitched loops. The back features a 'crinolette', where two rows of tapes are gathered in to give volume to the back of the garment. As the crinoline started to subside at the end of the 1860's. The centre front panel features 6 angled bands of lace 4.5 cm wide and angled to form a V shape. (1) A 9.5 cm band of pleated linen gauze-like fabric, edged with a 5 cm band of linen lace. (2) A 15 cm double layered frill-top layer 2 cm wide silk like pleats, lined with linen muslin type fabric, and an under frill of polished cotton, pleated in one cm wide knife pleats. The top frill is of fine cream cotton lace. At the top edge is a 3.5 cm wide band of floral cotton lace, and adjoined at the lower edge with a 9 cm deep pleated trim of exquisite cotton "floral and swirls" lace. The top frill is 42 cm wide, and extends over the centre front panel only. A cotton covered " stiffening- possibly bamboo or whale bone, extends 31.5 cm ;long at the crinolette. An unusual 'pocket like bag' is sewn into the right side seam 14 cm below the waist. This has rounded corners, and is 8 cm wide at the top, 17.5 cm wide at the lower edge, which is then rounded slightly. Overall length of the 'pocket' is 38 cms.costume, female, crinolette full length half slip -
 Bendigo Historical Society Inc.
Clothing - CREAM SILK - SATIN LONG SLEEVED BODICE, 1850's
... . Two large hooks facilitate a joining with a skirt.The three..., eight cm deep band, which fastens with two metal hooks and hand ...Cream silk satin bodice, with a high round neckline, finished with a seven cm deep, cream lace, boned, mandarin stand up collar - five bones-(one missing) to support the collar. Nine 16cm bones support the shaping of the tapered firmly fitted waist. A ten cm deep yoke at front and back shoulders. Below the yoke is a panel of eleven cm long pintucks right across the front, and on either side of the back. Centre front gathers into a cotton tape band at the waistline. Below the neckline of the centre front, is a panel ten cm deep of cotton lace, then a 13cm deep fine silk, gathered frill, edged with a reinforced silk ruffle. The centre back opening has a double placket, each fastening with alternate hook and eye,hook on either side of opening. Two large hooks facilitate a joining with a skirt.The three quarter length satin sleeves, are a bell shape, and gather into a cream net, eight cm deep band, which fastens with two metal hooks and hand made loops. Over the net is a double frill, 13 cm deep, and edged with a reinforced silk ruffle, as in the centre front panel. This bishop-type sleeve has five X 12cm long pintucks at the shoulderline. A ten cm long row of a feather stitch type of hand embroidery on either side of front bodice-one each side of the gathered centre front panel. Bodice is fully lined with polished cotton.costume, female, cream silk-satin long sleeved bodice -
 Flagstaff Hill Maritime Museum and Village
Domestic object - Bowl, Late 19th or early 20th Century
... everything with two hands. I often refer to soft hands – keep... and it is at it’s most fragile! Handle everything with two hands. I often ...The Process of Making Pottery Decorating, Firing, Glazing, Making, Technical There is a rhythm and flow to clay. It can’t be done all at once! Even the making process! It can take weeks to get everything done, especially if you can only work on your pottery once a week! Even though we have three hour classes, it’s often just not enough time! Here is an overview of some of the processes so you have a bit more grasp on some of the technical stuff! Step One – Design There are SO many ideas out there for making stuff in clay! From delicate porcelain jewellery, through to heavy sculptural work and everything in between. Deciding your direction is sometimes not that easy – when you first start, try everything, you will naturally gravitate to the style that you enjoy! The options and variations are endless and can get a wee bit overwhelming too! Check in with me before you start to ensure your ideas will work, what order you might do things, how you could achieve the look you are seeking and any other technical data required! Step Two – Making Clay is thixotropic. This means that as you work with it, the clay first gets sloppier and wetter, before is begins to dry in the atmosphere. For most things, you simply can’t do all parts of the project at once. An example of work order might look like: Get last weeks work out from the shelves Prepare clay for today’s work – roll your clay, prepare balls for throwing, make the first stage of a pinch pot) Clean up last week’s work and put it on the shelf for bisque firing Check that you have any glazing to do – and do enough of it that you will have time to finish your main project Do the next step of your next project – there might be a further step that can’t be complete immediately, in that case, wrap your work well and put onto the shelves. Letting your work rest for a while can really help keep your work clean and professional looking. Many things require bagging under plastic to keep it ready for work the next week – put your name on the outside of the bag so you can find your work easily. We have stickers and markers. Consider how you want to decorate your work – coloured slip can be applied at a fairly wet stage (remembering that it will make your work even wetter!). Trying to apply slip to dry clay won’t work! If you want to do sgraffito – you will need to keep the work leather hard (a state of dryness where you can still work the clay with a little effort and a little water and care). Step Three – Drying Most of the time your work can go into the rack uncovered to let it dry out for the following week. If you want to continue forming or shaping you will need to double bag your work – put your work on a suitable sized bat and put the bat in a bag so the base of the bag is under the bat, then put another bag over the top of the work and tuck the top of the bag under the bat. If you want to trim (or turn) your thrown work the following week, it should also be double bagged. If your work is large, delicate, or of uneven thicknesses, you should lightly cover your work for drying. When considering the drying process, bare in mind the weather, humidity and wind! The hotter and dryer, the faster things dry and work can dry unevenly in the shelves – this can lead to cracking – another time to lightly cover your work for drying. Step Four – Trimming and Cleaning Up Your work is dry! It is called greenware now and it is at it’s most fragile! Handle everything with two hands. I often refer to soft hands – keep everything gentle and with your fingers spread as much as possible. Try to not pick up things like plates too much, and always with both hands! Before your work can be bisque fired it should be “cleaned up”. You work won’t go into the kiln if it has sharp edges – when glazed, sharp edges turn into razor blades! Use a piece of fly wire to rub the work all over – this will scratch a little so be light handed. Use a knife or metal kidney to scrape any areas that require a bit more dynamic treatment than the fly wire offers! Finally, a very light wipe over with a slightly damp sponge can help soften and soothe all of your edges and dags! Trimming thrown work: If you are planning to trim (or turn) your thrown work (and you should be), make sure you bag it well – your work should be leather hard to almost dry for easiest trimming. Use this step to finish the work completely – use a metal kidney to polish the surface, or a slightly damp sponge to give a freshly thrown look. Wipe the sponge around the rim after trimming, and check the inside of the pot for dags! Trimming slip cast work: Usually I will trim the rims of your work on the wheel the following day to make that stage easier, however you will still need to check your work for lumps and bumps. Last but not least – check that your name is still clearly on the bottom of your work. Step Five – Bisque Firing When the work is completely dry it can go into the bisque kiln. The bisque kiln is fired to 1000°C. This process burns off the water in the clay as well as some of the chemically bound water. The structure of the clay is not altered that much at this temperature. Inside the bisque kiln, the work is stacked a little, small bowl inside a larger bowl and onto a heavy plate. Smaller items like decorations or drink coasters might get stacked several high. Consideration is paid to the weight of the stack and shape of the work. A bisque kiln can fire about one and a half times the amount of work that the glaze kiln can fire. The firing takes about 10 hours to complete the cycle and about two days to cool down. Once it has been emptied the work is placed in the glaze room ready for you to decorate! Step Six – Glazing Decorating your work with colour can be a lot of fun – and time consuming! There are three main options for surface treatment at this stage: Oxide Washes Underglazes Glazes Washes and underglazes do not “glaze” the work – It will still need a layer of glaze to fully seal the clay (washes don’t need glaze on surfaces not designed for food or liquid as they can gloss up a little on their own). Underglazes are stable colourants that turn out pretty much how they look in the jar. They can be mixed with each other to form other colours and can be used like water colours to paint onto your work. Mostly they should have a clear glaze on top to seal them. Oxides are a different species – the pink oxide (cobalt) wash turns out bright blue for instance. They don’t always need a glaze on top, and some glazes can change the colour of the wash! The glazes need no other “glaze” on top! Be careful of unknown glaze interactions – you can put any combination of glaze in a bowl or on a plate, but only a single glaze on the outside of any vertical surface! Glazes are a chemical reaction under heat. We don’t know the exact chemicals in the Mayco glazes we use. I can guess by the way they interact with each other, however, on the whole, you need to test every idea you have, and not run the test on a vertical surface! Simply put, glaze is a layer of glass like substance that bonds with the clay underneath. Clay is made of silica, alumina and water. Glaze is made of mostly silica. Silica has a melting point of 1700°C and we fire to 1240°C. The silica requires a “flux” to help it melt at the lower temperature. Fluxes can be all sorts of chemicals – a common one is calcium – calcium has a melting point of 2500°C, however, together they both melt at a much lower temperature! Colourants are metal oxides like cobalt (blue), chrome (green through black), copper (green, blue, even red!), manganese (black, purple and pink) iron (red brown), etc. Different chemicals in the glaze can have dramatic effects. for example, barium carbonate (which we don’t use) turns manganese bright pink! Other elements can turn manganese dioxide brown, blue, purple and reddish brown. Manganese dioxide is a flux in and of itself as well. So, glazes that get their black and purple colours, often interact with other glazes and RUN! Our mirror black is a good example – it mixes really well with many glazes because it fluxes them – causes them to melt faster. It will also bring out many beautiful colours in the glazes because it’s black colouring most definitely comes from manganese dioxide! Glaze chemistry is a whole subject on it’s own! We use commercial Mayco glazes on purpose – for their huge range of colour possibilities, stability, cool interactions, artistic freedom with the ability to easily brush the glazes on and ease of use. We currently have almost 50 glazes on hand! A major project is to test the interactions of all glazes with each other. That is 2,500 test tiles!!!! I’m going to make the wall behind the wheels the feature wall of pretty colours! Step Seven – Glaze (Gloss or sometimes called “Glost”) Firing Most of the time this is the final stage of making your creation (but not always!) The glaze kiln goes to 1240°C. This is called cone 6, or midrange. It is the low end of stoneware temperatures. Stoneware clays and glazes are typically fired at cone 8 – 10, that is 1260 – 1290°C. The energy requirement to go from 1240°C to 1280°C is almost a 30% more! Our clay is formulated to vitrify (mature, turn “glass-like”) at 1240°, as are our glazes. A glaze kiln take around 12 hours to reach temperature and two to three days to cool down. Sometimes a third firing process is required – this is for decoration that is added to work after the glaze firing. For example – adding precious metals and lustres. this firing temperature is usually around 600 – 800°C depending upon the techniques being used. There are many students interested in gold and silver trims – we will be doing this third type of firing soon! After firing your work will be in the student finished work shelves. Remember to pay for it before you head out the door! There is a small extra charge for using porcelain clay (it’s more than twice the price of regular clay), and for any third firing process! Once your work has been fired it can not turn back into clay for millennia – so don’t fire it if you don’t like it! Put it in the bucket for recycling. https://firebirdstudios.com.au/the-process-of-making-pottery/ The bowl is an example of kitchenware used in the 19th century and still in use today.Bowl white ceramic. Crack on side. Badly stained.Backstamp very faint and unable to be read.flagstaff hill, warrnambool, shipwrecked-coast, flagstaff-hill, flagstaff-hill-maritime-museum, maritime-museum, shipwreck-coast, flagstaff-hill-maritime-village, mixing bowl, food preparation, kitchen equipment, ceramic -
 Flagstaff Hill Maritime Museum and Village
Domestic object - Bowl
... everything with two hands. I often refer to soft hands – keep... and it is at it’s most fragile! Handle everything with two hands. I often ...The Process of Making Pottery Decorating, Firing, Glazing, Making, Technical There is a rhythm and flow to clay. It can’t be done all at once! Even the making process! It can take weeks to get everything done, especially if you can only work on your pottery once a week! Even though we have three hour classes, it’s often just not enough time! Here is an overview of some of the processes so you have a bit more grasp on some of the technical stuff! Step One – Design There are SO many ideas out there for making stuff in clay! From delicate porcelain jewellery, through to heavy sculptural work and everything in between. Deciding your direction is sometimes not that easy – when you first start, try everything, you will naturally gravitate to the style that you enjoy! The options and variations are endless and can get a wee bit overwhelming too! Check in with me before you start to ensure your ideas will work, what order you might do things, how you could achieve the look you are seeking and any other technical data required! Step Two – Making Clay is thixotropic. This means that as you work with it, the clay first gets sloppier and wetter, before is begins to dry in the atmosphere. For most things, you simply can’t do all parts of the project at once. An example of work order might look like: Get last weeks work out from the shelves Prepare clay for today’s work – roll your clay, prepare balls for throwing, make the first stage of a pinch pot) Clean up last week’s work and put it on the shelf for bisque firing Check that you have any glazing to do – and do enough of it that you will have time to finish your main project Do the next step of your next project – there might be a further step that can’t be complete immediately, in that case, wrap your work well and put onto the shelves. Letting your work rest for a while can really help keep your work clean and professional looking. Many things require bagging under plastic to keep it ready for work the next week – put your name on the outside of the bag so you can find your work easily. We have stickers and markers. Consider how you want to decorate your work – coloured slip can be applied at a fairly wet stage (remembering that it will make your work even wetter!). Trying to apply slip to dry clay won’t work! If you want to do sgraffito – you will need to keep the work leather hard (a state of dryness where you can still work the clay with a little effort and a little water and care). Step Three – Drying Most of the time your work can go into the rack uncovered to let it dry out for the following week. If you want to continue forming or shaping you will need to double bag your work – put your work on a suitable sized bat and put the bat in a bag so the base of the bag is under the bat, then put another bag over the top of the work and tuck the top of the bag under the bat. If you want to trim (or turn) your thrown work the following week, it should also be double bagged. If your work is large, delicate, or of uneven thicknesses, you should lightly cover your work for drying. When considering the drying process, bare in mind the weather, humidity and wind! The hotter and dryer, the faster things dry and work can dry unevenly in the shelves – this can lead to cracking – another time to lightly cover your work for drying. Step Four – Trimming and Cleaning Up Your work is dry! It is called greenware now and it is at it’s most fragile! Handle everything with two hands. I often refer to soft hands – keep everything gentle and with your fingers spread as much as possible. Try to not pick up things like plates too much, and always with both hands! Before your work can be bisque fired it should be “cleaned up”. You work won’t go into the kiln if it has sharp edges – when glazed, sharp edges turn into razor blades! Use a piece of fly wire to rub the work all over – this will scratch a little so be light handed. Use a knife or metal kidney to scrape any areas that require a bit more dynamic treatment than the fly wire offers! Finally, a very light wipe over with a slightly damp sponge can help soften and soothe all of your edges and dags! Trimming thrown work: If you are planning to trim (or turn) your thrown work (and you should be), make sure you bag it well – your work should be leather hard to almost dry for easiest trimming. Use this step to finish the work completely – use a metal kidney to polish the surface, or a slightly damp sponge to give a freshly thrown look. Wipe the sponge around the rim after trimming, and check the inside of the pot for dags! Trimming slip cast work: Usually I will trim the rims of your work on the wheel the following day to make that stage easier, however you will still need to check your work for lumps and bumps. Last but not least – check that your name is still clearly on the bottom of your work. Step Five – Bisque Firing When the work is completely dry it can go into the bisque kiln. The bisque kiln is fired to 1000°C. This process burns off the water in the clay as well as some of the chemically bound water. The structure of the clay is not altered that much at this temperature. Inside the bisque kiln, the work is stacked a little, small bowl inside a larger bowl and onto a heavy plate. Smaller items like decorations or drink coasters might get stacked several high. Consideration is paid to the weight of the stack and shape of the work. A bisque kiln can fire about one and a half times the amount of work that the glaze kiln can fire. The firing takes about 10 hours to complete the cycle and about two days to cool down. Once it has been emptied the work is placed in the glaze room ready for you to decorate! Step Six – Glazing Decorating your work with colour can be a lot of fun – and time consuming! There are three main options for surface treatment at this stage: Oxide Washes Underglazes Glazes Washes and underglazes do not “glaze” the work – It will still need a layer of glaze to fully seal the clay (washes don’t need glaze on surfaces not designed for food or liquid as they can gloss up a little on their own). Underglazes are stable colourants that turn out pretty much how they look in the jar. They can be mixed with each other to form other colours and can be used like water colours to paint onto your work. Mostly they should have a clear glaze on top to seal them. Oxides are a different species – the pink oxide (cobalt) wash turns out bright blue for instance. They don’t always need a glaze on top, and some glazes can change the colour of the wash! The glazes need no other “glaze” on top! Be careful of unknown glaze interactions – you can put any combination of glaze in a bowl or on a plate, but only a single glaze on the outside of any vertical surface! Glazes are a chemical reaction under heat. We don’t know the exact chemicals in the Mayco glazes we use. I can guess by the way they interact with each other, however, on the whole, you need to test every idea you have, and not run the test on a vertical surface! Simply put, glaze is a layer of glass like substance that bonds with the clay underneath. Clay is made of silica, alumina and water. Glaze is made of mostly silica. Silica has a melting point of 1700°C and we fire to 1240°C. The silica requires a “flux” to help it melt at the lower temperature. Fluxes can be all sorts of chemicals – a common one is calcium – calcium has a melting point of 2500°C, however, together they both melt at a much lower temperature! Colourants are metal oxides like cobalt (blue), chrome (green through black), copper (green, blue, even red!), manganese (black, purple and pink) iron (red brown), etc. Different chemicals in the glaze can have dramatic effects. for example, barium carbonate (which we don’t use) turns manganese bright pink! Other elements can turn manganese dioxide brown, blue, purple and reddish brown. Manganese dioxide is a flux in and of itself as well. So, glazes that get their black and purple colours, often interact with other glazes and RUN! Our mirror black is a good example – it mixes really well with many glazes because it fluxes them – causes them to melt faster. It will also bring out many beautiful colours in the glazes because it’s black colouring most definitely comes from manganese dioxide! Glaze chemistry is a whole subject on it’s own! We use commercial Mayco glazes on purpose – for their huge range of colour possibilities, stability, cool interactions, artistic freedom with the ability to easily brush the glazes on and ease of use. We currently have almost 50 glazes on hand! A major project is to test the interactions of all glazes with each other. That is 2,500 test tiles!!!! I’m going to make the wall behind the wheels the feature wall of pretty colours! Step Seven – Glaze (Gloss or sometimes called “Glost”) Firing Most of the time this is the final stage of making your creation (but not always!) The glaze kiln goes to 1240°C. This is called cone 6, or midrange. It is the low end of stoneware temperatures. Stoneware clays and glazes are typically fired at cone 8 – 10, that is 1260 – 1290°C. The energy requirement to go from 1240°C to 1280°C is almost a 30% more! Our clay is formulated to vitrify (mature, turn “glass-like”) at 1240°, as are our glazes. A glaze kiln take around 12 hours to reach temperature and two to three days to cool down. Sometimes a third firing process is required – this is for decoration that is added to work after the glaze firing. For example – adding precious metals and lustres. this firing temperature is usually around 600 – 800°C depending upon the techniques being used. There are many students interested in gold and silver trims – we will be doing this third type of firing soon! After firing your work will be in the student finished work shelves. Remember to pay for it before you head out the door! There is a small extra charge for using porcelain clay (it’s more than twice the price of regular clay), and for any third firing process! Once your work has been fired it can not turn back into clay for millennia – so don’t fire it if you don’t like it! Put it in the bucket for recycling. https://firebirdstudios.com.au/the-process-of-making-pottery/ This bowl is an example of kitchenware used in the 19th century and still in use today.Bowl white ceramic plain that has two sets of edging around lip. Inside bowl has plaster designed to look like cooking mixture.flagstaff hill, warrnambool, shipwrecked-coast, flagstaff-hill, flagstaff-hill-maritime-museum, maritime-museum, shipwreck-coast, flagstaff-hill-maritime-village, kitchen equipment, ceramic -
 Flagstaff Hill Maritime Museum and Village
Domestic object - Bowl, J & G Meakin, Late 19th or early 20th Century
... everything with two hands. I often refer to soft hands – keep... and it is at it’s most fragile! Handle everything with two hands. I often ...The Process of Making Pottery Decorating, Firing, Glazing, Making, Technical There is a rhythm and flow to clay. It can’t be done all at once! Even the making process! It can take weeks to get everything done, especially if you can only work on your pottery once a week! Even though we have three hour classes, it’s often just not enough time! Here is an overview of some of the processes so you have a bit more grasp on some of the technical stuff! Step One – Design There are SO many ideas out there for making stuff in clay! From delicate porcelain jewellery, through to heavy sculptural work and everything in between. Deciding your direction is sometimes not that easy – when you first start, try everything, you will naturally gravitate to the style that you enjoy! The options and variations are endless and can get a wee bit overwhelming too! Check in with me before you start to ensure your ideas will work, what order you might do things, how you could achieve the look you are seeking and any other technical data required! Step Two – Making Clay is thixotropic. This means that as you work with it, the clay first gets sloppier and wetter, before is begins to dry in the atmosphere. For most things, you simply can’t do all parts of the project at once. An example of work order might look like: Get last weeks work out from the shelves Prepare clay for today’s work – roll your clay, prepare balls for throwing, make the first stage of a pinch pot) Clean up last week’s work and put it on the shelf for bisque firing Check that you have any glazing to do – and do enough of it that you will have time to finish your main project Do the next step of your next project – there might be a further step that can’t be complete immediately, in that case, wrap your work well and put onto the shelves. Letting your work rest for a while can really help keep your work clean and professional looking. Many things require bagging under plastic to keep it ready for work the next week – put your name on the outside of the bag so you can find your work easily. We have stickers and markers. Consider how you want to decorate your work – coloured slip can be applied at a fairly wet stage (remembering that it will make your work even wetter!). Trying to apply slip to dry clay won’t work! If you want to do sgraffito – you will need to keep the work leather hard (a state of dryness where you can still work the clay with a little effort and a little water and care). Step Three – Drying Most of the time your work can go into the rack uncovered to let it dry out for the following week. If you want to continue forming or shaping you will need to double bag your work – put your work on a suitable sized bat and put the bat in a bag so the base of the bag is under the bat, then put another bag over the top of the work and tuck the top of the bag under the bat. If you want to trim (or turn) your thrown work the following week, it should also be double bagged. If your work is large, delicate, or of uneven thicknesses, you should lightly cover your work for drying. When considering the drying process, bare in mind the weather, humidity and wind! The hotter and dryer, the faster things dry and work can dry unevenly in the shelves – this can lead to cracking – another time to lightly cover your work for drying. Step Four – Trimming and Cleaning Up Your work is dry! It is called greenware now and it is at it’s most fragile! Handle everything with two hands. I often refer to soft hands – keep everything gentle and with your fingers spread as much as possible. Try to not pick up things like plates too much, and always with both hands! Before your work can be bisque fired it should be “cleaned up”. You work won’t go into the kiln if it has sharp edges – when glazed, sharp edges turn into razor blades! Use a piece of fly wire to rub the work all over – this will scratch a little so be light handed. Use a knife or metal kidney to scrape any areas that require a bit more dynamic treatment than the fly wire offers! Finally, a very light wipe over with a slightly damp sponge can help soften and soothe all of your edges and dags! Trimming thrown work: If you are planning to trim (or turn) your thrown work (and you should be), make sure you bag it well – your work should be leather hard to almost dry for easiest trimming. Use this step to finish the work completely – use a metal kidney to polish the surface, or a slightly damp sponge to give a freshly thrown look. Wipe the sponge around the rim after trimming, and check the inside of the pot for dags! Trimming slip cast work: Usually I will trim the rims of your work on the wheel the following day to make that stage easier, however you will still need to check your work for lumps and bumps. Last but not least – check that your name is still clearly on the bottom of your work. Step Five – Bisque Firing When the work is completely dry it can go into the bisque kiln. The bisque kiln is fired to 1000°C. This process burns off the water in the clay as well as some of the chemically bound water. The structure of the clay is not altered that much at this temperature. Inside the bisque kiln, the work is stacked a little, small bowl inside a larger bowl and onto a heavy plate. Smaller items like decorations or drink coasters might get stacked several high. Consideration is paid to the weight of the stack and shape of the work. A bisque kiln can fire about one and a half times the amount of work that the glaze kiln can fire. The firing takes about 10 hours to complete the cycle and about two days to cool down. Once it has been emptied the work is placed in the glaze room ready for you to decorate! Step Six – Glazing Decorating your work with colour can be a lot of fun – and time consuming! There are three main options for surface treatment at this stage: Oxide Washes Underglazes Glazes Washes and underglazes do not “glaze” the work – It will still need a layer of glaze to fully seal the clay (washes don’t need glaze on surfaces not designed for food or liquid as they can gloss up a little on their own). Underglazes are stable colourants that turn out pretty much how they look in the jar. They can be mixed with each other to form other colours and can be used like water colours to paint onto your work. Mostly they should have a clear glaze on top to seal them. Oxides are a different species – the pink oxide (cobalt) wash turns out bright blue for instance. They don’t always need a glaze on top, and some glazes can change the colour of the wash! The glazes need no other “glaze” on top! Be careful of unknown glaze interactions – you can put any combination of glaze in a bowl or on a plate, but only a single glaze on the outside of any vertical surface! Glazes are a chemical reaction under heat. We don’t know the exact chemicals in the Mayco glazes we use. I can guess by the way they interact with each other, however, on the whole, you need to test every idea you have, and not run the test on a vertical surface! Simply put, glaze is a layer of glass like substance that bonds with the clay underneath. Clay is made of silica, alumina and water. Glaze is made of mostly silica. Silica has a melting point of 1700°C and we fire to 1240°C. The silica requires a “flux” to help it melt at the lower temperature. Fluxes can be all sorts of chemicals – a common one is calcium – calcium has a melting point of 2500°C, however, together they both melt at a much lower temperature! Colourants are metal oxides like cobalt (blue), chrome (green through black), copper (green, blue, even red!), manganese (black, purple and pink) iron (red brown), etc. Different chemicals in the glaze can have dramatic effects. for example, barium carbonate (which we don’t use) turns manganese bright pink! Other elements can turn manganese dioxide brown, blue, purple and reddish brown. Manganese dioxide is a flux in and of itself as well. So, glazes that get their black and purple colours, often interact with other glazes and RUN! Our mirror black is a good example – it mixes really well with many glazes because it fluxes them – causes them to melt faster. It will also bring out many beautiful colours in the glazes because it’s black colouring most definitely comes from manganese dioxide! Glaze chemistry is a whole subject on it’s own! We use commercial Mayco glazes on purpose – for their huge range of colour possibilities, stability, cool interactions, artistic freedom with the ability to easily brush the glazes on and ease of use. We currently have almost 50 glazes on hand! A major project is to test the interactions of all glazes with each other. That is 2,500 test tiles!!!! I’m going to make the wall behind the wheels the feature wall of pretty colours! Step Seven – Glaze (Gloss or sometimes called “Glost”) Firing Most of the time this is the final stage of making your creation (but not always!) The glaze kiln goes to 1240°C. This is called cone 6, or midrange. It is the low end of stoneware temperatures. Stoneware clays and glazes are typically fired at cone 8 – 10, that is 1260 – 1290°C. The energy requirement to go from 1240°C to 1280°C is almost a 30% more! Our clay is formulated to vitrify (mature, turn “glass-like”) at 1240°, as are our glazes. A glaze kiln take around 12 hours to reach temperature and two to three days to cool down. Sometimes a third firing process is required – this is for decoration that is added to work after the glaze firing. For example – adding precious metals and lustres. this firing temperature is usually around 600 – 800°C depending upon the techniques being used. There are many students interested in gold and silver trims – we will be doing this third type of firing soon! After firing your work will be in the student finished work shelves. Remember to pay for it before you head out the door! There is a small extra charge for using porcelain clay (it’s more than twice the price of regular clay), and for any third firing process! Once your work has been fired it can not turn back into clay for millennia – so don’t fire it if you don’t like it! Put it in the bucket for recycling. https://firebirdstudios.com.au/the-process-of-making-pottery/This bowl was made by renowned pottery company J & G Meakin of England. The firm was established in the mid-1800's. The bowl is an example of kitchenware used in the 19th century and still in use today.Bowl; white ceramic, round and tapering inwards towards base. Made by J and G Meakin England.On base, 'Ironstone China Reg SOL 391413' with symbolflagstaff hill, flagstaff hill maritime museum and village, warrnambool, maritime museum, maritime village, great ocean road, shipwreck coast, mixing bowl, food preparation, j & g meakin, pottery, stoke-on-trent, kitchen equipment, ceramic -
 Flagstaff Hill Maritime Museum and Village
Domestic object - Plate
... everything with two hands. I often refer to soft hands – keep... and it is at it’s most fragile! Handle everything with two hands. I often ...The Process of Making Pottery Decorating, Firing, Glazing, Making, Technical There is a rhythm and flow to clay. It can’t be done all at once! Even the making process! It can take weeks to get everything done, especially if you can only work on your pottery once a week! Even though we have three hour classes, it’s often just not enough time! Here is an overview of some of the processes so you have a bit more grasp on some of the technical stuff! Step One – Design There are SO many ideas out there for making stuff in clay! From delicate porcelain jewellery, through to heavy sculptural work and everything in between. Deciding your direction is sometimes not that easy – when you first start, try everything, you will naturally gravitate to the style that you enjoy! The options and variations are endless and can get a wee bit overwhelming too! Check in with me before you start to ensure your ideas will work, what order you might do things, how you could achieve the look you are seeking and any other technical data required! Step Two – Making Clay is thixotropic. This means that as you work with it, the clay first gets sloppier and wetter, before is begins to dry in the atmosphere. For most things, you simply can’t do all parts of the project at once. An example of work order might look like: Get last weeks work out from the shelves Prepare clay for today’s work – roll your clay, prepare balls for throwing, make the first stage of a pinch pot) Clean up last week’s work and put it on the shelf for bisque firing Check that you have any glazing to do – and do enough of it that you will have time to finish your main project Do the next step of your next project – there might be a further step that can’t be complete immediately, in that case, wrap your work well and put onto the shelves. Letting your work rest for a while can really help keep your work clean and professional looking. Many things require bagging under plastic to keep it ready for work the next week – put your name on the outside of the bag so you can find your work easily. We have stickers and markers. Consider how you want to decorate your work – coloured slip can be applied at a fairly wet stage (remembering that it will make your work even wetter!). Trying to apply slip to dry clay won’t work! If you want to do sgraffito – you will need to keep the work leather hard (a state of dryness where you can still work the clay with a little effort and a little water and care). Step Three – Drying Most of the time your work can go into the rack uncovered to let it dry out for the following week. If you want to continue forming or shaping you will need to double bag your work – put your work on a suitable sized bat and put the bat in a bag so the base of the bag is under the bat, then put another bag over the top of the work and tuck the top of the bag under the bat. If you want to trim (or turn) your thrown work the following week, it should also be double bagged. If your work is large, delicate, or of uneven thicknesses, you should lightly cover your work for drying. When considering the drying process, bare in mind the weather, humidity and wind! The hotter and dryer, the faster things dry and work can dry unevenly in the shelves – this can lead to cracking – another time to lightly cover your work for drying. Step Four – Trimming and Cleaning Up Your work is dry! It is called greenware now and it is at it’s most fragile! Handle everything with two hands. I often refer to soft hands – keep everything gentle and with your fingers spread as much as possible. Try to not pick up things like plates too much, and always with both hands! Before your work can be bisque fired it should be “cleaned up”. You work won’t go into the kiln if it has sharp edges – when glazed, sharp edges turn into razor blades! Use a piece of fly wire to rub the work all over – this will scratch a little so be light handed. Use a knife or metal kidney to scrape any areas that require a bit more dynamic treatment than the fly wire offers! Finally, a very light wipe over with a slightly damp sponge can help soften and soothe all of your edges and dags! Trimming thrown work: If you are planning to trim (or turn) your thrown work (and you should be), make sure you bag it well – your work should be leather hard to almost dry for easiest trimming. Use this step to finish the work completely – use a metal kidney to polish the surface, or a slightly damp sponge to give a freshly thrown look. Wipe the sponge around the rim after trimming, and check the inside of the pot for dags! Trimming slip cast work: Usually I will trim the rims of your work on the wheel the following day to make that stage easier, however you will still need to check your work for lumps and bumps. Last but not least – check that your name is still clearly on the bottom of your work. Step Five – Bisque Firing When the work is completely dry it can go into the bisque kiln. The bisque kiln is fired to 1000°C. This process burns off the water in the clay as well as some of the chemically bound water. The structure of the clay is not altered that much at this temperature. Inside the bisque kiln, the work is stacked a little, small bowl inside a larger bowl and onto a heavy plate. Smaller items like decorations or drink coasters might get stacked several high. Consideration is paid to the weight of the stack and shape of the work. A bisque kiln can fire about one and a half times the amount of work that the glaze kiln can fire. The firing takes about 10 hours to complete the cycle and about two days to cool down. Once it has been emptied the work is placed in the glaze room ready for you to decorate! Step Six – Glazing Decorating your work with colour can be a lot of fun – and time consuming! There are three main options for surface treatment at this stage: Oxide Washes Underglazes Glazes Washes and underglazes do not “glaze” the work – It will still need a layer of glaze to fully seal the clay (washes don’t need glaze on surfaces not designed for food or liquid as they can gloss up a little on their own). Underglazes are stable colourants that turn out pretty much how they look in the jar. They can be mixed with each other to form other colours and can be used like water colours to paint onto your work. Mostly they should have a clear glaze on top to seal them. Oxides are a different species – the pink oxide (cobalt) wash turns out bright blue for instance. They don’t always need a glaze on top, and some glazes can change the colour of the wash! The glazes need no other “glaze” on top! Be careful of unknown glaze interactions – you can put any combination of glaze in a bowl or on a plate, but only a single glaze on the outside of any vertical surface! Glazes are a chemical reaction under heat. We don’t know the exact chemicals in the Mayco glazes we use. I can guess by the way they interact with each other, however, on the whole, you need to test every idea you have, and not run the test on a vertical surface! Simply put, glaze is a layer of glass like substance that bonds with the clay underneath. Clay is made of silica, alumina and water. Glaze is made of mostly silica. Silica has a melting point of 1700°C and we fire to 1240°C. The silica requires a “flux” to help it melt at the lower temperature. Fluxes can be all sorts of chemicals – a common one is calcium – calcium has a melting point of 2500°C, however, together they both melt at a much lower temperature! Colourants are metal oxides like cobalt (blue), chrome (green through black), copper (green, blue, even red!), manganese (black, purple and pink) iron (red brown), etc. Different chemicals in the glaze can have dramatic effects. for example, barium carbonate (which we don’t use) turns manganese bright pink! Other elements can turn manganese dioxide brown, blue, purple and reddish brown. Manganese dioxide is a flux in and of itself as well. So, glazes that get their black and purple colours, often interact with other glazes and RUN! Our mirror black is a good example – it mixes really well with many glazes because it fluxes them – causes them to melt faster. It will also bring out many beautiful colours in the glazes because it’s black colouring most definitely comes from manganese dioxide! Glaze chemistry is a whole subject on it’s own! We use commercial Mayco glazes on purpose – for their huge range of colour possibilities, stability, cool interactions, artistic freedom with the ability to easily brush the glazes on and ease of use. We currently have almost 50 glazes on hand! A major project is to test the interactions of all glazes with each other. That is 2,500 test tiles!!!! I’m going to make the wall behind the wheels the feature wall of pretty colours! Step Seven – Glaze (Gloss or sometimes called “Glost”) Firing Most of the time this is the final stage of making your creation (but not always!) The glaze kiln goes to 1240°C. This is called cone 6, or midrange. It is the low end of stoneware temperatures. Stoneware clays and glazes are typically fired at cone 8 – 10, that is 1260 – 1290°C. The energy requirement to go from 1240°C to 1280°C is almost a 30% more! Our clay is formulated to vitrify (mature, turn “glass-like”) at 1240°, as are our glazes. A glaze kiln take around 12 hours to reach temperature and two to three days to cool down. Sometimes a third firing process is required – this is for decoration that is added to work after the glaze firing. For example – adding precious metals and lustres. this firing temperature is usually around 600 – 800°C depending upon the techniques being used. There are many students interested in gold and silver trims – we will be doing this third type of firing soon! After firing your work will be in the student finished work shelves. Remember to pay for it before you head out the door! There is a small extra charge for using porcelain clay (it’s more than twice the price of regular clay), and for any third firing process! Once your work has been fired it can not turn back into clay for millennia – so don’t fire it if you don’t like it! Put it in the bucket for recycling. https://firebirdstudios.com.au/the-process-of-making-pottery/Ceramics have evolved over thousands of years.White earthenware dinner plate. Crazing evident all over.Backstamped ‘Made in England S LTD’flagstaff hill, warrnambool, shipwrecked-coast, flagstaff-hill, flagstaff-hill-maritime-museum, maritime-museum, shipwreck-coast, flagstaff-hill-maritime-village, ceramics, tableware -
 Flagstaff Hill Maritime Museum and Village
Domestic object - Plate, Johnson Bros
... everything with two hands. I often refer to soft hands – keep... and it is at it’s most fragile! Handle everything with two hands. I often ...The Process of Making Pottery Decorating, Firing, Glazing, Making, Technical There is a rhythm and flow to clay. It can’t be done all at once! Even the making process! It can take weeks to get everything done, especially if you can only work on your pottery once a week! Even though we have three hour classes, it’s often just not enough time! Here is an overview of some of the processes so you have a bit more grasp on some of the technical stuff! Step One – Design There are SO many ideas out there for making stuff in clay! From delicate porcelain jewellery, through to heavy sculptural work and everything in between. Deciding your direction is sometimes not that easy – when you first start, try everything, you will naturally gravitate to the style that you enjoy! The options and variations are endless and can get a wee bit overwhelming too! Check in with me before you start to ensure your ideas will work, what order you might do things, how you could achieve the look you are seeking and any other technical data required! Step Two – Making Clay is thixotropic. This means that as you work with it, the clay first gets sloppier and wetter, before is begins to dry in the atmosphere. For most things, you simply can’t do all parts of the project at once. An example of work order might look like: Get last weeks work out from the shelves Prepare clay for today’s work – roll your clay, prepare balls for throwing, make the first stage of a pinch pot) Clean up last week’s work and put it on the shelf for bisque firing Check that you have any glazing to do – and do enough of it that you will have time to finish your main project Do the next step of your next project – there might be a further step that can’t be complete immediately, in that case, wrap your work well and put onto the shelves. Letting your work rest for a while can really help keep your work clean and professional looking. Many things require bagging under plastic to keep it ready for work the next week – put your name on the outside of the bag so you can find your work easily. We have stickers and markers. Consider how you want to decorate your work – coloured slip can be applied at a fairly wet stage (remembering that it will make your work even wetter!). Trying to apply slip to dry clay won’t work! If you want to do sgraffito – you will need to keep the work leather hard (a state of dryness where you can still work the clay with a little effort and a little water and care). Step Three – Drying Most of the time your work can go into the rack uncovered to let it dry out for the following week. If you want to continue forming or shaping you will need to double bag your work – put your work on a suitable sized bat and put the bat in a bag so the base of the bag is under the bat, then put another bag over the top of the work and tuck the top of the bag under the bat. If you want to trim (or turn) your thrown work the following week, it should also be double bagged. If your work is large, delicate, or of uneven thicknesses, you should lightly cover your work for drying. When considering the drying process, bare in mind the weather, humidity and wind! The hotter and dryer, the faster things dry and work can dry unevenly in the shelves – this can lead to cracking – another time to lightly cover your work for drying. Step Four – Trimming and Cleaning Up Your work is dry! It is called greenware now and it is at it’s most fragile! Handle everything with two hands. I often refer to soft hands – keep everything gentle and with your fingers spread as much as possible. Try to not pick up things like plates too much, and always with both hands! Before your work can be bisque fired it should be “cleaned up”. You work won’t go into the kiln if it has sharp edges – when glazed, sharp edges turn into razor blades! Use a piece of fly wire to rub the work all over – this will scratch a little so be light handed. Use a knife or metal kidney to scrape any areas that require a bit more dynamic treatment than the fly wire offers! Finally, a very light wipe over with a slightly damp sponge can help soften and soothe all of your edges and dags! Trimming thrown work: If you are planning to trim (or turn) your thrown work (and you should be), make sure you bag it well – your work should be leather hard to almost dry for easiest trimming. Use this step to finish the work completely – use a metal kidney to polish the surface, or a slightly damp sponge to give a freshly thrown look. Wipe the sponge around the rim after trimming, and check the inside of the pot for dags! Trimming slip cast work: Usually I will trim the rims of your work on the wheel the following day to make that stage easier, however you will still need to check your work for lumps and bumps. Last but not least – check that your name is still clearly on the bottom of your work. Step Five – Bisque Firing When the work is completely dry it can go into the bisque kiln. The bisque kiln is fired to 1000°C. This process burns off the water in the clay as well as some of the chemically bound water. The structure of the clay is not altered that much at this temperature. Inside the bisque kiln, the work is stacked a little, small bowl inside a larger bowl and onto a heavy plate. Smaller items like decorations or drink coasters might get stacked several high. Consideration is paid to the weight of the stack and shape of the work. A bisque kiln can fire about one and a half times the amount of work that the glaze kiln can fire. The firing takes about 10 hours to complete the cycle and about two days to cool down. Once it has been emptied the work is placed in the glaze room ready for you to decorate! Step Six – Glazing Decorating your work with colour can be a lot of fun – and time consuming! There are three main options for surface treatment at this stage: Oxide Washes Underglazes Glazes Washes and underglazes do not “glaze” the work – It will still need a layer of glaze to fully seal the clay (washes don’t need glaze on surfaces not designed for food or liquid as they can gloss up a little on their own). Underglazes are stable colourants that turn out pretty much how they look in the jar. They can be mixed with each other to form other colours and can be used like water colours to paint onto your work. Mostly they should have a clear glaze on top to seal them. Oxides are a different species – the pink oxide (cobalt) wash turns out bright blue for instance. They don’t always need a glaze on top, and some glazes can change the colour of the wash! The glazes need no other “glaze” on top! Be careful of unknown glaze interactions – you can put any combination of glaze in a bowl or on a plate, but only a single glaze on the outside of any vertical surface! Glazes are a chemical reaction under heat. We don’t know the exact chemicals in the Mayco glazes we use. I can guess by the way they interact with each other, however, on the whole, you need to test every idea you have, and not run the test on a vertical surface! Simply put, glaze is a layer of glass like substance that bonds with the clay underneath. Clay is made of silica, alumina and water. Glaze is made of mostly silica. Silica has a melting point of 1700°C and we fire to 1240°C. The silica requires a “flux” to help it melt at the lower temperature. Fluxes can be all sorts of chemicals – a common one is calcium – calcium has a melting point of 2500°C, however, together they both melt at a much lower temperature! Colourants are metal oxides like cobalt (blue), chrome (green through black), copper (green, blue, even red!), manganese (black, purple and pink) iron (red brown), etc. Different chemicals in the glaze can have dramatic effects. for example, barium carbonate (which we don’t use) turns manganese bright pink! Other elements can turn manganese dioxide brown, blue, purple and reddish brown. Manganese dioxide is a flux in and of itself as well. So, glazes that get their black and purple colours, often interact with other glazes and RUN! Our mirror black is a good example – it mixes really well with many glazes because it fluxes them – causes them to melt faster. It will also bring out many beautiful colours in the glazes because it’s black colouring most definitely comes from manganese dioxide! Glaze chemistry is a whole subject on it’s own! We use commercial Mayco glazes on purpose – for their huge range of colour possibilities, stability, cool interactions, artistic freedom with the ability to easily brush the glazes on and ease of use. We currently have almost 50 glazes on hand! A major project is to test the interactions of all glazes with each other. That is 2,500 test tiles!!!! I’m going to make the wall behind the wheels the feature wall of pretty colours! Step Seven – Glaze (Gloss or sometimes called “Glost”) Firing Most of the time this is the final stage of making your creation (but not always!) The glaze kiln goes to 1240°C. This is called cone 6, or midrange. It is the low end of stoneware temperatures. Stoneware clays and glazes are typically fired at cone 8 – 10, that is 1260 – 1290°C. The energy requirement to go from 1240°C to 1280°C is almost a 30% more! Our clay is formulated to vitrify (mature, turn “glass-like”) at 1240°, as are our glazes. A glaze kiln take around 12 hours to reach temperature and two to three days to cool down. Sometimes a third firing process is required – this is for decoration that is added to work after the glaze firing. For example – adding precious metals and lustres. this firing temperature is usually around 600 – 800°C depending upon the techniques being used. There are many students interested in gold and silver trims – we will be doing this third type of firing soon! After firing your work will be in the student finished work shelves. Remember to pay for it before you head out the door! There is a small extra charge for using porcelain clay (it’s more than twice the price of regular clay), and for any third firing process! Once your work has been fired it can not turn back into clay for millennia – so don’t fire it if you don’t like it! Put it in the bucket for recycling. https://firebirdstudios.com.au/the-process-of-making-pottery/Ceramics have evolved over thousands of years.A white earthenware side plate with a gadroon edge. Has water marks and chips on front.‘Johnson Bros England Reg No 15587’flagstaff hill, warrnambool, shipwrecked-coast, flagstaff-hill, flagstaff-hill-maritime-museum, maritime-museum, shipwreck-coast, flagstaff-hill-maritime-village, johnson bros, ceramics, tableware -
 Flagstaff Hill Maritime Museum and Village
Domestic object - Plate, Alfred Meakin
... everything with two hands. I often refer to soft hands – keep... and it is at it’s most fragile! Handle everything with two hands. I often ...The Process of Making Pottery Decorating, Firing, Glazing, Making, Technical There is a rhythm and flow to clay. It can’t be done all at once! Even the making process! It can take weeks to get everything done, especially if you can only work on your pottery once a week! Even though we have three hour classes, it’s often just not enough time! Here is an overview of some of the processes so you have a bit more grasp on some of the technical stuff! Step One – Design There are SO many ideas out there for making stuff in clay! From delicate porcelain jewellery, through to heavy sculptural work and everything in between. Deciding your direction is sometimes not that easy – when you first start, try everything, you will naturally gravitate to the style that you enjoy! The options and variations are endless and can get a wee bit overwhelming too! Check in with me before you start to ensure your ideas will work, what order you might do things, how you could achieve the look you are seeking and any other technical data required! Step Two – Making Clay is thixotropic. This means that as you work with it, the clay first gets sloppier and wetter, before is begins to dry in the atmosphere. For most things, you simply can’t do all parts of the project at once. An example of work order might look like: Get last weeks work out from the shelves Prepare clay for today’s work – roll your clay, prepare balls for throwing, make the first stage of a pinch pot) Clean up last week’s work and put it on the shelf for bisque firing Check that you have any glazing to do – and do enough of it that you will have time to finish your main project Do the next step of your next project – there might be a further step that can’t be complete immediately, in that case, wrap your work well and put onto the shelves. Letting your work rest for a while can really help keep your work clean and professional looking. Many things require bagging under plastic to keep it ready for work the next week – put your name on the outside of the bag so you can find your work easily. We have stickers and markers. Consider how you want to decorate your work – coloured slip can be applied at a fairly wet stage (remembering that it will make your work even wetter!). Trying to apply slip to dry clay won’t work! If you want to do sgraffito – you will need to keep the work leather hard (a state of dryness where you can still work the clay with a little effort and a little water and care). Step Three – Drying Most of the time your work can go into the rack uncovered to let it dry out for the following week. If you want to continue forming or shaping you will need to double bag your work – put your work on a suitable sized bat and put the bat in a bag so the base of the bag is under the bat, then put another bag over the top of the work and tuck the top of the bag under the bat. If you want to trim (or turn) your thrown work the following week, it should also be double bagged. If your work is large, delicate, or of uneven thicknesses, you should lightly cover your work for drying. When considering the drying process, bare in mind the weather, humidity and wind! The hotter and dryer, the faster things dry and work can dry unevenly in the shelves – this can lead to cracking – another time to lightly cover your work for drying. Step Four – Trimming and Cleaning Up Your work is dry! It is called greenware now and it is at it’s most fragile! Handle everything with two hands. I often refer to soft hands – keep everything gentle and with your fingers spread as much as possible. Try to not pick up things like plates too much, and always with both hands! Before your work can be bisque fired it should be “cleaned up”. You work won’t go into the kiln if it has sharp edges – when glazed, sharp edges turn into razor blades! Use a piece of fly wire to rub the work all over – this will scratch a little so be light handed. Use a knife or metal kidney to scrape any areas that require a bit more dynamic treatment than the fly wire offers! Finally, a very light wipe over with a slightly damp sponge can help soften and soothe all of your edges and dags! Trimming thrown work: If you are planning to trim (or turn) your thrown work (and you should be), make sure you bag it well – your work should be leather hard to almost dry for easiest trimming. Use this step to finish the work completely – use a metal kidney to polish the surface, or a slightly damp sponge to give a freshly thrown look. Wipe the sponge around the rim after trimming, and check the inside of the pot for dags! Trimming slip cast work: Usually I will trim the rims of your work on the wheel the following day to make that stage easier, however you will still need to check your work for lumps and bumps. Last but not least – check that your name is still clearly on the bottom of your work. Step Five – Bisque Firing When the work is completely dry it can go into the bisque kiln. The bisque kiln is fired to 1000°C. This process burns off the water in the clay as well as some of the chemically bound water. The structure of the clay is not altered that much at this temperature. Inside the bisque kiln, the work is stacked a little, small bowl inside a larger bowl and onto a heavy plate. Smaller items like decorations or drink coasters might get stacked several high. Consideration is paid to the weight of the stack and shape of the work. A bisque kiln can fire about one and a half times the amount of work that the glaze kiln can fire. The firing takes about 10 hours to complete the cycle and about two days to cool down. Once it has been emptied the work is placed in the glaze room ready for you to decorate! Step Six – Glazing Decorating your work with colour can be a lot of fun – and time consuming! There are three main options for surface treatment at this stage: Oxide Washes Underglazes Glazes Washes and underglazes do not “glaze” the work – It will still need a layer of glaze to fully seal the clay (washes don’t need glaze on surfaces not designed for food or liquid as they can gloss up a little on their own). Underglazes are stable colourants that turn out pretty much how they look in the jar. They can be mixed with each other to form other colours and can be used like water colours to paint onto your work. Mostly they should have a clear glaze on top to seal them. Oxides are a different species – the pink oxide (cobalt) wash turns out bright blue for instance. They don’t always need a glaze on top, and some glazes can change the colour of the wash! The glazes need no other “glaze” on top! Be careful of unknown glaze interactions – you can put any combination of glaze in a bowl or on a plate, but only a single glaze on the outside of any vertical surface! Glazes are a chemical reaction under heat. We don’t know the exact chemicals in the Mayco glazes we use. I can guess by the way they interact with each other, however, on the whole, you need to test every idea you have, and not run the test on a vertical surface! Simply put, glaze is a layer of glass like substance that bonds with the clay underneath. Clay is made of silica, alumina and water. Glaze is made of mostly silica. Silica has a melting point of 1700°C and we fire to 1240°C. The silica requires a “flux” to help it melt at the lower temperature. Fluxes can be all sorts of chemicals – a common one is calcium – calcium has a melting point of 2500°C, however, together they both melt at a much lower temperature! Colourants are metal oxides like cobalt (blue), chrome (green through black), copper (green, blue, even red!), manganese (black, purple and pink) iron (red brown), etc. Different chemicals in the glaze can have dramatic effects. for example, barium carbonate (which we don’t use) turns manganese bright pink! Other elements can turn manganese dioxide brown, blue, purple and reddish brown. Manganese dioxide is a flux in and of itself as well. So, glazes that get their black and purple colours, often interact with other glazes and RUN! Our mirror black is a good example – it mixes really well with many glazes because it fluxes them – causes them to melt faster. It will also bring out many beautiful colours in the glazes because it’s black colouring most definitely comes from manganese dioxide! Glaze chemistry is a whole subject on it’s own! We use commercial Mayco glazes on purpose – for their huge range of colour possibilities, stability, cool interactions, artistic freedom with the ability to easily brush the glazes on and ease of use. We currently have almost 50 glazes on hand! A major project is to test the interactions of all glazes with each other. That is 2,500 test tiles!!!! I’m going to make the wall behind the wheels the feature wall of pretty colours! Step Seven – Glaze (Gloss or sometimes called “Glost”) Firing Most of the time this is the final stage of making your creation (but not always!) The glaze kiln goes to 1240°C. This is called cone 6, or midrange. It is the low end of stoneware temperatures. Stoneware clays and glazes are typically fired at cone 8 – 10, that is 1260 – 1290°C. The energy requirement to go from 1240°C to 1280°C is almost a 30% more! Our clay is formulated to vitrify (mature, turn “glass-like”) at 1240°, as are our glazes. A glaze kiln take around 12 hours to reach temperature and two to three days to cool down. Sometimes a third firing process is required – this is for decoration that is added to work after the glaze firing. For example – adding precious metals and lustres. this firing temperature is usually around 600 – 800°C depending upon the techniques being used. There are many students interested in gold and silver trims – we will be doing this third type of firing soon! After firing your work will be in the student finished work shelves. Remember to pay for it before you head out the door! There is a small extra charge for using porcelain clay (it’s more than twice the price of regular clay), and for any third firing process! Once your work has been fired it can not turn back into clay for millennia – so don’t fire it if you don’t like it! Put it in the bucket for recycling. https://firebirdstudios.com.au/the-process-of-making-pottery/Ceramics have evolved over thousands of years.Earthenware dessert plate, cream colour. Made by Alfred Meakin, England. Backstamped ‘Alfred Meakin England’. flagstaff hill, warrnambool, shipwrecked-coast, flagstaff-hill, flagstaff-hill-maritime-museum, maritime-museum, shipwreck-coast, flagstaff-hill-maritime-village, alfred meakin, ceramics, earthenware, kitchenware -
 Flagstaff Hill Maritime Museum and Village
Domestic object - Jug
... everything with two hands. I often refer to soft hands – keep... and it is at it’s most fragile! Handle everything with two hands. I often ...The Process of Making Pottery Decorating, Firing, Glazing, Making, Technical There is a rhythm and flow to clay. It can’t be done all at once! Even the making process! It can take weeks to get everything done, especially if you can only work on your pottery once a week! Even though we have three hour classes, it’s often just not enough time! Here is an overview of some of the processes so you have a bit more grasp on some of the technical stuff! Step One – Design There are SO many ideas out there for making stuff in clay! From delicate porcelain jewellery, through to heavy sculptural work and everything in between. Deciding your direction is sometimes not that easy – when you first start, try everything, you will naturally gravitate to the style that you enjoy! The options and variations are endless and can get a wee bit overwhelming too! Check in with me before you start to ensure your ideas will work, what order you might do things, how you could achieve the look you are seeking and any other technical data required! Step Two – Making Clay is thixotropic. This means that as you work with it, the clay first gets sloppier and wetter, before is begins to dry in the atmosphere. For most things, you simply can’t do all parts of the project at once. An example of work order might look like: Get last weeks work out from the shelves Prepare clay for today’s work – roll your clay, prepare balls for throwing, make the first stage of a pinch pot) Clean up last week’s work and put it on the shelf for bisque firing Check that you have any glazing to do – and do enough of it that you will have time to finish your main project Do the next step of your next project – there might be a further step that can’t be complete immediately, in that case, wrap your work well and put onto the shelves. Letting your work rest for a while can really help keep your work clean and professional looking. Many things require bagging under plastic to keep it ready for work the next week – put your name on the outside of the bag so you can find your work easily. We have stickers and markers. Consider how you want to decorate your work – coloured slip can be applied at a fairly wet stage (remembering that it will make your work even wetter!). Trying to apply slip to dry clay won’t work! If you want to do sgraffito – you will need to keep the work leather hard (a state of dryness where you can still work the clay with a little effort and a little water and care). Step Three – Drying Most of the time your work can go into the rack uncovered to let it dry out for the following week. If you want to continue forming or shaping you will need to double bag your work – put your work on a suitable sized bat and put the bat in a bag so the base of the bag is under the bat, then put another bag over the top of the work and tuck the top of the bag under the bat. If you want to trim (or turn) your thrown work the following week, it should also be double bagged. If your work is large, delicate, or of uneven thicknesses, you should lightly cover your work for drying. When considering the drying process, bare in mind the weather, humidity and wind! The hotter and dryer, the faster things dry and work can dry unevenly in the shelves – this can lead to cracking – another time to lightly cover your work for drying. Step Four – Trimming and Cleaning Up Your work is dry! It is called greenware now and it is at it’s most fragile! Handle everything with two hands. I often refer to soft hands – keep everything gentle and with your fingers spread as much as possible. Try to not pick up things like plates too much, and always with both hands! Before your work can be bisque fired it should be “cleaned up”. You work won’t go into the kiln if it has sharp edges – when glazed, sharp edges turn into razor blades! Use a piece of fly wire to rub the work all over – this will scratch a little so be light handed. Use a knife or metal kidney to scrape any areas that require a bit more dynamic treatment than the fly wire offers! Finally, a very light wipe over with a slightly damp sponge can help soften and soothe all of your edges and dags! Trimming thrown work: If you are planning to trim (or turn) your thrown work (and you should be), make sure you bag it well – your work should be leather hard to almost dry for easiest trimming. Use this step to finish the work completely – use a metal kidney to polish the surface, or a slightly damp sponge to give a freshly thrown look. Wipe the sponge around the rim after trimming, and check the inside of the pot for dags! Trimming slip cast work: Usually I will trim the rims of your work on the wheel the following day to make that stage easier, however you will still need to check your work for lumps and bumps. Last but not least – check that your name is still clearly on the bottom of your work. Step Five – Bisque Firing When the work is completely dry it can go into the bisque kiln. The bisque kiln is fired to 1000°C. This process burns off the water in the clay as well as some of the chemically bound water. The structure of the clay is not altered that much at this temperature. Inside the bisque kiln, the work is stacked a little, small bowl inside a larger bowl and onto a heavy plate. Smaller items like decorations or drink coasters might get stacked several high. Consideration is paid to the weight of the stack and shape of the work. A bisque kiln can fire about one and a half times the amount of work that the glaze kiln can fire. The firing takes about 10 hours to complete the cycle and about two days to cool down. Once it has been emptied the work is placed in the glaze room ready for you to decorate! Step Six – Glazing Decorating your work with colour can be a lot of fun – and time consuming! There are three main options for surface treatment at this stage: Oxide Washes Underglazes Glazes Washes and underglazes do not “glaze” the work – It will still need a layer of glaze to fully seal the clay (washes don’t need glaze on surfaces not designed for food or liquid as they can gloss up a little on their own). Underglazes are stable colourants that turn out pretty much how they look in the jar. They can be mixed with each other to form other colours and can be used like water colours to paint onto your work. Mostly they should have a clear glaze on top to seal them. Oxides are a different species – the pink oxide (cobalt) wash turns out bright blue for instance. They don’t always need a glaze on top, and some glazes can change the colour of the wash! The glazes need no other “glaze” on top! Be careful of unknown glaze interactions – you can put any combination of glaze in a bowl or on a plate, but only a single glaze on the outside of any vertical surface! Glazes are a chemical reaction under heat. We don’t know the exact chemicals in the Mayco glazes we use. I can guess by the way they interact with each other, however, on the whole, you need to test every idea you have, and not run the test on a vertical surface! Simply put, glaze is a layer of glass like substance that bonds with the clay underneath. Clay is made of silica, alumina and water. Glaze is made of mostly silica. Silica has a melting point of 1700°C and we fire to 1240°C. The silica requires a “flux” to help it melt at the lower temperature. Fluxes can be all sorts of chemicals – a common one is calcium – calcium has a melting point of 2500°C, however, together they both melt at a much lower temperature! Colourants are metal oxides like cobalt (blue), chrome (green through black), copper (green, blue, even red!), manganese (black, purple and pink) iron (red brown), etc. Different chemicals in the glaze can have dramatic effects. for example, barium carbonate (which we don’t use) turns manganese bright pink! Other elements can turn manganese dioxide brown, blue, purple and reddish brown. Manganese dioxide is a flux in and of itself as well. So, glazes that get their black and purple colours, often interact with other glazes and RUN! Our mirror black is a good example – it mixes really well with many glazes because it fluxes them – causes them to melt faster. It will also bring out many beautiful colours in the glazes because it’s black colouring most definitely comes from manganese dioxide! Glaze chemistry is a whole subject on it’s own! We use commercial Mayco glazes on purpose – for their huge range of colour possibilities, stability, cool interactions, artistic freedom with the ability to easily brush the glazes on and ease of use. We currently have almost 50 glazes on hand! A major project is to test the interactions of all glazes with each other. That is 2,500 test tiles!!!! I’m going to make the wall behind the wheels the feature wall of pretty colours! Step Seven – Glaze (Gloss or sometimes called “Glost”) Firing Most of the time this is the final stage of making your creation (but not always!) The glaze kiln goes to 1240°C. This is called cone 6, or midrange. It is the low end of stoneware temperatures. Stoneware clays and glazes are typically fired at cone 8 – 10, that is 1260 – 1290°C. The energy requirement to go from 1240°C to 1280°C is almost a 30% more! Our clay is formulated to vitrify (mature, turn “glass-like”) at 1240°, as are our glazes. A glaze kiln take around 12 hours to reach temperature and two to three days to cool down. Sometimes a third firing process is required – this is for decoration that is added to work after the glaze firing. For example – adding precious metals and lustres. this firing temperature is usually around 600 – 800°C depending upon the techniques being used. There are many students interested in gold and silver trims – we will be doing this third type of firing soon! After firing your work will be in the student finished work shelves. Remember to pay for it before you head out the door! There is a small extra charge for using porcelain clay (it’s more than twice the price of regular clay), and for any third firing process! Once your work has been fired it can not turn back into clay for millennia – so don’t fire it if you don’t like it! Put it in the bucket for recycling. https://firebirdstudios.com.au/the-process-of-making-pottery/The form of the jug has been in use for many centuries.Stoneware jug. Two tone brown glaze with pierced lip behind spout. Spout chipped.None.flagstaff hill, warrnambool, shipwrecked-coast, flagstaff-hill, flagstaff-hill-maritime-museum, maritime-museum, shipwreck-coast, flagstaff-hill-maritime-village, jug, ceramic jug -
 Eltham District Historical Society Inc
Negative - Photograph, J.H. Clark, Eltham Tennis Court, c.1905
... in November all the requisites were to hand, two courts were marked... in November all the requisites were to hand, two courts were marked ...People pose for a photograph at the Eltham tennis court. Four men set to play a doubles match while a group of women look on. The sandy looking court (with weeds growing) is surrounded by wooden posts with wire mesh, in the middle of a park with mature gum trees in the background. The tennis court was situated in Eltham South at Bremner’s Flats (near present day Wingrove Park). The court is approximately the location of the present day small carpark. Main Road can be seen in the background from centre left and Mount Pleasant just above, the intersection just above the centre of court. The photo by J.H. Clark has been taken outside the court. Cross Ref SEPP_0721 of the Lady Premiers for 1909-1910 in which an umpires raised seating platform has been erected and the court surface is more refined with marked lines. The Eltham Lawn Tennis Club was formed on a Saturday evening, the 29th of October, 1898 at a meeting held at the Eltham State school. The meeting was large and representative. Twenty members were enrolled, and eight more have since been added. Officers and a committee were duly elected, and the Treasurer was instructed to purchase the necessary requisites without delay. By the end of the first week in November all the requisites were to hand, two courts were marked out, and practice begun. The formal opening of the Courts of this Club took place on Saturday, November 12, 1898, when 26 members and their friends assembled. After several sets had been contested an adjournment was made for tea provided by the members and nicely laid out under the shade of the trees. Afterwards, sets were again formed and the game was proceeded with in a lively spirit till nearly dark, when all dispersed having thoroughly enjoyed themselves during the afternoon. (Evelyn Observer, and South and East Bourke Record (Vic. : 1882 - 1902), Friday 18 November 1898, page 2) Reproduced on p89 of 'Pioneers & Painters' Photographer: J.H. Clark John Henry Clark was the youngest of three boys born to William Henry Clark (1823-1877) and Maria White (1843-1914). He and his brothers, William Charles Clark (1872-1945), Clement Kent Clark (1874-1912) operated a photography business (Clark Bros.) from 25 Thomas Street, Windsor near Prahran during the period c.1894 to 1914. Following death of Clement in September 1912 and their mother in 1914, the Clark Bros business appears to have dissolved, the premises demolished, and a new house was under construction in 1915. John set up business independently in 1914 operating out of 29 Moor Street, Fitzroy where he is registered in the 1914 and 1915 Electoral Rolls. By 1916 John had relocated to Eltham where he continued his practice as a photographer and took many of the early images around the district of Little Eltham. Around 1930 John changed professions and opened a small cobbler's shop in 1931 near the pond opposite Dalton Street adjacent to the Jarrold family cottage. He never married and continued his profession as a bootmaker from this little shop, maintaining a close relationship with Mrs Jarrold for the rest of their lives. His bootmaker shop remains today beside the Whitecloud cottage and is one of only three remaining shops in the area from the early 20th century. There are a couple of images of Eltham taken by Clark Bros. in the Eltham District Historical Society collection, one such example being Hunniford’s Post Office with Miss Anne Hunniford out front (EDHS_00140 - marked on the back of the print, Clark Bros., 25 Thomas St. Windsor), which would date this image between c.1894 and 1914. Other early images of Eltham taken by John Henry Clark are marked on the face “J. H. Clark Photo” and it is assumed these are dated between 1914 and 1930. It is noted that the Grant of Probate for John H Clark of Eltham South dated 5 April !957 (513/387) records his occupation as "X Photographer".This photo forms part of a collection of photographs gathered by the Shire of Eltham for their centenary project book,"Pioneers and Painters: 100 years of the Shire of Eltham" by Alan Marshall (1971). The collection of over 500 images is held in partnership between Eltham District Historical Society and Yarra Plenty Regional Library (Eltham Library) and is now formally known as the 'The Shire of Eltham Pioneers Photograph Collection.' It is significant in being the first community sourced collection representing the places and people of the Shire's first one hundred years.Digital image 4 x 5 inch B&W Negshire of eltham pioneers photograph collection, bremner's flat, eltham, eltham tennis court, j.h. clark photo, pioneers and painters, tennis court, wingrove park, 1905, eltham lawn tennis club, main road, mount pleasant road -
 Bendigo Historical Society Inc.
Document - PETER ELLIS COLLECTION: BUSH MUSIC CLUB COLONIAL BALL, 1990
... & retire, 4 Adv, turn two hands, return to place. 4 1st couple lead... & retire, 4 Adv, turn two hands, return to place. 4 1st couple lead ...Small off white coloured booklet Bush Music Club Inc. Colonial Subscription Ball 1990 Dancers Companion (A guide to the Quadrilles) The Quadrille Figure 1 (Le Pantelon) (2x32) 8 Top couples R and L through. (without giving hands). 8 Set & turn Partners 8 Top ladies chain. 4 Top couples promenade across set. 4 Half R and L to place. 32 Side couples repeat Figure 2 (Le 'Ete) (4x24) 4 Top couples advance & retire. 4 Cross over (without changing places with partner). 8 Repeat back to place. 8 Set & turn partners. 24 Sides repeat. 48 Top and Sides repeat. Figure 3 (La Poule) (4x32) 4 Lady 1, Man 2 adv, tough RH, retire to opposite place. 4 Lady 1, Man 2 adv, join LH give RH to partner 4 Line of 4 balance fwd & back twice. 4 Men lead partners to opp. Place. 4 Lady 1, Man 2 adv. & ret. 4 Lady 1, Man 2 adv, honour & ret. 4 Top couples, advance & retire. 4 Half R & L to place. 32 Repeat with Lady 2, Man !. 32 Repeat with Lady 3, Man 4. 32 Repeat with Lady 4, Man 3. The Quadrille Figure 4. (La Pastourelle) (4x32) 4 1st couple advance & retire. 4 1st couple adv, lady join 2nd couple. 4 Line of 3 adv. & ret, 1st man retire. 4 Line of 3 adv. Ladies cross to 1st man. 4 Line of 3 adv. & ret, 2nd man retire. 4 Re-advance, form circle with 2nd man. 4 Circle L half way round. 4 Half R & L to place. 32 Repeat with 2nd couple leading. 32 Repeat with 3rd couple leading. 32 Repeat with 4th couple leading. Figure 5 (La Finale) (4 x 32 + 8) 4 All advance & retire. 4 Turn partners. 4 Ladies adv, curtsey & retire. 4 Men advance, bow & retire. 8 All set & turn corners. 8 Promenade with corner. (men to original place with corner) 96 Repeat 3 times to return to partner. 4 All advance & retire. Turn Partners. Notes: 1 Couples numbered 2 Set & turn is a 'balance' set and open hand turn. The Prince Imperial's Quadrille Figure 1. (4x24) 4 Top couples visit right, honour sides. 4 Top men retire with partner & side lady to opposite place, (ladies facing each other). 8 Ladies grand chain to places 8 All set and turn partners 24 Top couples repeat back to place. 48 Repeat with side couples. Figure 2 (4 x 24) 4 1st Lady, 2nd man adv & turn in centre finish facing 2nd lady. 2 2nd lady pass through to 1st man. 2 Both couples turn out to place. 4 top couples advance & retire. 4 Ladies chain back to place. (Nariel) 8 Chasse-croise. (4 steps past partner RH turn corner 4 steps back, LH turn with partner.) 24 Repeat wth 2nd lady, 1st man leading 24 Repeat wth 3rd lady, 4th man leading 24 Repeat wth 4th lady, 3rd man leading. Figure 3 (4x32) 4 1st lady to centre, curtsey to partner. (RH in RH, ACW turn in to centre) 4 2nd lady to centre, curtsey to partner. 4 3rd lady to centre, curtsey to partner.4 4th lady to centre, curtsey to partner. 8 ladies join hands, circle R, small steps after circle R, Men join circle, (giving RH to partner). 4 Balance for 4 (step lift x 4) 4 Turn partners to place, bow & curtsey. 32 Repeat, Lady 2, 1, 4 & 3 to centre 32 Repeat Lady 3, 4, 2 & 1 to centre 32 Repeat, Lady 4, 3, 1 & 2 to centre The Prince Imperial's Quadrille Figure 4 (4x32) 4 Top couples advance & retire. 4 Top couples adv, ladies move to R, as men retire to place. 8 Line of 3 adv & ret twice. 4 Single men adv, bow and retire. 4 Re-advance and turn to face partner. 4 Circle L half way round (with partner & side couple). 4 Half R & L to place. 32 Repeat with side couples leading. 32 Repeat with top couples leading (men moving to left as ladies retire) 32 Repeat with Side couple leading. (Men moving to left as ladies retire) Figure 5 (4x32 +32) 16 Ladies to the right, (RH turn with corner man then continue round to the right turning each man) 4 1st Lady, 2nd man advance & retire 4 re-advance & turn RH (finish facing partners) 8 set & turn partners (finishing in place) 32 Repeat with 2nd Lady, 1st man leading 32 repeat with 3rd lady, 4th man leading 32 Repeat with 4th Lady, 3rd man leading 16 Ladies to the right again. 4 Men turn partners to centre. 4 All bow and curtsey. 8 Promenade set ( hall) Note: Set & turn is a 'balance' set and open hand turn. The Parisienne Quadrille Figure 1 (1x32) 8 Couples R and L through. (without giving hands) 8 set & turn partners 8 Ladies chain. 4 Couples promenade across set. 4 Half R and L to place. Figure 2 (2x24) 4 Couples advance & retire. 4 Cross over (without changing places with partners) 8 Repeat back to place. 8 Set & turn partners. 24 Repeat. Figure 3 (2x32) 4 Lady 1, Man 2 adv, touch RH, retire to opposite place. 4 Lady 1, Man 2 adv, join LH, give RH to partner. 4 Line of 4 balance fwd & back twice 4 Men lead partners to opp. Place 4 Lady 1, Man 2 adv & retire 4 Lady 1, Man 2 adv, honour & ret. 4 Couples, advance & retire. 4 Half R & L to place. 32 Repeat with Lady 2, Man 1. The Parisienne Quadrille Figure 4. (2x32) 4 1st couple advance & retire. 4 1st couple adv, lady join 2nd couple. 4 Line of 3 adv. & ret, 1st man retire. 4 Line of 3 adv. Ladies cross to 1st man. 4 Line of 3 adv. & ret, 2nd man retire. 4 Re-advance, form circle with 2nd man. 4 Circle L half way round. 4 Half R & L to place. 32 Repeat with 2nd couple leading. Figure 5 (2x32) 4 Couples advance & retire 4 Cross over 8 Repeat back to place. 8 Ladies chain across & back.8 Set & turn partners. 32 Repeat Notes: 1 This 'quadrille' is similar to the first set (1st 4 figures) and is danced as two couple sets. 2 Set & turn is a 'balance' set and open hand turn. The Lancers Quadrille Figure 1 (4x24) 4 1st lady, 2nd man advance & retire, 4 Adv, turn two hands, return to place. 4 1st couple lead through across set 4 2nd couple lead through back 8 all set & turn corners. 24 Repeat, 2nd lady, 1st man leading 24 Repeat 3rd lady, 4th man leading 24 Repeat, 4th lady, 3rd man leading Figure 2 (4x24) 4 1st couple advance & retire. 2 1st lady adv to centre, turn to face partner 2 1st couple honour each other. 8 1st couple set and turn then sides form top & bottom lines 4 Lines advance & retire, 4 Advance and turn partners to place. 24 Repeat with 2nd couple leading 24 Repeat with 3rd couple leading 24 Repeat with 4th couple leading Figure 3. (2x32) 4 Ladies advance, curtsey & retire. 4 Men adv, bow, turn by left, bow to partners, then join RH in centre, (ladies RH on partners left elbow). 8 Promenade round set to place. 4 Ladies adv, curtsey & retire again. 4 Men adv, bow, turn by right, bow to partners, join LH in centre, right arm behind partner. 8 Promenade round to set in place. 32 Repeat. The Lancers Quadrille. Figure 4. (4x24) 8 Top couples visit R then L 4 Right Hands around with LH couple 4 then left hands around. 8 Circle left with that couple. 24 Repeat with side couples leading. 24 repeat, top couples visit L then R. 24 Repeat, side couples visit L then R. Figure 5. (4x48 +24) 8 All grand chain 1/2 way round and honour partners. 8 Continue grand chain to place and honour partners. 8 1st couple visit, return to place, facing out with sides in behind. 2 Change places with partner, 2 All rock fwd and back 2 change places again 2 All rock fwd and back 8 Cast out reform in lines 4 Lines advance & retire 4 Advance & turn partners to place 48 Repeat with 2nd couple leading 48 Repeat with 3rd couple leading 48 Repeat with 4th couple leading. 8 Grand chain 1/2 way round and honour partners. 8 continue grand chain to place and honour partners 8 swing partners (R arm round partner, LH in air) Note: All figures walked. Set & Turn is a 'balance' set and open two hand turn. The Caledonians Quadrille Figure 1. (2x32) 4 Top couples R.H. across, move CW (Ladies hands joined over Mens). 4 then L.H. across, move ACW. 8 Set & swing Partners 8 Top ladies chain. 4 Top couples promenade across set. 4 Half R and L to place. 32 Side couples repeat. Figure 2. (4x24) 8 1st Man advance & retire twice. 8 Set & swing corners. 8 Promenade with corners (to men's position.) 24 2nd man repeat. 48 3rd and 4th man repeat. Figure 3. (4x32) 4 Lady 1, Man 2 advance & retire. 4 Re-advance, 2 hand turn to place. 8 1st & 2nd couples lead through and back. (1st lead through across, 2nd back) 8 Set & swing corners. 4 All advance & retire. 4 Swing partners. 32 Repeat with Lady 2, Man 1. 32 Repeat with Lady 3, Man 4. 32 Repeat with Lady 4, Man 3. The Caledonians Quadrille Figure 4. (4x24) 2 Lady 1, Man 2 advance and stop. 2 Lady 2, Man 1 advance and stop. 4 Turn partners back to place. 2 All ladies to the right 4 steps. 2 All men to the left 4 steps. 2 All ladies to the right 4 steps. 2 All men to the left 4 steps. 4 Promenade to place. 4 Swing partners. 24 Repeat with Lady 2, Man 1 leading. 24 Repeat with Lady 3, Man 4 leading. 24 Repeat with Lady 4, Man 3 leading. Figure 5. (4x48 + 16) 8 1st couple visit. 4 Ladies advance, curtsey & retire. 4 Men advance, bow & retire. 8 All set & swing partners. 8 Grand chain 1/2 way round and honour partners. 4 Promenade to place 4 and swing partners. 8 Chasse-croise, (4 steps past partner, RH to corner balance fwd & back, then 4 steps back, LH to partner balance fwd & back). 48 Repeat with 2nd couple leading. 48 Repeat with 3rd couple leading. 48 Repeat with 4th couple leading. 8 All promenade set. 8 Swing partners. Note: Set & swing is 'normal' set and cross hand swing. The Royal Irish Quadrille Figure 1. (2x32) 8 Top couples to Right, R & L through 8 Set & swing Partners. 8 Ladies chain. 4 Couples promenade across (to the other couples position). 4 Half R & L to place. 32 Repeat with tops to the left. Figure 2. (4x24) 4 Top couples to Right, adv & ret. 4 Cross over (without changing places with partner). 8 Repeat back to place. 8 Set & swing partners. 24 Repeat with top couples to the Left. 48 Tops repeat with Right and Left sides. Figure 3. (4x32) 4 Lady 1,2 and Man on Right, advance, touch RH, retire to opposite place. 4 Advance again, join LH, give RH to partner. 4 Line of 4 balance fwd & back twice. 4 Men Lead partners to opp. Place. 4 Lady 1,2 and opp. Man adv & ret. 4 Advance, honour & retire. 4 Couples, advance & retire. 4 Half R & L to place. 32 Repeat with Ladies 3,4 leading. 64 Repeat with Tops facing left. The Royal Irish Quadrille Figure 4. (4x32) 4 Top couples to Right, adv & ret. 4 Re-adv, Top Ladies join opp. Couple. 4 Line of 3 adv & ret. Top men retire. 4 Line of 3 adv, ladies join other man. 4 Line of 3 adv & ret, Side men retire. 4 Re-advance, form circle with opp. Man. 4 Circle L half way round. 4 Half R & L to place. 32 Repeat with Side ladies leading. 64 Repeat with Top couples facing left. Figure 5. (4 x 32 + 8) 4 All advance & retire. 4 Swing partners. 4 Ladies advance, curtsey & retire. 4 Men advance, bow & retire. 8 All set & swing corners. 8 Promenade with corner. (Men to original place with corner). 96 Repeat 3 times to return to partner. 4 All advance & retire. 4 Swing partners. Notes: 1. This is The Quadrille danced diagonally, with Top couples dancing first with the side couple on their right, then the left. Ie. 1-3 and 2-4 then 1-4 and 2-3. 2. Set & swing is 'normal' set and irish swing.The Eightsome Reel Numbering: Clockwise 1-2-3-4 Part A (40 Bars) 4 All join hands, circle left 4 All circle right. 4 Grand Cross, Ladies join RH. 4 Grand Cross, Men join LH. 8 Set & turn Partners 16 Grand chain right round set. Part B ( 8x48 bars) 1st Lady advance to centre, Others join hands in circle. 8 Circle left and right 4 Set once and turn partner 1st Lady sets to partner then open hand turn once with partner. 4 Set once and turn opposite 1st Lady sets to opposite man, then open hand turn once. 8 Reel of 3, 1st Lady, partner and opposite man 1st Lady remains in centre. 8 Circle left and right again 4 Set once and turn side man 1st lady and man on right. 4 Set once and turn other side man 1st lady and man on left. 8 Reel of 3, 1st lady, and two side men. 48 2nd lady repeat. 96 3rd and 4th ladies repeat. 192 Men repeat same movement. The Eightsome Reel Part C (40 Bars) 8 All circle left and right. 4 Grand cross - Ladies join RH. 4 Grand Cross - Men join LH. 8 All set and turn partners. 16 Grand Chain round set. Note: Set is 'normal' set. Turn is open hand turn. NOTES 1. The Quadrille 2. The Prince Imperials 3. The Parisienne Quadrille 4. The Lancers Quadrille 5. The Caledonians Quadrille 6. The Royal Irish Quadrille 7. The Eightsome Reelperson, individual, peter ellis oam -
 Bendigo Historical Society Inc.
Document - PETER ELLIS COLLECTION: BUSH MUSIC CLUB COLONIAL BALL, 1991
... lady, 2nd man advance & retire, 4 Adv, turn two hands, return... Adv, turn two hands, return to place. 4 1st couple lead ...Small yellow booklet outline of a man on left of title and woman on right. Bush Music Club Inc. Colonial Subscription Ball 1991 Dancers Companion (A guide to the Quadrilles) The Quadrille Figure 1 (Le Pantelon) (2x32) 8 Top couples R and L through. (without giving hands). 8 Set & turn Partners 8 Top ladies chain. 4 Top couples promenade across set. 4 Half R and L to place. 32 Side couples repeat Figure 2 (Le 'Ete) (4x24) 4 Top couples advance & retire. 4 Cross over (without changing places with partner). 8 Repeat back to place. 8 Set & turn partners. 24 Sides repeat. 48 Top and Sides repeat. Figure 3 (La Poule) (4x32) 4 Lady 1, Man 2 adv, tough RH, retire to opposite place. 4 Lady 1, Man 2 adv, join LH give RH to partner 4 Line of 4 balance fwd & back twice. 4 Men lead partners to opp. Place. 4 Lady 1, Man 2 adv. & ret. 4 Lady 1, Man 2 adv, honour & ret. 4 Top couples, advance & retire. 4 Half R & L to place. 32 Repeat with Lady 2, Man !. 32 Repeat with Lady 3, Man 4. 32 Repeat with Lady 4, Man 3. The Quadrille Figure 4. (La Pastourelle) (4x32) 4 1st couple advance & retire. 4 1st couple adv, lady join 2nd couple. 4 Line of 3 adv. & ret, 1st man retire. 4 Line of 3 adv. Ladies cross to 1st man. 4 Line of 3 adv. & ret, 2nd man retire. 4 Re-advance, form circle with 2nd man. 4 Circle L half way round. 4 Half R & L to place. 32 Repeat with 2nd couple leading. 32 Repeat with 3rd couple leading. 32 Repeat with 4th couple leading. Figure 5 (La Finale) (4 x 32 + 8) 4 All advance & retire. 4 Turn partners. 4 Ladies adv, curtsey & retire. 4 Men advance, bow & retire. 8 All set & turn corners. 8 Promenade with corner. (men to original place with corner) 96 Repeat 3 times to return to partner. 4 All advance & retire. Turn Partners. Notes: 1 Couples numbered 1 4 2 3 2 Set & turn is a 'balance' set and open hand turn. The Lancers Quadrille Figure 1 (4x24) 4 1st lady, 2nd man advance & retire, 4 Adv, turn two hands, return to place. 4 1st couple lead through across set 4 2nd couple lead through back 8 all set & turn corners. 24 Repeat, 2nd lady, 1st man leading 24 Repeat 3rd lady, 4th man leading 24 Repeat, 4th lady, 3rd man leading Figure 2 (4x24) 4 1st couple advance & retire. 2 1st lady adv to centre, turn to face partner 2 1st couple honour each other. 8 1st couple set and turn then sides form top & bottom lines 4 Lines advance & retire, 4 Advance and turn partners to place. 24 Repeat with 2nd couple leading 24 Repeat with 3rd couple leading 24 Repeat with 4th couple leading Figure 3. (2x32) 4 Ladies advance, curtsey & retire. 4 Men adv, bow, turn by left, bow to partners, then join RH in centre, (ladies RH on partners left elbow). 8 Promenade round set to place. 4 Ladies adv, curtsey & retire again. 4 Men adv, bow, turn by right, bow to partners, join LH in centre, right arm behind partner. 8 Promenade round to set in place. 32 Repeat. The Lancers Quadrille. Figure 4. (4x24) 8 Top couples visit R then L 4 Right Hands around with LH couple 4 then left hands around. 8 Circle left with that couple. 24 Repeat with side couples leading. 24 repeat, top couples visit L then R. 24 Repeat, side couples visit L then R. Figure 5. (4x48 +24) 8 All grand chain 1/2 way round and honour partners. 8 Continue grand chain to place and honour partners. 8 1st couple visit, return to place, facing out with sides in behind. 2 Change places with partner, 2 All rock fwd and back 2 change places again 2 All rock fwd and back 8 Cast out reform in lines 4 Lines advance & retire 4 Advance & turn partners to place 48 Repeat with 2nd couple leading 48 Repeat with 3rd couple leading 48 Repeat with 4th couple leading. 8 Grand chain 1/2 way round and honour partners. 8 continue grand chain to place and honour partners 8 swing partners (R arm round partner, LH in air) Note: All figures walked. Set & Turn is a 'balance' set and open two hand turn. The Prince Imperial's Quadrille Figure 1. (4x24) 4 Top couples visit right, honour sides. 4 Top men retire with partner & side lady to opposite place, (ladies facing each other). 8 Ladies grand chain to places 8 All set and turn partners 24 Top couples repeat back to place. 48 Repeat with side couples. Figure 2 (4 x 24) 4 1st Lady, 2nd man adv & turn in centre finish facing 2nd lady. 2 2nd lady pass through to 1st man. 2 Both couples turn out to place. 4 top couples advance & retire. 4 Ladies chain back to place. (Nariel) 8 Chasse-croise. (4 steps past partner RH turn corner 4 steps back, LH turn with partner.) 24 Repeat with 2nd lady, 1st man leading 24 Repeat with 3rd lady, 4th man leading 24 Repeat wth 4th lady, 3rd man leading. Figure 3 (4x32) 4 1st lady to centre, curtsey to partner. (RH in RH, ACW turn in to centre) 4 2nd lady to centre, curtsey to partner. 4 3rd lady to centre, curtsey to partner.4 4th lady to centre, curtsey to partner. 8 ladies join hands, circle R, small steps after circle R, Men join circle, (giving RH to partner). 4 Balance for 4 (step lift x 4) 4 Turn partners to place, bow & curtsey. 32 Repeat, Lady 2, 1, 4 & 3 to centre 32 Repeat Lady 3, 4, 2 & 1 to centre 32 Repeat, Lady 4, 3, 1 & 2 to centre The Prince Imperial's Quadrille Figure 4 (4x32) 4 Top couples advance & retire. 4 Top couples adv, ladies move to R, as men retire to place. 8 Line of 3 adv & ret twice. 4 Single men adv, bow and retire. 4 Re-advance and turn to face partner. 4 Circle L half way round (with partner & side couple). 4 Half R & L to place. 32 Repeat with side couples leading. 32 Repeat with top couples leading (men moving to left as ladies retire) 32 Repeat with Side couple leading. (Men moving to left as ladies retire) Figure 5 (4x32 +32) 16 Ladies to the right, (RH turn with corner man then continue round to the right turning each man) 4 1st Lady, 2nd man advance & retire 4 re-advance & turn RH (finish facing partners) 8 set & turn partners (finishing in place) 32 Repeat with 2nd Lady, 1st man leading 32 repeat with 3rd lady, 4th man leading 32 Repeat with 4th Lady, 3rd man leading 16 Ladies to the right again. 4 Men turn partners to centre. 4 All bow and curtsey. 8 Promenade set ( hall) Note: Set & turn is a 'balance' set and open hand turn. The Parisienne Quadrille Figure 1 (1x32) 8 Couples R and L through. (without giving hands) 8 set & turn partners 8 Ladies chain. 4 Couples promenade across set. 4 Half R and L to place. Figure 2 (2x24) 4 Couples advance & retire. 4 Cross over (without changing places with partners) 8 Repeat back to place. 8 Set & turn partners. 24 Repeat. Figure 3 (2x32) 4 Lady 1, Man 2 adv, touch RH, retire to opposite place. 4 Lady 1, Man 2 adv, join LH, give RH to partner. 4 Line of 4 balance fwd & back twice 4 Men lead partners to opp. Place 4 Lady 1, Man 2 adv & retire 4 Lady 1, Man 2 adv, honour & ret. 4 Couples, advance & retire. 4 Half R & L to place. 32 Repeat with Lady 2, Man 1. The Parisienne Quadrille Figure 4. (2x32) 4 1st couple advance & retire. 4 1st couple adv, lady join 2nd couple. 4 Line of 3 adv. & ret, 1st man retire. 4 Line of 3 adv. Ladies cross to 1st man. 4 Line of 3 adv. & ret, 2nd man retire. 4 Re-advance, form circle with 2nd man. 4 Circle L half way round. 4 Half R & L to place. 32 Repeat with 2nd couple leading. Figure 5 (2x32) 4 Couples advance & retire 4 Cross over 8 Repeat back to place. 8 Ladies chain across & back.8 Set & turn partners. 32 Repeat Notes: 1 This 'quadrille' is similar to the first set (1st 4 figures) and is danced as two couple sets. 2 Set & turn is a 'balance' set and open hand turn. Wellington Waltz 8 Honour Partner, honour corner 8 Circle L 7 steps, then tap, tap 8 Circle R 7 steps, then tap, tap 4 Top couples, 2 side-steps to centre and back with lady turning under man's left arm. 4 Waltz across to opposite side 8 Side couples repeat. 8 Top ladies chain across. (pause in centre, turn twice with opp. Man) 8 Side ladies chain across. 8 Grand Chain half way round set. 8 Waltz to man's place. 64 Repeat with side couples leading. Waltz Cotillon 8 Honour Partner, honour corner 16 1st couple waltz the set. 8 Top ladies cross over.8 Side ladies cross over. 8 Top men cross over. 8 Side men cross over. 16 All waltz back to place. Form top & bottom lines, 8 Adv. & ret, cross over. 8 Adv. & ret, cross back. 16 Waltz chain to meet partner. 16 All waltz back to place. Form top & bottom lines, 8 Adv. & ret, cross over. 8 Adv. & ret, cross back. 16 Waltz chain to meet partner. 16 All waltz back to place. 112 Repeat with 2nd couple leading. 112 Repeat with 3rd couple leading. Side lines adv. & ret. 112 Repeat with 4th couple leading. Side lines adv. & ret. Galopade Quadrille 8 Honour Partner, honour corner 8 All galop round set. (Galop half way round set, on opp. Side change places with partner, continue galop to place.) 8 Top couples R & L through. 8 Side couples R & L through. 8 All set & swing partners. 8 All galop round set. 8 Top ladies chain. 8 Side ladies chain. 8 All set & swing partners. 8 All galop round set. 8 1st couple lead through, 2nd on return 8 3rd couple lead through, 4th on return 8 All set & swing partners. 8 All galop round set. 4 1st lady & 2nd man adv. & ret. 4 2nd lady & 1st man adv. & ret. 4 3rd lady & 4th man adv. & ret. 4 4th lady & 3rd man adv. & ret. 8 All set & swing partners. 8 All galop round set. 4 Ladies advance & retire. 4 Men advance & retire. 8 Double ladies chain. 8 All set & swing partners. 8 All galop round set. 8 Top couples waltz the set 8 Side couples waltz the set 8 All set & swing partners. 32 Waltz the hall. The Caledonians Quadrille Figure 1. (2x32) 4 Top couples R.H. across, move CW (Ladies hands joined over Mens). 4 then L.H. across, move ACW. 8 Set & swing Partners 8 Top ladies chain. 4 Top couples promenade across set. 4 Half R and L to place. 32 Side couples repeat. Figure 2. (4x24) 8 1st Man advance & retire twice. 8 Set & swing corners. 8 Promenade with corners (to men's position.) 24 2nd man repeat. 48 3rd and 4th man repeat. Figure 3. (4x32) 4 Lady 1, Man 2 advance & retire. 4 Re-advance, 2 hand turn to place. 8 1st & 2nd couples lead through and back. (1st lead through across, 2nd back) 8 Set & swing corners. 4 All advance & retire. 4 Swing partners. 32 Repeat wth Lady 2, Man 1. 32 Repeat with Lady 3, Man 4. 32 Repeat with Lady 4, Man 3. The Caledonians Quadrille Figure 4. (4x24) 2 Lady 1, Man 2 advance and stop. 2 Lady 2, Man 1 advance and stop. 4 Turn partners back to place. 2 All ladies to the right 4 steps. 2 All men to the left 4 steps. 2 All ladies to the right 4 steps. 2 All men to the left 4 steps. 4 Promenade to place. 4 Swing partners. 24 Repeat wth Lady 2, Man 1 leading. 24 Repeat wth Lady 3, Man 4 leading. 24 Repeat wth Lady 4, Man 3 leading. Figure 5. (4x48 + 16) 8 1st couple visit. 4 Ladies advance, curtsey & retire. 4 Men advance, bow & retire. 8 All set & swing partners. 8 Grand chain 1/2 way round and honour partners. 4 Promenade to place 4 and swing partners. 8 Chasse-croise, (4 steps past partner, RH to corner balance fwd & back, then 4 steps back, LH to partner balance fwd & back). 48 Repeat with 2nd couple leading. 48 Repeat wth 3rd couple leading. 48 Repeat wth 4th couple leading. 8 All promenade set. 8 Swing partners. Note: Set & swing is 'normal' set and cross hand swing. The Lancers Quadrille (BMC version) Figure 1. (4x32) 8 1st Lady, 2nd man advance & swing in centre (with ballroom hold). 4 Partners move 1/2 way across, Centres keep swinging. 4 Promenade partner to opp. Place. 8 1st couple lead through to place. 8 All swing corners. 32 Repeat with 2nd lady, 1st man. 32 Repeat with 3rd lady, 4th man. 32 Repeat with 4th lady, 3rd man. Figure 2. (4x32) 8 1st couple lead up (to 2nd) & retire. 8 1st couple swing in place Form top & bottom lines. 8 Lines adv & retire twice. 8 Swing partners. 32 Repeat with 2nd couple leading. 32 Repeat with 3rd couple leading. (Forming side lines instead) 32 Repeat with 4th couple leading. (Forming side lines instead) Figure 3. (2x32) 4 Introduction - Ladies to the centre and men form a circle around them. 8 Men circle left. 8 Men circle right. Men form a grand cross (LH) Right arm behind partners. 16 Promenade round set. Ladies return to the centre. 32 Repeat - Circle L & R, & Grand Cross. The Lancers Quadrille (BMC version) Figure 4. (2x48) 8 Top couples visit. 4 Tops RH star. 4 then LH star. 8 Tops basket Left. 8 Tops basket Right. 8 Tops circle Left. Tops circle Right. 48 Repeat with side couples leading. Figure 5. ((4x 16+32) + 24) 8 All grand chain 1/2 way round and honour partners. 8 Promenade with partners to place. 8 1st couple lead up, turn and lead out with side falling in behind. 8 Cast out, reform top & bottom lines. 4 Lines advance & retire. 4 Advance & swing partners to place. 8 Swing partners in place. 48 Repeat with 2nd couple leading. 48 Repeat with 3rd couple leading (forming side lines) 48 Repeat with 4th couple leading. (forming side lines) 8 All grand chain 1/2 way round and honour partners. 8 Promenade with partners to place. 8 Swing partners in place. Note: Normal swing here is with hands crossed. 1. The Quadrille 2.The Lancers Quadrille 3. The Prince Imperials 4. The Parisienne Quadrille 5. The Wellington Waltz 6. The Waltz Cotillon 7. The Galopade Quadrille 8. The Caledonians Quadrille 9. The Lancers Quadrille (BMC)person, individual, peter ellis oam -
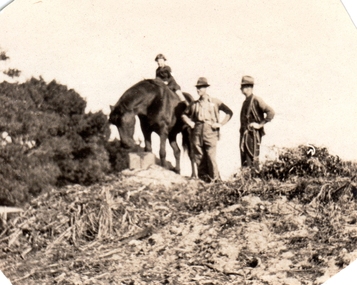 Williamstown Botanic Gardens- Hobsons Bay City Council
Photographs - Williamstown Botanic Gardens, 1936
... (Chic Anderson) on horse with no saddle. Two men, with hands... (Chic Anderson) on horse with no saddle. Two men, with hands ...Ernest Anderson (head gardener) and Harry (gardener) worked at Williamstown Botanic Gardens. The Anderson family lived in the curators lodge on the grounds in the 1930s. Horses were used at the gardens until the 1960s when the council bought a truck. Mr Biggs drove as Mr Anderson did not have a licence. He rode his bike to the Town Hall every Friday to put in the time sheets. The collection is the only known photos of the Gardens working horses and demonstrates Edwardian Municipal gardening techniques that continued into the 1960s. They are photographic evidence of the planting styles, species choices and structures. Details inscribed on the reverse of some of the photos confirm names of staff at this time. Photo 13 (m) m: Only known photo of Ernest Anderson to be held by the Gardens2013.001.a-l is a collection of 12 small format photographs from the Anderson family album dated from 1917-1936 plus one large image of donor's wedding c1953. Ernest Anderson (head gardener) and Harry (gardener) worked at Williamstown Botanic Gardens. The Anderson family lived in the curators lodge on the grounds in the 1930s. Photo 1 (a) Sepia photo of young girl (Chic Anderson) on horse with no saddle. Two men, with hands on hips, standing alongside wearing hats. All are on a small hill (a compost heap) with a shrub on the left of the image. Photo 2 (b) Young girl and horse standing on the top of a small hill (compost heap). Girl has short hair and is wearing a jumper, skirt and long socks. Horse has no saddle and has its head down as if to eat. Photo 3 (c) Horse and foal standing in a fenced enclosure. Part of yard is paved. Horse has a white blaze and white feet. Foal has white blaze and white legs and is looking up at the horse. Photo 4 (d) Horse pulling a mower. Two men standing with mower. One is holding mower, the other the reins of the horse. Both men are wearing hats, with one wearing a vest. Horse has hessian wrapping on his hooves. Photo 5 (e) Horse and man. Horse has a rope bridle. Man holding bridle and is dressed in trousers, shirt, cardigan and hat. They are in front of a hedge and closed timber gate. Tall palm is in background. Horse is side on to the camera. Photo 6 (f) Man and horse standing in front of hedge and open timber gate. Palms in background. Man wearing trousers, shirt, vest, tie, hat. Trousers look to be tucked into boots. He is looking at the horse. The horse is facing the camera. Photo 7 (g) Three horses looking over a picket fence. All with a white blaze. There is a timber wall with a window to the right of the photograph. A man’s arm holding something is seen on the right of the photo. Photo 8 (h) Large palm tree, understorey of shrubs with two palms in the background. Photo 9 (i) Scene of the Gardens. Path dividing at a conifer tree. Woman in long skirt and hat looking up at the conifer. Different varieties of palm trees with understorey of shrubs. Photo 10 (j) Garden bed of Dahlias surrounded by a wire fence. Palms and other trees in background. Photo 11 (k) Avenue of tall palm trees with under storey of shrubs. Photo has angles cut at top corners and two large crease marks at the bottom right hand corner. Photo 12 (l) Set of cast iron gates – double carriage gates with single pedestrian gates on either side and supported by four cast iron posts with ornamental finials on top. Photo 13 (m) Ernest Anderson and daughter Chic prior to her wedding. Ernest is holding his gloves in his left hand and Chic’s hand with his right. Palms trees in the background. Photo 1 (a) 'Ern & Harry / May 8th 1936' Photo 2 (b) ‘Jack aged 36 / Chic 5 years / (unclear) 1936’ Photo 3 (c) ‘foal born in / back shed’ Photo 4 (d) ‘The Olde Firm / Jack Ernie Harry / 1917’ Photo 6 (f ) ‘Before the / council provided / a truck all / work was done / with the horses’ Photo 7 (g) ‘our work horses’ Photo 9 (i) ‘Panoramic view of Gardens / looking South from Lodge / Wms Town Botanical Gardens / 15-10-17’ Photo 12 (l) ‘Gates Public Gardens’hobsons-bay-city-council, curator, lodge, horse, transport, dahlia, compost, anderson, williamstown, botanic, gardens, williamstown-botanic-gardens, hobsons-bay, hobsons, edwardian, gardening, 1936, 1917,