Showing 4084 items
matching depots
-
 Melbourne Tram Museum
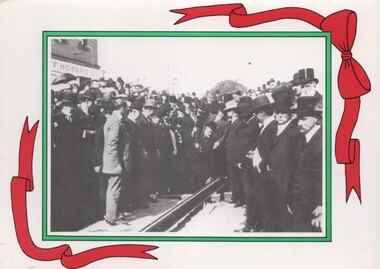
Ephemera - Christmas Card, Peter Duckett, c1990
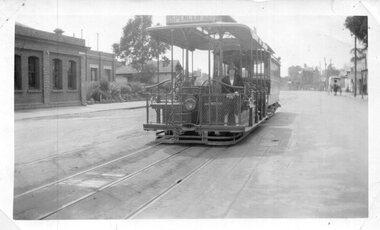
Christmas Card prepared by Peter and Patti Duckett and sent to Keith Kings Printed photo on exterior with red printed ribbons, photo corners on inside with another photo and gold block print and the Duckett's address. Photographs by Peter Duckett or from his collection. Item not dated. Cover photo of Laying the first rail for the PMTT Inside photo shows the opening scene at Malvern Depot of the PMTT."To Keith" in ink.trams, tramways, christmas cards, pmtt, trackwork, opening, malvern depot -
 Melbourne Tram Museum
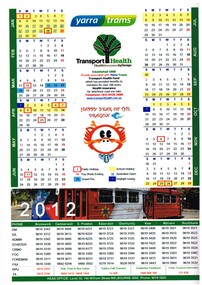
Ephemera - Calendar, Yarra Trams, 2011
Printed A4 calendar on matt paper, full colour providing dates for 2012 including public and school holidays, Australian Open, Grand Prix, Pay weeks and Daylight saving, phone numbers for contacts at each depot, Yarra Trams logo and a symbol for the "The Happy Year of the Dragon". Also has details of Transport Health Insurance. Has a part photo of Z3 158, the Royal Tram.trams, tramways, yarra trams, calendar, tram 158 -
 Melbourne Tram Museum
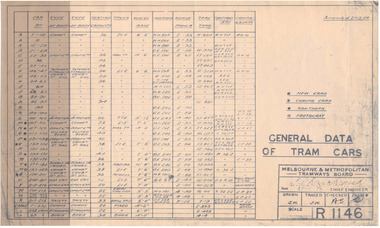
Document - Tramcar Data Sheet, Melbourne & Metropolitan Tramways Board (MMTB), "General Data of Tram cars", c1920's
Dyeline print of Drawing R1146, "General Data of Tram Cars", listing tram car number, type of body, seating capacity, truck wheel base, Motors, Horse Power, Tare tons, controllers and compressor type. Has an amendment date of 24.9.1924. Lists tramcars through to X 218, cable cars, W 338 and depot allocation if they were Coburg, Hawthorn or Footscray.trams, tramways, tramcars, mmtb, lists -
 Melbourne Tram Museum
Magazine, Glen Eira Historical Society, "Glen Eira Historical Society Newsletter", 2015
Parts of the Glen Eira Historical Society Newsletter" for an issue during 2015 containing an item written by Keith Stodden, titled "Our local tram services: a few thoughts" covering early horse tram services, cable trams, PMTT, Point Ormond, Glen Huntly depot, Elsternwick, routes and Truganini Road. Has a photo showing the former tramway poles at Elsternwick Park.trams, tramways, caulfield, horse trams, glen eira, glenhuntly tram depot, point ormond, tram routes, pmtt, truganini rd -
 Eltham District Historical Society Inc
Document - Series Listing, Fraser Faithfull et al, Series 13: Eltham Shire Photograph Album 1985, 2000
Series consists of 174 colour and B&W photographs of sites and activities in the Shire of Eltham. Most shots are 150mm by 100, though there are a number of smaller shots laid out in montages, and 6 large (A4 size) colour shots. Subjects documented include the Eltham Library, Eltham Lower Park, Eltham Senior Citizens Centre, Housing Development, the Council Depot, Shire Offices, Eltham Child Care Centre, Miniature Railway, Community Centre, the Bike Track, a Citizenship Ceremony, Shillingham Cottage, Eltham Town Park and other sites.shire of eltham archives, series listing -
 Bendigo Military Museum
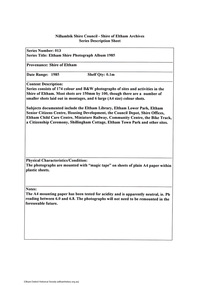
Photograph - PHOTOGRAPH, FRAMED, C. 1917 - 18
JAMES MERVYN HARVEY (telegraphist by trade) No 14510 enlisted in the AIF on 1.16.1916 in Australian Wireless Sqd reinforcement 3 aged 21 years 8 months. Embarked for Basra (Iraq) via Bombay 25.7.1916. It appears he was invalided to India on 12.11.1916, does not state why. He joined the Wireless Signal Service Depot in Rawalpindi India on 2.12.1917. Embarked from Bombay to Basra 27.2.1918 as part of 1st Aust & NZ Wireless Signal Sqd and joined the unit near Baghdad on 6.4.1918. Discharged from the AIF on 7.8.1919 as medically unfit.Framed, black & white photo of SAPPER JAMES MERVYN HARVEY No 14510 1st Australian Wireless Squadron AIF. He is operating a morse key mounted on the rear of a specially equipped GS wagon that is unhitched from its horses. The hatless soldier is seated on a folding bench seat & is wearing headphones. Numerous articles of personal kit are draped over the wagon. Bottom centre: Is a bio of SAPPER JAMES MERVYN HARVEY No 14510 1st Australian Wireless Squadron AIF.wireless sqd aif, ww1 -
 Bendigo Military Museum
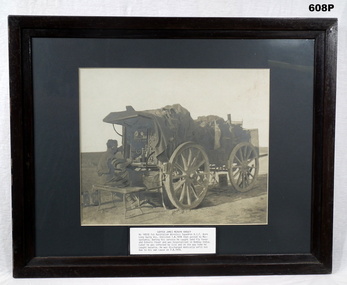
Award - MEDAL SET, Post WW1 and Post WW11
John Thomas O'Bree enlisted in 20th reinforcements 22nd Batt AIF on 4.7.16. As a Stretcher Bearer he was awarded a "Military Medal on 4.10.18 during an attack at Estrees east of Peronne. He worked without rest for 24 hours bringing out wounded lying helpless under concentrated shell fire and machine guns. Hospitalised on 20.10.18 with Influenza. Discharged from the AIF on 27.10.19. He enlisted again during WW11 on 24.4.41 for home service in the CMF, served in various Garrison Bn’s Ordnance and Salvage depots and was discharged on 18.1.45.Medal set, court mounted, set of (5) re J.T O'Bree. 1. Military Medal. 2. British War Medal 1914-19. 3. Victory Medal. 4. War Medal 1939-45. 5. Australian Service Medal.1 "6865 Pte J T O'Bree 22 Aust Inf" 2 & 3 "6865 Pte J T O'Bree 22 Bn" 4 & 5 "V13666 J T O'Bree"medals, military, history -
 Ballarat Tramway Museum
Manual, Ballarat Tramway Museum (BTM), "Traffic Operating Guidelines", c1990
Guides Ballarat Tramway Preservation Society conductors about their duties, ticket issuing, pay-ins sales etc. Was the first version of this document. Prepared by Peter Walker. The first version was issued 1/11/1989. see item 8875. Was collected from the depot 1/2001 when a new version of the Guidelines was issued. In use from c1990 to 2001 as a sample copy and loaned to new conductors. Document originally prepared by Peter Walker, who passed away 24/9/2005 - see Reg Item 6838 for Obituary.Demonstrates BTPS documentation for crew use.Folder containing in plastic sheets, the 1/5/1990 version of the Ballarat Vintage Tramway Operating Guidelines. The document is a photocopied version of "Issue 2 / 1.5.90" on yellow paper. It consists of 33 sheets which have been amended in a number of places to adjust for cash floats, fares, museum sales tin. Also contains a 12/92 Revenue Journal on A5 sheet, copies of older style Trip Way Bills, Revenue Journals, instructions as to cash floats and a folded Revenue Journal. trams, tramways, conductors manual, guidelines, manual, btm -
 Ballarat Tramway Museum
Photograph - Colour slides - Geelong A Power Station, 1960's and April 1971
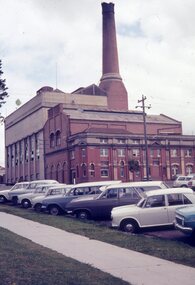
1 - Colour slide of the former Geelong A Power Station on the corner of Yarra St and Corio Tce (now Brougham St). First portion on the corner built by the Electric Lighting and Traction Co of Australia. The Geelong tram depot, operated by the Melbourne Electric Supply Co was incorporated within the structure during 1912. Operated by the State Electricity Commission from 1930 until the 1960's. Photo taken prior to the demolition of the chimney during the late 1960's. 2 - Colour slide dated April 1971, taken after the chimney has been demolished. Yields information about the former Geelong A power station prior to its partial demolition and incorporation into a shopping centre. Portions of the original brick buildings have been retained.1 - Green plastic Fuji Film Plastic slide of Photograph of Geelong A Power Station from Yarra St. 2 - Kodachrome cardboard colour slide, date stamped April 1971. No details of Photographer recorded on slide other than the date stamp.geelong, geelong a, power station, mesco, secv, tramways -
 Hymettus Cottage & Garden Ballarat
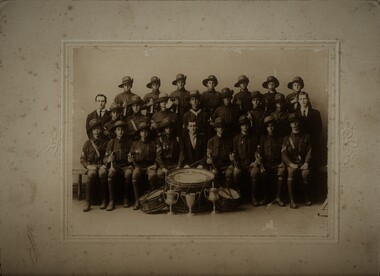
Photograph, photograph of 71st Battalion Bugle Band 1918, 1919
All boys aged 12 to 17 began Compulsory Military Training in Australia from 1912. The following year the militia was reformed with Ballarat East being allocated the 70th Infantry and Ballarat West being allocated the 71st Infantry. The 71st Battalion was known as the Ballarat West Battalion until changing to (City of Ballarat) Infantry with its depots reaching as far as Warrnambool. In this photograph of the prize winning 71st Battalion Bugle Band a young 16 year old Michael Taffe is a bugler and won several awards with the band and as a solo bugler. A record of the immediate post-war activities still popular in 1919-1920.Mounted photograph of bugle bandcity of ballarat infantry, 71st battalion, warrnambool, ballarat, michael taffe, ballarat west battalion, cadets., bugle band, awards, bugler -
 Wodonga & District Historical Society Inc
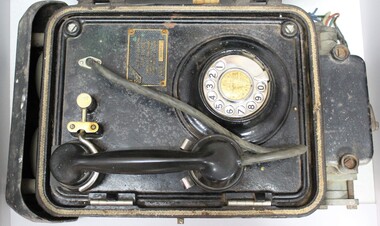
Functional object - Ericsson Auto Flameproof Telephone from the Golden Fleece Depot, Wodonga, c. late 1930s
This British made type "N1087" and code "N1087" C Ericsson auto flameproof telephone was used in the drum filling platform of the Golden Fleece Depot, in Hovell St., Wodonga. The type "N1087" and code "N1087" C Ericsson flameproof telephone was introduced in 1937 and certified by the British Mines Department as flameproof for Petroleum and Acetone Vapours, in 1938. It was designed specifically for outdoor use in areas where there may be exposure to inflammable vapours and hazardous chemicals such as petroleum. Each contact or switch point is enclosed in its own flameproof chamber, to reduce the risk of ignition and the volume of gas.The Ericsson auto flameproof telephone has local significance due to its use in the Golden Fleece Depot in Wodonga, as well as national and international significance due to its date and the rarity and relatively complete condition.Black Ericsson auto flameproof rotary dial telephone secured in a hinged cast iron case painted black. Rubber tubing connected to the bakelite handset and an adjacent metal plate with the name "Ericsson", type "N1087" and code "N1087 C", and certification of the telephone as flameproof with the letters FLP. "Ericsson" on the top left corner of the metal plate. "AUTO TELEPHONE / TYPE N1087 / CERTIFIED FLAMEPROOF / FOR GROUPS II & III / CERTIFICATE FLP. 2378" / CODE N1087 C" on the main part of the metal plate.ericsson telephones, british telephones, flameproof telephones, mining telephones, golden fleece depot wodonga, wodonga -
 Melbourne Tram Museum
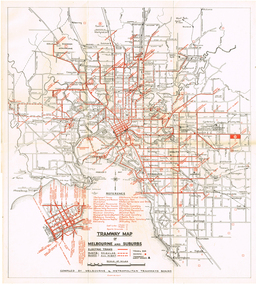
Map, "Tramway Map of Melbourne and Suburbs", c1952
Map of Melbourne's Tram and Bus routes, route destinations, MMTB Guest houses, all-night bus routes, depots, golf links and sporting grounds, rail lines, and location of major places of interest. Titled - "Tramway Map of Melbourne and Suburbs" - c1952, after the La Trobe or Latrobe St lines opened. Not known who produced the map. Does not give route numbers. See also Reg Item 2300 for an MMTB Map of the same era, 7315 for a similar version but without the guest houses, and 4525.1 for an MMTB Photograph.Yields information about Melbourne tram routes prior to Bourke St being built.Fold out map (6 sections), two colours. Has been removed from a book with the remnants of other paper in the top left-hand side.trams, tramways, melbourne, map, tram & bus services, all night services, mmtb, guest houses -
 Melbourne Tram Museum
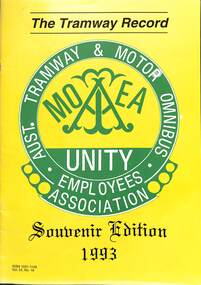
Magazine - The Tramway Record - Souvenir Edition - Vol. 54, No. 16, Australian Tramway & Motor Omnibus Employees Association (ATMOEA), 10/1993
Last issue of the Tramway Record - when the ATMOEA became the RTBU. Features history of the Union, Retired Tramway Employees Association, Tow Away Zones, Further tram stories by Frank Puls, news from the depots, Jess Wilson, one of the first connies in Melbourne, Remembering the Records, and a list of past and present Secretaries. Includes notes on the Combined Tramways & East Melbourne Sub-branch RSL. Frank Puls article on pages 9 and 10, stories of working on Melbourne trams and page 13, a photo of BTM Horse Tram No. 1Yields information about the ATMOEA and its transistion to the RTBUFifty Two page, with glossy card cover and plain white paper inside - "The Tramway Record Vol. 54, No. 16 Souvenir Edition 1993" - with title in green and black ink and Australian Tramway and Motor Omnibus Employees Association logo on the front cover. Printed by the Victorian branch of the union.trams, tramways, atmoea, rtbu, unions, melbourne, ballarat, btps, frank puls -
 Puffing Billy Railway
Emerald Station Sign
Station Sign - Emerald Emerald Station is situated on the Puffing Billy Railway in Victoria, Australia. It was opened with the Railway on 18 December 1900 and comprised a platform track and a loop siding. A passing loop was added between the two a few years later. There was also a spur siding off the Down end of No. 3 Road. Two standard 12 ft by 20 ft timber portable station buildings with a Van Goods Shed between (all adjoining) were provided on the platform and a Goods Shed on the No. 3 Road loop siding. Other buildings included Tea Rooms, lamp room and toilets along with a cattle race and loading bank. The station building was later reduced in length by one of the portables which housed the General and Ladies' waiting rooms. Emerald today remains very similar to the early days, but has had other Roads added into a Carriage Workshops, a turntable and storage sidings. Also, a Signal and Telegraph Branch depot in the form of a large Goods Shed and a multi-purpose yard building in the form of a Locomotive Depot administration building have been added. During 2009, the station building underwent stage one of an internal restoration to its former glory. ref: https://en.wikipedia.org/wiki/Emerald_railway_station,_Victoria photos at http://www.vicrailstations.com/Gembrook/Emerald/Emerald.html Historic - Victorian Railways Station sign used at Emerald Station Station Sign - Emerald Metal rectangle Station Name Sign with white enamel back ground and black lettersEmeraldstation sign, puffing billy, emerald station -
 City of Greater Bendigo - Civic Collection
Ceremonial object - Engraved Silver Trowel, Bendigo and Eaglehawk Electric Light and Tramway Powerhouse, 1901
This trowel was presented to City of Bendigo Mayor, Simeon Ryan by Mr B. Deakin the Australian representative of the Victorian Electric Supply Company on the occasion of the laying of the foundation stone for the new power house building in Hargreaves Street, Bendigo. This power house was built to supply power to both Bendigo and Eaglehawk and the overhead power system for the tramway which ran from Quarry Hill, through the city to Eaglehawk and from Golden Square to Lake Weeroona. The building of the power house changed Eaglehawk and Bendigo as street lights were installed and houses became electrified. A report in the Bendigo Independent in 1902 reported ' Night will then be almost as brilliant as the day and people .... who live in the suburbs are to be provided with a tram service worth of the name'. (See reference A Mammoth Scheme.) The tramways closed in April 1972 after the Victorian Parliament granted the SEC an application to cease operating. Today Bendigo Trust operates the tourist trams which run along Pall Mall and welcomes over 40,000 visitors annually. The Bendigo Tramways Depot is the oldest operating tram depot in Australia and is listed on the Victorian Heritage Register. There are currently 45 trams in the fleet (13 of which operate as part of the 'Talking' Tram service).For more about the history and to tour the tramways visit www.bendigotramways.com.Triangular shaped silver engraved trowel with ivory handle (0286a). Top face of trowel is ornately engraved with floral and decorative motifs and an image of an electric tram and two power poles. Reverse has engraved text. No makers mark detected. Housed in a leather covered case (0286b), lined with ruched blue silk. Case has two brass hinges and two small brass clasps.PRESENTED / By / THE ELECTRIC SUPPLY CO / OF VICTORIA TO / SIMEON RYAN. ESQ JP. / MAYOR OF BENDIGO / ON THE OCCASION OF HIS LAYING / THE MEMORIAL STONE OF THE / BENDIGO AND EAGLEHAWK / ELECTRIC LIGHT AND TRAMWAY / POWER HOUSE / 26th JUNE, 1901/ STERLING SILVERcouncillor simeon ryan, councillor s h mc gowan, councillor john hoskins, councillor george loudon, councillor john green, councillor alfred hicks, borough of eaglehawk, borough of eaglehawk mayor, mayor loudon, city of bendigo mayor, mayor ryan, bendigo and eaglehawk tramway -
 Melbourne Tram Museum
Album - Robert Thomson Slide Collection, "Melbourne 1965 April Box 1", April 1965
Photo - see pdf file for further information. Number Brief Description RT107 Whitehorse Road - tram 378 - "City" - route 42 RT108 Malvern Depot - tram 947 - "Malv Tn Hall" - route 6B RT109 tram 7 RT110 tram 7 RT111 North Fitzroy - tram 980 - East Brunswick - Blyth St - route 96 RT112 North Fitzroy - tram 980 - East Brunswick - Blyth St - route 96 RT113 Hawthorn Depot - tram 17 RT114 Location ? tram 471 - "City" - route 7 RT115 Deepdene - tram 848 - "City" - route 42 RT116 Wattle Pk Ter - tram 368 - "City" - route 70 RT117 East Brighton Ter - tram 105 - "East Brighton via Caulfield" - route 64 RT118 Simpson St Siding - tram 889 - "Spencer St" - route 48 & tram 249 -"Football" RT119 Swan St Relay - tram 517 - "Wattle Park Elgar Rd" - route 70 RT120 tram 401 - "City" - route 70 - Swan St RT121 tram 401 - "Wattle Park Elgar Rd" - route 70 - Swan St RT122 tram 330 - "City" - route 70 - Swan St Demonstrates the work of Robert Thomson in photography, collection and/or production of slidesAssembled album in a black presentation folder of 16 colour slides, collected or produced by Robert Thomson. All photographs have been scanned and placed on the Museum's G drive. A list of all photographs with details has been compiled. melbourne, tramways, trams -
 Ballarat RSL Sub-Branch Inc.
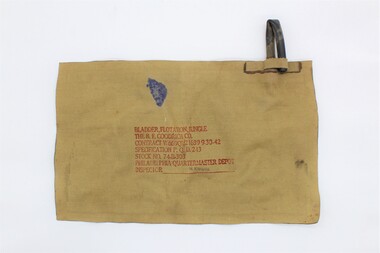
Floatation Bladder, B.F. Goodrich Co, 1939-45
This floatation bladder was made for survival whilst crossing rivers and streams. The device would have been inserted into clothing and the user would have blown air into the pipe. The pipe would have been folded in half and held in place to prevent air from escaping.Tough rectangular, flat, khaki coloured fabric and rubber bag. There is a rubber pipe at the top, right corner. There is a fabric flap at the base of this pipe which holds the pipe in a bent position. There are also inscriptions on the front/centre of the bag.The following inscriptions are at the front/cente of the bag, printed in red. The very last inscriptions ('M. KNAUSS') are printed in dark purple. 'BLADDER, FLOATATION, JUNGLE' 'THE B.F. GOODRICH CO.' 'CONTRACT W669QM21639 9-30-42' 'SPECIFICATION P.Q.D. 243' 'STOCK NO. 74-B-303' 'PHILADELPHIA QUARTERMASTER DEPOT' 'INSPECTOR______M. KNAUSS_____' floatation bladder, floatation device, world war two, ww2, wwii, second world war -
 Ballarat Tramway Museum
Photograph - Digital image Set of 20, 1971-72
Set of 20 digital images of Bendigo Tramways, 1972 at or before closure while on a tram tour by Stuart Lodington. .1 - No. 7 at Golden Square terminus .2 - ditto .3 - No. 26 in bound on the Eaglehawk line with a crossing loop behind. .4 - Birney crossing the bridge by the tram depot. .5 - No. 29 running a special on the Eaglehawk line with a HBA billboard in the background. .6 - No. 29 with a driver walking in front of the tram at the above location. .7 - No. 29 on the Eaglehawk line .8 - ditto waiting for a tram at Manchester Loop with poppet head in the background. .9 - No. 29 on the Eaglehawk line .10 - Eaglehawk Town Hall at night. .11 - No. 7 at the depot junction in McCrae St, with Golden Square destination. .12 - No. 29 with the Camp Hotel Eaglehawk in the background. Also a Newsagent with The Sun, The Bendigo Advertiser and The Age signs on the building, High St .13 - No. 29 Mt Korong Rd, with the railway overbridge in the background. .14 - interior photo of Birney tram roof .15 - interior view of controls of Birney at Eaglehawk .16 - No. 29 outbound at the Depot Junction McCrae St. .17 - No. 18 at the Eaglehawk terminus .18 - close up view of No. 29 front. .19 - No. 29 in Nolan St, crossing the bridge, outbound. .20 - No. 18 at the Eaglehawk terminus with the Eaglehawk Town Hall, Post Office in the background. Has a circus banner on the side.trams, tramways, bendigo, eaglehawk, quarry hill, golden square, depot, mccrae st, nolan st, tram 7, tram 26, tram 29, tram 18 -
 Melbourne Tram Museum
Photograph - Set of 4 Black & White Photograph/s, Don Schulz, mid 1920's
Series of four Black and White Photographs cable trams in Melbourne at the Bridge Road terminus or city during the mid 1920's/ .1 - Bridge road terminus with the car house or depot on the left hand side with the destination of Spencer St. .2 - Gripman possibly checking his watch with a depot worker? stepping off the tram. .3 - family stepping off the tram with cable trailer 368 in the view - Elizabeth St, near Flinders St? See Brian Weedon's notes re the photo and the trailer. .4 - As for .1 - with an X marked above the lady and a very large motor car passing. Printed on Kodak Paper. Adam Chandler advised by email 5/8/2020: " note there's a destination box fitted to the grip - from memory, these started to be used from the mid-1920s with the dummy and trailer repaints into the brown colour? That also looks to be either a 1925 or 26 Buick - the "moustache" shape at the top of the front radiator grille and the distinctly angled lower sash of the windscreen are further hints. Given the Richmond line closed in 1927 for conversion I'd say some time between 1924 and 29 June 1927." Also see image i5.pdf for further notes regarding the photographs and the Bridge Road tram depot building - use the original pdf file to read. Image i6, has had the "X" removed - done by Darren Hutchesson.On rear in ink in each print, "Cable car Melbourne" and "286 Anzac Hy/Marion Rd Adelaide SA, collection of late Don Schultz"trams, tramways, cable trams, bridge road, flinders st, richmond depot, hawthorn bridge, tram 368 -
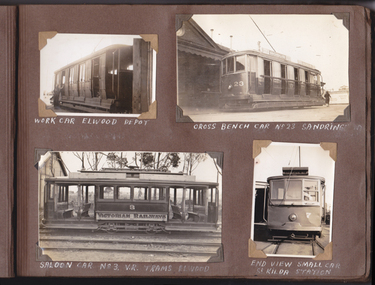 Tramway Heritage Centre
Photograph Album (part of), Ray Pearson's Photo Album - Trams of Victorian Railways, Ballarat, Bendigo, Geelong
Page 11 of Ray Pearson's Photo Album. Brown card page with four photographs (3 x landscape, 1 x portrait format) placed on page using metallic look and brown card decorative photo corners. All photographs depict trams. Hand written inscriptions are written under each photograph.Hand written inscription in white-out or white pen beneath phorograph on - Top left: WORK CAR ELWOOD DEPOT Top right: CROSS BENCH CAR No 23 SANDRINGHAM Bottom left: SALOON CAR No 3. V.R. TRAMS ELWOOD Bottom Right: END VIEW SMALL CAR St KILDA STATIONvictorian railways, melbourne tramways, vintage tram, elwood depot, elwood trams, cross bench car -
 Ballarat Tramway Museum
Slide - 35mm slide/s, Noel Simons, 21/11/1962 12:00:00 AM
Set of 17 transparencies taken on 21/11/1962 on Kodak mounts. 1188.1 - Bendigo No. 11 at Depot Junction McCrae and Arnold St. with driver/conductor changing points. 1188.2 - Bendigo No. 4 at Charing Cross, side on photo, with City Club Hotel and Alexandra Fountain in the background. Tram has Castrol and SEC 'Electric Cooking' ads. 1188.3 - Bendigo No. 4 climbing View St. after tram has passed photographer. Tram has Streets Ice Cream and Cohns Soft Drinks ad on rear dash panel. In the background are the buildings in View St., including the Princess Theatre. Tram has destination of Eaglehawk. 1188.4 - Trams 2 and 4 crossing at the California Gully or Thorpe St Loop. 1188.5 - Bendigo 4 in Mt Korong Road. Tram inbound with destination of Quarry Hill, just leaving Garden Gully Loop. 1188.6 - Bendigo 4 and 17 crossing at the Hayes St. or Iron Bark Gully Loop. No. 17 bound for Eaglehawk, No. 4, Quarry Hill. 17 has two SEC roof ads and a white horse whiskey ad. 1188.7 - No. 17 bound for Eaglehawk, soon after leaving California Gully. Has large mullock heap in background. 1188.8 - Bendigo 2 and 17 crossing at the Thorpe St. or California Gully Loop. Has butchers shop in background. 1188.9 - Bendigo 17 at the Eaglehawk terminus. Has destination of Quarry Hill. In background is the hotel and shops at the terminus, showing ads for "Melbourne Bitter". Tram has two SEC 'Electric Cooking' ads. Driver and conductor about to assist two lady passengers with a pram and baby. 1188.10 - No. 17 at Eaglehawk terminus, awaiting departure. Has Eaglehawk Town Hall and Post Office in background. Tram has a Whitehorse Whiskey ad on the front dash panel. 1188.11 - No. 3 in High St. Eaglehawk, with destination of Eaglehawk. Has the shops on the south side of High St. in the background, including the Eaglehawk fish shop. Tram has two roof ads, one an SEC roof ad, and Cohns Drinks and Streets Ice cream ads on front dash panel. 1188.12 - as above, but after tram has passed photographer. Note the centre of the road poles. 1188.13 - No. 2 outbound for Eaglehawk at the intersection of Mt. Korong Road and the Calder Highway. Photo taken after the tram has passed the photographer. Has an Ampol service station in the background. 1188.14 - No. 11 leaving the Bendigo depot, crossing the bridge, with the Scrubber car in the background. 1188.15 - No. 21 at the North Bendigo terminus. Tram has destination of Golden Square and Cohns drink ad on front dash and two roof ads on side. 1188.16 - No. 11 on Golden Square route, in High St. at intersection with Old High St. 1188.17 - No. 11 at the Golden Square terminus, conductor turning the pole. Hotel on the left side of the photo. Note the road works barrier and red flag behind the tram. Slide has an end of roll mark on the right hand side of the image.Information written on in black ink and date stamped on purple ink. 1188.1 - "Birney car No. 11 in McCrae St. at Cnr of Arnold about to run into depot, Bendigo" 1188.2 - "No. 4 at Alexandra Fountain, Charing Cross Bendigo" 1188.3 - "No. 4 climbing the View St. Hill from Charing Cross, Bendigo (Eaglehawk Route)" 1188.4 - "No. 4 and 2 at Thorpe St. Loop, California Gully" 1188.5 - "No. 4 in Mt Korong Rd., Long Gully, Near Havilah Rd. (Bendigo) (Eaglehawk Route)" 1188.6 - "Nos. 17 and 4 crossing on Hayes St. Loop, Ironbark, Bendigo" 1188.7 - "No. 17 soon after leaving California Gully (Eaglehawk Route)" 1188.8 - "No.2 and 17 crossing on Thorpe St. Loop, California Gully (Eaglehawk Route)" 1188.9 - "No. 17 at Eaglehawk terminus" 1188.10 - "No. 17 at Eaglehawk terminus" 1188.11 - "No. 3 in High St. Eaglehawk" 1188.12 - "No. 3 nearing Eaglehawk terminus" 1188.13 - "No. 2 in Mt. Korong Rd., Ironbark. Calder highway on left (Eaglehawk route) 1188.14 - "Birney car No. 11 leaving Bendigo depot. Scrubber car at rear" 1188.15 - "No. 21 at North Bendigo Terminus" 1188.16 - "Birney car No. 11 in High St. Bendigo at intersection with Old High Street (Golden Square Route)" 1188.17 - "Birney Car No. 11 at Golden Square terminus, High St., Bendigo". tramways, trams, bendigo, depot junction, charing cross, view st., eaglehawk, north bendigo, golden square, tram 2, tram 3, tram 4, tram 11, tram 17, tram 21, tram scrubber -
Glen Eira Historical Society
Article - TRAMWAYS IN GLEN EIRA
Contains 9 items: 1/Typed statements from Keith Stodden, dated 03/09/2004, contributing his list of tram routes in Glen Eira from 1920-1970 and 1970-2004. 2/’Trams in Glen Eira (Caulfield) – A Time Line History’, by Keith Stodden, dated 03/09/2004, listing opening and conversion dates and a detailed time-line from 1888 through 1995, of tram lines in Glen Eira (7 typed pages). Included is Mr Stodden’s handwritten draft of this time-line (13+2 pages). 3/’Trams in Glen Eira, notes prepared by Keith Stodden’, dated 27/05/2004, briefly describing tram routes in Glen Eira (2 pages). 4/Page from unnamed Melbourne newspaper (dated December 1895 in pen) with advertisement for tendering for lease of property for Caulfield Tramway. 5/’Our Tramways’, photocopy of cutting from unnamed newspaper, hand dated 1913, about recent developments on Melbourne tramways. 6/’Melbourne and Metropolitan Tramways Board, location of cars at end of 28 day period, 16 June 1928’, listing by tram depot (2 pages); ‘Melbourne and Metropolitan Tramways Board, location of cars at end of 28 day period, 9 June 1934’, listing by tram depot (2 pages); ‘Melbourne and Metropolitan Tramways Board, location of cards at end of financial year, 30 June 1938’, listing by depot (2 pages). 7/’Glenhuntly Road’, cutting from Southern Cross newspaper, dated 14/05 but without the year (perhaps 1980), with brief history of Glenhuntly Road and photograph of first electric tram there, April 1913. 8/Flyer (2 pages) for ‘The Tramway Society of Victoria Ltd’, about the history of the Society (undated). 9/’Caulfield Conservation Study-Tramways Reservation-Dandenong Road’, photocopied description (5 pages) of reservations in the centre of Dandenong Road, with photographs. Assessment and one photograph dated March 1994.tram services, tram depots, trams, glen eira, caulfield, transport, glen huntly road, leslie street, elsternwick, hawthorn road, grange road, dandenong road, derby road, carnegie, balaclava road, stodden keith, glen huntly depot, caulfield tramway, elsternwick, watts thomas, elstercreek, architectural features, flannagan leonard j., ward andrew, tram companies, land transport, tram shelter -
 National Vietnam Veterans Museum (NVVM)
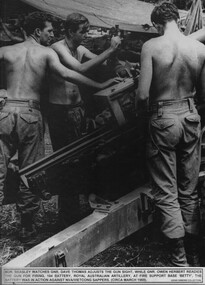
Photograph, Adjusting The Gunsight 1
A black and white ohotograph of Bdr. Beasley watches Gnr Dave Thomas adjusts the gun sight, while Gnr Owen Herbert readies the gun for firing, 104 Battery Royal Australian Artillery, at Fire Base Betty. The battery was in action against NVA/VietCong sappers attempting to attack the giant US supply depot at Long Binh in Bien Hoa Province during the 1969 Tet Offensivephotograph, brig beasley, gnr dave thomas, gnr owen herbert, 104 battery raa, fire base betty, nva/vc, tet offensive, 1969, long bien, bien hoa province, gibbons collection catalogue -
 National Vietnam Veterans Museum (NVVM)
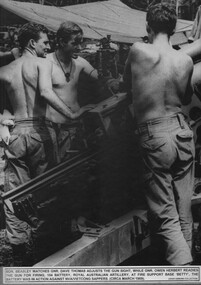
Photograph, Adjusting The Gunsight 2
A black and white photograph Bdr Beasley watches Gnr Dave Thomas adjust the gun sight, while Gnr Owen Herbert readies the gun for firing. 104 Battery Royal Australian Artillery at Fire Base Betty. The battery was in action against NVA/VietCong sappers attempting to attack the giant US supply depot at Long Binh in Bien Hoa Province during the 1969 Tet Offensivephotograph, 104 battery raa, brig beasley, gnr dave thomas, gnr owen herbert, fire base betty, nva/vc, long binh, bien hoa province, gibbons collection catalogue -
 National Vietnam Veterans Museum (NVVM)
Photograph, Adjusting The Gunsight 5
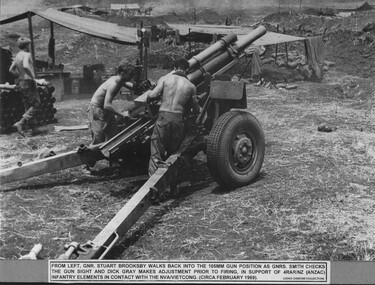
A black and white photograph of Gnr Stuart Brooksby walks back into the 105mm gun position as Gnr Smith checks the gun sight and Grn Dick Gray makes adjustment, prior to firing. in support of 4 RAR/NZ (ANZAC) infantry elements in contact with the NVA/VC sappers attempting to attack the giant US supply depot at Long Binh in Bien Hoa province during the Tet Offensivephotograph, artillery, 4 rar nz, tet offensive, long binh, bien hoa province, gnr stuart brooksby, gnr smith, gnr dick gray, gibbons collection catalogue, gunner -
 National Vietnam Veterans Museum (NVVM)
Photograph, Adjusting The Gunsight 6
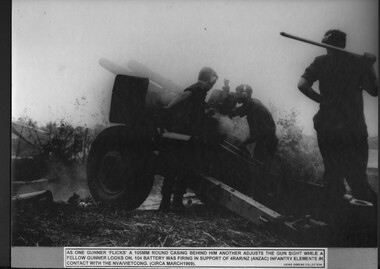
A black and white photograph of - As one Gunner of 104 Battery RAA at Fire Base Betty flicks a 105mm round casing behind him another adjusts the gunsight while a fellow gunner looks on. The battery was firing in support of 4RAR/NZ (ANZAC) Infantry in contact with the NVA/VietCong sappers attempting to attack the giant US supply depot at Long Binh in Bien Hoa Province during the Tet Offensivephotograph, artillery, 104 battery raa, long bien, 4rar nz, nva/vc, tet offensive, gibbons collection catalogue, gunner, fire base betty, 105mm artillery -
 Ballarat Tramway Museum
Document - Letter/s, Wayne Kell, 24/02/2021 12:00:00 AM
Yields information about the servicing of the trams and SEC maintenance practices. Has a strong association with Wayne Kell.Letter, 3 A4 pages + print of original letter from the Museum to Wayne Kell. Wayne provided further information on the meeting notes. Includes notes on the Painters and Carpenters, parking of trams, tram fleet and brake adjustments, servicing of trams, Depot staff, including Stan Lakey and Dan Irvin, Bill Trussler, payment of wages, Vin Dalton, relationship with SEC Management, union relationships and closure.trams, tramways, personnel, reunions, closure, sec, operations, payroll, tramcar brakes -
 Ballarat Tramway Museum
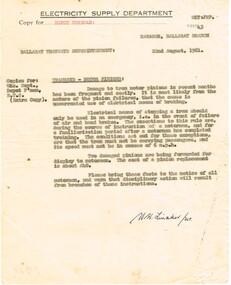
Administrative record - Memorandum, State Electricity Commission of Victoria (SECV), "Tramway - Motor Pinions", 22/08/1961 12:00:00 AM
Yields information about damage to tramcars from the use of electrical braking., Yields information about damage to tramcars from the use of electrical braking.Memorandum on Electricity Supply Department letterhead, quarto paper typed, from Manager Ballarat to the Superintendent with a copy to the Depot Foreman, titled "Tramway - Motor Pinions". Concerned about recent damage to pinions, due to "unwarranted use of electrical means of braking". Should only be used in training, emergency. Examples of damaged pinions to be shown to motorman. Dated 22-8-1961 Signed H W Linakertrams, tramways, motormen, motors, damage, training, repairs, braking -
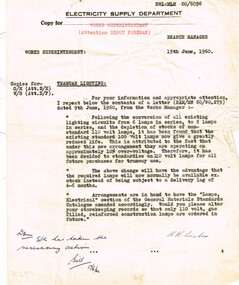 Ballarat Tramway Museum
Administrative record - Memorandum, State Electricity Commission of Victoria (SECV), "Tramcar Lighting", 15/06/1960 12:00:00 AM
Yields information about the type of lights or lamps used in trams., Yields information about the type of lights or lamps used in trams.Memorandum on Electricity Supply Department letterhead, quarto paper typed, from Branch Manager to Works Superintendent with a copy to the Depot Foreman, titled "Tramcar Lighting" dated 15/6/1960. Reports on the conversion from 6 lamps in series to 5 lamps and the use of 100V lamps was giving a greatly reduced life. Proposing to use only 110V lamps from now on. Signed H W Linakertrams, tramways, tramcars, lights, electrical equipment -
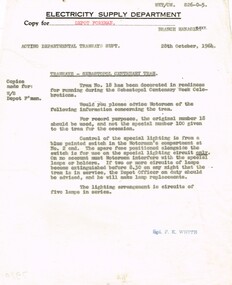 Ballarat Tramway Museum
Administrative record - Memorandum, State Electricity Commission of Victoria (SECV), "Tramways - Sebastopol Centenary Tram", 28/10/1964 12:00:00 AM
Yields information about the painting of tram 18 and the use of the lamps during the Sebastopol Centenary., Yields information about the painting of tram 18 and the use of the lamps during the Sebastopol Centenary.Memorandum on Electricity Supply Department letterhead, quarto, from the Branch Manager, F K White to the Acting Branch Tramways Superintendent, dated 28/10/1964 with a copy to the Depot Foreman, titled "Tramways - Sebastopol Centenary Tram", about the decoration of tram 18 for the Centenary event. Tram had been given the number "100" temporarily, and about the control of the lighting circuits. Stamped "F. K. White"trams, tramways, sebastopol, centenary, tram numbering, lights, tramcars, drivers