Showing 1535 items
matching ballarat north gardens
-
 Ballarat Tramway Museum
Slide - 35mm slide/s - set of 6, Noel Simons, 22/05/1971 12:00:00 AM
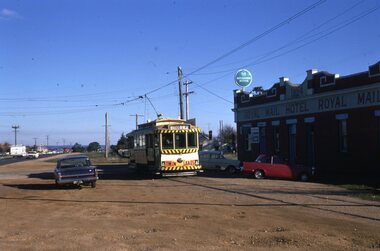
Set of 6 Kodachrome transparencies taken on 22/5/1971. 1171.1 - Tram 33 at Sebastopol terminus, showing destination of Lydiard St. Nth, with Royal Mail Hotel in the background and three parked cars. Tram has "Twin Lakes" sign on front dash. 1171.2 - as for 1171.1 but taken from other side of tram, has hotel in part of photo. Shows arrangement of tram terminus signs on a pole in the background. 1171.3 - Tram 26 just after arrival at the Lydiard St. terminus, with passengers getting off and driver about to swap ends. Destination has been changed to Sebastopol. Has Lydiard St. shelter in the right edge of the photo. 1171.4 - as for 1171.3 - but with pole turned and looking back along street towards city. Shows the undulating nature of the street. 1171.5 - Tram 26 outbound in Albert St. for Sebastopol, crossing the street near Ophir St. Has a motor cyclist stopped for tram and shows tram stop on the west side of the road. 1171.6 - Tram 26, close up of tram at the Sebastopol terminus with two cars parked along side. Tram has destination of Lydiard St. Nth.1171.1 - "No. 33 at Sebastopol Terminus" and initials "BC" in bottom left hand corner. 1171.2 - "No. 33 at Sebastopol Terminus" and initials "BC" in bottom left hand corner. 1171.3 - "No. 26 at Lydiard St. North terminus" and initials "BC" in bottom left hand corner. 1171.4 - "No. 26 at Lydiard St. North terminus" and initials "BC" in bottom left hand corner. 1171.5 - "No. 26 crossing from left side of Albert St. Sebastopol to right side near Ophir St." and initials "BC" in bottom left hand corner. 1171.6 - No. 26 at Sebastopol Terminus" and initials "BC" in bottom left hand corner. All slides have date stamp of "22 May 1971" in purple ink and Kodak developing date of "Jun 71M7" in red ink. tramways, trams, sebastopol, lydiard st nth, royal mail hotel, tram stops, tram 33, tram 26 -
 Ballarat Tramway Museum
Slide - 35mm slide/s - set of 9, Noel Simons, Sept. 1971
Set of 9 Kodak Ready-mount with slides made from the Association of Railway Enthusiast Provincial Tramways film strip. Reference Item 2560 details the ARE Film Strip, and provide references to other slides. See also Reg. item 1164. 1174.9 on plain white mount. 1174.1 - Tram 40 North bound for Lydiard St. North at the Railway Gates, with the gates closed. Tram carrying a heavy load of passengers. Railway station building and car park in background. Taken from the signal box. 1174.2 - Tram 12 bound for Gardens, photographed across the median strip plantation near Dawson St. Image i2a - adjusted 9/2021 to remove colour cast. 1174.3 - Tram 43 in bound along Wendouree Parade near Barrett Ave, passing a former tram stop and with "Warning Oncoming Trams" sign mounted on an adjacent pole. See also Reg. item 1172.1 for a photo taken in May 1971. This photo taken after the closure of the Victoria St. line, as the tram stop has been painted out. 1174.4 - Looking along the track to Sebastopol terminus on the west side of Albert St. - telephoto shot showing bogie tram in the far distance. Shows the nature of the track, poles, tram stop frequency and in the fare distance the terminus. Also show the trees that used to be along this section of the track. 1174.5 - No. 42 showing "Special" in Macarthur St. approaching Drummond St. north. Photo taken from under the verandah of a shop on the south side of the street that were many years later to become the Tramcar Restaurant. Note metal fence to cemetery. 1174.6 - Nos. 21 (Sebastopol) crossing 14 (Lydiard St. Nth) at the loop between Sayle and Grey St. Photo taken looking south. 1174.7 - No. 12 bound for Mt Pleasant, in Bridge St. about to stop at the junction for the two routes. Telephoto photo looking west along Bridge St. with many cars in the photo. Very few people on the street itself. 1174.8 - No. 30 and 17 at the City Terminus, on the north side of Sturt St. Taken from the Post Office corner with the Town Hall in the background. 1174.9 - No. 39 inbound along Sturt St. West. with many cars on the road. Bus stop on a pole on the other side of the road.1174.1 - "No. 40 on Lydiard St. North service waits at the level crossing at Ballarat Railway Station." 1174.2 - "No. 12 bound for 'Gardens' seen across the centre plantation in Sturt St." 1174.3 - "Barrett Ave." 1174.4 - "The Sebastopol route near the terminus" 1174.6 - "Nos. 21 and 14 crossing at Sayle St. Loop on Sebastopol route" 1174.7 - "No. 12 at Eastern end of Bridge St." 1174.8 - "Nos. 30 and 17 in Sturt St. at Cnr of Lydiard St." 1174.9 - "No. 39 City bound from 'Gardens" in Sturt St. West" All have date stamp of "Sep 1971" in black ink. Writing in blue ink.tramways, trams, lydiard st. nth, railway crossing, sturt st, wendouree parade, sebastopol, macarthur st., bridge st., sturt st. west, tram 12, tram 14, tram 17, tram 21, tram 30, tram 39, tram 40, tram 42, tram 43 -
 Ballarat Tramway Museum
Slide - 35mm slide/s - set of 17, Noel Simons, 20/11/1962 12:00:00 AM
Set of 17 transparencies taken on 20/11/1962 on Kodak mounts. 1187.1 - Bendigo No. 2 at the Quarry Hill terminus, showing destination of Quarry Hill. Has Cohns Drinks and Streets Ice Cream ads on dash panel, a SEC 'electric cooking' roof ad and another roof ad. Shows the Y terminus at this location, but tram standing just before it. Overhead in position. 1187.2 - as above, but closer up. 1187.3 - as above, but from the north side, showing cemetery in the background. 1187.4 - Bendigo No.3 at Eaglehawk terminus. Tram showing destination of Quarry Hill. Has the various buildings at Eaglehawk in the background including the Foodland store. Has Streets Ice cream and White Horse Whiskey ads on the dash panel. 1187.5 - Bendigo No. 18 at Garden Gully crossing loop, in bound, with destination of Eaglehawk. Passengers waiting for an Eaglehawk tram at the stop. Has a white horse whiskey ad on dash panel and SEC roof ads. Conductor standing in doorway looking out. 1187.6 - Bendigo No. 7 inbound in Nolan St. at cnr of McCrae St. showing destination of Golden Square. Has Streets Ice cream ad on dash panel and a Castrol Roof ad. 1187.7 - Bendigo No. 19 at the North Bendigo terminus with railway level crossing in background. Tram has a Cohns Drinks ad and an SEC 'Electric Cooking' roof ad. 1187.8 - Bendigo No. 2 at the Quarry Hill terminus, looking back into Bendigo, showing destination of Eaglehawk. 1187.9 - Bendigo No. 21 in McCrae St, near Nolan St outbound for North Bendigo. Photo taken after tram has passed photographer. 1187.10 - Bendigo Nos. 4 and 26 at Charing Cross in View St. with fountain alongside and the Beehive, Ezywalkin Buildings in the background. No. 26 has a Sandhurst Milk and SEC 'Electric Cooking' roof ad. 1187.11 - close up of 22E maximum traction truck and folded footstep. 1187.12 - Bendigo No. 19 at Charing Cross terminus, after tram has passed photographer, showing destination of North Bendigo, with the Beehive building in the background and passengers boarding tram. 1187.13 - Bendigo No. 11, turning from View St. into Pall Mall, showing Special with the conductor holding point bar. Has the Beehive and Ezywalkin Buildings in the background. 1187.14 - No. 7 at Charing Cross terminus, in Pall Mall, bound for Golden Square. Has the Beehive and Ezywalkin buildings in the background and passengers waiting at the tram stop. 1187.15 - No. 18 at the Charing Cross terminus, bound for Eaglehawk. Has the Beehive and Ezywalkin buildings in the background and passengers waiting at the tram stop. Also has the 'Safety Zone' sign in the photograph. 1187.16 - No. 2 at Quarry Hill terminus, night or dusk photo. Tram showing destination of Depot. 1187.17 - No. 26 at Charing Cross, night photo. Tram has destination of Quarry Hill, but is on the line for Eaglehawk. Photo looks along Mitchell St. Also shows Safety Zone sign. Information written on in black ink and date stamped on purple ink. 1187.1 - "No. 2 at Quarry Hill terminus Bendigo" 1187.2 - "No. 2 at Quarry Hill terminus Bendigo" 1187.3 - "No. 2 at Quarry Hill terminus Bendigo" 1187.4 - "No. 3 at Eaglehawk terminus" 1187.5 - "No. 18 in Mt Korong Road, Long Gully at cnr of Havilah Road (Eaglehawk Route)" 1187.6 - "No. 7 in Nolan St. Bendigo, at Cnr of McCrae St., near lake Weeroona, (North Bendigo Route)' 1187.7 - "No. 19 at North Bendigo terminus" 1187.8 - "No. 2 at Quarry Hill terminus" 1187.9 - "No. 21 in McCrae St. Bendigo, near Nolan St. (North Bendigo Route) 1187.10 - "4 and 26 at Alexandra Fountain, Charing Cross Bendigo" 1187.11 - "Truck of Bogie Car, Bendigo Tramways" 1187.12 - "No. 19 in Pall Mall at Charing Cross, Bendigo" 1187.13 - "Birney car No. 11 entering Pall Mall from View St. at Charing Cross Bendigo" 1187.14 - "No. 7 in Pall Mall at Charing Cross, Bendigo" 1187.15 - "No. 18 at Alexandra Fountain, Charing Cross, Bendigo" 1187.16 - "No. 2 at Quarry Hill terminus, Bendigo" 1187.17 - "No. 26 at Alexandra Fountain, Charing Cross, Bendigo" tramways, trams, bendigo, quarry hill, eaglehawk, north bendigo, maximum traction, night photo, tram 2, tram 3, tram 4, tram 7, tram 11, tram 18, tram 19, tram 21, tram 26 -
 Ballarat Tramway Museum
Slide - 35mm slide/s, Noel Simons, 21/11/1962 12:00:00 AM
Set of 17 transparencies taken on 21/11/1962 on Kodak mounts. 1188.1 - Bendigo No. 11 at Depot Junction McCrae and Arnold St. with driver/conductor changing points. 1188.2 - Bendigo No. 4 at Charing Cross, side on photo, with City Club Hotel and Alexandra Fountain in the background. Tram has Castrol and SEC 'Electric Cooking' ads. 1188.3 - Bendigo No. 4 climbing View St. after tram has passed photographer. Tram has Streets Ice Cream and Cohns Soft Drinks ad on rear dash panel. In the background are the buildings in View St., including the Princess Theatre. Tram has destination of Eaglehawk. 1188.4 - Trams 2 and 4 crossing at the California Gully or Thorpe St Loop. 1188.5 - Bendigo 4 in Mt Korong Road. Tram inbound with destination of Quarry Hill, just leaving Garden Gully Loop. 1188.6 - Bendigo 4 and 17 crossing at the Hayes St. or Iron Bark Gully Loop. No. 17 bound for Eaglehawk, No. 4, Quarry Hill. 17 has two SEC roof ads and a white horse whiskey ad. 1188.7 - No. 17 bound for Eaglehawk, soon after leaving California Gully. Has large mullock heap in background. 1188.8 - Bendigo 2 and 17 crossing at the Thorpe St. or California Gully Loop. Has butchers shop in background. 1188.9 - Bendigo 17 at the Eaglehawk terminus. Has destination of Quarry Hill. In background is the hotel and shops at the terminus, showing ads for "Melbourne Bitter". Tram has two SEC 'Electric Cooking' ads. Driver and conductor about to assist two lady passengers with a pram and baby. 1188.10 - No. 17 at Eaglehawk terminus, awaiting departure. Has Eaglehawk Town Hall and Post Office in background. Tram has a Whitehorse Whiskey ad on the front dash panel. 1188.11 - No. 3 in High St. Eaglehawk, with destination of Eaglehawk. Has the shops on the south side of High St. in the background, including the Eaglehawk fish shop. Tram has two roof ads, one an SEC roof ad, and Cohns Drinks and Streets Ice cream ads on front dash panel. 1188.12 - as above, but after tram has passed photographer. Note the centre of the road poles. 1188.13 - No. 2 outbound for Eaglehawk at the intersection of Mt. Korong Road and the Calder Highway. Photo taken after the tram has passed the photographer. Has an Ampol service station in the background. 1188.14 - No. 11 leaving the Bendigo depot, crossing the bridge, with the Scrubber car in the background. 1188.15 - No. 21 at the North Bendigo terminus. Tram has destination of Golden Square and Cohns drink ad on front dash and two roof ads on side. 1188.16 - No. 11 on Golden Square route, in High St. at intersection with Old High St. 1188.17 - No. 11 at the Golden Square terminus, conductor turning the pole. Hotel on the left side of the photo. Note the road works barrier and red flag behind the tram. Slide has an end of roll mark on the right hand side of the image.Information written on in black ink and date stamped on purple ink. 1188.1 - "Birney car No. 11 in McCrae St. at Cnr of Arnold about to run into depot, Bendigo" 1188.2 - "No. 4 at Alexandra Fountain, Charing Cross Bendigo" 1188.3 - "No. 4 climbing the View St. Hill from Charing Cross, Bendigo (Eaglehawk Route)" 1188.4 - "No. 4 and 2 at Thorpe St. Loop, California Gully" 1188.5 - "No. 4 in Mt Korong Rd., Long Gully, Near Havilah Rd. (Bendigo) (Eaglehawk Route)" 1188.6 - "Nos. 17 and 4 crossing on Hayes St. Loop, Ironbark, Bendigo" 1188.7 - "No. 17 soon after leaving California Gully (Eaglehawk Route)" 1188.8 - "No.2 and 17 crossing on Thorpe St. Loop, California Gully (Eaglehawk Route)" 1188.9 - "No. 17 at Eaglehawk terminus" 1188.10 - "No. 17 at Eaglehawk terminus" 1188.11 - "No. 3 in High St. Eaglehawk" 1188.12 - "No. 3 nearing Eaglehawk terminus" 1188.13 - "No. 2 in Mt. Korong Rd., Ironbark. Calder highway on left (Eaglehawk route) 1188.14 - "Birney car No. 11 leaving Bendigo depot. Scrubber car at rear" 1188.15 - "No. 21 at North Bendigo Terminus" 1188.16 - "Birney car No. 11 in High St. Bendigo at intersection with Old High Street (Golden Square Route)" 1188.17 - "Birney Car No. 11 at Golden Square terminus, High St., Bendigo". tramways, trams, bendigo, depot junction, charing cross, view st., eaglehawk, north bendigo, golden square, tram 2, tram 3, tram 4, tram 11, tram 17, tram 21, tram scrubber -
 Ballarat Tramway Museum
Slide - 35mm slide/s - set of 3, Noel Simons, 22/11/1962 12:00:00 AM
Set of 3 transparencies taken on 22/11/1962 on Kodak mounts. 1190.1 - No. 7 (bound for North Bendigo) at the Charing Cross stop with No. 19 just left for Quarry Hill. Has the buildings on the south side of High St. in the background, including RACV building. No. 7 has front dash panel ad for Streets ice cream, and roof ads for Ilford Film and an SEC "Cook with Electricity". Passengers are boarding the tram. 1190.2 - Bendigo No. 2 at Charing Cross with fountain in the background and other buildings on the south side of High St. Tram has two SEC roof ads - good side on view - "Electric Cooking - Matchless" and "Switch to Electric Cooking". 1190.3 - Nos. 19, 2 and 7 at Charing cross with a Austin ? motor car. Has buildings on the south side of High St. in the background, along with SEC and Ilford film roof ads.Information written on in black ink and date stamped on purple ink. 1190.1 - "Nos. 19 and 7 at Alexandra Fountain, Charing Cross, Bendigo" 1190.2 - "No. 2 at Alexandra Fountain, Charing Cross, Bendigo" 1190.3 - "Nos. 19, 2 and 7 at Alexandra Fountain, Charing Cross, Bendigo" tramways, trams, bendigo, charing cross, alexandra fountain, tram 2, tram 7, tram 19 -
 Ballarat Tramway Museum
Slide - 35mm slide/s - set of 4, Noel Simons, Apr. 1967
Set of 2 slides made from the Association of Railway Enthusiast Provincial Tramways film strip, possibly during April 1967. 1192.1 and 1192.3 mounted in Kodak Ready Mounts. The others in plain white mounts. Slides dated Dec. 1968. 1192.1 - No. 21 out bound to Golden Square in High St., between Wattle and Vine Streets. Photo taken after tram has passed photographer. Has a sign for "Reid's Furnituorium" in the background. 1192.2 - Bendigo No. 28 dressed up as Myers Christmas tram, passing the Post Office and Courts in Pall Mall. 1192.3 - Bendigo No. 23 at Needle Loop en route to Eaglehawk. Tram has two SEC roof ads, one "Electric Cooking" and the other "Everything fine in my all electric kitchen". 1192.4 - Bendigo scrubber parked at the end of the main depot lead, alongside the depot office buildings.Details in blue ink, date hand stamped in purple ink. 1192.1 - "No. 21 heads along High St for Golden Square between Wattle and Vine Streets." 1192.2 - "Birney No. 28 in Christmas Garb, traverses Pall Mall en route to North Bendigo". 1192.3 - "No. 23 at Needle Loop on its run to Eaglehawk". 1192.4 - "Scrubber car at Bendigo Depot".tramways, trams, north bendigo, bendigo, bridge st loop, depot, tram 21, tram 23, tram 28, tram scrubber -
 Ballarat Tramway Museum
Slide - 35mm slide/s, Noel Simons, Sep. 1971
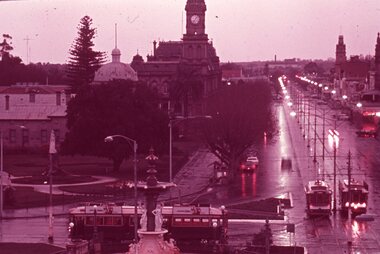
One slide on a Kodak Ready Mount made from the Association of Railway Enthusiast Provincial Tramways film strip, during September 1971 with a group of three trams at Charing Cross at dusk. Taken from an elevated position (the tower in the City Family Hotel) over looking the Alexandra fountain and looking towards the North on a wet evening. Two single truckers (1 possibly No. 6) and one bogie car waiting to proceed."Rainy evening at Charing Cross" in blue ink and "Sept 1971" in purple ink using a hand stamp.tramways, trams, charing cross, bendigo, tram 6 -
 Ballarat Tramway Museum
Slide - 35mm slide/s - set of 24, Noel Simons, 20/05/1971 12:00:00 AM
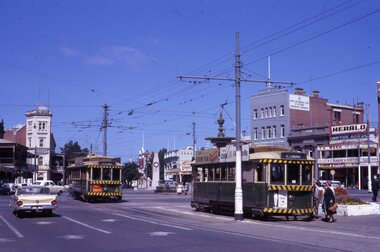
Set of 24 transparencies taken on 20/5/1971 on Kodak mounts. 1195.1 - Bendigo 19 arriving at Charing Cross en route to North Bendigo with Fountain Plaza and the City Family Hotel in the background. No. 19 has two roof ads for the SEC. -'Electricity better for cooking' and 'Everything's under control in my all electric kitchen' 1195.2 - as above, but standing at the Charing cross stop, with the Beehive Stores and other buildings along the east side of Pall Mall in the background. 1195.3 - No 21 ex Golden Square crossing View St. trackwork in front of No. 25 waiting to depart for Quarry Hill. No.21 has two roof ads (as for No.19 in 1195.1) and No.25 has one SEC roof ad and another. Ezywalkin sign in the background, and Fountain Plaza. 1195.4 - as for 1195.3, but after 21 has arrived and 25 left for Quarry Hill. Has Ezywalkin store and the Beehive store in the background. 1195.5 - No. 5 at the Eaglehawk terminus. Photo taken with a cannon in foreground looking along High St. Eaglehawk. Has shops on the west side of High St. in the background. 1195.6 - No. 5 at the Eaglehawk terminus, close up of the rear of the tram - note tow bar arrangement. Has destination of Quarry Hill. 1195.7-Nos.25 and 5 crossing at the Thorpe St. Loop, California Gully. No. 25 bound for Eaglehawk (has SEC Briquette and electric cooking roof ads) and 5 en route for Quarry Hill with a SEC and Cinzano roof ad. 1195.8 - as for 1195.7, but after trams have passed each other. Has Borough Auto Service building in the background. 1195.9 - No. 5 in Mt Korong Road, towards Bamard Street, photo taken after tram has passed photographer. 1195.10 - No. 30 at the Golden Square terminus with the Milk Bar on the right hand side of the photograph. 1195.11 - No. 30 inbound at Fire Station Loop, High St. Golden Square. Has old fire station in the background. Passengers are boarding the tramcar. 1195.12 - No. 30 in High St, bound for North Bendigo between Vine and Wattle Streets. 1195.13 - No. 5 bound for Eaglehawk waits at Iron Bark Gully Loop, at Hayes St. 1195.14 - No. 5 and No. 2 crossing at Iron Bark Gully Loop. 1195.15 - No. 5 bound for Eaglehawk leaving the Manchester Loop, Long gully. 1195.16 - No. 5 passing William Street, Long Gully en route to Eaglehawk. 1195.17 - No. 5 just before the California Gully Crossing Loop. 1195.18 - Nos. 5 and 26 crossing at California Gully crossing Loop. No. 5 heading to Eaglehawk, 26, Quarry Hill. 1195.19 - No. 5 in High St. Eaglehawk with Bob Moyle's Victoria Hotel and the TAB in the background. 1195.20 - No. 5 in High St. Eaglehawk approaching the terminus. Photo taken after the tram has passed the photographer. Has Foodland store and J. Best Fruit supply in the background, along with Eaglehawk Town Hall. 1195.21 - No. 5 at the Eaglehawk terminus, photo taken along seldom used track along High St. 1195.22 - as for 1195.22 - but at the very end of the track. 1195.23 - No. 5 en route for Quarry Hill climbs High St. Eaglehawk with the Victoria Hotel and Eaglehawk Town Hall in the background. 1195.24 - No. 5 and 25 crossing at Jobs Gully Loop. Note 25 has a black on white destination roll, while No. 5 has a white on black destination roll. Information written on in black ink and date stamped on purple ink. 1195.1 - "No. 19 arrives at Charing Cross Bendigo from Golden Square" 1195.2 - "No. 19 about to leave Charing Cross for North Bendigo" 1195.3 - "No. 25 awaiting departure for Quarry Hill, watches No. 21 arrive at Charring Cross from Golden Square" 1195.4 - "No. 21 on North Bendigo service and No. 25 on Quarry Hill run await departure at Charing Cross" 1195.5 - "No. 5 at Eaglehawk terminus" 1195.6 - "No. 5 at Eaglehawk terminus" 1195.7 - "Nos. 5 and 25 crossing at Thorpe St. Loop, California". 1195.8 - "Nos. 25 and 5 crossing Thorpe St. Loop, California Gully". 1195.9 - "No. 5 descending Mt Korong Rd. towards Bamard St." 1195.10 - "Birney car No. 30 at Golden Square terminus" 1195.11 - "Birney car No. 30 in High Street near Thistle Street (Fire Station Loop)" 1195.12 - "No. 30 in High St. between vine and Wattle Streets" 1195.13 - "No. 25 at Hayes Street Loop Iron Bark". 1195.14 - "Nos. 2 and 5 crossing at Hayes Street Loop Iron Bark" 1195.15 - "No. 5 at Manchester Loop opposite Havilah Road, Long Gully" 1195.16 - "No. 5 passing William Street, Long Gully". 1195.17 - "No. 5 at California Gully" 1195,18 - "Nos. 26 and 5 at Thorpe St. Loop, California Gully". 1195.19 - "No. 5 in High St. Eaglehawk". 1195.20 - "No. 5 approaching Eaglehawk terminus" 1195.21 - "No. 5 at Eaglehawk terminus" 1195.22 - "No. 5 at Eaglehawk terminus" 1195.23 - "No. 5 in High St. Eaglehawk" tramways, trams, bendigo, charing cross, eaglehawk, california gully, golden square, iron bark gully, jobs gully, tram 2, tram 5, tram 19, tram 21, tram 25, tram 26, tram 30 -
 Ballarat Tramway Museum
Slide - 35mm slide/s - set of 2, Noel Simons, 20/05/1971 12:00:00 AM
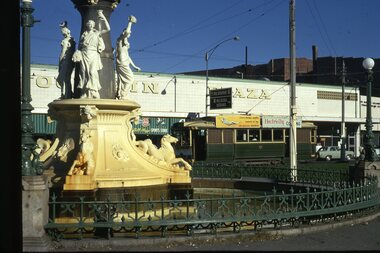
Set of 2 slides mounted in Kodak Ready Mounts. Slides dated 20 May 1971. 1196.1 - Bendigo No. 21 arriving at Charing Cross from Golden Square with the Alexandria Fountain in the foreground. In the background is the Fountain Plaza building. Tram has 2 SEC roof ads. 1196.2 - No. 30 at Charing Cross from North Bendigo. On a pole in front of the tram are two signs "All cars stop here" in white printing on a red background and "Cars Stop by Request" in white lettering on a black background.1196.1 - "No. 21 passing Alexandra Fountain on arrival at Charing Cross from Golden Square" 1196.2 - "No. 30 at Charing Cross"tramways, trams, charing cross, bendigo, alexandra fountain, tram stops, tram 21, tram 30 -
 Ballarat Tramway Museum
Slide - 35mm slide/s - set of 13, Noel Simons, 24/05/1971 12:00:00 AM
Set of 13 transparencies taken on 24/5/1971 on Kodak mounts. 1200.1 - No. 7 en route to Golden Square turning from Bridge St. into Nolan St. Photo taken after tram has passed photographer. Tram has a briquettes roof ad. 1200.2 - No. 21 in McCrae St. just before Nolan St. Photo taken after tram has passed photographer. 1200.3 - No. 7 in Nolan St at corner with McCrae St. Passenger boarding tram at a tram stop. 1200.4 - No 7 turning from Nolan into McCrae St. with Golden Fleece service station in background. 1200.5 - No. 7 in Thunder St en route to North Bendigo. Photo taken after tram has passed photographer. 1200.6 - No. 5 en route to Eaglehawk just after leaving Needle Loop between Long Gully and California Gully. 1200.7 - No. 5 at the start of the double track in High St. Eaglehawk. 1200.8 - No. 5 at Eaglehawk terminus showing "Depot" with Leo A Hughes Photographer advertisement on building in background. 1200.9 - No. 5 at Eaglehawk terminus. Has two SEC roof ads 'Everything's fine in my all electric kitchen' and 'Electricity best for cooking'. 1200.10 - No. 5 at Eaglehawk terminus, with canon, war memorial outside Town Hall and Leo A Hughes Photographer advertisement on building in background. 1200.11 - No. 5 in McCrae St. about to enter Arnold St. and depot. Tram showing depot, has driver changing points. 1200.12 - No. 5 in Arnold St. Photo taken looking up the centre of the access track - shows the overhead at depot junction. 1200.13 - Depot entrance with signage at depot entrance and depot building in background.Information written on in black ink and date stamped on purple ink. 1200.1 - "No. 7 entering Nolan St. from Bridge St." 1200.2 -"No. 21 in McRae St. about to turn into Nolan St." 1200.3 - "No. 7 in Nolan St. at corner of McRae St." 1200.4 - "No. 7 turning from Nolan St. into McRae St." 1200.5 - "No. 7 in Thunder St. just after turning from Caledonia St." 1200.6 - "No. 5 just after leaving Needle Loop between Long Gully and California Gully. 1200.7 - "No. 5 in High St. Eaglehawk at start of double track." 1200.8 - "No. 5 at Eaglehawk terminus" 1200.9 - "No. 5 at Eaglehawk terminus" 1200.10 - "No. 5 at Eaglehawk terminus."\ 1200.11 - "No. 5 in McCrae St. about to enter Arnold St." 1200.12 - "No. 5 in Arnold St." 1200.13 - "Entrance to Bendigo Tram Depot, No. 5 running into shed."tramways, trams, bendigo, mccrae st, north bendigo, california gully, eaglehawk, depot, tram 5, tram 7, tram 21 -
 Ballarat Tramway Museum
Slide - 35mm slide/s - set of 25, Noel Simons, 26/02/1972 12:00:00 AM
Set of 25 transparencies taken on 26/2/1972 on Kodak mounts. 1204.1 - Bendigo No. 5 - just arrived at Manchester Loop near Havilah Road, Long Gully. Photo taken after tram has passed photographer. 1204.2 - No. 26 in Backhaus St. Long Gully passing William St, en route to Quarry Hill. Photo taken after tram has passed photographer. 1204.3 - No. 5 climbing the High St. Hill Eaglehawk, heading for Quarry Hill with the buildings on the West side of High St. in the background, including the Eaglehawk Town Hall. 1204.4 - as for 1204.3, but tram close up. 1204.5 - as for 1204.3, but after tram has passed photographer. 1204.6 - No. 5 at intersection of Mt Korong Road Ironbark and Calder Highway, with the AMPOL service 'station in the background. Photo taken after tram has passed photographer. 1204.7 - No. 26 en route to Quarry Hill shortly after leaving Needle Loop, passing William St., Long Gully. 1204.8 - No. 5 at California Gully Loop, picking up a passenger, with the shops at Long Gully in the background. Photo taken after tram has passed photographer. 1204.9 - No. 5 in Long Gully, en route to Quarry Hill. Photo taken after tram has passed photographer. 1204.10 - No. 2 at Eaglehawk terminus with the Eaglehawk Town Hall and Post Office in the background. Tram has two SEC roof ads. 1204.11 - No. 2 at Eaglehawk terminus, close up. 1204.12 - as for 1204.11, but through the park gates. 1204.13 - as for 1204.11, but with tram stop shelters in the foreground and buildings on the West side of High St in the background. 1204.14 - No. 2 in Mt. Korong Rd, midway between California Gully Loop and Needle Loop. Photo taken after tram has passed photographer. 1204.15 - No. 5 in Long Gully, en route to Quarry Hill. 1204.16 - as for 1204.15, but with trams departed loop. Has an ESSO service station in the background. 1204.17 - No. 26 leaves Charing Cross up View St.. Photo taken after tram has passed photographer. Has Armstrong Tyre Service, Cohns Drinks ad on a building and the T&G building in the background. Also Firestone ads on the tyre service building. 1204.18 - No. 5 waits at Charing Cross with the Alexandra Fountain in the background. Tram has two SEC roof ads, 'Everything s fine in my all electric kitchen' and 'Electricity Best for Cooking'. Has RACV, Colonial Mutual Life buildings in the background and the planting areas around Charing Cross gardens in the foreground. 1204.19 - No. 21 en route to North Bendigo arrives at Charing Cross, with passengers waiting to board. No. 5 in the background. In the background is the Fountain Gate Plaza building and the City Family Hotel. 1204.20 - as for 1204.19, but with No. 7 en route to Golden Square. 1204.21 - as for 1204.19, but closer up. 1204.22 - as for 1204.18 1204.23 - No. 25 in Nolan St. near the crossing of Bendigo Creek, running a special tram tour. 1204.24 - No. 25 on a special charter, in Weeroona Ave. at Cnr of Caledonia St. passing the Gas works. 1204.25 - Nos. 25 (showing Golden Square), 7 and 26 at Charing Cross. Has fountain in the background.Information written on in blue ink and date stamped on purple ink. 1204.1 - "No. 5 at Manchester Loop, near Havilah Rd. Long Gully." 1204.2 - "No. 26 in Backhaus St. Long Gully passing William St." 1204.3 - "No. 5 in High St. Eaglehawk." 1204.4 - "No. 5 in High St. Eaglehawk." 1204.5 - "No. 5 in High St. Eaglehawk." 1204.6 - "No. 5 in Mt. Korong Rd., Ironbark, passing Calder Highway Junctn." 1204.7 - "No. 26 shortly after leaving Needle Loop, passing William St., Long Gully. No. 5 cresting hill in distance." 1204.8 - "No. 5 at California Gully Loop." 1204.9 - "No. 5 in Long Gully" 1204.10 - "No. 2 at Eaglehawk terminus." 1204.11 - "No. 2 at Eaglehawk terminus." 1204.12 - "No. 2 at Eaglehawk terminus." 1204.13 - "No. 2 at Eaglehawk terminus." 1204.14 - "No. 2 in Mt. Korong Rd, midway between California Gully Loop and Needle Loop. 1204.15 - "Nos. 2 and 26 crossing at Long Gully." 1204.16 - "No. 26 leaves Long Gully loop for Eaglehawk as No. 2 pulls out of the far end towards Bendigo" 1204.17 - "No. 26 beginning the climb up View St. from Charing Cross." 1204.18 - "No. 5 at Charing Cross." 1204.19 - "No 21 arrives at Charing Cross from Golden Square while No. 5 awaits departure time for Eaglehawk." 1204.20 - "Nos. 7, 21, and 2 (behind which is No. 5) at Charing Cross." 1204.21 - "Nos. 7, 21, and 2 at Charing Cross." 1204.22 - "No. 5 at Charing Cross." 1204.23 - "No. 25 in Nolan St. near Bendigo creek crossing" 1204.24 - "No. 25 in Weeroona Ave. at cnr of Caledonia St." 1204.25 - "Nos. 25, 7, 26 and 2 (behind 26) at Charing Cross."tramways, trams, bendigo, eaglehawk, long gully, california gully, charing cross, north bendigo, tram 2, tram 5, tram 7, tram 21, tram 25, tram 26 -
 Ballarat Tramway Museum
Newspaper, The Courier Ballarat, "Tourist Trams for Bendigo", 24/10/1972 12:00:00 AM
Newspaper Clipping possibly from The Courier, Ballarat, 24/10/1972 about questions to be asked in the Legislative Assembly today by Mr. Floyd (Labour Williamstown) about the running of the trams in Bendigo for tourists and running of trams in Ballarat. Item notes that approved the service between the North Deborah mine and the Chinese Joss House. Item possibly from the Courier as it has Ballarat people funeral notices on the rear."24/10/72" in top right hand corner in black ink.trams, tramways, bendigo, parliamentary questions, mr. floyd, mr. v. wilcox -
 Ballarat Tramway Museum
Photograph - Black & White Photograph/s, David Endacott, 14/08/1971 12:00:00 AM
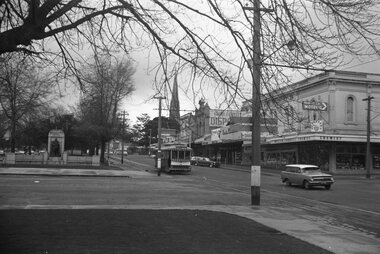
Black and white photograph and negative of Ballarat No. 26 eastbound in Sturt St., Saturday 14 August 1971 at the corner of Doveton St. Has the George V statute adjacent. Tram has destination of Lydiard St. North. Has Walter Connell Chemist on left hand side of photo, with a BP display thermometer showing temperature - about 12 degrees and a finger board for the Mid City Motel on chemist building. Original print by David Endacott, duplicate print (1261A) by John Phillips 12/99. Second copy added 5/2001. Original neg scanned at hi res and updated 11/5/2020.On original print "Last week of full tram service before phasing out / from Cnr of Sturt and Doveton Sts. / Sat 14 August 1971" in pencil.trams, tramways, ballarat, sturt st., doveton st., tram 26 -
 Ballarat Tramway Museum
Photograph - Black & White Photograph/s, David Endacott, 14/08/1971 12:00:00 AM
Black and white photograph and negative of Sturt St, north side, looking to the east of Armstrong Street, Saturday 14 August 1971 at the corner of Armstrong St. Has two single truck trams at the intersection with Lydiard St. North and a few parked cars. Original print by David Endacott, duplicate print (1262A) by John Phillips 12/99. Second copy added 5/2001. Original neg scanned at hi res and updated 11/5/2020.On original print "From Cnr Sturt & Armstrong Sts / Sat 14 Aug 1971" in pencil.trams, tramways, ballarat, sturt st., armstrong st. -
 Ballarat Tramway Museum
Photograph - Black & White Photograph/s, David Endacott, 14/08/1971 12:00:00 AM
Black and white photograph and negative of an inbound single truck tram in Sturt St. just to the west of Dawson St. Photo taken from the central median strip, has the shops on the north side of Sturt St. in the photograph - such as Gear Chemist. Photo taken 14 August 1971. The Alexandra Bandstand in the foreground. Original print by David Endacott, duplicate print (1270A) by John Phillips 12/1999. Large copy print added 5/2001. Original neg scanned at hi res and updated 11/5/2020. Original neg scanned at hi res and updated 11/5/2020.On original print "Last week of full tram service before phasing out / from Cnr Sturt & Dawson Sts. / Aug 1971" in pencil.trams, tramways, ballarat, sturt st, dawson st., alexandra bandstand -
 Ballarat Tramway Museum
Photograph - Colour Photograph/s, David Endacott, 1971
Colour print of a Ballarat No. 30 in Lydiard St. North opposite the concrete retaining wall on the east side of Lydiard St. North, just before Macarthur St, the cutting was between Clarendon St and Macarthur St. Tram has destination of Lydiard St. Nth. Has homes and the city of Ballarat in the background. Original film image scanned at 3200dpi 12/5/2020.On rear in blue ink "Lydiard St. Nth" and in the top left hand corner "1971".ballarat, lydiard st. nth, retaining wall, tram 30 -
 Ballarat Tramway Museum
Photograph - Colour Negative, Colour Print, David Endacott, 1971
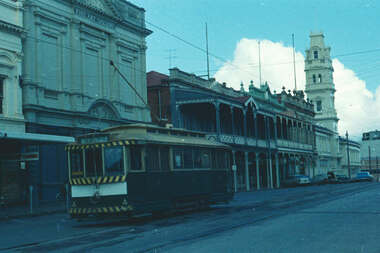
Colour positive (negative) of SEC tram No. 30 south bound in Lydiard St. North, with the destination of Sebastopol between Mair St and Sturt St. Has the Fine Art Gallery buildings, Post Office and Mining Exchange building in the background of the photograph. Photo taken after the tram has passed the photographer. A colour laser image of this negative made on 10/1/2000 using a Canon Laser printer has been placed on file at 01-01-57. Original film image scanned at 3200dpi 12/5/2020.ballarat, lydiard st. nth, fine art gallery, tram 30 -
 Ballarat Tramway Museum
Photograph - Colour Photograph/s, Earl Ewers, 1994
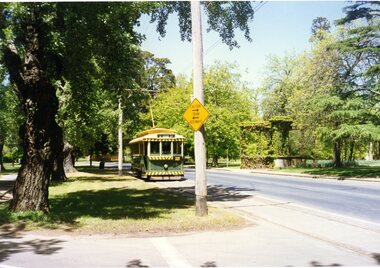
Colour photograph of BTM No. 18 north bound in Wendouree Parade, about to cross Windmill Drive North. Tram showing destination of "St. Aidans Drive". The "Caution Tram Bothways" sign on the pole adjacent to Windmill Drive had recently been positioned, following donation of the signs from St. Georges Road by the City of Northcote. Taken c1994 Has the MacDonald Gates in the view."E E" on back.windmill drive, wendouree parade, road signs, tram 18 -
 Ballarat Tramway Museum
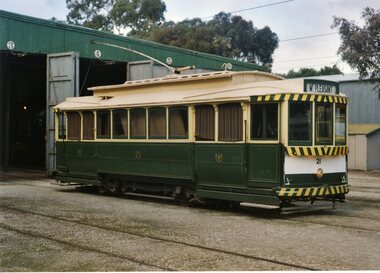
Photograph - Colour Photograph/s, Earl Ewers, 26/09/1992 12:00:00 AM
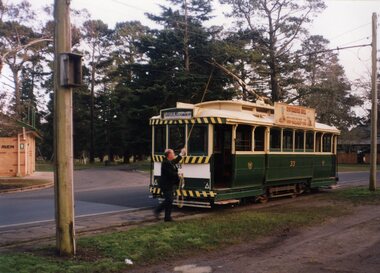
Yields information about the BTPS 21st Anniversary celebrations which involved running a "all day" service. First tram out, early am.Colour Photograph of BTM tram No. 33 being reversed by Gavin Young at the Gardens Loop on 26/9/1992 as part of the 21st Anniversary celebrations. Tram has Sovereign Hill ad on the side, and showing "Gardens via Drummond North". See also Reg Item 4056.1 > 4056.7 and September 1992 Fares Please!21st anniversary, btm, wendouree parade, gardens loop, tram 33 -
 Ballarat Tramway Museum
Document - Letter/s, Robert Aspinall, 20/02/2001 12:00:00 AM
Letter from Robert Aspinall, dated 20/2/2001 of North Fitzroy. outlining his tramway experience and as operator of MMTB Scrubber tram No. 8 (8W). Gives brief history of employment with MMTB, ATMOEA. Notes objectives of scrubbing and flushing rails, leaf season, logistics, and other thoughts. Letter on line foolscap paper with punch holes in the left hand margin. Letter handwritten in black ink - five pages. Photocopy of letter held on file. Information used in the preparation of the notes on the operation of No. 8 - 4/2001.trams, tramways, flushing, scrubber tram, employees -
 Ballarat Tramway Museum
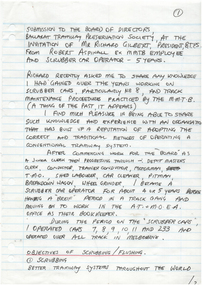
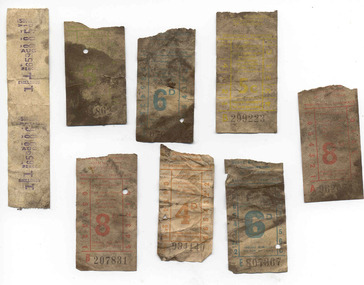
Ephemera - Ticket/s, State Electricity Commission of Victoria (SECV), Set of 13 mixed SEC decimal tickets found in Ballarat No. 18, 1950's to late 1960's
Set of 13 mixed SEC decimal tickets found in Ballarat No. 18, behind the north side sandbox, No. 2 end, 6/12/1997. Tickets have been used and are generally in a good condition. The image file shows the nature of the damage. Tickets have not been individually numbered with the Registration Number, but can be identified by their ticket number and denomination. All on white paper unless otherwise noted. For examples of backs, see image file btm1765i2.jpg 2d - Cd 440101 - black ticket with 2d in blue, plain back 2d - M 863134 - red ticket with tartan pattern on back 2d - B 310353 - reddish brown ticket, over stamped "Concession", with tartan pattern on back. 3d - An 556840 - orange ticket with 3d in blue, plain back 3d - C8 853318 - orange ticket with 3d in blue, with Bushells tea advert on back 4d - K 733913 - light brown ticket, with 4d in blue, plain back 4d - K 769645 - light brown ticket, tartan back 4d - L 938438 - light brown ticket, tartan back 4d - X 668357 - light brown ticket, tartan back 10d - B 027901 - black ticket, tartan back 7c - C535459 - turquoise ticket, with SEC little boy advert on back 8c - A 207590 - green ticket, with SEC advert on back 13c - A 655591 - black ticket, with SEC advert on back.trams, tramways, tickets, used tickets, secv, ballarat -
 Ballarat Tramway Museum
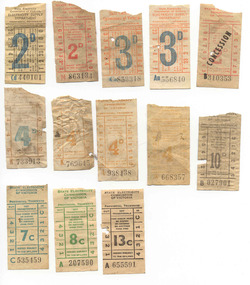
Ephemera - Ticket/s, State Electricity Commission of Victoria (SECV), Set of 16 mixed SEC tickets found in Ballarat No. 18, 1950's to late 1960's
Set of 16 mixed SEC tickets found in Ballarat No. 18, behind the north side sandboxes No. 2 end 6/12/1997. Tickets have been used and have varying degrees of dirt. The image file shows the nature of the damage. Tickets have not been individually numbered with the Registration Number, but can be identified by their ticket number and denomination. All SEC penny or pre decimal tickets with one SEC decimal issue. All on white paper unless otherwise noted. For examples of back see image file, btm1766i2. 1 1/2d - Ac 498642, black ticket, with 1 1/2d in red, with "Bushells More Cups - Finer Flavour" advert on back. 1 1/2d - Cb 824251, black ticket with 1 1/2d in red on pink paper, plain back. 2d - B 562077, black ticket, with 2d in blue, on plain paper. 2d - J 946575, black ticket, with 2d in red, on plain paper. 3d - AI - 428600, orange ticket, with 3d in blue, on plain paper - See Reg Item 4007 for another example of this. 3d - Ak 098572, black ticket with 3d in blue on pink paper, plain back 3d - Bf 244442, black ticket with 3d in blue, on pink paper, plain back 3d - F 021041, black ticket, with 3d in orange, plain paper 3d - Q 485745, orange ticket, with tartan back 3d - U 367936, orange ticket, with tartan back 4d - K 462 377, light brown ticket, with tartan back 8d - A 252730, light red ticket with tartan back 8d - A828147, light red ticket with tartan back 8d - A956056, light red ticket with tartan back 8d - B 389499, light red ticket with tartan back 7c - C 719178, green ticket with little boy in towel SEC logo on rear. trams, tramways, tickets, used tickets, secv, ballarat -
 Ballarat Tramway Museum
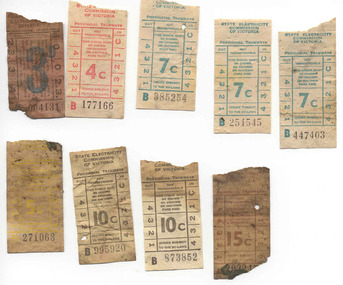
Ephemera - Ticket/s, State Electricity Commission of Victoria (SECV), Set of 9 mixed SEC tickets found in Ballarat No. 28, mid 1960's to late 1960's
Set of 9 mixed SEC tickets found in Ballarat No. 28, behind the north side sandboxes No. 2 end 6/1/1999. Tickets have been used and have varying degrees of dirt. The image file shows the nature of the damage. Tickets have not been individually numbered with the Registration Number, but can be identified by their ticket number and denomination. All SEC decimal tickets with one SEC pre decimal issue. All on white paper unless otherwise noted. 3d - 45 004131, black ticket with 3d in blue on pink paper, plain back 4c - B 177166 - red ticket, SEC logo on back 5c - B 271063 - yellow ticket, SEC logo on back 7c - B251545, turquoise ticket, SEC logo on back 7c - B385254 - turquoise ticket, SEC logo on back 7c - B447403 - turquoise ticket, SEC logo on back 10c - B873852 - black ticket, SEC logo on back 10c - B995920 - black ticket, SEC logo on back 15c - A202245? - brown ticket, tartan back trams, tramways, tickets, used tickets, secv, ballarat -
 Ballarat Tramway Museum
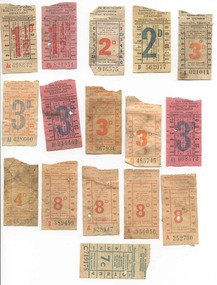
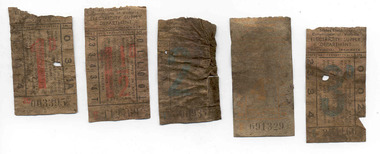
Ephemera - Ticket/s, State Electricity Commission of Victoria (SECV), Set of 8 mixed SEC tickets found in Ballarat No. 28, early1960's to late 1960's
Set of 8 mixed SEC tickets found in Ballarat No. 28, No. 2 end north side under old drop window in bulk head by Darren Hutchesson on 28/3/1999. Tickets have been used and have varying degrees of dirt. The image file shows the nature of the damage. Tickets have not been individually numbered with the Registration Number, but can be identified by their ticket number and denomination. Mostly SEC pre-decimal tickets with one SEC decimal issue ticket and one bus ticket. All on white paper unless otherwise noted. 4d F? or I? - 994140 - brown ticket with tartan back 5d - ? - 651862 - green ticket with tartan back 6d - E 807367 - blue ticket with tartan back 6d - J 078706 - blue ticket with tartan back 8d - B 207831 - light red ticket with tartan back 8d - A 962074 - light red ticket with tartan back 5c - B299223 - yellow ticket with SEC logo on rear. Bus ticket - strip - 1/1d, issued 7/8/1965, No. 885 and 886 marked "single"trams, tramways, tickets, used tickets, secv, ballarat -
 Ballarat Tramway Museum
Ephemera - Ticket/s, State Electricity Commission of Victoria (SECV), Set of 5 SEC decimal tickets found in a tramcar, 28, 1950's to late 1960's
Set of 5 SEC decimal tickets found in a tramcar, 28, 1/1999, No. 1 end north side. Tickets have been used and are generally in a good condition. The image file shows the nature of the damage. Tickets have not been individually numbered with the Registration Number, but can be identified by their ticket number and denomination. All on white paper unless otherwise noted. 1d - 20 003395 - black ticket with 1d and "20" in ticket number in red, plain back 1 1/2d - G 112769, black ticket with 1 1/2d in red, plain back 2d - 17 009376, blue ticket with 2d and "17" in ticket number in blue, plain back - ticket in two halves, very dirty. 3d - C 284 166, black ticket, with 3d in blue, plain back. 4d - R? 691329, brown ticket, with tartan backtrams, tramways, tickets, used tickets, secv, ballarat -
 Ballarat Tramway Museum
Photograph - Colour Photograph/s - set of 25, Austin Brehaut, 7/04/2000 12:00:00 AM
Yields information about various locations in Ballarat in March 2000 for comparison with previous photographs.Set of 25 colour photographs taken by Austin Brehaut on 7 April 2000 showing various locations that Ballarat trams once ran in, for use in a BTM presentation, named "Ballarat Past and Present" at the COTMA 2000 Ballarat Conference. All on Fujicolour Crystal Archive Paper. On rear in blue ink is the date, location and where relevant a reference number to photo locations that the author of the presentation had requested. Letter from Austin, filed with the worksheet for Reg. Item 1772. 1773.1 - Base Hospital, Cnr Drummond St. North and Mair St. .2 - Hospital Corner - Base Hospital Along Drummond St. North .3 - St John of God Hospital, cnr Mair and Drummond St. Nth. .4 - Hospital Corner, looking South East from Base Hospital .5 - Gardens at Loop (Wendouree Parade) .6 - Gardens Loop and Shelter .7 - Shelter at Gardens Loop .8 - Bridge Mall looking west .9 - Lower Victoria St. along Bridge St .10 - Railway crossing, Ballarat Station, with gates open .11 - Victoria St. hill facing west .12 - Railway crossing, Lydiard St. North .13 - Railway crossing, Ballarat Station, with gates closed .14 - Lydiard St. North terminus from cemetery .15 - Lydiard St. North at Macarthur St. .16 - Lydiard St. North at Sturt St facing South East - Post Office on left .17 - Looking north along Lydiard St at Sturt St .18 - Sturt and Lydiard Sts corner from Post Office .19 - Centre plantation Sturt St. looking east .20 - Sturt St. West near Ballarat and Clarendon College .21 - Sturt St. West facing west at Russell St. .22 - Victoria St. terminus .23 - Victoria St. terminus .24 - St Alipius Church, Victoria St. .25 - Junction of tramline and Phoenix foundry railway in Sturt St. at Armstrong St. (transferred from roadway) See Reg item 4645 and 4646 for the 2010 comparisons.See Aboveballarat, hospital corner, gardens loop, railway crossing, lydiard st. north, sturt st, phoenix foundry, armstrong st., victoria st., sturt st. west -
 Ballarat Tramway Museum
Ephemera - Ticket/s, Victorian Railways, BTPS Mirboo North tour, 1974
Edmondson pasteboard railway ticket, No. 14, dated 25 April 1974, for use on a Ballarat Tramway Preservation Society special train from Morwell to Mirboo North and return. See Reg. item 1819 for S circular or Special Train Notice for the tour. Ticket base is off white with eight light orange vertical bands equally spaced along the ticket, which is printed in landscape format. Notes as being "Available by Goods Train each way on day of issue only.", for Adult - Economy and Adult - Economy. Ticket number in reverse printing. See Reg Item 4676 for a group photo.trams, tramways, tickets, btps, morwell - mirboo north, tours -
 Ballarat Tramway Museum
Ephemera - Tour Notes, Victorian Railways, Apr. 1974
Victorian Railways "S" circular, number S.839/74 advising of a BTPS excursion from Morwell to Mirboo North on Thursday 25/4/1974 (Anzac Day). Noted that a BW carriage to be attached to the Mirboo North goods at Traralgon at the rear in front of the brake van, pick up passengers at Morwell, the train to Mirboo North would have an altered schedule, passengers would travel to Morwell by the 7.20am passenger ex Melbourne and return by the Gippslander ex Morwell, that passengers would have specially printed tickets (See Reg. Item 1817) and signed by J. C. Crute as Chief Traffic Manager. Issued on 10/4/1974. Printed on foolscap size paper. See Reg Item 4676 for a group photo.btps, tours, morwell - mirboo north, special trains -
 Ballarat Tramway Museum
Photograph - Colour Photograph/s set of 2, Warren Doubleday, 7/07/2001 12:00:00 AM
Set of two colour photographs taken on Saturday July 7, 2001 at the Australian Electric Traction Museum at St. Kilda South Australia for ex Ballarat trams No. 21 and 34 on 3 and 4 roads of the depot respectively. On Agfa paper. 1821.1 - No. 21 1821.2 - No. 21 and 34, showing Mt Pleasant and Gardens via Drummond North respectively.aetm, st kilda, sec, museums, tram 21, tram 34 -
Ballarat Tramway Museum
Document - Form/s, L. Walker, "Trip Way Bill", 18/09/1971 12:00:00 AM
Sheet of foolscap size paper, printed both sides as a SEC Electricity Supply Department, Provincial Tramways, Trip way bill showing Motorman/Conductor name, traffic number, day, date, trip details, time route, tram, ticket prices, numbers and number sold. Used by L. Walker, No. 54 on Saturday Sept 18, 1971, on tram No. 35 between Sebastopol and Lydiard St. North. Shows opening numbers in four figures and the closing numbers in three. Gives details of 12 trips from commencing at 7.55pm and finishing at 11.55pm. Has inscription on form "The Last Trip Way Bill on abandonment of Tramways Ballarat Sept 18, 1971, Lew Walker, Conductor / Motorman". See Reg Item 259 and 1057 for references. Question - did they do Trip Way Bills the following day, the last day on Sept. 19 1971? From a preliminary study, the Run No. of 26 on the top left hand corner of the sheet lines up with a Saturday Roster and trips. check with the final roster/runs for the period.See abovetrams, tramways, trip waybills, closure, l. walker, ballarat