Showing 943 items
matching crash
-
 Falls Creek Historical Society
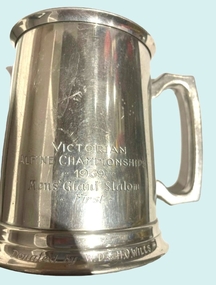
Award - Pewter Mug Trophies - Ross and Malcolm Milne - Victorian Alpine Championships 1969 Men's Giant Slalom First
This Pewter Mug Collection is a set of 32 trophies won by Australian Alpine skiers Ross and Malcolm Milne between 1959 and 1964. Ross and Malcolm grew up on their family's tobacco property in Myrtleford, and began skiing at Falls Creek at an early age. They were both taught by Austrian Sigi Haberzettl, who was chief coach at Falls Creek for 17 years. Ross went on to win the North-Eastern District Ski Association (NEDSA) Junior Championships for three years in a row. In 1961 Ross was a member of the Australian team which competed against New Zealand in the Inter-Dominion Championships. In 1963, he won the Downhill and Alpine Combined title at the Australian Championships, while placing second in the Grand Slalom event. Ross Milne was selected in the Australian team that participated in the 1964 Olympic Winter Games at Innsbruck, Austria. A few days before the opening of the Games, on 25 January 1964, he tragically lost his life when he crashed into a tree during a training run for the Men's Downhill. He was only 19 years of age. Malcolm became a member of the Australian Junior Ski Team to Japan at the age of 14. He won all of the NEDSA children’s races and won the State Title in 1966. Malcolm continued to achieve great success, winning the Australian Championships for the next five years. At the end of 1969 he won Gold in the Val d'Isere FIS Alpine Ski World Cup Downhill, Australia's first Alpine Ski World Cup medal. He was on the Australian National Ski Team for eight years, representing his country at the 1968 and 1972 Olympic Games and the 1966 and 1970 World Championships before turning professional in 1972. Malcolm Milne was inducted into the Sport Australia Hall of Fame in 1985. In 2000 he received the Australian Sports Medal for his contribution to skiing. In 2004, Ski & Snowboard Australia granted Milne Life Membership for the contribution he made to the sport by becoming the first World Cup medal winner in Australian winter sports history, and the subsequent impact his performances have had on future athletes. Malcolm Milne was awarded the Medal of the Order of Australia (OAM) for services to skiing in 2016.This item is significant because it is part of a collection which documents the career of two outstanding Australian sportsmen.A pewter mug awarded for first place in the Victorian Alpine Championships of 1969 in the Grand Slalom event. The mug was donated by W.D and H.O. Wills, a tobacco company which sponsored many sport competitions in Australia..Engraved on side of mug: VICTORIAN ALPINE CHAMPIONSHIPS 1969 Men's Giant Slalom First At bottom:- Donated by W.D. & H.O. WILLSross milne, malcolm milne, milne brothers, australian alpine skiers -
 Falls Creek Historical Society
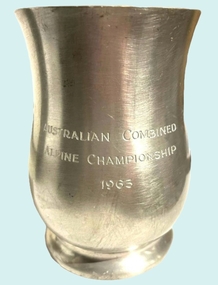
Award - Pewter Mug Trophies - Australian Combined Alpine Championships 1963
This Pewter Mug Collection is a set of 32 trophies won by Australian Alpine skiers Ross and Malcolm Milne between 1959 and 1964. Ross and Malcolm grew up on their family's tobacco property in Myrtleford, and began skiing at Falls Creek at an early age. They were both taught by Austrian Sigi Haberzettl, who was chief coach at Falls Creek for 17 years. Ross went on to win the North-Eastern District Ski Association (NEDSA) Junior Championships for three years in a row. In 1961 Ross was a member of the Australian team which competed against New Zealand in the Inter-Dominion Championships. In 1963, he won the Downhill and Alpine Combined title at the Australian Championships, while placing second in the Grand Slalom event. Ross Milne was selected in the Australian team that participated in the 1964 Olympic Winter Games at Innsbruck, Austria. A few days before the opening of the Games, on 25 January 1964, he tragically lost his life when he crashed into a tree during a training run for the Men's Downhill. He was only 19 years of age. Malcolm became a member of the Australian Junior Ski Team to Japan at the age of 14. He won all of the NEDSA children’s races and won the State Title in 1966. Malcolm continued to achieve great success, winning the Australian Championships for the next five years. At the end of 1969 he won Gold in the Val d'Isere FIS Alpine Ski World Cup Downhill, Australia's first Alpine Ski World Cup medal. He was on the Australian National Ski Team for eight years, representing his country at the 1968 and 1972 Olympic Games and the 1966 and 1970 World Championships before turning professional in 1972. Malcolm Milne was inducted into the Sport Australia Hall of Fame in 1985. In 2000 he received the Australian Sports Medal for his contribution to skiing. In 2004, Ski & Snowboard Australia granted Milne Life Membership for the contribution he made to the sport by becoming the first World Cup medal winner in Australian winter sports history, and the subsequent impact his performances have had on future athletes. Malcolm Milne was awarded the Medal of the Order of Australia (OAM) for services to skiing in 2016.This item is significant because it is part of a collection which documents the career of two outstanding Australian sportsmen.A pewter mug awarded for the Australian Combined Alpine Championships 1963Engraved on side of mug: AUSTRALIAN COMBINED ALPINE CHAMPIONSHIPS 1963ross milne, malcolm milne, milne brothers, australian alpine skiers -
 Falls Creek Historical Society
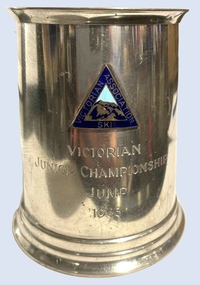
Award - Pewter Mug Trophies - Ross and Malcolm Milne - Victorian Junior Championship Jump 1965
This Pewter Mug Collection is a set of 32 trophies won by Australian Alpine skiers Ross and Malcolm Milne between 1959 and 1964. Ross and Malcolm grew up on their family's tobacco property in Myrtleford, and began skiing at Falls Creek at an early age. They were both taught by Austrian Sigi Haberzettl, who was chief coach at Falls Creek for 17 years. Ross went on to win the North-Eastern District Ski Association (NEDSA) Junior Championships for three years in a row. In 1961 Ross was a member of the Australian team which competed against New Zealand in the Inter-Dominion Championships. In 1963, he won the Downhill and Alpine Combined title at the Australian Championships, while placing second in the Grand Slalom event. Ross Milne was selected in the Australian team that participated in the 1964 Olympic Winter Games at Innsbruck, Austria. A few days before the opening of the Games, on 25 January 1964, he tragically lost his life when he crashed into a tree during a training run for the Men's Downhill. He was only 19 years of age. Malcolm became a member of the Australian Junior Ski Team to Japan at the age of 14. He won all of the NEDSA children’s races and won the State Title in 1966. Malcolm continued to achieve great success, winning the Australian Championships for the next five years. At the end of 1969 he won Gold in the Val d'Isere FIS Alpine Ski World Cup Downhill, Australia's first Alpine Ski World Cup medal. He was on the Australian National Ski Team for eight years, representing his country at the 1968 and 1972 Olympic Games and the 1966 and 1970 World Championships before turning professional in 1972. Malcolm Milne was inducted into the Sport Australia Hall of Fame in 1985. In 2000 he received the Australian Sports Medal for his contribution to skiing. In 2004, Ski & Snowboard Australia granted Milne Life Membership for the contribution he made to the sport by becoming the first World Cup medal winner in Australian winter sports history, and the subsequent impact his performances have had on future athletes. Malcolm Milne was awarded the Medal of the Order of Australia (OAM) for services to skiing in 2016.This item is significant because it is part of a collection which documents the career of two outstanding Australian sportsmen.A pewter mug awarded for Victorian Junior Championship Jump 1965. It bears the logo of the Victorian Ski Association and has engraving on the side.Engraved on side of mug: VICTORIAN JUNIOR CHAMPIONSHIPS JUMP 1965ross milne, malcolm milne, milne brothers, australian alpine skiers -
 Falls Creek Historical Society
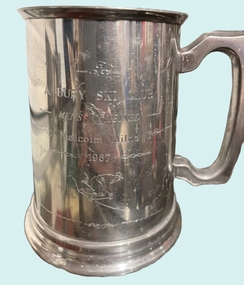
Award - Pewter Mug Trophies - Ross and Malcolm Milne - Albury Ski Club Men's Combined 1967
This Pewter Mug Collection is a set of 32 trophies won by Australian Alpine skiers Ross and Malcolm Milne between 1959 and 1964. Ross and Malcolm grew up on their family's tobacco property in Myrtleford, and began skiing at Falls Creek at an early age. They were both taught by Austrian Sigi Haberzettl, who was chief coach at Falls Creek for 17 years. Ross went on to win the North-Eastern District Ski Association (NEDSA) Junior Championships for three years in a row. In 1961 Ross was a member of the Australian team which competed against New Zealand in the Inter-Dominion Championships. In 1963, he won the Downhill and Alpine Combined title at the Australian Championships, while placing second in the Grand Slalom event. Ross Milne was selected in the Australian team that participated in the 1964 Olympic Winter Games at Innsbruck, Austria. A few days before the opening of the Games, on 25 January 1964, he tragically lost his life when he crashed into a tree during a training run for the Men's Downhill. He was only 19 years of age. Malcolm became a member of the Australian Junior Ski Team to Japan at the age of 14. He won all of the NEDSA children’s races and won the State Title in 1966. Malcolm continued to achieve great success, winning the Australian Championships for the next five years. At the end of 1969 he won Gold in the Val d'Isere FIS Alpine Ski World Cup Downhill, Australia's first Alpine Ski World Cup medal. He was on the Australian National Ski Team for eight years, representing his country at the 1968 and 1972 Olympic Games and the 1966 and 1970 World Championships before turning professional in 1972. Malcolm Milne was inducted into the Sport Australia Hall of Fame in 1985. In 2000 he received the Australian Sports Medal for his contribution to skiing. In 2004, Ski & Snowboard Australia granted Milne Life Membership for the contribution he made to the sport by becoming the first World Cup medal winner in Australian winter sports history, and the subsequent impact his performances have had on future athletes. Malcolm Milne was awarded the Medal of the Order of Australia (OAM) for services to skiing in 2016.This item is significant because it is part of a collection which documents the career of two outstanding Australian sportsmen.A pewter mug awarded for first place in the Albury Ski Club combined event 1967. It has the event title and the image of a skier engraved on one side.Engraved on side of mug: ALBURY SKI CLUB MEN'S COMBINED Malcolm Milne 1967ross milne, malcolm milne, milne brothers, australian alpine skiers -
 Falls Creek Historical Society
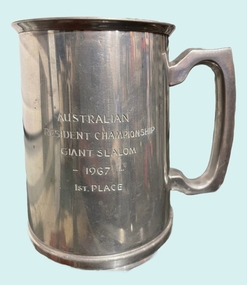
Award - Pewter Mug Trophies - Ross and Malcolm Milne - Australian Resident Championship 1967 - Giant Slalom
This Pewter Mug Collection is a set of 32 trophies won by Australian Alpine skiers Ross and Malcolm Milne between 1959 and 1964. Ross and Malcolm grew up on their family's tobacco property in Myrtleford, and began skiing at Falls Creek at an early age. They were both taught by Austrian Sigi Haberzettl, who was chief coach at Falls Creek for 17 years. Ross went on to win the North-Eastern District Ski Association (NEDSA) Junior Championships for three years in a row. In 1961 Ross was a member of the Australian team which competed against New Zealand in the Inter-Dominion Championships. In 1963, he won the Downhill and Alpine Combined title at the Australian Championships, while placing second in the Grand Slalom event. Ross Milne was selected in the Australian team that participated in the 1964 Olympic Winter Games at Innsbruck, Austria. A few days before the opening of the Games, on 25 January 1964, he tragically lost his life when he crashed into a tree during a training run for the Men's Downhill. He was only 19 years of age. Malcolm became a member of the Australian Junior Ski Team to Japan at the age of 14. He won all of the NEDSA children’s races and won the State Title in 1966. Malcolm continued to achieve great success, winning the Australian Championships for the next five years. At the end of 1969 he won Gold in the Val d'Isere FIS Alpine Ski World Cup Downhill, Australia's first Alpine Ski World Cup medal. He was on the Australian National Ski Team for eight years, representing his country at the 1968 and 1972 Olympic Games and the 1966 and 1970 World Championships before turning professional in 1972. Malcolm Milne was inducted into the Sport Australia Hall of Fame in 1985. In 2000 he received the Australian Sports Medal for his contribution to skiing. In 2004, Ski & Snowboard Australia granted Milne Life Membership for the contribution he made to the sport by becoming the first World Cup medal winner in Australian winter sports history, and the subsequent impact his performances have had on future athletes. Malcolm Milne was awarded the Medal of the Order of Australia (OAM) for services to skiing in 2016.This item is significant because it is part of a collection which documents the career of two outstanding Australian sportsmen.A pewter mug awarded for the Australian Resident Championship 1967 - Giant Slalom. It has the event title engraved on one side.Engraved on side of mug: AUSTRALIAN RESIDENT CHAMPIONSHIPS GIANT SLALOM 1967 1st PLACEross milne, malcolm milne, milne brothers, australian alpine skiers -
 Flagstaff Hill Maritime Museum and Village
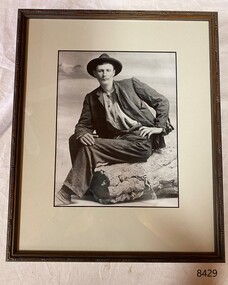
Photograph - William Ferrier, Henna Street Picture Framers, 2005
The photograph of William Ferrier was given to Avis Quarrell by Lewis Ferrier, 3rd youngest son of William during the centenary of the wreck of the La Bella. The photograph was framed by the Henna Street Picture Framers, Warrnambool in 2005. The photograph is of William Ferrier, the 25-year-old fisherman from South Warrnambool, whose rescue of two sailors from the wrecked La Bella made him an overnight national hero. The La Bella was wrecked on 10th November 1905,and the remains of the vessel now lie on her port side in 13 metres of sheltered water inside the reef she struck. The bow section is relatively intact and part of the stern has drifted north-easterly towards the mouth of the Hopkins River. The reef the La Bella struck now bears its name. Several attempts were made by the Warrnambool lifeboat crew to rescue the stricken sailors on the La Bella, but the rough conditions made this difficult for the boat to get close enough to the ship and the lifeboat had to return to shore. A another rescue attempt was made by Ferrier who rowed a small dingy through the heavy seas and managed to rescue the Captain George Mylius, whom he landed on the breakwater. Ferrier then returned to the ship to attempt a final rescue, losing his oars and rowlocks into the high sea. Using just a spare paddle he swam towards the La Bella, reaching her stern in time to cut loose the lone surviving sailor, Payne, from the ropes and debris that held him to the ship; the terrified sailor dropped from the ship and into the dingy. Shortly after the last man was rescued, the La Bella was lifted by a huge wave and crashed back down on the reef; she broke up and sank. The survivors were taken to the nearby Bay View Hotel and gratefully received warm food and clothing, medical attention and a place to sleep. William Ferrier became a national hero as news of the daring rescue spread. In recognition of his bravery in the two daring rescues, he was awarded the Silver Medal for Bravery by the Royal Humane Society and was honoured in the letter from the Prime Minister and the Parliament of the Commonwealth, telegrams and a cheque for £20 from the Governor-General, over £150 subscribed by the public, including Warrnambool and district and readers of The Argus, and a gold medal from the Glenelg Dinghy Club of South Australia. Ferrier’s rescue efforts are one of the most heroic in Victoria’s shipwreck history.This photograph is significant at both a local and state level. Its connection to the La Bella shipwreck and the rescue of survivors highlights the dangers of Victoria’s Shipwreck Coast and demonstrates the bravery of ordinary Australians like William Ferrier who risked their lives to save victims of shipwrecks along the coast. Moreover, the photograph has an association with the sailing ship ‘La Bella’, as it is one of the only two shipwrecks discovered in Lady Bay, Warrnambool, out of the 15-17 shipwrecks known to have been wrecked in the bay.Framed sepia photograph, mounted behind glass. Portrait of a man seated on a log. He is wearing a brimmed hat, dark coloured jacket and trousers, and a light coloured collarless shirt with buttons. The figure in the photograph is William Ferrier.flagstaff hill, warrnambool, maritime museum, shipwreck coast, la bella, william ferrier, rescue, hero william ferrier -
 Brighton Historical Society
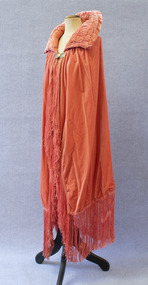
Cape, Opera cape, circa late 1920s
This velvet opera cape was worn by Agnes Emmeline "Dot" McCowan (nee Iredell, 1887-1969) to a reception for English aviatrix Amy Johnson in her North Road home in the early 1930s. Amy Johnson achieved worldwide fame in 1930 when she became the first woman to fly solo from England to Australia. Dot was the fourth child, and only surviving daughter, of Dr Charles Lesingham Maynard Iredell and Frances Keziah Iredell (née Hill), both formerly of Regents Park, London. Her parents had arrived in Australia in 1885 after Charles, a medical specialist, lost his money and house in the financial crash of 1880. In Melbourne, Charles established a reputation as an ear, nose and throat specialist and counted Dame Nellie Melba among his patients. Dot was schooled at Fairlight College in St Kilda. After falling from a tree at the age of twelve, she developed curvature of the spine. While recuperating, she took a correspondence course in theory and harmony of music with the Royal College of Music, London. She continued to pursue music after her recovery, ultimately winning an international scholarship to study piano and singing in Leipzig, Germany, but did not take up the offer due to her father's objections. She instead remained in Melbourne, where she put her skills to use as a music teacher. After her first fiancé disappeared at sea, Dot found happiness again with George Drummond. George owned a substantial property in Manjimup, Western Australia, and the couple planned to settle there after the wedding. It was not to be. Like many Australian men, George was killed in action on the Western Front during the First World War. It had become customary in George's wealthy family to give each son's bride a gift of one thousand pounds. Though Dot and George were never able to marry, the family nevertheless honoured the custom, and between their generous financial gift and her own teaching income, Dot was able to buy a well-appointed home at 9 North Road, Brighton for herself and her parents. The house remained in the family for many decades. In 1923, at the age of thirty-six, Dot met and fell in love with Alexander James McCowan. They were married on 28 February 1924; the reception was held in the North Road house.Salmon pink velvet opera cape with a padded collar and long fringe. Fastens at collar with a pair of circular metal clasps engraved with floral designs and accentuated with purple enamel. Silk lining.agnes emmeline iredell, agnes emmeline mccowan, opera cape, 1920s, 1930s, amy johnson -
 Flagstaff Hill Maritime Museum and Village
Instrument - Clock, 1900's
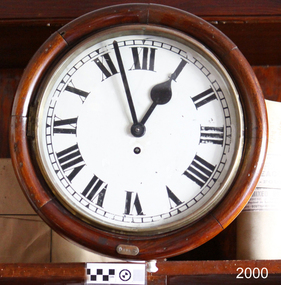
In August 1884, Alfred Hirst who had started his trade as a watch repairer and was described as a watchmaker extraordinaire established Hirst Brothers and Company, on Union Street in Oldham Manchester. He took his two stepbrothers into the business and the company was set up to produce timepieces and jewellery as well as importing “Limit company” Swiss watches and precision machine tools for the watch and clock trade. By 1902 Hirst Brothers. had become a limited company and was still growing, adding other businesses in Manchester in 1904 and at Birmingham in 1907. The quality of the clocks and watches was such that Alfred Hirst realised his greatest ambition in 1912 with a range of watches which carried the "Limit" trademark. These watch movements had originally been made in Switzerland and shipped to Hirst Bros. to be put into British made “Dennison” cases. This trade brought even more growth with additional sales offices opening in London and Glasgow. At the outbreak of the First World War in 1914 found them manufacturing aircraft parts including revolution counters and optical instruments. The firm had been tasked by the Ministry of Munitions to solve the problem of pilots dropping bombs by hand and as a result, they effectively created the first bomb rack. After the war, the company once again began to prosper and with the demand for their products increasing they looked to build a new purpose-built factory to manufacture their products. In 1917 they purchased a seven-acre field site at Tame Side Dobcross, the designing of the new factory was passed onto local architect AJ Howcroft. His brief for the design of the clockworks would have been prompted by Alfred Hirst who having visited modern factories in the United States was inspired by the latest factory designs providing as much daylight as possible during working hours. The factory was eventually completed in 1920, by the mid-1920s there were cheap clock imports from Germany and production turned to radio sets and other components as well as counter and gas meters for the "Parkinson and Cowan" company who was later to take over the business. In 1926 came the cotton crash and the District Bank who had loans with the company foreclosed on the Hirst loan. The company did survive and throughout the second World, War II were involved in munitions work at the factory as well as making instruments for various aircraft. In the 1950’s they were producing meters and high grade measuring equipment but by the 1970's the business had closed and the factory was demolished in the mid-1980 "s The item is a good example of the later use of an early mechanism “Fusee” that was originally invented around 1525 in Prague. This type of clock mechanism was replaced as watchmakers looked for mechanisms that could reduce the size of clocks and watches, it appears England was the only country to continue making clocks with a Fusee device until around 1900,s of which our clock is an example. The use of a Fusee movement eventually became obsolete in 1970,s. The item is significant for the collection as it is a clock with a movement that has long since been made obsolete. Fusee type gallery wall clock made by Tame Side with an 8-day mechanical fusee movement. The white enamel dial is a little crazed and some of the Roman Numeral numbers are fading due to over-cleaning. The movement has a hexagonal iron pendulum bob hooking onto a pendulum rod with a spring-wound anchor escapement.Only mark is stamped on the movement believed to be a production number "13490" and made in Tame Side. (If the clock had been made after 1912 it would have had a trade mark "Limit")flagstaff hill, warrnambool, shipwrecked-coast, flagstaff-hill, flagstaff-hill-maritime-museum, maritime-museum, shipwreck-coast, flagstaff-hill-maritime-village, clock, wall clock, fusee, gallery clock, alfred hirst, tame side -
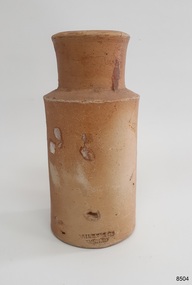 Flagstaff Hill Maritime Museum and Village
Container - Earthenware jar, Bailey & Co, circa 1878
The handmade earthenware jar was one of a group of artefacts in the McCulloch Collection that were recovered from the shipwreck Loch Ard. The jar could have been from the ship's cargo or personal effects. There are other jars in our collection that were recovered from the Loch Ard. The object is now one of the shipwreck artefacts in Flagstaff Hill’s Mc Culloch Collection, which includes items recovered from the wrecks of the Victoria Tower (wrecked in 1869) and Loch Ard (wrecked in 1878). They were salvaged by a diver in the early 1970s from the southwest coast of Victoria. Advanced marine technology had enabled divers to explore the depths of the ocean and gather its treasures before protective legislation was introduced by the Government. The artefacts were donated to Queensland’s Department of Environment and Heritage Protection (EHP) by a passionate shipwreck lover and their locations were verified by Bruce McCulloch. In 2017 the Department repatriated them to Flagstaff Hill where they joined our vast collection of artefacts from Victoria’s Shipwreck Coast. The Loch Ard: - The three-masted, square-rigged iron ship Loch Ard belonged to the famous Loch Line which sailed many ships from England to Australia. The ship was built in Glasgow in 1873. The Loch Ard made three trips to Australia and one trip to Calcutta before its final voyage. The Loch Ard left England on March 2, 1878, under the command of Captain Gibbs, bound for Melbourne with a crew of 37, plus 17 passengers and a load of cargo. The general cargo included straw hats, umbrellas, perfumes, clay pipes, pianos, clocks, confectionery, linen and candles, as well as a heavier load of railway irons, cement, lead and copper. There were items included that were intended for display in the 1880 Melbourne International Exhibition, including the famous Loch Ard Peacock. On June 1, 1878, Captain Gibbs was expecting to see land but visibility was reduced by fog. As it lifted, the sheer cliffs of Victoria's west coast came much closer than expected. The captain was unable to steer away and the ship struck a reef at the base of Mutton Bird Island, near Port Campbell. The top deck was loosened from the hull, the masts and rigging came down and knocked passengers and crew overboard, and even the lifeboat crashed into the side of the ship and capsized. Of the 54 people on board, only two survived: the apprentice, Tom Pearce and the young woman passenger, Eva Carmichael. The well-packed Minton porcelain peacock also survived, safe inside its crate. Much of the cargo was washed up, smashed and broken, and some was salvaged. Other cargo is still with the wreck at the base of Mutton Bird Island, now protected by Government law. The artefact is an example of cargo or personal items on board a ship in 1878. It provides a reference point for classifying and dating similar items. This artefact is significant for its association with the sailing ship Loch Ard, one of the best-known, and one of the worst, shipwrecks in Victoria’s history. Flagstaff Hill’s collection of artefacts from Loch Ard is significant for being one of the largest collections of artefacts from this shipwreck in Victoria. It is significant for its association with the shipwreck, which is on the Victorian Heritage Register (VHR S417). The collection is significant because of the relationship between the objects, as together they have a high potential to interpret the story of the Loch Ard. The Loch Ard collection is archaeologically significant as the remains of a large international passenger and cargo ship. It is historically significant for representing aspects of Victoria’s shipping history. Container, round brown earthenware jar with a wide mouth, thick lip, a wide neck that tapers slightly inwards towards the shoulder, and a body that tapers slightly inward towards the base. The glazed surface is rough. The variegated colours of the clay also has small dark speckles. There are several chips and dents on the jar. The inscription is stamped into the lower edge. Made by Bailey & Co., England. Recovered from the wreck of the Loch Ard.Inscription “Bailey [&] Co / ENGLAND” flagstaff hill, warrnambool, flagstaff hill maritime museum, maritime museum, shipwreck coast, flagstaff hill maritime village, great ocean road, white star line, victorian heritage register, sailing ship loch ard, loch line, loch ard, captain gibbs, eva carmichael, tom pearce, glenample station, mutton bird island, loch ard gorge, migrant ship 1878, cargo ship 1878, stoneware jar, domestic container, kitchenware, kitchen storage, bailey & co england, shipwreck artefact, wreck dive, mcculloch collection, bruce mcculloch, 1878, sailing ship, earthenware, stoneware, domestic jar -
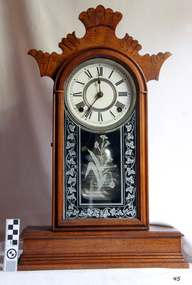 Flagstaff Hill Maritime Museum and Village
Domestic object - Clock, late 1900s early 20th Century
In 1850 the Ansonia Clock Company was formed as a subsidiary of the Ansonia Brass Company by Phelps and two Bristol Connecticut clock makers, Theodore Terry and Franklin C. Andrews. Terry & Andrews were the largest clock manufacturers in Bristol at the time with more than 50 employees using 58 tons of brass in the production of about 25,000 clocks in 1849. Phelps decided to get into the clock making business to expand the market for his brass, while Terry and Andrews got access to better quality brass at better prices. They had then sold 50% of their business to Phelps and moved the business to Ansonia, Connecticut. In 1877 the clock company purchased a factory in New York and moved most of its production thereafter being spun off from the brass company. Henry J. Davies of Brooklyn, himself a clock maker, inventor and case designer, joined the newly reconstituted company as one of its founders. As President, he is thought to have been largely responsible for the figurine clocks, swing clocks and other unusual and desirable novelties for which the Ansonia firm became known. By 1879, a second factory was opened in Brooklyn, New York and by June 1880 employed 360 workers, while the Connecticut factory continued producing clocks as well with a workforce of 100 men and 25 women. Hence, clocks marked "Connecticut" were generally produced before 1879, while those marked "New York" were all produced after 1880 After the New York factory burnt down in 1880 the company rebuilt the factory on the same site, and reopened the expanded factory in 1881, with a capacity to exceed that of the Connecticut factory which by 1883 had closed. By 1886, the company had sales offices in New York, Chicago and London, with more than 225 different clock models being manufactured. In 1899, Phelps' grandson William Earle Dodge Stokes commissioned architect Duboy to build the "greatest and grandest hotel in Manhattan, New York” which became the city's first air-conditioned building. In 1929 the majority of the timekeeping machinery and tooling was sold to the Soviet government's US trading company Amtorg, just before the stock market crash. The parts, machinery and key skilled workers were shipped out of the USA to form the basis, along with the remains of a watch company purchased a year later, of the clock and watch industry in Moscow such as Poljot and Sekonda. In 1969, the rights to the use of the name, trademarks, and goodwill were transferred to Ansonia Clock Co., Inc., Lynnwood, Washington. The item marks the beginning of mass produced clocks in the United States, cheaply priced and available to all. The company had many innervation's during it’s life regards clock and later wrist watch making that led the way for other companies in many different countries to emulate.Clock, pendulum mantle model. Carved scallop "Ginger bread house" cottage clock. Oak case, white enamel face, floral etched glass door. Clock has an hour bell chime. Glass front opens to allow rewinding. Made by Ansonia Clock Co, New York. Marked "Manufactured by Ansonia Clock Co. New York, USA"flagstaff hill, warrnambool, shipwrecked coast, flagstaff hill maritime museum, maritime museum, shipwreck coast, flagstaff hill maritime village, great ocean road, mantle clock, clock, pendulum clock, time keeper, horology, ansonia, ansonia clock co, america -
 Flagstaff Hill Maritime Museum and Village
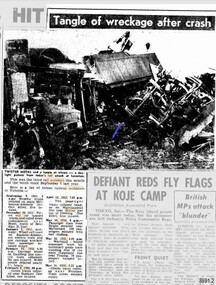
Photograph - Photograph and Negative, 1952
'Moriac, 1952 On 13 April 1952, a woman was killed and seven people were seriously injured when two passenger trains collided. A Melbourne-bound train collided with a Warrnambool-bound train, which was still shunting into siding at the station to allow the Melbourne-bound train to pass it on the single track. Both engines were derailed. The victim was in the first carriage of the Melbourne-bound train, which was telescoped after being forced into the tender of the locomotive. https://en.wikipedia.org/wiki/Railway_accidents_in_Victoria' 'April 12th 1952 7.52 p.m. Two passenger trains collided head on, on Warrnambool line near Moriac just out of Geelong. One killed four injured.' https://trove.nla.gov.au/newspaper/article/244373869?searchTerm=1952%20rail%20accident%20warrnambool ONE DEAD, MANY INJURED IN VIC. RAIL CRASH MELBOURNE, Saturday. — A woman was killed and seven persons were seriously injured when two passenger trains collided head-on at Moriac (59 miles south of Melbourne), near Geelong, at 8.15 tonight. Both engines were derailed, and the first carriage of the Geelong-bound train was telescoped by the coal tender. The dead woman was in this carriage. The trains involved were the 3.25 p.m. passenger train from Port Fairy to Geelong, and the 5.50 p.m. train from Melbourne to Warrnambool, which passed through Geelong at 7.05 p.m. ONE SHUNTING The Warrnambool-bound train had stopped at Moriac and was shunting into a siding to allow the other train to pass along the single track when the crash occurred. The impact hurled the Warrnambool-bound train backwards and the two engines, badly wrecked, came to rest 30ft apart. One engine hung at an acute angle on its side and the crew« were badly scalded by escaping steam. The crash was heard several miles away and hundreds of people rushed to the scene. Two ambulances were called from Geelong, and ambulance men joined railwaymen and volunteers in freeing the injured from badly damaged carriages. MANY SHOCKED Many other passengers were slightly hurt or badly affected by shock. They were treated on the spot. Mr. T. Mather, newsagent and postmaster at Moriac, said the noise of the crash startled him and he was on the scene in a matter of minutes. "There was great confusion," he said. "People on the trains were calling out for help. Many feared a fire would break out. However, we soon got relief gangs together and set to work to free those trapped in the wrecked carriage. One woman was dead, and a man seemed to be dead or dying." Special buses were chartered by the Railway Department to convey the passengers to their destinations. The line was blocked, but repair gangs were soon at work clearing the debris. https://trove.nla.gov.au/newspaper/article/18490332# This photograph and negative belonged to Dr. William Roy Angus. It was donated to Flagstaff Hill Maritime Village by his daughter, Bernice McDade. It is part of the “W.R. Angus Collection” includes historical medical equipment, surgical instruments and material once belonging to Dr Edward Ryan and Dr Thomas Francis Ryan, (both of Nhill, Victoria) as well as Dr Angus’ own belongings. The Collection’s history spans the medical practices of the two Doctors Ryan, from 1885-1926 plus that of Dr Angus, up until 1969. ABOUT THE “W.R.ANGUS COLLECTION” Doctor William Roy Angus M.B., B.S., Adel., 1923, F.R.C.S. Edin.,1928 (also known as Dr Roy Angus) was born in Murrumbeena, Victoria in 1901 and lived until 1970. He qualified as a doctor in 1923 at University of Adelaide, was Resident Medical Officer at the Royal Adelaide Hospital in 1924 and for a period was house surgeon to Sir (then Mr.) Henry Simpson Newland. Dr Angus was briefly an Assistant to Dr Riddell of Kapunda, then commenced private practice at Curramulka, Yorke Peninsula, SA, where he was physician, surgeon and chemist. In 1926, he was appointed as new Medical Assistant to Dr Thomas Francis Ryan (T.F. Ryan, or Tom), in Nhill, Victoria, where his experiences included radiology and pharmacy. In 1927 he was Acting House Surgeon in Dr Tom Ryan’s absence. Dr Angus had become engaged to Gladys Forsyth and they decided he further his studies overseas in the UK in 1927. He studied at London University College Hospital and at Edinburgh Royal Infirmary and in 1928, was awarded FRCS (Fellow from the Royal College of Surgeons), Edinburgh. He worked his passage back to Australia as a Ship’s Surgeon on the on the Australian Commonwealth Line’s T.S.S. Largs Bay. Dr Angus married Gladys in 1929, in Ballarat. (They went on to have one son (Graham 1932, born in SA) and two daughters (Helen (died 12/07/1996) and Berenice (Berry), both born at Mira, Nhill ) According to Berry, her mother Gladys made a lot of their clothes. She was very talented and did some lovely embroidery including lingerie for her trousseau and beautifully handmade baby clothes. Dr Angus was a ‘flying doctor’ for the A.I.M. (Australian Inland Ministry) Aerial Medical Service in 1928 . Its first station was in the remote town of Oodnadatta, where Dr Angus was stationed. He was locum tenens there on North-South Railway at 21 Mile Camp. He took up this ‘flying doctor’ position in response to a call from Dr John Flynn; the organisation was later known as the Flying Doctor Service, then the Royal Flying Doctor Service. A lot of his work during this time involved dental surgery also. Between 1928-1932 he was surgeon at the Curramulka Hospital, Yorke Peninsula, South Australia. In 1933 Dr Angus returned to Nhill and purchased a share of the Nelson Street practice and Mira hospital (a 2 bed ward at the Nelson Street Practice) from Dr Les Middleton one of the Middleton Brothers, the current owners of what previously once Dr Tom Ryan’s practice. Dr Tom and his brother had worked as surgeons included eye surgery. Dr Tom Ryan performed many of his operations in the Mira private hospital on his premises. He had been House Surgeon at the Nhill Hospital 1902-1926. Dr Tom Ryan had one of the only two pieces of radiology equipment in Victoria during his practicing years – The Royal Melbourne Hospital had the other one. Over the years Dr Tom Ryan had gradually set up what was effectively a training school for country general-practitioner-surgeons. Each patient was carefully examined, including using the X-ray machine, and any surgery was discussed and planned with Dr Ryan’s assistants several days in advance. Dr Angus gained experience in using the X-ray machine there during his time as assistant to Dr Ryan. When Dr Angus bought into the Nelson Street premises in Nhill he was also appointed as the Nhill Hospital’s Honorary House Surgeon 1933-1938. His practitioner’s plate from his Nhill surgery is now mounted on the doorway to the Port Medical Office at Flagstaff Hill Maritime Village, Warrnambool. When Dr Angus took up practice in the Dr Edward and Dr Tom Ryan’s old premises he obtained their extensive collection of historical medical equipment and materials spanning 1884-1926. A large part of this collection is now on display at the Port Medical Office at Flagstaff Hill Maritime Village in Warrnambool. In 1939 Dr Angus and his family moved to Warrnambool where he purchased “Birchwood,” the 1852 home and medical practice of Dr John Hunter Henderson, at 214 Koroit Street. (This property was sold in1965 to the State Government and is now the site of the Warrnambool Police Station. and an ALDI sore is on the land that was once their tennis court). The Angus family was able to afford gardeners, cooks and maids; their home was a popular place for visiting dignitaries to stay whilst visiting Warrnambool. Dr Angus had his own silk worm farm at home in a Mulberry tree. His young daughter used his centrifuge for spinning the silk. Dr Angus was appointed on a part-time basis as Port Medical Officer (Health Officer) in Warrnambool and held this position until the 1940’s when the government no longer required the service of a Port Medical Officer in Warrnambool; he was thus Warrnambool’s last serving Port Medical Officer. (Masters of immigrant ships arriving in port reported incidents of diseases, illness and death and the Port Medical Officer made a decision on whether the ship required Quarantine and for how long, in this way preventing contagious illness from spreading from new immigrants to the residents already in the colony.) Dr Angus was a member of the Australian Medical Association, for 35 years and surgeon at the Warrnambool Base Hospital 1939-1942, He served as a Surgeon Captain during WWII1942-45, in Ballarat, Victoria, and in Bonegilla, N.S.W., completing his service just before the end of the war due to suffering from a heart attack. During his convalescence he carved an intricate and ‘most artistic’ chess set from the material that dentures were made from. He then studied ophthalmology at the Royal Melbourne Eye and Ear Hospital and created cosmetically superior artificial eyes by pioneering using the intrascleral cartilage. Angus received accolades from the Ophthalmological Society of Australasia for this work. He returned to Warrnambool to commence practice as an ophthalmologist, pioneering in artificial eye improvements. He was Honorary Consultant Ophthalmologist to Warrnambool Base Hospital for 31 years. He made monthly visits to Portland as a visiting surgeon, to perform eye surgery. He represented the Victorian South-West subdivision of the Australian Medical Association as its secretary between 1949 and 1956 and as chairman from 1956 to 1958. In 1968 Dr Angus was elected member of Spain’s Barraquer Institute of Barcelona after his research work in Intrasclearal cartilage grafting, becoming one of the few Australian ophthalmologists to receive this honour, and in the following year presented his final paper on Living Intrasclearal Cartilage Implants at the Inaugural Meeting of the Australian College of Ophthalmologists in Melbourne In his personal life Dr Angus was a Presbyterian and treated Sunday as a Sabbath, a day of rest. He would visit 3 or 4 country patients on a Sunday, taking his children along ‘for the ride’ and to visit with him. Sunday evenings he would play the pianola and sing Scottish songs to his family. One of Dr Angus’ patients was Margaret MacKenzie, author of a book on local shipwrecks that she’d seen as an eye witness from the late 1880’s in Peterborough, Victoria. In the early 1950’s Dr Angus, painted a picture of a shipwreck for the cover jacket of Margaret’s book, Shipwrecks and More Shipwrecks. She was blind in later life and her daughter wrote the actual book for her. Dr Angus and his wife Gladys were very involved in Warrnambool’s society with a strong interest in civic affairs. He had an interest in people and the community They were both involved in the creation of Flagstaff Hill, including the layout of the gardens. After his death (28th March 1970) his family requested his practitioner’s plate, medical instruments and some personal belongings be displayed in the Port Medical Office surgery at Flagstaff Hill Maritime Village, and be called the “W. R. Angus Collection”. All rail accidents are serious, especially those involving fatalities.Photograph and negative showing two steam locomotives that appear to have collided head on. Also a newspaper article about the collision. From the W.R. Angus Collection.1139 on the back of the photograph together with multiple 'Ilford' brand marks.flagstaff hill maritime museum and village, great ocean road, shipwreck coast, rail accident, moriac, 1952, fatality, dr w r angus -
 Kiewa Valley Historical Society
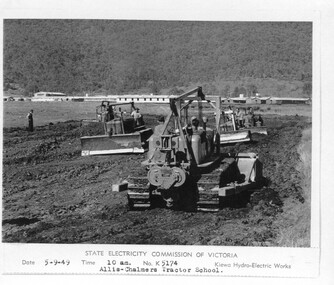
Photograph - Folder of Photographs – Photocopied set of 10 black and white photographs (pages 19 - 28) from the display folder put together by KVHS to document life on the Kiewa Valley Hydro-electric Scheme
Although the Kiewa Hydro-Electric Scheme was first proposed in 1911, construction did not commence until 1938. As part of the push to cut electricity costs and diversify supply, the Victorian Government (circa 1930) initiated the conversion from primarily brown coal supply to hydro – electricity. Field investigations during the 1940’s resulted in a new proposal for a scheme that had more than double the capacity of the 1938 scheme. The Kiewa Hydroelectric Scheme became the largest scheme of its kind in the State Of Victoria and the second largest scheme in Australia. The number of personnel involved in the planning and construction of the scheme increased dramatically. During the late 1940’s, most activity centred around the construction of the West Kiewa Power Station, Rocky Valley Reservoir, McKay Creek Power Station and the Bogong Creek Aqueduct.A common thread across all the larger hydro scheme constructions was the need for workers, both qualified and unqualified who came from around the world seeking a new life for themselves and their families. New accommodation and facilities were required for the army of workers engaged in construction in often remote and wild areas. The SEC had a high demand for timber, and set up the first of a number of sawmills at Bogong Creek in 1939 and set up the first hardwood logging in the headwaters of the Kiewa River. These new ‘towns’ such as Mt Beauty and Bogong, survived, serving the needs of operational personnel and their families, and expanding with growth of new industries. Mount Beauty, and to a lesser extent Bogong, are among these places. Large A3 size spiral bound display folder containing 21 pages of photocopied black and white photographs of various aspects of the early days of the Kiewa Valley Hydro-electric scheme including equipment, various work sites and photographs of workers and their families. 1-Allis Chalmers Tractor School 2- Gardens outside Administrative Office – Mt Beauty 3- Mt Beauty house – 1950 4-Bridge over Pretty Valley River, Bogong 5-Rocky Valley Spillway Tunnel break through 6-Ni 1 Headrace Tunnel drilling face 7-No 4 Power Station Drilling 8-Clover Dam Flood Waters 9-No1 Head Race Tunnel Portal Building 10-Clover Dam 1-STATE ELECTRICITY COMMISSION OF VICTORIA Date: 5.9.49 Time: 10amm No K5174 Kiewa Hydro Electric Works Allis Chalmers Tractor School Page number 19 2-STATE ELECTRICITY COMMISSION OF VICTORIA Date: 22.2.50 Time: 3.30pm No K5601 Kiewa Hydro Electric Works Gardens outside Administrative Office – Mt Beauty Page number 20 3-Mt Beauty house – 1950 Page number 21 4-STATE ELECTRICITY COMMISSION OF VICTORIA Date: 23.10.50 Time: 11.15am No K6331 Kiewa Hydro Electric Works Bogong-Bridge over Pretty Valley River Page number 22 5-STATE ELECTRICITY COMMISSION OF VICTORIA Date: 23.6.50 Time: 2.30pm No K5844 Kiewa Hydro Electric Works ROCKY VALLEY SPILLWAY TUNNEL BREAK THROUGH Page number 23 6-20/3/52 – No. 1 Headrace Tunnel Drilling face (E.E.E. contract) Page number 24 7-6/6/52 – No 4 Power Station – Drilling Page number 25 8-STATE ELECTRICITY COMMISSION OF VICTORIA Date: 6/6/52 Time: No K7113 Kiewa Hydro Electric Works Clover Dam Flood Waters Page number 26 9-STATE ELECTRICITY COMMISSION OF VICTORIA Date: Oct 1952 Time: No K7239 Kiewa Hydro Electric Works No. 1 HEAD RACE TUNNEL PORTAL BUILDING. Handwritten underneath – This information from Ron White-the later Principal Hydro Engineer of the SEC. Oct 1952 Location incorrect? All work on No 1 had ceased after financial crash of 1951. This photo would refer to No 4 Headrace Tunnel? Page number 27 10-STATE ELECTRICITY COMMISSION OF VICTORIA Date: Jan 1953 Time: No K7307 Kiewa Hydro Electric Works CLOVER DAM Page number 28 secv; kiewa hydro electric scheme; bogong; mt beauty; construction area -
 Flagstaff Hill Maritime Museum and Village
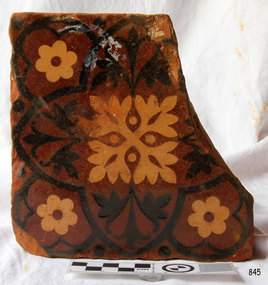
Ceramic - Tile, circa 1878
This Minton floor tile is from the wreck of the LOCH ARD along with other examples of this manufacture recovered from the wreck site and form part of the collection at Flagstaff Hill. The iron-hulled clipper ship from the Loch Line was heading for Port Phillip from London when it ran into the cliffs of Mutton Bird Island near Port Campbell and was wrecked on June 1st, 1878. The LOCH ARD was laden with high-value cargo including luxury goods intended for display at the Melbourne International Exhibition in 1880. One notable survivor from the ship’s freight manifest was the well-packed Minton porcelain peacock, a two-metre-high ceramic masterpiece of vivid glazed colours. The almost total loss of life and property from the LOCH ARD registered as a shocking tragedy for the Colony of Victoria, at a time when social confidence and economic optimism were otherwise high. The wealth generated from Gold and Wool was increasingly being spent on grandiose private residences and imposing public buildings. The demand for quality furnishings and fittings was therefore strong. Among the products consigned to burgeoning colonial markets by the Milton Pottery at Stoke upon Trent, were their new range of colourfully patterned but very durable floor tiles – ideal for the high-traffic spaces in the large civic buildings then being constructed in Australia and America. These new floor tiles were “encaustic”, meaning that their designs and colours were encased “within” the depth of the tile. Rather than their decorative patterns being glazed onto the surface of the tile, their inlaid designs were created during the manufacturing process, as “coloured slips” (or liquid clay) were poured into a deep pre-moulded casting. When fired, the resulting tile was colour-fast and design-fast. A brief history of the Loch Ard (1873-1878): - The sailing ship Loch Ard was one of the famous Loch Line ships that sailed from England to Australia. Barclay, Curdle and Co. built the three-masted iron vessel in Glasgow in 1873. It had sailed three trips to Australia and one trip to Calcutta before its fateful voyage. Loch Ard left England on March 2, 1878, under the command of recently married, 29-year-old Captain Gibbs. It was bound for Melbourne with a crew of 37, plus 17 passengers. The general cargo reflected the affluence of Melbourne at the time. Onboard were straw hats, umbrellas, perfumes, clay pipes, pianos, clocks, confectionery, linen and candles, and a heavier load of railway irons, cement, lead and copper. Other cargo included items intended for display in the Melbourne International Exhibition of 1880. The Loch Ard had been sailing for three months and was close to its destination on June 1, 1878. Captain Gibbs had expected to see land at about 3 am but the Loch Ard ran into a fog that greatly reduced visibility and there was no sign of land or the Cape Otway lighthouse. The fog lifted at 4 am and the sheer cliffs of Victoria's west coast were much closer to them than Captain Gibbs expected. He tried to manage the vessel but failed and the ship struck a reef at the base of Mutton Bird Island, near Port Campbell. The top deck loosened from the hull, and the masts and rigging crashed down, knocking passengers and crew overboard. The lifeboat was launched by Tom Pearce but crashed into the side of Loch Ard and capsized. He clung onto its overturned hull and sheltered under it. He drifted out to sea and the tide brought him back to what is now called Loch Ard Gorge. He swam to shore and found a cave for shelter. A passenger, Eva Carmichael, had raced onto the deck to find out what was happening and was confronted by towering cliffs above the ship. She was soon swept off the ship by a huge wave. Eva saw Tom Pearce on a small rocky beach and yelled to attract his attention. He swam out and dragged her to the shelter of the cave. He revived her with a bottle of brandy from a case that had washed up on the beach. Tom scaled a cliff in search of help and followed some horse hoof prints. He came from two men from Glenample Station, three and a half miles away. He told the men of the tragedy and then returned to the gorge while the two men rode back to the station to get help. They reached Loch Ard Gorge and took the two shipwreck survivors to Glenample Station to recover. Eva stayed at the station for six weeks before returning to Ireland by steamship. In Melbourne, Tom Pearce received a hero's welcome and was presented with a medal and some money. Of the 54 crew members and passengers on board, only two survived: the apprentice, Tom Pearce and the young woman passenger, Eva Carmichael, who lost her family in the tragedy. One of the most unlikely pieces of cargo to have survived the shipwreck was a Minton porcelain peacock - one of only nine in the world. The peacock was destined for the Melbourne International Exhibition in 1880. It had been well packed, which gave it adequate protection during the violent storm. Today, the Minton peacock can be seen at the Flagstaff Hill Maritime Museum in Warrnambool. From Australia's most dramatic shipwreck, it has now become Australia's most valuable shipwreck artefact and is one of very few 'objects' on the Victorian State Heritage Register. The Minton floor tile is significant for its hard-wearing yet attractive design. The shipwreck of the LOCH ARD is of State significance. Victorian Heritage Register S417. Flagstaff Hill’s collection of artefacts from LOCH ARD is significant for being one of the largest collections of artefacts from this shipwreck in Victoria. It is significant for its association with the shipwreck, which is on the Victorian Heritage Register (VHR S417). The collection is significant because of the relationship between the objects, as together they have a high potential to interpret the story of the LOCH ARD. The LOCH ARD collection is archaeologically significant as the remains of a large international passenger and cargo ship. The LOCH ARD collection is historically significant for representing aspects of Victoria’s shipping history and its potential to interpret sub-theme 1.5 of Victoria’s Framework of Historical Themes (living with natural processes). The collection is also historically significant for its association with the LOCH ARD, which was one of the worst and best-known shipwrecks in Victoria’s history. A square Minton floor tile with a black and apricot pattern against a chocolate brown background. There is a large chip missing. This decorative floor tile was recovered from the shipwreck of the LOCH ARD. On the back, or base, of the tile is inscribed the number “46” and the letters “Minton & Co Patent Stoke upon Trent”.flagstaff hill, warrnambool, shipwrecked coast, flagstaff hill maritime museum, maritime museum, shipwreck coast, flagstaff hill maritime village, great ocean road, loch line, loch ard, captain gibbs, eva carmichael, tom pearce, glenample station, mutton bird island, loch ard gorge, encaustic tile, melbourne international exhibition, floor tile, minton floor tile -
 Flagstaff Hill Maritime Museum and Village
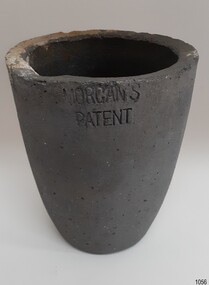
Functional object - Crucible, The Patent Plumbago Crucible Company, circa 1878
This crucible was raised from the wreck of the LOCH ARD. It is one of six similar relics, in a range of sizes, now in the Flagstaff Hill collection. All bear markings to indicate their manufacture by the Morgan brothers of Battersea, trading as the Patent Plumbago Crucible Co. A crucible is a container used for purifying and melting metals so that they can be cast in a mould to a predetermined shape and use. They must withstand extremely high temperatures, and abrupt cooling, and shed their contents with minimal adherence. The addition of graphite to the traditional firing clays greatly enhanced the durability of industrial crucibles in mid-Victorian Britain, a significant technological advance at a time of great activity in foundries and expansion of demand for refined metals. The Morgans first noticed the advantages of graphite crucibles at the Great Exhibition held in London in 1851. Initially, they contracted to be sole selling agents for the American-made products of Joseph Dixon and Co. from New Jersey, but in 1856 they obtained that firm’s manufacturing rights and began producing their own graphite crucibles from the South London site. The Morgans imported crystalline graphite in 4-5 cwt casks from the British colony of Ceylon (now Sri Lanka) and mixed it with conventional English (Stourbridge) clays to be fired in kilns. Their products were purchased by the Royal Mints in London and India, and exported to official mints in France and Germany. They were successful exhibitors of their crucibles and furnaces at the London Exhibition held in 1861 (Class 1, Mining, quarrying, metallurgy and mineral products, Exhibit 265, Patent Plumbago Crucible Co). The range of sizes represented by the six crucibles retrieved from the LOCH ARD, suggests they may have been part of a sample shipment intended for similar promotion in the Australian colonies ― at Melbourne’s International Exhibition to be held in 1880. The summary of the LOCH ARD cargo manifest, by Don Charlwood in ‘Wrecks and Reputations’, does not mention any crucibles, implying that they were not a large consignment of uniform items. A newspaper account of an 1864 tour of the Morgan brothers’ ‘Black Potteries’ at Battersea indicates: “All the pots were numbered according to their contents, each number standing for one kilogram, or a little over two pounds; a No. 2 crucible contains two kilogrammes; a No. 3, three kilogrammes, and so on.” These numbers are obscured by marine sediment on three of the crucibles in the Flagstaff Hill collection, but those legible on the remaining three are 5, 6, and 8. None of the six is of the same size from a visual appraisal. A brief history of the Loch Ard (1873-1878): - The sailing ship Loch Ard was one of the famous Loch Line of ships that sailed the long voyage from England to Australia. Barclay, Curdle and Co. built the three-masted iron vessel in Glasgow in 1873. It had sailed three trips to Australia and one trip to Calcutta before its fateful voyage. Loch Ard left England on March 2, 1878, under the command of recently married, 29-year-old Captain Gibbs. It was bound for Melbourne with a crew of 37, plus 17 passengers. The general cargo reflected the affluence of Melbourne at the time. Onboard were straw hats, umbrellas, perfumes, clay pipes, pianos, clocks, confectionery, linen and candles, and a heavier load of railway irons, cement, lead and copper. Other cargo included items intended for display in the Melbourne International Exhibition of 1880. The Loch Ard had been sailing for three months and was close to its destination on June 1, 1878. Captain Gibbs had expected to see land at about 3 am but the Loch Ard ran into a fog that greatly reduced visibility and there was no sign of land or the Cape Otway lighthouse. The fog lifted at 4 am and the sheer cliffs of Victoria's west coast were much closer to them than Captain Gibbs expected. He tried to manage the vessel but failed and the ship struck a reef at the base of Mutton Bird Island, near Port Campbell. The top deck loosened from the hull, and the masts and rigging crashed down, knocking passengers and crew overboard. The lifeboat was launched by Tom Pearce but crashed into the side of Loch Ard and capsized. He clung onto its overturned hull and sheltered under it. He drifted out to sea and the tide brought him back to what is now called Loch Ard Gorge. He swam to shore and found a cave for shelter. A passenger, Eva Carmichael, had raced onto the deck to find out what was happening and was confronted by towering cliffs above the ship. She was soon swept off the ship by a huge wave. Eva saw Tom Pearce on a small rocky beach and yelled to attract his attention. He swam out and dragged her to the shelter of the cave. He revived her with a bottle of brandy from a case that had washed up on the beach. Tom scaled a cliff in search of help and followed some horse hoof prints. He came from two men from Glenample Station, three and a half miles away. He told the men of the tragedy and then returned to the gorge while the two men rode back to the station to get help. They reached Loch Ard Gorge and took the two shipwreck survivors to Glenample Station to recover. Eva stayed at the station for six weeks before returning to Ireland by steamship. In Melbourne, Tom Pearce received a hero's welcome and was presented with a medal and some money. Of the 54 crew members and passengers on board, only two survived: the apprentice, Tom Pearce and the young woman passenger, Eva Carmichael, who lost her family in the tragedy. The shipwreck of the LOCH ARD is of State significance ― Victorian Heritage Register S417. Flagstaff Hill’s collection of artefacts from LOCH ARD is significant for being one of the largest collections of artefacts from this shipwreck in Victoria. It is significant for its association with the shipwreck, which is on the Victorian Heritage Register (VHR S417). The collection is significant because of the relationship between the objects, as together they have a high potential to interpret the story of the LOCH ARD. The LOCH ARD collection is archaeologically significant as the remains of a large international passenger and cargo ship. The LOCH ARD collection is historically significant for representing aspects of Victoria’s shipping history and its potential to interpret sub-theme 1.5 of Victoria’s Framework of Historical Themes (living with natural processes). The collection is also historically significant for its association with the LOCH ARD, which was one of the worst and best-known shipwrecks in Victoria’s history.A Morgan’s Patent graphite crucible No.8 (i.e. 8kgs capacity), one of a set. It was recovered from the wreck of the LOCH ARD. It is in its original grey colouring with minimal sediment accretion on the top rim. It rises in a slight curve from a flat circular base to a wider rim with a pouring lip. Maker’s marks on the side of the container clearly identify the manufacturer. The maker's details are stamped into the base around and within a circle. A white sticker is attached. Made by the Patent Plumbago Crucible Company at the Battersea Works in London. Number “8”. Letters “MORGAN’S PATENT”. Details on the base "MORGAN'S PATENT" "THE PATENT PLUMBAGO CRUCIBLE COMPANY" Symbol [8] above "BATTERSEA WORKS LONDON" Handwritten on a white sticker in black pen "LA/89"flagstaff hill, warrnambool, maritime museum, shipwreck coast, great ocean road, loch line, loch ard, captain gibbs, eva carmichael, tom pearce, glenample station, mutton bird island, loch ard gorge, graphite crucible, plumbago crucible, morgans crucible company, flagstaff hill maritime museum and village, fluxing pots, crucible, morgan’s patent, morgan brothers, patent plumbago crucible co, battersea works, london, port campbell -
 Flagstaff Hill Maritime Museum and Village
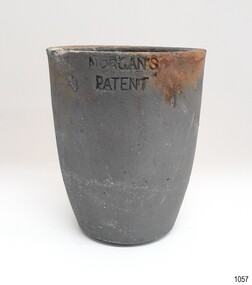
Functional object - Crucible, The Patent Plumbago Crucible Company, circa 1878
This crucible was raised from the wreck of the LOCH ARD. It is one of six similar relics, in a range of sizes, now in the Flagstaff Hill collection. All bear markings to indicate their manufacture by the Morgan brothers of Battersea, trading as the Patent Plumbago Crucible Co. A crucible is a container used for purifying and melting metals so that they can be cast in a mould to a predetermined shape and use. They must withstand extremely high temperatures, and abrupt cooling, and shed their contents with minimal adherence. The addition of graphite to the traditional firing clays greatly enhanced the durability of industrial crucibles in mid-Victorian Britain, a significant technological advance at a time of great activity in foundries and expansion of demand for refined metals. The Morgans first noticed the advantages of graphite crucibles at the Great Exhibition held in London in 1851. Initially, they contracted to be sole selling agents for the American-made products of Joseph Dixon and Co. from New Jersey, but in 1856 they obtained that firm’s manufacturing rights and began producing their own graphite crucibles from the South London site. The Morgans imported crystalline graphite in 4-5 cwt casks from the British colony of Ceylon (now Sri Lanka) and mixed it with conventional English (Stourbridge) clays to be fired in kilns. Their products were purchased by the Royal Mints in London and India, and exported to official mints in France and Germany. They were successful exhibitors of their crucibles and furnaces at the London Exhibition held in 1861 (Class 1, Mining, quarrying, metallurgy and mineral products, Exhibit 265, Patent Plumbago Crucible Co). The range of sizes represented by the six crucibles retrieved from the LOCH ARD, suggests they may have been part of a sample shipment intended for similar promotion in the Australian colonies ― at Melbourne’s International Exhibition to be held in 1880. The summary of the LOCH ARD cargo manifest, by Don Charlwood in ‘Wrecks and Reputations’, does not mention any crucibles, implying that they were not a large consignment of uniform items. A newspaper account of an 1864 tour of the Morgan brothers’ ‘Black Potteries’ at Battersea indicates: “All the pots were numbered according to their contents, each number standing for one kilogram, or a little over two pounds; a No. 2 crucible contains two kilogrammes; a No. 3, three kilogrammes, and so on.” These numbers are obscured by marine sediment on three of the crucibles in the Flagstaff Hill collection, but those legible on the remaining three are 5, 6, and 8. None of the six is of the same size from a visual appraisal. A brief history of the Loch Ard (1873-1878): - The sailing ship Loch Ard was one of the famous Loch Line of ships that sailed the long voyage from England to Australia. Barclay, Curdle and Co. built the three-masted iron vessel in Glasgow in 1873. It had sailed three trips to Australia and one trip to Calcutta before its fateful voyage. Loch Ard left England on March 2, 1878, under the command of recently married, 29-year-old Captain Gibbs. It was bound for Melbourne with a crew of 37, plus 17 passengers. The general cargo reflected the affluence of Melbourne at the time. Onboard were straw hats, umbrellas, perfumes, clay pipes, pianos, clocks, confectionery, linen and candles, and a heavier load of railway irons, cement, lead and copper. Other cargo included items intended for display in the Melbourne International Exhibition of 1880. The Loch Ard had been sailing for three months and was close to its destination on June 1, 1878. Captain Gibbs had expected to see land at about 3 am but the Loch Ard ran into a fog that greatly reduced visibility and there was no sign of land or the Cape Otway lighthouse. The fog lifted at 4 am and the sheer cliffs of Victoria's west coast were much closer to them than Captain Gibbs expected. He tried to manage the vessel but failed and the ship struck a reef at the base of Mutton Bird Island, near Port Campbell. The top deck loosened from the hull, and the masts and rigging crashed down, knocking passengers and crew overboard. The lifeboat was launched by Tom Pearce but crashed into the side of Loch Ard and capsized. He clung onto its overturned hull and sheltered under it. He drifted out to sea and the tide brought him back to what is now called Loch Ard Gorge. He swam to shore and found a cave for shelter. A passenger, Eva Carmichael, had raced onto the deck to find out what was happening and was confronted by towering cliffs above the ship. She was soon swept off the ship by a huge wave. Eva saw Tom Pearce on a small rocky beach and yelled to attract his attention. He swam out and dragged her to the shelter of the cave. He revived her with a bottle of brandy from a case that had washed up on the beach. Tom scaled a cliff in search of help and followed some horse hoof prints. He came from two men from Glenample Station, three and a half miles away. He told the men of the tragedy and then returned to the gorge while the two men rode back to the station to get help. They reached Loch Ard Gorge and took the two shipwreck survivors to Glenample Station to recover. Eva stayed at the station for six weeks before returning to Ireland by steamship. In Melbourne, Tom Pearce received a hero's welcome and was presented with a medal and some money. Of the 54 crew members and passengers on board, only two survived: the apprentice, Tom Pearce and the young woman passenger, Eva Carmichael, who lost her family in the tragedy. The shipwreck of the LOCH ARD is of State significance ― Victorian Heritage Register S417 Flagstaff Hill’s collection of artefacts from LOCH ARD is significant for being one of the largest collections of artefacts from this shipwreck in Victoria. It is significant for its association with the shipwreck, which is on the Victorian Heritage Register (VHR S417). The collection is significant because of the relationship between the objects, as together they have a high potential to interpret the story of the LOCH ARD. The LOCH ARD collection is archaeologically significant as the remains of a large international passenger and cargo ship. The LOCH ARD collection is historically significant for representing aspects of Victoria’s shipping history and its potential to interpret sub-theme 1.5 of Victoria’s Framework of Historical Themes (living with natural processes). The collection is also historically significant for its association with the LOCH ARD, which was one of the worst and best-known ahipwrecks in Victoria’s history.A Morgan’s Patent graphite crucible No.4 (i.e. 4kgs capacity), one of a set of three. It was recovered from the wreck of the LOCH ARD. It is in its original grey colouring with minimal sediment accretion on the top rim. It rises in a slight curve from a flat circular base to a wider rim with a pouring lip. Maker’s marks on the side of the container clearly identify the manufacturer. The maker's details are stamped into the base around and within a circle. A white sticker is attached. Made by the Patent Plumbago Crucible Company at the Battersea Works in London.Number or. Letters “MORGAN’S PATENT”. Details on the base "MORGAN'S PATENT" "THE PATENT PLUMBAGO CRUCIBLE COMPANY" Symbol [4] above "BATTERSEA WORKS LONDON" Handwritten on a white sticker in black pen "L89"flagstaff hill, warrnambool, flagstaff hill maritime museum, maritime museum, shipwreck coast, flagstaff hill maritime village, great ocean road, loch line, loch ard, captain gibbs, eva carmichael, tom pearce, glenample station, mutton bird island, loch ard gorge, graphite crucible, plumbago crucible, morgan's crucible company, flagstaff hill maritime museum and village, fluxing pots, crucible, morgan’s patent, morgan brothers, patent plumbago crucible co, battersea works, london, port campbell -
 Flagstaff Hill Maritime Museum and Village
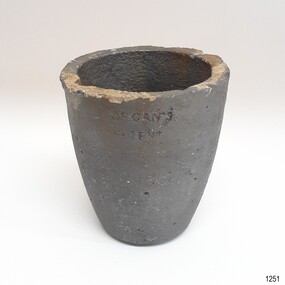
Functional object - Crucible, The Patent Plumbago Crucible Company, circa 1873
Crucibles are used for heating and pouring molten metal. The set of six crucibles was raised from the wreck of the Loch Ard and includes a range of sizes, now in the Flagstaff Hill collection. All were manufactured by the Morgan brothers who founded the Patent Plumbago Crucible Company in 1856, making crucibles in a small factory in Battersea London. A crucible is a container used for purifying and melting metals so that they can be cast in a mould to a predetermined shape and use. They must withstand extremely high temperatures, and abrupt cooling, and shed their contents with minimal adherence. The addition of graphite to the traditional firing clays greatly enhanced the durability of industrial crucibles this technique was pioneered by the Morgan Bros thereby making a significant technological advance in foundry technology and metallurgy. The Morgans first noticed the advantages of graphite crucibles at the Great Exhibition held in London in 1851. Initially, they contracted to be sole selling agents for the American-made products of Joseph Dixon and Co. from New Jersey, but in 1856 they obtained that firm's manufacturing rights and began producing their graphite crucibles from the South London site. The Morgans imported crystalline graphite in 4-5 cwt casks from the British colony of Ceylon (now Sri Lanka) and mixed it with conventional English (Stourbridge) clays to be fired in kilns. Their products were purchased by the Royal Mints in London and India and exported to official mints in France and Germany. They were successful exhibitors of their crucibles and furnaces at the London Exhibition held in 1861 (Class 1, Mining, quarrying, metallurgy and mineral products, Exhibit 265, Patent Plumbago Crucible Co). The range of sizes represented by the six crucibles retrieved from the Loch Ard suggests they may have been part of a sample shipment intended for similar promotion in the Australian colonies or at Melbourne's International Exhibition to be held in 1880. A newspaper account of an 1864 tour of the Morgan brothers' 'Black Potteries' at Battersea indicates: "All the pots were numbered according to their contents, each number standing for one kilogram or a little over two pounds; a No. 2 crucible contains two kilograms; a No. 3, three kilograms, and so on." These numbers are obscured by marine sediment on three of the crucibles in the Flagstaff Hill collection, but those legible on the remaining three are 5, 6, and 8. None of the six is of the same size. A brief history of the Loch Ard (1873-1878): - The sailing ship Loch Ard was one of the famous Loch Line of ships that sailed the long voyage from England to Australia. Barclay, Curdle and Co. built the three-masted iron vessel in Glasgow in 1873. It had sailed three trips to Australia and one trip to Calcutta before its fateful voyage. Loch Ard left England on March 2, 1878, under the command of recently married, 29-year-old Captain Gibbs. It was bound for Melbourne with a crew of 37, plus 17 passengers. The general cargo reflected the affluence of Melbourne at the time. Onboard were straw hats, umbrellas, perfumes, clay pipes, pianos, clocks, confectionery, linen and candles, and a heavier load of railway irons, cement, lead and copper. Other cargo included items intended for display in the Melbourne International Exhibition of 1880. The Loch Ard had been sailing for three months and was close to its destination on June 1, 1878. Captain Gibbs had expected to see land at about 3 am but the Loch Ard ran into a fog that greatly reduced visibility and there was no sign of land or the Cape Otway lighthouse. The fog lifted at 4 am and the sheer cliffs of Victoria's west coast were much closer to them than Captain Gibbs expected. He tried to manage the vessel but failed and the ship struck a reef at the base of Mutton Bird Island, near Port Campbell. The top deck loosened from the hull, and the masts and rigging crashed down, knocking passengers and crew overboard. The lifeboat was launched by Tom Pearce but crashed into the side of Loch Ard and capsized. He clung onto its overturned hull and sheltered under it. He drifted out to sea and the tide brought him back to what is now called Loch Ard Gorge. He swam to shore and found a cave for shelter. A passenger, Eva Carmichael, had raced onto the deck to find out what was happening and was confronted by towering cliffs above the ship. She was soon swept off the ship by a huge wave. Eva saw Tom Pearce on a small rocky beach and yelled to attract his attention. He swam out and dragged her to the shelter of the cave. He revived her with a bottle of brandy from a case that had washed up on the beach. Tom scaled a cliff in search of help and followed some horse hoof prints. He came from two men from Glenample Station, three and a half miles away. He told the men of the tragedy and then returned to the gorge while the two men rode back to the station to get help. They reached Loch Ard Gorge and took the two shipwreck survivors to Glenample Station to recover. Eva stayed at the station for six weeks before returning to Ireland by steamship. In Melbourne, Tom Pearce received a hero's welcome and was presented with a medal and some money. Of the 54 crew members and passengers on board, only two survived: the apprentice, Tom Pearce and the young woman passenger, Eva Carmichael, who lost her family in the tragedy. The shipwreck of the Loch Ard is of significance for Victoria and is registered on the Victorian Heritage Register ( S 417). Flagstaff Hill has a varied collection of artefacts from Loch Ard and its collection is significant for being one of the largest accumulation of artefacts from this notable Victorian shipwreck of which the subject items are a small part. The collection's objects give us a snapshot of how we can interpret the story of this tragic event. The collection is also archaeologically significant as it represents aspects of Victoria's shipping history that allows us to interpret Victoria's social and historical themes of the time. Through is associated with the worst and best-known shipwreck in Victoria's history.This crucible is the smallest of three nested crucibles, or fluxing pots, numbered according to their size. These containers rise slightly from a smaller flat base to a wider open top with a lip for pouring. They were recovered from the wreck of the Loch Ard. The crucibles have a coating of sediment that obscures some of their numerical specifications of size and capacity. Made by the Patent Plumbago Crucible Company at the Battersea Works in London. The number on this crucible is obscured by the sticker.Stamped into side "MORGAN'S PATENT" Stemped into base "MORGAN'S PATENT" "THE PATENT PLUMBAGO CRUCIBLE COMPANY" Sticker "L 96"flagstaff hill, warrnambool, graphite crucible, plumbago crucible, morgan's crucible company, loch ard, morgan potteries, crucible, fluxing pot, nested crucibles, heat proof container, metal worker, maritime museum, shipwreck coast, flagstaff hill maritime village, great ocean road, loch line, morgans crucible company, flagstaff hill maritime museum and village, fluxing pots, morgan’s patent, morgan brothers, patent plumbago crucible co, battersea works, london, loch ard gorge, port campbell -
 Flagstaff Hill Maritime Museum and Village
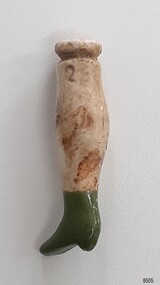
Leisure object - Doll's Leg, circa 1878
This doll's leg was one of a set of artefacts recovered from the shipwreck of the Loch Ard that were donated together. The doll's leg could have been from the ship's cargo or personal effects. Dolls from this era were often made from fabric, which would have quickly deteriorated in the ocean. Ceramic limbs were joined to the body by tightening the fabric around the grooves on the limbs. There are other doll's limbs in our collection that were recovered from the Loch Ard The object is now one of the shipwreck artefacts in Flagstaff Hill’s Mc Culloch Collection, which includes items recovered from the wrecks of the Victoria Tower (wrecked in 1869) and Loch Ard (wrecked in 1878). They were salvaged by a diver in the early 1970s from the southwest coast of Victoria. Advanced marine technology had enabled divers to explore the depths of the ocean and gather its treasures before protective legislation was introduced by the Government. The artefacts were donated to Queensland’s Department of Environment and Heritage Protection (EHP) by a passionate shipwreck lover and their locations were verified by Bruce McCulloch. In 2017 the Department repatriated them to Flagstaff Hill where they joined our vast collection of artefacts from Victoria’s Shipwreck Coast.The Loch Ard: - The three-masted, square-rigged iron ship Loch Ard belonged to the famous Loch Line which sailed many ships from England to Australia. The ship was built in Glasgow in 1873. The Loch Ard made three trips to Australia and one trip to Calcutta before its final voyage. The Loch Ard: - The Loch Ard left England on March 2, 1878, under the command of Captain Gibbs, bound for Melbourne with a crew of 37, plus 17 passengers and a load of cargo. The general cargo included straw hats, umbrellas, perfumes, clay pipes, pianos, clocks, confectionery, linen and candles, as well as a heavier load of railway irons, cement, lead and copper. There were items included that were intended for display in the 1880 Melbourne International Exhibition, including the famous Loch Ard Peacock. On June 1, 1878, Captain Gibbs was expecting to see land but visibility was reduced by fog. As it lifted, the sheer cliffs of Victoria's west coast came much closer than expected. The captain was unable to steer away and the ship struck a reef at the base of Mutton Bird Island, near Port Campbell. The top deck was loosened from the hull, the masts and rigging came down and knocked passengers and crew overboard, and even the lifeboat crashed into the side of the ship and capsized. Of the 54 people on board, only two survived: the apprentice, Tom Pearce and the young woman passenger, Eva Carmichael. The well-packed Minton porcelain peacock also survived, safe inside its crate. Much of the cargo was washed up, smashed and broken, and some was salvaged. Other cargo is still with the wreck at the base of Mutton Bird Island, now protected by Government law. The artefact is an example of cargo or personal items on board a ship in 1878. It provides a reference point for classifying and dating similar items. This artefact is significant for its association with the sailing ship Loch Ard, one of the best-known, and one of the worst, shipwrecks in Victoria’s history. Flagstaff Hill’s collection of artefacts from Loch Ard is significant for being one of the largest collections of artefacts from this shipwreck in Victoria. It is significant for its association with the shipwreck, which is on the Victorian Heritage Register (VHR S417). The collection is significant because of the relationship between the objects, as together they have a high potential to interpret the story of the Loch Ard. The Loch Ard collection is archaeologically significant as the remains of a large international passenger and cargo ship. It is historically significant for representing aspects of Victoria’s shipping history. Doll's leg, cream-coloured ceramic leg with two seams, a flat solid top and a glazed green ankle-length heeled boot. A shallow groove runs around the leg just below the top. An inscription is stamped into the leg below the groove. Recovered from the wreck of the Loch Ard. Inscribed "2"flagstaff hill, warrnambool, maritime village, maritime museum, flagstaff hill maritime museum and village, shipwreck coast, great ocean road, shipwreck artefact, wreck dive, mcculloch collection, bruce mcculloch, loch ard, 1878, loch line, victorian heritage register, sailing ship, captain gibbs, eva carmichael, tom pearce, mutton bird island, loch ard gorge, migrant ship 1878, cargo ship 1878, doll's leg, ceramic doll leg, porcelain doll leg, doll's limb, 1870s doll, 1870's toy, ceramic limb from doll, children's toy, children's recreation, doll's leg with green boot -
 Flagstaff Hill Maritime Museum and Village
Functional object - Lamp Fitting, circa 1878
This gas pipe fitting was one of a group of artefacts in the McCulloch Collection that were recovered from the shipwreck Loch Ard and were donated together. The fitting could have been from the ship's cargo or a ship’s fitting. Lamps from this era were fuelled by gas. There are other gas lamp fittings in our collection that were recovered from the Loch Ard The object is now one of the shipwreck artefacts in Flagstaff Hill’s Mc Culloch Collection, which includes items recovered from the wrecks of the Victoria Tower (wrecked in 1869) and Loch Ard (wrecked in 1878). They were salvaged by a diver in the early 1970s from the southwest coast of Victoria. Advanced marine technology had enabled divers to explore the depths of the ocean and gather its treasures before protective legislation was introduced by the Government. The artefacts were donated to Queensland’s Department of Environment and Heritage Protection (EHP) by a passionate shipwreck lover and their locations were verified by Bruce McCulloch. In 2017 the Department repatriated them to Flagstaff Hill where they joined our vast collection of artefacts from Victoria’s Shipwreck Coast. The Loch Ard: - The three-masted, square-rigged iron ship Loch Ard belonged to the famous Loch Line which sailed many ships from England to Australia. The ship was built in Glasgow in 1873. The Loch Ard made three trips to Australia and one trip to Calcutta before its final voyage. The Loch Ard left England on March 2, 1878, under the command of Captain Gibbs, bound for Melbourne with a crew of 37, plus 17 passengers and a load of cargo. The general cargo included straw hats, umbrellas, perfumes, clay pipes, pianos, clocks, confectionery, linen and candles, as well as a heavier load of railway irons, cement, lead and copper. There were items included that were intended for display in the 1880 Melbourne International Exhibition, including the famous Loch Ard Peacock. On June 1, 1878, Captain Gibbs was expecting to see land but visibility was reduced by fog. As it lifted, the sheer cliffs of Victoria's west coast came much closer than expected. The captain was unable to steer away and the ship struck a reef at the base of Mutton Bird Island, near Port Campbell. The top deck was loosened from the hull, the masts and rigging came down and knocked passengers and crew overboard, and even the lifeboat crashed into the side of the ship and capsized. Of the 54 people on board, only two survived: the apprentice, Tom Pearce and the young woman passenger, Eva Carmichael. The well-packed Minton porcelain peacock also survived, safe inside its crate. Much of the cargo was washed up, smashed and broken, and some was salvaged. Other cargo is still with the wreck at the base of Mutton Bird Island, now protected by Government law. The artefact is an example of cargo or personal items on board a ship in 1878. It provides a reference point for classifying and dating similar items. This artefact is significant for its association with the sailing ship Loch Ard, one of the best-known, and one of the worst, shipwrecks in Victoria’s history. Flagstaff Hill’s collection of artefacts from Loch Ard is significant for being one of the largest collections of artefacts from this shipwreck in Victoria. It is significant for its association with the shipwreck, which is on the Victorian Heritage Register (VHR S417). The collection is significant because of the relationship between the objects, as together they have a high potential to interpret the story of the Loch Ard. The Loch Ard collection is archaeologically significant as the remains of a large international passenger and cargo ship. It is historically significant for representing aspects of Victoria’s shipping history. Brass decorative gas lamp fitting. Two flat arms of different lengths are joined on either side of a fitting that has a fleur-de-lis-like design. The shorter arm has a J-shaped brass pipe fitted to it with a decorative threaded cube joint part way along, and ends with a triangular tap and knob. The longer arm is also J-shaped and ends with a feather design on it. There are remnants of green paint on the cube fittings and the knob. Recovered from the wreck of the Loch Ard.flagstaff hill, warrnambool, maritime village, maritime museum, flagstaff hill maritime museum and village, shipwreck coast, great ocean road, shipwreck artefact, wreck dive, mcculloch collection, bruce mcculloch, loch ard, 1878, loch line, victorian heritage register, sailing ship, captain gibbs, eva carmichael, tom pearce, mutton bird island, loch ard gorge, migrant ship 1878, cargo ship 1878, lamp fitting, gas lamp fitting, ship’s fitting, ship’s lamp, brass lamp fitting, lighting, domestic lighting, ship’s lighting -
 Falls Creek Historical Society
Award - Pewter Mug Trophies - Ross and Malcolm Milne - Molony Cup 1966 - Third
This Pewter Mug Collection is a set of 32 trophies won by Australian Alpine skiers Ross and Malcolm Milne between 1959 and 1964. Ross and Malcolm grew up on their family's tobacco property in Myrtleford, and began skiing at Falls Creek at an early age. They were both taught by Austrian Sigi Haberzettl, who was chief coach at Falls Creek for 17 years. Ross went on to win the North-Eastern District Ski Association (NEDSA) Junior Championships for three years in a row. In 1961 Ross was a member of the Australian team which competed against New Zealand in the Inter-Dominion Championships. In 1963, he won the Downhill and Alpine Combined title at the Australian Championships, while placing second in the Grand Slalom event. Ross Milne was selected in the Australian team that participated in the 1964 Olympic Winter Games at Innsbruck, Austria. A few days before the opening of the Games, on 25 January 1964, he tragically lost his life when he crashed into a tree during a training run for the Men's Downhill. He was only 19 years of age. Malcolm became a member of the Australian Junior Ski Team to Japan at the age of 14. He won all of the NEDSA children’s races and won the State Title in 1966. Malcolm continued to achieve great success, winning the Australian Championships for the next five years. At the end of 1969 he won Gold in the Val d'Isere FIS Alpine Ski World Cup Downhill, Australia's first Alpine Ski World Cup medal. He was on the Australian National Ski Team for eight years, representing his country at the 1968 and 1972 Olympic Games and the 1966 and 1970 World Championships before turning professional in 1972. Malcolm Milne was inducted into the Sport Australia Hall of Fame in 1985. In 2000 he received the Australian Sports Medal for his contribution to skiing. In 2004, Ski & Snowboard Australia granted Milne Life Membership for the contribution he made to the sport by becoming the first World Cup medal winner in Australian winter sports history, and the subsequent impact his performances have had on future athletes. Malcolm Milne was awarded the Medal of the Order of Australia (OAM) for services to skiing in 2016. James Malony originally established his business in 1854 in King Street Melbourne. The family owned business of J. Molony initially specialised in shoemaking. Several members of the family were recognised ice hockey and figure skaters who have represented Australia in international winter events including the 1952 Olympic Games in Oslo, Norway and the 1976 Innsbruck Winter Olympics. Molony’s in Elizabeth Street expanded their business with a focus on ski equipment, opening new premises in Falls Creek in 1960. They sponsored several events included the Malony Cup, a Grand Slalom event held at Falls Creek.This item is significant because it is part of a collection which documents the career of two outstanding Australian sportsmen.A pewter mug awarded for Moloney Cup 1966Engraved on side of mug: Molony Cup 1966 MENS THIRDross milne, malcolm milne, milne brothers, australian alpine skiers, j. malony -
 Eltham District Historical Society Inc
Photograph, Peter Pidgeon, Grave of Beulah Alice Rutter and children, June and Samuel, Eltham Cemetery, Victoria, 5 April 2021
Hubert and Beulah Alice (Simpson) Rutter had five children: Hubert Jnr. (Joe) in 1913, David in 1915, June in 1917, Donald in 1922 and Samuel in 1926. Samuel died as an infant aged 17 days. Hubert was a notable figure in Eltham and beyond, with a career as a mining manager in Australia and Malaya. He served in the AIF in the First World War. While the children were growing up at ‘Yarra Braes’, Eltham, their father was an Eltham Shire Councillor in the 1920s, shire president in 1928 and a leading figure in establishing the Shire of Eltham War Memorial League, which was responsible for building the Shire of Eltham War Memorial tower at Kangaroo Ground, near where the Shire Offices were located until the 1930s. The Rutter name was commemorated after the war at Eltham High School with one of the schoolhouses named ‘Rutter House’ and at Geelong Grammar School until the 1960s where a ‘Rutter Badge’ was awarded to junior boys for leadership. The family home, ‘Yarra Braes’ was destroyed in the devasting Black Friday bushfire, 13 January 1939 and Beulah relocated to Toorak, Hubert working in Western Australia. Tragedy struck the family again December 19, 1940 when daughter June was killed after falling from the Heidelberg train on to an adjacent track into the path of a Reservoir train at Victoria Park station. Sons David and Donald both served in the R.A.A.F. during the Second World War and were killed in action, David in Libya in 1941 and Donald in Germany in 1945. The wreck of his plane and his body were not recovered at the time and Hubert never ceased to chase down leads as to his whereabouts. Beulah never gave up hope that Donald was still alive. Hubert had received several reports shortly after the war that his son was still alive but these were ultimately accepted as misidentification. Such was the anguish of the grieving parents, their son’s plane not found to confirm the fact for certain. Hubert wrote to the Air Force in frustration, failing to understand how the plane could disappear when it crashed in a relatively populated area. Unfortunately the answers came too late for Beulah who died in 1946 and was buried in Eltham Cemetery along with her daughter June and baby Samuel. Donald’s plane was eventually located and his body recovered in 1949. He is buried in the Hanover War Cemetery, Germany. David is commemorated on Column 245, Alamein Memorial, Egypt. Both David and Donald are commemorated on Eltham’s Roll of Honour Board, commissioned by the Eltham War Memorial Trust to be hung in the Baby Health Centre, part of the Eltham War Memorial building precinct. Hubert Senior and Hubert Junior both continued to work in the mining industry in Western Australia. Hubert senior died 1957 at Plantagenet Western Australia and Hubert junior in 1979 at Gascoyne, Western Australia. Sacred to the memory of Beulah AliceBeloved wife of Hubert Rutter Died August 21st 1946 also June Beloved daughter of Beulah and Hubert Rutter Died 19th December 1940 aged 23 years Also her baby brother Samuel Died 7th October 1926, aged 17 daysBorn Digitaleltham cemetery, gravestones, beulah alice rutter, hubert rutter, june rutter, samuel rutter -
 Federation University Historical Collection
Photograph - Photograph - Colour, E.J. Barker Library Social Distancing During the Covid19 Pandemic, 2020, 06/04/2020
On 12 January, the World Health Organization (WHO) confirmed that a novel coronavirus was the cause of a respiratory illness in a cluster of people in Wuhan City, Hubei Province, China, who had initially come to the attention of the WHO on 31 December 2019. On 3 March, the Reserve Bank of Australia became the first central bank to cut interest rates in response to the outbreak. Official interest rates were cut by 0.25% (25 base points) to a record low of 0.5%. On 12 March, the Federal Government announced a A$17.6 billion stimulus package, the first since the 2008 GFC. he package consists of multiple parts, a one-off A$750 payment to around 6.5 million welfare recipients as early as 31 March 2020, small business assistance with 700,000 grants up to $25,000 and a 50% wage subsidy for 120,000 apprenticies or trainees for up to 9 months, 1 billion to support economically impacted sectors, regions and communities, and $700 million to increase tax write off and $3.2 billion to support short-term small and medium-sized business investment. On 16 March, Premier Dan Andrews and Minister for Health Jenny Mikakos declared a state of emergency for Victoria for at least four weeks. On 19 March, the Reserve Bank again cut interest rates by a further 0.25% to 0.25%, the lowest in Australian history. On 22 March, the government announced a second stimulus package of A$66bn, increasing the amount of total financial package offered to A$89bn. This included several new measures like doubling income support for individuals on Jobseeker's allowance, granting A$100,000 to small and medium-sized businesses and A$715 million to Australian airports and airlines. It also allowed individuals affected by the outbreak to access up to A$10,000 of their superannuation during 2019–2020 and also being able to take an additional same amount for the next year. on the same day Victorian Premier Daniel Andrews announced on 22 March that the state will bring the school holiday forwards to 24 March from 27 March. On 30 March, the Australian Federal Government announced a $130 billion "JobKeeper" wage subsidy program offering to pay employers up to $1500 a fortnight per full-time, part-time or casual employee that has worked for that business for over a year. For a business to be eligible, they must have lost 30% of turnover after 1 March of annual revenue up to and including $1 billion. For businesses with a revenue of over $1 billion, turnover must have decreased by 50%. Businesses are then required by law to pay the subsidy to their staff, in lieu of their usual wages. This response came after the enormous job losses seen just a week prior when an estimated 1 million Australians lost their jobs. This massive loss in jobs caused the myGov website to crash and lines out of Centrelink offices to run hundreds of metres long.The program was backdated to 1 March, to aim at reemploying the many people who had just lost their jobs in the weeks before. Businesses would receive the JobKeeper subsidy for six months.Colour photographs of furniture placed for social distancing in the Federation University E.J Barker Library during the Covid-19 Pandemic. The next day the library was closed all except staff.covid-19, corona virus, pandemic, library, e.j. barker library, mt helen library -
 Wodonga & District Historical Society Inc
Photograph - The Carriers' Arms, Wodonga
In October 1874, Thomas Reidy and Andrew McCormack opened the Carriers’ Arms on the corner of South and Church Streets. They also established a general store next door, which they soon extended. The Carriers’ Arms was a coach stop for the Bethanga Express Coach. On 8 December 1882 the licence for the Carriers’ Arms was granted to Ann Reidy. In 1883, Edmund T. Powell, and his Irish-born wife, Mary Ann, purchased the Carriers’ Arms. By 1898 the Licence was in the name of M. A. Powell. She was still the licensee at the time of her death in August 1906. For a short time, the property was in the hands of Miss Maud Powell but in February 1907, the licence for The Carriers’ Arms Hotel was transferred to Mr George L. Leighton. On Monday 5th February 1917 a clearing sale of all furniture and effects of the Carriers’ Arms Hotel was held. The new proprietor and licensee was Henry R. Baker. In April 1920, the Carriers’ Arms had another new proprietor, Mrs A. E. Frauenfelder but by October 1921 it was transferred to Kathleen Hickey. Mrs. Hickey was at the Carriers’ Arms until she died in January 1926. In 1927, Mr H.W. Allen, formerly proprietor of the Terminus Hotel took over the Carriers’ Arms but in August 1928 the balance of the lease was transferred to Mrs Mulrooney. In 1932 it again changed hands, with the licence being transferred to Mrs Eileen Dorothy Hemphill, of Wodonga. In 1933 the Carriers’ Arms was licensed to Mrs. M.G. O’Brien, a sister of Mrs Hemphill. In 1935 Leo Houlihan took over the business but 6 months later it was transferred to A C Ferguson. The next year the licence was transferred yet again to Zelda Allen. By 1937 it was in the hands of Percy Cumberland then to Lila Maud MacPherson and soon followed by Ronald Dobson. By 1940 Herbert V.A. Callender had taken over the Carriers’ Arms and in 1942 the licence was transferred again to Sarah Jane Callander. In July 1943 Mr G. A. Adams disposed of the freehold of the Carriers’ Arms Hotel in Hume Street to Mr J.H. Perry. By September 1955 Edward Spencer held the Victualler’s licence for Carriers Arms Hotel and the licences was transferred to Kevin Patrick Howell. Mr Howell operated the hotel for many years. At some stage in the 1980s Geoff Milne operated the Carriers’ Arms. In 2007 he was killed in a light airplane crash. In 1991 David McLeish and Bob Craig, took over the Carriers’ Arms and were joined in 1993 by James Carroll. They continued to operate it until 2003. In 2010 Greg Evans held the Freehold with Licensees Cate Nightingale and Michael McNamara, After running into major financial difficulties it was run by Greg Evans. In 2010 the Carriers’ Arms was put up for auction but failed to sell. From 2013 - 2016, Ron Montgomery and his wife Michelle took over the lease of the Carriers’ Arms. In 2018, the Carriers’ Arms was purchased from Greg Evans by Leigh Esler. After opening to the public in 1874, The Carriers’ Arms was closed in 2019 and following extensive refurbishment opened as Church Street These items are significant as they document the history of a long-serving business in the Wodonga community.A collection of photos and advertisements documenting the life of the Carriers' Arms Hotel, Wodonga.early wodonga businesses, carriers' arms wodonga -
 Flagstaff Hill Maritime Museum and Village
Artwork, other - Framed poster, Tim Walker, Loch Ard Shipwreck, circa 2010
Tim Walker’s work is an eye-catching array of shipwreck artefacts and associated items. They help tell the story of the 19th century ships that travelled across the world full of people and cargo that are now part of our history. The work was commissioned especially for Flagstaff Hill and highlights the famous story of the 1878 ‘Loch Ard’ shipwreck. The images also include two small items from the 1981 ‘Fiji’ shipwreck. Local professional artist Timothy “Tim” Walker was born in Britain in 1970. He was self-taught had the desire to use his talents for full-time work. He specialised in painting local scenes, landscape and people of Warrnambool and district after he moved there in 1990. As he worked at the location of his subjects, people often told him interesting and amusing stories. He soon became involved in the Warrnambool and District Artists’ Society, where he has served for a period as President. In 2010 Warrnambool Art Gallery hosted an exhibition “Nine Lives” with works from nine local artists including Tim Walker. The ‘LOCH ARD’ 1873-1878 - brief history The clipper ship ‘Loch Ard’ was a built in Scotland in 1873. In 1978 the ship was sailing to Melbourne with 54 people on board as well as a mixed cargo of items, some of which were bound for the 1880 International Exhibition in Melbourne. On June 1st 1878 it was very close to its destination when it crashed into Mutton Bird Island, east of Port Campbell. Only two people survived. The wreck was re-discovered in 1967, almost a century later, and the site continues to provide evidence of the range of goods imported into the Colony of Victoria in the post-Gold Rush era. Flagstaff Hill divers in the 1970s reported finds of “Bottles of champagne, window panes, rolls of zinc, barrels of cement, iron rails, clocks, lead shot, corrugated iron, lead, marble, salad oil bottles, ink bottles, copper wire, gin bottles, rolls of carpet, floor tiles, copper rivets, gas light fittings, pocket knives, toys, crystal chandeliers, beer mugs, cutlery, candles sticks, wick scissors, cow bells, and sauce bottles.” The famous Loch Ard Peacock was also on board. The ‘FIJI’ 1875-1891 – brief history The barque ‘Fiji’ was built in Ireland in 1875. The sailing ship left Hamburg in May 1891, bound for Melbourne with a crew of twenty-five plus the captain. The ‘Fiji’ had almost reached her destination after a trip of 100 days at sea when, on September 5th 1891, she struck rock 300 metres from the shore at Moonlight Head, near Cape Otway. Eleven men lost their lives but with the help of locals including members of the Rocket Rescue Crew, the rest of the men were saved. In anticipation of Christmas, the cargo had included a wide variety of children’s toys, amongst which were dolls with china limbs, wooden rocking horses, miniature ships, and red and white rubber balls. There were also cases of dynamite, pig iron, steel goods, spirits, sailcloth, tobacco, fencing wire, concrete, 400 German pianos, concertinas and other musical instruments, artists’ supplies, porcelain, furniture, china and candles. This artwork has historical significance as it shows a small sample of the variety of items on board the late 19th century ships bound for Australia in the Colonial and late God Rush period. The cargo contained personal luggage, items intended as gifts, and goods ordered for domestic, commercial or industrial use. The wreck sites of both vessels, ‘Loch Ard’ and ‘Fiji’ are classified on the Victorian Heritage Register as significant and are now protected by government law. The sites are popular with divers and provide interpretive material regarding social and maritime history. Framed poster of a watercolour painting by Tim Walker, gilt frame, behind glass. Subject is a group of objects, most of which are connected with the 1878 shipwreck Loch Ard, such as items recovered from the shipwreck and the famous ‘Loch Ard Peacock’. Two items are from the wreck of the ‘Fiji’. Inscriptions on ingot, a handwritten letter, bell, clear bottle, and small plaque.On ingot: “PONTIFEX & WOOD. LONDON”. On letter: “Presented to Mr. Thomas Pearce”. On small ingot: “TIM WALKER”. On bell: “LOCH ARD”. On clear bottle “THE SINGER MANUFACTURING COMPANY“. On plaque: TIM WALKER”.warrnambool, flagstaff hill maritime museum, maritime museum, shipwreck coast, flagstaff hill maritime village, great ocean road, flagstaff hill, loch ard, fiji, watercolour, timothy walker, tim walker, warrnambool & district artists’ society, warrnambool art gallery, poster, henna street picture framers, cargo, print -
 Federation University Historical Collection
Photograph, Dana Street, Ballarat During Covid-19 State of Emergency, 13/04/2020
On 12 January, the World Health Organization (WHO) confirmed that a novel coronavirus was the cause of a respiratory illness in a cluster of people in Wuhan City, Hubei Province, China, who had initially come to the attention of the WHO on 31 December 2019. On 3 March, the Reserve Bank of Australia became the first central bank to cut interest rates in response to the outbreak. Official interest rates were cut by 0.25% (25 base points) to a record low of 0.5%. On 12 March, the Federal Government announced a A$17.6 billion stimulus package, the first since the 2008 GFC. he package consists of multiple parts, a one-off A$750 payment to around 6.5 million welfare recipients as early as 31 March 2020, small business assistance with 700,000 grants up to $25,000 and a 50% wage subsidy for 120,000 apprenticies or trainees for up to 9 months, 1 billion to support economically impacted sectors, regions and communities, and $700 million to increase tax write off and $3.2 billion to support short-term small and medium-sized business investment. On 16 March, Premier Dan Andrews and Minister for Health Jenny Mikakos declared a state of emergency for Victoria for at least four weeks. On 19 March, the Reserve Bank again cut interest rates by a further 0.25% to 0.25%, the lowest in Australian history. On 22 March, the government announced a second stimulus package of A$66bn, increasing the amount of total financial package offered to A$89bn. This included several new measures like doubling income support for individuals on Jobseeker's allowance, granting A$100,000 to small and medium-sized businesses and A$715 million to Australian airports and airlines. It also allowed individuals affected by the outbreak to access up to A$10,000 of their superannuation during 2019–2020 and also being able to take an additional same amount for the next year. on the same day Victorian Premier Daniel Andrews announced on 22 March that the state will bring the school holiday forwards to 24 March from 27 March. On 30 March, the Australian Federal Government announced a $130 billion "JobKeeper" wage subsidy program offering to pay employers up to $1500 a fortnight per full-time, part-time or casual employee that has worked for that business for over a year. For a business to be eligible, they must have lost 30% of turnover after 1 March of annual revenue up to and including $1 billion. For businesses with a revenue of over $1 billion, turnover must have decreased by 50%. Businesses are then required by law to pay the subsidy to their staff, in lieu of their usual wages. This response came after the enormous job losses seen just a week prior when an estimated 1 million Australians lost their jobs. This massive loss in jobs caused the myGov website to crash and lines out of Centrelink offices to run hundreds of metres long.The program was backdated to 1 March, to aim at reemploying the many people who had just lost their jobs in the weeks before. Businesses would receive the JobKeeper subsidy for six months. * On 12 April 2020 Victorian Premier Daniel Andrews Extended the State of Emergency until midnight on May 11. On this day the world has 1,604,900 cases of coronavirus, with 95,738 deaths. America has 468,887 cases of covid19, with 1,900 Americans dying in the last 24 hours. The UK has 65,077 cases. 881 people died in the last 24 hours. Australia has 6,292 cases. 58 people have died to date.Colour photographs of Ballarat's usually very busy Dana Street during Covid-19 Social Isoliation. The photographs were taken at 4.00pm. dana street, ballarat, covid19, corona virus, pandemic, state of emergency -
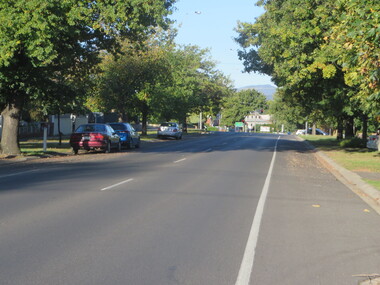 Federation University Historical Collection
Photograph - Photograph - Colour, Eyre Street, Ballarat During Covid-19 State of Emergency, 13/04/2020
On 12 January, the World Health Organization (WHO) confirmed that a novel coronavirus was the cause of a respiratory illness in a cluster of people in Wuhan City, Hubei Province, China, who had initially come to the attention of the WHO on 31 December 2019. On 3 March, the Reserve Bank of Australia became the first central bank to cut interest rates in response to the outbreak. Official interest rates were cut by 0.25% (25 base points) to a record low of 0.5%. On 12 March, the Federal Government announced a A$17.6 billion stimulus package, the first since the 2008 GFC. he package consists of multiple parts, a one-off A$750 payment to around 6.5 million welfare recipients as early as 31 March 2020, small business assistance with 700,000 grants up to $25,000 and a 50% wage subsidy for 120,000 apprenticies or trainees for up to 9 months, 1 billion to support economically impacted sectors, regions and communities, and $700 million to increase tax write off and $3.2 billion to support short-term small and medium-sized business investment. On 16 March, Premier Dan Andrews and Minister for Health Jenny Mikakos declared a state of emergency for Victoria for at least four weeks. On 19 March, the Reserve Bank again cut interest rates by a further 0.25% to 0.25%, the lowest in Australian history. On 22 March, the government announced a second stimulus package of A$66bn, increasing the amount of total financial package offered to A$89bn. This included several new measures like doubling income support for individuals on Jobseeker's allowance, granting A$100,000 to small and medium-sized businesses and A$715 million to Australian airports and airlines. It also allowed individuals affected by the outbreak to access up to A$10,000 of their superannuation during 2019–2020 and also being able to take an additional same amount for the next year. on the same day Victorian Premier Daniel Andrews announced on 22 March that the state will bring the school holiday forwards to 24 March from 27 March. On 30 March, the Australian Federal Government announced a $130 billion "JobKeeper" wage subsidy program offering to pay employers up to $1500 a fortnight per full-time, part-time or casual employee that has worked for that business for over a year. For a business to be eligible, they must have lost 30% of turnover after 1 March of annual revenue up to and including $1 billion. For businesses with a revenue of over $1 billion, turnover must have decreased by 50%. Businesses are then required by law to pay the subsidy to their staff, in lieu of their usual wages. This response came after the enormous job losses seen just a week prior when an estimated 1 million Australians lost their jobs. This massive loss in jobs caused the myGov website to crash and lines out of Centrelink offices to run hundreds of metres long.The program was backdated to 1 March, to aim at reemploying the many people who had just lost their jobs in the weeks before. Businesses would receive the JobKeeper subsidy for six months. * On 12 April 2020 Victorian Premier Daniel Andrews Extended the State of Emergency until midnight on May 11. On this day the world has 1,604,900 cases of coronavirus, with 95,738 deaths. America has 468,887 cases of covid19, with 1,900 Americans dying in the last 24 hours. The UK has 65,077 cases. 881 people died in the last 24 hours. Australia has 6,292 cases. 58 people have died to date.Colour photographs of Ballarat's usually very busy Eyre Street during Covid-19 Social Isoliation. The photographs were taken at 4.00pm. ballarat, covid19, corona virus, pandemic, state of emergency, eyre street -
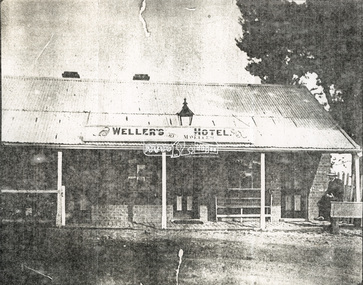 Eltham District Historical Society Inc
Document - Folder, Wellers of Kangaroo Ground, 1984-2017
Wellers of Kangaroo Ground Vertical File Contents: 1. Article: History of Wellers Restaurant by Sandra Cahir, revised 2017. 7 pages 2. Article: Weller’s Hotel of Kangaroo Ground (final draft) by Jim Allan, 1 June 2017, including feedback email from Sandra Cahir (7 May 2017). 3. Printout of online image - Kangaroo Ground landholders from 1841, Kangaroo Ground Presbyterian Church. (2022, June 29). Retrieved from https://kgpc.pcvic.org.au/images/history_images/Kangaroo-Ground-landholders.jpg 4. Folder of printouts of historical newspaper articles referencing the hotel 1866-1911 https://trove.nla.gov.au/list/163201 5. Printouts (various versions) from Victorian Heritage Database (National Trust and Nillumbik Shire) https://vhd.heritagecouncil.vic.gov.au/ 6. Collection of research notes, copies of records from various publications including EDHS Chronology of Events and Kangaroo Ground: The Highland Taken by Mick Woiwod, pp90, 180-181 (EDHS_01618). 7. Report: Request for ministerial amendment to use the property as a restaurant, includes existing conditions and plan for development, 1 November 1984 8. Papers donated by Diana and Peter Bassett-Smith including: a. Photocopy of Weller’s Hotel, Licensee M. Weller b. Letter: Shire of Eltham to Office of the Secretary for Planning and Environment, 23 Feb 1984 - Information regarding inclusion of Wellers Hotel into the Historic Buildings Register c. Letter: Historic Buildings Council letter to Peter Bassett-Smith seeking historical information on Wellers Hotel, 10 Jan 1985 d. Memo: Peter Bassett-Smith to Robert N. Hendrey on history of Wellers Hotel, 28 Jan 1985 - Includes extract of information about Mary Weller, Dept. of Crown Lands and Survey Map NILLUMBIK showing properties of John Weller and E. Weller and a Diamond Valley News article from 10 April 1973, p11, "Eltham on old coach route" 9. Information about the Weller family including family trees from various sources a. Edward Weller, Pioneer Families in Victoria, http://mepnab.netau.net/w/w09.html, 1 Jan 2017 (link broken) b. The WELLER family tree. (2017, January 1), 2 pages. Retrieved from https://www.weller.org.uk/cgi-bin/FamilyTree/ShowFamily.pl? and 27 pages Retrieved from https://www.weller.org.uk/cgi-bin/FamilyTree/ShowFamily.pl?ListAllPeople=A c. Edward WELLER on the WELLER family tree. (2017, January 1), 1 page. Retrieved from https://www.weller.org.uk/cgi-bin/FamilyTree/ShowFamily.pl?PersonID=516 d. Photograph (print copy), believed to be Edward Weller, 1836-1883 e. Photograph (print copy), Gravestone of Weller family at Kangaroo Cemetery f. Wellers of Kangaroo Ground, 1 page, possibly from History, http://www.wellers.com.au (broken) c.2016 g. Edward and Mary Weller miscellaneous biographical research notes (by Jim Allen?) including from Ancestry.com, and extracts from Chappel file (EDHS_04448) with relevant names highlighted h. Information about the Vernon Pitman family from Ancestry.com 10. Newspaper articles: a. Cobb & Co called here by Marguerite Marshall; Diamond Valley News, May 4, 1982, p2 b. Rich is history, 30 August 1983 (very similar to previous article) c. Weller’s Pub - restaurant, craft store or art gallery? Diamond Valley News, October 22, 1985, p3 d. Despite years of neglect a magical charm lies waiting, Diamond Valley News, October 29, 1985 e. Old pub fate still in doubt, Diamond Valley News, (?) 29 October 1985 f. Renovated Weller’s Pub to begin its new stage of life, DVN 26 January 1988 g. Wellers Restaurant, Lynne Hillier, Network, October 1988, p14 h. Revolution at Wellers, Nillumbik Mail, December 20, 2000 i. Wellers brings on good times, Valley Weekly, June 22, 2005 j. Dine in with ideal outlook, Valley News, 10 August 2005 k. Advertisement: Wellers of Kangaroo Ground, Enjoy lunch, afternoon tea and dinner at Wellers from Tuesday to Sunday, Valley Weekly, Wednesday, August 31, 2005 l. Advertisement: Wellers of Kangaroo Ground, Appearing live; Normie Rowe Fri 24 Feb, Diamond Valley Leader February 22, 2006, p11 m. Advertisement: Wellers of Kangaroo Ground, Lunch Special, Diamond Valley Leader March 27, 2010 n. Braithwaite abounds to Kangaroo Ground, Gig Guide, The Age, Friday, October 8, 2010, p14 o. History up for grabs, Diamond Valley Leader, March 28, 2012 p. Advertisement: Wellers Restaurant, Freehold only for sale, Morrison Kleeman, Diamond Valley Leader, March 28, 2012 q. Restaurant’s crash course, Megan Bailey, Diamond Valley Leader, January 1, 2014, p3. Also accessible online - Staff praised after car crashes through Kangaroo Ground eatery. (2022, June 29). Retrieved from https://www.heraldsun.com.au/leader/north/staff-praised-after-car-crashes-through-kangaroo-ground-eatery/news-story/021c896a1ab6d76bd6b73f2e57dc1854 r. Eatery set for revival, Brittany Shanahan, Diamond Valley Leader 15 February 2017; Also, online as Much-loved Wellers of Kangaroo Ground to be relaunched as Italian restaurant Fondata 1872. (2022, June 29). Retrieved from https://www.heraldsun.com.au/leader/north/muchloved-wellers-in-kangaroo-ground-to-be-relaunched-as-italian-restaurant-fondata-1872/news-story/665777fb347584ef483867ae2b536a8f s. Fondata 1872 proves a big hit with food, Diamond Valley Leader 3 May 2017, p3 11. Wellers of Kangaroo Restaurant Bar Entertainment Functions, tri-fold brochure promotional brochure 12. Website Printout: Wellers Restaurant, Live Guide, (2017, January 5). Retrieved from http://www.liveguide.com.au/Restaurants_Bars/VIC/Kangaroo_Ground/Food_Styles/3... 13. Website Printout: Wellers of Kangaroo Ground, Only Melbourne (2017, January 30). Retrieved from http://www.onlymelbourne.com.au/wellers-of-kangaroo-ground 14. Printouts from Fondata 1872 website and Facebook page including colour photograph of sign in front and business card (2017). Related EDHS Collection items • Wellers Hotel of Kangaroo Ground by Jim Allen, Part 1, Newsletter No. 235, Eltham District Historical Society, August 2017. Retrieved from https://elthamhistory.files.wordpress.com/2017/08/edhs-nl-235-aug-2017.pdf • Wellers Hotel of Kangaroo Ground by Jim Allen, Part 2, Newsletter No. 236, Eltham District Historical Society, October 2017. Retrieved from https://elthamhistory.files.wordpress.com/2017/10/edhs-nl-236-oct-2017.pdf • EDHS_03997 - Slide, Wellers Hotel, Pitmans Corner, Eltham-Yarra Glen Road, Kangaroo Ground, c.1975 https://victoriancollections.net.au/items/5e59e36221ea671798ac40eb • EDHS_03998 - Slide, Wellers Hotel, Pitmans Corner, Eltham-Yarra Glen Road, Kangaroo Ground, c.1975 https://victoriancollections.net.au/items/5e59e39e21ea671798ac9c27 • EDHS_03999 - Slide, Wellers Hotel, Pitmans Corner, Eltham-Yarra Glen Road, Kangaroo Ground, c.1975 https://victoriancollections.net.au/items/5e59e3c721ea671798acd2ef • EDHS_04000 - Slide, Wellers Hotel, Pitmans Corner, Eltham-Yarra Glen Road, Kangaroo Ground, c.1975 https://victoriancollections.net.au/items/5e59e3e021ea671798acfd68 • EDHS_04066-18 - Photograph, Wellers Restaurant, Eltham-Yarra Glen Road, Kangaroo Ground, c.Mar. 1989 https://victoriancollections.net.au/items/610f4dafa346aadcee7ac79c • EDHS_04041-26 - Photograph, Wellers Restaurant, 150 Eltham-Yarra Glen Road, Kangaroo Ground, c.May 1988 https://victoriancollections.net.au/items/610e2f4a7d65e7c945a35e69 • EDHS_04437 – Newsclipping, Renovated Weller's Pub to begin its new stage of life by Linley Hartley, Diamond Valley News, 26 January 1988 https://victoriancollections.net.au/items/5de4913921ea6710a46a85c7 • EDHS_04438 - Newsclipping, Wellers Restaurant by Lynne Hillier, Network, October 1988, p14 https://victoriancollections.net.au/items/5de4916f21ea6710a46aea0f • ArtStreams magazine (from Volume 9, 2004) ‘partnered' with Wellers in promoting and supporting the arts and culture. Various advertisements throughout, particular with live performance acts. Numerous references throughout to art and music performances on site. • Stephen Cummings and Joe Camilleri at Wellers Kangaroo Ground, ArtStreams, Vol. 9, No. 4, Sep/Oct 2004, p17 EDHS_04406 - Journal, ArtStreams: Whittlesea, Banyule, Darebin, Manningham, Nillumbik, Yarra; Vol. 9, No. 4, Sep-Oct 2004 https://victoriancollections.net.au/items/5bcc086021ea6804a82a92a9 • Daryl Braithwaite rocks up at Wellers, Fiona Sievers, ArtStreams, Vol.10 No.2, 2005, pp6-7 EDHS_04409 - Journal, ArtStreams: Vol. 10, No. 2, 2005 https://victoriancollections.net.au/items/60f5416ab06f0c13a9419541 • Ephemeral Sculpture by Peter Dougherty, ArtStreams, Vol.10 No.3, 2005, pp7-9. About sculptures created in or on the grounds of culinary establishments throughout the Shire. - Denise Keele-Bedford constructed ‘Ou Well’ at Wellers Restaurant and Vicky Shukuroglou, also at Wellers set up cotton banners printed and painted with natural dyes from onion skins, spinach, radish beetroot, turmeric and charcoal. EDHS_04410 - Journal, ArtStreams: Vol. 10, No. 3, 2005 https://victoriancollections.net.au/items/60f5436db06f0c13a941ae19 • Music at Wellers Restaurant, ArtStreams, Vol.10 No.4, 2005, p23 EDHS_04411 - Journal, ArtStreams: Vol. 10, No. 4, 2005 https://victoriancollections.net.au/items/60f543e4b06f0c13a941b059 • Weller’s Pub, Diamond Valley sketchbook / text by Brian McKinlay ; drawings by Graham Hawley, 1973, pp42-43 EDHS_00856 - https://victoriancollections.net.au/items/590852edd0ce7b14e8177da3 • Gold Field Coaches Stopped Here, Nillumbik now and then / Marguerite Marshall; photographs Alan King with Marguerite Marshall, 2008, pp86-87 EDHS_00977 - https://victoriancollections.net.au/items/5935f315d0cdd42c80f9cc52 External Links: • Historic Kangaroo Ground venue comes up for rare sale. (2022, June 29). Retrieved from https://www.smh.com.au/business/companies/historic-kangaroo-ground-venue-comes-up-for-rare-sale-20120325-1vshw.html • Wellers, Kangaroo Ground property sold with leaseback. (2022, June 29). Retrieved from https://www.urban.com.au/expert-insights/investing/37735-wellers-kangaroo-ground-property-sold-with-leaseback • Wellers, Kangaroo Ground | With Mark Seymour, at one of his …. (2022, June 29). Retrieved from https://www.flickr.com/photos/robertmilesdesign/4564390893/ • 2016 Notice of proposed deregistration - WELLERS OF KANGAROO GROUND PTY LTD 124 435 409. (2022, June 29). Retrieved from https://publishednotices.asic.gov.au/browsesearch-notices/notice-details/WELLERS-OF-KANGAROO-GROUND-PTY-LTD-124435409/35d43b89-159a-4435-963f-daec688a61ca • Search results for: Websites (archived). (2022, June 29). Retrieved from https://trove.nla.gov.au/search/category/websites?keyword=%22wellers%20restaurant%22 29 June 2022 edward weller, wellers of kangaroo ground, wellers hotel, wellers restaurant, mary weller, pittmans corner, fondata 1812 at wellers, historic buildings register, hotels, john weller, kangaroo ground, pitman's corner, bassett-smith collection -
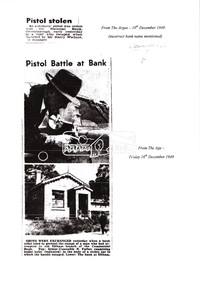 Eltham District Historical Society Inc
Folder, Commercial Bank of Australia Eltham Branch Hold-Up, 15 December 1949
Thursday, December 15, 1949, the quiet little bank was embroiled in an infamous wild shoot-out between a daring thief and two bank officers. Today, the building still carries the scars ; a bullet hole remains visible in a cedar bench testifying to the events that played out that day. 3.30 a.m., Friday, December 9. The manager of the Commercial Bank branch at Greensborough, Mr Harry Wallace and his wife are asleep in their bedroom of the little house behind the branch. Harry is awakened by a noise and sees an intruder in a corner of the bedroom. He calls out but the intruder who has switched off the power in anticipation flees through a side door and scarpers down Main Street. Harry summons the police but a search by First Constable Thomas of the Greensborough Police assisted by a wireless patrol car is unsuccessful. A report is filed noting the theft of a .25 calibre pistol from the wardrobe. Thursday, December 15th. It is 1pm and the Commercial Bank has just opened. The branch is only open Mondays and Thursdays from 1-3pm. The morning started off a little cool with some scattered showers but it has fined up and the temperature is now around 61 degrees (16 C). A new grey Singer sports car with soft-top pulls up on the opposite side of the road and a young man, neatly dressed in a dark blue suit, wearing a grey hat and carrying a brief case exits the vehicle. He looks around then crosses the road and walks up the steps and through the door into the bank. There are three people inside; Mr. Jack Burgoyne whose grocery store is situated just 50 yards up the road, Mr. Lindsay A. Spears, the Eltham Agency Receiving Officer and by chance, Mr Harry Wallace, manager of the Greensborough branch. Jack Burgoyne takes note of the young stranger; thinking to himself he appears nervous. The man approaches the counter and introduces himself as John Henderson of Greensborough and explains that he wishes to open a new account. He places his hat and £3 on the counter. Mr Spears attends to the paperwork. He asks the young man to sign two forms, which he does but then he withdraws from the counter and starts walking towards the door. Suddenly he spins around pulling an automatic pistol from his right-hand pocket. He exclaims forcefully; “The game’s on! I’ll take the lot!” Spears appears to comply by pretending to open a drawer. The man shouts loudly, “Keep your hand away from that drawer.” Spears instead reaches for a pistol in his pocket and challenges the man, “Here it is. Come and get it!” At the same time, Harry Wallace pulls a pistol from his pocket as well. The bandit fires a shot but misses, the bullet striking the counter. Both Spears and Wallace open fire and Jack Burgoyne ducks for cover. As the bandit turns and runs for the door leaving his £3 behind, he fires another shot, which strikes the ceiling. Spears fires back, and thinks he may have hit him in the foot. The bandit flees the bank and heads for the grey Singer car, registration NO-106, parked opposite. Wallace and Spears pursue him to the door and open fire again, striking the car three times around the driver’s door. Spears lets off eight shots and Wallace, seven before his gun jams. The getaway car initially heads slowly down Main Road towards Bridge Street. About 100 yards down the road, Dave Adams, a PMG employee, who has heard the shots, throws a steel manhole step at the driver. It hits the roof of the car nine inches above the driver’s head and tears the hood. Another witness claims to have seen the door blow open and the driver raise his hand. The car gathers speed and swings left into Bridge Street racing along at about 60 miles an hour careering recklessly past council employee, Mr. Percy Williams, who is driving a dray along Smarts Road [believed to be Bridge Street]. At the end of the road the Singer fails to get round the sharp turn and crashes into an embankment skidding to a stop outside the home of Mr John Clifford. One side of the car is wrecked. Mr Clifford, an aircraft engineer hears the fast travelling car bump heavily into the road bank at about 1.25 p.m. Hearing the whine of an engine he goes outside to find the grey Singer parked at the side of the road. Jack George also lives at the corner and hears the car crash. “The bandit opened the car door, ran 50 yards, and suddenly turned back,” exclaims Jack. “He took something from the car. It might have been a gun.” In his haste, the bandit drops his grey felt hat, size 6 7/8, on the road and dashes up Sherbourne Road for about 200 yards then disappears into the scrub carrying a brief case and a bundle in which a sailor’s cap can be seen. About 3 p.m., Mr H.D. Pettie of Mountain View Road, Montmorency is looking through his field glasses and notices a young man walking through thick scrub on private property some distance from his house. The man is wearing a sailor’s cap and disappears along the railway track toward Montmorency. As the day progresses, ten police cars, one motor cycle, and about 40 police led by Det. Sgt. McMennemin of Malvern CIB are searching for him. They believe he is hiding in thick scrub along the bank of the creek about half-a-mile outside Eltham township. Wireless patrol cars, four mobile traffic cars and the CIB area cars from Malvern and Kew are taking part. Police check the thief’s car and discover it was stolen from Helen Baxter, of Doncaster Road, North Balwyn from outside Victoria Barracks. Harry Wallace informs the police that he believes he recognised the bandit as the man who took his pistol from his bedroom the previous Friday morning. As night falls, armed police are posted at strategic points in the Eltham-Greensborough district. Police in cars are watching the roads. Others are searching the bush and checking passengers on trains. Little do they realise the young man has already slipped out of the net. SEQUEL YOUTH OF 19 CHARGED WITH ATTEMPTED ARMED ROBBERY OF BANK AT ELTHAM Weekly Times, Wednesday 15 February 1950, page 6 Detectives who raided a house in Bell St., Coburg, Melbourne, charged a 19-year-old youth, of South Yarra, with attempted armed robbery at the Commercial Bank’s Eltham (Vic.) receiving depot on Dec. 15. Police say they recovered a loaded automatic pistol, diamond and signet rings worth more than £200, a complete set of house-breaking instruments, a sailor’s uniform, and chloroform gauze in the raid. The youth was charged that while armed with an offensive weapon, he attempted to rob Lindsay George Spears of a sum of money. He was further charged on six counts of breaking, entering and stealing. Police allege that the person who tried to hold up Mr Spears in the Commercial Bank receiving depot at Eltham on December 15. escaped in a stolen car, after Mr Spears and Mr Henry Wallace, manager of the bank’s Greensborough branch, had fired at him. After the car crashed, he escaped into thick scrub and is alleged to have changed into a sailor’s uniform. On December 9 an automatic pistol was stolen from Mr Wallace’s bedroom at the Greensborough bank. The chloroform pad recovered is alleged to have been stolen from the Dental Supply Company, Plenty Road, Preston. The rings are alleged to have been taken in a £513 burglary from the shop of James Paton. Sydney Road, Coburg. Det. Sgt. H. McMennemin conducted the investigations with Senior Dets. R. Newton and M Downie, Detectives l. Dent, R. Rayner, P. Pedersen and M. Handley and First Constable A. Thomas. The youth will appear at Eltham Court on February 22. Manager’s Gun Used in Holdup at Bank The Age, Thursday 23 February 1950, page 4 It was stated in Eltham court yesterday that a youth who robbed a bank manager of his pistol, later used it in an attempt to hold-up the bank. Kay Arthur Morgan, 19, draftsman, of Castle-street, South Yarra, was committed for trial on charges of breaking and entering, and stealing a pistol and attempted robbery while armed with an offensive weapon. He pleaded guilty. The manager of Eltham branch of the Commercial Bank of Australia Ltd., Henry Clifton Cabot Wallace, said he disturbed someone in the bedroom, in which he and his wife were sleeping, at 3 a.m. on December. 9, 1949. Later he found that his automatic- pistol was missing. On December 15 a youth, who said his name was John Henderson, entered the bank and opened a new account. As the youth was leaving the bank he turned round with a pistol in his hand and said: — “I want the lot.” Spear indicated a drawer under the counter; and said.— “Here it is. Come and get it.” The youth said:— “Keep your hand away from that drawer.” Witness said Spear then drew his pistol from his hip pocket. The youth fired at them, and Spear returned the fire. “I pulled my pistol and fired, too” said witness. The youth fired again, ran out to a car and drove off. Witness and Spear fired several shots at the car. The youth was the accused Morgan, sitting in court, witness said. Evidence was given that one bullet was found in the celling and the other in the bank. Morgan was allowed £100 bail on each charge. Morgan ended up serving three years for the failed armed robbery and became a notorious criminal. He had twin sons, Peter and Doug and even though only ten years old, Morgan would get his sons to act as lookouts whilst he committed burglaries. The lads became building contractors but when the industry suffered a downturn in 1977 and they were short on cash, they returned to the family business. Over the following 23 months they undertook 24 raids on country and outer-suburban TABs and banks. Whilst robbing one country bank for the third time, just like their father, it all went wrong ending up with a police officer shot. They were nick-named the “After-dark” bandits and are considered to be Australia’s last bushrangers. They were convicted and served 17 years in prison.5 x A4 photocopied pagesbank hold-up, cba bank, det sgt mcmennemin, eltham, h.d. pettie, harry wallace, jack burgoyne, kay arthur morgan, lindsay a. spears, main road -
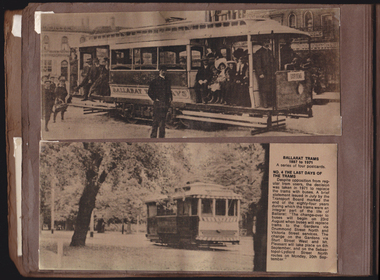 Tramway Heritage Centre
Photograph Album (part of), Ray Pearson's Photo Album - Trams of Victorian Railways, Ballarat, Bendigo, Geelong
Page 4 of Ray Pearson's Photo Album. Brown card page with two metallic look postcards (landscape format) placed on page using clear plastic photo corners. Both postcard images depict trams in Ballarat. Both postcards have come loose of two of their photo corners (top and bottom on the left) and are not secure on the page.Printed text to back of postcard at top: BALLARAT TRAMS / 1887 to 1971 / A series of four postcards. / NO. 2 EARLY ELECTRIC TRAMS / Electric trams first ran in / Ballarat on 18th Aigust, 1905. / Twelve of the horse trams were / converted to electric cars by lengthening them at both ends. / Eight of the remaining horse / trams were used as trailers to / the motor cars. / The electric trams were / given a secret trial during the / previous night to the opening / date, but the drivers clanged / the gongs so much that it / brought people out of their / beds in night attire. They / formed an unofficial guard of / honour around Wendouree / Parade. / The trams were gaily decor- / ated for Opening Day. As the / line of cars came down Camp / Hill (Sturt Street) filled with / local dignitaries, the brakes on / the last car failed and it crashed / into the one in front. The win- / dows of both cars were / smashed, and the occupants / who had been sitting in state / made an undignified exit. / Seating accommodation was / from 32 to 36. Six small electric / trams were purchased from the / Sydney Tramways in 1905 and / were converted to a similar / pattern to the 12 re-built / Ballarat horse trams. In 1906 / two open summer cars with / open cross seats (popularly / called toast racks) / were intro- / duced. These trams were packed at week-ends with / families en route to picnic by / the lake. A fine printed vertical line runs down the centre of the blank writing space to the left of the body text. Above is written: POSTCARD Printed text to right of image on bottom postcard: BALLARAT TRAMS / 1887 to 1971 / A series of four postcards. / NO. 4 THE LAST DAYS OF THE TRAMS / Despite opposition from reg- / ular tram users, the decision / was taken in 1971 to replace / the trams with buses. A brief / statement issued in July by the / Transport Boar marked the / end of the eighty-four years / during which the trams were an / integral part of the life of / Ballarat: “The change-over to / buses will begin on 23rd / August when buses will replace / trams to the Gardens via / Drummond Street North and / Victoria Street services. The / change on the Gardens via / Sturt Street West and Mt. / Pleasant will take place on 6th / September, and on the Sebas- / topol-Lydiard Street North / routes on Monday, 20th Sep- / tember.” A fine printed vertical line runs down the centre of the blank writing space to the left of the body text. Above is written: POSTCARDpostcard, ballarat trams, ballarat tramways, vintage trams, tram postcard, electric trams -
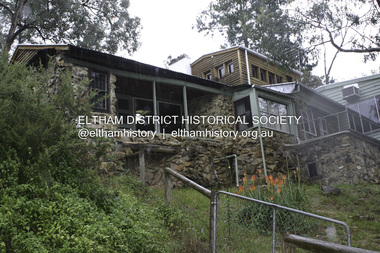 Eltham District Historical Society Inc
Photograph - Digital Photograph, Alan King, Stonygrad, 34 Hamilton Road, North Warrandyte, 30 January 2008
Vassilieff dynamited rock from his own property to build his house. Stonygrad is reminiscent of a grotto and in parts, of a sculpture. Covered under Heritage Overlay, Nillumbik Planning Scheme. Published: Nillumbik Now and Then / Marguerite Marshall 2008; photographs Alan King with Marguerite Marshall.; p135 Stonygrad, the home built by Expressionist painter and sculptor Danila Vassilieff, is reminiscent of a grotto and in parts, of a sculpture. Vassilieff, who amongst others influenced painter Sydney Nolan and Albert Tucker, was a member of the artists group the Angry Penguins. He was also a highly regarded art teacher at the nearby Koornong Experimental School and taught at Eltham High School. Art critic Robert Hughes described Vassilieff’s painting as ‘lyrical without social commentary’, and said Vassilieff was ‘the most oddly neglected artist in recent Australian History’. Vassilieff, who was born in 1897 in Russia, had an unusually adventurous life before he settled in Warrandyte. The 12th of 18 children, he lived on a farm in the Don Basin. Vassilieff trained with the Imperial Military Academy at St Petersburg and fought in World War One as an officer in the White Russian Army against the communists. In 1920 he was captured, then escaped from prison, stole a horse and rode bareback 150 miles to the Black Sea, helped at first by Tartar freebooters. He then travelled to India, Shanghai and arrived in Queensland as a refugee in 1923 where he began painting. He and his wife Anisia bought a sugar farm near Ingram, and later he constructed railway lines at Mataranka, in the Northern Territory.4 In 1929 Vassilieff went to Brazil for formal art training from former fellow-officer Dmitri Ismailovich, but he soon left to travel up the Amazon River. He then worked as a sidewalk artist in the West Indies and travelled for two years in England, France and Spain. In 1937 he arrived in Melbourne where he lived until his death in 1958. His first major Australian series was the Carlton streetscapes and from 1951 he sculpted in local hard limestone. Vassilieff rejected all dogma and regarded religious subjects as suitable only for decorative arts. In 1944 he helped defeat a communist attempt to take over the Contemporary Art Society. For a short time, from around 1955, Vassilieff taught at various Victorian schools. The Angry Penguins painted mainly between 1937 and 1947, and included Arthur Boyd, Albert Tucker, Sidney Nolan and Joy Hester. The group formed as they felt isolated from European thought and art (including Surrealism) from which their work was derived. They were also angry at what they considered to be the complacency and insularity of their society. They maintained Australians at first were scarcely aware of the threats of the Wall Street Crash and Hitler and were little interested in the Spanish Civil War. The Angry Penguins also objected to the White Australia Policy. Hughes said although most of the Melbourne Expressionists in the 1940s were unskilled and their work crude in style, they helped jolt Australian painting from its pastoral complacency. Their style influenced nearly every painting produced by significant figurative artists in Melbourne in the 1950s such as Charles Blackman. From 1939 Vassilieff built Stonygrad, mainly with local stone. The house stands at the end of a private road surrounded by trees with the quiet occasionally broken by the sounds of bellbirds. To build his house Vassilieff dynamited rock and cut trees from his own property. The original section of the three-level house is of irregular-shaped pieces of solid stone, exposed inside like the exterior. Vassilieff later built sections with timber and brick. Inside is rustic and cave-like, and several rooms are linked by arched openings with no doors. One undulating wall was carved out of rock from which two sculptured heads protrude. Several ceilings are of rough-hewn logs and the built-in table and bookcase are rough, as is a timber ladder leading to a bedroom. Not for the elderly or unsteady! Yet the general impression in the muted light is beautiful, with artistic originality.This collection of almost 130 photos about places and people within the Shire of Nillumbik, an urban and rural municipality in Melbourne's north, contributes to an understanding of the history of the Shire. Published in 2008 immediately prior to the Black Saturday bushfires of February 7, 2009, it documents sites that were impacted, and in some cases destroyed by the fires. It includes photographs taken especially for the publication, creating a unique time capsule representing the Shire in the early 21st century. It remains the most recent comprehenesive publication devoted to the Shire's history connecting local residents to the past. nillumbik now and then (marshall-king) collection, danila vassilieff, hamilton road, north warrandyte, stonygrad -
 Melbourne Tram Museum
Ephemera - Olympic Scrap book, "MMTB #1", 1987 to 2003
Collection of newspaper clippings pasted into the scrapbook by the donor. Covers the period 1979 to 1990 when the Melbourne tram system underwent large changes. All from The Herald Sun or The Sun, unless noted otherwise. Contains the following cuttings: 1 - New tram link proves popular - Progress Print 12/12/1979 2 - Extension for tram? Standard 28/11/1979 3 - Ban trams from mall call - Herald - 14/12/1979 4 - Its war on tram yobbos - Sun 25/4/1980 5 - A bus drivers' dream sale 6 - Art lovers in transport of delight - The Bulletin 3/4/1979 7 - Your turn: Our Red cars are gone and all but forgotten - Los Angeles Herald Examiner 21/6/1978 8 - Push for tram line - Eastern Standard - 3/12/1980 9 - Photo of the opening of Bundoora line - 19/5/1983 10 - From cable cars to electric trams - Reg Baird - City Extra 13/11/1985 11 - Louie fears he'll soon be history - Sun 12/11/1985 12 - The first tram rolls unofficially of course - Box Hill Gazette - 18/7/1978 13 - Then and now - Board looks back to 1916 - Box Hill Gazette - 18/7/1978 14 - Blockade - trams buses choke city - 20/7/1987 15 - What a clangers - Tranquil city of trammies, and a City of the Rails - 21/7/1984 16 - Trammies on the buses - 24/7/1984 17 - A tram voted a winner - Progress Press 17/10/1984 18 - A class trams - Eastern Standard 23/10/1984 19 - Danton Carson - ex cable trammie - 12/11/1985 20 - Tram line upgrade - 10/9/1985 21 - Launch of B1 2001 - 16/11/1984 22 - Home built from trams - Progress Press - 9/11/1983 23 - A shortcut on the Brunswick line - Malcolm tram on Miller St bridge - 22/8/1985 24 - Stone and brick and cable tram - The Age 2/11/1985 25 - Danton Carson article by Lahey at Large - The Age 9/11/1985 26 - Why not a City tram loop? - 21/11/1986 27 - tram route ruling angers commuters - (route 82) - 4/1/1986 28 - History back on the tracks - photo o W1 612 - 3/8/1987 29 - The last number 77 - The Age 8/1/1986 30 - Art on wheels (tram 336) - Progress Press 10/12/1986 31 - Ban on Trams - Kew Depot - Progress Press 10/12/1986 32 - The Ghosts of Brisbane Past - Brisbane Courier Mail - 9/10/1987 33 - Trammies had to be tough in the days of cable cars - The Herald - 11/11/1985 34 - Catch a vintage tram at Bylands - 11/11/1985 35 - Aboard the trams home - 26/8/1987 36 - The end of the line for a private tram fleet - 28/3/1989 37 - Jim's tram plan clangs to a halt 38 - Red nose trams in a class of their own 39 - PTC Statewide Open Day - 17/10/1991 40 - Trams a vital part of city's transport - 18/5/1988 41 - Fun tram just the ticket -15/3/1988 42 - Desire is a streetcar for Jim, a collector obsessed 0 8/3/1988 43 - Tram crash 31 hurt - 7/2/1989 44 - Tramway exhibition to roll - Progrss Report - 18/10/1989 45 - Business on the right line - Restaurant tram - 30/10/1989 46 - Experience the 'real' tram museum on a shaky ride - 17/6/1989 47 - The start of electric trams - progress press 18/10/1989 48 - Trams Back - fights erupt as trammies vote - 2/2/1990 49 - Tram row legacy to linger on - 2/2/1990 50 - Trams back, but travelers aren't - Progress Press - 14/2/1990 51 - advert by The Met - Trams operating today - 8/2/1990 52 - Trams roll - rebe;'s rage still a threat - Z33 3/2/1990 53 - An early tram catches a few passengers - Month before all trams back - 5/2/1990 Yields information about the Melbourne tram network in the 1990sScrap book - Olympic - 32 plain sheets + printed card covers, centre stapled.tramways, melbourne, newspapers, box hill, tram museums, unions, tram blockade, a class, east burwood, bundoora, cable trams, b class, route 82, route 77, danton carson, brisbane, restaurant tram, adelaide