Showing 5062 items matching "crown"
-
 Tennis Australia
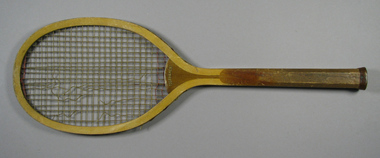
Racquet, Circa 1902
A Wright and Ditson 'Toournament' tennis racquet, with: solid convex throat; bevelled and gorged crown; and, fine-grooved, thick octagonal handle. Decal inscription across throat on obverse: TOURNAMENT. Wright & Ditson Championship logo, with tennis player on ball trademark feature on throat on reverse. Materials: Wood, Lacquer, Glue, Metal, Paint, Ink, Leather, Gut, Stringtennis -
 Tennis Australia
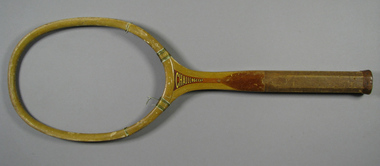
Racquet, Circa 1920
An unstrung Wright and Ditson 'Challenge Cup' tennis racquet, with: bevelled crown; string whipping around shoulders; and, fine-grooved, thick octagonal handle. Decal inscription along throat on obverse: CHALLENGE CUP. Wright & Ditson cursive logo features along throat on reverse. Materials: Wood, Lacquer, Glue, Metal, Paint, Ink, Leather, Gut, Stringtennis -
 Tennis Australia
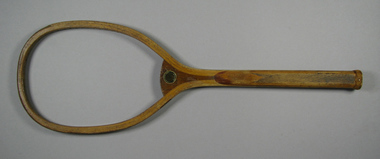
Racquet, Circa 1898
A destrung, Spalding 'The Practice' transitional flat-top, junior tennis racquet, featuring: solid convex throat; and, cross-hatched handle. Decal of A.G. Spalding & Bros. Makers logo encircling ball trademark features on throat on obverse. Impression of model name features across crown, on obverse. Materials: Wood, Lacquer, Glue, Metal, Ink, Leathertennis -
 Tennis Australia
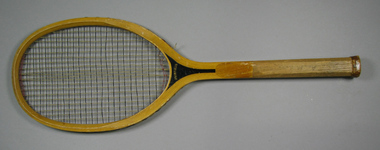
Racquet, Circa 1917
A Spalding 'Fairfield' wooden tennis racquet with concave throat, partially double-strung net, bevelled crown, and grooved octagonal handle. Model name across throat on obverse. Spalding ball trademark features on throat on reverse. Inscription along right side of shaft: FORSPUN GUT/... Materials: Wood, Metal, Lacquer, Glue, Gut, Ink, Leather, Painttennis -
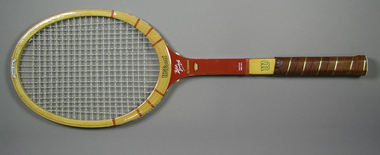 Tennis Australia
Racquet, Circa 1968
A Wilson "Butch" Buchholz Autograph tennis racquet. Base of head features Wilson logo. Throat features model name, with a crown device. Lower shaft and butt cap feature 'W' trademark. Leather handle grip features quatrefoil perforations. Materials: Wood, Nylon, Leather, Glue, Metal, Lacquer, Paint, Adhesive tape, Ribbon, Plastictennis -
 Tennis Australia
Racquet, Circa 1968
A Wilson Flight tennis racquet. Wilson logo features across base of head. Model name, with a gold crown device features on throat. 'W' trademark features on lower shaft and butt cap. Leather handle grip features quatrefoil perforations. Materials: Wood, Nylon, Leather, Adhesive tape, Ribbon, Plastic, Glue, Lacquer, Metal, Ink, Painttennis -
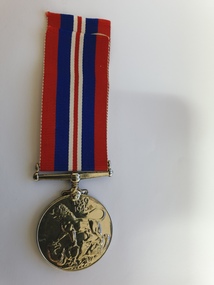 Clayton RSL Sub Branch
Medal, War Medal
John Alexander Young V82835 DOB 14.10.1899 LieutenantAustralian War Medal 1939-1945 The medal is cupro-nickel with the crowned effigy of King George VI on the obverse. The reverse has a lion standing on a double-headed dragon. The top of the reverse shows the dates 1939 and 1945. The stripes signify the dark blue of the Royal Navy and Merchant Navy, red to represent the service of the Army and the light blue of the Air Force J.A. Young V82835 -
 The 5th/6th Battalion Royal Victoria Regiment Historical Collection
Medal - Victorian Long Service Medal 1880, T.A. McWinney, c. 1880
Presented to a member of the Victorian Volunteer forces in 1880. Part of history of 5/6 RVRPresented to colonial victorian forces for long serviceSilver medal suspended from decorative silver mount on a ribbon made up of two 9mm Violet bars and one 14mm off white bar. Obverse face has a St. George Cross with 5 stars inside of a belt surmounted by a crown. This is surrounded by the words Local forces Victoria. The Reverse of the medal has " For long and efficient service" embossed on it T.A.McWhinney5/6 rvr, regmimental property, colonial, officers and sergeants mess, bhq -
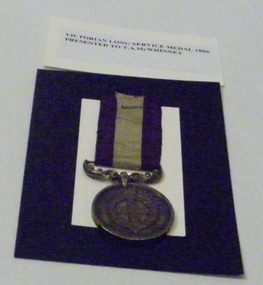
 The 5th/6th Battalion Royal Victoria Regiment Historical Collection
Medal - Victorian Long Service Medal 1880 Presented to S.Windridge
Awarded for Long ServiceSilver Medal mounted on a decorative arm. Ribbon is made up of two 9mm Violet Bars set astride a 14 mm off white bar Obverse face has a St. George Cross with 5 stars inside of a belt surmounted by a crown. This is surrounded by the words Local forces Victoria. The Reverse of the medal has " For long and efficient service" embossed on itS.Windridge 18805/6 rvr, officers and sergeants mess, victorian, colonial -
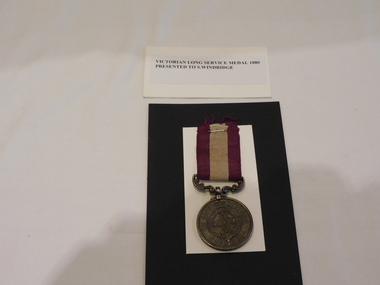
 The 5th/6th Battalion Royal Victoria Regiment Historical Collection
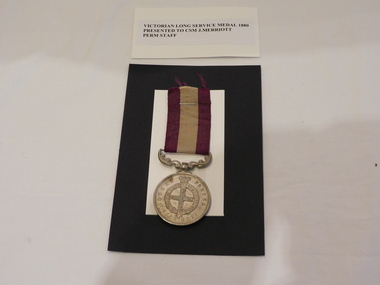
Medal - Victorian Long Service Medal 1880 Presented to CSM J. Merriott Perm Staff
presented for long serviceSilver Medal mounted on a decorative arm. Ribbon is made up of two 9mm Violet Bars set astride a 14 mm off white bar Obverse face has a St. George Cross with 5 stars inside of a belt surmounted by a crown. This is surrounded by the words Local forces Victoria. The Reverse of the medal has " For long and efficient service" embossed on itJames Merriott COY. SERGT. MAJOR PERMT. STAFF5/6 rvr, 5/6 rvr officer's mess / sergeant's mess, victorian, colonial, medal, long service medal -
 The 5th/6th Battalion Royal Victoria Regiment Historical Collection
Medal - Victorian Long Service Medal 1880 Presented to to AB L.W.Houston Port Melbourne Naval Brigade
Awarded for Long and Efficient ServiceSilver Medal mounted on a decorative arm. Ribbon is made up of two 9mm Violet Bars set astride a 14 mm off white bar Obverse face has a St. George Cross with 5 stars inside of a belt surmounted by a crown. This is surrounded by the words Local forces Victoria. The Reverse of the medal has " For long and efficient service" embossed on itJ.W.Houston Able Seaman Port Melb Division N.B5/6 rvr, officers and sergeants mess, colonial, victorian -
 The 5th/6th Battalion Royal Victoria Regiment Historical Collection
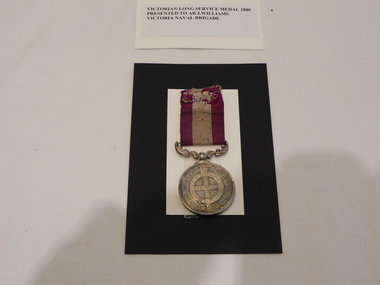
Medal - Victorian Long Service Medal 1880 Presented to AB J.Williams Victoria Naval Brigade
Award for long and efficient serviceSilver Medal mounted on a decorative arm. Ribbon is made up of two 9mm Violet Bars set astride a 14 mm off white bar Obverse face has a St. George Cross with 5 stars inside of a belt surmounted by a crown. This is surrounded by the words Local forces Victoria. The Reverse of the medal has " For long and efficient service" embossed on itJoseph Williams Able Seaman Vic Naval Brigade5/6 rvr, officers and sergeants mess, colonial, victorian -
 Bendigo Military Museum
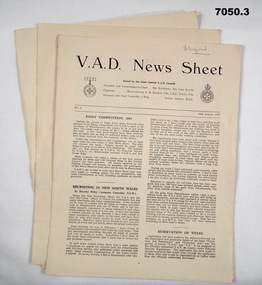
Pamphlet - V.A.D. NEWS SHEETS, Joint Central VAD Council Australia, 1943
Part of a collection re Bendigo Voluntary Aid Detachment. Refer Cat No 7028 for all the collection.These are single sheet of paper folded to make 4 pages. They are printed in black ink. At the top of front page is the title with 2 badges. Left side= Commonwealth of Australia V.A.D. Badge. Right side= Voluntary Aid Detachment Australia. It has a Royal Crown on top. These three pamphlets are on the same issue that being No.2 dated 14 Aug 1943.1. Has a few paragraphs marked out in pencil. 2. OK. 3. Top of front page has name “O.M. Guest” in pencil.vad pamphlets, ww2 -
 Melbourne Tram Museum
Document - Personal Papers, H. S McComb, "Tramways on Commonwealth Property", Apr. 1960
Handwritten draft on foolscap paper, titled "Tramways on Commonwealth Property", to the Deputy Crown Solicitor, Commonwealth of Australia, responding to the letter of 14/8/1959, concerning a draft agreement between the Board and the Commonwealth with suggested changes, indemnities, discharge of drainage, Maribyrnong River Bridge, vehicle or level crossings - has date of 28-4-1960 and initialled by Mr. McComb.trams, tramways, maribyrnong river bridge, agreements, commonwealth government, essendon airport, west maribyrnong -
 Bendigo Military Museum
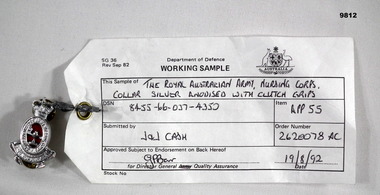
Manual - SAMPLE BADGE, SILVER COLOUR, c. 1992
Badge is an example of sample used to ensure standard of manufacture among local contractors. See item 9806.Silver coloured badge with two (2) pins, one (1) at top and bottom; gold coloured clasp on each. Crown on top of oval (pointed end). Lit oil lamp in centre of oval with red textile (possibly velvet) behind. Banner at base with motto. Gold coloured plate on back. Tag secured to badge with wire and lead seal.In oval around lamp - "ROYAL AUSTRALIAN ARMY NURSING CORPS." In banner - "PRO HUMANITATE [for humanity (or kindness)]" Tag (handwritten sections) - "THE ROYAL AUSTRALIAN ARMY, NURSING CORPS/COLLAR SILVER ANODISED WITH CLUTCH GRIPS" "8455-66-037-4350/APP 55" "J+J CASH/2620078 AC" " G P Barr [signature]/ 19/8/92"insignia, badge -
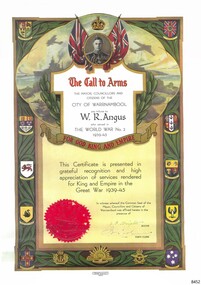 Flagstaff Hill Maritime Museum and Village
Certificate - Call to Arms, Osboldstone & Co. Pty. Ltd, W.R. Angus, ca. 1945
This copy of the Certificate of Call to Arms was presented to Dr William Roy Angus at the completion of World War II by the May, Councillors and Citizens of Warrnambool in appreciation for his service. It is now part of Flagstaff Hill’s comprehensive W.R. Angus Collection, donated by the family of Dr W R Angus, 1901-1970, surgeon and oculist. During World War II between 1942-45, Dr Angus served with the Australian Department of Defence as a Surgeon Captain in Ballarat, Victoria, and in Bonegilla, N.S.W., completing his service just before the end of the war due to suffering from a heart attack. The Certificate is headed by a crown above the portrait of King George VI, the reigning British monarch at the time of WWII and afterwards. King George was King of the United Kingdom and the Dominions of the British Commonwealth, which is illustrated by the emblems of the Commonwealth countries and of the states of Australia. It also has symbols for the three Australian Military Forces; Navy, Army and Air Vorce. The Certificate also carries the Common Seal of the Mayor, Councillors and Citizens of the City of Warrnambool, and the signatures of the Mayor and Town Clerk. The W.R. Angus Collection: - The W.R. Angus Collection includes historical medical equipment, surgical instruments and material belonging to Dr Edward Ryan and Dr Thomas Francis Ryan, (both of Nhill, Victoria) and Dr Angus’ own belongings. The Collection’s history spans the medical practices of the two Doctors Ryan, from 1885-1926 plus that of Dr Angus, up until 1969. It includes historical medical and surgical equipment and instruments from the doctors Edward and Thomas Ryan of Nhill, Victoria. Dr Angus married Gladys in 1927 at Ballarat, the nearest big city to Nhill where he began as a Medical Assistant. He was also Acting House surgeon at the Nhill hospital where their two daughters were born. During World War II He served as a Military Doctor in the Australian Defence Force. Dr Angus and his family moved to Warrnambool in 1939, where Dr Angus operated his own medical practice. He later added the part-time Port Medical Officer responsibility and was the last person appointed to that position. Both Dr Angus and his wife were very involved in the local community, including the planning stages of the new Flagstaff Hill and the layout of the gardens there. Dr Angus passed away in March 1970.This is an example of objects used by or issued to Doctor Angus during and after his military service as Surgeon Captain in Australia during World War II. The W.R. Angus Collection is significant for still being located at the site it is connected with, Doctor Angus being the last Port Medical Officer in Warrnambool. The Collection includes historical medical objects that date back to the late 1800s.Call to Arms; certificate of service awarded as a tribute to W. R. Angus by the Mayor, Councillors and Citizens of the City of Warrnambool and sealed with Common Seal and the signatures of the Mayor and the Town Clerk. The top of the certificate has a portrait of King George VI below a crown emblem. The border has logos for countries of the British Commonwealth - Canada, South Africa, Inda and New Zealand - and the Australian States of Queensland, South Australia, Victoria, West Australia and Tasmania. The bottom has the badges of the Royal Australian Navy, the Australian Commonwealth Military Forces and the Royal Australian Air Force. The Certificate was printed by Osboldstone & Co. of Melbourne, with the registered serial number 55319. This copy of the original certificate is part of the W. R. Angus Collection.Printed; "The Mayor, Councillors and citizens of the City of Warrnambool pay tribute to W.R. Angus who served in The World War No. 2 1939-45, for God, King and Empire" "This Certificate is presented in grateful recognition and high appreciation of services rendered for King and Empire in the Great War 1939-45." "In witness whereof, the Common Seal of the Mayor, Councillors and Citizens of Warrnambool was affixed hereto in the presence of " (Signatures of "J.F. Knights" [Mayor] "H.J. Worland" [Town Clerk]) Printed under the certificate: "Osboldstone & Co. Pty. Ltd. Printers, Melbourne" and "55319"flagstaff hill, warrnambool, maritime village, maritime museum, shipwreck coast, great ocean road, flagstaff hill maritime museum and village, dr w r angus, dr ryan, warrnambool base hospital, nhill base hospital, mira hospital, flying doctor, w.r. angus collection, australian department of defence, australian army, world war ii, wwii, surgeon captain, ballarat, bonegilla, certificate, call to arms, warrnambool mayor, j.f. knights, warrnambool town clerk, h.j. worland", city of warrnambool, world war no. 2', 1939-45, great war 1939-45, common seal of city of warrnambool, osboldstone & co. pty ltd., 55319, king george vi, british commonwealth, canada, south aftrica, india, new zealand, australian commonwealth military forces -
 Federation University Historical Collection
Document, License under Section 19 of "The Land Act 1869", 1875
Full license and authority to enter and occupy Crown Land outlined was given to James Cowan. This was for a period of three years and subjected to conditions outlined on the document. The area was in the County of Bourke, Parish of Blackwood. The area concerned is located on the Lerderderg River in the Wombat State Forest. The fee for occupation was to be paid in advance by half-yearly payments to the Land Officer at Ballarat. The document signed on 1 July 1875 by William F Stawell, Acting Governor of Victoria.Thick pale blue paper. Hand written in ink Hand drawn map of land in questionDated 1 July 1875 Signed William F Stawelllicence, license, crown land, james cowan, county of bourke, parish of blackwood, lerderberg river, wombat state forest, william foster stawell, acting governor, land officer, ballarat -
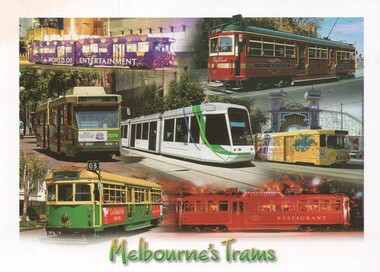 Melbourne Tram Museum
Postcard - Seven panel Melbourne tram photographs, Nucolorvue Publishing, Melbourne's Trams, 2001
Postcard featuring seven Melbourne tramcars - B2 2111 in an all-over advertising livery for Crown "World of Entertainment" in 2001, SW6 957 City Circle, B2 2070 (Bundoora), C1 2004, B2 2019 (2001) advertising Luna Park outside Luna Park, W7 1005 (Toorak Glenferrie Rd, route 8) and an SW6 tram as one of the Restaurant trams. Nu-Color-Vue number 11ML580, NCV 13584Yields information about seven different types of Melbourne trams around 2001.Postcard colour - seven panel Melbourne tram photographs - Nu-Color-Vuetrams, tramways, tramcar restaurant, luna park, w7 class tram, sw6 class tram, b class tram, c1 class tram, advertising trams, tram 2111, tram 957, tram 2020, tram 2004, tram 2019, tram 1005 -
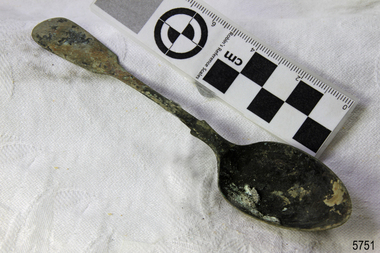 Flagstaff Hill Maritime Museum and Village
Domestic object - Spoon, circa 1878
This tea spoon is from the wreck of the LOCH ARD, a Loch Line ship of 1,693 tons which sailed from Gravesend, London, on 2 March 1878 with 17 passengers and a crew of 36 under Captain George Gibbs. “The intention was to discharge cargo in Melbourne, before returning to London via the Horn with wool and wheat”. Instead, on 1 June 1878, after 90 days at sea, she struck the sandstone cliffs of Mutton Bird Island on the south west coast of Victoria, and sank with the loss of 52 lives and all her cargo. The manifest of the LOCH ARD listed an array of manufactured goods and bulk metals being exported to the Colony of Victoria, with a declared value of £53,700. (202 bills of lading show an actual invoice value of £68, 456, with insurance underwriting to £30,000 of all cargo). Included in the manifest is the item of “Tin hardware & cutlery £7,530”. This teaspoon is one of 482 similar items of electro-plated cutlery from the LOCH ARD site, comprising spoons and forks of various sizes but all sharing the same general shape or design and metallic composition. 49 of these pieces display a legible makers’ mark — the initials “W” and “P” placed within a raised diamond outline, which is in turn contained within a sunken crown shape — identifying the manufacturer as William Page & Co of Birmingham. An electroplater’s makers’ marks, unlike sterling silver hallmarks, are not consistent identifiers of quality or date and place of manufacture. A similar line of five impressions was usually made to impress the consumer with an implication of industry standards, but what each one actually signified was not regulated and so they varied according to the whim of the individual foundry. In this case, the maker’s marks are often obscured by sedimentary accretion or removed by corrosion after a century of submersion in the ocean. However sufficient detail has survived to indicate that these samples of electro-plated cutlery probably originated from the same consignment in the LOCH ARD’s cargo. The following descriptions of maker’s marks are drawn from 255 tea spoons, 125 dessert spoons, and 99 table forks. These marks are clearly visible in 66 instances, while the same sequence of general outlines, or depression shapes, is discernible in another 166 examples. 1. A recessed Crown containing a raised Diamond outline and the initials “W” and “P” (the recognised trademark of William Page & Co) 2. An impressed Ellipse containing a raised, pivoted, Triangle in its lower part and bearing a Resurrection Cross on its upper section (a possible dissenting church symbol reflecting religious affiliation); OR a rounded Square impression containing a raised, ‘lazy’, letter “B” (possibly mimicking sterling silver hallmark signifying city of manufacture i.e. Birmingham) 3. An impressed rounded Square filled with a raised Maltese Cross (the base metal composite of nickel silver was also known as ‘German silver’ after its Berlin inventors in 1823) 4. A recessed Circle containing a Crab or Scarab Beetle image; OR a recessed Circle containing a rotated ‘fleur de lys’ or ‘fasces’ design 5. A depressed Diamond shape enclosing a large raised letter “R” and a small raised letter “D” (mimicking the U.K. Patent Office stamp which abbreviated the term ‘registered’ to “RD”, but also included date and class of patent) Suggested trade names for William Page & Co’s particular blend of brass plating are ‘roman silver’ or ‘silverite’. This copper alloy polishes to a lustrous gold when new, discolouring to a murky grey with greenish hue when neglected. HISTORY OF THE LOCH ARD The LOCH ARD belonged to the famous Loch Line which sailed many ships from England to Australia. Built in Glasgow by Barclay, Curdle and Co. in 1873, the LOCH ARD was a three-masted square rigged iron sailing ship. The ship measured 262ft 7" (79.87m) in length, 38ft (11.58m) in width, 23ft (7m) in depth and had a gross tonnage of 1693 tons. The LOCH ARD's main mast measured a massive 150ft (45.7m) in height. LOCH ARD made three trips to Australia and one trip to Calcutta before its final voyage. LOCH ARD left England on March 2, 1878, under the command of Captain Gibbs, a newly married, 29 year old. She was bound for Melbourne with a crew of 37, plus 17 passengers and a load of cargo. The general cargo reflected the affluence of Melbourne at the time. On board were straw hats, umbrella, perfumes, clay pipes, pianos, clocks, confectionary, linen and candles, as well as a heavier load of railway irons, cement, lead and copper. There were items included that intended for display in the Melbourne International Exhibition in 1880. The voyage to Port Phillip was long but uneventful. At 3am on June 1, 1878, Captain Gibbs was expecting to see land and the passengers were becoming excited as they prepared to view their new homeland in the early morning. But LOCH ARD was running into a fog which greatly reduced visibility. Captain Gibbs was becoming anxious as there was no sign of land or the Cape Otway lighthouse. At 4am the fog lifted. A man aloft announced that he could see breakers. The sheer cliffs of Victoria's west coast came into view, and Captain Gibbs realised that the ship was much closer to them than expected. He ordered as much sail to be set as time would permit and then attempted to steer the vessel out to sea. On coming head on into the wind, the ship lost momentum, the sails fell limp and LOCH ARD's bow swung back. Gibbs then ordered the anchors to be released in an attempt to hold its position. The anchors sank some 50 fathoms - but did not hold. By this time LOCH ARD was among the breakers and the tall cliffs of Mutton Bird Island rose behind the ship. Just half a mile from the coast, the ship's bow was suddenly pulled around by the anchor. The captain tried to tack out to sea, but the ship struck a reef at the base of Mutton Bird Island, near Port Campbell. Waves broke over the ship and the top deck was loosened from the hull. The masts and rigging came crashing down knocking passengers and crew overboard. When a lifeboat was finally launched, it crashed into the side of LOCH ARD and capsized. Tom Pearce, who had launched the boat, managed to cling to its overturned hull and shelter beneath it. He drifted out to sea and then on the flood tide came into what is now known as LOCH ARD Gorge. He swam to shore, bruised and dazed, and found a cave in which to shelter. Some of the crew stayed below deck to shelter from the falling rigging but drowned when the ship slipped off the reef into deeper water. Eva Carmichael had raced onto deck to find out what was happening only to be confronted by towering cliffs looming above the stricken ship. In all the chaos, Captain Gibbs grabbed Eva and said, "If you are saved Eva, let my dear wife know that I died like a sailor". That was the last Eva Carmichael saw of the captain. She was swept off the ship by a huge wave. Eva saw Tom Pearce on a small rocky beach and yelled to attract his attention. He dived in and swam to the exhausted woman and dragged her to shore. He took her to the cave and broke open case of brandy which had washed up on the beach. He opened a bottle to revive the unconscious woman. A few hours later Tom scaled a cliff in search of help. He followed hoof prints and came by chance upon two men from nearby Glenample Station three and a half miles away. In a state of exhaustion, he told the men of the tragedy. Tom returned to the gorge while the two men rode back to the station to get help. By the time they reached LOCH ARD Gorge, it was cold and dark. The two shipwreck survivors were taken to Glenample Station to recover. Eva stayed at the station for six weeks before returning to Ireland, this time by steamship. In Melbourne, Tom Pearce received a hero's welcome. He was presented with the first gold medal of the Royal Humane Society of Victoria and a £1000 cheque from the Victorian Government. Concerts were performed to honour the young man's bravery and to raise money for those who lost family in the LOCH ARD disaster. Of the 54 crew members and passengers on board, only two survived: the apprentice, Tom Pearce and the young woman passenger, Eva Carmichael, who lost all of her family in the tragedy. Ten days after the LOCH ARD tragedy, salvage rights to the wreck were sold at auction for £2,120. Cargo valued at £3,000 was salvaged and placed on the beach, but most washed back into the sea when another storm developed. The wreck of LOCH ARD still lies at the base of Mutton Bird Island. Much of the cargo has now been salvaged and some was washed up into what is now known as LOCH ARD Gorge. Cargo and artefacts have also been illegally salvaged over many years before protective legislation was introduced. One of the most unlikely pieces of cargo to have survived the shipwreck was a Minton porcelain peacock - one of only seven in the world. The peacock was destined for the Melbourne International Exhibition in 1880. It had been well packed, which gave it adequate protection during the violent storm. Today, the Minton peacock can be seen at the Flagstaff Hill Maritime Museum in Warrnambool. From Australia's most dramatic shipwreck it has now become Australia's most valuable shipwreck artefact and is one of very few 'objects' on the Victorian State Heritage Register. The LOCH ARD shipwreck is of State significance – Victorian Heritage Register S 417. Flagstaff Hill’s collection of artefacts from LOCH ARD is significant for being one of the largest collections of artefacts from this shipwreck in Victoria. It is significant for its association with the shipwreck, which is on the Victorian Heritage Register (VHR S417). The collection is significant because of the relationship between the objects, as together they have a high potential to interpret the story of the LOCH ARD. The LOCH ARD collection is archaeologically significant as the remains of a large international passenger and cargo ship. The LOCH ARD collection is historically significant for representing aspects of Victoria’s shipping history and its potential to interpret sub-theme 1.5 of Victoria’s Framework of Historical Themes (living with natural processes). The collection is also historically significant for its association with the LOCH ARD, which was one of the worst and best known shipwrecks in Victoria’s history. Unrestored tea spoon from the wreck of the LOCH ARD. The spoon design has a flattened fiddle-back handle, with a thin stem or shank, flared collar, and elongated bowl. The spoons metallic composition is a thin layer of brass alloy which has partially corroded back to a nickel-silver base metal. Approximately 30% of original electroplating remains, with some verdigris. Outlines of five makers marks are visible on lower rear of handle (Crown, Ellipse, Rounded Square, Circle, Diamond), but interior details are unclear.flagstaff hill maritime museum, shipwreck coast, loch line, loch ard, mutton bird island, loch ard gorge, electroplated cutlery, loch ard shipwreck, nickel silver, william page & co, birmingham, brass plating, makers marks -
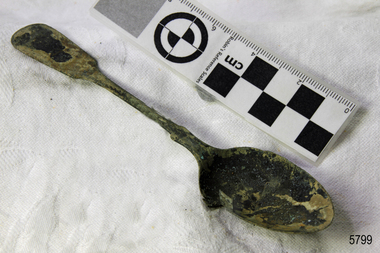 Flagstaff Hill Maritime Museum and Village
Domestic object - Spoon, c.1878
This tea spoon is from the wreck of the LOCH ARD, a Loch Line ship of 1,693 tons which sailed from Gravesend, London, on 2 March 1878 with 17 passengers and a crew of 36 under Captain George Gibbs. “The intention was to discharge cargo in Melbourne, before returning to London via the Horn with wool and wheat”. Instead, on 1 June 1878, after 90 days at sea, she struck the sandstone cliffs of Mutton Bird Island on the south west coast of Victoria, and sank with the loss of 52 lives and all her cargo. The manifest of the LOCH ARD listed an array of manufactured goods and bulk metals being exported to the Colony of Victoria, with a declared value of £53,700. (202 bills of lading show an actual invoice value of £68, 456, with insurance underwriting to £30,000 of all cargo). Included in the manifest is the item of “Tin hardware & cutlery £7,530”. This teaspoon is one of 482 similar items of electro-plated cutlery from the LOCH ARD site, comprising spoons and forks of various sizes but all sharing the same general shape or design and metallic composition. 49 of these pieces display a legible makers’ mark — the initials “W” and “P” placed within a raised diamond outline, which is in turn contained within a sunken crown shape — identifying the manufacturer as William Page & Co of Birmingham. An electroplater’s makers’ marks, unlike sterling silver hallmarks, are not consistent identifiers of quality or date and place of manufacture. A similar line of five impressions was usually made to impress the consumer with an implication of industry standards, but what each one actually signified was not regulated and so they varied according to the whim of the individual foundry. In this case, the maker’s marks are often obscured by sedimentary accretion or removed by corrosion after a century of submersion in the ocean. However sufficient detail has survived to indicate that these samples of electro-plated cutlery probably originated from the same consignment in the LOCH ARD’s cargo. The following descriptions of maker’s marks are drawn from 255 tea spoons, 125 dessert spoons, and 99 table forks. These marks are clearly visible in 66 instances, while the same sequence of general outlines, or depression shapes, is discernible in another 166 examples. 1. A recessed Crown containing a raised Diamond outline and the initials “W” and “P” (the recognised trademark of William Page & Co) 2. An impressed Ellipse containing a raised, pivoted, Triangle in its lower part and bearing a Resurrection Cross on its upper section (a possible dissenting church symbol reflecting religious affiliation); OR a rounded Square impression containing a raised, ‘lazy’, letter “B” (possibly mimicking sterling silver hallmark signifying city of manufacture i.e. Birmingham) 3. An impressed rounded Square filled with a raised Maltese Cross (the base metal composite of nickel silver was also known as ‘German silver’ after its Berlin inventors in 1823) 4. A recessed Circle containing a Crab or Scarab Beetle image; OR a recessed Circle containing a rotated ‘fleur de lys’ or ‘fasces’ design 5. A depressed Diamond shape enclosing a large raised letter “R” and a small raised letter “D” (mimicking the U.K. Patent Office stamp which abbreviated the term ‘registered’ to “RD”, but also included date and class of patent) Suggested trade names for William Page & Co’s particular blend of brass plating are ‘roman silver’ or ‘silverite’. This copper alloy polishes to a lustrous gold when new, discolouring to a murky grey with greenish hue when neglected. HISTORY OF THE LOCH ARD The LOCH ARD belonged to the famous Loch Line which sailed many ships from England to Australia. Built in Glasgow by Barclay, Curdle and Co. in 1873, the LOCH ARD was a three-masted square rigged iron sailing ship. The ship measured 262ft 7" (79.87m) in length, 38ft (11.58m) in width, 23ft (7m) in depth and had a gross tonnage of 1693 tons. The LOCH ARD's main mast measured a massive 150ft (45.7m) in height. LOCH ARD made three trips to Australia and one trip to Calcutta before its final voyage. LOCH ARD left England on March 2, 1878, under the command of Captain Gibbs, a newly married, 29 year old. She was bound for Melbourne with a crew of 37, plus 17 passengers and a load of cargo. The general cargo reflected the affluence of Melbourne at the time. On board were straw hats, umbrella, perfumes, clay pipes, pianos, clocks, confectionary, linen and candles, as well as a heavier load of railway irons, cement, lead and copper. There were items included that intended for display in the Melbourne International Exhibition in 1880. The voyage to Port Phillip was long but uneventful. At 3am on June 1, 1878, Captain Gibbs was expecting to see land and the passengers were becoming excited as they prepared to view their new homeland in the early morning. But LOCH ARD was running into a fog which greatly reduced visibility. Captain Gibbs was becoming anxious as there was no sign of land or the Cape Otway lighthouse. At 4am the fog lifted. A man aloft announced that he could see breakers. The sheer cliffs of Victoria's west coast came into view, and Captain Gibbs realised that the ship was much closer to them than expected. He ordered as much sail to be set as time would permit and then attempted to steer the vessel out to sea. On coming head on into the wind, the ship lost momentum, the sails fell limp and LOCH ARD's bow swung back. Gibbs then ordered the anchors to be released in an attempt to hold its position. The anchors sank some 50 fathoms - but did not hold. By this time LOCH ARD was among the breakers and the tall cliffs of Mutton Bird Island rose behind the ship. Just half a mile from the coast, the ship's bow was suddenly pulled around by the anchor. The captain tried to tack out to sea, but the ship struck a reef at the base of Mutton Bird Island, near Port Campbell. Waves broke over the ship and the top deck was loosened from the hull. The masts and rigging came crashing down knocking passengers and crew overboard. When a lifeboat was finally launched, it crashed into the side of LOCH ARD and capsized. Tom Pearce, who had launched the boat, managed to cling to its overturned hull and shelter beneath it. He drifted out to sea and then on the flood tide came into what is now known as LOCH ARD Gorge. He swam to shore, bruised and dazed, and found a cave in which to shelter. Some of the crew stayed below deck to shelter from the falling rigging but drowned when the ship slipped off the reef into deeper water. Eva Carmichael had raced onto deck to find out what was happening only to be confronted by towering cliffs looming above the stricken ship. In all the chaos, Captain Gibbs grabbed Eva and said, "If you are saved Eva, let my dear wife know that I died like a sailor". That was the last Eva Carmichael saw of the captain. She was swept off the ship by a huge wave. Eva saw Tom Pearce on a small rocky beach and yelled to attract his attention. He dived in and swam to the exhausted woman and dragged her to shore. He took her to the cave and broke open case of brandy which had washed up on the beach. He opened a bottle to revive the unconscious woman. A few hours later Tom scaled a cliff in search of help. He followed hoof prints and came by chance upon two men from nearby Glenample Station three and a half miles away. In a state of exhaustion, he told the men of the tragedy. Tom returned to the gorge while the two men rode back to the station to get help. By the time they reached LOCH ARD Gorge, it was cold and dark. The two shipwreck survivors were taken to Glenample Station to recover. Eva stayed at the station for six weeks before returning to Ireland, this time by steamship. In Melbourne, Tom Pearce received a hero's welcome. He was presented with the first gold medal of the Royal Humane Society of Victoria and a £1000 cheque from the Victorian Government. Concerts were performed to honour the young man's bravery and to raise money for those who lost family in the LOCH ARD disaster. Of the 54 crew members and passengers on board, only two survived: the apprentice, Tom Pearce and the young woman passenger, Eva Carmichael, who lost all of her family in the tragedy. Ten days after the LOCH ARD tragedy, salvage rights to the wreck were sold at auction for £2,120. Cargo valued at £3,000 was salvaged and placed on the beach, but most washed back into the sea when another storm developed. The wreck of LOCH ARD still lies at the base of Mutton Bird Island. Much of the cargo has now been salvaged and some was washed up into what is now known as LOCH ARD Gorge. Cargo and artefacts have also been illegally salvaged over many years before protective legislation was introduced. One of the most unlikely pieces of cargo to have survived the shipwreck was a Minton porcelain peacock - one of only seven in the world. The peacock was destined for the Melbourne International Exhibition in 1880. It had been well packed, which gave it adequate protection during the violent storm. Today, the Minton peacock can be seen at the Flagstaff Hill Maritime Museum in Warrnambool. From Australia's most dramatic shipwreck it has now become Australia's most valuable shipwreck artefact and is one of very few 'objects' on the Victorian State Heritage Register. The LOCH ARD shipwreck is of State significance – Victorian Heritage Register S 417. Flagstaff Hill’s collection of artefacts from LOCH ARD is significant for being one of the largest collections of artefacts from this shipwreck in Victoria. It is significant for its association with the shipwreck, which is on the Victorian Heritage Register (VHR S417). The collection is significant because of the relationship between the objects, as together they have a high potential to interpret the story of the LOCH ARD. The LOCH ARD collection is archaeologically significant as the remains of a large international passenger and cargo ship. The LOCH ARD collection is historically significant for representing aspects of Victoria’s shipping history and its potential to interpret sub-theme 1.5 of Victoria’s Framework of Historical Themes (living with natural processes). The collection is also historically significant for its association with the LOCH ARD, which was one of the worst and best known shipwrecks in Victoria’s history. Unrestored tea spoon from the wreck of the LOCH ARD. The spoon design has a flattened fiddle-back handle, with a thin stem or shank, flared collar, and elongated bowl. The spoons metallic composition is a thin layer of brass alloy which has partially corroded back to a nickel-silver base metal. Approximately 70% of original electroplating survives, with some verdigris. Spoon has cracked bowl. Outlines of five makers marks are visible (Crown, Ellipse, Circle, Circle, Diamond) but detail is not legible.flagstaff hill maritime museum, shipwreck coast, great ocean road, loch line, loch ard, mutton bird island, loch ard gorge, electroplated cutlery, nickel silver, william page and company, birmingham brass plating, makers marks -
 Flagstaff Hill Maritime Museum and Village
Domestic object - Spoon, c.1878
This tea spoon is from the wreck of the LOCH ARD, a Loch Line ship of 1,693 tons which sailed from Gravesend, London, on 2 March 1878 with 17 passengers and a crew of 36 under Captain George Gibbs. “The intention was to discharge cargo in Melbourne, before returning to London via the Horn with wool and wheat”. Instead, on 1 June 1878, after 90 days at sea, she struck the sandstone cliffs of Mutton Bird Island on the south west coast of Victoria, and sank with the loss of 52 lives and all her cargo. The manifest of the LOCH ARD listed an array of manufactured goods and bulk metals being exported to the Colony of Victoria, with a declared value of £53,700. (202 bills of lading show an actual invoice value of £68, 456, with insurance underwriting to £30,000 of all cargo). Included in the manifest is the item of “Tin hardware & cutlery £7,530”. This teaspoon is one of 482 similar items of electro-plated cutlery from the LOCH ARD site, comprising spoons and forks of various sizes but all sharing the same general shape or design and metallic composition. 49 of these pieces display a legible makers’ mark — the initials “W” and “P” placed within a raised diamond outline, which is in turn contained within a sunken crown shape — identifying the manufacturer as William Page & Co of Birmingham. An electroplater’s makers’ marks, unlike sterling silver hallmarks, are not consistent identifiers of quality or date and place of manufacture. A similar line of five impressions was usually made to impress the consumer with an implication of industry standards, but what each one actually signified was not regulated and so they varied according to the whim of the individual foundry. In this case, the maker’s marks are often obscured by sedimentary accretion or removed by corrosion after a century of submersion in the ocean. However sufficient detail has survived to indicate that these samples of electro-plated cutlery probably originated from the same consignment in the LOCH ARD’s cargo. The following descriptions of maker’s marks are drawn from 255 tea spoons, 125 dessert spoons, and 99 table forks. These marks are clearly visible in 66 instances, while the same sequence of general outlines, or depression shapes, is discernible in another 166 examples. 1. A recessed Crown containing a raised Diamond outline and the initials “W” and “P” (the recognised trademark of William Page & Co) 2. An impressed Ellipse containing a raised, pivoted, Triangle in its lower part and bearing a Resurrection Cross on its upper section (a possible dissenting church symbol reflecting religious affiliation); OR a rounded Square impression containing a raised, ‘lazy’, letter “B” (possibly mimicking sterling silver hallmark signifying city of manufacture i.e. Birmingham) 3. An impressed rounded Square filled with a raised Maltese Cross (the base metal composite of nickel silver was also known as ‘German silver’ after its Berlin inventors in 1823) 4. A recessed Circle containing a Crab or Scarab Beetle image; OR a recessed Circle containing a rotated ‘fleur de lys’ or ‘fasces’ design 5. A depressed Diamond shape enclosing a large raised letter “R” and a small raised letter “D” (mimicking the U.K. Patent Office stamp which abbreviated the term ‘registered’ to “RD”, but also included date and class of patent) Suggested trade names for William Page & Co’s particular blend of brass plating are ‘roman silver’ or ‘silverite’. This copper alloy polishes to a lustrous gold when new, discolouring to a murky grey with greenish hue when neglected. HISTORY OF THE LOCH ARD The LOCH ARD belonged to the famous Loch Line which sailed many ships from England to Australia. Built in Glasgow by Barclay, Curdle and Co. in 1873, the LOCH ARD was a three-masted square rigged iron sailing ship. The ship measured 262ft 7" (79.87m) in length, 38ft (11.58m) in width, 23ft (7m) in depth and had a gross tonnage of 1693 tons. The LOCH ARD's main mast measured a massive 150ft (45.7m) in height. LOCH ARD made three trips to Australia and one trip to Calcutta before its final voyage. LOCH ARD left England on March 2, 1878, under the command of Captain Gibbs, a newly married, 29 year old. She was bound for Melbourne with a crew of 37, plus 17 passengers and a load of cargo. The general cargo reflected the affluence of Melbourne at the time. On board were straw hats, umbrella, perfumes, clay pipes, pianos, clocks, confectionary, linen and candles, as well as a heavier load of railway irons, cement, lead and copper. There were items included that intended for display in the Melbourne International Exhibition in 1880. The voyage to Port Phillip was long but uneventful. At 3am on June 1, 1878, Captain Gibbs was expecting to see land and the passengers were becoming excited as they prepared to view their new homeland in the early morning. But LOCH ARD was running into a fog which greatly reduced visibility. Captain Gibbs was becoming anxious as there was no sign of land or the Cape Otway lighthouse. At 4am the fog lifted. A man aloft announced that he could see breakers. The sheer cliffs of Victoria's west coast came into view, and Captain Gibbs realised that the ship was much closer to them than expected. He ordered as much sail to be set as time would permit and then attempted to steer the vessel out to sea. On coming head on into the wind, the ship lost momentum, the sails fell limp and LOCH ARD's bow swung back. Gibbs then ordered the anchors to be released in an attempt to hold its position. The anchors sank some 50 fathoms - but did not hold. By this time LOCH ARD was among the breakers and the tall cliffs of Mutton Bird Island rose behind the ship. Just half a mile from the coast, the ship's bow was suddenly pulled around by the anchor. The captain tried to tack out to sea, but the ship struck a reef at the base of Mutton Bird Island, near Port Campbell. Waves broke over the ship and the top deck was loosened from the hull. The masts and rigging came crashing down knocking passengers and crew overboard. When a lifeboat was finally launched, it crashed into the side of LOCH ARD and capsized. Tom Pearce, who had launched the boat, managed to cling to its overturned hull and shelter beneath it. He drifted out to sea and then on the flood tide came into what is now known as LOCH ARD Gorge. He swam to shore, bruised and dazed, and found a cave in which to shelter. Some of the crew stayed below deck to shelter from the falling rigging but drowned when the ship slipped off the reef into deeper water. Eva Carmichael had raced onto deck to find out what was happening only to be confronted by towering cliffs looming above the stricken ship. In all the chaos, Captain Gibbs grabbed Eva and said, "If you are saved Eva, let my dear wife know that I died like a sailor". That was the last Eva Carmichael saw of the captain. She was swept off the ship by a huge wave. Eva saw Tom Pearce on a small rocky beach and yelled to attract his attention. He dived in and swam to the exhausted woman and dragged her to shore. He took her to the cave and broke open case of brandy which had washed up on the beach. He opened a bottle to revive the unconscious woman. A few hours later Tom scaled a cliff in search of help. He followed hoof prints and came by chance upon two men from nearby Glenample Station three and a half miles away. In a state of exhaustion, he told the men of the tragedy. Tom returned to the gorge while the two men rode back to the station to get help. By the time they reached LOCH ARD Gorge, it was cold and dark. The two shipwreck survivors were taken to Glenample Station to recover. Eva stayed at the station for six weeks before returning to Ireland, this time by steamship. In Melbourne, Tom Pearce received a hero's welcome. He was presented with the first gold medal of the Royal Humane Society of Victoria and a £1000 cheque from the Victorian Government. Concerts were performed to honour the young man's bravery and to raise money for those who lost family in the LOCH ARD disaster. Of the 54 crew members and passengers on board, only two survived: the apprentice, Tom Pearce and the young woman passenger, Eva Carmichael, who lost all of her family in the tragedy. Ten days after the LOCH ARD tragedy, salvage rights to the wreck were sold at auction for £2,120. Cargo valued at £3,000 was salvaged and placed on the beach, but most washed back into the sea when another storm developed. The wreck of LOCH ARD still lies at the base of Mutton Bird Island. Much of the cargo has now been salvaged and some was washed up into what is now known as LOCH ARD Gorge. Cargo and artefacts have also been illegally salvaged over many years before protective legislation was introduced. One of the most unlikely pieces of cargo to have survived the shipwreck was a Minton porcelain peacock - one of only seven in the world. The peacock was destined for the Melbourne International Exhibition in 1880. It had been well packed, which gave it adequate protection during the violent storm. Today, the Minton peacock can be seen at the Flagstaff Hill Maritime Museum in Warrnambool. From Australia's most dramatic shipwreck it has now become Australia's most valuable shipwreck artefact and is one of very few 'objects' on the Victorian State Heritage Register. The LOCH ARD shipwreck is of State significance – Victorian Heritage Register S 417. Flagstaff Hill’s collection of artefacts from LOCH ARD is significant for being one of the largest collections of artefacts from this shipwreck in Victoria. It is significant for its association with the shipwreck, which is on the Victorian Heritage Register (VHR S417). The collection is significant because of the relationship between the objects, as together they have a high potential to interpret the story of the LOCH ARD. The LOCH ARD collection is archaeologically significant as the remains of a large international passenger and cargo ship. The LOCH ARD collection is historically significant for representing aspects of Victoria’s shipping history and its potential to interpret sub-theme 1.5 of Victoria’s Framework of Historical Themes (living with natural processes). The collection is also historically significant for its association with the LOCH ARD, which was one of the worst and best known shipwrecks in Victoria’s history. Unrestored tea spoon from the wreck of the LOCH ARD. The spoon design has a flattened fiddle-back handle, with a thin stem or shank, flared collar, and elongated bowl. The spoons metallic composition is a thin layer of brass alloy which has partially corroded back to a nickel-silver base metal. Approximately 60% of original electroplating survives, with some verdigris. Plain heraldic shield on upper rear of bowl and outlines of five makers marks (Crown, Circle, Circle, Circle, Diamond) on lower rear of handle.flagstaff hill maritime museum, shipwreck coast, great ocean road, loch line, loch ard, loch ard gorge, electroplated cutlery, loch ard, nickel silver, william page and company, birmingham brass plating, makers marks, tea spoons -
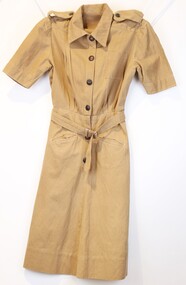 Shepparton RSL Sub Branch
Uniform, Dress, C. 1940s
This dress belonged to Dorothy May Mortlock (VF518245), who served as a Sapper with the Australian Women’s Army Service from 27 July 1945 to 1 August 1946.Light brown coloured woven cotton dress with button-up front secured by 6 metal buttons. Dress constructed of a skirt element attached to a short sleeve shirt-style torso section, a hook and eye sits on interior of two sections to fasten left and right sides together. One square topstitched pocket on the left chest and two angled hip pockets on front. Fabric belt with metal buckle held in place by fabric loops on both left and right side. Fabric epaulette passes through loop on both left and right side and secured with metal button. Two loops on interior left and right shoulders, left loop with inscription; woven label stitched to interior left side underneath which is a stamped motif.Ink inscription on interior loop difficult to read, “VF518245” and 5-6 indiscernible characters. Button reads “AUSTRALIAN MILITARY FORCES” below an embossed image of Australia with the King George V crown on top. Stamped motif reads “[broad arrow]/S.D.”women, wwii, world war two, second world war, australian womens army service, awas -
Frankston RSL Sub Branch
Cup, Invalid
Plain white china feeding cup, provided with a handle and pouring spout at right angles to each other. There is a scalloped half-cover over the cup to prevent spillage. A Red Cross symbol, surrounded by a solid red circle, is located on the top. Used in hospitals for feeding invalid or bed-ridden patients.This cup has a Red Cross symbol on the upper surface. The underside of the cup has the following imprint: "MADE IN ENGLAND", "EMPIRE WORKS", "STOKE on TRENT" beneath a symbol of a crown which is beneath "E. P. Co.". The cup is also is impressed with the word "ENGLAND". -
Dutch Australian Heritage Centre Victoria
Coat of arms for a sports club, Heraldische Wapen Industrie (Heraldic Coat of Arms Industry) "Hooymayers", Koninklijke Nederlandsche Cricket Bond - 1883 (Royal Dutch Cricket Association), late 20th century
The 1883 date refers to the establishment of the Royal Dutch Cricket Association. Represents a link between Anglo-Dutch sporting connections.Small brown wooden shield with a plastic medallion in black, yellow and gold.Circular medallion displaying two crossed cricket bats in front of a wicket with a crown above them. Below this is the date "1883" and along the bottom half is the name of the association. Rear has a mounting hole. On back of shield is a sticker which names the manufacturer of the shield. -
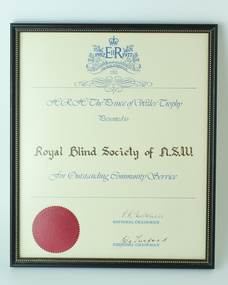 Vision Australia
Certificate - Text, H.R.H. The Prince of Wales Trophy to Royal Blind Society of N.S.W, 1977
In 1977 the Royal Blind Society of New South Wales was awarded the HRH The Prince of Wales trophy for outstanding community service. The certificate was signed by P.R. Mitchell (National Chairman) and Reg Lusford (Regional Chairman).1 cream page with seal of Queens Silver Jubilee TrustAt the head of the page: the Royal crown then below a spray of flowers sit either side of the initials "ER II" and the dates "1952" and "1977" amongst the flowers. Beneath that reads "The Queens Elizabeth Silver Jubilee Trust for Young Australians". All text and illustrations are in blue.royal blind society of nsw, awards -
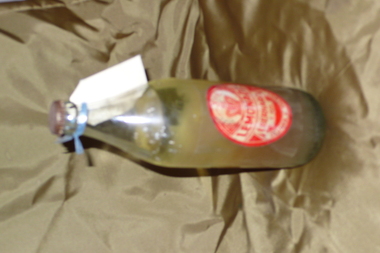 Clunes Museum
Container - BOTTLE, EBERHARD & CO. CLUNES
CLEAR BOTTLE OF EBERHARD & CO LEMONADE WITH CONTENTSLABEL : DEPOSIT 3D REFUNDED WITH THIS LABEL ATTACHED LEMONADE EBERHARD & CO CLUNES & TALBOT BOTTLE : THIS BOTTLE REMAINS THE PROPERTY OF EBERHARD & CO CLUNES EBERHARD & CO (CROWN SYMBOL) CLUNES & TALBOT BOTTOM : 225 28 ISM - 157 (MAKERS SYMBOL)eberhard & co, lemonadebottle -
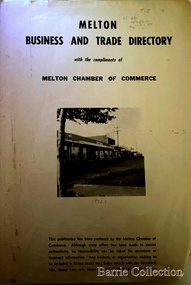 Melton City Libraries
Booklet, Melton Business and Trade Directory, c.1965
BUSINESS TRADE AND DIRECTORY MAP NORTH of High Street RALIEGHS Road - Early settlers Oliver Reierson ( Norwegian) Raliegh SHEBLER Court Auguste EMIL Court Jongebloed Family residence “Hemlich” ALEXANDRA Street Coronation King, Queen Alexandra - 1903 O’NEILS Road Farmer OLDERSHAW Road CORR Grove Early landowner, Teacher at the Common School – Denominational Churches, 1850’s Wesleyan (Methodist) BRYAN Court 1850’s resident renamed from earliest town site - Flat HURLEY Street Early settler and farmers - CHESNEY Road was named Minns, due to duplication altered to Chesney (Minns) SOUTH of High ALKEMADE Drive. Family name ARNOLD Court Family BARRIES Road Charles Ernest Barrie “Darlingsford” 1911 Residence KILPATRICKS Road became Barries Road west of Station Road BLACKWOOD Drive Alexander, Early settler CALLANAN Drive Surveyor early LUBY Court John Luby - Crown Grant Land title KERWIN Street Michael - Crown Grant land title (deleted due to Freeway)Pamphlet of Melton Businesses and map of the townlocal identities, misc., council -
Greensborough Historical Society
Article, The Willis Diary by Anne Paul. Based on A Pioneer Squatter's Life, 09/04/1837o
The Willis Diary by GHS member Anne Paul is based on A Pioneer Squatter's Life (Item158). The Willis family were early settlers at Lower Plenty, just near where the hotel and old bridge are today. Anne has reviewed and analysed this chapter from Historical Records of Victoria, Vol. 6. The Crown, the land, and the squatter, 1835-1840. She includes further information on the Willis family and photographs of the archaeological dig at the Bridge Inn Hotel Mernda in 2017.Diary of James L Willis from 1837, portraying hardships suffered in the young colony of Victoria.15 page, text and colour illustrations. Digital copy.willis family, plenty river, lower plenty, james willis, bridge inn hotel mernda -
Greensborough Historical Society
Article, A Squatter's life on the Plenty River at 'Wanstead' by Anne Paul, 09/04/1837o
The Willis Diary by GHS member Anne Paul is based on A Pioneer Squatter's Life (Item158). The Willis family were early settlers at Lower Plenty, just near where the hotel and old bridge are today. Anne has reviewed and analysed this chapter from Historical Records of Victoria, Vol. 6. The Crown, the land, and the squatter, 1835-1840. She includes further information on the Willis family and photographs of the archaeological dig at the Bridge Inn Hotel Mernda in 2017.Diary of James L Willis from 1837, portraying hardships suffered in the young colony of Victoria.10 pages, text and colour illustrations. Abridged hard copy of item 4491.willis family, plenty river, lower plenty, james willis, bridge inn hotel mernda -
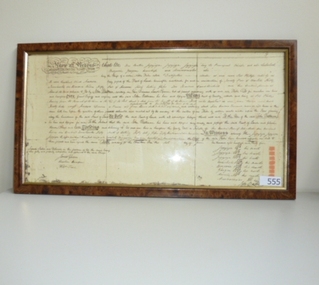 Greensborough Historical Society
Document (Framed), Batman's Treaty of Melbourne, 06/06/1835
John Batman recorded in his journal that he had signed a treaty with the local Aboriginal people, the Wurundjeri to buy 2,000 km of land around Melbourne and another 400 km around Geelong. In exchange he gave the eight chiefs whose marks he acquired on the treaty, a quantity of blankets, knives, tomahawks, scissors, looking-glasses, flour, handkerchiefs and shirts. Under British law, the treaty was legally invalid as the land belonged to the Crown, not to the Wurundjeri. Although the treaty was declared null and void by Governor Bourke within six months of John and Henry Batman and the Port Phillip Association organising this treaty, it remains an interesting part of Melbourne's early history. Copy of Batman's Treaty of Melbourne, 1835. Original hand written on parchment in triplicate. john batman, wurundjeri, treaty of melbourne, melbourne history, batman's treaty