Showing 151 items matching route 20
-
 Marysville & District Historical Society
Booklet (Item) - Information booklet, Artworkz Tourism, The Big Culvert, Unknown
An information booklet that was produced as a guide to The Big Culvert.An information booklet that was produced as a guide to The Big Culvert. The Big Culvert is a historic granite and bluestone arch along the Yarra Track, a major route to Melbourne through the 1800s. Built in 1870 and a major piece of infrastructure for its time, the heritage listed culvert allowed water to flow under often-flooded the road. The Yarra Track is the former name of the gold fields road from Healesville to the Woods Point and Jordan Goldfields, in Victoria, Australia. A direct route via the Yarra River and the Great Divide was discovered by Rieck in September 1862 and became known as the Yarra Track. Early in 1863, the Victorian Government decided to construct a 193-kilometre (120 mile) road along the route. Its original width varied between 4 and 6 metres (12 and 20 feet), and was designed to accommodate horse-drawn vehicles. The Track involved the climbing of the Black Spur, descent into the Acheron Valley, and then through Marysville to the Cumberland where it followed the existing route.the big culvert, yarra track, victoria, healesville, wood's point goldfields, jordan goldfields, black spur, acheron valley, cumberland valley -
Marysville & District Historical Society
Flyer (Item) - Information flyer, Artworkz Tourism, The Big Culvert, 26-03-2016
An information flyer that was produced as a guide to The Big Culvert.An information flyer that was produced as a guide to The Big Culvert. The Big Culvert is a historic granite and bluestone arch along the Yarra Track, a major route to Melbourne through the 1800s. Built in 1870 and a major piece of infrastructure for its time, the heritage listed culvert allowed water to flow under often-flooded the road. The Yarra Track is the former name of the gold fields road from Healesville to the Woods Point and Jordan Goldfields, in Victoria, Australia. A direct route via the Yarra River and the Great Divide was discovered by Rieck in September 1862 and became known as the Yarra Track. Early in 1863, the Victorian Government decided to construct a 193-kilometre (120 mile) road along the route. Its original width varied between 4 and 6 metres (12 and 20 feet), and was designed to accommodate horse-drawn vehicles. The Track involved the climbing of the Black Spur, descent into the Acheron Valley, and then through Marysville to the Cumberland where it followed the existing route.the big culvert, yarra track, victoria, healesville, wood's point goldfields, jordan goldfields, black spur, acheron valley, cumberland valley -
 Marysville & District Historical Society
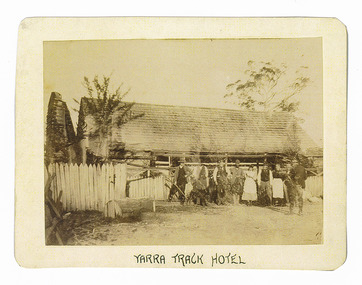
Photograph (Item) - Black and white photograph, Yarra Track Hotel, c1900
An early black and white photograph of a hotel along the Yarra Track.An early black and white photograph of a hotel along the Yarra Track. The Yarra Track is the former name of the gold fields road from Healesville to the Woods Point and Jordan Goldfields, in Victoria, Australia. A direct route via the Yarra River and the Great Divide was discovered by Rieck in September 1862 and became known as the Yarra Track. Early in 1863, the Victorian Government decided to construct a 193-kilometre (120 mile) road along the route. Its original width varied between 4 and 6 metres (12 and 20 feet), and was designed to accommodate horse-drawn vehicles. The Track involved the climbing of the Black Spur, descent into the Acheron Valley, and then through Marysville to the Cumberland where it followed the existing route. Unable to ascertain both the location and name of hotel.ARMSTRONG COLLECTION 42 STATION STREET/ SANDRINGHAM 3191/ TEL. (03) 9521 5442/ IAN M.L. ARMSTRONG OAMyarra track, healesville, wood's point, jordan goldfields, victoria, yarra river, great divide, reick, black spur, acheron valley, marysville, cumberland creek -
 Marysville & District Historical Society
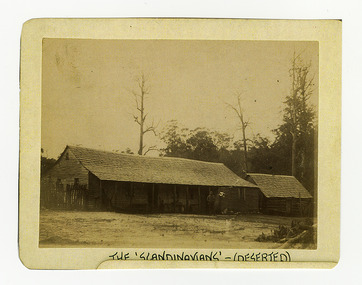
Photograph (Item) - Black and white photograph, The "Scandinavians' - (Deserted), c1900
An early black and white photograph of The Scandinavian's Hotel and Boarding House along the Yarra Track.An early black and white photograph of The Scandinavian's Hotel and Boarding House along the Yarra Track. The Yarra Track is the former name of the gold fields road from Healesville to the Woods Point and Jordan Goldfields, in Victoria, Australia. A direct route via the Yarra River and the Great Divide was discovered by Rieck in September 1862 and became known as the Yarra Track. Early in 1863, the Victorian Government decided to construct a 193-kilometre (120 mile) road along the route. Its original width varied between 4 and 6 metres (12 and 20 feet), and was designed to accommodate horse-drawn vehicles. The Track involved the climbing of the Black Spur, descent into the Acheron Valley, and then through Marysville to the Cumberland where it followed the existing route.ARMSTRONG COLLECTION 42 STATION STREET/ SANDRINGHAM 3191/ TEL. (03) 9521 5442/ IAN M.L. ARMSTRONG OAMthe scandinavians', yarra track, healesville, wood's point, jordan goldfields, victoria, yarra river, great divide, reick, black spur, acheron valley, marysville, cumberland creek -
 Marysville & District Historical Society
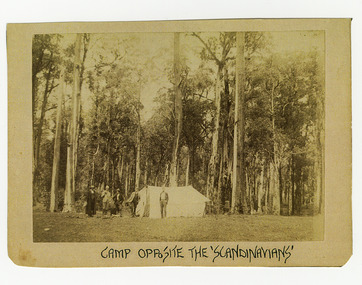
Photograph (Item) - Black and white photograph, Camp Opposite The "Scandinavians', c1900
An early black and white photograph of a camp which was opposite The Scandinavian's Hotel and Boarding House along the Yarra Track.An early black and white photograph of a camp which was opposite The Scandinavian's Hotel and Boarding House along the Yarra Track. The Yarra Track is the former name of the gold fields road from Healesville to the Woods Point and Jordan Goldfields, in Victoria, Australia. A direct route via the Yarra River and the Great Divide was discovered by Rieck in September 1862 and became known as the Yarra Track. Early in 1863, the Victorian Government decided to construct a 193-kilometre (120 mile) road along the route. Its original width varied between 4 and 6 metres (12 and 20 feet), and was designed to accommodate horse-drawn vehicles. The Track involved the climbing of the Black Spur, descent into the Acheron Valley, and then through Marysville to the Cumberland where it followed the existing route.ARMSTRONG COLLECTION 42 STATION STREET/ SANDRINGHAM 3191/ TEL. (03) 9521 5442/ IAN M.L. ARMSTRONG OAMthe scandinavians', yarra track, healesville, wood's point, jordan goldfields, victoria, yarra river, great divide, reick, black spur, acheron valley, marysville, cumberland creek -
 Marysville & District Historical Society
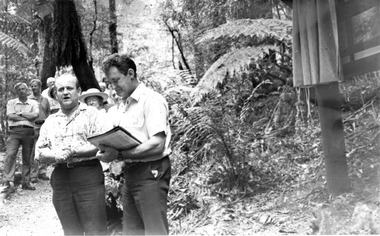
Photograph (Item) - Black and white photograph, Unknown
A black and white photograph taken at the unveiling of the sign placed at The Big Culvert.A black and white photograph taken at the unveiling of the sign placed at The Big Culvert. The Big Culvert is a historic granite and bluestone arch along the Yarra Track, a major route to Melbourne through the 1800s. Built in 1870 and a major piece of infrastructure for its time, the heritage listed culvert allowed water to flow under often-flooded the road. The Yarra Track is the former name of the gold fields road from Healesville to the Woods Point and Jordan Goldfields, in Victoria, Australia. A direct route via the Yarra River and the Great Divide was discovered by Rieck in September 1862 and became known as the Yarra Track. Early in 1863, the Victorian Government decided to construct a 193-kilometre (120 mile) road along the route. Its original width varied between 4 and 6 metres (12 and 20 feet), and was designed to accommodate horse-drawn vehicles. The Track involved the climbing of the Black Spur, descent into the Acheron Valley, and then through Marysville to the Cumberland where it followed the existing route.Unveiling of sign/ at "Big Culvert" In front Max Cockerrell and - Rear: second back Geoff Pope R.H.S. rear: Nancy "/ Anne "the big culvert, yarra track, victoria, healesville, wood's point goldfields, jordan goldfields, black spur, acheron valley, cumberland valley -
 Marysville & District Historical Society
Photograph (Item) - Colour photograph, 20-09-2008
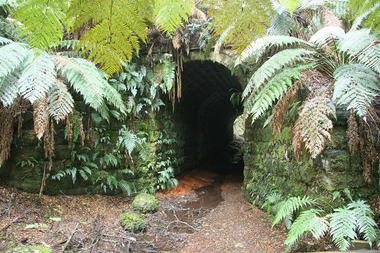
A colour photograph of the entrance to The Big Culvert.A colour photograph of the entrance to The Big Culvert. The Big Culvert is a historic granite and bluestone arch along the Yarra Track, a major route to Melbourne through the 1800s. Built in 1870 and a major piece of infrastructure for its time, the heritage listed culvert allowed water to flow under often-flooded the road. The Yarra Track is the former name of the gold fields road from Healesville to the Woods Point and Jordan Goldfields, in Victoria, Australia. A direct route via the Yarra River and the Great Divide was discovered by Rieck in September 1862 and became known as the Yarra Track. Early in 1863, the Victorian Government decided to construct a 193-kilometre (120 mile) road along the route. Its original width varied between 4 and 6 metres (12 and 20 feet), and was designed to accommodate horse-drawn vehicles. The Track involved the climbing of the Black Spur, descent into the Acheron Valley, and then through Marysville to the Cumberland where it followed the existing route.the big culvert, yarra track, victoria, healesville, wood's point goldfields, jordan goldfields, black spur, acheron valley, cumberland valley -
Ringwood and District Historical Society
Entry Form - Walkathon, Wal Elms, Hon Chairman, Walkathon Committee, Maroondah Hospital Family Walkathon records of entry and progress - 1971-72, 1971
Form for recording the entry and progress of a person in a family walkathon for the Maroondah Hospital. Qty 2. A map of the route is shown on the card and there is provision for about 20 sponsors. +Additional Keywords: Elms, Wal (Hon Chairman) / McGrath, Keith (Hon Sec) / Gough, Mrs -
 Mt Dandenong & District Historical Society Inc.
Photograph, Site of Kyeema Aircraft Crash, 1978
Woman looking down slope towards the actual site of the Kyeema aircraft crash which occurred on October 25th, 1938. The Douglas DC-2 Kyeema, operated by Australian National Airways, was en-route from Adelaide to Melbourne when it overshot Essendon Airport by 20 miles. Descending in thick cloud, it crashed into the western face of Mt Dandenong, killing all 18 occupants.air crash, kyeema, mt dandenong -
 Kew Historical Society Inc
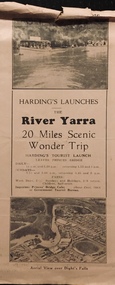
Flyer, Melbourne Ferries Pty Ltd, River Yarra: 20 Miles Scenic Wonder Trip
Bifold brochure including route map of the full 44 mile 'Wonder Trip' on pages 2 & 3. Photos used include an 'Aerial view over Dight's Falls', two ferries, and a 'Scene near Dight's Falls'.Flyer for Harding’s Launches on the River Yarra: 20 miles scenic wonder trip. Aerial view over Dight’s Falls on front. non-fictionBifold brochure including route map of the full 44 mile 'Wonder Trip' on pages 2 & 3. Photos used include an 'Aerial view over Dight's Falls', two ferries, and a 'Scene near Dight's Falls'.river yarra, melbourne ferries pty ltd, yarra river -- tourism, harding's cruises, christian-washfold collection -
 8th/13th Victorian Mounted Rifles Regimental Collection
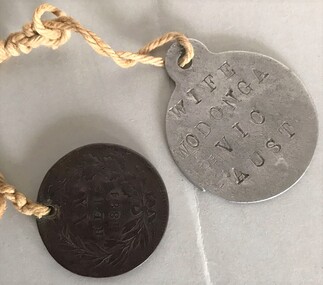
Badge - Identity disc Schleibs
Frederick August Schleibs a 44 year old farmer of Wodonga enlisted in AIF 30 March 1916 and was allocated to 2nd Pioneer Battalion with regimental number 2972. En route to England he was hospitalised at Cape Town with injured knee. He was returned to Australia and discharged 27 October 1916. He reenlisted 21 February 1917 and sailed with 28th Reinforcements 8th Light Horse to Egypt. He returned to Australia following the war. Unusual to see a foreign coin used as an identity disc.Soldiers identify disc set connected by string; one aluminium and one a Portuguese 20 Reis coin. Both are stamped with information relating to 3383 Frederick Augustus Schleibs who served with 8th Australian Light Horse in World War One.On aluminium disc "A F Schleibs / 3383 / 8LH / CE", and on reverse "Wife / Wadonga / Vic / Aust". On coin "FAS / 3383 / CE"schleibs, light horse, 8th, world war one, wwi, aif, pioneer, wodonga -
 Phillip Island and District Historical Society Inc.
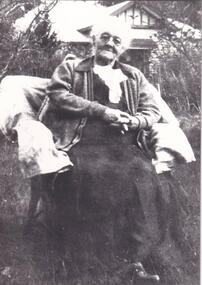
Photograph, Anderson Family, 1938
Wilhelmena, born 1856 on the ship "Wilhelmena" en route to Australia. Parents Robert and Margaret Anderson. Glen Isla was built in 1868 (added to in 1887-88) to become a Boarding House, run by Wilhelmena. Married James Young, became first Sewing Mistress at the Phillip Island School. died 20/09/1938.Wilhelmena Young seated in cane chair, covered with shawl. Home Glen Isla in background, shortly before her death.local history, photography, photographs, slides, film, wilhelmena young nee anderson, black & white photograph, mrs emma anderson jacobs -
 Warrnambool and District Historical Society Inc.
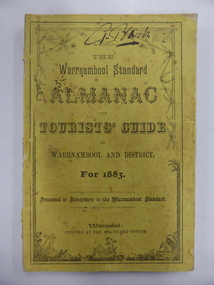
Book, Warrnambool Standard Almanac 1883, 1883
This booklet was given to subscribers to the Warrambool Standard newspaper as an almanac for the year 1883. These Standard almanacs were produced from 1875 to 1930. They contain much local information on Warrnambool and district about the businesses, government officials, schools, societies and organizations, harbour management, churches, banks etc. The Warrnambool Standard newspaper was established in 1872 and continues to this day. This booklet is of high significance as it contains much valuable information on Warrnambool and district for the year 1883. It is a very valuable research tool for those studying and writing the history of Warrnambool and district. The copy is signed ‘G. Barber’ and probably this refers to the son of George Barber, a well-known solicitor who opened a legal practice in Warrnambool in 1855. He died in 1879 and it appears that a member or members of his family went to live in the Maryborough area as this copy came into the collection of the Warrnambool and District Historical Society via the Midlands Historical Society. This is a soft cover booklet of 72 pages plus several pages of a gardener’s calendar and 20 pages of advertisements. The cover is yellow with black lettering and the spine is partly torn away. There is a fold-out page of the Western District’s railway and coach routes and the pages on the tourist’s guide to Warrnambool are printed in green. The booklet contains several black and white illustrations. There are several pages that are torn with parts of the pages missing. The front cover has the name of ‘G. Barber’ handwritten in black ink. ‘G. Barber’ warrnambool standard newspaper, history of warrnambool, standard almanac 1883, g barber solicitor -
 Eltham District Historical Society Inc
Negative - Photograph, Mail coach en route to Hurstbridge, c.1922
Coach with flaps takes aboard passengers. It travelled between Kinglake and Hurstbridge. The vehicle has advertising on the side indicating: W. BODY. HURSTBRIDGE bread and pastry. The Advertiser on 15 Sep 1922 has a display advertisement on page 2 indicating that Hurstbridge bakery 'W. Body wishes to notify the Public of Hurstbridge and surrounding district that he has purchased Mr Oliver's business'. The Advertiser, Friday 10 November 1922, page 2: Mr J. D. Chalmers, who runs the motor service from Hurstbridge to Kinglake, has just had a large, body built on a two-ton motor, which will be serviceable for either 25 passengers or general goods. The work was entrusted to Mr. D.G. Graham, motor and coach builder, Hurstbridge, who completed it within a month, the finish, painting, etc.. being quite up to the standard of a city shop. The mail coach operated the route between Kinglake and Hurstbridge motor route, on which Mr. Sharpe had pioneered and run a motor mail route with a bus which carried 20 passengers, for many years but Sharpe's license for his motor bus was refused by the Country Roads Board mid 1930 as his bus was considered too large . In February 1935, Mr Sharpe was granted a license to carry passengers between Hurstbridge and Kinglake and Mr Kell between Kinglake and Hurstbridge. In 1936 the mail contract from Heidelberg to Knglake was via car and members of the community were concerned that there was no further any conveyance of passengers from Hurstbridge to Kinglake.This photo forms part of a collection of photographs gathered by the Shire of Eltham for their centenary project book,"Pioneers and Painters: 100 years of the Shire of Eltham" by Alan Marshall (1971). The collection of over 500 images is held in partnership between Eltham District Historical Society and Yarra Plenty Regional Library (Eltham Library) and is now formally known as 'The Shire of Eltham Pioneers Photograph Collection.' It is significant in being the first community sourced collection representing the places and people of the Shire's first one hundred years.Digital image 4 x 5 inch B&W Neg 9 x 12.5 cm B&W printsepp, shire of eltham pioneers photograph collection, kinglake, mail coach, w. body, public transport, bus, bus travel, hurstbridge, pioneers and painters -
 Queenscliffe Maritime Museum
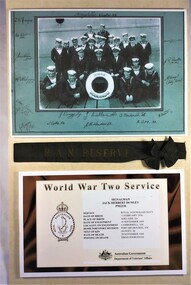
Uniform - Hat Band
In the evening of 20 November 1940, while en route from Queenscliff to Portsea in Port Phillip Bay where she intended to anchor for the evening, she collided with the 10,364 ton, outward bound passenger liner, MV Duntroon, which struck her amidships on the port side. Duntroon’s captain had believed that she was on a parallel course to Goorangai and overtaking her. By the time he realised Goorangai’s true course, with Duntroon travelling at more than 17 knots, it was too late to avoid the collision. Goorangai was cut in two and sank in less than a minute with the loss of her entire crew of 24. Just six bodies were recovered in subsequent salvage operations. She was the first ship lost by the RAN in World War II.This event is still remembered by the community at an annual ceremony in Queenscliffe. The hat band holds Victorian Heritage Register number S294 / 151982A hat band of Signalman Jack Herbert RAN mounted on a display board containing a copy of a signed photograph of the HMAS Goorangai ships company and an extract of his service record.hmas goorangai, mv duntroon, wwii, royal australian navy, port phillip -
Moorabbin Air Museum
Document (collection) - Simon Warrender Collection See items under Description
-
 Coal Creek Community Park & Museum
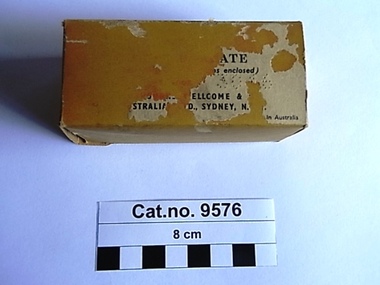
Box, cardboard, c.1937-1960
Trove : Advertised from 1937-1949 in various publications search under "Wellcome"' Calcium Borogluconate (yes with 2 'l's) . Victorian Government Gazette , no.2 Jan 5, 1960, page 16. List of Registered Stock Medicine. Registered Wholesale Dealer : Burroughs Wellcome and Co. (Aust) Ltd. Cressy Street, Rosebery New South Wales. Manufacturer, if other than the Wholesale Dealer - , Distinguishing Name of Stock Medicine : "Wellcome" Calcium Borogluconate, Approved Use or for the Treatment of : Milk Fever, hypocalcaemia. Rectangular faded pink cardboard box opening at both ends with the remnants of a paper label on one side, containing a folded paper leaflet and a cellophane bag containing white granules.Outer label '.....ATE .s enclosed)..........ELLCOME & .............STRALIA..D., SYDNEY, N....in Australia'. Impressed on one flap of box '132'. Printed leaflet (side one) Illustration of a unicorn, a thick black line under which text 'WELLCOME' brand CALCIUM BOROGLUCONATE (Vetinary)' followed by another thick black line. 'Calcium Borogluconate ia a stable , non-irritant calcium preparation for subcutaneous or intravenous injection in the treatment of milk fever and other forms of acute hypocalcaemia. It is available in the dry state as 'Wellcome' Calcium Borogluconate, a granular product in single dose containers of 2 1/2 oz. Milk Fever In the treatment of milk fever in cows, 21/2 oz. to 31/2 oz. of the granules should be injected subcutaneously at two or three points in the neck, with the usual aseptic precautions. The granules should be dissolved in 10 fl. oz. of boiling water, the solution allowed to boil for five minutes, then cooled to body temperature before administration. Repetition of the dose is very rarely necessary. Should a more rapid response be desired, the whole of the solution hay be given by slow intravenous injection; alternatively , the greater part of the solution may be injected by this route and the remainder given subcutaneously in the manner described above. A convenient apparatus for the controlled administration of large volumes of fluid (leaflet side two) is the 'Wellcome' Flutter Valve Injection Apparatus. Prophylaxis Recurrent attacks at successive parturitions may be prevented by giving calcium borogluconate immediately after calving and again about 20 hours later. Each dose should be from one or two ounces of 'Wellcome' Calcium Borogluconate, dissolved as directed above. Other Indications Certain other conditions have been found to respond readily to calcium borogluconate therapy. These include parturient hypocalcaemia or milk fever in ewes, parturient eclampsia in sows and bitches, so-called "staggers" in lactating dairy cattle suspected to be due to hypocalcaemia, and transit tetany in horses. The dosage for various species is generally within the ranges indicated below : horses and cattle 11/2 to 31/2 oz. Sheep, goats and pigs 1/2 oz. to 1 oz. Dogs 11/2 dr. to 3 dr. 'WELLCOME' brand CALCIUM BOROGLUCONATE A readily-soluble granular product issued in cartons of 21/2 oz.' Illustration of a unicorn, 'BURROUGHS WELLCOME & CO. (AUSTRALIA) LTD. (Incorporated in England) SYDNEY, N.S.W.' A black line 'ref.A5007g 54.1. 25' milk fever, hypocalcaemia, subcutaneous -
 Ballarat Tramway Museum
Slide - 35mm slide/s - set of 14, Noel Simons, 23/11/1962 12:00:00 AM
Set of 14 Kodachrome transparencies taken on 23/11/1962. 1162.1 - tram 38 turning into Lydiard St. North from Sturt St. with tram 20 in background. Many motor vehicles in photo. 1162.2 - as above, but a minute of so later. Has Mutual Life building in background as well as Town Hall. 1162.3 - No. 40 entering Albert St. from Skipton St. outbound to Sebastopol. 1162.4 - No. 40 near start of side of the road running in Albert St. heading to Sebastopol. 1162.5 - No. 40 at the City terminus, on the South side of Sturt St. Has Town Hall and other buildings along the south side of Sturt St. in the background. 1162.6 - No. 40 at Sebastopol terminus - shows arrangement of the signs at the terminus. 1162.7 - No. 40 and No. 38 crossing at loop between Sayle and Grey St. No. 40 inbound. 1162.8 - No. 40 turning from Drummond St. South to Sturt St. at Hospital Corner with Southern Cross Hotel in background. 1162.9 - No. 18 in Wendouree Parade near Forest St. heading east with destination of "Victoria St." 1162.10 - Nos 41 and 39 at Depot Junction. Both trams have SEC ads. 1162.11 - No. 39 turning into the depot from Wendouree Parade - showing destination of "Gardens via Drummond Nth" 1162.12- No. 17 at Lydiard St. North terminus, showing destination of "Grey St. Sebas". Has a Twin Lakes sign 1162.13 - ditto, but with trolley pole turned around. Has SEC Briquettes roof ad and Whitehorse whiskey ad on rear dash panel. 1162.14 - No. 40 outbound to Sebastopol crossing Albert St. 1162.1 -"Nos. 38 and 20 in Sturt St. Ballarat at corner of Lydiard St." 1162.2 - "No. 38 turns into Lydiard St. as No. 20 waits at stop in Sturt St. Ballarat" 1162.3 - "No. 40 entering Albert St. from Skipton St. Redan on Sebastopol route." 1162.4 - "No 40 at beginning of reserved track on Sebastopol route, Albert St. Redan." 1162.5 - "No. 40 in Sturt St. Ballarat near cnr. of Armstrong St." 1162.6 - "No. 40 at Sebastopol terminus" 1162.7 - "No. 38 and 40 crossing at Sayle St. Loop on Albert St. reserved track, Sebastopol route" 1162.8 - "No. 40 turning into Sturt St. from Drummond St." 1162.9 - "No. 18 in Wendouree Pde. Ballarat near tramway depot" 1162.10 - "No. 41 and 39 outside Ballarat tramway depot, Lake Wendouree in background" 1162.11 - "No. 39 entering tramway depot from Wendouree Parade, Ballarat" 1162.12 - "No 17 at Lydiard St. North terminus, Ballarat North" 1162.13 - "No 17 at Lydiard St. North terminus, Ballarat North" 1162.14 - "No. 40 crossing Albert St. Sebastopol as reserved track switches from left to right of road" All have date stamp of "23 Nov. 1962" in purple ink. All black ink unless otherwise noted.tramways, trams, ballarat, albert st., sturt st., sebastopol, grey st., hospital corner, wendouree parade, depot junction, lydiard st. north, tram 17, tram 18, tram 20, tram 38, tram 39, tram 40, tram 41 -
 Ballarat Tramway Museum
Slide - 35mm slide/s - set of 24, Noel Simons, 20/05/1971 12:00:00 AM
Set of 24 transparencies taken on 20/5/1971 on Kodak mounts. 1195.1 - Bendigo 19 arriving at Charing Cross en route to North Bendigo with Fountain Plaza and the City Family Hotel in the background. No. 19 has two roof ads for the SEC. -'Electricity better for cooking' and 'Everything's under control in my all electric kitchen' 1195.2 - as above, but standing at the Charing cross stop, with the Beehive Stores and other buildings along the east side of Pall Mall in the background. 1195.3 - No 21 ex Golden Square crossing View St. trackwork in front of No. 25 waiting to depart for Quarry Hill. No.21 has two roof ads (as for No.19 in 1195.1) and No.25 has one SEC roof ad and another. Ezywalkin sign in the background, and Fountain Plaza. 1195.4 - as for 1195.3, but after 21 has arrived and 25 left for Quarry Hill. Has Ezywalkin store and the Beehive store in the background. 1195.5 - No. 5 at the Eaglehawk terminus. Photo taken with a cannon in foreground looking along High St. Eaglehawk. Has shops on the west side of High St. in the background. 1195.6 - No. 5 at the Eaglehawk terminus, close up of the rear of the tram - note tow bar arrangement. Has destination of Quarry Hill. 1195.7-Nos.25 and 5 crossing at the Thorpe St. Loop, California Gully. No. 25 bound for Eaglehawk (has SEC Briquette and electric cooking roof ads) and 5 en route for Quarry Hill with a SEC and Cinzano roof ad. 1195.8 - as for 1195.7, but after trams have passed each other. Has Borough Auto Service building in the background. 1195.9 - No. 5 in Mt Korong Road, towards Bamard Street, photo taken after tram has passed photographer. 1195.10 - No. 30 at the Golden Square terminus with the Milk Bar on the right hand side of the photograph. 1195.11 - No. 30 inbound at Fire Station Loop, High St. Golden Square. Has old fire station in the background. Passengers are boarding the tramcar. 1195.12 - No. 30 in High St, bound for North Bendigo between Vine and Wattle Streets. 1195.13 - No. 5 bound for Eaglehawk waits at Iron Bark Gully Loop, at Hayes St. 1195.14 - No. 5 and No. 2 crossing at Iron Bark Gully Loop. 1195.15 - No. 5 bound for Eaglehawk leaving the Manchester Loop, Long gully. 1195.16 - No. 5 passing William Street, Long Gully en route to Eaglehawk. 1195.17 - No. 5 just before the California Gully Crossing Loop. 1195.18 - Nos. 5 and 26 crossing at California Gully crossing Loop. No. 5 heading to Eaglehawk, 26, Quarry Hill. 1195.19 - No. 5 in High St. Eaglehawk with Bob Moyle's Victoria Hotel and the TAB in the background. 1195.20 - No. 5 in High St. Eaglehawk approaching the terminus. Photo taken after the tram has passed the photographer. Has Foodland store and J. Best Fruit supply in the background, along with Eaglehawk Town Hall. 1195.21 - No. 5 at the Eaglehawk terminus, photo taken along seldom used track along High St. 1195.22 - as for 1195.22 - but at the very end of the track. 1195.23 - No. 5 en route for Quarry Hill climbs High St. Eaglehawk with the Victoria Hotel and Eaglehawk Town Hall in the background. 1195.24 - No. 5 and 25 crossing at Jobs Gully Loop. Note 25 has a black on white destination roll, while No. 5 has a white on black destination roll. Information written on in black ink and date stamped on purple ink. 1195.1 - "No. 19 arrives at Charing Cross Bendigo from Golden Square" 1195.2 - "No. 19 about to leave Charing Cross for North Bendigo" 1195.3 - "No. 25 awaiting departure for Quarry Hill, watches No. 21 arrive at Charring Cross from Golden Square" 1195.4 - "No. 21 on North Bendigo service and No. 25 on Quarry Hill run await departure at Charing Cross" 1195.5 - "No. 5 at Eaglehawk terminus" 1195.6 - "No. 5 at Eaglehawk terminus" 1195.7 - "Nos. 5 and 25 crossing at Thorpe St. Loop, California". 1195.8 - "Nos. 25 and 5 crossing Thorpe St. Loop, California Gully". 1195.9 - "No. 5 descending Mt Korong Rd. towards Bamard St." 1195.10 - "Birney car No. 30 at Golden Square terminus" 1195.11 - "Birney car No. 30 in High Street near Thistle Street (Fire Station Loop)" 1195.12 - "No. 30 in High St. between vine and Wattle Streets" 1195.13 - "No. 25 at Hayes Street Loop Iron Bark". 1195.14 - "Nos. 2 and 5 crossing at Hayes Street Loop Iron Bark" 1195.15 - "No. 5 at Manchester Loop opposite Havilah Road, Long Gully" 1195.16 - "No. 5 passing William Street, Long Gully". 1195.17 - "No. 5 at California Gully" 1195,18 - "Nos. 26 and 5 at Thorpe St. Loop, California Gully". 1195.19 - "No. 5 in High St. Eaglehawk". 1195.20 - "No. 5 approaching Eaglehawk terminus" 1195.21 - "No. 5 at Eaglehawk terminus" 1195.22 - "No. 5 at Eaglehawk terminus" 1195.23 - "No. 5 in High St. Eaglehawk" tramways, trams, bendigo, charing cross, eaglehawk, california gully, golden square, iron bark gully, jobs gully, tram 2, tram 5, tram 19, tram 21, tram 25, tram 26, tram 30 -
 Ballarat Tramway Museum
Slide - 35mm slide/s - set of 20, Noel Simons, 21/05/1971 12:00:00 AM
Set of 20 transparencies taken on 21/5/1971 on Kodak mounts. 1197.1 - Bendigo No. 5 en route to Eaglehawk at Creeth St Long Gully. Tram has a SEC roof ad and Cinzano roof ad. 1197.2 - No 5 approaching Needle Loop between Long Gully and California Gully. On left hand side is the City of Bendigo sign, indicating city boundary. 1197.3 - As for 1197.2 but actually entering loop. Photo taken after tram has passed photographer. 1197.4 - No. 26 bound for Eaglehawk descending the railway bridge near Eaglehawk, at Jobs Gully. 1197.5 - as for 1197.4, but after crossing bridge, now ascending a hill. Photo taken after tram has passed photographer. 1197.6 - No. 26 climbing High St. hill Eaglehawk, nearing end of Double track, bound for Quarry Hill. Shows centre of the road poles. 1197.7 - As for 1197.6, with tram entering single track section. Photo taken after tram has passed photographer. Has a BP service station in the background. 1197.8 - No. 26 (bound for Quarry Hill) crossing No. 17 (Eaglehawk) at Job's Gully Loop. 1197.9 - No. 17 climbing railway bridge at Job's Gully, en route to Eaglehawk. Photo taken after tram has passed photographer. 1197.10 - No.26 bound for Quarry Hill, leaving Long Gully Loop? Has the Creeth St. church in l197.l in the far background. Photo taken after tram has passed photographer. 1197.11 - Tramway Point work at the northern end of Long Gully Loop. 1197.12 - No. 17 en route for Quarry Hill turning into View St. from Bamard St. Tram has SEC roof ads "Everything fine in my all electric Kitchen' and 'Electric Cooking is Matchless'. 1197.13 - as for 1197.12, but tram has turned into View St and about to enter the double line track. Photo taken after tram has passed photographer. 1197.14 - No. 21 enters Nolan St after turning from MacRae St. en route to Bendigo. Note sign on its own post noting tram turns "Beware Tram Turns" and stop sign on adjacent pole "Trams stop on Request". No. 21 has two SEC roof ads. 1197.15 - No. 21 in Nolan St. after turning from Bridge St. (White Hills Road). Note signal light for Bridge St. loop on pole corner of street. Photo taken after tram has passed photographer. 1197.16 - No. 2 bound for Eaglehawk at unknown location. 1197.17 - Tram stop sign on a pole "CARS STOP BY REQUEST" 1197.18 - No. 5 in Carpenter St.? en route to Quarry Hill. 1197.19 - No. 28 has just arrive at Golden Square terminus, passengers are disembarking and the trolley pole is being turned. Golden Square Hotel in the background. 1197.20 - No. 28 at Golden Square terminus. Has a "Nothing beats Briquettes for hear roof ad. Information written on in black ink and date stamped on purple ink. 1197.1 - "No. 5 at Creeth St. Long Gully" 1197.2 - "No. 5 approaching Needle Loop between Long Gully and California Gully" 1197.3 - "No. 5 at Needle Loop between Long Gully and California Gully" 1197.4 - "No. 26 crossing railway bridge at Job's Gully near Eaglehawk" 1197.5 - "No. 26 just after crossing railway bridge at Job's Gully near Eaglehawk/ 1197.6 - "No. 26 in High St. Eaglehawk" 1197.7 - "No. 26 at end of double track in High St. Eaglehawk" 1197.8 - "Nos. 26 and 17 crossing at Job's Gully Loop" 1197.9 - "No. 17 crossing railway bridge at Job's Gully near Eaglehawk". 1197.10 - "No. 26 at Long Gully" 1197.11 - 'Northern end of points at Long Gully Loop". 1197.12 - "No. 17 turning into View St. from Bamard St. Bendigo". 1197.13 -'No. 17 at beginning of double track in View St. after leaving Bamard St. Bendigo. 1197.14 - "No. 21 enters Nolan St. from MacRae St. Bendigo." 1197.15 - "No. 21 in Nolan St. Bendigo just after leaving White Hills Road." 1197.16 - "No. 2" 1197.18 - "No. 5" 1197.19 - "Birney car No. 28 at Golden Square Terminus" 1197.20 "Birney car No. 28 at Golden Square Terminus" tramways, trams, bendigo, long gully, railway bridge, jobs gully, trackwork, nolan st, quarry hill, tram stops, golden square, tram 2, tram 5, tram 17, tram 21, tram 26, tram 28 -
 Ballarat Tramway Museum
Slide - 35mm slide/s - set of 23, Noel Simons, 26/02/1972 12:00:00 AM
Set of 23 transparencies taken on 26/2/1972 on Kodak mounts. 1205.1 - Bendigo No. 25 on a special tour at Fire Station Loop, en route to Golden Square. 1205.2 - No. 21 and 25 crossing at Fire Station Loop, note photographers on the ground. No. 21 bound for North Bendigo. 1205.3 - as for 1205.3, but with trams departing loop and fire station in the background. 1205.4 - No. 25 at Golden Square Hotel with 'Rodda's Golden Square Hotel' in the background. Tram on a special tour, but showing destination of North Bendigo. 1205.5 - as for 1205.4 - but showing special. Has the end of the track in the photograph. 1205.6 - Nos. 7 and 25 (on a special tour) crossing at Myrtle St. Loop. 1205.7 - No. 7 leaving Myrtle St. loop with the mine poppet head in the background. Photo taken after tram has passed photographer. (Print made of this slide 10/2001 for use in the Gold Gold Gold exhibition of 10/2001 - See Reg. item 1979. 1205.8 - No. 25 entering depot. Tram showing 'special'. Tennis court on right has players. Photo taken after tram has passed photographer. 1205.9 - No. 24 (showing 'special') and No. 20 (showing 'Long Gully') at Bendigo Depot. 1205.10 - No. 24 on a special charter, leaving Bendigo depot. Tram has two 'Johnnie Walker' roof ads. 1205.11 - Bendigo depot with 29, 25 and a bogie car inside the depot doors. 1205.12 - As for 1205.11, but with 28 and 29. 1205.13 - No. 24 standing at front entrance of Bendigo depot with No. 20 in the background. 1205.14 - No. 24 running out into McCrae St showing special, with conductor on front step. 1205.15 - No. 24 in Caledonia St. at corner of Thunder St with the Gasworks in the background. 1205.16 - No. 5 en route for Quarry Hill at Charing cross with No. 26 (en route for Eaglehawk) about to arrive. Has former crossover at this location in the foreground. Has the Ezywalkin building in the background. 1205.17 - No. 5 and 26 at Charing Cross, with the Alexandra Fountain in the foreground and the Beehive and Ezywalkin buildings in the background. No.26 has two SEC roof ads. 1205.18 - Charing Cross looking along Pall Mall with trams 7 and 21 and 26 in the picture. 1205.19 - Charing Cross, with 21 departing for Golden Square and No. 5 heading for Quarry Hill. Has the Ezywalkin and the Beehive buildings in the background. 1205.20 - as for 1205.19, but a few moments later. Adjacent pole has a "NO ROAD" letter in reflectors vertically. 1205.21 - Charing Cross with Nos. 25, 21, 26 and 7, looking south from Pall Mall end. 1205.22 - No. 24 crossing Mitchell St. en route for Golden Square, showing 'special' with the Beehive and Ezywalkin buildings in the background. 1205.23 - Charing Cross with Nos. 24, 21 and 7 in the photo and Fountain Plaza in the background. Print of 1205.7 - stored in box D1.Information written on in blue ink and date stamped on purple ink. 1205.1 - "No. 25 at Fire Station Loop High Street, Golden Square." 1205.2 - "Nos. 25 and 21 crossing at Fire Station Loop, near Golden Square." 1205.3 - "Nos. 25 and 21 crossing at Fire Station Loop, near Golden Square." 1205.4 - "No. 25 at Golden Square terminus." 1205.5 - "No. 25 at Golden Square terminus." 1205.6 - "Nos. 7 and 25 crossing at Myrtle St. Loop." 1205.7 - "No. 7 leaving Myrtle St. Loop." 1205.8 - "No 25, entering Bendigo Depot." 1205.9 - "Nos. 20 and 24 at Bendigo Depot." 1205.10 - "No. 24 at Bendigo Depot." 1205.11 - "Nos. 25 and 29 at Bendigo Depot." 1205.12 - "Birney cars 29 and 28 at Bendigo Depot." 1205.13 - "No. 24 (with 20 beyond) at Bendigo Depot." 1205.14 - "No. 24 entering McCrae St. from Arnold St." 1204.15 - "No. 24 in Caledonia St. at cnr of Thunder St." 1204.16 - "No. 5 waits at Charing Cross as No. 26 arrives from Quarry Hill. Note remains of crossover abandoned on relocation in 1965." 1204.17 - "Nos. 5 and 26 at Charing Cross." 1204.18 - "Nos. 26, 7 and 21 at Charing Cross (No. 5 just visible behind No. 26)." 1204.19 - "No. 21 leaves Charing Cross for Golden Square as No. 5 starts off for Quarry Hill." 1204.20 - "No. 21 swings onto the single track Golden Square line as No. 5 heads into Mitchell St. towards Quarry Hill." 1204.21 - "Nos. 25, 21 and 26 watch No. 7 arrive at Charing Cross from Golden Square." 1204.22 - "No. 24 at Charing Cross crossing Mitchell St." 1204.23 - "Nos. 24, 21 and 7 at Charing Cross."tramways, trams, bendigo, golden square, myrtle st., fire station, depot, charing cross, tram 5, tram 7, tram 20, tram 21, tram 24, tram 25, tram 28, tram 29 -
 Ballarat Tramway Museum
Slide - 35mm slide/s - set of 4, Noel Simons, Apr. 1972
Set of 4 transparencies - copy slides - possibly ARE film strip dated March 1972. 1209.2 and 1209.4 on Kodak Readymount mounts. 1209.1 - Bendigo 5, 6 and 28 on a special tram service in bound to the City on a tour in Caledonia St. about to enter Lucan St, or White Hills Road or Weeroona Ave. (mis match in names in various maps). Gas works in the background. No. 5 has a white disk on the rear of the tram. 1209.2 - Nos 2 and 26 at Charing Cross with the Fountain Plaza in the background. Both trams have the destination of Quarry Hill, though 26 is on the Eaglehawk bound track. 1209.3 - No. 19 at the Golden Square terminus, with the conductor or driver swinging the pole and Billy Rodda's Golden Square hotel in the background. 1209.4 - No. 7 at Fire Station loop, en route to North Bendigo, picking up a passenger with a pram. Part of a set of 20 slides made by the Association of Railway Enthusiast Provincial Tramways film strip. Reference Item 2560 details the ARE Film Strip and provide references to other slides.Information written on in blue ink and date stamped on purple ink. 1209.1 - "Nos 5, 6 and 28 in Caledonia St. about to enter Weeroona Ave." 1209.2 - "Nos 2 and 26 at Charing Cross." 1209.3 - "Swinging the pole on No. 19 at Golden Square Terminus." 1209.4 - "No. 7 inward bound from Golden Square stops at Fire Station Loop."tramways, trams, bendigo, charing cross, golden square, gas works, special trams, tram 2, tram 5, tram 6, tram 7, tram 19, tram 28 -
 Ballarat Tramway Museum
Slide - 35mm slide/s - set of 4, Noel Simons, Apr. 1972
Set of 4 transparencies - copy slides - possibly ARE film strip dated April 1972. 1210.3 on Kodak Readymount mount. 1210.1 - No. 3 arriving at Quarry Hill terminus. 1210.2 - Bogie car at Long Gully Loop, in the far distance, with a Hotel and the ESSO service station in between. Has Fosters Lager and Carlton signs on hotel. Note sign on the closet pole - "No standing between Notices" 1210.3 - Nos. 26 (Quarry Hill) and 25 (Eaglehawk) at Jobs Gully Loop. 1201.4 - No. 5 showing Charing Cross in bound for Charing Cross and No. 3 en route for Eaglehawk in View St. near the end of the double track. Appears to be SEC employee at the rear of No. 3. Part of a set of 20 slides made by the Association of Railway Enthusiast Provincial Tramways film strip. Reference Item 2560 details the ARE Film Strip and provide references to other slides.Information written on in blue ink and date stamped on purple ink. 1210.1 - "No. 3 arriving at Quarry Hill terminus." 1210.2 - "Bogie car at Long Gully Loop." 1210.3 - "Nos. 26 and 25 at Jobs Gully Loop." 1210.4 - "Nos 5 and 3 in View St. near the end of the double track."tramways, trams, bendigo, long gully, quarry hill, view st., tram 3, tram 5, tram 25, tram 26 -
 Ballarat Tramway Museum
Photograph - Black & White Photograph/s, early 1960's
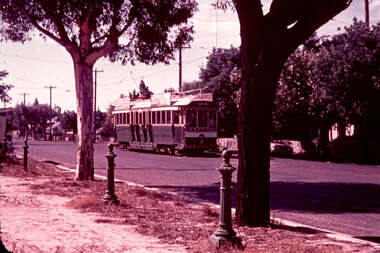
Black and White print of Bendigo SECV Bendigo tram 18 at Charing Cross terminus for the Eaglehawk route with a single truck car crossing behind heading for Golden Square. Trams have dash canopy lights, but no large white strip under the drivers windows. Photo not dated but appears to be at during early 1960's. Tram 18 has White Horse Whiskey ad on front dash panel, SEC Roof ad "Electricity best for Cooking" and a "CASTROL" ad, and showing destination of "Eaglehawk". Single truck car has SEC roof ad "You'll Cook better electrically" and a roof ad for "B.J. Osborn Plumbing Service" ad. Has City Club Hotel and Plaza Theatre buildings in background. Single truck could be No. 20, based on roof ads, see 986.trams, tramways, charing cross, bendigo, tram 18, tram 20 -
 Ballarat Tramway Museum
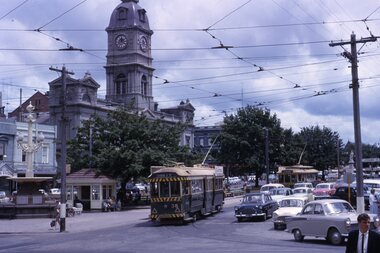
Photograph - Black & White Photograph/s, early 1960's
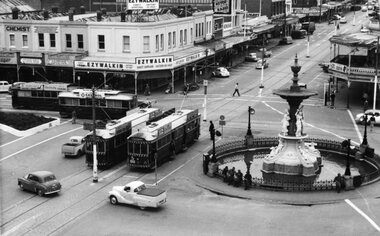
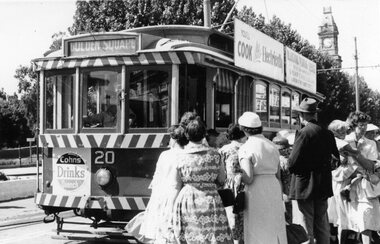
Black and White print of an SECV Bendigo tram 20 at Charing Cross terminus for the Golden Square route loading passengers. Trams has dash canopy lights, but no large white strip under the drivers windows. Photo not dated but appears to be at during early 1960's. Tram showing destination of "Golden Square", has "Cohn's Drinks Quench" ad on front dash panel, SEC Roof ad "You'll Cook better electrically" and "B.J. Osborn Plumbing Service" roof ad. Has Bendigo Post Office clock tower in background. Tram off loading passengers while others are waiting to get on. Good photo for people.trams, tramways, charing cross, bendigo, golden square, tram 20 -
 Ballarat Tramway Museum
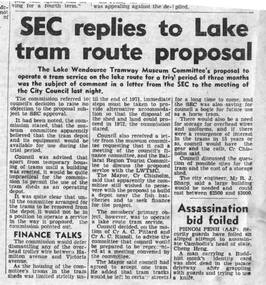
Newspaper, The Courier Ballarat, "SEC replies to Lake Tram route proposal", 14/09/1971 12:00:00 AM
Yields information about the discussions and views of the SEC about operation of historic trams in Ballarat after the closure of the SEC operated system.Newspaper clipping from The Courier, Ballarat, 14/9/1971 about a letter to the City Council from the SEC about the Lake Wendouree Tramway Museum Committee's proposal to operate a tram service on the lake route for a trail period. SEC said that this was not practical and advised that the sheds could only be used to house the trams. Noted that the SEC proposed to sell the land in 1972, and the Council's proposal that certain materials be stored. Quotes Cr. Chisholm (Mayor) and City Engineer (Mr. R. J. Sharp). Image added 20/11/2013In black ink in the top right hand corner of the item - '14/9/71'trams, tramways, museum establishment, btps, depot, city of ballarat -
 Ballarat Tramway Museum
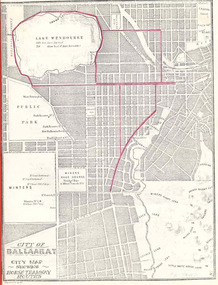
Book, City of Ballaarat, "Mayors Special Report Ballarat Tramways", Sep. 1971
Historically significant for at the time it demonstrated aspects of the evolution of Ballarat Tramways and yields information about the formation of the tramways, the Councils viewpoint and has a strong association with the Mayor of the time.Twenty two page book, produced by photocopying, side stapled and bound with a red plastic binding, titled "Mayor's Special Report Ballarat Tramways", dated 20 September 1971 for presentation to the City of Ballaarat Council Meeting 27 Sept. 1971 and signed by the Mayor, J.A.Chisholm. Note pages 18 and 19 have been reversed. Comprises: Page 1 - map (image 1829i1) - of Ballarat (Ballaarat) showing the horse tram routes in red (appear to have been drawn in with a red pencil). Note the Sebastopol route terminates at Rubicon St. Page 3 - letter to the City Councillors from the Mayor Page 4 - Outline of the "The Ballarat Tramway System" Pages 5 - 7 - Conditions for tendering the horse tram system within the City of Ballarat" Pages 8 - 11 - Specifications and Agreement for the Ballaarat Tramways (horse trams). pages 12 - 19 - Memorandum of Agreement with the British Insulated Wire Company (later ESCo) Page 20 - Copy of letter from the Secretary of the SEC to the Minister of Fuel and Power, dated 10 Sept. 1971 advising of the formal abandonment of the Ballarat and Bendigo tramway systems. Page 21 - five photos (image 1829i3) of trams in Ballarat, including the bogie tram decorated for the Queens visit, courtesy of Mr. L. J. Denmead, Tramways Superintendent. Page 22 - Plan (image 1829i2) of Ballarat Bus Services, showing route numbers, destinations and existing tramway routes. 3rd copy added 16/7/2010trams, tramways, city of ballaarat, mayor's reports, ballaarat tramway company, british insulated wire company, esco, bus services, sec -
 Ballarat Tramway Museum
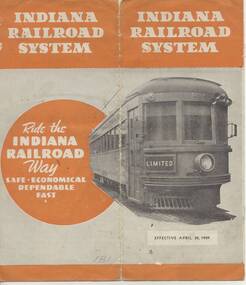
Ephemera - Timetable, Indiana Railroad, "Indiana Railroad system, Timetable, April 30, 1939" - Wal Jack Collection, Apr. 1932
Eight page (folded) timetable for the Indiana Railroad (Interurban Traction Co.) in receivership at time (see page 2), map of page 1, showing routes and connecting lines, bus services, services, days run etc. Record images added 20/8/2013.On each timetable in pencil, whether traction operated or bus (coach), where coach, crossed out in pencil.indiana railroad (electric cars), indianapolis, terre haute, timetables -
 Ballarat Tramway Museum
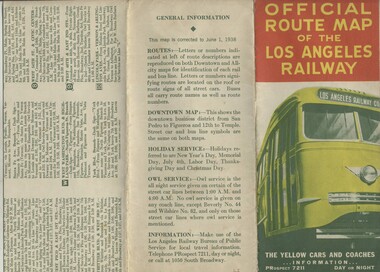
Map, H.P. Noordwal, "Official Route Map of the Los Angeles Railway", Jun. 1938
A (12 section) fold out map of street car (tram) and bus services for Los Angeles, dated June 1, 1938, showing all LAR (Los Angeles Railway) streetcar and coach (tram and bus) services, Pacific Electric lines within area, detailed "downtown" map, route descriptions and points of interest. Record images added 20/8/2013.Three terminus have been marked with pencil "X". On rear car, next to object number is a symbol looking like a "H & S" merged together.trams, tramways, los angeles, street cars, map