Showing 3515 items matching " tram 3"
-
 Melbourne Tram Museum
Negative - Set of 2 - St Kilda station - tram 3, Wal Jack, 30/12/1940
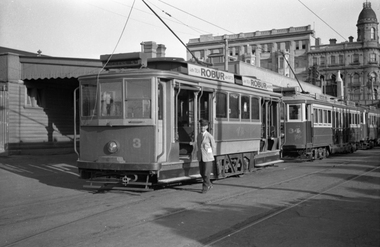
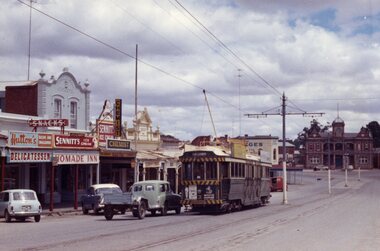
... Set of 2 - St Kilda station - tram 3...tram 3...Set of two Photo of Victorian Railways trams 3, 34 and 40... of two Photo of Victorian Railways trams 3, 34 and 40 at the St ...Set of two Photo of Victorian Railways trams 3, 34 and 40 at the St Kilda Railway station, with a driver in the view. Photo in the Wal Jack Victorian Railways Album - dated 30-12-1940.Yields information about VR trams at the St Kilda Railway Station during Dec. 1940.Set of two Black and white negatives.trams, tramways, victorian railways, vr trams, brighton, tram 3, tram 34, tram 40, crews, uniforms -
 Melbourne Tram Museum
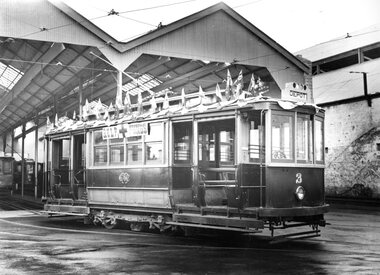
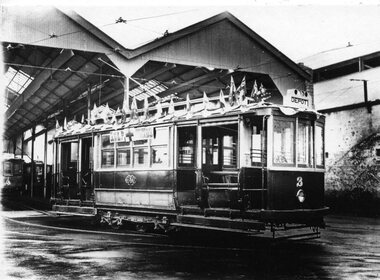
Photograph - VR tram 3, Elwood depot, Victorian Railways (VR)
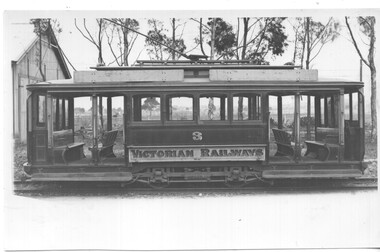
... VR tram 3, Elwood depot...tram 3... No 3, a Combination tramcar at Elwood Depot. The tram... No 3, a Combination tramcar at Elwood Depot. The tram was built ...Formal Victorian Railways Rolling stock photo of VR tram No 3, a Combination tramcar at Elwood Depot. The tram was built in 1907 and scrapped in 1956.Yields information about VR Tram No. 3.Black and white photograph with notes on the rear."Victorian Railways, No. 3 Combination (old photo and cleaner car) at Elwood shed" in ink and RS63. in penciltramcars, tramways, vr, elwood depot, tram 3 -
 Melbourne Tram Museum
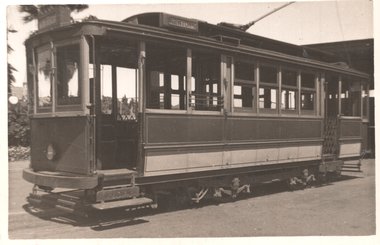
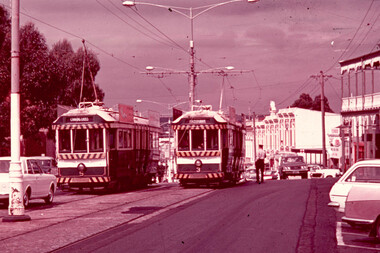
Photograph - VR Single truck tram 3 second fleet
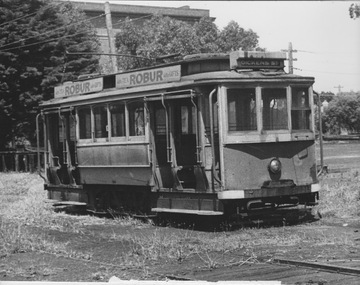
... VR Single truck tram 3 second fleet...VR tram 3...Photograph shows single truck VR tram 3 second fleet...Photograph shows single truck VR tram 3 second fleet ...Photograph shows single truck VR tram 3 second fleet in Elwood Depot yard with trolley pole raised, weather blinds raised and destination Dickens St. The exterior of the tram appears to be in poor condition and it stands amid low grass with trees and a large building at the rear. Dickens St was an intermediate crossover about 2 km south of the St Kilda Station terminus and was used as a turnback for short run cars during peak hours.Yields information about VR tram 3 and Elwood Depot Black and white photograph with surface peeling at bottom of printvictorian railways, st kilda railway station, vr tram 3, second fleet, dickens st, elwood depot -
 Ballarat Tramway Museum
Photograph - ESCo Bendigo tram 3, 1930s
... ESCo Bendigo tram 3...tram 3...Photograph of Bendigo Tram No 3 at the tram depot...Photograph of Bendigo Tram No 3 at the tram depot ...Photograph of Bendigo Tram No 3 at the tram depot, with the destination of Depot. Tram in the ESCo Red and Cream colour scheme with the tram number on the side of the vehicle. The tram commenced life with the Hawthorn Tramway Trust as their No. 8. Became No. 114 when the MMTB took over, sold to the SEC in 1931 and became Bendigo No. 3. It was donated to the AETA in 1956 and subsequently rebuilt as HTT 8. The tram is on display at the Melbourne Tram Museum Hawthorn. See reference for further details. One of a series of 7 photos (items 9108 to 9114) possibly taken at the time of the SEC takeover in 1934 to illustrate the type of tram that was being used at Bendigo. Possibly an SEC report photo. Based on the book Destination Eaglehawk, most likely from the Basil Miller collection.Yields information about Bendigo tram 3 during the mid 1930s.Photograph, black and white with notes on rear.In ink on rear "No. 3 - Electric Supply Co of Victoria (Prior to 1934 when SEC acquired the undertaking), and Ken Magor stamp.tramways, trams, bendigo, tram 3, aeta, tram 8 -
 Bendigo Historical Society Inc.
Negative - TRAM NO. 3 EAGLEHAWK, 1890-2017
... TRAM NO. 3 EAGLEHAWK...tram no. 3...Negative of Tram Number 3 Eaglehawk. Negative not scanned...BENDIGO Tramways tram no. 3 http://www.bendigotramways.com ...Negative of Tram Number 3 Eaglehawk. Negative not scanned at this time.bendigo, tramways, tram no. 3, http://www.bendigotramways.com/images/stories/pdf/thebendigotramwaystory.pdf (full history of tramways) -
 Ballarat Tramway Museum
Photograph - Digital image, Wal Jack, Ballarat ESCo tram 3 after scrapping, 12/1/1946
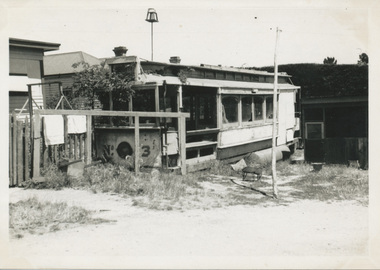
... Ballarat ESCo tram 3 after scrapping... tram 3... ESCo Scrapped Trams tram 3 on rear in ink "SEC / Ballarat / Old ...Photo of the body of ESCo No. 3 in Cobden St, Mt Pleasant 12-1-1946. Has the details on the rear of the photograph. This tram began its life as a Sydney C class electric tram, possibly No. 14. It was scrapped in 1935. See image i2 for rear of photograph. See image i3 for hi res scan of print. See image i4 for hi res scan of negativeYields information the condition in 1946 of an old ESCo Tram body that was sold.Digital image from the Wal Jack Ballarat Album.on rear in ink "SEC / Ballarat / Old No. 3 original electric (body) Mount Pleasant / 12-1-46" and the Wal Jack stamp with "T102"trams, tramways, esco, scrapped trams, tram 3 -
 Melbourne Tram Museum
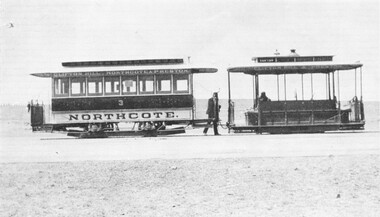
Photograph, Northcote cable tram 3
... Northcote cable tram 3...tram 3... with the MMTB. Trams tramways cable tram Northcote Clifton Hill tram 3 ...The photograph shows a Northcote cable tram set - grip car and trailer No. 3. The trailer is lettered - Clifton Hill - Northcote & Preston. The background has been whited out though possibly a conductor and the gripman can be seen. For the story of the Northcote line, see the Museum's article - Northcote: the on again, off again cable tramway in the references.Yields information about the Northcote cable trams before they were merged with the MMTB.Photograph, black and white, plain papertrams, tramways, cable tram, northcote, clifton hill, tram 3 -
 Bendigo Historical Society Inc.
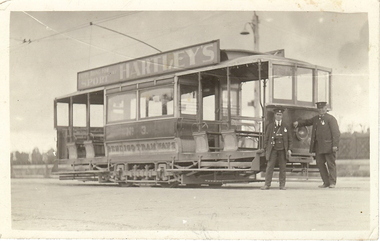
Photograph - BASIL MILLER COLLECTION: ELECTRIC TRAM NO. 3
... BASIL MILLER COLLECTION: ELECTRIC TRAM NO. 3...Black and white postcard of Bendigo Tramways Electric Tram... TRAM NO. 3 ...BHS CollectionBlack and white postcard of Bendigo Tramways Electric Tram No. 3 showing a driver and a conductor. Advertising 'Hartley's Everything for Sport'. Taken in front of Bendigo Cemetery, Carpenter St, Bendigo.Kodak Australiaperson, individual, basil miller -
 Ballarat Tramway Museum
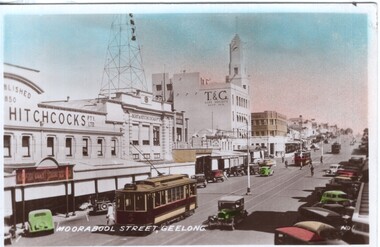
Photograph, Moorabool Street Geelong - tram 3, late 1940s
... Moorabool Street Geelong - tram 3... - No. 1" Moorabool Street Geelong - tram 3 Photograph ...The colour print of Moorabool Street Geelong shows SEC No. 3 just to the south of Malop St. Has Hitchcocks, T & G building and the Bank of NSW buildings in the view. The tram is shown with a red colour scheme which is incorrect, should be green. There are two other trams in the view. Possibly a Kodak print.Yields information about the Moorabool St Geelong, late 1940s.Colour photograph titled "Moorabool Street Geelong - No. 1"In pencil on rear "No. 3 car". Ken Magor stamp and in pencil "K McCarthy No. 71" tramways, trams, geelong, moorabool st, tram 8 -
 Bendigo Historical Society Inc.
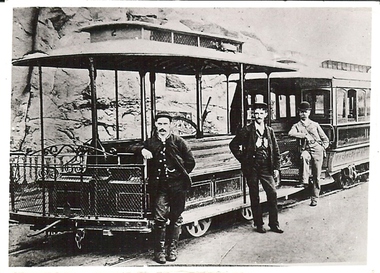
Photograph - BASIL MILLER COLLECTION: TRAM WITH 3 MEN
... BASIL MILLER COLLECTION: TRAM WITH 3 MEN...Black and white photograph of tram with 3 men, 2 in uniform... COLLECTION: TRAM WITH 3 MEN ...Black and white photograph of tram with 3 men, 2 in uniform, one in suit with bowler hat. Possibly to be cable car or battery tram. '(2)' written in blue ink on back, '6' written in pencil on back of photo.person, individual, basil miller -
 Ballarat Tramway Museum
Functional object, Preston Workshops, W6 939, restaurant tram No. 3, c1990's
... W6 939, restaurant tram No. 3..., restaurant tram No. 3, during Feb. 2015. Shows the base colour... of W6 939, restaurant tram No. 3, during Feb. 2015. Shows ...Sample of paint chip scraped off the roof line of W6 939, restaurant tram No. 3, during Feb. 2015. Shows the base colour of the paint applied to the tram (would have faded), and striping. Two separate samples retained.trams, tramways, restaurant tram, paintwork -
 Melbourne Tram Museum
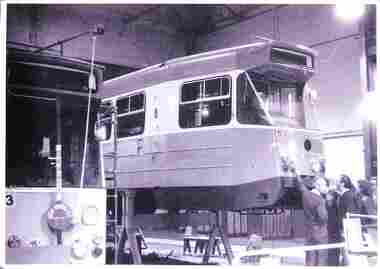
Photograph - Z3 and Z5 under construction Preston Workshops, 1975
... tram 3...The photograph shows Z-class trams 3 and 5 being fitted out...The photograph shows Z-class trams 3 and 5 being fitted out ...The photograph shows Z-class trams 3 and 5 being fitted out or constructed at Preston Workshops, 1975. Z3 has been fitted with a trolley pole and other equipment, while Z5 is on stands. There are a number of people looking at Z5, which indicates a possible workshop tour. The tours database does not give a formal enthusiast tour of Preston in 1975. Z3 entered service in June 1975 after being delivered from Comeng in Feb. 1975.Yields information about the construction of Z class trams.Black and White Photograph with a plain back.tramways, trams, z class, tram 3, tram 5, preston workshops, new trams -
 Ballarat Tramway Museum
Photograph - Geelong Tram No.3 - Red Cross
... Geelong Tram No.3 - Red Cross... and white print on paper. Photograph Geelong Tram No.3 - Red Cross ...Duncan and Fraser tramcar No 3 at the depot bedecked with large Australian flags and small Red Cross flags and seeking donations to the Red Cross. It is most likely the date is during WW1, probably 1916-1918.Black and white print on paper.12/1 and No. 1 in a circle written in pen on the reverse. GRS170/12/1/1 written in pencil on the reverse.geelong trams, duncan and fraser tramcar, ww1 decorations on trams -
 Ballarat Tramway Museum
Photograph - Geelong 3 at Railway Station, Ken McCarthy, 4-2-1948
... tram 3...The photo shows Geelong tram No. 3 at the railway station...The photo shows Geelong tram No. 3 at the railway station ...The photo shows Geelong tram No. 3 at the railway station with the destination of Newtown. Photo by Ken McCarthy 4-2-1948Yields information about the Geelong railway station terminus and tram 3.Black and white photograph with stamped details on rear.Typed on rear "No. 3 car SEC Geelong 4 Feb 1948, copyright K McCarthy, Photo No. 76". Ken Magor stamp as well" tramways, trams, geelong, tram 3, railway, railway station -
 Ballarat Tramway Museum
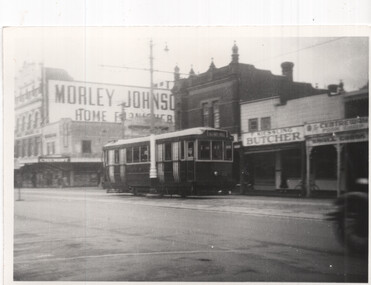
photograph - Set of 5 Black & White - Bendigo tramways, Peter Duckett, early 1950s
... tram 3... No. 3 at the depot. 3 - Tram 7 on a Quarry Hill service. 4... and F. Kessling Butcher 2 - Tram No. 3 at the depot. 3 - Tram 7 ...Set of five photographs of Bendigo trams photographed by Peter Duckett, early 1950s 1 - Bendigo 22 in Mitchell Street. Tram has the destination of Quarry Hill. In the background is the Morley Johnson Home furnisher and F. Kessling Butcher 2 - Tram No. 3 at the depot. 3 - Tram 7 on a Quarry Hill service. 4 - Bogie tram 24 at the depot 5 - Track cleaner - scrubber and another ex Melbourne single trucker at the depot.Yields information about Bendigo trams early 1950sSet of five black and white photographs by Peter Duckett.Details the image on the rear of the print in ink.bendigo, tramcars, bendigo tramways, quarry hill, charing cross, mitchell st, tram 22, tram 3, tram 7, tram 24, scrubber tram -
 Ballarat Tramway Museum
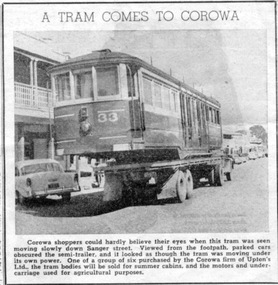
Newspaper, ex VR tram, Corowa 3/1959, Mar. 1959
... ex VR tram, Corowa 3/1959... tram, Corowa 3/1959 Newspaper ...Newspaper clipping of former St Kilda - Black Rock tramway (Operated by Victorian Railways) tramcar No. 33, on semitrailer passing through town of Corowa on way to form summer cabins - Newspaper unknown, one of six bodies to Corowa.On top "keep" and on bottom "Mar 19th 59". On rear has "432" in a box.trams, tramways, vr trams, corowa, scrapped trams, disposal -
 Ballarat Tramway Museum
Slide - Bendigo tram depot - set of 6, Ron Hood, 12/1970
... tram 3... in the depot yard. 2 - tram No. 3 shunting in the yard. 3 - ditto 4... in the depot yard. 2 - tram No. 3 shunting in the yard. 3 - ditto 4 ...Set of six colour photographs by Ron Hood December 1970 taken at the Bendigo tram depot: 1 - Bendigo scrubber parked in the depot yard. 2 - tram No. 3 shunting in the yard. 3 - ditto 4 - general view of the front of the depot shed with trams 23 and 30. 5 - scrubber tram 6 - depot entranceYields information about the Bendigo tram depot and some of the trams at the time - December. 1970Set of 6 Colour slides in hanimount cardboard mounts.Numbered "Bendigo Depot" in ink and slide nos, 12 to 17.tramways, trams, bendigo depot, scrubber, tram 3, tram 23, tram 30 -
 Ballarat Tramway Museum
Photograph - Black & White Photograph/s, c1918
... tram 3... printer?) of Geelong Cross bench tram No. 3, in the Geelong Depot... Depot Red Cross World War 1 tram 3 "Geelong Hist Soc / William ...Yields information about the form and style of the early Geelong trams and how they were used with trailers for football matches.Black and white photograph, printed onto card (inkjet printer?) of Geelong Cross bench tram No. 3, in the Geelong Depot yard, decorated with Australian flags and a "Help + Funds" = Red Cross during First World War. C1918?"Geelong Hist Soc / William Scott Collection." in ink.trams, tramways, geelong, depot, red cross, world war 1, tram 3 -
 Ballarat Tramway Museum
Photograph - Black & White Photograph/s - set of 2, George Bishop, Dec. 1971
... tram 3...Two Black and White photograph of a in-bound bogie tram... Mitchell St Railway Station tram 3 On the back of the photos in ink ...Two Black and White photograph of a in-bound bogie tram No. 3, 12/1971 descending Mitchell St Bendigo, just after the start of the double track near the railway station. Photo has Glendon House on the left hand side. Photo by George Bishop. Tram has the destination "Eaglehawk"On the back of the photos in ink "Outside Glendon House Bendigo / G. Bishop photo" and in pencil on 3609.2 "No. 3 near Rly Station Bendigo, Dec 1971, Destination Eaglehawk: and "George Bishop Photo"tramways, trams, bendigo, mitchell st, railway station, tram 3 -
 Ballarat Tramway Museum
Slide - 35mm slide/s, Travis Jeffrey, late 1960's or early 1970's
... tram 3... of Bendigo Nos. 3 and 26 at Charing Cross. The trams are bound... Charing Cross tram 3 tram 26 "BES 48" in pencil. Agfa plastic ...Agfa plastic mount (blue base, white cover) with a photo of Bendigo Nos. 3 and 26 at Charing Cross. The trams are bound for Eaglehawk, Quarry Hill respectively. Photo shows the traffic arrangements at Charing Cross prior to closure. Photo taken late 1960's early 1970's from the window of another tram. No. 3 has two roof advertisement racks which are empty, while No. 26 has a SEC briquettes roof advertisement."BES 48" in pencil.tramways, trams, bendigo, charing cross, tram 3, tram 26 -
 Ballarat Tramway Museum
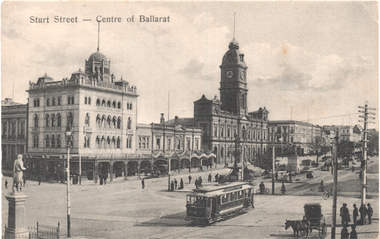
Postcard, J. Summerscales and Ballarat, "Sturt Sreet - Centre of Ballarat", c1908
... tram 3.... ESCo No. 3 is eastbound, the tram has a small roof.... ESCo No. 3 is eastbound, the tram has a small roof ...Postcard from the publisher's office, next door to the Post Office Ballarat at the intersection of Sturt and Lydiard Streets. ESCo No. 3 is eastbound, the tram has a small roof advertisement. In the view are the National Mutual building, the Post Office, and Snows. On the left is the Robbie Burns Statue. Possilby not tram No. 3 (an ex Sydney C class tram) as it does not have the centre window vertical mullion - maybe No. 13 - see item 1647 showing this.Yields information about Sturt St Ballarat and ESCo tram No. 3.Postcard black and white, divided back, unused, H J Summerscales,tramways, trams, esco, sturt st, tram 3 -
 Ballarat Tramway Museum
Photograph - Black & White Photograph/s, Wal Jack, 24/06/1949 12:00:00 AM
... tram 3... of Geelong trams 36, 3 and 31, inside the depot at Geelong 24-6-1949... tram 36 tram 3 tram 31 On rear in ink SEC Geelong / Nos. 36, 3 ...Black and White print contained within the Wal Jack Bendigo and Geelong Album, see Reg Item 5003 for more details. Photograph of Geelong trams 36, 3 and 31, inside the depot at Geelong 24-6-1949. Shows the Geelong trackwork at the depot and overhead. Photo by Wal Jack. See Also Reg item 5889 for an elevated photograph. i1 - scan of print in the album i2 - rear of image i3 - scan of negative at 3200dpi added 29/6/2020.On rear in ink SEC Geelong / Nos. 36, 3, 31 inside sheds (from ground level), Geelong depot / 24-6-1949". Has the Wal Jack copyright stamp in the top right hand corner with the number T297 written in.trams, tramways, geelong, depot, tram 36, tram 3, tram 31 -
 Ballarat Tramway Museum
Photograph - Colour Photograph/s, 21/11/1962 12:00:00 AM
... tram 3...Colour print of Bendigo SECV Bendigo tram 3 travelling.... High St tram 3 On rear top left hand corner "3" Colour print ...Colour print of Bendigo SECV Bendigo tram 3 travelling High St Eaglehawk towards the Eaglehawk Terminus. Photo taken after the tram has passed the photographer. On Kodacolor paper with a Kodak red ink stamp on rear. Tram has dash canopy lights, but no large white strip under the drivers windows. Photo not dated but appears to be at about the same time as 977, 21.11.1962. Has Eaglehawk Town Hall and Post office in background and shops along the south side of High St. Tram showing destination of "Eaglehawk". Tram has White Horse Whiskey ad and another on front dash panel and two roof ads. In photo are advertisements for "Hutton's Bacon" and "Sennett's Ice Cream" on shop roof advertisements.On rear top left hand corner "3"eaglehawk, bendigo, town hall., high st, tram 3 -
 Melbourne Tram Museum
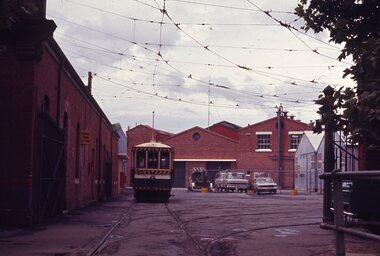
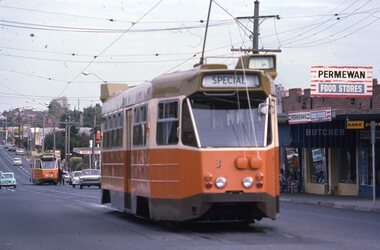
Slide, Z class trams 2 & 3 West Preston, May 1975
... tram 3...Colour slide of Z class trams 2 and 3 at the West Preston... Colour slide of Z class trams 2 and 3 at the West Preston ...Colour slide of Z class trams 2 and 3 at the West Preston terminus, both showing Special. Most likely being tested prior to entering service late June 1975. The slide is dated May 1975. In the background is a Permewan food store and a Commonwealth Bank.Yields information about Z class trams 2 and 3.Kodachrome colour slides, cardboard mount.tramways, z class, new tram, west preston, tram 2, tram 3 -
 Melbourne Tram Museum
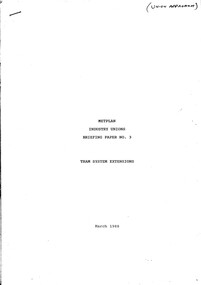
Document - Report, Public transport Unions, "Metplan - Industry Unions - Briefing Paper No. 3 - Tram System Extensions", "Metplan Discussion Paper", 1987 to 1988
... "Metplan - Industry Unions - Briefing Paper No. 3 - Tram... Unions - Briefing Paper No. 3 - Tram System Extensions" - March... - "Metplan - Industry Unions - Briefing Paper No. 3 - Tram System ...Set of four photocopied documents, A4 sheets, stapled in top left hand corner concerning the development and adoption of Metplan, a Metropolitan Public Transport Industry Plan - see Reg Item 1186 for a discussion paper. .1 - "Metplan - Industry Unions - Briefing Paper No. 3 - Tram System Extensions" - March 1988 - 16 sheets - one of series of four documents to give Public Transport Unions where the industry is heading over the 15 years project life period. document looks at the Docklands Light Rail in London and bus services through the Central district of Melbourne. .2 - "Metplan Draft Document - January 1988" - 5 pages - prepared by Martin Gray - December 1987 - looking at training, working conditions, employment security, station staff and service delivery and job opportunities. .3 - "Metplan Discussion Paper" - 3 sheets - gives an overview of the suburban system, union's role, what could be done, electrification, rail cars, station development, dual voltage systems. .4 - "Metplan Discussion Paper" - table looking at the various measures, percentage changes, Metplan issues, services, finance and extension options. See also Reg item 2809 for a August 1988 paper and 345 for a detailed report.trams, tramways, ptc, metplan, unions, buses, tramways, public transport, suburban and underground -
 Melbourne Tram Museum
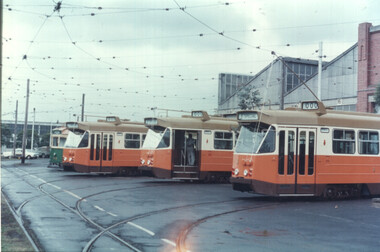
Photograph - Colour print - Z's 1, 2, 3 at Preston Workshops, June 1975
... tram 3...Colour print showing Z1 class trams, 1, 2, and 3 on the fan... Colour print showing Z1 class trams, 1, 2, and 3 on the fan ...Colour print showing Z1 class trams, 1, 2, and 3 on the fan at Preston Workshops, possibly late May or June 1975 at the time of entry into service. All the trams are showing special. In the background is a W7, possibly 1036. Yields information about the then new Z1 class trams at the time of the entry into service. Colour print on Kodak Royal paper.trams, tramways, z1 class, tram 1, tram 2, tram 3 -
 Ballarat Tramway Museum
Slide - 35mm slide/s, Max Michell, Apr. 1972
... tram 3... Strip" of Bendigo trams Nos. 3 and 5 in View St., near Rowan St... View St Bendigo tram 3 tram 5 Stamped on base of slide "11802 ...White cardboard mount, 35mm slide, from the Association of Railway Enthusiast's film strip titled "Provincial Tramway Film Strip" of Bendigo trams Nos. 3 and 5 in View St., near Rowan St. No. 3 has destination of Eaglehawk, while No. 5, inbound has destination of Charing Cross. An SEC Employee is standing by the rear of No. 3 The film strip notes (Reg. Item 2560), provided the following caption details: "Bogie cars 3 & 5 (running out of course due to an earlier failure) meet on the double track at the Bendigo end of the "EAGLEHAWK" Line - Apr. '72 (Max Michell)" See image btm2592p.tif for high level scan of image. Stamped on base of slide "11802" and written in ink on top edge "No 3 & 5 Eaglehawk line Bendigo"tramways, trams, are, film strip, view st, bendigo, tram 3, tram 5 -
 Ballarat Tramway Museum
Slide - 27 mm sq slide/s - set of 3 - tram stop shelters, Lilian Butler, c1971
... 27 mm sq slide/s - set of 3 - tram stop shelters... Butler. Slide 27 mm sq slide/s - set of 3 - tram stop shelters ...Yields information about some of the tramway shelters in Ballarat.Set of Hanimex colour slides in a white cardboard mount of Ballarat tramway shelters. .1 - tramway shelter at Haddon St - note this shelter has been since rebuilt. .2 - Shelter at Ripon St - middle of Sturt St east side of intersection - has Ampol Service station in background. .3 - ditto with the Western Hotel in the view. Photo from the collection of Lilian Butler. ballarat, tramways, trams, shelters, sturt st, ripon st -
 Melbourne Tram Museum
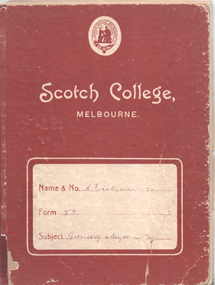
Book - Cable tram records - book 3 of 4, Alf Twentyman, c1940 to 1985
... Cable tram records - book 3 of 4... tram records - book 3 of 4 Alf Twentyman ...This is the third of four documents compiled by Alf Twentyman about the history of Melbourne cable trams. On the inside cover is a list of depot closing dates. On the side is a table of contents and a reference to the page, though the pages are not actually numbered. Provides notes on the cars at each car house or car depot, dates, cables or ropes, rope speed, and date converted to electric tram or closed. Alf's notes on Geometry remain in the book, though not scanned.Demonstrates the recording and drawing work of Alf Twentyman and his notes.Exercise book - printed for Scotch College, ruled in a graph paper format - 40 pages with red card covers.Has been used for Geometry lessons tramways, cable trams, alf twentyman, history, records, depots, car houses -
 Melbourne Tram Museum
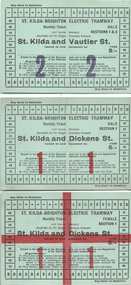
Ephemera - Set of 3 Tram Monthly ticket, Victorian Railways (VR), c1930s
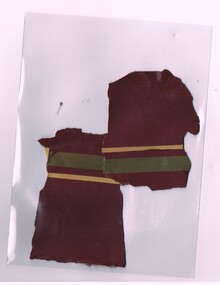
... Set of 3 Tram Monthly ticket... be folded. Ephemera Set of 3 Tram Monthly ticket Victorian Railways ...Victorian Railways Tram Monthly Periodical with conditions of travel on the inside. See reference page 125/126 and Figure 6-31. All tickets were available for 60-only tram trips, with space for the name of the holder Not numbered. 1 - St Kilda and Vautier St - 2 sections, 9/-, Male 2 - St Kilda and Dickens St, fare 6/- Male 3 - St Kilda and Dickens St, fare 6/- Female - printed with a red cross.Demonstrates a Victorian Railways Tram monthly ticket for a specific section or trip on the St Kilda Brighton tramway. May have been used as a training sample.Printed card ticket, card, with a crease in the middle so it could be folded.tickets, vr, vr trams, victorian railways, st kilda brighton tramway, monthy