Showing 20 items matching " manchester loop"
-
 Ballarat Tramway Museum
Slide - 35mm slide/s, Travis Jeffrey, c1962
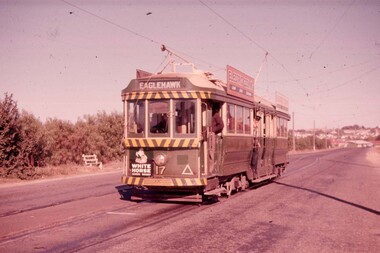
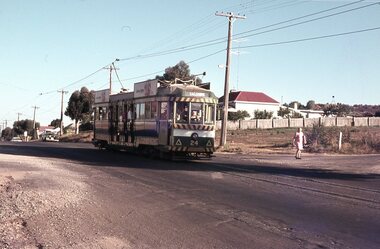
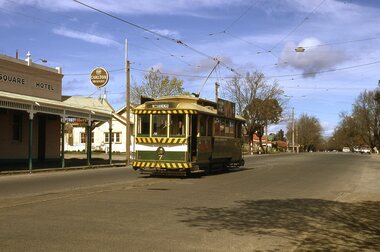
... ... Manchester Loop...Agfa plastic mount (blue base, white cover) with a photo of Bendigo 17, possibly at Manchester Loop, with destination of Eaglehawk. ...Tramways trams Bendigo Eaglehawk Manchester Loop tram 17 "BES 28" in pencil Agfa plastic mount (blue base, white cover) with a photo of Bendigo 17, possibly at Manchester Loop, with destination of Eaglehawk. ...Agfa plastic mount (blue base, white cover) with a photo of Bendigo 17, possibly at Manchester Loop, with destination of Eaglehawk. Tram fitted with Whitehorse Whiskey ad on front dash panel and two "Electric Cook" roof advertisements. Photo taken c1962."BES 28" in penciltramways, trams, bendigo, eaglehawk, manchester loop, tram 17 -
 Ballarat Tramway Museum
Slide - 35mm slide/s, Travis Jeffrey, c1962
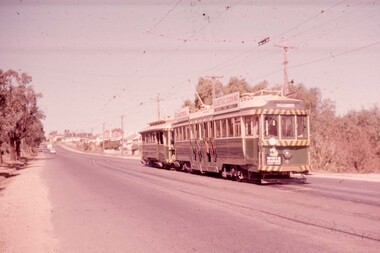
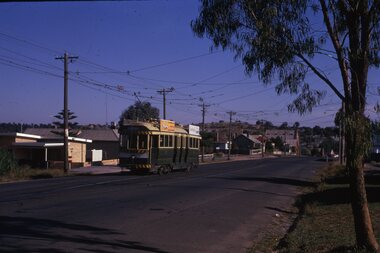
... ... Manchester Loop...Agfa plastic mount (blue base, white cover) with a photo of Bendigo No. 4 and a single trucker, possibly No. 16 at Manchester Loop. Taken c1962, spring or early summer. ...Tramways trams Bendigo Eaglehawk Manchester Loop tram 4 "BES 19" in pencil Agfa plastic mount (blue base, white cover) with a photo of Bendigo No. 4 and a single trucker, possibly No. 16 at Manchester Loop. ...Agfa plastic mount (blue base, white cover) with a photo of Bendigo No. 4 and a single trucker, possibly No. 16 at Manchester Loop. Taken c1962, spring or early summer. No. 4 has a Whitehorse Whiskey advertisement and a tram following indicator on the front dash panel, a Castrol and a SEC Electric Cooking roof advertisements and destination of Eaglehawk."BES 19" in penciltramways, trams, bendigo, eaglehawk, manchester loop, tram 4 -
 Ballarat Tramway Museum
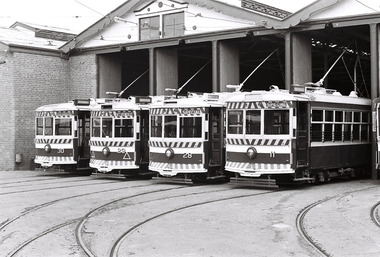
Photograph - Black & White Photograph/s, Keith Kings, 7/03/1958 12:00:00 AM
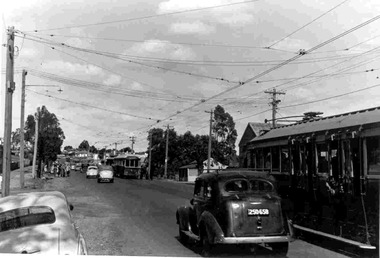
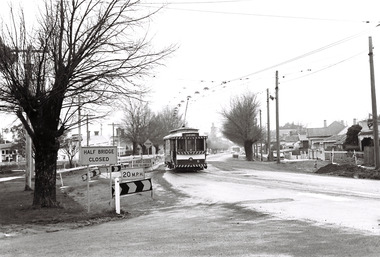
... ... Manchester Loop...Photograph of SEC Bendigo - Manchester Loop on the Eaglehawk route, with trams 21, 2 and 23 to the city with No. 20 and 17 waiting in the loop to proceed to Eaglehawk. ...Photograph of SEC Bendigo - Manchester Loop on the Eaglehawk route, with trams 21, 2 and 23 to the city with No. 20 and 17 waiting in the loop to proceed to Eaglehawk. ...Black and White photograph contained with Reg. Item 1902 - Photo Album from Keith Kings to Les Denmead 1970. Photograph of SEC Bendigo - Manchester Loop on the Eaglehawk route, with trams 21, 2 and 23 to the city with No. 20 and 17 waiting in the loop to proceed to Eaglehawk. Part of the Bendigo Easter Fair day? Large group of people waiting to board tram in the background. A number of motor vehicles in the photo. Photo taken Easter Monday, 7/3/1958. On rear of photo is stamped "ll317A and 28.5.70", possibly indicating print manufacture dates. Keith Kings No. A(e)(12) Scanning: i - image file, p - presentation file, b - back of photograph.Stamp in top left hand corner and handwritten number with "K.S. Kings No. A(e)(12) Copyright reserved". In blue ink "Bendigo / The second track cleaning car / Depot / Easter Monday 7/3/54".trams, tramways, bendigo, easter fair, manchester loop, eaglehawk, tram 21, tram 2, tram 23, tram 20, tram 17 -
 Ballarat Tramway Museum
Photograph - Digital image Set of 20, 16/04/1972 12:00:00 AM
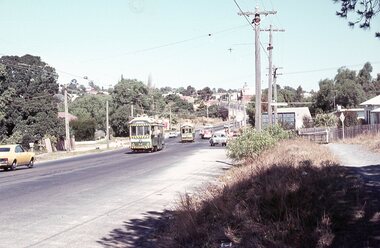
... ... Manchester Loop...Set of 22 digital images of Bendigo Tramways, of the last running day of the Eaglehawk to Quarry Hill line 16 April 1972, .1 - No. 3 and 24 crossing at Long Gully .2 - No. 3 turning at the Cricket ground, Barnard and View Sts, inbound to the City and Quarry Hill .3 - No. 3 in bound to the City and Quarry Hill, Long Gully area .4 - No. 18 inbound to the City and Quarry Hill crossing the railway bridge from Eaglehawk. .5 - Manchester Loop .6 - No. 18 inbound to the City and Quarry Hill crossing the railway bridge from Eaglehawk. .7 - No. 18 about to enter Jobs Gully Loop .8 - No. 3 about to turn at the Cricket ground, Barnard and View Sts inbound to the City and Quarry Hill .9 - No. 3 turning at the Cricket ground, Barnard and View Sts, inbound to the City and Quarry Hill .10 - No. 18 at Eaglehawk terminus with the Mechanics Institute in the background. .11 - No. 3 in bound, Ironbark area. .12 - No. 3 at Long Gully Loop .13 - No. 3 outbound to Eaglehawk. .14 - No. 18 at Eaglehawk with German circus banner on tram .15 - No. 18 on the Eaglehawk line at Jobs Gully Loop .16 - No. 24 outbound to Eaglehawk at Taylor St .17 - No. 18 inbound to the City and Quarry Hill crossing the railway bridge from Eaglehawk. .18 - No. 3 at Manchester Loop .19 - No. 18 at Eaglehawk terminus .20 - No. 18 at Eaglehawk with German circus banner on tram .21 - bogie tram at Long Gully Loop. .22 - No. 24 outbound to Eaglehawk at Taylor St...Ballarat Tramway Museum South Gardens Reserve Wendouree Parade Ballarat Ballarat goldfields Trams tramways Bendigo Eaglehawk Long Gully Jobs Gully Manchester Loop tram 24 tram 18 tram 3 Set of 22 digital images of Bendigo Tramways, of the last running day of the Eaglehawk to Quarry Hill line 16 April 1972, .1 - No. 3 and 24 crossing at Long Gully .2 - No. 3 turning at the Cricket ground, Barnard and View Sts, inbound to the City and Quarry Hill .3 - No. 3 in bound to the City and Quarry Hill, Long Gully area .4 - No. 18 inbound to the City and Quarry Hill crossing the railway bridge from Eaglehawk. .5 - Manchester Loop .6 - No. 18 inbound to the City and Quarry Hill crossing the railway bridge from Eaglehawk. .7 - No. 18 about to enter Jobs Gully Loop .8 - No. 3 about to turn at the Cricket ground, Barnard and View Sts inbound to the City and Quarry Hill .9 - No. 3 turning at the Cricket ground, Barnard and View Sts, inbound to the City and Quarry Hill .10 - No. 18 at Eaglehawk terminus with the Mechanics Institute in the background. .11 - No. 3 in bound, Ironbark area. .12 - No. 3 at Long Gully Loop .13 - No. 3 outbound to Eaglehawk. .14 - No. 18 at Eaglehawk with German circus banner on tram .15 - No. 18 on the Eaglehawk line at Jobs Gully Loop .16 - No. 24 outbound to Eaglehawk at Taylor St .17 - No. 18 inbound to the City and Quarry Hill crossing the railway bridge from Eaglehawk. .18 - No. 3 at Manchester Loop .19 - No. 18 at Eaglehawk terminus .20 - No. 18 at Eaglehawk with German circus banner on tram .21 - bogie tram at Long Gully Loop. .22 - No. 24 outbound to Eaglehawk at Taylor St Photograph Digital image Set of 20 ...Set of 22 digital images of Bendigo Tramways, of the last running day of the Eaglehawk to Quarry Hill line 16 April 1972, .1 - No. 3 and 24 crossing at Long Gully .2 - No. 3 turning at the Cricket ground, Barnard and View Sts, inbound to the City and Quarry Hill .3 - No. 3 in bound to the City and Quarry Hill, Long Gully area .4 - No. 18 inbound to the City and Quarry Hill crossing the railway bridge from Eaglehawk. .5 - Manchester Loop .6 - No. 18 inbound to the City and Quarry Hill crossing the railway bridge from Eaglehawk. .7 - No. 18 about to enter Jobs Gully Loop .8 - No. 3 about to turn at the Cricket ground, Barnard and View Sts inbound to the City and Quarry Hill .9 - No. 3 turning at the Cricket ground, Barnard and View Sts, inbound to the City and Quarry Hill .10 - No. 18 at Eaglehawk terminus with the Mechanics Institute in the background. .11 - No. 3 in bound, Ironbark area. .12 - No. 3 at Long Gully Loop .13 - No. 3 outbound to Eaglehawk. .14 - No. 18 at Eaglehawk with German circus banner on tram .15 - No. 18 on the Eaglehawk line at Jobs Gully Loop .16 - No. 24 outbound to Eaglehawk at Taylor St .17 - No. 18 inbound to the City and Quarry Hill crossing the railway bridge from Eaglehawk. .18 - No. 3 at Manchester Loop .19 - No. 18 at Eaglehawk terminus .20 - No. 18 at Eaglehawk with German circus banner on tram .21 - bogie tram at Long Gully Loop. .22 - No. 24 outbound to Eaglehawk at Taylor Sttrams, tramways, bendigo, eaglehawk, long gully, jobs gully, manchester loop, tram 24, tram 18, tram 3 -
 Ballarat Tramway Museum
Photograph - Digital image Set of 20, 16/04/1972 12:00:00 AM
... ... Manchester Loop...Set of 20 digital images of Bendigo Tramways, of the last running day of the Eaglehawk to Quarry Hill line 16 April 1972, .1 - No. 24 outbound to Eaglehawk .2 - No. 3? at Manchester Loop .3 - No. 24 outbound to Eaglehawk .4 - bogie tram crossing the rail over bridge from Eaglehawk .5 - No. 18 in View St .6 - No. 24 outbound to Eaglehawk .7 - No 18 at Eaglehawk with destination roll being changed, and shopping centre in the background. .8 - No. 24 crossing the railway overbridge, going to Eaglehawk .9 - No. 3 outbound to Eaglehawk .10 - No. 24 crossing the railway overbridge, going to Eaglehawk .11 - No. 3 and 24 crossing at Long Gully .12 - No. 18 at Eaglehawk with Leo A Hughes photographer building in the background and a CFA truck passing the tram. ...Ballarat Tramway Museum South Gardens Reserve Wendouree Parade Ballarat Ballarat goldfields Trams tramways Bendigo Eaglehawk Long Gully Manchester Loop tram 24 tram 18 tram 3 Set of 20 digital images of Bendigo Tramways, of the last running day of the Eaglehawk to Quarry Hill line 16 April 1972, .1 - No. 24 outbound to Eaglehawk .2 - No. 3? ...Set of 20 digital images of Bendigo Tramways, of the last running day of the Eaglehawk to Quarry Hill line 16 April 1972, .1 - No. 24 outbound to Eaglehawk .2 - No. 3? at Manchester Loop .3 - No. 24 outbound to Eaglehawk .4 - bogie tram crossing the rail over bridge from Eaglehawk .5 - No. 18 in View St .6 - No. 24 outbound to Eaglehawk .7 - No 18 at Eaglehawk with destination roll being changed, and shopping centre in the background. .8 - No. 24 crossing the railway overbridge, going to Eaglehawk .9 - No. 3 outbound to Eaglehawk .10 - No. 24 crossing the railway overbridge, going to Eaglehawk .11 - No. 3 and 24 crossing at Long Gully .12 - No. 18 at Eaglehawk with Leo A Hughes photographer building in the background and a CFA truck passing the tram. Tram SEC roof advertisement and a banner for "German -?- Circus" at Eaglehawk and dates. .13 - No. 3 inbound on the Eaglehawk line. .14 - No. 18 outbound to Eaglehawk .15 - ditto .16 - No. 18 at Eaglehawk terminus with the Mechanics Institute in the background. .17 - No. 24 at the Eaglehawk terminus .18 - No 24 at the intersection with Taylor St .19 - No. 24 at the Eaglehawk terminus .20 - dittotrams, tramways, bendigo, eaglehawk, long gully, manchester loop, tram 24, tram 18, tram 3 -
 Ballarat Tramway Museum
Slide - 35mm slide/s, Travis Jeffrey, c1962
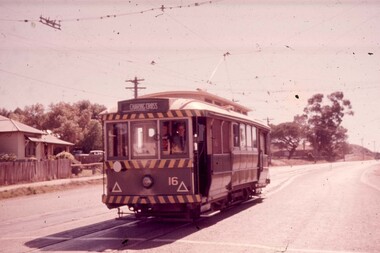
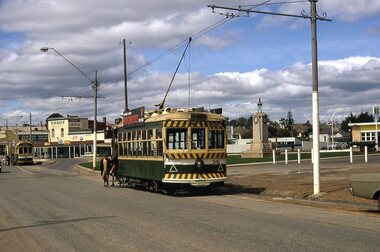
... Agfa plastic mount (blue base, white cover) with a photo of Bendigo No. 16 Manchester Loop, near Jackson St. Taken c1962, spring or early summer. ...Tramways trams Bendigo Eaglehawk tram 16 "BES 20" in pencil Agfa plastic mount (blue base, white cover) with a photo of Bendigo No. 16 Manchester Loop, near Jackson St. Taken c1962, spring or early summer. ...Agfa plastic mount (blue base, white cover) with a photo of Bendigo No. 16 Manchester Loop, near Jackson St. Taken c1962, spring or early summer. No. 16 has a tram following indicator on the front dash panel and destination of Charing Cross. Note wall behind tram remains in situ 8/2004."BES 20" in penciltramways, trams, bendigo, eaglehawk, tram 16 -
 Ballarat Tramway Museum
Slide - 35mm slide/s - set of 25, Noel Simons, 26/02/1972 12:00:00 AM
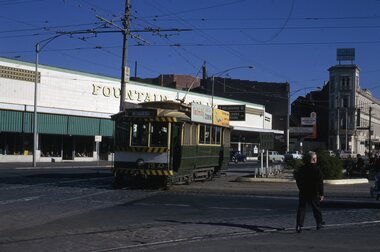
... Set of 25 transparencies taken on 26/2/1972 on Kodak mounts. 1204.1 - Bendigo No. 5 - just arrived at Manchester Loop near Havilah Road, Long Gully. ...Information written on in blue ink and date stamped on purple ink. 1204.1 - "No. 5 at Manchester Loop, near Havilah Rd. Long Gully." 1204.2 - "No. 26 in Backhaus St. ...Set of 25 transparencies taken on 26/2/1972 on Kodak mounts. 1204.1 - Bendigo No. 5 - just arrived at Manchester Loop near Havilah Road, Long Gully. Photo taken after tram has passed photographer. 1204.2 - No. 26 in Backhaus St. ...Set of 25 transparencies taken on 26/2/1972 on Kodak mounts. 1204.1 - Bendigo No. 5 - just arrived at Manchester Loop near Havilah Road, Long Gully. Photo taken after tram has passed photographer. 1204.2 - No. 26 in Backhaus St. Long Gully passing William St, en route to Quarry Hill. Photo taken after tram has passed photographer. 1204.3 - No. 5 climbing the High St. Hill Eaglehawk, heading for Quarry Hill with the buildings on the West side of High St. in the background, including the Eaglehawk Town Hall. 1204.4 - as for 1204.3, but tram close up. 1204.5 - as for 1204.3, but after tram has passed photographer. 1204.6 - No. 5 at intersection of Mt Korong Road Ironbark and Calder Highway, with the AMPOL service 'station in the background. Photo taken after tram has passed photographer. 1204.7 - No. 26 en route to Quarry Hill shortly after leaving Needle Loop, passing William St., Long Gully. 1204.8 - No. 5 at California Gully Loop, picking up a passenger, with the shops at Long Gully in the background. Photo taken after tram has passed photographer. 1204.9 - No. 5 in Long Gully, en route to Quarry Hill. Photo taken after tram has passed photographer. 1204.10 - No. 2 at Eaglehawk terminus with the Eaglehawk Town Hall and Post Office in the background. Tram has two SEC roof ads. 1204.11 - No. 2 at Eaglehawk terminus, close up. 1204.12 - as for 1204.11, but through the park gates. 1204.13 - as for 1204.11, but with tram stop shelters in the foreground and buildings on the West side of High St in the background. 1204.14 - No. 2 in Mt. Korong Rd, midway between California Gully Loop and Needle Loop. Photo taken after tram has passed photographer. 1204.15 - No. 5 in Long Gully, en route to Quarry Hill. 1204.16 - as for 1204.15, but with trams departed loop. Has an ESSO service station in the background. 1204.17 - No. 26 leaves Charing Cross up View St.. Photo taken after tram has passed photographer. Has Armstrong Tyre Service, Cohns Drinks ad on a building and the T&G building in the background. Also Firestone ads on the tyre service building. 1204.18 - No. 5 waits at Charing Cross with the Alexandra Fountain in the background. Tram has two SEC roof ads, 'Everything s fine in my all electric kitchen' and 'Electricity Best for Cooking'. Has RACV, Colonial Mutual Life buildings in the background and the planting areas around Charing Cross gardens in the foreground. 1204.19 - No. 21 en route to North Bendigo arrives at Charing Cross, with passengers waiting to board. No. 5 in the background. In the background is the Fountain Gate Plaza building and the City Family Hotel. 1204.20 - as for 1204.19, but with No. 7 en route to Golden Square. 1204.21 - as for 1204.19, but closer up. 1204.22 - as for 1204.18 1204.23 - No. 25 in Nolan St. near the crossing of Bendigo Creek, running a special tram tour. 1204.24 - No. 25 on a special charter, in Weeroona Ave. at Cnr of Caledonia St. passing the Gas works. 1204.25 - Nos. 25 (showing Golden Square), 7 and 26 at Charing Cross. Has fountain in the background.Information written on in blue ink and date stamped on purple ink. 1204.1 - "No. 5 at Manchester Loop, near Havilah Rd. Long Gully." 1204.2 - "No. 26 in Backhaus St. Long Gully passing William St." 1204.3 - "No. 5 in High St. Eaglehawk." 1204.4 - "No. 5 in High St. Eaglehawk." 1204.5 - "No. 5 in High St. Eaglehawk." 1204.6 - "No. 5 in Mt. Korong Rd., Ironbark, passing Calder Highway Junctn." 1204.7 - "No. 26 shortly after leaving Needle Loop, passing William St., Long Gully. No. 5 cresting hill in distance." 1204.8 - "No. 5 at California Gully Loop." 1204.9 - "No. 5 in Long Gully" 1204.10 - "No. 2 at Eaglehawk terminus." 1204.11 - "No. 2 at Eaglehawk terminus." 1204.12 - "No. 2 at Eaglehawk terminus." 1204.13 - "No. 2 at Eaglehawk terminus." 1204.14 - "No. 2 in Mt. Korong Rd, midway between California Gully Loop and Needle Loop. 1204.15 - "Nos. 2 and 26 crossing at Long Gully." 1204.16 - "No. 26 leaves Long Gully loop for Eaglehawk as No. 2 pulls out of the far end towards Bendigo" 1204.17 - "No. 26 beginning the climb up View St. from Charing Cross." 1204.18 - "No. 5 at Charing Cross." 1204.19 - "No 21 arrives at Charing Cross from Golden Square while No. 5 awaits departure time for Eaglehawk." 1204.20 - "Nos. 7, 21, and 2 (behind which is No. 5) at Charing Cross." 1204.21 - "Nos. 7, 21, and 2 at Charing Cross." 1204.22 - "No. 5 at Charing Cross." 1204.23 - "No. 25 in Nolan St. near Bendigo creek crossing" 1204.24 - "No. 25 in Weeroona Ave. at cnr of Caledonia St." 1204.25 - "Nos. 25, 7, 26 and 2 (behind 26) at Charing Cross."tramways, trams, bendigo, eaglehawk, long gully, california gully, charing cross, north bendigo, tram 2, tram 5, tram 7, tram 21, tram 25, tram 26 -
 Ballarat Tramway Museum
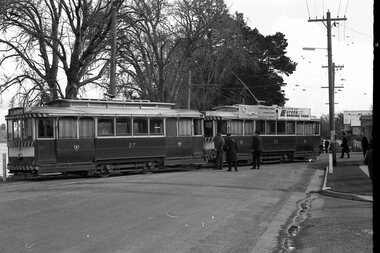
Slide - 35mm slide/s - set of 24, Noel Simons, 20/05/1971 12:00:00 AM
... Passengers are boarding the tramcar. 1195.12 - No. 30 in High St, bound for North Bendigo between Vine and Wattle Streets. 1195.13 - No. 5 bound for Eaglehawk waits at Iron Bark Gully Loop, at Hayes St. 1195.14 - No. 5 and No. 2 crossing at Iron Bark Gully Loop. 1195.15 - No. 5 bound for Eaglehawk leaving the Manchester Loop, Long gully. 1195.16 - No. 5 passing William Street, Long Gully en route to Eaglehawk. 1195.17 - No. 5 just before the California Gully Crossing Loop. 1195.18 - Nos. 5 and 26 crossing at California Gully crossing Loop. ...Loop, California Gully". 1195.9 - "No. 5 descending Mt Korong Rd. towards Bamard St." 1195.10 - "Birney car No. 30 at Golden Square terminus" 1195.11 - "Birney car No. 30 in High Street near Thistle Street (Fire Station Loop)" 1195.12 - "No. 30 in High St. between vine and Wattle Streets" 1195.13 - "No. 25 at Hayes Street Loop Iron Bark". 1195.14 - "Nos. 2 and 5 crossing at Hayes Street Loop Iron Bark" 1195.15 - "No. 5 at Manchester Loop opposite Havilah Road, Long Gully" 1195.16 - "No. 5 passing William Street, Long Gully". 1195.17 - "No. 5 at California Gully" 1195,18 - "Nos. 26 and 5 at Thorpe St. ...Passengers are boarding the tramcar. 1195.12 - No. 30 in High St, bound for North Bendigo between Vine and Wattle Streets. 1195.13 - No. 5 bound for Eaglehawk waits at Iron Bark Gully Loop, at Hayes St. 1195.14 - No. 5 and No. 2 crossing at Iron Bark Gully Loop. 1195.15 - No. 5 bound for Eaglehawk leaving the Manchester Loop, Long gully. 1195.16 - No. 5 passing William Street, Long Gully en route to Eaglehawk. 1195.17 - No. 5 just before the California Gully Crossing Loop. 1195.18 - Nos. 5 and 26 crossing at California Gully crossing Loop. ...Set of 24 transparencies taken on 20/5/1971 on Kodak mounts. 1195.1 - Bendigo 19 arriving at Charing Cross en route to North Bendigo with Fountain Plaza and the City Family Hotel in the background. No. 19 has two roof ads for the SEC. -'Electricity better for cooking' and 'Everything's under control in my all electric kitchen' 1195.2 - as above, but standing at the Charing cross stop, with the Beehive Stores and other buildings along the east side of Pall Mall in the background. 1195.3 - No 21 ex Golden Square crossing View St. trackwork in front of No. 25 waiting to depart for Quarry Hill. No.21 has two roof ads (as for No.19 in 1195.1) and No.25 has one SEC roof ad and another. Ezywalkin sign in the background, and Fountain Plaza. 1195.4 - as for 1195.3, but after 21 has arrived and 25 left for Quarry Hill. Has Ezywalkin store and the Beehive store in the background. 1195.5 - No. 5 at the Eaglehawk terminus. Photo taken with a cannon in foreground looking along High St. Eaglehawk. Has shops on the west side of High St. in the background. 1195.6 - No. 5 at the Eaglehawk terminus, close up of the rear of the tram - note tow bar arrangement. Has destination of Quarry Hill. 1195.7-Nos.25 and 5 crossing at the Thorpe St. Loop, California Gully. No. 25 bound for Eaglehawk (has SEC Briquette and electric cooking roof ads) and 5 en route for Quarry Hill with a SEC and Cinzano roof ad. 1195.8 - as for 1195.7, but after trams have passed each other. Has Borough Auto Service building in the background. 1195.9 - No. 5 in Mt Korong Road, towards Bamard Street, photo taken after tram has passed photographer. 1195.10 - No. 30 at the Golden Square terminus with the Milk Bar on the right hand side of the photograph. 1195.11 - No. 30 inbound at Fire Station Loop, High St. Golden Square. Has old fire station in the background. Passengers are boarding the tramcar. 1195.12 - No. 30 in High St, bound for North Bendigo between Vine and Wattle Streets. 1195.13 - No. 5 bound for Eaglehawk waits at Iron Bark Gully Loop, at Hayes St. 1195.14 - No. 5 and No. 2 crossing at Iron Bark Gully Loop. 1195.15 - No. 5 bound for Eaglehawk leaving the Manchester Loop, Long gully. 1195.16 - No. 5 passing William Street, Long Gully en route to Eaglehawk. 1195.17 - No. 5 just before the California Gully Crossing Loop. 1195.18 - Nos. 5 and 26 crossing at California Gully crossing Loop. No. 5 heading to Eaglehawk, 26, Quarry Hill. 1195.19 - No. 5 in High St. Eaglehawk with Bob Moyle's Victoria Hotel and the TAB in the background. 1195.20 - No. 5 in High St. Eaglehawk approaching the terminus. Photo taken after the tram has passed the photographer. Has Foodland store and J. Best Fruit supply in the background, along with Eaglehawk Town Hall. 1195.21 - No. 5 at the Eaglehawk terminus, photo taken along seldom used track along High St. 1195.22 - as for 1195.22 - but at the very end of the track. 1195.23 - No. 5 en route for Quarry Hill climbs High St. Eaglehawk with the Victoria Hotel and Eaglehawk Town Hall in the background. 1195.24 - No. 5 and 25 crossing at Jobs Gully Loop. Note 25 has a black on white destination roll, while No. 5 has a white on black destination roll. Information written on in black ink and date stamped on purple ink. 1195.1 - "No. 19 arrives at Charing Cross Bendigo from Golden Square" 1195.2 - "No. 19 about to leave Charing Cross for North Bendigo" 1195.3 - "No. 25 awaiting departure for Quarry Hill, watches No. 21 arrive at Charring Cross from Golden Square" 1195.4 - "No. 21 on North Bendigo service and No. 25 on Quarry Hill run await departure at Charing Cross" 1195.5 - "No. 5 at Eaglehawk terminus" 1195.6 - "No. 5 at Eaglehawk terminus" 1195.7 - "Nos. 5 and 25 crossing at Thorpe St. Loop, California". 1195.8 - "Nos. 25 and 5 crossing Thorpe St. Loop, California Gully". 1195.9 - "No. 5 descending Mt Korong Rd. towards Bamard St." 1195.10 - "Birney car No. 30 at Golden Square terminus" 1195.11 - "Birney car No. 30 in High Street near Thistle Street (Fire Station Loop)" 1195.12 - "No. 30 in High St. between vine and Wattle Streets" 1195.13 - "No. 25 at Hayes Street Loop Iron Bark". 1195.14 - "Nos. 2 and 5 crossing at Hayes Street Loop Iron Bark" 1195.15 - "No. 5 at Manchester Loop opposite Havilah Road, Long Gully" 1195.16 - "No. 5 passing William Street, Long Gully". 1195.17 - "No. 5 at California Gully" 1195,18 - "Nos. 26 and 5 at Thorpe St. Loop, California Gully". 1195.19 - "No. 5 in High St. Eaglehawk". 1195.20 - "No. 5 approaching Eaglehawk terminus" 1195.21 - "No. 5 at Eaglehawk terminus" 1195.22 - "No. 5 at Eaglehawk terminus" 1195.23 - "No. 5 in High St. Eaglehawk" tramways, trams, bendigo, charing cross, eaglehawk, california gully, golden square, iron bark gully, jobs gully, tram 2, tram 5, tram 19, tram 21, tram 25, tram 26, tram 30 -
 Ballarat Tramway Museum
Photograph - Digital image Set of 20
... Bests .6 - No. 29 and 23 crossing Manchester Loop with Manchester Arms Hotel in the background and an old poppet head. .7 - No. 29 at ditto with poppet head in the background. .8 - No. 28 and two other trams at the Quarry Hill terminus. .9 - No. 29 in High St Bendigo with the Cathedral and Golden Gate Hotel in the background. .10 - No. 3 with destination Eaglehawk, in bound Carpenter St? ...Bests .6 - No. 29 and 23 crossing Manchester Loop with Manchester Arms Hotel in the background and an old poppet head. .7 - No. 29 at ditto with poppet head in the background. .8 - No. 28 and two other trams at the Quarry Hill terminus. .9 - No. 29 in High St Bendigo with the Cathedral and Golden Gate Hotel in the background. .10 - No. 3 with destination Eaglehawk, in bound Carpenter St? ...Set of 20 digital images of Bendigo Tramways, 1972 at or before closure while on a tram tour by Stuart Lodington. .1 - No. 28 and 5 at Eaglehawk terminus .2 - No. 28 leaving Charing Cross and travelling into View St with Armstrong Type Service building in background and Firestone Advertisements. .3 - No. 29 with Eaglehawk Town Hall and Post Office in background. .4 - No. 26 and 29 at start of double track, High St Eaglehawk .5 - No. 29 leaving Eaglehawk with shops in the background, Foodland, J. Bests .6 - No. 29 and 23 crossing Manchester Loop with Manchester Arms Hotel in the background and an old poppet head. .7 - No. 29 at ditto with poppet head in the background. .8 - No. 28 and two other trams at the Quarry Hill terminus. .9 - No. 29 in High St Bendigo with the Cathedral and Golden Gate Hotel in the background. .10 - No. 3 with destination Eaglehawk, in bound Carpenter St? .11 - No. 29 following a single trucker through a loop or the end of the double track near the depot. .12 - No. 23?, at Eaglehawk terminus, with Eaglehawk Town Hall in the background. .13 - Birney tram crossing the bridge at the Depot entrance - No. 29 .14 - No. 29 on the Eaglehawk line? .15 - as for .13 .16 - No. 29 entering the depot. .17 - No. 23, inbound from Eaglehawk, at Jobs Gully Loop with the railway overbridge in the background. .18 - No. 28 and two other trams (see also Reg Item 4982) for the same tram tour at Myrtle St. Loop. .19 - No. 21 with North Bendigo on the destination approaching the Golden Square terminus. .20 - No. 7 at Golden Square terminustrams, tramways, bendigo, eaglehawk, quarry hill, golden square, depot, tram 5, tram 29, tram 28, tram 26, tram 23, tram 7, tram 21 -
 Ballarat Tramway Museum
Photograph - Digital image Set of 20, 1971-72
... Set of 20 digital images of Bendigo Tramways, 1972 at or before closure while on a tram tour by Stuart Lodington. .1 - No. 7 at Golden Square terminus .2 - ditto .3 - No. 26 in bound on the Eaglehawk line with a crossing loop behind. .4 - Birney crossing the bridge by the tram depot. .5 - No. 29 running a special on the Eaglehawk line with a HBA billboard in the background. .6 - No. 29 with a driver walking in front of the tram at the above location. .7 - No. 29 on the Eaglehawk line .8 - ditto waiting for a tram at Manchester Loop with poppet head in the background. .9 - No. 29 on the Eaglehawk line .10 - Eaglehawk Town Hall at night. .11 - No. 7 at the depot junction in McCrae St, with Golden Square destination. .12 - No. 29 with the Camp Hotel Eaglehawk in the background. ...Ballarat Tramway Museum South Gardens Reserve Wendouree Parade Ballarat Ballarat goldfields Trams tramways Bendigo Eaglehawk Quarry Hill Golden Square Depot McCrae St Nolan St tram 7 tram 26 tram 29 tram 18 Set of 20 digital images of Bendigo Tramways, 1972 at or before closure while on a tram tour by Stuart Lodington. .1 - No. 7 at Golden Square terminus .2 - ditto .3 - No. 26 in bound on the Eaglehawk line with a crossing loop behind. .4 - Birney crossing the bridge by the tram depot. .5 - No. 29 running a special on the Eaglehawk line with a HBA billboard in the background. .6 - No. 29 with a driver walking in front of the tram at the above location. .7 - No. 29 on the Eaglehawk line .8 - ditto waiting for a tram at Manchester Loop with poppet head in the background. .9 - No. 29 on the Eaglehawk line .10 - Eaglehawk Town Hall at night. .11 - No. 7 at the depot junction in McCrae St, with Golden Square destination. .12 - No. 29 with the Camp Hotel Eaglehawk in the background. ...Set of 20 digital images of Bendigo Tramways, 1972 at or before closure while on a tram tour by Stuart Lodington. .1 - No. 7 at Golden Square terminus .2 - ditto .3 - No. 26 in bound on the Eaglehawk line with a crossing loop behind. .4 - Birney crossing the bridge by the tram depot. .5 - No. 29 running a special on the Eaglehawk line with a HBA billboard in the background. .6 - No. 29 with a driver walking in front of the tram at the above location. .7 - No. 29 on the Eaglehawk line .8 - ditto waiting for a tram at Manchester Loop with poppet head in the background. .9 - No. 29 on the Eaglehawk line .10 - Eaglehawk Town Hall at night. .11 - No. 7 at the depot junction in McCrae St, with Golden Square destination. .12 - No. 29 with the Camp Hotel Eaglehawk in the background. Also a Newsagent with The Sun, The Bendigo Advertiser and The Age signs on the building, High St .13 - No. 29 Mt Korong Rd, with the railway overbridge in the background. .14 - interior photo of Birney tram roof .15 - interior view of controls of Birney at Eaglehawk .16 - No. 29 outbound at the Depot Junction McCrae St. .17 - No. 18 at the Eaglehawk terminus .18 - close up view of No. 29 front. .19 - No. 29 in Nolan St, crossing the bridge, outbound. .20 - No. 18 at the Eaglehawk terminus with the Eaglehawk Town Hall, Post Office in the background. Has a circus banner on the side.trams, tramways, bendigo, eaglehawk, quarry hill, golden square, depot, mccrae st, nolan st, tram 7, tram 26, tram 29, tram 18 -
 Bendigo Historical Society Inc.
Photograph - Robert Green Collection - Photos of Bendigo Tramways - Sheet 7 of 8, 1960s
... Photos: 11147.7a No 6 to Golden Square in Mcrae Street 11147.7b No 21 to North Bendigo in Mcrae Street 11147.7c No 7 to North Bendigo in Mcrae Street 11147.7d No 7 to North Bendigo in Mcrae Street passes No 21 to Golden Square on the loop 11147.7e The Depot and Back Creek bridge 11147.7f The Depot and Back Creek bridge 11147.7g Nos 25, 23 and 30 in the depot 11147.7h The photographer in Thunder Street North Bendigo, railway line in the background 11147.7i No 21 coming up to the North Bendigo terminus in Thunder or Finn street 11147.7j No 21 leaving the North Bendigo terminus in Thunder or Finn street 11147.7k The Photographer in Thunder Street, North Bendigo 11147.7l No 21 in Thunder or Finn street 11147.7m No 21 in Thunder or Finn street 11147.7n No 17 in Eaglehawk 11147.7o No 17 in Eaglehawk 11147.7p No 26 at the top of Mitchell Street 11147.7q No 26 heading to Eaglehawk in the rain 11147.7r No 2 to Quarry Hill in the rain at the Manchester Arms Loop 11147.7s Passing Trams 11147.7t No 30 Birney Car to Quarry Hill in the rain at the Manchester Arms Loop 11147.7u No 7 to North Bendigo, the rowing Club in the background, Thunder Street 11147.7v No 7 turns into Finn Street from the North Bendigo Terminus 11147.7w The Birney Car turns into the North Bendigo Terminus from Finn Street 11147.7x The Birney Car turns into the North Bendigo Terminus from Finn Street 11147.7y Two trams at the North Bendigo Terminus 11147.7z No 24 approaches the Cemetery gates and horse hitching posts in Quarry Hill 11147.7aa The Cemetery and horse hitching posts in Quarry Hill 11147.7ab No 24 and horse hitching post in Quarry Hill...Photos: 11147.7a No 6 to Golden Square in Mcrae Street 11147.7b No 21 to North Bendigo in Mcrae Street 11147.7c No 7 to North Bendigo in Mcrae Street 11147.7d No 7 to North Bendigo in Mcrae Street passes No 21 to Golden Square on the loop 11147.7e The Depot and Back Creek bridge 11147.7f The Depot and Back Creek bridge 11147.7g Nos 25, 23 and 30 in the depot 11147.7h The photographer in Thunder Street North Bendigo, railway line in the background 11147.7i No 21 coming up to the North Bendigo terminus in Thunder or Finn street 11147.7j No 21 leaving the North Bendigo terminus in Thunder or Finn street 11147.7k The Photographer in Thunder Street, North Bendigo 11147.7l No 21 in Thunder or Finn street 11147.7m No 21 in Thunder or Finn street 11147.7n No 17 in Eaglehawk 11147.7o No 17 in Eaglehawk 11147.7p No 26 at the top of Mitchell Street 11147.7q No 26 heading to Eaglehawk in the rain 11147.7r No 2 to Quarry Hill in the rain at the Manchester Arms Loop 11147.7s Passing Trams 11147.7t No 30 Birney Car to Quarry Hill in the rain at the Manchester Arms Loop 11147.7u No 7 to North Bendigo, the rowing Club in the background, Thunder Street 11147.7v No 7 turns into Finn Street from the North Bendigo Terminus 11147.7w The Birney Car turns into the North Bendigo Terminus from Finn Street 11147.7x The Birney Car turns into the North Bendigo Terminus from Finn Street 11147.7y Two trams at the North Bendigo Terminus 11147.7z No 24 approaches the Cemetery gates and horse hitching posts in Quarry Hill 11147.7aa The Cemetery and horse hitching posts in Quarry Hill 11147.7ab No 24 and horse hitching post in Quarry Hill Photograph Robert Green Collection - Photos of Bendigo Tramways - Sheet 7 of 8 ...This collection contains eight archive sheets (Sheet 1 to Sheet 8) of strips of original 35mm black and white negatives of photographs taken during the 1960s and early 1970s by Robert Green, of the Bendigo State Electricty Commission of Victoria Tramways prior to their abandonment The collection also includes two archive quality sheets (Sheet A and Sheet B) of original 35mm colour slides taken by Robert Green during the same period. Sheet B also contains one slide taken by Robert's friend Keigh S King (1928-2019) who was the author of the book 'The Bendigo Tramways an illustrated history, published by the Australian Railway Historical Society Victorian Division Melbourne in February 1972; BHS Item no. 5052. The collection also includes one USB stick which contains images of all photographs described above, except for one colour slide taken by Keith S Kings. Sixteen black and white prints from the images are also included.Robert Green Collection, this item contains 28 Black and White Negatives of the trams at various locations around Bendigo. Photos: 11147.7a No 6 to Golden Square in Mcrae Street 11147.7b No 21 to North Bendigo in Mcrae Street 11147.7c No 7 to North Bendigo in Mcrae Street 11147.7d No 7 to North Bendigo in Mcrae Street passes No 21 to Golden Square on the loop 11147.7e The Depot and Back Creek bridge 11147.7f The Depot and Back Creek bridge 11147.7g Nos 25, 23 and 30 in the depot 11147.7h The photographer in Thunder Street North Bendigo, railway line in the background 11147.7i No 21 coming up to the North Bendigo terminus in Thunder or Finn street 11147.7j No 21 leaving the North Bendigo terminus in Thunder or Finn street 11147.7k The Photographer in Thunder Street, North Bendigo 11147.7l No 21 in Thunder or Finn street 11147.7m No 21 in Thunder or Finn street 11147.7n No 17 in Eaglehawk 11147.7o No 17 in Eaglehawk 11147.7p No 26 at the top of Mitchell Street 11147.7q No 26 heading to Eaglehawk in the rain 11147.7r No 2 to Quarry Hill in the rain at the Manchester Arms Loop 11147.7s Passing Trams 11147.7t No 30 Birney Car to Quarry Hill in the rain at the Manchester Arms Loop 11147.7u No 7 to North Bendigo, the rowing Club in the background, Thunder Street 11147.7v No 7 turns into Finn Street from the North Bendigo Terminus 11147.7w The Birney Car turns into the North Bendigo Terminus from Finn Street 11147.7x The Birney Car turns into the North Bendigo Terminus from Finn Street 11147.7y Two trams at the North Bendigo Terminus 11147.7z No 24 approaches the Cemetery gates and horse hitching posts in Quarry Hill 11147.7aa The Cemetery and horse hitching posts in Quarry Hill 11147.7ab No 24 and horse hitching post in Quarry Hillkeith s king, bendigo, trams, robert green -
 Bendigo Historical Society Inc.
Document - ALBERT RICHARDSON COLLECTION: VICTORIA HILL IRONBARK
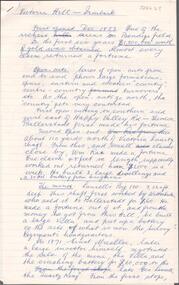
... BCV 8, John Brown Knitwear factory, Esposito's Gold Mines Hotel, Central Nell Gwynne and Manchester tram loops are mentioned....BCV 8, John Brown Knitwear factory, Esposito's Gold Mines Hotel, Central Nell Gwynne and Manchester tram loops are mentioned. Document ALBERT RICHARDSON COLLECTION: VICTORIA HILL IRONBARK ...Three page document hand written by Albert Richardson, on the history of Victoria Hill, Ironbark. 'one of the richest areas on Bendigo field. In the first six years, £1,200,000 worth of gold was obtained. Almost every claim returned a fortune.' Page three title: Other features on Victoria Hill. 'Adjacent to Central Nell Gwynne area as the mining museum. Adjacent to the New Chum Hill on direct south side of the Calder Highway. This hill reached by a short and excellent access road gives a magnificent view of Bendigo and Golden Square, and a very good view of another tourist attraction, Lansells 'Fortuna' now Survey Regiment's headquarters. This hill is the centre of another rich area. The Lazarus mine 3,360 feet deep with 24 saddle reefs in 2,200 feet. The New Chum United, Lansell's 222with its 120 ft high poppet legs. BCV 8, John Brown Knitwear factory, Esposito's Gold Mines Hotel, Central Nell Gwynne and Manchester tram loops are mentioned.Albert Richardsonbendigo, mining, victoria hill -
 Ballarat Tramway Museum
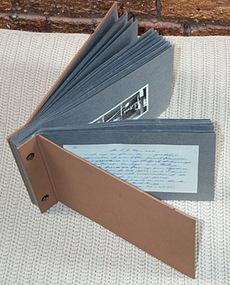
Album - Photo Album, Keith Kings, Jul. 1970
... Denmead from Keith Kings. 2 Title sheet – “BALLARAT” 3 1903 Small photo of SEC Monogram from Geelong No. 1 1904 Photo of SEC plaques etc at Wendouree office 4 1905 Photo of front of Wendouree Parade depot – 1957 - with trams 40 and 25 in photo. 5 1906 Photo of Ballarat 23 at depot 6 1907 Photo of Ballarat 29 in depot. 7 1908 Photo of Ballarat 17 in Wendouree Parade 8 1909 Photo of Ballarat 21 at depot. 9 1910 Photo of Ballarat 15 and 31 in Sturt St. 10 1911 Photo of Ballarat No. 40 Sturt St. 11 1912 Photo of Ballarat No. 38 – Wendouree Parade 12 1913 Photo of Scrubber car in depot. 13 Title sheet – “BENDIGO” 14 1914 Photo of Bendigo depot 15 1915 Photo of Bendigo No. 17, 1949. 16 1916 Photo of Bendigo 22 and 4 at Eaglehawk. 17 1917 Photo of Bendigo 12 at Golden Square. 18 1918 Photo of Bendigo 13 and 26 at Eaglehawk terminus. 19 1919 Photo of Bendigo 17 (bogie) at Quarry Hill terminus. 20 1920 Photo of Bendigo 18 at Charing Cross 21 1921 Photo of Bendigo Birneys 28 and 29 at Charing Cross 22 1922 Photo of original sprinkler and track cleaning car in Bendigo depot 23 1923 Photo of Bendigo 2nd track cleaning car 24. 1924 Photo of trams at Manchester Loop, 1958. 25. Title sheet – “GEELONG” 26 1925 Photo of Geelong 19 in front of the depot. 27 1926 Photo of Geelong depot 28 1927 Photo of Geelong No. 3 at East terminus 29 1928 Photo of Geelong No. 23 outside depot. 30 1929 Photo of Geelong No. 16 at Eastern Park terminus. 31 1930 Photo of Geelong No. 28 at depot 32 1931 Photo of Geelong Birney No. 14 at Eastern Park terminus. 33 1932 Photo of Geelong No. 32 at Moorabool St. 34 1933 Photo of Geelong No. 37 outside depot 35 1934 Photo of Geelong No. 39 at West terminus 36. ...Denmead from Keith Kings. 2 Title sheet – “BALLARAT” 3 1903 Small photo of SEC Monogram from Geelong No. 1 1904 Photo of SEC plaques etc at Wendouree office 4 1905 Photo of front of Wendouree Parade depot – 1957 - with trams 40 and 25 in photo. 5 1906 Photo of Ballarat 23 at depot 6 1907 Photo of Ballarat 29 in depot. 7 1908 Photo of Ballarat 17 in Wendouree Parade 8 1909 Photo of Ballarat 21 at depot. 9 1910 Photo of Ballarat 15 and 31 in Sturt St. 10 1911 Photo of Ballarat No. 40 Sturt St. 11 1912 Photo of Ballarat No. 38 – Wendouree Parade 12 1913 Photo of Scrubber car in depot. 13 Title sheet – “BENDIGO” 14 1914 Photo of Bendigo depot 15 1915 Photo of Bendigo No. 17, 1949. 16 1916 Photo of Bendigo 22 and 4 at Eaglehawk. 17 1917 Photo of Bendigo 12 at Golden Square. 18 1918 Photo of Bendigo 13 and 26 at Eaglehawk terminus. 19 1919 Photo of Bendigo 17 (bogie) at Quarry Hill terminus. 20 1920 Photo of Bendigo 18 at Charing Cross 21 1921 Photo of Bendigo Birneys 28 and 29 at Charing Cross 22 1922 Photo of original sprinkler and track cleaning car in Bendigo depot 23 1923 Photo of Bendigo 2nd track cleaning car 24. 1924 Photo of trams at Manchester Loop, 1958. 25. Title sheet – “GEELONG” 26 1925 Photo of Geelong 19 in front of the depot. 27 1926 Photo of Geelong depot 28 1927 Photo of Geelong No. 3 at East terminus 29 1928 Photo of Geelong No. 23 outside depot. 30 1929 Photo of Geelong No. 16 at Eastern Park terminus. 31 1930 Photo of Geelong No. 28 at depot 32 1931 Photo of Geelong Birney No. 14 at Eastern Park terminus. 33 1932 Photo of Geelong No. 32 at Moorabool St. 34 1933 Photo of Geelong No. 37 outside depot 35 1934 Photo of Geelong No. 39 at West terminus 36. ...Album comprises heavy cardboard covers with brown Rexene covers, with inside papers of heavy dark grey photo album paper, 36 leaves of dark grey photo paper and two brass interscrews within black grommets. See Condition Details re damage to back cover. Album contains 32 photos - personal prints of Keith Kings. Title page has been hand written to Les Denmead, dated 6/7/1970, thanking Mr. Denmead for his assistance over the years. Photos divided into the three SEC Provincial Tramway cities, each with a typed name proceeding the set of photos. Two further photos of Geelong were at the rear of the album, but were not in position when catalogued. One of these photos may be Reg. Item 1874 - photo of Geelong scrubber tram. Each of the photographs have been separately registered, as shown in the table below. Scanned images made of front and back of the photos. Back has Keith Kings ID number, description, notes and date of photo. Conservation Notes prepared - within the cataloguing sheet - see related documents. Folio Reg. Notes Item No. 1 Handwritten note to Mr. L. J. Denmead from Keith Kings. 2 Title sheet – “BALLARAT” 3 1903 Small photo of SEC Monogram from Geelong No. 1 1904 Photo of SEC plaques etc at Wendouree office 4 1905 Photo of front of Wendouree Parade depot – 1957 - with trams 40 and 25 in photo. 5 1906 Photo of Ballarat 23 at depot 6 1907 Photo of Ballarat 29 in depot. 7 1908 Photo of Ballarat 17 in Wendouree Parade 8 1909 Photo of Ballarat 21 at depot. 9 1910 Photo of Ballarat 15 and 31 in Sturt St. 10 1911 Photo of Ballarat No. 40 Sturt St. 11 1912 Photo of Ballarat No. 38 – Wendouree Parade 12 1913 Photo of Scrubber car in depot. 13 Title sheet – “BENDIGO” 14 1914 Photo of Bendigo depot 15 1915 Photo of Bendigo No. 17, 1949. 16 1916 Photo of Bendigo 22 and 4 at Eaglehawk. 17 1917 Photo of Bendigo 12 at Golden Square. 18 1918 Photo of Bendigo 13 and 26 at Eaglehawk terminus. 19 1919 Photo of Bendigo 17 (bogie) at Quarry Hill terminus. 20 1920 Photo of Bendigo 18 at Charing Cross 21 1921 Photo of Bendigo Birneys 28 and 29 at Charing Cross 22 1922 Photo of original sprinkler and track cleaning car in Bendigo depot 23 1923 Photo of Bendigo 2nd track cleaning car 24. 1924 Photo of trams at Manchester Loop, 1958. 25. Title sheet – “GEELONG” 26 1925 Photo of Geelong 19 in front of the depot. 27 1926 Photo of Geelong depot 28 1927 Photo of Geelong No. 3 at East terminus 29 1928 Photo of Geelong No. 23 outside depot. 30 1929 Photo of Geelong No. 16 at Eastern Park terminus. 31 1930 Photo of Geelong No. 28 at depot 32 1931 Photo of Geelong Birney No. 14 at Eastern Park terminus. 33 1932 Photo of Geelong No. 32 at Moorabool St. 34 1933 Photo of Geelong No. 37 outside depot 35 1934 Photo of Geelong No. 39 at West terminus 36. No photo – marks of four corners remained. 37 – back cover No photo – marks of four corners remained. Photos not to be taken out of the album unless for photographic copying. Use image files. Photo Album - The Commercial Photo Album - No. 1 - 36 leaves. See hand written note from Keith Kings to Mr. L. J. Denmead. Dated 6/7/70.trams, tramways, ballarat, bendigo, geelong, photo album -
 Bendigo Historical Society Inc.
Photograph - Robert Green Collection - Photos of Bendigo Tramways - Sheet 2 of 8, 1960s
... Photos: 11147.2a No 30, 29, 28 and 11 Birney Cars lined up at the Depot 11147.2b No 30, 29, 28 and 11 Birney Cars lined up at the Depot 11147.2c No 30, 29, 28 and 11 Birney Cars lined up at the Depot 11147.2d No 30, 29, 28 and 11 Birney Cars lined up at the Depot 11147.2e No 30, 29, 28 and 11 Birney Cars lined up at the Depot 11147.2f No 30, 29, 28 Birney Cars lined up at the Depot 11147.2g No 30, 29, 28 and 11 Birney Cars lined up at the Depot 11147.2h No 30, 29, 28 and 11 Birney Cars lined up at the Depot 11147.2i No 30, 29, 28 and 11 Birney Cars and No 25 lined up at the Depot 11147.2j No 30, 29, 28 and 11 Birney Cars and No 25 lined up at the Depot 11147.2k No 28 and 11 Birney Cars lined up at the Depot 11147.2l No 30 Special leaves the depot watched by the photographer 11147.2m No 29 Special leaves the depot 11147.2n Driver and passenger inside a Birney Car 11147.2o Driver and passenger inside a Birney Car heading up Pall Mall 11147.2p The four Birney Cars in Carpenter Street, Quarry Hill Terminus at the Cemetery Gates 11147.2q The four Birney Cars in Carpenter Street, Quarry Hill Terminus at the Cemetery Gates 11147.2r The four Birney Cars in Carpenter Street, Quarry Hill Terminus at the Cemetery Gates 11147.2s The four Birney Cars in Carpenter Street, Quarry Hill Terminus at the Cemetery Gates 11147.2t The four Birney Cars at the Carpenter Street, Quarry Hill Loop 11147.2u No 28 Special Birney Car 11147.2v No 30 Special Birney Car 11147.2w The four Birney Cars at the fountain side by side getting reading to depart to Eaglehawk 11147.2x The four Birney Cars at Eaglehawk beside Canterbury Park 11147.2y The four Birney Cars at Eaglehawk beside Canterbury Park with the Drivers and the Inspector 11147.2z The four Birney Cars at Eaglehawk beside Canterbury Park 11147.2aa The four Birney Cars at Eaglehawk beside Canterbury Park 11147.2ab The four Birney Cars at Eaglehawk beside the town hall 11147.2ac Birney Car 28 passes 17 at the Long gully Manchester Arms Hotel Loop 11147.2ad No 21 and two others at the North Bendigo terminus 11147.2af Four trams heading to Golden Square in High Street 11147.2ag Four trams heading to Golden Square in High Street 11147.2ah Four trams heading at the Golden Square Terminus at Maple High Streets...Photos: 11147.2a No 30, 29, 28 and 11 Birney Cars lined up at the Depot 11147.2b No 30, 29, 28 and 11 Birney Cars lined up at the Depot 11147.2c No 30, 29, 28 and 11 Birney Cars lined up at the Depot 11147.2d No 30, 29, 28 and 11 Birney Cars lined up at the Depot 11147.2e No 30, 29, 28 and 11 Birney Cars lined up at the Depot 11147.2f No 30, 29, 28 Birney Cars lined up at the Depot 11147.2g No 30, 29, 28 and 11 Birney Cars lined up at the Depot 11147.2h No 30, 29, 28 and 11 Birney Cars lined up at the Depot 11147.2i No 30, 29, 28 and 11 Birney Cars and No 25 lined up at the Depot 11147.2j No 30, 29, 28 and 11 Birney Cars and No 25 lined up at the Depot 11147.2k No 28 and 11 Birney Cars lined up at the Depot 11147.2l No 30 Special leaves the depot watched by the photographer 11147.2m No 29 Special leaves the depot 11147.2n Driver and passenger inside a Birney Car 11147.2o Driver and passenger inside a Birney Car heading up Pall Mall 11147.2p The four Birney Cars in Carpenter Street, Quarry Hill Terminus at the Cemetery Gates 11147.2q The four Birney Cars in Carpenter Street, Quarry Hill Terminus at the Cemetery Gates 11147.2r The four Birney Cars in Carpenter Street, Quarry Hill Terminus at the Cemetery Gates 11147.2s The four Birney Cars in Carpenter Street, Quarry Hill Terminus at the Cemetery Gates 11147.2t The four Birney Cars at the Carpenter Street, Quarry Hill Loop 11147.2u No 28 Special Birney Car 11147.2v No 30 Special Birney Car 11147.2w The four Birney Cars at the fountain side by side getting reading to depart to Eaglehawk 11147.2x The four Birney Cars at Eaglehawk beside Canterbury Park 11147.2y The four Birney Cars at Eaglehawk beside Canterbury Park with the Drivers and the Inspector 11147.2z The four Birney Cars at Eaglehawk beside Canterbury Park 11147.2aa The four Birney Cars at Eaglehawk beside Canterbury Park 11147.2ab The four Birney Cars at Eaglehawk beside the town hall 11147.2ac Birney Car 28 passes 17 at the Long gully Manchester Arms Hotel Loop 11147.2ad No 21 and two others at the North Bendigo terminus 11147.2af Four trams heading to Golden Square in High Street 11147.2ag Four trams heading to Golden Square in High Street 11147.2ah Four trams heading at the Golden Square Terminus at Maple High Streets Photograph Robert Green Collection - Photos of Bendigo Tramways - Sheet 2 of 8 ...This collection contains eight archive sheets (Sheet 1 to Sheet 8) of strips of original 35mm black and white negatives of photographs taken during the 1960s and early 1970s by Robert Green, of the Bendigo State Electricty Commission of Victoria Tramways prior to their abandonment The collection also includes two archive quality sheets (Sheet A and Sheet B) of original 35mm colour slides taken by Robert Green during the same period. Sheet B also contains one slide taken by Robert's friend Keigh S King (1928-2019) who was the author of the book 'The Bendigo Tramways an illustrated history, published by the Australian Railway Historical Society Victorian Division Melbourne in February 1972; BHS Item no. 5052. The collection also includes one USB stick which contains images of all photographs described above, except for one colour slide taken by Keith S Kings. Sixteen black and white prints from the images are also included.Robert Green Collection, this item contains 34 Black and White Negatives of the trams at various locations around Bendigo. Photos: 11147.2a No 30, 29, 28 and 11 Birney Cars lined up at the Depot 11147.2b No 30, 29, 28 and 11 Birney Cars lined up at the Depot 11147.2c No 30, 29, 28 and 11 Birney Cars lined up at the Depot 11147.2d No 30, 29, 28 and 11 Birney Cars lined up at the Depot 11147.2e No 30, 29, 28 and 11 Birney Cars lined up at the Depot 11147.2f No 30, 29, 28 Birney Cars lined up at the Depot 11147.2g No 30, 29, 28 and 11 Birney Cars lined up at the Depot 11147.2h No 30, 29, 28 and 11 Birney Cars lined up at the Depot 11147.2i No 30, 29, 28 and 11 Birney Cars and No 25 lined up at the Depot 11147.2j No 30, 29, 28 and 11 Birney Cars and No 25 lined up at the Depot 11147.2k No 28 and 11 Birney Cars lined up at the Depot 11147.2l No 30 Special leaves the depot watched by the photographer 11147.2m No 29 Special leaves the depot 11147.2n Driver and passenger inside a Birney Car 11147.2o Driver and passenger inside a Birney Car heading up Pall Mall 11147.2p The four Birney Cars in Carpenter Street, Quarry Hill Terminus at the Cemetery Gates 11147.2q The four Birney Cars in Carpenter Street, Quarry Hill Terminus at the Cemetery Gates 11147.2r The four Birney Cars in Carpenter Street, Quarry Hill Terminus at the Cemetery Gates 11147.2s The four Birney Cars in Carpenter Street, Quarry Hill Terminus at the Cemetery Gates 11147.2t The four Birney Cars at the Carpenter Street, Quarry Hill Loop 11147.2u No 28 Special Birney Car 11147.2v No 30 Special Birney Car 11147.2w The four Birney Cars at the fountain side by side getting reading to depart to Eaglehawk 11147.2x The four Birney Cars at Eaglehawk beside Canterbury Park 11147.2y The four Birney Cars at Eaglehawk beside Canterbury Park with the Drivers and the Inspector 11147.2z The four Birney Cars at Eaglehawk beside Canterbury Park 11147.2aa The four Birney Cars at Eaglehawk beside Canterbury Park 11147.2ab The four Birney Cars at Eaglehawk beside the town hall 11147.2ac Birney Car 28 passes 17 at the Long gully Manchester Arms Hotel Loop 11147.2ad No 21 and two others at the North Bendigo terminus 11147.2af Four trams heading to Golden Square in High Street 11147.2ag Four trams heading to Golden Square in High Street 11147.2ah Four trams heading at the Golden Square Terminus at Maple High Streetskeith s king, bendigo, trams, robert green -
 Bendigo Historical Society Inc.
Mixed media - Robert Green Collection - Photos of Bendigo Tramways - Black and White Prints, 1968
... Robert Green Collection, this item 11147.12 contains 20 printed photos scanned from eight plastic archival sheets of black and white negatives, also one PDF Document entitled "Bendigo's Last Tram Mail" 11147.12v PDF The day before permanent closure of the Bendigo tramways on Sunday 16 April 1972, the Tramway Museum Society of Victoria Inc (TMSV) arranged for “Last Tram Mail” to be carried along the Eaglehawk line to simulate the once regular transport of mail around the city by tram. 5.5 x 3.5 Inch Photo Prints 11147.12a Print from Sheet 3 (11147.3ac) No 28 Birney Car Special heads down Pall Mall past the Court House Hotel 11147.12b Print from Sheet 8 (11147.8c) No 18 passing the View Street and Rowan Street intersection 11147.12c Print from Sheet 8 (11147.8u) No 25 at the Bendigo Cemetery Terminus 11147.12d Print from Sheet 5 (11147.5e) No 18 and old shop front 11147.12e Print from Sheet 7 (11147.7s) Passing Trams 11147.12f Print from Sheet 3 (11147.3s) Tram leaving the Eaglehawk Town Hall in the dark 11147.12g Print from Sheet 5 (11147.5m) No 21 returning to the Tramways Avenue Depot with the scrubber tram on the left 11147.12l Print from Sheet 6 (11147.6ag) Four trams and one driver at the depot TMS Bendigo Tour 24 March 1968. 11147.12m Print from Sheet 2 (11147.2ac) Birney Car 28 passes 17 at the Long gully Manchester Arms Hotel Loop TMS Bendigo Tour 24 March 1968 11147.12n Print from Sheet 2 (11147.2u) No 28 Special Birney Car on the Quarry Hill Line TMS Bendigo Tour 24 March 1968 11147.12o Print from Sheet 2 (11147.2v) No 30 Special Birney Car on the Quarry Hill Line TMS Bendigo Tour 24 March 1968 11147.12q Print from Sheet 2 (11147.2ab) The four Birney Cars at Eaglehawk beside the town hall TMS Bendigo Tour 24 March 1968 11147.12r Print from Sheet 6 (11147.6z) Birney Car 11 and two others arriving at the depot TMS Bendigo Tour 24 March 1968 11147.12s Print from Sheet 2 (11147.2t) The four Birney Cars at the Carpenter Street, Quarry Hill Loop TMS Bendigo Tour 24 March 1968 11147.12t Print from Sheet 2 (11147.2h) No 30, 29, 28 and 11 Birney Cars lined up at the Depot TMS Bendigo Tour 24 March 1968 11147.12u Print from Sheet 2 (11147.2ad) No 21 and two others at the North Bendigo terminus TMS Bendigo Tour 24 March 1968 8 x 10 Inch Photo Prints 11147.12h Print from Sheet 3 (11147.3ai) Birney Car Tram passes the School of Mines in McRae St heading to the fountain 11147.12i Print from Sheet 2 (11147.2a) No 30, 29, 28 and 11 Birney Cars lined up at the Depot 11147.12j Print from Sheet 2 (11147.2a) No 30, 29, 28 and 11 Birney Cars lined up at the Depot 11147.12k Print from Sheet 2 (11147.2a) No 30, 29, 28 and 11 Birney Cars lined up at the Depot...Sixteen black and white prints from the images are also included. keith s king bendigo trams robert green Robert Green Collection, this item 11147.12 contains 20 printed photos scanned from eight plastic archival sheets of black and white negatives, also one PDF Document entitled "Bendigo's Last Tram Mail" 11147.12v PDF The day before permanent closure of the Bendigo tramways on Sunday 16 April 1972, the Tramway Museum Society of Victoria Inc (TMSV) arranged for “Last Tram Mail” to be carried along the Eaglehawk line to simulate the once regular transport of mail around the city by tram. 5.5 x 3.5 Inch Photo Prints 11147.12a Print from Sheet 3 (11147.3ac) No 28 Birney Car Special heads down Pall Mall past the Court House Hotel 11147.12b Print from Sheet 8 (11147.8c) No 18 passing the View Street and Rowan Street intersection 11147.12c Print from Sheet 8 (11147.8u) No 25 at the Bendigo Cemetery Terminus 11147.12d Print from Sheet 5 (11147.5e) No 18 and old shop front 11147.12e Print from Sheet 7 (11147.7s) Passing Trams 11147.12f Print from Sheet 3 (11147.3s) Tram leaving the Eaglehawk Town Hall in the dark 11147.12g Print from Sheet 5 (11147.5m) No 21 returning to the Tramways Avenue Depot with the scrubber tram on the left 11147.12l Print from Sheet 6 (11147.6ag) Four trams and one driver at the depot TMS Bendigo Tour 24 March 1968. 11147.12m Print from Sheet 2 (11147.2ac) Birney Car 28 passes 17 at the Long gully Manchester Arms Hotel Loop TMS Bendigo Tour 24 March 1968 11147.12n Print from Sheet 2 (11147.2u) No 28 Special Birney Car on the Quarry Hill Line TMS Bendigo Tour 24 March 1968 11147.12o Print from Sheet 2 (11147.2v) No 30 Special Birney Car on the Quarry Hill Line TMS Bendigo Tour 24 March 1968 11147.12q Print from Sheet 2 (11147.2ab) The four Birney Cars at Eaglehawk beside the town hall TMS Bendigo Tour 24 March 1968 11147.12r Print from Sheet 6 (11147.6z) Birney Car 11 and two others arriving at the depot TMS Bendigo Tour 24 March 1968 11147.12s Print from Sheet 2 (11147.2t) The four Birney Cars at the Carpenter Street, Quarry Hill Loop TMS Bendigo Tour 24 March 1968 11147.12t Print from Sheet 2 (11147.2h) No 30, 29, 28 and 11 Birney Cars lined up at the Depot TMS Bendigo Tour 24 March 1968 11147.12u Print from Sheet 2 (11147.2ad) No 21 and two others at the North Bendigo terminus TMS Bendigo Tour 24 March 1968 8 x 10 Inch Photo Prints 11147.12h Print from Sheet 3 (11147.3ai) Birney Car Tram passes the School of Mines in McRae St heading to the fountain 11147.12i Print from Sheet 2 (11147.2a) No 30, 29, 28 and 11 Birney Cars lined up at the Depot 11147.12j Print from Sheet 2 (11147.2a) No 30, 29, 28 and 11 Birney Cars lined up at the Depot 11147.12k Print from Sheet 2 (11147.2a) No 30, 29, 28 and 11 Birney Cars lined up at the Depot Mixed media Robert Green Collection - Photos of Bendigo Tramways - Black and White Prints ...This collection contains eight archive sheets (Sheet 1 to Sheet 8) of strips of original 35mm black and white negatives of photographs taken during the 1960s and early 1970s by Robert Green, of the Bendigo State Electricty Commission of Victoria Tramways prior to their abandonment The collection also includes two archive quality sheets (Sheet A and Sheet B) of original 35mm colour slides taken by Robert Green during the same period. Sheet B also contains one slide taken by Robert's friend Keigh S King (1928-2019) who was the author of the book 'The Bendigo Tramways an illustrated history, published by the Australian Railway Historical Society Victorian Division Melbourne in February 1972; BHS Item no. 5052. The collection also includes one USB stick which contains images of all photographs described above, except for one colour slide taken by Keith S Kings. Sixteen black and white prints from the images are also included.Robert Green Collection, this item 11147.12 contains 20 printed photos scanned from eight plastic archival sheets of black and white negatives, also one PDF Document entitled "Bendigo's Last Tram Mail" 11147.12v PDF The day before permanent closure of the Bendigo tramways on Sunday 16 April 1972, the Tramway Museum Society of Victoria Inc (TMSV) arranged for “Last Tram Mail” to be carried along the Eaglehawk line to simulate the once regular transport of mail around the city by tram. 5.5 x 3.5 Inch Photo Prints 11147.12a Print from Sheet 3 (11147.3ac) No 28 Birney Car Special heads down Pall Mall past the Court House Hotel 11147.12b Print from Sheet 8 (11147.8c) No 18 passing the View Street and Rowan Street intersection 11147.12c Print from Sheet 8 (11147.8u) No 25 at the Bendigo Cemetery Terminus 11147.12d Print from Sheet 5 (11147.5e) No 18 and old shop front 11147.12e Print from Sheet 7 (11147.7s) Passing Trams 11147.12f Print from Sheet 3 (11147.3s) Tram leaving the Eaglehawk Town Hall in the dark 11147.12g Print from Sheet 5 (11147.5m) No 21 returning to the Tramways Avenue Depot with the scrubber tram on the left 11147.12l Print from Sheet 6 (11147.6ag) Four trams and one driver at the depot TMS Bendigo Tour 24 March 1968. 11147.12m Print from Sheet 2 (11147.2ac) Birney Car 28 passes 17 at the Long gully Manchester Arms Hotel Loop TMS Bendigo Tour 24 March 1968 11147.12n Print from Sheet 2 (11147.2u) No 28 Special Birney Car on the Quarry Hill Line TMS Bendigo Tour 24 March 1968 11147.12o Print from Sheet 2 (11147.2v) No 30 Special Birney Car on the Quarry Hill Line TMS Bendigo Tour 24 March 1968 11147.12q Print from Sheet 2 (11147.2ab) The four Birney Cars at Eaglehawk beside the town hall TMS Bendigo Tour 24 March 1968 11147.12r Print from Sheet 6 (11147.6z) Birney Car 11 and two others arriving at the depot TMS Bendigo Tour 24 March 1968 11147.12s Print from Sheet 2 (11147.2t) The four Birney Cars at the Carpenter Street, Quarry Hill Loop TMS Bendigo Tour 24 March 1968 11147.12t Print from Sheet 2 (11147.2h) No 30, 29, 28 and 11 Birney Cars lined up at the Depot TMS Bendigo Tour 24 March 1968 11147.12u Print from Sheet 2 (11147.2ad) No 21 and two others at the North Bendigo terminus TMS Bendigo Tour 24 March 1968 8 x 10 Inch Photo Prints 11147.12h Print from Sheet 3 (11147.3ai) Birney Car Tram passes the School of Mines in McRae St heading to the fountain 11147.12i Print from Sheet 2 (11147.2a) No 30, 29, 28 and 11 Birney Cars lined up at the Depot 11147.12j Print from Sheet 2 (11147.2a) No 30, 29, 28 and 11 Birney Cars lined up at the Depot 11147.12k Print from Sheet 2 (11147.2a) No 30, 29, 28 and 11 Birney Cars lined up at the Depotkeith s king, bendigo, trams, robert green -
 Flagstaff Hill Maritime Museum and Village
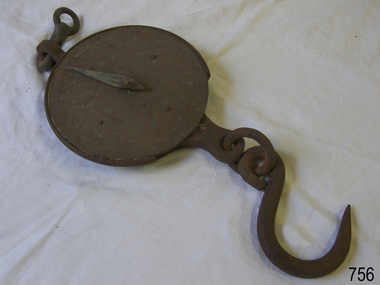
Equipment - Spring Balance Scale, George Salter & Co, 1920s
... Manchester-based consumer goods giant Ultimate Products in 2021 after they had previously licensed the brand for cookware and kitchen electrical since 2011. Flagstaff Hill Warrnambool Flagstaff-Hill-Maritime-Museum Maritime-Museum Shipwreck-coast Flagstaff-Hill-Maritime-Village Salter Balance Scale Weight Measuring Scale Weighing Dry Goods Engraved on the face: "Class III Salter's Spring Balance Silvester's Patent To Weigh 300lbs". Balance scale Salters Spring Balance consisting of a circular, bronze face engraved with measurements in pounds, with an iron hand, weighing mechanism and hanging loop ...Scales such as the subject item were used to measure commercial quantities, possibly grains and farm produce for quite large amounts of product. Bags of grain etc would have been hooked up and weighed. Salter has been a name long associated with weights and measures. The firm began life in the late 1760s in the village of Bilston, England when Richard Salter, a spring maker, began making the first spring scales in Britain. He called these scales "pocket steelyards", though they work on a different principle from steelyard balances. By 1825 his nephew George had taken over the company, which became known as George Salter & Co. George later established a manufacturing site in the town of West Bromwich, about 4 miles (7 km) from Bilston. West Bromwich Albion football club was formed from workers at this works site. From here the company produced a wide variety of scales including the UK's first bathroom scales. Other items were added to the range, including irons, mincers, potato chippers, coin-operated machines and the first typewriters made in the UK. The business thrived throughout the 1900s, and by 1950 it employed over 2000 people, still in the same area and owned by the same family.Salter is a British housewares brand developing products that span a wide range of core product categories, including scales, electrical, cookware. It is a market leader in kitchen and bathroom scales and one of the UK’s oldest consumer brands. Established in 1760, Salter has been developing precision products for over 260 years. It was acquired by Manchester-based consumer goods giant Ultimate Products in 2021 after they had previously licensed the brand for cookware and kitchen electrical since 2011.Balance scale Salters Spring Balance consisting of a circular, bronze face engraved with measurements in pounds, with an iron hand, weighing mechanism and hanging loop. Engraved on the face: "Class III Salter's Spring Balance Silvester's Patent To Weigh 300lbs".flagstaff hill, warrnambool, flagstaff-hill-maritime-museum, maritime-museum, shipwreck-coast, flagstaff-hill-maritime-village, salter balance scale, weight measuring scale, weighing dry goods -
 Ballarat Tramway Museum
Photograph - SECV Ballarat - operations - set of 10, George Stevens, 15/8/1971
... Note workers on the signal gantry. 7 - Trams 27 Northbound passing the Manchester Unity IOOF Sebastopol Hall, at 113 Albert St. Sebastopol. 8 - Trams 27 And 26 Crossing at the Bell St loop 9 - Tram 26 Crossing Albert St 10 - Tram 26 Passing the Borough of Sebastopol Offices in Albert St. ...Set of 10 Digital images, from negatives taken by George Stevens on 15/8/1971:Yields information about the tramcars used on 15/8/1971 and the various locations around the system. 1 - Trams 27 And 33 off the road at depot junction with tram 33 about to tow it back on 2 - Tram 33 Stones Corner with the Caltex Service station in the background. 3 - Tram 33 Victoria St outbound with St Alipius Church in the background 4 - Tram 12 Victoria St inbound with St Alipius Church in the background 5 - Tram 31 Climbing the Sturt St Hill to Lydiard St with Dickins, Patersons and the T&G building the background 6 - Tram 28 Crossing the level crossing with Reids Palace and the railway station in the background. Note workers on the signal gantry. 7 - Trams 27 Northbound passing the Manchester Unity IOOF Sebastopol Hall, at 113 Albert St. Sebastopol. 8 - Trams 27 And 26 Crossing at the Bell St loop 9 - Tram 26 Crossing Albert St 10 - Tram 26 Passing the Borough of Sebastopol Offices in Albert St. Set of 10 digital images scanned from black and white negatives.tramways, sturt st, albert st, wendouree parade, lydiard st nth, victoria st, depot, level crossing, tram 33, tram 26, tram 27, tram 31 -
Clunes Museum
Domestic object - MANCHESTER
... Clunes Museum 36 Fraser Street enter building through Collins Place Clunes goldfields DOMESTIC OBJECT crochet food covers sugar Nil .1 Crocheted sugar bowl cover, rectangular with looped beading around edge "SUGAR" crocheted in centre .2 Crocheted sauce bottle cover, drawstring at base Domestic object MANCHESTER ...DOMESTIC OBJECT.1 Crocheted sugar bowl cover, rectangular with looped beading around edge "SUGAR" crocheted in centre .2 Crocheted sauce bottle cover, drawstring at baseNilcrochet, food covers, sugar -
 Whitehorse Historical Society Inc.
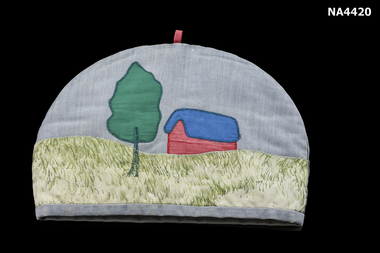
Domestic object - Tea Cosy, 1960s
... manchester table linen Tea cosy in a half circle shape. There is a scene appliqued on the front of a tree in green cotton fabric with a machine stitched hunk on the left hand side. There is a house appliqued on the right hand side. The roof of the house is deep blue cotton fabric and the house is in red cotton fabric. The foreground is of a cotton material with a cream background with 'grass' pattern on it in shades of green. The background is in blue fabric with a small red loop ...The cosy was made as a present.Tea cosy in a half circle shape. There is a scene appliqued on the front of a tree in green cotton fabric with a machine stitched hunk on the left hand side. There is a house appliqued on the right hand side. The roof of the house is deep blue cotton fabric and the house is in red cotton fabric. The foreground is of a cotton material with a cream background with 'grass' pattern on it in shades of green. The background is in blue fabric with a small red loop on the top.domestic items, table setting, manchester, table linen -
 Bendigo Historical Society Inc.
Photograph - Robert Green Collection - Photos of Bendigo Tramways - Sheet 1 of 8, 1960s
... Houses in the foreground, on the left is 245 Eaglehawk Road and on the right 241 Eaglehawk Road. 11147.1e No 28 Birney Car Special 11147.1f No 28 Birney Car Special and No 2 possibly in Eaglehawk 11147.1g No 18 roars up Eaglehawk Road into Iron Bark 11147.1h Tram crossing the railway at Jobs Gully, on its way to Bendigo 11147.1i Tram crossing the railway at Jobs Gully, on its way to Eaglehawk 11147.1j Central Deborah Gold Mine 11147.1k The intersection of Reginald and Houston St, with the Cemetery on the left. 11147.1l Tram Stop on Pall Mall opposite Ezywalkins Conrner of Mitchell St 11147.1m Electrical Cable junction box 11147.1n Electrical Cable junction box 11147.1o No 18 at Canterbury Park Terminus Eaglehawk 11147.1p No 26 at the top of Mitchell St on its way to Quarry Hill 11147.1q Nos 26 and 18 at the Railway Station stop in Mitchell St 11147.1r No 18 coming down Mitchell St 11147.1s No 5 possibly in Carpenter St 11147.1t No 5 at the Cemetery Gates ready to depart the terminus 11147.1u No 5 at the Cemetery Gates ready to depart the terminus 11147.1v No 5 at the Cemetery Gates ready to depart the terminus 11147.1w Nos 18 and 5 crossover at the Fountain 11147.1x Nos 18 and 5 crossover at the Fountain 11147.1y Nos 18 and 5 crossover at the Fountain 11147.1z Heading into Long Gully past the Manchester Arms Hotel 11147.1aa No 5 loading passengers at the Eaglehawk Terminus next to Canterbury Park 11147.1ab Traffic conjestion at the loop on the way back to Bendigo 11147.1ac The Eaglehawk Terminus next to Canterbury Park 11147.1ad The Eaglehawk Terminus next to Canterbury Park 11147.1ae The Eaglehawk Terminus next to Canterbury Park 11147.1af The Eaglehawk Terminus next to Canterbury Park...Houses in the foreground, on the left is 245 Eaglehawk Road and on the right 241 Eaglehawk Road. 11147.1e No 28 Birney Car Special 11147.1f No 28 Birney Car Special and No 2 possibly in Eaglehawk 11147.1g No 18 roars up Eaglehawk Road into Iron Bark 11147.1h Tram crossing the railway at Jobs Gully, on its way to Bendigo 11147.1i Tram crossing the railway at Jobs Gully, on its way to Eaglehawk 11147.1j Central Deborah Gold Mine 11147.1k The intersection of Reginald and Houston St, with the Cemetery on the left. 11147.1l Tram Stop on Pall Mall opposite Ezywalkins Conrner of Mitchell St 11147.1m Electrical Cable junction box 11147.1n Electrical Cable junction box 11147.1o No 18 at Canterbury Park Terminus Eaglehawk 11147.1p No 26 at the top of Mitchell St on its way to Quarry Hill 11147.1q Nos 26 and 18 at the Railway Station stop in Mitchell St 11147.1r No 18 coming down Mitchell St 11147.1s No 5 possibly in Carpenter St 11147.1t No 5 at the Cemetery Gates ready to depart the terminus 11147.1u No 5 at the Cemetery Gates ready to depart the terminus 11147.1v No 5 at the Cemetery Gates ready to depart the terminus 11147.1w Nos 18 and 5 crossover at the Fountain 11147.1x Nos 18 and 5 crossover at the Fountain 11147.1y Nos 18 and 5 crossover at the Fountain 11147.1z Heading into Long Gully past the Manchester Arms Hotel 11147.1aa No 5 loading passengers at the Eaglehawk Terminus next to Canterbury Park 11147.1ab Traffic conjestion at the loop on the way back to Bendigo 11147.1ac The Eaglehawk Terminus next to Canterbury Park 11147.1ad The Eaglehawk Terminus next to Canterbury Park 11147.1ae The Eaglehawk Terminus next to Canterbury Park 11147.1af The Eaglehawk Terminus next to Canterbury Park Photograph Robert Green Collection - Photos of Bendigo Tramways - Sheet 1 of 8 ...This collection contains eight archive sheets (Sheet 1 to Sheet 8) of strips of original 35mm black and white negatives of photographs taken during the 1960s and early 1970s by Robert Green, of the Bendigo State Electricty Commission of Victoria Tramways prior to their abandonment The collection also includes two archive quality sheets (Sheet A and Sheet B) of original 35mm colour slides taken by Robert Green during the same period. Sheet B also contains one slide taken by Robert's friend Keigh S King (1928-2019) who was the author of the book 'The Bendigo Tramways an illustrated history, published by the Australian Railway Historical Society Victorian Division Melbourne in February 1972; BHS Item no. 5052. The collection also includes one USB stick which contains images of all photographs described above, except for one colour slide taken by Keith S Kings. Sixteen black and white prints from the images are also included.Robert Green Collection, this item contains thirty three Black and White Negatives of trams at various locations around Bendigo. Photos: 11147.1a and 11147.1b Tram on its way out of Long Gully along Mt Korong (Eaglehawk) Road towards Eaglehawk. Houses in the foreground, on the left is 245 Eaglehawk Road and on the right 241 Eaglehawk Road. 11147.1c Birney Car Tram on its way out of Long Gully along Mt Korong (Eaglehawk) Road towards Eaglehawk, looking back ove the Long Gully township. 11147.1d Birney Car Tram on its way out of Long Gully along Mt Korong (Eaglehawk) Road towards Eaglehawk. Houses in the foreground, on the left is 245 Eaglehawk Road and on the right 241 Eaglehawk Road. 11147.1e No 28 Birney Car Special 11147.1f No 28 Birney Car Special and No 2 possibly in Eaglehawk 11147.1g No 18 roars up Eaglehawk Road into Iron Bark 11147.1h Tram crossing the railway at Jobs Gully, on its way to Bendigo 11147.1i Tram crossing the railway at Jobs Gully, on its way to Eaglehawk 11147.1j Central Deborah Gold Mine 11147.1k The intersection of Reginald and Houston St, with the Cemetery on the left. 11147.1l Tram Stop on Pall Mall opposite Ezywalkins Conrner of Mitchell St 11147.1m Electrical Cable junction box 11147.1n Electrical Cable junction box 11147.1o No 18 at Canterbury Park Terminus Eaglehawk 11147.1p No 26 at the top of Mitchell St on its way to Quarry Hill 11147.1q Nos 26 and 18 at the Railway Station stop in Mitchell St 11147.1r No 18 coming down Mitchell St 11147.1s No 5 possibly in Carpenter St 11147.1t No 5 at the Cemetery Gates ready to depart the terminus 11147.1u No 5 at the Cemetery Gates ready to depart the terminus 11147.1v No 5 at the Cemetery Gates ready to depart the terminus 11147.1w Nos 18 and 5 crossover at the Fountain 11147.1x Nos 18 and 5 crossover at the Fountain 11147.1y Nos 18 and 5 crossover at the Fountain 11147.1z Heading into Long Gully past the Manchester Arms Hotel 11147.1aa No 5 loading passengers at the Eaglehawk Terminus next to Canterbury Park 11147.1ab Traffic conjestion at the loop on the way back to Bendigo 11147.1ac The Eaglehawk Terminus next to Canterbury Park 11147.1ad The Eaglehawk Terminus next to Canterbury Park 11147.1ae The Eaglehawk Terminus next to Canterbury Park 11147.1af The Eaglehawk Terminus next to Canterbury Parkkeith s king, bendigo, trams, robert green