Showing 143 items matching " safety zone"
-
 Melbourne Tram Museum
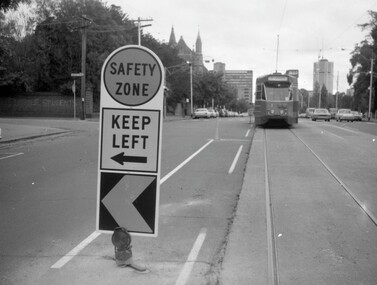
Negative - Safety Zone sign - Nicholson St, Hugh Ballment, c1976
... Safety Zone sign - Nicholson St......Safety Zone...The photograph shows a safety zone sign in Nicholson St Fitzroy, with Z class tram No. 3 in the distance. ...Negative Safety Zone sign - Nicholson St Hugh Ballment ...The photograph shows a safety zone sign in Nicholson St Fitzroy, with Z class tram No. 3 in the distance. Would appear that line marking and sign is new. Photo taken near the Exhibition buildings, c1976 - possibly part of the project described in item 342.Yields information about the installation of a safety zone in Nicholson St c1976.Negative - 127 film black and white.tramways, tramcars, z class, tram 3, nicholson st, safety zone -
 Melbourne Tram Museum
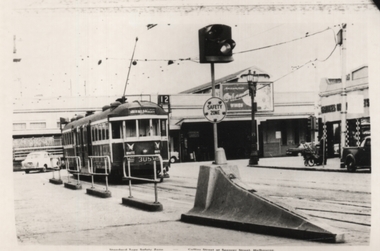
Photograph - Safety Zone prow & W2 305, Melbourne & Metropolitan Tramways Board (MMTB), 1961
... Safety Zone prow & W2 305......safety zone...Photo, an Official MMTB photograph, shows a safety zone concrete prow with a set of flashing lights at the intersection of Collins and Spencer Sts. ...Yields information about Safety zones and W2 305. Tramways Collins St. Spencer St safety zone W2 class tram 305 In ink on rear "Collins & Spencer" Black and White photograph on plain paper. ...Photo, an Official MMTB photograph, shows a safety zone concrete prow with a set of flashing lights at the intersection of Collins and Spencer Sts. In the view is W2 305 (Route 12, South Melbourne Beach). The tram has large experimental roof ventilators and two White Wings Tomato sauce adverts on the end panels. In the background are the Victorian Railways Spencer St buildings. Photo used in the 1961 MMTB Annual Report.Yields information about Safety zones and W2 305.Black and White photograph on plain paper.In ink on rear "Collins & Spencer"tramways, collins st., spencer st, safety zone, w2 class, tram 305 -
 Melbourne Tram Museum
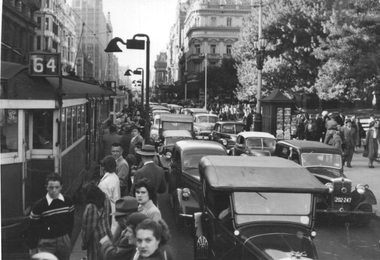
Photograph - Safety Zone Flinders and Swanston, The Herald, Jan. 1954
... Safety Zone Flinders and Swanston......Safety Zone...Black and white photograph showing a crowded Safety Zone at the Swanston St stop for Flinders St. ...Melbourne Tram Museum 8 Wallen Road Hawthorn melbourne Black and white photograph showing a crowded Safety Zone at the Swanston St stop for Flinders St. ...Black and white photograph showing a crowded Safety Zone at the Swanston St stop for Flinders St. Has at least five trams in the view and shows how passengers could read route numbers as to their tram - can see routes 64, 8, 7 and 6 with possibly a 5 at the end of the line . Note the loudspeakers used by Inspectors to advise passengers of the trams and to stand clear when the trams were ready to depart. There is a wide variety of motor cars in the view. Photo by the Herald Sun 1/1954. A cropped version of this photo was used on page 4 of the January 1957 issue of Electric Traction - Courtesy of the City Development Association. Yields information about Melbourne tram route numbers and how they could be seen by passengers at safety zones.Photograph with hand written notes on rear and stamps on the rear.In ink "No. 5 - Cr Flinders and Swanston Streets, Jan 1954" and The Herald Sun copyright stamp.trams, tramways, swanston st, safety zone, route number boxes -
 Ballarat Tramway Museum
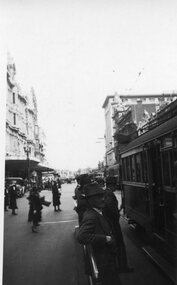
Photograph - Black & White Photograph/s, 20/11/1932 12:00:00 AM
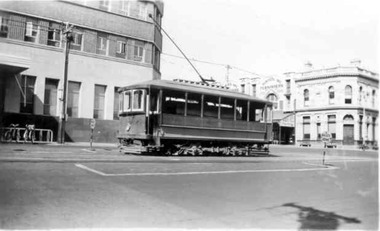
... ... Safety Zone...Black and white photograph trams and a safety zone at the corner of Swanston and Collins St. ...In pencil on rear, "A view of the safety zone cr Collins & Swanston St / 20/11/32" and "H&N" or "HSN"....Ballarat Tramway Museum South Gardens Reserve Wendouree Parade Ballarat Ballarat goldfields trams tramways Melbourne Safety Zone Swanston St. In pencil on rear, "A view of the safety zone cr Collins & Swanston St / 20/11/32" and "H&N" or "HSN". ...Black and white photograph trams and a safety zone at the corner of Swanston and Collins St. Melbourne. Would appear to be looking south along Swanston St. A W2 passing the people standing at the safety zone, with a number of trams in the background and many pedestrians. Taken 20/11/1932. See image i1 for the details on the rear.In pencil on rear, "A view of the safety zone cr Collins & Swanston St / 20/11/32" and "H&N" or "HSN".trams, tramways, melbourne, safety zone, swanston st. -
 Melbourne Tram Museum
Photograph - Traffic congestion delays trams in Collins Street - Set of 2, Melbourne & Metropolitan Tramways Board MMTB or VicRail or Ministry of Transport, c1960
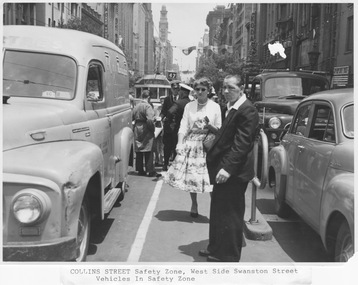
... ...safety zone...One photograph shows two safety zone conductors in conversation amid several passengers, one dressed in a dust coat. ...Typed attached explanation reads: "Collins Street safety Zone, West side Swanston Street. Vehicles In Safety Zone." ...Yields information about Collins Street congestion and Melbourne c1960 Collins Street Swanston Street motor vehicles safety zone Kew Depot route 47 span wire decoration Moomba procession safety zone conductors dust coat official M&MTB photograph Typed attached explanation reads: "Collins Street safety Zone, West side Swanston Street. ...Both photographs were taken at the same location in Collins Street just west of Swanston Street in the middle of a warm, sunny day. Both depict several motor vehicles queuing on the tram tracks inside a the safety zone while several passengers await a tram which is stuck behind these vehicles. A second queue of vehicles is between the safety zone and the kerb. The approaching W2 class trams both shows destinations Kew Depot route 47. In both photographs, decorations hang from a span wire close to the trams. One photograph shows two safety zone conductors in conversation amid several passengers, one dressed in a dust coat. One possible explanation is that traffic has been halted by the closure of Swanston Street, perhaps the annual Moomba procession in March, and will soon be cleared. Both are official M&MTB photographs.Yields information about Collins Street congestion and Melbourne c1960 Two Black and white photographs with typed explanation below and stamp on rear. Typed attached explanation reads: "Collins Street safety Zone, West side Swanston Street. Vehicles In Safety Zone." On rear: "Melbourne & Metropolitan Tramways Board P. 25/1/111" Typed attached explanation reads: "Collins Street Approaching Swanston Street. Vehicles Blocking Trams." On rear: "Melbourne & Metropolitan Tramways Board P. 25/1/111" collins street, swanston street, motor vehicles, safety zone, kew depot, route 47, span wire, decoration, moomba procession, safety zone conductors, dust coat, official m&mtb photograph -
 Ballarat Tramway Museum
Photograph - Black & White Photograph/s, John Webster, 6/06/1950 12:00:00 AM
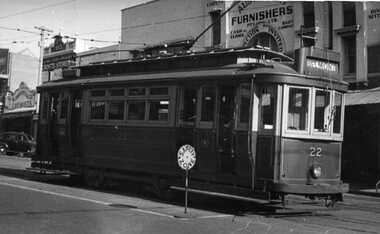
... ... Safety Zone...Black and white photograph of Geelong No. 22 photographed in Moorabool St at a Safety Zone stop. Safety Zone stop sign in photograph. ...Black and white photograph of Geelong No. 22 photographed in Moorabool St at a Safety Zone stop. Safety Zone stop sign in photograph. ...Yields information about the appearance of one Geelong's single truck trams and its city streets.Black and white photograph of Geelong No. 22 photographed in Moorabool St at a Safety Zone stop. Safety Zone stop sign in photograph. Tram has the destination of Belmont. Chemist, Crofts Stores and Austral Art Furnishers store building in the background. Photographed by John Webster, 6/6/1950. Copy 1 - On rear in ink "Tram 22 Geelong Vic" and on right hand edge "BB31 F2 / T20 / F16 / 6/6/50 1/100 at 12, VV HP3".tramways, trams, geelong, moorabool st, safety zone, tram 22 -
 Ballarat Tramway Museum
Photograph - Digital image Set of 2, Doug Colquhoun, c1955
... ... Safety Zone...Tram has the destination of Beach. .2 - Trams 31 and 34 photographed in Moorabool St at a Safety Zone stop. Safety Zone stop sign in photograph. ...Tram has the destination of Beach. .2 - Trams 31 and 34 photographed in Moorabool St at a Safety Zone stop. Safety Zone stop sign in photograph. ...Set of two colour digital images of Geelong trams photographed by Doug Colquhoun? .1 - Geelong No 8 at the Chilwell terminus, c1955. Note the tram stop furniture on the pole behind. Tram has the destination of Beach. .2 - Trams 31 and 34 photographed in Moorabool St at a Safety Zone stop. Safety Zone stop sign in photograph. Trams have the destination of Belmont and North. Kays pastries and Austral Art Furnishers stores building in the background.trams, tramways, geelong, north, belmont, moorabool st, safety zone, tram 8, tram 31, tram 34 -
 Ballarat Tramway Museum
Photograph - Black & White Photograph/s, 14/01/1952 12:00:00 AM
... ... Safety Zone...Taken by Keith Kings 14/1/1952. Note the 'Safety Zone' signs and arrangements. ...Taken by Keith Kings 14/1/1952. Note the 'Safety Zone' signs and arrangements. Photograph Black & White Photograph/s ...Black and white photograph of Geelong Tramways, Scrubber or track cleaning tram in Ryrie St, at Moorabool St.. Taken by Keith Kings 14/1/1952. Note the 'Safety Zone' signs and arrangements. Stamp on rear, purple ink 'K.S. Kings No. F(k)(14) Copyright Reserved', with number hand written in using blue ink. Also written on back of photograph "Geelong / Track cleaning car. / Ryrie St. at Moorabool St., City / 14/1/52."trams, tramways, scrubber tram, track cleaner, geelong, safety zone, tram scrubber -
 Melbourne Tram Museum
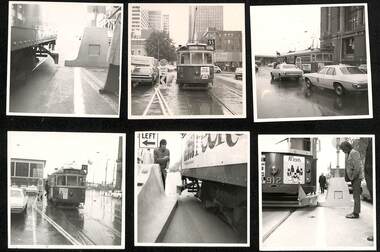
Document - Report, Melbourne & Metropolitan Tramways Board (MMTB), "Interim Report - Nicholson Street Safety Bars", 1978c, 1973
... ... Safety Zone...Describes the work involved in providing a type of "jiggle bars" leading up to the safety zone. Many photographs of the various types of safety zone marks were included within the folder. ...Describes the work involved in providing a type of "jiggle bars" leading up to the safety zone. Many photographs of the various types of safety zone marks were included within the folder. ...Report and photographs of various mechanisms to identify and check clearances for Safety Zones on tramways. .1 - Report - 4 pages stapled in top left hand corner - titled "Interim Report - Nicholson Street Safety Bars", dated 20/6/1978 signed by R. G. Vanselow. Describes the work involved in providing a type of "jiggle bars" leading up to the safety zone. Many photographs of the various types of safety zone marks were included within the folder. The photos of 912 are related to the clearance testing carried out during 1973 for the Z class. See also Reg Item 480? .2 - tram 912 fitted with a wooden device to measure clearances - with a concrete safety zone being checked. .3 - tram 1040 in Bourke St with a Safety Zone sign on the left - King St? .4 - tram and traffic at the Bourke St terminus. .5 - not used. .6 - tram 1000 at ditto on a wet day .7 - as for .2 .8 - ditto .9 - ditto .10 - side on view of W2 447 with a concrete prow fitted with a set of flashing lights. .11 - to .15 - series of large prints of enlarged 35mm negatives of night testing of safety zone sign taken at South Melbourne Depot and in St Kilda Road. .16 Bourke St - looking west at Russell St? with caption "prow replacing type 2 (Hairpin sign) with both original (white) and new MCC (Yellow) line marking on approach". .17 - Bourke St - looking west at Kings St and caption "Prow replacing type 2 (Hairpin sign) with original line marking on approach. .16 and .17 taken on Polaroid Instamatic cameras.Some of the photos have captions written on the rear.trams, tramways, tram stops, bourke st, safety zone, testing, z class, safety, tram 912, tram 1040, tram 1000, tram 447 -
 Ballarat Tramway Museum
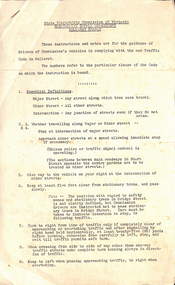
Document - Instruction, State Electricity Commission of Victoria (SECV), "Ballarat Traffic Code", 1/08/1939 12:00:00 AM
... ... Safety Zone...Has definitions, stopping, giving way, driving with trams, passing vehicles, right turns, parking, safety zones, Sturt St and general behaviour....Trams tramways SEC Instructions Safety Zone Tram Stops Motor vehicles Two page duplicated instruction - Ballarat Traffic Code - dated 1/8/1939 issued by the SEC to driver's of Commission vehicles about the traffic rules to apply in Ballarat. ...Yields information about the control of traffic in the City of Ballarat and driving of motor cars.Two page duplicated instruction - Ballarat Traffic Code - dated 1/8/1939 issued by the SEC to driver's of Commission vehicles about the traffic rules to apply in Ballarat. Has definitions, stopping, giving way, driving with trams, passing vehicles, right turns, parking, safety zones, Sturt St and general behaviour.trams, tramways, sec, instructions, safety zone, tram stops, motor vehicles -
 Ballarat Tramway Museum
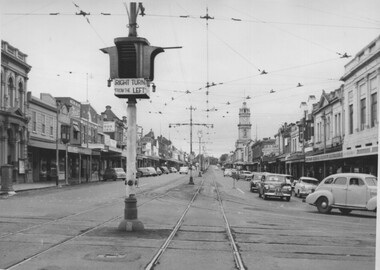
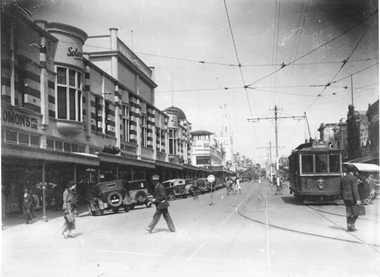
Photograph - Black & White Photograph/s, Charles Craig, mid 1950's
... ... Safety Zone...Photograph of the intersection of Ryrie and Moorabool Streets Geelong looking West along Ryrie St, showing the bar type traffic lights and that right hand turns were done from the left lane. Note the Safety zone sign. Two prints held - one large and one small in a vertical form with the traffic lights featured.. ...Note the Safety zone sign. Two prints held - one large and one small in a vertical form with the traffic lights featured.. ...Photograph of the intersection of Ryrie and Moorabool Streets Geelong looking West along Ryrie St, showing the bar type traffic lights and that right hand turns were done from the left lane. Note the Safety zone sign. Two prints held - one large and one small in a vertical form with the traffic lights featured.. trams, tramways, geelong, ryrie st, moorabool st, traffic lights, safety zone -
 Ballarat Tramway Museum
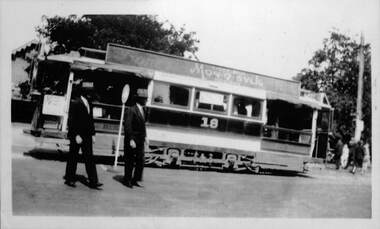
Photograph - Laminated - ESCo 18 Wendouree Parade
... Safety Zone...Tram has a roof advertisement for Monosylk hosiery. There is a safety zone sign and two gentlemen standing alongside. ...Tram has a roof advertisement for Monosylk hosiery. There is a safety zone sign and two gentlemen standing alongside. ...Photograph of Electric Supply Co. of Vic (ESCo) Ballarat tram 18 in Wendouree Parade with the Gardens Kiosk in the background. Tram has a roof advertisement for Monosylk hosiery. There is a safety zone sign and two gentlemen standing alongside. The safety zone and line markings are unusual in Ballarat where passengers alighted or boarded on the lake side of the roadway. A related item could be 5904 which shows ESCo tram 9 offloading passengers on the "wrong side" for Ballarat at this location and a sign in position. Possibly a special event or a trial. Photo possibly mid 1920sYields information about the use of a safety zone sign in Ballarat and tram 18Laminated laser print photograph black and whitesafety zone, wendouree parade, ballarat, tram 18, esco, events, monosvlk -
 Melbourne Tram Museum
Photograph - Swanston Street 1930s, Marlborough Art Series, c1910
... ...safety zone...Swanston Street is busy with pedestrians, motor cars and other trams and intending passengers wait at the safety zone....Swanston Street is busy with pedestrians, motor cars and other trams and intending passengers wait at the safety zone. Yields information about Swanston Street in the 1930s W2 class 570 route 1 Elsternwick safety zone Black and white photograph with no notes on rear. ...Photograph shows W2 class 570 southbound in Swanston Street at Lonsdale Street with destination 'Elsternwick route 1'. Swanston Street is busy with pedestrians, motor cars and other trams and intending passengers wait at the safety zone.Yields information about Swanston Street in the 1930s Black and white photograph with no notes on rear. w2 class, 570, route 1, elsternwick, safety zone -
 Ballarat Tramway Museum
Photograph - Black & White Photograph/s, Lee A Ratten, late 1940's to early to mid 1950's
... ... Safety Zone...Tram stop has a safety zone sign and two crew members at the front of the tram. ...Tram stop has a safety zone sign and two crew members at the front of the tram. ...Black and white photograph of Bendigo 12 in Pall Mal, the stop before Charing Cross. Tram stop has a safety zone sign and two crew members at the front of the tram. Photograph late 1940's to early to mid 1950's. Tram has the destination of Golden Square. Photo possibly Lee A Ratten - see related document and Reg Item 7185.trams, tramways, bendigo, pall mall, safety zone, tram 12 -
 Melbourne Tram Museum
Slide - Set of 5, Ron Scholten, May. 1973
... ... Safety Zone...Set of five colour slides, white/red cardboard, Duplicates by Pacific Film Laboratories of tram 912 in the City area testing clearances around safety zones, as part of the development of the Z class tram. ...Melbourne Tram Museum 8 Wallen Road Hawthorn melbourne Trams tramways SW6 class Testing Safety Zone Bourke St Safety Z class North Fitzroy Route 97 tram 912 All have a running number "1204" to "1208" and "912" written on the slide. ...Set of five colour slides, white/red cardboard, Duplicates by Pacific Film Laboratories of tram 912 in the City area testing clearances around safety zones, as part of the development of the Z class tram. Done on a Sunday morning. .1 - Bourke St showing the various equipment or protrusions attached to the tram in order to test clearances to safety zones at crossings. .2 - about to travel through a crossover. .3 - using the Queen or William St crossover. Tram has adverts for Tolleys Brandy and PGF Golf clubs. .4 - ditto - with tram 1021 running a route 97 to North Fitzroy Park St. .5 - ditto- with adverts for Williamson Real Estate and All Saints winery. See also Reg Item 3795 for Black and White and Reg Item 4611 for photos of the event and the use of car 1018.All have a running number "1204" to "1208" and "912" written on the slide.trams, tramways, sw6 class, testing, safety zone, bourke st, safety, z class, north fitzroy, route 97, tram 912 -
 Melbourne Tram Museum
Document - Memorandum, Kew Depot, "Issues concerning and relating to the New Shunt being Constructed in Spencer Street", 18/11/1993 12:00:00 AM
... ... Safety Zone...Regards issues of the single line shunt in Spencer St, north of Latrobe St, Safety Zones, timing, running times, solutions and options....Regards issues of the single line shunt in Spencer St, north of Latrobe St, Safety Zones, timing, running times, solutions and options. ...Memorandum - two A4 sheets - titled "Issues concerning and relating to the New Shunt being Constructed in Spencer Street" from Ric Barker, Secretary Kew Tram Depot Committee to Frank Barbuto, Acting Depot Manager - 18-11-1993. Regards issues of the single line shunt in Spencer St, north of Latrobe St, Safety Zones, timing, running times, solutions and options.trams, tramways, spencer st, terminus, la trobe st, safety zone -
 Melbourne Tram Museum
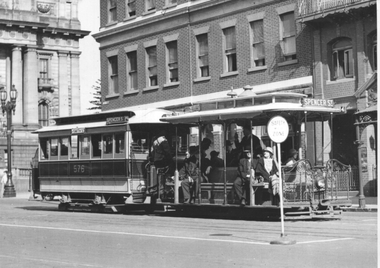
Photograph - Cable tram - Bourke Street at Spring Street, Herald Sun, late 1930s
... ...Safety Zone...Has Victorian Parliament house in the background. There is a safety zone sign in the foreground for the outbound tram service. ...Has Victorian Parliament house in the background. There is a safety zone sign in the foreground for the outbound tram service. ...Photograph shows a cable tram set - trailer number 576 with the destination of Spencer St in Bourke St at the intersection with Spring St. Has Victorian Parliament house in the background. There is a safety zone sign in the foreground for the outbound tram service. Photo late 1930s or 1940Yields information about Bourke St cable trams.Black and White photograph - printed on plain paper.On the rear has the Copyright stamp of the Herald Sun and pencil number "KM-M-006" and Ken Magor stamp.cable trams, bourke st, spring st, parliament house, safety zone -
 Melbourne Tram Museum
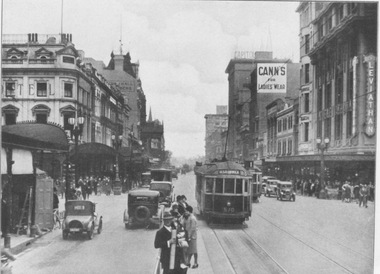
Photograph - W2 tram 570 in Swanston St, 1930-31
... ...safety zone...Photograph looks southward along Swanston St as intending passengers stand on the safety zone at Bourke St. W2 570 with destination "Elsternwick, route 1" has just departed the safety zone and obscures another W2 travelling in the opposite direction. ...Melbourne Tram Museum 8 Wallen Road Hawthorn melbourne Photograph looks southward along Swanston St as intending passengers stand on the safety zone at Bourke St. W2 570 with destination "Elsternwick, route 1" has just departed the safety zone and obscures another W2 travelling in the opposite direction. ...Photograph looks southward along Swanston St as intending passengers stand on the safety zone at Bourke St. W2 570 with destination "Elsternwick, route 1" has just departed the safety zone and obscures another W2 travelling in the opposite direction. The street is busy with pedestrians and motor cars and new traffic lights (1928-29) control the intersection. The Leviathan Department Store can be seen to the right and workmen's ladders and equipment can bee seen far left. W2 570 was built in 1929 and fitted with newly adopted route number boxes. The W2 it is passing does not appear to have route number boxes fitted yet, which dates the photo to c1930-31.Yields information about early electric trams along Swanston St Black and white print with no note.swanston st, w2 class, 570, route number boxes, bourke st, safety zone, leviathan, elsternwick, route 1 -
 Melbourne Tram Museum
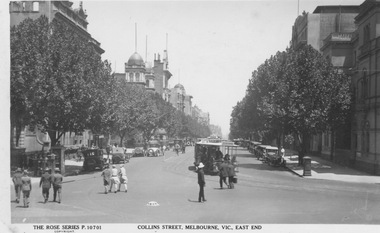
Postcard - Collins Street, East End, late 1920s
... ...Safety Zone...Collins Street is lined with Plane leaf trees and dozens of motor cars. Note the tram Safety zone. ...Collins Street is lined with Plane leaf trees and dozens of motor cars. Note the tram Safety zone. Yields information about Collins Street Collins Street Spring Street traffic policeman Cable Trams Safety Zone Rose Series On front: 'The Rose Series P 10701 Collins Street, Melbourne, Vic, East End'; on rear: 'Postcard - A real photograph. ...Photograph looks west along Collins Street from Spring Street on a summer's day. Cable trams approach and numerous pedestrians cross the roadway watched by traffic policeman. Collins Street is lined with Plane leaf trees and dozens of motor cars. Note the tram Safety zone. Yields information about Collins Street Postcard with label below photograph and postcard markings on rear. On front: 'The Rose Series P 10701 Collins Street, Melbourne, Vic, East End'; on rear: 'Postcard - A real photograph. Produced in Australia'collins street, spring street, traffic policeman, cable trams, safety zone, rose series -
 Melbourne Tram Museum
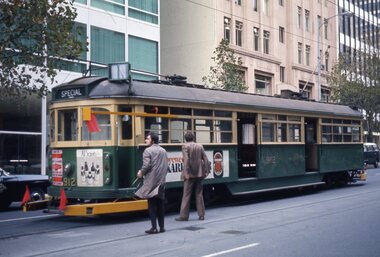
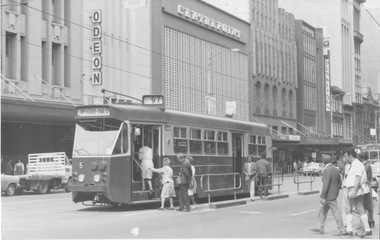
Photograph - Z class 5 in Bourke St, mid-1970s
... ...safety zone conductor...This section of Bourke St, after a short period of closure in 1973, would eventually be closed to through traffic in early 1978 for the slow development of the city Mall. On the safety zone with passengers is a safety zone conductor who collected fares before entry to prevent tram delays. ...This section of Bourke St, after a short period of closure in 1973, would eventually be closed to through traffic in early 1978 for the slow development of the city Mall. On the safety zone with passengers is a safety zone conductor who collected fares before entry to prevent tram delays. ...Photograph of Z 5 taking on passengers in Bourke St at Swanston St, bound for "North Fitzroy - Park St Route No. 97", the destination used for North Fitzroy Depot. This section of Bourke St, after a short period of closure in 1973, would eventually be closed to through traffic in early 1978 for the slow development of the city Mall. On the safety zone with passengers is a safety zone conductor who collected fares before entry to prevent tram delays. He is without a cap, as the wearing of caps became optional from 1972. At right, a W class tram approaches and pedestrians including a man in shorts and long socks begin to cross with the lights. In the background are prominent signs for the Odeon Cinema, Centrepoint and Dunklings.Yields information about Bourke St Mall in 1970s Black and white print with no note on rearz5, bourke st, swanston st, north fitzroy - park st, route 97, city mall, odeon cinema, centrepoint, dunklings, safety zone conductor, caps -
 Ballarat Tramway Museum
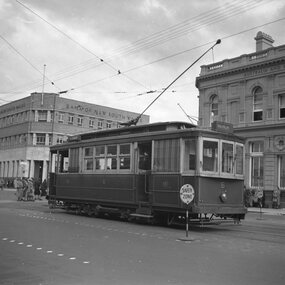
Photograph - Black & White Photograph/s, 1955 or 1956
... ... Safety Zone...The third tram is eastbound in Ryrie St. Note Safety zone signs, the bar traffic lights. ...The third tram is eastbound in Ryrie St. Note Safety zone signs, the bar traffic lights. ...Black and white photograph of three Geelong bogie trams at the intersection of Moorabool and Ryrie Streets. Tram No. 33 in Moorabool St. has the destination of Belmont, while the adjacent tram has the destination of North. The third tram is eastbound in Ryrie St. Note Safety zone signs, the bar traffic lights. See also Reg. item 2799 for a subsequent photograph. In the background is the Bank of New South Wales building. Two copies held.tramways, trams, geelong, moorabool st, ryrie st, traffic lights, safety zone, tram 33 -
 Ballarat Tramway Museum
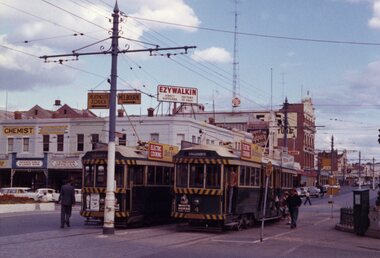
Photograph - Black & White Photograph/s, 1955 or 1956
... ... Safety Zone...The third tram is eastbound in Ryrie St. Note Safety zone signs, the bar traffic lights. ...The third tram is eastbound in Ryrie St. Note Safety zone signs, the bar traffic lights. ...Black and white photograph of two Geelong bogie trams at the intersection of Moorabool and Ryrie Streets and Pengelly tram No. 17 turning into Moorabool St. See Reg. Item 2798 for a photograph just taken prior to this one. Tram No. 33 in Moorabool St. has the destination of Belmont, while the adjacent tram has the destination of North. The third tram is eastbound in Ryrie St. Note Safety zone signs, the bar traffic lights. In the background is Kays bakery. tramways, trams, geelong, moorabool st, ryrie st, traffic lights, safety zone, tram 33, tram 17 -
 Melbourne Tram Museum
Postcard, Rose Stereograph Co, "Swanston Street Melbourne", late 1940s
... ...Safety Zone...One W2 class tram is running a Route 7D is in the view. Note the Tram Safety Zone with the lamp on the top. In the background are the Town Hall on the left, the Manchester Unity building, and advertising for Capstan cigarettes and a sign for the Capital Theatre....Yields information about Swanston St. at the intersection with Little Collins St. 1940s trams tramways W2 class Swanston St route 7D Rose Series Safety Zone Has "1949" in pencil on the rear. ...Rose Series postcard P.967, titled "Swanston Street Melbourne", looking south from Little Collins St. One W2 class tram is running a Route 7D is in the view. Note the Tram Safety Zone with the lamp on the top. In the background are the Town Hall on the left, the Manchester Unity building, and advertising for Capstan cigarettes and a sign for the Capital Theatre.Yields information about Swanston St. at the intersection with Little Collins St. 1940sPostcard - printed real photograph with Rose Stereograph Co. name on the rear. Unused.Has "1949" in pencil on the rear.trams, tramways, w2 class, swanston st, route 7d, rose series, safety zone -
 Melbourne Tram Museum
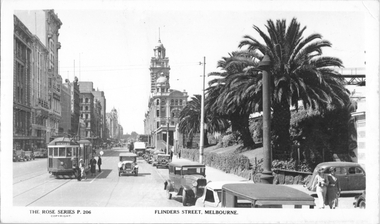
Postcard, Rose Stereograph Co, "Flinders St Melbourne", late 1930s
... ...Safety Zone...A group of ladies has alighted from the tram at the Safety Zone near Queen St. Note the "Do not park here" sign placed behind the pole on the right side of the photograph....A group of ladies has alighted from the tram at the Safety Zone near Queen St. Note the "Do not park here" sign placed behind the pole on the right side of the photograph. ...Rose Series postcard P.206, titled "Flinders St Melbourne" with W2 class tram 412 (Spencer St, route 40) westbound in Flinders St with Flinders Street Railway Station in the background. A group of ladies has alighted from the tram at the Safety Zone near Queen St. Note the "Do not park here" sign placed behind the pole on the right side of the photograph.Yields information about Flinders St late 1930sPostcard - printed real photograph with Rose Stereograph Co. name on the rear. Two copies held.tramways, w2 class, flinders st, tram 412, safety zone, trams, route 40, rose series -
 Melbourne Tram Museum
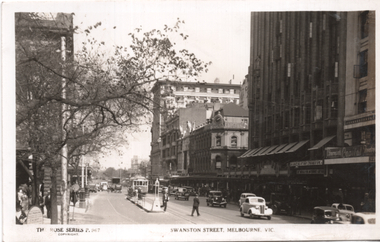
Postcard, Rose Stereograph Co, "Swanston Street Melbourne", c1937
... ...Safety Zone...Has a number of trams in the view, W1 class 438 Route 15 to St Kilda Beach. Note the Tram Safety Zone with the lamp on the top. In the background are the Ezywalkin, Leviathan, F T Field and Steeles Furniture stores. ...Has a number of trams in the view, W1 class 438 Route 15 to St Kilda Beach. Note the Tram Safety Zone with the lamp on the top. In the background are the Ezywalkin, Leviathan, F T Field and Steeles Furniture stores. ...Rose Series postcard P.564, titled "Swanston Street Melbourne", looking south from Little Bourke St. Has a number of trams in the view, W1 class 438 Route 15 to St Kilda Beach. Note the Tram Safety Zone with the lamp on the top. In the background are the Ezywalkin, Leviathan, F T Field and Steeles Furniture stores. The new Foys Department store on the left appears to be having its verandah fitted. Yields information about Swanston St. at the intersection with Little Bourke St. c1937Postcard - printed real photograph with Rose Stereograph Co. name on the rear. Unused.trams, tramways, swanston st, route 15, tram 438, w1 class, safety zone, rose series -
 Ballarat Tramway Museum
Photograph - B&W print of donated negative, John Webster, 21/08/1955 12:00:00 AM
... ... Safety Zone...Photographed by John Webster, 21/8/1955, assumed date given other photographs. Safety Zone and ladies crossing the street in the photograph. ...Photographed by John Webster, 21/8/1955, assumed date given other photographs. Safety Zone and ladies crossing the street in the photograph. ...Yields information about the appearance of Geelong No. 6 in Moorabool St and background buildingsBlack and white digital print from scan of a donated negative of Geelong No. 6 at the corner of Moorabool and Ryrie St. Geelong. Has the Bank of New South Wales building and Australia and New Zealand Bank? in the background. Tram has the destination of Beach. Photographed by John Webster, 21/8/1955, assumed date given other photographs. Safety Zone and ladies crossing the street in the photograph. Black and White prints made from scan of negative. Original Negative stored with Negatives. Negative scanned at hi res 2/6/2020 and image updated.On left hand side of the negatives in ink is "EI 22"tramways, trams, geelong, moorabool st, ryrie st, safety zone, tram 6 -
 Ballarat Tramway Museum
Photograph - Geelong 4 - Moorabool St, late 1930s
... ...Safety Zone...In the background is a safety zone sign, the Solomons store, the T&G building, and many angle-parked motor cars. ...In the background is a safety zone sign, the Solomons store, the T&G building, and many angle-parked motor cars. ...The photo taken at the corner of Moorabool and Malop Streets is looking south along Moorabool St. Shows Geelong tram 4 with the destination of North, about to turn into Malop St with several passengers boarding the tram. In the background is a safety zone sign, the Solomons store, the T&G building, and many angle-parked motor cars. The T&G building is finished. The bar traffic lights don’t appear to be at the Moorabool and Ryrie St corner yet so the photo was taken between 1934 and 1939Yields information about Geelong late 1930s and tramway operations.Black and white photograph - plain back.geelong, moorabool st, malop st, tramways, tram 4, safety zone -
 Melbourne Tram Museum
Postcard, "Flinders St showing Princes Bridge & Flinders St stations", c1955
... ...Safety Zone...Photo c1955. Note the safety zone stops for a tram stop on either side of the intersection in Flinders Street....Photo c1955. Note the safety zone stops for a tram stop on either side of the intersection in Flinders Street. ...Postcard titled "Flinders St showing Princes Bridge & Flinders St stations", by Rose No. 13592, looking west along Flinders Street from east of Swanston Street. Has many "FJ" Holdens in the view, including one AEC Mk111 bus, and four trams including SW6 850. In the background at Princes Bridge is a chemist, a boot repairer, and an advert for Mitchell brushes. Photo c1955. Note the safety zone stops for a tram stop on either side of the intersection in Flinders Street.Yields information about Flinders St at Swanston St and the two railway stations buildings.Black and white postcard divided back unused.In pencil on rear "4-00"tramways, flinders st, flinders st station, princes bridge station, safety zone, tram stops, trams, sw6 class, tram 850, mmtb buses, aec mk iii, rose series -
 Ballarat Tramway Museum
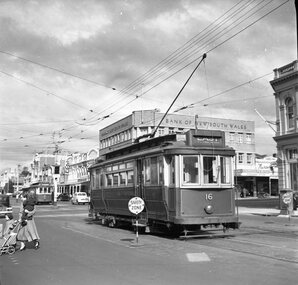
Photograph - B&W print of donated negative, John Webster, 21/08/1955 12:00:00 AM
... ... Safety Zone...Tram has the destination of Each Photographed by John Webster, 21/8/1955, assumed date given other photographs. Safety Zone signs on either side of the tramcar, lady with a pram and the bar lights are shown. ...Tram has the destination of Each Photographed by John Webster, 21/8/1955, assumed date given other photographs. Safety Zone signs on either side of the tramcar, lady with a pram and the bar lights are shown. ...Yields information about the appearance of Geelong No. 6 in Moorabool St and background buildingsBlack and white digital print from scan of a donated negative of Geelong No. 16 at the corner of Moorabool and Ryrie St. Geelong. Has the Bank of New South Wales building in the background. Tram has the destination of Each Photographed by John Webster, 21/8/1955, assumed date given other photographs. Safety Zone signs on either side of the tramcar, lady with a pram and the bar lights are shown. Black and White prints made from scan of negative. Original Negative stored with Negatives. Negative scanned at hi res 4/6/2020 and image updated.On left hand side of the negatives in ink is "DB 11"tramways, trams, geelong, moorabool st, ryrie st, safety zone, tram 16 -
 Ballarat Tramway Museum
Photograph - Colour Photograph/s, 21/11/1962 12:00:00 AM
... ... Safety Zone...Both trams fitted with roof ads and dash canopy ads - White Horse Whiskey. Shows "safety zone" arrangements. No. 2 has destination of "Quarry Hill" while 4 has destination of "Eaglehawk". ...Ballarat Tramway Museum South Gardens Reserve Wendouree Parade Ballarat Ballarat goldfields Charing Cross Bendigo Mitchell St. Safety Zone tram 2 tram 4 On rear top left hand corner "2 and 4 / 21.11.62" in very wavy handwriting, typical of an aged person. ...Colour print of Bendigo SECV Bendigo trams 2 and 4 at Charing Cross. On Kodacolor paper with a Kodak red ink stamp on rear. Trams have dash canopy lights, but no large white strip under the drivers windows. Photo dated 21.11.1962. Buildings on corner of Pall Mall and Mitchell St in background. Both trams fitted with roof ads and dash canopy ads - White Horse Whiskey. Shows "safety zone" arrangements. No. 2 has destination of "Quarry Hill" while 4 has destination of "Eaglehawk". Has a number of passengers boarding trams. Note "PYE" name on radio tower mast.On rear top left hand corner "2 and 4 / 21.11.62" in very wavy handwriting, typical of an aged person.charing cross, bendigo, mitchell st., safety zone, tram 2, tram 4