Showing 19 items matching " tram 39 tram 1 tram 17"
-
 Ballarat Tramway Museum
Print - Set of 2, Geoff Grant, 2/04/1955 12:00:00 AM
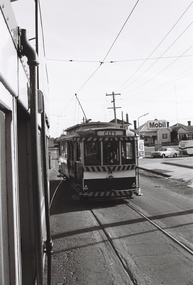
... ... tram 39 tram 1 tram 17...Ballarat Tramway Museum South Gardens Reserve Wendouree Parade Ballarat Ballarat goldfields Trams tramways Geelong AETA Depot tram 39 tram 1 tram 17 On small copy ex Robert Green in ink "Geelong car shed, 2-4-1955, ARHS Neg" On large print in pencil "Geelong 2-4-1955" Negative No. 265 and colour print made by colour laser printer (stored in folder ) of a head on shot of No. 39 in front of the Geelong depot, by Geoff Grant on 2/4/1955 while on an Australian Electric Traction Association tour. ...Negative No. 265 and colour print made by colour laser printer (stored in folder ) of a head on shot of No. 39 in front of the Geelong depot, by Geoff Grant on 2/4/1955 while on an Australian Electric Traction Association tour. Other trams in view are 1 and 17. .1 - Copy large format print from Lloyd Rogers collection via Robert Green 2/2014. Added 4-4-2019 - 2 copies added. Original negative scanned at hi res 18/5/2020 and image updated.On small copy ex Robert Green in ink "Geelong car shed, 2-4-1955, ARHS Neg" On large print in pencil "Geelong 2-4-1955"trams, tramways, geelong, aeta, depot, tram 39 tram 1 tram 17 -
 Ballarat Tramway Museum
Print - Set of 2, Geoff Grant, 2/04/1955 12:00:00 AM
... ... tram 39 tram 1 tram 17...Trams tramways Geelong AETA Depot tram 39 tram 1 tram 17 On small copy ex Robert Green in ink "Geelong car shed, 2-4-1955, ARHS Neg" On large print in pencil "Geelong 2-4-1955" Negative No. 265 and colour print made by colour laser printer (stored in folder ) of a head on shot of No. 39 in front of the Geelong depot, by Geoff Grant on 2/4/1955 while on an Australian Electric Traction Association tour. ...Negative No. 265 and colour print made by colour laser printer (stored in folder ) of a head on shot of No. 39 in front of the Geelong depot, by Geoff Grant on 2/4/1955 while on an Australian Electric Traction Association tour. Other trams in view are 1 and 17. .1 - Copy large format print from Lloyd Rogers collection via Robert Green 2/2014. Added 4-4-2019 - 2 copies added. Original negative scanned at hi res 18/5/2020 and image updated.On small copy ex Robert Green in ink "Geelong car shed, 2-4-1955, ARHS Neg" On large print in pencil "Geelong 2-4-1955"trams, tramways, geelong, aeta, depot, tram 39 tram 1 tram 17 -
 Ballarat Tramway Museum
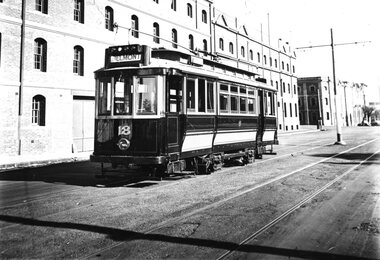
Slide - SECV Bridge St - Set of 2, Ron Hood, 9/1971
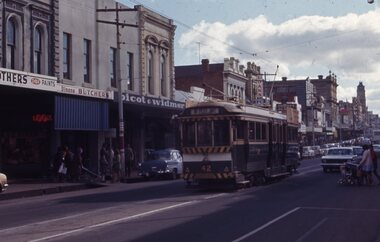
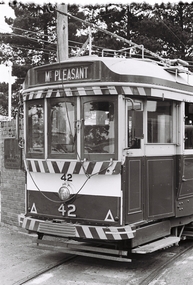
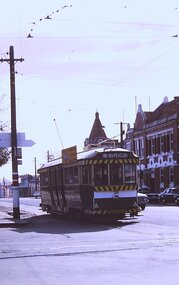
... trams in Bridge St Ballarat. 1 - tram 42 to Mt Pleasant, with a lady with a pram walking over to the tram. In the background is Dinons Butcher, Didcot & Widmer, BFC Loans and Suttons. 2 - tram 39 to Gardens via Sturt St West, with the Caltex service station, Centenary Hotel (Peel St), Gullans newsagency (Listener In magazine) and E Leitch & Co. Yields information about tram operations on the Gardens via Sturt St West/Mt Pleasant line in Bridge St shortly before closure of the route. tramways trams Bridge St tram 42 tram 39 In ink "Ballarat Sept. 1971" and slide numbers 17 ...Set of two colour photographs by Ron Hood in early Sept. 1971 of trams in Bridge St Ballarat. 1 - tram 42 to Mt Pleasant, with a lady with a pram walking over to the tram. In the background is Dinons Butcher, Didcot & Widmer, BFC Loans and Suttons. 2 - tram 39 to Gardens via Sturt St West, with the Caltex service station, Centenary Hotel (Peel St), Gullans newsagency (Listener In magazine) and E Leitch & Co.Yields information about tram operations on the Gardens via Sturt St West/Mt Pleasant line in Bridge St shortly before closure of the route.Set of 2 Colour slides in plain white cardboard mounts.In ink "Ballarat Sept. 1971" and slide numbers 17 and 18tramways, trams, bridge st, tram 42, tram 39 -
 Ballarat Tramway Museum
Photograph - SECV Ballarat - operations - set of 14, George Stevens, 8/4/1971
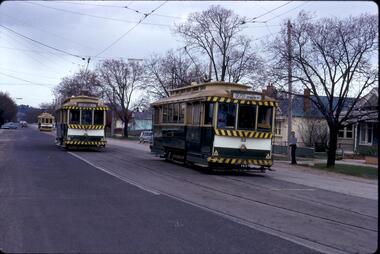
... Set of 14 Digital images, from slides taken by George Stevens on 8/4/1971: 1 Tram 17 Outbound in Victoria St with St Alipius Church in the background 2 Tram 17 At Victoria St terminus with a Trotting at Bray Raceway tonight board 3 Tram 34 Northbound in Lydiard St North at level crossing with the Provincial Hotel and Ballart B signal box. Tram has a trotting at Bray Raceway tonight board. 4 Tram 35 Southbound in Drummond St Sth at Eyre St with the Foundry hotel in the background. 5 Trams 31 and 39...Ballarat Tramway Museum South Gardens Reserve Wendouree Parade Ballarat Ballarat goldfields Set of 14 Digital images, from slides taken by George Stevens on 8/4/1971: 1 Tram 17 Outbound in Victoria St with St Alipius Church in the background 2 Tram 17 At Victoria St terminus with a Trotting at Bray Raceway tonight board 3 Tram 34 Northbound in Lydiard St North at level crossing with the Provincial Hotel and Ballart B signal box. Tram has a trotting at Bray Raceway tonight board. 4 Tram 35 Southbound in Drummond St Sth at Eyre St with the Foundry hotel in the background. 5 Trams 31 and 39 ...Set of 14 Digital images, from slides taken by George Stevens on 8/4/1971: 1 Tram 17 Outbound in Victoria St with St Alipius Church in the background 2 Tram 17 At Victoria St terminus with a Trotting at Bray Raceway tonight board 3 Tram 34 Northbound in Lydiard St North at level crossing with the Provincial Hotel and Ballart B signal box. Tram has a trotting at Bray Raceway tonight board. 4 Tram 35 Southbound in Drummond St Sth at Eyre St with the Foundry hotel in the background. 5 Trams 31 and 39 are northbound in Drummond St Sth, with destinations of Lydiard St and City respectively. 6 Trams 39, 31 and 35 Crossing at Urquhart St loop. 7 Tram 38 At Hospital Corner 8 Tram 39 At Hospital Corner 9 Tram 31 At Hospital Corner, with destination of City 10 Trams 35, 40 Crossing at the Grey St loop with 35 for Sebastopol and 40 for Lydiard St Nth 11 Tram 17 Inbound in Drummond St Sth 12 Tram 18 Wendouree Parade near Windmill Drive Nth 13 Tram 26 outbound in Sturt St west at Russell St 14 Tram 33 Inbound in Sturt St west Yields information about the tramcars used on 8/4/1971 and the various locations around the system.Set of 14 digital images scanned from slides.tram 26, lydiard st, tram 30, barkly st, sturt st, king st loop, victoria st, level crossing, drummond st sth, hospital corner, urquhart st., grey st loop, albert st, sturt st west, tram 17, tram 34, tram 35, tram 31, tram 39, tram 38, tram 40, tram 18, tram 33 -
 Ballarat Tramway Museum
Photograph - SECV Ballarat - last Friday of operations - set of 12, George Stevens, 17/9/1971
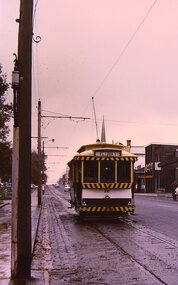
... Set of 12 Digital images, from negatives taken by George Stevens on 17/9/1971: 1 - Tram Scrubber At depot with 39 alongside 2 - Trams 34 & 17 Crossing at Urquhart St loop 3 - Tram 17 Reversing at Grey St - note the two different spellings of Grey St and Gray St. 4 - Tram 34 Waiting for a goods train to pass through the level crossing. 5 - Tram 34 At Lydiard St North, through the cemetery gates 6 - Tram 35 Westbound in Sturt St near Dawson St with Town Hall, Myer and Coles in the background. ...Ballarat Tramway Museum South Gardens Reserve Wendouree Parade Ballarat Ballarat goldfields Set of 12 Digital images, from negatives taken by George Stevens on 17/9/1971: 1 - Tram Scrubber At depot with 39 alongside 2 - Trams 34 & 17 Crossing at Urquhart St loop 3 - Tram 17 Reversing at Grey St - note the two different spellings of Grey St and Gray St. 4 - Tram 34 Waiting for a goods train to pass through the level crossing. 5 - Tram 34 At Lydiard St North, through the cemetery gates 6 - Tram 35 Westbound in Sturt St near Dawson St with Town Hall, Myer and Coles in the background. ...Set of 12 Digital images, from negatives taken by George Stevens on 17/9/1971: 1 - Tram Scrubber At depot with 39 alongside 2 - Trams 34 & 17 Crossing at Urquhart St loop 3 - Tram 17 Reversing at Grey St - note the two different spellings of Grey St and Gray St. 4 - Tram 34 Waiting for a goods train to pass through the level crossing. 5 - Tram 34 At Lydiard St North, through the cemetery gates 6 - Tram 35 Westbound in Sturt St near Dawson St with Town Hall, Myer and Coles in the background. Note the End of Section sign on the pole and that it is a compulsory stop 7 - Tram 34 with the destination of city - location ?? 8 - Tram 21 Sturt St 9 - Tram 21 In Lydiard St North on its way to Sebastopol 10 - Tram 32 Northbound in Lydiard St North, near Nolan St 11 - Tram 32 At Seymour St with North Star hotel in the background and a young lady boarding. 12 - Tram 30 Night photo with Town Hall in background. Yields information about the tramcars used on 17/9/1971 and the various locations around the system.Set of 12 digital images scanned from black and white negatives.tramways, sturt st, albert st, wendouree parade, lydiard st nth, victoria st, depot, level crossing, tram 34, tram 17, tram 30, tram 21, tram 32, dawson st -
 Ballarat Tramway Museum
Negative - SECV Ballarat operations set of 7, Robert Green, 14/9/1968
... Set of 7 photographs by Robert Green 14/9/1968, showing the tramcar operations of the SECV system. 1 -Tram 20 In Albert St - side on view 2 -Trams 39, 34 & ? Night view of the depot 3 -Trams Night view of tram at Lydiard St North 4 -Tram 17 Night view at Victoria St 5 -Tram 12 Night view at Mt Pleasant 6 -Tram 28 Night view at Sebastopol 7 -Tram 28 ditto with driver standing alongside tram ...Ballarat Tramway Museum South Gardens Reserve Wendouree Parade Ballarat Ballarat goldfields Set of 7 photographs by Robert Green 14/9/1968, showing the tramcar operations of the SECV system. 1 -Tram 20 In Albert St - side on view 2 -Trams 39, 34 & ? Night view of the depot 3 -Trams Night view of tram at Lydiard St North 4 -Tram 17 Night view at Victoria St 5 -Tram 12 Night view at Mt Pleasant 6 -Tram 28 Night view at Sebastopol 7 -Tram 28 ditto with driver standing alongside tram Yields information about the SECV Ballarat tramways operations on 14/9/1968. ...Set of 7 photographs by Robert Green 14/9/1968, showing the tramcar operations of the SECV system. 1 -Tram 20 In Albert St - side on view 2 -Trams 39, 34 & ? Night view of the depot 3 -Trams Night view of tram at Lydiard St North 4 -Tram 17 Night view at Victoria St 5 -Tram 12 Night view at Mt Pleasant 6 -Tram 28 Night view at Sebastopol 7 -Tram 28 ditto with driver standing alongside tram Yields information about the SECV Ballarat tramways operations on 14/9/1968.35mm negative in a film strip - set of 7tramways, tram 27, lydiard st nth, tram 20, sebastopol, tram 39, tram 34, tram 17, tram 28, mt pleasant, victoria st -
 Ballarat Tramway Museum
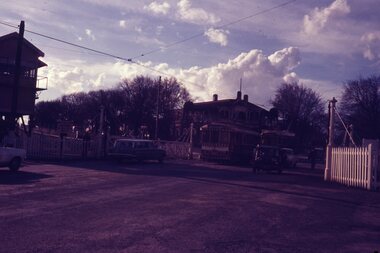
Negative - SECV Ballarat operations set of 5, Robert Green, 1967
... Set of 5 photographs by Robert Green during 1967, showing the tramcar operations of the SECV system. 1 -Tram 42 at the depot - note the white on black destination roll - photo taken at the time of the changeover during 1967. 2 -Trams 35, 39, 17 depot interior photo - note destination roll type and dual numbers on tram 39 3 - scrubber on 0 orad with tennis court in the background 4 - scrubber ditto 5 -Tram 18 at depot junction. ...Ballarat Tramway Museum South Gardens Reserve Wendouree Parade Ballarat Ballarat goldfields Set of 5 photographs by Robert Green during 1967, showing the tramcar operations of the SECV system. 1 -Tram 42 at the depot - note the white on black destination roll - photo taken at the time of the changeover during 1967. 2 -Trams 35, 39, 17 depot interior photo - note destination roll type and dual numbers on tram 39 3 - scrubber on 0 orad with tennis court in the background 4 - scrubber ditto 5 -Tram 18 at depot junction. ...Set of 5 photographs by Robert Green during 1967, showing the tramcar operations of the SECV system. 1 -Tram 42 at the depot - note the white on black destination roll - photo taken at the time of the changeover during 1967. 2 -Trams 35, 39, 17 depot interior photo - note destination roll type and dual numbers on tram 39 3 - scrubber on 0 orad with tennis court in the background 4 - scrubber ditto 5 -Tram 18 at depot junction. Tram has a white on black destination roll. Yields information about the SECV Ballarat tramways operations during 1967.35mm negative in a film strip - set of 5 - Black and white prints of items 1 and 2 held.tramways, depot, scrubber, tram 42, tram 35, tram 39, tram 17 -
 Ballarat Tramway Museum
Negative - SECV Ballarat operations set of 6, Robert Green, 1968
... 1 -Tram 14 Barkly St on Mt Pleasant with another tram behind. Tram has destination of City 2 -Tram 39 At Mt Pleasant with conductor walking to reboard the tram. Has the General store in the background' 3 -Trams Lady sitting in a bogie car, probably No. 39 4 -Tram 30 City tram stop, with women gossiping and one gent. In the background is Allan Bros, National Mutual entrance, coffee shop advertising the type of drinks available, including Bonox and Gemmola's pharmacy 5 -Tram 43 view from rear window of a tram, in Sturt St 6 -Tram 17...1 -Tram 14 Barkly St on Mt Pleasant with another tram behind. Tram has destination of City 2 -Tram 39 At Mt Pleasant with conductor walking to reboard the tram. Has the General store in the background' 3 -Trams Lady sitting in a bogie car, probably No. 39 4 -Tram 30 City tram stop, with women gossiping and one gent. In the background is Allan Bros, National Mutual entrance, coffee shop advertising the type of drinks available, including Bonox and Gemmola's pharmacy 5 -Tram 43 view from rear window of a tram, in Sturt St 6 -Tram 17 ...Set of 6 photographs by Robert Green during 1968, showing the tramcar operations of the SECV system. 1 -Tram 14 Barkly St on Mt Pleasant with another tram behind. Tram has destination of City 2 -Tram 39 At Mt Pleasant with conductor walking to reboard the tram. Has the General store in the background' 3 -Trams Lady sitting in a bogie car, probably No. 39 4 -Tram 30 City tram stop, with women gossiping and one gent. In the background is Allan Bros, National Mutual entrance, coffee shop advertising the type of drinks available, including Bonox and Gemmola's pharmacy 5 -Tram 43 view from rear window of a tram, in Sturt St 6 -Tram 17 At Lydiard St Nth terminus Yields information about the SECV Ballarat tramways operations during 1968.35mm negative in a film strip - set of 6tramways, sturt st, lydiard st, tram 14, tram 39, mt pleasant, tram 30, tram 43, tram 17, lydiard st nth -
 Ballarat Tramway Museum
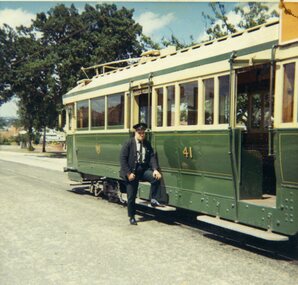
Slide - 35mm slide/s - set of 5, Roy J Mitchell, late 1960's
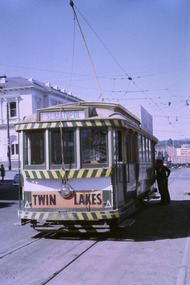
... 1 - tram No. 11 southbound in Lydiard St North, at the level crossing with destination of Sebastopol. Has Osborne House in the background. .2 - ditto with tram 39 showing special .3 - Bogie tram crossing No. 11 (showing City) at Gregory St. No. 11 has a Twin Lakes sign .4 - Part of one of the timetable board as the City terminus, Sturt and Lydiard Sts. .5 - No. 17...Ballarat Tramway Museum South Gardens Reserve Wendouree Parade Ballarat Ballarat goldfields Tramways trams Lydiard St North Level Crossings Gregory St Timetable Boards tram 11 tram 39 tram 17 On each slide in ink "Roy Mitchell" , "Tram" "1958-1971". .1 - "20" .2 - "28" .4 - "15" Set of four green Fuji Film green plastic slides during late 1960's of: 1 - tram No. 11 southbound in Lydiard St North, at the level crossing with destination of Sebastopol. ...Set of four green Fuji Film green plastic slides during late 1960's of: 1 - tram No. 11 southbound in Lydiard St North, at the level crossing with destination of Sebastopol. Has Osborne House in the background. .2 - ditto with tram 39 showing special .3 - Bogie tram crossing No. 11 (showing City) at Gregory St. No. 11 has a Twin Lakes sign .4 - Part of one of the timetable board as the City terminus, Sturt and Lydiard Sts. .5 - No. 17 with driver/conductor reversing the pole. Has the city in the far distance, looking back towards the city.On each slide in ink "Roy Mitchell" , "Tram" "1958-1971". .1 - "20" .2 - "28" .4 - "15"tramways, trams, lydiard st north, level crossings, gregory st, timetable boards, tram 11, tram 39, tram 17 -
 Ballarat Tramway Museum
Photograph - Digital image Set of 8, 21/08/1971 12:00:00 AM
... trams in the months before the closure of the SEC Tramway system. Yields information about the streetscape. Trams tramways Railway Station Macarthur St Victoria St Sturt St Lydiard St North Level Crossings Depot tram 31 tram 32 tram 39 tram 26 tram 17 tram 43 Set of 8 Digital images, scanned from slides by Graeme Cleak, scanning by Peter Winspur 9/2011. .1 - Slide FS14 - No. 31 and 32 crossing at the High St Loop in Macarthur St. ...Yields information about the SEC Ballarat trams in the months before the closure of the SEC Tramway system. Yields information about the streetscape. Set of 8 Digital images, scanned from slides by Graeme Cleak, scanning by Peter Winspur 9/2011. .1 - Slide FS14 - No. 31 and 32 crossing at the High St Loop in Macarthur St. Tram 31 has the destination of Victoria St. Geoff Dean and his mini on the right hand side of the photograph. Another depot bound single trucker in the photograph, .2 - Slide FS3 - 31 outbound in Victoria St, with St Alipius church in the background. .3 - Slide FS5 - No. 31, and four other trams, some running special at Sturt and Lydiard Sts during the ARHS tour of that day. Has the ANZ Bank and SEC offices in the background. .4 - Slide FS9 - Nos. 39, 26 and two other trams in Lydiard St for the ARHS tour with Reid's Palace, Macleod & Co and J.J. Collier buildings in the background along with other buildings in Lydiard St North. Taken from the Provincial Hotel. .5 - Slide FS11 - No. 26 northbound showing Special running through the level crossing at Ballarat with the Kennedy Murray General Carrier in the background. Taken from the Provincial Hotel. .6 - Slide FS13 - No. 32 turning from Sturt St into Drummond Street North showing Depot via Drummond North, with the Southern Cross Hotel, Rimmington Bros and J.A, Malpass(?) buildings in the background. .7 - Slide FR35 - night shot of No. 17 (with Twin Lakes sign) and No. 32 in Nos 3 and 4 roads at the depot. .8 - Slide FR34 - night shot of the front of the depot - as above and No. 43 on "0" road. All photos 21-8-1971 trams, tramways, railway station, macarthur st, victoria st, sturt st, lydiard st north, level crossings, depot, tram 31, tram 32, tram 39, tram 26, tram 17, tram 43 -
 Ballarat Tramway Museum
Photograph - Digital image Set of 10, Tony Smith, 1971
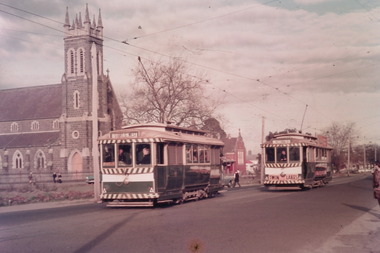
... 1 - 35 (Sebastopol), with the Town Hall and Gemmola's chemist in the background. Tram waiting at the tram stop. .2 - 27 at Victoria St loop, showing Gardens via Drummond St Nth. .3 - 35 at Armstrong St inbound showing Lydiard St Nth. Has the Commonwealth bank in the background. .4 - 32 westbound in Sturt St between Dawson and Lyon Streets, tram has the destination of Gardens via Drummond Nth. Has the Town Hall and other buildings in the background. .5 - 17 inbound at Dawson St. Tram has destination of Mt Pleasant. .6 - 39...trams prior to the closure of the tramway system. Trams tramways Sturt St Victoria St Dawson St Lake Wendouree Wendouree Parade Depot tram 35 tram 27 tram 32 tram 17 tram 39 tram 37 tram 21 tram 11 tram 41 Set of 10 digital images of Ballarat trams prior to closure, scanned from original slides by Tony Smith, 1971 prior to closure of the system. The following photos have suffered colour change and showing some deterioration - fungal growth. .1 ...Yields information about Ballarat Tramways and trams prior to the closure of the tramway system.Set of 10 digital images of Ballarat trams prior to closure, scanned from original slides by Tony Smith, 1971 prior to closure of the system. The following photos have suffered colour change and showing some deterioration - fungal growth. .1 - 35 (Sebastopol), with the Town Hall and Gemmola's chemist in the background. Tram waiting at the tram stop. .2 - 27 at Victoria St loop, showing Gardens via Drummond St Nth. .3 - 35 at Armstrong St inbound showing Lydiard St Nth. Has the Commonwealth bank in the background. .4 - 32 westbound in Sturt St between Dawson and Lyon Streets, tram has the destination of Gardens via Drummond Nth. Has the Town Hall and other buildings in the background. .5 - 17 inbound at Dawson St. Tram has destination of Mt Pleasant. .6 - 39 picking up passengers at the tram stop on the west side of Dawson St. Has the Ritzy cafe and the Golden City hotel in the background. Tram appears to be well loaded with lady passengers and has a "Everything under my control in my all electric kitchen" SEC roof ad. .7 - 37 using the Dawson St crossover - has St Patricks Cathedral in the background. .8 - 21 entering the depot with Lake Wendouree in the background. .9 - 11 sitting in 0 road at the depot. .10 - 41 at the depot on 2 road. Tram has two Johnny Walker Whiskey roof adverts.trams, tramways, sturt st, victoria st, dawson st, lake wendouree, wendouree parade, depot, tram 35, tram 27, tram 32, tram 17, tram 39, tram 37, tram 21, tram 11, tram 41 -
 Ballarat Tramway Museum
Photograph - Digital image Set of 10, Tony Smith, 5/09/1971 12:00:00 AM
... trams prior to the closure of the tramway system. Trams tramways Sturt St City Grenville St Bridge St Mt Pleasant Barkly St Grant St Main St Closure tram 17 tram 26 tram 43 tram 14 tram 12 tram 27 tram 39 Set of 10 digital images of Ballarat trams prior to closure, scanned from original slides by Tony Smith, 1971 prior to closure of the system. This set of slides, possibly on the last weekend of Mt Pleasant services - closure took place on 5/9/1971. . .1 ...Yields information about Ballarat Tramways and trams prior to the closure of the tramway system.Set of 10 digital images of Ballarat trams prior to closure, scanned from original slides by Tony Smith, 1971 prior to closure of the system. This set of slides, possibly on the last weekend of Mt Pleasant services - closure took place on 5/9/1971. . .1 - 17 at the City terminus, north side. Tram showing the destination of Sebastopol and has a Twin Lakes sign. .2 - 26 at the city terminus, south side with Geommola's Pharmacy and Kodak Film advert and Town Hall in the background. .3 - 43 at the City terminus, north side, with destination of Mt Pleasant. Has a number of men at the tram stop. .4 - 14 leaving Bridge St, crossing Grenville St into Sturt St, with destination of City. Has the Dickins and Woolworths Big W store in the background. .5 - 43 at Mt Pleasant terminus with conductor boarding the tram. Tram has destination of Gardens via Sturt St West. In the background is the corner store with adverts for The Sun, Womens Weekly, Coca Cola and Robur Tea. .6 - 43 and 26 Barkly St, about to arrive at the Grant St loop. Both trams inbound. .7 - 43, 26 and 27 at Grant St loop. .8 - 12 (Lydiard St Nth) and another bogie tram at the city terminus north with the Town Hall in the background. .9 - 39 outbound in Barkly St to Mt Pleasant - note the new bus stop signs on either side of the tram. 10 - 27 (City) and 26 turning from Barkly St into Main St with the Ampol petrol station, a general store advertising Escort cigarettes and The Age in the background . On the right hand side is a fish and chips shop advertising crays and drinks.trams, tramways, sturt st, city, grenville st, bridge st, mt pleasant, barkly st, grant st, main st, closure, tram 17, tram 26, tram 43, tram 14, tram 12, tram 27, tram 39 -
 Ballarat Tramway Museum
Photograph - Digital image Set of 2, Chris Phillips, c1970
... trams at Hospital corner, c1970 by Chris Phillips.. .1 - No 39 inbound in Sturt St, about to cross Drummond St. Has the Hospital in the background and the tram stop. Tram has the destination of Mt Pleasant. .2 - No. 17 crossing Sturt St from Drummond St South. Has the destination of Lydiard St North. Has the buildings on the corner and the various directional signs in the view. Tram...trams in the vicinity of Hospital Corner. Trams tramways Hospital Corner Sturt St Drummond St tram 39 tram 17 Set of two digital images of trams at Hospital corner, c1970 by Chris Phillips.. .1 - No 39 inbound in Sturt St, about to cross Drummond St. ...Yields information about the use of trams in the vicinity of Hospital Corner.Set of two digital images of trams at Hospital corner, c1970 by Chris Phillips.. .1 - No 39 inbound in Sturt St, about to cross Drummond St. Has the Hospital in the background and the tram stop. Tram has the destination of Mt Pleasant. .2 - No. 17 crossing Sturt St from Drummond St South. Has the destination of Lydiard St North. Has the buildings on the corner and the various directional signs in the view. Tram has a SEC roof advert - everything's under control in my all electric kitchen. Ritchie's food and liquor store in the background.trams, tramways, hospital corner, sturt st, drummond st, tram 39, tram 17 -
 Ballarat Tramway Museum
Photograph - Digital image Set of 7, Chris Phillips, early 1960's
... Trams tramways Sturt St Hospital Corner Doveton St Dawson St Tram Stops tram 26 tram 17 tram 12 tram 39 Set of 7 digital images of trams in Sturt St, c1970 - Photos by Chris Phillips. .1 - No. 26, in bound near Armstrong St - destination of Mt Pleasant St. ...Yields information about tramway operations in Sturt St c1970.Set of 7 digital images of trams in Sturt St, c1970 - Photos by Chris Phillips. .1 - No. 26, in bound near Armstrong St - destination of Mt Pleasant St. Has the Commercial Bank of Australia building in the background - CBC .2 - No. 26 in bound to City, near Hospital Corner. .3 - No. 17 near the Doveton St intersection, has a roof advert "Make Bliss Not Love". Has the State Savings Bank, CAGA Finance, CBC bank buildings in the background. .4 - No. 12 in bound with the destination of Gardens via Sturt St West, at the corner of Dawson and Sturt St. Shows the tram stop. Has the R. E. Hayden Real Estate building in the background. .5 - No. 39 inbound at Hospital corner. .6 - No. 39 at the City terminus with the Post Office in the background. .7 - No. 43 outbound to the Gardens Via Sturt St west near Drummond St. Has the Marshall battery centre, Morris Ellis & Sons, Pope Mowers and The Ballarat Modern Diary in the background. Also a sign for AWA car radio.trams, tramways, sturt st, hospital corner, doveton st, dawson st, tram stops, tram 26, tram 17, tram 12, tram 39 -
 Ballarat Tramway Museum
Photograph - Digital image Set of 10, George Coop, 1968 - 1970
... tram operations and the landscape views of the Sturt St median strip. Trams tramways Sturt St Raglan St Passengers Doveton St tram 26 tram 40 tram 30 tram 39 tram 18 tram 31 tram 41 tram 13 tram 17 Ten (10) Digital images taken by George Coop during the period 1968 - 1970, of SEC trams in Sturt St, between the City and Pleasant Streets. .1 - Tram 26 climbing the Sturt St hill to Lydiard St, with the Cook's Private Hotel, the Commonwealth Bank and the National Mutual Life building in the background. ...Yields information about the tram operations and the landscape views of the Sturt St median strip.Ten (10) Digital images taken by George Coop during the period 1968 - 1970, of SEC trams in Sturt St, between the City and Pleasant Streets. .1 - Tram 26 climbing the Sturt St hill to Lydiard St, with the Cook's Private Hotel, the Commonwealth Bank and the National Mutual Life building in the background. Photo taken from the Titanic Bandstand. .2 - Tram 40 Sturt St, enough to Lydiard St North just before Raglan St. Has a lady passenger by the tram stop. .3 - Tram 30 - Sturt St north side, near Armstrong St, - has a blue framing line around the photograph. .4 - Tram 39, Sturt St, near Doveton St, shows the rotunda in the median strip. .5 - Tram 18, with median step in view. .6 - Tram 31, with two Johnnie Walker whiskey roof adverts, outside the National Mutual Life building with the Alan Bros Jewellers and Golden Star Chinese Cafe in the view. .7 - Tram 31, Sturt St south side with Town Hall and the Golden City Hotel in the view. Tram has destination of Gardens via Drummond North. .8 - Tram 41 - ditto - going to Sebastopol. .9 - Tram 13, south side, Gardens via Sturt West, about , near Ripon St, with the Ampol service station in the background and about to pick up a lady passenger .10 - Tram 17, near Doveton St. Has a Twin Lakes sign and a Wilkinson Sword Razor Bladese roof advert. trams, tramways, sturt st, raglan st, passengers, doveton st, tram 26, tram 40, tram 30, tram 39, tram 18, tram 31, tram 41, tram 13, tram 17 -
 Melbourne Tram Museum
Magazine, Yarra Trams, "The Wire", 5/2011 to 1/2015
... (see htd5043i21 for a image from an unknown newspaper of the actual event - features Z3 158.) .11 - No. 25 - 22/11/2011 - new staff guide, Gold Coast tram line, Macarthur St, overhead, fund raising, route numbering update. .12 - No. 26 - 6/12/2011 - Swanston St Superstops, Newmarket bridge strikes, rhinos. .13 - No. 27 - 20/12/2011 - Christmas carnival, Lenny Bates, portable crossover, uniforms. .14 - No. 28 - 17/1/2012 - Passing of Len Bates, Myki, Gardiner railway station. 14a - No. 29 - 31/1/2012 - Southbank depot, patronage, myki, think like a passenger, fatigue management, .15 - No. 30 - 15/2/2012 - visit of Keolis, SNCF people, list of Executive leadership team with photos, Swanston St works, Myki introduction. .16 - No. 31 - 29/2/2012 - patronage up, tram postage stamps, Myki, rhinos. .17 - No. 32 - 14/3/2012 - St Kilda Rd trackwork, fund raising, Southbank Depot extensions, Myki, driving conditions, grand prix. .18 - No. 33 - 30/3/2012 - introduction of the PTV, end of MetLink and Transport Ticketing Authority, changes in management structure, trackwork, Gold Coast tramway and Keolis. .19 - No. 34 - Dr Jake - Royal children's Hospital super stop, route 96 - Premium line. .20 - No. 35, 2/5/2012 - Revision of Rules, trackwork in St Kilda Road and Elizabeth St, Myki, safety - Zero Harm. .21 - No. 69 - 25/9/2013 - Passengers paying their way, E class update, Mal Ashworth retires, progress report, feedback, new chime on trams. .22 - No. 70 - 9/10/2013 - Art comes alive, tram 925, driver simulator at Preston Workshops, E class project, 90th Glen Huntly. .23 - No. 83 - 23/4/2014 - Screen time for trams, new PIDs on B class, assistance animals, Operations Centre, Preston Workshops, Electrical log sheets to SLV. .24 - No. 89 - 23/7/2014 - punctuality, refresh of network map (fold-out map), women drivers. .25 - No. 97 - 19/11/2014 - Revitalising route 96, Keolis news, free tram zone, guide dogs. .26 - No. 99 - 17/12/2014 - Accessibility week, new uniform top for CSE's, free tram zone, world trade centre stop upgrade, heat stress, Art tram 158. .27 - No. 100 - 14/1/2015 - Route 96 complete, New Years eve free travel, fare compliance, patronage down, .28 - No. 12 - 16/5/2011 - Gold coast tramway, performance dashboard, tramworks and the rhino .29 - No. 16 - 19/7/2011 - Depot managers, tevor jones, record patronage, vision, rhino .30 - No. 17 - 2/8/2011 - High St Westgarth works, Duncan Smith, David Clarke Training, Swanston St works, and Preston Workshops . .32 - No. 39 - 28/6.2012 - maintenance, Emmanual Sorin, transformation, fare evasion, and Combino in Potsdam. .33 - No. 105 - 25/3/2015 - Grand Prix, Elgin and Lygon upgrade, Camberwell Junction, PTV hub, overhead. .34 - No. 78 - 12/2/2014 - January heatwave, Australian Open, Mark Wild of PTV, and Curt Skinner - voice in Channel 10 series Get Ace .35 - No. 81 - 26/3/2014 - drug and alcohol testing, zero harm, Victoria Bridge works, Keolis, relations with Toronto, Collins St safety and incident on a route 57 tram. .36 - No. 109 - 20/5/2015 - Goodbye Z class, Hello E class, Kew Depot centenary, drug & alcohol reminder, passenger satisfaction, Anzac day, B class life extension. .37 - No. 110 - 3/6/2015 - 3rd W class tram back grom Bendigo, employer of the year, CSE's go digital, Camberwell depot, Queensbridge tram and bus stop and Tram Hub preview. .38 - No. 115 - Feb. 2016 - 12 page centre stapled - New Year's eve services, spike the rhino is back, Burke Road level crossing removed, more E class, safe network in 2106, tennis, customers happy, New Preston depot, Farewell to Clement, Z class 40 years on network....(see htd5043i21 for a image from an unknown newspaper of the actual event - features Z3 158.) .11 - No. 25 - 22/11/2011 - new staff guide, Gold Coast tram line, Macarthur St, overhead, fund raising, route numbering update. .12 - No. 26 - 6/12/2011 - Swanston St Superstops, Newmarket bridge strikes, rhinos. .13 - No. 27 - 20/12/2011 - Christmas carnival, Lenny Bates, portable crossover, uniforms. .14 - No. 28 - 17/1/2012 - Passing of Len Bates, Myki, Gardiner railway station. 14a - No. 29 - 31/1/2012 - Southbank depot, patronage, myki, think like a passenger, fatigue management, .15 - No. 30 - 15/2/2012 - visit of Keolis, SNCF people, list of Executive leadership team with photos, Swanston St works, Myki introduction. .16 - No. 31 - 29/2/2012 - patronage up, tram postage stamps, Myki, rhinos. .17 - No. 32 - 14/3/2012 - St Kilda Rd trackwork, fund raising, Southbank Depot extensions, Myki, driving conditions, grand prix. .18 - No. 33 - 30/3/2012 - introduction of the PTV, end of MetLink and Transport Ticketing Authority, changes in management structure, trackwork, Gold Coast tramway and Keolis. .19 - No. 34 - Dr Jake - Royal children's Hospital super stop, route 96 - Premium line. .20 - No. 35, 2/5/2012 - Revision of Rules, trackwork in St Kilda Road and Elizabeth St, Myki, safety - Zero Harm. .21 - No. 69 - 25/9/2013 - Passengers paying their way, E class update, Mal Ashworth retires, progress report, feedback, new chime on trams. .22 - No. 70 - 9/10/2013 - Art comes alive, tram 925, driver simulator at Preston Workshops, E class project, 90th Glen Huntly. .23 - No. 83 - 23/4/2014 - Screen time for trams, new PIDs on B class, assistance animals, Operations Centre, Preston Workshops, Electrical log sheets to SLV. .24 - No. 89 - 23/7/2014 - punctuality, refresh of network map (fold-out map), women drivers. .25 - No. 97 - 19/11/2014 - Revitalising route 96, Keolis news, free tram zone, guide dogs. .26 - No. 99 - 17/12/2014 - Accessibility week, new uniform top for CSE's, free tram zone, world trade centre stop upgrade, heat stress, Art tram 158. .27 - No. 100 - 14/1/2015 - Route 96 complete, New Years eve free travel, fare compliance, patronage down, .28 - No. 12 - 16/5/2011 - Gold coast tramway, performance dashboard, tramworks and the rhino .29 - No. 16 - 19/7/2011 - Depot managers, tevor jones, record patronage, vision, rhino .30 - No. 17 - 2/8/2011 - High St Westgarth works, Duncan Smith, David Clarke Training, Swanston St works, and Preston Workshops . .32 - No. 39 - 28/6.2012 - maintenance, Emmanual Sorin, transformation, fare evasion, and Combino in Potsdam. .33 - No. 105 - 25/3/2015 - Grand Prix, Elgin and Lygon upgrade, Camberwell Junction, PTV hub, overhead. .34 - No. 78 - 12/2/2014 - January heatwave, Australian Open, Mark Wild of PTV, and Curt Skinner - voice in Channel 10 series Get Ace .35 - No. 81 - 26/3/2014 - drug and alcohol testing, zero harm, Victoria Bridge works, Keolis, relations with Toronto, Collins St safety and incident on a route 57 tram. .36 - No. 109 - 20/5/2015 - Goodbye Z class, Hello E class, Kew Depot centenary, drug & alcohol reminder, passenger satisfaction, Anzac day, B class life extension. .37 - No. 110 - 3/6/2015 - 3rd W class tram back grom Bendigo, employer of the year, CSE's go digital, Camberwell depot, Queensbridge tram and bus stop and Tram Hub preview. .38 - No. 115 - Feb. 2016 - 12 page centre stapled - New Year's eve services, spike the rhino is back, Burke Road level crossing removed, more E class, safe network in 2106, tennis, customers happy, New Preston depot, Farewell to Clement, Z class 40 years on network. ...0 - No 9 - 1/4/2011 - Rhinos on skateboards, Did you know, Spencer St works, 00 - No 10 - 19/4/2011 - safety boards, busting ghost routes, works alerts, travelling without tickets, launch of a new tram network maps and compliments received from customers. .1 - No. 11 of 3/5/2011 with the revised Yarra trams logo, traffic priority, work over Easter in Spencer St at Bourke and Collins St, Good Friday appeal, safety, passenger feedback and future works. .2 - No. 13 - 31/5/2011 - new uniform, cleaning, CEPR, trackwork - Fitzroy St, Northcote, Rhino, Carlton Control. .3 - No. 14 - 15/6/2011 - Haymarket Roundabout, accessibility, maintenance, CSE. 3a - No. 16 - 19/7/2011 - Managers on the move, Trevor Jones, Yarra's vision, Richard Ch'ng and Rhino update. .4 - No. 17 - 2/8/2011 - High St Westgarth trackwork, Swanston St, IMF CEO visit .5 - No. 18 - 16/8/2011 - Performance benchmarks met, Preston Workshops, repairs to 3018, tram signal priority. .6 - No . 19 - 30/8/2011 - New E class trams, routes "a" or "d", TramTracker in shelters, police, fare evasion .7 - No. 20 - 15/9/2011 - Football trams, Superstops, Bridge Road, Rhinos. .8 - No. 21 - 27/9/2011 - CEO's journey to work, accessibility, increased patronage, E class. .8a - No. 22 - 11/10/2011 - Minister Mulder visit, E class, Customer experience, Elizabeth Kerdelhue Corporate Affairs Director, flood indicator in Wellington Parade, Keolis - Orleans and PTV coming your way. .9 - No. 23 - 25/10/2011 - forthcoming royal visit, opening for Footscray Road extension, Rhinos, Stockholm .10 - No. 24 - 8/11/2011- Royal visit, photos, Z3 158, route 86 works in High St. (see htd5043i21 for a image from an unknown newspaper of the actual event - features Z3 158.) .11 - No. 25 - 22/11/2011 - new staff guide, Gold Coast tram line, Macarthur St, overhead, fund raising, route numbering update. .12 - No. 26 - 6/12/2011 - Swanston St Superstops, Newmarket bridge strikes, rhinos. .13 - No. 27 - 20/12/2011 - Christmas carnival, Lenny Bates, portable crossover, uniforms. .14 - No. 28 - 17/1/2012 - Passing of Len Bates, Myki, Gardiner railway station. 14a - No. 29 - 31/1/2012 - Southbank depot, patronage, myki, think like a passenger, fatigue management, .15 - No. 30 - 15/2/2012 - visit of Keolis, SNCF people, list of Executive leadership team with photos, Swanston St works, Myki introduction. .16 - No. 31 - 29/2/2012 - patronage up, tram postage stamps, Myki, rhinos. .17 - No. 32 - 14/3/2012 - St Kilda Rd trackwork, fund raising, Southbank Depot extensions, Myki, driving conditions, grand prix. .18 - No. 33 - 30/3/2012 - introduction of the PTV, end of MetLink and Transport Ticketing Authority, changes in management structure, trackwork, Gold Coast tramway and Keolis. .19 - No. 34 - Dr Jake - Royal children's Hospital super stop, route 96 - Premium line. .20 - No. 35, 2/5/2012 - Revision of Rules, trackwork in St Kilda Road and Elizabeth St, Myki, safety - Zero Harm. .21 - No. 69 - 25/9/2013 - Passengers paying their way, E class update, Mal Ashworth retires, progress report, feedback, new chime on trams. .22 - No. 70 - 9/10/2013 - Art comes alive, tram 925, driver simulator at Preston Workshops, E class project, 90th Glen Huntly. .23 - No. 83 - 23/4/2014 - Screen time for trams, new PIDs on B class, assistance animals, Operations Centre, Preston Workshops, Electrical log sheets to SLV. .24 - No. 89 - 23/7/2014 - punctuality, refresh of network map (fold-out map), women drivers. .25 - No. 97 - 19/11/2014 - Revitalising route 96, Keolis news, free tram zone, guide dogs. .26 - No. 99 - 17/12/2014 - Accessibility week, new uniform top for CSE's, free tram zone, world trade centre stop upgrade, heat stress, Art tram 158. .27 - No. 100 - 14/1/2015 - Route 96 complete, New Years eve free travel, fare compliance, patronage down, .28 - No. 12 - 16/5/2011 - Gold coast tramway, performance dashboard, tramworks and the rhino .29 - No. 16 - 19/7/2011 - Depot managers, tevor jones, record patronage, vision, rhino .30 - No. 17 - 2/8/2011 - High St Westgarth works, Duncan Smith, David Clarke Training, Swanston St works, and Preston Workshops . .32 - No. 39 - 28/6.2012 - maintenance, Emmanual Sorin, transformation, fare evasion, and Combino in Potsdam. .33 - No. 105 - 25/3/2015 - Grand Prix, Elgin and Lygon upgrade, Camberwell Junction, PTV hub, overhead. .34 - No. 78 - 12/2/2014 - January heatwave, Australian Open, Mark Wild of PTV, and Curt Skinner - voice in Channel 10 series Get Ace .35 - No. 81 - 26/3/2014 - drug and alcohol testing, zero harm, Victoria Bridge works, Keolis, relations with Toronto, Collins St safety and incident on a route 57 tram. .36 - No. 109 - 20/5/2015 - Goodbye Z class, Hello E class, Kew Depot centenary, drug & alcohol reminder, passenger satisfaction, Anzac day, B class life extension. .37 - No. 110 - 3/6/2015 - 3rd W class tram back grom Bendigo, employer of the year, CSE's go digital, Camberwell depot, Queensbridge tram and bus stop and Tram Hub preview. .38 - No. 115 - Feb. 2016 - 12 page centre stapled - New Year's eve services, spike the rhino is back, Burke Road level crossing removed, more E class, safe network in 2106, tennis, customers happy, New Preston depot, Farewell to Clement, Z class 40 years on network.Demonstrates Yarra trams staff newsletters.Set of 34 Yarra Trams internal newsletter "The Wire", All A4, printed in full colour. All four pages unless noted otherwise, full colour, performance snapshot on front cover.trams, tramways, yarra trams, traffic control, trackwork, spencer st, fund raising, operations, rhinos, carlton control, high st, haymarket, preston workshops, e class, route numbers, bridge road, wellington parade, ptv, royal visit, footscray road, gold coast, macarthur st, swanston st, superstops, newmarket, gardiner, burke road, level crossings, railway squares, myki, metlink, tickets, route 96, rules, st kilda road, elizabeth st, tram 158, tram 925, glen huntly depot, simulator, b class, opeations centre, art trams, patronage, kew depot, new preston, queensbridge, w class, bendigo, map -
 Melbourne Tram Museum
Album - Photo Album, Transit Australia Publishing, "TAP - Part E - VR Trams – Sheets E1 to E24 ", 1950's to 1990's
... tram 1... tram 7... tram 17... tram 23... tram 26... tram 40... tram 43... tram 46... tram 51... tram 6... tram 3... tram 13... tram 23... tram 28... tram 32... tram 34... tram 36... tram 39...Melbourne Tram Museum 8 Wallen Road Hawthorn melbourne Trams tramways Transit Australia Destination City Tramcars Depots VR Victorian Railways St Kilda Brighton Sandringham tram 1 tram 7 tram 17 tram 23 tram 26 tram 40 tram 43 tram 46 tram 51 tram 6 tram 3 tram 13 tram 23 tram 28 tram 32 tram 34 tram 36 tram 39 tram 37 tram 52 tram 40 tram 43 tram 41 tram 48 tram 51 tram 50 tram 53 tram 4 tram 54 tram 42 Photo Album - titled "TAP - Part E - VR Trams – Sheets E1 to E24 ", from Transit Australia Publishing. ...Photo Album - titled "TAP - Part E - VR Trams – Sheets E1 to E24 ", from Transit Australia Publishing. Photos used in the Destination City and other publications series. For a detailed list of photographs see htd4604i.pdf. For individual photo images see: \dbtext\hawthtramcoll\photo collections\TAP-Part D, images TAP269 to TAP315. TAP269_1-scrubber-OrmondRd_c1943_LeonMarcshallWood.jpg (Bob Lilburn notes in a letter to Keith Kings, photo dated 10/1942 - see 4064.1 in the same folder) TAP270_7_BrightonBeach_1954_HughBallment.jpg TAP271_17_ex-Sydney_LeonMarshallWoodCollection.jpg TAP272_23_ElwoodDepotTurntable.jpg TAP273_26_SandringhamDepot_LGPooleColln.jpg TAP274_40_BrightonBeach_1954_HughBallment.jpg TAP275_43_Sandringham_1943_LeonMarshallWood.jpg TAP276_43_ElwoodDepot_HughBallment.jpg TAP277_48_BlackRock_1954_HughBallment.jpg TAP278_51_ElwoodDepot_25Jan1957_LeonMarshallWood.jpg TAP279_ElwoodDepot_1918.jpg TAP280_6-ElwoodDepot.jpg TAP281_8-9trailer_LeonMarshallWoodCollection.jpg TAP282_3_ElwoodDepot_HughBallment.jpg TAP283_6_ElwoodDepot.jpg TAP284_6_ElwoodDepot_RayPearsonColln.jpg TAP285_trailer_ElwoodDepot_PTC.jpg TAP286_23_Sandringham_RayPearson.jpg TAP287_28-32_ElwoodDepot_PTC.jpg TAP288_32_StKilda_HughBallment.jpg TAP289_34_OrrmondRd_TMSV.jpg TAP291_37_ElwoodDepot_LindsayCrowe.jpg TAP292_36-39_VautierSt_JimSeletto.jpg TAP292_36-52_ElwoodDepot_1959_JimSeletto.jpg TAP293_40-33_ElwoodDepot_HughBallment.jpg TAP294_41_StKildaStation_1959_JimSeletto.jpg TAP295_43_StKildaStation_HughBallment.jpg TAP296_48_BlackRock_1954_HughBallment.jpg TAP297_51_Sandringham_LindsayCrowe.jpg TAP298_51_leaving-Sandringham_HughBallment.jpg TAP299_51_Sandringham_RayPearson.jpg TAP300_50_Sandringham_1955_GeoffGrant.jpg TAP301_LuxuryCar_Elwood_VictorianRailways.jpg TAP302_52_leaving-StKilda_HughBallment.jpg TAP303_53_ElwoodDepot_HughBallment.jpg TAP304_53-40_StKilda_NoelReed_19Jan1954.jpg TAP305_54_ElwoodDepot_NoelReed.jpg TAP306_Esplanade_MiddleBrighton_TMSV.jpg TAP307_BrightonBeach_TMSV.jpg TAP308_SandringhamStation_TMSV.jpg TAP309_34_ElwoodDepot_JimSeletto.jpg TAP310_34_Yarrambat_JimSeletto.jpg TAP312_34_Elwood_VictorianRailways.jpg TAP313_43_StKildaStation_HughBallment.jpg TAP314_43-894_StKildaStation.jpg TAP315_53_VautierSt_JimSeletto.jpgtrams, tramways, transit australia, destination city, tramcars, depots, vr, victorian railways, st kilda brighton, sandringham, tram 1, tram 7, tram 17, tram 23, tram 26, tram 40, tram 43, tram 46, tram 51, tram 6, tram 3, tram 13, tram 23, tram 28, tram 32, tram 34, tram 36, tram 39, tram 37, tram 52, tram 40, tram 43, tram 41, tram 48, tram 51, tram 50, tram 53, tram 4, tram 54, tram 42 -
 Ballarat Tramway Museum
Photograph - Colour Photograph/s - set of 3, Maurice Stanley, 1971
... Tram Crews Personnel tram 26 tram 39 tram 41 On rear of 2901.2 - in ink "This is myself at the controls of my tram" 2901.2 - "This is one of my workmates he comes from England also." Set of two 89mm sq colour prints of SEC Crew - Maurice Stanley and one black and white photograph of another SEC crewman standing by No. 39. .1 - Maurice Stanley standing alongside No. 41 at Lydiard St North .2 - Maurice Stanley in cab of No. 26 at Gardens, tram showing destination of Victoria St .3 - Crewman, No. 17, standing by rear of No. 39 at View Point Junction. ...Set of two 89mm sq colour prints of SEC Crew - Maurice Stanley and one black and white photograph of another SEC crewman standing by No. 39. .1 - Maurice Stanley standing alongside No. 41 at Lydiard St North .2 - Maurice Stanley in cab of No. 26 at Gardens, tram showing destination of Victoria St .3 - Crewman, No. 17, standing by rear of No. 39 at View Point Junction. Image 4 is a higher resolution image of the face of the crewman. Note: - Maurice also drove for the BTM in the 1970's and early 80's until he left to return to the UK. Assumed photos taken 1971 just prior to closure of the system.On rear of 2901.2 - in ink "This is myself at the controls of my tram" 2901.2 - "This is one of my workmates he comes from England also."tram crews, personnel, tram 26, tram 39, tram 41 -
 Ballarat Tramway Museum
Photograph - Geelong Tram No. 18, Melbourne Electric Supply Co. (MESCo), 15-6-1939
... tram in Geelong to One-manj operation. Geelong tramcar conversion to one man operation MESCo lineouts one-man tram 18 MESCo Corio Terrrace Geelong No. 1 inside a circle and 13-8 printed on the reverse in ink. GSR710/13/1/8 printed on the reverse in pencil. On second copy "1a Converted Pengelly: and date stamp of 17 June 1939." A second note "Pengelly (converted) tram - 15-6-39" Black and white print on paper with notes on rear. Second copy printed on Velox paper. Two copies held. Photograph Geelong Tram ...Geelong Tramcar No. 18, freshly painted, in Corio Tce. with Strachan & Co's wool store in the background. The car has been converted for one-man operation but retains the MESCo's double lineouts that were replaced by single yellow lines in the 1940s. Photo dated 15/6/1939. See also Item 9230.Yields information about the conversion of a Pengelly tram in Geelong to One-manj operation.Black and white print on paper with notes on rear. Second copy printed on Velox paper. Two copies held.No. 1 inside a circle and 13-8 printed on the reverse in ink. GSR710/13/1/8 printed on the reverse in pencil. On second copy "1a Converted Pengelly: and date stamp of 17 June 1939." A second note "Pengelly (converted) tram - 15-6-39"geelong tramcar conversion to one man operation, mesco lineouts, one-man, tram 18, mesco, corio terrrace, geelong