Showing 5 items matching " tram 917"
-
 Melbourne Tram Museum
Slide - MMTB, and MTA tramway operations set of 11, Hugh Ballment, 1950s to 1980s
... ...tram 917...HBM190 - MMTB Trams 722, 917, c1986, Swanston St, Art Tram David Larwill - at Flinders St with Young and Jackson in the background with adverts for Peter Stuyvesant, four X, Classic Restaurant and a large advert for Coca Cola. ...HBM190 - MMTB Trams 722, 917, c1986, Swanston St, Art Tram David Larwill - at Flinders St with Young and Jackson in the background with adverts for Peter Stuyvesant, four X, Classic Restaurant and a large advert for Coca Cola. ...Set of 11 photos by Hugh Ballment, unless noted, of MMTB, and MTA: HBM185 - MMTB Tram 377, c1954, Swanston St, At Bourke St, with Royal visit decorations along the street. In the background is Foy Gibson, ANZ Bank, Cosmopolitan Hotel and a policeman directing traffic. HBM186 - MMTB Tram 677, late 1950s, Elsternwick, Has the Tram stop sign about tram services, adverts for Dandy Ham and BP Energy fuel and a Cartage Contractor's offices in the background. HBM187 - MMTB Tram 518, cMay 1983, Seattle, Tourist Tram HBM188 - MTA Tram 2, 1987, Bourke St, Spencer St junction construction. Has the MTOCo offices and Spencer St station in the background. HBM189 - MTA Tram 244, cNov1997, Flinders St, At Spencer St, with a ComEng Train on the viaduct. HBM190 - MMTB Trams 722, 917, c1986, Swanston St, Art Tram David Larwill - at Flinders St with Young and Jackson in the background with adverts for Peter Stuyvesant, four X, Classic Restaurant and a large advert for Coca Cola. HBM191 - MTA Tram 24, Aug 1988, Bourke St, Cable track removal at Spencer St HBM192 - MMTB Tram 857, 24/05/1954, St Kilda Rd, At Sturt St corner, with the Trocadero building in the background HBM193 - MMTB Tram 651, cMay1968, St Kilda junction, Queensway construction, with a passenger at the tram stop. HBM194 - MMTB, Z class tram no. 29, cMay 1976, Bourke St, shows the Palladium Entertainment Centre in the background advertising "Barry Lyndon". Photo taken from the Southern Cross Hotel. HBM195 - MMTB, T class No. 180, 9/09/1967, Royal Parade, TMSV Tour - tours data base gives the date of 10/9/1967, confirmed by TMSV tours listing. Yields information about Melbourne tram operations, with 1950s to 1980s photos of Melbourne tramways.Kodachrome cardboard and plastic mounts, with notes - set of 11new tramway, bourke st, spencer st, swanston st, elizabeth st, flinders st, tram 377, tram 677, elsternwick, seattle, tram 518, tram 244, tram 722, tram 24, tram 857, st kilda road, tram 917, z class, x2 class, t class, royal parade, tram 180 -
 Melbourne Tram Museum
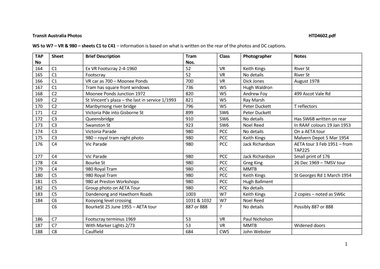
Album - Photo Album, Transit Australia Publishing, "TAP - Part C - W5 to W7 – VR & 980 – sheets C1 to C41 ", 1950's to 1990's
... ... tram 917...Melbourne Tram Museum 8 Wallen Road Hawthorn melbourne Trams tramways Transit Australia Destination City Tramcars Depots W5 class SW5 class SW6 class W7 class W6 class VR tram 52 tram 700 tram 736 tram 820 tram 796 tram 899 tram 910 tram 923 tram 980 tram 1003 tram 1031 tram 1032 tram 53 tram 684 tram 685 tram 721 tram 736 tram 740 tram 746 tram 760 tram 787 tram 801 tram 808 tram 810 tram 812 tram 816 tram 844 tram 847 tram 856 tram 885 tram 836 tram 887 tram 914 tram 923 tram 915 tram 958 tram 965 tram 979 tram 988 tram 1003 tram 991 tram 993 tram 994 tram 999 tram 1002 tram 1003 tram 1010 tram 1032 tram 1033 tram 750 tram 759 tram 761 tram 961 tram 833 tram 974 tram 888 tram 940 tram 891 tram 917 tram 1016 Photo Album - titled " TAP - Part C - W5 to W7 – VR & 980 – sheets C1 to C41 ", from Transit Australia Publishing. ...Photo Album - titled " TAP - Part C - W5 to W7 – VR & 980 – sheets C1 to C41 ", from Transit Australia Publishing. Photos used in the Destination City and other publications series. For a detailed list of photographs see htd4602i.pdf. For individual photo images see: \dbtext\hawthtramcoll\photo collections\htd4602-TAP-PartC, images TAP164 to TAP243. TAP164_52_RiverSt_KeithKings_2Apr1960.jpg TAP165_52_RiverSt.jpg TAP166_700_MooneePonds.jpg TAP167_736_HughWaldron.jpg TAP168_820_MooneePondsJunct_2Feb1972_AndrewFoy.jpg TAP169_821_VictoriaPde_Jan1993_RayMarsh.jpg TAP170_796_MaribyrnongRvrBridge_DuckettColln.jpg TAP171_899_VictoriaPde-at-GisborneSt_DuckettColln.jpg TAP172_910_QueensBridge.jpg TAP173_923_RAAF_SwanstonSt_NoellReed_19Jan1953.jpg TAP174_980_VictoriaPde.jpg TAP175_980_RoyalVisit_MalvernDepot_5Mar1954-KeithKings.jpg TAP176_980_VictoriaPde_3Feb1951.jpg TAP177_980_VictoriaPde_3Feb1951.jpg TAP178_980_BourkeSt_26Dec1969_GregKing.jpg TAP179_980_RoyalTram-MMTB.jpg TAP180_980_RoyalTram-StGeorgesRd_KeithKings_1Mar1954.jpg TAP181_980_Preston_HughBallment.jpg T AP182_980_AETA-tour.jpg TAP183_1003_HawthornRd_12April1955_KeithKings_1Mar1954.jpg TAP184_1031-1032_GlenferrieRd_NoelReed_17Feb1956.jpg TAP185_AETA_pre-opening tour_BourkeSt_25Jun1955.jpg TAP186_53_Footscray_18Jan1969_PaulNicholson.jpg TAP187_53_Preston_Feb1973_MMTB.jpg TAP188_684_Caulfield_WJohnWebster.jpg TAP189_685_Esplanade_RayPearson.jpg TAP190_721_Elsternwick_WJohnWebster.jpg TAP191_736_MMTB.jpg TAP192_740_WilliamSt_AndrewFoy_7Feb1972.jpg TAP194_736_VicMarket_RayPearson_13Apr1936.jpg TAP195_760_VicMarket_1986_MichaelMcLeod.jpg TAP196_787_FlemingtonRd_RogerPywell_16May1960.jpg TAP197_801_StKildaRd-trackwork_KSKings_18Mar1951.jpg TAP198_808_Esplanade_RayPearson.jpg TAP199_810_TruganiniRd_NoelReed.jpg TAP200_812_StKildaJunction.jpg TAP201_816_MalvernDepot_WJohnWebster.jpg TAP201_847_BatmanAve_WJohnWebster.jpg TAP202_816_FlindersSt_1986_MichaelMcLeod.jpg TAP203_844_MalvernDepot_AndrewFoy6Jan1973.jpg TAP205_856_BatmanAve_WJohnWebster.jpg TAP206_885_Carnegie_IanCooper.jpg TAP207_836_ElizabethSt_HughBallment.jpg TAP208_887_MalvernDepot_WJohnWebster.jpg TAP209_914_BatmanAve_GeoffGrant.jpg TAP210_914_BatmanAve_LindsayCrowe.jpg TAP211_923_RAAF_VictoriaSt_WJohnWebster.jpg TAP212_915_50thAnnivFederation_Preston_21May1951_KeithKings.jpg TAP213_958_Glenhuntly_AndrewFoy_9Jan1986.jpg TAP214_965_ChapelSt_AndrewFoy_9Jan1986.jpg TAP215_979_HighSt_MMTB.jpg TAP216_988-1003_TestRuns_NicholsonSt_GeoffGrant_19Jun1955.jpg TAP217_988_Nicholson-intoVictoria_GeoffGrant_19Jun1955.jpg TAP218_991_BourkeStOpening_GeoffGrant_24Jun1955.jpg TAP219_993_EastBrighton_DaleBudd_1989.jpg TAP220_993_NicholsonSt_PaulNicholson_10Sep1968.jpg TAP221_994_SmithSt_AndrewFoy_20May1976.jpg TAP222_999_SwanSt_AndrewFoy_19Jan1977.jpg TAP223_980_GlenferrieRd_NoelReed_.jpg TAP224_980_GlenferrieRd_WJohnWebster.jpg TAP225_980_VictoriaPde_AETAtour_KeithKings_3Feb1951.jpg TAP226_980_DandenongRd_MMTB.jpg TAP227_980_Preston_HughBallment.jpg TAP228_1002_SwanstonSt_AndrewFoy_3Jan1989.jpg TAP229_1003_EastPrestonDepot_MMTB.jpg TAP230_1010_HighSt_MMTB.jpg TAP231_1032_MMTB.jpg TAP232_1033_AETAtour_7Apr1956_GeoffGrant.jpg TAP233_1033_EastBrunswick_AETAtour_7Apr1956_GeoffGrant.jpg TAP234_52_DroopSt_JimSeletto.jpg TAP235a_761-961_DomainInterchenge_FrizVanDam_24Oct1988.jpg TAP235_750-759_VictoriaStShunt_FrizVanDam_31Oct1988.jpg TAP236_833-974_CarlisleSt_FrizVanDam_24Oct1988.jpg TAP237_888-999_DandenongRd-at-LansdowneSt_FrizVanDam_22Oct1988.jpg TAP238_940_EastPreston_marker-lights_Jun1970_MMTB.jpg TAP239_891-Kew_pantographtest_RayMarsh_21Nov1989.jpg TAP240_1032-917_VictoriaPde_FrizVanDam_28Oct1988.jpg TAP241_1024_EastBrighton_JimSeletto_1963.jpg TAP242_FrontEntranceSW6-drawing_MMTB_22Aug1955.jpg TAP243_FrontEntranceSW6-drawing_altered-as-1016.jpg Transit Australia Photos - W5 to W7 + VR + 980 sheets C1 to C41.pdf - this item stored in box 01-0 - as Reg Item 4620 foolscap size - larger than folder.trams, tramways, transit australia, destination city, tramcars, depots, w5 class, sw5 class, sw6 class, w7 class, w6 class, vr, tram 52, tram 700, tram 736, tram 820, tram 796, tram 899, tram 910, tram 923, tram 980, tram 1003, tram 1031, tram 1032, tram 53, tram 684, tram 685, tram 721, tram 736, tram 740, tram 746, tram 760, tram 787, tram 801, tram 808, tram 810, tram 812, tram 816, tram 844, tram 847, tram 856, tram 885, tram 836, tram 887, tram 914, tram 923, tram 915, tram 958, tram 965, tram 979, tram 988, tram 1003, tram 991, tram 993, tram 994, tram 999, tram 1002, tram 1003, tram 1010, tram 1032, tram 1033, tram 750, tram 759, tram 761, tram 961, tram 833, tram 974, tram 888, tram 940, tram 891, tram 917, tram 1016 -
 Melbourne Tram Museum
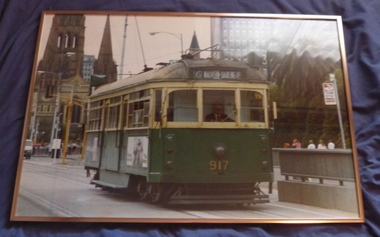
Photograph - Framed Photographs, Malvern Framing Gallery, c1990
... ... tram 917...Framed photograph Malvern Driver Ron Scholten's driving W6 917 on a route, East Malvern Darling Road, route 3, in St Kilda Road, c1990. Has St Patricks Cathedral and the Gas and Fuel towers in the background. Has a tram...Melbourne Tram Museum 8 Wallen Road Hawthorn melbourne Trams tramways Swanston St St Kilda Rd Tram Stops tram 917 On rear in pencil "Photo David Featherston" Framed photograph Malvern Driver Ron Scholten's driving W6 917 on a route, East Malvern Darling Road, route 3, in St Kilda Road, c1990. ...Framed photograph Malvern Driver Ron Scholten's driving W6 917 on a route, East Malvern Darling Road, route 3, in St Kilda Road, c1990. Has St Patricks Cathedral and the Gas and Fuel towers in the background. Has a tram stop sign on the right hand side of the photograph. The tram has two advertisements on the side. Photograph by David Featherston. Received with a broken sheet of glass.On rear in pencil "Photo David Featherston"trams, tramways, swanston st, st kilda rd, tram stops, tram 917 -
 Melbourne Tram Museum
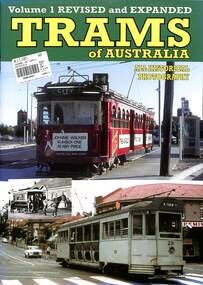
Book, Topmill Pty Ltd, Trams of Australia Vol 1 revised - Topmill
... Includes Melbourne trams 670, 611, 613, 106, 469, 25, 389, 214, 1008, 234, 975, 814, 279, 2112, 812, 442, 917, 2027. ...Includes Melbourne trams 670, 611, 613, 106, 469, 25, 389, 214, 1008, 234, 975, 814, 279, 2112, 812, 442, 917, 2027. ...Book published by Topmill, featuring images and background information on tram types including horse, cable, steam and electric trams. Has photos of Sydney, Brisbane, Melbourne, Adelaide, Hobart, Ballarat, Bendigo, Geelong, Rockhampton and Kalgoorlie. Many in colour. Includes photographs of tram museums. Includes Melbourne trams 670, 611, 613, 106, 469, 25, 389, 214, 1008, 234, 975, 814, 279, 2112, 812, 442, 917, 2027. Melbourne photographs by Ray Marsh and Ken Smith.Book - 40 full colour A4 pages + card cover, centre stapled, titled "Trams of Australia Vol. 1" revised and expanded.trams, tramcars, melbourne, sydney, brisbane, adelaide, tram museums, ballarat, bendigo -
 Melbourne Tram Museum
Slide - Set of 6, Keith Caldwell, March 1967?
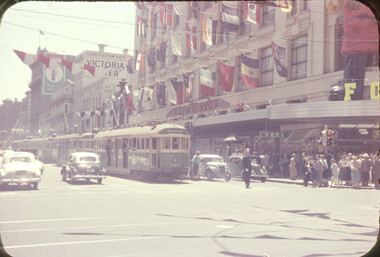
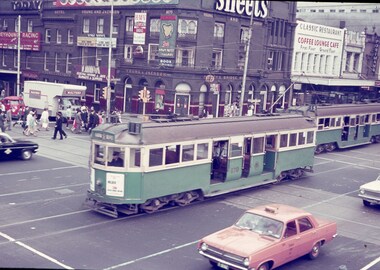
... (East Malvern, route 4D) .3 - W3 668 to South Melbourne Beach, route 1 .4 - W3 669, route 1 to South Melbourne Beach, has advert for White Crow sauce. .5 - W2 627, North Balwyn with other trams at the Swanston St stop, including a SW6 on route 64 .6 - a long line up of up to 9 trams northbound at the Swanston St stop outside Flinders St Station, led by SW6 917 (University, route 64) with adverts Suptuned, Sony and "take my advice" featuring an owl. ...(East Malvern, route 4D) .3 - W3 668 to South Melbourne Beach, route 1 .4 - W3 669, route 1 to South Melbourne Beach, has advert for White Crow sauce. .5 - W2 627, North Balwyn with other trams at the Swanston St stop, including a SW6 on route 64 .6 - a long line up of up to 9 trams northbound at the Swanston St stop outside Flinders St Station, led by SW6 917 (University, route 64) with adverts Suptuned, Sony and "take my advice" featuring an owl. ...Set of six Agfa colour blue white plastic mount slides, photo by Keith Caldwell of trams passing the intersection of Flinders and Swanston St. Slides undated - c1967/68, possibly 3/68, aligns with similar scene and time on Reg Item 4315 .1 - W4 670 crossing Flinders St with both the driver and conductor in the view. Has destination of Hanna St. .2 - L102 crossing route 61 to South Caulfield Junction. Has adverts for Tolley's Brandy and a fast courier. In the background is SW6 940 (University 2A) and W2 389? (East Malvern, route 4D) .3 - W3 668 to South Melbourne Beach, route 1 .4 - W3 669, route 1 to South Melbourne Beach, has advert for White Crow sauce. .5 - W2 627, North Balwyn with other trams at the Swanston St stop, including a SW6 on route 64 .6 - a long line up of up to 9 trams northbound at the Swanston St stop outside Flinders St Station, led by SW6 917 (University, route 64) with adverts Suptuned, Sony and "take my advice" featuring an owl. Following is another SW6, 913? with adverts for Tiger Paw, also a route 64. In the background is the Flinders St station awing with a Craven Filer cigarette advert.. Photos have Young and Jackson, the Classic Restaurant Coffee lounge bar in the view, Coles,.1 - "BXBU" and on .3, .1 also has W4" in ink.trams, tramways, flinders st, swanston st, w4 class, w3 class, l class, sw6 class, w2 class, hanna st, south caulfield, university, route 2a, route 4d, east malvern, st kilda beach, route 1, route 64, north balwyn, tram 670, tram 102, tram 668, tram 669, tram 627, tram 913