Showing 13 items matching " tram y 613"
-
 Ballarat Tramway Museum
Print, Geoff Grant, 7/05/1955 12:00:00 AM
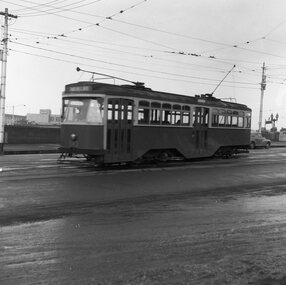
... ... tram Y 613...Ballarat Tramway Museum South Gardens Reserve Wendouree Parade Ballarat Ballarat goldfields Trams tramways Melbourne Batman Ave tram Y 613 Negative No. 283 and colour prints made by colour laser printer (stored in folder ) of Y 613 leaving the Batman Avenue terminus 7/5/1955. ...Negative No. 283 and colour prints made by colour laser printer (stored in folder ) of Y 613 leaving the Batman Avenue terminus 7/5/1955. Photo by Geoff Grant. Numbered 1564.1 and 1564.2. Hi res scan of negative and image updated 19/5/2020.trams, tramways, melbourne, batman ave, tram y 613 -
 Ballarat Tramway Museum
Print - Set of 2, Geoff Grant, 7/05/1955 12:00:00 AM
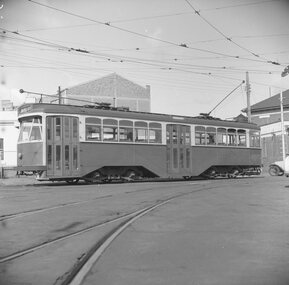
... ... tram Y 613...Ballarat Tramway Museum South Gardens Reserve Wendouree Parade Ballarat Ballarat goldfields Trams tramways Melbourne Camberwell Depot tram Y 613 Negatives No. 284 and N285 and colour print made by colour laser printer (stored in folder ) of Y1 613 in Camberwell depot entry or existing area 7/5/1955. ...Negatives No. 284 and N285 and colour print made by colour laser printer (stored in folder ) of Y1 613 in Camberwell depot entry or existing area 7/5/1955. Photo by Geoff Grant. Numbered 1565.1 and 1565.2. Hi res scan of negative and image updated 19/5/2020.trams, tramways, melbourne, camberwell depot, tram y 613 -
 Ballarat Tramway Museum
Print, Geoff Grant, 7/05/1955 12:00:00 AM
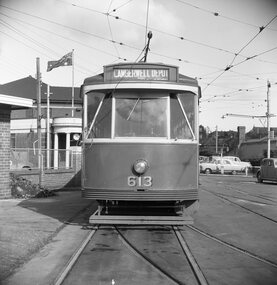
... ... tram Y 613...Ballarat Tramway Museum South Gardens Reserve Wendouree Parade Ballarat Ballarat goldfields Trams tramways Melbourne Camberwell Depot Depot tram Y 613 Negative No. 286 and colour print made by colour laser printer (stored in folder ) of Y1 613 on the Camberwell Depot access track, 7/5/1955. ...Negative No. 286 and colour print made by colour laser printer (stored in folder ) of Y1 613 on the Camberwell Depot access track, 7/5/1955. Photo by Geoff Grant. Hi res scan of negative and image updated 19/5/2020.trams, tramways, melbourne, camberwell depot, depot, tram y 613 -
 Melbourne Tram Museum
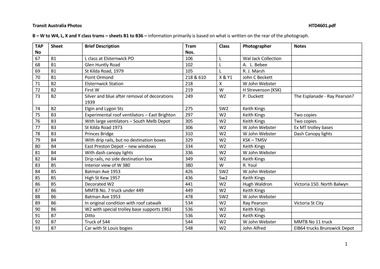
Album - Photo Album, Transit Australia Publishing, "TAP - Part B - W to W4, L, X and Y class trams – sheets B1 to B36", 1950's to 1990's
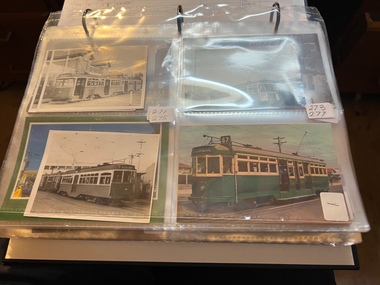
... Y Class... tram 106... tram 102... tram 105... tram 218... tram 610... tram 219... tram 249... tram 275... tram 297... tram 305... tram 306... tram 210... tram 334... tram 336... tram 349... tram 380... tram 426... tram 436... tram 441... tram 449... tram 478... tram 534... tram 536... tram 544... tram 548... tram 573... tram 574... tram 646... tram 658... tram 665... tram 459... tram 460... tram 467... tram 678... tram 679... tram 680... tram 469... tram 610... tram 611... tram 613...Melbourne Tram Museum 8 Wallen Road Hawthorn melbourne Trams tramways Transit Australia Destination City Tramcars Depots W Class W1 class W2 class W3 class W4 class L class X class Y Class tram 106 tram 102 tram 105 tram 218 tram 610 tram 219 tram 249 tram 275 tram 297 tram 305 tram 306 tram 210 tram 334 tram 336 tram 349 tram 380 tram 426 tram 436 tram 441 tram 449 tram 478 tram 534 tram 536 tram 544 tram 548 tram 573 tram 574 tram 646 tram 658 tram 665 tram 459 tram 460 tram 467 tram 678 tram 679 tram 680 tram 469 tram 610 tram 611 tram 613 tram 104 tram 1024 tram 217 tram 218 tram 280 tram 308 tram 210 tram 681 tram 317 tram 340 tram 364 tram 390 tram 422 tram 426 tram 436 tram 511 tram 514 tram 544 tram 568 tram 660 tram 658 tram 660 tram 665 tram 671 tram 673 tram 674 tram 459 tram 679 tram 610 tram 611 tram 613 tram 419 tram 510 Photo Album - titled "TAP - Part B - W to W4, L, X and Y class trams – sheets B1 to B36", from Transit Australia Publishing. ...Photo Album - titled "TAP - Part B - W to W4, L, X and Y class trams – sheets B1 to B36", from Transit Australia Publishing. Photos used in the Destination City and other publications series. For a detailed list of photographs see htd4601i.pdf. For individual photo images see: \dbtext\hawthtramcoll\photo collections\htd4601-TAP-ParB, images TAP67 to TAP160. TAP67_106_ElsternwickPO_WalJack.jpg TAP68_102_GlenhuntlyRd_ALBebeek.jpg TAP69_105_StKildaRd_Jun1979_RayMarsh.jpg TAP70_218-610_PointOrmond_JohnBeckett.jpg TAP71_218_ElsternwickStation_25Sep1953_WJohnWebster.jpg TAP72_219_Dec1923_JohnStevenson_KSKcollection.jpg TAP73_249_Esplanade_decorations-gone_1939_PWDuckett.jpg TAP74_275_ElginSt_24Mar1956_KeithKings.jpg TAP75_297_EastBrighton_14May1961_KeithKings.jpg TAP76_305_SouthMelbourne_14May1961_KeithKings.jpg TAP77_306_StKildaRd_25Sep1953_WJohnWebster.jpg TAP78_310_PrincesBridge_WJohnWebster.jpg TAP79_329_GlenhuntlyDepot_Jul1929.jpg TAP80_334_EastPrestonDepot_7April1969_KeithKings.jpg TAP81_3326_ColinsSt_WJohnWebster.jpg TAP82_348_BalaclavaJunction_13Jan1962_KeithKings.jpg TAP83_380-dropcentreSeats_RYoul.jpg TAP84_426_BatmanAve_23Sep1953_WJohnWebster.jpg TAP85_436_HighSt-at-BennettsRd_16Feb1957_KeithKings.jpg TAP86_441_Victoria150_NorthBalwyn.jpg TAP87_No7-truck_449_KIngsway_KeithKings_9Sep1961n.jpg TAP88_478_BatmanAve_23Sep1953_WJohnWebster.jpg TAP89_534_VictoriaSt_RayPearson.jpg TAP90_536_HighSt_Kew_KeithKings_28Sep1961.jpg TAP91_536_HighSt_Kew_KeithKings_28Sep1961.jpg TAP92_No7-truck_544_WJohnWebster_29Sep1953.jpg TAP93_548_StLouis.EIB64.Trucks_BrunswickDepot_JohnAlfred_28Jan1957.jpg TAP94_548_StLouis.EIB64.Trucks_StKildaRd_KeithKings_19Mar1955.jpg TAP95_573_PointOrmond_LindsayCrow.jpg TAP96_574_CollinsSt_WJohnWebster_28Sep1953.jpg TAP97_646-113_1987_Bundoora.jpg TAP98_654_RoyalPde_BobLilburn_1949.jpg TAP99_658_ElizabethSt_WJohnWebster_28Sep1953.jpg TAP100_665_CollinsSt_WJohnWebster_28Sep1953.jpg TAP101_665_MacarthurSt_WJohnWebster_28Sep1953.jpg TAP102_459_BallaratRd_Footscray_ALBebee.jpg TAP103_459_BallaratRd_Footscray_ALBebee.jpg TAP104_460_NicholsonSt-into-BuckleySt_Footscray_WJohnWebster_28Sep1953.jpg TAP105_467_GordonSt.jpg TAP106_X1_WilliamstownRd.jpg T AP107_X1_interior.jpg TAP108_678_WilliamstownRd_KeithKings_13Jan1962.jpg TAP109_679_BuckleySt-depot.jpg TAP110_680_FootscrayStation_RayPearson.jpg TAP111_469_BatmanAve_25Sep1953_WJohnWebster.jpg TAP112_469_CamberwellDepot_KeithKings_25April1950.jpg TAP113_469_RiversdaleRd_NedMackintosh_1972.jpg TAP114_610_PointOrmond_JohnBeckett.jpg TAP115_611_CamberwellDepot_BobLilburn.jpg TAP116_613_BatmanAve_WJohnWebster_23Sep1953.jpg TAP117_104_JohnBeckett.jpg TAP118_105_MMTB.jpg TAP119_103-1024_StKildaRd_6Jan1973_AndrewFoy.jpg TAP120_106_GlenhuntlyRd.jpg TAP121_217_MalvernDepot_MMTB.jpg TAP122_217_MalvernDepot_DaveMacartney_12Sep1971.jpg TAP123_218_PointOrmond_LCrow.jpg TAP124_218_Elsternwick_WJohnWebster_c1953.jpg TAP125_218_GlenhuntlyRd_Broadway.jpg TAP126_W-body_MMTB.jpg TAP127_275_MalvernDepot.jpg TAP128_275_SwanstonSt.jpg TAP129_280_StKilda_WJohnWebster_c1953.jpg TAP130_308_KewDepot_c1925_MMTBAnnualReport.jpg TAP131_310-681_BatmanAve_RayPearson_1930s.jpg TAP132_317_Traverser_Preston_MMTB.jpg TAP133_340_HighSt_MMTB.jpg TAP134_364_Preston_MMTB.jpg TAP135_390_WellingtonPde.jpg TAP136_422_SwanstonSt_WJohnWebster_c1953.jpg TAP137_426_BatmanAve_LCrow.jpg TAP138_426_BatmanAve_WJohnWebster.jpg TAP139_426_CamberwellDepot_GeoffGrant_7May1955.jpg TAP140_436_SpencerSt_BobLilburn_1948.jpg TAP141_511_CamberwellDepot_GeoffGrant_7May1955.jpg TAP142_514_StKildaRd_WJohnWebster.jpg TAP143_544_StKilda_WJohnWebster.jpg TAP144_568_Decorated_RayPearson.jpg TAP145_660_GlenhuntlyDepot_LCrow.jpg TAP146_658_SwanstonSt_PaulNicholson_23Dec1967.jpg TAP145 - copy of TAP 145 TAP148_665_MacarthurSt_WJohnWebster_28Sep1953.jpg TAP149_671_Preston_MMTB.jpg TAP150_673_decorated_Preston_MMTB.jpg TAP151_674_PeelSt_DaleBudd_1965.jpg TAP152_674_WJohnWebster_c1953.jpg TAP153_456_PointOrmond_WJohnWebster_c1953.jpg TAP154_679_BuckleySt_LCrow_mid1950s.jpg TAP155_610_MorelandRd_PaulNicholson_22Sep1968.jpg TAP156_610_Preston_MMTB_1930.jpg TAP157_611_Preston_MMTB.jpg TAP158_613_BatmanAve_25Sep1953_WJohnWebster.jpg TAP159_419_Preston_MMTB.jpg TAP160_510_WellingtonPde_PTC_1989.jpgtrams, tramways, transit australia, destination city, tramcars, depots, w class, w1 class, w2 class, w3 class, w4 class, l class, x class, y class, tram 106, tram 102, tram 105, tram 218, tram 610, tram 219, tram 249, tram 275, tram 297, tram 305, tram 306, tram 210, tram 334, tram 336, tram 349, tram 380, tram 426, tram 436, tram 441, tram 449, tram 478, tram 534, tram 536, tram 544, tram 548, tram 573, tram 574, tram 646, tram 658, tram 665, tram 459, tram 460, tram 467, tram 678, tram 679, tram 680, tram 469, tram 610, tram 611, tram 613, tram 104, tram 1024, tram 217, tram 218, tram 280, tram 308, tram 210, tram 681, tram 317, tram 340, tram 364, tram 390, tram 422, tram 426, tram 436, tram 511, tram 514, tram 544, tram 568, tram 660, tram 658, tram 660, tram 665, tram 671, tram 673, tram 674, tram 459, tram 679, tram 610, tram 611, tram 613, tram 419, tram 510 -
 Melbourne Tram Museum
Album - Charles Craig - part 2 of 2, 1950s to 1970s
... Tram Museum 8 Wallen Road Hawthorn melbourne Photo - see pdf file for further information. Number Brief Description CC271 Y1 610 and another at Camberwell depot CC272 Ditto CC273 Y1 613 at Batman Ave CC274 Y1 611 Peel St North Melbourne CC275 Y 469 Camberwell depot CC276 Ditto CC277 Postcard – L104 – MMTB CC278 L103, Hawthorn Road CC279 L103, Hawthorn Road CC280 L103 Dandenong Road CC281 L103 and w5 847 Dandenong Road CC282 L104 on Preston Workshops traverser CC283 Flinders St station with Ws CC284 Flinders St looking south along St Kilda Road to Shrine CC285 Postcard – Nu Color vue – Flinders St CC286 Postcard – Valentines – Flinders St No. 13 CC287 Postcard – Rose Series – 13595 – has been trimmed CC288 Postcard – Rose Series – 10660 – Princes Bridge and Flinders St yard CC289 Postcard – Rose but has been trimmed of Flinders St CC290 Postcard – same as CC285 CC291 SW6 914 and another car in Swanston St by Flinders St CC292 SW6 903 and bus 436 with Flinders St Station in background CC293 W5 776 at Flinders St Station CC294 W2 596 at Flinders St Station CC295 L101 and W2 Swanston St by Ian Brady CC296 Postcard - Biscay BG 250 – A 281 - CC297 W5 779 Maribyrnong River CC298 SW5 787 Queensbridge St CC299A Duplicate copy CC299 Ditto CC300 W5 812 St Kilda Junction CC301 W5 721 Carnegie? ...Photo - see pdf file for further information. Number Brief Description CC271 Y1 610 and another at Camberwell depot CC272 Ditto CC273 Y1 613 at Batman Ave CC274 Y1 611 Peel St North Melbourne CC275 Y 469 Camberwell depot CC276 Ditto CC277 Postcard – L104 – MMTB CC278 L103, Hawthorn Road CC279 L103, Hawthorn Road CC280 L103 Dandenong Road CC281 L103 and w5 847 Dandenong Road CC282 L104 on Preston Workshops traverser CC283 Flinders St station with Ws CC284 Flinders St looking south along St Kilda Road to Shrine CC285 Postcard – Nu Color vue – Flinders St CC286 Postcard – Valentines – Flinders St No. 13 CC287 Postcard – Rose Series – 13595 – has been trimmed CC288 Postcard – Rose Series – 10660 – Princes Bridge and Flinders St yard CC289 Postcard – Rose but has been trimmed of Flinders St CC290 Postcard – same as CC285 CC291 SW6 914 and another car in Swanston St by Flinders St CC292 SW6 903 and bus 436 with Flinders St Station in background CC293 W5 776 at Flinders St Station CC294 W2 596 at Flinders St Station CC295 L101 and W2 Swanston St by Ian Brady CC296 Postcard - Biscay BG 250 – A 281 - CC297 W5 779 Maribyrnong River CC298 SW5 787 Queensbridge St CC299A Duplicate copy CC299 Ditto CC300 W5 812 St Kilda Junction CC301 W5 721 Carnegie? - CC302 W5 817 Elliot Ave – see also CC150 CC303 CW5 682 CC304 CW5 682 Dandenong Road CC305 SW6 855 Power St Hawthorn CC306 Argus photo same as CC8A CC307 Freight car 19 leaving South Melbourne depot CC308 Freight car 19 at South Melbourne depot CC309 Cleaner 7 CC310 W2 295 and 8 at South Melbourne Depot CC311 Cleaners 5, 8 and 7 and S or T at South Melbourne depot CC312 Freight car 17 with crew member CC313 Cleaners 5, 8 and 7 along with a tower truck and another road motor CC314 Wheel Transport car 16 at Preston CC315 Cleaner 7 CC316 Cleaner 6 Brunswick Depot R Hudson and Bob Prentice CC317 SW6 867 in Swanston at Flinders CC318 SW6 850 at Chapel and Brighton Road CC319 SW6 914 at Batman Ave CC320 SW6 963 and W5 826 in Collins St near Spencer St CC321 Sw6 923 RAAF tram CC322 Same image at 318, but better has initials T McC (Tom McCaw) CC323 Sw6 963 In Collins at Spencer St CC324 SW6 947 in Collins at Spencer St CC325 Ditto with crew CC326 SW6 850 at Preston Workshop – Argus photo CC327 SW5 843 at Swan and church, severely derailed – Herald photo CC328 SW6 886 in Victoria Parade near La Trobe CC329 SW6 948 turning from Union St into Maribyrnong Road – single curve CC330 W5 731 CC331 SW5 on a 4D – Herald WT photo CC332 Sw6 867 Swanston St with driver carrying handles etc CC333 SW6 954 – Truganini Cres CC334 SW6 915 illuminated for Christmas, the CDA father Xmas special CC335 SW6 850 on route 77 side on view CC336 Sydney R class 1845 on trailer in a busy road CC337 Sydney R class 1845 on trailer CC338 Ditto CC339 Ditto – on trailer turning from a local street CC340 MMTB Emergency van CC341 Ditto CC342 Welding truck – Hopkins and Leeds CC343 Welding truck – Hopkins and Leeds CC344 Welding truck in Hopkins St Footscray CC345 Negative – Hobart tram 103 CC346 Launceston tram CC347 Trackwork – East Kew CC348 Trackwork and a W2 East Kews CC349 SW6 892 and trackwork – East Kew CC350 W4 670 – FRONT ON CC351 W3 654 – Brunswick Depot CC352 W3 666 – St Kilda Road and High St Demonstrates the work of Charles Craig in photography and collection of prints.Assembled album in a black presentation folder of 80 photographs from the Charles Craig Collection - 31 sleeves - part 2 of 2. All photographs have been scanned and placed on the Museum's G drive. A list of all photographs with details where possible has been compiled. Victorian Provincial, Launceston, Hobart and Sydney tram photos have been transferred to other Museums, image files retained.melbourne, tramways, tramcars, trams, charles craig -
 Melbourne Tram Museum
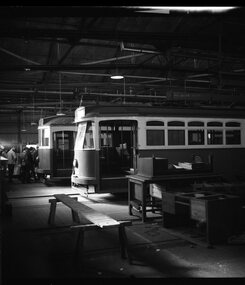
Photograph - Preston Workshops Tour Y class and works trams, Warren Doubleday, 30/7/1969
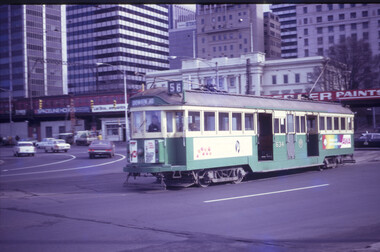
... Tram...tram 613...tram 469...tram 16...tram 19...Y1 class...Y...Melbourne Tram Museum 8 Wallen Road Hawthorn melbourne Photos show interior of Preston Workshops during a Monash Railway club tour on 30/7/1969. 1 - Y1 613 and Y 469 2 - Y 469 and works car 16 3 - Spare freight car 19 Yields information about Preston Workshops and trams stored or being repaired. tramways trams Preston Workshops Freight Tram tram 613 tram 469 tram 16 tram 19 Y1 class Y class Has details on rear in red ink. ...Photos show interior of Preston Workshops during a Monash Railway club tour on 30/7/1969. 1 - Y1 613 and Y 469 2 - Y 469 and works car 16 3 - Spare freight car 19Yields information about Preston Workshops and trams stored or being repaired.Set of three Black and white photographs of the interior of Preston Workshops during a tour.Has details on rear in red ink.tramways, trams, preston workshops, freight tram, tram 613, tram 469, tram 16, tram 19, y1 class, y class -
 Melbourne Tram Museum
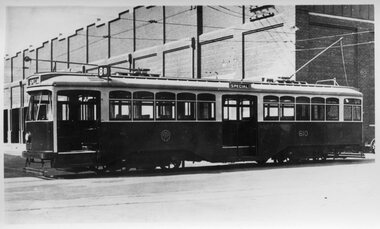
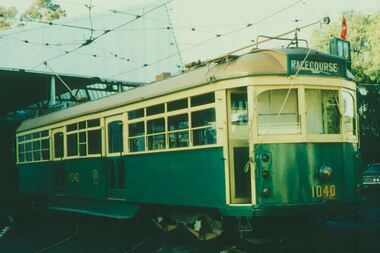
Photograph - Melbourne Y1 Class Tram 610 Photo, Melbourne & Metropolitan Tramways Board (MMTB), 1930
... Y class design classified Y1 Class 610. Four of these Trams were built in the MMTB Preston Workshops in 1930, 610 to 613. ...Melbourne Tram Museum 8 Wallen Road Hawthorn melbourne Photo shows the first build of the upgraded Y class design classified Y1 Class 610. Four of these Trams were built in the MMTB Preston Workshops in 1930, 610 to 613. ...Photo shows the first build of the upgraded Y class design classified Y1 Class 610. Four of these Trams were built in the MMTB Preston Workshops in 1930, 610 to 613. There was one solitary Y Class tram 469. They were built with the intention of evaluating one-man operation. Due to their higher cost and Union resentment, the MMTB resorted to the proven W Class tram design. It is fitted with a route number box. The tram entered service 26/3/1930. It is now at Bendigo Tramways.Yields information about the first Y1 tram built by Preston WorkshopsPhotograph of Y1 610 at Preston WorkshopsThe inscription on the rear of 610 is " MMTB Y1-610 with Route No. Boxes. Preston Workshops.tramways, y1 class, tram 610, preston workshops, trams, mmtb -
 Melbourne Tram Museum
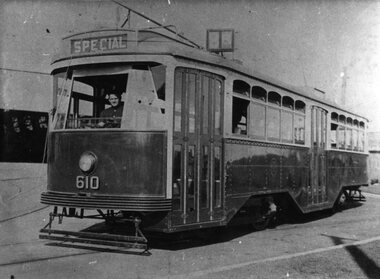
Photograph - Black and White - Tram Y1 610, Early 1930s
... Photo shows the first build of the upgraded Y class design classified Y1 Class 610. Four of these Trams were built in the MMTB Preston Workshops in 1930, 610 to 613. ...Melbourne Tram Museum 8 Wallen Road Hawthorn melbourne Photo shows the first build of the upgraded Y class design classified Y1 Class 610. Four of these Trams were built in the MMTB Preston Workshops in 1930, 610 to 613. ...Photo shows the first build of the upgraded Y class design classified Y1 Class 610. Four of these Trams were built in the MMTB Preston Workshops in 1930, 610 to 613. There was one solitary Y Class tram 469. They were built with the intention of evaluating one-man operation. Due to their higher cost and Union resentment, the MMTB resorted to the proven W Class tram design. All Y and Y1 classes were withdrawn from regular passenger service in 1965 and transferred to the Driver training school at Hawthorn Depot. All cars are preserved in various museums in Australia. Tram 610 is operable at the Bendigo Tram Museum.Black and White photograph of MMTB Y1 610 at South Melbourne Depot, as originally built with destination route number box and centre sash of windshield dropped. tramways, trams, tram 610, south melbourne depot, y1 class -
 Melbourne Tram Museum
Document - Report, Norm Cross, "Notes on M&MTB Y and Y1 class tramcars", Nov. 1970
... Melbourne Tram Museum 8 Wallen Road Hawthorn melbourne Trams tramways Y Class Y1 Class Tram Numbering Tramcar Acquisition Tramcar Design Tramcar Construction Report - typed - quarto sheet - two sheets, stapled titled "Notes on M&MTB Y and Y1 class tramcars" written by Norm Cross in November 1970. Looks at the history of Y469, and Y1's 610 to 613 ...Report - typed - quarto sheet - two sheets, stapled titled "Notes on M&MTB Y and Y1 class tramcars" written by Norm Cross in November 1970. Looks at the history of Y469, and Y1's 610 to 613 including notes on the design, use, construction issues, depots, changes over the life and the use of 613 by the VR on the Sandringham to Black Rock line.trams, tramways, y class, y1 class, tram numbering, tramcar acquisition, tramcar design, tramcar construction -
 Melbourne Tram Museum
Slide - Set of 15, Mike Ryan, Nov. 1998
... Y Class... tram 1040... tram 676... tram 774... tram 431... tram 510... tram 1041... tram 613...Melbourne Tram Museum 8 Wallen Road Hawthorn melbourne Trams tramways MMTB W Class W1 class W2 class W5 class 1041 X2 class V class X Class S Class T Class Y Class tram 1040 tram 676 tram 774 tram 431 tram 510 tram 1041 tram 613 tram 469 tram 8 tram 180 tram 164 tram 217 Slide - set of 15 - 35mm - white plastic mount of the trams currently (2018) housed at the Melbourne Tram Museum. .1 - W7 1040 at Hawthorn .2 - X2 676 at Preston Workshops .3 - W5 774 at Preston Workshops .4 - W1 431 .5 - W 380 .6 - W2 510 at Preston .7 - 1041 - copy of MMTB Official Photo at Wattle Park when formally launched by the MMTB .8 - Y1 613 at Preston Workshops .9 - V214 .10 - L104 - showing route 67, Carnegie .11 - T180 at Hawthorn .12 - S164 at Preston Workshops .13 - HTT 8 .14 - X217 at Hawthorn .15 - Y469 at Preston Workshops Photographed by Mike Ryan c1998 Slide Set of 15 Mike Ryan ...Slide - set of 15 - 35mm - white plastic mount of the trams currently (2018) housed at the Melbourne Tram Museum. .1 - W7 1040 at Hawthorn .2 - X2 676 at Preston Workshops .3 - W5 774 at Preston Workshops .4 - W1 431 .5 - W 380 .6 - W2 510 at Preston .7 - 1041 - copy of MMTB Official Photo at Wattle Park when formally launched by the MMTB .8 - Y1 613 at Preston Workshops .9 - V214 .10 - L104 - showing route 67, Carnegie .11 - T180 at Hawthorn .12 - S164 at Preston Workshops .13 - HTT 8 .14 - X217 at Hawthorn .15 - Y469 at Preston Workshops Photographed by Mike Ryan c1998trams, tramways, mmtb, w class, w1 class, w2 class, w5 class, 1041, x2 class, v class, x class, s class, t class, y class, tram 1040, tram 676, tram 774, tram 431, tram 510, tram 1041, tram 613, tram 469, tram 8, tram 180, tram 164, tram 217 -
 Melbourne Tram Museum
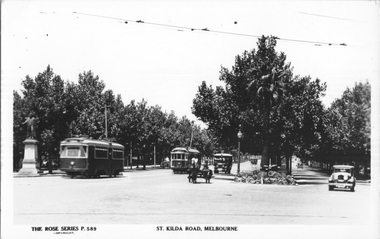
Postcard, Rose Stereograph Co, "St Kilda Road Melbourne", c1935
... Very rare to see the Y1 class tram operational in a photo. trams St Kilda Road tramways W2 class Y1 class tram 300 bus tram 613 In pencil on rear: "M&MTB, Y` 613 southbound to Camberwell? ...Rose Series postcard No. P 589, titled "St Kilda Road Melbourne", with Y1 class tram 613 outbound with the destination of Toorak and W2 class tram 300, in bound in St Kilda Road, taken at the intersection with City Road. Has another W2 in the distance and a private bus along with two horse-drawn vehicles. Tram 300 was fitted with route number boxes in November1933. To the left is the Edmund Fitz Gibbon Memorial in its original location and in the top of the photo is the tram overhead into City Road. Details a scene at the intersection of City Road and St Kilda Road c1935. Very rare to see the Y1 class tram operational in a photo.Postcard - printed real photograph with Rose Stereograph Co. name on the rear.In pencil on rear: "M&MTB, Y` 613 southbound to Camberwell? and "W2 300 approaching Princes Bridge (City), photo taken about 1930"trams, st kilda road, tramways, w2 class, y1 class, tram 300, bus, tram 613 -
 Melbourne Tram Museum
Album - Ron Scholten Slide Collection, Ron Scholten
... Y class...Y1 class...W5 class...Z1 class...tram 465...tram 181...tram 217...tram 467...tram 164...tram 102...tram 669...tram 667...tram 976...tram 890...tram 558...tram 657...tram 571...tram 484...tram 535...Flinders St...tram 980...tram 1041...tram 482...tram 64...tram 104...tram 1...tram 466...tram 680...tram 676...tram 955...tram 92...tram 201...tram 3510...tram 3530...tram 3504...tram 3503...tram 53...tram 588...tram 383...tram 960...tram 32...tram 2042...tram 3016...tram 516...tram 43...tram 463...tram 191...tram 139...tram 469...tram 613...Trams on route 88 delayed in Queens Parade Clifton Hill RSC121 Bendigo Birney car in Finn Street near North Bendigo terminus RSC122 SW6 in St Kilda Road at Domain Road at night RSC123 All 3 of Alf Twentyman’s cable cars in his Northcote backyard RSC124 Cable trailer 256 being unloaded into the shed at Bylands RSC125 Cable grip car 1 being removed from the Melbourne Museum RSC126 Alf Twentyman's cable cars in his Northcote Backyard RSC127 Alf Twentyman's cable cars in his Northcote Backyard RSC128 Alf Twentyman's cable cars in his Northcote Backyard RSC129 Alf Twentyman's cable cars in his Northcote Backyard RSC130 W class car in Swanston Street at Collins Street RSC131 Y1 469, L & W3 on the run out of Glenhuntly Depot on a tour RSC132 W7 1024 as an advertising tram for Bank of NSW at Clifton Hill RSC133 W2 496 on a footy special in Simpson Street Siding RSC134 W2 as originally converted to a test car at Preston Workshops RSC135 W3 667 in Brunswick Depot with Ellen Butland at the controls RSC136 W3 669 on its final run at Victoria Parade and Brunswick Street RSC137 W2 571 in Wellington Parade at Clarendon Street with a Footy Final load of Passengers RSC138 Y1 613 shunts at Spencer Street Terminus as X 217 waits on Australia Day Pageant RSC139 PCC 1041 on Route 96 in Bourke Street outside the Southern Cross Hotel RSC140 SW6 890 with accident damage on the outside roads at Preston Workshops, c1978 RSC141 W2 535 on Route 4 at the old St Kilda Junction, c1967 RSC142 PCC 1041 on Route 88 turns from Bourke Street into Spring Street, 1973 RSC143 L 102 on a tour at Albert Park Beach Terminus, Feb 1972 RSC144 W5 class Nos 833, 834 & 835 in Malvern Depot, c1976 RSC145 W2 No 281 in Wellington Parade on a football very crowded special c1974 RSC146 X1 No 464 Ballarat Road 1960 RSC147 T No 181 bound for the Explosives Factory - at Footscray Station - July 1960 RSC148 T No 181 at Williamstown Road, 1960 RSC149 Cable car set in Alf Twentyman’s back yard, c1970 RSC150 X No 217 at Malvern Depot, c1970 RSC151 X1 No 465 and T No181 Footscray Football ground in Barkly Street. c1960 RSC152 Scrubber No 5 at South Melbourne Depot, c1960 RSC153 X1 No 465 Footscray to Russell Street, c1960 RSC154 X1 No 467 Leeds Street Footscray, 1960 RSC155 PMTT No 4 Glenferrie Road, 1910 RSC156 S No 164 at Malvern Depot c1970 RSC157 T No 178 Footscray c1960 RSC158 Cleaner No. 7 at South Melbourne Depot c1960 RSC159 Two Y classes at Princes Bridge and Batman Avenue mid 1950s RSC160 Swanston Street – Nu color vue slide – M142 Demonstrates the work of Ron Scholten in photography, collection and/or production of duplicate slides Melbourne tramways trams cable trams Horse Tram Route 67 Route 88 Route 55 Route 64 Route 59 Route 49 Route 50 Point Ormond Royal Park Swanston St Footscray Essendon Depot Matthews Ave Brunswick Depot Glenhuntly Depot Malvern Depot St.Georges Road Preston Workshops PCC class VR class W2 class W3 class L class S class x class x1 class K class Z3 class D1 class sw6 class W6 class W7 class T class B1 class C class Q class Y class Y1 class W5 class Z1 class tram 465 tram 181 tram 217 tram 467 tram 164 tram 102 tram 669 tram 667 tram 976 tram 890 tram 558 tram 657 tram 571 tram 484 tram 535 Flinders St tram 980 tram 1041 tram 482 tram 64 tram 104 tram 1 tram 466 tram 680 tram 676 tram 955 tram 92 tram 201 tram 3510 tram 3530 tram 3504 tram 3503 tram 53 tram 588 tram 383 tram 960 tram 32 tram 2042 tram 3016 tram 516 tram 43 tram 463 tram 191 tram 139 tram 469 tram 613 tram 796 tram 258 tram 384 Assembled album in a black presentation folder of 160 colour slides, 8 slide sleeves, collected or produced by Ron Scholten. ...Photo - see pdf file for further information. Number Brief Description RSC1 PCC 1041 at the gates of Preston Workshops on a test run without its trolley retriever RSC2 PCC 1041 in Glenhuntly Road on Route 67 en-route to Carnegie crossing the Railway Gates at Glenhuntly Station RSC3 W2 482 stored at Malvern Depot with Olympic Park on the Destination RSC4 Cable Car Set 64 in Swanston Street outside Princess Bridge Station in bound with open top Double Deck Bus, Trak Motors ? Departing from Flinders St Station RSC5 W3 669 in St George Road at Sumner Street en-route to Preston Workshops for scrapping RSC6 Cable Car in Lygon Street en-route to Carlton RSC7 PCC 1041 turning from St Georges Road into Miller Street to enter the Preston Workshops RSC8 Flinders Street Station with cable cars RSC9 PCC 1041 in strife on its maiden day in service. Trams on route 88 delayed in Queens Parade Clifton Hill RSC10 Flinders Street at William Street with Cable Cars RSC11 L 104 on the fan of the new shed at Malvern Depot on a TMSV tour RSC12 Cable Set 1 after it’s restoration at Preston Workshops on the fan near the front gate RSC13 X1 466 at a suburban terminus of the Footscray System RSC14 X2 680 at Point Ormond Terminus RSC15 An ex Launceston Tram at the outside terminus of the Penny Royal Complex Tramway in Launceston RSC16 Q 148 at Preston Workshops awaiting disposal RSC17 Elizabeth Street with Cable Cars RSC18 Elizabeth and Bourke Streets corner outside the GPO with cable cars RSC19 Collins Street with Cable Cars RSC20 A photo taken from the observation deck of the ICI building showing a view of Parliament House with a W class tram in Nicholson Street RSC21 Auburn Horse car with a posed photo of all the tramway men employed RSC22 Cheltenham Double Deck Horsecar with a full load of passengers RSC23 City of Northcote cable trailer No 3 at a terminus RSC24 City of Northcote Cable cars passing in High Street Northcote RSC25 St Kilda Road at Princes Bridge with Cable Cars RSC26 Flinders Street with Cable Cars RSC27 Cable Cars RSC28 Bourke Street looking towards Elizabeth Street from Queen Street RSC29 Cable cars in Bourke Street at Elizabeth Street looking east RSC30 Cable cars in Elizabeth Street at the terminus at Flinders Street RSC31 Cable cars in Bourke Street at Swanston Street looking west RSC32 Cable cars in Swanston Street at Flinders Street looking north RSC33 Cable cars in Collins Street near Russell Street RSC34 Cable cars in Elizabeth Street at Bourke Street RSC35 Cable cars in Collins Street at Elizabeth Street RSC36 Cable Cars in Swanston Street at Flinders Street RSC37 Cable cars in Collins Street RSC38 Cable Cars RSC39 Cable cars in St Kilda Road near Princes Bridge RSC40 Cable cars in Collins Street east of Swanston Street RSC41 Cable cars in Spring Street outside Parliament House RSC42 K class No 92 in M&MTB Chocolate and cream livery but with a P&MTT Destination box on Route 14 RSC43 Thornbury Depot viewed from Miller Street and St Georges Road. Two W2 class cars are laying over between the peaks RSC44 Z3 No 201 in Met Livery passes D1 No 3510 in new M/Tram livery. A staff member in uniform stands in the doorway. Dandenong Road RSC45 D1 No 3530 advertising Heinekin Super Golf on Route 55 in Royal Park RSC46 D1 No 3504 in M/Tram livery on the reserved track in Matthews Avenue near Essendon Airport showing Route 81 Travancore. I suspect it is a private enthusiasts charter due to the Malvern W class run number in the rear windscreen RSC47 D1 No 3504 on Route 64 in Dandenong Road in M/Tram Livery RSC48 D1 No 3504 in M/Tram Livery at Airport West Terminus RSC49 D1 No 3504 in M Tram Livery in Union Road outside the Showgrounds RSC50 D1 No 3504 at West Maribyrnong Terminus in M/Tram Livery RSC51 D1 No 3503 in M/Tram Livery in Malvern Depot RSC52 SW6 No 960 and VR No 53 in Harbour Esplanade for the NMEL&T Co Centenary RSC53 Hawthorn Tramways Trust No 32 in Harbour Esplanade for the NMEL&T Co Centenary RSC54 VR 53 & B 2042 in Harbour Esplanade for the NMEL&T Co Centenary RSC55 VR 53 & C 3016 in Harbour Esplanade for the NMEL&T Co Centenary RSC56 NMEL&T Co No 13 (Formerly No 214) in Harbour Esplanade for the NMEL&T Co Centenary RSC57 NMEL&T Co 13 (formerly No 214) at Preston Workshops for the NMEL&T Co Centenary RSC58 Hawthorn Tramways Trust Lettering on HTT No 32 in Harbour Esplanade for the NMEL&T Co Centenary RSC59 Hawthorn Tramways Trust No 32 in Harbour Esplanade for the NMEL&T Co Centenary RSC60 Hawthorn Tramways Trust No 32 in Harbour Esplanade for the NMEL&T Co Centenary RSC61 Hawthorn Tramways Trust No 32 in Harbour Esplanade for the NMEL&T Co Centenary RSC62 NMEL&T Co No 13 (formerly No 214) at Preston Workshops for the NMEL&T Co Centenary RSC63 W2 516 and another on route 59 wait to shunt at Essendon Aerodrome Terminus as W2 571 on route 49 departs. This was the last day of operation. RSC64 Australia’s First Electric Tram at Box Hill with tramway men including H J Hilton who is in the centre RSC65 W2 484 en-route to St Kilda Junction and another wait for passengers after a race meeting at Caulfield Racecourse RSC66 X1 463 on the Footscray system en-route to Russell Street RSC67 Geelong 35 on Chilwell Route, Formerly HTT 13, M&MTB 119, then Bendigo 1 and Ballarat 37 RSC68 P&MTT No 4 on Opening Day of the system in Glenferrie Road RSC69 Bendigo No 6 in McCrae Street near the Depot en-route to North Bendigo RSC70 P&MTT No 4 in Glenferrie Road on opening day of the system RSC71 Scrubber No 3 stripped and awaiting scrapping at Preston Workshops RSC72 Scrubber No 4 at South Melbourne Depot RSC73 Q 191 & 139 at Preston Workshops awaiting scrapping RSC74 Rail Grinder No 3 at Preston Workshops as purchased from Sydney RSC75 Y 469 waits to shunt at Wattle Park Terminus as Y1 613 departs on driver training duties RSC76 VR 53 on the outside roads at Essendon Depot RSC77 W5 796 with three doors and square windows running out of Brunswick Depot in Cameron Street, with a supplementary destination board showing “City via Swanston St” RSC78 W2 258 on the wheel grinder road at Brunswick Depot RSC79 X2 676 on a TMSV tour, W5 817 & 836 & VR 53 on the open roads at Essendon Depot RSC80 PCC 1041 on test, passes W7 1035 in High Street Preston RSC81 D1 class production number 7 as delivered on test in Matthews Avenue RSC82 W2 383 on route 5 turning from the reserved track in Dandenong Road into St Kilda Road at St Kilda Junction RSC83 Z3 204 as advertising tram for Vodaphone Grand Prix running into Malvern Depot new shed RSC84 Z1 No 4 on test in St Georges Road RSC85 PCC 1041 on Route 96 in Bourke Street near Exhibition Street RSC86 Z1 No 3 without numbers on test turning from Miller Street in St Georges Road RSC87 Track components stored in Coldblo Road at Malvern Depot with Z class cars adjacent RSC88 D1 3501 in M/Tram Livery on Route 55 in Peel Street at Franklin Street RSC89 C 3001 in Yarra Trams Livery Porto No 018 & D1 3502 in M/Tram Livery on display in Harbourside Esplanade RSC90 D1 class tram production number 7, in as delivered condition on test in Matthews Avenue RSC91 D1 3503 inside Malvern Depot RSC92 SW6 955 and W6 974 in St Kilda Road at City Road at dusk. RSC93 Freight Car No 19 at Preston Workshops in green Livery RSC94 Rail Grinder No 3 in green Livery at South Melbourne Per Way Yard RSC95 A SW6 class car on route 50 shunting at Elizabeth Street Terminus at night, taken from Flinders Street Station RSC96 W2 588 & 435 in St Kilda Road at Batman Avenue RSC97 Y1 613 in service at Wattle Park Terminus RSC98 W2 588 in Wellington Parade en-route to the City with a Grand Final Load of passengers followed closely by No 384 RSC99 W2 558 on MCG Footy Special entering the Simpson Street siding RSC100 W3 657 & an L Class in the new shed at Malvern Depot RSC101 Y1 613 in St Kilda Road on an enthusiast's tour in St Kilda Road south of St Kilda Junction RSC102 Y1 613 on an enthusiast's tour in Clarendon Street with the two extra tracks on the Railways viaduct under construction RSC103 W6 976 on the fan of the new shed at Malvern Depot RSC104 W7 1024 as an advertising car for Bank of NSW at the route 1 terminus at South Melbourne Beach RSC105 PCC 980 on route 96 in Nicholson Street near North Fitzroy Depot RSC106 SW6 890 with dash canopy lighting in Market Street on the opening day of William Street Services RSC107 W2 444 with big numbers heads a line of footy specials in Simpson Street Siding RSC108 Cable Cars in Elizabeth Street RSC109 NMEL&T co No 2 with a trailer outside the power station in Mount Alexander Road RSC110 Alf Twentyman’s cable car set in his Northcote backyard RSC111 Cable Cars in Queens Parade Clifton Hill RSC112 Cable cars in Collins Street outside the Town Hall RSC113 PCC 1041 at Carnegie terminus RSC114 Cable cars in Elizabeth Street RSC115 Cable cars in Collins St near Swanston St RSC116 HTT 19 turns from Riversdale Road into Camberwell Road at Camberwell Junction RSC117 W1 419 official builders photo of first car of the class RSC118 Cable car with a full load of passengers RSC119 W1 422 illuminated for the visit of T.R.H. The Duke and Duchess of York RSC120 PCC 1041 in strife on it’s maiden day in service. Trams on route 88 delayed in Queens Parade Clifton Hill RSC121 Bendigo Birney car in Finn Street near North Bendigo terminus RSC122 SW6 in St Kilda Road at Domain Road at night RSC123 All 3 of Alf Twentyman’s cable cars in his Northcote backyard RSC124 Cable trailer 256 being unloaded into the shed at Bylands RSC125 Cable grip car 1 being removed from the Melbourne Museum RSC126 Alf Twentyman's cable cars in his Northcote Backyard RSC127 Alf Twentyman's cable cars in his Northcote Backyard RSC128 Alf Twentyman's cable cars in his Northcote Backyard RSC129 Alf Twentyman's cable cars in his Northcote Backyard RSC130 W class car in Swanston Street at Collins Street RSC131 Y1 469, L & W3 on the run out of Glenhuntly Depot on a tour RSC132 W7 1024 as an advertising tram for Bank of NSW at Clifton Hill RSC133 W2 496 on a footy special in Simpson Street Siding RSC134 W2 as originally converted to a test car at Preston Workshops RSC135 W3 667 in Brunswick Depot with Ellen Butland at the controls RSC136 W3 669 on its final run at Victoria Parade and Brunswick Street RSC137 W2 571 in Wellington Parade at Clarendon Street with a Footy Final load of Passengers RSC138 Y1 613 shunts at Spencer Street Terminus as X 217 waits on Australia Day Pageant RSC139 PCC 1041 on Route 96 in Bourke Street outside the Southern Cross Hotel RSC140 SW6 890 with accident damage on the outside roads at Preston Workshops, c1978 RSC141 W2 535 on Route 4 at the old St Kilda Junction, c1967 RSC142 PCC 1041 on Route 88 turns from Bourke Street into Spring Street, 1973 RSC143 L 102 on a tour at Albert Park Beach Terminus, Feb 1972 RSC144 W5 class Nos 833, 834 & 835 in Malvern Depot, c1976 RSC145 W2 No 281 in Wellington Parade on a football very crowded special c1974 RSC146 X1 No 464 Ballarat Road 1960 RSC147 T No 181 bound for the Explosives Factory - at Footscray Station - July 1960 RSC148 T No 181 at Williamstown Road, 1960 RSC149 Cable car set in Alf Twentyman’s back yard, c1970 RSC150 X No 217 at Malvern Depot, c1970 RSC151 X1 No 465 and T No181 Footscray Football ground in Barkly Street. c1960 RSC152 Scrubber No 5 at South Melbourne Depot, c1960 RSC153 X1 No 465 Footscray to Russell Street, c1960 RSC154 X1 No 467 Leeds Street Footscray, 1960 RSC155 PMTT No 4 Glenferrie Road, 1910 RSC156 S No 164 at Malvern Depot c1970 RSC157 T No 178 Footscray c1960 RSC158 Cleaner No. 7 at South Melbourne Depot c1960 RSC159 Two Y classes at Princes Bridge and Batman Avenue mid 1950s RSC160 Swanston Street – Nu color vue slide – M142 Demonstrates the work of Ron Scholten in photography, collection and/or production of duplicate slidesAssembled album in a black presentation folder of 160 colour slides, 8 slide sleeves, collected or produced by Ron Scholten. Many are TMSV or Windsor Publications slides. All photographs have been scanned and placed on the Museum's G drive. A list of all photographs with details has been compiled. melbourne, tramways, trams, cable trams, horse tram, route 67, route 88, route 55, route 64, route 59, route 49, route 50, point ormond, royal park, swanston st, footscray, essendon depot, matthews ave, brunswick depot, glenhuntly depot, malvern depot, st.georges road, preston workshops, pcc class, vr class, w2 class, w3 class, l class, s class, x class, x1 class, k class, z3 class, d1 class, sw6 class, w6 class, w7 class, t class, b1 class, c class, q class, y class, y1 class, w5 class, z1 class, tram 465, tram 181, tram 217, tram 467, tram 164, tram 102, tram 669, tram 667, tram 976, tram 890, tram 558, tram 657, tram 571, tram 484, tram 535, flinders st, tram 980, tram 1041, tram 482, tram 64, tram 104, tram 1, tram 466, tram 680, tram 676, tram 955, tram 92, tram 201, tram 3510, tram 3530, tram 3504, tram 3503, tram 53, tram 588, tram 383, tram 960, tram 32, tram 2042, tram 3016, tram 516, tram 43, tram 463, tram 191, tram 139, tram 469, tram 613, tram 796, tram 258, tram 384 -
 Melbourne Tram Museum
Slide - MMTB, VR and MTA tramway operations set of 11, Hugh Ballment, 1950s to 1990s
... Tram terminus structure, Flinders Street Railway station, and the Herald & Weekly Times and the IBM buildings across the Yarra River. HBM165 - MMTB Y1 613, 17/07/1957, Camberwell Depot, Night pic interior. Photo by Keith Kings HBM166 - MMTB Y1 611, 17/07/1957, Camberwell Depot. Photo by Keith Kings, Night pic interior HBM167 - MMTB Y...Tram terminus structure, Flinders Street Railway station, and the Herald & Weekly Times and the IBM buildings across the Yarra River. HBM165 - MMTB Y1 613, 17/07/1957, Camberwell Depot, Night pic interior. Photo by Keith Kings HBM166 - MMTB Y1 611, 17/07/1957, Camberwell Depot. Photo by Keith Kings, Night pic interior HBM167 - MMTB Y ...Set of 11 photos by Hugh Ballment, unless noted, of MMTB, VR, and MTA: HBM162 - MMTB W2 634, 1970s, Queensbridge, running a Domain Road Route 56 with a Tait set on the viaduct and the city skyline. HBM163 - MMTB, cMay 1968, St Kilda Junction, Construction of Queensway, showing a temporary bridge. W2 on route 4D HBM164 - MTA B1 2055, Route 59. Z3 162, Route 57. cNov1997, Elizabeth St terminus, showing the Sir Robert Risson Tram terminus structure, Flinders Street Railway station, and the Herald & Weekly Times and the IBM buildings across the Yarra River. HBM165 - MMTB Y1 613, 17/07/1957, Camberwell Depot, Night pic interior. Photo by Keith Kings HBM166 - MMTB Y1 611, 17/07/1957, Camberwell Depot. Photo by Keith Kings, Night pic interior HBM167 - MMTB Y 612, 1960s, Batman Avenue, running a Burwood service. A W2 is in front of the 612. HBM168 - VR No 41 entering the Broadway from Ormond Road while MMTB SW6 953 class waits to complete it journey to Point Ormond along Glen Huntly Road. 1950s, HBM169 - MMTB X2 679, 8/03/1957, Footscray Depot. Several X1 cars on the left. A Ford bus No 476 is on the right. This vehicle was retired and officially out of use at the time. Photo by Keith Kings, HBM170 - VR Tram 51, 26/05/1954, Bluff Road Black Rock, Terminus, Tram has departed for Sandringham. See image HBM154 as well. In the background is Bluff Road Audio, advertising Astor Radio and J Boyd Robinson Tested. The tram is showing the destination of Sandringham HBM171 - VR Tram 48, 26/05/1954, Station St Sandringham, arriving at the station terminus with a Ladies Hairdresser shop in the background. HBM172 - MTA A 263, cNov 1997, Spencer Street and Flinders Street intersection, with a ComEng train on viaduct. Tram is running a Port Melbourne route 109 service. Yields information about Melbourne tram operations, with 1950s to 1990s photos of Melbourne tramways.Kodachrome cardboard and plastic mounts, with notes - set of 11new tramway, tram 634, queensbridge, st kilda junction, tram 162, elizabeth st, tram 41, tram 2055, tram 613, tram 611, glen huntly road, vr, st kilda brighton tramway, broadway, tram 679, footscray depot, trams, w2 class, sw6 class, x2 class, a class, b class, y1 class, z3 class, tram 612, tram 953, x1 class, route 56, route 4d, route 59, route 57, batman avenue, camberwell depot, interiors, mmtb buses, bus 476, ford motor company, sandringham, black rock, bluff road, tram 51, tram 48, sandringham to black rock, tram 263, route 109, flinders st, spencer st, ormond road