Showing 97 items matching "4th australian division"
-
 Wangaratta RSL Sub Branch
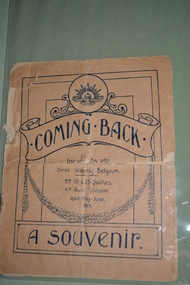
Booklet, Coming Back - A Souvenir, c1919
... ...4th australian division...Wangaratta RSL Sub Branch 2-4 Templeton Street Wangaratta high-country This booklet contains a collection of stories, anecdotes and jokes told by soldiers returning to Australia from Belgium aboard the Troopship SS Port Napier. wwi coming back - a souvenir 4th australian division 1919 On front cover: Coming Back, Incidents etc since leaving Belgium, Nos 19 & 25 Quotas 4th Aust. ...This booklet contains a collection of stories, anecdotes and jokes told by soldiers returning to Australia from Belgium aboard the Troopship SS Port Napier.Small booklet with blue printing consisting of seven pages.On front cover: Coming Back, Incidents etc since leaving Belgium, Nos 19 & 25 Quotas 4th Aust. Division. April - May - June, 1919. A Souvenir. On back cover: Autographs, with lots of handwritten names in purple pencil.wwi, coming back - a souvenir, 4th australian division, 1919 -
 Bendigo Military Museum
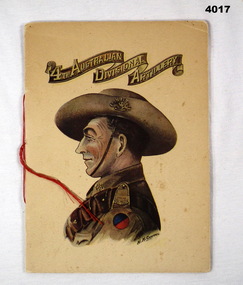
Booklet - BOOKLET WW1, 4th Australian Divisional Artillery, Post WW1
... 4th AUSTRALIAN DIVISIONAL ARTILLERY - photo/printed card booklet showing history of the 4th Australian Divisional Artillery. ...Bendigo Military Museum 37 - 39 Pall Mall Bendigo goldfields 4th AUSTRALIAN DIVISIONAL ARTILLERY - photo/printed card booklet showing history of the 4th Australian Divisional Artillery. ...4th AUSTRALIAN DIVISIONAL ARTILLERY - photo/printed card booklet showing history of the 4th Australian Divisional Artillery. Produced by its Association at the end of hostilities.Cover -soft cover, cardboard, beige colour, front with gold print on scroll ribbon above illustration of soldier in uniform in profile portrait. In muted colours - khaki, blue, red, skin tones. Block print on back cover with illustrations of horse heads and armoury. Pages - cardboard, beige colour. Illustrated - black line drawings, some coloured. Spine - fastened with black and red ribbon.booklet, 4th div, artillery -
 Bendigo Military Museum
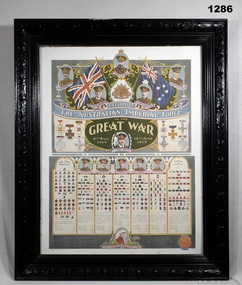
Poster - POSTER WW1, FRAMED
... Poster shows history of 1st, 2nd, 3rd, 4th & 5th Australian Divisions, also campaign medals....Bendigo Military Museum 37 - 39 Pall Mall Bendigo goldfields Copyright J W SANDERS (late AIF). documents-posters military history-army AIF Printed top section of frame: “RECORD OF THE AUSTRALIAN IMPERIAL FORCE IN THE GREAT WAR 4TH AUG. 1914 - 28TH JUNE 1919” Black decorative wooden frame without glass. Poster in colour with white border & cardboard backing. Poster shows history of 1st, 2nd, 3rd, 4th & 5th Australian Divisions ...Copyright J W SANDERS (late AIF).Black decorative wooden frame without glass. Poster in colour with white border & cardboard backing. Poster shows history of 1st, 2nd, 3rd, 4th & 5th Australian Divisions, also campaign medals.Printed top section of frame: “RECORD OF THE AUSTRALIAN IMPERIAL FORCE IN THE GREAT WAR 4TH AUG. 1914 - 28TH JUNE 1919”documents-posters, military history-army, aif -
 Warrnambool and District Historical Society Inc.
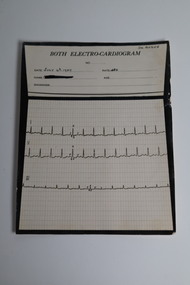
Document - "Both" Electrocardiogram printout, 4 Jul 1939
... division of the Australian Medical Association from 1949 to 1956 and Chairman from 1956 to 1958. His obituary in the Medical Journal of Australia (July 1970) stated he was "dedicated and devoted to both his profession and his patients" . This item provides a link to an Australian invention of medical equipment which improved diagnosis and treatment of heart conditions in the 1930's. It is an example of diagnostic recordings used by a Warrnambool doctor in 1939. dr william roy angus both electro-cardiogram dr angus collection Front: BOTH ELECTRO-CARDIOGRAM No. Date July 4th ...In 1932, Edward Thomas Both invented the first portable direct reading electro cardiograph. This item is a three lead electrocardiograph tracing conducted on one of Dr Angus' patients in 1939. Dr William Roy Angus (1901-1970) came to Warrnambool in 1939, purchasing the general practice of Dr John Hunter Henderson. He was the last serving Warrnambool Port Medical Officer. A health problem after the war prompted a change from general practice to ophthalmology. Dr. Angus became an important ophthalmologist , pioneering the use of the intrascleral cartilage implant which resulted in cosmetically better artificial eyes. He was an Honorary Consultant Ophthalmologist at Warrnambool Base Hospital for 31 years. He was Secretary of the Victorian South West sub-division of the Australian Medical Association from 1949 to 1956 and Chairman from 1956 to 1958. His obituary in the Medical Journal of Australia (July 1970) stated he was "dedicated and devoted to both his profession and his patients" .This item provides a link to an Australian invention of medical equipment which improved diagnosis and treatment of heart conditions in the 1930's. It is an example of diagnostic recordings used by a Warrnambool doctor in 1939.This is a card record of a three lead "Both" Electrogram. The upper one third has places for the date patient details and diagnosis. There are three electrocardiogram tracings over graph paper in the bottom two thirds of the item. The reverse side has a handwritten in ink interpretation of the tracings.Front: BOTH ELECTRO-CARDIOGRAM No. Date July 4th 1939 Rate 130 Name Age Diagnosis The patient name has been blacked out. Dr. Angus is printed in the top right hand corner. Rear: The P wave in lead 1 is broadened and notched, and has a suggestive "plateau" top. This may indicate a mitral stenosis, auricular hypertrophy. E Bannondr william roy angus, both electro-cardiogram, dr angus collection -
 Warrnambool and District Historical Society Inc.
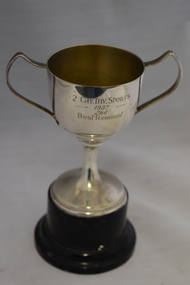
Trophy, 2 Cav Div Sports 1937 2nd best remount, 1930s
... Division of the Victorian Light Horse regiments (The 4th/19th Light Horse Regiment was active in the Warrnambool region at that time). The Victorian Light Horse had both mounted infantry and cavalry units and was the successor in the early 1900s to the Victorian Mounted Rifles founded by Colonel Tom Price in 1886. Eight mounted contingents from Australia...Division of the Victorian Light Horse regiments (The 4th/19th Light Horse Regiment was active in the Warrnambool region at that time). The Victorian Light Horse had both mounted infantry and cavalry units and was the successor in the early 1900s to the Victorian Mounted Rifles founded by Colonel Tom Price in 1886. Eight mounted contingents from Australia ...This cup was awarded at a sports day held in 1937 by the Second Cavalry Division of the Victorian Light Horse regiments (The 4th/19th Light Horse Regiment was active in the Warrnambool region at that time). The Victorian Light Horse had both mounted infantry and cavalry units and was the successor in the early 1900s to the Victorian Mounted Rifles founded by Colonel Tom Price in 1886. Eight mounted contingents from Australia served in the Boer War and the Australian Light Horse served with distinction in World War One. The Australian Light Horse, as official military units, ceased to exist in the 1940s. It is not known to whom this cup was awarded in 1937. This cup is of considerable interest as a memento of the activities of the Victorian Light Horse regiments in the 1930s, possibly in the Warrnambool district.This is a silver-plated cup on a circular Bakelite stand. The cup has two side handles and is inscribed on one side. The cup is slightly tarnished. ‘2 Cav.Div. Sports 1937 2nd - Best Remount’victorian light horse regiments, history of warrnambool -
 Bendigo Military Museum
Album - PHOTOGRAPHS WW2, Post 1945
... Australia, Shepparton, Royal Park, Darby Camp, Balcombe, Alice Springs, NT, Larrakeyah, Darwin, Bombing of Darwin, Alice Springs, Adelaide River, New Guinea. There is several interesting photos of damage to Darwin Hotels by AIF units disgruntled at not being sent overseas. Allen Edward Malone VX46797 enlisted in the AIF on 13.7.1940, allotted to 8th Division, transferred to 2/4th...Australia, Shepparton, Royal Park, Darby Camp, Balcombe, Alice Springs, NT, Larrakeyah, Darwin, Bombing of Darwin, Alice Springs, Adelaide River, New Guinea. There is several interesting photos of damage to Darwin Hotels by AIF units disgruntled at not being sent overseas. Allen Edward Malone VX46797 enlisted in the AIF on 13.7.1940, allotted to 8th Division, transferred to 2/4th ...These photos were taken at Training Camps in Australia, Shepparton, Royal Park, Darby Camp, Balcombe, Alice Springs, NT, Larrakeyah, Darwin, Bombing of Darwin, Alice Springs, Adelaide River, New Guinea. There is several interesting photos of damage to Darwin Hotels by AIF units disgruntled at not being sent overseas. Allen Edward Malone VX46797 enlisted in the AIF on 13.7.1940, allotted to 8th Division, transferred to 2/4th Australian Field Workshops 8.2.1941, Moved to the NT arriving 8.5.1941, unit renamed 23rd Independant Group Ordnance W/Shops, moved to QLD 4.6.1943, posted to 2/137 Brigade W/Shops, promoted A/Cpl 26.6.1943, embark 12.7.1943 for New Guinea, detached for duty with 6th Aust Field Ambulance (Had previously done this with prior unit as a medical Orderly) Promoted Cpl 8.12.1943, Leave to Victoria 5.11.1944, embark at Townsville for New Britain 2.2.1945, disembark Brisbane 5.6.1945, discharged from the AIF 28.11.1945.1) Cover for Album, cardboard with a buckram finish, all black colours. .2) Album black covers, black pages with white glassien tissue sheets between each page, rear cover page has a envelope for a disc. Pasted on inside front cover is an A4 sheet typed with the service details re the owner and when taken, 20 pages have photos on with photo corners, photos have details written in white pen under them.On first page in white pen, "A.E. Malone Photo Album - photos taken during War service 1940 - 1945. Many of the photos were taken and developed by A.E. Malone"album ww2, malone collection -
 Bendigo Military Museum
Poster - POSTER, FRAMED WW1, Osboldstone & Co Pty Ltd, Post WW1
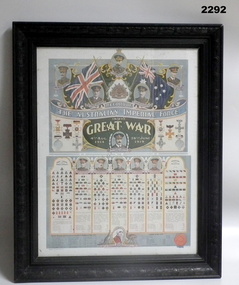
... AUSTRALIAN IMPERIAL FORCE/ IN THE/ GREAT WAR/ 4TH AUG/ 1914/ 28TH JUNE/ 1919" Original Poster. Poster - colour print on paper. Top depicts British and Australian Flags with portraits of "H.M.KING GEORGE V" and four AIF Generals. Middle section - Honours and Decorations awarded to Members of the AIF with portrait of one AIF Major General. Lower Section - Portraits of five AIF Major Generals above seven columns of Unit Colour Patches of AIF Divisions ...Original Poster. Poster - colour print on paper. Top depicts British and Australian Flags with portraits of "H.M.KING GEORGE V" and four AIF Generals. Middle section - Honours and Decorations awarded to Members of the AIF with portrait of one AIF Major General. Lower Section - Portraits of five AIF Major Generals above seven columns of Unit Colour Patches of AIF Divisions, Corps, Troops and miscellaneous. Below - portrait of a Nurse within Kangaroo/emu emblem. Frame - timber with black/brown finish and decorative moulding. Glass front and brown paper backing over timber backing board.Heading on Poster - "RECORD OF/ THE AUSTRALIAN IMPERIAL FORCE/ IN THE/ GREAT WAR/ 4TH AUG/ 1914/ 28TH JUNE/ 1919" poster, framed accessories, ww1, aif -
 4th/19th Prince of Wales's Light Horse Regiment Unit History Room
Programme, Army Headquarters Cairo, Programme of Australian Mounted Division Horse Show and Sports Held in Palestine Saturday 9th March 1918, 1918
... 4th/19th Prince of Wales's Light Horse Regiment Unit History Room 4/19 PWLH Regiment, Building 78 Simpson Barracks Macleod melbourne light horse palestine sports Soft covered 15 page booklet covering time table of events, prizes, contestants,judges and starters Programme of Australian Mounted Division Horse Show and Sports Held in Palestine Saturday 9th March 1918 Programme J Pariadi & Taha Ibrahim Army Headquarters Cairo ...Soft covered 15 page booklet covering time table of events, prizes, contestants,judges and starterslight horse, palestine, sports -
4th/19th Prince of Wales's Light Horse Regiment Unit History Room
The Division in Battle Pam No 4 Armour, 1970
... 4th/19th Prince of Wales's Light Horse Regiment Unit History Room 4/19 PWLH Regiment, Building 78 Simpson Barracks Macleod melbourne armour organisation training armour organisation training DSN 7610-66-038-0008 A soft covered booklet containing the doctrine for the basis of training, covering the role, organisation, characteristics etc of armoured units within the Australian Army The Division in Battle Pam No 4 Armour ...A soft covered booklet containing the doctrine for the basis of training, covering the role, organisation, characteristics etc of armoured units within the Australian ArmyDSN 7610-66-038-0008armour, organisation training, armour, organisation training -
4th/19th Prince of Wales's Light Horse Regiment Unit History Room
Booklet, The Division in Battle Pam No 8 Infantry, 1969
... 4th/19th Prince of Wales's Light Horse Regiment Unit History Room 4/19 PWLH Regiment, Building 78 Simpson Barracks Macleod melbourne Infantry DSN 7610-66-028-6020 A soft covered loose leaf booklet containing the doctrine for the basis for training, covering the role, organisation, characteristics etc of infantry type units within the Australian Army The Division in Battle Pam No 8 Infantry Booklet ...A soft covered loose leaf booklet containing the doctrine for the basis for training, covering the role, organisation, characteristics etc of infantry type units within the Australian ArmyDSN 7610-66-028-6020infantry -
4th/19th Prince of Wales's Light Horse Regiment Unit History Room
Greatcoat, abt 1940
... 4th/19th Prince of Wales's Light Horse Regiment Unit History Room 4/19 PWLH Regiment, Building 78 Simpson Barracks Macleod melbourne Not of particular significance to this collection. Available for "swaps" with other collections Clothing uniforms greatcoat On label sewn inside " M TX" World War 2 pattern greatcoat. With Australian Military Forces buttons and colour patch of 6 Division ...Not of particular significance to this collection. Available for "swaps" with other collectionsWorld War 2 pattern greatcoat. With Australian Military Forces buttons and colour patch of 6 Division Engineers on each sleeveOn label sewn inside " M TX"clothing, uniforms, greatcoat -
4th/19th Prince of Wales's Light Horse Regiment Unit History Room
Pamphlet, The Division in Battle Pamphlet No 7 Signals 1970, 1970
... 4th/19th Prince of Wales's Light Horse Regiment Unit History Room 4/19 PWLH Regiment, Building 78 Simpson Barracks Macleod melbourne Used by the Regiment training manual signals division australia DSN 7610-66-033-8017 Semi-hard covered book detailing the basic training doctrine for Signals within the Division The Division in Battle Pamphlet No 7 Signals 1970 Pamphlet Pamphlet ...Used by the RegimentSemi-hard covered book detailing the basic training doctrine for Signals within the DivisionDSN 7610-66-033-8017training manual, signals, division, australia -
4th/19th Prince of Wales's Light Horse Regiment Unit History Room
Book, The Division in Battle Pamphlet No 7 Signals 1970, 1970
... 4th/19th Prince of Wales's Light Horse Regiment Unit History Room 4/19 PWLH Regiment, Building 78 Simpson Barracks Macleod melbourne Used by the Regiment Training manual Signals Division Australia DSN 7610-66-033-8017 Semi-hard covered book detailing the basic training doctrine for Signals within the Division. ...Used by the RegimentSemi-hard covered book detailing the basic training doctrine for Signals within the Division.DSN 7610-66-033-8017training manual, signals, division, australia -
4th/19th Prince of Wales's Light Horse Regiment Unit History Room
Book, The Division in Battle Pamphlet No 7 Signals 1970, 1970
... 4th/19th Prince of Wales's Light Horse Regiment Unit History Room 4/19 PWLH Regiment, Building 78 Simpson Barracks Macleod melbourne Training manual Signals Division Australia DSN 7610-66-033-8017 Supersedes DSN 7610-66-023-5721 The Division in Battle Pam No 7 Signals 1965 Semi-hard covered book detailing the basic training doctrine for Signals within the Division The Division in Battle Pamphlet No 7 Signals 1970 Book ...Semi-hard covered book detailing the basic training doctrine for Signals within the DivisionDSN 7610-66-033-8017 Supersedes DSN 7610-66-023-5721 The Division in Battle Pam No 7 Signals 1965training manual, signals, division, australia -
4th/19th Prince of Wales's Light Horse Regiment Unit History Room
Manual - Folder, loose leaf, Precis Holder Radio wing, c 1960
... 4th/19th Prince of Wales's Light Horse Regiment Unit History Room 4/19 PWLH Regiment, Building 78 Simpson Barracks Macleod melbourne Radio training of Regimental officers radio officer training 3 division Precis holder with badge of School of Land-Air Warfare Royal Australian Air Force Hard covered loose leaf folder containing the radio handouts from the 3 Division Officer Training School Wireless Wing and 4/19 PWLH Regt Radio Wing - from the 1960's Precis Holder Radio wing Manual Folder, loose leaf ...Radio training of Regimental officersHard covered loose leaf folder containing the radio handouts from the 3 Division Officer Training School Wireless Wing and 4/19 PWLH Regt Radio Wing - from the 1960'sPrecis holder with badge of School of Land-Air Warfare Royal Australian Air Forceradio, officer training, 3 division -
4th/19th Prince of Wales's Light Horse Regiment Unit History Room
Booklet (2 copies), Victorian Railways Printing Works, Tactical Handling of Army Tank Battalions Military Training Pamphlet No 22 Part III: Employment 1939, 1941
... 4th/19th Prince of Wales's Light Horse Regiment Unit History Room 4/19 PWLH Regiment, Building 78 Simpson Barracks Macleod melbourne Tank tactics World War 2 Not to be taken forward of Divisional Headquarters. Soft covered booklet. As modified for Australia ...Soft covered booklet. As modified for Australia in 1941.Not to be taken forward of Divisional Headquarters.tank tactics, world war 2 -
 4th/19th Prince of Wales's Light Horse Regiment Unit History Room
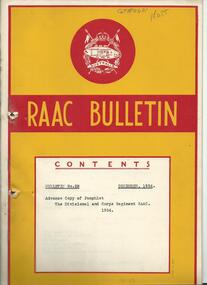
Document - Bulletin, Royal Australian Armoured Corps Bulletin No 28 (2 copies), Dec 1954
... 4th/19th Prince of Wales's Light Horse Regiment Unit History Room 4/19 PWLH Regiment, Building 78 Simpson Barracks Macleod melbourne raac bulletin division/corp regiment raac A 25 page document being an advance copy of the pamphlet "The Division and Corps Regiment RAAC". The aim of the pamphlet is to lay down the principles governing the use of the Division/Corps Regiment RAAC and to provide a guide to its characteristics, organisation and handling. 2 copies, 1 incomplete. Royal Australian ...A 25 page document being an advance copy of the pamphlet "The Division and Corps Regiment RAAC". The aim of the pamphlet is to lay down the principles governing the use of the Division/Corps Regiment RAAC and to provide a guide to its characteristics, organisation and handling. 2 copies, 1 incomplete.raac bulletin, division/corp regiment raac -
4th/19th Prince of Wales's Light Horse Regiment Unit History Room
Document - Bulletin, Royal Australian Armoured Corps Bulletin No 38, March 1961
... 4th/19th Prince of Wales's Light Horse Regiment Unit History Room 4/19 PWLH Regiment, Building 78 Simpson Barracks Macleod melbourne raac bulletin pentropic division A ten page document listing officer postings, the introduction of the training pamphlet "The Pentropic Division in Battle - Part 4 - Armour", and the introduction new wireless equipment. Royal Australian ...A ten page document listing officer postings, the introduction of the training pamphlet "The Pentropic Division in Battle - Part 4 - Armour", and the introduction new wireless equipment.raac bulletin, pentropic division -
4th/19th Prince of Wales's Light Horse Regiment Unit History Room
Booklet, Australian Military Forces The Division in Battle Pamphlet No 5 Artillery 1969, 1969
... 4th/19th Prince of Wales's Light Horse Regiment Unit History Room 4/19 PWLH Regiment, Building 78 Simpson Barracks Macleod melbourne artillery command deployment 7610-66-031-4752 Soft covered booklet with amendments 1& 2 covering Artillery - its characteristics, role, equipment & ammunition, organisation, principles of employment, applications of fire etc. 3 copies Australian Military Forces The Division in Battle Pamphlet No 5 Artillery 1969 Booklet ...Soft covered booklet with amendments 1& 2 covering Artillery - its characteristics, role, equipment & ammunition, organisation, principles of employment, applications of fire etc. 3 copies7610-66-031-4752artillery command deployment -
4th/19th Prince of Wales's Light Horse Regiment Unit History Room
Booklet, Australian Army Manual of Land Warfare Part 2 Artillery Training Vol 3 Pam 6 Mortar Locating Troop 1980, 1980
... 4th/19th Prince of Wales's Light Horse Regiment Unit History Room 4/19 PWLH Regiment, Building 78 Simpson Barracks Macleod melbourne artillery mortar locating 7610-66-104-8349 Soft covered booklet providing information and doctrine for the Mortar Locating Troop, Divisional Locating Battery Australian Army Manual of Land Warfare Part 2 Artillery Training Vol 3 Pam 6 Mortar Locating Troop 1980 Booklet ...Soft covered booklet providing information and doctrine for the Mortar Locating Troop, Divisional Locating Battery 7610-66-104-8349artillery, mortar locating -
4th/19th Prince of Wales's Light Horse Regiment Unit History Room
Framed Photograph, Mena Camp -The 1st Australian Division, Australian Imperial Force - Egypt, 1914-15, abt 1915
... 4th/19th Prince of Wales's Light Horse Regiment Unit History Room 4/19 PWLH Regiment, Building 78 Simpson Barracks Macleod melbourne On mobilisation, the Australian 4th Light Horse Regiment was originally destined to go to the Salisbury Plain UK for training. However the Australian troops were diverted to Egypt to defend the Suez Canal from a threat from Turkey. A camp was set up at Mena, near the Pyramids. May your comradeship be as lasting as that still prevailing in our Regiment. With compliments from 4 ALH. Framed black & white photo of Mena Camp in wood frame Mena Camp -The 1st Australian Division ...On mobilisation, the Australian 4th Light Horse Regiment was originally destined to go to the Salisbury Plain UK for training. However the Australian troops were diverted to Egypt to defend the Suez Canal from a threat from Turkey. A camp was set up at Mena, near the Pyramids.Framed black & white photo of Mena Camp in wood frameMay your comradeship be as lasting as that still prevailing in our Regiment. With compliments from 4 ALH. -
4th/19th Prince of Wales's Light Horse Regiment Unit History Room
Uniform, Service Dress WW1, c 1914
... 4th captured 12,000 Turks and set about relieving their sufferings. Bourchier was three times mentioned in dispatches. He was appointed C.M.G. in June 1919 and his A.I.F. appointment ended in October. In 1921 he was promoted colonel, commanding the 5th Cavalry Brigade, and in 1931 brigadier, in charge of the 2nd Cavalry Division. He returned to Strathmerton but later farmed a property at Katandra, which he named Kuneitra. - Source: Australian...4th captured 12,000 Turks and set about relieving their sufferings. Bourchier was three times mentioned in dispatches. He was appointed C.M.G. in June 1919 and his A.I.F. appointment ended in October. In 1921 he was promoted colonel, commanding the 5th Cavalry Brigade, and in 1931 brigadier, in charge of the 2nd Cavalry Division. He returned to Strathmerton but later farmed a property at Katandra, which he named Kuneitra. - Source: Australian ...Sir Murray William James Bourchier (1881-1937), grazier, soldier and politician, was born on 4 April 1881 at Pootilla, Bungaree, Victoria, eldest son of Edward Bourchier, Geelong-born farmer, and his wife Francis (Fanny), née Cope. In 1878 Edward and his three brothers had taken up four adjoining selections on the Murray River near Tocumwal. Within a few years their properties had expanded considerably: Edward's, near Strathmerton, was called Woodland Park; the other three were known collectively as Boomagong. After a private education in Melbourne, Murray returned to Woodland Park. From 1909 until the outbreak of World War I he commanded a troop of light horse at Numurkah, attending annual camps and courses. Bourchier's military service was distinguished. He enlisted in the Australian Imperial Force in August 1914 and sailed as a lieutenant in the 4th Light Horse Regiment, serving seven months on Gallipoli. After the Sinai campaign in 1916-17, during which he was promoted lieutenant-colonel commanding his regiment, he made the crucial final assault on Beersheba. On 31 October 1917 he led his men, many of them from his own district, at full gallop over two miles into Turkish entrenchments and on for a further two miles (3.2 km) into Beersheba to capture vital wells before the Turks could destroy them. Lacking sabres, the regiment used bayonets held in their hands as shock weapons. For this exploit he was awarded the Distinguished Service Order and earned the sobriquet 'Bourchier of Beersheba'. Eleven months later, after fighting north through Palestine, he commanded a joint force of the 4th and 12th Light Horse regiments (Bourchier Force) in the final advance on Damascus; on entering the city the 4th captured 12,000 Turks and set about relieving their sufferings. Bourchier was three times mentioned in dispatches. He was appointed C.M.G. in June 1919 and his A.I.F. appointment ended in October. In 1921 he was promoted colonel, commanding the 5th Cavalry Brigade, and in 1931 brigadier, in charge of the 2nd Cavalry Division. He returned to Strathmerton but later farmed a property at Katandra, which he named Kuneitra. - Source: Australian Dictionary of BiographyService dress of General Sir Murray Bourchier, complete with jacket, trousers, shirt, tie, boots (high rise),Sam Browne belt, peaked cap, medal ribbons, badges of rank, medal ribbons -
4th/19th Prince of Wales's Light Horse Regiment Unit History Room
Uniform, Mess Kit, c 1914
... 4th captured 12,000 Turks and set about relieving their sufferings. Bourchier was three times mentioned in dispatches. He was appointed C.M.G. in June 1919 and his A.I.F. appointment ended in October. In 1921 he was promoted colonel, commanding the 5th Cavalry Brigade, and in 1931 brigadier, in charge of the 2nd Cavalry Division. He returned to Strathmerton but later farmed a property at Katandra, which he named Kuneitra. Source: Australian...4th captured 12,000 Turks and set about relieving their sufferings. Bourchier was three times mentioned in dispatches. He was appointed C.M.G. in June 1919 and his A.I.F. appointment ended in October. In 1921 he was promoted colonel, commanding the 5th Cavalry Brigade, and in 1931 brigadier, in charge of the 2nd Cavalry Division. He returned to Strathmerton but later farmed a property at Katandra, which he named Kuneitra. Source: Australian ...Sir Murray William James Bourchier (1881-1937), grazier, soldier and politician, was born on 4 April 1881 at Pootilla, Bungaree, Victoria, eldest son of Edward Bourchier, Geelong-born farmer, and his wife Francis (Fanny), née Cope. In 1878 Edward and his three brothers had taken up four adjoining selections on the Murray River near Tocumwal. Within a few years their properties had expanded considerably: Edward's, near Strathmerton, was called Woodland Park; the other three were known collectively as Boomagong. After a private education in Melbourne, Murray returned to Woodland Park. From 1909 until the outbreak of World War I he commanded a troop of light horse at Numurkah, attending annual camps and courses. Bourchier's military service was distinguished. He enlisted in the Australian Imperial Force in August 1914 and sailed as a lieutenant in the 4th Light Horse Regiment, serving seven months on Gallipoli. After the Sinai campaign in 1916-17, during which he was promoted lieutenant-colonel commanding his regiment, he made the crucial final assault on Beersheba. On 31 October 1917 he led his men, many of them from his own district, at full gallop over two miles into Turkish entrenchments and on for a further two miles (3.2 km) into Beersheba to capture vital wells before the Turks could destroy them. Lacking sabres, the regiment used bayonets held in their hands as shock weapons. For this exploit he was awarded the Distinguished Service Order and earned the sobriquet 'Bourchier of Beersheba'. Eleven months later, after fighting north through Palestine, he commanded a joint force of the 4th and 12th Light Horse regiments (Bourchier Force) in the final advance on Damascus; on entering the city the 4th captured 12,000 Turks and set about relieving their sufferings. Bourchier was three times mentioned in dispatches. He was appointed C.M.G. in June 1919 and his A.I.F. appointment ended in October. In 1921 he was promoted colonel, commanding the 5th Cavalry Brigade, and in 1931 brigadier, in charge of the 2nd Cavalry Division. He returned to Strathmerton but later farmed a property at Katandra, which he named Kuneitra. Source: Australian Dictionary of BiographyMess kit of General Sir Murray Bourchier complete with peaked cap, jacket, cummerbund, shirt, tie, waistcoat, trousers, shoes, AMF lapel badges & badges of rank -
 4th/19th Prince of Wales's Light Horse Regiment Unit History Room
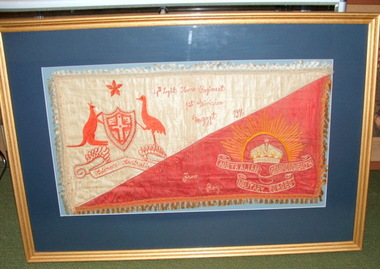
Souvenir - Scarf, framed, 1916
... Background is colour patch of the 4th Australian Light Horse Regiment, diagonally divided with upper left section white and lower part red. The Australian Coat of Arms (in red) is at the upper left. Embroidered in red at top centre: "4th Light Horse Regiment 1st Division...Background is colour patch of the 4th Australian Light Horse Regiment, diagonally divided with upper left section white and lower part red. The Australian Coat of Arms (in red) is at the upper left. Embroidered in red at top centre: "4th Light Horse Regiment 1st Division ...Sgt Roy Arthur Heuston Taggart, 4th Australian Light Horse Regiment, Grazier of Hawthorn, born 4 Sep 1888, enlisted 19 July 1915, 12th Reinforcements. Awarded Distinguished Conduct Medal for outstanding services during Flanders operations.Historic item by original member of 4ALHRectangular embroidery in glass fronted wooden frame. Background is colour patch of the 4th Australian Light Horse Regiment, diagonally divided with upper left section white and lower part red. The Australian Coat of Arms (in red) is at the upper left. Embroidered in red at top centre: "4th Light Horse Regiment 1st Division Egypt 1916". In gold thread at bottom right: Aust Army rising sun badge. . It is edged with white tassels at top and left and gold tassels at right and lower edge.Embroidered in gold thread : "From Roy"embroidery, 4th light horse, roy taggart, scarf as gift to family -
4th/19th Prince of Wales's Light Horse Regiment Unit History Room
Diary, The Personal Diary of Kenneth Alan McKenzie DSO, Major, Australian Staff Corps, Gallipoli to Beersheba 1915-1917, Aug 1993
... Division, Served in World War 2 in command of 4th Motor Brigade. After the war he retired with rank of Brigadier . Died in 1948, aged 54 diary mckenzie Annotated transcription from original diaries of Major McKenzie. A4 bound pages The Personal Diary of Kenneth Alan McKenzie DSO, Major, Australian ...Kenneth Alan Mckenzie was the youngest of the six children of George and Martha McKenzie of Geelong, Victoria . Attended Duntroon. Commissioned 3/11/14. Embarked 12/2/15. Prom Captain 19/9/15. Prom Major 19/3/16. Brigade Major 4 Brigade 18/2/17. GSO 3 - Imperial Mounted Division 21/3/17. Brigade Major 4 LH Brigade 16/4/17. MID. DSO MID GSO 2 Descorps 4/10/18. Appointed Adjutant of Duntroon 1920, later 2nd Cavalry Division, Served in World War 2 in command of 4th Motor Brigade. After the war he retired with rank of Brigadier . Died in 1948, aged 54 Annotated transcription from original diaries of Major McKenzie. A4 bound pagesdiary, mckenzie -
 Bendigo Military Museum
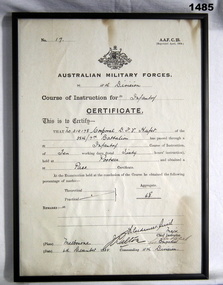
Certificate - CERTIFICATE, FRAMED, 1935
... “Australian Military Forces 4th Division. Cpl D F V Hufer 38th/7th Batt. ...Bendigo Military Museum 37 - 39 Pall Mall Bendigo goldfields documents-certificates, frame accessories military history-army Instruction hufer “Australian Military Forces 4th Division. Cpl D F V Hufer 38th/7th Batt. ...Certificate in black frame with glass, white paper with black print, black ink writing.“Australian Military Forces 4th Division. Cpl D F V Hufer 38th/7th Batt. Infantry Course”documents-certificates, frame accessories, military history-army, instruction, hufer -
 Federation University Historical Collection
Document - Document - Examination Paper, VIOSH: National Safety Council of Australia; Victorian Division: Course for Safety Officers, Examination Paper, 1972
... Australia, Victorian Division. The paper was set by C T Willis, Manager, Occupational Department. The exam was held 4th October 1972. ...Australia, Victorian Division. The paper was set by C T Willis, Manager, Occupational Department. The exam was held 4th October 1972. ...Victorian Institute of Occupational Safety and Health (VIOSH) Australia is the Asia-Pacific centre for teaching and research in occupational health and safety (OHS) and is known as one of Australia's leaders on the field. VIOSH has a global reputation for its innovative approach within the field of OHS management. VIOSH had its first intake of students in 1979. At that time the Institution was known as the Ballarat College of Advanced Education. In 1990 it became known as Ballarat University College, then in 1994 as University of Ballarat. It was 2014 that it became Federation University. VIOSH Australia students are safety managers, senior advisors and experienced OHS professionals. They come from all over Australia and industry. Students are taught active research and enquiry; rather than textbook learning and a one-size fits all approach. VIOSH accepts people into the Graduate Diploma of Occupational Hazard Management who have no undergraduate degree - on the basis of extensive work experience and knowledge. Item sent by Eric Wigglesworth - an item of interest. It is an exam paper for students doing a Course for Safety Officers -1972. This was through the National Safety council of Australia, Victorian Division. The paper was set by C T Willis, Manager, Occupational Department. The exam was held 4th October 1972. Allotted marks for each question are given. Eric was one of those instrumental in the development of VIOSH at Ballarat in 1970s.Two A4 pages - typed. One note page - typedECW on note (Eric Wigglesworth)viosh, victorian institute of occupational safety and health, national safety council of australia, victorian division, examination paper, safety officers, c.t.willis, occupational department, manager -
 Lara RSL Sub Branch
Statement By Eric George Elliott on the Light Horse Brigade charge at Beersheba
... 4th Light Horse Brigade. Commencing at dusk, members of the brigade stormed through the Turkish defences and seized the strategic town of Beersheba. The capture of Beersheba enabled British Empire forces to break the Ottoman line near Gaza on 7 November and advance into Palestine. Decisive victory at Beersheba fell to one of the last great charges of mounted troops in history. As Australian Light Horse Divisions ...This statement by Eric George Elliott tells how The battle of Beersheba took place on 31 October 1917 as part of the wider British offensive collectively known as the third Battle of Gaza. The final phase of this all day battle was the famous mounted charge of the 4th Light Horse Brigade. Commencing at dusk, members of the brigade stormed through the Turkish defences and seized the strategic town of Beersheba. The capture of Beersheba enabled British Empire forces to break the Ottoman line near Gaza on 7 November and advance into Palestine.Decisive victory at Beersheba fell to one of the last great charges of mounted troops in history. As Australian Light Horse Divisions captured the town and secured crucial water wells, their success also marked the beginning of the end of the war in the Middle East. This end came exactly a year to the day after success at Beersheba.Rectangular shaped glass covered picture frame with a photocopy of his statement on the charge of Beersheba.ww!, beersheba, statement, photocopy, australian light horse brigade. -
 Lara RSL Sub Branch
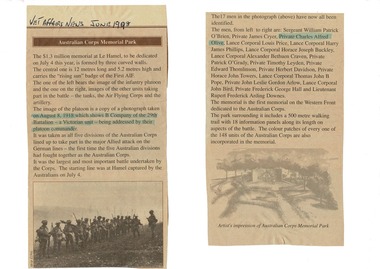
Veteran Affairs Newspaper article dated June 1998, Australian Corps Memorial Park - $1.3 million memorial at La Hamel for Australian World War 1 Soldiers
... Australian Corps Memorial Park. Article covers a Memorial cost $1.3 million dollars for dedication on 4th July 1998 consisting of three curved memorial walls for Australian soldiers that died during Wold War 2. The photograph included in the article was taken on August 8, 1918 which shows B company of the 29th Battalion - a Victorian Unit - being addressed by their platoon Commander. All 5 Australian Divisions...Australian Corps Memorial Park. Article covers a Memorial cost $1.3 million dollars for dedication on 4th July 1998 consisting of three curved memorial walls for Australian soldiers that died during Wold War 2. The photograph included in the article was taken on August 8, 1918 which shows B company of the 29th Battalion - a Victorian Unit - being addressed by their platoon Commander. All 5 Australian Divisions ...Article of World War 1 Refer to carved life size soldier with machine gun in foyer and photograph at its feet.A4 sheet of white paper has two cut-out sections of Veteran Affairs Newspaper article dated June 1998 glued on. Title Australian Corps Memorial Park. Article covers a Memorial cost $1.3 million dollars for dedication on 4th July 1998 consisting of three curved memorial walls for Australian soldiers that died during Wold War 2. The photograph included in the article was taken on August 8, 1918 which shows B company of the 29th Battalion - a Victorian Unit - being addressed by their platoon Commander. All 5 Australian Divisions took part in the major Allied attack on the German Lines - the first time the five Australian Divisions had fought together as the Australian Corps. (Under Australian Command) It is the First memorial on the Western Front dedicated to the Australian Corps. The park surrounding it includes a 500 meter walking tril with 18 information panels along its length on aspects of the battle.Article was found in Veteran Affairs News dated June 1998, heading - Australian Corps Memorial Park.veteran affairs news article, a4 paper sheet -
 Lara RSL Sub Branch
Photograph, Set 4 photographs. and others for Torquay Light Horse camp, 1940
... Australia Day, 1997, Sir John Young unveiled this plaque on Point Danger, Torquay. Torquay history, Light Horse Training Camp, WW2 Plaque at Pt. Danger Note----- (See images to view plaque) The plaque identifies a significant event in Torquay’s history and the sentiments of ‘change’ for the Light Horse Brigade – from horses to machines. In 1940 the four Light Horse Regiments (4th, 8th, 13th and 20th), some 5000 Light Horse and 2000 horses camped and trained at Torquay. Three other regiments, formerly mounted on horses, were also at Torquay ‘mounted’ on privately owned trucks and cars. Division...Australia Day, 1997, Sir John Young unveiled this plaque on Point Danger, Torquay. Torquay history, Light Horse Training Camp, WW2 Plaque at Pt. Danger Note----- (See images to view plaque) The plaque identifies a significant event in Torquay’s history and the sentiments of ‘change’ for the Light Horse Brigade – from horses to machines. In 1940 the four Light Horse Regiments (4th, 8th, 13th and 20th), some 5000 Light Horse and 2000 horses camped and trained at Torquay. Three other regiments, formerly mounted on horses, were also at Torquay ‘mounted’ on privately owned trucks and cars. Division ...These images capture for all time Light Horsemen travelling through Geelong on their way to camp at Torquay for the last Group meeting in Australia . information following - details obtained from .........https://torquayhistory.com/light-horse-brigade/ On Australia Day, 1997, Sir John Young unveiled this plaque on Point Danger, Torquay. Torquay history, Light Horse Training Camp, WW2 Plaque at Pt. Danger Note----- (See images to view plaque) The plaque identifies a significant event in Torquay’s history and the sentiments of ‘change’ for the Light Horse Brigade – from horses to machines. In 1940 the four Light Horse Regiments (4th, 8th, 13th and 20th), some 5000 Light Horse and 2000 horses camped and trained at Torquay. Three other regiments, formerly mounted on horses, were also at Torquay ‘mounted’ on privately owned trucks and cars. Division troops included Artillery, Engineers, Signals, Field Ambulance and other branches of the Army necessary to enable a Division to function. It wasn’t just the sheer numbers of men coming to this little town that made the event significant, it was also the fact that the men of the Light Horse were dramatic, almost glamorous figures and it is easy to see their exploits as some splendid adventure. Horses have played a special role in the story of Australia. They were the only means of transport across this huge country, so it was necessary for everyone to have the ability to ride a horse. When war broke out in 1899 between Britain and the Boers of South Africa (“Boer” was Dutch for “farmer”) Australia sent troops to fight. At first Britain was wary of using untried, unprofessional colonial cavalrymen but soon saw that the slouch-hatted Australian “bushmen” were a match for the fast-moving and unconventional mounted commandos of the Boers. The Australians proved themselves to be expert rough-riding horsemen and good shots. Bush life had hardened them to go for long periods with little food and water. They also showed remarkable ability to find their way in a strange country and use its features for cover, in both attack and defence. By 1914, when Australia joined the war against Germany, there were 23 Light Horse regiments of militia volunteers. Many men from these units joined the Light Horse regiments of the Australian Imperial Force (AIF). Men were given remounts (if not using their own horses) – army horses bought by Commonwealth purchasing officers from graziers and breeders. These were called “walers” because they were a New South Wales stockhorse type – strong, great-hearted animals with the strains of the thoroughbred and semi-draught to give them speed, strength and stamina. On 1st November, 1914, Australia’s First Infantry Division and the first four Light Horse regiments sailed for England in a fleet of transport ships. The first of the Light Horse arrived at Gallipoli in May without their horses. Back with their horses after Gallipoli, they were formidable combatants across the Sinai and Palestine. Some British commanders observed that the light horseman moved with a “lazy, slouching gait, like that of a sleepy tiger” but described how the promise of battle “changes that careless gait, into a live athletic swing that takes him over the ground much quicker than other troops”. They had Light Horse, Torquay, training campdeveloped a reputation as formidable infantrymen. The Turks called them “the White Ghurkas” – a reference to their deadly skill with the bayonet. The Arabs called them “The Kings of the Feathers”. The plume had originally been a battle honour of the Queensland Mounted Infantry for their work in the shearer’s strike of 1891. During WW1 it was adopted by almost all the Light Horse Regiments. It was the proud badge of the light horseman. The most famous of their battles was the attack on Beersheba- the charge of the 4th Light Horse Brigade. Mounted infantrymen and their superb walers had carried out one of the most successful cavalry charges in history – against what seemed impossible odds. They surprised the Turks by charging cavalry-style, when they would normally have ridden close to an objective then dismounted to fight. The fall of Beersheba swung the battle tide against the Turks in Palestine; and changed the history of the Middle East. While 19 men from the Surf Coast Shire served with the 4th Light Horse over the course of WW1, only four were involved in the charge of Beersheba- John GAYLARD, Philip QUINN.(Winchelsea); Wallace FINDLAY (Anglesea); Harry TRIGG (Bambra). After the war, Light Horse units played a key role in the Australian Government’s compulsory military training programme. The Citizen Military Forces (C.M.F.) thrived on the glamour of the wartime Light Horse tradition, ignoring the possibility that motor vehicles would soon replace the horses. When training was no longer compulsory, the C.M.F. regiments declined and horses became more of a luxury during the 1930s depression years of poverty and unemployment. Some regiments were motorised. Then, in 1939, Australia joined Britain in another world war. Training was increased for the militia at both home bases and regional training camps. The camp at Torquay in 1940, commanded by Major General Rankin, was at Divisional strength. By the end of the camp some felt that the Division was ready for active service. Gradually, over the next four years, the Australian Light Horse units were mounted on wheels and tracks and the horses were retired. Six men enlisted at the Torquay camp and another 57 men and women enlisted at Torquay for service in WW2. Those who served in the Militia provided valuable Officers and NCOs and men for the armed services during the war. Each infantry division of the 2nd AIF had a Light Horse regiment attached to it. But the day of the Australian mounted soldier hadn’t quite passed. During World War II, Australia’s 6th Cavalry Regiment formed a mounted unit they called “The Kelly Gang” which did valuable scouting work. In New Guinea, a mounted Light Horse Troop did patrol duty and helped carry supplies. Some fully equipped walers were flown into Borneo for reconnaissance in rugged mountain country. But by the end of the war, in 1945, the horse had disappeared from the Australian Army. References: Australian Light Horse Association www.lighthorse.org.au National Australia Archives Australian War Memorial Surf Coast Shire WW1 memorials www.togethertheyserved.com The Light horse- a Cavalry under Canvas Light Horse, Training Camp, Torquay, WW2 Late in 1939 it was decided to set up a Lighthorse training camp in Torquay to train both men and horses for the battles of the Second World War. Horses, men and equipment came on special trains from all over Victoria and NSW, and as you would expect horseman came from areas such as Omeo and Sale, the Wimmera and the Western District. They arrived at the Geelong racecourse for watering in the Barwon River and then were ridden across the ford at the breakwater and began their 11 mile trek to Torquay. Light Horse, Training Camp, Torquay, WW2 Tent city By the end of January 1940 the camp at Torquay accommodated some 5000 men and 2500 horses of the Second Cavalry Division. The rows of horses, tents and huts near Blackgate Road were quite a sight. While the cavalrymen engaged in exercises on the land and on the beaches, many of the troops took over the Torquay School for special training of men and officers. Mr Bob Pettit local farmer and Councillor for the Barrabool Shire, wrote about the Light horse in the Surf Coast Community News in 1985 saying “They used to travel about the district riding four abreast in one long convoy. To my annoyance they went through my property and shut all the gates behind them. I had certain gates open to let stock in to the water holes and it would take me three -quarters of an hour to follow the horsemen up and put all the gates right again” he continued “the men from the Light Horse were here when the fire went through in March 1940. He recalled an incident when early one morning, as some one blew the bugle, a soldier putting a white sheet on the line frightened the horses. They panicked and ran off in all directions. Six went over the cliff near Bird Rock, five were never found, and the rest were gathered up after nearly a fortnight in the bush around Addiscott and Anglesea" Light Horse, Training Camp, Torquay, WW2, Geelong Parade Geelong parade The training camp culminated in a parade through the streets of Geelong on March 12th 1940. The salute was given at the Town Hall and the troops continued on a route to the You Yang’s for a training exercise. Note-----(see media section for photograph) The Camp was abandoned in mid 1940 as it was deemed unsuitable for training during winter and the cost of a permanent camp could not be justified if it could not be used all year. Historic.......Rare,,,Interpretive.Sepia photographs.set of four ....post card size ....Horses &LighthorsemenNo 1, Lighthorsemen Regiment Geelong 1940......No 2 Light Horse at Breakwater Geelong 1938 to 1940....No 3 Light Horse at Breakwater Geelong 1938 to 1940.....No 4 Light Horse crossing Breakwater camped at Geelong Showgrounds. These markings are on reverse of photographs.light horsemengeelong 1940., world war 2