Showing 9 items matching "bendigo weeroona gas works"
-
 Bendigo Historical Society Inc.
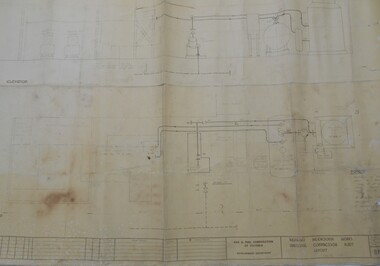
Map - BENDIGO WEEROONA GASWORKS MAP/PLAN COLLECTION: COMPRESSOR PLAN LAYOUT, 15.2.1971
... ...bendigo weeroona gas works...History House 11 Mackenzie Street Bendigo goldfields PLAN Bendigo bendigo weeroona gas works gasworks public utility Gas and Fuel Corporation Plan showing compressor plan layout at Bendigo Weeroona Gasworks. ...Plan showing compressor plan layout at Bendigo Weeroona Gasworks. Prepared by Gas and Fuel Corporation Development Department.plan, bendigo, bendigo weeroona gas works, gasworks, public utility, gas and fuel corporation -
 Bendigo Historical Society Inc.
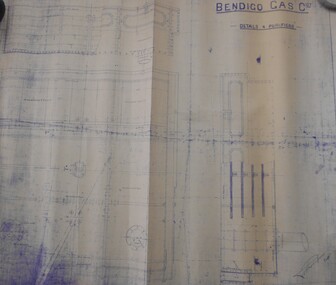
Map - BENDIGO WEEROONA GASWORKS MAP/PLAN COLLECTION: DETAILS FOUR PURIFIERS, 1889
... ...bendigo weeroona gas works...History House 11 Mackenzie Street Bendigo goldfields PLAN Bendigo bendigo weeroona gas works gasworks Thompson Plan/map: Bendigo Weeroona Gaswork, plan showing details four purifiers. ...Plan/map: Bendigo Weeroona Gaswork, plan showing details four purifiers. Plan signed by? Thompson engineer, dated 1889. Written on bottom RH: this is one of the drawings referred to in my contract dated ... (undated).plan, bendigo, bendigo weeroona gas works, gasworks, thompson -
 Bendigo Historical Society Inc.
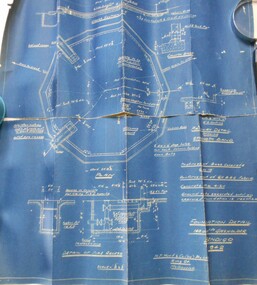
Map - BENDIGO WEEROONA GASWORKS MAP/PLAN COLLECTION: FOUNDATION DETAILS, 1942
... ...bendigo weeroona gas works...History House 11 Mackenzie Street Bendigo goldfields PLAN Bendigo bendigo weeroona gas works gas works Plan: Bendigo Weeroona Gasworks. ...Plan: Bendigo Weeroona Gasworks. Plan shows foundation detail 140,000 c. ft. gasholder, Bendigo, 1942. Prepared by N.J. Hurll & Co. ( Vic ) Pty. Ltd., King St., Melbourne.plan, bendigo, bendigo weeroona gas works, gas works -
 Bendigo Historical Society Inc.
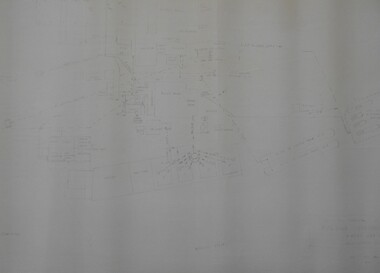
Map - BENDIGO WEEROONA GASWORKS MAP/PLAN COLLECTION: LAY OUT OF NORTHERN SECTION, 1982
... ...bendigo weeroona gasworks... gas works...History House 11 Mackenzie Street Bendigo goldfields PLAN Bendigo bendigo weeroona gasworks gas works Plan of Bendigo Weeroona Works, works lay out northern section. ...Plan of Bendigo Weeroona Works, works lay out northern section. Written on bottom of plan: this tracing from old drawing …. (?) difficult to read, very faded.plan, bendigo, bendigo weeroona gasworks, gas works -
 Bendigo Historical Society Inc.
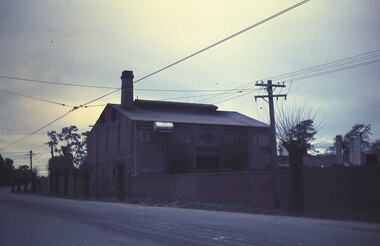
Slide - BENDIGO & EASTER FAIR, c1968
... Bendigo Gas Works, Weeroona Ave, Bendigo....History House 11 Mackenzie Street Bendigo goldfields SLIDE Bendigo bendigo gas works Bendigo Gas Works Bendigo Gas Works, Weeroona Ave, Bendigo. ...Bendigo Gas Works, Weeroona Ave, Bendigo.slide, bendigo, bendigo gas works, bendigo gas works -
 Bendigo Historical Society Inc.
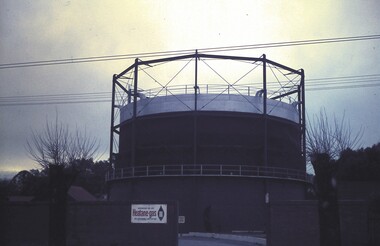
Slide - BENDIGO & EASTER FAIR, c1968
... Bendigo Gas Works, Weeroona Ave, Bendigo. Gasometer...History House 11 Mackenzie Street Bendigo goldfields SLIDE Bendigo bendigo gas works Bendigo Gas Works Bendigo Gas Works, Weeroona Ave, Bendigo. ...Bendigo Gas Works, Weeroona Ave, Bendigo. Gasometerslide, bendigo, bendigo gas works, bendigo gas works -
 Ballarat Tramway Museum
Slide - 35mm slide/s - set of 25, Noel Simons, 26/02/1972 12:00:00 AM
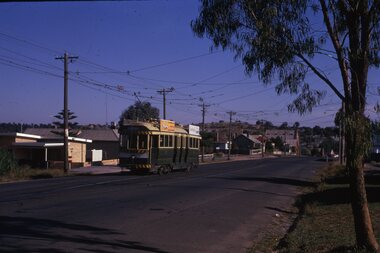
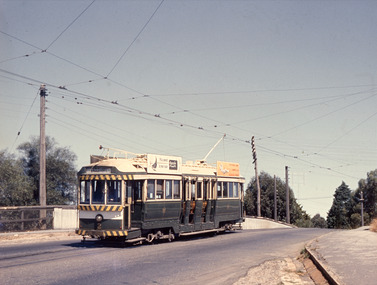
... In the background is the Fountain Gate Plaza building and the City Family Hotel. 1204.20 - as for 1204.19, but with No. 7 en route to Golden Square. 1204.21 - as for 1204.19, but closer up. 1204.22 - as for 1204.18 1204.23 - No. 25 in Nolan St. near the crossing of Bendigo Creek, running a special tram tour. 1204.24 - No. 25 on a special charter, in Weeroona Ave. at Cnr of Caledonia St. passing the Gas works. 1204.25 - Nos. 25 (showing Golden Square), 7 and 26 at Charing Cross. ...In the background is the Fountain Gate Plaza building and the City Family Hotel. 1204.20 - as for 1204.19, but with No. 7 en route to Golden Square. 1204.21 - as for 1204.19, but closer up. 1204.22 - as for 1204.18 1204.23 - No. 25 in Nolan St. near the crossing of Bendigo Creek, running a special tram tour. 1204.24 - No. 25 on a special charter, in Weeroona Ave. at Cnr of Caledonia St. passing the Gas works. 1204.25 - Nos. 25 (showing Golden Square), 7 and 26 at Charing Cross. ...Set of 25 transparencies taken on 26/2/1972 on Kodak mounts. 1204.1 - Bendigo No. 5 - just arrived at Manchester Loop near Havilah Road, Long Gully. Photo taken after tram has passed photographer. 1204.2 - No. 26 in Backhaus St. Long Gully passing William St, en route to Quarry Hill. Photo taken after tram has passed photographer. 1204.3 - No. 5 climbing the High St. Hill Eaglehawk, heading for Quarry Hill with the buildings on the West side of High St. in the background, including the Eaglehawk Town Hall. 1204.4 - as for 1204.3, but tram close up. 1204.5 - as for 1204.3, but after tram has passed photographer. 1204.6 - No. 5 at intersection of Mt Korong Road Ironbark and Calder Highway, with the AMPOL service 'station in the background. Photo taken after tram has passed photographer. 1204.7 - No. 26 en route to Quarry Hill shortly after leaving Needle Loop, passing William St., Long Gully. 1204.8 - No. 5 at California Gully Loop, picking up a passenger, with the shops at Long Gully in the background. Photo taken after tram has passed photographer. 1204.9 - No. 5 in Long Gully, en route to Quarry Hill. Photo taken after tram has passed photographer. 1204.10 - No. 2 at Eaglehawk terminus with the Eaglehawk Town Hall and Post Office in the background. Tram has two SEC roof ads. 1204.11 - No. 2 at Eaglehawk terminus, close up. 1204.12 - as for 1204.11, but through the park gates. 1204.13 - as for 1204.11, but with tram stop shelters in the foreground and buildings on the West side of High St in the background. 1204.14 - No. 2 in Mt. Korong Rd, midway between California Gully Loop and Needle Loop. Photo taken after tram has passed photographer. 1204.15 - No. 5 in Long Gully, en route to Quarry Hill. 1204.16 - as for 1204.15, but with trams departed loop. Has an ESSO service station in the background. 1204.17 - No. 26 leaves Charing Cross up View St.. Photo taken after tram has passed photographer. Has Armstrong Tyre Service, Cohns Drinks ad on a building and the T&G building in the background. Also Firestone ads on the tyre service building. 1204.18 - No. 5 waits at Charing Cross with the Alexandra Fountain in the background. Tram has two SEC roof ads, 'Everything s fine in my all electric kitchen' and 'Electricity Best for Cooking'. Has RACV, Colonial Mutual Life buildings in the background and the planting areas around Charing Cross gardens in the foreground. 1204.19 - No. 21 en route to North Bendigo arrives at Charing Cross, with passengers waiting to board. No. 5 in the background. In the background is the Fountain Gate Plaza building and the City Family Hotel. 1204.20 - as for 1204.19, but with No. 7 en route to Golden Square. 1204.21 - as for 1204.19, but closer up. 1204.22 - as for 1204.18 1204.23 - No. 25 in Nolan St. near the crossing of Bendigo Creek, running a special tram tour. 1204.24 - No. 25 on a special charter, in Weeroona Ave. at Cnr of Caledonia St. passing the Gas works. 1204.25 - Nos. 25 (showing Golden Square), 7 and 26 at Charing Cross. Has fountain in the background.Information written on in blue ink and date stamped on purple ink. 1204.1 - "No. 5 at Manchester Loop, near Havilah Rd. Long Gully." 1204.2 - "No. 26 in Backhaus St. Long Gully passing William St." 1204.3 - "No. 5 in High St. Eaglehawk." 1204.4 - "No. 5 in High St. Eaglehawk." 1204.5 - "No. 5 in High St. Eaglehawk." 1204.6 - "No. 5 in Mt. Korong Rd., Ironbark, passing Calder Highway Junctn." 1204.7 - "No. 26 shortly after leaving Needle Loop, passing William St., Long Gully. No. 5 cresting hill in distance." 1204.8 - "No. 5 at California Gully Loop." 1204.9 - "No. 5 in Long Gully" 1204.10 - "No. 2 at Eaglehawk terminus." 1204.11 - "No. 2 at Eaglehawk terminus." 1204.12 - "No. 2 at Eaglehawk terminus." 1204.13 - "No. 2 at Eaglehawk terminus." 1204.14 - "No. 2 in Mt. Korong Rd, midway between California Gully Loop and Needle Loop. 1204.15 - "Nos. 2 and 26 crossing at Long Gully." 1204.16 - "No. 26 leaves Long Gully loop for Eaglehawk as No. 2 pulls out of the far end towards Bendigo" 1204.17 - "No. 26 beginning the climb up View St. from Charing Cross." 1204.18 - "No. 5 at Charing Cross." 1204.19 - "No 21 arrives at Charing Cross from Golden Square while No. 5 awaits departure time for Eaglehawk." 1204.20 - "Nos. 7, 21, and 2 (behind which is No. 5) at Charing Cross." 1204.21 - "Nos. 7, 21, and 2 at Charing Cross." 1204.22 - "No. 5 at Charing Cross." 1204.23 - "No. 25 in Nolan St. near Bendigo creek crossing" 1204.24 - "No. 25 in Weeroona Ave. at cnr of Caledonia St." 1204.25 - "Nos. 25, 7, 26 and 2 (behind 26) at Charing Cross."tramways, trams, bendigo, eaglehawk, long gully, california gully, charing cross, north bendigo, tram 2, tram 5, tram 7, tram 21, tram 25, tram 26 -
 Ballarat Tramway Museum
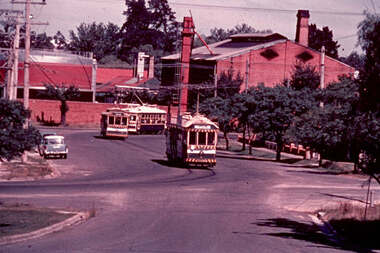
Slide - 35mm slide/s - set of 4, Noel Simons, Apr. 1972
... Set of 4 transparencies - copy slides - possibly ARE film strip dated March 1972. 1209.2 and 1209.4 on Kodak Readymount mounts. 1209.1 - Bendigo 5, 6 and 28 on a special tram service in bound to the City on a tour in Caledonia St. about to enter Lucan St, or White Hills Road or Weeroona Ave. (mis match in names in various maps). Gas works...Ballarat Tramway Museum South Gardens Reserve Wendouree Parade Ballarat Ballarat goldfields Tramways trams Bendigo Charing Cross Golden Square Gas Works Special Trams tram 2 tram 5 tram 6 tram 7 tram 19 tram 28 Information written on in blue ink and date stamped on purple ink. 1209.1 - "Nos 5, 6 and 28 in Caledonia St. about to enter Weeroona Ave." 1209.2 - "Nos 2 and 26 at Charing Cross." 1209.3 - "Swinging the pole on No. 19 at Golden Square Terminus." 1209.4 - "No. 7 inward bound from Golden Square stops at Fire Station Loop." ...Set of 4 transparencies - copy slides - possibly ARE film strip dated March 1972. 1209.2 and 1209.4 on Kodak Readymount mounts. 1209.1 - Bendigo 5, 6 and 28 on a special tram service in bound to the City on a tour in Caledonia St. about to enter Lucan St, or White Hills Road or Weeroona Ave. (mis match in names in various maps). Gas works in the background. No. 5 has a white disk on the rear of the tram. 1209.2 - Nos 2 and 26 at Charing Cross with the Fountain Plaza in the background. Both trams have the destination of Quarry Hill, though 26 is on the Eaglehawk bound track. 1209.3 - No. 19 at the Golden Square terminus, with the conductor or driver swinging the pole and Billy Rodda's Golden Square hotel in the background. 1209.4 - No. 7 at Fire Station loop, en route to North Bendigo, picking up a passenger with a pram. Part of a set of 20 slides made by the Association of Railway Enthusiast Provincial Tramways film strip. Reference Item 2560 details the ARE Film Strip and provide references to other slides.Information written on in blue ink and date stamped on purple ink. 1209.1 - "Nos 5, 6 and 28 in Caledonia St. about to enter Weeroona Ave." 1209.2 - "Nos 2 and 26 at Charing Cross." 1209.3 - "Swinging the pole on No. 19 at Golden Square Terminus." 1209.4 - "No. 7 inward bound from Golden Square stops at Fire Station Loop."tramways, trams, bendigo, charing cross, golden square, gas works, special trams, tram 2, tram 5, tram 6, tram 7, tram 19, tram 28 -
 Bendigo Historical Society Inc.
Photograph - Robert Green Collection - Photos of Bendigo Tramways - Sheet A of 10, 1972
... Photos: 11147.9a No 2 to Eaglehawk leaves Carpenter Street, crosses the railway line and enters Mitchell Street 11147.9b Two Birney Cars ready to depart in Pall Mall 11147.9c Nos 30 and 28 Birney Cars ready to depart in Pall Mall 11147.9d No 30 to North Bendigo turns off Weeroona Avenue into Caledonia St at the Gas Works 11147.9e No 5 comes up View Street past Dudley House and the Masonic Hall 11147.9f No 28 Birney Car 11147.9g No 3 comes into Eaglehawk 11147.9h Nos 2 and 3 cross over at the Eaglehawk Road and Cuneen Streets Loop in Long Gully 11147.9j No 30 Birney Car crosses the Munday St and Pall Mall intersection heading for the fountain 11147.9k No 28 Birney Car comes down Nolan Street past the Lake Weeroona 11147.9l No 30 Birney Car in the darkness 11147.9m The Scrubber Car comes up Mitchell Street 11147.9n The Scrubber Car 11147.9o No 18 at Eaglehawk, Bendigo T.M.S of Vic. ...Photos: 11147.9a No 2 to Eaglehawk leaves Carpenter Street, crosses the railway line and enters Mitchell Street 11147.9b Two Birney Cars ready to depart in Pall Mall 11147.9c Nos 30 and 28 Birney Cars ready to depart in Pall Mall 11147.9d No 30 to North Bendigo turns off Weeroona Avenue into Caledonia St at the Gas Works 11147.9e No 5 comes up View Street past Dudley House and the Masonic Hall 11147.9f No 28 Birney Car 11147.9g No 3 comes into Eaglehawk 11147.9h Nos 2 and 3 cross over at the Eaglehawk Road and Cuneen Streets Loop in Long Gully 11147.9j No 30 Birney Car crosses the Munday St and Pall Mall intersection heading for the fountain 11147.9k No 28 Birney Car comes down Nolan Street past the Lake Weeroona 11147.9l No 30 Birney Car in the darkness 11147.9m The Scrubber Car comes up Mitchell Street 11147.9n The Scrubber Car 11147.9o No 18 at Eaglehawk, Bendigo T.M.S of Vic. ...This collection contains eight archive sheets (Sheet 1 to Sheet 8) of strips of original 35mm black and white negatives of photographs taken during the 1960s and early 1970s by Robert Green, of the Bendigo State Electricty Commission of Victoria Tramways prior to their abandonment The collection also includes two archive quality sheets (Sheet A and Sheet B) of original 35mm colour slides taken by Robert Green during the same period. Sheet B also contains one slide taken by Robert's friend Keigh S King (1928-2019) who was the author of the book 'The Bendigo Tramways an illustrated history, published by the Australian Railway Historical Society Victorian Division Melbourne in February 1972; BHS Item no. 5052. The collection also includes one USB stick which contains images of all photographs described above, except for one colour slide taken by Keith S Kings. Sixteen black and white prints from the images are also included.Robert Green Collection, this item contains Colour Slides of the trams at various locations around Bendigo. Photos: 11147.9a No 2 to Eaglehawk leaves Carpenter Street, crosses the railway line and enters Mitchell Street 11147.9b Two Birney Cars ready to depart in Pall Mall 11147.9c Nos 30 and 28 Birney Cars ready to depart in Pall Mall 11147.9d No 30 to North Bendigo turns off Weeroona Avenue into Caledonia St at the Gas Works 11147.9e No 5 comes up View Street past Dudley House and the Masonic Hall 11147.9f No 28 Birney Car 11147.9g No 3 comes into Eaglehawk 11147.9h Nos 2 and 3 cross over at the Eaglehawk Road and Cuneen Streets Loop in Long Gully 11147.9j No 30 Birney Car crosses the Munday St and Pall Mall intersection heading for the fountain 11147.9k No 28 Birney Car comes down Nolan Street past the Lake Weeroona 11147.9l No 30 Birney Car in the darkness 11147.9m The Scrubber Car comes up Mitchell Street 11147.9n The Scrubber Car 11147.9o No 18 at Eaglehawk, Bendigo T.M.S of Vic. Ltd Photo, Sat 15 April 1972. Robert Green and John Fitzsimons holding "Last Tram Mail" 1/125 f8. Taken at 9am on the second last day of the trams.keith s king, bendigo, trams, robert green