
Showing 106 items matching "blue-green glass"
-
 Nepean Historical Society
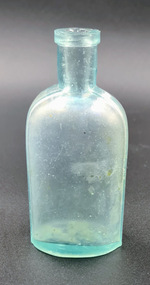
Domestic object - Blue/green glass bottle
... Blue/green glass bottle...Blue/green glass bottle...Nepean Historical Society 827 Melbourne Road Sorrento mornington-peninsula Excavated from No 7 Cooper Grove (which was originally near the old Ophir Guest House), when they were excavating for a swimming pool for Mr and Mrs Robert Riley several years ago Bottles Ponds Extract. 1846 Blue/green glass bottle Domestic object Blue/green glass bottle ...Excavated from No 7 Cooper Grove (which was originally near the old Ophir Guest House), when they were excavating for a swimming pool for Mr and Mrs Robert Riley several years agoBlue/green glass bottlePonds Extract. 1846bottles -
 Flagstaff Hill Maritime Museum and Village
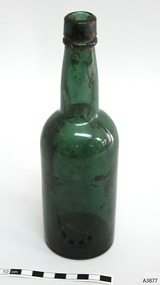
Container - Bottle, 1840s-1870s
... ...green glass...blue...blue-green, non-olive) has been handmade from about the 1840s-1870s. The bottle, possibly used to store soda or mineral water, was found in the coastal waters of Victoria about 100 years from when it was made. It is part of the John Chance Collection. The teal, or blue-green, colour of this bottle’s glass...Bottle; unusual dark teal (blue-green, non-olive) opaque glass, medium size, cork-top style. ...Items that come from several wrecks have since been donated to the Flagstaff Hill Maritime Village’s museum collection by his family, illustrating this item’s level of historical value. flagstaff hill warrnambool flagstaff hill maritime museum maritime museum shipwreck coast flagstaff hill maritime village great ocean road shipwreck artefact john chance glass bottle antique bottle handmade mouth blown blown bottle 19th century bottle collectable bottle green glass blue-green glass teal glass non-olive green glass dip mould soda bottle Bottle; unusual dark teal (blue-green, non-olive) opaque glass, medium size, cork-top style. ...This teal coloured bottle (blue-green, non-olive) has been handmade from about the 1840s-1870s. The bottle, possibly used to store soda or mineral water, was found in the coastal waters of Victoria about 100 years from when it was made. It is part of the John Chance Collection. The teal, or blue-green, colour of this bottle’s glass is reasonably rare. The colour is probably the result of a combination of cobalt (blue), iron (yellow-orange) and chromium (green) that may have been in the raw silica, or perhaps added to the glass sand before making the glass. Glassblowers made bottles like this one by blowing air through a long pipe into the molten glass blob at the end of the pipe. The glass was blown out to fit into the shape of the cylindrical dip mould. Once it hardened, the glass was removed from the mould and the glassblower would continue using the pipe to create the neck while carefully using a tool to hold the base. A ponty tool was used to complete the shape of the base. The bottle would be cracked off the end of the glassblower’s pipe and a blob of molten glass would be wrapped around the top of the neck and shaped to finish the lip of the bottle, sometimes using a tool to do this. The seal was usually a cork, often held in place with wax or wire with tape over it to seal the aerated drink inside. The gutter between the upper and lower lip was used to anchor the seal. This style of handmade bottles would often have horizontal bubbles in the applied finish, caused by twisting the glass, and vertical bubbles and diagonal lines in the neck and body from it being blown, and a mark in the base where the ponty tool had been attached. Although the bottle is not linked to a particular shipwreck, it is recognised as being historically significant as an example of handmade, mid-19th century bottles imported for use in Colonial Victoria in the mid-to-late 1800s. The bottle is significant for its rarity, as its teal, blue-green colour is unusual. It is a valuable addition to our collection of 1800s handmade bottles. The bottle is also significant as it was recovered by John Chance, a diver in Victoria’s coastal waters in the late 1960s to early 1970s. Items that come from several wrecks have since been donated to the Flagstaff Hill Maritime Village’s museum collection by his family, illustrating this item’s level of historical value. Bottle; unusual dark teal (blue-green, non-olive) opaque glass, medium size, cork-top style. Handmade with applied double-collar lip with straight side upper and a ring lower. The edge of the mouth is uneven. Neck is slightly bulbous. Body has shoulder seam, then tapers inwards to base, shallow base. Heel is uneven width. Base is shallow with glass of different density. Bubbles in the body and an elongated bubble at base of neck. Sediment inside bottle. Chip in lip. Scratched surface.flagstaff hill, warrnambool, flagstaff hill maritime museum, maritime museum, shipwreck coast, flagstaff hill maritime village, great ocean road, shipwreck artefact, john chance, glass bottle, antique bottle, handmade, mouth blown, blown bottle, 19th century bottle, collectable, bottle, green glass, blue-green glass, teal glass, non-olive green glass, dip mould, soda bottle -
 Uniting Church Archives - Synod of Victoria
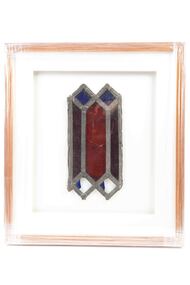
Artwork, other - Stained glass fragment
... G010.1 and G010.2 - Red, blue, green and yellow glass in lead framework. Both are in modern picture frames....Wesleyan church corner Collins Street and Queen Street Stained glass G010.1 and G010.2 - Red, blue, green and yellow glass in lead framework. ...These two fragments are from the first Wesleyan church in Melbourne, built in 1841, on the corner of Collins Street and Queen Street.G010.1 and G010.2 - Red, blue, green and yellow glass in lead framework. Both are in modern picture frames.wesleyan church corner collins street and queen street, stained glass -
 Warrnambool and District Historical Society Inc.
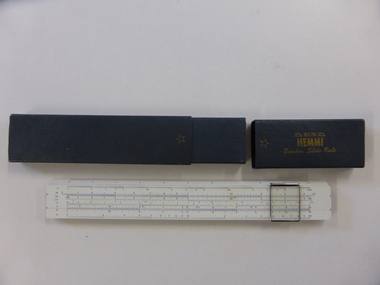
Instruments, Slide Rule, C1955
... glass panel or cursor . The bamboo is in three sections with the middle section movable. It is marked in various graduated measurements mainly in dark blue but with some in green and red.It is inside a dark grey rectangular box with a slide off lid on one end.There is a celluloid panel on the back with a conversion table printed on it. ...glass panel or cursor . The bamboo is in three sections with the middle section movable. It is marked in various graduated measurements mainly in dark blue but with some in green and red.It is inside a dark grey rectangular box with a slide off lid on one end.There is a celluloid panel on the back with a conversion table printed on it. ...A slide rule is an instrument which is used to carry out mathematical calculations. William Oughtred is credited with its invention in 1621, however many others including Isaac Newton have made improvements or modifications over the years. From 1625 to 1800 there were approximately 40 different styles brought forward. with the following 100 years sees over 250 designs created.There have been different versions and modifications to suit scientific, mathematical and engineering requirements. It is interesting to note that many of the buildings of the 19th and 20th centuries have been designed with the use of slide rules. Their use has declined in the last 25-30 years with the advent of computers and specialist calculators.While not directly linked in any way to the history of Warrnambool, this slide rule would have been a item in use by students doing maths at upper secondary level as well as other applications which would make it a familiar object to many people.Coated bamboo with sliding metal framed glass panel or cursor . The bamboo is in three sections with the middle section movable. It is marked in various graduated measurements mainly in dark blue but with some in green and red.It is inside a dark grey rectangular box with a slide off lid on one end.There is a celluloid panel on the back with a conversion table printed on it. There is an accompanying 67 page manual with a pale green cover with black text. On slide rule:Sun Hemmi Japan No 2664S On box: Sun Hemmi Japan No 2664S warrnambool, hemmi slide rule, bamboo slide rule -
 Warrnambool and District Historical Society Inc.
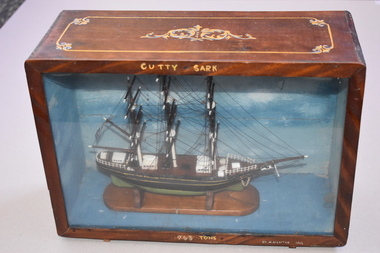
Model Boat, H. Richter, Cutty Sark, 1964
... green and black with gold bands. The ship is mounted on a wooden stand and enclosed in a wooden box with a glass front. The box is varnished and has ornamental patterns in gold and blue on the top and sides. ...green and black with gold bands. The ship is mounted on a wooden stand and enclosed in a wooden box with a glass front. The box is varnished and has ornamental patterns in gold and blue on the top and sides. ...The Cutty Sark sailing ship was a popular model-making ship. It was a British clipper ship built originally for the China- England tea trade and was one of the last and fastest tea clippers. From 1883 to 1895 it was used to carry wool from Australia to England and held many records for speed during that time. Since 1954 the ship has been on display at Greenwich, England. The model has an etched inscription indicating that it was made by Herman Richter and so it is presumed that he was the maker of this model. A model of the Cutty Sark was made by his father, Edward Richter using wood from the Enterprise wrecked in Lady Bay and that model was in the old Warrnambool Museum. This information was in a newspaper article at the time of Edward Richter’s death. This Herman Richter model may be a copy of his father’s model. The Richters have been prominent in Warrnambool’s history, beginning with Henry Richter who came to Warrambool in the 1850s and worked in the Western Brewery and was licensee of the Royal Archer Hotel. His son Edward who died in 1937 was a prominent Warrnambool resident for 78 years. Herman, the son of Susan and Edward Richter was well-known as a model boat maker and maker of model boats in bottles.This model boat is of great interest because the ‘Cutty Sark’ was a well-known sailing ship and was important in Australia’s maritime history as a carrier to London of Australian wool in the 1880s and 90s. It is also of interest as it was made by a member of the Richter family, a prominent one in Warrnambool’s history with both Edward and his son Herman Richter producing many artefacts connected to Warrnambool’s history – model ships, violin-making, maritime paintings etc. This is the model of a three-masted ship with a hull painted in green and black with gold bands. The ship is mounted on a wooden stand and enclosed in a wooden box with a glass front. The box is varnished and has ornamental patterns in gold and blue on the top and sides. The inside of the box is painted blue and white to represent the sea and the sky.‘Cutty Sark 963Tons by H Richter 1964’richter family, warrnambool, model boat building -
 Warrnambool and District Historical Society Inc.
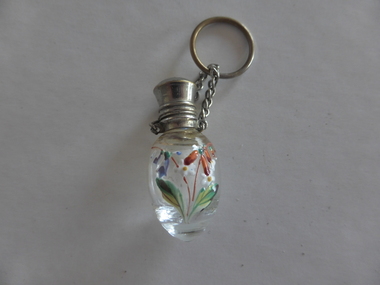
Bottle, Perfume, Late 19th century
... glass perfume bottle with a rounded bottom and a silver-coloured metal stopper. The hinged stopper has a chain attached with a metal ring for attachment to a belt or purse. The top of the stopper has an ornate etching on it. There are hand-painted flowers on the side of the bottle (white, orange, green and blue...glass perfume bottle with a rounded bottom and a silver-coloured metal stopper. The hinged stopper has a chain attached with a metal ring for attachment to a belt or purse. The top of the stopper has an ornate etching on it. There are hand-painted flowers on the side of the bottle (white, orange, green and blue ...No information is available on this particular bottle. The hand-painted flowers may have been added by the owner after purchase. Painting on glass was very popular in the 1880s and 1890s. Perfume bottles were carried by ladies to use when the odours of the surrounds were objectionable or when they needed to freshen up on a journey. This bottle is of some interest as an example of the items carried by a woman in the late 19th and early 20th centuries. It is useful for displayThis is a small glass perfume bottle with a rounded bottom and a silver-coloured metal stopper. The hinged stopper has a chain attached with a metal ring for attachment to a belt or purse. The top of the stopper has an ornate etching on it. There are hand-painted flowers on the side of the bottle (white, orange, green and blue)perfume bottle, warrnambool, 1880 perfume bottle -
 Bendigo Military Museum
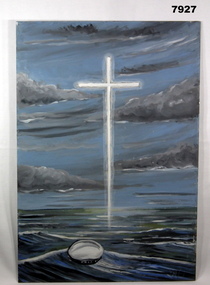
Painting - ORIGINAL OIL PAINTING, Unknown
... blue, grey, white, green colours, oil artists paint. Depicting - sea, sky with shimmering cross and two sailors caps floaing on the water. Painted on glass...blue, grey, white, green colours, oil artists paint. Depicting - sea, sky with shimmering cross and two sailors caps floaing on the water. Painted on glass ...Item in the collection re: "William Anthony (Bill) Theodore" DSM. Refer Cat No. 7926P for his service record.Painting - black, blue, grey, white, green colours, oil artists paint. Depicting - sea, sky with shimmering cross and two sailors caps floaing on the water. Painted on glass. Painting appears to be signed by artist with two capital letters "WG". Glass sheet used for painting and provides the frame.Artist signature "WG".framed accessories, painting, william theodore -
 Bendigo Military Museum
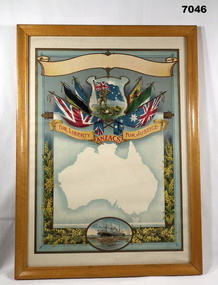
Certificate - CERTIFICATE, FRAMED, Goldsworthy & Davey Artists, WW1
... green wattle flowers and foliage. Pale blue background. Certificate template - possibly available to Shires and localities to customise as required. frame - timber, with varnish finish in natural tones, glass front and cardboard back....green wattle flowers and foliage. Pale blue background. Certificate template - possibly available to Shires and localities to customise as required. frame - timber, with varnish finish in natural tones, glass front and cardboard back. ...Red print on Certificate template. "For Liberty ANZACS FOR JUSTICE". This is a blank certificate.Certificate - paper, red print on scroll, illustrated in colour - top to bottom, blank scroll; 2 soldiers and flag surrounded by 6 flags, silhouette in white of Australian map, oval shape with ship and troops. Further side decoration yellow and green wattle flowers and foliage. Pale blue background. Certificate template - possibly available to Shires and localities to customise as required. frame - timber, with varnish finish in natural tones, glass front and cardboard back.framed, ww1, certificate -
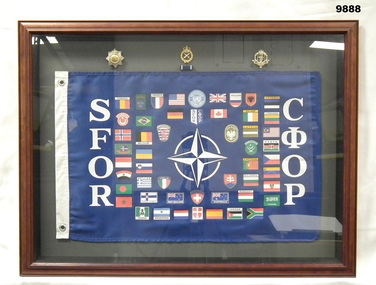 Bendigo Military Museum
Banner - FRAMED BADGES ON BANNER, MR FRAME, Unknown
... blue colour fabric in flag shape printed with the flags from many countries, mounted on green coloured cardboard. Above banner there are three badges - metal, gold and silver colour.'' Left to right - Queen's Crown, Laurel Wreath with letters "VRI" on star shape. - Queen's Crown, Laurel Wreath, Crossed swords - Below Badge is a service ribbon, blue and white - NATO. - Queen's Crown, Laurel Wreath with letters "ER", Ribbon shape with letters "ROYAL MILITARY POLICE" Frame - timber, brown stain with decorative moulding. Glass...blue colour fabric in flag shape printed with the flags from many countries, mounted on green coloured cardboard. Above banner there are three badges - metal, gold and silver colour.'' Left to right - Queen's Crown, Laurel Wreath with letters "VRI" on star shape. - Queen's Crown, Laurel Wreath, Crossed swords - Below Badge is a service ribbon, blue and white - NATO. - Queen's Crown, Laurel Wreath with letters "ER", Ribbon shape with letters "ROYAL MILITARY POLICE" Frame - timber, brown stain with decorative moulding. Glass ...“Greg Westhead" collection Refer Cat. No. 1496.7 for his service details.Banner - mid blue colour fabric in flag shape printed with the flags from many countries, mounted on green coloured cardboard. Above banner there are three badges - metal, gold and silver colour.'' Left to right - Queen's Crown, Laurel Wreath with letters "VRI" on star shape. - Queen's Crown, Laurel Wreath, Crossed swords - Below Badge is a service ribbon, blue and white - NATO. - Queen's Crown, Laurel Wreath with letters "ER", Ribbon shape with letters "ROYAL MILITARY POLICE" Frame - timber, brown stain with decorative moulding. Glass front, MDF board backing. Recessed Box frame. Handwritten information on backing board.Handwritten information - black ink pen. "317595 WO2 G. WESTHEAD ROYAL AUST CORP MILITARY POLICE LONG LOOK 1999 ROYAL MILITARY POLICE 6 RMP REGT BOSNIA JUN-AUG 99"framed accessories, banner, badges, nato, greg westhead -
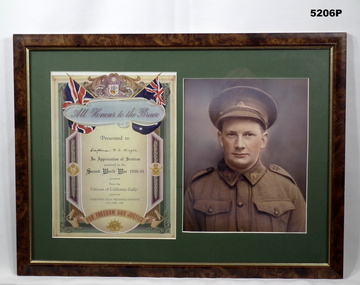 Bendigo Military Museum
Photograph - PHOTOGRAPH, FRAMED, 1946
... blue and brown ink. Three service badges illustrated. Frame - timber with marble effect paint finish, gold trim. Mount - Cardboard, dark green colour. Glass...blue and brown ink. Three service badges illustrated. Frame - timber with marble effect paint finish, gold trim. Mount - Cardboard, dark green colour. Glass ...Certificate issued by "California Gully Mechanics Institute/10th June 1946/ From the Citizens of California Gully.Photograph - colour photograph, half portrait of a soldier in uniform. Certificate beside photograph - in colour at top Australian Coat of Arms with two flags. print in Navy blue and brown ink. Three service badges illustrated. Frame - timber with marble effect paint finish, gold trim. Mount - Cardboard, dark green colour. Glass front. Backing - Cardboard.Handwritten in black ink on Certificate "Craftsman W. G.Wrights".framed items, certificates, ww2 -
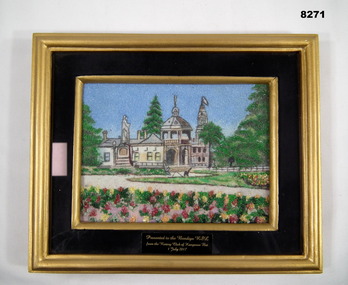 Bendigo Military Museum
Artwork, other - GEMSTONE CRAFT
... glass front, bottom centre, gold engraving on black plastic. "Presented to the Bendigo RSL from the Rotary Club of Kangaroo Flat 1 July 2017" framed accessories rotary club smirsl brsl Information printed on paper on back of board, "Good/idea/ Ph 704973 o0 - 5005115/ Gem name and colour/ Ruby red/Spinel pink/ Sapphire blue/ Lapis La2uh blue/ Jade green, Tomaline black/ Apatite light green/ Peridot light green" The work depicts the Soldiers Memorial Institute Building (Bendigo Military Museum) using a number of coloured gemstone chips adhered to a support board, list of Gemstone chips listed on the back of frame, original hand made craft. ...Presentation plaque adhered to glass front, bottom centre, gold engraving on black plastic. "Presented to the Bendigo RSL from the Rotary Club of Kangaroo Flat 1 July 2017"The work depicts the Soldiers Memorial Institute Building (Bendigo Military Museum) using a number of coloured gemstone chips adhered to a support board, list of Gemstone chips listed on the back of frame, original hand made craft. Frame timber with gold paint, 3D look with black fabric mount, glass front and MDF board backing and MDF board stand.Information printed on paper on back of board, "Good/idea/ Ph 704973 o0 - 5005115/ Gem name and colour/ Ruby red/Spinel pink/ Sapphire blue/ Lapis La2uh blue/ Jade green, Tomaline black/ Apatite light green/ Peridot light green"framed accessories, rotary club, smirsl, brsl -
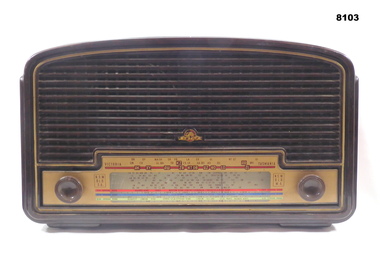 Bendigo Military Museum
Domestic object - ASTOR RADIO, C.1950's
... glass face has two control knobs. The top line of stations covers Victoria to Tasmania followed by NSW, QLD & SA. At the bottom is 3 bands in red, blue, light green which cover Europe, USA. ...glass face has two control knobs. The top line of stations covers Victoria to Tasmania followed by NSW, QLD & SA. At the bottom is 3 bands in red, blue, light green which cover Europe, USA. ...This one appears to be Model 27 from the early 1950's. This radio was last used in the Office at the Soldiers Memorial Institute most likely pre 1990's.Radio, ASTOR brand, brown Bakelite frame, the glass face has two control knobs. The top line of stations covers Victoria to Tasmania followed by NSW, QLD & SA. At the bottom is 3 bands in red, blue, light green which cover Europe, USA. On the rear are two stickers relating to power, patents, use and licencing.1st sticker on rear, "Selex Decal Pty Ltd - No 5 - 217540", 2nd sticker, "Danger"brsl, smirsl, radio, astor -
 Kiewa Valley Historical Society
Stereoscope
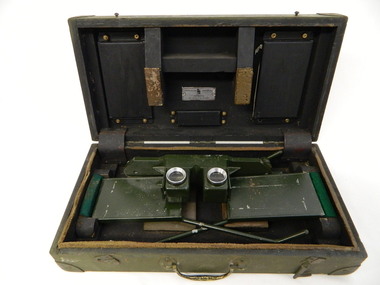
... blue tape beneath: Mirror stereoscope 1026. written in black centre top of box: W10/WKA.0233. On front edge of box written in black: W10/WKA 0233. Inside box lid on silver plaque: Stereoscope Universal/ Made in / Australia / Die Casters Ltd. Victoria Dark green wooden box with padded protection around the perimeter and on lid where 2 rectangular pieces of wood touch the stereoscope. The box is fitted with wooden dividers that fit around the stereoscope. The stereoscope is green metal with folding legs and sides attached to allow the stereoscope to sit on a surface. The instrument has 2 round glass ...The stereoscope was an interpretation device used to interpret aerial photography and the landscape. It was used by National Parks Victoria located at Mt Beauty to look at aerial photos so that they showed up the relief of the topography and therefore looked 3D.Used by National Parks Victoria staff located at the Mt Beauty office during the 1970's and early 1980's.Dark green wooden box with padded protection around the perimeter and on lid where 2 rectangular pieces of wood touch the stereoscope. The box is fitted with wooden dividers that fit around the stereoscope. The stereoscope is green metal with folding legs and sides attached to allow the stereoscope to sit on a surface. The instrument has 2 round glass ('mirrored viewing lens') cylinders eye distance apart, that allow light in from the side swinging doors. The amount of light is constricted by a rectangular piece of metal at the top of each leg. The box has swing clips used to close it and a metal swing handle all on the front side.The hinges are reinforced (and offer protection) by additional rubber pieces at each end. Inside the box is a brush made of bristle with a wooden handle - used for cleaning.Outside and top of box: written in black: No. 1026. On blue tape beneath: Mirror stereoscope 1026. written in black centre top of box: W10/WKA.0233. On front edge of box written in black: W10/WKA 0233. Inside box lid on silver plaque: Stereoscope Universal/ Made in / Australia / Die Casters Ltd. Victorianational parks victoria. stereoscope. aerial photographs. scientific instrument. mt beauty. 3d -
 Bendigo Military Museum
Banner - BCOF BANNERS, FRAMED, Banners c 1946. Frames 2022
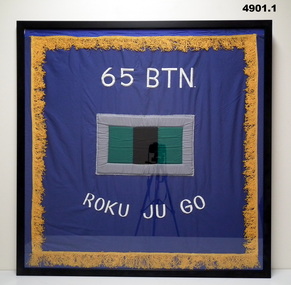
... BLUE BACKGROUND, GOLD COLOURED TASSLE FRINGE, WHITE EMBROIDERED INSCRIPTION, COLOUR PATCH CENTRE, GREEN AND BLACK WITH GREY SURROUND.. 2. BANNER FRAMED, COTTON FABRIC, DARK BLUE BACKGROUND, GOLD COLOURED TASSLE FRINGE, OFF WHITE INSCRIPTION, COLOUR PATCH CENTRE, GREEN AND PURPLE WITH GREY SURROUND. 3. BANNER FRAMED, COTTON FABRIC, BLUE BACKGROUND, GOLD COLOURED TASSLE FRINGE, WHITE EMBROIDERED INSCRIPTIONS, COLOUR PATCH CENTRE, GREEN AND BROWN WITH GREY SURROUND. 1,2,3, Frames - timber, black colour print, glass...BLUE BACKGROUND, GOLD COLOURED TASSLE FRINGE, WHITE EMBROIDERED INSCRIPTION, COLOUR PATCH CENTRE, GREEN AND BLACK WITH GREY SURROUND.. 2. BANNER FRAMED, COTTON FABRIC, DARK BLUE BACKGROUND, GOLD COLOURED TASSLE FRINGE, OFF WHITE INSCRIPTION, COLOUR PATCH CENTRE, GREEN AND PURPLE WITH GREY SURROUND. 3. BANNER FRAMED, COTTON FABRIC, BLUE BACKGROUND, GOLD COLOURED TASSLE FRINGE, WHITE EMBROIDERED INSCRIPTIONS, COLOUR PATCH CENTRE, GREEN AND BROWN WITH GREY SURROUND. 1,2,3, Frames - timber, black colour print, glass ...Banners - BCOF - British Commonwealth Occupation Force (Japan) 65/66/67th BTNs Formed in the islands from the 7th Division AIF for service in Japan 1946 - 48.1. BANNER FRAMED, COTTON FABRIC, BLUE BACKGROUND, GOLD COLOURED TASSLE FRINGE, WHITE EMBROIDERED INSCRIPTION, COLOUR PATCH CENTRE, GREEN AND BLACK WITH GREY SURROUND.. 2. BANNER FRAMED, COTTON FABRIC, DARK BLUE BACKGROUND, GOLD COLOURED TASSLE FRINGE, OFF WHITE INSCRIPTION, COLOUR PATCH CENTRE, GREEN AND PURPLE WITH GREY SURROUND. 3. BANNER FRAMED, COTTON FABRIC, BLUE BACKGROUND, GOLD COLOURED TASSLE FRINGE, WHITE EMBROIDERED INSCRIPTIONS, COLOUR PATCH CENTRE, GREEN AND BROWN WITH GREY SURROUND. 1,2,3, Frames - timber, black colour print, glass front, cardboard backing.White embroidered letters and numbers - 1, "65 BTN. ROKU JU GO" Fabric letters and numbers - 2. "66 BTN. ROKU J.U. ROKU" white embroidered letters and numbers - 3. "67 BTN. ROKU JU NANA" military, ww2, japan, banners -
 Bendigo Military Museum
Banner - SOUVENIR BANNER, FRAMED, 1941
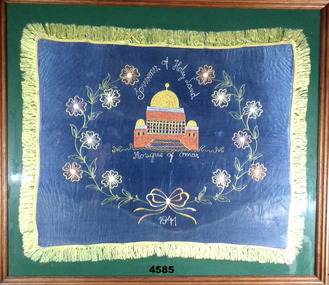
... Frame - timber with decorative detail, brown stain with glass front, frame attached to timber stand. Feet supporting frame with piano hinge and chain. Mount - green felt Banner - blue silk like background, with embroidered foliage, flowers, building and inscription in colour. ...Frame - timber with decorative detail, brown stain with glass front, frame attached to timber stand. Feet supporting frame with piano hinge and chain. Mount - green felt Banner - blue silk like background, with embroidered foliage, flowers, building and inscription in colour. ...Framed banner on stand. Frame - timber with decorative detail, brown stain with glass front, frame attached to timber stand. Feet supporting frame with piano hinge and chain. Mount - green felt Banner - blue silk like background, with embroidered foliage, flowers, building and inscription in colour. Yellow silk like fringe.Handwritten on back of frame "Made by M. Bowles. Feb. 1993" Embroidered on banner "Souvenir of Holyland/Mosque of Omar/1941"souvenir, wwii, middle east -
 Bendigo Military Museum
Uniform - UNIFORM, MOUNTED
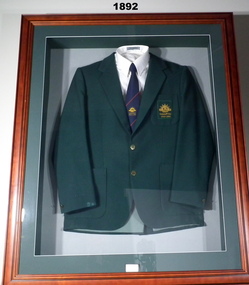
... glass front. Mount: Green cardboard with deep recessed between dark green and light green. Gallipoli Coat: dark green fabric with gold buttons and pocket patch with gold embroidery. Tie: Navy blue...glass front. Mount: Green cardboard with deep recessed between dark green and light green. Gallipoli Coat: dark green fabric with gold buttons and pocket patch with gold embroidery. Tie: Navy blue ...Items worn by George Henry Fullerton to the 1990 ANZAC 75th Anniversary Commemoration. Refer Cat No’s 4069.2 for service details also 4070.Gallipoli Coat and Tie mounted in wooden frame with glass cover. Frame: Timber with decorative edge, brown coloured stain, glass front. Mount: Green cardboard with deep recessed between dark green and light green. Gallipoli Coat: dark green fabric with gold buttons and pocket patch with gold embroidery. Tie: Navy blue fabric with gold, green and red embroidery. Shirt: white business shirt.Embroidered on pocket patches - Rising Sun emblem "GALLIPOLI/1915 - 1990". Embroidered on tie - Rising Sun emblem "GALLIPOLI/1915 - 1990". White label on glass with black print - "COAT AND TIE/ Donated by/ A.J. Fullerton"uniforms - army, trades -carpentery, ww1 -
 Bendigo Military Museum
Accessory - FOB WATCH & CASE WW1, c.1900
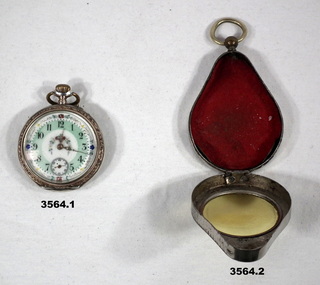
... blue / red / green around numbers. Face has small second hand. Rear opens, inside inscriptions. .2) Metal case to suit watch with glass face, inside has red felt lining. ...blue / red / green around numbers. Face has small second hand. Rear opens, inside inscriptions. .2) Metal case to suit watch with glass face, inside has red felt lining. ...Item was given to M E MONIGATTI who was a POW in Germany in exchange for a sandwich by a German soldier. Ref Cat No 3562 for his service details..1) FOB Watch, round, face is intricate with inlays of silver, coloured flowers blue / red / green around numbers. Face has small second hand. Rear opens, inside inscriptions. .2) Metal case to suit watch with glass face, inside has red felt lining. Swivel ring at top..1) Wording appears to be: “Resnontow cylinder 10 Reelis, 22652” .2) Wording appears to be: “BRAVO”accessory, watch, fob -
 Bendigo Military Museum
Legal record - CERTIFICATES, FRAMED
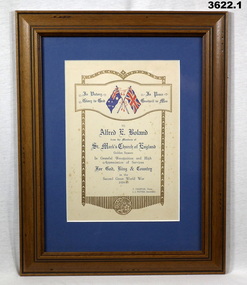
... Re Alfred Edward BOLAND. .1) Coloured certificate on blue background under glass in a wooden frame. .2) Cream background with black print, green surround, glass covered in a wooden frame. .3) Cream background with black print, green surround, glass covered in a wooden frame....Re Alfred Edward BOLAND. .1) Coloured certificate on blue background under glass in a wooden frame. .2) Cream background with black print, green surround, glass covered in a wooden frame. .3) Cream background with black print, green surround, glass covered in a wooden frame. ...Certificates presented to Alfred Edward BOLAND between 1942 - 1946. Refer Cat No 2473 for his service details.Re Alfred Edward BOLAND. .1) Coloured certificate on blue background under glass in a wooden frame. .2) Cream background with black print, green surround, glass covered in a wooden frame. .3) Cream background with black print, green surround, glass covered in a wooden frame..1) Service Recognized by St Marks Church of England, Golden Square. .2) Certificate of Service of an Officer. .3) Australian Military Forces Warrant Issued 20.2.1942.promotion, service, recognition -
 Bendigo Military Museum
Memorabilia - MONTAGE, FRAMED MEMORABILIA
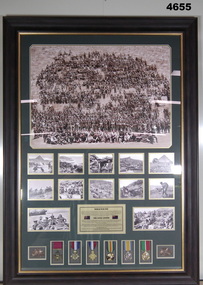
... blue felt tip pen "DONATED TO BGO RSL/ BILL YATES" . Framed memorabilia of "WORLD WAR ONE /THE ANZAC LEGEND". Frame: Moulded timber frame, dark brown, coloured with gold painted inner edge. Glass front. Mount: dark green ...Framed memorabilia of "WORLD WAR ONE /THE ANZAC LEGEND". Frame: Moulded timber frame, dark brown, coloured with gold painted inner edge. Glass front. Mount: dark green cardboard with gold inner individual mounts. Memorabilia: top - a colourised black and white photograph depicting a large group of soldiers on a pyramid. Middle: Collection of black & white photographs of various ANZAC locations. Lower section: Service and Bravery Award medals with two Rising Sun badges.Gold coloured information label within the mount with the heading "WORLD WAR ONE"AND "THE ANZAC LEGEND" with black printed information on back of frame - handwritten, blue felt tip pen "DONATED TO BGO RSL/ BILL YATES" .framed memorabilia, ww1, anzac -
 Bendigo Military Museum
Print - PRINT, FRAMED
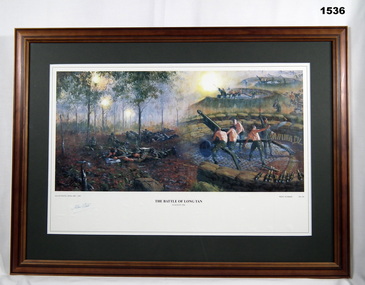
... Blue print below print copy of signature "Allan Waite". Framed print of an original oil painting by Allan Waite FRAS, AWI - 1997 of The battle of Long Tan 18th Aug 1966, Print of painting - coloured scene of "The Battle of Long Tan" depicting various infantry and artillary during the battle. Frame - timber with decorated edge, mid brown colour stain - glass front. Mount - dark green ...Framed print of an original oil painting by Allan Waite FRAS, AWI - 1997 of The battle of Long Tan 18th Aug 1966, Print of painting - coloured scene of "The Battle of Long Tan" depicting various infantry and artillary during the battle. Frame - timber with decorated edge, mid brown colour stain - glass front. Mount - dark green coloured cardboard.Black print below print ÄLLAN WAITE, FRAS, AWI, 1997/ THE BATTLE OF LONG TAN/ 1st AUGUST 1966/ Print Number ...... of 150. Blue print below print copy of signature "Allan Waite".illustrations-prints, framed print, battle, vietnam -
 Bendigo Military Museum
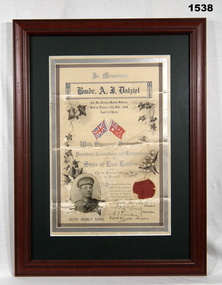
Certificate - SHIRE OF EAST LODDON, FRAMED, c.1919 Certificate
... glass front. Dark green mount. In Memoriam Certificate decorated in grey, silver print, flowers & leaves, red & blue crossed flags. ...glass front. Dark green mount. In Memoriam Certificate decorated in grey, silver print, flowers & leaves, red & blue crossed flags. ...Refer Cat No 172, 173 for service details.Timber frame, mid brown with glass front. Dark green mount. In Memoriam Certificate decorated in grey, silver print, flowers & leaves, red & blue crossed flags. Red paper common seal of the Shire of East London at lower right. Oval shaped black & white photo, portrait of a soldier in uniform inserted in a frame within the certificate at lower left. Some of the print appears to be hard printed.“Bmdr A.J Dalziel 3rd Div Trench Mortar Battery. Died in France 24th Feb 1916. Aged 24 years. Signed by Shire of East London, President & Councillors”documents-certificates, frame accessories, shire seat loddon, dalziel -
 Bendigo Military Museum
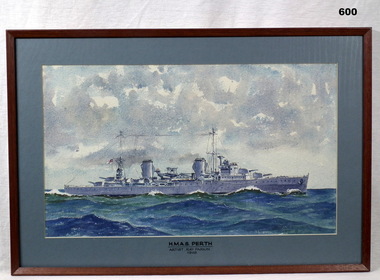
Painting - NAVY PAINTING, FRAMED, 1948
... blue border in a brown wooden frame with glass front, cream paper backing & a wire hanging strap. Water colour painting of a warship at sea. The ship is grey with 4 twin main gun turrets. It also holds an Albatross Aircraft, 2 funnels & 2 wireless masts. The painted sky shows patchy clouds, the sea is a blue green...blue border in a brown wooden frame with glass front, cream paper backing & a wire hanging strap. Water colour painting of a warship at sea. The ship is grey with 4 twin main gun turrets. It also holds an Albatross Aircraft, 2 funnels & 2 wireless masts. The painted sky shows patchy clouds, the sea is a blue green ...Painting is mounted with light blue border in a brown wooden frame with glass front, cream paper backing & a wire hanging strap. Water colour painting of a warship at sea. The ship is grey with 4 twin main gun turrets. It also holds an Albatross Aircraft, 2 funnels & 2 wireless masts. The painted sky shows patchy clouds, the sea is a blue green colour with small white waves. HMAS Perth Artist Ray Parkin 1948hmas perth, ww2, ran, paintings -
 Bendigo Military Museum
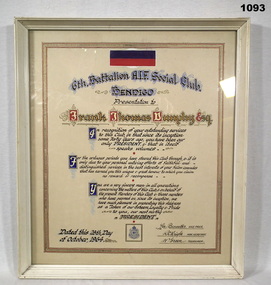
Certificate - CERTIFICATE, FRAMED, c.1964
... Green" Frame. Timber, cream painted with glass front. Certificate. Black, white, blue, red & yellow ink, hand written certificate on beige paper. ...FRANK THOMAS DUNPHY No 4485 enlisted in the AIF on 12.7.1915 in 14th reinforcements to 6th Batt age 22 years. Embarked for Egypt 28.1.1916, embarked for France 29.3.1916, hospitalised 7.9.1916 with varicose veins, while recovering was hospitalised again with mumps. Returned to unit 19.2.1917, WIA 5.10.1917 with GSW’s chest & right arm - severe, returned to Australia and discharged medically unfit on 1.10.1918.Frame. Timber, cream painted with glass front. Certificate. Black, white, blue, red & yellow ink, hand written certificate on beige paper. Battalion colour patch at the top & RSL badge at bottom with printed blue ink: 28th Day of October 1964. "From 6th Battalion AIF Social Club Bendigo - To Frank Thomas Dunphy Esq" Signed in black ink bottom RH: "Les Bennetts- R C Wright - W Green"documents - certificates, frame accessories, military history -
 Orbost & District Historical Society
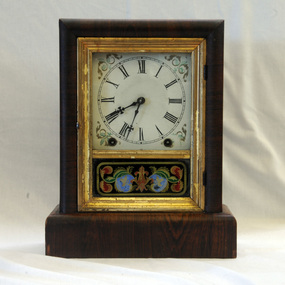
mantel clock, late 1840's
... blue and gold decorations. the numerals are Roman. The face surround is white and the numerals black.There is a glass door with red,blue and green decorations on the lower quarter. ...blue and gold decorations. the numerals are Roman. The face surround is white and the numerals black.There is a glass door with red,blue and green decorations on the lower quarter. ...This clock was brought out to Australia in 1849. it was then bought in Ballarat by Samuel Richardson in 1865 and brought to Orbost when he settled there. The Richardson family was one of the very early settler families to establish themselves in the Orbost district. Samuel Richardson was builder of the Paddle Steamer Curlip. This clock may have been used as a marine clock. The Richardson family was one of the very early settler families to establish themselves in the Orbost district. Samuel Richardson was builder of the Paddle Steamer Curlip. A wooden mantle clock in a rectangular cabinet. It has pendulum striking. The face has blue and gold decorations. the numerals are Roman. The face surround is white and the numerals black.There is a glass door with red,blue and green decorations on the lower quarter. There is a faded printed label behind the clock and pendulum.Scratched onto the back: "To Australia in 1849. Samuel Richardson bought this clock in Ballarat1865" -
 Orbost & District Historical Society
bottle, circa 1930's?
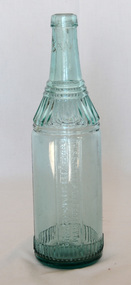
... A clear glass bottle with fluted patterns around the shoulder and base. It has a blue/green tinge. ...Orbost & District Historical Society Ruskin Street Orbost gippsland Glass bottles were refillable until the 1960s, creating a demand for their collection and onsale back to beverage manufacturers via ‘bottle merchants’. studley-preserving-co bottle container cordial This bottle is the property of On the base - AGM Studley Preserving Co Pty Ltd A clear glass bottle with fluted patterns around the shoulder and base. It has a blue/green tinge. ...Glass bottles were refillable until the 1960s, creating a demand for their collection and onsale back to beverage manufacturers via ‘bottle merchants’.A clear glass bottle with fluted patterns around the shoulder and base. It has a blue/green tinge. The top seems to be made for a cork stopper.This bottle is the property of On the base - AGM Studley Preserving Co Pty Ltdstudley-preserving-co bottle container cordial -
 Orbost & District Historical Society
inkwells, first half 20th century
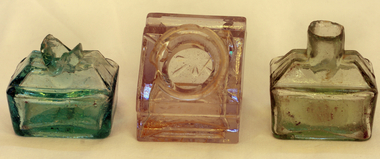
... Three glass inkwells. .1-blue tinted with broken top. .2 green tinted broken at top. .3 clear glass with symmetrical design....This item is an example of early stationery equipment commonly used in schools, households and commercial enterprises. inkwell writing-equipment glass domestic-item Three glass inkwells. .1-blue tinted with broken top. .2 green tinted broken at top. .3 clear glass with symmetrical design. inkwells ...Inkwells were generally more decorative than ink bottles and designed to be more permanent.We have mostly dispensed with ink bottles and quills. This item is an example of early stationery equipment commonly used in schools, households and commercial enterprises.Three glass inkwells. .1-blue tinted with broken top. .2 green tinted broken at top. .3 clear glass with symmetrical design.inkwell writing-equipment glass domestic-item -
 Orbost & District Historical Society
bottle, 1900's
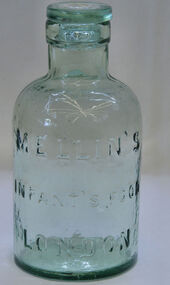
... Squat and round with green glass stopper. Moulded writing on front. The thick glass has a slight blue-green tinge to it....Squat and round with green glass stopper. Moulded writing on front. The thick glass has a slight blue-green tinge to it. bottle Mellins ...Australia was not self sufficient in glass making until the turn of the 20th century and many bottles were made overseas and shipped to Australia with their contents and when emptied were re-filled with other company’s products. These bottles have an aesthetic element in that the shapes , colours and textures are visually appealing. They reflect the type of glassware that was used for food containers in the early 20th century. Moulded baby food bottle. Squat and round with green glass stopper. Moulded writing on front. The thick glass has a slight blue-green tinge to it.Bottom -M4 Front- Mellin's Infants' Food, LOndonbottle glass food -container -
 Orbost & District Historical Society
ornament, early 19th century
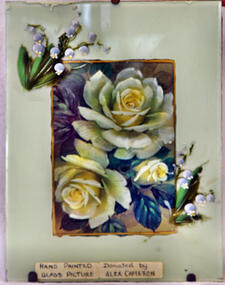
... Hand painted glass picture showing roses and blue bells on a light green background. ...Orbost & District Historical Society Ruskin Street Orbost gippsland This item is an example of a hand crafted item made to personalise and add aesthetic value to a homes. ornament painting glass-painting handcraft Hand painted glass picture showing roses and blue bells on a light green background. ...This item is an example of a hand crafted item made to personalise and add aesthetic value to a homes.Hand painted glass picture showing roses and blue bells on a light green background. On a wooden board with stand.ornament painting glass-painting handcraft -
 Blacksmith's Cottage and Forge
Bobbins - lace making, Untitled, early 20th century
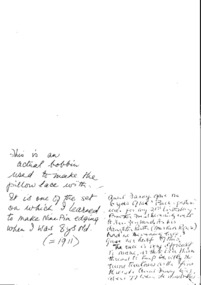
... glass beads attached with wire. Bobbin one has 4 red beads, 4 clear beads, 2 black beads and 1 white bead with green and red colour band. Bobbin two has 2 brown beads, 2 blue...glass beads attached with wire. Bobbin one has 4 red beads, 4 clear beads, 2 black beads and 1 white bead with green and red colour band. Bobbin two has 2 brown beads, 2 blue ...These bobbins were given to donor by her aunt and were part of the set on which the donor learned to make Nine Pin edging when she was 8 years old. (approx 1911) 2 wooden lacemaker bobbins, decorated on ends with coloured glass beads attached with wire. Bobbin one has 4 red beads, 4 clear beads, 2 black beads and 1 white bead with green and red colour band. Bobbin two has 2 brown beads, 2 blue beads, 1 black bead and 1 clear bead. Bobbins have shaped and turned shafts. bobbins lace, wood turning, hand craft -
 The Beechworth Burke Museum
Animal specimen - Rainbow Bee-Eater, Trustees of the Australian Museum, 1860-1880
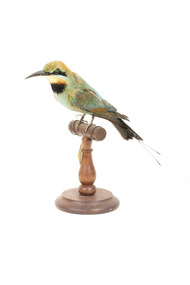
... green, blue, chestnut and yellow. The build of this specimen is small and graceful and the bill is slender and curved. This Bee-Eater has two distinct streamers that extend from the base of the tail. The glass...green, blue, chestnut and yellow. The build of this specimen is small and graceful and the bill is slender and curved. This Bee-Eater has two distinct streamers that extend from the base of the tail. The glass ...The Rainbow Bee-Eater is native to Australia, living across the mainland, except in desert areas. Male and female birds are both brightly coloured, the primary difference being the length of their tail streamers. Male Bee-Eaters have longer streamers than the females. They are insectivores and use techniques to remove threats to themselves; eg. they will remove wasp's stingers to avoid the poison. They nest in sand and dig a long tunnel, at the end is a 'chamber' where they lay the eggs. This specimen is part of a collection of almost 200 animal specimens that were originally acquired as skins from various institutions across Australia, including the Australian Museum in Sydney and the National Museum of Victoria (known as Museums Victoria since 1983), as well as individuals such as amateur anthropologist Reynell Eveleigh Johns between 1860-1880. These skins were then mounted by members of the Burke Museum Committee and put-on display in the formal space of the Museum’s original exhibition hall where they continue to be on display. This display of taxidermy mounts initially served to instruct visitors to the Burke Museum of the natural world around them, today it serves as an insight into the collecting habits of the 19th century.This specimen is part of a significant and rare taxidermy mount collection in the Burke Museum. This collection is scientifically and culturally important for reminding us of how science continues to shape our understanding of the modern world. They demonstrate a capacity to hold evidence of how Australia’s fauna history existed in the past and are potentially important for future environmental research. This collection continues to be on display in the Museum and has become a key part to interpreting the collecting habits of the 19th century. The Rainbow Bee-Eater is a uniquely beautiful species of bird with strikingly bright colouring. The plumage is green, blue, chestnut and yellow. The build of this specimen is small and graceful and the bill is slender and curved. This Bee-Eater has two distinct streamers that extend from the base of the tail. The glass eyes provided to this specimen are dark black in colour; however, in life, this specimen has red eyes which contrast with the black stripe of colour that is located from the base of the bill to the ears. Below the black stripe, is a smaller pale blue colour. The throat is orange-yellow and the breast is green. The tail is black with a blue tinge to the plumage closer to the rear of the torso. The colouring on this particular specimen has faded significantly, but it provides a good example of what this specimen looked like while alive.Label: 5a / Australian Bee-Eater / See catalogue page 7 / taxidermy mount, taxidermy, animalia, burke museum, beechworth, australian museum, skin, reynell eveleigh johns, bird, rainbow bee-eater
