Showing 285 items matching charred
-
 Ballarat Tramway Museum
Slide - 35mm slide/s, Keith Kings, 3/12/1961 12:00:00 AM
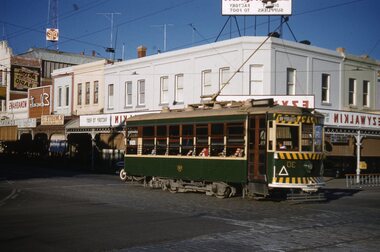
Bendigo Birney tram No. 30 leaving Charing Cross for Quarry Hill, taken after tram has passed, on 3-12-1961. Tram fitted with lights and warning stripes. Passing Ezywalkin stores. Shows stone sets in pavement. Has Quarry Hill destination. Photo by Keith Kings.Stamped on 'K.S.Kings etc.' and in blue ink, 'K(k)(359), 1/250 f4, 3/12/61, Bendigo Birney 30, Charing Cross'tramways, trams, bendigo, birney, tram 30 -
 Ballarat Tramway Museum
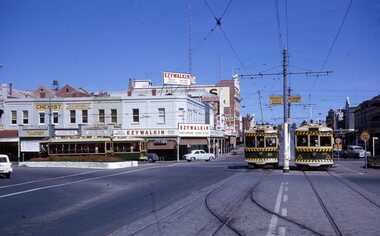
Slide - 35mm slide/s - set of 4, Peter Moses, Jan. 1969
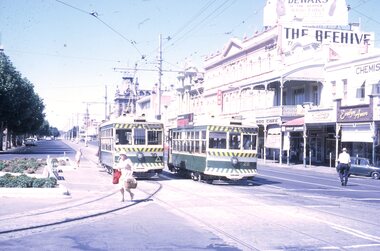
Set of four colour slides taken at Charing Cross Bendigo, Jan. 1969. .1 - Trams 30 and 28 travelling to North Bendigo and Golden Square respectively. Has the Beehive building in the background, along with W.M.I. Jones Chemist, Evelyn Amor shop, Dewars Whiskey rooftop advertisement. 28 has a SEC Briquettes roof advertisement. .2 - As above but with the front or bogie tram in the photo. Also has A. G. Treloar Optician's shop. Kodak cardboard mount slide, taken by Peter Moses, Jan. 1969. .3 - Close up photo of Birney No. 30, with 28 in the background. .4 - No. 28 leaving for Golden Square with the Plaza building, the Cenotaph, and the City Family Hotel in the background. Kodak cardboard mount slide, taken by Peter Moses, Jan. 1969.On the rear of all the slides "P. Moses" in black ink .1 - "Bendigo Charing Cross" and in red ink "19" .2 - "Bendigo three trams / Charing Cross" and in red ink "21" .3 - "Bendigo" and in red ink "23" .4 - "Bendigo Charing Cross" and in red ink "14". tramways, trams, bendigo, tram 28, tram 30 -
 Ballarat Tramway Museum
Slide - 35mm slide/s, Ray Marsh, Sept. 1971
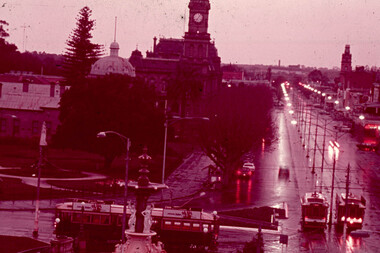
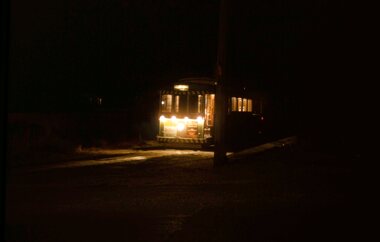
White cardboard mount, 35mm slide, from the Association of Railway Enthusiast's film strip titled "Provincial Tramway Film Strip" of the Charing Cross area on a rainy evening at sunset. Features three trams, Pall Mall and the Bendigo Post Office building. The film strip notes (Reg. Item 2560), provided the following caption details: "A rainy evening sees a pair of single truckers on "GOLDEN SQUARE" - "NORTH BENDIGO" line meeting an outbound "EAGLEHAWK" car at the Cross. Sept. '71 (Ray Marsh)" See image btm2581p.tif for high level scan of image. Stamped on base of slide "11790" and written in ink on top edge "Charing Cross Bendigo"tramways, trams, are, film strip, charing cross, bendigo, pall mall, night photo -
 Ballarat Tramway Museum
Slide - 35mm slide/s - set of 4, Noel Simons, 24/05/1971 12:00:00 AM
Set of 4 transparencies taken on 24/5/1971 on Kodak mounts. 1199.1 - No. 21 in High St. at junction with old High St., near Fire Station Loop. Tram has two SEC roof ads. 1199.2 - No. 21 in High St. between Shamrock and Thistle Sts. Photo taken after the tram has passed the photographer. 1199.3 - Photo of a green box containing timetables for the four Bendigo routes. Located at Charing Cross. 1199.4 - Bendigo No. 23 en route to Eaglehawk at Charing Cross, with two SEC roof ads 'Everything's fine in my all electric kitchen' and "Switch to electric cooking'. Has the Ezywalkin building and the Beehive building in the background. Information written on in black ink and date stamped on purple ink. 1199.1 - "No. 21 in High St. at junction with old High St., near Fire Station Loop." 1199.2 - "No. 21 in High St. between Shamrock and Thistle Sts." 1199.3 - "Bendigo Tramways timetable at Alexandra Fountain Charing Cross." 1199.4 - "No. 23 at Alexandra Fountain Charing Cross, Bendigo." tramways, trams, bendigo, timetables, charing cross, high st., tram 21, tram 23 -
 Ballarat Tramway Museum
Slide - 35mm slide/s, Max Mitchell, Apr. 1969
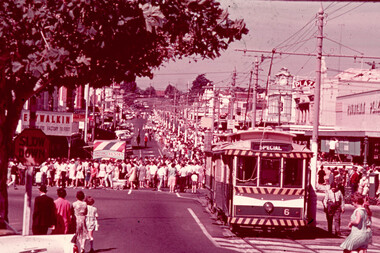
White cardboard mount, 35mm slide, from the Association of Railway Enthusiast's film strip titled "Provincial Tramway Film Strip" of Bendigo No. 6 and another single trucker at Charing Cross, during the Bendigo Easter Fair Parade. The film strip notes (Reg. Item 2560), provided the following caption details: "Easter Monday afternoon in Bendigo was the traditional time for the float parade. Single truckers ran as second sections to the regular bogie cars on the "EAGLEHAWK" line until the commencement of the parade - which had to finish before they could proceed to the depot. - Apr. '69 (Max Mitchell)" See image btm2582p.tif for high level scan of image. Stamped on base of slide "11791" and written in ink on top edge "No. 6 Charing Cross"tramways, trams, are, film strip, charing cross, bendigo, easter fair, tram 6 -
 Bendigo Historical Society Inc.
Sign - Name Plate
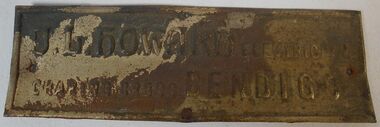
Joseph Lambert Howard was born in Albury, NSW in 1886 and died in Bendigo, Vic. in 1958. From the years 1915 - 1917 he advertised in the Bendigo Advertiser as an Electrical contractor and supplier of Electrical accessories, operating from the Lyric Building in Charing Cross, Bendigo. He also produced an advertising calendar for 1917.Small metal name plate possible tin - has holes Centre of each side. Front is Gold in parts with brown dirty spots - back shows embossing in reverse with some discoloration. Rectangular in shape 6.5cm x 2.0cm. J.L HOWARD - Electrician Charing Cross Bendigo.bendigo electrician, j.l. howard, charing cross bendigo -
 Ballarat Heritage Services
Photograph - Image, Pall Mall, Bendigo, 1951
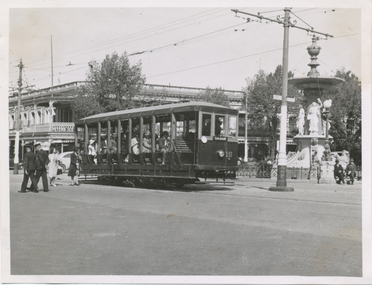
A tram at Charring Cross Bendigo. bendigo, charring cross, pall mall -
 Ballarat Tramway Museum
Photograph, Wal Jack, Bendigo No. 23 at Charing Cross, 3/01/1954
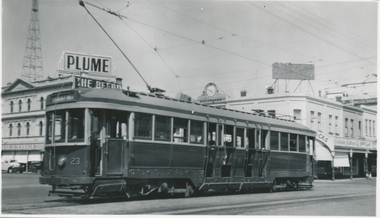
Photo of No. 23 at Charing Cross with the destination of Quarry Hill, photo by Wal Jack 3-1-1954. Has the Beehive in the background, a Plume petrol sign and the watchmaker's clock in the background. Printed on Ilford paper. Two prints held. See image i2 for rear of photograph. See image i3 for hi res scan of negative Yields information about Bendigo tram 23 in 1954 and Charing Cross.Black and White print contained within the Wal Jack Bendigo and Geelong Album, see Reg Item 5003 for more details. On the rear in blue ink "SEC Bendigo No 23 bogie to Quarry Hill at Fountain (Charing Cross) Bendigo 3-1-54" with Wal Jack copyright stamp in the top right hand corner and the number "T59PC" written in.trams, tramways, bendigo, charing cross, tram 23 -
 Ballarat Tramway Museum
Photograph - Black & White Photograph/s, Wal Jack, Easter 1941, Saturday
Black and White print contained within the Wal Jack Bendigo and Geelong Album, see Reg Item 5003 for more details. Photo of No. 18 at Charing Cross, Easter 1941. Tram has the destination of Eaglehawk and is carrying a white disk. Has the City Club Hotel in the background, with a Peters Ice Cream sign on it. i1 - scan of print in the album i2 - rear of image i3 - scan of negative at 3200dpi added 6/6/2020. On rear in ink "T187, Bendigo Tramways, No. 18 Summer Car at Charing Cross, Easter Saturday" and in bottom right hand corner "Photo by W. Jack"trams, tramways, bendigo, easter fair, charing cross, tram 18 -
 Ballarat Tramway Museum
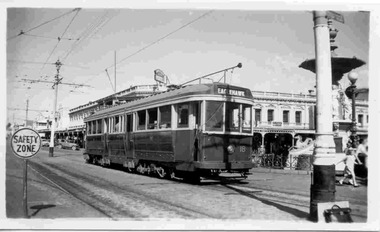
Slide - 35mm slide/s - set of 17, Noel Simons, 20/11/1962 12:00:00 AM
Set of 17 transparencies taken on 20/11/1962 on Kodak mounts. 1187.1 - Bendigo No. 2 at the Quarry Hill terminus, showing destination of Quarry Hill. Has Cohns Drinks and Streets Ice Cream ads on dash panel, a SEC 'electric cooking' roof ad and another roof ad. Shows the Y terminus at this location, but tram standing just before it. Overhead in position. 1187.2 - as above, but closer up. 1187.3 - as above, but from the north side, showing cemetery in the background. 1187.4 - Bendigo No.3 at Eaglehawk terminus. Tram showing destination of Quarry Hill. Has the various buildings at Eaglehawk in the background including the Foodland store. Has Streets Ice cream and White Horse Whiskey ads on the dash panel. 1187.5 - Bendigo No. 18 at Garden Gully crossing loop, in bound, with destination of Eaglehawk. Passengers waiting for an Eaglehawk tram at the stop. Has a white horse whiskey ad on dash panel and SEC roof ads. Conductor standing in doorway looking out. 1187.6 - Bendigo No. 7 inbound in Nolan St. at cnr of McCrae St. showing destination of Golden Square. Has Streets Ice cream ad on dash panel and a Castrol Roof ad. 1187.7 - Bendigo No. 19 at the North Bendigo terminus with railway level crossing in background. Tram has a Cohns Drinks ad and an SEC 'Electric Cooking' roof ad. 1187.8 - Bendigo No. 2 at the Quarry Hill terminus, looking back into Bendigo, showing destination of Eaglehawk. 1187.9 - Bendigo No. 21 in McCrae St, near Nolan St outbound for North Bendigo. Photo taken after tram has passed photographer. 1187.10 - Bendigo Nos. 4 and 26 at Charing Cross in View St. with fountain alongside and the Beehive, Ezywalkin Buildings in the background. No. 26 has a Sandhurst Milk and SEC 'Electric Cooking' roof ad. 1187.11 - close up of 22E maximum traction truck and folded footstep. 1187.12 - Bendigo No. 19 at Charing Cross terminus, after tram has passed photographer, showing destination of North Bendigo, with the Beehive building in the background and passengers boarding tram. 1187.13 - Bendigo No. 11, turning from View St. into Pall Mall, showing Special with the conductor holding point bar. Has the Beehive and Ezywalkin Buildings in the background. 1187.14 - No. 7 at Charing Cross terminus, in Pall Mall, bound for Golden Square. Has the Beehive and Ezywalkin buildings in the background and passengers waiting at the tram stop. 1187.15 - No. 18 at the Charing Cross terminus, bound for Eaglehawk. Has the Beehive and Ezywalkin buildings in the background and passengers waiting at the tram stop. Also has the 'Safety Zone' sign in the photograph. 1187.16 - No. 2 at Quarry Hill terminus, night or dusk photo. Tram showing destination of Depot. 1187.17 - No. 26 at Charing Cross, night photo. Tram has destination of Quarry Hill, but is on the line for Eaglehawk. Photo looks along Mitchell St. Also shows Safety Zone sign. Information written on in black ink and date stamped on purple ink. 1187.1 - "No. 2 at Quarry Hill terminus Bendigo" 1187.2 - "No. 2 at Quarry Hill terminus Bendigo" 1187.3 - "No. 2 at Quarry Hill terminus Bendigo" 1187.4 - "No. 3 at Eaglehawk terminus" 1187.5 - "No. 18 in Mt Korong Road, Long Gully at cnr of Havilah Road (Eaglehawk Route)" 1187.6 - "No. 7 in Nolan St. Bendigo, at Cnr of McCrae St., near lake Weeroona, (North Bendigo Route)' 1187.7 - "No. 19 at North Bendigo terminus" 1187.8 - "No. 2 at Quarry Hill terminus" 1187.9 - "No. 21 in McCrae St. Bendigo, near Nolan St. (North Bendigo Route) 1187.10 - "4 and 26 at Alexandra Fountain, Charing Cross Bendigo" 1187.11 - "Truck of Bogie Car, Bendigo Tramways" 1187.12 - "No. 19 in Pall Mall at Charing Cross, Bendigo" 1187.13 - "Birney car No. 11 entering Pall Mall from View St. at Charing Cross Bendigo" 1187.14 - "No. 7 in Pall Mall at Charing Cross, Bendigo" 1187.15 - "No. 18 at Alexandra Fountain, Charing Cross, Bendigo" 1187.16 - "No. 2 at Quarry Hill terminus, Bendigo" 1187.17 - "No. 26 at Alexandra Fountain, Charing Cross, Bendigo" tramways, trams, bendigo, quarry hill, eaglehawk, north bendigo, maximum traction, night photo, tram 2, tram 3, tram 4, tram 7, tram 11, tram 18, tram 19, tram 21, tram 26 -
 Ballarat Tramway Museum
Photograph - Black & White Photograph/s, Wal Jack, Easter Saturday 1941
Black and White print contained within the Wal Jack Bendigo and Geelong Album, see Reg Item 5003 for more details. Photograph of ESCo tram No. 1 (carrying a white disc) and No. 2 at Charing Cross, Easter Saturday 1941. No. 1 is on the "wrong line", about to run through the cross over in front of the tram. No. 2 has the destination of Quarry Hill. i1 - scan of print in the album i2 - rear of image i3 - scan of negative at 3200dpi added 6/6/2020. On rear in ink "T196, Bendigo Tramways, No. 1 Original Class, No. 2 - ex MMTB A class, Charing Cross, Easter Saturday 1941. Wal Jack Photo.trams, tramways, bendigo, esco, secv, charing cross, tram 1, tram 2 -
 Ballarat Tramway Museum
Slide - 35mm slide/s - set of 23, Noel Simons, 26/02/1972 12:00:00 AM
Set of 23 transparencies taken on 26/2/1972 on Kodak mounts. 1205.1 - Bendigo No. 25 on a special tour at Fire Station Loop, en route to Golden Square. 1205.2 - No. 21 and 25 crossing at Fire Station Loop, note photographers on the ground. No. 21 bound for North Bendigo. 1205.3 - as for 1205.3, but with trams departing loop and fire station in the background. 1205.4 - No. 25 at Golden Square Hotel with 'Rodda's Golden Square Hotel' in the background. Tram on a special tour, but showing destination of North Bendigo. 1205.5 - as for 1205.4 - but showing special. Has the end of the track in the photograph. 1205.6 - Nos. 7 and 25 (on a special tour) crossing at Myrtle St. Loop. 1205.7 - No. 7 leaving Myrtle St. loop with the mine poppet head in the background. Photo taken after tram has passed photographer. (Print made of this slide 10/2001 for use in the Gold Gold Gold exhibition of 10/2001 - See Reg. item 1979. 1205.8 - No. 25 entering depot. Tram showing 'special'. Tennis court on right has players. Photo taken after tram has passed photographer. 1205.9 - No. 24 (showing 'special') and No. 20 (showing 'Long Gully') at Bendigo Depot. 1205.10 - No. 24 on a special charter, leaving Bendigo depot. Tram has two 'Johnnie Walker' roof ads. 1205.11 - Bendigo depot with 29, 25 and a bogie car inside the depot doors. 1205.12 - As for 1205.11, but with 28 and 29. 1205.13 - No. 24 standing at front entrance of Bendigo depot with No. 20 in the background. 1205.14 - No. 24 running out into McCrae St showing special, with conductor on front step. 1205.15 - No. 24 in Caledonia St. at corner of Thunder St with the Gasworks in the background. 1205.16 - No. 5 en route for Quarry Hill at Charing cross with No. 26 (en route for Eaglehawk) about to arrive. Has former crossover at this location in the foreground. Has the Ezywalkin building in the background. 1205.17 - No. 5 and 26 at Charing Cross, with the Alexandra Fountain in the foreground and the Beehive and Ezywalkin buildings in the background. No.26 has two SEC roof ads. 1205.18 - Charing Cross looking along Pall Mall with trams 7 and 21 and 26 in the picture. 1205.19 - Charing Cross, with 21 departing for Golden Square and No. 5 heading for Quarry Hill. Has the Ezywalkin and the Beehive buildings in the background. 1205.20 - as for 1205.19, but a few moments later. Adjacent pole has a "NO ROAD" letter in reflectors vertically. 1205.21 - Charing Cross with Nos. 25, 21, 26 and 7, looking south from Pall Mall end. 1205.22 - No. 24 crossing Mitchell St. en route for Golden Square, showing 'special' with the Beehive and Ezywalkin buildings in the background. 1205.23 - Charing Cross with Nos. 24, 21 and 7 in the photo and Fountain Plaza in the background. Print of 1205.7 - stored in box D1.Information written on in blue ink and date stamped on purple ink. 1205.1 - "No. 25 at Fire Station Loop High Street, Golden Square." 1205.2 - "Nos. 25 and 21 crossing at Fire Station Loop, near Golden Square." 1205.3 - "Nos. 25 and 21 crossing at Fire Station Loop, near Golden Square." 1205.4 - "No. 25 at Golden Square terminus." 1205.5 - "No. 25 at Golden Square terminus." 1205.6 - "Nos. 7 and 25 crossing at Myrtle St. Loop." 1205.7 - "No. 7 leaving Myrtle St. Loop." 1205.8 - "No 25, entering Bendigo Depot." 1205.9 - "Nos. 20 and 24 at Bendigo Depot." 1205.10 - "No. 24 at Bendigo Depot." 1205.11 - "Nos. 25 and 29 at Bendigo Depot." 1205.12 - "Birney cars 29 and 28 at Bendigo Depot." 1205.13 - "No. 24 (with 20 beyond) at Bendigo Depot." 1205.14 - "No. 24 entering McCrae St. from Arnold St." 1204.15 - "No. 24 in Caledonia St. at cnr of Thunder St." 1204.16 - "No. 5 waits at Charing Cross as No. 26 arrives from Quarry Hill. Note remains of crossover abandoned on relocation in 1965." 1204.17 - "Nos. 5 and 26 at Charing Cross." 1204.18 - "Nos. 26, 7 and 21 at Charing Cross (No. 5 just visible behind No. 26)." 1204.19 - "No. 21 leaves Charing Cross for Golden Square as No. 5 starts off for Quarry Hill." 1204.20 - "No. 21 swings onto the single track Golden Square line as No. 5 heads into Mitchell St. towards Quarry Hill." 1204.21 - "Nos. 25, 21 and 26 watch No. 7 arrive at Charing Cross from Golden Square." 1204.22 - "No. 24 at Charing Cross crossing Mitchell St." 1204.23 - "Nos. 24, 21 and 7 at Charing Cross."tramways, trams, bendigo, golden square, myrtle st., fire station, depot, charing cross, tram 5, tram 7, tram 20, tram 21, tram 24, tram 25, tram 28, tram 29 -
 Ballarat Tramway Museum
Slide - 35mm slide/s, Keith Kings, 7/01/1961 12:00:00 AM
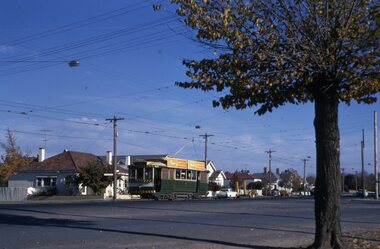
Bendigo No. 6 arriving at Charing Cross ex North Bendigo, with 'Golden Square' destination. Tram has all blinds down, fitted with briquettes ad on front dash, has had bumper and top of roof painted with safety stripes, and under front window small white stripe has been painted, no lights as yet. On a centre of road pole, on a sign is 'ALL CARS STOP HERE'. Photo taken 7-1-1961. Photo by Keith Kings.Stamped on 'K.S.Kings etc' and in blue ink 'K(k)(329), 1/250,. f5.6, 7/1/61, Bendigo No. 6, ex Ballarat 25, at Charing Cross, in Pall Mall.'tramways, trams, bendigo, charing cross, pall mall, north bendigo, tram 6 -
 Ballarat Tramway Museum
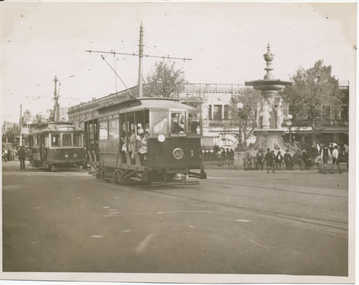
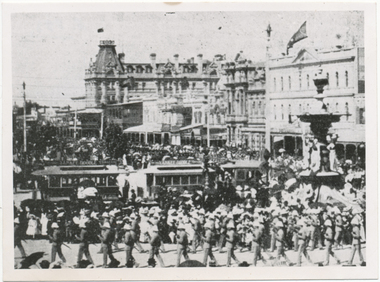
Photograph - Black & White Photograph/s, The Bendigonian, Feb. 2001
Black and White copy print contained within the Wal Jack Bendigo and Geelong Album, see Reg Item 5003 for more details. Photograph of steam trams at Charing Cross, Fountain, during a procession for the death of Queen Victoria. Dated Feb. 1901. Copied by Keith Kings from The Bendigonian 5/2/1901. Photo caption notes different types of six wheel trailers.On rear in ink " S-A773, Bendigo, Steam Tram Motor and two different types of 6 window trailers at Charing Cross (Procession re death of Queen Victoria). Copied by Keith Kings ex "The Bendigonian" 5/2/1901. "trams, tramways, bendigo, steam trams, charing cross -
 Flagstaff Hill Maritime Museum and Village
Tool - Plane, 1819-1901
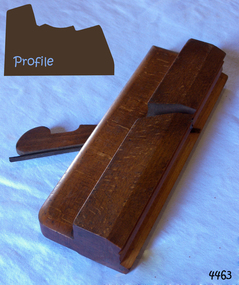
A moulding plane is a specialised plane used for making the complex shapes found in wooden mouldings that are used to decorate furniture or other wooden objects. Traditionally, moulding planes were blocks of wear-resistant hardwood, often beech or maple, which were worked to the shape of the intended moulding. The blade or iron was likewise formed to the intended moulding profile and secured in the body of the plane with a wooden wedge. A traditional cabinetmakers shop might have many, perhaps hundreds, of moulding planes for the full range of work to be performed. Large crown mouldings required planes of six or more inches in width, which demanded great strength to push and often had additional peg handles on the sides, allowing the craftsman's apprentice or other workers to pull the plane ahead of the master who guided it. Company History: The Holtzapffel dynasty of tool and lathe makers was founded in Long Acre, London by a Strasbourg-born turner, Jean-Jacques Holtzapffel, in 1794. The firm specialized in lathes for ornamental turning but also made a name for its high-quality edge and boring tools. Moving to London from Alsace in 1792, Jean-Jacques worked initially in the workshop of the scientific-instrument maker Jesse Ramsden, Anglicizing his name to John Jacob Holtzapffel. In 1794 he set up a tool-making partnership in Long Acre with Francis Rousset and they began trading under the name of John Holtzapffel. From 1804 he was in partnership with the Mannheim-born Johann Georg Deyerlein until the latter died in 1826, trading under the name Holtzapffel & Deyerlein. Holtzapffel sold his first lathe in June 1795, for £25-4s-10d, an enormous price at the time. All of Holtzapffel's lathes were numbered and by the time he died in 1835, about 1,600 had been sold. The business was located at 64 Charing Cross, London from 1819 until 1901 when the site was required "for building purposes". The firm then moved to 13 and 14 New Bond Street and was in premises in the Haymarket from 1907 to 1930. John's son, Charles Holtzapffel (1806–1847) joined the firm in 1827, at around which time the firm became known as Holtzapffel & Co. Charles continued to run the business after his father's death. He wrote a 2,750-page treatise entitled Turning and Mechanical Manipulation, published in 1843 which came to be regarded as the bible of ornamental turning. The final two volumes were completed and published after his death by his son, John Jacob Holtzapffel (1836–1897). When Charles Holtzapffel died in 1847 his wife Amelia ran the business until 1853. John Jacob II, the son of Charles and Amelia, was head of the firm from 1867 until 1896. A nephew of John Jacob II, George William Budd (1857–1924) became head of the firm in 1896. His son John George Holtzapffel Budd (1888–1968) later ran the business. By the early twentieth century, ornamental turning was going out of fashion, and the firm sold its last lathe in 1928. A vintage tool made by a well-known firm made for firms and individuals that worked in wood. The tool was used before routers and spindle moulders came into use after World War ll, a time when to produce a decorative moulding for a piece of furniture or other items this had to be accomplished by hand using one of these types of planes. A significant item from the mid to late 19th century that today is quite rare and sought after by collectors. It gives us a snapshot of how furniture was made predominately by hand and with tools that were themselves hand made shows the craftsmanship used to make such a unique item. Moulding Plane Holtzaffel 64 Charing & Owner J Heath 9/16" marked opposite endflagstaff hill, warrnambool, shipwrecked-coast, flagstaff-hill, flagstaff-hill-maritime-museum, maritime-museum, shipwreck-coast, flagstaff-hill-maritime-village, plane moulding, plane, j heath -
 Flagstaff Hill Maritime Museum and Village
Tool - Plane, 1819-1901
A moulding plane is a specialised plane used for making the complex shapes found in wooden mouldings that are used to decorate furniture or other wooden objects. Traditionally, moulding planes were blocks of wear-resistant hardwood, often beech or maple, which were worked to the shape of the intended moulding. The blade or iron was likewise formed to the intended moulding profile and secured in the body of the plane with a wooden wedge. A traditional cabinetmakers shop might have many, perhaps hundreds, of moulding planes for the full range of work to be performed. Large crown mouldings required planes of six or more inches in width, which demanded great strength to push and often had additional peg handles on the sides, allowing the craftsman's apprentice or other workers to pull the plane ahead of the master who guided it. Company History: The Holtzapffel dynasty of tool and lathe makers was founded in Long Acre, London by a Strasbourg-born turner, Jean-Jacques Holtzapffel, in 1794. The firm specialized in lathes for ornamental turning but also made a name for its high-quality edge and boring tools. Moving to London from Alsace in 1792, Jean-Jacques worked initially in the workshop of the scientific-instrument maker Jesse Ramsden, Anglicizing his name to John Jacob Holtzapffel. In 1794 he set up a tool-making partnership in Long Acre with Francis Rousset and they began trading under the name of John Holtzapffel. From 1804 he was in partnership with the Mannheim-born Johann Georg Deyerlein until the latter died in 1826, trading under the name Holtzapffel & Deyerlein. Holtzapffel sold his first lathe in June 1795, for £25-4s-10d, an enormous price at the time. All of Holtzapffel's lathes were numbered and by the time he died in 1835, about 1,600 had been sold. The business was located at 64 Charing Cross, London from 1819 until 1901 when the site was required "for building purposes". The firm then moved to 13 and 14 New Bond Street and was in premises in the Haymarket from 1907 to 1930. John's son, Charles Holtzapffel (1806–1847) joined the firm in 1827, at around which time the firm became known as Holtzapffel & Co. Charles continued to run the business after his father's death. He wrote a 2,750-page treatise entitled Turning and Mechanical Manipulation, published in 1843 which came to be regarded as the bible of ornamental turning. The final two volumes were completed and published after his death by his son, John Jacob Holtzapffel (1836–1897). When Charles Holtzapffel died in 1847 his wife Amelia ran the business until 1853. John Jacob II, the son of Charles and Amelia, was head of the firm from 1867 until 1896. A nephew of John Jacob II, George William Budd (1857–1924) became head of the firm in 1896. His son John George Holtzapffel Budd (1888–1968) later ran the business. By the early twentieth century, ornamental turning was going out of fashion, and the firm sold its last lathe in 1928. A vintage tool made by a well-known firm made for firms and individuals that worked in wood. The tool was used before routers and spindle moulders came into use after World War ll, a time when to produce a decorative moulding for a piece of furniture or other items this had to be accomplished by hand using one of these types of planes. A significant item from the mid to late 19th century that today is quite rare and sought after by collectors. It gives us a snapshot of how furniture was made predominately by hand and with tools that were themselves hand made shows the craftsmanship used to make such a unique item. Moulding Plane Holtzaffel 64 Charing & Owner J Heath 9/16" marked opposite endflagstaff hill, warrnambool, shipwrecked-coast, flagstaff-hill, flagstaff-hill-maritime-museum, maritime-museum, shipwreck-coast, flagstaff-hill-maritime-village, plane moulding, plane, j heath -
 Ballarat Tramway Museum
Slide - 35mm slide/s, Keith Kings, 8/01/1961 12:00:00 AM
Bendigo, Charing Cross, 8-1-1961. Trams 30 (large white bumper) and 19 (top and bottom safety stripes, but no lighting) on Eaglehawk/Quarry Hill run, and trams 29, 28 on North Bendigo/Golden Square. Both Birneys have had bumpers painted white. Large white painted traffic island on North side. Ezywalkin, Beehive buildings and Mobilgas sign. By front door of tram 30 is a 'Safety Zone' sign. Tram 19, has a 'Briquette' ad on front panel. Photo by Keith Kings.Stamped 'K.S.Kings etc' and in blue ink, 'K(r)(335)m, Bendigo, 1/250. f4.5, 8/1/61, 29, 28, 19 and 30 at Charing Cross'tramways, trams, bendigo, birney, charing cross, tram 19, tram 29, tram 28, tram 30 -
 Ballarat Tramway Museum
Slide - 35mm slide/s - set of 25, Noel Simons, 26/02/1972 12:00:00 AM
Set of 25 transparencies taken on 26/2/1972 on Kodak mounts. 1204.1 - Bendigo No. 5 - just arrived at Manchester Loop near Havilah Road, Long Gully. Photo taken after tram has passed photographer. 1204.2 - No. 26 in Backhaus St. Long Gully passing William St, en route to Quarry Hill. Photo taken after tram has passed photographer. 1204.3 - No. 5 climbing the High St. Hill Eaglehawk, heading for Quarry Hill with the buildings on the West side of High St. in the background, including the Eaglehawk Town Hall. 1204.4 - as for 1204.3, but tram close up. 1204.5 - as for 1204.3, but after tram has passed photographer. 1204.6 - No. 5 at intersection of Mt Korong Road Ironbark and Calder Highway, with the AMPOL service 'station in the background. Photo taken after tram has passed photographer. 1204.7 - No. 26 en route to Quarry Hill shortly after leaving Needle Loop, passing William St., Long Gully. 1204.8 - No. 5 at California Gully Loop, picking up a passenger, with the shops at Long Gully in the background. Photo taken after tram has passed photographer. 1204.9 - No. 5 in Long Gully, en route to Quarry Hill. Photo taken after tram has passed photographer. 1204.10 - No. 2 at Eaglehawk terminus with the Eaglehawk Town Hall and Post Office in the background. Tram has two SEC roof ads. 1204.11 - No. 2 at Eaglehawk terminus, close up. 1204.12 - as for 1204.11, but through the park gates. 1204.13 - as for 1204.11, but with tram stop shelters in the foreground and buildings on the West side of High St in the background. 1204.14 - No. 2 in Mt. Korong Rd, midway between California Gully Loop and Needle Loop. Photo taken after tram has passed photographer. 1204.15 - No. 5 in Long Gully, en route to Quarry Hill. 1204.16 - as for 1204.15, but with trams departed loop. Has an ESSO service station in the background. 1204.17 - No. 26 leaves Charing Cross up View St.. Photo taken after tram has passed photographer. Has Armstrong Tyre Service, Cohns Drinks ad on a building and the T&G building in the background. Also Firestone ads on the tyre service building. 1204.18 - No. 5 waits at Charing Cross with the Alexandra Fountain in the background. Tram has two SEC roof ads, 'Everything s fine in my all electric kitchen' and 'Electricity Best for Cooking'. Has RACV, Colonial Mutual Life buildings in the background and the planting areas around Charing Cross gardens in the foreground. 1204.19 - No. 21 en route to North Bendigo arrives at Charing Cross, with passengers waiting to board. No. 5 in the background. In the background is the Fountain Gate Plaza building and the City Family Hotel. 1204.20 - as for 1204.19, but with No. 7 en route to Golden Square. 1204.21 - as for 1204.19, but closer up. 1204.22 - as for 1204.18 1204.23 - No. 25 in Nolan St. near the crossing of Bendigo Creek, running a special tram tour. 1204.24 - No. 25 on a special charter, in Weeroona Ave. at Cnr of Caledonia St. passing the Gas works. 1204.25 - Nos. 25 (showing Golden Square), 7 and 26 at Charing Cross. Has fountain in the background.Information written on in blue ink and date stamped on purple ink. 1204.1 - "No. 5 at Manchester Loop, near Havilah Rd. Long Gully." 1204.2 - "No. 26 in Backhaus St. Long Gully passing William St." 1204.3 - "No. 5 in High St. Eaglehawk." 1204.4 - "No. 5 in High St. Eaglehawk." 1204.5 - "No. 5 in High St. Eaglehawk." 1204.6 - "No. 5 in Mt. Korong Rd., Ironbark, passing Calder Highway Junctn." 1204.7 - "No. 26 shortly after leaving Needle Loop, passing William St., Long Gully. No. 5 cresting hill in distance." 1204.8 - "No. 5 at California Gully Loop." 1204.9 - "No. 5 in Long Gully" 1204.10 - "No. 2 at Eaglehawk terminus." 1204.11 - "No. 2 at Eaglehawk terminus." 1204.12 - "No. 2 at Eaglehawk terminus." 1204.13 - "No. 2 at Eaglehawk terminus." 1204.14 - "No. 2 in Mt. Korong Rd, midway between California Gully Loop and Needle Loop. 1204.15 - "Nos. 2 and 26 crossing at Long Gully." 1204.16 - "No. 26 leaves Long Gully loop for Eaglehawk as No. 2 pulls out of the far end towards Bendigo" 1204.17 - "No. 26 beginning the climb up View St. from Charing Cross." 1204.18 - "No. 5 at Charing Cross." 1204.19 - "No 21 arrives at Charing Cross from Golden Square while No. 5 awaits departure time for Eaglehawk." 1204.20 - "Nos. 7, 21, and 2 (behind which is No. 5) at Charing Cross." 1204.21 - "Nos. 7, 21, and 2 at Charing Cross." 1204.22 - "No. 5 at Charing Cross." 1204.23 - "No. 25 in Nolan St. near Bendigo creek crossing" 1204.24 - "No. 25 in Weeroona Ave. at cnr of Caledonia St." 1204.25 - "Nos. 25, 7, 26 and 2 (behind 26) at Charing Cross."tramways, trams, bendigo, eaglehawk, long gully, california gully, charing cross, north bendigo, tram 2, tram 5, tram 7, tram 21, tram 25, tram 26 -
 Ballarat Tramway Museum
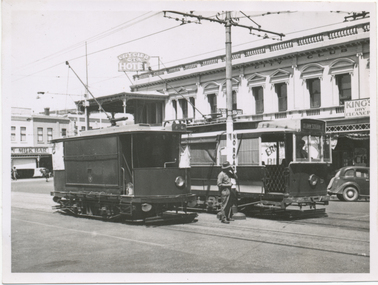
Photograph - Black & White Photograph/s, John Buckland, 23/12/1946 12:00:00 AM
Black and white photograph of Bendigo track cleaner/sprinkler and ESCo No. 9 at the Pall Mall tram stop just to the south of the Fountain at Charing Cross. ESCo 9 has been modified (See Kings Bendigo Tramways p54). Sprinkler car has trolley pole facing Golden Square, as has No. 9. Pole by the trams have signs "ALL CARS STOP HERE" and a "NO ROAD" sign. Photo taken 23/12/1946. 676.1 - Black and White print contained within the Wal Jack Bendigo and Geelong Album, see Reg Item 5003 for more details. Added 2/7/2013. See The Bendigo Tramways, K.S.Kings On rear typed is "SECV Bendigo Tramways Car 9 and Track Grinder at Charing Cross 23/12/1946" and stamped in but rh corner "Photograph by John Buckland" trams, tramways, bendigo, esco, work trams, tram sprinkler, scrubber, tram 9 -
 Ballarat Tramway Museum
Slide - 35mm slide/s, Keith Kings, 20/01/1963 12:00:00 AM
Bendigo, Charing Cross, four Birneys on Sunday 20-1-1963, 3.36pm. Photo taken from View St. looking east along Mitchell Street. Tram 11 to North, 30 to Golden Aq, 28 to Quarry Hill and 29 to Eaglehawk. Note road signs (yellow with black writing)on centre poles, Ezywalkin building in rear, cross over in foreground. Black and white version of photo appears on page 66 of K.S.Kings book 'The Bendigo Tramways'. Photo by Keith Kings.Stamped on 'K.S.Kings etc.' and in blue ink 'K(r)(390), Bendigo, 1/250., f8 20/1/63, Charing Cross, Sunday, 3.36pm 11 to North, 30 to Golden Square, 28 to Quarry Hill, 29 to Eaglehawk.'tramways, trams, bendigo, birney, charing cross, tram 11, tram 30, tram 28, tram 29 -
 Ballarat Tramway Museum
Slide - 35mm slide/s set of 7, Noel Simons, 29 Feb. 1972
Set of 7 transparencies taken on 29/2/1972 on Kodak mounts. 1208.1 - Bendigo 18 (en route to Quarry Hill) and 2 (Eaglehawk) in the early morning at Charing cross with the Alexandra fountain and the Fountain Plaza building in the background. 1208.2 - No. 2 descending View St. Photo taken after tram has passed the photographer. 1208.3 - as for 1208.2 at Mackenzie St. intersection 1208.4 - No. 26 ascending View St. with the ANZ bank, T& G in the background. 1208.5 - as for 1208.4, but at Mackenzie St. intersection. Photo taken after tram has passed the photographer. 1208.6 - No. 18 in View St. seen from the lookout tower in Rosalind Park. 1208.7 - No. 7 en route to North Bendigo in Nolan St. Photographed across the Centenary Oval.Information written on in blue ink and date stamped on purple ink. 1208.1 - "Nos. 18 and 2 in the early morning sun at Charing Cross." 1208.2 - "No. 2 descending View St. towards Charing Cross." 1208.3 - "No. 2 in View St. passing Mackenzie St." 1208.4 - "No. 26 in View St. just after leaving Charing Cross." 1208.5 - "No. 26 climbing View St. past Mackenzie St." 1208.6 - "No. 18 climbing View St. seen from lookout tower in Rosalind Park." 1208.7 - "No. 7 in Nolan St. heading towards North Bendigo. / Last picture of a Bendigo tram."tramways, trams, bendigo, charing cross, view st., nolan st., tram 2, tram 7, tram 18, tram 26 -
 Ballarat Heritage Services
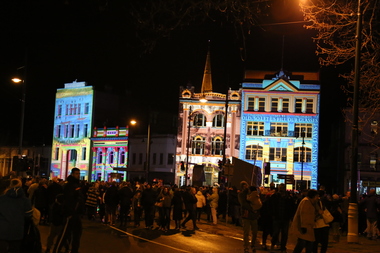
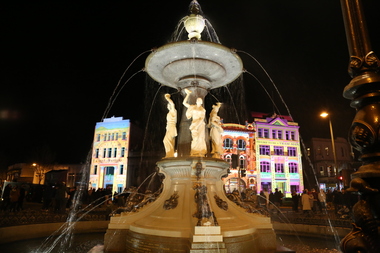
Photograph - Colour, Clare Gervasoni, Charing Cross Bendigo during White Night Bendigo, 2018, 01/09/2018
Charing Cross buildings illuminated during White Night Bendigo, and featuring the Alexandra Fountain.white night bendigo, charing cross -
 Ballarat Heritage Services
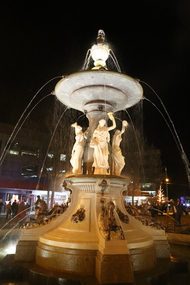
Photograph - Colour, Clare Gervasoni, Charing Cross Bendigo during White Night Bendigo, Featuring the Alexandra Fountain, 2018, 01/09/2018
Charing Cross buildings illuminated during White Night Bendigo, and featuring the Alexandra Fountain.white night bendigo, charing cross -
 Ballarat Heritage Services
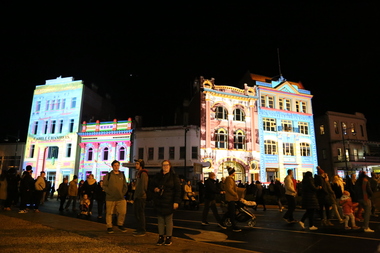
Photograph - Colour, Clare Gervasoni, Charing Cross Bendigo during White Night Bendigo, Featuring the Alexandra Fountain, 2018, 01/09/2018
Charing Cross buildings illuminated during White Night Bendigo, and featuring the Alexandra Fountain.white night bendigo, charing cross -
 Ballarat Heritage Services
Photograph - Photograph - Colour, Clare Gervasoni, Charing Cross Bendigo during White Night Bendigo, Featuring the Alexandra Fountain, 2018, 01/09/2018
Charing Cross buildings illuminated during White Night Bendigo, and featuring the Alexandra Fountain.white night bendigo, charing cross, alexandra fountain -
 Ballarat Heritage Services
Photograph - Photograph - Colour, Clare Gervasoni, Charing Cross Bendigo during White Night Bendigo, Featuring the Alexandra Fountain, 2018, 01/09/2018
Charing Cross buildings illuminated during White Night Bendigo, and featuring the Alexandra Fountain.white night bendigo, charing cross, alexandra fountain, bendigo -
 Ballarat Heritage Services
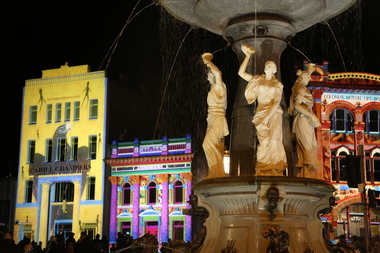
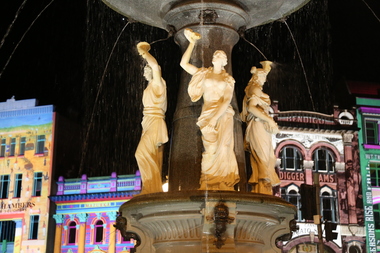
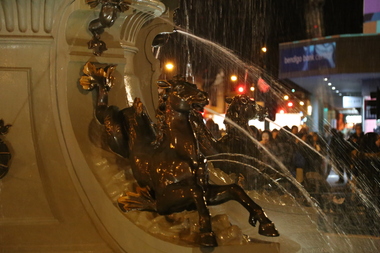
Photograph - Photograph - Colour, Clare Gervasoni, Alexandra Fountain during White Night Bendigo, 2018, 01/09/2018
The Alexandra Fountain was designed by William Vahland and is constructed of Harcourt Granite.Charing Cross buildings illuminated during White Night Bendigo, and featuring the Alexandra Fountain.white night bendigo, charing cross, alexandra fountain, horse, william vahland -
 Ballarat Tramway Museum
Photograph - Black & White Photograph/s, Keith Kings, 11/04/1953 12:00:00 AM
Black and White photograph contained with Reg. Item 1902 - Photo Album from Keith Kings to Les Denmead 1970. Photograph of SEC Bendigo tram 18 at Charing Cross. Date of photo 11/4/1953. Tram showing destination of Eaglehawk. Has "City Club Hotel" in the background, a Safety Zone sign to the left of the photo. Note bag and folder or envelope on pole closest to photographer. Tram converted for "one-man" operation. Keith Kings No. H(e)(1) Scanning: i - image file, p - presentation file, b - back of photograph.Stamp in top left hand corner and handwritten number with "K.S. Kings No. H(e)(1) Copyright reserved". In blue ink "Bendigo / No.18, as converted for "One-man" operation. / Charing Cross. 11/4/53"trams, tramways, bendigo, charing cross, city club hotel, one man trams, tram 18 -
 Ballarat Tramway Museum
Photograph - Black & White Photograph/s, Keith Kings, 24/09/1961 12:00:00 AM
Black and White photograph contained with Reg. Item 1902 - Photo Album from Keith Kings to Les Denmead 1970. Photograph of SEC Bendigo trams 28 and 29 at Charing Cross. Date of photo 24/9/1961. Both trams have the tiger stripes and dash canopy lighting added, but not the large white stripe above the headlight. Both trams have "Nothing Beats Briquettes for Heat" roof advertisements. The Beehive building in the background and other buildings on the east side of Pall Mall. Keith Kings No. L(n)(17) Scanning: i - image file, p - presentation file, b - back of photograph.Stamp in top left hand corner and handwritten number with "K.S. Kings No. L(n)(17) Copyright reserved". In blue ink "Bendigo / Nos. 28 and 29. / Birney Safety Cars. / Charing Cross 24/9/61"trams, tramways, bendigo, beehive building, charing cross, tram 28, tram 29