Showing 566 items matching "colonial melbourne"
-
 Westbourne Grammar Heritage Collection
Book - Charles Steedman, 1867, Manual of Swimming
... ...colonial melbourne...It evokes our early history as an emerging grammar school with links to prominent athletes, artists and gentry of colonial Melbourne. williamstown sandridge baths swimming colonial melbourne art williamstown grammar On title page, handwritten inscriptions in brown coloured ink. ...Charles Steedman was headmaster of Williamstown Grammar School from 1870-76 and 1885-90. In 1870, under agreement with school trustees, Sir George Verdon and John Courtis, he leased the school under a seven-year lease, effectively saving it from closure. Steedman had previously been manager of Sandridge Baths and a champion swimmer of Victoria. His 1867 book, 'Manual of Swimming', was the first major technical contribution to the sport of speed swimming and water safety, for which Steedman was inducted into the Sport Australia Hall of Fame in 2006. As headmaster of Williamstown Grammar, Steedman initiated a student produced school paper called 'The Schoolboy' (surviving editions can be accessed at the State Library of Victoria), added swimming lessons to the curriculum and opened enrolment to girls in 1885. The book contains nine illustration plates featuring line drawings of a human figure in the positions detailed by Steedman in his text. These drawings are attributed to O.R. Campbell. Oswald Rose Campbell is best known for his appointment (1876-1886) as drawing master of the School of Design, a department of the Public Library, Museums and National Gallery of Victoria. He taught (and famously disagreed with) the likes of celebrated Australian artists, Tom Roberts and Frederick McCubbin. O.R Campbell taught drawing and painting at Williamstown Grammar in the early 1870s.The book holds historic significance for Westbourne Grammar School, having been written by a former headmaster and very important figure in the history of the school. It evokes our early history as an emerging grammar school with links to prominent athletes, artists and gentry of colonial Melbourne. Blue cloth covered case-bound book, with debossed decorative scrollwork in each corner and in the centre of front cover, and gilt lettering on the spine. 270 numbered pages, nine illustration plates (one adjacent to title page, eight as end pages).On title page, handwritten inscriptions in brown coloured ink. Possibly ‘Joshua Saggs Esq. / With the authors compliments’ and below, in different handwriting and darker ink, ‘To dear Flossie from Grandma 1901’. williamstown, sandridge baths, swimming, colonial melbourne, art, williamstown grammar -
 Flagstaff Hill Maritime Museum and Village
Lead shot, Before 1878
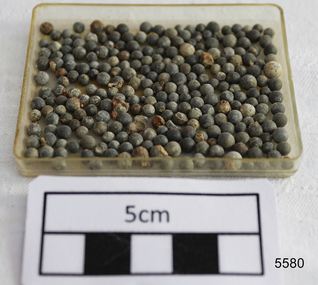
... ...colonial industry...melbourne...colonial demand exceeded this source of local supply. The continued strength of the market for lead shot in the Colony of Victoria prompted substantial investment in additional productive capacity in Melbourne in the next decade. ...The collection is also historically significant for its association with the LOCH ARD, which was one of the worst and best known shipwrecks in Victoria’s history. flagstaff hill warrnambool shipwrecked coast flagstaff hill maritime museum maritime museum shipwreck coast flagstaff hill maritime village great ocean road loch line loch ard captain gibbs eva carmichael tom pearce glenample station mutton bird island loch ard gorge lead shot colonial industry melbourne shot towers victorian metallurgy colonial imports A quantity of lead shot pellets retrieved from the wreck of the LOCH ARD. ...The objects comprise a quantity of small calibre lead shot raised from the LOCH ARD shipwreck site by Flagstaff Hill divers in 1976. The Maritime Village’s collection has companion pieces. The three masted, iron hulled, LOCH ARD was wrecked against the tall limestone cliffs of Mutton Bird Island in the early hours of the first of June 1878. Included in her diverse and valuable cargo were 22 tons of lead shot, packed in cloth bags and wooden casks. Bulk quantities of lead shot, uniformly round balls of dull grey metal ranging from 2mm “birdshot” to 8mm “buckshot”, were routinely exported to the Australian colonies. Shot was used mostly as projectiles fired from smooth bored guns to bring down moving targets such as wild ducks and small game. It was also useful as ballast, when a dense, “pourable” weight was required to fill cavities or establish volume within a measuring container. The production of consistently round spheres of lead shot required the pouring of molten metal through a sieve and then a long drop through the atmosphere to a water filled basin for final cooling and collection. This “shot tower” process was first patented by William Watts of Bristol in 1782. His calculation of a 150 feet fall was not only to form evenly spherical droplets through surface tension, but also to provide partial cooling and solidification to each shot before they hit the water below. The value of his innovation was the minimising of indentation and shape distortion, avoiding the expense of re-smelting and re-moulding the lead. Lead shot was already being produced in Australia at the time the LOCH ARD loaded her cargo and left Gravesend on the second of March 1878. James Moir constructed a 157 feet circular stone shot tower near Hobart in 1870, with a peak annual production of 100 tons of lead shot sold in 28 pound linen bags. However colonial demand exceeded this source of local supply. The continued strength of the market for lead shot in the Colony of Victoria prompted substantial investment in additional productive capacity in Melbourne in the next decade. In 1882 Richard Hodgson erected the 160 feet round chimney-shaped Clifton Hill shot tower on Alexandra Parade (VHR H0709) and in 1889 Walter Coop built the 160 feet square tower-shaped Melbourne Central shot tower on La Trobe Street (VHR H0067). At its peak, the Coop Tower produced 6 tons of lead shot per week, or 312 tons per annum. HISTORY OF THE LOCH ARD The LOCH ARD belonged to the famous Loch Line which sailed many ships from England to Australia. Built in Glasgow by Barclay, Curdle and Co. in 1873, the LOCH ARD was a three-masted square rigged iron sailing ship. The ship measured 262ft 7" (79.87m) in length, 38ft (11.58m) in width, 23ft (7m) in depth and had a gross tonnage of 1693 tons. The LOCH ARD's main mast measured a massive 150ft (45.7m) in height. LOCH ARD made three trips to Australia and one trip to Calcutta before its final voyage. LOCH ARD left England on March 2, 1878, under the command of Captain Gibbs, a newly married, 29 year old. She was bound for Melbourne with a crew of 37, plus 17 passengers and a load of cargo. The general cargo reflected the affluence of Melbourne at the time. On board were straw hats, umbrella, perfumes, clay pipes, pianos, clocks, confectionary, linen and candles, as well as a heavier load of railway irons, cement, lead and copper. There were items included that intended for display in the Melbourne International Exhibition in 1880. The voyage to Port Phillip was long but uneventful. At 3am on June 1, 1878, Captain Gibbs was expecting to see land and the passengers were becoming excited as they prepared to view their new homeland in the early morning. But LOCH ARD was running into a fog which greatly reduced visibility. Captain Gibbs was becoming anxious as there was no sign of land or the Cape Otway lighthouse. At 4am the fog lifted. A man aloft announced that he could see breakers. The sheer cliffs of Victoria's west coast came into view, and Captain Gibbs realised that the ship was much closer to them than expected. He ordered as much sail to be set as time would permit and then attempted to steer the vessel out to sea. On coming head on into the wind, the ship lost momentum, the sails fell limp and LOCH ARD's bow swung back. Gibbs then ordered the anchors to be released in an attempt to hold its position. The anchors sank some 50 fathoms - but did not hold. By this time LOCH ARD was among the breakers and the tall cliffs of Mutton Bird Island rose behind the ship. Just half a mile from the coast, the ship's bow was suddenly pulled around by the anchor. The captain tried to tack out to sea, but the ship struck a reef at the base of Mutton Bird Island, near Port Campbell. Waves broke over the ship and the top deck was loosened from the hull. The masts and rigging came crashing down knocking passengers and crew overboard. When a lifeboat was finally launched, it crashed into the side of LOCH ARD and capsized. Tom Pearce, who had launched the boat, managed to cling to its overturned hull and shelter beneath it. He drifted out to sea and then on the flood tide came into what is now known as LOCH ARD Gorge. He swam to shore, bruised and dazed, and found a cave in which to shelter. Some of the crew stayed below deck to shelter from the falling rigging but drowned when the ship slipped off the reef into deeper water. Eva Carmichael had raced onto deck to find out what was happening only to be confronted by towering cliffs looming above the stricken ship. In all the chaos, Captain Gibbs grabbed Eva and said, "If you are saved Eva, let my dear wife know that I died like a sailor". That was the last Eva Carmichael saw of the captain. She was swept off the ship by a huge wave. Eva saw Tom Pearce on a small rocky beach and yelled to attract his attention. He dived in and swam to the exhausted woman and dragged her to shore. He took her to the cave and broke open case of brandy which had washed up on the beach. He opened a bottle to revive the unconscious woman. A few hours later Tom scaled a cliff in search of help. He followed hoof prints and came by chance upon two men from nearby Glenample Station three and a half miles away. In a state of exhaustion, he told the men of the tragedy. Tom returned to the gorge while the two men rode back to the station to get help. By the time they reached LOCH ARD Gorge, it was cold and dark. The two shipwreck survivors were taken to Glenample Station to recover. Eva stayed at the station for six weeks before returning to Ireland, this time by steamship. In Melbourne, Tom Pearce received a hero's welcome. He was presented with the first gold medal of the Royal Humane Society of Victoria and a £1000 cheque from the Victorian Government. Concerts were performed to honour the young man's bravery and to raise money for those who lost family in the LOCH ARD disaster. Of the 54 crew members and passengers on board, only two survived: the apprentice, Tom Pearce and the young woman passenger, Eva Carmichael, who lost all of her family in the tragedy. Ten days after the LOCH ARD tragedy, salvage rights to the wreck were sold at auction for £2,120. Cargo valued at £3,000 was salvaged and placed on the beach, but most washed back into the sea when another storm developed. The wreck of LOCH ARD still lies at the base of Mutton Bird Island. Much of the cargo has now been salvaged and some was washed up into what is now known as LOCH ARD Gorge. Cargo and artefacts have also been illegally salvaged over many years before protective legislation was introduced. One of the most unlikely pieces of cargo to have survived the shipwreck was a Minton porcelain peacock - one of only nine in the world. The peacock was destined for the Melbourne International Exhibition in 1880. It had been well packed, which gave it adequate protection during the violent storm. Today, the Minton peacock can be seen at the Flagstaff Hill Maritime Museum in Warrnambool. From Australia's most dramatic shipwreck it has now become Australia's most valuable shipwreck artefact and is one of very few 'objects' on the Victorian State Heritage Register. The shipwreck of the LOCH ARD is of State significance – Victorian Heritage Register S417 Flagstaff Hill’s collection of artefacts from LOCH ARD is significant for being one of the largest collections of artefacts from this shipwreck in Victoria. It is significant for its association with the shipwreck, which is on the Victorian Heritage Register (VHR S417). The collection is significant because of the relationship between the objects, as together they have a high potential to interpret the story of the LOCH ARD. The LOCH ARD collection is archaeologically significant as the remains of a large international passenger and cargo ship. The LOCH ARD collection is historically significant for representing aspects of Victoria’s shipping history and its potential to interpret sub-theme 1.5 of Victoria’s Framework of Historical Themes (living with natural processes). The collection is also historically significant for its association with the LOCH ARD, which was one of the worst and best known shipwrecks in Victoria’s history. A quantity of lead shot pellets retrieved from the wreck of the LOCH ARD. There are 242 loose 2mm pieces and 17 loose 4mm pieces. They are in good condition, with some shape distortion and sedimentary concretion, and shot tower made.flagstaff hill, warrnambool, shipwrecked coast, flagstaff hill maritime museum, maritime museum, shipwreck coast, flagstaff hill maritime village, great ocean road, loch line, loch ard, captain gibbs, eva carmichael, tom pearce, glenample station, mutton bird island, loch ard gorge, lead shot, colonial industry, melbourne shot towers, victorian metallurgy, colonial imports -
 Flagstaff Hill Maritime Museum and Village
Weapon - Ammunition, Before 1878
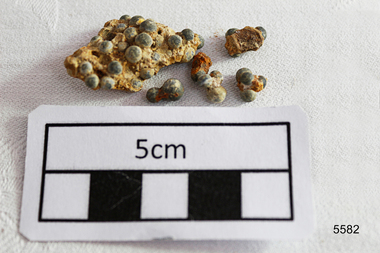
... ...colonial industry...melbourne...colonial demand exceeded this source of local supply. The continued strength of the market for lead shot in the Colony of Victoria prompted substantial investment in additional productive capacity in Melbourne in the next decade. ...The collection is also historically significant for its association with the LOCH ARD, which was one of the worst and best known shipwrecks in Victoria’s history. flagstaff hill warrnambool shipwrecked coast flagstaff hill maritime museum maritime museum shipwreck coast flagstaff hill maritime village great ocean road loch line loch ard captain gibbs eva carmichael tom pearce glenample station mutton bird island loch ard gorge lead shot colonial industry melbourne shot towers victorian metallurgy colonial imports A quantity of 2mm and 4mm lead shot ammunition retrieved from the LOCH ARD shipwreck site. ...The objects are a small sample of small gauge lead shot raised by Flagstaff Hill divers from the LOCH ARD shipwreck site in 1976. Companion pieces are in the Maritime Village collection. The three masted, iron hulled, LOCH ARD was wrecked against the tall limestone cliffs of Mutton Bird Island in the early hours of the first of June 1878. Included in her diverse and valuable cargo were 22 tons of lead shot, packed in cloth bags and wooden casks. Bulk quantities of lead shot, uniformly round balls of dull grey metal ranging from 2mm “birdshot” to 8mm “buckshot”, were routinely exported to the Australian colonies. Shot was used mostly as projectiles fired from smooth bored guns to bring down moving targets such as wild ducks and small game. It was also useful as ballast, when a dense, “pourable” weight was required to fill cavities or establish volume within a measuring container. The production of consistently round spheres of lead shot required the pouring of molten metal through a sieve and then a long drop through the atmosphere to a water filled basin for final cooling and collection. This “shot tower” process was first patented by William Watts of Bristol in 1782. His calculation of a 150 feet fall was not only to form evenly spherical droplets through surface tension, but also to provide partial cooling and solidification to each shot before they hit the water below. The value of his innovation was the minimising of indentation and shape distortion, avoiding the expense of re-smelting and re-moulding the lead. Lead shot was already being produced in Australia at the time the LOCH ARD loaded her cargo and left Gravesend on the second of March 1878. James Moir constructed a 157 feet circular stone shot tower near Hobart in 1870, with a peak annual production of 100 tons of lead shot sold in 28 pound linen bags. However colonial demand exceeded this source of local supply. The continued strength of the market for lead shot in the Colony of Victoria prompted substantial investment in additional productive capacity in Melbourne in the next decade. In 1882 Richard Hodgson erected the 160 feet round chimney-shaped Clifton Hill shot tower on Alexandra Parade (VHR H0709) and in 1889 Walter Coop built the 160 feet square tower-shaped Melbourne Central shot tower on La Trobe Street (VHR H0067). At its peak, the Coop Tower produced 6 tons of lead shot per week, or 312 tons per annum. The shipwreck of the LOCH ARD is of State significance – Victorian Heritage Register S417 Flagstaff Hill’s collection of artefacts from LOCH ARD is significant for being one of the largest collections of artefacts from this shipwreck in Victoria. It is significant for its association with the shipwreck, which is on the Victorian Heritage Register (VHR S417). The collection is significant because of the relationship between the objects, as together they have a high potential to interpret the story of the LOCH ARD. The LOCH ARD collection is archaeologically significant as the remains of a large international passenger and cargo ship. The LOCH ARD collection is historically significant for representing aspects of Victoria’s shipping history and its potential to interpret sub-theme 1.5 of Victoria’s Framework of Historical Themes (living with natural processes). The collection is also historically significant for its association with the LOCH ARD, which was one of the worst and best known shipwrecks in Victoria’s history. A quantity of 2mm and 4mm lead shot ammunition retrieved from the LOCH ARD shipwreck site. They are concreted together by sediment. There are (6) small pieces with some single shot and a larger conglomerate of cemented shot. flagstaff hill, warrnambool, shipwrecked coast, flagstaff hill maritime museum, maritime museum, shipwreck coast, flagstaff hill maritime village, great ocean road, loch line, loch ard, captain gibbs, eva carmichael, tom pearce, glenample station, mutton bird island, loch ard gorge, lead shot, colonial industry, melbourne shot towers, victorian metallurgy, colonial imports -
 Flagstaff Hill Maritime Museum and Village
Functional object - Lead shot, Circa 1877
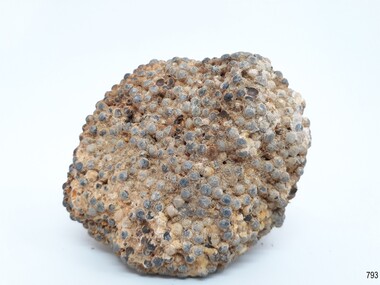
... ...colonial industry...melbourne...colonial demand exceeded this source of local supply. The continued strength of the market for lead shot in the Colony of Victoria prompted substantial investment in additional productive capacity in Melbourne in the next decade. ...Through is associated with the worst and best-known shipwreck in Victoria's history. warrnambool shipwreck coast flagstaff hill flagstaff hill maritime village flagstaff hill maritime museum shipwreck artefact lead shot loch ard colonial industry melbourne shot towers victorian metallurgy colonial imports None Lead shot; a group of mixed -sized lead shot. ...This artifact is a sample of small caliber lead shot recovered by Flagstaff Hill divers from the wreck of the Loch Ard in 1975. Included in her diverse and valuable cargo were 22 tons of lead shot, packed in cloth bags and wooden casks. Bulk quantities of lead shot, uniformly round balls of dull grey metal ranging from 2mm “birdshot” to 8mm “buckshot”, were routinely exported to the Australian colonies. Shot was used mostly as projectiles fired from smooth bored guns to bring down moving targets such as wild ducks and small game. It was also useful as ballast, when a dense, “pourable” weight was required to fill cavities or establish volume within a measuring container. The production of consistently round spheres of lead shot required the pouring of molten metal through a sieve and then a long drop through the atmosphere to a water filled basin for final cooling and collection. This “shot tower” process was first patented by William Watts of Bristol in 1782. His calculation of a 150 feet fall was not only to form evenly spherical droplets through surface tension, but also to provide partial cooling and solidification to each shot before they hit the water below. The value of his innovation was the minimising of indentation and shape distortion, avoiding the expense of re-smelting and re-moulding the lead. Lead shot was already being produced in Australia at the time the Loch Ard sinking in March 1878. James Moir had constructed a 157 feet circular stone shot tower near Hobart in 1870, with a peak annual production of 100 tons of lead shot sold in 28 pound linen bags. However colonial demand exceeded this source of local supply. The continued strength of the market for lead shot in the Colony of Victoria prompted substantial investment in additional productive capacity in Melbourne in the next decade. In 1882 Richard Hodgson erected the 160 feet round chimney-shaped Clifton Hill shot tower on Alexandra Parade (VHR H0709) and in 1889 Walter Coop built the 160 feet square tower-shaped Melbourne Central shot tower on La Trobe Street (VHR H0067). At its peak, the Coop Tower produced 6 tons of lead shot per week, or 312 tons per annum. History of the Loch Ard: The Loch Ard got its name from "Loch Ard" a loch that lies to the west of Aberfoyle, and the east of Loch Lomond. It means "high lake" in Scottish Gaelic. The vessel belonged to the famous Loch Line which sailed many vessels from England to Australia. The Loch Ard was built in Glasgow by Barclay, Curle & Co. in 1873, the vessel was a three-masted square-rigged iron sailing ship that measured 79.87 meters in length, 11.58 m in width, and 7 m in depth with a gross tonnage of 1693 tons with a mainmast that measured a massive 45.7 m in height. Loch Ard made three trips to Australia and one trip to Calcutta before its fateful voyage. Loch Ard left England on March 2, 1878, under the command of 29-year-old Captain Gibbs, who was newly married. The ship was bound for Melbourne with a crew of 37, plus 17 passengers. The general cargo reflected the affluence of Melbourne at the time. Onboard were straw hats, umbrellas, perfumes, clay pipes, pianos, clocks, confectionery, linen, and candles, as well as a heavier load of railway irons, cement, lead, and copper. There were other items included that were intended for display in the Melbourne International Exhibition of 1880. The voyage to Port Phillip was long but uneventful. Then at 3 am on June 1, 1878, Captain Gibbs was expecting to see land. But the Loch Ard was running into a fog which greatly reduced visibility. Captain Gibbs was becoming anxious as there was no sign of land or the Cape Otway lighthouse. At 4 am the fog lifted and a lookout aloft announced that he could see breakers. The sheer cliffs of Victoria's west coast came into view, and Captain Gibbs realised that the ship was much closer to them than expected. He ordered as much sail to be set as time would permit and then attempted to steer the vessel out to sea. On coming head-on into the wind, the ship lost momentum, the sails fell limp and Loch Ard's bow swung back towards land. Gibbs then ordered the anchors to be released in an attempt to hold their position. The anchors sank some 50 fathoms - but did not hold. By this time the ship was among the breakers and the tall cliffs of Mutton Bird Island rose behind. Just half a mile from the coast, the ship's bow was suddenly pulled around by the anchor. The captain tried to tack out to sea, but the ship struck a reef at the base of Mutton Bird Island, near Port Campbell. Waves subsequently broke over the ship and the top deck became loosened from the hull. The masts and rigging came crashing down knocking passengers and crew overboard. When a lifeboat was finally launched, it crashed into the side of Loch Ard and capsized. Tom Pearce, who had launched the boat, managed to cling to its overturned hull and shelter beneath it. He drifted out to sea and then on the flood tide came into what is now known as Lochard Gorge. He swam to shore, bruised and dazed, and found a cave in which to shelter. Some of the crew stayed below deck to shelter from the falling rigging but drowned when the ship slipped off the reef into deeper water. Eva Carmichael a passenger had raced onto the deck to find out what was happening only to be confronted by towering cliffs looming above the stricken ship. In all the chaos, Captain Gibbs grabbed Eva and said, "If you are saved Eva, let my dear wife know that I died like a sailor". That was the last Eva Carmichael saw of the captain. She was swept off the ship by a huge wave. Eva saw Tom Pearce on a small rocky beach and yelled to attract his attention. He dived in and swam to the exhausted woman and dragged her to shore. He took her to the cave and broke the open case of brandy that had washed up on the beach. He opened a bottle to revive the unconscious woman. A few hours later Tom scaled a cliff in search of help. He followed hoof prints and came by chance upon two men from nearby Glenample Station three and a half miles away. In a complete state of exhaustion, he told the men of the tragedy. Tom then returned to the gorge while the two men rode back to the station to get help. By the time they reached Loch Ard Gorge, it was cold and dark. The two shipwreck survivors were taken to Glenample Station to recover. Eva stayed at the station for six weeks before returning to Ireland by steamship. In Melbourne, Tom Pearce received a hero's welcome. He was presented with the first gold medal of the Royal Humane Society of Victoria and a £1000 cheque from the Victorian Government. Concerts were performed to honour the young man's bravery and to raise money for those who lost families in the disaster. Of the 54 crew members and passengers on board, only two survived: the apprentice, Tom Pearce, and the young woman passenger, Eva Carmichael, who lost her family in the tragedy. Ten days after the Lochard tragedy, salvage rights to the wreck were sold at auction for £2,120. Cargo valued at £3,000 was salvaged and placed on the beach, but most washed back into the sea when another storm developed. The wreck of Lochard still lies at the base of Mutton Bird Island. Much of the cargo has now been salvaged and some items were washed up into Lochard Gorge. Cargo and artifacts have also been illegally salvaged over many years before protective legislation was introduced in March 1982. One of the most unlikely pieces of cargo to have survived the shipwreck was a Minton majolica peacock- one of only nine in the world. The peacock was destined for the Melbourne 1880 International Exhibition. It had been well packed, which gave it adequate protection during the violent storm. Today the Minton peacock can be seen at the Flagstaff Hill Maritime Museum in Warrnambool. From Australia's most dramatic shipwreck it has now become Australia's most valuable shipwreck artifact and is one of very few 'objects' on the Victorian State Heritage Register.The shipwreck of the Loch Ard is of significance for Victoria and is registered on the Victorian Heritage Register ( S 417). Flagstaff Hill has a varied collection of artifacts from Loch Ard and its collection is significant for being one of the largest accumulation of artifacts from this notable Victorian shipwreck of which the subject items are a small part. The collection's objects give us a snapshot of how we can interpret the story of this tragic event. The collection is also archaeologically significant as it represents aspects of Victoria's shipping history that allows us to interpret Victoria's social and historical themes of the time. Through is associated with the worst and best-known shipwreck in Victoria's history.Lead shot; a group of mixed -sized lead shot. Small 2mm shot is embedded in a sea sediment clump of concretion. Also in the group are also 5 single 2mm shot and 4 single 4mm shot that are clean and free of sediment. The shot was recovered from the wreck of the Loch Ard.Nonewarrnambool, shipwreck coast, flagstaff hill, flagstaff hill maritime village, flagstaff hill maritime museum, shipwreck artefact, lead shot, loch ard, colonial industry, melbourne shot towers, victorian metallurgy, colonial imports -
 Flagstaff Hill Maritime Museum and Village
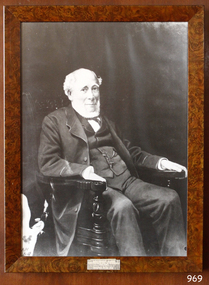
Photograph - Portrait, David Charles McArthur, Superintendent, Bank of Australasia 1867-1876
... colonial commerce...manager bank of australasia melbourne...This period is symbolised by a photograph of McArthur, which represents the origins of Warrnambool's commercial history and its early financial infrastructure. flagstaff hill warrnambool shipwrecked-coast flagstaff-hill flagstaff-hill-maritime-museum maritime-museum shipwreck-coast flagstaff-hill-maritime-village bank of australasia david charteris mcarthur superintendent bank of australasia colonial commerce manager bank of australasia melbourne colonial bank warrnambool bank of australasia Shipwrecked coast Flagstaff Hill Maritime Museum Maritime Museum Shipwreck coast Flagstaff Hill Maritime Village Great Ocean Road BoA Union Bank Australia & New Zealand Bank ANZ Bank David Charters McArthur D C McArthur Lower left corner "A-H 1-9". ...The subject of this photograph, David Charteris McArthur, was the founding manager of the Bank of Australasia in Port Phillip (Melbourne). McArthur was born in 1808 in Gloucester, England, and educated in Scotland. He worked for an insurance firm in Edinburgh, where in 1835 he married Caroline, nee Wright. McArthur and his family party sailed from the U.K. to arrive in Sydney in October 1835, where he joined the Bank of Australasia when it opened in Sydney in December. McArthur sailed to Melbourne in August 1838 with 3000 pounds in coins, protected by armed guards and two bulldogs, to open the Melbourne branch of the Bank of Australasia. The branch grew quickly, servicing both private and government customers. He opened many branches in the goldfields during the 1850s. In 1862, he was appointed as general inspector of branches. He spent time with the bank in New Zealand. On his return to Melbourne, at age 57, he was put in charge of the entire bank. McArthur lived in the hills of Heidelberg, Melbourne. He was the first chairman of Associated Banks and was an advisor to politicians and merchants. He was retired in October 1876 by the London directors and given a free trip to London, an annuity and a seat on the bank’s Advisory Board. McArthur was active in the community, being a member of the Mechanics’ Institute, on the committee that advised Governor Hotham on the Colony’s finances, chairman of the Heidelberg Road Board, one of the original trustees of the Library of Victoria in 1853 and president of the trustees of the Public Library, Museums and National Gallery of Victoria in 1880-83. He was also on many other community organisations. He died in his home “Charterisville” in East Ivanhoe in 1887. He and Caroline had no children. The Melbourne branch of Australia and New Zealand Bank has a portrait of McArthur in its boardroom. St John's Church, Heidelberg, commemorates him with a stained-glass window entitled 'King David'. The McArthur Gallery in the National Gallery of Victoria is also named after him. (David's brother, Donald, moved from Sydney to Melbourne in 1836 with the first government survey team.) ABOUT THE BANK OF AUSTRALASIA In 1836 the Bank of Australasia was established in London by Royal Charter. In 1951 the bank merged with the Union Bank of Australia, to form ANZ Bank Limited. In 1970 it merged with the English, Scottish and Australian Bank to become Australia and New Zealand Banking Group Limited. Since that time the ANZ has acquired other banks and introduced Internet banking and mobile banking. BANK OF AUSTRALASIA IN WARRNAMBOOL The Bank of Australasia first opened in Warrnambool in July 1854 in a building on Merri Street. The manager was Mr Samuel Hannaford. The bank then purchased and moved to a stone building on the corner of Timor and Gibson Streets, previously owned by Cramond and Dickson and almost opposite the Examiner’s office. In January 1957 Mr W.H. Palmer became the new manager and was there until November 1869. The bank then built its own building on the corner of Timor and Kepler Streets in 1859. Mr Basil Spence, the teller, was appointed acting manager in 1869 and Mr H.B. Chomley was the next appointed manager, in April 1873 and was still manager in 1886. The municipality of Warrnambool first banked with the Bank of Australasia from 1856 to April 1857. David Charteris McArthur served as the founding manager of the Bank of Australasia. His leadership marked a significant chapter in Warrnambool's early commercial development. The municipality of Warrnambool relied on the Bank of Australasia as its official bank from 1856 until April 1857. This period is symbolised by a photograph of McArthur, which represents the origins of Warrnambool's commercial history and its early financial infrastructure.Photograph; portrait of David Charteris McArthur. Heavily retouched black and white print in plain brown varnished frame, behind glass, with plaque on lower edge and inscription lower left corner.Lower left corner "A-H 1-9". Engraved on plaque "DAVID CHARTERS MCARTHUR \ SUPERINTENDENT \ BANK OF AUSTRALASIA \ 1867-1876"flagstaff hill, warrnambool, shipwrecked-coast, flagstaff-hill, flagstaff-hill-maritime-museum, maritime-museum, shipwreck-coast, flagstaff-hill-maritime-village, bank of australasia, david charteris mcarthur, superintendent bank of australasia, colonial commerce, manager bank of australasia melbourne, colonial bank, warrnambool bank of australasia, shipwrecked coast, flagstaff hill maritime museum, maritime museum, shipwreck coast, flagstaff hill maritime village, great ocean road, boa, union bank, australia & new zealand bank, anz bank, david charters mcarthur, d c mcarthur -
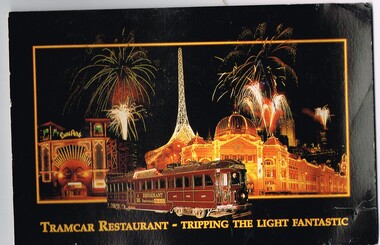 Ballarat Tramway Museum
Postcard, Colonial Tramcar Restaurant Co, Colonial Tramcar Restaurant Tram No. 442, c1985
... ... Colonial Tramcar Restaurant... Melbourne...Ballarat Tramway Museum South Gardens Reserve Wendouree Parade Ballarat Ballarat goldfields Trams tramways Restaurant tram Colonial Tramcar Restaurant Melbourne Full colour postcard featuring Colonial Tramcar Restaurant Tram No. 442 with a background of Luna Park, Flinders St station and the Arts Centre with the words "Tramcar Restaurant - Tripping the Light Fantastic". ...Full colour postcard featuring Colonial Tramcar Restaurant Tram No. 442 with a background of Luna Park, Flinders St station and the Arts Centre with the words "Tramcar Restaurant - Tripping the Light Fantastic". On the rear is a divided back arrangement with space for stamp and an address, the company logo and name and contact details - no web site. Card c1985.trams, tramways, restaurant tram, colonial tramcar restaurant, melbourne -
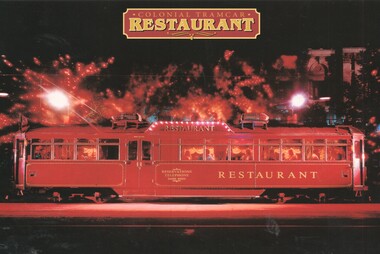 Melbourne Tram Museum
Postcard, Visit Gallery, SW6 class Restaurant trams in Melbourne, c2010
... ... Colonial Tramcar Restaurant... Melbourne...Postcard - featuring one of the SW6 class Restaurant trams in Melbourne. Has the details of the Colonial Tramcar Restaurant on rear and that it was produced by Visit Gallery. ...Melbourne Tram Museum 8 Wallen Road Hawthorn melbourne Trams tramways Restaurant Tram Colonial Tramcar Restaurant Melbourne Postcard - featuring one of the SW6 class Restaurant trams in Melbourne. ...Postcard - featuring one of the SW6 class Restaurant trams in Melbourne. Has the details of the Colonial Tramcar Restaurant on rear and that it was produced by Visit Gallery. See item 6033 for a similar postcard.trams, tramways, restaurant tram, colonial tramcar restaurant, melbourne -
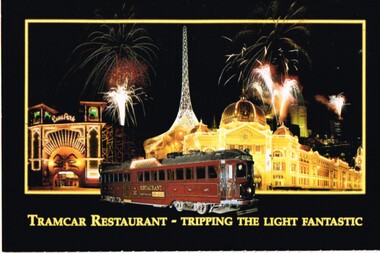 Melbourne Tram Museum
Postcard, Colonial Tramcar Restaurant Co, Colonial Tramcar Restaurant Tram No. 442, 1985
... ... Colonial Tramcar Restaurant... Melbourne...Melbourne Tram Museum 8 Wallen Road Hawthorn melbourne Trams tramways Restaurant Tram Colonial Tramcar Restaurant Melbourne tram 442 Full colour postcard featuring Colonial Tramcar Restaurant Tram No. 442 with a background of Luna Park, Flinders St station and the Arts Centre with the words "Tramcar Restaurant - Tripping the Light Fantastic". ...Full colour postcard featuring Colonial Tramcar Restaurant Tram No. 442 with a background of Luna Park, Flinders St station and the Arts Centre with the words "Tramcar Restaurant - Tripping the Light Fantastic". On the rear is a divided back arrangement with space for stamp and an address, the company logo and name and contact details - no web site. Card c1985. See Reg Item 3955 for the same image on a poster. See also Reg item 4569 for another production using the same image.trams, tramways, restaurant tram, colonial tramcar restaurant, melbourne, tram 442 -
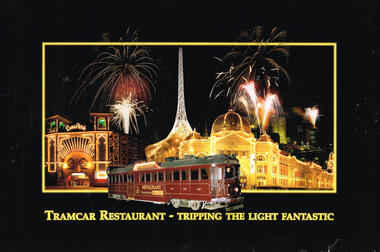 Melbourne Tram Museum
Poster, Colonial Tramcar Restaurant Co, Colonial Tramcar Restaurant Tram No. 442, c1985
... ... Colonial Tramcar Restaurant... Melbourne...Melbourne Tram Museum 8 Wallen Road Hawthorn melbourne Trams tramways Restaurant Tram Colonial Tramcar Restaurant Melbourne Poster - Full colour featuring Colonial Tramcar Restaurant Tram No. 442 with a background of Luna Park, Flinders St station and the Arts Centre with the words "Tramcar Restaurant - Tripping the Light Fantastic". ...Poster - Full colour featuring Colonial Tramcar Restaurant Tram No. 442 with a background of Luna Park, Flinders St station and the Arts Centre with the words "Tramcar Restaurant - Tripping the Light Fantastic". On the rear is a divided back arrangement with space for stamp and an address, the company logo and name and contact details - no web site. c1985. See Reg Item 2173 for a postcard of this image.trams, tramways, restaurant tram, colonial tramcar restaurant, melbourne -
 Melbourne Tram Museum
Postcard, Colonial Tramcar Restaurant Co, Colonial Tramcar Restaurant Tram No. 442, c1995
... ... Colonial Tramcar Restaurant... Melbourne...Melbourne Tram Museum 8 Wallen Road Hawthorn melbourne Trams tramways Restaurant Tram Colonial Tramcar Restaurant Melbourne tram 442 Full colour postcard featuring Colonial Tramcar Restaurant Tram No. 442 with a background of Luna Park, Flinders St station and the Arts Centre with the words " Colonial Tramcar Restaurant". ...Full colour postcard featuring Colonial Tramcar Restaurant Tram No. 442 with a background of Luna Park, Flinders St station and the Arts Centre with the words " Colonial Tramcar Restaurant". On the rear is a divided back arrangement with space for stamp and an address, the company logo and name and contact details - no web site for the tramcar company, but one for the card designer. Card c1995. See also Reg item 2173 and 5264 for another manufacturer using the same image. Two copies held.trams, tramways, restaurant tram, colonial tramcar restaurant, melbourne, tram 442 -
 Melbourne Tram Museum
Postcard, Colonial Tramcar Restaurant Co, Colonial Tramcar Restaurant Tram No. 964, late 2001 or early 2012
... ... Colonial Tramcar Restaurant... Melbourne...Melbourne Tram Museum 8 Wallen Road Hawthorn melbourne Trams tramways Restaurant Tram Colonial Tramcar Restaurant Melbourne tram 964 Full colour postcard featuring Colonial Tramcar Restaurant Tram No. 964 with another Restaurant tram behind. ...Full colour postcard featuring Colonial Tramcar Restaurant Tram No. 964 with another Restaurant tram behind. At the Southbank pick up point in Normanby Road. Dated late 2011 or early 2012 based on its conversion date. On the rear is a divided back arrangement with space for stamp and an address, the company logo and name and contact details - now has the web site for the tramcar company, and one for the card designer. Card c1995. See also Reg item 2173 and 4569 for other versionstrams, tramways, restaurant tram, colonial tramcar restaurant, melbourne, tram 964 -
 Melbourne Tram Museum
Postcard, Scancolor, Colonial Tramcar Restaurant Tram No. 442, 1995
... ... Colonial Tramcar Restaurant... Melbourne...Melbourne Tram Museum 8 Wallen Road Hawthorn melbourne Trams tramways Restaurant Tram Colonial Tramcar Restaurant Melbourne tram 442 Full colour postcard featuring Colonial Tramcar Restaurant Tram No. 442 with a background of Luna Park, Flinders St station and the Arts Centre with the words " Colonial Tramcar Restaurant". ...Full colour postcard featuring Colonial Tramcar Restaurant Tram No. 442 with a background of Luna Park, Flinders St station and the Arts Centre with the words " Colonial Tramcar Restaurant". On the rear is a divided back arrangement with space for stamp and an address, the Scancolor logo and name and contact details - no web site for the tramcar company, but one for the card designer. Card c1995, may be earlier. Produced by Scancolor - No. SCC 1193 See also Reg item 2173 and 4569 for another manufacturer using the same image.trams, tramways, restaurant tram, colonial tramcar restaurant, melbourne, tram 442 -
 Melbourne Tram Museum
Postcard, Visit Gallery, SW6 class Restaurant trams in Melbourne, c2010
... ... Colonial Tramcar Restaurant... Melbourne...Postcard - featuring one of the SW6 class Restaurant trams in Melbourne. Has the details of the Colonial Tramcar Restaurant on rear and that it was produced by Visit Gallery. ...Melbourne Tram Museum 8 Wallen Road Hawthorn melbourne Trams tramways Restaurant Tram Colonial Tramcar Restaurant Melbourne Postcard - featuring one of the SW6 class Restaurant trams in Melbourne. ...Postcard - featuring one of the SW6 class Restaurant trams in Melbourne. Has the details of the Colonial Tramcar Restaurant on rear and that it was produced by Visit Gallery. See Item 5546 for a similar postcard.trams, tramways, restaurant tram, colonial tramcar restaurant, melbourne -
 Melbourne Tram Museum
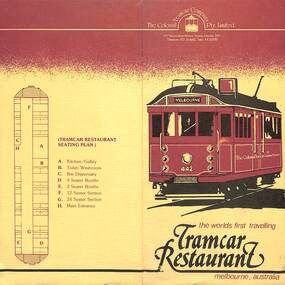
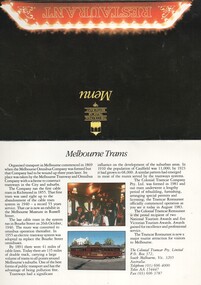
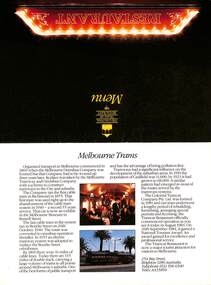
Pamphlet, Colonial Tramcar Restaurant Co, "The Colonial Tramcar Restaurant", c1983
... Pamphlet, two fold special size, printed stippled paper, for the "The Colonial Tramcar Restaurant", Melbourne. with tram 442 on front cover, advertising the restaurant, the food, seating plan, departure point and the times or the availability of the tramcar....Melbourne Tram Museum 8 Wallen Road Hawthorn melbourne Trams tramways Restaurant Tram Colonial Tramcar Restaurant Pamphlet, two fold special size, printed stippled paper, for the "The Colonial Tramcar Restaurant", Melbourne. ...Pamphlet, two fold special size, printed stippled paper, for the "The Colonial Tramcar Restaurant", Melbourne. with tram 442 on front cover, advertising the restaurant, the food, seating plan, departure point and the times or the availability of the tramcar.trams, tramways, restaurant tram, colonial tramcar restaurant -
 Ballarat Tramway Museum
Ephemera - Menu, Colonial Tramcar Restaurant Co, "The Colonial Tramcar Restaurant", c2012
... Menu cover for the "The Colonial Tramcar Restaurant", Melbourne, early dinner or lunch three course menu, including logos. ...Ballarat Tramway Museum South Gardens Reserve Wendouree Parade Ballarat Ballarat goldfields Trams tramways Restaurant tram Colonial Tramcar Restaurant Menu Menu cover for the "The Colonial Tramcar Restaurant", Melbourne, early dinner or lunch three course menu, including logos. ...Menu cover for the "The Colonial Tramcar Restaurant", Melbourne, early dinner or lunch three course menu, including logos. On the rear is a brief history of Melbourne tramways and the Colonial Tramcar Restaurant itself. Has contact details. Inside the cover has the actual menu for a three course meal.trams, tramways, restaurant tram, colonial tramcar restaurant, menu -
 Melbourne Tram Museum
Document - Programme, Colonial Tramcar Restaurant Co, "The Colonial Tramcar Restaurant", 2013
... Menu cover for the "The Colonial Tramcar Restaurant", Melbourne, full dinner four course menu, including logos. ...Menu cover for the "The Colonial Tramcar Restaurant", Melbourne, full dinner four course menu, including logos. ...Menu cover for the "The Colonial Tramcar Restaurant", Melbourne, full dinner four course menu, including logos. On the rear is a brief history of Melbourne tramways and the Colonial Tramcar Restaurant itself. Has contact details. Inside the cover has the actual menu for the meal served on 24/3/2013.On the rear of the insert menu, the date "24/3/2013".trams, tramways, restaurant tram, colonial tramcar restaurant, menu -
 City of Moorabbin Historical Society (Operating the Box Cottage Museum)
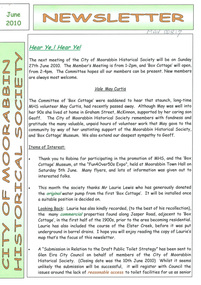
Newsletter, City of Moorabbin Historical Society Jun 2010 pdf, June 2010
... Helen provides a précis, of 4 A4 pages, describing ‘The City Morgue in Colonial Melbourne’ printed in Provenance Journal No3 November 2004....Helen provides a précis, of 4 A4 pages, describing ‘The City Morgue in Colonial Melbourne’ printed in Provenance Journal No3 November 2004. ...The City of Moorabbin Historical Society was formed c 1960 by a group of Moorabbin residents who were concerned that the history of the area should be preserved. A good response to a call for items related to the historical area of Moorabbin Shire brought donations of a wide variety of artefacts which are now preserved by the current members of CMHS at Box Cottage Museum . Helen Stanley, Secretary of CMHS, began producing a Newsletter for members in April 2007 to provide current information and well researched items of historical interest. Helen Stanley has produced a bi-monthly Newsletter, 2007 - 2013, for the members of the City of Moorabbin Historical Society that contains well researched interesting historical items, notification of upcoming events, current advice from Royal Australian Historical Society , Museums Australia Victoria and activities of Local Historical Societies. The Newsletter is an important record of the activities of the CMHS. Photocopied Plan of ‘Two Acre Village c1853’ and notes about the Colonial City Morgue Melbourne c1888 7 x A4 paper printed on 1 side Issue 17 of the bi-monthly, City of Moorabbin Historical Society Newsletter produced by Society member and Secretary, Mrs Helen Stanley in June 2010. Notice of meeting June 17th and recent death of Mrs May Curtis,CMHS member. June 5th , Robina Naughton, CMHS, represented Box Cottage at the 'Fun4over50s' expo at Moorabbin Town Hall. Mr Laurie Lewis donated the 'original water pump' from the first Box Cottage and has provided a list of the commercial properties around Box Cottage c 1900, as he remembers. An application to Glen Eira City Council for a Public Toilet at Box Cottage for visitors and volunteers. A volunteer has joined CMHS following our enrolment with 'Volunteering Glen Eira'. State Library of Victoria has approved CMHS for the 'Vicnet' program where Box Cottage Museum can be promoted. Helen provides a précis, of 4 A4 pages, describing ‘The City Morgue in Colonial Melbourne’ printed in Provenance Journal No3 November 2004.CITY of MOORABBIN HISTORICAL SOCIETY / JUNE 2010 NEWSLETTERcity of moorabbin historical society, stanley helen, curtis may, graham street mckinnon, curtis geoff, moorabbin town hall, lewis laurie, lewis grace, lewis timber pty. ltd., melbourne, moorabbin, brighton, cheltenham, ormond, bentleigh, market gardeners, pioneers, early settlers, moorabbin shire, box cottage museum, water pump, elster creek, volunteering glen eira, state library of victoria, vicnet, dendy henry, dendy’s special survey 1841, mclean n, box henry, joyce park ormond, city of moorabbin, box william, jasper road east brighton, melbourne city morgue, cooke simon, brown mwy andrew -
 Melbourne Tram Museum
Document - Programme, Colonial Tramcar Restaurant Co, "The Colonial Tramcar Restaurant - Menu", c2005
... Menu cover for the "The Colonial Tramcar Restaurant", Melbourne, early dinner or lunch three course menu, including logos. ...Melbourne Tram Museum 8 Wallen Road Hawthorn melbourne Trams tramways Restaurant Tram Colonial Tramcar Restaurant Menu Menu cover for the "The Colonial Tramcar Restaurant", Melbourne, early dinner or lunch three course menu, including logos. ...Menu cover for the "The Colonial Tramcar Restaurant", Melbourne, early dinner or lunch three course menu, including logos. On the rear is a brief history of Melbourne tramways and the Colonial Tramcar Restaurant itself. Has contact details. Inside the cover has the actual menu for a three course meal. .1 - Menu - used for the five course meal. .2 - ditto - different selection and different rear cover.trams, tramways, restaurant tram, colonial tramcar restaurant, menu -
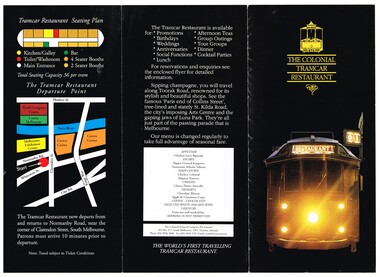 Melbourne Tram Museum
Document - Programme, Colonial Tramcar Restaurant Co, "The Colonial Tramcar Restaurant", c1983
... Set of two documents, full colour on gloss paper, for the "The Colonial Tramcar Restaurant", Melbourne. .1 - pamphlet with 442 on front cover, advertising the restaurant, the food, seating plan, departure point and the availability of the tramcar. .2 - Menu - full dinner four course menu, including logos. ...Melbourne Tram Museum 8 Wallen Road Hawthorn melbourne Trams tramways Restaurant Tram Colonial Tramcar Restaurant Menu Set of two documents, full colour on gloss paper, for the "The Colonial Tramcar Restaurant", Melbourne. .1 - pamphlet with 442 on front cover, advertising the restaurant, the food, seating plan, departure point and the availability of the tramcar. .2 - Menu - full dinner four course menu, including logos. ...Set of two documents, full colour on gloss paper, for the "The Colonial Tramcar Restaurant", Melbourne. .1 - pamphlet with 442 on front cover, advertising the restaurant, the food, seating plan, departure point and the availability of the tramcar. .2 - Menu - full dinner four course menu, including logos. On the rear is a brief history of Melbourne tramways and the Colonial Tramcar Restaurant itself. Has contact details. c1983. Two copies of .1 held. .3 and .4 - similar to .1 with slightly different information and contents.trams, tramways, restaurant tram, colonial tramcar restaurant, menu -
 Bendigo Historical Society Inc.
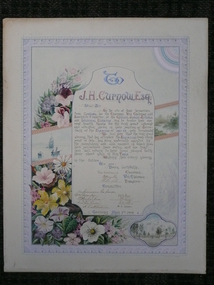
Document - JAMES HENRY CURNOW ILLUMINATED ADDRESS, 1888
... It is decorated with floral motifs and hand-painted scenes including a sailing ship and the Melbourne Exhibition Building, which was the central hub for these types of colonial celebrations in Melbourne....It is decorated with floral motifs and hand-painted scenes including a sailing ship and the Melbourne Exhibition Building, which was the central hub for these types of colonial celebrations in Melbourne. ...James Curnow served as a key official for the Geelong Jubilee Juvenile and Industrial Exhibition in 1887. This exhibition was a major event held to celebrate Queen Victoria's Golden Jubilee and to encourage young people in trades and the "fine arts and ornamental works". The illuminated address is authenticated by the signatures of the exhibition's committee members. It is decorated with floral motifs and hand-painted scenes including a sailing ship and the Melbourne Exhibition Building, which was the central hub for these types of colonial celebrations in Melbourne.An illuminated address presented to James Henry Curnow, Esq., by the Committee of the Geelong Jubilee Juvenile and Industrial exhibition, 1887. Hand painted and written on card with committee members signatures, decorated with flowers and with scenes of Melbourne Exhibition building, sailing ship and bordered by a design in blue/grey.Markings - H Frank and Co, Geelong.person, individual, james henry curnow -
 Melbourne Tram Museum
Pamphlet - Colonial Tramcar Restaurant, Colonial Tramcar Restaurant, Menu, 1988
... Set of three documents, full colour on gloss paper, for the "The Colonial Tramcar Restaurant", Melbourne. 1 - Menu - full dinner four course menu, including logos. ...Yields information about the Tramcar Restaurant operation in Melbourne. tramways trams W class Restaurant Tram Colonial Tramcar Restaurant Menu Tram 442 Set of three documents, full colour on gloss paper, for the "The Colonial Tramcar Restaurant", Melbourne. 1 - Menu - full dinner four course menu, including logos. ...Set of documents associated with the Colonial Tramcar Restaurant that commenced operations in 1982 and ceased in 2018 due to dispute with Yarra Trams over the safety of the tramcars. It was a very popular operation. See reference for further details. Item 1 - notes the September 1984 Tourism Award, item 2 and 3 are promotional pamphlets. The Museum has other similar documents from different dates in its collection. Yields information about the Tramcar Restaurant operation in Melbourne.Set of three documents, full colour on gloss paper, for the "The Colonial Tramcar Restaurant", Melbourne. 1 - Menu - full dinner four course menu, including logos. On the rear is a brief history of Melbourne tramways and the Colonial Tramcar Restaurant itself. Has contact details. 2 - pamphlet with 442 on front cover, advertising the restaurant, the food, seating plan, departure point and the availability of the tramcar. 3 - pamphlet promoting group bookings, general information, contact details including telex and fax numbers. Gives prices from Jan. 1988 and times. tramways, trams, w class, restaurant tram, colonial tramcar restaurant, menu, tram 442 -
 Melbourne Tram Museum
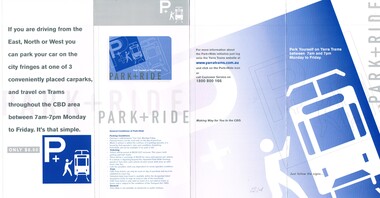
Pamphlet, Yarra Trams, "Park & Ride", c2001
... pamphlet about parking at Melbourne Museum, Colonial Stadium, or Olympic Park, and then using trams after purchasing a ticket. ...Melbourne Tram Museum 8 Wallen Road Hawthorn melbourne pamphlet about parking at Melbourne Museum, Colonial Stadium, or Olympic Park, and then using trams after purchasing a ticket. ...pamphlet about parking at Melbourne Museum, Colonial Stadium, or Olympic Park, and then using trams after purchasing a ticket. The map gave the locations of car parks and the travel limitations of the ticket. The pamphlet has instructions on how to use, the costs, and that it is only available on the tram service. Not dated, c2001 - Colonial stadium known as such between 2000 and 2002 - see https://en.wikipedia.org/wiki/Docklands_Stadium - accessed 7-12-2015. Second copy has a yellow sticker on the front, "All Day car parking and Tram Travel $8.50"Yields information about a Park and Ride scheme of Yarra Trams.Pamphlet - DL four fold titled "Park & Ride". Two copies held.trams, tramways, yarra trams, park and ride, tickets, melbourne -
 Broadmeadows Historical Society & Museum
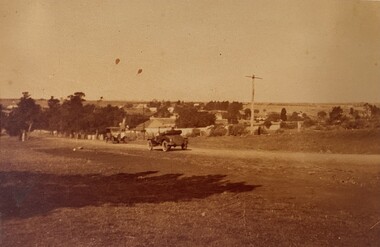
Photograph - Area - Suburb, Fawkner Street Westmeadows Looking North
... Historically, Westmeadows was a key waypoint along the Old Sydney Road, and its built environment—including bluestone bridges and early civic buildings—offers insight into Melbourne’s colonial and interwar development. This photograph contributes to the visual documentation of the City of Hume’s transformation from rural township to suburban district....Historically, Westmeadows was a key waypoint along the Old Sydney Road, and its built environment—including bluestone bridges and early civic buildings—offers insight into Melbourne’s colonial and interwar development. This photograph contributes to the visual documentation of the City of Hume’s transformation from rural township to suburban district. ...This photograph captures a historically significant streetscape in Westmeadows, formerly known as Broadmeadows Township, looking north from Fawkner Street. The image features a dirt road with a vintage automobile parked along its path, flanked by trees and modest residential buildings in the background. A tall utility or signpost stands prominently, indicative of early infrastructure in the area. The scene reflects the semi-rural character of Westmeadows prior to its suburban expansion in the post-war period. The presence of unsealed roads and early 20th-century vehicles suggests a time when the township served as a quiet residential and agricultural community, before the development of the Broadmeadows Housing Commission estate in the late 1940s. Historically, Westmeadows was a key waypoint along the Old Sydney Road, and its built environment—including bluestone bridges and early civic buildings—offers insight into Melbourne’s colonial and interwar development. This photograph contributes to the visual documentation of the City of Hume’s transformation from rural township to suburban district.This photograph holds historical and cultural significance as a visual record of Westmeadows, a township in Melbourne’s north-west, during the early 20th century. Captured from Fawkner Street looking north, the image depicts a dirt road flanked by modest residential buildings and mature trees, with a vintage automobile parked in the foreground. The presence of a tall utility or signpost adds to the authenticity of the streetscape. The image is emblematic of Westmeadows’ semi-rural character prior to its suburban transformation in the post-war era. It reflects the township’s role as a quiet residential and agricultural community, shaped by its proximity to the Old Sydney Road and its historical function as a waypoint for travelers. The architectural style and infrastructure visible in the photograph provide insight into the urban morphology and transport conditions of the time. As a primary source, the photograph contributes to the documentation of Melbourne’s suburban expansion, offering valuable context for researchers, historians, and urban planners studying the evolution of the City of Hume. It is significant for its ability to convey the lived experience, landscape, and development patterns of a community in transition.Sepia tone photo. Two cars on road. Trees, some buildings behind. Open land. Street view.'Looking north Fawkner Street Westmeadows'/'PH-0018' (old catalogue number)westmeadows, fawkner street, north, car -
 Clunes Museum
Poster
... PROCLAMATION ISSUED BY THE COLONIAL SECRETARY'S OFFICE IN MELBOURNE IN 1854. Describes Lawlor as Height, 5 ft 1&/34 in, age 35 hair dark brown, whiskers dark brown, and shaved under the chin, no moustache, rather good looking, and is a well made man. ...Clunes Museum 36 Fraser Street enter building through Collins Place Clunes goldfields PROCLAMATION ISSUED BY THE COLONIAL SECRETARY'S OFFICE IN MELBOURNE IN 1854. Describes Lawlor as Height, 5 ft 1&/34 in, age 35 hair dark brown, whiskers dark brown, and shaved under the chin, no moustache, rather good looking, and is a well made man. ...PROCLAMATION ISSUED BY THE COLONIAL SECRETARY'S OFFICE IN MELBOURNE IN 1854. Describes Lawlor as Height, 5 ft 1&/34 in, age 35 hair dark brown, whiskers dark brown, and shaved under the chin, no moustache, rather good looking, and is a well made man. His accomplice, Black described as Height over 6 feet, straight figure, slight build, bright red hair, worn in general rather long and brushed backwards, red and large whiskers, meeting under the chin, blue eyes, large thin nose, ruddy complexion and rather small mouth. Lawlor was wanted for treasonable seditious language and incite men to take up arms with a view to make war against our sovereign lady the Queen.TWO PHOTOCOPIES OF POSTER FOR TWO WANTED MEN - LAWLOR AND BLACK. WITH A REWARD OF 400 POUNDS LEADING TO THEIR ARRESTNILlawlor/black, wanted poster, lalor -
 Warrnambool and District Historical Society Inc.
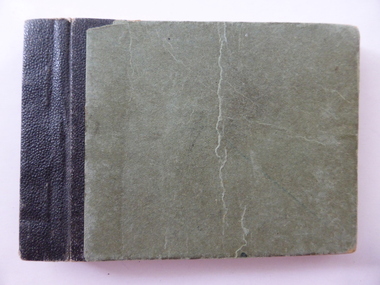
Book - Encyclopaedia of Australasia, David Blair, Cyclopaedia of Australasia, 1881
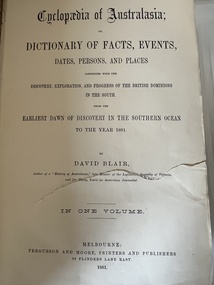
... Colonial History Australian History Warrnambool History Dictionary of facts, places and people of British Colonies in the Southern Ocean R. Dodman Oct 4th 1926 This is a book of 794 pages. It has a brown cover with gold printing on the front and the spine. The front cover is completely detached. The pages contain printed text. Cyclopaedia of Australasia Book Encyclopaedia of Australasia David Blair Fergusson and Moore, Melbourne ...Dictionary of facts, places and people of British Colonies in the Southern OceanThis is a book of 794 pages. It has a brown cover with gold printing on the front and the spine. The front cover is completely detached. The pages contain printed text. non-fictionDictionary of facts, places and people of British Colonies in the Southern Ocean british colonial history, australian history, warrnambool history -
 Warrnambool and District Historical Society Inc.
Book, Melbourne University Press, Picturesque Pursuits, 2005
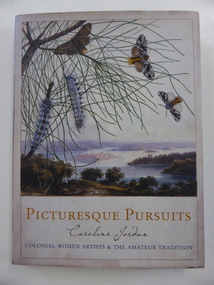
... colonial woman artists. This is a hard cover book of 224 pages. It contains sections on Acknowledgements, Prologue, five chapters, Epilogue, Abbreviations, Notes, Bibliography, Sources of Illustrations and Index. The cover is cream-coloured with gold lettering and the dust cover has a grey background with a colour image of an artist’s work on the front cover and a colour image of a woman on the back cover. The book has many black and white and colour illustrations. Picturesque Pursuits Book Book Melbourne ...This book gives information on Australian colonial woman artists.This is a hard cover book of 224 pages. It contains sections on Acknowledgements, Prologue, five chapters, Epilogue, Abbreviations, Notes, Bibliography, Sources of Illustrations and Index. The cover is cream-coloured with gold lettering and the dust cover has a grey background with a colour image of an artist’s work on the front cover and a colour image of a woman on the back cover. The book has many black and white and colour illustrations. non-fictionThis book gives information on Australian colonial woman artists.women artists in australia, caroline jordan -
 Warrnambool and District Historical Society Inc.
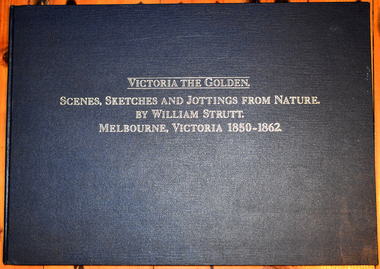
Book, William Strutt et al, Victoria The Golden - Scenes, Sketches and Jottings from Nature, 1980
... Melbourne and other districts in Victoria and portraits of local people. The original book of 'Victoria The Golden' is in the Library of the Parliament of Victoria. This book is retained for its historical value as a record of early colonial ...Reproduction of an early Victorian artist's workThis is a book of 85 pages. It has a blue cover with gold lettering on the front cover and the spine. It contains printed text, reproductions of artistic works - sketches, lithographs and jottings. non-fictionReproduction of an early Victorian artist's workvictorian colonial art, william strutt -
 Warrnambool and District Historical Society Inc.
Booklet, W'bool harbor board pages Harbour - stamp, 1928
... Colonial Government. In those times these officials were responsible to the Chief Harbour Master and the Ports and Harbours Department in Melbourne but over the ensuing years the Port of Warrnambool came under different colonial and State Departments and the titles of the harbour officials in Warrnambool changed accordingly. ...Colonial Government. In those times these officials were responsible to the Chief Harbour Master and the Ports and Harbours Department in Melbourne but over the ensuing years the Port of Warrnambool came under different colonial and State Departments and the titles of the harbour officials in Warrnambool changed accordingly. ...This is a receipt book issued by the Warrnambool Harbour Board to masters of ships that took on fresh water in Warrnambool Harbour. The Port of Warrnambool was administered by various bodies since the early 1850s with Harbour Masters, Pilots, Boatmen and Customs officials appointed by the Colonial Government. In those times these officials were responsible to the Chief Harbour Master and the Ports and Harbours Department in Melbourne but over the ensuing years the Port of Warrnambool came under different colonial and State Departments and the titles of the harbour officials in Warrnambool changed accordingly. In 1928 the Warrnambool Harbour Board was formed with Captain James Menzies as the Warrnambool Harbour Master. This Board was dissolved in 1937 and Captain Menzies was transferred to Portland where he stayed until 1945. Warrnambool ceased to operate as a port in the early 1940s. This receipt is of maritime interest. The book records the names of several ships in Warrnambool from 1927 to 1937, including the ‘Casino’, ‘Chillagoe’, the dredge ‘Pioneer’, and ‘Kapera’. This is a receipt book used by the Warrnambool Harbour Board. The book has mostly the pink copy of the receipt issued but there are a couple of the original receipts still intact. The receipt book has been printed and the details on the receipts have been handwritten in ink. The cover is cardboard with brown taping and the stamp of the Warrnabool Harbour Board is on the back cover. ‘Warrnambool Harbour Board’ warrnambool harbour board, captain james menzies, maritime history of warrnambool. -
 Warrnambool and District Historical Society Inc.
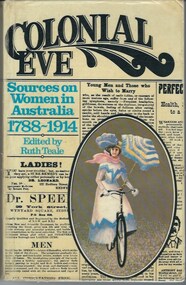
Book, Colonial Eve edited by Ruth Teale, 1978
... A comprehensive collection of material which gives an interesting insight into various aspects of women’s lives in Early Australia. colonial Eve ruth teale convict women victorian age women Australia early australian women History of Warrnambool Oxford University Press Melbourne. ...This book relates the story of women in Australian history from 1788 to 1914. It draws on information from a collection of original documents collected from journals, newspapers, government documents and private accounts. It includes a number of black and white illustrations from various sources including the Bulletin. It covers topics such as convict women, women at home in the Victorian age, Women and their Families and Women outside the home.A comprehensive collection of material which gives an interesting insight into various aspects of women’s lives in Early Australia.Paperback yellow in colour with black title and newspaper text. By Line “Sources on Women in Australia 1788-1914 edited by Ruth Teale” in blue. Lady dressed in blue and white, riding a bicycle on back cover. 288 Pages.Oxford University Press Melbourne. First published 1978.colonial eve, ruth teale, convict women, victorian age women australia, early australian women, history of warrnambool -
 Warrnambool and District Historical Society Inc.
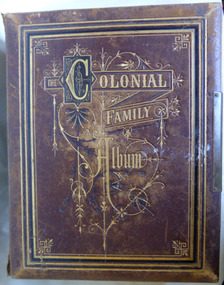
Album - Family photo album
... Colonial Family Album on the front, back and spine engraved. Metal locking clasp is broken. 23 pages. Binding in blue tape. Each page is highly decorated changing on each page, facing pages match each other, colours used are gold, red, blue, pink and green. Photos are taken mid 1870's to late 1880's by photographers from Melbourne...Colonial Family Album on the front, back and spine engraved. Metal locking clasp is broken. 23 pages. Binding in blue tape. Each page is highly decorated changing on each page, facing pages match each other, colours used are gold, red, blue, pink and green. Photos are taken mid 1870's to late 1880's by photographers from Melbourne ...The actual history of this object relating to Warrnambool is unknown at this stageSome photos have been identified as local people from WarrnamboolLeather bound. Brown. Engrave with Gold and Black. Ornate scrolled, embossed work on cover with The words The Colonial Family Album on the front, back and spine engraved. Metal locking clasp is broken. 23 pages. Binding in blue tape. Each page is highly decorated changing on each page, facing pages match each other, colours used are gold, red, blue, pink and green. Photos are taken mid 1870's to late 1880's by photographers from Melbourne, Portland & Ballarat. Sepia photos, 20 large frames of men & women, 20 small oval & round topped oblong frames. Collection of Women, Men, Teenagers and children. Each photo slides in from the bottom of frame through a small slot.album. photographs. photographers. ornate art work., warrnambool historical society