Showing 41 items matching "gun turrets"
-
 Moorabbin Air Museum
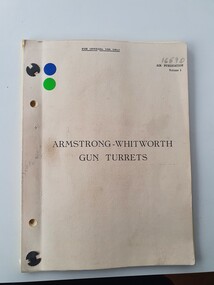
Manual (item) - Armstrong-Whitworth Gun Turrets, February 1939
... Armstrong-Whitworth Gun Turrets...Armstrong-Whitworth Gun Turrets ......Gun turrets...Avro Anson, Armstrong-Whitworth, Gun turrets, Air ministry 1939...Moorabbin Air Museum Moorabbin Airport 12 First Street Moorabbin melbourne Avro Anson, Armstrong-Whitworth, Gun turrets, Air ministry 1939 Armstrong-Whitworth RAF Air Ministry Gun turrets Avro Anson Armstrong-Whitworth Gun Turrets Manual Armstrong-Whitworth Gun Turrets ...Avro Anson, Armstrong-Whitworth, Gun turrets, Air ministry 1939armstrong-whitworth, raf, air ministry, gun turrets, avro anson -
 Moorabbin Air Museum
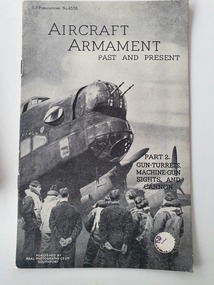
Booklet (item) - Aircraft Armament Past and Present: Part 2. Gun Turrets, Machine-Gun Sights, and Cannon, R.P. Publications No.42/15 Aircraft Armament Past and Present
... Aircraft Armament Past and Present: Part 2. Gun Turrets, Machine-Gun Sights, and Cannon...Focusing on aircraft that utilized gun turrets, machine guns and cannons. ...Focusing on aircraft that utilized gun turrets, machine guns and cannons. World War Two World War Two Aircraft Aircraft Aircraft Armament R.P. ...Second world war armament. Focusing on aircraft that utilized gun turrets, machine guns and cannons. world war two, world war two aircraft, aircraft, aircraft armament -
 Moorabbin Air Museum
Document (Item) - Drawings and design data for machine gun turrets and propellers also Cessna 0-1A bird dog article, Packet 48 turret and propellers
... Drawings and design data for machine gun turrets and propellers also Cessna 0-1A bird dog article...Moorabbin Air Museum Moorabbin Airport 12 First Street Moorabbin melbourne Packet 48 turret and propellers Document Drawings and design data for machine gun turrets and propellers also Cessna 0-1A bird dog article ... -
Moorabbin Air Museum
Manual (Item) - Armstrong-Whitworth Gun Turrets
... Armstrong-Whitworth Gun Turrets...Manual Armstrong-Whitworth Gun Turrets ...Description: 800 pages. Published by Hawker Siddeley Aviation Limited, Avro Whitworth Division. Published with materials from 1960-1965. Level of Importance: World. -
Moorabbin Air Museum
Drawing (item) - C-76, Curtiss Wright caravan, P175, Anti tank aircraft, Sopwith Hawker Hart II, P165 gun turrets, Miscellaneous Aircraft Drawings
... C-76, Curtiss Wright caravan, P175, Anti tank aircraft, Sopwith Hawker Hart II, P165 gun turrets ...Moorabbin Air Museum Moorabbin Airport 12 First Street Moorabbin melbourne Miscellaneous Aircraft Drawings Drawing C-76, Curtiss Wright caravan, P175, Anti tank aircraft, Sopwith Hawker Hart II, P165 gun turrets ... -
 National Vietnam Veterans Museum (NVVM)
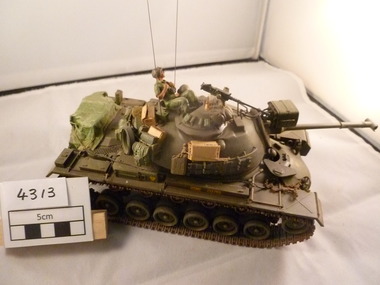
Model - Model, tank
... '5124' on gun turret...National Vietnam Veterans Museum (NVVM) 25 Veterans Drive Newhaven phillip-island-and-the-bass-coast Tank Model '5124' on gun turret An olive green model tank with the number 5124 on the side turret. ...An olive green model tank with the number 5124 on the side turret. This is possibily an Russian tank.'5124' on gun turrettank, model -
 Bendigo Military Museum
Photograph - PHOTOGRAPH, RAAF WW2, C.1943 - 45
... B & W photograph showing an Airmen in the rear Gun Turret of a Bomber....Bendigo Military Museum 37 - 39 Pall Mall Bendigo goldfields The Airmen in the turret is Allan Frederick Goodall DFC, RAAF, refer Cat No 543.2 for his service details. photographs DFC bomber B & W photograph showing an Airmen in the rear Gun Turret of a Bomber. Photograph PHOTOGRAPH, RAAF WW2 ...The Airmen in the turret is Allan Frederick Goodall DFC, RAAF, refer Cat No 543.2 for his service details.B & W photograph showing an Airmen in the rear Gun Turret of a Bomber.photographs, dfc, bomber -
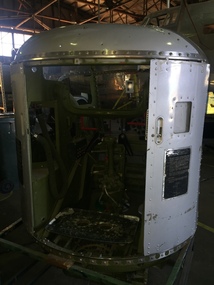 B-24 Liberator Memorial Restoration Australia Inc
Gun Turret, Rear Gun Turret
... Gun Turret...Rear Gun Turret...Perspex side and top covered metal round gun turret with 1 inch steel plate...B-24 Liberator Memorial Restoration Australia Inc Corner Farm Rd & Princes Highway Werribee melbourne Perspex side and top covered metal round gun turret with 1 inch steel plate Rear Gun Turret Gun Turret ...Perspex side and top covered metal round gun turret with 1 inch steel plate -
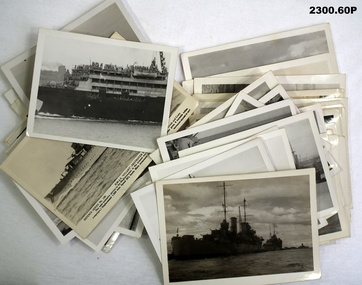
 Bendigo Military Museum
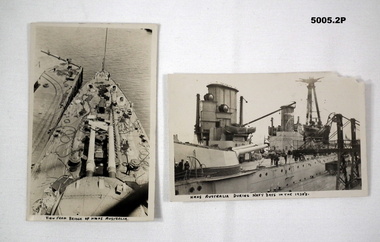
Postcard - POSTCARDS OF HMAS AUSTRALIA IN 1920, Royal Australian Navy, c1920's
... The photo shows one gun turret, two funnels and wireless mast....B & W postcard shows scene of foredeck taken from the bridge. One twin gun turret can be observed. The ship is tied up at a wharf. 2. ...1. B & W postcard shows scene of foredeck taken from the bridge. One twin gun turret can be observed. The ship is tied up at a wharf. 2. Side view of HMAS AUSTRALIA. The photo shows one gun turret, two funnels and wireless mast.1. On front bottom is handwritten "View from bridge of HMAS AUSTRALIA". 2. On front bottom is written "HMAS AUSTRALIA during Navy days in the 1920's" .photographs, ran, hmas australia -
 National Vietnam Veterans Museum (NVVM)
Model - Model, US Patton tank
... USMC 217793, 54 in circle on mudguard, 4 in a shield shape on frontal armour, C 23 on gun turret and frontal armour....National Vietnam Veterans Museum (NVVM) 25 Veterans Drive Newhaven phillip-island-and-the-bass-coast M48 Patton Tank USMC 217793, 54 in circle on mudguard, 4 in a shield shape on frontal armour, C 23 on gun turret and frontal armour. Patton Tank M48 USMC with crew and heavy machine gun in with tarp covered box on rear. ...Patton Tank M48 USMC with crew and heavy machine gun in with tarp covered box on rear. Colour of the tank is olive green.USMC 217793, 54 in circle on mudguard, 4 in a shield shape on frontal armour, C 23 on gun turret and frontal armour.m48, patton tank -
 Stawell Historical Society Inc
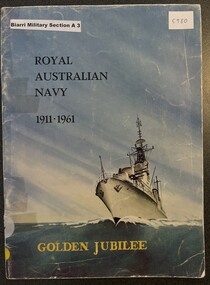
Book - Navy Golden Jubilee, Royal Australian Navy 1911-1961 Golden Jubilee Souvenir
... Paperback front cover in colour Naval vessel at Sea Rear b/w Gun Turret on vessel "stand to, the dawn"...a brief hiostory of the navy for jubilee purposes Navy History Jubilee Issud by authority of the Departmentof the navy, Canberra Paperback front cover in colour Naval vessel at Sea Rear b/w Gun Turret on vessel "stand to, the dawn" Royal Australian Navy 1911-1961 Golden Jubilee Souvenir Book Navy Golden Jubilee ...a brief hiostory of the navy for jubilee purposesPaperback front cover in colour Naval vessel at Sea Rear b/w Gun Turret on vessel "stand to, the dawn"Issud by authority of the Departmentof the navy, Canberranavy, history jubilee -
 National Vietnam Veterans Museum (NVVM)
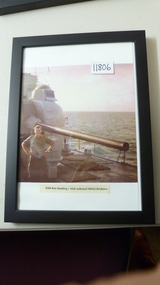
Photograph, GNR Ron Ressing - Visit onboard HMAS Brisbane
... Photograph of GNR Ron Redding standing in front of a Mount 5 Forward 5 inch gun turret aboard HMAS Brisbane...National Vietnam Veterans Museum (NVVM) 25 Veterans Drive Newhaven phillip-island-and-the-bass-coast Photograph HMAS Brisbane Photograph of GNR Ron Redding standing in front of a Mount 5 Forward 5 inch gun turret aboard HMAS Brisbane GNR Ron Ressing - Visit onboard HMAS Brisbane Photograph Photograph ...Photograph of GNR Ron Redding standing in front of a Mount 5 Forward 5 inch gun turret aboard HMAS Brisbanephotograph, hmas brisbane -
 Lara RSL Sub Branch
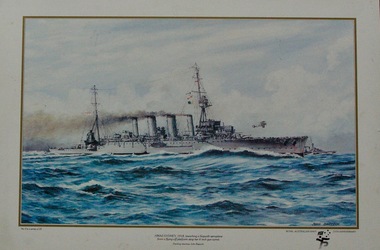
Coloured Print of HMAS SYDNEY 1918
... HMAS SYDNEY 1918,launching a Sopwith aeroplane from a flying-off platform atop her 6 inch gun turret. ROYAL AUSTRALIAN NAVY 75TH ANNIVERSARY...HMAS SYDNEY 1918,launching a Sopwith aeroplane from a flying-off platform atop her 6 inch gun turret. ROYAL AUSTRALIAN NAVY 75TH ANNIVERSARY Rectangular shaped mounted Print of HMAS SYDNEY 1918 Coloured Print of HMAS SYDNEY 1918 ...HMAS Sydney was a Chatham-class light cruiser of the Royal Australian Navy. Laid down in 1911 and launched in 1912, the cruiser was commissioned into the RAN in 1913. During the early stages of World War I, Sydney was involved in supporting the Australian Naval and Military Expeditionary Force, and escorting the first ANZAC convoy. On 9 November 1914, the cruiser defeated the German cruiser SMS Emden at the Battle of Cocos. During 1915 and 1916, Sydney operated on the North America and West Indies Station, before joining the 2nd Light Cruiser Squadron at Greenock, Scotland in November 1916. On 4 May 1917, the cruiser was involved in an inconclusive action against the German zeppelin L43; neither was damaged. During late 1917, Sydney became the first Australian warship to launch an aircraft, and the first warship to do so from a rotatable platform.Rectangular shaped mounted Print of HMAS SYDNEY 1918HMAS SYDNEY 1918,launching a Sopwith aeroplane from a flying-off platform atop her 6 inch gun turret. ROYAL AUSTRALIAN NAVY 75TH ANNIVERSARYww1, hmas sydney,lara r.s.l. australian naval ships, light cruisers. -
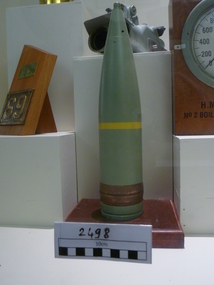 National Vietnam Veterans Museum (NVVM)
Weapon, 4.5 Inch Naval Gun Projectile
... Inert Training Round Inert training rounds, such as this example, were used to train gun turret crews in handling and firing the 4.5 guns on HMAS Vendetta which served on the 'gunline' during the Vietnam war....National Vietnam Veterans Museum (NVVM) 25 Veterans Drive Newhaven phillip-island-and-the-bass-coast Shell HMAS Vendetta Inert Training Round Inert training rounds, such as this example, were used to train gun turret crews in handling and firing the 4.5 guns on HMAS Vendetta which served on the 'gunline' during the Vietnam war. ...A green shell that has a yellow ring in the middle and metal ring near the bottom. It sits on a crimson wooden stand.Inert Training Round Inert training rounds, such as this example, were used to train gun turret crews in handling and firing the 4.5 guns on HMAS Vendetta which served on the 'gunline' during the Vietnam war.shell, hmas vendetta -
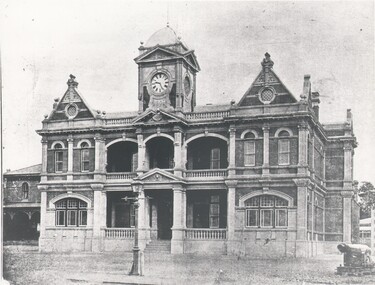 Bendigo Historical Society Inc.
Photograph - HARRY BIGGS COLLECTIO: EAGLEHAWK TOWN HALL
... Steps are leading up to the main entrance & a gun turret is at the side....Steps are leading up to the main entrance & a gun turret is at the side. Photograph HARRY BIGGS COLLECTIO: EAGLEHAWK TOWN HALL ...Photograph. Harry Biggs Collection. 3 black & white photos of Eaglehawk Town Hall. The ornate façade of the Town Hall is clearly visible with the clock above. Steps are leading up to the main entrance & a gun turret is at the side.place, building, public buildings, harry biggs collection, eaglehawk town hall -
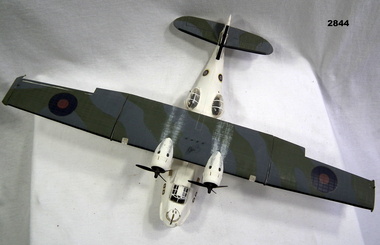 Bendigo Military Museum
Leisure object - MODEL, FLYING BOAT, post WW2
... Two Rockets under each side of main wing. Gun turrets on each side of fuselage....Two Rockets under each side of main wing. Gun turrets on each side of fuselage. Leisure object MODEL, FLYING BOAT ...Plastic scale model of Catalina Flying Boat. Twin engines on high main wing. Camouflage colouring on top of wing & tail wings. White fuselage & under wings. Gun mounted in front of cockpit. Two Rockets under each side of main wing. Gun turrets on each side of fuselage.Each side of fuselage under cockpit: "No 88" Each side of tail fin: "No 1188"military history - souvenirs - air force, passchendaele barracks trust -
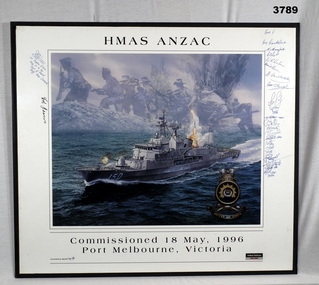 Bendigo Military Museum
Print - PRINT HMAS, MOUNTED, Post 1966
... Ship is powering forward firing forward gun turret & 2 missiles from aft. Ground troops with weapons are pictured in top background. ...Ship is powering forward firing forward gun turret & 2 missiles from aft. Ground troops with weapons are pictured in top background. ...Coloured print of HMAS ANZAC by Tom Freeman 1996. Ship is powering forward firing forward gun turret & 2 missiles from aft. Ground troops with weapons are pictured in top background. Print is mounted on chipboard with white border & black edging. Laminated in clear plastic with small white hanging strap at rear.Above print in black type: “HMAS ANZAC” Below print in black type: “Commissioned 18 May, 1996 Port Melbourne, Victoria” Handwritten in blue ink either side of print: “Signatures” Emblem RHS bottom of print: “ANZAC UNITED WE STAND” Signatures print, anzac, mounted, hmas -
 Bendigo Military Museum
Print - PRINT RAN, FRAMED, Post 1978
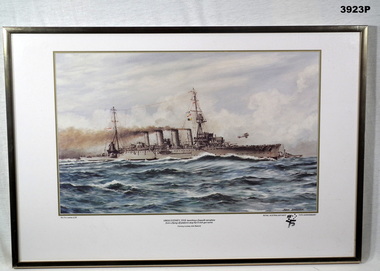
... Launching a Sopwith aeroplane from a flying off platform atop her 6 inch gun turret. There is another ship in background visible RHS past bow of the Sydney. ...Launching a Sopwith aeroplane from a flying off platform atop her 6 inch gun turret. There is another ship in background visible RHS past bow of the Sydney. ...Painting courtesy of John Bastock.Colour print of HMAS Sydney 1918 at sea. Launching a Sopwith aeroplane from a flying off platform atop her 6 inch gun turret. There is another ship in background visible RHS past bow of the Sydney. Print is No 3 in a series of 25. Mounted with white border with gold metal frame, masonite backing & wire hanging strap. Printed RHS bottom on border under print: “ROYAL AUSTRALIAN NAVY 75TH ANNIVERSARY” Printed RHS bottom corner on print: “John Bastock”print, ran, anniversary, 75th -
 Bendigo Military Museum
Painting - NAVY PAINTING, FRAMED, 1948
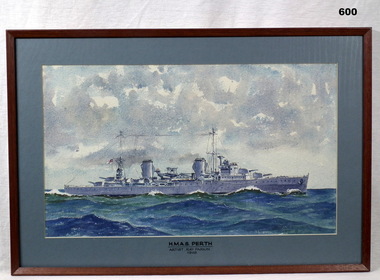
... The ship is grey with 4 twin main gun turrets. It also holds an Albatross Aircraft, 2 funnels & 2 wireless masts. ...The ship is grey with 4 twin main gun turrets. It also holds an Albatross Aircraft, 2 funnels & 2 wireless masts. ...Painting is mounted with light blue border in a brown wooden frame with glass front, cream paper backing & a wire hanging strap. Water colour painting of a warship at sea. The ship is grey with 4 twin main gun turrets. It also holds an Albatross Aircraft, 2 funnels & 2 wireless masts. The painted sky shows patchy clouds, the sea is a blue green colour with small white waves. HMAS Perth Artist Ray Parkin 1948hmas perth, ww2, ran, paintings -
 4th/19th Prince of Wales's Light Horse Regiment Unit History Room
Weapon - 76 mm Instructional Gun Turret
... 76 mm Instructional Gun Turret...76 mm gun in Scorpion turret. In steel mounting in which holes have been cut for trainee viewing. ...Weapon 76 mm Instructional Gun Turret ...Equipment previously used by the Regiment76 mm gun in Scorpion turret. In steel mounting in which holes have been cut for trainee viewing. With 1 x drill round.gunnery, training aid, 76mm. -
 B-24 Liberator Memorial Restoration Australia Inc
Mid Upper Turret, B-24 Liberator Part, C. 1944/45
... The 23A was an all electric Turret. It was armed with two .50 calibre machine guns (Browning) MKII. ...The 23A was an all electric Turret. It was armed with two .50 calibre machine guns (Browning) MKII. ...Martin 250CE Mid Upper Turret first introduced on the L Model B-24 Liberator. The US Army Air Force Model 23A became standard on all late model J, J/R, L, M and M/R model Liberators. The 23A was an all electric Turret. It was armed with two .50 calibre machine guns (Browning) MKII. The Turret carried 900 rounds (bullets), 450 rounds per gun.a12 -
 City of Melbourne Libraries
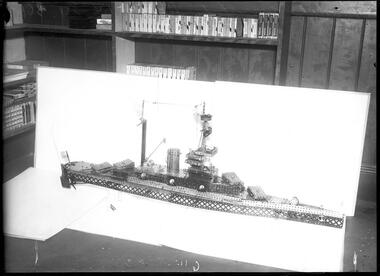
Photograph, Bull, Hugh Jones, 1897-1993, Window display: model warship YiPi
... It is fitted with four swivelling turret guns, six quick-firers, searchlight, movable anchor rudder and propeller. ...It is fitted with four swivelling turret guns, six quick-firers, searchlight, movable anchor rudder and propeller. ...Teenager’s Meccano model in The Age window Whilst Barry’s model is interesting, and he himself is more than interesting – renowned for his lifelong harmonica playing, vaudeville and stand-up comedy as “Mr Versatility” – it is the location of the photo which intrigued us. Was this the photographer’s office, and would it give us a clue to his identity? We thought he might be “Mr Duke” as some boxes of Kodak slides were so named! But we later deduced they were most likely related to the Duke’s Centenary visit to Melbourne. However, they did lead us to The Age archivist Michelle Stillman, who held the key to unlock the photographer’s identity. Louise McKenzie. Photographer notations on slide: "Model warship YiPi 14-12-34 B61" Published: 14 September 1934 The Age p15 Published title: MECCANO CRUISER Published caption: Barry Sandford (17) of Richmond, recently completed this splendid Meccano model of a modern cruiser. It is fitted with four swivelling turret guns, six quick-firers, searchlight, movable anchor rudder and propeller. This model is on view in "The Age" office window, Collins-street. Trove article identifier: http://nla.gov.au/nla.news-article205072014 Description: Meccano model of cruiser. Wood panelled office walls and boxes of glass slides can be seen in the background. Research by project volunteer, Louise McKenzie: The second slide we scanned, this photo of Barry Sandford’s Meccano model of a cruiser was of particular interest because it appeared to have been taken in the photographer's studio/office. For the bulk of our project, the identity of the photographer was not known, and we delighted in imagining who they were, whether they were amateur or professional, and what else might be stored in those neatly labelled boxes in the background. But the photo had its own story regardless. A photo of Barry Sandford’s meccano model appeared in the Melbourne AGE on Friday 14 December 1934; it was probably the same photo as the one in our collection – now cropped to remove the background office environment. This background shows shelves of Kodak Panochromatic, and archived boxes labelled “DUKE” with various references: D1 – D23, and one labelled ‘DUKE Not Used’. On a shelf there is a stack of wooden glass plate holders. It wasn't until early 2023 that the photographer's identity was revealed with the help of archivist/librarian at The Age, Michelle Stillman. As for young Barry – what a talent! Meccano was hugely popular at this time. The Melbourne Meccano Club met on a Tuesday at the YMCA building. On 18 August 1933 The Age reported that at their upcoming meeting the model builders “will gain an insight into the oil industry from a lecturer and moving pictures supplied by the Vacuum Oil Co.” Models reflected an interest in rapid technological developments of the time, and also key activities. On 2 November 1934 The Age showed Barry with a model of Sir Charles Kingsford Smith’s Lockheed Altair, “Lady Southern Cross”, which Kingsford Smith purchased with the intent to compete in the MacRobertson Air Race as part of the Melbourne Centenary celebrations. He did not participate, but in late 1935 he and co-pilot John Thompson “Tommy” Pethybridge flew Lady Southern Cross from India to Singapore in an attempt to break the England-Australia speed record. Sadly, on the night of 8 November, they disappeared over the Andaman Sea and were never found. The Harmonica Riff Raff blog provides an amazing and comprehensive commentary on Barry Sandford's life. He is described as a Richmond boy of many talents – model making, archery, comedy, kite making, magic and juggling, as well as a harmonica virtuoso. He was particularly renowned for his harmonica playing and the creation of a two-foot long harmonica, and a tiny, hands-free organ which he played fully enclosed in his mouth. He promoted himself as Mr. Versatility and often featured in Melbourne news articles in the 1930s and 1940s. He remained very active in the entertainment business throughout his life, including as a member of the Four Octaves harmonica group, on the Tivoli circuit, and in vaudeville and stand up comedy. He successfully made the move from stage and radio into television. He died in 1992, still saluted by his peers as the gentleman, Mr Versatility. References: MECCANO CRUISER. (1934, December 14). The Age (Melbourne, Vic. : 1854 - 1954), p. 3. Retrieved January 22, 2024, from http://nla.gov.au/nla.news-article205072014 MIMIC MECCANO WARFARE. (1933, July 21). The Age (Melbourne, Vic. : 1854 - 1954), p. 2 (This Supplement is Published Every Friday). Retrieved September 19, 2023, from http://nla.gov.au/nla.news-article204368610 MELBOURNE MECCANO CLUB. (1933, August 18). The Age (Melbourne, Vic. : 1854 - 1954), p. 1 (This Supplement is Published Every Friday). Retrieved September 19, 2023, from http://nla.gov.au/nla.news-article204367564 MECCANO MODEL OF LADY SOUTHERN CROSS. (1934, November 2). The Age (Melbourne, Vic. : 1854 - 1954), p. 3. Retrieved September 19, 2023, from http://nla.gov.au/nla.news-article205083196 Charles Kingsford Smith, Wikipedia, https://en.wikipedia.org/wiki/Charles_Kingsford_Smith 'Mr. Versatility', Harmonica Riff Raff, https://harmonicariffraff.blog/2022/09/05/mr-versatility/ Photographer notations on slide: "Model warship YiPi 14-12-34 B61".ships, models, the age, harmonicas, meccano -
4th/19th Prince of Wales's Light Horse Regiment Unit History Room
Information Sheet, Turret, Machine Gun T-50
... Turret, Machine Gun T-50...4th/19th Prince of Wales's Light Horse Regiment Unit History Room 4/19 PWLH Regiment, Building 78 Simpson Barracks Macleod melbourne T-50 Turret A photocopy of the user handbook for the T-50 turret giving the general description and data, operating and maintenance instructions Turret, Machine Gun T-50 Information Sheet ...A photocopy of the user handbook for the T-50 turret giving the general description and data, operating and maintenance instructionst-50 turret -
4th/19th Prince of Wales's Light Horse Regiment Unit History Room
Photograph, Marman-Herrington Armoured Car
... Photograph of a Marmon-Herrington Mk VI, an eight wheeled, rear engined, armoured car fitted with a 2-pounder gun, .30 co-ax mg with twin .30 mgs for anti-aircraft mounted on a turret....4th/19th Prince of Wales's Light Horse Regiment Unit History Room 4/19 PWLH Regiment, Building 78 Simpson Barracks Macleod melbourne photo Marmon-Herrington Photograph of a Marmon-Herrington Mk VI, an eight wheeled, rear engined, armoured car fitted with a 2-pounder gun, .30 co-ax mg with twin .30 mgs for anti-aircraft mounted on a turret. Marman-Herrington Armoured Car Photograph ...Photograph of a Marmon-Herrington Mk VI, an eight wheeled, rear engined, armoured car fitted with a 2-pounder gun, .30 co-ax mg with twin .30 mgs for anti-aircraft mounted on a turret.photo, marmon-herrington -
4th/19th Prince of Wales's Light Horse Regiment Unit History Room
Photograph, Prototype Armoured Vehicle, est 1930's or 40's
... A b&w photograph that appears to be either a mock up or prototype of an an armoured vehicle. A turret mounting a 25 pdr (?) gun is on the back of a truck chassis. ...4th/19th Prince of Wales's Light Horse Regiment Unit History Room 4/19 PWLH Regiment, Building 78 Simpson Barracks Macleod melbourne photo AFV prototype Vehicle is signed "F83431" A b&w photograph that appears to be either a mock up or prototype of an an armoured vehicle. A turret mounting a 25 pdr (?) gun is on the back of a truck chassis. ...A b&w photograph that appears to be either a mock up or prototype of an an armoured vehicle. A turret mounting a 25 pdr (?) gun is on the back of a truck chassis. The driver's cabin is offset to the right and is armour protected as is the engine compartment. The truck is a Blitz or Bedford type.Vehicle is signed "F83431"photo, afv prototype -
 Bendigo Military Museum
Photograph - ARTHUR GEORGE HOLLEY PHOTOGRAPHIC ALBUM 11 PHOTOGRAPHS, HMAS Canberra 1928-1930
... Each desription is preceeded by an approximate date e.g.1940 06 is June 1940. 1. 7963-1 1933 Holley A nd B turrets HMAS Canberra Portsmouth England 2. 7963-2 1934 Spring cruise HMAS Squadron Australia Canberra and destroyers 3. 7963-3 1941 Holley hobart 4. 7963-4 Holley Canberra firing 8inch guns 5. 7963-5 Holley Canberra salvo 8inch guns 6. 7963-6 Holley Canberra 7. 7963-7 Holley HMAS Canberra in heavy seas 8. 7963-8 Canberra Welcome home 9. 7963-9 Holley ship with biplanes flypast from 015 10. 7963-10 holley Swains reef Queensland 1930s 11. 7963-11 Holley with 2 shipmates from HMAS Canberra...HMAS Canberra Interwar period arthur george holley Each desription is preceeded by an approximate date e.g.1940 06 is June 1940. 1. 7963-1 1933 Holley A nd B turrets HMAS Canberra Portsmouth England 2. 7963-2 1934 Spring cruise HMAS Squadron Australia Canberra and destroyers 3. 7963-3 1941 Holley hobart 4. 7963-4 Holley Canberra firing 8inch guns 5. 7963-5 Holley Canberra salvo 8inch guns 6. 7963-6 Holley Canberra 7. 7963-7 Holley HMAS Canberra in heavy seas 8. 7963-8 Canberra Welcome home 9. 7963-9 Holley ship with biplanes flypast from 015 10. 7963-10 holley Swains reef Queensland 1930s 11. 7963-11 Holley with 2 shipmates from HMAS Canberra HMAS Canberra 1928-1930 Photograph ARTHUR GEORGE HOLLEY PHOTOGRAPHIC ALBUM 11 PHOTOGRAPHS ...Items in the collection relating to ARTHUR GEORGE HOLLEY no 13556 RAN Refer cat no 2134 for his service record. The photographs are from his personal album, and are mainly official photographs widely available among the services. The photographs are from Australian , British and American sources. This set illustrates Holley's service on HMAS Canberra in the period 1928-1930 Whilst not taken personally, they do capture the events he and his Canberra crewmates would have experienced and witnessed.Each desription is preceeded by an approximate date e.g.1940 06 is June 1940. 1. 7963-1 1933 Holley A nd B turrets HMAS Canberra Portsmouth England 2. 7963-2 1934 Spring cruise HMAS Squadron Australia Canberra and destroyers 3. 7963-3 1941 Holley hobart 4. 7963-4 Holley Canberra firing 8inch guns 5. 7963-5 Holley Canberra salvo 8inch guns 6. 7963-6 Holley Canberra 7. 7963-7 Holley HMAS Canberra in heavy seas 8. 7963-8 Canberra Welcome home 9. 7963-9 Holley ship with biplanes flypast from 015 10. 7963-10 holley Swains reef Queensland 1930s 11. 7963-11 Holley with 2 shipmates from HMAS Canberrahmas canberra, interwar period, arthur george holley -
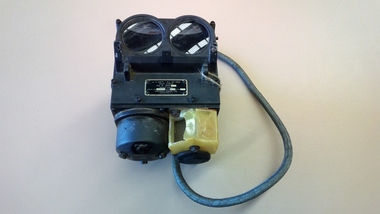 Nhill Aviation Heritage Centre
Memorabilia - US Navy MK18 Aircraft Computing Turret Gunsight
... GUN SIGHT MK 18 Mod SIGHT UNIT SERIAL No 501 Eastman Kodak Co ROCHESTER NY Black metal box with lens sights, and steel braid cord and plug connections.. Memorabilia US Navy MK18 Aircraft Computing Turret ...Used in military aircraft by US Navy Black metal box with lens sights, and steel braid cord and plug connections..U.S. NAVY. B U of ORD. GUN SIGHT MK 18 Mod SIGHT UNIT SERIAL No 501 Eastman Kodak Co ROCHESTER NY -
 Bendigo Military Museum
Photograph - PHOTOGRAPHS, NAVY WW2, c.WWII
... 1941 .14) HMS Carthage .15) Pilot station at Colombo .16) Aquitania .17) Ajax on patrol with Hobart and battle fleet .18) Hobart rolling in the Bight .19) HMS Gnat (river gun boat) hit by torpedo at Tobruk .20) - .21) Mauritania .22) Italian cruiser sunk by HMAS Sydney .23) Greek destroyer .24) Memorial of Mohomed Pasha Alexandria. Presented by Musso .25) Searchlight at Alexandria .26) Hobart pile driving in heavy weather .27) Lockheed Hudson dive bombing .28) - .29) HMS Galatea? x 1 turret...1941 .14) HMS Carthage .15) Pilot station at Colombo .16) Aquitania .17) Ajax on patrol with Hobart and battle fleet .18) Hobart rolling in the Bight .19) HMS Gnat (river gun boat) hit by torpedo at Tobruk .20) - .21) Mauritania .22) Italian cruiser sunk by HMAS Sydney .23) Greek destroyer .24) Memorial of Mohomed Pasha Alexandria. Presented by Musso .25) Searchlight at Alexandria .26) Hobart pile driving in heavy weather .27) Lockheed Hudson dive bombing .28) - .29) HMS Galatea? x 1 turret ...Photographs collected by Earnest Albert Simmons W/2129 Royal Australian Navy. Enlisted 30 June 1941 and discharged 14 October 1946 with the rank of Leading Stoker. Posting at discharge was HMAS Lonsdale..1) Ship .2) Submarine conning tower .3) Ship .4) Hospital ship .5) Ship at anchor .6) Launch at ships side .7) Ships at anchor .8) Sunken ship .9) Ship .10) Group on launch .11) Ship firing a broadside .12) Wooden sailing vessel .13) Ship .14) Ship .15) Pilot station .16) Ship .17) Ship .18) Ship.s deck and biplane .19) Partially sunken ship .20) Two ships .21) Ship .22) Ship - damaged .23) Ship .24) Statue and colonade .25) Searchlights .26) Ships deck at sea .27) Aircraft .28) Ship .29) Ship .30) Troop ship .31) Swimmers at ships side .32) Ship .33) Ship .34) Ship deck at sea .35) Ship .36) Submarine .37) Ship .38) Ship .39) Ship .40) Two ships at sea .41) Ship .42) Aircraft carrier .43) Ships symbol .44) Sketch of Berbera .45) Sketch of biplanes .46) Boat at pier .47) Tug boat .48) Ship .49) Ship at wharf .50) Ships at wharf .51) Aircraft carrier .52) Ship .53) Ship at wharf .54) Ships at wharf .55) Ship .56) Two ships .57) Tug boat .58) Diagram comparing the size of two ships .59) Ship sailing past lighthouse .60) Postcard HMAS "Stuart". .1) Hobart and Glascow at Colombo .2) British submarine returning to Alexandria after claiming a victory - note Skull and X Bones .3) HMS Glascow at Colombo .4) Ex Italian hospital ship taken over by British. RAMB II .5) HMS Exeter .6) The landing party returning .7) Part fleet at Colombo .8) British ammunition ship sunk by sabotage in Alex Harbour .9) HMS Exeter .10) On the approach of the island. Note twin Lewis guns .11) HMS Ajax bombarding Bardia .12) A native boat used along coasts and Indian Ocean .13) RMS Georgie refoated at Pt? 1941 .14) HMS Carthage .15) Pilot station at Colombo .16) Aquitania .17) Ajax on patrol with Hobart and battle fleet .18) Hobart rolling in the Bight .19) HMS Gnat (river gun boat) hit by torpedo at Tobruk .20) - .21) Mauritania .22) Italian cruiser sunk by HMAS Sydney .23) Greek destroyer .24) Memorial of Mohomed Pasha Alexandria. Presented by Musso .25) Searchlight at Alexandria .26) Hobart pile driving in heavy weather .27) Lockheed Hudson dive bombing .28) - .29) HMS Galatea? x 1 turret at stern .30) Troops on Aquitania .31) Boys swimming in the middle lakes at Ismalia in the centre of Sues Canal .32) A water NG ? .33) - .34) Hobart striking heavy weather .35) HMS Jupiter .36) British submarine entering Alex .37) Queen Mary .38) Queen Elizabeth .39) Nieuw Amsterdam .40) - .41) Achilles .42) HMS Aircraft carrier - Illustrious .43) Symbol of Hobart's Pom-Pom .44) - .45) - .46) - .47) - .48) Mohoja and Oronties .49) Mohoja .50) - .51) - .52) HMAS Murchison 1954 .53) Strathmore .54) - .55) - .56 - .57 - .58) HMAS Vendetta .59) HMAS Cowra .60) - photographs, ran, hmas -
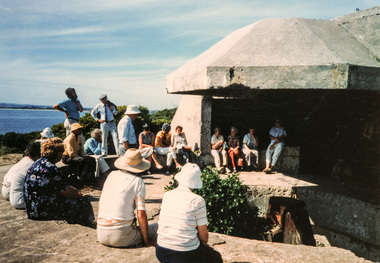 Eltham District Historical Society Inc
Photograph, Joh Ebeli, Point Nepean Gun Turret, Portsea and Sorrento, 1 December 1985, 01/12/1985
... Point Nepean Gun Turret, Portsea and Sorrento, 1 December 1985...This was a long and tiring, but very rewarding, trip. activities portsea sorrento Colour photograph Point Nepean Gun Turret, Portsea and Sorrento, 1 December 1985 Photograph Photograph Joh Ebeli ...[from EDHS Newsletter No. 46, January 1986:] Our bus trip to Portsea was considered by many to be one of the most enjoyable staged by the Society. Peter Collins of the Peninsula Historical Society travelled with us as a guide. He proved most informative and entertaining, particularly with regard to the Army and Quarantine Reserve at Point Nepean. We also visited the Museum at Sorrento and the site of the 1803 First Settlement. This was a long and tiring, but very rewarding, trip.Colour photographactivities, portsea, sorrento -
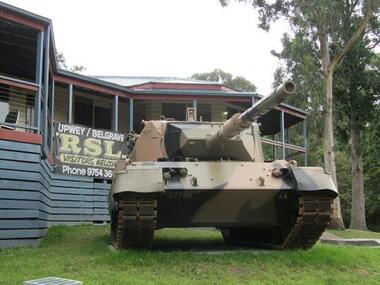 Running Rabbits Military Museum operated by the Upwey Belgrave RSL Sub Branch
Leopard Tank, Krauss-Maffei Wegmann GmbH & Co KG, Leopard Tank ARN 27765, 1970
... Crew 4: Crew Commander, Gunner, Operator, Driver Engine MTU supercharged V-10, (37.4 litres) Fuel Capacity 985 litres Hull Armour 70mm Turret Armour Classified Main Armament L7A3 105mm rifled gun Length 9.54m (with gun in combat position) Width 3.37m Height 2.62m (4.8m with radio aerials) ...gun tank is powered by a V-10 four stroke, supercharged diesel engine developing 610kW. It has a maximum speed of about 62km/h and can "snorkel" through water. These tanks were never used outside Australia and have never been used in combat. leopard tank Crew 4: Crew Commander, Gunner, Operator, Driver Engine MTU supercharged V-10, (37.4 litres) Fuel Capacity 985 litres Hull Armour 70mm Turret Armour Classified Main Armament L7A3 105mm rifled gun Length 9.54m (with gun in combat position) Width 3.37m Height 2.62m (4.8m with radio aerials) Leopard Tank ARN 27765 Leopard Tank Krauss-Maffei Wegmann GmbH & Co KG ...The tank provides heavy and direct firepower against enemy targets. Its main armament is a 105mm gun which can fire high explosive, armour-piercing, anti-personnel and smoke ammunition. The main gun can engage a pin point target at distances up to 2500m and area targets up to 8000m As with other members of the Leopard family, the gun tank is powered by a V-10 four stroke, supercharged diesel engine developing 610kW. It has a maximum speed of about 62km/h and can "snorkel" through water. These tanks were never used outside Australia and have never been used in combat.Crew 4: Crew Commander, Gunner, Operator, Driver Engine MTU supercharged V-10, (37.4 litres) Fuel Capacity 985 litres Hull Armour 70mm Turret Armour Classified Main Armament L7A3 105mm rifled gun Length 9.54m (with gun in combat position) Width 3.37m Height 2.62m (4.8m with radio aerials) leopard tank