Showing 48 items matching "hot plate"
-
 Kiewa Valley Historical Society
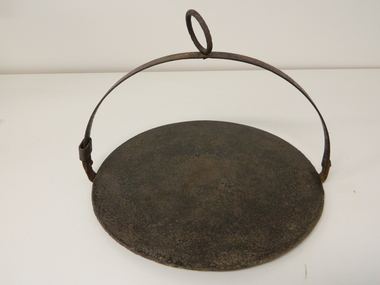
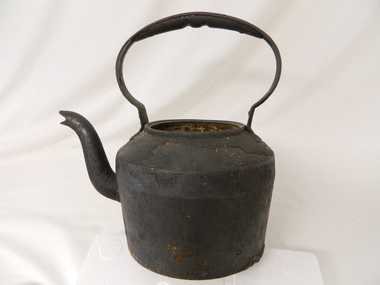
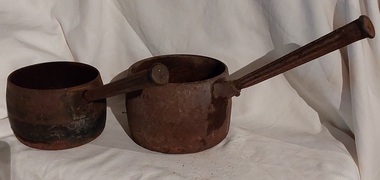
Plate Hot - Camp Fire, circa early 1900s
... Plate Hot - Camp Fire......hot plate...This "camp fire" hot plate has been used from the early 1900's on camp drafts /droving cattle onto and from the Victorian high plains. ...This open fire hot plate is made from caste iron. It has a circular flat (cooking) base, ideal for a few thick pieces of prime steak, a high semi circular handle with a large circular carry ring, to apply a thick stick or rod through it as an insulated handle (to position the hot plate where required over a fire). ...This Camp Fire hot plate was used on the High Plains at the Roper Hut for approximately 35 years. camp fire cooking utensils hot plate cast iron cooking appliance drovers kitchen cattlemen This open fire hot plate is made from caste iron. ...This "camp fire" hot plate has been used from the early 1900's on camp drafts /droving cattle onto and from the Victorian high plains. The size of "camp" kitchens would depend on the amount of "cattle" men required to collect and move the "herd" to and from the "lush" high plains.This "camp fire" hot plate is significant because it was donated by a member of the Roper family (the Roper's of the Kiewa Valley) a "pioneer" family. This particular camp fire hot plate originated in Tasmania however the Victorian Alps are very similar to the Tasmanian mountain regions and this type of cooking utensil was, and still is, used in isolated regions e.g. large cattle properties in the Northern Territory. This Camp Fire hot plate was used on the High Plains at the Roper Hut for approximately 35 years.This open fire hot plate is made from caste iron. It has a circular flat (cooking) base, ideal for a few thick pieces of prime steak, a high semi circular handle with a large circular carry ring, to apply a thick stick or rod through it as an insulated handle (to position the hot plate where required over a fire). The "handle" can be folded down to save space when packing it in the saddle bags. The handle has a strong metal rivet on each end (is loose enough to allow it to be moved to either side e.g. flattened). One end, of the handle, has a movable sleeve to fasten the the handle in an upright positioncamp fire cooking utensils, hot plate, cast iron cooking appliance, drovers kitchen, cattlemen -
 Blacksmith's Cottage and Forge
Handle, lifter for stove
... Lifter was used to lift hot plates from top of stove to allow housewife to see state of fire or to add small wood chips if necessary....Cast alloy angled-hooked lifter for hot plates on stove-top. Pitted and rusty, but solid....Cast alloy angled-hooked lifter for hot plates on stove-top. Pitted and rusty, but solid. ...Lifter was used to lift hot plates from top of stove to allow housewife to see state of fire or to add small wood chips if necessary.Local.Cast alloy angled-hooked lifter for hot plates on stove-top. Pitted and rusty, but solid. -
 Kiewa Valley Historical Society
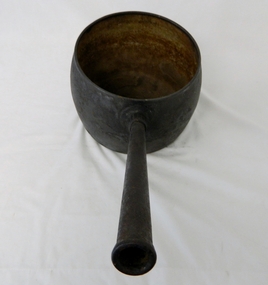
Saucepan, circa mid to late 1900's
... ...hot plate...This pan was used in the early to late 1900's for the "stews" and other meals required by hard working stock men and farmers that had irregular "lunch and dinner" breaks under sometimes hard and gruelling conditions. Hot plates were normally not in use....This pan was used in the early to late 1900's for the "stews" and other meals required by hard working stock men and farmers that had irregular "lunch and dinner" breaks under sometimes hard and gruelling conditions. Hot plates were normally not in use. This "open fire" saucepan belonged, and was used by a Kiewa Valley, pioneer family, the Roper Family. ...This large deep pan (with a long handle) was used by pioneer families, mainly rural folk, that needed a pan which could cope with an open fire heat source, in or mainly outside the homestead. This pan was used in the early to late 1900's for the "stews" and other meals required by hard working stock men and farmers that had irregular "lunch and dinner" breaks under sometimes hard and gruelling conditions. Hot plates were normally not in use.This "open fire" saucepan belonged, and was used by a Kiewa Valley, pioneer family, the Roper Family. This saucepan was moved from their Kiewa Valley property to their hut built on the Bogong High Plains. This saucepan was one of an array of "open fire" cooking utensils used in the "camp draft" grazing in the Bogong High Plains and this could take up to six weeks. This kettle belonged and was used by a Kiewa Valley, pioneer family, the Roper Family. This kettle was moved from their Kiewa Valley property to their hut built on the Bogong High Plains. A scientific study started in 1947 to study the impact of grazing cattle on the natural Alpine and sub Alpine vegetation found grazing cattle had an adverse affect on the natural Alpine and sub alpine vegetation, and grazing on the plains was stopped by the Victorian Government in 2005.This large (black, soot infused) cast iron saucepan has a "ten pint" holding capacity and was used on the "open fire", possible on the fire direct. It has a long all metal handle coming from the top half of the pot and angled at approximately sixty degrees upwards. This angle insures that both distance from flame intensity and least bending of knees when lifting is at a minimum.On bottom of pan (underside) "N0. 8 JSJ SIDDONS" on the other side "WEST BROMWICH 5 QUARTS"camp fire cooking utensils, hot plate, cast iron cooking appliance, drovers kitchen -
 Kiewa Valley Historical Society
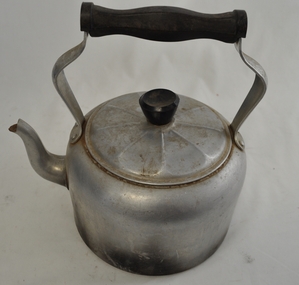
Kettle Aluminium, mid to late 1900's
... This 99% aluminium hot plate kettle with lid (bakelite handle) is Australian made for flat stoves (cooking or room heating). ...On both sides of the aluminium handle "HOT PLATE WARE" and covering an oblique shaped triangle "99% PURE ALUMINIUM" and below that "MADE IN AUSTRALIA".Within the triangle "DURALIFE"...The C.W.A. motto "Honour our God, Loyalty to the throne, Service to the country, Through country women, For country women, By country women." cwa homeware aluminium kitchen utensils made in australia cook ware On both sides of the aluminium handle "HOT PLATE WARE" and covering an oblique shaped triangle "99% PURE ALUMINIUM" and below that "MADE IN AUSTRALIA".Within the triangle "DURALIFE" This 99% aluminium hot plate kettle with lid (bakelite handle) is Australian made for flat stoves (cooking or room heating). ...This aluminium kettle was manufactured between 1940 to 1960's and replaced the heavier caste iron "open fire" stove ones (in doors or in the bush). A cast iron flat base between the open fires and the kettle was required. This kettle was used extensively with indoor open fire places. It was part of the evolution in "tea" making kettles. These were the only method of making hot beverages before introduction of electric kettles. For the Kiewa Valley the connection to the major electricity grid was post 1950's.This kettle is significant demonstrating the type of kitchen utensils required before electrical home connections became a reality. The aluminium structure of the kettle was an advancement over the heavier caste iron kettles. This type of kettle is still in use for bush and mountain hikers/climbers due to the light weight. This kettle was used by the Tawonga C.W.A. Branch. The C.W.A. motto "Honour our God, Loyalty to the throne, Service to the country, Through country women, For country women, By country women."This 99% aluminium hot plate kettle with lid (bakelite handle) is Australian made for flat stoves (cooking or room heating). It has a "tea style" spout and a bakelite hand grip(knob) on the top of the lid. The lid has nine ridges (for strength) radiating from the central hand grip. The two handle prongs are bop riveted onto the the body of the kettle. The bakelite hand grip has been fashioned to fit the natural contours of a clutching hand.On both sides of the aluminium handle "HOT PLATE WARE" and covering an oblique shaped triangle "99% PURE ALUMINIUM" and below that "MADE IN AUSTRALIA".Within the triangle "DURALIFE"cwa, homeware aluminium kitchen utensils, made in australia cook ware -
 Kiewa Valley Historical Society
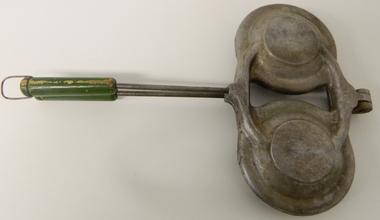
Pie Iron Camping, circa mid to late 1900s
... ...hot plate...As the time spent in this remote location was governed by the climatic condition maximum utilisation of the very good pastures in the High Plains was crucial to a successful and profitable season. camp fire cooking utensils hot plate cast iron cooking appliances pie irons jaffle irons drovers kitchen This pie iron has two pie forms in horizontal configuration and both top and base rounded forms are connected at one end (Top) with pop rivet application. ...This Pie Iron was used in the mid to late 1900's when stock, both cattle and sheep, were grazed on the Bogong High Plains. Providing meals for stockmen over open fires, even in log cabins in the Victorian Alpine region, was usually by a "camp cook" or a stockman designated "cook" from the Valley station/property. The use of "camping cooking utensils were a necessity and not a "weekend" affair. Stockmen could spend up to six weeks on the plains and all their cooking needs required had to "pack horsed" from the valley below. A scientific study started in 1947, to study the impact of grazing cattle on the natural Alpine and sub Alpine vegetation found grazing cattle had an adverse affect on the natural Alpine and sub alpine vegetation, and grazing on the plains was stopped by the Victorian Government in 2005.This item is highly significant to the Kiewa Valley as it demonstrates the kind of cooking utensils that were required for camp drafts in the Bogong High Plains environment. As the control of cattle and sheep in the High Plains was very demanding upon horse and rider, good "tucker" was a pre- requisite for a successful operation. As the time spent in this remote location was governed by the climatic condition maximum utilisation of the very good pastures in the High Plains was crucial to a successful and profitable season.This pie iron has two pie forms in horizontal configuration and both top and base rounded forms are connected at one end (Top) with pop rivet application. This application allows for the "opening" up of the two halves. The bodies are made from cast iron in a "cup" form and a metal rod and wooden handle extend to permit the opening of the two sides. The inner side of the "cups" are smooth which relates to pie requirements and not the jaffle/sandwich irons. A clasp metal "D" ring is installed at the end of one wooden handle (to keep the iron in the close/cooking position).camp fire cooking utensils, hot plate, cast iron cooking appliances, pie irons, jaffle irons, drovers kitchen -
 Kiewa Valley Historical Society
Kettle Cast Iron, Circa 1950
... ...hot plate...A scientific study started in 1947 to study the impact of grazing cattle on the natural Alpine and sub Alpine vegetation found grazing cattle had an adverse affect on the natural Alpine and sub alpine vegetation, and grazing on the plains was stopped by the Victorian Government in 2005.This "camp draft" could take up to six weeks. camp fire cooking utensils hot plate cast iron cooking appliance drovers kitchen Clark Quality This large cast iron kettle holds a capacity of three pints of water/tea. ...This kettle was used by pioneer families, mainly rural, folk that needed a constant readily available source of boiling water, in or mainly outside the homestead.. This kettle was used in the early to late 1900's for the refreshment of stock men and farmers that had irregular "tea" breaks under sometimes hard and gruelling conditions.This kettle belonged and was used by a Kiewa Valley, pioneer family, the Roper Family. This kettle was moved from their Kiewa Valley property to their hut built on the Bogong High Plains. A scientific study started in 1947 to study the impact of grazing cattle on the natural Alpine and sub Alpine vegetation found grazing cattle had an adverse affect on the natural Alpine and sub alpine vegetation, and grazing on the plains was stopped by the Victorian Government in 2005.This "camp draft" could take up to six weeks.This large cast iron kettle holds a capacity of three pints of water/tea. It has a flat base and mushroom shaped handle welded onto the "pot" below the rim of the pot opening. It has a rim to position the tea pot lid but no lid. It has a curved spout "welded" to the main body.Clark Qualitycamp fire cooking utensils, hot plate, cast iron cooking appliance, drovers kitchen -
 Kiewa Valley Historical Society
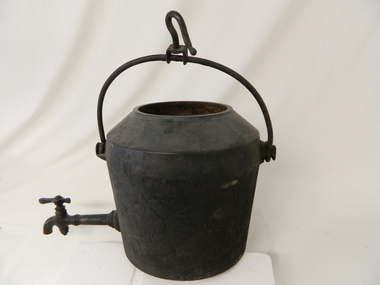
Pot Large with Tap, Circa 1950
... ...hot plate...This "camp draft" activity , in the high plains, could take up to six weeks. camp fire cooking utensils hot plate cast iron cooking appliance drovers kitchen Ot the flat bottom "FIRST QUALITY 2 GALLONS" This large cast iron modified camp pot (cauldron) has a long tap connection located at the bottom end. ...This type of cast iron kettle was used by pioneer families, mainly rural in the early 1900's upon open fires (log). It covered rural activities that needed a constant readily available source of boiling water, in or mainly outside the kitchen of homesteads. This kettle was used in the early to late 1900's for the refreshment of stock men and farmers that had irregular "tea" breaks under sometimes hard and gruelling conditions.This kettle belonged to and was used by a Kiewa Valley, pioneer family, the Roper Family. This kettle was moved from their Kiewa Valley property to their hut built on the Bogong High Plains. The Bogong High Plains area provided Kiewa Valley cattlemen a good supply of fodder to supplement their Kiewa Valley grazing areas. This "camp draft" activity , in the high plains, could take up to six weeks.This large cast iron modified camp pot (cauldron) has a long tap connection located at the bottom end. The "tap" is made from brass and has a simple elongated "bar" control swivel at the end to control the water flow. The tap suggests that only water was heated (to a constant boil) for the replenishment of cattlemen's, or other horse rider's, tea or coffee mugs. Refreshments at a "temporary" location on the Bogong High Plains. There was a "log" hut built by the Roper family as temporary accommodation for cattlemen and other family members.Ot the flat bottom "FIRST QUALITY 2 GALLONS"camp fire cooking utensils, hot plate, cast iron cooking appliance, drovers kitchen -
 Kiewa Valley Historical Society
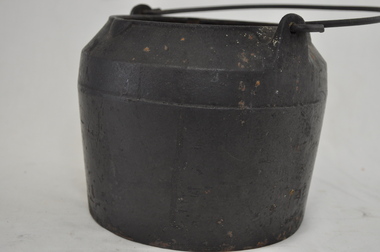
Pot Melting, circa mid to late 1900's
... ...hot plate...This aspect of "survival" in the "bush" can be seen in the "huts" built on the Bogong High Plains to accommodate the seasonal grazing of cattle from the Kiewa Valley. camp fire cooking utensils hot plate cast iron cooking appliance drovers kitchen "BH" indented within a diamond shape. ...Before 1908 the words "melting pot" was a term relating to a "crucible" with a meaning of "a pot in which metals and other substances are melted (fused) to provide metal items of varying shapes and uses. From the mid 1900's this term changed and became more related to the "mixing" of social and ethnically diverse populations. The description used here is that of pre 1908. This melting pot was used in the early to late 1900's when produce and hardware shops were too far away from the Kiewa Valley and time was at the essence. The ability to manufacture as many "crucial " items at the home property was the difference between running a successful rural business or not. The isolation of the Kiewa Valley (before the 1950's), hindered the "time down" of machinery and important "widget" replacements. The ability of self sufficiency on properties is still a boon to rural properties as time lost is never really recovered.This melting pot is highly significant to the Kiewa Valley as it provides evidence that the graziers and cattle stations required to be self sufficient in all aspects of day to day maintenance and replenishment of worn materials requiring to be "manufactured " at the property and lack of replacements from commercially shelved products. This aspect of "survival" in the "bush" can be seen in the "huts" built on the Bogong High Plains to accommodate the seasonal grazing of cattle from the Kiewa Valley.This black melting pot is made of cast iron. The lid is missing. The top rim of the pot has three lips for poring accuracy. The formation of these lips are in a "triangle" formation. The top section of the body has a curve inwards reducing the pot diameter from 270mm at the base to 135mm.at the top. The handle is made from heavy gauge wire which is fastened to the body through two lugs (welded onto the top section of the pot) and fasten through a hole at the top of each lug. The handle has a "U" shape as it goes through the lug hole, ensuring no accidental fixture to any side thus allowing free swiveling from one side to the other . "BH" indented within a diamond shape. Opposite "No 3"camp fire cooking utensils, hot plate, cast iron cooking appliance, drovers kitchen -
 Kiewa Valley Historical Society
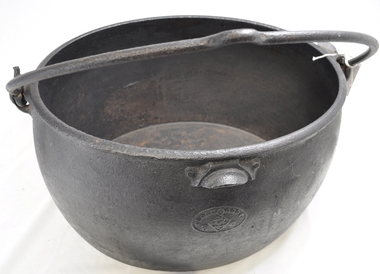
Pot Boiler, circa early 1900s
... ...hot plate...The "old English" values lingered on until the mid 1900's. camp fire cooking utensils hot plate cast iron cooking and boiling appliance drovers kitchen At the bottom (underneath) "CLARK & Co. ...This cast iron "boiler" was produced by one of the largest foundries in England during the late 1700's and onwards. These products were "shipped to the far realms of the "British Empire". This source was one of the only ones available to the early settlers in Australia until the mid 1900's. The catch cry of those "early " times was "the best of British" which was ingrained into the early (Australian) settler's iron and cast iron purchasing mind set. It was not until after World War II did that mindset change, when both American and Asian based manufacturers' products were accepted by the Australian consumer. The city based consumer embraced the swing a lot earlier than the more "traditional" rural consumer. This cast iron 8 gallon "boiler" is very significant to the Kiewa Valley not only that large "boilers" were used to "boil" clothes clean, over an open flame source, but also because it demonstrates one of the most important "rural" mores founded by the "early" settlers in this region. That more was the very "close" tie to "Mother England" and the "establishment". The social and "family" values from the "English" way of life was ingrained until well past the day of the "Australian Federation". It was not until the friendly "American soldier" invasion during World War II that the "Empire" bondage was being eroded away. The transition from the good "rural war cry" of "Australia prospers off the sheep's back" was slipping away and the industrial monolith started its challenge. This change was the slowest in semi remote rural centres such as the Kiewa Valley. The "old English" values lingered on until the mid 1900's.This large (8 gallons) cast iron boiler is oval in shape and has a cast iron (swivel) carrying handle. The handle has a "bend" in the centre position to allow hook and straight type rods to facilitate the positioning of a "hot" boiler. This boiler would have been used over an open fire or placed on top of "coals". On the top rim and evenly spaced between the fixed handle joins is a slightly semi curved balancing/control lip.At the bottom (underneath) "CLARK & Co. PATENT", Below this a six star triangle with the letter "C" in the middle.. On the opposite end "BEST QUALITY" and underneath "8 Gall s"camp fire cooking utensils, hot plate, cast iron cooking and boiling appliance, drovers kitchen -
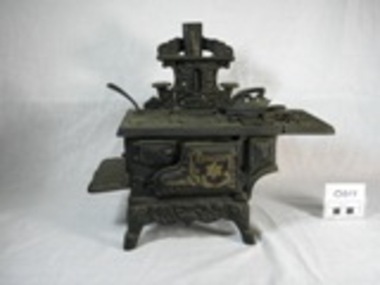
 Tatura Irrigation & Wartime Camps Museum
Toy - stove, 1940's
... 3 holes on top of stove representing hot plates...Made by internee and used by Helga Weid (niece of Karl Kaltenbach) tatura toys dolls furniture toy stove Weid kaltenbach 3 holes on top of stove representing hot plates Blue painted steel model of a cooking oven used as a childs toy. ...Made by internee and used by Helga Weid (niece of Karl Kaltenbach) Blue painted steel model of a cooking oven used as a childs toy. Has two doors to two ovens either side of a smaller door on the fire box.3 holes on top of stove representing hot platestatura, toys, dolls, furniture, toy stove, weid, kaltenbach -
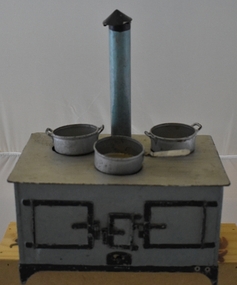
 Upper Yarra Museum
Stove, Miniature
... Frying pan, hot plate handle and "swan flat iron on stand. ...Frying pan, hot plate handle and "swan flat iron on stand. ...Story to be placed here - Available to publicMinature cast iron, Black Solid Wood Stove with miniature utensils. The stove is on legs with left hand extension for pots, right hand extension with holes, removeable hot plates [4 round 1 rectangle] tin chimney with folded join and seperate decorative cover with pot stands x2 , front door opens on hinges with internal gold pan with gold crescent logo. Frying pan, hot plate handle and "swan flat iron on stand. Solid fuel space with tin base. 2 screws and bolts used to assemble stove. 14 removeable parts.crescent, star, scrolls, wood, iron, tin, cast, stove, black, cast iron, star, solid, fuel, chimney, flat iron stand, flat, stand, hot plates, frying, pan, bolt, screws, legs, toy, miniature, crescent, made in taiwan, taiwan, wood box -
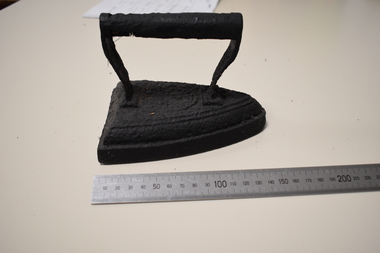 Tatura Irrigation & Wartime Camps Museum
Iron
... Iron would have been heated before use on a wood fired stove top/hot plate...Iron would have been heated before use on a wood fired stove top/hot plate iron camp 13 murchison tatura domestic items irons Black flat iron with shaped handle Iron ...Used at Camp 13, Italian compound, Murchison. Recovered from there in 1989. Iron would have been heated before use on a wood fired stove top/hot plateBlack flat iron with shaped handleiron, camp 13, murchison, tatura, domestic, items, irons -
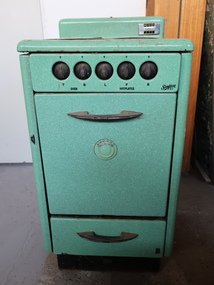 Kiewa Valley Historical Society
Stove - electric
... Green ceramic stove with 3 hot plates - 2 solid (one small and one large) at the back and one at the front with coils (large). 5 black knobs - 2 for the oven and 3 for the hotplates. ...Green ceramic stove with 3 hot plates - 2 solid (one small and one large) at the back and one at the front with coils (large). 5 black knobs - 2 for the oven and 3 for the hotplates. ...Simpson was founded in 1853 by Alfred M. Simpson. It was a manufacturer of household appliances based in Adelaide, Australia. This stove has only 3 hotplates (not the usual 4) and may have been used in the 1950s.Used by a resident of the Kiewa Valley.Green ceramic stove with 3 hot plates - 2 solid (one small and one large) at the back and one at the front with coils (large). 5 black knobs - 2 for the oven and 3 for the hotplates. The oven has a tray and adjustable shelving. At the bottom there is a warming drawer. The stove is electric and has a warming drawer at the bottom. The handles are black."Simpson" on the front on the vertical panel and also on the control panel.ceramic stove, simpson stove -
Emerald Museum & Nobelius Heritage Park
Domestic object - Hot water pot
... Silver Plate "Challenge" Hot Water Pot...Emerald Museum & Nobelius Heritage Park 5 Crichton Rd Emerald yarra-valley-and-the-dandenong-ranges This tea set was presented to Harold Leggett by the Emerald Mechanics Institute for his services as secretary to the committee 1926 - 1938 This tea set is significant because the recipient was a well-known local man in the early part of the twentieth century and the Mechanics Institute was an important Emerald institution Emerald Mechanics Institute Leggett Tea set Under the pot - "CHALLENGE EPNS A1" Silver Plate "Challenge" Hot Water Pot Domestic object Hot water pot ...This tea set was presented to Harold Leggett by the Emerald Mechanics Institute for his services as secretary to the committee 1926 - 1938This tea set is significant because the recipient was a well-known local man in the early part of the twentieth century and the Mechanics Institute was an important Emerald institution Silver Plate "Challenge" Hot Water PotUnder the pot - "CHALLENGE EPNS A1"emerald mechanics institute, leggett, tea set -
 Mont De Lancey
Domestic object - Saucepans, C.Clark & Co, 1900's
... This pan was used in the early to late 1900's for the stews and other meals required by hard working stockmen and farmers that had irregular lunch and dinner or tea breaks under sometimes hard and gruelling conditions. Hot plates were normally not in use....This pan was used in the early to late 1900's for the stews and other meals required by hard working stockmen and farmers that had irregular lunch and dinner or tea breaks under sometimes hard and gruelling conditions. Hot plates were normally not in use. Cooking equipment Cooking pots Cooking Saucepans Pots Kitchen equipment '6 pints' has indecipherable inscription. ...This large deep pan (with a long handle) was used by pioneer families, mainly rural folk, that needed a pan which could cope with an open fire heat source, in or mainly outside the homestead. This pan was used in the early to late 1900's for the stews and other meals required by hard working stockmen and farmers that had irregular lunch and dinner or tea breaks under sometimes hard and gruelling conditions. Hot plates were normally not in use.Two vintage black sooted heavy cast iron cooking pots or saucepans with rounded sides and long straight fluted handles angled at approximately sixty degrees upwards. This angle ensured that both distance from flame intensity and least bending of knees when lifting is at a minimum. It was used on the open fire or on a wood fired stove, possible on the fire direct.'6 pints' has indecipherable inscription. On the back of the '4' pints one - 'C. Clark & Co. R 455279 - Best Quality'cooking equipment, cooking pots, cooking, saucepans, pots, kitchen equipment -
 Vision Australia
Photograph - Image, Kodak images part 1, 2004
... A female assists a boy cut his hot dog on a plate. 2. An elderly female and older man engage with each other, in black and white. 3. ...A female assists a boy cut his hot dog on a plate. 2. An elderly female and older man engage with each other, in black and white. 3. ...1. A female assists a boy cut his hot dog on a plate. 2. An elderly female and older man engage with each other, in black and white. 3. A young child looks at a brightly coloured book. 4. A Christmas gift exchanges hands.4 digital images originally printed on to oversize blocksvision australia, carols by candlelight, kodak -
 Whitehorse Historical Society Inc.
Domestic object - Plate
... Metal and china dinner plate (with hot water tank) with blue pattern and metal warmer underneath. ...Whitehorse Historical Society Inc. 2-10 Deep Creek Road Mitcham melbourne domestic items crockery Metal and china dinner plate (with hot water tank) with blue pattern and metal warmer underneath. ...Metal and china dinner plate (with hot water tank) with blue pattern and metal warmer underneath. Warmer has spout and two handles.|Used on farms to keep the workers dinner hot - or be taken down to the barn - some had a metal cover. (Slight crack in plate, quite rare and prized.domestic items, crockery -
 Bendigo Military Museum
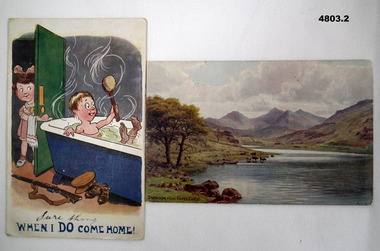
Postcard - A HUMOROUS CARD AND A SCENIC CARD, James Henderson & Sons Ltd London et al, c1910-1918
... 4803.1 - Humorous card - shows a soldier boy in a hot bath tub with a modest young girl passing some more soap on a plate. printed in colour. ...(About Mail) Jo" Dated 21 Jan 1918 4803.1 - Humorous card - shows a soldier boy in a hot bath tub with a modest young girl passing some more soap on a plate. printed in colour. ...See Cat 4799 for data4803.1 - Humorous card - shows a soldier boy in a hot bath tub with a modest young girl passing some more soap on a plate. printed in colour. The title at the bottom is - "When I do come home!" "Sure thing" is hand written above the printed line. 4803.2 - Scenic Card - A coloured print showing a lane, cattle drinking and mountains in the background. Printed on the bottom is "Snowdon from Capel Curig."4803.1 - Rear has a message Mary Ling dated 25 Nov. He talks about Salisbury, Christmas leave. 4803.2 - Rear has a brief message to "Dear Susie.... (About Mail) Jo" Dated 21 Jan 1918ww!, sisters, wales, salisbury -
Emerald Museum & Nobelius Heritage Park
Domestic object - Tea set
... Silver Plate Tea Set consisting of tea pot, hot water pot and sugar bowl...Emerald Museum & Nobelius Heritage Park 5 Crichton Rd Emerald yarra-valley-and-the-dandenong-ranges This tea set was presented to Harold Leggett by the Emerald Mechanics Institute for his services as secretary to the committee 1926 - 1938 This tea set is significant because the recipient was a well-known local man in the early part of the twentieth century and the Mechanics Institute was an important Emerald institution Emerald Mechanics Institute Leggett Tea set Silver Plate Tea Set consisting of tea pot, hot water pot and sugar bowl Domestic object Tea set ...This tea set was presented to Harold Leggett by the Emerald Mechanics Institute for his services as secretary to the committee 1926 - 1938This tea set is significant because the recipient was a well-known local man in the early part of the twentieth century and the Mechanics Institute was an important Emerald institution Silver Plate Tea Set consisting of tea pot, hot water pot and sugar bowlemerald mechanics institute, leggett, tea set -
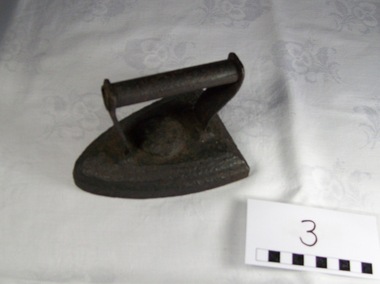 Blacksmith's Cottage and Forge
Iron, Flat, 1800 (estimated); 19th. century
... hot. Source: www.wikipedia.org Local social history, domestic item domestic iron work womens laundry on top plate but not decipherable Black cast iron with handle Iron, Flat ...From the 17th century, sadirons or sad irons (from an old word meaning solid) began to be used. They were thick slabs of cast iron, delta - shaped and with a handle, heated in a fire. These were also called flat irons. Another solution was to employ a cluster of solid irons that were heated from the single source: as the iron currently in use cools down, it could be quickly replaced by another one that is hot. Source: www.wikipedia.orgLocal social history, domestic itemBlack cast iron with handleon top plate but not decipherabledomestic, iron, work, womens, laundry -
 The Beechworth Burke Museum
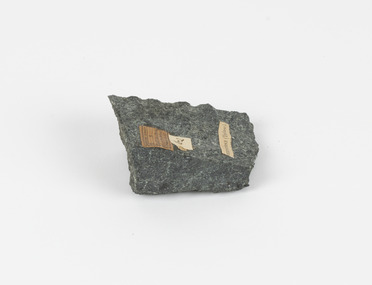
Geological specimen - Greenstone / Gabbro, Unknown
... plate boundary. In the rock cycle (the series of processes that creates the various types of rocks) there are identified three different types of rocks, which are the sedimentary, the igneous and the metamorphic. Metamorphic rocks started out as sedimentary, igneous or earlier metamorphic rocks but changed from their original condition under the effect of high heat, high pressure or hot, mineral-rich fluid. ...plate boundary. In the rock cycle (the series of processes that creates the various types of rocks) there are identified three different types of rocks, which are the sedimentary, the igneous and the metamorphic. Metamorphic rocks started out as sedimentary, igneous or earlier metamorphic rocks but changed from their original condition under the effect of high heat, high pressure or hot, mineral-rich fluid. ...This specimen was recovered from Ceres West of Geelong, Victoria. Greenstone is the name for any metamorphosed basic igneous rock (in the case of this specimen, Gabbro) that gains its greenish colour to the presence of the minerals chlorite, actinolite, or epidote, hence the term 'green' and 'stone'. Greenstone is often formed through metamorphsis along a convergent plate boundary. In the rock cycle (the series of processes that creates the various types of rocks) there are identified three different types of rocks, which are the sedimentary, the igneous and the metamorphic. Metamorphic rocks started out as sedimentary, igneous or earlier metamorphic rocks but changed from their original condition under the effect of high heat, high pressure or hot, mineral-rich fluid. However, if pressure or heat is too high, then the rock will melt, resulting in the formation of an igneous rock. The name used to describe these types of rocks reflects this specific inherent trait of change, since the word “metamorphic” derives from the Greek word “metamorphosis”, meaning “change of form or structure”. Metamorphic rocks form in the Earth`s crust but can be also found on the surface, due to elevation of the Earth`s surface. They are divided into two categories: the foliated metamorphic and the non-foliated metamorphic rocks. Gabbro is a highly useful mineral that is often polished to create cemetery markers and kitchen benches. It is notable for its qualities of durability, being able to withstand extreme elements and wear. Whilst not rare, Gabbro is of great utility and has been highly desirable for its qualities. This specimen is part of a larger collection of geological and mineral specimens collected from around Australia (and some parts of the world) and donated to the Burke Museum between 1868-1880. A large percentage of these specimens were collected in Victoria as part of the Geological Survey of Victoria that begun in 1852 (in response to the Gold Rush) to study and map the geology of Victoria. Collecting geological specimens was an important part of mapping and understanding the scientific makeup of the earth. Many of these specimens were sent to research and collecting organisations across Australia, including the Burke Museum, to educate and encourage further study.Greenstone is a solid hand-sized metamorphic mineral of a green colour. Greenstone is the name for any metamorphosed basic igneous rock (in the case of this specimen, Gabbro) that gains its greenish colour to the presence of the minerals chlorite, actinolite, or epidote, hence the term 'green' and 'stone'. Gabbro is a medium to coarse grained rocks that consist primarily of plagioclase feldspar and pyroxene. Greenstone is often formed through metamorphsis along a convergent plate boundary. Gabbro forms due to cooling and crystallization of magma underneath Earth's surface. Greenstone/Gabbro/from Ceres west/of Geelong. Has old Geological Survey label/and probably collected by/Richard Daintree in 1861/C.Willam 15/4/21/ Other label: 62 /greenstone, metamorphosed, igneous rock, gabbro, chlorite, actinolite, epidote, metamorphsis, rock cycle, various types of rocks, sedimentary, high heat, high pressure, mineral-rich fluid, metamorphosis, foliated metamorphic, non-foliated metamorphic, convergent plate boundary, greenish colour, minerals -
 Montmorency–Eltham RSL Sub Branch
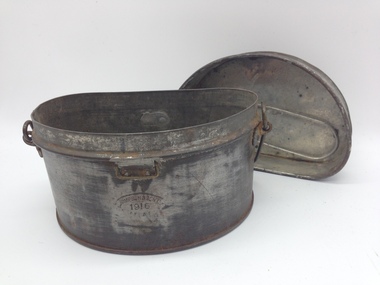
Functional object - Mess Tin WW1, WW1 Mess Tin, 1916
... hot very quickly when heated. Used by Australian military servicemen during WW1 mess tin ww1 australia military metal two piece A. SIMPSON & SON LTD 1916 ADELAIDE Two piece "D" shaped silver coloured metal mess tin and lid. Used by Australian military servicemen during WW1, it is believed to be based on a British design. Made of tin plated ...Mess tins were used to prepare or heat food, but thay were also used as a container from which to eat or drink. The tins are lightweight and sturdy but they became hot very quickly when heated.Used by Australian military servicemen during WW1Two piece "D" shaped silver coloured metal mess tin and lid. Used by Australian military servicemen during WW1, it is believed to be based on a British design. Made of tin plated steel, this mess tin has a wire rod carrying handle and rectangular metal wire clips for a shoulder strap, attached to the top section of the mess tin by metal rivets and straps. There is a metal wire rod folding handle mounted on the inside of the removable lid section. The mess tin has a folded seam on the bottom edge and along the left hand side. A wire rod is mounted around the top section of the mess tin as a base for the removable lid. The lid has a folded metal seam on the top edge and along the left hand side. The bottom edge of the lid is folded around a metal wire rod.A. SIMPSON & SON LTD 1916 ADELAIDEmess tin, ww1, australia, military, metal, two piece -
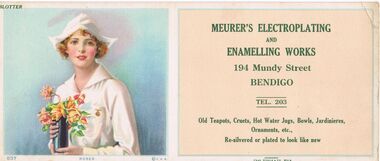
 Bendigo Historical Society Inc.
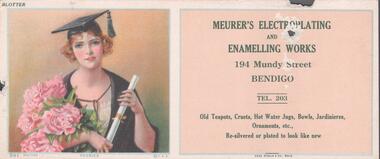
Document - BENDIGO BUSINESSES COLLECTION: MEURER'S ELECTROPLATING
... Old teapots, cruets, hot water jugs, bowls, jardinières, ornaments, etc. Re-silvered or plated to look like new. ...Old teapots, cruets, hot water jugs, bowls, jardinières, ornaments, etc. Re-silvered or plated to look like new. ...Blotter paper advertising Meurer's electroplating and enamelling works, 194 Mundy Street, Bendigo, tel. 203. Old teapots, cruets, hot water jugs, bowls, jardinières, ornaments, etc. Re-silvered or plated to look like new. On the left a drawing of a young lady in her graduation gown with a bunch of peonies.bendigo, business, meurer -
 Bendigo Historical Society Inc.
Document - RANDALL COLLECTION: MEURER'S ELECTROPLATING AND ENAMELLING WORKS
... Old Teapots, Cruets, Hot Water Jugs, Bowls, Jardinières, Ornaments, etc., Re-silvered or plated to look like new.No. 537, ''Roses''....Old Teapots, Cruets, Hot Water Jugs, Bowls, Jardinières, Ornaments, etc., Re-silvered or plated to look like new.No. 537, ''Roses''. ...Object, Blotter, Meurer's Electroplating and Enamelling Works, 194 Mundy Street, Bendigo, Tel. 203. Old Teapots, Cruets, Hot Water Jugs, Bowls, Jardinières, Ornaments, etc., Re-silvered or plated to look like new.No. 537, ''Roses''.Chas Steele & Co., Melb.business, retail, meurer's electroplating and enamell -
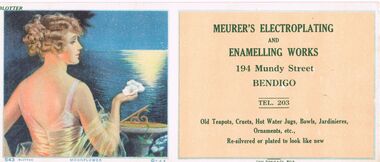 Bendigo Historical Society Inc.
Document - RANDALL COLLECTION: MEURER'S ELECTROPLATING AND ENAMELLING WORKS
... Old Teapots, Cruets, Hot Water Jugs, Bowls, Jardinières, Ornaments, etc.,Re-silvered or plated to look like new.No. 543 ''Moonflower''....Old Teapots, Cruets, Hot Water Jugs, Bowls, Jardinières, Ornaments, etc.,Re-silvered or plated to look like new.No. 543 ''Moonflower''. ...Object, Blotter, Meurer's Electroplating and Enamelling Works, 194 Mundy Street, Bendigo, Tel. 203. Old Teapots, Cruets, Hot Water Jugs, Bowls, Jardinières, Ornaments, etc.,Re-silvered or plated to look like new.No. 543 ''Moonflower''.Chas Steele & Co. Melb..business, retail, meurer's electroplating and enamell -
 Flagstaff Hill Maritime Museum and Village
Functional object - Water Boiler, Jackson Boilers Ltd, 1920s
... hot water for domestic and catering use. It is also significant as it is one of the earlier boilers the Jackson company made in the early 1920s before they applied for a US patent on their revised design in 1926. Flagstaff Hill Maritime Museum and Village Flagstaff Hill Maritime Museum Flagstaff Hill Maritime Museum Maritime Village Warrnambool Great Ocean Road Leeds Jackson Boilers Ltd Jackson Boilers Henry Jackson brass founders electro platers sheet metal works Patent Water Boilers Leeds manufacturer tube water boiler domestic boiler tube domestic boiler tube boiler water heaters water boilers self-feeding water boilers sheet metal work instantaneous water heaters engineering allied trades metal workers metal trade food machinery hospitality equipment ship equipment ship water boiler ship heater catering boilers café boiler restaurant boiler canteen boiler Catering Equipment Manufacturers’ Association CEMA kitchen equipment kitchen appliance war work World War I WWI picric acid picric acid cases fuse hole plugs electro plated fuse hole plugs Reginald M cargo ship Port Adelaide 1922 John Murch Jackson Boilers Leeds Ltd. ...Jackson Boilers Ltd., brass founders, electro platers and sheet metal works made this tube water boiler. It was a fitting in the vessel Reginald M, a small cargo ship built at Port Adelaide in 1922 and named after her builder and first owner, John Murch. The Reginald M was launched at Largs Bay, South Australia, in 1922 to carry cargo around South Australia that included guano, barley, wool, horses, cattle, timber, explosives, potatoes, shell grit, and gypsum. It passed through numerous owners over the years and primarily maintained its purpose as a cargo vessel. In 1975, the decommissioned Reginald M was purchased by Flagstaff Hill Maritime Museum as an attraction. Although restoration efforts were undertaken and maintained for the craft above the water line, deterioration occurred below the surface and resulted in the ship being unsafe for visitors to board. It was broken up and removed from Flagstaff Hill in 2018, but items such as the historical boiler remain in Flagstaff Hill’s Collection. JACKSON BOILERS LTD.: - In 1911, Henry Jackson was the Managing Director at Jackson Boilers Ltd. He had gained around 30 years’ experience as a tin plate worker, plumber and gas fitter at Ilkey in 1881, then at Leeds by 1901. By 1921, he had changed employment from Jackson Boilers to Managing Director of Patent Water Boilers. During World War I, Jackson Boilers Ltd of Leeds performed war work like many other manufacturers at that time. The firm made cases for the explosive picric acid and electroplated fuse hole plugs. In 1918, the firm employed 15 males and 19 females. Jacksons Boilers became very successful throughout the first half of the twentieth century with showrooms and sales offices in Scotland, the Midlands and Southern England. It also had an office in Dublin, Ireland. In the post-war 1920s, the firm’s production included instantaneous water boilers and coffee machines for cafes, restaurants and canteens. Jackson Boilers also began to supply shipping lines with catering water boilers for their ships. The firm applied for a USA patent for the tube boiler in 1930, for the design which appears to have been invented in 1926. A 1971 advertisement adds the credentials, Members of the Catering Equipment Manufacturers’ Association. The tube water boiler was designed specifically for use in a ship's restaurant or dining area and patented by Jackson Boilers Ltd. of Leeds. The boiler is significant as a patented design, illustrating the evolution of maritime, commercial and domestic water boilers that have led to many innervations and improvements in today's boilers that are used in heating and in producing hot water for domestic and catering use. It is also significant as it is one of the earlier boilers the Jackson company made in the early 1920s before they applied for a US patent on their revised design in 1926.Water boiler, free standing Jackson's Tube boiler. A tall metal cylindrical stand with a metal sphere on top and several pipe fittings on the sides. A brass tap with a lever handle is connected to the front. A plaque with maker's details is attached under the tap. Details are also impressed into the cylinder above the tap.Jackson Boilers Leeds Ltd. "JACKSON'S PATENT" . Other details indecipherable. flagstaff hill maritime museum and village, flagstaff hill maritime museum, flagstaff hill, maritime museum, maritime village, warrnambool, great ocean road, leeds, jackson boilers ltd, jackson boilers, henry jackson, brass founders, electro platers, sheet metal works, patent water boilers, leeds manufacturer, tube water boiler, domestic boiler, tube domestic boiler, tube boiler, water heaters, water boilers, self-feeding water boilers, sheet metal work instantaneous water heaters, engineering, allied trades, metal workers, metal trade, food machinery, hospitality equipment, ship equipment, ship water boiler, ship heater, catering boilers, café boiler, restaurant boiler, canteen boiler, catering equipment manufacturers’ association, cema, kitchen equipment, kitchen appliance, war work, world war i, wwi, picric acid, picric acid cases, fuse hole plugs, electro plated fuse hole plugs, reginald m, cargo ship, port adelaide, 1922, john murch -
 Flagstaff Hill Maritime Museum and Village
Domestic object - Plate
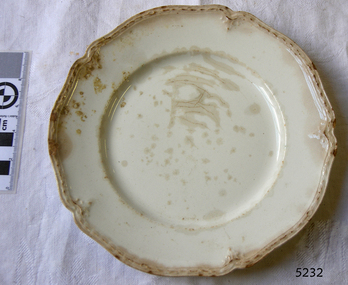
... hotter and dryer, the faster things dry and work can dry unevenly in the shelves – this can lead to cracking – another time to lightly cover your work for drying. Step Four – Trimming and Cleaning Up Your work is dry! It is called greenware now and it is at it’s most fragile! Handle everything with two hands. I often refer to soft hands – keep everything gentle and with your fingers spread as much as possible. Try to not pick up things like plates...hotter and dryer, the faster things dry and work can dry unevenly in the shelves – this can lead to cracking – another time to lightly cover your work for drying. Step Four – Trimming and Cleaning Up Your work is dry! It is called greenware now and it is at it’s most fragile! Handle everything with two hands. I often refer to soft hands – keep everything gentle and with your fingers spread as much as possible. Try to not pick up things like plates ...The Process of Making Pottery Decorating, Firing, Glazing, Making, Technical There is a rhythm and flow to clay. It can’t be done all at once! Even the making process! It can take weeks to get everything done, especially if you can only work on your pottery once a week! Even though we have three hour classes, it’s often just not enough time! Here is an overview of some of the processes so you have a bit more grasp on some of the technical stuff! Step One – Design There are SO many ideas out there for making stuff in clay! From delicate porcelain jewellery, through to heavy sculptural work and everything in between. Deciding your direction is sometimes not that easy – when you first start, try everything, you will naturally gravitate to the style that you enjoy! The options and variations are endless and can get a wee bit overwhelming too! Check in with me before you start to ensure your ideas will work, what order you might do things, how you could achieve the look you are seeking and any other technical data required! Step Two – Making Clay is thixotropic. This means that as you work with it, the clay first gets sloppier and wetter, before is begins to dry in the atmosphere. For most things, you simply can’t do all parts of the project at once. An example of work order might look like: Get last weeks work out from the shelves Prepare clay for today’s work – roll your clay, prepare balls for throwing, make the first stage of a pinch pot) Clean up last week’s work and put it on the shelf for bisque firing Check that you have any glazing to do – and do enough of it that you will have time to finish your main project Do the next step of your next project – there might be a further step that can’t be complete immediately, in that case, wrap your work well and put onto the shelves. Letting your work rest for a while can really help keep your work clean and professional looking. Many things require bagging under plastic to keep it ready for work the next week – put your name on the outside of the bag so you can find your work easily. We have stickers and markers. Consider how you want to decorate your work – coloured slip can be applied at a fairly wet stage (remembering that it will make your work even wetter!). Trying to apply slip to dry clay won’t work! If you want to do sgraffito – you will need to keep the work leather hard (a state of dryness where you can still work the clay with a little effort and a little water and care). Step Three – Drying Most of the time your work can go into the rack uncovered to let it dry out for the following week. If you want to continue forming or shaping you will need to double bag your work – put your work on a suitable sized bat and put the bat in a bag so the base of the bag is under the bat, then put another bag over the top of the work and tuck the top of the bag under the bat. If you want to trim (or turn) your thrown work the following week, it should also be double bagged. If your work is large, delicate, or of uneven thicknesses, you should lightly cover your work for drying. When considering the drying process, bare in mind the weather, humidity and wind! The hotter and dryer, the faster things dry and work can dry unevenly in the shelves – this can lead to cracking – another time to lightly cover your work for drying. Step Four – Trimming and Cleaning Up Your work is dry! It is called greenware now and it is at it’s most fragile! Handle everything with two hands. I often refer to soft hands – keep everything gentle and with your fingers spread as much as possible. Try to not pick up things like plates too much, and always with both hands! Before your work can be bisque fired it should be “cleaned up”. You work won’t go into the kiln if it has sharp edges – when glazed, sharp edges turn into razor blades! Use a piece of fly wire to rub the work all over – this will scratch a little so be light handed. Use a knife or metal kidney to scrape any areas that require a bit more dynamic treatment than the fly wire offers! Finally, a very light wipe over with a slightly damp sponge can help soften and soothe all of your edges and dags! Trimming thrown work: If you are planning to trim (or turn) your thrown work (and you should be), make sure you bag it well – your work should be leather hard to almost dry for easiest trimming. Use this step to finish the work completely – use a metal kidney to polish the surface, or a slightly damp sponge to give a freshly thrown look. Wipe the sponge around the rim after trimming, and check the inside of the pot for dags! Trimming slip cast work: Usually I will trim the rims of your work on the wheel the following day to make that stage easier, however you will still need to check your work for lumps and bumps. Last but not least – check that your name is still clearly on the bottom of your work. Step Five – Bisque Firing When the work is completely dry it can go into the bisque kiln. The bisque kiln is fired to 1000°C. This process burns off the water in the clay as well as some of the chemically bound water. The structure of the clay is not altered that much at this temperature. Inside the bisque kiln, the work is stacked a little, small bowl inside a larger bowl and onto a heavy plate. Smaller items like decorations or drink coasters might get stacked several high. Consideration is paid to the weight of the stack and shape of the work. A bisque kiln can fire about one and a half times the amount of work that the glaze kiln can fire. The firing takes about 10 hours to complete the cycle and about two days to cool down. Once it has been emptied the work is placed in the glaze room ready for you to decorate! Step Six – Glazing Decorating your work with colour can be a lot of fun – and time consuming! There are three main options for surface treatment at this stage: Oxide Washes Underglazes Glazes Washes and underglazes do not “glaze” the work – It will still need a layer of glaze to fully seal the clay (washes don’t need glaze on surfaces not designed for food or liquid as they can gloss up a little on their own). Underglazes are stable colourants that turn out pretty much how they look in the jar. They can be mixed with each other to form other colours and can be used like water colours to paint onto your work. Mostly they should have a clear glaze on top to seal them. Oxides are a different species – the pink oxide (cobalt) wash turns out bright blue for instance. They don’t always need a glaze on top, and some glazes can change the colour of the wash! The glazes need no other “glaze” on top! Be careful of unknown glaze interactions – you can put any combination of glaze in a bowl or on a plate, but only a single glaze on the outside of any vertical surface! Glazes are a chemical reaction under heat. We don’t know the exact chemicals in the Mayco glazes we use. I can guess by the way they interact with each other, however, on the whole, you need to test every idea you have, and not run the test on a vertical surface! Simply put, glaze is a layer of glass like substance that bonds with the clay underneath. Clay is made of silica, alumina and water. Glaze is made of mostly silica. Silica has a melting point of 1700°C and we fire to 1240°C. The silica requires a “flux” to help it melt at the lower temperature. Fluxes can be all sorts of chemicals – a common one is calcium – calcium has a melting point of 2500°C, however, together they both melt at a much lower temperature! Colourants are metal oxides like cobalt (blue), chrome (green through black), copper (green, blue, even red!), manganese (black, purple and pink) iron (red brown), etc. Different chemicals in the glaze can have dramatic effects. for example, barium carbonate (which we don’t use) turns manganese bright pink! Other elements can turn manganese dioxide brown, blue, purple and reddish brown. Manganese dioxide is a flux in and of itself as well. So, glazes that get their black and purple colours, often interact with other glazes and RUN! Our mirror black is a good example – it mixes really well with many glazes because it fluxes them – causes them to melt faster. It will also bring out many beautiful colours in the glazes because it’s black colouring most definitely comes from manganese dioxide! Glaze chemistry is a whole subject on it’s own! We use commercial Mayco glazes on purpose – for their huge range of colour possibilities, stability, cool interactions, artistic freedom with the ability to easily brush the glazes on and ease of use. We currently have almost 50 glazes on hand! A major project is to test the interactions of all glazes with each other. That is 2,500 test tiles!!!! I’m going to make the wall behind the wheels the feature wall of pretty colours! Step Seven – Glaze (Gloss or sometimes called “Glost”) Firing Most of the time this is the final stage of making your creation (but not always!) The glaze kiln goes to 1240°C. This is called cone 6, or midrange. It is the low end of stoneware temperatures. Stoneware clays and glazes are typically fired at cone 8 – 10, that is 1260 – 1290°C. The energy requirement to go from 1240°C to 1280°C is almost a 30% more! Our clay is formulated to vitrify (mature, turn “glass-like”) at 1240°, as are our glazes. A glaze kiln take around 12 hours to reach temperature and two to three days to cool down. Sometimes a third firing process is required – this is for decoration that is added to work after the glaze firing. For example – adding precious metals and lustres. this firing temperature is usually around 600 – 800°C depending upon the techniques being used. There are many students interested in gold and silver trims – we will be doing this third type of firing soon! After firing your work will be in the student finished work shelves. Remember to pay for it before you head out the door! There is a small extra charge for using porcelain clay (it’s more than twice the price of regular clay), and for any third firing process! Once your work has been fired it can not turn back into clay for millennia – so don’t fire it if you don’t like it! Put it in the bucket for recycling. https://firebirdstudios.com.au/the-process-of-making-pottery/Ceramics have evolved over thousands of years.White earthenware dinner plate. Crazing evident all over.Backstamped ‘Made in England S LTD’flagstaff hill, warrnambool, shipwrecked-coast, flagstaff-hill, flagstaff-hill-maritime-museum, maritime-museum, shipwreck-coast, flagstaff-hill-maritime-village, ceramics, tableware -
 Flagstaff Hill Maritime Museum and Village
Domestic object - Plate, Johnson Bros
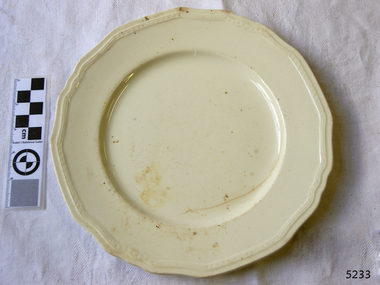
... hotter and dryer, the faster things dry and work can dry unevenly in the shelves – this can lead to cracking – another time to lightly cover your work for drying. Step Four – Trimming and Cleaning Up Your work is dry! It is called greenware now and it is at it’s most fragile! Handle everything with two hands. I often refer to soft hands – keep everything gentle and with your fingers spread as much as possible. Try to not pick up things like plates...hotter and dryer, the faster things dry and work can dry unevenly in the shelves – this can lead to cracking – another time to lightly cover your work for drying. Step Four – Trimming and Cleaning Up Your work is dry! It is called greenware now and it is at it’s most fragile! Handle everything with two hands. I often refer to soft hands – keep everything gentle and with your fingers spread as much as possible. Try to not pick up things like plates ...The Process of Making Pottery Decorating, Firing, Glazing, Making, Technical There is a rhythm and flow to clay. It can’t be done all at once! Even the making process! It can take weeks to get everything done, especially if you can only work on your pottery once a week! Even though we have three hour classes, it’s often just not enough time! Here is an overview of some of the processes so you have a bit more grasp on some of the technical stuff! Step One – Design There are SO many ideas out there for making stuff in clay! From delicate porcelain jewellery, through to heavy sculptural work and everything in between. Deciding your direction is sometimes not that easy – when you first start, try everything, you will naturally gravitate to the style that you enjoy! The options and variations are endless and can get a wee bit overwhelming too! Check in with me before you start to ensure your ideas will work, what order you might do things, how you could achieve the look you are seeking and any other technical data required! Step Two – Making Clay is thixotropic. This means that as you work with it, the clay first gets sloppier and wetter, before is begins to dry in the atmosphere. For most things, you simply can’t do all parts of the project at once. An example of work order might look like: Get last weeks work out from the shelves Prepare clay for today’s work – roll your clay, prepare balls for throwing, make the first stage of a pinch pot) Clean up last week’s work and put it on the shelf for bisque firing Check that you have any glazing to do – and do enough of it that you will have time to finish your main project Do the next step of your next project – there might be a further step that can’t be complete immediately, in that case, wrap your work well and put onto the shelves. Letting your work rest for a while can really help keep your work clean and professional looking. Many things require bagging under plastic to keep it ready for work the next week – put your name on the outside of the bag so you can find your work easily. We have stickers and markers. Consider how you want to decorate your work – coloured slip can be applied at a fairly wet stage (remembering that it will make your work even wetter!). Trying to apply slip to dry clay won’t work! If you want to do sgraffito – you will need to keep the work leather hard (a state of dryness where you can still work the clay with a little effort and a little water and care). Step Three – Drying Most of the time your work can go into the rack uncovered to let it dry out for the following week. If you want to continue forming or shaping you will need to double bag your work – put your work on a suitable sized bat and put the bat in a bag so the base of the bag is under the bat, then put another bag over the top of the work and tuck the top of the bag under the bat. If you want to trim (or turn) your thrown work the following week, it should also be double bagged. If your work is large, delicate, or of uneven thicknesses, you should lightly cover your work for drying. When considering the drying process, bare in mind the weather, humidity and wind! The hotter and dryer, the faster things dry and work can dry unevenly in the shelves – this can lead to cracking – another time to lightly cover your work for drying. Step Four – Trimming and Cleaning Up Your work is dry! It is called greenware now and it is at it’s most fragile! Handle everything with two hands. I often refer to soft hands – keep everything gentle and with your fingers spread as much as possible. Try to not pick up things like plates too much, and always with both hands! Before your work can be bisque fired it should be “cleaned up”. You work won’t go into the kiln if it has sharp edges – when glazed, sharp edges turn into razor blades! Use a piece of fly wire to rub the work all over – this will scratch a little so be light handed. Use a knife or metal kidney to scrape any areas that require a bit more dynamic treatment than the fly wire offers! Finally, a very light wipe over with a slightly damp sponge can help soften and soothe all of your edges and dags! Trimming thrown work: If you are planning to trim (or turn) your thrown work (and you should be), make sure you bag it well – your work should be leather hard to almost dry for easiest trimming. Use this step to finish the work completely – use a metal kidney to polish the surface, or a slightly damp sponge to give a freshly thrown look. Wipe the sponge around the rim after trimming, and check the inside of the pot for dags! Trimming slip cast work: Usually I will trim the rims of your work on the wheel the following day to make that stage easier, however you will still need to check your work for lumps and bumps. Last but not least – check that your name is still clearly on the bottom of your work. Step Five – Bisque Firing When the work is completely dry it can go into the bisque kiln. The bisque kiln is fired to 1000°C. This process burns off the water in the clay as well as some of the chemically bound water. The structure of the clay is not altered that much at this temperature. Inside the bisque kiln, the work is stacked a little, small bowl inside a larger bowl and onto a heavy plate. Smaller items like decorations or drink coasters might get stacked several high. Consideration is paid to the weight of the stack and shape of the work. A bisque kiln can fire about one and a half times the amount of work that the glaze kiln can fire. The firing takes about 10 hours to complete the cycle and about two days to cool down. Once it has been emptied the work is placed in the glaze room ready for you to decorate! Step Six – Glazing Decorating your work with colour can be a lot of fun – and time consuming! There are three main options for surface treatment at this stage: Oxide Washes Underglazes Glazes Washes and underglazes do not “glaze” the work – It will still need a layer of glaze to fully seal the clay (washes don’t need glaze on surfaces not designed for food or liquid as they can gloss up a little on their own). Underglazes are stable colourants that turn out pretty much how they look in the jar. They can be mixed with each other to form other colours and can be used like water colours to paint onto your work. Mostly they should have a clear glaze on top to seal them. Oxides are a different species – the pink oxide (cobalt) wash turns out bright blue for instance. They don’t always need a glaze on top, and some glazes can change the colour of the wash! The glazes need no other “glaze” on top! Be careful of unknown glaze interactions – you can put any combination of glaze in a bowl or on a plate, but only a single glaze on the outside of any vertical surface! Glazes are a chemical reaction under heat. We don’t know the exact chemicals in the Mayco glazes we use. I can guess by the way they interact with each other, however, on the whole, you need to test every idea you have, and not run the test on a vertical surface! Simply put, glaze is a layer of glass like substance that bonds with the clay underneath. Clay is made of silica, alumina and water. Glaze is made of mostly silica. Silica has a melting point of 1700°C and we fire to 1240°C. The silica requires a “flux” to help it melt at the lower temperature. Fluxes can be all sorts of chemicals – a common one is calcium – calcium has a melting point of 2500°C, however, together they both melt at a much lower temperature! Colourants are metal oxides like cobalt (blue), chrome (green through black), copper (green, blue, even red!), manganese (black, purple and pink) iron (red brown), etc. Different chemicals in the glaze can have dramatic effects. for example, barium carbonate (which we don’t use) turns manganese bright pink! Other elements can turn manganese dioxide brown, blue, purple and reddish brown. Manganese dioxide is a flux in and of itself as well. So, glazes that get their black and purple colours, often interact with other glazes and RUN! Our mirror black is a good example – it mixes really well with many glazes because it fluxes them – causes them to melt faster. It will also bring out many beautiful colours in the glazes because it’s black colouring most definitely comes from manganese dioxide! Glaze chemistry is a whole subject on it’s own! We use commercial Mayco glazes on purpose – for their huge range of colour possibilities, stability, cool interactions, artistic freedom with the ability to easily brush the glazes on and ease of use. We currently have almost 50 glazes on hand! A major project is to test the interactions of all glazes with each other. That is 2,500 test tiles!!!! I’m going to make the wall behind the wheels the feature wall of pretty colours! Step Seven – Glaze (Gloss or sometimes called “Glost”) Firing Most of the time this is the final stage of making your creation (but not always!) The glaze kiln goes to 1240°C. This is called cone 6, or midrange. It is the low end of stoneware temperatures. Stoneware clays and glazes are typically fired at cone 8 – 10, that is 1260 – 1290°C. The energy requirement to go from 1240°C to 1280°C is almost a 30% more! Our clay is formulated to vitrify (mature, turn “glass-like”) at 1240°, as are our glazes. A glaze kiln take around 12 hours to reach temperature and two to three days to cool down. Sometimes a third firing process is required – this is for decoration that is added to work after the glaze firing. For example – adding precious metals and lustres. this firing temperature is usually around 600 – 800°C depending upon the techniques being used. There are many students interested in gold and silver trims – we will be doing this third type of firing soon! After firing your work will be in the student finished work shelves. Remember to pay for it before you head out the door! There is a small extra charge for using porcelain clay (it’s more than twice the price of regular clay), and for any third firing process! Once your work has been fired it can not turn back into clay for millennia – so don’t fire it if you don’t like it! Put it in the bucket for recycling. https://firebirdstudios.com.au/the-process-of-making-pottery/Ceramics have evolved over thousands of years.A white earthenware side plate with a gadroon edge. Has water marks and chips on front.‘Johnson Bros England Reg No 15587’flagstaff hill, warrnambool, shipwrecked-coast, flagstaff-hill, flagstaff-hill-maritime-museum, maritime-museum, shipwreck-coast, flagstaff-hill-maritime-village, johnson bros, ceramics, tableware -
 Flagstaff Hill Maritime Museum and Village
Domestic object - Plate, Alfred Meakin
... hotter and dryer, the faster things dry and work can dry unevenly in the shelves – this can lead to cracking – another time to lightly cover your work for drying. Step Four – Trimming and Cleaning Up Your work is dry! It is called greenware now and it is at it’s most fragile! Handle everything with two hands. I often refer to soft hands – keep everything gentle and with your fingers spread as much as possible. Try to not pick up things like plates...hotter and dryer, the faster things dry and work can dry unevenly in the shelves – this can lead to cracking – another time to lightly cover your work for drying. Step Four – Trimming and Cleaning Up Your work is dry! It is called greenware now and it is at it’s most fragile! Handle everything with two hands. I often refer to soft hands – keep everything gentle and with your fingers spread as much as possible. Try to not pick up things like plates ...The Process of Making Pottery Decorating, Firing, Glazing, Making, Technical There is a rhythm and flow to clay. It can’t be done all at once! Even the making process! It can take weeks to get everything done, especially if you can only work on your pottery once a week! Even though we have three hour classes, it’s often just not enough time! Here is an overview of some of the processes so you have a bit more grasp on some of the technical stuff! Step One – Design There are SO many ideas out there for making stuff in clay! From delicate porcelain jewellery, through to heavy sculptural work and everything in between. Deciding your direction is sometimes not that easy – when you first start, try everything, you will naturally gravitate to the style that you enjoy! The options and variations are endless and can get a wee bit overwhelming too! Check in with me before you start to ensure your ideas will work, what order you might do things, how you could achieve the look you are seeking and any other technical data required! Step Two – Making Clay is thixotropic. This means that as you work with it, the clay first gets sloppier and wetter, before is begins to dry in the atmosphere. For most things, you simply can’t do all parts of the project at once. An example of work order might look like: Get last weeks work out from the shelves Prepare clay for today’s work – roll your clay, prepare balls for throwing, make the first stage of a pinch pot) Clean up last week’s work and put it on the shelf for bisque firing Check that you have any glazing to do – and do enough of it that you will have time to finish your main project Do the next step of your next project – there might be a further step that can’t be complete immediately, in that case, wrap your work well and put onto the shelves. Letting your work rest for a while can really help keep your work clean and professional looking. Many things require bagging under plastic to keep it ready for work the next week – put your name on the outside of the bag so you can find your work easily. We have stickers and markers. Consider how you want to decorate your work – coloured slip can be applied at a fairly wet stage (remembering that it will make your work even wetter!). Trying to apply slip to dry clay won’t work! If you want to do sgraffito – you will need to keep the work leather hard (a state of dryness where you can still work the clay with a little effort and a little water and care). Step Three – Drying Most of the time your work can go into the rack uncovered to let it dry out for the following week. If you want to continue forming or shaping you will need to double bag your work – put your work on a suitable sized bat and put the bat in a bag so the base of the bag is under the bat, then put another bag over the top of the work and tuck the top of the bag under the bat. If you want to trim (or turn) your thrown work the following week, it should also be double bagged. If your work is large, delicate, or of uneven thicknesses, you should lightly cover your work for drying. When considering the drying process, bare in mind the weather, humidity and wind! The hotter and dryer, the faster things dry and work can dry unevenly in the shelves – this can lead to cracking – another time to lightly cover your work for drying. Step Four – Trimming and Cleaning Up Your work is dry! It is called greenware now and it is at it’s most fragile! Handle everything with two hands. I often refer to soft hands – keep everything gentle and with your fingers spread as much as possible. Try to not pick up things like plates too much, and always with both hands! Before your work can be bisque fired it should be “cleaned up”. You work won’t go into the kiln if it has sharp edges – when glazed, sharp edges turn into razor blades! Use a piece of fly wire to rub the work all over – this will scratch a little so be light handed. Use a knife or metal kidney to scrape any areas that require a bit more dynamic treatment than the fly wire offers! Finally, a very light wipe over with a slightly damp sponge can help soften and soothe all of your edges and dags! Trimming thrown work: If you are planning to trim (or turn) your thrown work (and you should be), make sure you bag it well – your work should be leather hard to almost dry for easiest trimming. Use this step to finish the work completely – use a metal kidney to polish the surface, or a slightly damp sponge to give a freshly thrown look. Wipe the sponge around the rim after trimming, and check the inside of the pot for dags! Trimming slip cast work: Usually I will trim the rims of your work on the wheel the following day to make that stage easier, however you will still need to check your work for lumps and bumps. Last but not least – check that your name is still clearly on the bottom of your work. Step Five – Bisque Firing When the work is completely dry it can go into the bisque kiln. The bisque kiln is fired to 1000°C. This process burns off the water in the clay as well as some of the chemically bound water. The structure of the clay is not altered that much at this temperature. Inside the bisque kiln, the work is stacked a little, small bowl inside a larger bowl and onto a heavy plate. Smaller items like decorations or drink coasters might get stacked several high. Consideration is paid to the weight of the stack and shape of the work. A bisque kiln can fire about one and a half times the amount of work that the glaze kiln can fire. The firing takes about 10 hours to complete the cycle and about two days to cool down. Once it has been emptied the work is placed in the glaze room ready for you to decorate! Step Six – Glazing Decorating your work with colour can be a lot of fun – and time consuming! There are three main options for surface treatment at this stage: Oxide Washes Underglazes Glazes Washes and underglazes do not “glaze” the work – It will still need a layer of glaze to fully seal the clay (washes don’t need glaze on surfaces not designed for food or liquid as they can gloss up a little on their own). Underglazes are stable colourants that turn out pretty much how they look in the jar. They can be mixed with each other to form other colours and can be used like water colours to paint onto your work. Mostly they should have a clear glaze on top to seal them. Oxides are a different species – the pink oxide (cobalt) wash turns out bright blue for instance. They don’t always need a glaze on top, and some glazes can change the colour of the wash! The glazes need no other “glaze” on top! Be careful of unknown glaze interactions – you can put any combination of glaze in a bowl or on a plate, but only a single glaze on the outside of any vertical surface! Glazes are a chemical reaction under heat. We don’t know the exact chemicals in the Mayco glazes we use. I can guess by the way they interact with each other, however, on the whole, you need to test every idea you have, and not run the test on a vertical surface! Simply put, glaze is a layer of glass like substance that bonds with the clay underneath. Clay is made of silica, alumina and water. Glaze is made of mostly silica. Silica has a melting point of 1700°C and we fire to 1240°C. The silica requires a “flux” to help it melt at the lower temperature. Fluxes can be all sorts of chemicals – a common one is calcium – calcium has a melting point of 2500°C, however, together they both melt at a much lower temperature! Colourants are metal oxides like cobalt (blue), chrome (green through black), copper (green, blue, even red!), manganese (black, purple and pink) iron (red brown), etc. Different chemicals in the glaze can have dramatic effects. for example, barium carbonate (which we don’t use) turns manganese bright pink! Other elements can turn manganese dioxide brown, blue, purple and reddish brown. Manganese dioxide is a flux in and of itself as well. So, glazes that get their black and purple colours, often interact with other glazes and RUN! Our mirror black is a good example – it mixes really well with many glazes because it fluxes them – causes them to melt faster. It will also bring out many beautiful colours in the glazes because it’s black colouring most definitely comes from manganese dioxide! Glaze chemistry is a whole subject on it’s own! We use commercial Mayco glazes on purpose – for their huge range of colour possibilities, stability, cool interactions, artistic freedom with the ability to easily brush the glazes on and ease of use. We currently have almost 50 glazes on hand! A major project is to test the interactions of all glazes with each other. That is 2,500 test tiles!!!! I’m going to make the wall behind the wheels the feature wall of pretty colours! Step Seven – Glaze (Gloss or sometimes called “Glost”) Firing Most of the time this is the final stage of making your creation (but not always!) The glaze kiln goes to 1240°C. This is called cone 6, or midrange. It is the low end of stoneware temperatures. Stoneware clays and glazes are typically fired at cone 8 – 10, that is 1260 – 1290°C. The energy requirement to go from 1240°C to 1280°C is almost a 30% more! Our clay is formulated to vitrify (mature, turn “glass-like”) at 1240°, as are our glazes. A glaze kiln take around 12 hours to reach temperature and two to three days to cool down. Sometimes a third firing process is required – this is for decoration that is added to work after the glaze firing. For example – adding precious metals and lustres. this firing temperature is usually around 600 – 800°C depending upon the techniques being used. There are many students interested in gold and silver trims – we will be doing this third type of firing soon! After firing your work will be in the student finished work shelves. Remember to pay for it before you head out the door! There is a small extra charge for using porcelain clay (it’s more than twice the price of regular clay), and for any third firing process! Once your work has been fired it can not turn back into clay for millennia – so don’t fire it if you don’t like it! Put it in the bucket for recycling. https://firebirdstudios.com.au/the-process-of-making-pottery/Ceramics have evolved over thousands of years.Earthenware dessert plate, cream colour. Made by Alfred Meakin, England. Backstamped ‘Alfred Meakin England’. flagstaff hill, warrnambool, shipwrecked-coast, flagstaff-hill, flagstaff-hill-maritime-museum, maritime-museum, shipwreck-coast, flagstaff-hill-maritime-village, alfred meakin, ceramics, earthenware, kitchenware -
 Flagstaff Hill Maritime Museum and Village
Domestic object - Jug
... hotter and dryer, the faster things dry and work can dry unevenly in the shelves – this can lead to cracking – another time to lightly cover your work for drying. Step Four – Trimming and Cleaning Up Your work is dry! It is called greenware now and it is at it’s most fragile! Handle everything with two hands. I often refer to soft hands – keep everything gentle and with your fingers spread as much as possible. Try to not pick up things like plates...hotter and dryer, the faster things dry and work can dry unevenly in the shelves – this can lead to cracking – another time to lightly cover your work for drying. Step Four – Trimming and Cleaning Up Your work is dry! It is called greenware now and it is at it’s most fragile! Handle everything with two hands. I often refer to soft hands – keep everything gentle and with your fingers spread as much as possible. Try to not pick up things like plates ...The Process of Making Pottery Decorating, Firing, Glazing, Making, Technical There is a rhythm and flow to clay. It can’t be done all at once! Even the making process! It can take weeks to get everything done, especially if you can only work on your pottery once a week! Even though we have three hour classes, it’s often just not enough time! Here is an overview of some of the processes so you have a bit more grasp on some of the technical stuff! Step One – Design There are SO many ideas out there for making stuff in clay! From delicate porcelain jewellery, through to heavy sculptural work and everything in between. Deciding your direction is sometimes not that easy – when you first start, try everything, you will naturally gravitate to the style that you enjoy! The options and variations are endless and can get a wee bit overwhelming too! Check in with me before you start to ensure your ideas will work, what order you might do things, how you could achieve the look you are seeking and any other technical data required! Step Two – Making Clay is thixotropic. This means that as you work with it, the clay first gets sloppier and wetter, before is begins to dry in the atmosphere. For most things, you simply can’t do all parts of the project at once. An example of work order might look like: Get last weeks work out from the shelves Prepare clay for today’s work – roll your clay, prepare balls for throwing, make the first stage of a pinch pot) Clean up last week’s work and put it on the shelf for bisque firing Check that you have any glazing to do – and do enough of it that you will have time to finish your main project Do the next step of your next project – there might be a further step that can’t be complete immediately, in that case, wrap your work well and put onto the shelves. Letting your work rest for a while can really help keep your work clean and professional looking. Many things require bagging under plastic to keep it ready for work the next week – put your name on the outside of the bag so you can find your work easily. We have stickers and markers. Consider how you want to decorate your work – coloured slip can be applied at a fairly wet stage (remembering that it will make your work even wetter!). Trying to apply slip to dry clay won’t work! If you want to do sgraffito – you will need to keep the work leather hard (a state of dryness where you can still work the clay with a little effort and a little water and care). Step Three – Drying Most of the time your work can go into the rack uncovered to let it dry out for the following week. If you want to continue forming or shaping you will need to double bag your work – put your work on a suitable sized bat and put the bat in a bag so the base of the bag is under the bat, then put another bag over the top of the work and tuck the top of the bag under the bat. If you want to trim (or turn) your thrown work the following week, it should also be double bagged. If your work is large, delicate, or of uneven thicknesses, you should lightly cover your work for drying. When considering the drying process, bare in mind the weather, humidity and wind! The hotter and dryer, the faster things dry and work can dry unevenly in the shelves – this can lead to cracking – another time to lightly cover your work for drying. Step Four – Trimming and Cleaning Up Your work is dry! It is called greenware now and it is at it’s most fragile! Handle everything with two hands. I often refer to soft hands – keep everything gentle and with your fingers spread as much as possible. Try to not pick up things like plates too much, and always with both hands! Before your work can be bisque fired it should be “cleaned up”. You work won’t go into the kiln if it has sharp edges – when glazed, sharp edges turn into razor blades! Use a piece of fly wire to rub the work all over – this will scratch a little so be light handed. Use a knife or metal kidney to scrape any areas that require a bit more dynamic treatment than the fly wire offers! Finally, a very light wipe over with a slightly damp sponge can help soften and soothe all of your edges and dags! Trimming thrown work: If you are planning to trim (or turn) your thrown work (and you should be), make sure you bag it well – your work should be leather hard to almost dry for easiest trimming. Use this step to finish the work completely – use a metal kidney to polish the surface, or a slightly damp sponge to give a freshly thrown look. Wipe the sponge around the rim after trimming, and check the inside of the pot for dags! Trimming slip cast work: Usually I will trim the rims of your work on the wheel the following day to make that stage easier, however you will still need to check your work for lumps and bumps. Last but not least – check that your name is still clearly on the bottom of your work. Step Five – Bisque Firing When the work is completely dry it can go into the bisque kiln. The bisque kiln is fired to 1000°C. This process burns off the water in the clay as well as some of the chemically bound water. The structure of the clay is not altered that much at this temperature. Inside the bisque kiln, the work is stacked a little, small bowl inside a larger bowl and onto a heavy plate. Smaller items like decorations or drink coasters might get stacked several high. Consideration is paid to the weight of the stack and shape of the work. A bisque kiln can fire about one and a half times the amount of work that the glaze kiln can fire. The firing takes about 10 hours to complete the cycle and about two days to cool down. Once it has been emptied the work is placed in the glaze room ready for you to decorate! Step Six – Glazing Decorating your work with colour can be a lot of fun – and time consuming! There are three main options for surface treatment at this stage: Oxide Washes Underglazes Glazes Washes and underglazes do not “glaze” the work – It will still need a layer of glaze to fully seal the clay (washes don’t need glaze on surfaces not designed for food or liquid as they can gloss up a little on their own). Underglazes are stable colourants that turn out pretty much how they look in the jar. They can be mixed with each other to form other colours and can be used like water colours to paint onto your work. Mostly they should have a clear glaze on top to seal them. Oxides are a different species – the pink oxide (cobalt) wash turns out bright blue for instance. They don’t always need a glaze on top, and some glazes can change the colour of the wash! The glazes need no other “glaze” on top! Be careful of unknown glaze interactions – you can put any combination of glaze in a bowl or on a plate, but only a single glaze on the outside of any vertical surface! Glazes are a chemical reaction under heat. We don’t know the exact chemicals in the Mayco glazes we use. I can guess by the way they interact with each other, however, on the whole, you need to test every idea you have, and not run the test on a vertical surface! Simply put, glaze is a layer of glass like substance that bonds with the clay underneath. Clay is made of silica, alumina and water. Glaze is made of mostly silica. Silica has a melting point of 1700°C and we fire to 1240°C. The silica requires a “flux” to help it melt at the lower temperature. Fluxes can be all sorts of chemicals – a common one is calcium – calcium has a melting point of 2500°C, however, together they both melt at a much lower temperature! Colourants are metal oxides like cobalt (blue), chrome (green through black), copper (green, blue, even red!), manganese (black, purple and pink) iron (red brown), etc. Different chemicals in the glaze can have dramatic effects. for example, barium carbonate (which we don’t use) turns manganese bright pink! Other elements can turn manganese dioxide brown, blue, purple and reddish brown. Manganese dioxide is a flux in and of itself as well. So, glazes that get their black and purple colours, often interact with other glazes and RUN! Our mirror black is a good example – it mixes really well with many glazes because it fluxes them – causes them to melt faster. It will also bring out many beautiful colours in the glazes because it’s black colouring most definitely comes from manganese dioxide! Glaze chemistry is a whole subject on it’s own! We use commercial Mayco glazes on purpose – for their huge range of colour possibilities, stability, cool interactions, artistic freedom with the ability to easily brush the glazes on and ease of use. We currently have almost 50 glazes on hand! A major project is to test the interactions of all glazes with each other. That is 2,500 test tiles!!!! I’m going to make the wall behind the wheels the feature wall of pretty colours! Step Seven – Glaze (Gloss or sometimes called “Glost”) Firing Most of the time this is the final stage of making your creation (but not always!) The glaze kiln goes to 1240°C. This is called cone 6, or midrange. It is the low end of stoneware temperatures. Stoneware clays and glazes are typically fired at cone 8 – 10, that is 1260 – 1290°C. The energy requirement to go from 1240°C to 1280°C is almost a 30% more! Our clay is formulated to vitrify (mature, turn “glass-like”) at 1240°, as are our glazes. A glaze kiln take around 12 hours to reach temperature and two to three days to cool down. Sometimes a third firing process is required – this is for decoration that is added to work after the glaze firing. For example – adding precious metals and lustres. this firing temperature is usually around 600 – 800°C depending upon the techniques being used. There are many students interested in gold and silver trims – we will be doing this third type of firing soon! After firing your work will be in the student finished work shelves. Remember to pay for it before you head out the door! There is a small extra charge for using porcelain clay (it’s more than twice the price of regular clay), and for any third firing process! Once your work has been fired it can not turn back into clay for millennia – so don’t fire it if you don’t like it! Put it in the bucket for recycling. https://firebirdstudios.com.au/the-process-of-making-pottery/The form of the jug has been in use for many centuries.Stoneware jug. Two tone brown glaze with pierced lip behind spout. Spout chipped.None.flagstaff hill, warrnambool, shipwrecked-coast, flagstaff-hill, flagstaff-hill-maritime-museum, maritime-museum, shipwreck-coast, flagstaff-hill-maritime-village, jug, ceramic jug