Showing 427 items matching "night photo"
-
 Moorabbin Air Museum
Photograph (Item) - C130 & Caribou night photo with fireworks
... C130 & Caribou night photo with fireworks...C130 & Caribou night photo with fireworks...Moorabbin Air Museum Moorabbin Airport 12 First Street Moorabbin melbourne C130 & Caribou night photo with fireworks Photograph C130 & Caribou night photo with fireworks ... -
 Ballaarat Mechanics' Institute (BMI Ballarat)
Film - Photograph by Herb Richmond. ca 1971, Night photo view SE cnr Sturt & Albert Sts, Ballarat
... Night photo view SE cnr Sturt & Albert Sts, Ballarat...Ballaarat Mechanics' Institute (BMI Ballarat) 117 Sturt St Ballarat goldfields Ballarat History Ballarat Ballaraat Sturt & Albert Sts 35mm B&W Kodak Safety Film Night photo view SE cnr Sturt & Albert Sts, Ballarat Film Photograph by Herb Richmond. ca 1971 ...Ballarat History35mm B&W Kodak Safety Filmballarat, ballaraat, sturt & albert sts -
 Stawell Historical Society Inc
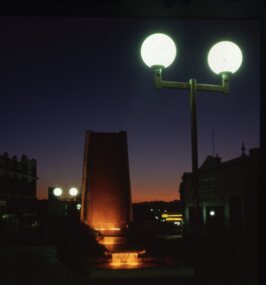
Slide, Set of Large Format colour positive slides of Stawell c1970 - Night photo of Fountain in Gold Reef Mall
... Set of Large Format colour positive slides of Stawell c1970 - Night photo of Fountain in Gold Reef Mall...Stawell Historical Society Inc 46 Longfield St Stawell grampians Believed taken by Ian McCann Stawell's first Tourism Officer 7191-18 is duplicated in -35, -48, -49 which were removed Positive Colour Slides Set of Large Format colour positive slides of Stawell c1970 - Night photo of Fountain in Gold Reef Mall Slide ...Believed taken by Ian McCann Stawell's first Tourism Officer 7191-18 is duplicated in -35, -48, -49 which were removed Positive Colour Slides -
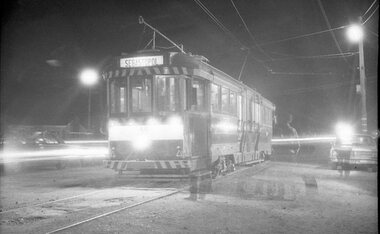
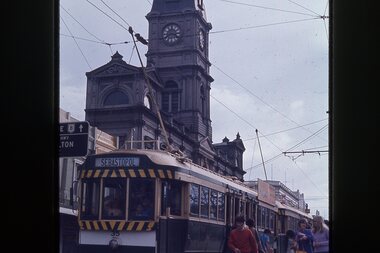
 Ballarat Tramway Museum
Photograph - SECV Ballarat - 17 in Sturt St at Lydiard St, Chris Wurr, 1/1971
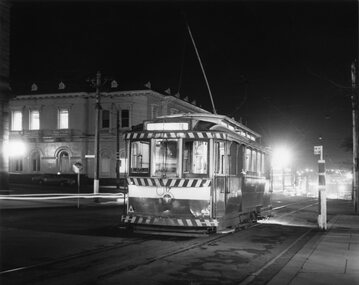
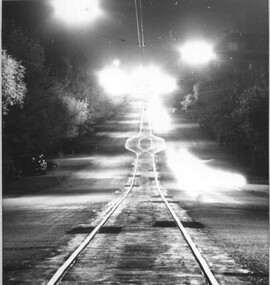
... ... Night Photo...night - time exposure. Tram has the destination of 'Sebastopol'. No other vehicles in the scene, though a motor car has passed the scene behind the tramcar. In the view are the Post Office, tram stop signs and buildings near Grenville St. Photo...Black and White photograph, with the photographer's notes not the rear. Night photo....Night photo. Photograph SECV Ballarat - 17 in Sturt St at Lydiard St. ...Photograph of No. 17 at the city terminus at night - time exposure. Tram has the destination of 'Sebastopol'. No other vehicles in the scene, though a motor car has passed the scene behind the tramcar. In the view are the Post Office, tram stop signs and buildings near Grenville St. Photo by Chris Wurr Jan. 1971Yields information about the streetscape at the City terminus at night and just how lonely it could be.Black and White photograph, with the photographer's notes not the rear. Night photo.Stamped on rear in black ink "Donated to BTPS by and Photo By" / "Chris Wurr"tramways, trams, city, sturt st, lydiard st, night photo, tram 17 -
 Ballarat Tramway Museum
Photograph - Colour Photograph/s - set of 3, Carolyn Dean, c2002
... ... Night Photo...On Konica paper. .1 - 45 and 14 on the depot fan .2 - night photo of No. 14 - Gardens Loop? .3 - night photo of 14 and 45 at Gardens Loop, Wendouree Parade....On Konica paper. .1 - 45 and 14 on the depot fan .2 - night photo of No. 14 - Gardens Loop? .3 - night photo of 14 and 45 at Gardens Loop, Wendouree Parade. ...Set of three photographs of featuring No. 14 and No. 45 as the Gold Tram. Taken 2001 or 2002. Photographer not known. On Konica paper. .1 - 45 and 14 on the depot fan .2 - night photo of No. 14 - Gardens Loop? .3 - night photo of 14 and 45 at Gardens Loop, Wendouree Parade.depot, wendouree parade, night photo, tram 14, tram 45 -
 Ballarat Tramway Museum
Photograph - Black & White Photograph/s, Len Millar, May. 1970
... ... Night Photo...Black and white photograph on card paper of SEC trams 34 and 12 in the depot at night. Photo by Len Millar May 1970....Trams tramways Night Photo Depot tram 34 tram 12 Detailed notes on rear in ink and pencil by Len Millar and Keith Kings - see image i2. ...Yields information about the tram depot at night.Black and white photograph on card paper of SEC trams 34 and 12 in the depot at night. Photo by Len Millar May 1970.Detailed notes on rear in ink and pencil by Len Millar and Keith Kings - see image i2.trams, tramways, night photo, depot, tram 34, tram 12 -
 Ballarat Tramway Museum
Photograph - Black & White Photograph/s, Len Millar, Apr. 1970
... ... Night Photo...Black and white photograph on card paper of SEC tram 13 parked on the City loop at night. Photo by Len Millar April 1970....Trams tramways Night Photo City Loop tram 13 Detailed notes on rear in ink and pencil by Len Millar and Keith Kings - see image i2. ...Yields information about the tram operations at night - in particular at the City Loop.Black and white photograph on card paper of SEC tram 13 parked on the City loop at night. Photo by Len Millar April 1970.Detailed notes on rear in ink and pencil by Len Millar and Keith Kings - see image i2.trams, tramways, night photo, city loop, tram 13 -
 Ballarat Tramway Museum
Photograph - digital Images, Campbell Duncan
... ... Night Photo...Digital image of a photograph taken on 19/9/1971 by Campbell Duncan of No. 40 at Sebastopol on the day of closure, night photo - probably not the very last tram, not enough people on board. ...Trams tramways Sebastopol Closure Albert St Night Photo Last Day Digital image of a photograph taken on 19/9/1971 by Campbell Duncan of No. 40 at Sebastopol on the day of closure, night photo - probably not the very last tram, not enough people on board. ...Yields information about the last day of operation of the SEC Ballarat system and the Sebastopol terminus.Digital image of a photograph taken on 19/9/1971 by Campbell Duncan of No. 40 at Sebastopol on the day of closure, night photo - probably not the very last tram, not enough people on board. trams, tramways, sebastopol, closure, albert st, night photo, last day -
 Ballarat Tramway Museum
Photograph - Digital image, 19/09/1971 12:00:00 AM
... ... Night Photo...Digital image from a black and white print of Ballarat No. 37 in the Sturt St loop - night photo. Taken on the last day of SEC tram services by Bill Kingsley, 19/9/1971. ...Ballarat Tramway Museum South Gardens Reserve Wendouree Parade Ballarat Ballarat goldfields Yields information about the closing hours of the SEC Ballarat tramways - night photo of trams in the city loop. Trams tramways Sturt St Night Photo Closure tram 37 Digital image from a black and white print of Ballarat No. 37 in the Sturt St loop - night photo. ...Yields information about the closing hours of the SEC Ballarat tramways - night photo of trams in the city loop.Digital image from a black and white print of Ballarat No. 37 in the Sturt St loop - night photo. Taken on the last day of SEC tram services by Bill Kingsley, 19/9/1971. trams, tramways, sturt st, night photo, closure, tram 37 -
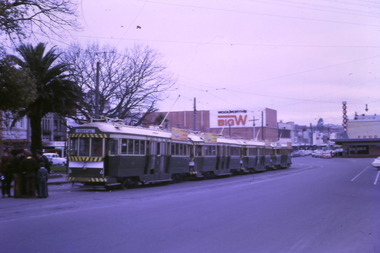 Ballarat Tramway Museum
Photograph - Digital image Set of 7, Tony Smith, 19/09/1971 12:00:00 AM
... ... Night Photo...Has the post office in the background. .3 - bogie tram at the south side, night photo, has the Commonwealth Bank in the background. .4 - 39 (at the rear of the four bogie trams parked in the City loop), night photo, looking west. .5 - 42 at Sebastopol terminus with the Royal Mail Hotel in the background - night photo. .6 - bogie tram and 39 parked in the city loop - two have now departed. ...Has the post office in the background. .3 - bogie tram at the south side, night photo, has the Commonwealth Bank in the background. .4 - 39 (at the rear of the four bogie trams parked in the City loop), night photo, looking west. .5 - 42 at Sebastopol terminus with the Royal Mail Hotel in the background - night photo. .6 - bogie tram and 39 parked in the city loop - two have now departed. ...Yields information about Ballarat Tramways and trams prior to the closure of the tramway system.Set of 7 digital images of Ballarat trams prior to closure, scanned from original slides by Tony Smith, 1971 prior to closure of the system. This set of slides appears to be the last day of operations - 19/9/1971 .1 - Four bogie trams parked in city loop with Woolworth's Big W and Dickins in the background. Not well focused. first tram 37 - see Reg Item 6158.6. .2 - 42 at Sturt and Lydiard St, north side, night photo with crew standing by the tram stop sign. Has the post office in the background. .3 - bogie tram at the south side, night photo, has the Commonwealth Bank in the background. .4 - 39 (at the rear of the four bogie trams parked in the City loop), night photo, looking west. .5 - 42 at Sebastopol terminus with the Royal Mail Hotel in the background - night photo. .6 - bogie tram and 39 parked in the city loop - two have now departed. Has Dickins, Gear Chemist and Edments Hartleys stores in the background. .7 - 34 at Sturt and Lydiard St north side.trams, tramways, closure, night photo, city loop, post office, tram 37, tram 42, tram 39, tram 34 -
 Ballarat Tramway Museum
Photograph - Digital image, 19/09/1971 12:00:00 AM
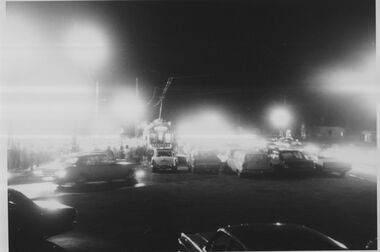
... ... Night Photo...Digital image from a black and white print of possibly the last or near to the last trams at the Sebastopol terminus with many cars at the terminus. Night photo. Taken on the last day of SEC tram services by Bill Kingsley, 19/9/1971. ...Night photo. Taken on the last day of SEC tram services by Bill Kingsley, 19/9/1971. ...Yields information about the closing hours of the SEC Ballarat tramways - night photo of trams at the Sebastopol terminus.Digital image from a black and white print of possibly the last or near to the last trams at the Sebastopol terminus with many cars at the terminus. Night photo. Taken on the last day of SEC tram services by Bill Kingsley, 19/9/1971. trams, tramways, sebastopol, night photo, closure -
 Melbourne Tram Museum
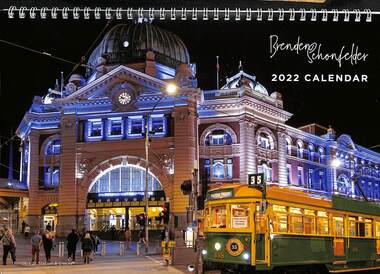
Ephemera - Calendar, Brenden Schonfelder, "Brenden Schonfelder 2022 Calendar", 2021
... ... Night Photo...Calendar - 12 full colour pages wire bound featuring night photos of W8 class trams in Melbourne CBD during the COVID-19 shutdowns. ...Melbourne Tram Museum 8 Wallen Road Hawthorn melbourne Trams tramways W8 class COVID-19 Flinders St Station Flinders St Docklands City Circle Route 35 Night Photo Spencer St La Trobe St Spring St tram 888 tram 856 tram 925 Calendar - 12 full colour pages wire bound featuring night photos of W8 class trams in Melbourne CBD during the COVID-19 shutdowns. ...Calendar - 12 full colour pages wire bound featuring night photos of W8 class trams in Melbourne CBD during the COVID-19 shutdowns. Photos by Brenden Schonfelder. Rear cover has a set of 12 images featured in the calendar along with photographer's contact details. Features trams 888, 856, 925trams, tramways, w8 class, covid-19, flinders st station, flinders st, docklands, city circle, route 35, night photo, spencer st, la trobe st, spring st, tram 888, tram 856, tram 925 -
 Ballarat Tramway Museum
Slide - 35mm slide/s - set of 8, Noel Simons, 25/02/1972 12:00:00 AM
... ... Night Photo...Set of 8 transparencies taken on 25/02/72 on Kodak mounts. 1202.1 - Night photo of Bendigo 5 at Charing Cross, waiting to depart to Quarry Hill. ...Ballarat Tramway Museum South Gardens Reserve Wendouree Parade Ballarat Ballarat goldfields Tramways trams Bendigo Night Photo Charing Cross Quarry Hill Mitchell St. tram 2 tram 5 tram 7 tram 21 tram 26 Information written on in blue ink and date stamped on purple ink. 1202.1 - "No. 5 at Charing Cross" 1202.2 - "No 5. at Charing Cross" 1202.3 - "Nos. 7, 21 and 5 at Charing Cross" 1202.4 - "Nos. 5 and 2 at Charing Cross" 1202.5 - "No. 2 at Charing Cross" 1202.6 - "No. 26 at Quarry Hill" 1202.7 - "No. 26 in Mitchell St. opposite Wills St." 1202.8 - "No. 26 at Quarry Hill" Set of 8 transparencies taken on 25/02/72 on Kodak mounts. 1202.1 - Night photo of Bendigo 5 at Charing Cross, waiting to depart to Quarry Hill. ...Set of 8 transparencies taken on 25/02/72 on Kodak mounts. 1202.1 - Night photo of Bendigo 5 at Charing Cross, waiting to depart to Quarry Hill. Tram has two SEC roof ads. Has Ezywalkin and the Beehive buildings in the background. 1202.2 - as for 1202.1 1202.3 - as for 1202.1 but further back and 7 and 21 waiting for their runs as well in Pall Mall. 1202.4 - 5 and 2 at Charing Cross, night photo, looking along Mitchell St. with Fountain Plaza on right of photo and Ezywalkin store. 1202.5 - No. 2 at Charing cross, bound for Eaglehawk. Tram has two SEC ads. 1202.6 - No. 26 at Quarry Hill terminus with the cemetery in the background. Tram has two SEC roof ads. 1202.7 - No. 26 in Mitchell St. bound for Eaglehawk, at Wills St. with the Hopetoun Hotel in the background. 1202.8 - as for 1202.6Information written on in blue ink and date stamped on purple ink. 1202.1 - "No. 5 at Charing Cross" 1202.2 - "No 5. at Charing Cross" 1202.3 - "Nos. 7, 21 and 5 at Charing Cross" 1202.4 - "Nos. 5 and 2 at Charing Cross" 1202.5 - "No. 2 at Charing Cross" 1202.6 - "No. 26 at Quarry Hill" 1202.7 - "No. 26 in Mitchell St. opposite Wills St." 1202.8 - "No. 26 at Quarry Hill" tramways, trams, bendigo, night photo, charing cross, quarry hill, mitchell st., tram 2, tram 5, tram 7, tram 21, tram 26 -
 Ballarat Tramway Museum
Slide - 35mm slide/s - set of 19, Noel Simons, 26/02/1972 12:00:00 AM
... ... Night Photo...Photo taken after the tram has passed the photographer. 1203.12 - No. 7 end on photograph, at Golden Square, destination showing Golden Square - night photo. 1203.13 - number not used. 1203.14 - as for 1202.12, but partially side on, has a passenger looking out the tram. 1203.15 - as for 1202.12, but with hotel in the background. 1203.16 - No. 26 and 2 at Charing Cross, night photo. ...Photo taken after the tram has passed the photographer. 1203.12 - No. 7 end on photograph, at Golden Square, destination showing Golden Square - night photo. 1203.13 - number not used. 1203.14 - as for 1202.12, but partially side on, has a passenger looking out the tram. 1203.15 - as for 1202.12, but with hotel in the background. 1203.16 - No. 26 and 2 at Charing Cross, night photo. ...Set of 18 transparencies taken on 26/2/1972 on Kodak mounts. 1203.1 - Bendigo 5 at Eaglehawk terminus - with new traffic works. 1203.2 - No. 5 climbing the High St. hill Eaglehawk with the buildings on the east side in the photo. 1203.3 - No 2 descending the road over rail bridge at Job's Gully, heading for Quarry Hill. 1203.4 - as for 1202.3, but more side on. Tram has two SEC roof ads. 1203.5 - as for 1202.4 1203.6 - No. 26 entering Garden Gully Loop, Mt. Korong Road, Ironbark. Tram en route to Eaglehawk. Water column on right hand side of photograph. 1203.7 - No. 2 on the Eaglehawk route, Iron Bark area?, bound for Quarry Hill. 1203.8 - as for 1202.7, but photo taken after tram has past photographer. 1203.9 - No. 5 at Eaglehawk terminus, night photo. Tram has arrived at terminus, showing Quarry Hill, pole turned, but the tram lights have yet to be turned around. 1203.10 - as for 1202.9, but lights have been turned around. 1203.11 - No. 26 climbing the View St. Hill near the Commodore Hotel. Has Campbells Electrical Services building in the background. Photo taken after the tram has passed the photographer. 1203.12 - No. 7 end on photograph, at Golden Square, destination showing Golden Square - night photo. 1203.13 - number not used. 1203.14 - as for 1202.12, but partially side on, has a passenger looking out the tram. 1203.15 - as for 1202.12, but with hotel in the background. 1203.16 - No. 26 and 2 at Charing Cross, night photo. Tram 26 en route to Quarry Hill, 2 to Eaglehawk. 1203.17 - Interior photo of No. 26, at night. 1203.18 - No. 26 at the Quarry Hill terminus as night. 1203.19 - as for 1202.18, but central portion of the tramcar.Information written on in blue ink and date stamped on purple ink. 1203.1 - "No. 5 at Eaglehawk terminus" 1203.1 - "No. 5 in High St. Eaglehawk" 1203.3 - "No. 2" 1203.4 - "No. 2" 1203.5 - "No. 2" 1203.6 - "No. 26 at Garden Gully Loop Mt Korong Rd., Ironbark" 1203.7 - "No. 2" 1203.8 - "No. 2" 1203.9 - "No. 5 at Eaglehawk terminus" 1203.10 - "No. 5 at Eaglehawk terminus" 1203.11 - "No. 26 in View St. Near the Commodore Motel" 1203.12 - "No. 7 at Golden Square Terminus" 1203.14 - "No. 7 at Golden Square Terminus" 1203.15 - "No. 7 at Golden Square Terminus" 1203.16 - "Nos. 26 and 2 at Charing Cross" 1203.17 - "Interior of No. 26" 1203.18 - "No. 26 at the Quarry Hill terminus" 1203.19 - "No. 26 at the Quarry Hill terminus "tramways, trams, bendigo, eaglehawk, bridges, iron bark gully, night photo, quarry hill, golden square, tram 2, tram 5, tram 7, tram 26 -
 Melbourne Tram Museum
Slide - Set of 5, Keith Caldwell, 1/11/1978 12:00:00 AM
... ... Night Photo...Dated 2.11.1978. .5 - Night photo of Z69, East Preston, at the Swanston St intersection? ...Dated 2.11.1978. .5 - Night photo of Z69, East Preston, at the Swanston St intersection? ...Set of five Kodak Colour slides, cardboard mounts, by Keith Caldwell of: .1 - Z59 (East Brunswick, route 96) and Z41 (City route 88) in the Bourke St Mall, with the Buckleys and Myers buildings in the background. Dated 1.11.78. .2 - Z63 (East Brunswick route 96) and another Z at Swanston St in Bourke St with the Foys in the background. Also signs for Portmans, get smart clothing, Dated 1.11.1978. .3 - Z71 (City - Route 96) and another Z at the Spencer St stop, with the Eliza Tinsley building in the background. Dated 1.11.1978. .4 - Z71 (East Preston - Bell St - Route 89) and Z51 (East Preston Tyler St route 89) in Bourke St Mall, with Myers and the Post Office in the background. Dated 2.11.1978. .5 - Night photo of Z69, East Preston, at the Swanston St intersection? Has an illuminated sign for The Carlyon Hotel and South Cross Hotel in the backgroundDates as shown above in red ink.trams, tramways, bourke st, swanston st, z class, route 96, route 88, east brunswick, east preston, route 89, night photo, tram 59, tram 41, tram 63, tram 71, tram 69, tram 51 -
 Ballarat Tramway Museum
Photograph - SECV Ballarat - last day of operations - set of 15, George Stevens, 15/8/1971
... ...Night Photo...Set of 15 Digital images, from slides taken by George Stevens on the last day of operations of the SECV Ballarat system on 19/9/1971. 1 - Trams 35, 34 In Sturt St with the Town Hall in the background 2 - Trams 35, 34 Passing through the Bell St loop 3 - Trams 35, 34 ditto with the milko plodding by 4 - Trams 35, 34, 42 Three trams crossing and plenty of photographers trying to get run over 5 - Trams 35, 34, 42 Crossing 42 at the Bell St loop 6 - Trams 35, 34 In Albert St 7 - Trams 35, 34 Crossing Albert St 8 - Tram 34 Returning to the city in Skipton St 9 - Trams 39,34 and 35 Crossing at the Bell St loop 10 - A small distraction 11 - Trams 37,43,34,35 Night photo of the four trams in City Loop with Woolworths Big W store in the background 12 - Trams 37,43,34,35 ditto but camera mooved 13 - Tram 35 At Lydiard St North terminus with the terminus shelter in the background, 14 - Tram 35 ditto 15 - Tram 42 At Sebastopol with the Royal Mail Hotel in the background ...Tramways Drummond St Sth Lydiard St Nth Sturt St Sebastopol Bell St loop City loop Night Photo tram 35 tram 34 tram 42 tram 39 tram 43 Set of 15 digital images scanned from slides. ...Set of 15 Digital images, from slides taken by George Stevens on the last day of operations of the SECV Ballarat system on 19/9/1971. 1 - Trams 35, 34 In Sturt St with the Town Hall in the background 2 - Trams 35, 34 Passing through the Bell St loop 3 - Trams 35, 34 ditto with the milko plodding by 4 - Trams 35, 34, 42 Three trams crossing and plenty of photographers trying to get run over 5 - Trams 35, 34, 42 Crossing 42 at the Bell St loop 6 - Trams 35, 34 In Albert St 7 - Trams 35, 34 Crossing Albert St 8 - Tram 34 Returning to the city in Skipton St 9 - Trams 39,34 and 35 Crossing at the Bell St loop 10 - A small distraction 11 - Trams 37,43,34,35 Night photo of the four trams in City Loop with Woolworths Big W store in the background 12 - Trams 37,43,34,35 ditto but camera mooved 13 - Tram 35 At Lydiard St North terminus with the terminus shelter in the background, 14 - Tram 35 ditto 15 - Tram 42 At Sebastopol with the Royal Mail Hotel in the background Yields information about the tramcars used on 15/8/1971 and the various locations around the system.Set of 15 digital images scanned from slides.tramways, drummond st sth, lydiard st nth, sturt st, sebastopol, bell st loop, city loop, night photo, tram 35, tram 34, tram 42, tram 39, tram 43 -
 Ballarat Tramway Museum
Photograph - Digital image Set of 10, Tony Smith, 1971
... ... Night Photo...Set of 10 digital images of Ballarat trams prior to closure, scanned from original slides by Tony Smith, 1971 prior to closure of the system. .1 - 21 - night photo - at Sebastopol terminus .2 - 13 at Victoria St terminus .3 - 13 arriving at the Sturt St stop at Lydiard St, from Grenville St. ...Trams tramways Night Photo Sebastopol Victoria St Sturt St Drummond St Nth Mill St loop Macarthur St Mair St Lydiard St Nth Martin Ave Wendouree Parade tram 21 tram 13 tram 26 tram 31 Set of 10 digital images of Ballarat trams prior to closure, scanned from original slides by Tony Smith, 1971 prior to closure of the system. .1 - 21 - night photo - at Sebastopol terminus .2 - 13 at Victoria St terminus .3 - 13 arriving at the Sturt St stop at Lydiard St, from Grenville St. ...Yields information about Ballarat Tramways and trams prior to the closure of the tramway system.Set of 10 digital images of Ballarat trams prior to closure, scanned from original slides by Tony Smith, 1971 prior to closure of the system. .1 - 21 - night photo - at Sebastopol terminus .2 - 13 at Victoria St terminus .3 - 13 arriving at the Sturt St stop at Lydiard St, from Grenville St. Tram has the destination of Gardens via Sturt St West. Has the Commonwealth Bank and Mechanics institute in the background. .4 - 21 at Mill St loop, Drummond St Nth, enroute to Gardens via Drummond Nth. .5 - 26? about to turn from Drummond St Nth into Macarthur St with passengers boarding and leaving the tram. .6 - 21 northbound in Drummond St north at Mair St with an old hotel in the background. .7 - 33 at Lydiard St Nth, with many passengers boarding. Has the cemetery gates in the background. .8 - 26 waiting in the Martin Ave loop. Tram has the destination of Gardens via Drummond St Nth. .9 - 31 crossing 26 at the Martin Ave Loop. .10 - 26 at Gardens Loop with passengers getting off the tram. Tram has the destination of Mt Pleasant. The stop signage is visible to the right of the tram.trams, tramways, night photo, sebastopol, victoria st, sturt st, drummond st nth, mill st loop, macarthur st, mair st, lydiard st nth, martin ave, wendouree parade, tram 21, tram 13, tram 26, tram 31 -
 Ballarat Tramway Museum
Slide - 35mm slide/s - set of 17, Noel Simons, 20/11/1962 12:00:00 AM
... ... Night Photo...Also has the 'Safety Zone' sign in the photograph. 1187.16 - No. 2 at Quarry Hill terminus, night or dusk photo. Tram showing destination of Depot. 1187.17 - No. 26 at Charing Cross, night photo. ...Also has the 'Safety Zone' sign in the photograph. 1187.16 - No. 2 at Quarry Hill terminus, night or dusk photo. Tram showing destination of Depot. 1187.17 - No. 26 at Charing Cross, night photo. ...Set of 17 transparencies taken on 20/11/1962 on Kodak mounts. 1187.1 - Bendigo No. 2 at the Quarry Hill terminus, showing destination of Quarry Hill. Has Cohns Drinks and Streets Ice Cream ads on dash panel, a SEC 'electric cooking' roof ad and another roof ad. Shows the Y terminus at this location, but tram standing just before it. Overhead in position. 1187.2 - as above, but closer up. 1187.3 - as above, but from the north side, showing cemetery in the background. 1187.4 - Bendigo No.3 at Eaglehawk terminus. Tram showing destination of Quarry Hill. Has the various buildings at Eaglehawk in the background including the Foodland store. Has Streets Ice cream and White Horse Whiskey ads on the dash panel. 1187.5 - Bendigo No. 18 at Garden Gully crossing loop, in bound, with destination of Eaglehawk. Passengers waiting for an Eaglehawk tram at the stop. Has a white horse whiskey ad on dash panel and SEC roof ads. Conductor standing in doorway looking out. 1187.6 - Bendigo No. 7 inbound in Nolan St. at cnr of McCrae St. showing destination of Golden Square. Has Streets Ice cream ad on dash panel and a Castrol Roof ad. 1187.7 - Bendigo No. 19 at the North Bendigo terminus with railway level crossing in background. Tram has a Cohns Drinks ad and an SEC 'Electric Cooking' roof ad. 1187.8 - Bendigo No. 2 at the Quarry Hill terminus, looking back into Bendigo, showing destination of Eaglehawk. 1187.9 - Bendigo No. 21 in McCrae St, near Nolan St outbound for North Bendigo. Photo taken after tram has passed photographer. 1187.10 - Bendigo Nos. 4 and 26 at Charing Cross in View St. with fountain alongside and the Beehive, Ezywalkin Buildings in the background. No. 26 has a Sandhurst Milk and SEC 'Electric Cooking' roof ad. 1187.11 - close up of 22E maximum traction truck and folded footstep. 1187.12 - Bendigo No. 19 at Charing Cross terminus, after tram has passed photographer, showing destination of North Bendigo, with the Beehive building in the background and passengers boarding tram. 1187.13 - Bendigo No. 11, turning from View St. into Pall Mall, showing Special with the conductor holding point bar. Has the Beehive and Ezywalkin Buildings in the background. 1187.14 - No. 7 at Charing Cross terminus, in Pall Mall, bound for Golden Square. Has the Beehive and Ezywalkin buildings in the background and passengers waiting at the tram stop. 1187.15 - No. 18 at the Charing Cross terminus, bound for Eaglehawk. Has the Beehive and Ezywalkin buildings in the background and passengers waiting at the tram stop. Also has the 'Safety Zone' sign in the photograph. 1187.16 - No. 2 at Quarry Hill terminus, night or dusk photo. Tram showing destination of Depot. 1187.17 - No. 26 at Charing Cross, night photo. Tram has destination of Quarry Hill, but is on the line for Eaglehawk. Photo looks along Mitchell St. Also shows Safety Zone sign. Information written on in black ink and date stamped on purple ink. 1187.1 - "No. 2 at Quarry Hill terminus Bendigo" 1187.2 - "No. 2 at Quarry Hill terminus Bendigo" 1187.3 - "No. 2 at Quarry Hill terminus Bendigo" 1187.4 - "No. 3 at Eaglehawk terminus" 1187.5 - "No. 18 in Mt Korong Road, Long Gully at cnr of Havilah Road (Eaglehawk Route)" 1187.6 - "No. 7 in Nolan St. Bendigo, at Cnr of McCrae St., near lake Weeroona, (North Bendigo Route)' 1187.7 - "No. 19 at North Bendigo terminus" 1187.8 - "No. 2 at Quarry Hill terminus" 1187.9 - "No. 21 in McCrae St. Bendigo, near Nolan St. (North Bendigo Route) 1187.10 - "4 and 26 at Alexandra Fountain, Charing Cross Bendigo" 1187.11 - "Truck of Bogie Car, Bendigo Tramways" 1187.12 - "No. 19 in Pall Mall at Charing Cross, Bendigo" 1187.13 - "Birney car No. 11 entering Pall Mall from View St. at Charing Cross Bendigo" 1187.14 - "No. 7 in Pall Mall at Charing Cross, Bendigo" 1187.15 - "No. 18 at Alexandra Fountain, Charing Cross, Bendigo" 1187.16 - "No. 2 at Quarry Hill terminus, Bendigo" 1187.17 - "No. 26 at Alexandra Fountain, Charing Cross, Bendigo" tramways, trams, bendigo, quarry hill, eaglehawk, north bendigo, maximum traction, night photo, tram 2, tram 3, tram 4, tram 7, tram 11, tram 18, tram 19, tram 21, tram 26 -
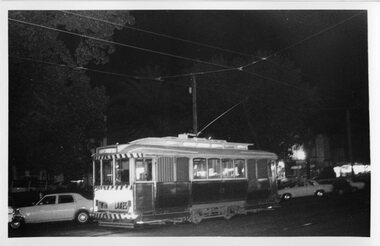
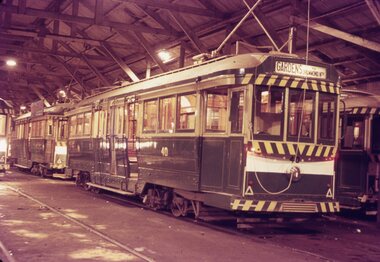
 Ballarat Tramway Museum
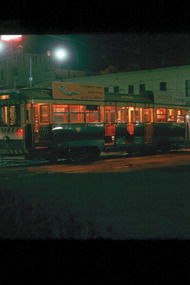
Slide - SECV Ballarat tram 39 outside depot at night, Graeme Cleak, 5-4-1969
... ...Night Photo...The photo shows SECV Ballarat tram 39 outside the depot at night showing Special. ...Tramways tramcars AETA Tours depot Night Photo tram 39 In ink "No 39 Depot 5-4-69, EK21" Colour slide - AGFA Cardboard mount with handwritten notes. ...The photo shows SECV Ballarat tram 39 outside the depot at night showing Special. The tram was one of the three tour trams during the day. Taken during the AETA Easter tour to Ballarat - see reference. Yields information about the AETA 1969 Ballarat tour and tram 39.Colour slide - AGFA Cardboard mount with handwritten notes.In ink "No 39 Depot 5-4-69, EK21"tramways, tramcars, aeta tours, depot, night photo, tram 39 -
 Ballarat Tramway Museum
Slide - SECV Ballarat tram 39 Sebastopol at night, Graeme Cleak, 5-4-1969
... ...Night Photo...Tramways tramcars AETA Tours Night Photo tram 39 Sebastopol Royal Mail Hotel In ink "No 39 Sebastopol 5-4-69, EK23" Colour slide - AGFA Cardboard mount with handwritten notes. ...The photo shows SECV Ballarat tram 39 at Sebastopol with the service car behind. In the background is the Royal Mail Hotel. Taken during the AETA Easter tour to Ballarat - see reference. Yields information about the AETA 1969 Ballarat tour and tram 39.Colour slide - AGFA Cardboard mount with handwritten notes.In ink "No 39 Sebastopol 5-4-69, EK23"tramways, tramcars, aeta tours, night photo, tram 39, sebastopol, royal mail hotel -
 Ballarat Tramway Museum
Slide - Set of two - SECV Ballarat tram 39 Lydiard St North at night, Graeme Cleak, 5-4-1969
... ...Night Photo...Tramways tramcars AETA Tours Night Photo tram 39 Lydiard St Nth In ink "No 39 Lydiard St Nth 5-4-69, EK23" - second slide EK24. ...Set of two photos showing SECV Ballarat tram 39 at the Lydiard St North terminus. The tram has an SECV all-electric cooking roof advert. Taken during the AETA Easter tour to Ballarat - see reference.Yields information about the AETA 1969 Ballarat tour and tram 39.Colour slide - AGFA Cardboard mount with handwritten notes.In ink "No 39 Lydiard St Nth 5-4-69, EK23" - second slide EK24.tramways, tramcars, aeta tours, night photo, tram 39, lydiard st nth -
 Ballarat Tramway Museum
Slide - SECV Ballarat tram 40 in depot at night, Graeme Cleak, 5-4-1969
... ...Night Photo...The photo shows SECV Ballarat tram 40 in the depot at night along with other trams. ...Tramways tramcars AETA Tours tram 40 depot Night Photo In ink "No 40 Depot 5-4-69, EK20" Colour slide - AGFA Cardboard mount with handwritten notes. ...The photo shows SECV Ballarat tram 40 in the depot at night along with other trams. Taken during the AETA Easter tour to Ballarat - see reference. I Yields information about the AETA 1969 Ballarat tour and tram 40.Colour slide - AGFA Cardboard mount with handwritten notes.In ink "No 40 Depot 5-4-69, EK20"tramways, tramcars, aeta tours, tram 40, depot, night photo -
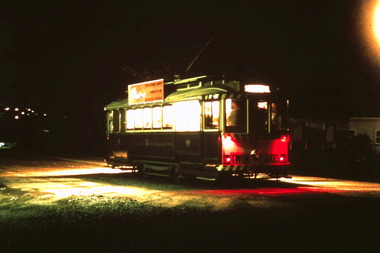
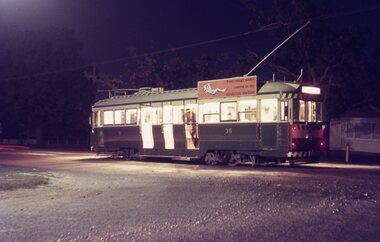
 Ballarat Tramway Museum
Photograph - Ballarat tram depot - night - trams 11 & 42, Len Millar, April 1970
... ...Night Photo...night. Tram 11 has a Twin Lakes sign and is over the inspection pit on No. 1 road. The photo was used on page 51 in Keith Kings 1971 book "Ballarat Tramways." ...Yields information about trams 11 & 42 at the depot during April 1970. tramcars tramways depot tram 11 tram 42 Night Photo In pencil "ST 11 & bogie car 42 in Ballarat Depot 4/70, Len Millar" and "No. 32 page 51" Black and white photograph notes on rear. ...The photograph shows Ballarat trams 11 and 42 in the depot at night. Tram 11 has a Twin Lakes sign and is over the inspection pit on No. 1 road. The photo was used on page 51 in Keith Kings 1971 book "Ballarat Tramways." Yields information about trams 11 & 42 at the depot during April 1970.Black and white photograph notes on rear.In pencil "ST 11 & bogie car 42 in Ballarat Depot 4/70, Len Millar" and "No. 32 page 51"tramcars, tramways, depot, tram 11, tram 42, night photo -
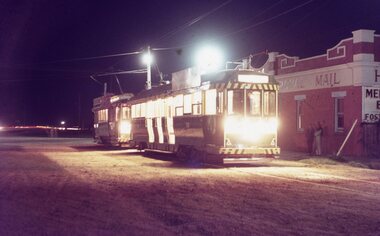
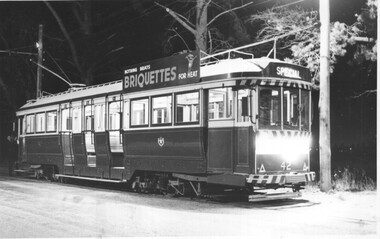 Ballarat Tramway Museum
Photograph - SECV Ballarat tram 42 - depot junction, Len Millar, April 1970
... ...Night Photo...night. The tram is showing "Special" and has a briquettes roof advert.. The photo was used on page 53 in Keith Kings 1971 book "Ballarat Tramways." ...Yields information about trams 42 at the depot during April 1970. tramcars tramways depot tram 42 Night Photo In pencil "Bogie car 42 outside Ballarat Depot 4/70, Len Millar" and "No. 33 page 53" Black and white photograph notes on rear. ...The photograph shows Ballarat tram 42 outside the depot in Wendouree Parade before running in at night. The tram is showing "Special" and has a briquettes roof advert.. The photo was used on page 53 in Keith Kings 1971 book "Ballarat Tramways." Yields information about trams 42 at the depot during April 1970.Black and white photograph notes on rear.In pencil "Bogie car 42 outside Ballarat Depot 4/70, Len Millar" and "No. 33 page 53"tramcars, tramways, depot, tram 42, night photo -
 Ballarat Tramway Museum
Photograph - Ballarat tramways Passing loop - at night, Keith Kings, c1970
... ...Night Photo...The photograph shows a Ballarat tramway crossing or passing loop at night, looking down hill, possibly the Seymour or Gregory St loop in Lydiard St North. The photo was used on page 59 in Keith Kings 1971 book "Ballarat Tramways." ...Yields information about the appearance of a crossing loop possibly in Lydiard St North at night tramcars tramways Crossing Loop passing loop Night Photo In pencil "No. 38, page 59 and KK" Black and white photograph notes on rear with cropping paper. ...The photograph shows a Ballarat tramway crossing or passing loop at night, looking down hill, possibly the Seymour or Gregory St loop in Lydiard St North. The photo was used on page 59 in Keith Kings 1971 book "Ballarat Tramways." Yields information about the appearance of a crossing loop possibly in Lydiard St North at nightBlack and white photograph notes on rear with cropping paper.In pencil "No. 38, page 59 and KK" tramcars, tramways, crossing loop, passing loop, night photo -
 Ballarat Tramway Museum
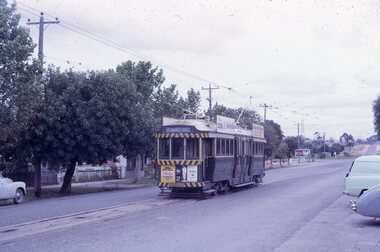
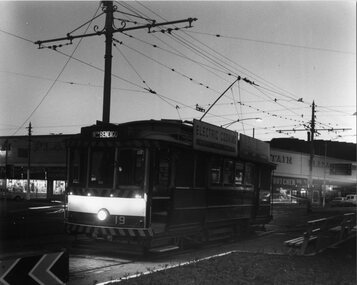
Photograph - Black & White Photograph/s, Chris Wurr, early 1970's
... ... Night Photo...Ballarat Tramway Museum South Gardens Reserve Wendouree Parade Ballarat Ballarat goldfields Yields information about the appearance of Bendigo Birney trams early 1970's and the North Bendigo area. trams tramways Bendigo Charing Cross Night Photo tram 19 "Photo by Chris Wurr" stamped on the rear. ...Yields information about the appearance of Bendigo Birney trams early 1970's and the North Bendigo area.Black and White Photograph of SEC Bendigo 19, late evening photograph, at Charing Cross with the Fountain Plaza building in the background. Tram has the destination of Nth Bendigo and SEC Electric Cooking roof advertisements. Photo Chris Wurr, early 1970's. "Photo by Chris Wurr" stamped on the rear.trams, tramways, bendigo, charing cross, night photo, tram 19 -
 Ballarat Tramway Museum
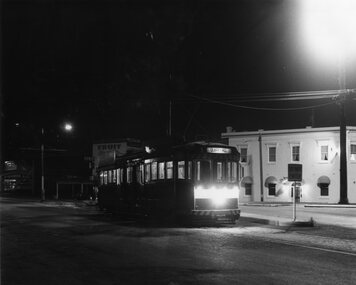
Photograph - Black & White Photograph/s, Chris Wurr, Jan. 1971
... ... Night Photo...night photograph. Tram has the destination of Quarry Hill. In the background is the Foodland Store, a Milk bar. The tram has arrived at the terminus, the trolley pole has been turned, but the headlights and dash canopy lights have yet to be turned. Tram has the destination of Quarry Hill. Photo...Ballarat Tramway Museum South Gardens Reserve Wendouree Parade Ballarat Ballarat goldfields trams tramways Bendigo Eaglehawk Night Photo tram 2 "Photo by Chris Wurr" stamped on the rear. ...Black and White Photograph of Bendigo No. 2 at the Eagle Hawk terminus, Jan. 1971, night photograph. Tram has the destination of Quarry Hill. In the background is the Foodland Store, a Milk bar. The tram has arrived at the terminus, the trolley pole has been turned, but the headlights and dash canopy lights have yet to be turned. Tram has the destination of Quarry Hill. Photo Chris Wurr, early 1970's. "Photo by Chris Wurr" stamped on the rear. In top left hand corner, in ink "71)" and "Bendigo (SEC) Tramways / 1.1971 / Eaglehawk Terminus"trams, tramways, bendigo, eaglehawk, night photo, tram 2 -
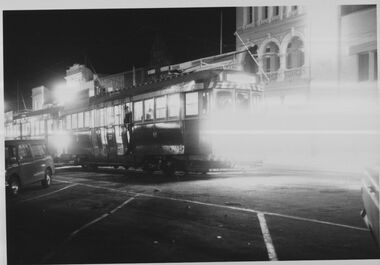
 Ballarat Tramway Museum
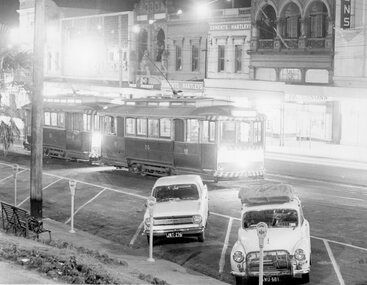
Photograph - Black & White Photograph/s, Dave Macartney, 23/12/1967 12:00:00 AM
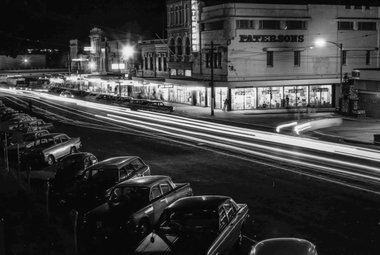
... ... Night Photo...photo to an approx. A4 print by colour photocopying and laminated for display purposes. Made July 2000 for the Trams at Night exhibition in the depot. ...Ballarat Tramway Museum South Gardens Reserve Wendouree Parade Ballarat Ballarat goldfields trams tramways Sturt St City Loop Night Photo tram 26 tram 28 Black and white photograph of SEC Trams 26 and 28 in the City Loop on 23.12.1967 in the evening. ...Black and white photograph of SEC Trams 26 and 28 in the City Loop on 23.12.1967 in the evening. Both trams have their lights on. Two motor cars parked with parking meters. In rear are the buildings on the south side of Sturt St to the west of Grenville St. Buildings in view are "Edments Hartleys", "Gear Chemist" and "Patersons". Photo by Dave Macartney - 23/12/1967. Copy1 - Photocopy made 4/1999 for display purposes. Copy 2 - made by enlarging photo to an approx. A4 print by colour photocopying and laminated for display purposes. Made July 2000 for the Trams at Night exhibition in the depot. Made by W.Doubleday. Has four Velcro dots on rear. Overall size 203H x 268W. Stored in same box at rear of large photos area in an A4 plastic folder.trams, tramways, sturt st, city loop, night photo, tram 26, tram 28 -
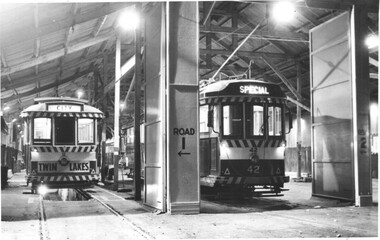
 Ballarat Tramway Museum
Photograph - Black & White Photograph/s, c1970
... ... Night Photo...photo to an approx. A4 print by colour photocopying and laminated for display purposes. Made July 2000 for the Trams at Night exhibition in the depot. ...Ballarat Tramway Museum South Gardens Reserve Wendouree Parade Ballarat Ballarat goldfields trams tramways Gardens Loop Bogie Trams Night Photo tram 43 Black and white photograph of bogie tram No. 43 at Gardens Loop, photographed in the early evening. ...Black and white photograph of bogie tram No. 43 at Gardens Loop, photographed in the early evening. Has a SEC Roof Advertisement "Everything's under control in my all-electric kitchen". Copy 1 - Colour photocopy, laminated, of this photograph on display 5/2000 at 02-02-06 Copy 2 - made by enlarging photo to an approx. A4 print by colour photocopying and laminated for display purposes. Made July 2000 for the Trams at Night exhibition in the depot. Made by W.Doubleday. Has four Velcro dots on rear. Overall size 210H x 288W. Stored in same box at rear of large photos area in an A4 plastic folder.trams, tramways, gardens loop, bogie trams, night photo, tram 43 -
 Ballarat Tramway Museum
Photograph - Black & White Photograph/s, R.G. Vanselow, 30/08/1968 12:00:00 AM
... ... Night Photo...photo to an approx. A4 print by colour photocopying and laminated for display purposes. Made July 2000 for the Trams at Night exhibition in the depot. ...Ballarat Tramway Museum South Gardens Reserve Wendouree Parade Ballarat Ballarat goldfields trams tramways City Centre Sturt St Night Photo tram 32 On rear in pencil "Approx. 11.05pm, Fri 30 August 1968 / City Centre, Sturt St, / Ballarat" and in bottom right hand corner, in ink "With Compliments / R.G." and stamped in black ink "Vanselow". ...Black and white photograph of SEC No. 32 and two other single truckers at the City Centre in Sturt St, on the north side. Photographed by R.G. Vanselow at 11.05pm on 30/8/1968. The three crew members (drivers) are standing by the tram stop pole while an Inspector walks towards them. Photo has the SEC building in the background. Tram 32 has a Wilkinson Sword razor blade roof ad. The 2nd tram has a roof ad for Myers Pixietown. Tram 32 showing destination of "Victoria St." Colour photocopy, laminated, of this photograph on display 5/2000 at 02-02-06 1380 Copy 2 - made by enlarging photo to an approx. A4 print by colour photocopying and laminated for display purposes. Made July 2000 for the Trams at Night exhibition in the depot. Made by W.Doubleday. Has four Velcro dots on rear. Overall size 210H x 272W. Stored in same box at rear of large photos area in an A4 plastic folder.On rear in pencil "Approx. 11.05pm, Fri 30 August 1968 / City Centre, Sturt St, / Ballarat" and in bottom right hand corner, in ink "With Compliments / R.G." and stamped in black ink "Vanselow".trams, tramways, city centre, sturt st, night photo, tram 32