Showing 101 items matching "passing loop"
-
 Ballarat Tramway Museum
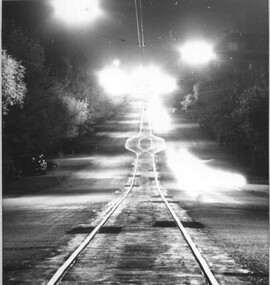
Photograph - Ballarat tramways Passing loop - at night, Keith Kings, c1970
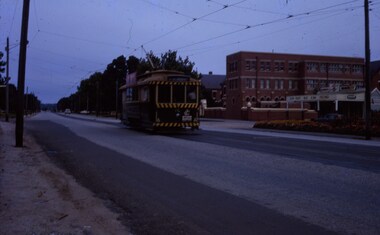
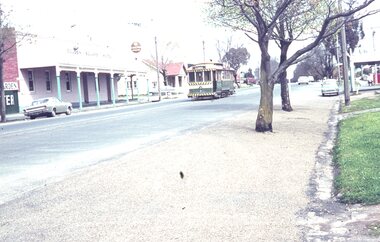
... Ballarat tramways Passing loop - at night......passing loop...The photograph shows a Ballarat tramway crossing or passing loop at night, looking down hill, possibly the Seymour or Gregory St loop in Lydiard St North. ...Photograph Ballarat tramways Passing loop - at night Keith Kings ...The photograph shows a Ballarat tramway crossing or passing loop at night, looking down hill, possibly the Seymour or Gregory St loop in Lydiard St North. The photo was used on page 59 in Keith Kings 1971 book "Ballarat Tramways." Yields information about the appearance of a crossing loop possibly in Lydiard St North at nightBlack and white photograph notes on rear with cropping paper.In pencil "No. 38, page 59 and KK" tramcars, tramways, crossing loop, passing loop, night photo -
 Melbourne Tram Museum
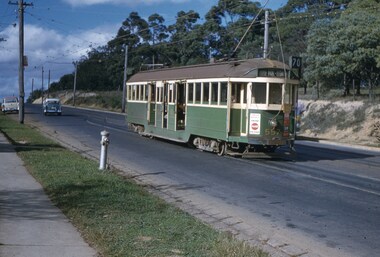
Slide, John Webster, 28/05/1960 12:00:00 AM
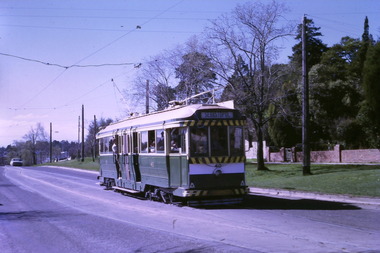
... Colour slide, Kodak, white cardboard of Tram 557 waiting on passing loop, Riversdale Road, Wattle Park, outbound to Wattle Park, Elgar Road, route 70/ Has adverts for Coca Cola, 3AW. ...Hand writing on rear in ink "28-5-60- Track - Tram 557 waiting on passing loop, Riversdale Road, Wattle Park, Melbourne Vic"...Melbourne Tram Museum 8 Wallen Road Hawthorn melbourne Trams tramways W2 class Wattle Park Riversdale Rd Route 70 tram 557 Hand writing on rear in ink "28-5-60- Track - Tram 557 waiting on passing loop, Riversdale Road, Wattle Park, Melbourne Vic" Colour slide, Kodak, white cardboard of Tram 557 waiting on passing loop, Riversdale Road, Wattle Park, outbound to Wattle Park, Elgar Road, route 70/ Has adverts for Coca Cola, 3AW. ...Colour slide, Kodak, white cardboard of Tram 557 waiting on passing loop, Riversdale Road, Wattle Park, outbound to Wattle Park, Elgar Road, route 70/ Has adverts for Coca Cola, 3AW. Also has an Auxiliary board - Football? There is a fire hydrant in the view and the tram stop sign. Slide dated 28-5-1960.Hand writing on rear in ink "28-5-60- Track - Tram 557 waiting on passing loop, Riversdale Road, Wattle Park, Melbourne Vic"trams, tramways, w2 class, wattle park, riversdale rd, route 70, tram 557 -
 Ballarat Tramway Museum
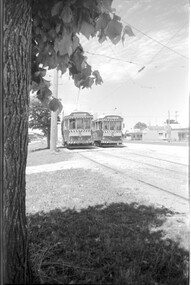
Photograph - SECV Trams 42 & 37 Grey St loop, Mal Rowe, 31/12/1968
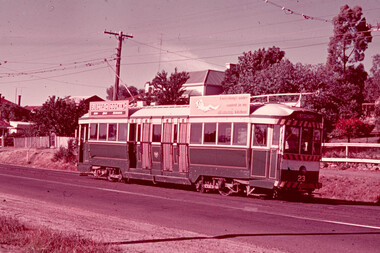
... Mal Rowe copyright stamp with "Sebastopol passing loop" in pencil....Yields information about the Grey St loop and tram services on the Sebastopol line. tramcars tramways tram 42 tram 37 Grey St Loop Albert St Mal Rowe copyright stamp with "Sebastopol passing loop" in pencil. Black and white photograph notes on rear. ...Photograph of Ballarat trams 42 (Sebastopol) and 37 (Lydiard St North) crossing at the Grey St loop in Albert St Sebastopol. Photo by Mal Rowe, 31/12/1968.Yields information about the Grey St loop and tram services on the Sebastopol line.Black and white photograph notes on rear.Mal Rowe copyright stamp with "Sebastopol passing loop" in pencil.tramcars, tramways, tram 42, tram 37, grey st loop, albert st -
 Ballarat Tramway Museum
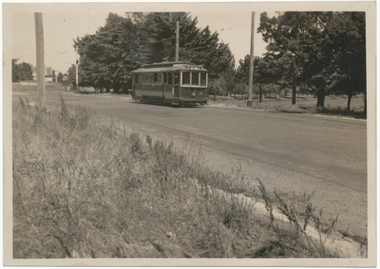
Photograph - Digital image, Wal Jack, 27/12/1943 12:00:00 AM
... Digital image from the Wal Jack Ballarat Album of No. 21 in Wendouree Parade Martin Ave Passing loop, 27-12-43. Note Neg Number T357 the same as for Reg item 5161. ...on rear of photo in ink, "SEC Ballarat Tramways No. 21 (ex Adelaide No. 10) in Wendouree Parade, new passing loop near Martin Ave 27-12-1943". Has the Wal Jack copyright stamp in the bottom right hand corner with the number "T357" in it....Digital image from the Wal Jack Ballarat Album of No. 21 in Wendouree Parade Martin Ave Passing loop, 27-12-43. Note Neg Number T357 the same as for Reg item 5161. ...Yields information the appearance of No. 21 in 1943 and the streetscape in Wendouree Parade Dec. 1943.Digital image from the Wal Jack Ballarat Album of No. 21 in Wendouree Parade Martin Ave Passing loop, 27-12-43. Note Neg Number T357 the same as for Reg item 5161. See image i2 for rear of photograph. See image i3 for hi res scan of print. See image i4 for hi res scan of negativeon rear of photo in ink, "SEC Ballarat Tramways No. 21 (ex Adelaide No. 10) in Wendouree Parade, new passing loop near Martin Ave 27-12-1943". Has the Wal Jack copyright stamp in the bottom right hand corner with the number "T357" in it.trams, tramways, wendouree parade, martin ave, tram 21 -
 Ballarat Tramway Museum
Slide - 35mm slide/s, Peter Moses, Aug. 1971
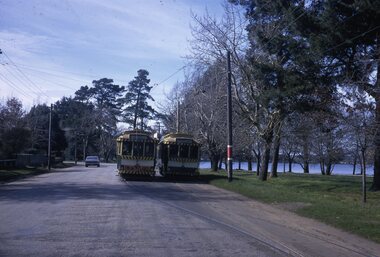
... On back of slide in red ink "Ballarat / Passing Loop Wendouree Pde" and in bottom right hand corner in black ink "P. ...Tramways trams Wendouree Parade Depot Crossing Loop Barrett Ave Depot Loop tram 27 tram 32 On back of slide in red ink "Ballarat / Passing Loop Wendouree Pde" and in bottom right hand corner in black ink "P. ...Photo of SEC Ballarat Tram No. 27 and 32 crossing at Depot Loop (Barrett Ave) in Wendouree Parade, east bound, near the Junction for the SEC Depot. Tram 27 has the destination of "Victoria St.". Has Lake Wendouree in the background. Shows the arrangement of the loop within Wendouree Parade Kodak cardboard mount slide, taken by Peter Moses August 1971.On back of slide in red ink "Ballarat / Passing Loop Wendouree Pde" and in bottom right hand corner in black ink "P. Moses" on the other side of the slide.tramways, trams, wendouree parade, depot, crossing loop, barrett ave, depot loop, tram 27, tram 32 -
 Ballarat Tramway Museum
Photograph - Black & White Photograph/s, David Clark, 17/02/1971 12:00:00 AM
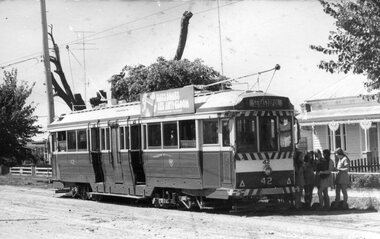
... On the rear in ink "Tram No. 42 in Skipton St at Bala St passing loop (looking to Sturt St , Ballarat City). ...Ballarat Tramway Museum South Gardens Reserve Wendouree Parade Ballarat Ballarat goldfields Yields information about the Ballarat's tramcars in the early 1970's and operation in Albert St Sebastopol and schoolchildren being picked up. tramways trams Sebastopol Albert St Schools tram 42 On the rear in ink "Tram No. 42 in Skipton St at Bala St passing loop (looking to Sturt St , Ballarat City). ...Yields information about the Ballarat's tramcars in the early 1970's and operation in Albert St Sebastopol and schoolchildren being picked up.Black and white photograph of Ballarat No. 42 in Albert St at the Grey St Loop (Bala St) with a number of school girls standing at the front of the tram. Photo by David Clark, 17/2/1971. The Tram has a "Bliss Bombs are Anti Gloom" Roof advertisement and has the destination of Sebastopol.On the rear in ink "Tram No. 42 in Skipton St at Bala St passing loop (looking to Sturt St , Ballarat City). Ballarat Tramways, Photo 25, Taken by David Clark", with David's address stamp "4 Adeney Ave Kew 3101" with "Melbourne" underneath.tramways, trams, sebastopol, albert st, schools, tram 42 -
 Ballarat Tramway Museum
Photograph - SECV Bendigo No. 17 and No. 22 at Mt Korong Road loop, Wal Jack, Easter Saturday, 1941
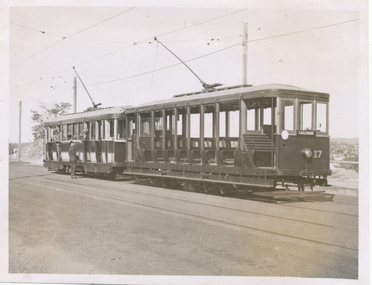
... On rear in ink "T191 State Electricity Commission Bendigo tramways / No. 17 summer car and "No. 22 Ex MMTB G Class standing at Passing Loop in Mt Korong Road, Easter Saturday 1941." ...Yields information about the use of trams, in particular No. 17, during Easter 1941. trams tramways Bendigo Mt Korong Road Garden Gully Loop tram 17 tram 22 On rear in ink "T191 State Electricity Commission Bendigo tramways / No. 17 summer car and "No. 22 Ex MMTB G Class standing at Passing Loop in Mt Korong Road, Easter Saturday 1941." ...No. 17 and No. 22 at Mt Korong Road loop - Garden Gully Loop. Photo taken Easter Saturday, 1941. Negative No. T191. No. 17 has the destination of "Eaglehawk" and is carrying a white disk at the front of the tram. Black and White print contained within the Wal Jack Bendigo and Geelong Album, see Reg Item 5003 for more details. i1 - scan of print in the album i2 - rear of image i3 - scan of negative at 3200dpi added 6/6/2020.Yields information about the use of trams, in particular No. 17, during Easter 1941.On rear in ink "T191 State Electricity Commission Bendigo tramways / No. 17 summer car and "No. 22 Ex MMTB G Class standing at Passing Loop in Mt Korong Road, Easter Saturday 1941." In bottom right hand corner "W. Jack Photo".trams, tramways, bendigo, mt korong road, garden gully loop, tram 17, tram 22 -
 Bendigo Historical Society Inc.
Document - BASIL MILLER COLLECTION: TRAMS - JOURNAL 'ELECTRIC TRACTION', February 1964
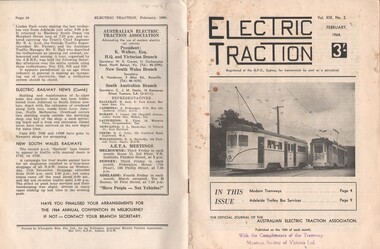
... Cover picture of a recent addition to the Brisbane tramcar fleet, No. 550 passes pre-war drop centre 335 on the passing loop before Bardon terminus....Cover picture of a recent addition to the Brisbane tramcar fleet, No. 550 passes pre-war drop centre 335 on the passing loop before Bardon terminus. Document BASIL MILLER COLLECTION: TRAMS - JOURNAL 'ELECTRIC TRACTION' ...Journal of Australian Electric Traction Association, Volume XIX, No. 2, February 1964, 16 pages. History of document: Part of 'Basil Miller Collection'. Cover picture of a recent addition to the Brisbane tramcar fleet, No. 550 passes pre-war drop centre 335 on the passing loop before Bardon terminus.Pub: Australian Electric Traction Associaion, Printer: O'Loughlin Bros. Pty. Ltd., Sydney, NSWdocument -
 Ballarat Tramway Museum
Photograph - Albert Sebastopol - trams 40 & 39, Keith Kings, 12/01/1957
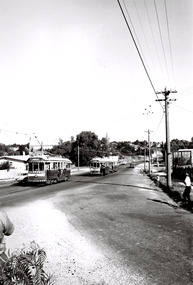
... Bogie cars nos. 40 and 39 cross on the Grey Street passing loop on the long single track side of the road route."...Bogie cars nos. 40 and 39 cross on the Grey Street passing loop on the long single track side of the road route." ...Photograph of bogie trams crossing at Grey St. Loop, Albert St. Sebastopol, - Nos. 40 and 39 on 12/1/1957. Photo by Keith Kings.Yields information about the appearance of Albert St and the Grey St loop in Jan. 1957Black and white photograph with photogrphers notes on the rear.On rear of photo in blue ink. "Ballarat: "K.S. Kings No. u (w)(6) Copyright reserved" and "Albert Street, Sebastopol, is one of the most changed thoroughfares in greater Ballarat since this view was taken on 12/1/1957." Bogie cars nos. 40 and 39 cross on the Grey Street passing loop on the long single track side of the road route."trams, tramways, albert st, grey st., sebastopol, tram 39, tram 40 -
 Ballarat Tramway Museum
Photograph - Geelong 37 Pakington at Aphrasia Sts, Keith Kings, Jan. 1956
... Photo shows the track layout and operation at the corner of Pakington St and Aphrasia St looking south from the passing loop. Shows Geelong tram 37, ex Chilwell swinging out before entering the loop. ...Ballarat Tramway Museum South Gardens Reserve Wendouree Parade Ballarat Ballarat goldfields Photo shows the track layout and operation at the corner of Pakington St and Aphrasia St looking south from the passing loop. Shows Geelong tram 37, ex Chilwell swinging out before entering the loop. ...Photo shows the track layout and operation at the corner of Pakington St and Aphrasia St looking south from the passing loop. Shows Geelong tram 37, ex Chilwell swinging out before entering the loop. Photographer notes the Newtown turns right at this location shown in the trolley wire. The Municipal Hall and fire station tower are on the right. Photo by Keith Kings 8/1/1956, photo number Q(w)(7). Yields information about the junction of the Chillwell and Newtown tram routes in Geelong.Black and white photograph with notes on rear.See rear image and context.trams, tramways, pakington st, geelong, tram 37, newtown, aphrasia st -
 Melbourne Tram Museum
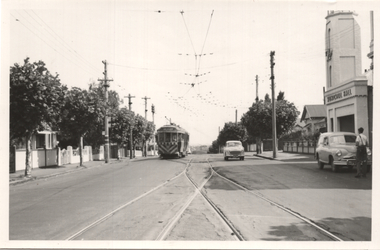
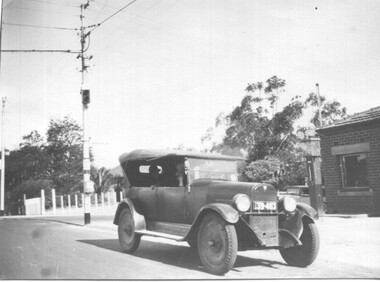
Photograph - 1926 Hudson Super 6 - Riversdale and Warragul Roads, Ray Pearson, 1930s
... It was built as a single track with a passing loop about halfway along, plus a passing loop at the former Boundary Road terminus. ...It was built as a single track with a passing loop about halfway along, plus a passing loop at the former Boundary Road terminus. ...Photograph of a 1926 Hudson Super 6 parked at the tea room/kiosk on the intersection of Riversdale Road and Warragul Road. Distinguishing features of the car include the triangular badge on the radiator and the unusual disc wheels. The 1926 Hudson also had horizontal radiator shutters. On this vehicle, a finer mesh has been attached in front of the shutters. This is normal practice when insects such as locusts are in plague. At the time, Warragul Road was known as East Boundary Road. Behind the car on the tramway pole is a colour light tramway signal for the single-line section between Warragul Road and the terminus. On 1 July 1928, the Wattle Park line was extended from Boundary Road via Riversdale Road to Elgar Road. It was built as a single track with a passing loop about halfway along, plus a passing loop at the former Boundary Road terminus. The tramway pole has a stop sign and a telephone box as well. In a box of negatives received is an envelope noting the car was owned by Ray Pearson and photo taken during the 1930s. Inside the motor car are two people, the driver, and a lady. In the background is part of the tea rooms located at this corner with a Shell gravity-fed petrol bowser. At the time, petrol was not sold at Service Stations on a Sunday - Sunday trading laws, but they allowed Tea Rooms or kiosks to be open.Yields information the intersection of Warragul and Riversdale Road and MMTB single line signals.Black and white photograph on Velox paper.On rear in pencil "Colour light signal Wattle Park Route, down end loop line, corner of Riversdale and East Boundary Roads".trams, tramways, riversdale road, wattle park, warragul road, motor cars, hudson super 6, shell fuel, signalling, single line, ray pearson -
 Ballarat Tramway Museum
Photograph - Digital image, Wal Jack, 28/12/1943 12:00:00 AM
... Digital image from the Wal Jack Ballarat Album of No. 21 entering the Gregory St passing loop, Lydiard St North, 28-12-43. Has the St. ...Digital image from the Wal Jack Ballarat Album of No. 21 entering the Gregory St passing loop, Lydiard St North, 28-12-43. Has the St. ...Yields information the appearance of SEC No. 21 and the streetscape in Lydiard St Loop near Gregory St in 1943.Digital image from the Wal Jack Ballarat Album of No. 21 entering the Gregory St passing loop, Lydiard St North, 28-12-43. Has the St. Columbia's catholic church spire in the background. Tram has the destination of Sebastopol. Note Neg Number T357 the same as for Reg item 5161. See image i2 for rear of photograph. See image i3 for hi res scan of print. See image i4 for hi res scan of negative on rear of photo in ink, "SEC Ballarat Tramways No. 21 (ex Adelaide No. 10) in Wendouree Parade, entering Gregory St loop, Lydiard St North 28-12-1943". Has the Wal Jack copyright stamp in the bottom right hand corner with the number "T357" in it.trams, tramways, lydiard st nth, gregory st, tram 21 -
 Ballarat Tramway Museum
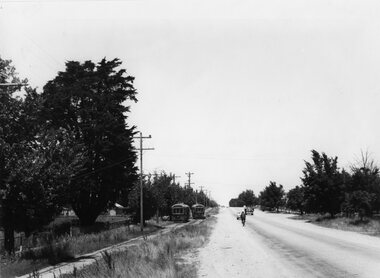
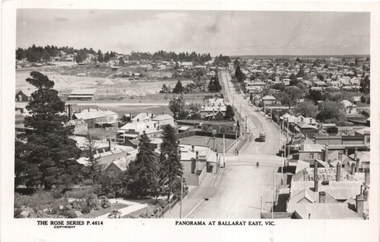
Postcard, Rose Stereograph Co, "Panorama at Ballarat East Vic", c1916
... Old type tram from Mt Pleasant about to turn into Main St. Note old passing loop behind tram. Loop removed to top of rise in centre background. ...Old type tram from Mt Pleasant about to turn into Main St. Note old passing loop behind tram. Loop removed to top of rise in centre background. ...Photo looks west from the Ballarat Fire Station (East) tower, and has a good view looking along Barkly St. Shows the crossing loop between Eastwood and Main St with one tram in the view. Wal has dated the photo as 1914 in his album notes. On rear Wal Jack has written "Looking up Barkly St towards Mt Pleasant. Photo taken from Ballarat Fire Station about 1914-1916 period. Old type tram from Mt Pleasant about to turn into Main St. Note old passing loop behind tram. Loop removed to top of rise in centre background. Old Ballarat East Gardens on left and council yards, showing big tin shed in centre of picture. Locality much altered today." See item 5127 for a digital image.Yields information about the buildings and scene looking west from the Fire Station tower along Barkly St. East BallaratPostcard Black and white - Rose Series No P4614, Divided back. No publishers details on rear.See image 2 for Wal Jack's notes.tramways, trams, esco, ballarat east, barkly st -
 Melbourne Tram Museum
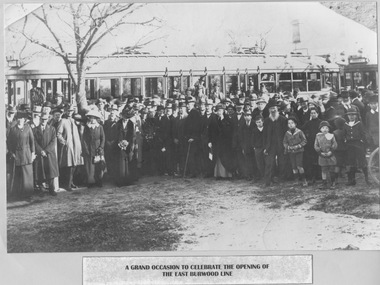
Photograph - Crowd gathered at opening of Burwood line, 10/6/1916
... In 1916 the new Burwood line beyond Camberwell Junction was mostly single track with many passing loops. The service proved to be so popular that the Hawthorn Tramways Trust's 10 maximum traction cars were quickly supplemented by 4 similar trams purchased from the Prahran and Malvern Tramways Trust....In 1916 the new Burwood line beyond Camberwell Junction was mostly single track with many passing loops. The service proved to be so popular that the Hawthorn Tramways Trust's 10 maximum traction cars were quickly supplemented by 4 similar trams purchased from the Prahran and Malvern Tramways Trust. ...Photograph shows a large crowd of formally dressed adults and children standing on open ground in front of a leafless tree and two long (maximum traction) tramcars. The location is the new tram Burwood tram terminus in Norwood Road (later Toorak Road) at Boundary Road (later Warrigal Road). The caption's reference to East Burwood is incorrect - an error possibly made by the writer of the caption who glued the photo and caption to the blue paper. East Burwood was the name of the line between 1978 and 2005. In 1916 the new Burwood line beyond Camberwell Junction was mostly single track with many passing loops. The service proved to be so popular that the Hawthorn Tramways Trust's 10 maximum traction cars were quickly supplemented by 4 similar trams purchased from the Prahran and Malvern Tramways Trust.Yields information about the opening of the Burwood line Black and white photograph glued to blue paper with note below. Note reads: "A grand occasion to celebrate the opening of the East [sic] Burwood line" maximum traction, burwood, norwood road, toorak road, boundary road, warrigal road, east burwood, 1978, camberwell junction, hawthorn tramway trust, prahran and malvern tramway trust -
 Ballarat Tramway Museum
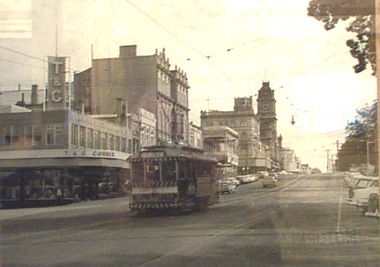
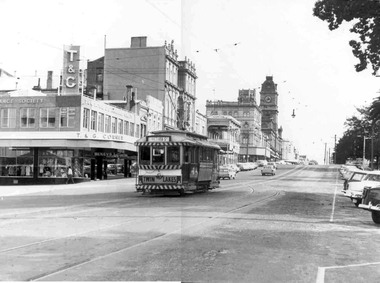
Photograph - SECV Ballarat 12 Sturt St at City Loop, John Phillips, 1968
... Photograph of No. 12 heading up Sturt St. hill, passing City loop. Tram fitted with large white stripe, Twin Lakes sign under headlight. ...Ballarat Tramway Museum South Gardens Reserve Wendouree Parade Ballarat Ballarat goldfields Photograph of No. 12 heading up Sturt St. hill, passing City loop. Tram fitted with large white stripe, Twin Lakes sign under headlight. ...Photograph of No. 12 heading up Sturt St. hill, passing City loop. Tram fitted with large white stripe, Twin Lakes sign under headlight. Destination showing Victoria St. Many Holdens in photograph and some Ford motor cars. Good photo of buildings on south side of Sturt St. at the time, T&G corner building in photo. See also item 2021 for another print.Yields information about the vicinity of the Sturt St city loop and the buildings on the south side of Sturt St.Black and white photograph, laminated.trams, tramways, ballarat, sturt st., city loop, tram 12 -
 Ballarat Tramway Museum
Document - Report, Connell Wagner, "Ballarat Heritage Tram Route Concept Engineering Assessment", 22/03/2002 12:00:00 AM
... Has an introduction, looks at the concept for each section of the route with a photograph showing possible route, features, looks at passing loop locations, tram stop locations, substations, potential depot sites, concept construction costs and has maps of preferred route and alternative routes, depot options, concept construction costs, typical track cross sections and costing detail. ...Has an introduction, looks at the concept for each section of the route with a photograph showing possible route, features, looks at passing loop locations, tram stop locations, substations, potential depot sites, concept construction costs and has maps of preferred route and alternative routes, depot options, concept construction costs, typical track cross sections and costing detail. ...Forty Eight sheet A4 size document, unbound, printed mainly double sided "Ballarat Heritage Tram Route Concept Engineering Assessment". Produced by Connell Wagner for Booz Allen Hamilton as part of the project study for the return of trams to the central part of the City of Ballarat. Document, dated 1/3/2002. See Reg, Item 2273 for a bound draft version of this document. Has an introduction, looks at the concept for each section of the route with a photograph showing possible route, features, looks at passing loop locations, tram stop locations, substations, potential depot sites, concept construction costs and has maps of preferred route and alternative routes, depot options, concept construction costs, typical track cross sections and costing detail. Has an index.trams, tramways, ballarat city tramway, ballarat revival, civil engineering, depot -
Ballarat Tramway Museum
Document - Report, Connell Wagner, "Ballarat Heritage Tram Route Concept Engineering Assessment", Mar. 2002
... Has an introduction, looks at the concept for each section of the route with a photograph showing possible route, features, looks at passing loop locations, tram stop locations, substations, potential depot sites, concept construction costs and has maps of preferred route and alternative routes, depot options. ...Has an introduction, looks at the concept for each section of the route with a photograph showing possible route, features, looks at passing loop locations, tram stop locations, substations, potential depot sites, concept construction costs and has maps of preferred route and alternative routes, depot options. ...Seventy Seven page A4 size document, bound with clear plastic cover, black coloured card back cover using a black comb binder, titled "Ballarat Heritage Tram Route Concept Engineering Assessment". Produced by Connell Wagner for Booz Allen Hamilton as part of the project study for the return of trams to the central part of the City of Ballarat. Draft Document, dated 1/3/2002. Has an introduction, looks at the concept for each section of the route with a photograph showing possible route, features, looks at passing loop locations, tram stop locations, substations, potential depot sites, concept construction costs and has maps of preferred route and alternative routes, depot options. Note folio page 40 assumes the track in the pavement at Armstrong St was the original track - not the replica crossing to the Phoenix foundry. Has an index.trams, tramways, ballarat city tramway, ballarat revival, civil engineering, depot -
 Ballarat Tramway Museum
Slide - 35mm slide/s, Chas Bevan, 19/12/1970 12:00:00 AM
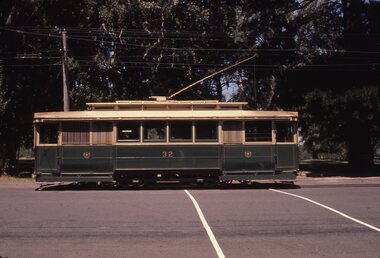
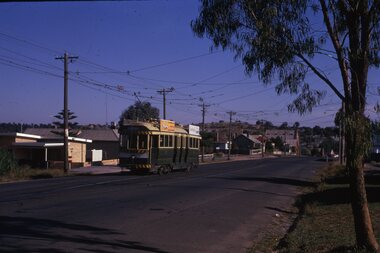
... Colour slide - 35mm - of Ballarat single trucker No. 32, northbound in Wendouree Parade, about to enter Gardens loop, passing over the pedestrian crossing. Side on view. ...Colour slide - 35mm - of Ballarat single trucker No. 32, northbound in Wendouree Parade, about to enter Gardens loop, passing over the pedestrian crossing. Side on view. ...Yields information about tram No. 32, side on view at the Gardens.Colour slide - 35mm - of Ballarat single trucker No. 32, northbound in Wendouree Parade, about to enter Gardens loop, passing over the pedestrian crossing. Side on view. Photo taken by Chas Bevan on Saturday 19-12-1970."Ballarat trams 19-12-70" in ink.tramways, trams, wendouree parade, gardens loop, tram 32 -
 Ballarat Tramway Museum
Slide - 35mm slide/s
... Ballarat SEC single truck tram, number 31 in Victoria St. heading east, passing through King St. loop, looking south west, dated 1963....King St. tram 31 'Tram, Victoria St., Ballarat 1963' Ballarat SEC single truck tram, number 31 in Victoria St. heading east, passing through King St. loop, looking south west, dated 1963. ...Ballarat SEC single truck tram, number 31 in Victoria St. heading east, passing through King St. loop, looking south west, dated 1963.'Tram, Victoria St., Ballarat 1963'tramways, trams, victoria st., king st., tram 31 -
Ballarat Tramway Museum
Photograph - SECV Ballarat 12 Sturt St at City Loop, John Phillips, 1968
... Photo of Ballarat No. 12 with destination of Victoria St., westbound in Sturt St, passing the City Loop. No. 12 has a "Twin Lakes" sign on the back of the tram. ...Photo of Ballarat No. 12 with destination of Victoria St., westbound in Sturt St, passing the City Loop. No. 12 has a "Twin Lakes" sign on the back of the tram. ...Photo of Ballarat No. 12 with destination of Victoria St., westbound in Sturt St, passing the City Loop. No. 12 has a "Twin Lakes" sign on the back of the tram. In the background is the T&G Assurance Society building, the Vegas cinema and other buildings on the south side of St. St. See item 407 for a laminated print.Yields information about the vicinity of the Sturt St city loop and the buildings on the south side of Sturt St.Black and White photograph mounted on heavy cardboard backing with velcro dots on rear.trams, tramways, sturt st, city loop, town hall, tram 12 -
 Ballarat Tramway Museum
Photograph - SECV Ballarat 12 Sturt St at City Loop, John Phillips, 1968
... Photo of Ballarat No. 12 with destination of Victoria St., westbound in Sturt St, passing the City Loop. No. 12 has a "Twin Lakes" sign on the back of the tram. ...Ballarat Tramway Museum South Gardens Reserve Wendouree Parade Ballarat Ballarat goldfields Photo of Ballarat No. 12 with destination of Victoria St., westbound in Sturt St, passing the City Loop. No. 12 has a "Twin Lakes" sign on the back of the tram. ...Photo of Ballarat No. 12 with destination of Victoria St., westbound in Sturt St, passing the City Loop. No. 12 has a "Twin Lakes" sign on the back of the tram. In the background is the T&G Assurance Society building, the Vegas cinema and other buildings on the south side of St. St. See item 407 for a laminated print.Yields information about the vicinity of the Sturt St city loop and the buildings on the south side of Sturt St.Black and White photograph mounted on heavy cardboard backing with velcro dots on rear.trams, tramways, sturt st, city loop, town hall, tram 12 -
 Puffing Billy Railway
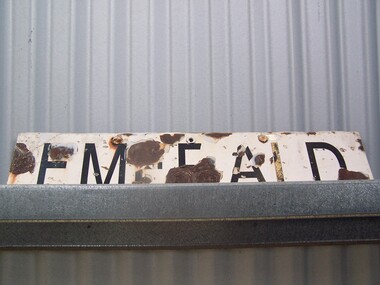
Emerald Station Sign
... It was opened with the Railway on 18 December 1900 and comprised a platform track and a loop siding. A passing loop was added between the two a few years later. ...It was opened with the Railway on 18 December 1900 and comprised a platform track and a loop siding. A passing loop was added between the two a few years later. ...Station Sign - Emerald Emerald Station is situated on the Puffing Billy Railway in Victoria, Australia. It was opened with the Railway on 18 December 1900 and comprised a platform track and a loop siding. A passing loop was added between the two a few years later. There was also a spur siding off the Down end of No. 3 Road. Two standard 12 ft by 20 ft timber portable station buildings with a Van Goods Shed between (all adjoining) were provided on the platform and a Goods Shed on the No. 3 Road loop siding. Other buildings included Tea Rooms, lamp room and toilets along with a cattle race and loading bank. The station building was later reduced in length by one of the portables which housed the General and Ladies' waiting rooms. Emerald today remains very similar to the early days, but has had other Roads added into a Carriage Workshops, a turntable and storage sidings. Also, a Signal and Telegraph Branch depot in the form of a large Goods Shed and a multi-purpose yard building in the form of a Locomotive Depot administration building have been added. During 2009, the station building underwent stage one of an internal restoration to its former glory. ref: https://en.wikipedia.org/wiki/Emerald_railway_station,_Victoria photos at http://www.vicrailstations.com/Gembrook/Emerald/Emerald.html Historic - Victorian Railways Station sign used at Emerald Station Station Sign - Emerald Metal rectangle Station Name Sign with white enamel back ground and black lettersEmeraldstation sign, puffing billy, emerald station -
 Ballarat Tramway Museum
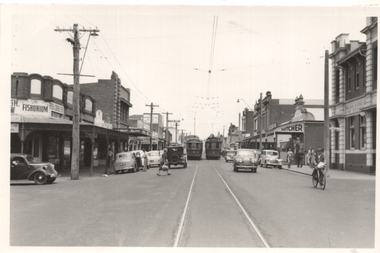
Photograph - Pakington St West Geelong, Keith Kings, early 1956
... The photo shows trams 40 & 17 passing on the loop in Pakington St at Clarence Sts in West Geelong. ...Ballarat Tramway Museum South Gardens Reserve Wendouree Parade Ballarat Ballarat goldfields The photo shows trams 40 & 17 passing on the loop in Pakington St at Clarence Sts in West Geelong. ...The photo shows trams 40 & 17 passing on the loop in Pakington St at Clarence Sts in West Geelong. Has a "Fishorium" (fish shop), A E Bent Radio, a Grocery shop, Commercial bank, a butcher, and the State Savings Bank of Vic in the photo. Photo undated, Keith Kings late 1955 or early 1956, photo number Q(R)(8)Yields information about the West Geelong shoping centre and tramway operations.Black and white photograph with notes on rear.See rear image and context.trams, tramways, pakington st, geelong, west geelong, tram 40, tram 17 -
 Melbourne Tram Museum
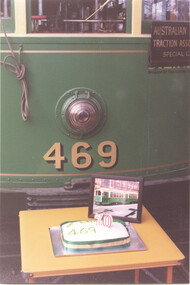
Photograph - Tram Y class 469, 70th birthday tour set of four, 13/7/1997
... loop. Photo 2 shows SW6 855, running a route 12, South Melbourne/St Kilda beach service passing through the loop. ...loop. Photo 2 shows SW6 855, running a route 12, South Melbourne/St Kilda beach service passing through the loop. ...Set of four photographs of an AETA tour to celebrate the 70th anniversary of Y class tram No. 469, complete with cake at the South Melbourne parking loop. Photo 2 shows SW6 855, running a route 12, South Melbourne/St Kilda beach service passing through the loop. See item 8782 for the AETA event on 13/7/1997.Yields information about Y class tram 469 and its use on an AETA tram tour to celebrate its 70th anniversary in 1997.Colour print on fujicolor paper - set of 4trams, tramways, sw6 class, y class, 70th, tram 469, tram 855 -
 Ballarat Tramway Museum
Slide - 35mm slide/s, Dave Macartney, Dec. 1968
... White cardboard mount, 35mm slide, from the Association of Railway Enthusiast's film strip titled "Provincial Tramway Film Strip" of a Bendigo No. 23 passing through Needle Loop, enroute to Eaglehawk. Tram has two SEC Roof advertisements "Electric Cooking" and "Everything's under control in my all electric kitchen" The film strip notes (Reg. ...Tramways trams ARE Film Strip Needle Loop Eaglehawk tram 23 Stamped on base of slide "11804" and written in ink on top edge "No. 23 Needles Loop Eaglehawk line" White cardboard mount, 35mm slide, from the Association of Railway Enthusiast's film strip titled "Provincial Tramway Film Strip" of a Bendigo No. 23 passing through Needle Loop, enroute to Eaglehawk. ...White cardboard mount, 35mm slide, from the Association of Railway Enthusiast's film strip titled "Provincial Tramway Film Strip" of a Bendigo No. 23 passing through Needle Loop, enroute to Eaglehawk. Tram has two SEC Roof advertisements "Electric Cooking" and "Everything's under control in my all electric kitchen" The film strip notes (Reg. Item 2560), provided the following caption details: "Bogie car 23 - freshly painted - negotiates Needles loop on the way to "EAGLEHAWK". - Dec 68 (Dave Macartney)" See image btm2594p.tif for high level scan of image. Stamped on base of slide "11804" and written in ink on top edge "No. 23 Needles Loop Eaglehawk line"tramways, trams, are, film strip, needle loop, eaglehawk, tram 23 -
Glenelg Shire Council Cultural Collection
Functional object - Fishing Float, n.d
... Top section orange with orange disc on end, then narrow white band, the rest, including central barrel-shaped section is black. Two metal loops for passing fishing line through - one at bottom end of float, the other just above barrel-shaped section. ...Top section orange with orange disc on end, then narrow white band, the rest, including central barrel-shaped section is black. Two metal loops for passing fishing line through - one at bottom end of float, the other just above barrel-shaped section. ...Similar to 7572 a, b and 7514. Painted wooden 'pencil' fishing float. Top section orange with orange disc on end, then narrow white band, the rest, including central barrel-shaped section is black. Two metal loops for passing fishing line through - one at bottom end of float, the other just above barrel-shaped section. Piece of lead wrapped around bottom section of float, just above metal loop. -
 Ballarat Tramway Museum
Slide - 35mm slide/s - set of 13, Carolyn Dean, 24/09/1970 12:00:00 AM
... Piece of rail alongside tram. .3 - "7" - No. 7 crossing No. 29 at start of double track with Hotel in background .4 - "8" - No. 29 running special at depot junction. .5 - "9" - No. 29 turning from Nolan into Bridge St. .6 - "10" - ditto, passing old loop .7 - "12" - ditto, turning from Caledonia into Thunder St .8 - "13" - ditto, southbound in Pall Mall near Bull St. .9 - "16" - ditto, crossing bridge into tram depot, with tram depot in background. .10 - "17" - ditto, entering depot. .11 - "18" - No. 26 entering the Eaglehawk terminus, High St. with Leo A Hughes photographer shop in background. .12 - "19" - No. 26 at terminus, showing "Quarry Hill", with High St in the background. .13 - "21" - No. 26 after leaving terminus, travelling in High St with shops n the background....Piece of rail alongside tram. .3 - "7" - No. 7 crossing No. 29 at start of double track with Hotel in background .4 - "8" - No. 29 running special at depot junction. .5 - "9" - No. 29 turning from Nolan into Bridge St. .6 - "10" - ditto, passing old loop .7 - "12" - ditto, turning from Caledonia into Thunder St .8 - "13" - ditto, southbound in Pall Mall near Bull St. .9 - "16" - ditto, crossing bridge into tram depot, with tram depot in background. .10 - "17" - ditto, entering depot. .11 - "18" - No. 26 entering the Eaglehawk terminus, High St. with Leo A Hughes photographer shop in background. .12 - "19" - No. 26 at terminus, showing "Quarry Hill", with High St in the background. .13 - "21" - No. 26 after leaving terminus, travelling in High St with shops n the background. ...Set of photographs of operations, including special tram, track work by SEC prior to the Bendigo system closing closing.Set of 13 Agfa slides, blue and white plastic base of Bendigo trams. Taken 24.9.1970 by Carolyn Dean. .1 - "5" - No. 7 at Golden Square terminus, with Golden Square Hotel in background. .2 - "6" - No. 7 passing SEC workmen replacing a broken joint, in McCrae St. Piece of rail alongside tram. .3 - "7" - No. 7 crossing No. 29 at start of double track with Hotel in background .4 - "8" - No. 29 running special at depot junction. .5 - "9" - No. 29 turning from Nolan into Bridge St. .6 - "10" - ditto, passing old loop .7 - "12" - ditto, turning from Caledonia into Thunder St .8 - "13" - ditto, southbound in Pall Mall near Bull St. .9 - "16" - ditto, crossing bridge into tram depot, with tram depot in background. .10 - "17" - ditto, entering depot. .11 - "18" - No. 26 entering the Eaglehawk terminus, High St. with Leo A Hughes photographer shop in background. .12 - "19" - No. 26 at terminus, showing "Quarry Hill", with High St in the background. .13 - "21" - No. 26 after leaving terminus, travelling in High St with shops n the background.Each slide has in corner a number in pencil and the first one the date of "24-9-70".tramways, trams, bendigo, tram 7, tram 29, tram 26 -
 Bendigo Historical Society Inc.
Photograph - Robert Green Collection - Photos of Bendigo Tramways - Sheet 6 of 8, 1960s
... Photos: 11147.6a Two trams passing at the loop in Eaglehawk Road at the Philpot Street intersection 11147.6b Two trams passing at the loop in Eaglehawk Road at the Philpot Street intersection 11147.6c Two trams passing at the loop in Eaglehawk Road at the Philpot Street intersection 11147.6d Two trams leave the loop in Eaglehawk Road at the Philpot Street intersection 11147.6e No 18 heading out of Iron Bark to Long Gully along Eaglehawk Road 11147.6f No 25 Special head down View Street at the McKenzie Street intersection 11147.6g The No 25 Special from Eaglehawk arrives at the fountain 11147.h No 2 to Eaglehawk comes up View Street past the Infant Welfare Centre 11147.6i The Quarry Hill tram passes the Carpenter and Houston St intersection at the corner of the cemetery 11147.6j The Quarry Hill tram passes the Carpenter and Houston St intersection at the corner of the cemetery 11147.6k The Quarry Hill tram approached the terminus at the Cemetery gates 11147.6l The Quarry Hill tram at the terminus at the Cemetery gates picking up passengers 11147.6m The Quarry Hill tram at the terminus at the Cemetery gates picking up passengers 11147.6n The Quarry Hill tram at the terminus at the Cemetery gates picking up passengers 11147.6o Tram and large crown in front of the Eaglehawk Town Hall 11147.6p Tram and large crown in front of the Eaglehawk Town Hall 11147.6q Tram and large crown in front of the Eaglehawk Town Hall 11147.6q Two Trams and large crown in front of the Eaglehawk Town Hall 11147.6r Two Trams and large crown in front of the Eaglehawk Town Hall 11147.6s Passengers on the "Last Tram" 11147.6t Passengers on the "Last Tram" 11147.6u Passengers on the "Last Tram" 11147.6v Two trams leaving the depot crossing the Back Creek 11147.6w The Scrubber tram in the depot 11147.6x Birney Car 30 tram in the depot 11147.6y Birney Car 29 and two others arriving at the depot 11147.6z Birney Car 11 and two others arriving at the depot 11147.6aa No 11 Birney Car at the depot 11147.6ab No 28 Birney Car at the depot 11147.6ac Nos 29, 11 and 25 at the depot 11147.6ad Birney Car 28 arrives at the depot 11147.6ae Birney Cars Nos 30 and 29 in the depot 11147.6af The Scrubber Car at the depot 11147.6ag Four trams and one driver at the depot TMS Bendigo Tour 24 March 1968...Photos: 11147.6a Two trams passing at the loop in Eaglehawk Road at the Philpot Street intersection 11147.6b Two trams passing at the loop in Eaglehawk Road at the Philpot Street intersection 11147.6c Two trams passing at the loop in Eaglehawk Road at the Philpot Street intersection 11147.6d Two trams leave the loop in Eaglehawk Road at the Philpot Street intersection 11147.6e No 18 heading out of Iron Bark to Long Gully along Eaglehawk Road 11147.6f No 25 Special head down View Street at the McKenzie Street intersection 11147.6g The No 25 Special from Eaglehawk arrives at the fountain 11147.h No 2 to Eaglehawk comes up View Street past the Infant Welfare Centre 11147.6i The Quarry Hill tram passes the Carpenter and Houston St intersection at the corner of the cemetery 11147.6j The Quarry Hill tram passes the Carpenter and Houston St intersection at the corner of the cemetery 11147.6k The Quarry Hill tram approached the terminus at the Cemetery gates 11147.6l The Quarry Hill tram at the terminus at the Cemetery gates picking up passengers 11147.6m The Quarry Hill tram at the terminus at the Cemetery gates picking up passengers 11147.6n The Quarry Hill tram at the terminus at the Cemetery gates picking up passengers 11147.6o Tram and large crown in front of the Eaglehawk Town Hall 11147.6p Tram and large crown in front of the Eaglehawk Town Hall 11147.6q Tram and large crown in front of the Eaglehawk Town Hall 11147.6q Two Trams and large crown in front of the Eaglehawk Town Hall 11147.6r Two Trams and large crown in front of the Eaglehawk Town Hall 11147.6s Passengers on the "Last Tram" 11147.6t Passengers on the "Last Tram" 11147.6u Passengers on the "Last Tram" 11147.6v Two trams leaving the depot crossing the Back Creek 11147.6w The Scrubber tram in the depot 11147.6x Birney Car 30 tram in the depot 11147.6y Birney Car 29 and two others arriving at the depot 11147.6z Birney Car 11 and two others arriving at the depot 11147.6aa No 11 Birney Car at the depot 11147.6ab No 28 Birney Car at the depot 11147.6ac Nos 29, 11 and 25 at the depot 11147.6ad Birney Car 28 arrives at the depot 11147.6ae Birney Cars Nos 30 and 29 in the depot 11147.6af The Scrubber Car at the depot 11147.6ag Four trams and one driver at the depot TMS Bendigo Tour 24 March 1968 Photograph Robert Green Collection - Photos of Bendigo Tramways - Sheet 6 of 8 ...This collection contains eight archive sheets (Sheet 1 to Sheet 8) of strips of original 35mm black and white negatives of photographs taken by Robert green during the 1960s and early 1970s of the Bendigo State Electricty Commission of Victoria Tramways prior to their abandonment. The collection also includes two archive quality sheets (Sheet A and Sheet B) of original 35mm colour slides taken by Robert Green during the same period. Sheet B also contains one slide taken by Robert's friend Keigh S King (1928-2019) who was the author of the book 'The Bendigo Tramways an illustrated history, published by the Australian Railway Historical Society Victorian Division Melbourne in February 1972; BHS Item no. 5052. The collection also includes one USB stick which contains images of all photographs described above, except for one colour slide taken by Keith S Kings. Sixteen black and white prints from the images are also included.Robert Green Collection, this item contains 33 Black and White Negatives of the trams at various locations around Bendigo. Photos: 11147.6a Two trams passing at the loop in Eaglehawk Road at the Philpot Street intersection 11147.6b Two trams passing at the loop in Eaglehawk Road at the Philpot Street intersection 11147.6c Two trams passing at the loop in Eaglehawk Road at the Philpot Street intersection 11147.6d Two trams leave the loop in Eaglehawk Road at the Philpot Street intersection 11147.6e No 18 heading out of Iron Bark to Long Gully along Eaglehawk Road 11147.6f No 25 Special head down View Street at the McKenzie Street intersection 11147.6g The No 25 Special from Eaglehawk arrives at the fountain 11147.h No 2 to Eaglehawk comes up View Street past the Infant Welfare Centre 11147.6i The Quarry Hill tram passes the Carpenter and Houston St intersection at the corner of the cemetery 11147.6j The Quarry Hill tram passes the Carpenter and Houston St intersection at the corner of the cemetery 11147.6k The Quarry Hill tram approached the terminus at the Cemetery gates 11147.6l The Quarry Hill tram at the terminus at the Cemetery gates picking up passengers 11147.6m The Quarry Hill tram at the terminus at the Cemetery gates picking up passengers 11147.6n The Quarry Hill tram at the terminus at the Cemetery gates picking up passengers 11147.6o Tram and large crown in front of the Eaglehawk Town Hall 11147.6p Tram and large crown in front of the Eaglehawk Town Hall 11147.6q Tram and large crown in front of the Eaglehawk Town Hall 11147.6q Two Trams and large crown in front of the Eaglehawk Town Hall 11147.6r Two Trams and large crown in front of the Eaglehawk Town Hall 11147.6s Passengers on the "Last Tram" 11147.6t Passengers on the "Last Tram" 11147.6u Passengers on the "Last Tram" 11147.6v Two trams leaving the depot crossing the Back Creek 11147.6w The Scrubber tram in the depot 11147.6x Birney Car 30 tram in the depot 11147.6y Birney Car 29 and two others arriving at the depot 11147.6z Birney Car 11 and two others arriving at the depot 11147.6aa No 11 Birney Car at the depot 11147.6ab No 28 Birney Car at the depot 11147.6ac Nos 29, 11 and 25 at the depot 11147.6ad Birney Car 28 arrives at the depot 11147.6ae Birney Cars Nos 30 and 29 in the depot 11147.6af The Scrubber Car at the depot 11147.6ag Four trams and one driver at the depot TMS Bendigo Tour 24 March 1968keith s king, bendigo, trams, robert green -
 Ballarat Tramway Museum
Slide - 35mm slide/s - set of 25, Noel Simons, 26/02/1972 12:00:00 AM
... Photo taken after tram has passed photographer. 1204.7 - No. 26 en route to Quarry Hill shortly after leaving Needle Loop, passing William St., Long Gully. 1204.8 - No. 5 at California Gully Loop, picking up a passenger, with the shops at Long Gully in the background. ...Korong Rd., Ironbark, passing Calder Highway Junctn." 1204.7 - "No. 26 shortly after leaving Needle Loop, passing William St., Long Gully. ...Korong Rd., Ironbark, passing Calder Highway Junctn." 1204.7 - "No. 26 shortly after leaving Needle Loop, passing William St., Long Gully. ...Set of 25 transparencies taken on 26/2/1972 on Kodak mounts. 1204.1 - Bendigo No. 5 - just arrived at Manchester Loop near Havilah Road, Long Gully. Photo taken after tram has passed photographer. 1204.2 - No. 26 in Backhaus St. Long Gully passing William St, en route to Quarry Hill. Photo taken after tram has passed photographer. 1204.3 - No. 5 climbing the High St. Hill Eaglehawk, heading for Quarry Hill with the buildings on the West side of High St. in the background, including the Eaglehawk Town Hall. 1204.4 - as for 1204.3, but tram close up. 1204.5 - as for 1204.3, but after tram has passed photographer. 1204.6 - No. 5 at intersection of Mt Korong Road Ironbark and Calder Highway, with the AMPOL service 'station in the background. Photo taken after tram has passed photographer. 1204.7 - No. 26 en route to Quarry Hill shortly after leaving Needle Loop, passing William St., Long Gully. 1204.8 - No. 5 at California Gully Loop, picking up a passenger, with the shops at Long Gully in the background. Photo taken after tram has passed photographer. 1204.9 - No. 5 in Long Gully, en route to Quarry Hill. Photo taken after tram has passed photographer. 1204.10 - No. 2 at Eaglehawk terminus with the Eaglehawk Town Hall and Post Office in the background. Tram has two SEC roof ads. 1204.11 - No. 2 at Eaglehawk terminus, close up. 1204.12 - as for 1204.11, but through the park gates. 1204.13 - as for 1204.11, but with tram stop shelters in the foreground and buildings on the West side of High St in the background. 1204.14 - No. 2 in Mt. Korong Rd, midway between California Gully Loop and Needle Loop. Photo taken after tram has passed photographer. 1204.15 - No. 5 in Long Gully, en route to Quarry Hill. 1204.16 - as for 1204.15, but with trams departed loop. Has an ESSO service station in the background. 1204.17 - No. 26 leaves Charing Cross up View St.. Photo taken after tram has passed photographer. Has Armstrong Tyre Service, Cohns Drinks ad on a building and the T&G building in the background. Also Firestone ads on the tyre service building. 1204.18 - No. 5 waits at Charing Cross with the Alexandra Fountain in the background. Tram has two SEC roof ads, 'Everything s fine in my all electric kitchen' and 'Electricity Best for Cooking'. Has RACV, Colonial Mutual Life buildings in the background and the planting areas around Charing Cross gardens in the foreground. 1204.19 - No. 21 en route to North Bendigo arrives at Charing Cross, with passengers waiting to board. No. 5 in the background. In the background is the Fountain Gate Plaza building and the City Family Hotel. 1204.20 - as for 1204.19, but with No. 7 en route to Golden Square. 1204.21 - as for 1204.19, but closer up. 1204.22 - as for 1204.18 1204.23 - No. 25 in Nolan St. near the crossing of Bendigo Creek, running a special tram tour. 1204.24 - No. 25 on a special charter, in Weeroona Ave. at Cnr of Caledonia St. passing the Gas works. 1204.25 - Nos. 25 (showing Golden Square), 7 and 26 at Charing Cross. Has fountain in the background.Information written on in blue ink and date stamped on purple ink. 1204.1 - "No. 5 at Manchester Loop, near Havilah Rd. Long Gully." 1204.2 - "No. 26 in Backhaus St. Long Gully passing William St." 1204.3 - "No. 5 in High St. Eaglehawk." 1204.4 - "No. 5 in High St. Eaglehawk." 1204.5 - "No. 5 in High St. Eaglehawk." 1204.6 - "No. 5 in Mt. Korong Rd., Ironbark, passing Calder Highway Junctn." 1204.7 - "No. 26 shortly after leaving Needle Loop, passing William St., Long Gully. No. 5 cresting hill in distance." 1204.8 - "No. 5 at California Gully Loop." 1204.9 - "No. 5 in Long Gully" 1204.10 - "No. 2 at Eaglehawk terminus." 1204.11 - "No. 2 at Eaglehawk terminus." 1204.12 - "No. 2 at Eaglehawk terminus." 1204.13 - "No. 2 at Eaglehawk terminus." 1204.14 - "No. 2 in Mt. Korong Rd, midway between California Gully Loop and Needle Loop. 1204.15 - "Nos. 2 and 26 crossing at Long Gully." 1204.16 - "No. 26 leaves Long Gully loop for Eaglehawk as No. 2 pulls out of the far end towards Bendigo" 1204.17 - "No. 26 beginning the climb up View St. from Charing Cross." 1204.18 - "No. 5 at Charing Cross." 1204.19 - "No 21 arrives at Charing Cross from Golden Square while No. 5 awaits departure time for Eaglehawk." 1204.20 - "Nos. 7, 21, and 2 (behind which is No. 5) at Charing Cross." 1204.21 - "Nos. 7, 21, and 2 at Charing Cross." 1204.22 - "No. 5 at Charing Cross." 1204.23 - "No. 25 in Nolan St. near Bendigo creek crossing" 1204.24 - "No. 25 in Weeroona Ave. at cnr of Caledonia St." 1204.25 - "Nos. 25, 7, 26 and 2 (behind 26) at Charing Cross."tramways, trams, bendigo, eaglehawk, long gully, california gully, charing cross, north bendigo, tram 2, tram 5, tram 7, tram 21, tram 25, tram 26 -
 Ballarat Tramway Museum
Photograph - Digital image Set of 9, Tony Smith, 19/09/1971 12:00:00 AM
... This set of slides appears to be the last day of operations - 19/9/1971 .1 - 40 south bound in Lydiard St Nth, at the Gregory St Loop. .2 - 40 after passing through the loop .3 - 42, north bound in Lydiard St. ...This set of slides appears to be the last day of operations - 19/9/1971 .1 - 40 south bound in Lydiard St Nth, at the Gregory St Loop. .2 - 40 after passing through the loop .3 - 42, north bound in Lydiard St. ...Yields information about Ballarat Tramways and trams prior to the closure of the tramway system.Set of 9 digital images of Ballarat trams prior to closure, scanned from original slides by Tony Smith, 1971 prior to closure of the system. This set of slides appears to be the last day of operations - 19/9/1971 .1 - 40 south bound in Lydiard St Nth, at the Gregory St Loop. .2 - 40 after passing through the loop .3 - 42, north bound in Lydiard St. North at Macarthur St. .4 - 42 southbound at the Railway station level crossing with the Kennedy Murray Pty Ltd General Carriers building at the station yard in the background. .5 - 42 southbound in Lydiard St North after crossing the railway - taken from the signal box (B) with Reids Palace in the background and the Provincial Hotel. .6 - 35 northbound after passing through the level crossing. .7 - bogie tram crossing the tracks with Ballarat Railway Station in the background. .8 - bogie tram entering the double track section in Lydiard St with Reids Palace in the background. Note the new bus stop bay. .9 - 35 and another bogie in Sturt St, with the Town Hall, Golden Star Chinese Cafe and Georges Fish & Chip shop in the background.trams, tramways, lydiard st nth, gregory st, level crossings, ballarat railway station, sturt st, closure, tram 40, tram 42, tram 35