Showing 30 items matching "photograph. bendigo tram no. 19. bendigo tramways."
-
 Bendigo Historical Society Inc.
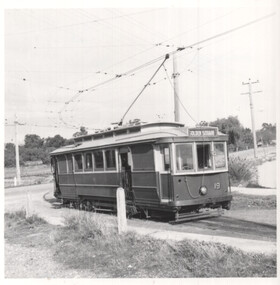
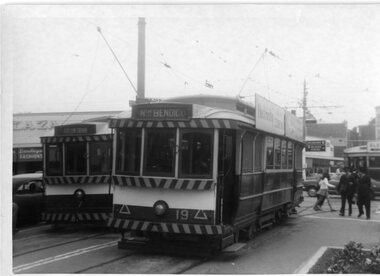
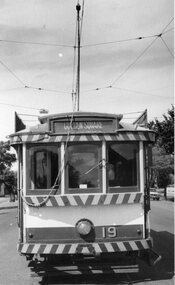
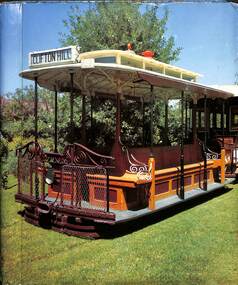
Photograph - PHOTOGRAPH. TRAM NO.19, BENDIGO TRAMWAYS
... Photograph. Bendigo Tram No. 19. Bendigo Tramways....Bendigo Historical Society Inc. Bendigo Historical Society Inc. History House 11 Mackenzie Street Bendigo goldfields PHOTOGRAPH Tram no. 19 Photograph. Bendigo Tram No. 19. Bendigo Tramways ...Colour photograph - Tram No. 19, Bendigo Tramways.photograph, tram, no. 19, photograph. bendigo tram no. 19. bendigo tramways. -
 Bendigo Historical Society Inc.
Photograph - BASIL MILLER COLLECTION: TRAM TO LEICHHARDT
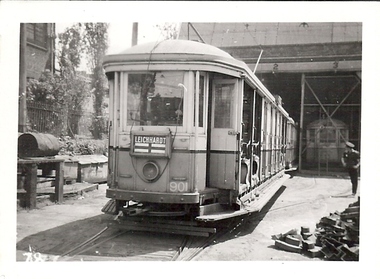
... Bendigo Historical Society Inc. Bendigo Historical Society Inc. History House 11 Mackenzie Street Bendigo goldfields PERSON Individual basil miller Black and white photo of tram showing Leidhardt as destination, leaving depot, tram no 901. Man in tramway uniform on left of tram. 'LB Manny Collection Photo No 19' on back, '(28)' written in pencil on back of photo. Photograph ...Black and white photo of tram showing Leidhardt as destination, leaving depot, tram no 901. Man in tramway uniform on left of tram. 'LB Manny Collection Photo No 19' on back, '(28)' written in pencil on back of photo.person, individual, basil miller -
 Bendigo Historical Society Inc.
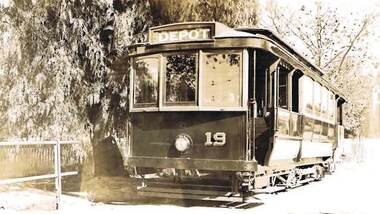
Photograph - BENDIGO TRAM NO 19, 1935
... Bendigo Historical Society Inc. Bendigo Historical Society Inc. History House 11 Mackenzie Street Bendigo goldfields PHOTOGRAPH Tram no. 19 Bendigo Tram Bendigo Trams Bendigo Tramways Trams Bendigo Electric Tramways Black and White Photo of Tram No 19, No 19 Tram parked by a Peppercorn Tree, Destination Plate at top of tram reads 'Depot', Markings on back of Photo read 'Bendigo Electric Tramways 1935', '1935 One man- two man cars', 'S.E.C. ...Black and White Photo of Tram No 19, No 19 Tram parked by a Peppercorn Tree, Destination Plate at top of tram reads 'Depot', Markings on back of Photo read 'Bendigo Electric Tramways 1935', '1935 One man- two man cars', 'S.E.C. Colours', stamped with 'Printed by Olivers Bendigo'photograph, tram, no. 19, bendigo tram, bendigo trams, bendigo tramways, trams, bendigo electric tramways -
 Bendigo Historical Society Inc.
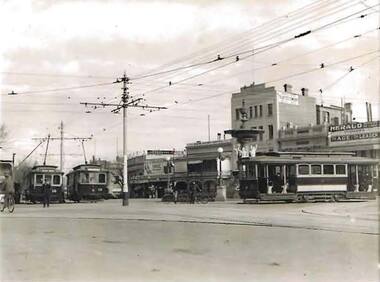
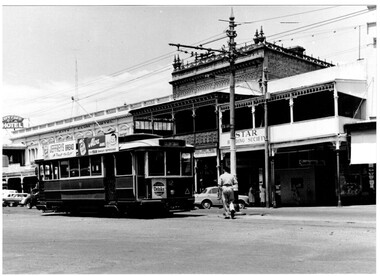
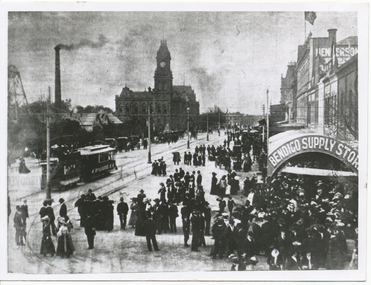
Photograph - PHOTOGRAPH OF CHARING CROSS 1938, October 1938
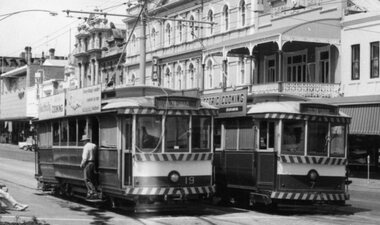
... Bendigo Historical Society Inc. Bendigo Historical Society Inc. History House 11 Mackenzie Street Bendigo goldfields PHOTOGRAPH charing cross & trams Bendigo Trams Bendigo Tramways Trams Charing Cross Black and White Photograph of Charing Cross October 1938. In the Photo are a number of Trams, some of the trams are about to move up High Street in the direction of Golden Square. Photographed are Trams 'No 16 Golden Square', '19 ...Black and White Photograph of Charing Cross October 1938. In the Photo are a number of Trams, some of the trams are about to move up High Street in the direction of Golden Square. Photographed are Trams 'No 16 Golden Square', '19 Lake Weeroona' and '13 Quarry Hill'. Off centre left shows the complexity of overhead wiring required to keep the trams moving. Far left man in dark clothing on bicycle. Tram employee standing in front of tram No. 16. Background right Herald, Age, and Leader newsagent signage. E.S.&A. Bank sign. Streader shoe signage. Centre two men leaning on bicycles at Fountain Fence. Taller building has signage for Trustee Company on wall.photograph, charing cross & trams, bendigo trams, bendigo tramways, trams, charing cross -
 Bendigo Historical Society Inc.
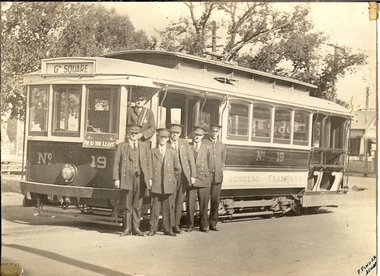
Photograph - BASIL MILLER COLLECTION: NUMBER 19 TRAM, DRIVER AND SENIOR OFFICIALS
... Bendigo Historical Society Inc. Bendigo Historical Society Inc. History House 11 Mackenzie Street Bendigo goldfields PERSON Individual basil miller Percy Pinder Black and white photograph of Number 19 tram, Conductor standing on tram, driver is on extreme right. Four others appear to be Senior Tramways ...Black and white photograph of Number 19 tram, Conductor standing on tram, driver is on extreme right. Four others appear to be Senior Tramways Officials, note double breasted jackets, tram is destined for Golden Square. On front bottom right corner signed 'P.Basil Miller' 284 King Street Bendigo.Percy Pinderperson, individual, basil miller -
 Bendigo Historical Society Inc.
Photograph - BASIL MILLER COLLECTION: TRAMWAY STAFF OUTSIDE TRAM
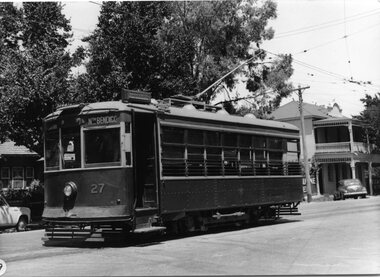
... Bendigo Historical Society Inc. Bendigo Historical Society Inc. History House 11 Mackenzie Street Bendigo goldfields BHS Collection PERSON Individual basil miller Photo shows tram and 15 men, 2 shaking hands. 11 men shown wearing tramways uniforms. Cap numbers 1, 60, 57, 15, 27, 35, 43, 19. Photograph ...BHS CollectionPhoto shows tram and 15 men, 2 shaking hands. 11 men shown wearing tramways uniforms. Cap numbers 1, 60, 57, 15, 27, 35, 43, 19.person, individual, basil miller -
 Bendigo Historical Society Inc.
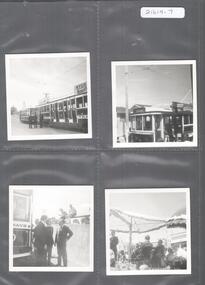
Photograph - KEN HESSE COLLECTION: SET OF FOUR BLACK AND WHITE PHOTOS
... Bendigo Historical Society Inc. Bendigo Historical Society Inc. History House 11 Mackenzie Street Bendigo goldfields TRAMWAYS History bendigotramway Set of four black and white photographs. First of two Bendigo trams parked on the street, there are three drivers/conductors standing near advertising sign on the closer tram for Myer and Gas the good flame. The second of the No 19 ...Set of four black and white photographs. First of two Bendigo trams parked on the street, there are three drivers/conductors standing near advertising sign on the closer tram for Myer and Gas the good flame. The second of the No 19 tram - Golden Square with Cohn advertising sign. Third of four men standing next to Bendigo tram talking to each other, two others are sitting on a rail. The last photo several people sitting on chairs under a canopy listening to a men speechtramways, history, bendigotramway -
 Ballarat Tramway Museum
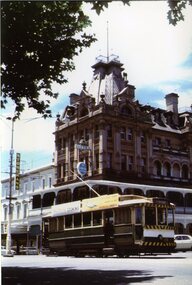
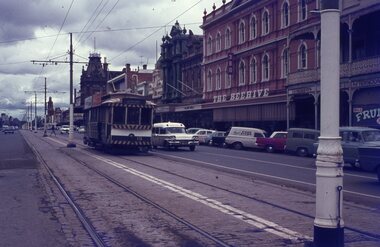
Slide - Bendigo No. 19 Pall Mall with the Shamrock Hotel, Ron Hood, 12/1970
... Ballarat Tramway Museum South Gardens Reserve Wendouree Parade Ballarat Ballarat goldfields Colour photograph of Bendigo 19, by Ron Hood December 1970 northbound to North Bendigo, taken in Pall Mall with the Shamrock Hotel in the background. Also in the background are signs for Stonemasons and Hume & Iser. The tram ...Colour photograph of Bendigo 19, by Ron Hood December 1970 northbound to North Bendigo, taken in Pall Mall with the Shamrock Hotel in the background. Also in the background are signs for Stonemasons and Hume & Iser. The tram has two electricity cooking roof adverts.Yields information about Bendigo tram 19 in Pall Mall - December. 1970Colour slide in hanimount cardboard mount.Numbered "Bendigo" and slide number 20 in ink.tramways, trams, pall mall, tram 19 -
 Ballarat Tramway Museum
Photograph - Bendigo tram 12, 1950s
... Ballarat Tramway Museum South Gardens Reserve Wendouree Parade Ballarat Ballarat goldfields Photograph of Bendigo Tram 12 with a North Bendigo destination, leaving at a tram stop. Has a shop in the background. Photographer unknown, 1950s given the colour scheme. Tram ex Melbourne No. 107 sold to SEC in 1935, as Ballarat 19 ...Photograph of Bendigo Tram 12 with a North Bendigo destination, leaving at a tram stop. Has a shop in the background. Photographer unknown, 1950s given the colour scheme. Tram ex Melbourne No. 107 sold to SEC in 1935, as Ballarat 19, swapped with Bendigo during 1960 and became Bendigo 12. Yields information about Bendigo tram 12.Photograph, black and white on plain paper.tramways, trams, bendigo, tram 12, north bendigo -
 Ballarat Tramway Museum
Photograph - Set of 7 photographs of a Bendigo Tram tour with Birney trams, Vance Findlay, c1971
... tram - a spring possibly has failed. 7 - Tram 19 running out the depot lead into McCrae St with an SEC Cooking roof and a Briquettes dash canopy advertisements. Yields information about Bendigo tram tours prior to the closure of the SEC operated system. trams tramways SEC Bendigo tram 28 tram 30 High St Eaglehawk tram 6 McCrae St View St Five Lions Hotel tram 19 tours Birney tramcars Black and White photographs on Ilford Paper - undated - set of 7 Photograph Set of 7 photographs of a Bendigo Tram tour with Birney trams Vance Findlay ...Set of 7 photographs taken during a tram tour using Birney's 30 and 28. Possibly 1971 or early 1972 prior to closure. 1 - High St Eaglehawk with Primary School hall behind. 2 - Tram 28 from another tram's window - note no driver. 3 - trams 28 and 30 in McCrae St with the Bendigo Technical College building in the background. 4 - Tour trams turning from Bernard St into View St with the Five Lions Hotel in the background with a Fosters Lager advertisement. This hotel has since been demolished. 5 - Tram 30 on the single-track extension at Eaglehawk. 6 - Tram 6 and another single trucker at Charing Cross - note the sag on the second tram - a spring possibly has failed. 7 - Tram 19 running out the depot lead into McCrae St with an SEC Cooking roof and a Briquettes dash canopy advertisements.Yields information about Bendigo tram tours prior to the closure of the SEC operated system.Black and White photographs on Ilford Paper - undated - set of 7trams, tramways, sec, bendigo, tram 28, tram 30, high st, eaglehawk, tram 6, mccrae st, view st, five lions hotel, tram 19, tours, birney tramcars -
 Ballarat Tramway Museum
photograph - Set of 4 Black & White - Bendigo tramways, Peter Duckett, late 1940s
... Set of four photographs of Bendigo trams and infrastructure photographed by Peter Duckett, early 1950 1 - Bendigo 19 at North Bendigo terminus - tram has destination of Golden Square 2 - Birney No. 30 leaving the depot for North Bendigo 3 - Depot entrance from Arnold St (now Tramway Ave) across Hargraves St 4- North Bendigo terminus overhead wiring...Ballarat Tramway Museum South Gardens Reserve Wendouree Parade Ballarat Ballarat goldfields Set of four photographs of Bendigo trams and infrastructure photographed by Peter Duckett, early 1950 1 - Bendigo 19 at North Bendigo terminus - tram has destination of Golden Square 2 - Birney No. 30 leaving the depot for North Bendigo 3 - Depot entrance from Arnold St (now Tramway Ave) across Hargraves St 4- North Bendigo terminus overhead wiring Yields information about Bendigo trams early 1950s Bendigo tramcars Bendigo Tramways overhead double trolley wire terminals Quarry Hill Charing Cross tram 19 tram 30 Details the image on the rear of the print in ink. ...Set of four photographs of Bendigo trams and infrastructure photographed by Peter Duckett, early 1950 1 - Bendigo 19 at North Bendigo terminus - tram has destination of Golden Square 2 - Birney No. 30 leaving the depot for North Bendigo 3 - Depot entrance from Arnold St (now Tramway Ave) across Hargraves St 4- North Bendigo terminus overhead wiringYields information about Bendigo trams early 1950sSet of four black and white photographs by Peter Duckett.Details the image on the rear of the print in ink.bendigo, tramcars, bendigo tramways, overhead, double trolley wire, terminals, quarry hill, charing cross, tram 19, tram 30 -
 Ballarat Tramway Museum
Photograph - Black & White Photograph/s, Keith Kings, 30/01/2956 12:00:00 AM
... trams tramways Bendigo Birney McCrae St tram 27 Stamp in top right hand corner and handwritten number with "K.S. Kings No. R(q)(8) Copyright reserved". In black ink "Bendigo / Birney 27 in McCrae St and Arnold St, (Now Tramways Avenue) 30/1/1956. On front of photograph in bottom left hand corner, white dot with number "19 ...Black and White Photograph of SEC Bendigo Birney 27 in McCrae St and Arnold St, 30/1/1956. Has destination of North Bendigo, and the hotel in the background. Photo Keith Kings, number R(q)(8) Stamp in top right hand corner and handwritten number with "K.S. Kings No. R(q)(8) Copyright reserved". In black ink "Bendigo / Birney 27 in McCrae St and Arnold St, (Now Tramways Avenue) 30/1/1956. On front of photograph in bottom left hand corner, white dot with number "19"trams, tramways, bendigo, birney, mccrae st, tram 27 -
 Ballarat Tramway Museum
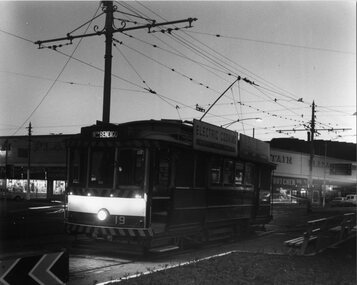
Photograph - Black & White Photograph/s, Chris Wurr, early 1970's
... Ballarat Tramway Museum South Gardens Reserve Wendouree Parade Ballarat Ballarat goldfields Yields information about the appearance of Bendigo Birney trams early 1970's and the North Bendigo area. trams tramways Bendigo Charing Cross Night Photo tram 19 "Photo by Chris Wurr" stamped on the rear. Black and White Photograph ...Yields information about the appearance of Bendigo Birney trams early 1970's and the North Bendigo area.Black and White Photograph of SEC Bendigo 19, late evening photograph, at Charing Cross with the Fountain Plaza building in the background. Tram has the destination of Nth Bendigo and SEC Electric Cooking roof advertisements. Photo Chris Wurr, early 1970's. "Photo by Chris Wurr" stamped on the rear.trams, tramways, bendigo, charing cross, night photo, tram 19 -
 Ballarat Tramway Museum
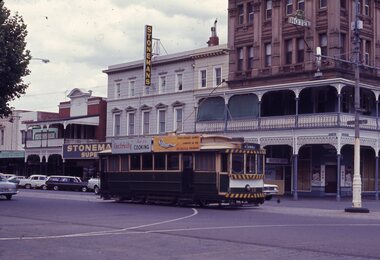
Photograph - Colour Print, Glen Mills, 22/12/1971 12:00:00 AM
... Ballarat Tramway Museum South Gardens Reserve Wendouree Parade Ballarat Ballarat goldfields Trams tramways Bendigo Pall Mall tram 19 On rear in pencil "Glen G Mills / Bendigo 22.12.71 / A 4218 (slide)" Colour photograph of 19, inbound in Pall Mall with Stoneman's Shamrock Hotel in the background. ...Colour photograph of 19, inbound in Pall Mall with Stoneman's Shamrock Hotel in the background. Tram has two SEC roof advertisements and destination of Golden Square. Photo by Glen Mills, ex a slide, printed on Fujifilm, Pictropaper. Dated 22.12.1971On rear in pencil "Glen G Mills / Bendigo 22.12.71 / A 4218 (slide)"trams, tramways, bendigo, pall mall, tram 19 -
 Ballarat Tramway Museum
Photograph - Black & White Photograph/s, Keith Kings, 3/09/1967 12:00:00 AM
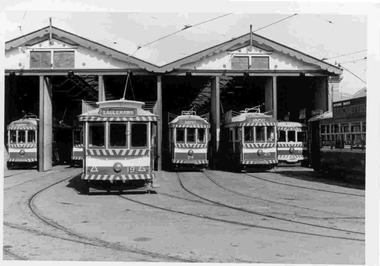
... trams tramways Bendigo Depot tram 4 tram 19 tram 24 tram 25 tram 28 Stamp in top left hand corner and handwritten number with "K.S. Kings No. 12-27 Copyright reserved". In blue ink "Bendigo / Depot / 3/9/67" and stamped on the back of the prints in black ink "ll 411A and -2.6.70", possibly indicating date of print manufacture. Black and White photograph ...Black and White photograph contained with Reg. Item 1902 - Photo Album from Keith Kings to Les Denmead 1970. Photograph of SEC Bendigo tram depot with tram car nos (left to right) 4, 19, 24, 25 and 28. Two other trams in photo, but numbers not visible. Most trams have destination of "Depot" showing, except 19, which is showing "Eaglehawk". Photo taken 3/9/1967. Keith Kings No. 12-27 Scanning: i - image file, p - presentation file, b - back of photograph.Stamp in top left hand corner and handwritten number with "K.S. Kings No. 12-27 Copyright reserved". In blue ink "Bendigo / Depot / 3/9/67" and stamped on the back of the prints in black ink "ll 411A and -2.6.70", possibly indicating date of print manufacture.trams, tramways, bendigo, depot, tram 4, tram 19, tram 24, tram 25, tram 28 -
 Ballarat Tramway Museum
Photograph - Black & White Photograph/s, Ian Barkla, 30/08/1969 12:00:00 AM
... Ballarat Tramway Museum South Gardens Reserve Wendouree Parade Ballarat Ballarat goldfields Trams Tramways Bendigo Pall Mall Charing Cross Tram 19 7 On rear in black biro "Bendigo 19 at the Fountain, 30-8-69 / Ex 185 MMTB" Black and white photograph of Bendigo 7 and 19 at Charing Cross, with the end of a Bogie tram in the background. ...Black and white photograph of Bendigo 7 and 19 at Charing Cross, with the end of a Bogie tram in the background. Bendigo 19 has destination of "Nth Bendigo", 7 of "Golden Square". Both trams have the large white strip under the dash canopy lighting. In background is a driver and conductor walking towards 19. Tram 19 has two large SEC roof ads. Taken 30-8-1969. On Kodak paper.On rear in black biro "Bendigo 19 at the Fountain, 30-8-69 / Ex 185 MMTB"trams, tramways, bendigo, pall mall, charing cross , tram 19, 7 -
 Ballarat Tramway Museum
Photograph - Black & White, Bendigo 12 leaving Charing Cross, late 1950's
... Trams tramways Bendigo Charing Cross High St tram 12 "TMSV Sales" stamp on rear. On rear of in ink 'HTT1 = MM107 = BED 19, Renumbered 12" Black and White photograph, of Bendigo12 with destination of Golden Square, leaving Charing Cross in High St, during the mid to late 1950's. Tram has roof adverts for Jeffreys Bread, Alva Jams and a Cohn's Drink ad on the front drivers panel. In the background are the City Club Hotel and Start Building Society buildings. Printed on Fujichrome paper. Two copies held. Bendigo ...Black and White photograph, of Bendigo12 with destination of Golden Square, leaving Charing Cross in High St, during the mid to late 1950's. Tram has roof adverts for Jeffreys Bread, Alva Jams and a Cohn's Drink ad on the front drivers panel. In the background are the City Club Hotel and Start Building Society buildings. Printed on Fujichrome paper. Two copies held."TMSV Sales" stamp on rear. On rear of in ink 'HTT1 = MM107 = BED 19, Renumbered 12"trams, tramways, bendigo, charing cross, high st, tram 12 -
 Ballarat Tramway Museum
Slide - 35mm slide/s, Travis Jeffrey, late 1960's or early 1970's
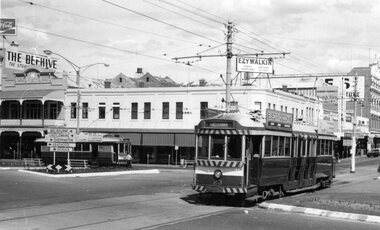
... Tramways trams Bendigo Pall Mall Beehive Building tram 19 "BES 35" in pencil Agfa plastic mount (blue base, white cover) with a photo of Bendigo No. 19 in Pall Mall, nearing Charing Cross. Tram has the destination of Golden Square Photo taken late 1960's early 1970's. Photo has the Beehive, the Shamrock Hotel in the background. Radio station 3BO can be seen on the Beehive building. No. 19 has two SEC roof advertisements. Note the point bar on the pole on the right hand side of the photograph ...Agfa plastic mount (blue base, white cover) with a photo of Bendigo No. 19 in Pall Mall, nearing Charing Cross. Tram has the destination of Golden Square Photo taken late 1960's early 1970's. Photo has the Beehive, the Shamrock Hotel in the background. Radio station 3BO can be seen on the Beehive building. No. 19 has two SEC roof advertisements. Note the point bar on the pole on the right hand side of the photograph."BES 35" in penciltramways, trams, bendigo, pall mall, beehive building, tram 19 -
 Ballarat Tramway Museum
Photograph - Black & White Photograph/s - set of 32, Eldon Hogan, 4/06/1965 12:00:00 AM
... Yields information about a 1924 Jelbart Engine manufacturing display in Sturt St and the street scene and peoples clothing at the time. trams tramways ARE Bendigo Eaglehawk Quarry Hill Golden Square North Bendigo tram 30 tram 29 tram 28 tram 6 tram 19 tram 25 tram 17 tram 18 Set of 32 black and white photographs of an Association of Railway Enthusiasts tour to Bendigo and trams 4/7/1965. ...Yields information about a 1924 Jelbart Engine manufacturing display in Sturt St and the street scene and peoples clothing at the time.Set of 32 black and white photographs of an Association of Railway Enthusiasts tour to Bendigo and trams 4/7/1965. The photos are not necessarily in photographic order. .1 - 30 on the Eaglehawk terminal track, beyond the normal terminus. .2 - 30 & 29 High St Eaglehawk. .3 - ditto with a poppet head in the background. .4 - 30 at one of the crossing loops .5 - 30 at Eaglehawk terminus extension .6 - ditto. .7 - ditto .8 - cleaning out the track .9 - showing the location of the track at Eaglehawk terminus and its extension .10 - cleaning out track .11 - a portable shed adjacent to the track .12 - A view of the two Birneys travelling in the empty country. .13 - ditto .14 - 19 and 18 at Golden Square .15 - Bendigo tram depot - creek crossing .16 - Scrubber at the depot .17 - 28 and 19 at the North Bendigo terminus .18 - 18 and 30 on the Golden Sq line .19 - 28 and 19 at the North Bendigo terminus .20 - ditto. .21 - 28 and 19 near the depot entry. .22 - 28 and 30 Pall Mall .23 - 28 at North Bendigo .24 - 17 and 19 and 6 at Quarry Hill .25 - 28 and 30 Mitchell St .26 - 19, 6 and 21 Quarry Hill .27 - 19 and 6 Quarry Hill .28 - 28 and 6 at the depot entry .29 - ditto .30 - 18 and 30, Golden Sq line .31 - 25 at depot .32 - 6 and 19 Charing Cross. Photographer Eldon Hogan. Printed on Kodak Paper .33 - roll of negatives of some of the above photos - stored in box 83 as well. trams, tramways, are, bendigo, eaglehawk, quarry hill, golden square, north bendigo, tram 30, tram 29, tram 28, tram 6, tram 19, tram 25, tram 17, tram 18 -
 Ballarat Tramway Museum
Photograph - SECV Bendigo Bendigo tram No. 19, 1930
... tram. Wal Jack has written in on the album "No. 19, 1st of ex MMTB cars at depot 1930". Black and White print contained within the Wal Jack Bendigo and Geelong Album, see Reg Item 5003 for more details. Peter Duckett photo or collection. Yields information about Bendigo tram 19, the first ex MMTB Car in Bendigo. Trams tramways Bendigo New Trams Signs Crews tram 19 On the rear in blue ink "PWD" Black and white print with initials on the rear. Photograph ...Photo of Bendigo tram No. 19, 1st of the ex MMTB cars to Bendigo, prior to any conversion work. Tram has "Bendigo Tramways" painted on the side of the tram, a sign at the front of the tram saying "Pay as you Leave", the destination of Golden Square. Has one conductor and five drivers? (motormen) standing alongside the front of the tram. Wal Jack has written in on the album "No. 19, 1st of ex MMTB cars at depot 1930". Black and White print contained within the Wal Jack Bendigo and Geelong Album, see Reg Item 5003 for more details. Peter Duckett photo or collection.Yields information about Bendigo tram 19, the first ex MMTB Car in Bendigo.Black and white print with initials on the rear.On the rear in blue ink "PWD"trams, tramways, bendigo, new trams, signs, crews, tram 19 -
 Ballarat Tramway Museum
Photograph - Black & White Photograph/s - set of 2, George Bishop, Dec. 1971
... Ballarat Tramway Museum South Gardens Reserve Wendouree Parade Ballarat Ballarat goldfields tramways trams Bendigo Charing Cross Pall Mall tram 7 tram 19 On the back of two of the photos in ink No. 7 and 19, at Charing Cross Bendigo Dec. 1971 / G. Bishop photo" Black and white photographs ...Black and white photographs of Bendigo No. 7 and 19 at Charing Cross 12/1971. Photos by George Bishop. .1 - 19 and 7 at the Charing Cross stop, with a man getting off the tram. Has a over exposure line across part of No. 19. 3BO sign on the Beehive buildings in the background. .2 - Close up of the ends of the both trams - note both have destinations of "Golden Square". Both trams have two SEC roof advertisements for electric cooking.On the back of two of the photos in ink No. 7 and 19, at Charing Cross Bendigo Dec. 1971 / G. Bishop photo"tramways, trams, bendigo, charing cross, pall mall, tram 7, tram 19 -
 Ballarat Tramway Museum
Photograph - Black & White Photograph/s, George Bishop, Dec. 1971
... Ballarat Tramway Museum South Gardens Reserve Wendouree Parade Ballarat Ballarat goldfields tramways trams Bendigo Charing Cross Pall Mall tram 19 tram 23 On the back of the photo in ink "SEC trams No. 19 and 23 (Bendigo System) at Charing Cross. / G. Bishop photo." Black and white photographs ...Black and white photographs of Bendigo No. 23 and 19 at Charing Cross 12/1971. No. 23 has destination of Eaglehawk. The Beehive and Ezywalkin buildings in the background. No. 19 in the distance. Both trams have SEC Electric Cooking Roof Advertisements. Photos by George Bishop. .On the back of the photo in ink "SEC trams No. 19 and 23 (Bendigo System) at Charing Cross. / G. Bishop photo."tramways, trams, bendigo, charing cross, pall mall, tram 19, tram 23 -
 Ballarat Tramway Museum
Photograph - Black & White Photograph/s - set of 4, George Bishop, Dec. 1971
... Ballarat Tramway Museum South Gardens Reserve Wendouree Parade Ballarat Ballarat goldfields tramways trams Bendigo Golden Square tram 19 On the back of the photos in ink or pencil in ink are captions regarding No. 19, Golden Square, Bendigo and "George Bishop Photo" Set of four Black and white photographs of Bendigo No. 19 at or near Golden Square terminus 12/1971. ...Set of four Black and white photographs of Bendigo No. 19 at or near Golden Square terminus 12/1971. Photos by George Bishop. .1 - End of view of tram at terminus, showing destination "Golden Square" .2 - Tram nearing terminus .3 - Tram arriving at terminus .3 - View of tram at terminus and with conductor about to turn the pole with Billy Rodda's Golden Square Hotel in the background. No. 19 has two SEC roof advertisements for electric cooking.On the back of the photos in ink or pencil in ink are captions regarding No. 19, Golden Square, Bendigo and "George Bishop Photo"tramways, trams, bendigo, golden square, tram 19 -
 Ballarat Tramway Museum
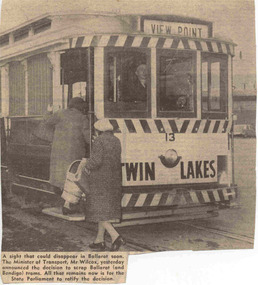
Newspaper, The Courier Ballarat, announcement the previous day by the Minister of Transport, 19/7/1968?
... Tramway Museum South Gardens Reserve Wendouree Parade Ballarat Ballarat goldfields Closure Ballarat V Wilcox Newspaper Clipping from The Courier, possibly July 19, 1968, following the announcement the previous day by the Minister of Transport, Mr. Wilcox the decision to scrap Ballarat and Bendigo trams. Noted that State Parliament still had to ratify the decision. Features two ladies boarding No. 13 in Sturt St at Grenville St. Tram has the destination of View Point. See Reg Item 3747 for a print of the Courier Photograph. See Reg Item 995 for Bendigo ...Newspaper Clipping from The Courier, possibly July 19, 1968, following the announcement the previous day by the Minister of Transport, Mr. Wilcox the decision to scrap Ballarat and Bendigo trams. Noted that State Parliament still had to ratify the decision. Features two ladies boarding No. 13 in Sturt St at Grenville St. Tram has the destination of View Point. See Reg Item 3747 for a print of the Courier Photograph. See Reg Item 995 for Bendigo Advertiser item on the same matter dated -19/7/1968. closure, ballarat, v wilcox -
 Melbourne Tram Museum
Album - Compiled by David Frost - VR trams etc, David Frost, 2005
... Melbourne Tram Museum 8 Wallen Road Hawthorn melbourne Page 1 - postcards and notes on the Alf Twentyman's preserved cars. 2 - VR tram 41 at Bendigo 2001 and two VR tram tickets 3 - VR 41 at Sandringham station - night photo 4 & 5 - VR 41 at Bendigo 6 & 7 - VR 41 at Bendigo 8 & 9 - photo copies of VR railway - tram tickets 10 - 11 - photo copies of VR railway - tram tickets and photo of VR 41 at North Bendigo. 12 - Photo of David Frost selling a ticket to David Vendy, Mayor of Ballarat at the time - July 2002 13 & 14 Two Melbourne tram postcards and tram tickets 15 - 18 - Four Peter Gerasimon greeting cards featuring Melbourne trams, 19 - Ballarat tramway postcard and cable saloon trailer 171 being loaded for Portland - July 2002. 20 - three photos of David Frost at Bylands rear cover - photos of VR 41 and VR 53 at Bendigo. Illustrates the work of David Frost and his interest in VR trams. cable cars VR trams Alf Twentyman David Frost VR 41 Bendigo tickets postcards Peter Gerasimon trams tramways Photo Album - 10 heavy card sheets with plastic sheets over each, white plastic ring bound, covered with a large photograph of Alf Twentyman's cable cars at Northcote. ...Page 1 - postcards and notes on the Alf Twentyman's preserved cars. 2 - VR tram 41 at Bendigo 2001 and two VR tram tickets 3 - VR 41 at Sandringham station - night photo 4 & 5 - VR 41 at Bendigo 6 & 7 - VR 41 at Bendigo 8 & 9 - photo copies of VR railway - tram tickets 10 - 11 - photo copies of VR railway - tram tickets and photo of VR 41 at North Bendigo. 12 - Photo of David Frost selling a ticket to David Vendy, Mayor of Ballarat at the time - July 2002 13 & 14 Two Melbourne tram postcards and tram tickets 15 - 18 - Four Peter Gerasimon greeting cards featuring Melbourne trams, 19 - Ballarat tramway postcard and cable saloon trailer 171 being loaded for Portland - July 2002. 20 - three photos of David Frost at Bylands rear cover - photos of VR 41 and VR 53 at Bendigo.Illustrates the work of David Frost and his interest in VR trams.Photo Album - 10 heavy card sheets with plastic sheets over each, white plastic ring bound, covered with a large photograph of Alf Twentyman's cable cars at Northcote. See 3086 for an unused version.cable cars, vr trams, alf twentyman, david frost, vr 41, bendigo, tickets, postcards, peter gerasimon, trams, tramways -
 Ballarat Tramway Museum
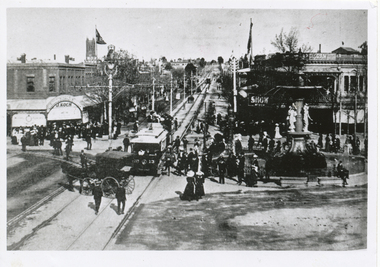
Photograph - ESCo Bendigo Pall Mall, The Bendigonian, Sep. 2005
... tram trailer. Has the Bendigo Supply Stores in the right hand side of the photo. Would appear to be a special event given the number of people in the photograph. Black and White copy print contained within the Wal Jack Bendigo and Geelong Album, see Reg Item 5003 for more details. Copied by Keith Kings from The Bendigonian 19/9/1905. Yields information about Pall Mall Bendigo and the early operations of ESCo Trams tramways ...Photo of the Pall Mall with the Town Hall and Post Office buildings in the background, a mine poppet head. Features an electric tram towing an ex Ballarat double deck horse tram trailer. Has the Bendigo Supply Stores in the right hand side of the photo. Would appear to be a special event given the number of people in the photograph. Black and White copy print contained within the Wal Jack Bendigo and Geelong Album, see Reg Item 5003 for more details. Copied by Keith Kings from The Bendigonian 19/9/1905.Yields information about Pall Mall Bendigo and the early operations of ESCoBlack and white print with source notes on the rear.On rear in ink " SA777, Bendigo, Electric tram towing an ex Ballarat old horse tram. Fountain. Copied ex "The Bendigonian 19/9/1905."trams, tramways, bendigo, charing cross, horse trams, pall mall -
 Ballarat Tramway Museum
Photograph - ESCo Bendigo No. 13 and a double deck trailer, The Bendigonian, Sep. 1905
... tram No. 13 and a double deck trailer - has the centre poles along Mitchell St. in the photograph. In the background is a J. Koch and the Bendigo Supply Stores. Has fountain in photograph. Black and White copy print contained within the Wal Jack Bendigo and Geelong Album, see Reg Item 5003 for more details. Copied by Keith Kings from The Bendigonian 19/9/1905. Yields information about the early operation of electric trams in Bendigo by ESCo. Trams tramways ...Photo of looking east along Mitchell St towards the Railway Station with tram No. 13 and a double deck trailer - has the centre poles along Mitchell St. in the photograph. In the background is a J. Koch and the Bendigo Supply Stores. Has fountain in photograph. Black and White copy print contained within the Wal Jack Bendigo and Geelong Album, see Reg Item 5003 for more details. Copied by Keith Kings from The Bendigonian 19/9/1905.Yields information about the early operation of electric trams in Bendigo by ESCo.Black and white print with source notes on the rear.On rear in ink " SA782, Bendigo, No. 13 - 3 window saloon Charing Cross. Note:- Crossover in Mitchell St.". Copied ex "The Bendigonian 19/9/1905."trams, tramways, bendigo, charing cross, horse trams, mitchell st -
 Ballarat Tramway Museum
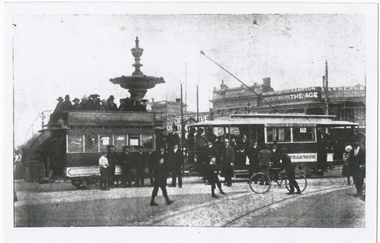
Photograph - ESCo Bendigo ex Ballarat double deck horse tram as a trailer, The Bendigonian, Sep. 1905
... 19/9/1905. Yields information about the reuse of ex Ballarat horse tram trailers in Bendigo. Trams tramways Bendigo Charing Cross Horse Trams Trailer On rear in ink " SA778 Bendigo electric tram towing an ex Ballarat d/d horse tram, Charing Cross. Note:- Compound Xover at front of tram." Copied ex "The Bendigonian 19/9/1905." Black and white print with source notes on the rear. Photograph ...Photo of an electric tram towing an ex Ballarat double deck horse tram as a trailer with the Fountain at Charing Cross in the background. In the background are the buildings on the south west corner of Charing Cross, featuring an advertisement for The Age. Copied by Keith Kings from The Bendigonian 19/9/1905. Yields information about the reuse of ex Ballarat horse tram trailers in Bendigo.Black and white print with source notes on the rear.On rear in ink " SA778 Bendigo electric tram towing an ex Ballarat d/d horse tram, Charing Cross. Note:- Compound Xover at front of tram." Copied ex "The Bendigonian 19/9/1905."trams, tramways, bendigo, charing cross, horse trams, trailer -
 Ballarat Tramway Museum
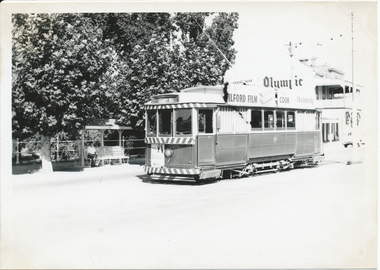
Photograph - SECV Bendigo 7 at Eaglehawk, Wal Jack, 6/01/1963
... Bendigo tram 7 and the Eaglehawk terminus. Trams tramways Bendigo Eaglehawk tram 7 On the rear in blue ink "SEC Bendigo, 3rd No. 7 ex Ballarat No. 19. Eaglehawk, 6-1-63" with Wal Jack copyright stamp in the top right hand corner and the number "T1311" written in. Black and white print with photographer’s notes on the rear. Photograph ...Photo of the Bendigo 7 at Eaglehawk 6-1-1963. Wal's album notes note that the tram ex Ballarat No. 19. The tram has the destination of Eaglehawk and has advertisements for Ilford Film and Electricity cooking on roof and Hutton's ham on rear drivers dash panel. Black and White print contained within the Wal Jack Bendigo and Geelong Album, see Reg Item 5003 for more details. In the background is the Park Hotel with the wall painted for Beaurepaires Olympic tyres. Printed on Ilford Paper. i1 - scan of print in the album i2 - rear of image i3 - scan of negative at 3200dpi added 6/6/2020.Yields information about Bendigo tram 7 and the Eaglehawk terminus.Black and white print with photographer’s notes on the rear.On the rear in blue ink "SEC Bendigo, 3rd No. 7 ex Ballarat No. 19. Eaglehawk, 6-1-63" with Wal Jack copyright stamp in the top right hand corner and the number "T1311" written in.trams, tramways, bendigo, eaglehawk, tram 7 -
 Ballarat Tramway Museum
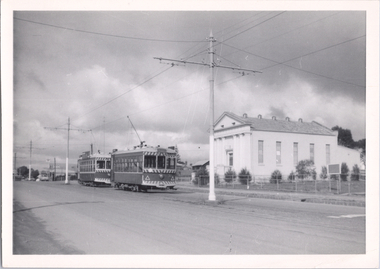
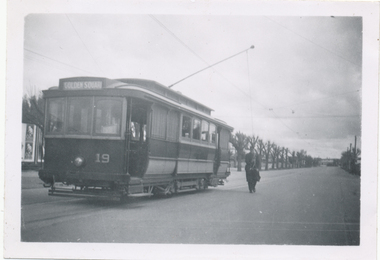
Photograph - SECV Bendigo 19 at Lake Weeroona, Wal Jack, 7/10/1939
... Yields information about Bendigo 19 and the Lake Weeroona terminus in 1939 prior to the construction of the North Bendigo line. trams tramways Bendigo Lake Weeroona tram 19 On rear in ink "SEC Bendigo, No. 19 (ex MMTB 185) at Lake Weeroona terminus 7-10-39" with the Wal Jack copyright stamp in the top right hand corner and the number "T189" written in. Black and white print with photographer’s notes on the rear. Photograph ...Photo of No. 19 at the Lake Weeroona Terminus, 7-10-1939, with the driver turning the trolley pole. The tram has the destination of Golden Square. Black and White print contained within the Wal Jack Bendigo and Geelong Album, see Reg Item 5003 for more details. i1 - scan of print in the album i2 - rear of image i3 - scan of negative at 3200dpi added 6/6/2020.Yields information about Bendigo 19 and the Lake Weeroona terminus in 1939 prior to the construction of the North Bendigo line.Black and white print with photographer’s notes on the rear.On rear in ink "SEC Bendigo, No. 19 (ex MMTB 185) at Lake Weeroona terminus 7-10-39" with the Wal Jack copyright stamp in the top right hand corner and the number "T189" written in.trams, tramways, bendigo, lake weeroona, tram 19